28?? CLIPPED HEAD

FRAMING NAILER

MODEL H6145

INSTRUCTION MANUAL

COPYRIGHT ?? FEBRUARY, 2005 BY GRIZZLY INDUSTRIAL, INC.

WARNING: NO PORTION OF THIS MANUAL MAY BE REPRODUCED IN ANY SHAPE

OR FORM WITHOUT THE WRITTEN APPROVAL OF GRIZZLY INDUSTRIAL, INC.

#BL6905 PRINTED IN CHINA

SAFETY

For Your Own Safety Read Instruction Manual

Before Operating This Equipment

The purpose of safety symbols is to attract your attention to possible hazard- ous conditions. This manual uses a series of symbols and signal words which are intended to convey the level of importance of the safety messages. The progression of symbols is described below. Remember that safety messages by themselves do not eliminate danger and are not a substitute for proper accident prevention measures.

Indicates an imminently hazardous situation which, if not avoided, WILL result in death or serious injury.

Safety Instructions for Machinery

1.READ THROUGH THE ENTIRE

MANUAL BEFORE STARTING MACHINERY. Machinery presents serious injury hazards to untrained users.

2.MAKE SURE ALL GUARDS ARE

IN THEIR CORRECT PLACE AND

WORK CORRECTLY BEFORE

USING MACHINERY. NEVER

OPERATE MACHINE WITHOUT

GUARDS.

3.ALWAYS USE ANSI APPROVED

SAFETY GLASSES WHEN

OPERATING MACHINERY.

4.WEAR PROPER APPAREL. DO NOT wear loose clothing, gloves, neckties, rings, or jewelry which may get caught in moving parts. Wear protective hair covering to contain long hair and wear non-slip foot- wear.

5.NEVER OPERATE MACHINERY

WHEN TIRED, OR UNDER THE

INFLUENCE OF DRUGS OR ALCOHOL. Be mentally alert at all times when running machinery.

6.ONLY ALLOW TRAINED AND

PROPERLY SUPERVISED PER-

SONNEL TO OPERATE MACHIN- ERY. Make sure operation instruc- tions are safe and clearly under- stood.

7.KEEP CHILDREN AND VISITORS AWAY. Keep all children and visi- tors a safe distance from the work area.

8.MAKE WORKSHOP CHILD PROOF. Use padlocks, master switches, and remove start switch keys.

9.NEVER LEAVE WHEN MACHINE IS RUNNING. Turn power OFF and allow all moving parts to come to a complete stop before leaving machine unattended.

10.DO NOT USE IN DANGEROUS ENVIRONMENTS. DO NOT use machinery in damp, wet locations, or where any flammable or noxious fumes may exist.

11.KEEP WORK AREA CLEAN AND WELL LIT. Clutter and dark shad- ows may cause accidents.

12.USE A GROUNDED EXTENSION

CORD RATED FOR THE

MACHINE AMPERAGE.

Undersized cords overheat and reduce voltage. Replace extension cords if they become damaged. DO NOT use extension cords for 220V machinery.

13.ALWAYS DISCONNECT FROM

POWER SOURCE BEFORE SERVICING MACHINERY. Make sure switch is in OFF position before reconnecting.

14.MAINTAIN MACHINERY WITH CARE. Keep blades sharp and clean for best and safest per- formance. Follow instructions for lubricating and changing acces- sories.

15.REMOVE ADJUSTING KEYS AND WRENCHES. Make a habit of checking for keys and adjust- ing wrenches before turning ON machinery.

16.CHECK FOR DAMAGED PARTS

BEFORE USING MACHINERY.

Check for binding and align- ment of parts, broken parts, part mounting, loose bolts, and any other conditions that may affect machine operation. Repair or replace damaged parts.

17.USE RECOMMENDED ACCESSORIES. Refer to the instruction manual for recom- mended accessories. The use of improper accessories may cause risk of injury.

18.DO NOT FORCE MACHINERY.

Work at the speed for which the machine or accessory was designed.

Additional Safety Instructions for Nailers

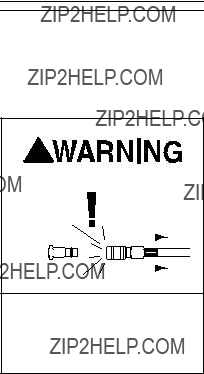
1.HAND INJURIES: Do not place your hands near the nail point of entry. A nail can deflect and tear through the surface of the workpiece, puncturing your hand or fingers.

2.COMBUSTIBLE GASES: Never connect the nailer to pressurized oxygen or other combustible gases as a power source. Only use fil- tered, lubricated, and regulated compressed air.

3.SAFE HANDLING: Never point the nailer at others! Do not keep the trigger pulled when loading fasten- ers, carrying, or holding tool. Carry the nailer only by the handle, never by any other part. Do not carry the nailer by the air hose. Disconnect the nailer from the air hose when going up and down ladders.

4.CLEANING: Never use gasoline or other flammable liquids to clean the nailer; vapors in the nailer will ignite by a spark and cause it to explode.

5.HOSE USAGE: Make sure your air hose is designed for the tool in use, is in good condition, and is long enough to reach your work without stretching. However, an overly long air hose in the work area may be a tripping hazard.

6.OPERATING QUESTIONS: If you are not sure about the intended operation, stop using the nailer. Seek formal training or research books or magazines that special- ize in pneumatic tools.

7.MAINTENANCE: Always discon- nect air from the nailer when ser- vicing or installing nails. During maintenance, a nailer connected to air may fire accidentally, caus- ing serious personal injury.

8.COMPRESSED AIR RATING: Do not connect the nailer to com- pressed air that exceeds 120 PSI.

9.CHECK VALVE: Do not use a check valve or any other fitting that allows air to remain in the tool.

Operating this nailer can propel objects into the air, causing imme- diate eye damage. To protect your- self, always wear American National Standards Institute (ANSI) approved safety glasses or goggles when oper- ating this equipment. In addition, this nailer discharges at 85-90 decibels. To protect your hearing, always wear ANSI approved ear protection when operating this nailer.

No list of safety guidelines can be complete. Every shop environment is different. Always consider safety first, as it applies to your individual working conditions. Use this and other tools with caution and respect. Failure to do so could result in seri- ous personal injury, damage to equipment or poor work results.

Never point this nailer at yourself or another person! Always pay attention to the direction this nailer is pointed. Use this tool with respect and caution to lessen the possibility of operator or bystander injury. Ignoring this warning may result in serious personal injury.

INTRODUCTION

We are proud to offer the Grizzly Model H6145 28?? Clipped Head Framing Nailer. This model is part of a growing Grizzly family of fine pneumatic tools. When used according to the guidelines set forth in this manual, you can expect years of trouble- free, enjoyable operation and proof of Grizzly???s commitment to customer satis- faction.

The Model H6145 is designed to toenail into corners. This nailer is ideal for fram- ing, pallet and crate assembly, deck, roof, fencing, and sidewall sheathing construc- tion. The Model H6145 features a 360?? exhaust port, comfort grip rubber handle, and economical air consumption with low noise.

The specifications, details, and photo- graphs in this manual represent the Model H6145 as supplied when the manual was prepared. However, owing to Grizzly???s pol- icy of continuous improvement, changes may be made at any time with no obliga- tion on the part of Grizzly.

Machine Data

-4-

If you have any comments regarding this manual, please write to us at the following address:

Grizzly Industrial, Inc.

C/O Technical Documentation

P.O. Box 2069

Bellingham, WA 98227-2069

Most importantly, we stand behind our tools. If you have any service questions or parts requests, please call or write us at the location listed below.

Grizzly Industrial, Inc.

1203 Lycoming Mall Circle

Muncy, PA 17756

Phone: (570) 546-9663

Fax: (800) 438-5901 E-Mail: techsupport@grizzly.com Web Site: http://www.grizzly.com

Read the manual before operation. Become familiar with this nailer, its safety instructions, and its operation before beginning any work. Serious personal injury may result if safety or operational information is not under- stood or followed.

H6145 28?? Clipped Head Framing Nailer

SET UP

Your Model H6145 left our warehouse in a carefully packed box. If you discover the nailer is damaged after you have signed for delivery, please immediately call Customer Service at (570) 546-9663 for advice.

Save the containers and all packing mate- rials for possible inspection by the car- rier or its agent. Otherwise, filing a freight claim can be difficult.

When you are completely satisfied with the condition of the shipment, you should inventory the equipment.

After you remove the nailer case from the box you should find the following.

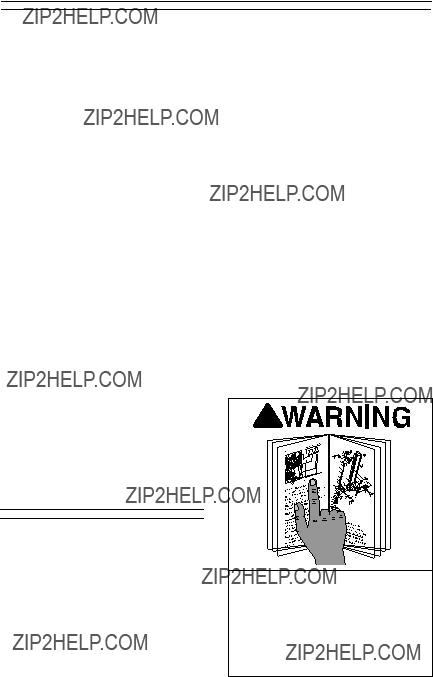
Model H6145 Inventory (Figure 1)

A

B

C

G

F

E

D

Figure 1. Model H6145 inventory.

Compressed Air

System

The Model H6145 is designed to be oper- ated at 70-120 PSI using clean, dry, regu- lated, compressed air. DO NOT exceed the maximum operating pressure for your model.

Before using your new nailer, regulate the air pressure on your air compressor to the minimum PSI for your model.

An in-line filter/lubricator/regulator unit, depicted in Figure 2, can be installed and should be located as close to the nailer as possible.

This filter/lubricator/regulator unit will protect your tool from damaging water build-up, allow you to adjust and maintain constant air pressure to your tool, and save you the inconvenience of having to manually lubricate your tool every time you use it.

Exceeding the maximum permissible operating pressure may cause the nailer to explode, blowing metal frag- ments in all directions. To protect yourself from serious personal injury, DO NOT allow your air compressor to exceed the recommended pressure when connected to this nailer!

Check the current Grizzly catalog for avail- ability of this unit. If you plan on install- ing a filter/lubricator/regulator unit in your compressed air system, always follow the connection instructions that come with the unit.

Safety Yoke

A safety yoke mechanism (bump fire) on the nose of the nailer acts as a second- ary safety device. When the trigger is pressed, the nailer will not fire until the safety yoke mechanism is depressed.

Before you use your nailer for the first time, check the safety yoke mechanism to ensure proper function. To do this:

1.DISCONNECT NAILER FROM THE

AIR SUPPLY!

2. Make sure the magazine is empty and contains no nails.

3.Make sure the trigger and the safety yoke mechanism move up and down without sticking.

4.Connect the nailer to the air supply.

5.Without pressing the trigger, depress the safety yoke mechanism against a scrap piece of wood that is clean and free of any knots, nails, or other foreign objects.

???If the nailer does not fire, then the safety yoke mechanism is working correctly.

???If the nailer does fire when you do this, immediately disconnect the nailer from the air supply and call Grizzly Technical Support at (570) 546-9663 for help.

???If the nailer fires when the trigger is pulled, without the safety yoke mechanism being depressed, then the nailer is not working properly.

???If either of these two conditions develop after you have used your nailer for a period of time, check the lubrication of these mechanisms.

The safety yoke is a mechanical device that can fail. Never rely on the safety yoke mechanism as an excuse to point the nailer at yourself or any bystanders. Serious injury may occur.

OPERATIONS

Loading

When replacing nails in your Model H6145, follow these guidelines:

Diameter: 7???64"-1???8"

Length: 2"-31???2"

Capacity: 100

Strip Angle: 28??

NOTICE: A number of manufacturers' nails may fit the H6145. However, for best performance, we recommend you use Grizzly nail Models G2421-G2430.

1.DISCONNECT NAILER FROM THE

AIR SUPPLY!

2.Gripping the nailer firmly, pull the mag- azine pusher back and engage the catch lever, as shown in Figure 3.

Pusher

Catch Lever

Figure 3. Sliding pusher toward the catch lever pusher.

3.Insert a strip of nails, pointed-end down, into the magazine as shown in

Figure 4.

Figure 4. Loading nails into magazine.

4.Slide the nails all the way down to the nose of the nailer.

5.Release the catch lever. The pusher slides forward until it rests against the nail stick.

Operating

If you have not read the safety instruc- tions in this manual, do not operate the nailer.

Before you operate your nailer, place five to six drops of the included oil into the quick connect fitting where the nailer con- nects to the air supply.

To operate your nailer:

1.Connect the air supply to the quick connect fitting.

2.To test for proper nail penetration, hold the nailer perpendicular to the surface of a piece of clean scrap wood that is thick enough for the length of nails you have loaded.

3.Pull the trigger and depress the safety yoke mechanism on your workpiece.

4.Before pulling the trigger, make sure your free hand and other body parts are positioned out of the way of a potential path of a nail in case of deflection.

Deflection is caused when grain irregularities, knots or foreign objects inside the wood cause the nail to change its path, resulting in the nail puncturing the surface of the workpiece as shown in Figure 5.

Besides damaging your workpiece, deflection can cause injury if your free hand is securing the workpiece in the location that the nail deflects.

Figure 5. Example of nail deflection.

5.Pull the trigger. If the nail drove into the wood far enough, continue with your intended operations. If the nail either went too far or not far enough, then go to the Adjusting Depth section on this page.

Adjusting Depth

The nose of the gun houses a depth adjust- ment mechanism for setting the nail depth.

To adjust the depth:

1.DISCONNECT NAILER FROM THE

AIR SUPPLY!

2.If the nail is driven too far into the workpiece, loosen the cap screw on the safety nose with a 4mm wrench, as shown in Figure 6.

Figure 6. Loosening cap screw for depth adjustment.

3.Slide the safety nose (Figure 6) toward the nailer body to drive nails deeper. Slide the safety nose forward if the nail goes too deep.

4.Tighten the safety nose cap screw each time after making adjustments.

5.Connect to the air.

6.Pull the trigger and depress the safety yoke mechanism on your workpiece to test the depth adjustment.

The nailer is designed to fire one nail at a time, or one after another, using the safety yoke mechanism.

To operate your nailer in single fire mode:

1.Depress the safety yoke mechanism against the workpiece.

2.Pull the trigger, then remove your finger from the trigger after the nail is driven.

To operate your nailer in bump fire mode:

1.Pull the trigger.

2.Press the safety yoke mechanism against your workpiece and raise it after the nail is driven.

3.Hold the trigger and repeat Step 2 to drive more nails.

-10-

A jammed nail must be cleared before using the nailer again. The two places where a nail can get jammed are the maga- zine and the discharge area.

To clear a jammed nail from the maga- zine:

1.DISCONNECT NAILER FROM THE

AIR SUPPLY!

2. Pull back and lock the magazine push- er.

3.Remove the nail stick.

4.Locate and remove the jammed nail with needle nose pliers. Release the catch lever and let the pusher slide to front of the magazine.

To clear a jammed nail from the dis- charge area:

1.DISCONNECT NAILER FROM THE

AIR SUPPLY!

2.Pull back and lock the magazine push- er in place.

3.Remove all nails from the magazine.

4.Locate the nail in the nailer nose, dis- lodge the nail with a tool that will fit in the slot on the underside of the nose.

5.Throw the damaged nail away and insert a new nail stick that only con- tains clean, undamaged nails. DO NOT use dirty or damaged nails!

6.Release the catch lever and let the pusher slide to the front of the maga- zine.

H6145 28?? Clipped Head Framing Nailer

Replacing Pistons/O-

Rings

If you use your nailer day in and day out, repair pistons are cheap insurance against wasted down time and lost profits, in the event that a piston or piston shaft becomes worn out.

Always disconnect air from nailer whenever servicing! During mainte- nance, a nailer connected to air may fire accidentally, causing serious personal injury!

To replace a piston:

1.DISCONNECT NAILER FROM THE

AIR SUPPLY!

2.Remove all nails from the magazine cartridge.

3.Remove the four cap screws on the top of the nailer, near the exhaust port.

4.Remove the top cap.

5.The top of the piston should now be visible inside the cylinder, which is housed in the head of the nailer.

6.Open the magazine.

7.Watch the discharge area and push the top of the piston with your finger. You will see the piston shaft slide down the discharge area.

8.With a long flathead screwdriver or similarly shaped tool, push the piston shaft back inside the nailer until you can grip the piston head and remove it from the cylinder. (Be careful not to scratch the discharge area when push- ing the piston shaft with the screw- driver.)

9.Place a new O-ring on the new piston and apply a thin film of the nailer lubri- cating oil on the O-ring.

10.Insert the new piston in the cylinder. Make sure that the grooves on the piston shaft line up with those on the guide at the bottom of the cylinder. The new piston should easily slide into the cylinder. DO NOT force the piston into the cylinder! If the piston is not easily inserted, double-check the alignment of the piston shaft with the grooves on the guide.

11.After the piston is inserted correctly, close the magazine. Replace the top cap assembly and tighten the 4 cap screws.

12.For more assistance, or to install a complete O-ring set, refer to the appro- priate breakdown diagram in the back of this manual.

CLEANING & LUBRICATION

Use a good solvent to clean the nose assembly of the nailer. Always be sure that the nailer is dry before using it again.

Do not allow dust, chips, sand, etc. into the air connectors or into the body of the nailer; this may result in leaks and dam- age to the nailer and the air couplings.

Never use gasoline or other flamma- ble liquids to clean this tool. Vapors in the tool may ignite, causing the tool to explode. Ignoring this warning may lead to serious personal injury or even death!

Special oil has been included with your new Grizzly nailer to help maintain its useful life. Place two to six drops of oil in the nailer air inlet (as shown in Figure 7) before every use, or after 2 hours of continuous use.

Wipe off any excess oil near the nailer exhaust to avoid dust build-up. When the oil that was included with the nailer has been completely used, replace with Grizzly Model G2820 Pneumatic Tool Oil.

Another option to manual oiling would be to install a lubricator in your air compres- sor line. If your air compressor line already has a lubricator, then regular lubrication of your nailer will not be necessary. Just make sure there is always oil in the lubri- cator.

As mentioned before, the best option is to install a filter/lubricator/regulator unit in your air line.

Figure 7. Lubricating nailer via air inlet.

Nailer Framing Head Clipped 28?? H6145

?????????

?????????

???

???

???

??? ??????

??????

?????????

??????

??????

?????? ??????

??????

??????

??????

??????

PARTS H6145

??????

??????

??????

?????? ??????

?????? ??????

??????

??????

??????

??????

??????

??????

??????

-13-

??????

??????

??????

??????

??????

BREAKDOWN

H6145 PARTS LIST

TROUBLESHOOTING

WARRANTY AND RETURNS

Grizzly Industrial, Inc. warrants every product it sells for a period of 1 year to the original purchaser from the date of purchase. This warranty does not apply to defects due directly or indirectly to misuse, abuse, negligence, accidents, repairs or alterations or lack of maintenance. This is Grizzly???s sole written warranty and any and all warranties that may be implied by law, including any merchantability or fitness, for any particular purpose, are hereby limited to the duration of this written warranty. We do not warrant or represent that the merchandise complies with the provisions of any law or acts unless the manufacturer so warrants. In no event shall Grizzly???s liability under this warranty exceed the purchase price paid for the product and any legal actions brought against Grizzly shall be tried in the State of Washington, County of Whatcom.

We shall in no event be liable for death, injuries to persons or property or for incidental, contingent, special, or consequential damages arising from the use of our products.

To take advantage of this warranty, contact us by mail or phone and give us all the details. We will then issue you a ???Return Authorization Number,??? which must be clearly posted on the outside as well as the inside of the carton. We will not accept any item back without this number. Proof of purchase must accompany the merchandise.

The manufacturers reserve the right to change specifications at any time because they constantly strive to achieve better quality equipment. We make every effort to ensure that our products meet high quality and durability standards and we hope you never need to use this warranty.

Please feel free to write or call us if you have any questions about the machine or the manual.

Grizzly Industrial, Inc.

1203 Lycoming Mall Circle

Muncy, PA 17756

Phone: (570) 546-9663

Fax: (800) 438-5901

E-Mail: techsupport@grizzly.com

Web Site: http://www.grizzly.com

Thank you again for your business and continued support. We hope to serve you again soon!

WARRANTY CARD

Name_________________________________________________________________________

Street ________________________________________________________________________

City____________________State________Zip_________

Phone Number____________E-Mail___________________FAX ____________

Model # H6145 28?? Clipped Head Framing Nailer Serial#_______________Order #________

The following information is given on a voluntary basis. It will be used for marketing purposes to help us develop better products and services. Of course, all information is strictly confidential.

___Other__________________________

2.What is your annual household income?

___$20,000-$29,999 ___$60,000-$69,999

___$30,000-$39,999 ___$70,000-$79,999

___$40,000-$49,999 ___$80,000-$89,999

___$50,000-$59,999 ___$90,000 +

3.What is your age group?

4. How long have you been a woodworker?

5.How would you rank your woodworking skills?

___Simple___Advanced

6.What stationary woodworking tools do you own? Check all that apply.

___Horiz.Boring Machine

___Vacuum Veneer Press

___Other______________________________

7.How many of your woodworking machines are Grizzly? _______________________________

8.Which benchtop tools do you own? Check all that apply.

___1"x42" Belt Sander ___6" - 8" Grinder

___Spindle/Belt Sander ___Mini Jointer

___10"-12"Thickness Planer Other____________________________________

9.How many of the machines checked above are Grizzly? __________________________________

10.Which portable/hand held power tools do you own? Check all that apply.

Other_________________________________

11.What machines/supplies would you like Grizzly Industrial to carry?

________________________________________

________________________________________

________________________________________

________________________________________

12.What new accessories would you like Grizzly Industrial to carry?

________________________________________

________________________________________

________________________________________

________________________________________

13.What other companies do you purchase your tools and supplies from?

________________________________________

________________________________________

________________________________________

________________________________________

14.Do you think your purchase represents good value?

___Yes___No

15. Would you recommend Grizzly to a friend?

___Yes___No

16. Would you allow us to use your name as a refer- ence for Grizzly customers in your area? Note: We

never use names more than three times.

___Yes___No

17.Comments:________________________________

_________________________________________

_________________________________________

_________________________________________

Send a Grizzly Catalog to a friend:

Name________________________________

Street________________________________

City______________State______Zip_______

FOLD ALONG DOTTED LINE

Place

Stamp

Here

GRIZZLY INDUSTRIAL, INC.

P.O. BOX 2069

BELLINGHAM, WA 98227-2069

TAPE ALONG EDGES--PLEASE DO NOT STAPLE