MODEL H8170/H8171

HYDRAULIC/ELECTRIC

LOG SPLITTER

OWNER'S MaNUAL

Copyright ?? MARCH, 2007 By Grizzly Industrial, Inc.

WaRNING: No portion of this manual may be reproduced in any shape Or form without the written approvaL of GrIzzlY InDUSTRIAL, inc.

#JCCR9029 printed in CHinA

This manual provides critical safety instructions on the proper setup, operation, maintenance, and service of this machine/tool. Save this document, refer to it often, and use it to instruct other operators.

Failure to read, understand and follow the instructions in this manual may result in fire or serious personal injury???including amputation, electrocution, or death.

The owner of this machine/tool is solely responsible for its safe use. This responsibility includes but is not limited to proper installation in a safe environment, personnel training and usage authorization, proper inspection and maintenance, manual availability and compre- hension, application of safety devices, cutting/sanding/grinding tool integrity, and the usage of personal protective equipment.

The manufacturer will not be held liable for injury or property damage from negligence, improper training, machine modifications or misuse.

Some dust created by power sanding, sawing, grinding, drilling, and other construction activities contains chemicals known to the State of California to cause cancer, birth defects or other reproductive harm. Some examples of these chemicals are:

???Lead from lead-based paints.

???Crystalline silica from bricks, cement and other masonry products.

???Arsenic and chromium from chemically-treated lumber.

Your risk from these exposures varies, depending on how often you do this type of work. To reduce your exposure to these chemicals: Work in a well ventilated area, and work with approved safety equip- ment, such as those dust masks that are specially designed to filter out microscopic particles.

INTRODUCTION

We are proud to offer the Model H8170/H8171 Hydraulic/Electric Log Splitter. This machine is part of a growing Grizzly family of fine household equipment. When used according to the guide- lines set forth in this manual, you can expect years of trouble-free, enjoyable operation and proof of Grizzly???s commitment to customer satis- faction.

The specifications, drawings, and photographs illustrated in this manual represent the Model H8170/H8171 when the manual was prepared. However, owing to Grizzly???s policy of continuous improvement, changes may be made at any time with no obligation on the part of Grizzly.

For your convenience, we always keep current Grizzly manuals available on our website at www. grizzly.com. Any updates to your machine will be reflected in these manuals as soon as they are complete. Visit our site often to check for the lat- est updates to this manual!

-2-

If you have any comments regarding this manual, please write to us at the address below:

Grizzly Industrial, Inc.

C/O Technical Documentation Manager

P.O. Box 2069

Bellingham, WA 98227-2069

Email: manuals@grizzly.com

We stand behind our machines. If you have any service questions or parts requests, please call or write us at the location listed below.

Grizzly Industrial, Inc.

1203 Lycoming Mall Circle

Muncy, PA 17756

Phone: (570) 546-9663

Fax: (800) 438-5901 E-Mail: techsupport@grizzly.com Web Site: http://www.grizzly.com

H8170/H8171 Hydraulic/Electric Log Splitter

MACHINe dATA

SHeeT

Customer Service #: (570) 546-9663 ??? To Order Call: (800) 523-4777 ??? Fax #: (800) 438-5901

Model H8170/H8171 HYdRAUlIC/eleCTRIC

loG SPlITTeR

(The actual maximum and minimum splitting diameter for a particular log will depend on wood species, grain characteristics and moisture content.)

Identification

A

M

N

L

B

C D

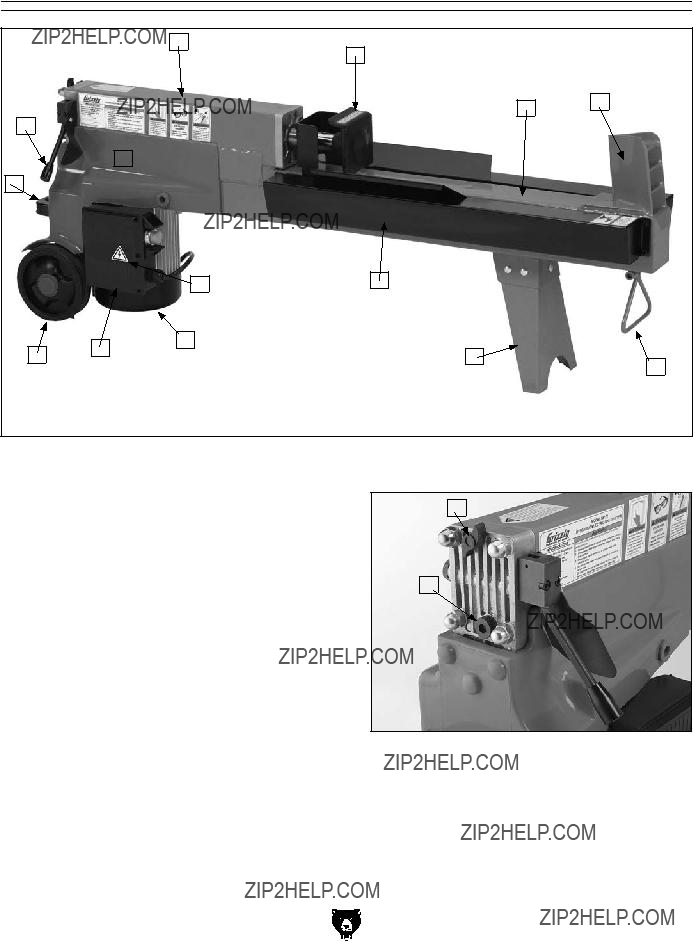
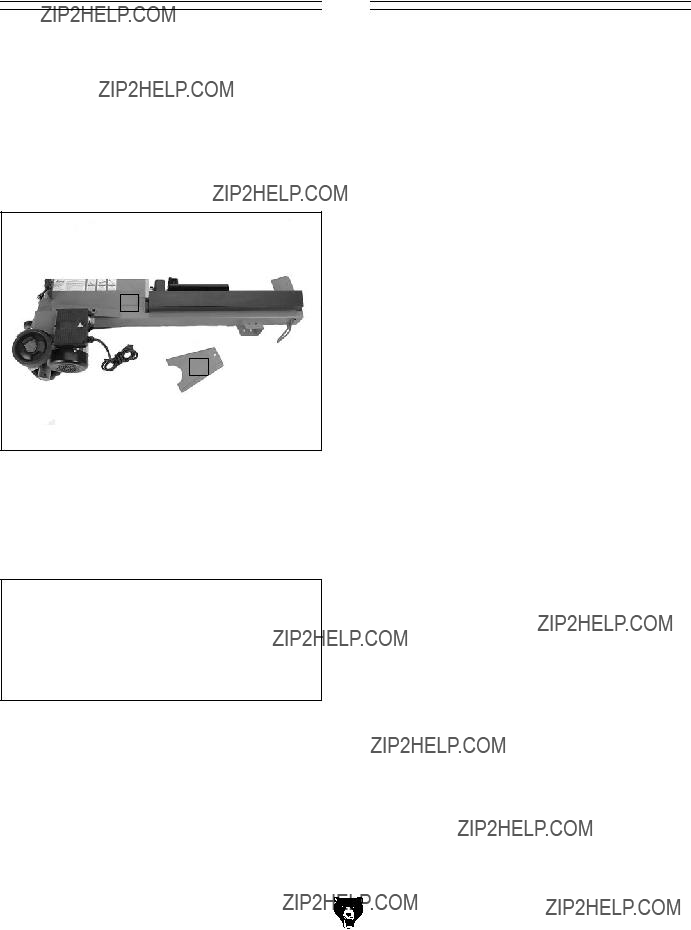
Figure 1. H8170/H8171 identification front view.

A.Oil Tank

B.Log Pusher

C.Log Table

D.Splitting Wedge

E. Front Lifting Handle

F. Support Leg

G.Log Table Extension

H.Power Switch

I.Motor

J.Wiring Box

K. Wheel

L. Rear Lifting Handle

M. Hydraulic Control Lever N. Hydraulic Lever Guard O. Hydraulic Air Bleed Screw P. Oil Drain Bolt with Dipstick.

O

P

Figure 2. Identification end view.

SECTION 1: SAFETY

For Your Own Safety, Read Instruction Manual Before Operating This Machine

The purpose of safety symbols is to attract your attention to possible hazardous conditions. This manual uses a series of symbols and signal words intended to convey the level of impor- tance of the safety messages. The progression of symbols is described below. Remember that safety messages by themselves do not eliminate danger and are not a substitute for proper accident prevention measures. Always use common sense and good judgment.

Safety Instructions for Machinery

OWNER???S MANUAL. Read and understand this owner???s manual BEFORE using machine.

TRAINED OPERATORS ONLY. Untrained oper- ators have a higher risk of being hurt or killed. Only allow trained/supervised people to use this machine. When machine is not being used, dis- connect power, remove switch keys, or lock-out machine to prevent unauthorized use???especially around children. Make workshop kid proof!

DANGEROUS ENVIRONMENTS. Do not use machinery in areas that are wet, cluttered, or have poor lighting. Operating machinery in these areas greatly increases the risk of accidents and injury.

MENTAL ALERTNESS REQUIRED. Full mental alertness is required for safe operation of machin- ery. Never operate under the influence of drugs or alcohol, when tired, or when distracted.

ELECTRICAL EQUIPMENT INJURY RISKS. You can be shocked, burned, or killed by touching live electrical components or improperly grounded machinery. To reduce this risk, only allow qualified service personnel to do electrical installation or repair work, and always disconnect power before accessing or exposing electrical equipment.

DISCONNECT POWER FIRST. Always discon- nect machine from power supply BEFORE making adjustments, changing tooling, or servicing machine. This prevents an injury risk from unintended startup or contact with live electrical components.

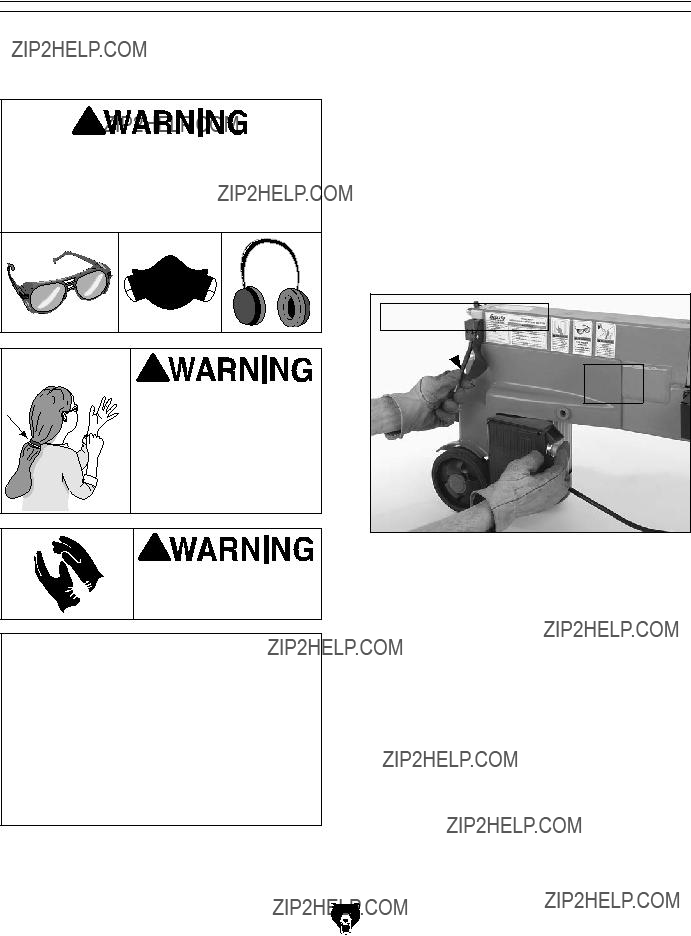
EYE PROTECTION. Always wear ANSI-approved safety glasses or a face shield when operating or observing machinery to reduce the risk of eye injury or blindness from flying particles. Everyday eyeglasses are not approved safety glasses.

??

WEARING PROPER APPAREL.?? Do?? not?? wear?? clothing,?? apparel?? or?? jewelry?? that?? can?? become?? entangled?? in?? moving?? parts.?? Always?? tie?? back?? or?? cover??long??hair.??Wear??non-slip??footwear??to??avoid?? accidental??slips,??which??could??cause??loss??of??work- piece??control.

hAzARdOus dusT. Dust?? created?? while?? using?? machinery?? may?? cause?? cancer,?? birth?? defects,?? or?? long-term?? respiratory?? damage.?? Be?? aware?? of?? dust?? hazards??associated??with??each??workpiece??material,?? and??always??wear??a??NIOSH-approved??respirator??to?? reduce??your??risk.

hEARING PROTECTION.?? Always?? wear?? hear- ing?? protection?? when?? operating?? or?? observing?? loud?? machinery.?? Extended?? exposure?? to?? this?? noise?? without??hearing??protection??can??cause??permanent?? hearing??loss.

REMOVE AdJusTING TOOLs.?? Tools?? left?? on?? machinery?? can?? become?? dangerous?? projectiles?? upon??startup.??Never??leave??chuck??keys,??wrenches,?? or?? any?? other?? tools?? on?? machine.?? Always?? verify?? removal??before??starting!

INTENdEd usAGE.?? Only?? use?? machine?? for?? its?? intended??purpose??and??never??make??modifications?? not?? approved?? by?? Grizzly.?? Modifying?? machine?? or?? using?? it?? differently?? than?? intended?? may?? result?? in?? malfunction??or??mechanical??failure??that??can??lead??to?? serious??personal??injury??or??death!

AWKWARd POsITIONs.?? Keep?? proper?? footing?? and??balance??at??all??times??when??operating??machine.?? Do??not??overreach!??Avoid??awkward??hand??positions?? that?? make?? workpiece?? control?? difficult?? or?? increase?? the??risk??of??accidental??injury.

ChILdREN & BYsTANdERs. Keep??children??and??

bystanders??at??a??safe??distance??from??the??work??area.

Stop??using??machine??if??they??become??a??distraction.

GuARds & COVERs.??Guards??and??covers??reduce?? accidental?? contact?? with?? moving?? parts?? or?? flying?? debris.?? Make?? sure?? they?? are?? properly?? installed,?? undamaged,??and??working??correctly.

FORCING MAChINERY.??Do??not??force??machine.?? It?? will?? do?? the?? job?? safer?? and?? better?? at?? the?? rate?? for?? which??it??was??designed.

NEVER sTANd ON MAChINE.?? Serious?? injury?? may?? occur?? if?? machine?? is?? tipped?? or?? if?? the?? cutting?? tool??is??unintentionally??contacted.??

sTABLE MAChINE. Unexpected??movement??dur- ing?? operation?? greatly?? increases?? risk?? of?? injury?? or?? loss??of??control.??Before??starting,??verify??machine??is?? stable??and??mobile??base??(if??used)??is??locked.

usE RECOMMENdEd ACCEssORIEs.??Consult?? this??owner???s??manual??or??the??manufacturer??for??rec- ommended?? accessories.?? Using?? improper?? acces- sories??will??increase??the??risk??of??serious??injury.

uNATTENdEd OPERATION. To?? reduce?? the?? risk?? of?? accidental?? injury,?? turn?? machine?? off?? and?? ensure?? all?? moving?? parts?? completely?? stop?? before?? walking?? away.?? Never?? leave?? machine?? running?? while??unattended.??

MAINTAIN WITh CARE.??Follow??all??maintenance?? instructions?? and?? lubrication?? schedules?? to?? keep?? machine?? in?? good?? working?? condition.?? A?? machine?? that?? is?? improperly?? maintained?? could?? malfunction,?? leading??to??serious??personal??injury??or??death.??

ChECK dAMAGEd PARTs.?? Regularly?? inspect?? machine?? for?? any?? condition?? that?? may?? affect?? safe?? operation.??Immediately??repair??or??replace??damaged?? or??mis-adjusted??parts??before??operating??machine.

MAINTAIN POWER CORds. When?? disconnect-

ing?? cord-connected?? machines?? from?? power,?? grab?? and??pull??the??plug???NOT??the??cord.??Pulling??the??cord?? may?? damage?? the?? wires?? inside.?? Do?? not?? handle?? cord/plug??with??wet??hands.??Avoid??cord??damage??by?? keeping??it??away??from??heated??surfaces,??high??traffic?? areas,??harsh??chemicals,??and??wet/damp??locations.

EXPERIENCING dIFFICuLTIEs. If?? at?? any?? time?? you??experience??difficulties??performing??the??intend- ed??operation,??stop??using??the??machine!??Contact??our?? Technical??Support??at??(570)??546-9663.

??

Additional Safety Instructions for Hydraulic Log Splitters

SETTING ON THIS LOG SPLITTER.

Adjusting the pressure limit screw may cause a hydraulic explosion and seriously injure the operator and bystanders.

BE FAMILIAR WITH THE HAZARDS OF HYDRAULIC INJECTION INJURIES. Leaking hydraulic fluid may be under sufficient pressure to penetrate skin. Hydraulic fluid injected into skin is a medical emergency and may, if not treated promptly, result in infection, disability, or death.

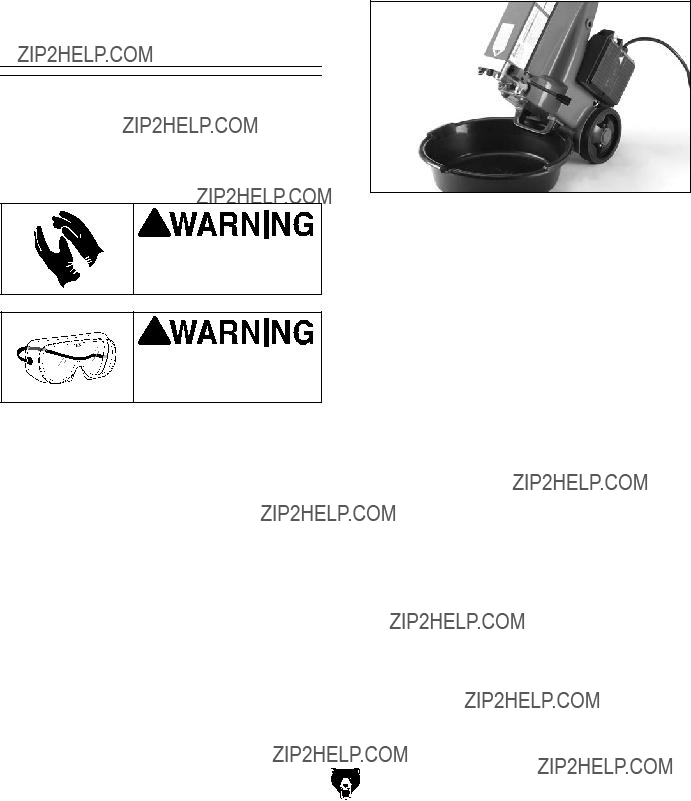
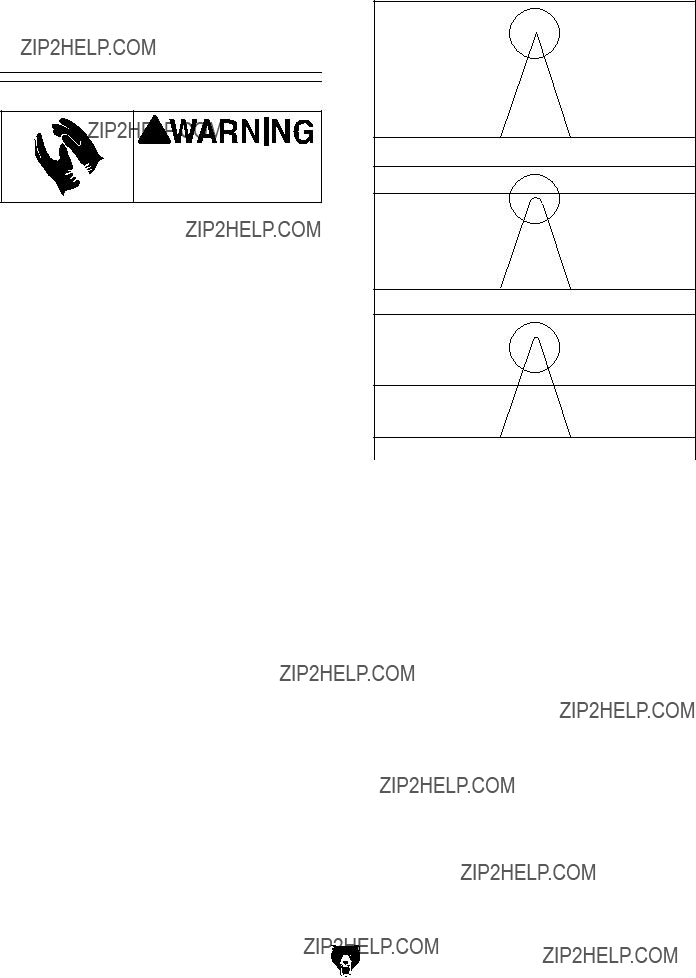
NEVER USE HANDS TO CHECK FOR HYDRAULIC LEAKS. Always wear gloves when operating hydraulic equipment.

PROTECT EYES WHEN WORKING AROUND HYDRAULIC EQUIPENT. Safety glasses may not be sufficient to protect your eyes from hot pressurized fluid. Stay away from leaks until the system is depressurized.

STOP THE MACHINE IMMEDIATELY IF IT LEAKS HYDRAULIC FLUID. Allowing the machine to run with a leak significantly increas- es the risk of injury.

NEVER FORCE HYDRAULIC EQUIPMENT

TO APPLY MORE PRESSURE THAN IT IS DESIGNED TO EXERT. Pushing hydraulic equipment beyond the limitations of design can easily damage hydraulic systems and increase the risk of operator injury.

REGULARLY CHECK THE HYDRAULIC

FLUID LEVEL AND ADD FLUID WHEN

NEEDED.

NEVER USE THE LOG SPLITTER FOR ANY

PURPOSE OTHER THAN SPLITTING WOOD.

NEVER ALLOW OTHERS TO ASSIST THE

OPERATOR IN LOADING OR SPLITTING LOGS.

KEEP CHILDREN AWAY FROM THE LOG

SPLITTER AT ALL TIMES! IT IS NOT A TOY.

NEVER LEAVE THE SPLITTER UNATTENDED

AND ALWAYS STORE IT IN A LOCKED

LOCATION WHEN IT IS NOT IN USE.

FOLLOW THE INSTRUCTIONS IN THIS

MANUAL TO RELEASE LOGS THAT BECOME JAMMED ON THE SPLITTING HEAD. Be aware that logs with high moisture content will be more difficult to split and more likely to jam.

BE AWARE THAT LOGS WITH EXTENSIVE

KNOTTINGMAYBEDIFFICULTORIMPOSSIBLE TO SPLIT. Making repeated attempts to split an unsuitable log will increase wear on the splitter and increase the risk of operator injury.

NEVER ATTEMPT TO SPLIT MORE THAN ONE LOG AT A TIME. Doing so may cause logs to fly off the splitter with great force, resulting in serious injury or death.

NEVER USE ANY PART OF YOUR BODY TO

GUIDE OR STEADY A LOG WHEN THE RAM IS MOVING. Failure to follow this instruction can result in serious personal injury, including loss of limbs.

SECTION 2: CIRCUIT REQUIREMENTS

110V Operation

Serious personal injury could occur if you connect the machine to the power source before you have completed the set up pro- cess. DO NOT connect the machine to the power source until instructed to do so.

Amperage Draw

The Model H8170/H8171 motor draws the follow- ing amps under maximum load:

Circuit Recommendations

We recommend connecting your machine to a dedicated and grounded circuit that is rated for the amperage given below. Never replace a circuit breaker on an existing circuit with one of higher amperage without consulting a qualified electri- cian to ensure compliance with wiring codes. If you are unsure about the wiring codes in your area or you plan to connect your machine to a shared circuit, consult a qualified electrician.

110V Circuit...........................................20 Amps

Plug/Receptacle Type

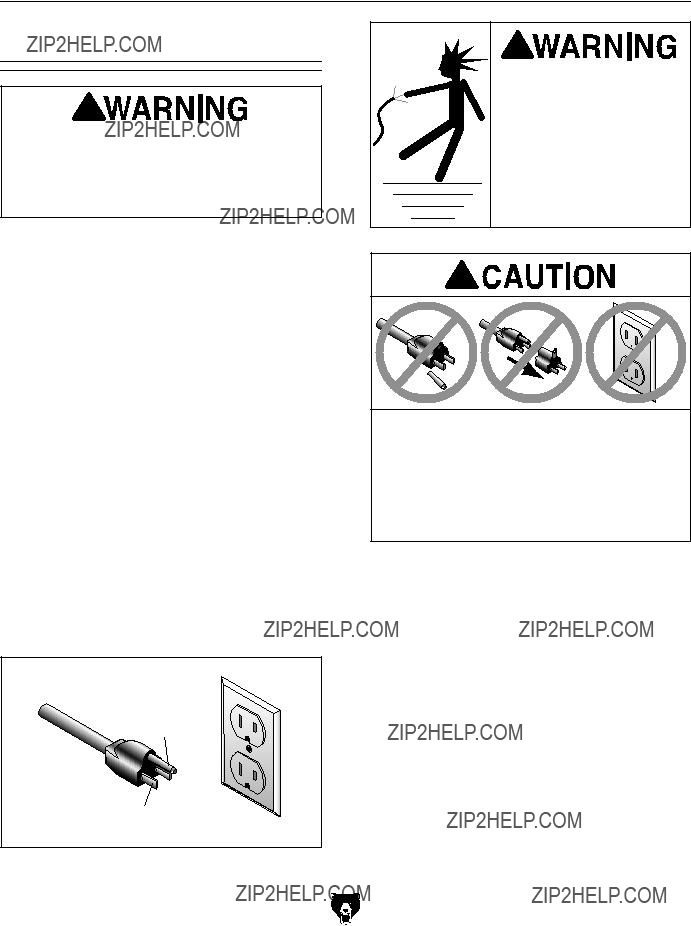
Included Plug Type........................... NeMA 5-15

GROUNDED

5-15 RECEPTACLE

Grounding Prong

5-15 PLUG

Neutral Hot

Electrocution or fire could result if this machine is not grounded correctly or if your electrical configu- ration does not comply with local and state codes. Ensure compliance by checking with a qualified electrician!

SHOCK HAZARD!

Two-prong outlets do not meet the grounding requirements for this machine. Do not modify or use an adapter on the plug provided???if it will not fit the outlet, have a qualified electrician install the proper outlet with a verified ground.

Extension Cords

Follow these instructions when using an exten- sion cord with your log splitter:

???Use at least a 12 gauge cord that does not exceed 50 feet in length!

???The cord must have a ground wire and plug pin; always keep the cord and plug dry.

???A qualified electrician MUST size cords over 50 feet long to prevent motor damage.

Figure 3. Typical type 5-15 plug and receptacle.

SECTION 3: SETUP

SetUp Safety

This machine presents serious injury hazards to untrained users. Read through this entire manu- al to become familiar with the controls and opera- tions before starting the machine!

Wear safety glasses dur- ing the entire setup pro- cess!

Wear gloves during the entire setup process and during operations!

This log splitter is heavy. Get help whenever moving the log splitter between worksites and lifting it to an elevated work surface.

H8170/H8171 Hydraulic/Electric Log Splitter

Items Needed for

Setup

The following items are needed to complete the setup process, but are not included with your machine:

Unpacking

Your machine was carefully packaged for safe transportation. Remove the packaging materials from around your machine and inspect it. If you discover the machine is damaged, please imme- diately call Customer Service at (570) 546-9663 for advice.

Save the containers and all packing materials for possible inspection by the carrier or its agent.

Otherwise, filing a freight claim can be difficult.

When you are completely satisfied with the condi- tion of your shipment, inventory the contents.

-9-

A

B

Figure 4. H8170/H8171 Inventory.

If any nonproprietary parts are missing (e.g. a nut or a washer), we will gladly replace them; or for the sake of expediency, replacements can be obtained at your local hardware store.

NOTICE

Some hardware/fasteners on the inventory list may arrive pre-installed. Check mount- ing locations before assuming that any items from the inventory list are missing.

-10-

Site Considerations

Work Surface

Always use the splitter on a flat, stable work sur- face. Operating your splitter will be easiest when the controls are waist high. At minimum, your work surface must safely support the combined weight of splitter and the heaviest log you intend to split.

Working Clearances

Allow enough room on all sides to move logs to and from the splitter. Refer to the Machine Data Sheet for the dimensions of your splitter.

Moving the Splitter

The wheels on the Model H8170/H8171 make it possible for one person to move it short distances. However, the rugged design of your splitter makes it heavy; we recommend that you get assistance whenever lifting it.

To move the splitter :

1. DISCONNECT THE LOG SPLITTER FROM

THE POWER SUPPLY!

2. Close the air bleeder screw by turning it clockwise (viewed from the rear of the split- ter) until it stops. This will prevent hydraulic fluid from leaking out during the move.

3. Grab the front handle and lift until the wheels carry the load of the rear end. You will need to raise the front end about 15" to shift the load to the wheels. Roll the splitter to the desired location and lower the front end.

4. Open the air bleeder screw by turning it counterclockwise two full turns.

To lift the splitter:

1. Do Steps 1???2, above.

2.Get an assistant to help you to lift the split- ter and carry it to the new worksite; use the handles at each end.

H8170/H8171 Hydraulic/Electric Log Splitter

The only assembly required is attaching the sup- port leg to the splitter assembly.

1.Carefully lay the splitter on its side, with the wiring box facing up.

2. Use the carriage bolts and nuts to secure the support leg to the splitter body as shown in

Figure 5.

Figure 5. Attaching the support leg.

Before you begin operations, do Steps 1???5 below to make sure your splitter is running properly.

To test run the log splitter:

1.Make sure that all tools and other materials are cleared away from the machine.

2. Review SECTIONS 1 and 2 (SAFETY and CIRCUIT REQUIREMENTS) on Pages 15- 8 and connect your machine to the power source.

3.Turn the air bleed screw clockwise (as you face the rear of the splitter) until it stops, then turn it counterclockwise two full turns.

4. Press the ON button in and, while holding it down, push the hydraulic control lever down. The ram should move forward, stopping about 8???3???8" from the splitting wedge.

Note: For your safety, both the ON button and the hydraulic lever must be engaged to start the ram moving forward.

5. When the ram stops moving forward, release both ON button and the control lever. The motor will stop running and the ram will slide back to the start position.

???If the ram moves as described in Steps 4???5, then the splitter is working properly and the test run is complete.

???If the ram does not operate as described, or if the splitter vibrates excessively or makes unusual noises, stop using the splitter immediately, disconnect the split- ter from the power supply and refer to

Troubleshooting on Page 17 If you still cannot resolve the problem, contact our Technical Support at (570) 546-9663.

SECTION 4: OPERATIONS

Damage to your eyes, lungs, and ears could result from using this machine without proper protective gear. Always wear safety glasses, a respirator, and hearing protection when operating this machine.

Loose hair and cloth-

ing could get caught in

machinery and cause seri-

ous personal injury. Keep

loose clothing and long hair away from moving machinery.

Always wear gloves when operating this log splitter!

NOTICE

If you have never used this type of machine or equipment before, We strongly rec- omMEND that you read books, trade maga- zines, or get formal training before begin- ning any projects. Regardless of the con- tent in this section, Grizzly Industrial will not be held liable for accidents caused by lack of training.

-12-

When you press the ON button, the electric mo- tor pressurizes hydraulic fluid. When you push the control lever down, the pressurized fluid moves the pusher forward, pressing the log into the split- ting wedge.

To operate the splitter you must use both hands to activate the controls simultaneiously. See Figure 6 for the position of the controls and hands during operation.

Hydraulic Control Lever

ON

Button

Figure 6. Operating the basic controls.

H8170/H8171 Hydraulic/Electric Log Splitter

Basic Operations

Locate the splitter as close as possible to the logs you will split. Refer to CIRCUIT REQUIREMENTS, on Page 8 for the maximum length of extension cords.

To split a log:

1. Make sure the bleeder screw is open by first turning it clockwise until it stops and then turning it counterclockwise two full turns.

2. Place the log squarely on the bed as shown in Figure 7. DO NOT try to split a log against the grain by laying it sideways on the bed.

Splitting

Wedge

Splitter Bed

Figure 7. Placing a log on the splitter bed.

3. With your body and clothing away from log and the hydraulic ram, depress and hold the ON button, then push the control lever down. Keep pressing the ON button while holding the control arm down; the ram will push the log into the splitting head. When the ram stops, immediatley release both the ON but- ton and control arm.

Note: The hydraulic system will be damaged if you try to force the ram forward by holding the controls in the ON position after the ram stops.

4. Clear the pieces of split wood away from the splitter.

Removing a Jammed

Log

If a log does not split and becomes jammed on the splitting wedge, Do Not try to clear it by hit- ting it from the side or kicking it; this can result in personal injury and damage the splitter.

To safely remove a jammed log:

1. With the ram fully back, set a wooden wedge flat side down on the bed with the narrow end pointing under the log as shown in Figure 8.

Wood

Wedge

Figure 8. Using a wedge to clear a jam.

Note: A piece of split wood set crossways on the bed may make a good wedge, but it must narrow enough to slide under the end of the jammed log.

2. Start the splitter to push the wedge under the jammed log until the log lifts off the splitting head.

Note: If the first wedge does not free the log, repeat the process using wedges with steeper slopes until the log is free.

Use an 8mm hex wrench to remove the fill plug/dipstick, as shown in Figure 9.
Oil Fill Plug
Figure 9. Removing the oil fill plug.
Wipe off the dipstick and use it to check the oil level as shown in Figure 10.
Add Range
Use the front lifting handle to raise the split- ter to a vertical position, motor end up. Make sure the ram is fully retracted and have an assistant hold the splitter steady.

SECTION 5: MAINTENANCE

Always disconnect power to the machine before performing maintenance. Failure to do this may result in serious person- al injury.

Cleaning

For optimum performance from your log splitter, clean it with a brush after every use and wipe it down occasionally with a rag. To prevent rusting, dry the log splitter thoroughly after every use.

Schedule

Follow the maintenance schedule below and refer to any specific instructions given in this section.

Before each use, check for:

???Low hydraulic fluid level.

???Loose hardware.

???Leaking hydraulic fluid.

???Any other unsafe or abnormal condition.

Every 150 hours of use:

???Replace old hydraulic fluid with new.

As needed:

???Remove rust from the splitting wedge and apply rust-preventative touch-up paint to bare surfaces.

-14-

Checking/Adding

Hydraulic Fluid

The oil fill plug on the Model H8170/H8171 has a dipstick attached. The fill plug is located under the bleed screw on the back of the splitter.

To check the fluid level: 1.

2.

3.

Full Range

Figure 10. Checking the fluid level.

H8170/H8171 Hydraulic/Electric Log Splitter

???If the oil level is at least halfway between the two grooves, no additional oil is needed ???wipe the dipstick clean, return the plug, and tighten it.

???If the oil level is close to the lower mark, add fluid through the oil plug hole until the level is at the top line, then tighten the fill plug.

Changing the

Hydraulic Fluid

Change the hydraulic fluid after each 150 hours of operation. See the Machine Data Sheet for fluid requirements and capacities of your model. Failure to follow tthese instructions may damage your machine and cause serious personal injury.

Always wear protective gloves when changing hydraulic fluid.

Always wear safety gog- gles when the changing hydraulic fluid.

H8170/H8171 Hydraulic/Electric Log Splitter

To change the hydraulic fluid:

1. DISCONNECT THE SPLITTER FROM THE

POWER SOURCE!

2. With the help of an assistant, tip the splitter back, motor end down, and place a basin under the fill plug to catch the oil as shown in

Figure 11.

Figure 11. Draining hydraulic fluid.

3. Remove the oil fill plug. As the fluid drains into the basin, loosen the bleeder screw two full turns.

4. While holding a clean rag over the fill open- ing, tip the splitter upright, motor end up. Have your assistant hold it steady.

5Pour new oil into the fill plug hole. Check the fluid level frequently as you add oil. Fill to until the oil level is between the two grooves on the dipstick, then replace the fill plug and tighten.

Note: Remember to fully tighten the fill plug before removing it to check the fluid level. If you do not, you run the risk of over-filling, which can result in machine damage.

-15-

Sharpening the

Splitting Wedge

Always wear protective, gloves when sharpening the splitting wedge.

During the life of your log splitter, you will need to sharpen the splitting wedge perodically. When sharpening the wedge,m keep in mind that if you try and keep the wedge sharpened to a razor point (like an axe blade), you will greatly reduce the life of the wedge by always sharpening it. However, if you allow the point to become very dull or bullnosed, your log splitter will have to overwork to split logs and wear out. The optimum point is somewhere between. Refer to Figure 12 for a general idea.

-16-

Wedge too Sharp

Wedge too Dull

Wedge Just Right

Figure 12. Wedge points.

H8170/H8171 Hydraulic/Electric Log Splitter

SECTION 6: SERVICE

Review the troubleshooting and procedures in this section to fix or adjust your machine if a problem devel- ops. If you need replacement parts or you are unsure of your repair skills, then feel free to call our Technical Support at (570) 546-9663.

Troubleshooting

Operation

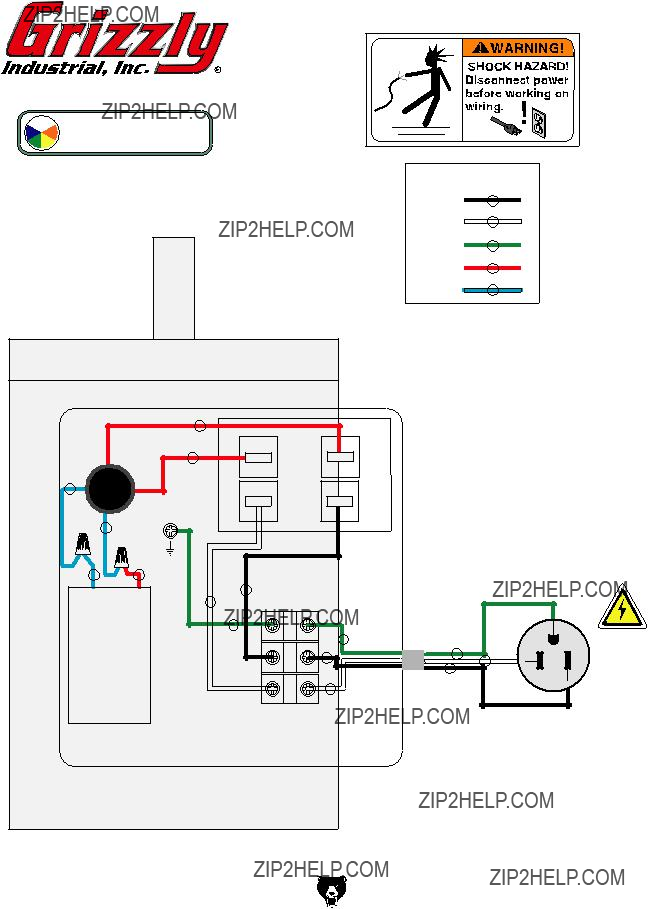
H8170/H8171 Wiring Diagram

View this page in color at

www.grizzly.com.

button Push switch

H8170/H8171 Hydraulic System Schematic

Before servicing the hydraulic system always disconnect the motor from power, and depressurize the hydraulic system by moving the control lever back and fourth a few times. Ignoring this warning can lead to hydraulic fluid poisoning, which is a serious and potentially fatal injury.

NOTICE

This hydraulic schematic will help the you identify hydraulic system components. However, it is not intended to be a how-to repair guide. Seek assistance from a profes- sional hydraulic technician whenever ser- vicing or repairing the hydraulic system.

Tank

Pressure

Relief

Valve

Cylinder

Ram

Control

Valve

Tank

H8170 Parts Breakdown - Main Assembly

Log Splitter

1

5 6 7 8 9

2

10 11 12 13

14

15

16

23 25

18

2019

21

22

23

24

17

H8170/H8171 Hydraulic/Electric

-20-

H8170 Parts List

H8171 Parts Breakdown - Main Assembly

Log Splitter

5 6 7 8 9

2

14

1517

16

17

23

25

20 19 18

21

22

23

24

H8170/H8171 Hydraulic/Electric

-22-

H8171 Parts List

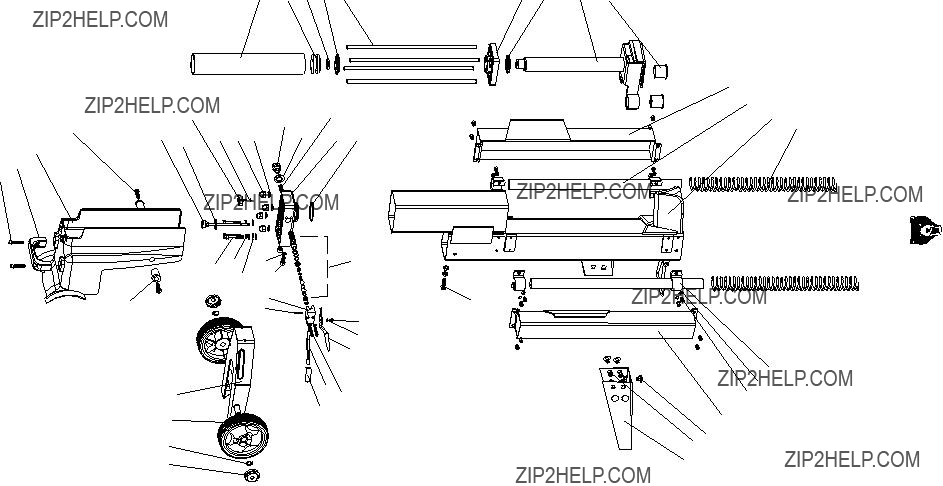
H8170/H8171 Parts Breakdown

Motor Assembly

43

44

45

46

47

48

49

50

51

82-1

39

NOTE: Unnumbered Parts are Only Available In Gear Pump

Assembly,26 Item 26

40

82-4

-24-

41

95

H8170/H8171 Hydraulic/Electric Log Splitter

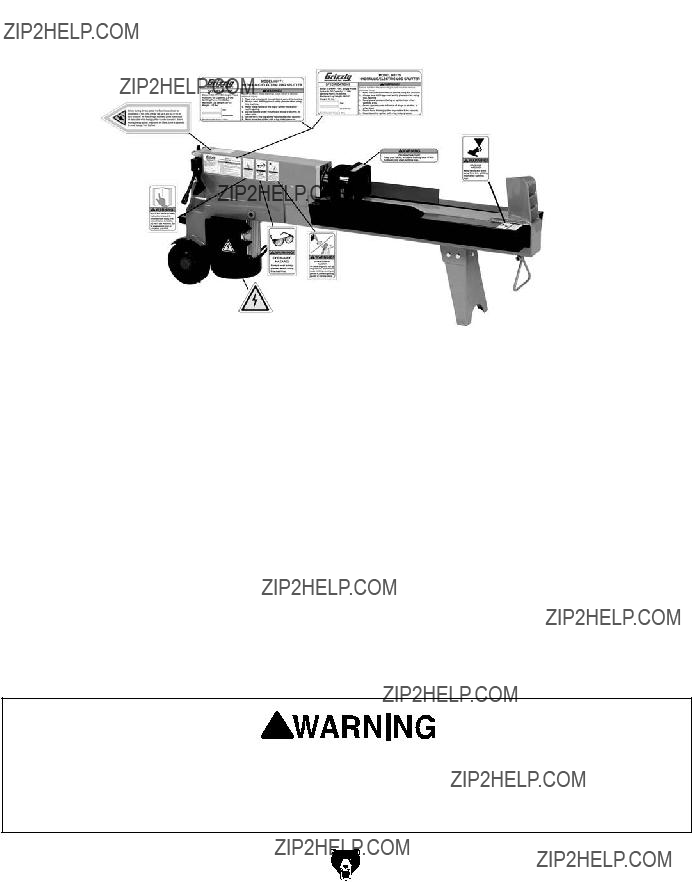
H8170/H8171 Safety Label Parts List

86

87

91

89 88

90

Safety labels warn about machine hazards and ways to prevent injury. The owner of this machine MUST maintain the original location and readability of the labels on the machine. If any label is removed or becomes unreadable, REPLACE that label before using the machine again. Contact Grizzly at (800) 523-4777 or www.grizzly.com to order new labels.

WARRANTY AND RETURNS

Grizzly Industrial, Inc. warrants every product it sells for a period of 1 year to the original purchaser from the date of purchase. This warranty does not apply to defects due directly or indirectly to misuse, abuse, negligence, accidents, repairs or alterations or lack of maintenance. This is Grizzly???s sole written warranty and any and all warranties that may be implied by law, including any merchantability or fitness, for any par- ticular purpose, are hereby limited to the duration of this written warranty. We do not warrant or represent that the merchandise complies with the provisions of any law or acts unless the manufacturer so warrants. In no event shall Grizzly???s liability under this warranty exceed the purchase price paid for the product and any legal actions brought against Grizzly shall be tried in the State of Washington, County of Whatcom.

We shall in no event be liable for death, injuries to persons or property or for incidental, contingent, special, or consequential damages arising from the use of our products.

To take advantage of this warranty, contact us by mail or phone and give us all the details. We will then issue you a ???Return Number,?????? which must be clearly posted on the outside as well as the inside of the carton. We will not accept any item back without this number. Proof of purchase must accompany the merchandise.

The manufacturers reserve the right to change specifications at any time because they constantly strive to achieve better quality equipment. We make every effort to ensure that our products meet high quality and durability standards and we hope you never need to use this warranty.

Please feel free to write or call us if you have any questions about the machine or the manual.

Thank you again for your business and continued support. We hope to serve you again soon.

CUT ALONG DOTTED LINE

WARRANTY CARD

Name_____________________________________________________________________________

Street_____________________________________________________________________________

City _______________________ State_________________________ Zip _____________________

Phone # ____________________ Email _________________________________________________

Model # ____________________ Order #_______________________ Serial #__________________

The following information is given on a voluntary basis. It will be used for marketing purposes to help us develop better products and services. Of course, all information is strictly confidential.

1.How did you learn about us?

2.Which of the following magazines do you subscribe to?

3.What is your annual household income?

4.What is your age group?

5.How long have you been a woodworker/metalworker?

6.How many of your machines or tools are Grizzly?

9.Would you allow us to use your name as a reference for Grizzly customers in your area?

10. Comments: _____________________________________________________________________

_________________________________________________________________________________

_________________________________________________________________________________

_________________________________________________________________________________

FOLD ALONG DOTTED LINE

Place

Stamp

Here

GRIZZLY INDUSTRIAL, INC.

P.O. BOX 2069

BELLINGHAM, WA 98227-2069

FOLD ALONG DOTTED LINE

Send a Grizzly Catalog to a friend:

Name_______________________________

Street_______________________________

City______________State______Zip______

TAPE ALONG EDGES--PLEASE DO NOT STAPLE