Car Seat/Booster Seat

Owner???s Manual

Model 8485

READ THIS MANUAL.

Do not install or use this car seat until you read and understand the instructions in this manual.

FAILURE TO PROPERLY USE THIS

CAR SEAT INCREASES THE RISK OF

SERIOUS INJURY OR DEATH IN A

SUDDEN STOP OR CRASH.

?? 2001 Graco 426-7-01

Table of Contents

1.0 Warnings to Parents and Other Users . . . . . .3 2.0 Registration Information . . . . . . . . . . . . . . . . .4

2.1 Register Your Car Seat . . . . . . . . . . . . . . . .4

2.2 Recall Information . . . . . . . . . . . . . . . . . . . .4

2.3 If You Need Help . . . . . . . . . . . . . . . . . . . .4

3.0 Features . . . . . . . . . . . . . . . . . . . . . . . . . . . .5-6

4.0 Important Information . . . . . . . . . . . . . . . . .7-10

4.1 Warnings . . . . . . . . . . . . . . . . . . . . . . . . . .7

4.2 Height and Weight Limitations . . . . . . . . . . .9

4.2.1 WITH Built-In Harness System . . . . .10

4.2.2 WITHOUT Built-In Harness System .10

5.0 Car Seat Location . . . . . . . . . . . . . . . . . .11-16

5.1 Vehicle Seat Requirements . . . . . . . . . . . .11 5.2 Vehicle Seat Belt Requirements . . . . . . . .12 5.2.1 UNSAFE Vehicle Belt Systems . . . . .12 5.2.2 SAFE Vehicle Belt Systems . . . . . . .14

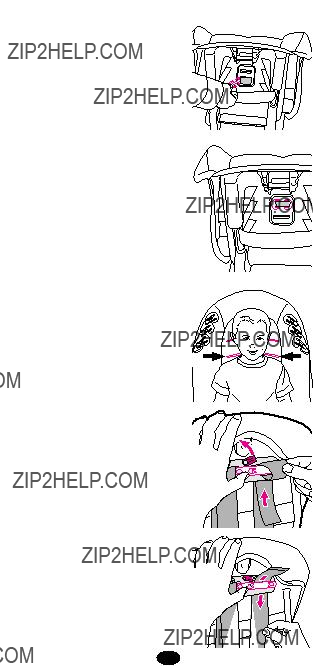
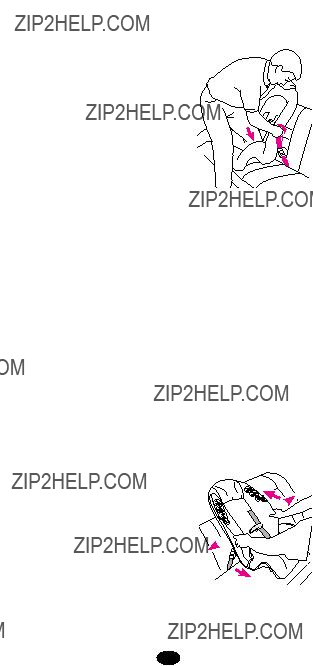
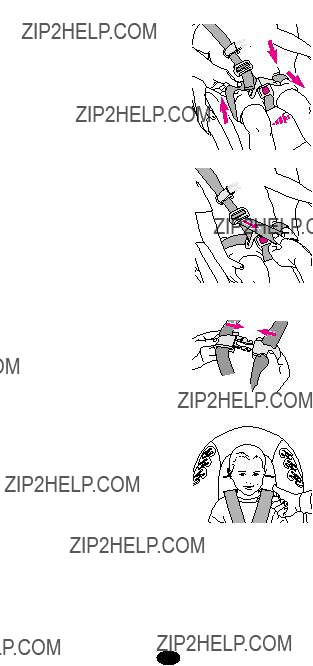
6.0 Using Car Seat With Built-In Harness . . .17-24

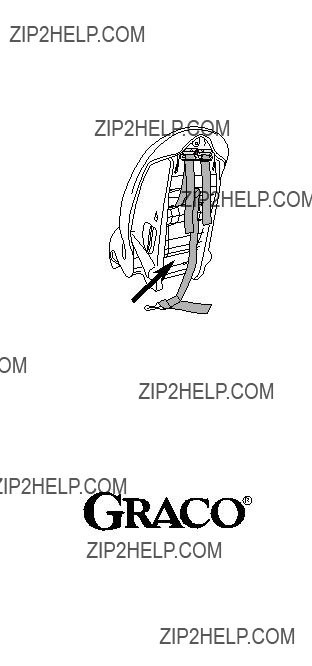
6.1 Positioning the Harness Straps . . . . . . . . .17 6.2 Securing the Car Seat in Your Vehicle . . . .21 6.3 Securing Your Child in the Car Seat . . . . .23

7.0 Using Car Seat Without Built-In Harness . . .25-27

7.1 Harness Removal . . . . . . . . . . . . . . . . . . .26

7.2 Securing Child and Booster

Seat in Vehicle . . . . . . . . . . . . . . . . . . . . .26

8.0 Additional Information . . . . . . . . . . . . . . .28-29

8.1 Using the Tether . . . . . . . . . . . . . . . . . . . .28

8.2 Airplane Use . . . . . . . . . . . . . . . . . . . . . . .29

8.3 Cupholder . . . . . . . . . . . . . . . . . . . . . . . . .29

9.0 Care and Maintenance . . . . . . . . . . . . . . .30-31

10.0 Replacement Parts . . . . . . . . . . . . . . . . . .32-33

2

1.0 Warnings to Parents and Other Users

Failure to properly use this car seat increases the risk of serious injury or death in a sharp turn, sudden stop or crash. Your child???s safety depends on you installing and using this car seat correctly.

Even if using this car seat seems easy to figure out on your own, it is very important to READ THE OWNER???S MANUAL and the vehicle owner???s manual.

Your child???s safety depends on:

1.Choosing the correct mode of use for the car seat depending on your child???s size.

2.Inserting the harness straps (if needed) in the proper slots for your child.

3.Selecting a suitable location for the car seat in your vehicle.

4.Properly routing the vehicle seat belt.

5.Properly securing the car seat in the vehicle using a seat belt designed to restrain the car seat and your child. Many seat belts are NOT safe to use with this car seat, even though they can easily be threaded through or around the car seat!

6.Properly securing your child in the car seat.

3

2.0 Registration Information

Model Number:

Serial Number:

Purchase Date:

2.1 Register Your Car Seat

Please fill in the above information. The model and serial numbers can be found on a label underneath your car seat. Fill out the prepaid registration postcard attached to the seat cover and mail it today.

Child restraints could be recalled for safety reasons. You must register this restraint to be reached in a recall. Send your name, address and model/serial numbers to:

Graco Children???s Products Inc. P.O. Box 100

Elverson, PA, 19520-9974 or call 1-888-224-6549

2.2 Recall Information

??? Call the U.S. Government???s Auto Safety Hotline at 1-800-424-9393 (202-366-0123 in D.C. area)

??? www.nhtsa.dot.gov

??? Graco: 1-888-224-6549 or www.gracobaby.com

2.3 If You Need Help

Please contact our Customer Service Department with any questions you may have concerning parts, use, or maintenance. When you contact us, please have your product???s model and serial numbers ready so that we may help you efficiently. These numbers can be found on a sticker on the underside of your car seat.

1-888-224-6549 or www.gracobaby.com

4

3.0 Features

Cupholder (certain models)

5

Adjuster

bar lock

Adjuster

bar

Tether strap**

Owner???s manual

Tether clipstorage compartment

???

Expiration date

*The locking clip is stored on the back of the car seat. You will need to use it with certain types of vehicle seat belts.

**Vehicles are now (or can be) equipped with tether anchor points behind some seats. A tether anchors the top of the car seat to the body of the vehicle.

When used properly with the vehicle seat belt, a tether helps reduce injury in a sudden stop or crash.

6

4.0Important Information

4.1Warnings

???DO NOT INSTALL OR USE THIS CAR SEAT

UNTIL YOU READ AND UNDERSTAND THE

INSTRUCTIONS IN THIS MANUAL AND IN YOUR VEHICLE OWNER???S MANUAL. DO NOT let others install or use the car seat unless they understand how to use it.

???FAILURE TO PROPERLY USE THIS CAR SEAT

INCREASES THE RISK OF SERIOUS INJURY OR

DEATH IN A SHARP TURN, SUDDEN STOP OR CRASH. Your child can be injured in a vehicle even if you are not in a crash. Sudden braking and sharp turns can injure your child if the car seat is not properly installed or if your child is not properly secured in the car seat.

???According to accident statistics, CHILDREN ARE

SAFER WHEN PROPERLY RESTRAINED IN

REAR VEHICLE SEATING POSITIONS, RATHER THAN FRONT SEATING POSITIONS. For a vehicle with a front passenger air bag, refer to your vehicle owner???s manual as well as these instructions for car seat installation.

???NEVER LEAVE YOUR CHILD UNATTENDED.

???NEVER LEAVE A CAR SEAT UNSECURED IN YOUR VEHICLE. An unsecured car seat can be thrown around and may injure occupants in a sharp turn, sudden stop or crash. Remove it or make sure that it is securely belted in the vehicle.

???REPLACE THE CAR SEAT AFTER AN ACCIDENT OF ANY KIND. An accident can cause damage to the car seat that you cannot see.

7

???STOP USING CAR SEAT AND THROW IT AWAY after the date molded into the back of the car seat.

???DO NOT MODIFY YOUR CAR SEAT or use any accessories or parts supplied by other manufacturers.

???NEVER USE CAR SEAT IF IT HAS DAMAGED OR MISSING PARTS. DO NOT use a cut, frayed or damaged car seat harness or vehicle seat belt.

???THE CAR SEAT CAN BECOME VERY HOT IF LEFT IN THE SUN. Contact with these parts can burn your child???s skin. Always touch the surface of any metal or plastic parts before putting your child the car seat.

???THIS CHILD RESTRAINT CONFORMS to all applicable Federal Motor Vehicle Safety Standards and is certified for use in motor vehicles. It is certified for use in Aircraft ONLY when used with the built-in harness. When used as a booster without the harness, this restraint is NOT certified for use in aircraft.

???NEVER GIVE THIS CAR SEAT to someone else without also giving them this manual.

???NEVER USE A SECOND-HAND CAR SEAT or a car seat whose history you do not know.

8

4.2 Height and Weight Limits

FAILURE TO USE CAR SEAT IN A MANNER

APPROPRIATE FOR YOUR CHILD???S SIZE MAY

INCREASE THE RISK OF SERIOUS INJURY OR DEATH. Instructions for the use of this car seat and your vehicle???s seat belt differ greatly depending

on the size of your child. Be sure you are using the car seat in the correct mode and with the correct features for your child.

9

4.2.1 WITH Built in Harness

Your child MUST meet all requirements:

???WEIGHT: 20 to 40 lbs. (9 to 18 kg)

???HEIGHT: 27 to 43 inches (69 to 109 cm)

???At least one year old and can sit upright unassisted

???Shoulders are BELOW top harness slots. If shoulders are above top harness slots, child is too large for built-in harness.

If child is between 30 and 40 lbs. and shoulders are below the upper harness slots, we highly recommend use of the built-in harness for as long as it is suitable and comfortable (up to 40 lbs.) .

4.2.2 WITHOUT Built in Harness

Your child MUST meet all requirements:

???WEIGHT: 30 to 80 lbs. (14 to 36 kg)

???HEIGHT: 35 to 54 inches (89 to 138 cm)

???Child???s ears are BELOW top of booster seat. If tops of ears are above top of seat, child is too large for booster seat.

10

5.0Car Seat Location

5.1Vehicle Seat Requirements

IMPROPER PLACEMENT OF THE CAR SEAT

INCREASES THE RISK OF SERIOUS INJURY OR DEATH. Some seating positions in your vehicle may not be safe for this car seat. Some vehicles do not have any seating positions that can be used safely with the car seat. If you are not sure where to place the car seat in your vehicle, consult your vehicle owner???s manual or Graco Children's Products Inc., 1-888-224-6549.

???Children are safer when properly restrained in rear vehicle seating positions. Whenever possible secure the car seat in the center position of the seat directly behind the front seats. However, this position is often equipped with a

lap belt only and cannot be used when this car seat is used without the built-in harness.

???The vehicle seat must face forward.

???Front of car seat must not hang

over edge of vehicle seat.

11

5.2Vehicle Seat Belt Requirements

MANY SEAT BELT SYSTEMS ARE NOT SAFE TO

USE WITH THE CAR SEAT. THE VEHICLE SEAT

BELT MUST BE DESIGNED TO HOLD THE CAR

SEAT TIGHTLY AT ALL TIMES.

Pay careful attention to these systems; some of the seat belts that are not safe to use look very much like seat belts that are safe to use. If you are unsure, consult your vehicle owner???s manual or Graco Children's Products Inc., 1-888-224-6549.

5.2.1 UNSAFE Vehicle Belt

Systems

DO NOT USE ANY OF THE FOLLOWING SYSTEMS

TO SECURE THE CAR SEAT.

??? Lap Belts with Emergency

Locking Retractor (ELR)

This lap belt stays loose and can move until it locks in a crash or sudden stop.

??? Combination Lap/Shoulder

Belt with Retractor

Each strap has a retractor at one end and is attached to the latch plate at the other end.

12

???Passive Restraint - Lap Belt with Motorized Shoulder Belt

???Passive Restraint - Lap or Shoulder Belt Mounted on Door

DO NOT use vehicle belts that are attached to the door in any way or that move along a track to automatically surround the passenger when the door is closed.

???Lap Belts Forward of Seat Crease

13

5.2.2SAFE Vehicle Belt Systems

THE FOLLOWING BELT SYSTEMS CAN BE USED WITH YOUR CAR SEAT, IF the seat location meets all other requirements of these instructions and those in your vehicle owner's manual.

For Built-in Harness Only

???Lap Belts - Manually Adjusted

When buckled, the belt is tightened manually by pulling on the excess belt.

???Lap Belts with Automatic Locking Retractor (ALR)

The automatic locking retractor will not permit the lap belt to lengthen once it is buckled. Tighten the belt by feeding the belt back into the retractor while pushing down hard on the car seat.

14

With OR Without Built-in

Harness

???Combination Lap/Shoulder Belt with Locking Latch Plate

Once it is buckled, this type of belt has a latchplate that will not allow the lap portion of the belt to loosen. Belt is tightened by pulling hard on the shoulder portion of the vehicle belt while pushing down hard on the car seat.

???Combination Lap/Shoulder Belt with Sliding Latch Plate

This belt has a latchplate that slides freely along the belt.

WITH Built-in harness: This belt MUST be converted to prevent movement of the lap portion of the belt. You must use

the locking clip provided with the

car seat, unless your vehicle's seat

belt can be converted in another

way as described in your vehicle Locking clip owner's manual.

WITHOUT Built-in harness: Conversion or locking clip are not needed.

15

3. Connect lap and shoulder belts as shown ??.

4. Rebuckle belt. Check that lap belt does not move by pulling hard. If belt loosens or lengthens, repeat procedure.

Remove locking clip when not using car seat. Store under it???s tab on the back of seat.

16

6.0Using Car Seat WITH Built-in Harness

6.1Positioning the Harness

Straps

FAILURE TO PROPERLY ADJUST THE HARNESS

STRAPS FOR YOUR CHILD INCREASES THE RISK

OF SERIOUS INJURY OR DEATH IN THE EVENT

OF A SHARP TURN, SUDDEN STOP OR CRASH.

Snugly adjust the belts provided with this child restraint around your child.

1.Open harness clip ??.

2.Unbuckle harness straps ??.

??

??

3. Place child in the seat.

17

4.Check the crotch strap.

Choose the position that is closest to but not under your child.

To move the strap:

Remove clip from strap loop ?? under the bottom of the car seat. From top, rethread crotch strap through correct opening. Re-attach clip exactly

as shown ??. Pull on buckle to make sure it is secure.

5.The harness straps must go into the slots even with or just above the shoulders ??.

6.If straps are in the proper slots, go to step 11 on page 20.

7.To adjust harness straps: Remove straps from harness plate and adjuster bar ??.

??

??

??

??

18

8.Pull strap ends through slots and reinsert them in the correct slots ?? as determined in step 5.

9.Reassemble straps onto adjuster bar exactly as shown ??. When looking from the front, adjust left shoulder strap so harness clip is at armpit level

and adjuster is slightly below it.

There must be some strap extended below the adjustment bar.

??

??

??

10. Push adjuster bar down ??.

Rotate red lock down ??.

??

19

11.Check that the straps are inserted at the same level and that they are not twisted. Pull on harness to make sure it is secure.

12.Harness Adjustment

Use LEFT adjuster bar

?? to position inline adjuster ?? halfway between harness clip and buckle (see also step 9, previous page.)

Use RIGHT adjuster

bar ?? to control the amount of webbing around child.

Use INLINE adjuster

?? to fine-tune the fit each time your child is in the car seat.

(See also Section 6.3, Securing Your Child in the Car Seat, page 23.)

REMEMBER to check the shoulder and crotch straps as your child grows and move them to the next position when necessary.

?? ??

??

This end should measure anywhere from 1-2??? when harness is loosened to around 9??? when the harness is tightened.

20

6.2Securing the Car Seat in Your Vehicle

FAILURE TO PROPERLY SECURE THE CAR SEAT

IN THE VEHICLE INCREASES THE CHILD???S RISK

OF SERIOUS INJURY OR DEATH IN THE EVENT

OF A SHARP TURN, SUDDEN STOP OR CRASH.

Carefully follow these instructions and those in your vehicle owner???s manual to be sure your car seat is properly located, positioned, and held tightly at all times.

1.Place the car seat firmly against the back of a forward-facing vehicle seat.

2.Thread the seat belt:

For lap/sholder belt

For lap-only belt

3.Buckle the vehicle belt. The vehicle belt should not be twisted or turned.

21

4. Tighten vehicle seat belt

Push down hard with your knee or free hand in the middle of the car seat ??. Then pull and tighten the vehicle belt.

For more information on how to tighten the belt for your seat belt system, see Section 5.2 Vehicle Seat Belt Requirements, pp. 12-16, or your vehicle owner???s manual.

5.If you want to use tether to hold seat in place, secure it now. See Section 8.1 Using the Tether, page 28.

When not using the tether, push it behind the car seat or in the vehicle seat crease.

6.Safety Check for Secure Installation

Perform this test every time you drive with your child.

Twist and pull car seat front to back and left to right to check that seat is secure

??. Vehicle belt must stay 
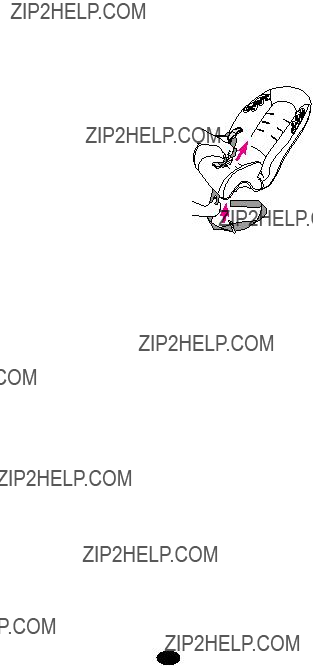
tight. Car seat must be
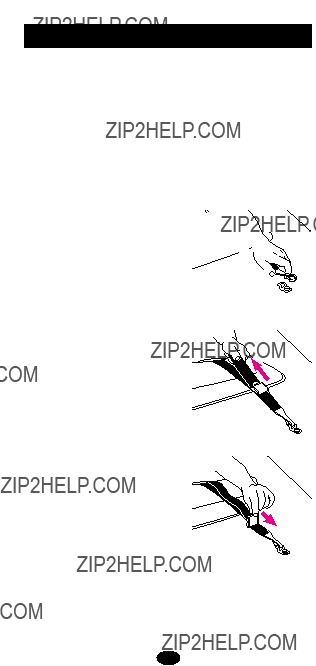
 very tight.

If car seat is not secure or loose, repeat procedure OR find another location for the seat, see Section 5.0 Car Seat Location, pp. 11-16.

??

??

22

6.3Securing Your Child in the Car Seat

FAILURE TO PROPERLY SECURE YOUR CHILD IN

THE CAR SEAT INCREASES THE RISK OF SERI-

OUS INJURY OR DEATH IN THE EVENT OF A

SHARP TURN, SUDDEN STOP OR CRASH.

In a crash, the car seat provides NO protection for your child unless the harness straps are properly secured. Follow these instructions carefully to prop- erly secure your child.

???ADJUST THE HARNESS SYSTEM SNUGLY EVERY TIME you place your child in the car seat.

???Avoid bulky clothing.

1.Place child in car seat with child???s back flat against back of car seat.

2.Place harness straps over child???s shoulders (If necessary, press down on metal bar on top of adjuster and pull up to lengthen straps ??.) and insert tongues into buckle ??.

CHECK that straps are not twisted.

CHECK that harness is securely latched by pulling up on straps.

DO NOT use car seat if harness does not latch.

??

??

23

3.Pull up on left side of lap belt to tighten right side of harness ??.

4.Pull down on adjustment strap to securely tighten harness ??.

5.Secure harness clip ??. Position harness clip

at middle of child???s chest, level with armpits.

6.Make sure straps are flat and tight against child???s shoulders. You should not be able to insert more than one finger between harness and child???s shoulder ??.

??

??

??

??

24

7.0Using Car Seat WITH- OUT Built-in Harness

FAILURE TO PROPERLY

SECURE YOUR CHILD AND

THE BOOSTER SEAT IN YOUR

VEHICLE INCREASES THE

RISK OF SERIOUS INJURY OR

DEATH IN THE EVENT OF A

SHARP TURN, SUDDEN STOP

OR CRASH.

Use only the vehicle???s lap and shoulder belt system when restraining the child in this booster seat ??.

NEVER use a vehicle lap-only belt across front of child ??.

Vehicle belts MUST lay flat against child and MUST not be twisted.

DO NOT use shoulder belt loose or positioned under arm ??.

Lap portion of lap/shoulder belt MUST be low and snug on hips, just touching thighs.

DO NOT allow child to slide down in booster seat ??.

If child will not keep vehicle restraint properly positioned, DO NOT use this booster seat. Use a different child restraint system.

??

??

??

??

25

7.1 Harness Removal

7.2Securing Child and Booster Seat in Vehicle

1.Place car seat firmly against the back of a forward-facing vehicle seat equipped with a lap/shoulder belt only.

2.If you want to use tether to hold seat in place, secure it now. See

Section 8.1 Using the Tether, page 28.

3.Place child in car seat with child???s back flat against back of car seat.

26

4.Position lap/shoulder belt as shown ??.

Fasten buckle and pull up on the shoulder belt to tighten.

5.If belt lays across child???s neck, head or face, redirect belt across chest using the shoulder belt positioner. Thread vehicle shoulder belt through one of the three positioners exactly as shown ??.

6.Check that shoulder belt is properly positioned over shoulder and snug against child.

??

??

27

8.0Additional information

8.1Using the Tether

If you want to use the tether, check your vehicle owner???s manual for the location(s). If your vehicle is not equipped with a tether anchor, it may be possible to install one. Contact your vehicle dealership for the proper anchor location and installation. You may purchase tether anchor parts kit by calling Graco Customer Service at 1-888-224-6549.

1.Check that tether is securely attached to car seat.

2.Fasten tether clip to anchor point ??.

3.Tighten the tether strap securely ??.

4.Check car seat tightness after securing tether.

If necessary, retighten vehicle seat belt when used with the harness.

5.To loosen, lift up on the metal tongue of the buckle ??.

??

??

??

28

8.2 Airplane Use

This restraint is certified for use in Motor Vehicles. It is certified for use in Aircraft ONLY when used with the built-in harness. When used as a booster without

the harness, this restraint is NOT certified for use

in aircraft because there is no shoulder belt available. Important points to remember

1.Airlines have some restrictions about the use of car seats.

2.Install your car seat on an airplane in the same way it is installed in an automobile with a lap belt (see

Section 6.2, Securing the Car Seat in Your Vehicle, pp. 21-22).

3.Check that the airplane seat belt holds the car seat securely in place at all times.

8.3 Cupholder (Optional)

1. Insert the two prongs of the cupholder into the two slots on either the left or right side of the seat ??.

2.Push cupholder down until the clip snaps on

to the bottom of seat ??. CHECK that cupholder is secure by pulling on it.

??

??

Clip

29

9.0 Care and Maintenance

???CONTINUOUS USE OF CAR SEAT MAY CAUSE DAMAGE TO VEHICLE SEAT. Use a car seat mat, towel or thin blanket to protect upholstery.

???METAL AND PLASTIC PARTS: clean with mild soap and cool water. No bleach or detergents.

???HARNESS STRAPS: spot clean or replace. Do not immerse the straps in water. Doing so may weaken the harness straps.

???BUCKLE AND HARNESS ADJUSTER: clean with a damp cloth.

???NEVER LUBRICATE THE BUCKLE. If buckle or harness adjuster sticks or will not remain tight, check for foreign objects such as food, dirt, etc. Remove objects with tweezers and/or clean with a cotton swab. If you cannot get the harness to remain tight with the buckle securely locked, do not use this car seat. Call Graco at 1-888-224-6549 to purchase a replacement harness or buckle.

???SEAT COVER: clean with a damp sponge using mild soap and cool water. If necessary, cover may be removed for cleaning (see next page).

30

To Remove Seat Cover

1.Remove harness and crotch straps (see Section 7.1, Harness Removal

for help).

2.Remove elastic

loops and binding from seat as shown ??.

3. Machine wash cover in cold water on delicate cycle and drip- dry. DO NOT USE

BLEACH.

4.To put the seat cover back on, reverse

preceding instructions.

Thread the harness straps through the appropriate holes in the seat cover ??.

??

??

31

10.0 Replacement Parts

How to Order:

Complete the form that follows. Your car seat model and serial numbers MUST be included on the form to ensure proper replacement parts. Your model number can be found on a sticker on the underside of your car seat. Payment must accompany your order.

Parts may also ordered from Graco???s web site at www.gracobaby.com.

Parts List: . . . . . . . . . . . . . . . . .Price:*

Locking clip . . . . . . . . . . . . . . . . . . . . . . . . . . . .$5.00 Harness with buckles and harness clip . . . . . . .$12.00 Seat cover . . . . . . . . . . . . . . . . . . . . . . . . . . . .$35.00 Crotch strap with buckle and metal retainer . . . .$8.00 Tether strap . . . . . . . . . . . . . . . . . . . . . . . . . . .$10.00 2-Piece Chest Clip . . . . . . . . . . . . . . . . . . . . . . .$5.00 Cupholder . . . . . . . . . . . . . . . . . . . . . . . . . . . . .$7.00

*Prices subject to change without notice

IF YOU NEED HELP

If you have any questions or need any parts not listed, please call toll-free: 1-888-224-6549

or visit our Internet website, www.gracobaby.com.

Return the form with payment to:

GRACO CHILDREN???S PRODUCTS INC.

CUSTOMER SERVICE DEPARTMENT

P.O. BOX 100, MAIN STREET

ELVERSON, PA 19520

32

Model No.

Serial No.

(Both Numbers Required)

Locking clip

Harness with buckles and harness clip

Seat cover

Crotch strap w/buckle Tether strap

2-Piece Chest Clip Cupholder

Subtotal:

Sales tax**:

Total:

* $15.00 outside the continental U.S.

**CA 6%, IL 6.25%, IN 5%, NY 8.25%, OH 5.75%, PA 6%, SC 5%

Check or money order enclosed

Account #

Expiration date

Signature

SHIP TO:

Name

Address

City, State, Zip Code

Telephone (including Area Code)

33

Keep this manual

in the storage compartment on the back of the car seat.

Graco Children???s Products Inc.

Elverson, PA 19520

1-888-224-6549

Asiento para autom??vil/silla alta

Manual del propietario

Modelo 8485

LEA ESTE MANUAL.

No instale ni use este asiento para autom??vil hasta que haya le??do y entendido las instrucciones en este manual.

NO USAR DEBIDAMENTE ESTE ASIENTO

PARA AUTOM??VIL AUMENTA EL RIESGO

DE LESIONES SERIAS O MUERTE EN UNA

PARADA REPENTINA O ACCIDENTE

?? 2001 Graco 426-7-01

??ndice de materias

1.0 Advertencias a padres y otros usuarios . . . . . . . . . . .3 2.0 Informaci??n sobre el registro . . . . . . . . . . . . . . . . . . . .4

2.1 Registre su asiento para autom??vil . . . . . . . . . . . . .4 2.2 Informaci??n sobre el retiro de productos del mercado .4 2.3 Si necesita ayuda . . . . . . . . . . . . . . . . . . . . . . . . . .5

3.0 Caracter??sticas . . . . . . . . . . . . . . . . . . . . . . . . . . . . . .5-6 4.0 Informaci??n importante . . . . . . . . . . . . . . . . . . . . . .7-10

4.1 Advertencias . . . . . . . . . . . . . . . . . . . . . . . . . . . . .7 4.2 Limitaciones de peso y altura . . . . . . . . . . . . . . . . .9 4.2.1 CON el sistema de arn??s incorporado . . . . .10 4.2.2 SIN el sistema de arn??s incorporado . . . . . .10

5.0 Ubicaci??n del asiento para autom??vil . . . . . . . . . .11-16

5.1 Requisitos del asiento del veh??culo . . . . . . . . . . . .11 5.2 Requisitos del cintur??n de seguridad del veh??culo .12

5.2.1 Sistemas PELIGROSOS de cinturones

de veh??culos . . . . . . . . . . . . . . . . . . . . . . . . . . . . .12

5.2.2 Sistemas SEGUROS de cinturones

de veh??culos . . . . . . . . . . . . . . . . . . . . . . . . . . . . .14

6.0 Uso del asiento para autom??viles con el

arn??s incorporado . . . . . . . . . . . . . . . . . . . . . . . . .17-24

6.1 Colocaci??n de las correas del arn??s . . . . . . . . . . .17 6.2 Asegurar el asiento del autom??vil en su veh??culo .21 6.3 Asegurar a su ni??o en el asiento del autom??vil . . .23

7.0 Uso del asiento para autom??viles sin

arn??s incorporado . . . . . . . . . . . . . . . . . . . . . . . . . . . . .25-27

7.1 Eliminaci??n del arn??s . . . . . . . . . . . . . . . . . . . . . .26 7.2 Asegurar al ni??o y la silla alta en el veh??culo . . . . .26

8.0 Informaci??n adicional . . . . . . . . . . . . . . . . . . . . . .28-29

8.1 Uso de la soga . . . . . . . . . . . . . . . . . . . . . . . . . . .28 8.2 Uso en aeronaves . . . . . . . . . . . . . . . . . . . . . . . .29 8.3 Apoya vasos . . . . . . . . . . . . . . . . . . . . . . . . . . . .29

9.0 Atenci??n y mantenimiento . . . . . . . . . . . . . . . . . . .30-31 10.0 Piezas de repuesto . . . . . . . . . . . . . . . . . . . . . . . . .32-33

2

1.0 Advertencias a padres y otros usuarios

No usar debidamente este asiento para autom??vil aumenta el riesgo de lesiones serias o muerte en una curva cerrada, parada repentina o accidente. La seguridad de su ni??o depende de que usted instale y use este asiento para autom??vil correctamente.

A pesar de que el uso de este asiento para autom??vil parezca f??cil de descifrar, es muy importante LEER EL MANUAL DEL PROPIETARIO y el manual del propietario del veh??culo.

La seguridad de su ni??o depende de:

1.Elegir el modo de uso correcto asiento para el autom??vil seg??n el tama??o de su ni??o.

2.Insertar las correas del arn??s (si fuera necesario) en las ranuras adecuadas para su ni??o.

3.Seleccionar un lugar adecuado para el asiento para autom??vil en su veh??culo.

4.Pasar debidamente el cintur??n de seguridad del veh??culo.

5.Asegurar el asiento para autom??vil correcta- mente al veh??culo usando el cintur??n de seguridad dise??ado para sujetar el asiento para autom??vil y su ni??o. Muchos cinturones de seguridad NO son seguros para usar con este asiento de autom??vil, a pesar de que se pueden f??cilmente colocar a trav??s o alrededor del asiento para autom??vil!

6.Asegurar debidamente a su ni??o en el asiento para autom??vil.

3

2.0 Informaci??n sobre el registro

N??mero de modelo:

N??mero de serie:

Fecha de compra:

2.1 Registre su asiento para autom??vil

Por favor, complete la informaci??n que se solicita m??s arriba. Los n??meros de modelo y de serie pueden encontrarse en una etiqueta ubicada debajo del asiento para autom??vil. Llena la tarjeta postal de registro prepagada que se encuentra en la tapa del asiento y env??ela hoy mismo.

Los dispositivos de seguridad para ni??os podr??n ser retirados del mercado por problemas de seguridad. Debe registrar este sistema para que lo podamos contactar en dicho caso. Env??e su nombre, direcci??n y n??meros de serie y de modelo a:

Graco Children???s Products Inc. P.O. Box 100

Elverson, PA, 19520-9974 o llame al 1-888-224-6549

2.2 Informaci??n sobre el retiro de productos del mercado

???Llame a la L??nea telef??nica sobre seguridad en autom??viles del gobierno de EE.UU. al 1-800-424-9393 (202-366-0123 en la zona

de Washington, D.C.)

???www.nhtsa.dot.gov

???Graco: 1-888-224-6549 o www.gracobaby.com

4

2.3 Si necesita ayuda

Por favor, comun??quese con el Departamento de Servicio al Cliente con cualquier pregunta que pudiera tener sobre piezas, uso o mantenimiento. Cuando se ponga en contacto con nosotros, por favor tenga listo los n??meros de modelo y de serie de su producto para que lo podamos ayudar m??s eficientemente. Estos n??meros pueden encontrarse en una etiqueta ubicada abajo del asiento para autom??vil.

1-888-224-6549 o www.gracobaby.com

3.0 Caracter??sticas

Ajustador

del arn??s

Correa de

ajuste del arn??sCorrea para la entrepierna

Apoya vasos (ciertos modelos)

5

Correa de la soga**

Fecha de vencimiento

*La traba de seguridad se guarda en el respaldo del asiento para autom??vil. Necesitar?? usarlo con ciertos tipos de cinturones de seguridad de autom??viles.

**Los veh??culos ahora vienen equipados (o pueden estar equipados) con puntos de sujetaci??n de la soga detr??s de algunos asientos. Una soga sujeta la parte superior del asiento para autom??vil a la carrocer??a del veh??culo. Cuando se usa debidamente con el cintur??n de seguridad del veh??culo, la soga ayuda a reducir las lesiones en una parada repentina o accidente.

6

4.0Informaci??n importante

4.1Advertencias

???NO INSTALE NI USE ESTE ASIENTO PARA

AUTOM??VIL HASTA QUE HAYA LE??DO Y

ENTENDIDO LAS INSTRUCCIONES EN ESTE

MANUAL Y EN EL MANUAL DEL PROPIETARIO DE SU VEH??CULO. NO deje que otros instalen

o usen el asiento del autom??vil a menos que entiendan c??mo usarlo.

???NO USAR DEBIDAMENTE ESTE ASIENTO

PARA AUTOM??VIL AUMENTA EL RIESGO DE

LESIONES SERIAS O MUERTE EN UNA CURVA

CERRADA, PARADA REPENTINA O ACCIDENTE.

Su ni??o puede sufrir una lesi??n en un veh??culo aunque no sufra un accidente. Una frenada repentina o una curva cerrada puede lesionar a su ni??o si el asiento para autom??vil no est?? debidamente instalado o si el ni??o no est??

debidamente asegurado en el asiento del autom??vil.

???Seg??n las estad??sticas de accidentes, LOS

NI??OS EST??N M??S SEGUROS CUANDO EST??N

DEBIDAMENTE SUJETADOS EN LOS ASIENTOS

TRASEROS DEL VEH??CULO EN LUGAR DE A LOS ASIENTOS DELANTEROS. En el caso de un veh??culo con una bolsa de aire para el pasajero delantero, consulte el manual del propietario de su veh??culo as?? como estas instrucciones para la instalaci??n del asiento para autom??vil.

???NUNCA DEJE A SU NI??O SIN ATENDER.

???NUNCA DEJE UN ASIENTO SIN SUJETAR EN SU VEH??CULO. Un asiento sin sujetar puede ser arrojado y podr??a lesionar a los ocupantes en una curva cerrada, parada repentina o accidente.

S??quelo o aseg??rese de que est?? debidamente sujetado en el veh??culo.

7

???CAMBIE EL ASIENTO PARA AUTOM??VIL

DESPU??S DE UN ACCIDENTE DE CUALQUIER TIPO. Un accidente puede causar da??o invisible al asiento para autom??vil.

???DEJE DE USAR EL ASIENTO PARA AUTOM??VIL Y T??RELO despu??s de la fecha que aparece moldeada en el respaldo del asiento para autom??vil.

???NO MODIFIQUE EL ASIENTO PARA AUTOM??VIL ni use accesorios o piezas suministradas por otros fabricantes.

???NUNCA USE EL ASIENTO PARA AUTOM??VIL

SI TIENE PIEZAS DA??ADAS O QUE FALTAN.

No use un arn??s para asiento para autom??vil o cintur??n de seguridad del veh??culo que est?? cortado, deshilachado o da??ado.

???EL ASIENTO PARA AUTOM??VILES PUEDE

CALENTARSE MUCHO SI SE LO DEJA EN EL SOL. El contacto con estas partes puede quemar la piel de su ni??o. Toque siempre la superficie de cualquier pieza de metal o de pl??stico antes de poner a su ni??o en el asiento para autom??vil.

???ESTE SISTEMA PARA NI??OS CUMPLE con todas las Normas Federales de Seguridad para Veh??culos Automotor y ha sido certificado para el uso en veh??culos automotor. Ha sido certificado para uso en aeronaves solamente cuando se lo usa con el arn??s incorporado. Cuando se lo usa como silla alta sin el arn??s, este sistema no ha sido certificado para ser usado en aeronaves.

???NUNCA ENTREGUE ESTE ASIENTO PARA AUTOM??VIL a otra persona sin entregarles este manual.

???NUNCA USE UN ASIENTO PARA AUTOM??VIL USADO o un asiento para autom??vil cuya historia no conoce.

8

4.2 Limitaciones de peso y altura

NO USAR EL ASIENTO PARA AUTOM??VIL DE

MANERA APROPIADA SEG??N EL TAMA??O DE

SU NI??O PODR??A AUMENTAR EL RIESGO DE

SUFRIR UNA LESI??N SERIA O LA MUERTE.

Las instrucciones para el uso de este asiento para autom??vil y el cintur??n de seguridad del veh??culo difieren mucho dependiendo del tama??o de su ni??o. Aseg??rese de que usa el asiento para autom??vil de la manera correcta y con las funciones correctas para su ni??o.

9

4.2.1 CON el arn??s incorporado

Su ni??o DEBE CUMPLIR todos los requisitos:

???PESO: 20 a 40 libras (9 a 18 kg)

???ALTURA: 27 a 43 pulgadas (69 a 109 cm)

???Por lo menos debe tener un a??o de edad y debe poder sentarse sin ayuda

???Los hombros est??n DEBAJO de las ranuras superiores del arn??s. Si los hombros est??n por enci- ma de las ranuras superiores del arn??s, el ni??o es demasiado grande para usar el arn??s incorporado.

Si el ni??o pesa entre 30 y 40 libras y los hombros se encuentran por debajo de las ranuras superiores del arn??s, recomendamos enf??ticamente el uso del arn??s incorporado mientras sea c??modo y ??til (hasta las 40 libras).

4.2.2 SIN el arn??s incorporado

Su ni??o DEBE CUMPLIR todos los requisitos:

???PESO: 30 a 80 libras (14 a 36 kg)

???ALTURA: 35 a 54 pulgadas (89 a 138 cm)

???Los o??dos del ni??o est??n DEBAJO de la parte superior de la silla alta. Si la parte de arriba de los o??dos se encuentran arriba de la parte superior del asiento, el ni??o es demasiado grande para la silla alta.

10

5.0Ubicaci??n del asiento para autom??vil

5.1Requisitos del asiento

del veh??culo

UNA COLOCACI??N INADECUADA DEL ASIENTO

PARA AUTOM??VIL AUMENTA EL RIESGO DE

SUFRIR UNA LESI??N SERIA O LA MUERTE.

Algunas posiciones de sentado en su veh??culo podr??an no ser seguras para este asiento para autom??vil. Algunos veh??culos no tienen posiciones de sentado que puedan usarse seguramente con el asiento para autom??vil. Si no est?? seguro sobre d??nde colocar el asiento para autom??vil en su veh??culo, consulte el manual del propietario del veh??culo o Graco Children's Products, Inc., al 1-888-224-6549.

???Los ni??os est??n m??s seguros cuando est??n debidamente sujetados en las posiciones de sentado trasero en el veh??culo. Cuando sea posible, asegure el asiento del autom??vil en la posici??n de sentado central directamente atr??s de los asientos delanteros. Sin embargo, esta posici??n est?? m??s a menudo equipada solamente con un

cintur??n para la falda y no puede usarse con este asiento para autom??vil sin el arn??s incorporado.

???El asiento del veh??culo debe mirar hacia adelante.

???El frente del asiento para autom??vil

no debe quedar suspendido sobre el borde del asiento del veh??culo.

11

5.2Requisitos del cintur??n de seguridad del veh??culo

MUCHOS SISTEMAS DE CINTURONES PARA

SEGURIDAD NO SON SEGUROS CUANDO SE LOS

USA CON EL ASIENTO PARA AUTOM??VIL. EL

CINTUR??N DE SEGURIDAD DEL VEH??CULO DEBE

HABER SIDO DISE??ADO PARA MANTENER EL

ASIENTO PARA AUTOM??VIL APRETADAMENTE

EN TODO MOMENTO.

Preste mucha atenci??n a estos sistemas ya que muchos de los sistemas de cinturones de seguridad que no son seguros parecen iguales a los que son seguros. Si no est?? seguro, consulte el manual del propietario del veh??culo o a Graco Children's Products, Inc., al 1-888-224-6549.

5.2.1 Sistemas PELIGROSOS de cinturones de veh??culos

NO USE NINGUNO DE LOS SIGUIENTES SISTEMAS

PARA ASEGURAR EL ASIENTO PARA AUTOM??VIL.

???Cinturones para la falda con retractor de seguridad para

emergencias (ELR)- Este cintur??n para la falda se mantiene suelto y puede moverse hasta que se traba en un accidente o parada repentina.

??? Combinaci??n de cintur??n para el hombro y la falda con retractor - Cada correa tiene un retractor en una punta y est?? conectada a

la placa de seguridad en la otra punta.

12

???Cintur??n pasivo - Cintur??n para la falda con cintur??n para el hombro motorizado

???Cintur??n pasivo - Cintur??n para el hombro o la falda montado en la puerta

NO use los cinturones del veh??culo que est??n conectados a la puerta de manera alguna o que se muevan a trav??s de un carril para rodear autom??ticamente al pasajero cuando se cierra la puerta.

???Cinturones para la falda que est??n m??s adelante del pliegue del asiento

13

5.2.2 Sistemas SEGUROS de cinturones de veh??culos

LOS SIGUIENTES SISTEMAS DE CINTURONES

PUEDEN USARSE CON SU ASIENTO PARA AUTOM??VIL, SI la ubicaci??n del asiento cumple todos los otros requisitos de estas instrucciones y las del manual del propietario del veh??culo.

Para el arn??s incorporado solamente

???Cinturones para la falda - ajustado manualmente

Cuando se activa la hebilla, el cintur??n se ajuste manualmente tirando del exceso del cintur??n.

???Cinturones para la falda con retractor de seguridad autom??tico (ALR)

El retractor de seguridad autom??tico no permitir?? que el cintur??n para la falda se extienda una vez que est?? sujetado en la hebilla. Ajuste el cintur??n pasando el cintur??n por el retractor mientras empuja con fuerza el asiento para autom??vil hacia abajo.

14

Traba de seguridad

Con O sin el arn??s incorporado

??? Combinaci??n cintur??n para el hombro/falda con placa de seguridad con traba

Una vez que est?? trabado en la hebilla, este tipo de cintur??n tiene una placa de seguridad que no permitir?? que la parte del cintur??n que est?? en la falda se afloje. El cintur??n se ajusta tirando con fuerza de la parte del hombro del cintur??n del veh??culo mientras empuja con fuerza el asiento para autom??vil hacia abajo.

??? Combinaci??n cintur??n para el hombro/falda con placa de seguridad con traba m??vil

Este cintur??n tiene una placa de seguridad que se mueve libremente a lo largo del cintur??n.

CON el arn??s incorporado: Este cintur??n DEBE convertirse para prevenir el movimiento de la parte de la falda del cintur??n. Debe usar la traba de seguridad provista con el asiento para autom??vil, a menos que el cintur??n de seguridad del asiento de su veh??culo pueda convertirse

de otra manera como se describe en el manual del propietario

del veh??culo.

SIN el arn??s incorporado: No se necesita la traba de seguridad o de conversi??n.

15

Para instalar la traba de seguridad:

1.Ajuste el cintur??n trabado empujando con fuerza el asiento para autom??vil hacia abajo y tirando con fuerza el cintur??n del hombro.

2.Mientras empuja el asiento hacia abajo, apriete las dos correas juntas detr??s de la lengua de la hebilla. Destrabe el cintur??n sin permitir que se mueva.

3.Conecte los cinturones del hombro y de la falda como se indica ??.

4.Vuelva a poner el cintur??n en la hebilla. Verifique que el cintur??n de la falda no se mueve tirando con fuerza. Si el cintur??n se afloja o se alarga, repita el procedimiento.

Saque la traba de seguridad cuando no usa el asiento para autom??vil. Gu??rdelo debajo de la leng??eta detr??s del asiento.

??

????? (1.25 cm)

16

6.0Uso del asiento para autom??vil CON arn??s incorporado

6.1Colocaci??n de las correas

del arn??s

NO AJUSTAR DEBIDAMENTE LAS CORREAS DEL

ARN??S DE SU NI??O AUMENTA EL RIESGO DE

LESIONES SERIAS O LA MUERTE EN UNA CURVA

CERRADA, PARADA REPENTINA O ACCIDENTE.

Ajuste apretadamente los cinturones provistos con este sistema de seguridad alrededor de su ni??o

1.Abra la traba del arn??s ??.

2.Destrabe las correas del arn??s ??.

3.Coloque al ni??o en el asiento.

??

??

17

4.Verifique la correa para la entrepierna. Elija la posici??n que est?? m??s cercana pero no debajo de su ni??o.

Para mover la correa:

Saque la traba del nudo de la correa ?? debajo del fondo del asiento para autom??vil. Desde arriba, vuelva a pasar la correa para la entrepierna a trav??s de la abertura correcta. Vuelva a conectar la traba exactamente como se indica ??. Tire de la hebilla para asegurarse que est?? segura.

5.Las correas del arn??s deben pasar por las ranuras a la altura o apenas por encima de los hombros ??.

6.Si las correas est??n en las ranuras correctas, vaya al paso 11 de la p??gina 20.

7.Para ajustar las correas del arn??s: Saque las correas de la placa del arn??s y la barra de ajuste ??.

??

??

??

??

18

8.Tire los extremos de las correas a trav??s de las ranuras y vuelva a insertarlos en las ranur as correctas ?? como se determina en el paso 5 en p??gina 18.

9.Vuelva a armar las correas en la barra de ajuste exactamente como se indica ??. Cuando mira desde el frente, ajuste la correa del hombro izquierdo para que la traba del arn??s est?? a la altura de la axila y el ajustador est?? apenas un poco debajo de ella.

Debe quedar parte de la correa extendi- da por debajo de la barra de ajuste.

10.Empuje la barra de ajuste hacia abajo ??.

Gire la traba roja hacia abajo ??.

??

??

??

??

19

11.Verifique que las correas se inserten al mismo nivel y que no est??n dobladas. Tire del arn??s para asegurarse que est?? asegurado.

12.Ajuste del arn??s

Use la barra de ajuste IZQUIERDA ?? para colocar al ajustador

en l??nea ?? a mitad de camino entre la traba y la hebilla del arn??s (vea tambi??n el paso 9, en la p??gina anterior).

Use la barra de ajuste DERECHA ?? para controlar la cantidad de correa alrededor del ni??o.

Use el ajustador EN L??NEA ?? para ajustar el calce cada vez que su ni??o se siente en el asiento para autom??vil.

(Vea tambi??n la Secci??n 6.3, C??mo asegurar su ni??o al asiento para autom??vil, p??gina 23.)

RECUERDE verificar las correas para la entrepierna y del hombro a medida que su ni??o crece y mu??valas a la posici??n siguiente cuando sea necesario.

?? ??

??

Este extremo deber??a medir entre 1 y 2 pulgadas cuando el arn??s est?? flojo hasta 9 pulgadas cuando est?? ajustado.

20

6.2Asegurar el asiento para autom??vil en su veh??culo

NO AJUSTAR DEBIDAMENTE EL ASIENTO PARA

AUTOM??VIL EN EL VEH??CULO AUMENTA EL

RIESGO DE LESIONES SERIAS O LA MUERTE

EN UNA CURVA CERRADA, PARADA REPENTINA

O ACCIDENTE.

Cumpla detenidamente estas instrucciones y las del manual del propietario de su veh??culo para asegurarse que el asiento para autom??vil est?? debidamente ubicado, colocado y asegurado apretadamente en todo momento.

1.Coloque el asiento para autom??vil firmemente contra el respaldo del asiento del veh??culo mirando hacia adelante.

2.Pase el cintur??n de seguridad:

Para el cintur??n del hombro/falda

Para el cintur??n

del hombro solamente

3.Trabe el cintur??n de veh??culo.

El cintur??n del veh??culo no deber?? estar doblado ni dado vuelta.

21

Para obtener m??s informaci??n sobre c??mo ajustar el cintur??n de su sistema del cintur??n de

seguridad, vea la Secci??n 5.2, Requisitos del cintur??n de seguridad del veh??culo, p??ginas 12 a 16, o el manual del propietario de su veh??culo.

5.Si desea usar la soga para mantener el asiento en su lugar, aseg??rela ahora mismo. Vea la Secci??n 8.1 Uso de la soga, p??gina 28.

Cuando no usa la soga, emp??jela detr??s del asiento del autom??vil o en la uni??n del asiento del veh??culo.

6.Verificaci??n de seguridad para una instalaci??n segura

Si el asiento para autom??vil no est?? asegurado o flojo, repita el procedimiento O busque otro lugar para el asiento, vea la Secci??n 5.0 Ubicaci??n del asiento para autom??vil, p??ginas 11 a 16.

22

6.3Asegurar a su ni??o en el asiento del autom??vil

NO AJUSTAR DEBIDAMENTE A SU NI??O EN EL

ASIENTO PARA AUTOM??VIL AUMENTA EL RIESGO

DE LESIONES SERIAS O LA MUERTE EN UNA CURVA

CERRADA, PARADA REPENTINA O ACCIDENTE.

En un accidente, el asiento para autom??vil NO ofrece protecci??n a su ni??o a menos que las correas del arn??s est??n debidamente aseguradas. Cumpla

estas instrucciones detenidamente para asegurar debidamente a su ni??o.

???AJUSTE EL SISTEMA DEL ARN??S APRETADAMENTE CADA VEZ que coloca a su ni??o en el asiento para autom??vil.

???Evite usar ropas abultadas.

est??n dobladas.

VERIFIQUE que el arn??s est?? debidamente apretado tirando de las correas.

NO use el asiento para autom??vil si el arn??s no se traba.

23

3.Tire hacia arriba en el costado izquierdo del cintur??n para la falda para ajustar el lado derecho del arn??s ??.

4.Tire hacia abajo de la correa de ajuste para ajustar el arn??s con firmeza ??.

5.Asegure la traba del arn??s ??. Coloque la traba del arn??s en el medio del pecho del ni??o, nivelado con las axilas.

6.Aseg??rese que las correas est??n planas y ajustadas contra los hombros del ni??o.

No deber?? poder insertar m??s que un dedo entre el arn??s y el hombro

del ni??o ??.

??

??

??

??

24

7.0Uso del asiento para autom??vil SIN el arn??s incorporado

NO AJUSTAR DEBIDAMENTE

A SU NI??O Y LA SILLA ALTA

EN EL VEH??CULO AUMENTA

EL RIESGO DE LESIONES

SERIAS O LA MUERTE EN UNA

CURVA CERRADA, PARADA

REPENTINA O ACCIDENTE.

Use solamente el sistema de cintur??n para el hombro y la falda del veh??culo cuando sujeta a su ni??o en la silla alta ??.

NUNCA use un cintur??n del veh??culo para la falda solamente a trav??s del frente de su ni??o ??.

Los cinturones del veh??culo DEBEN estar planos contra el ni??o y no DEBEN estar doblados.

NO use el cintur??n del hombro flojo o puesto debajo del brazo

??.

La parte de la falda del cintur??n para la falda/hombro DEBE estar bajo y apretado en la cadera, apenas tocando los muslos.

NO deje que su ni??o salga por abajo de la silla alta ??.

??

??

??

??

Si el ni??o no puede mantener el 
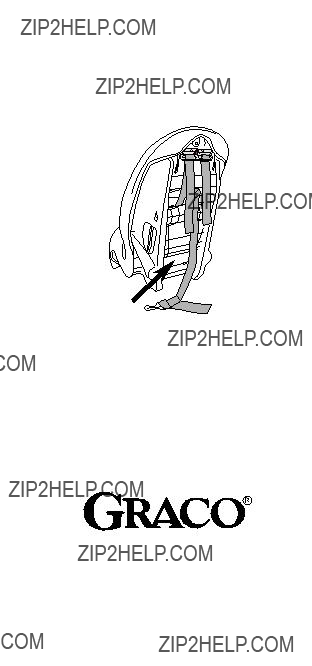
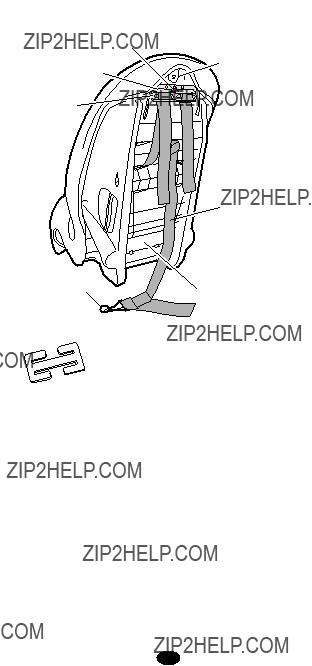
sistema de seguridad del veh??culo debidamente colocado, NO use esta silla alta.

Use un sistema de seguridad diferente para el ni??o.

25

7.1 Eliminaci??n del arn??s

2.Saque la correa para la entrepierna.

Vea la figura 1 y 2 en la p??gina 18 para obtener m??s ayuda.

3.Invierta las instrucciones para volver a instalarlas. Vea la figura 2 en la p??gina 31 para obtener la v??a correcta del arn??s.

7.2Asegurar al ni??o y la silla alta en el veh??culo

1.Coloque el asiento para autom??vil mirando hacia adelante y firmemente contra el respaldo del asiento del veh??culo equipado solamente con un cintur??n para el hombro y la falda.

2.Si desea usar la correa de la soga para mantener el asiento en su lugar, aseg??rela ahora mismo.

Vea la Secci??n 8.1 Uso de la soga, p??gina 28.

3.Coloque al ni??o en el asiento para autom??vil con la espalda del ni??o plana contra el respaldo del asiento para autom??vil.

26

4.Coloque el cintur??n para el hombro/falda como se indica en ??.

Ajuste la hebilla y tire hacia arriba del cintur??n para el hombro para ajustarlo.

5.Si el cintur??n pasa a trav??s del cuello, cabeza o cara del ni??o, vuelva a colocar el cintur??n a trav??s del pecho, usando el colocador del cintur??n para el hombro. Pase

la correa del hombro del veh??culo a trav??s de uno de los tres posicionadores exactamente como se indica ??.

6.Verifique que el cintur??n para el hombro est?? debidamente

colocado sobre el hombro y apretadamente sobre el ni??o.

??

??

27

8.0Informaci??n adicional

8.1Uso de la soga

Si desea usar la soga, consulte el manual del propietario de su veh??culo para determinar los lugares. Si su veh??culo no est?? equipado con un sujetador de soga, podr??a ser posible instalar uno. Contacte al concesionario de su veh??culo para determinar el lugar correcto del sujetador y su instalaci??n. Puede comprar un juego de piezas para sujetar la soja llamando al Servicio al Cliente de Graco al 1-888-224-6549.

1.Verifique que la soga est?? apretadamente sujetada al asiento para autom??vil.

2.Sujete la traba de la soga al punto de agarre ??.

3.Ajuste la correa de la soga apretadamente ??.

4.Verifique que el asiento est?? apretado despu??s de instalar la soga. De ser necesario, vuelva a sujetar el cintur??n de seguridad del veh??culo cuando lo usa con

el arn??s.

5.Para aflojarlo, levante la lengua de metal de la hebilla ??.

??

??

??

28

8.2 Uso en aeronaves

Este sistema de seguridad ha sido certificado para ser usado en veh??culos automotor. Ha sido certificado para uso en aeronaves SOLAMENTE cuando se lo usa con el arn??s incorporado. Cuando se lo usa como silla alta sin el arn??s, este sistema NO ha sido certificado para ser usado en aeronaves porque no hay cintur??n del hombro disponible.

Puntos importantes que recordar:

1.Las aerol??neas tienen ciertas restricciones sobre el uso de los asientos para autom??viles.

2.Instale el asiento para autom??vil en un aeronave de la misma manera en que se instala en un autom??vil con un cintur??n para la falda (ver la Secci??n 6.2, C??mo asegurar el asiento para autom??vil en su veh??culo, p??ginas 21 y 22).

3.Verifique que el cintur??n del asiento de la aeronave sujeta seguramente al asiento para autom??vil en todo momento.

8.3 Apoya Vasos (Opcional)

1. Inserte las dos clavijas del apoya vasos en las dos ranuras del costado izquierdo o derecho del asiento ??.

??

??

29

9.0Atenci??n y mantenimiento

???USO CONTINUO DEL ASIENTO PARA

AUTOM??VIL PODR??A CAUSAR DA??O AL ASIENTO DEL VEH??CULO. Use una estera para asiento del autom??vil, toalla o frazada fina para proteger el tapizado.

???PIEZAS DE METAL Y DE PL??STICO: limpiar con un jab??n suave y agua fresca. No use cloro ni detergentes.

???CORREAS DEL ARN??S: limpie el lugar sucio. No sumerja las correas en agua. Hacerlo podr??a aflojar las correas del arn??s.

???AJUSTADOR DE LA HEBILLA Y EL ARN??S: limpiar con un trapo h??medo.

???NUNCA LUBRIQUE LA HEBILLA. Si la hebilla o el ajustador del arn??s se pega o no se mantiene apretado, verifique que no haya ning??n objeto extra??o tal como comida, suciedad, etc. Saque los objetos con pinzas y/o l??mpielas con una escobilla de algod??n. Si no puede lograr que el arn??s se mantenga apretado con la hebilla trabada con seguridad, no use este asiento para autom??vil. Llame a Graco al 1-888-224-6549 para comprar un arn??s o hebilla de repuesto.

???FUNDA DEL ASIENTO: limpiar con una esponja h??meda usando un jab??n suave y agua fresca. De ser necesario, se puede sacar la funda para limpiarla (ver la p??gina siguiente).

30

Para sacar la funda del asiento

1.Saque las correas del arn??s y para la entrepierna (vea la Secci??n 7.1, C??mo sacar el arn??s, p??ginas 26 para

obtener ayuda).

2. Saque los nudos de el??stico y el ribete del asiento como se indica ??.

3.Lave la funda a m??quina en agua fr??a en el ciclo delicado y s??quelo al aire. NO

USE CLORO.

4.Para volver a poner la funda del asiento,

invierta las instrucciones anteriores.

Pase las correas del arn??s a trav??s de los agujeros apropiados en la funda del asiento ??.

??

??

31

10.0 Piezas de repuesto

C??mo hacer pedidos:

Complete el formulario que sigue. Los n??meros de serie y del modelo de su asiento para autom??vil DEBEN incluirse en el formulario para asegurarse que recibir?? las piezas de repuesto correctas. El n??mero del modelo puede encontrarse en una etiqueta ubicado abajo de su asiento para autom??vil. Debe incluir el pago con su pedido.

Tambi??n se pueden solicitar las piezas del sitio web de Graco en www.gracobaby.com.

Lista de piezas: . . . . . . . . . . . .Precio:*

Traba de seguridad . . . . . . . . . . . . . . . . . . . . . .$5.00 Arn??s con hebilla y traba del arn??s . . . . . . . . . .$12.00 Funda del asiento . . . . . . . . . . . . . . . . . . . . . . .$35.00 Correa para la entrepierna y ret??n de metal . . . .$8.00 Correa de la soga . . . . . . . . . . . . . . . . . . . . . . .$10.00 Traba para el pecho de 2 piezas . . . . . . . . . . . .$5.00 Apoya vasos . . . . . . . . . . . . . . . . . . . . . . . . . . .$7.00

*Los precios est??n sujetos a cambio sin previo aviso

SI NECESITA AYUDA

Si tuviera alguna pregunta o necesita piezas que no est??n listadas, por favor llame gratis al:

1-888-224-6549

o visite nuestro sitio web en Internet, www.gracobaby.com.

Devuelva el formulario con su pago a:

GRACO CHILDREN???S PRODUCTS INC.

CUSTOMER SERVICE DEPARTMENT

P.O. BOX 100, MAIN STREET

ELVERSON, PA 19520

32

Model No. ??? N?? de modelo

Serial No. ??? N?? de serie

(Both Numbers Required/Se requieren ambos n??meros)

Locking clip/

Traba de seguridad

Harness with buckles and harness clip/Arn??s con hebilla y traba del arn??s

Seat cover/ Funda del asiento

Crotch strap w/buckle/ Correa para la entrepierna

Tether strap/ Correa de la soga

2-Piece Chest Clip/Traba para el pecho de 2 piezas

Cupholder/Apoya vasos

Total ??? Total:

Sales tax**:

Impuestos**:

Total due

Total a pagar:

*$15.00 outside the continental U.S. *US$ 15,00 para fuera del continente de EE.UU

**CA 6%, IL 6.25%, IN 5%, NY 8.25%, OH 5.75%, PA 6%, SC 5%

Check or money order enclosed (payable to Graco Children???s Products Inc.)

Cheque o giro adjunto (a nombre de Graco Children's Products Inc.)

Charge to credit card ??? Cargar a la tarjeta de cr??dito

Account #: ??? Cuenta N??

Exp. date ??? Fecha de vencimiento

Signature ??? Firma

Ship to ??? Enviar a

Name ??? Nombre

Address ??? Direcci??n

City, State, Zip ??? Ciudad, Estado, C??digo postal

Telephone ??? Telef??no

33

Guarde este manual en el compartimiento de almacenamiento en el respaldo del asiento para autom??vil.

Graco Children???s Products Inc.

Elverson, PA 19520

1-888-224-6549