The Entertainer???

Activity Center

OWNER???S MANUAL

Model No. __________

Serial No. __________

Dear Customer,

Failure to foll instructions c

Please fill in the model and serial numbers above from the label under the tray of your new Entertainer??? activity center.

Model 4118

Congratulations on your purchase of a Graco?? Entertainer??? activity center!

Graco is the recognized leader in the design and manufacture of quality baby products. We believe your new Graco?? Entertainer??? activity center is a wise choice, promising many hours of enjoyment for your baby.

Before using your activity center, please take a few minutes to read this Owner???s

Manual. The short time you spend reading these instructions will help you to use your activity center properly.

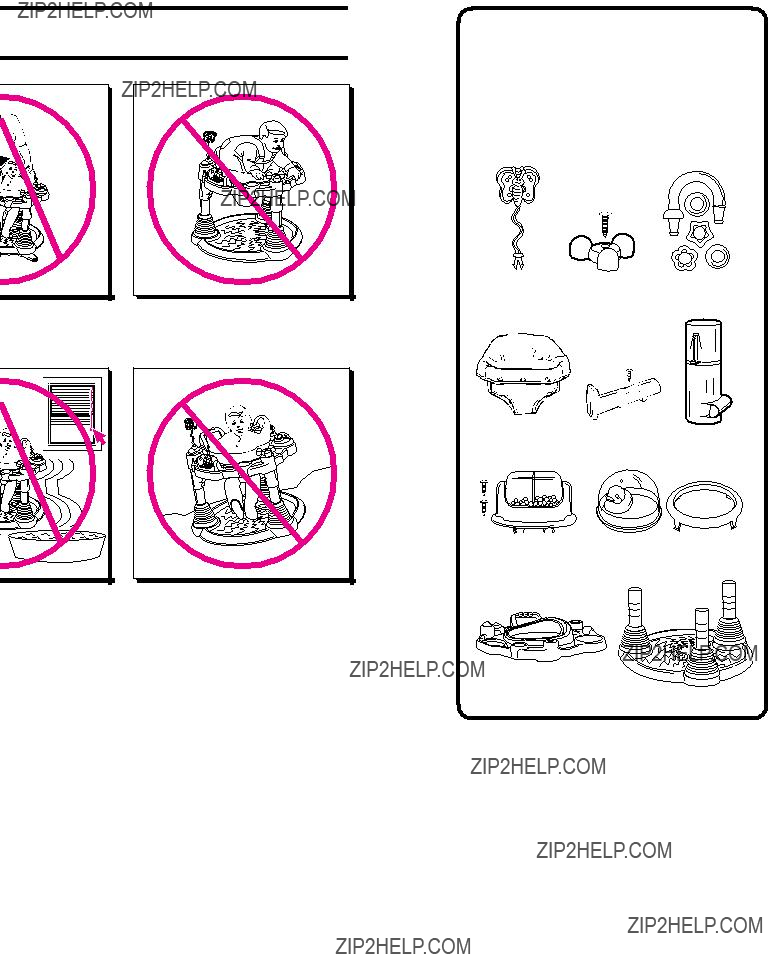
Never leave child unattended. Always keep child in view while in this product.

Strings can cause strangulation! DO NOT place items with a string around your child???s neck, such as hood strings or pacifier cords. DO NOT suspend strings over the activity center or attach strings to toys.

Never lift or carry child in it.

Product may grad the floor as child p movement of prod child stays away fr area such as stair pools, sources of else that may injur

Customer Satisfaction

Our goal is to make every product the best it can be! We are also committed to supporting our products after purchase. If you would like to speak with Graco about your product, please contact our Customer Service Department at 1-800-345-4109. Our knowledgeable staff will be ready to answer any questions you may have concerning parts, use or maintenance. When you call, please have the model and serial numbers ready so your call may be processed quickly and efficiently.

THIS PRODUCT REQUIRES ADULT ASSE

READ ALL INSTRUCTIONS BEFORE ASS

If you experience any difficulties, please co

KEEP INSTRUCTIONS FOR FUTURE USE

THIS PRODUCT IS FOR USE ONLY by a c unable to walk, weighs less than 30 pounds

EXCESSIVE EXPOSURE TO SUN OR HE

DO NOT USE THIS PRODUCT if it is dama

THIS PRODUCT IS NOT INTENDED FOR

ow these warnings and the assembly ould result in serious injury or death.

PARTS LIST

CHECK that you have all the parts listed below BEFORE assembling your Entertainer??? activity center. If any parts are missing, call Customer Service at 1-800-345-4109.

Tool required: Screwdriver

this product with

ually move across lays in it. Watch for uct and be sure om hazards in the s, cords, hot liquids, heat and anything e your child.

MBLY.

Do not use product with a child who can tip over or climb out of product.

To avoid tipovers, place product on flat, level floor/ground. Adjust legs to same height so that the tray is level before placing child in product.

Tray and seat ring

Base

CARE AND MAINTENANCE

EMBLY AND USE OF THIS PRODUCT. ntact the Customer Service Department.

.

hild who is able to sit upright unassisted, , and is less than 32 inches tall.

AT could cause fading or warping of parts.

ged or broken.

COMMERCIAL USE.

3

FROM TIME TO TIME CHECK YOUR ACTIVITY CENTER for loose screws, worn parts, torn material or stitching. Replace or repair the parts as needed. Use only Graco?? replacement parts.

REMOVABLE CLOTH SEAT may be machine washed in lukewarm water on delicate cycle and drip-dried. DO NOT MACHINE DRY. NO BLEACH.

TO CLEAN FRAME, use only household soap or detergent and warm water. NO BLEACH. Use only a damp cloth to clean the musical star.

4

To Assemble Your

Entertainer??? Activity Center

Step 1.

Turn the tray over and locate the hole that the seat lock screws into. Place the seat lock on the tray as shown and screw it to the tray. DO NOT overtighten screw???seat lock must be free to slide.

Step 2.

Four tabs are located behind the indentations inside the seat ring. Remove the seat ring by pulling the four tabs out from under the tray, one at a time, while lifting the seat ring.

Solid color inside

Step 6.

Turn tray over. Push one leg into socket in tray exactly as shown until it snaps into place. Repeat for other two legs.

Button faces seat

Step 7.

On top of tray, CHECK that snaps are visible through slots. Pull on leg to be sure it is securely attached.

Step 3.

Put the seat ring upside down inside the cloth seat. The high side of the seat ring goes to the back of the seat, where the warning label is located.

Attach the seat to the seat ring by tucking the seat edge into the channel and snapping the grommets on the pegs.

Step 4.

Turn the seat over and push the seat down into the seat ring.

Step 5.

Snap the seat ring back onto the tray. Make sure all four tabs are snapped onto the inside lip.

Grommet

Pattern side

Pattern side UP

Snaps visible

Step 8.

Slide the leg tubes on the tray onto the leg tubes on the base as shown.

HINT: If a tray leg tube will not slide onto the base leg tube, twist the base tube slightly to line up the parts.

Push in the buttons on each of the upper leg tubes and adjust the activity center to the desired height.

The bottom edge of the upper tubes must be even with one of the three lines on the lower leg tube.

CHECK that all three leg tubes are set to the same height.

Buttons

Line

Step 9.

Assemble the toys on the tray as shown. The mirror, squeaker, and music button are already assembled.

Mount ring toys onto loop, then insert ends of loop into holes on tray. Short end of loop goes directly over leg. The loop and ring toys will not be removable.

Place tumbler into oval space as shown, then use two screws provided to attach it from underneath tray. DO NOT over- tighten screw.

Tighten screw until clicker does not move freely???DO NOT overtighten??? then loosen screw slightly.

Set duck pond in round space provided. Then place retainer ring over it, pushing all four tabs into slots in tray.

To Use the Seat Lock

Push gently on latch and turn the seat until latch engages in one of the four stop positions.

To allow seat to swivel again, pull lock out.

7

To Adjust the Seat Height

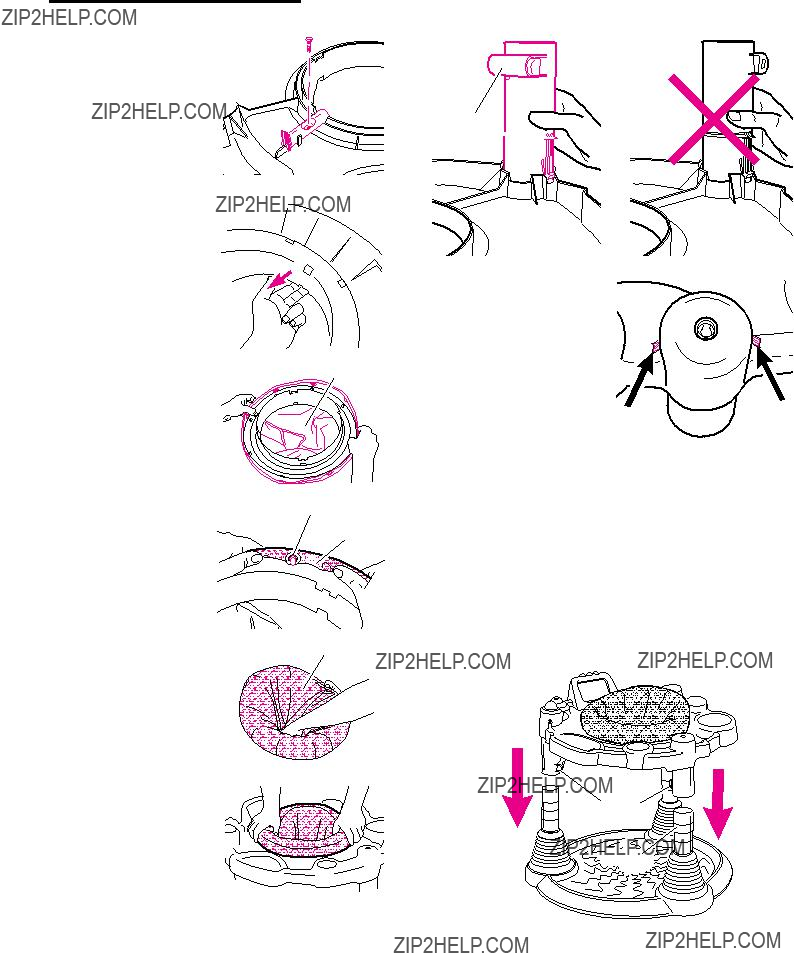
Do not adjust height while child is in activity center.

Step 1.

Press in the buttons on each leg to adjust seat to desired height. The bottom edge of the upper tubes must be even with one of the three lines on the lower leg tube.

For your child???s safety, all three legs must be set to the same height. Tray must be level.

8

Step 2.

After adjusting height of the seat, CHECK that your child???s feet can rest completely on the floor of your activity center. Tray should not be too high or too low. Remove child and readjust height if necessary.

Tray at proper height

Replacement Parts

Instructions for ordering activity center parts:

Complete form below. Your model number MUST be included on the form to ensure proper replacement parts. Your model number can be found on a sticker on the bottom of the tray. Payment must accompany your order.

* Prices subject to change without notice.

IF YOU NEED HELP

If you have any questions, please call toll-free:

1-800-345-4109

Return the form below with payment to:

GRACO CHILDREN???S PRODUCTS INC.

CUSTOMER SERVICE DEPARTMENT

P.O. BOX 100, MAIN STREET

ELVERSON, PA 19520