User Manual
User Manual

2
Copyright Copyright ?? 2006, GE Security, Inc. All rights reserved.
This document may not be copied in whole or in part, or otherwise reproduced except as specifically permitted under US copyright law, without the prior written consent from GE.
Document
Disclaimer THE INFORMATION IN THIS DOCUMENT IS SUBJECT TO CHANGE WITHOUT
NOTICE. GE ASSUMES NO RESPONSIBILITY FOR INACCURACIES OR OMISSIONS
AND SPECIFICALLY DISCLAIMS ANY LIABILITIES, LOSSES, OR RISKS, PERSONAL
OR OTHERWISE, INCURRED AS A CONSEQUENCE, DIRECTLY OR INDIRECTLY, OF
THE USE OR APPLICATION OF ANY OF THE CONTENTS OF THIS DOCUMENT. FOR
THE LATEST DOCUMENTATION, CONTACT YOUR LOCAL SUPPLIER OR VISIT US
ONLINE AT WWW.GESECURITY.COM.
This publication may contain examples of screen captures and reports used in daily operations. Examples may include fictitious names of individuals and companies. Any similarity to names and addresses of actual businesses or persons is entirely coincidental.
Trademarks GE and the GE monogram are registered trademarks of General Electric. and patents The
GE Security.
Other trade names used in this document may be trademarks or registered trademarks of the manufacturers or vendors of the respective products.
Software GE software supplied with GE products is proprietary and furnished under license license and can be used or copied only in accordance with the license terms.
agreement THE ENCLOSED PROGRAM IS FURNISHED SUBJECT TO THE TERMS AND
CONDITIONS OF THIS AGREEMENT. RETENTION OF THE PROGRAM FOR MORE
THAN 30 DAYS, OPENING OF THE SEALED WRAPPER, IF ANY, SURROUNDING THE
PROGRAM, OR USE OF THE PROGRAM IN ANY MANNER WILL BE CONSIDERED
ACCEPTANCE OF THE AGREEMENT TERMS. IF THESE TERMS ARE NOT
ACCEPTABLE, RETURN THE UNUSED PROGRAM AND ANY ACCOMPANYING
DOCUMENTATION TO GE FOR A FULL REFUND OF THE LICENSE FEE PAID. (FOR
INFORMATION REGARDING THE RETURN OF PROGRAMS ENCODED OR
INCORPORATED WITHIN EQUIPMENT, CONTACT THE NEAREST GE SALES OFFICE.)
Intended use Use this product only for the purpose it was designed for; refer to the data sheet and user documentation. For the latest product information, contact your local supplier or visit us online at www.gesecurity.com.
FCC This equipment has been tested and found to comply with the limits for a Class compliance A digital device, pursuant to part 15 of the FCC Rules. These limits are
designed to provide reasonable protection against harmful interference when the equipment is operated in a commercial environment. This equipment generates, uses, and can radiate radio frequency energy and, if not installed and used in accordance with the instruction manual, may cause harmful interference to radio communications.
You are cautioned that any changes or modifications not expressly approved by the party responsible for compliance could void the user's authority to operate the equipment.
Regulatory Operation of this equipment in a residential area may cause interference, in which case the user is required to take all measures that are necessary, at the user's expense, to correct the interference

3


5
Before You Begin
Read these instructions before installing or operating this product.
Note: This installation should be made by a qualified service person and should conform to local codes.
This manual provides installation and operation information. To use this document, you must have the following minimum qualifications:
???A basic knowledge of CCTV systems and components
???A basic knowledge of electrical wiring and
Use this product only for the purpose for which it was designed.
Customer Support
For assistance in installing, operating, maintaining, and troubleshooting this product, refer to this document and any other documentation provided. If you still have questions, contact Technical Support:
GE Security
Call:
Note: You should be at the equipment, ready with details before calling Technical Support.
Conventions Used in this Manual
Boldface or button icons highlight command entries. The following WARNING, CAUTION, and Note statements identify potential hazards:

6
*WARNING:
Improper use of this equipment can cause severe bodily injury or equipment damage.
** CAUTION:
Improper use of this equipment can cause equipment damage.
Note: Notes contain important information about a product or procedure.
*This symbol indicates electrical warnings and cautions.
**This symbol indicates general warnings and cautions.

7
Introduction
This manual provides all the information necessary to properly install this product.
** CAUTION:
Your system???s layout, camera assignment, PB3 termination, and serial device model should all be selected before starting the installation.
The GE
One PB3 is required per device. Where multiple devices are connected to a single DVMRe unit, the individual PB3???s are interconnected through its
A list of the supported serial devices associated with the devices can be found in the DIP switch settings section on page 24.

8
Compatibility
The PB3 is compatible with the following GE DVMRe products:
To verify the software version in your DVMRe, note the display which identifies the version when the unit
Additional Equipment
The installer will need to provide suitable length RS485 cable terminated with
Disclaimer
The GE ProBridge components identified within this document provide means of capturing transaction text/data for use by the DVMRe family of digital video recording/transmission products. The ProBridge components translate the data into a usable format by the DVMRe and permits associating transaction data

9
with specific cameras. GE assumes no responsibility for the amount and type of information available, the operation, non- operation or erroneous operation of the customer provided equipment that interfaces with the ProBridge.
PB3 System Components
You should find the following PB3 system components when the product is unboxed.
Figure

10
???(1)
???(1) P/N
???(1) P/N
???(1) P/N
???(1) P/N
???(1) P/N
???(1) P/N
P/N
???(1) P/N
Installation Environment
Power: Ensure that the installation site???s AC power is stable and within the rated voltage of the external power supply. If the site???s AC power is likely to have spikes or dips, use power line conditioning or an Uninterruptible Power Supply.
Temperature: Observe the unit???s ambient temperature specifications when choosing a location for the unit. Extremes of heat or cold beyond the specified operating temperature limits may cause the unit to fail. Do not install this unit on top of other hot equipment.
11
Moisture: Do not expose the unit to rain or moisture. Moisture can damage internal components. Do not install this unit near sources of water.
RS232 Limitations: Cable length between the POS device and the PB3 is limited to 50???. Cable length between the PB3 unit and the DVMRe is also limited to 50???. If the supplied cables are replaced by custom made cables to address distances between components, ensure the cable is manufactured to ANSI standards for RS232 communication.
RS485 Limitations: If multiple PB3 units are connected to a single DVMRe unit, the distance between the first and last PB3 unit is limited to 3,000 feet (RS485 communication standards).
Power
The PB3 is furnished with a power supply (110 or 240 VAC). Do not use any other power supply with this product. The manufacturer accepts no responsibility for damage caused by the use of any other power supply.
Make sure installation is complete and all connections are made before applying power to the unit.

12
Power Supply Input
Voltage: 120 VAC
Tolerance: ??10%
Frequency: 60 Hz
Power Supply Output
Voltage: 12 VDC
Current: 110 mA
Power: 1.3 Watts
Connector: 2.1mm female barrel. Center Positive
Power Supply Input
Voltage: 220 Volt AC
Tolerance: ??10%
Frequency: 50 Hz
Power Supply Output
Voltage: 12 Volt DC
Current: 110mA
Power: 1.3 Watts
Connector: 2.1mm female barrel. Center Positive

13
Installation
Before installation please familiarize yourself with the PB3 and its typical system layout.
PB3 Components
Figure

14
Typical System Layout
RS232/2
Port
Monitor
DVMRe Triplex
Camera
Receipt Printer
Cable
Receipt Printer Electronic Cash Register
2nd
CameraCable
Receipt Printer Electronic Cash Register
* Power Connections not show for clarity.
Figure
** IMPORTANT:
Your system???s layout, camera assignment, PB3 termination, and serial device model should all be selected before starting the installation.

15
Required Dip Switch Information
*These settings should be set before beginning the installation.
Default (Factory) Dipswitch Settings

16
Switch Settings as shown above are:
???Camera Number 1 (SW1
???Generic Printer (SW3
???PB3 Termination OFF (SW4 3)
Detailed Installation Steps
Note: Modify the DVMRe???s default baud rate of 19200 to 57600.
1)At the minimum set or verify the DIP Switch settings for the Camera Number, PB3 Termination, and the type of serial device.
2)Disconnect the existing serial device cable from the Printer and install the ECR Interconnect Cable (multiple DB25 connectors) to the serial device as shown on page 14.
Note: If the existing connection is using a DB9 to DB9 connection, then use the supplied Triport cable in place of the ECR Interconnect cable. See the Triport cable specification on page 45.
3)Reconnect the serial device Cable to one of the DB25F connectors on the ECR Interconnect Cable as shown on page 14.
4)Connect the PB3 Interface Cable (DB25M to DB9F) to the remaining DB25F connector on the ECR Interconnect Cable as shown on page 14. Connect the other end (DB9F) to the DB9M connector on the PB3 unit (Port 2).
5)Connect the PB3 Power Supply to the unit, but do not plug in the power.
Note: If only one (1) PB3 unit (one cash register) is to be connected, skip to Step 9 below.

17
6)If more than one cash register interface is to be installed repeat steps
7)Connect each PB3 unit together by using an RS485 cable with
Note: The installer shall provide this cable.
8)Confirm that each PB3 has the proper termination setting.
9)Connect the PB3 closest to the DVMRe using the supplied cable from Port 1 (RJ45 outer receptacle) of the PB3 to the RS232/2 port on the DVMRe unit.
Note: Modify the DVMRe???s default baud rate of 19200 to 57600.
10) Supply power to the PB3.
Verify Operation
To verify proper operation process several transactions at the Cash Register.
To verify proper operation with a
Select
The text box will display any transaction data as it is passed to the PB3 unit from the POS device. Be aware that some POS devices only send transaction data until the end of the transaction (when the receipt is printed).

18
If the unit fails to display transaction text, please go to the troubleshooting section of this manual.

19
Dip Switch Settings
This chapter deals in detail with the Dip Switch Settings. The PB3 must be
SW1 Settings
SW1
The first four switch positions on SW1 are programmed to provide special functions on the PB3 for display and troubleshooting. Under normal installations these settings do not need to be changed from the defaults.
Display Mode
This setting displays all internal memory settings through Port 1 on the text box window of the selected camera on a DVMRe Triplex. This allows you to quickly check what settings are in your unit.

20
Demo Mode (Simulated Message)
This setting permits the PB3 to send a simulated POS transaction message to the DVMRe/Triplex. This is useful for troubleshooting or for demonstrating PB3 functionality without having a POS device connected. As a troubleshooting tool, this element allows you to verify that the PB3 is able to send messages and have the DVMRe correctly capture data coming from the PB3. In this mode, if text can be received and displayed, yet when attempting to process ECR data fails, then some other problem exists with respect to the ECR connection (cabling) or interface setup.
Reset (Clear Memory)
This is primarily a troubleshooting tool that allows the user to clear the
Auto Line Feed
This option has been added to allow the insertion of Auto Line Feeds when a new line character is detected in Generic mode.
21
SW1 - Switches
Dipswitches 5 thru 8 on SW1 assigns transaction text for that cash register???s PB3 unit to a specific camera on the DVMRe.

22
SW2 Settings
SW2 - Switch 1
Switch 1 on SW2 is reserved for Technical Support personnel. Do not use.
SW2 - Switches
Switches
SW2

23
SW2 - Switches
Switches
???Stop Bit: 7 or
???Stop Bit: 1 or
???Parity: Odd, Even, or None
In the following table 8,1,E would translate to
SW2

24
SW3 Settings
SW3 - Switches
Switches 1 thru 8 on SW3 define the serial device used for the interface. The selection predetermines the Baud Rate and Protocol for the target serial device.
Baud Rate and Protocol can be manually overridden using the dipswitches for these elements.

25
SW3

26
SW4 Settings
SW4 ??? Switches 1,2,
These switches are reserved for Technical Support personnel. Do not use.
SW4 - Switch 3
Switch 3 on SW4 is used for signal termination for Port 0 on the PB3. Termination is important whenever multiple PB3 units are interconnected via the unit???s
SW4 - Switches
Switches 7 and 8 on SW4 controls the Network protocol of Port 1 on the PB3. In other words, Port 1 on the PB3 can communicate as an RS232 or RS485 port depending on the needs on the Network environment.
SW4

27
Troubleshooting
* Use Demo mode to verify that the PB3 is passing data to the DVMRe.

28
Hyperterminal Setup
Manual configuration can also be completed using Windows HyperTerminal in stead of the DIP switches. Manual configuration should only be used if the ???POS Device Selection??? does not conform to your specific device because baud rates or protocols are slightly different than the default values for the selected device.
Equipment Required
You will need the following equipment to program the PB3 using HyperTerminal:
???A PC or Laptop Computer with a COM port and Windows 98/NT/200/XP installed and operational.
???The supplied
Setup
1.Remove power and disconnect the PB3 from the DVMRe.
2.Plug the
3.Launch HyperTerminal, found in Start/Programs/Accessories/Communications/ HyperTerminal.

29
Figure
Open a new Connection (FILE>NEW):
Give the connection a name and select an Icon.
Click OK.
Under ???Connect Using??? option select ???COM1???.

30
The Com1 Properties menu will appear. Select the following settings to complete the setup:
Bits per Second = 57600 Data Bits = 8
Parity = None Stop Bits = 1
Flow Control = None
Power up the PB3 unit by plugging in
the power supply. The following screen (or similar) will confirm that you are in HyperTerminal programming mode.
31
The configurable settings are:
???Protocol
???Baud Rate
???Parity
???# of Stop Bits
???Character Set
???POS Device Type
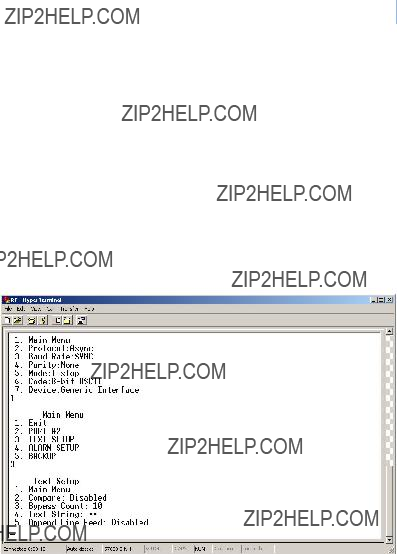
Once HyperTerminal mode is set up, press the ???Enter??? key twice. The following menu will appear:
To make a menu selection, enter the number of the element and press ???Enter???.
For example:

32
Main Menu Option 2 (Port #2)
Port #2 is an
Once you have selected this option, there will be multiple selections available for each element. Entering the number for the element will switch to the next option for that element. Continue to enter the same element number until the desired entry appears.
The menu options are presented similar to the following screen:
Note: To return to the Main Menu at any time press ???1??? and hit ???Enter???.

33
Menu Selection 2 ??? Protocol Options
???Asynchronous
Menu Selection 3 ??? Baud Rate
Baud Rate is only used if Protocol option selected is
Asynchronous.
???1200
???2400
???4800
???9600
???14.4K
???19.2K
???38.4K
Menu Selection 4 ??? Parity
???None
???Odd
???Even
Menu Selection 5 ??? Mode
The available selections are:
???
???

34
Menu Selection 6 ??? Code (Character)
The available selections are:
???
???
IMPORTANT: You must BACKUP (Save) the program information via the BACKUP option so that everytime the unit is powered up, the settings you configured will be used. Go back to the Main Menu and select element #3 BACKUP and select the option to Save the settings.
35
Main Menu Option 3 (Text Setup)
The Text Setup menus allow the user to use some text filtering options. These options allow the user to filter out excess data. Select the Text Setup option from the Main Menu.
Once you have selected this option, there will be multiple selections available for each element. Entering the number for the element will switch to the next option for that element. Continue to enter the same element number until the desired entry appears.
The menu options are presented similar to the following screen:
Compare
Use this command to enable or disable Text filtering.
Toggle the Compare option by entering the number ???2??? followed by the Enter key.
2 > Enter

36
Bypass Count
The Bypass Count is the number of characters to bypass or ignore excluding the characters in the Text String.
The Bypass Count can be entered when you enter the sequence: 3 > Enter.
Enter Count: _
The range of the Bypass Count is 0 to 255. Entry will auto- terminate after the 3rd number input. You may terminate input by using the Enter key. The Backspace key may also be used for correction.
Enter Count: 200
Enter Count: 50 > Enter (manual termination)
Text String
The Text String option allows entering characters (up to 20) in a string to be ignored or bypassed. When you enter the option ???4??? followed by the Enter key, you will be prompted to enter a string.
Enter String: _
The maximum number of characters you can enter (including the space character) is 20. The entered string of characters will be converted to all UPPER CASE because the Text Filter is not case sensitive.
Append Line Feed
This allows the Append Line Feed option to be enabled or disabled. When the Append Line Feed option is enabled, each time the PB3 receives a new line Character (Carriage Return or

37
Linefeed), the PB3 will output both a Carriage Return and a Line Feed. If this option is disabled then, the PB3 will not append any extra characters.
Toggle the Append Line Feed option by entering the number ???5??? followed by the Enter key.
5 > Enter
Example of setting Text Setup Menu options:
1.Access the Text Setup Menu (Enter, Enter, 3, Enter).
2.Enable the String Compare (2, Enter) Compare: Enabled.
3.Set Bypass Count to 18 (3, Enter) and enter the number 18 followed by the Enter key.
4.Enter a text string (4, Enter) Thank you! > Enter.
5.Enable the Append option (5, Enter) Append Line Feed: Enabled.
6.Exit the menus (1, Enter) repeat 2 times.

38
An example of the setup above is shown in the following illustration.
Receipt
Figure
39
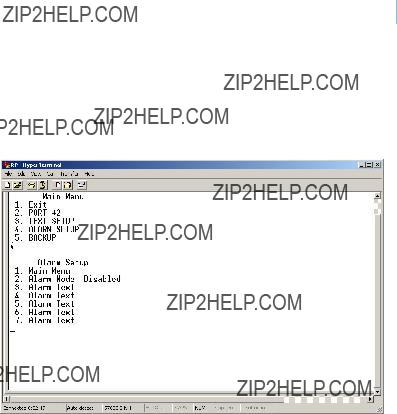
Main Menu Option 4 (Alarm Setup)
Use this option to enable or disable alarm mode and to customize the text to display for each alarm. Select option #4 to display the following screen
To change the alarm mode select option #2 and press the enter button. The alarm mode will toggle between enabled or disabled.
You can enter customized alarm text by selecting options 3 through 7 and entering your text. Your text string can be up to 15 characters. Make sure you save your changes before exiting HyperTerminal.
Main Menu Option 4 (Backup)
Use the Backup menu (Main Menu Option 5), to save the settings that you have modified.

40
PB3 Specifications
Note: All specifications are subject to change without notice. GE believes that all specifications are correct, however no liability is assumed for omissions or errors.
41
Cable Specifications
ProBridge to Triplex
RJ45 Connector
RJ45 Connector
Part Number :
Communication Type: RS232
Connector Type:
Cable Required: 5 Foot
Pin 8:
Pin 7: Common
Pin 6: A-
Pin 5: Rcv
Pin 4: Tx
Pin 3: A+
Pin 2:
Pin 1: Common
Connector to Triplex
Pin 8:
Pin 7: Common
Pin 6: A-
Pin 5: Rcv
Pin 4: Tx
Pin 3: A+
Pin 2:
Pin 1: Common
Connector to PB3

42
ProBridge to DVMRe
RJ45 Connector
Part Number :
Communication Type: RS232
Connector Type:
Cable Required: 6 Foot
NOTE: This cable also used for Programming ProBridge via Windows HyperTerminal

43
ProBridge to ProBridge Cable
RJ45 Connector
Part Number : Installer Provided
Communication Type:
Connector Type: RJ45, RJ45
Cable Required:

44
ProBridge to Printer Interconnect Cable
DB25M
Part Number :
Communication Type: RS232
Connector Type: DB25M, DB9F
Cable Required: 6 Foot DB25M to DB9F RS232 Cable (Supplied). Connects PB3 to the Printer Interconnect Cable.
DB9F

45
ProBridge Interconnect Cable to serial device
Communication Type: RS232
Connector Type: DB25M, DB25F, DB25F
Cable Required: 6 Foot DB25M to DB25F to DB25F cable (Supplied). Connects PB3 Interconnect cable to the serial device.

46
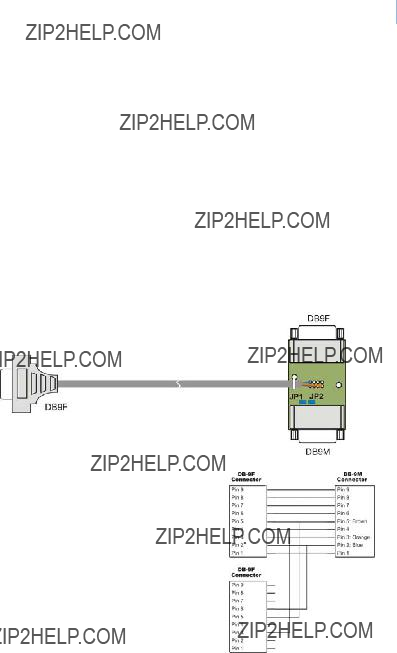
Triport Cable
The Triport cable is used for tapping serial
For installation, do the following:
1.Remove the DB9 printer connector at the POS (if an external printer is connected).
2.Install the Triport connector (printed circuit board) into the vacated POS connector.
3.Connect the DB9 printer connector to the Triport.
4.Connect the Triport cable (gray cable
NOTE1: If a printer was not attached to the POS, it may be necessary to enable the serial port on the POS. Program the POS for a printer setting.
NOTE2: If the POS uses a
Hardware Handshake Jumpers JP1 and JP2
For a POS system with an external printer connected, remove the JP1 and JP2 jumpers.
For a POS system without a printer, it may be necessary to jumper one or both JP1/JP2.
???JP1 shorts pins 7 and 8 (RTS/CTS)
???JP2 shorts pins 4 and 6 (DTR/DSR)
47
Triport Cable Modifications
In some cases, it may become necessary to modify the wiring of the Triport cable. It is recommended that only trained technicians modify the Triport. Modifications are limited to only the removal of the orange or blue wire. Removing both wires or
Ref: The orange wire carries signals from the transmit signal of the cash register.
Ref: The blue wire carries signals from the transmit signal of the printer.
Part Number :
Communication Type: RS232
Connector Type: DB9M, DB9F, DB9F
Cable Required: 6 Foot DB29F to DB9F and DB9M RS232 Cable (Supplied). Connects PB3 to the POS device and printer.

48
Contacting technical support
For assistance installing, operating, maintaining, and troubleshooting this product, refer to this document and any other documentation provided. If you still have questions, you may contact technical support during normal business hours (Monday through Friday, excluding holidays, between 6 a.m. and 5 p.m. Pacific Time).
Note: Be ready at the equipment before calling for technical support.
Online publication library
Another great resource for assistance with your GE Security products is our online publication library, available to all of our customers on our website. To access our publication library, go to our website at the following location:
In the Tools area at the top, click the Publication Library link. After you register and log on, you may search through our online library for the documentation you need.1
1Many GE Security documents are provided as PDFs (portable document format). To read these documents, you will need Adobe Acrobat Reader, which can be downloaded free from Adobe???s website at www.adobe.com.