BURR GRINDER
Model Number: 169132
UPC: 681131691321
Customer Assistance
1 877 207 0923 (US)
1 877 556 0973 (Canada)
Thank you for purchasing a GE small appliance.
In keeping with the GE ecomagination initiative, please consider the option to recycle the packaging material and donate the appliance you are no longer using.
To read about GE???s ecomagination commitment, visit
http://ge.ecomagination.com

IMPORTANT SAFEGUARDS
When using electrical appliances, basic safety precautions should always be followed including the following:
???Read all instructions.
???To protect against electrical shock, do not immerse cord, plug or any non-removable parts in water or other liquid.
???To reduce the risk of severe injury to persons or damage to the appliance, keep hands and utensils out of the bean hopper while grinding, and when the grinder is plugged in.
???Close supervision is necessary when any appliance is used by or near children.
???Unplug unit from outlet when not in use, before putting on or taking off parts, and before cleaning.
???Avoid contacting moving parts.
???Do not operate appliance with a damaged cord or plug or after the appliance malfunctions, or is dropped or damaged in any manner. No user-serviceable parts inside. Call our toll-free customer service number for information on examination, repair, or adjustment.
???The use of accessory attachments not recommended or sold by the manufacturer may cause fire, electric shock or injury.
???Do not use outdoors.
???Do not let cord hang over edge of table or counter or touch hot surfaces.
???Check the grinding mechanism for presence of foreign objects before operating.
???Always operate the burr grinder with the cover in place.
???Do not place on or near a hot gas or electric burner, or in a heated oven.
???Do not operate the grinder when empty.
???To disconnect, turn the control to off then remove the plug from wall outlet.
???Do not use appliance for other than intended use.
???Do not operate grinder while unattended.
SAVE THESE INSTRUCTIONS!

This appliance is for HOUSEHOLD USE ONLY. It may be plugged into an AC electrical outlet (ordinary household current). Do not use any other electrical outlet.
DO NOT OPERATE APPLIANCE IF THE LINE CORD SHOWS ANY DAMAGE, OR IF APPLIANCE
WORKS INTERMITTENTLY OR STOPS WORKING ENTIRELY.
A short power-supply cord (or detachable power-supply cord) is to be provided to reduce the risk resulting from becoming entangled in or tripping over a longer cord. Longer detachable power-supply cords or extension cords are available and may be used if care is exercised in their use. If a longer detachable power-supply cord or extension cord is used,
1)The marked electrical rating of the cord set or extension cord should be at least as great as the electrical rating of the appliance, and
2)The cord should be arranged so that it will not drape over the countertop or tabletop where it can be pulled on by children or tripped over unintentionally.
POLARIZED PLUG
This appliance has a polarized plug (one blade is wider than the other). To reduce the risk of electric shock, this plug is intended to fit into a polarized outlet only one way; if the plug does not fit fully into the outlet, reverse the plug. If it still does not fit, contact a qualified electrician. Do not attempt to defeat this safety feature.
LINE CORD SAFETY TIPS
1.Never pull or yank on cord or the appliance.
2.To insert plug, grasp it firmly and guide it into outlet.
3.To disconnect appliance, grasp plug and remove it from outlet.
4.Before each use, inspect the line cord for cuts and/or abrasion marks. If any are found, this indicates that the appliance should be serviced and the line cord replaced.
5.Never wrap the cord tightly around the appliance, as this could place undo stress on the cord where it enters the appliance and cause it to fray and break.
PARTS
1.Transparent lid cover
2.Cup selector dial
3.On / Off button with power indicator light
4.Coarseness selector dial (on back of burr grinder)
5.Transparent coffee ground container with lid
6.Cord wrap and integrated cleaning brush storage (bottom of base)
1.
2.
3. 
4.
5.
6. 
3
INSTRUCTIONS FOR USE
For your safety, always read and understand this Instruction Manual before attempting to use the Burr Grinder.
Before Using:
1.Carefully unpack the grinder. Remove all packaging materials.
2.Wash the bean cover, ground coffee container and ground coffee container lid in hot soapy water. Dry thoroughly. The bean cover, ground coffee container and ground coffee container lid can be washed in the top rack of the dishwasher, but may become cloudy over time. Therefore, it is recommended to hand wash all parts.
3.Wipe exterior surfaces with a soft, moist cloth to remove dust particles collected during packing and handling. Dry thoroughly. Do not use abrasive cleaners. NEVER
IMMERSE THE GRINDER, CORD OR PLUG IN WATER OR ANY OTHER LIQUID.
4.Be sure all parts are properly assembled and in place before use.
5.Your grinder is now ready to use.
For the first use of your coffee grinder, it is recommended to use a medium setting on the coarseness selector and then adjust the setting for future grinding according to your taste.
About Grinding Coffee:
The proper grind will brew the best cup of coffee. The grind depends on the method by which the coffee is to be brewed. Generally, the finer the grind, the more quickly the coffee should be prepared. That is why an espresso grind is much finer than coffee to be brewed in a drip coffee maker.
Coffee that is grind too fine (fine espresso grinds used in an automatic drip coffee maker) will result in bitter tasting coffee. Conversely, coffee that is too coarse for a particular brewing method will result in weak coffee. If the correct grind is used, adding more coffee will make a stronger brew without making the brewed coffee bitter.
Another benefit of a coffee burr grinder is a consistent grind. This is important to ensure that the extraction is consistent across all the ground particles. It is recommended to grind coffee beans just prior to brewing.
5

Grinding Coffee Beans:
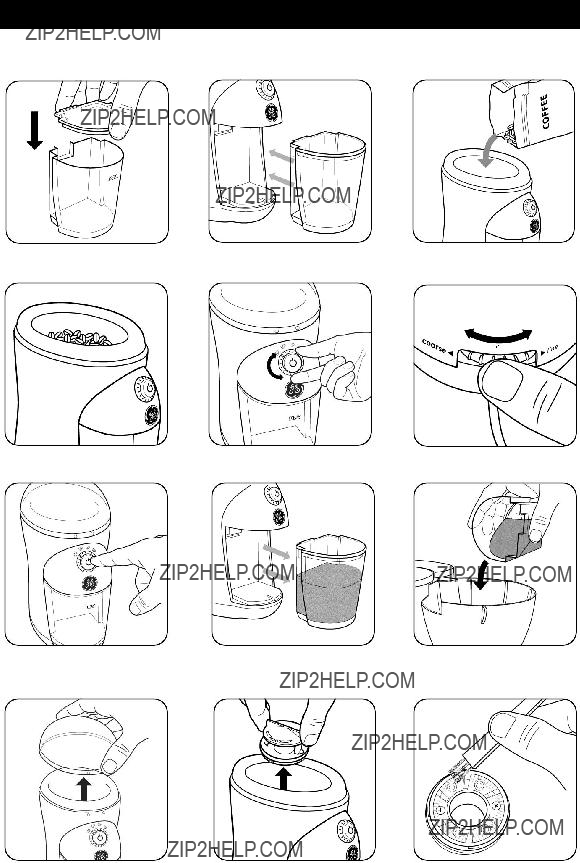
1.Be sure the coffee grinder is unplugged and on a flat, level surface. Place the ground coffee container lid on the ground coffee container (see figure 1) and correctly position them in the grinder body (see figure 2). The grinder will not properly operate without the ground coffee container in place.
2.Remove the bean hopper lid and fill the bean hopper to the desired level (see figure 3 and reference chart above). The bean hopper lid can also be used to scoop coffee beans. Do not fill the bean hopper above the ???max??? marking (see figure 4). Replace the lid, making sure it is properly positioned or the grinder will not operate properly.
Note: This grinder is designed to grind whole bean coffee only.
3.Set the quantity of ground coffee you desire by rotating the cup selector dial to the proper setting: 2 cups, 4 cups, 8 cups or 12 cups (see figure 5).
4.Set the ground coffee coarseness level by adjusting the coarseness selector to the desired level (see figure 6).
5.Plug the power cord into a 120V AC electrical outlet. The blue light will illuminate indicating there is power to the appliance.
Note: The blue indicator light will remain illuminated until the appliance is unplugged from the wall outlet.
6.Press the on/off button to begin the grinding process (see figure 7).
Note: Do not adjust the coarseness selector or the cup selector dial while the appliance is operating.
7.Once the selected number of cups has been ground, the grinding process will stop automatically. To stop the grinding cycle before the process is complete, press the on/off button.
8.Remove the ground coffee container from the body of the grinder (see figure 8) and gently tap the container. Remove the ground coffee container lid and pour the ground coffee into the filter of your coffee maker (see figure 9) or use a measuring spoon.
9.To run another grinding cycle, repeat the above process. The selected settings will be retained for additional grinding cycles.
10.When finished grinding unplug the cord from the wall outlet.
Note: The more cups selected to grind, the longer the grinding cycle will run.

This appliance requires little maintenance. It contains no user-serviceable parts. Do not attempt to repair it yourself. Any servicing that requires disassembly, other than cleaning, must be performed by a qualified appliance repair technician.
To Clean:
1.Before cleaning, be sure the cord is unplugged from the outlet.
2.To ensure the optimum performance of the grinder, fully empty the ground coffee container and the bean lid following each use.
3.Remove the lid and empty any whole beans from the grinder (see figure 10). Remove the top grinding wheel by rotating it clockwise and lifting it up (see figure 11). This will allow you to clean the lower grinding wheel and grinding compartment.
4.Clean the interior of the grinding compartment and the grinding wheels with the brush provided (see figure 12). Never use water or any liquid to clean the lower grinding section or main body of this grinder.
5.Wipe the inside of the grinder, lid and body with a damp cloth and dry thoroughly.
6.The ground coffee container and ground coffee container lid can be washed in hot, soapy water. They are also both top rack dishwasher safe.
7.Thoroughly dry all parts and replace the top grinding wheel in position by aligning the tabs and the receptacle. Rotate the top grinding wheel counterclockwise until it locks into position (see figure 13). Once the top grinding wheel is in position, gently pull upward to check that it is properly locked in position. If the top grinding wheel comes out, repeat the steps to replace it.
To Store:
Be sure all parts are clean and dry before storing. Store appliance in its box or in a clean, dry place. Never wrap cord tightly around the appliance; keep it loosely coiled or use the cord wrap underneath the grinder. The cleaning brush has an integrated storage location on the bottom of the grinder (see figure 14).