USE & CARE MANUAL

NOTE: This USE & CARE MANUAL pro- vides specific operating instructions for your model. Use the room air conditioner only as instructed in this USE & CARE MANUAL. These instructions are not meant to cover every possible condition and situation that may occur. Common sense and caution must be practiced when installing, operat- ing, and maintaining any appliance.

Contents

2Warranty

3Product Registration

3 Packaging

3Normal Sounds

4Important Safety Instructions

5-9 Air Conditioner Features

10Care and Cleaning

10Energy Saving Ideas

11Avoid Service Checklist

READ AND SAVE THESE INSTRUCTIONS

SLIDER CASEMENT

ELECTRONIC CONTROL

AIR CONDITIONER

P/N 66121613

ROOM AIR CONDITIONER WARRANTY

Your product is protected by this warranty

Your appliance is warranted by Electrolux. Electrolux has authorized Frigidaire Consumer Services and their authorized servicers to perform service under this warranty. Electrolux authorizes no one else to change or add to any of these obligations under this warranty. Any obligations for service and parts under this warranty must be performed by Frigidaire Consumer Services or an authorized Frigidaire servicer.

* NORMAL

RESPONSIBILITIES OF

THE CONSUMER

This warranty applies only to products in ordinary household use, and the consumer is responsible for the items

listed below.

1.Proper use of the appliance in accordance with instructions provided with the product.

2.Proper installation by an authorized servicer in accordance with instructions provided with the appliance and in accordance with all local plumbing, electrical and/or gas codes.

3.Proper connection to a grounded power supply of sufficient voltage, replacement of blown fuses, repair of loose connections or defects in house wiring.

4.Expenses for making the appliance accessible for servicing, such as removal of trim, cupboards, shelves, etc., which are not a part of the appliance when it was shipped from the factory.

5.Damages to finish after installation.

6.Damage to unit after removal from packaging carton.

EXCLUSIONS

IF YOU NEED SERVICE

This warranty does not cover the following:

1.CONSEQUENTIAL OR INCIDENTAL DAMAGES SUCH AS PROPERTY DAMAGE AND INCIDENTAL EXPENSES

RESULTING FROM ANY BREACH OF THIS WRITTEN OR ANY IMPLIED WARRANTY. Note: Some states do not allow the exclusion or limitation of incidental or consequential damages, so this limitation or exclusion may not apply to you.

2.Service calls which do not involve malfunction or defects in workmanship or material, or for appliances not in ordinary household use. The consumer shall pay for such service calls.

3.Damages caused by services performed by persons other than authorized Frigidaire servicers; use of parts other than

Frigidaire Genuine Renewal Parts; obtained from persons other than such servicers; or external causes such as abuse, misuse, inadequate power supply or acts of God.

4.Products with original serial numbers that have been removed or altered and cannot be readily determined.

Keep your bill of sale, delivery slip, or some other appropriate payment record. The date on the bill establishes the warranty period should service be required. If service is performed, it is in your best interest to obtain and keep all receipts. This written warranty gives you specific legal rights. You may also have other rights that vary from state to state. Service under this warranty must be obtained by following these steps, in order:

1.Contact Frigidaire Consumer Services or an authorized Frigidaire servicer.

2.If there is a question as to where to obtain service, contact our Consumer Relations Department at:

Product features or specifications as described or illustrated are subject to change without notice. All warranties are made by

Electrolux.

This warranty applies only in the 50 states of the U.S.A., Puerto Rico and Canada.

FOR SERVICE CALL 1-800-444-4944.

2

Product Registration

Packaging

Normal Sounds

Record Your Model and Serial Numbers

Record in the space provided below the model and serial numbers. On all models, the serial plate is located on the outside of the cabinet.

Model No.

Serial No.

Register Your Product

The self-addressed PRODUCT REGISTRATION CARD should be filled in completely, signed and returned to the Frigidaire Company.

Remove all packaging from inside the unit, also any inserts placed into the side louvers.

PACKAGING INSERTS

High Pitched Chatter

Sound of Rushing Air

At the front of the unit, you may hear the sound of rushing air being moved by the fan.

Today???s high efficiency compressors may have a high pitched chatter during the cooling cycle.

Vibration

Unit may vibrate and make noise because of poor wall or window construction or incorrect installation.

Pinging or Swishing

Droplets of water hitting condenser during normal operation may cause ???pinging or swishing??? sounds.

Gurgle/Hiss

???Gurgling or hissing??? noise may be heard due to refrigerant passing through evaporator during normal operation.

3

Important Safety

Instructions

The power supply cord with this air conditioner contains a current detection device designed to reduce the risk of fire.

Please refer to the section ???Operation of Current Device??? for details.

In the event that the power supply cord is damaged, it cannot be repaired it must be replaced with a cord from the Product Manufacturer.

Avoid fire hazard or electric shock. Do not use an extension cord or an adaptor plug. Do not remove any prong from the power cord.

Grounding type wall receptacle

Do not, under any circumstances, cut, remove, or bypass the grounding prong.

Power supply cord with 3-prong grounding plug and current detection device

Read all instructions before using this air conditioner.

For Your Safety

Do not store or use gasoline or other flammable vapors and liquids in the vicinity of this or any other appliance. Read product labels for flammability and other warnings.

Prevent Accidents

To reduce the risk of fire, electrical shock, or injury to persons when using your air conditioner, follow basic precautions, including the following:

???Be sure the electrical service is adequate for the model you have chosen. This information can be found on the serial plate, which is located on the side of the cabinet and behind the grille.

???If the air conditioner is to be installed in a window, you will probably want to clean both sides of the glass first. If the window is a triple-track type with a screen panel included, remove the screen completely before installation.

???Be sure the air conditioner has been securely and correctly installed according to the separate installation instructions provided with this manual. Save this manual and the installation instructions for possible future use in removing or reinstalling this unit.

???When handling the air conditioner, be careful to avoid cuts from sharp metal fins on front and rear coils.

Electrical Information

The complete electrical rating of your new room air conditioner is stated on the serial plate. Refer to the rating when checking the electrical requirements.

???Be sure the air conditioner is properly grounded. To minimize shock and fire hazards, proper grounding is important. The power cord is equipped with a three-prong grounding plug for protection against shock hazards.

???Your air conditioner must be used in a properly grounded wall receptacle. If the wall receptacle you intend to use is not adequately grounded or protected by a time delay fuse or circuit breaker, have a qualified electrician install the proper receptacle.

???Do not run air conditioner with outside protective cover in place. This could result in mechanical damage within the air conditioner.

???Do not use an extension cord or an adapter plug.

READ THIS SECTION BEFORE ATTEMPTING TO OPERATE AIR CONDITIONER.

Operation of Current

Device

Plug in & press RESET

NOTE: Some plugs have buttons on the top.

The power supply cord contains a current device that senses damage to the power cord. To test your power supply cord do the following:

1.Plug in the Air Conditioner.

2.The power supply cord will have TWO buttons on the plug head. Press the TEST button. You will notice a click as the RESET button pops out.

3.Press the RESET button. Again you will notice a click as the button engages.

4.The power supply cord is now supplying electricity to the unit. (On some products this is also indicated by a light on the plug head).

NOTES:

???Do not use this device to turn the unit on or off.

???Always make sure the RESET button is pushed in for correct operation.

???The power supply cord must be replaced if it fails to reset when either the TEST button is pushed, or it cannot be reset. A new one can be obtained from the product manufacturer.

???If power supply cord is damaged, it CANNOT be repaired. It MUST be replaced by one obtained from the product manufacturer.

4

Air Conditioner Features ELECTRONIC CONTROL OPERATING INSTRUCTIONS

ON/OFF

ADJUSTS

TEMP &

TIME

SETS

MODE

Before you begin, thoroughly familiarize yourself with the control panel and remote as shown LIGHT below and all its functions, then follow the symbol for the functions you desire. The unit can

be controlled by the touch pad alone or with the remote.

SETS

FAN

SPEED

Auto

Temp

ACTIVATE

TIMER

TOUCH PAD

NOTE: The following instructions represent the Touch Pad, the same instructions can be used for the Remote Control.

DO THIS:

PRESS ON/OFF

BUTTON

5

Air Conditioner Features

(continued)

TO CHANGE

TEMPERATURE SETTING:

DO THIS:

PRESS TO RAISE

PRESS TO LOWER

TO ADJUST FAN SPEEDS:

DO THIS:

PRESS TO SELECT:

Lo, Med or Hi

TO USE AUTO TEMP FEATURE:

DO THIS:

PRESS TO SELECT:

AUTO TEMP

YOU WILL SEE:

Note: Tap or hold either up(???) or down(???) button until the desired temperature is seen on the display. This temperature will be automatically maintained anywhere between 60oF(16oC) and 90oF (32oC). If you want the display to read the actual room temperature. See "To Operate on Fan Only" section on Page 6.

YOU WILL SEE:

The chosen fan speed LED will light up.

Note: Fan speed starts at high and adjusts to a slower speed as the room temperature dictates. For example, if the room doesn't get too warm it will stay at the slowest speed. If the room temperature rises quickly, such as a door being opened, it will automatically go to the highest speed. The fan speeds will readjust back to the slowest speed as the room returns to the original set temperature. Press the Fan Speed button to adjust the fan speed manually.

6

Air Conditioner Features

(continued)

TO OPERATE FAN ONLY:YOU WILL SEE:LIGHT On

DO THIS:

PRESS

MODE BUTTON

CHOOSE

FAN ONLY

TO USE THE ENERGY SAVER FEATURE:

DO THIS:

PRESS

MODE BUTTON

CHOOSE

ENERGY SAVER

SLEEP FEATURE:

DO THIS:

PRESS

SLEEP BUTTON

Note: Use this function only when cooling is not desired, such as for room air circulation or to exhaust stale air (Remember to open the vent during this function, but keep it closed during cooling for maximum cooling efficiency). You can choose any fan speed you prefer.

During this function, the display will show the actual room temperature, not the set temperature as in the cooling mode.

Note: In this mode, the fan will continue to run for 3 minutes after the compressor shuts off. The fan then cycles on for 2 minutes at 10 minute intervals until the room temperature is above the set temperature, at which time the unit turns back on.

Note: In this "MODE" the selected temperature will increase by 2 degrees F 30 minutes after the mode is selected. The temperature will then increase by another 2 degrees F after an additional 30 minutes. This new temperature will be maintained for 7 hours before it returns to the originally selected temperature. This ends the "Sleep" MODE and the unit will continue to operate as originally programmed. The "Sleep" MODE program can be cancelled at any time during operation by pressing "Sleep" MODE button.

7

Air Conditioner Features

(continued)

TIMER: DELAY STOP/START FEATURE:

DO THIS:

PRESS TIMER

BUTTON

THEN DO THIS:

PRESS UP ( ??? ) OR

DOWN ( ??? ) BUTTON

CHECK FILTER FEATURE:

FAULT CODES

If the display reads ???AS???, a sensor has failed. Contact your Authorized Frigidaire Service Center

YOU WILL SEE HOW MUCH TIME IS CHOSEN:

LIGHT On

Note: For Delay Stop, the unit must be in the On position.

Note: For Delay Start, the unit must be in the Off position.

To adjust timer setting, tap or hold the UP arrow() DOWN arrow(
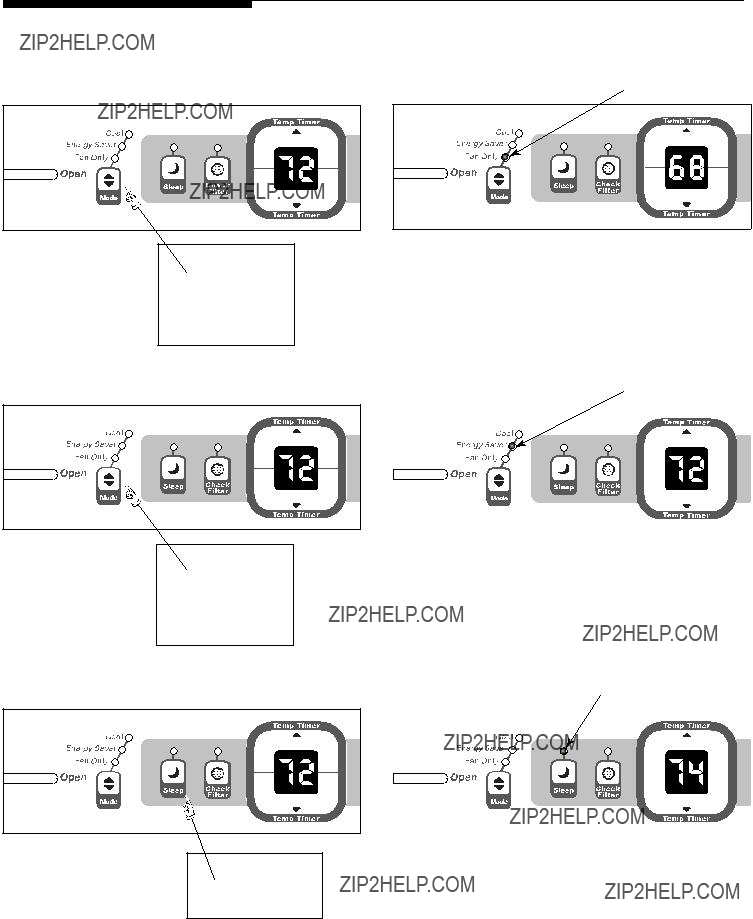
) to change delay timer at .5 hour increments, up to 10 hours, then at 1 hour increments up to 24 hours. The control will count down the time remaining until start (8, 7.5, 7, etc.). The Delay Start mode automatically selects cooling with maximum Fan Speed. The temperature maintained will be the same as previously set. To change the set temperature, press ??? COOL??? then Up or Down arrows until the desired temperature is indicated on the display. After 5 seconds, the control will automatically change the display back to the hours remaining until the unit will start/stop. Turning the unit ???ON??? or ???OFF??? at any time will cancel the Delay Start/ Stop function.

The Delay Start/Stop Feature will work until the unit either starts or stops. Once that happens the above steps have to be repeated again.

Note: This feature is a reminder to clean the Air Filter (See Care and Cleaning) for more efficient operation and cooling. The LED (light) will illuminate after 250 hours of operation. To reset after cleaning the filter, press the ??? Check Filter ??? button and the light will go off.

If the display reads ???ES???, a sensor has failed. Contact your Authorized Frigidaire Service Center

8

DO THIS:

PRESS ON/OFF

BUTTON

Air Conditioner Features

(continued)

ADDITIONAL THINGS YOU SHOULD KNOW

Now that you have mastered the operating procedure, here are more features in your control that you should become familiar with.

The ???Cool??? circuit has an automatic 3 minute delayed start if the unit is turned off and on

quickly.this prevents overheating of the compressor and possible circuit breaker tripping. The

fan will continue to run during this time.

The control will maintain the set temperature within 2degrees Fahrenheit, between 60Fand 90F degrees.

The control is capable of displaying temperature in degrees Fahrenheit or degrees Celsius. To convert from one to the other and back, press and hold the ???TEMP/TIMER??? Up () and Down () buttons together for 3 seconds.

EXHAUST CONTROL

closed

Exhaust

This Exhaust Control allows the air conditioner to either recirculate inside air (CLOSED) or exhaust air to the outside (OPEN). The CLOSED position is used when maximum cooling is desired. It may also be used for air recirculation without cooling when the air conditioner is set in any FAN position.

The OPEN position removes stale air from the room and exhausts it to the outside. Fresh air is drawn in through normal passages in the home.

4-WAY LOUVERS

The 4-Way air directional louvers allow you to direct air flow up or down, left or right throughout the room as needed.

9

Care and Cleaning

Clean your air conditioner occasionally to keep it looking new. Be sure to unplug the unit

before cleaning to prevent shock or fire hazards.

Air Filter Cleaning

The air filter should be checked at least once a month to see if cleaning is necessary. Trapped particles in the filter can build up and cause an accumulation of frost on

the cooling coils.

???Grasp the filter by the center and pull up and out.

???Wash the filter using liquid dishwashing detergent and warm water. Rinse filter thoroughly. Gently shake excess water from the filter. Be sure filter is thoroughly dry before replacing.

???Or, instead of washing you may vacuum the filter clean.

Cabinet Cleaning

??? Be sure to unplug the air conditioner to prevent shock or fire hazard. The cabinet and front may be dusted with an oil-free cloth or washed with a cloth dampened in a solution of warm water and mild liquid dishwashing detergent. Rinse thoroughly and wipe dry.

??? Never use harsh cleaners, wax or polish on the cabinet front.

???Be sure to wring excess water from the cloth before wiping around the controls. Excess water in or around the controls may cause damage to the air conditioner.

???Plug in air conditioner.

Winter Storage

If you plan to store the air conditioner during the winter, remove it carefully from the window according to the installation instructions. Cover it with plastic or return it to the original carton.

NOTE: To prevent rust or electrical connections from being damaged, store air conditioner in an upright position and a dry place.

10

Avoid Service Checklist

Before calling for service, review this list. It may save you time and expense. This list includes common occurrences that are not the result of defective workman-ship or materials in this appliance.

Air from unit does not feel cold enough.

Room temperature below 60??F (16??C). Cooling may not occur until room temperature rises above 60??F (16??C).

Temperature sensing element touching cold coil, located behind air filter. Straighten away from coil.

Reset to a Lower temperature.

Compressor shut-off by changing modes. Wait approximately 3 minutes and listen for compressor to restart when set in the COOL mode.

Air conditioner cooling, but room is too warm - ice forming on cooling coil behind decorative front.

Outdoor temperature below 60??F (18??C). To defrost the coil, set FAN ONLY Mode.

Air filter may be dirty. Clean filter. Refer to Care and Cleaning section. To defrost, set to FAN ONLY Mode.

Temperature is set too Low for night-time cooling. To defrost the coil, set to FAN ONLY Mode. Then, set Tem- perature to a Higher setting.

Air conditioner cooling, but room is too warm - NO ice forming on cooling coil behind decorative front.

Dirty air filter - air restricted. Clean air filter. Refer to Care and Cleaning section.

Temperature is set too High. Set temperature to a Lower setting.

Air directional louvers positioned improperly. Position louvers for better air distribution.

Front of unit is blocked by drapes, blinds, furniture, etc. - restricts air distribution. Clear blockage in front of unit.

Doors, windows, registers, etc. open - cold air escapes. Close doors, windows, registers, etc.

Unit recently turned on in hot room. Allow additional time to remove ???stored heat??? from walls, ceiling, floor and furniture.

Air conditioner turns on and off rapidly.

Dirty air filter - air restricted. Clean air filter.

Outside temperature extremely hot. Set FAN speed to a faster setting to bring air past cooling coils more frequently.

Noise when unit is cooling.

Air movement sound. This is normal. If too loud, set to a slower FAN setting.

Window vibration - poor installation. Refer to installation instructions or check with installer.

Water dripping INSIDE when unit is cooling.

Improper installation. Tilt air conditioner slightly to the outside to allow water drainage. Refer to installation instructions - check with installer.

Water dripping OUTSIDE when unit is cooling.

Unit removing large quantity of moisture from humid room. This is normal during excessively humid days.

If These Solutions Fail, Call 1-800-444-4944 For Frigidaire Service.

11