Grow With Me???
RC Rally
Model Number 77306
Please keep this instruction sheet for future reference, as it contains important information.
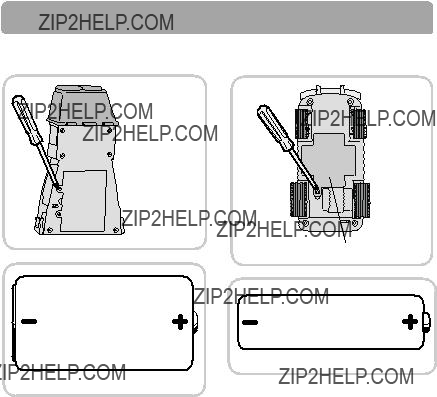
Requires four "C" (LR14) alkaline batteries for control tower; four "AA" (LR6) alkaline batteries for car; and one 9V (6LR61) alkaline battery for remote controller (batteries not included).
Adult assembly is required. Tool required for assembly:
When To Replace Batteries
If this toy is working slowly or erratically, it???s likely that batteries need to be replaced. While it is possible that all batteries may need replace- ment, the batteries that will need replacement most often are the batteries in the car, followed by the remote controller, and then the control tower. For more information, see the troubleshooting guide beginning on page 19.
Battery Tips
???We recommend using alkaline batteries for longer battery life.
???Do not mix old and new batteries.
???Do not mix different types of batteries: alkaline, standard (carbon-zinc) or rechargeable (nickel-cadmium).
???Remove the batteries during long periods of non-use. Always remove exhausted batteries from the toy. Battery leakage and corrosion can damage this toy. Dispose of batteries safely.
???Do not dispose of batteries in a fire. The batteries may explode or leak.
???Never short circuit the battery terminals.
???Non-rechargeable batteries are not to be recharged.
???Only batteries of the same or equivalent type as recommended in the "Battery Installation" instructions are to be used.
???If removable rechargeable batteries are used, they are only to be charged under adult supervision.
???Rechargeable batteries are to be removed from the toy before they are charged.
???If you use a battery charger, it should be examined regularly for damage to the cord, plug, enclosure and other parts. Do not use a damaged battery charger until it has been properly repaired.
Assembly
 WARNING
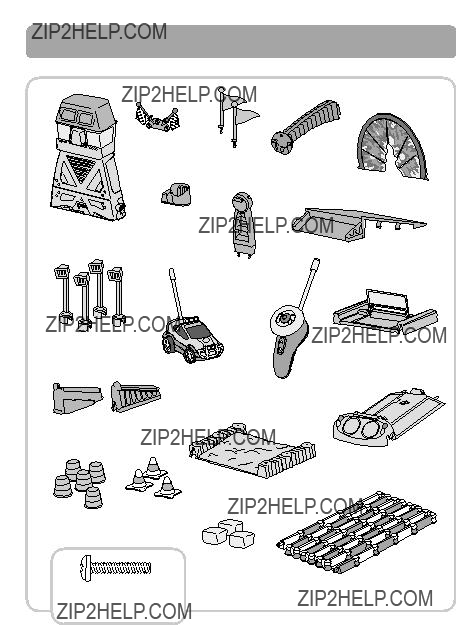
This product contains small parts in its unassembled state. Adult assembly is required.

 1
1

Pegs
Double
Flag
 Handle
Support
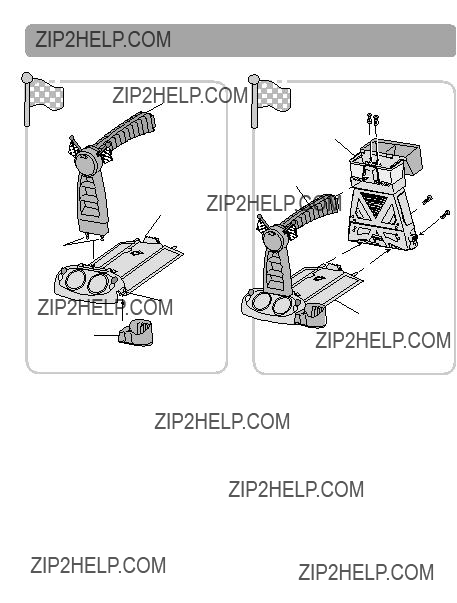
???Position the handle support so the pegs are facing you.
???With the checkered side facing down, fit the double flag on to the pegs on the handle support.

 2
2


Handle
 Handle
Support
???Fit the handle onto the handle support as shown.

 3
3

???Insert three screws through the holes in the handle and into the handle support. Tighten the screws with a Phillips screwdriver. Do not over-tighten.
Label Decoration
Proper label application will help keep labels looking their best! When applying labels, keep the following guidelines in mind:
???Wash hands before applying labels.
???Before applying labels, wipe the surface of the toy with a clean, dry cloth to remove dust or oils.
???For best results, avoid repositioning a label once it has been applied.
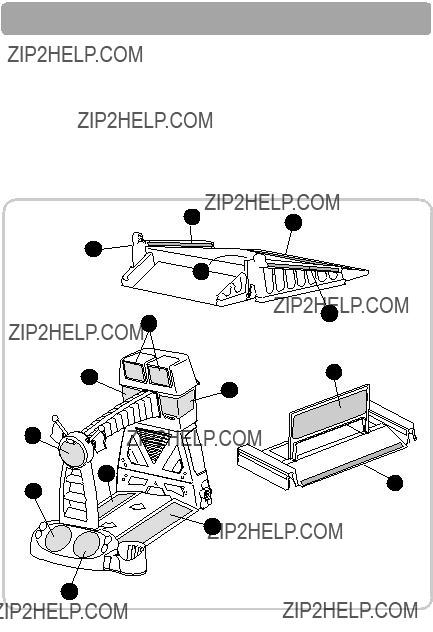
???Apply labels as shown in the illustration.
One-time assembly is now complete.
3
8
7
12
1
5
12
6
Mode I - Beginner Driver
Mode I is for a beginner or younger driver. Automatic Course Control always keeps the car hugging the track, even over obstacles. Just press the remote controller button to go and release to stop.
Setting Up The Track
Control
Tower
Hint: For best performance, use this toy on a smooth, flat surface. We do not recommend use on a deep, pile carpet. This toy is designed for indoor use only.
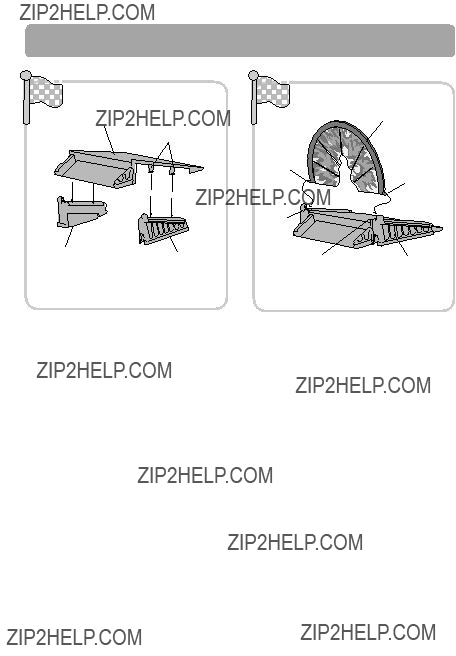
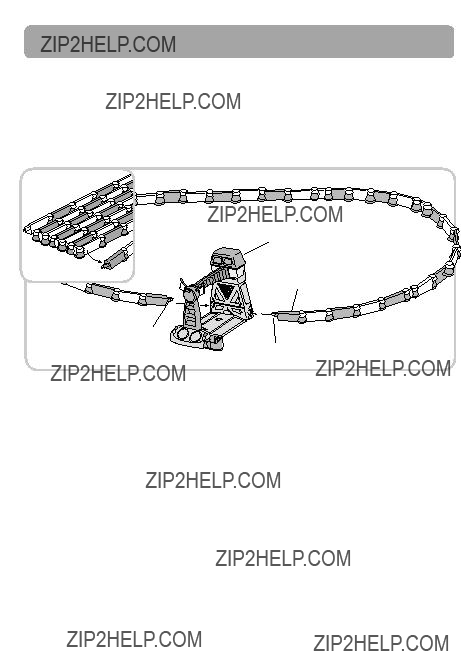
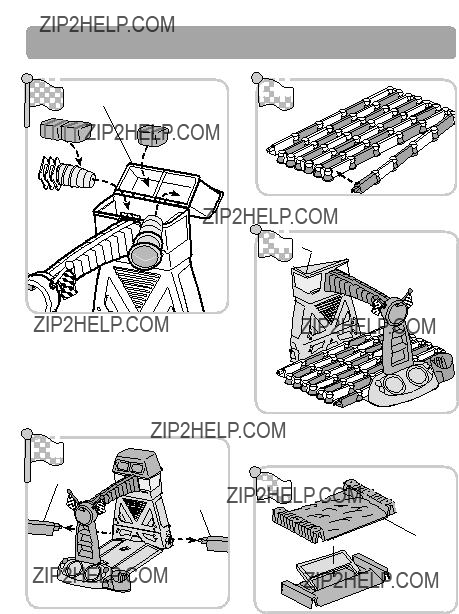
???Unfold the flexible track into an oval shape and place it behind the control tower.
???Insert the plugs on each end of the flexible track into the matching slots on either side of the control tower.
IMPORTANT! For proper function, the track must be installed behind the control tower.
??? Push or pull the flexible track into any curved shape you like.
Notes:
???The track creates a magnetic field. Do not use this toy around items that are sensitive to or affected by magnetic fields.
???Do not connect two Grow With Me ??? RC Rally sets together.
Mode I - Beginner Driver
Ring of
Fire Ramp
Crash Gate
Flag 

Dirt Track
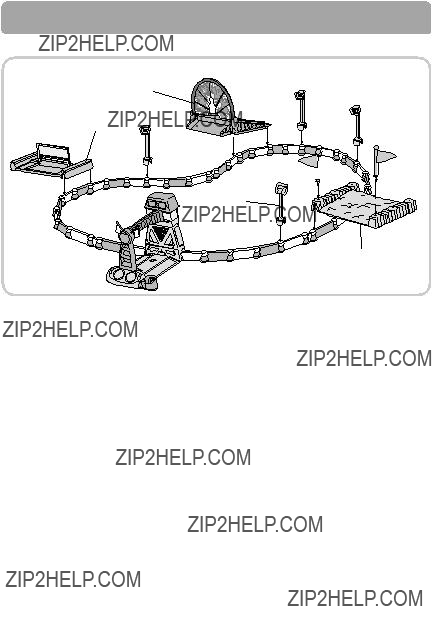
???Note the grooves on the edges of the crash gate, the ring of fire ramp and the dirt track.
???Fit the grooves on these three obstacles onto the flexible track. Place the obstacles anywhere you like, but be sure to keep them on the outside of the track, as shown.
Hint: For best performance, space the obstacles equally around the course.
???Fit the four stadium lights anywhere onto the track.
???Fit the two flags into any of the holes on the dirt track.
Mode I - Beginner Driver
 WARNING
To prevent entanglement, keep hair away from wheels.
Arrows
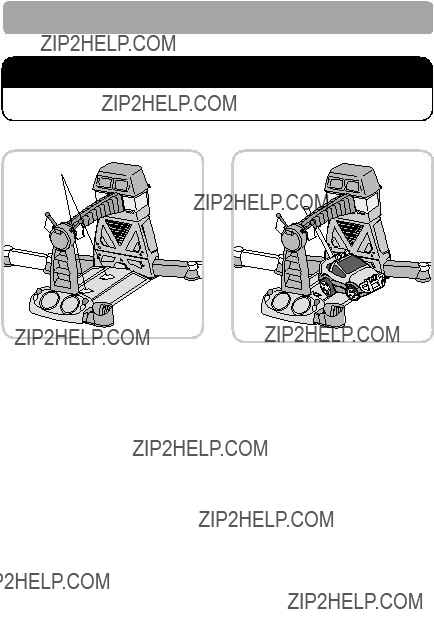
???Note the arrows on the starting ramp.
???Place rear wheels of the car on the starting ramp, making sure the car is pointing in the same direction as the arrows. The car should move around the track counter-clockwise. Listen to the engine revving.
Mode II - Pro Driver
Mode II is for a more experienced driver who has acquired better manual skills. In this mode, your child can take full control of steering and direction. For some challenging fun, your child can set up an off road course and use the remote controller wheel to steer around obstacles.
Setting Up The Track
???For off-road fun, place the starting ramp, dirt track, ring of fire or crash gate in any layout you like.
???Place additional obstacles around your layout like the cones or
hay bales or barrels to test driving skills.
???You can still use the flexible track as an obstacle or part of your layout, but note that the ???Automatic Course Control??? feature does not work in Mode II - Pro Driver.
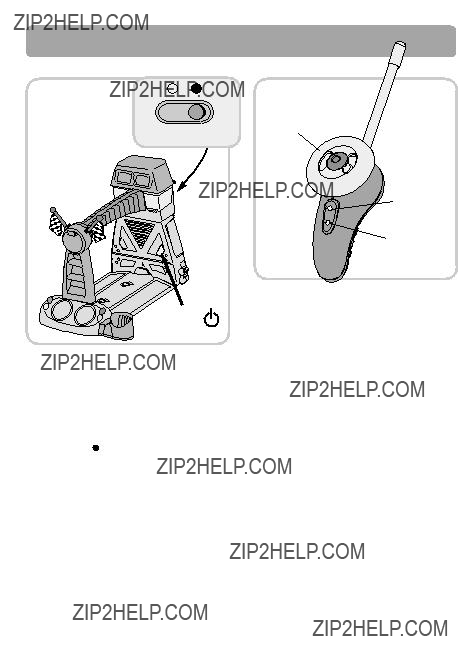
Mode Switch
ON/OFF
Button
Speed Control Switch
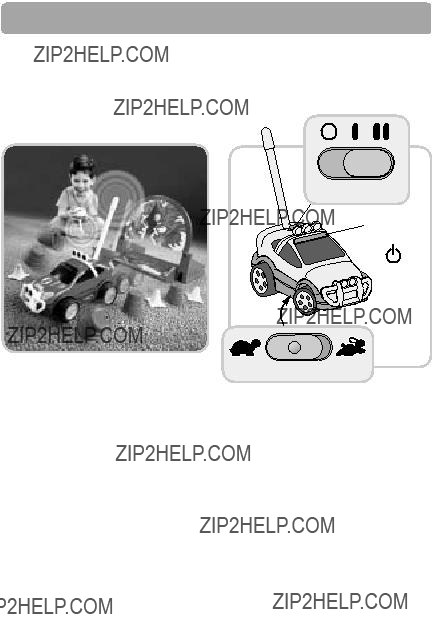
???Slide the switch on the top of the car to II for pro driver mode.
???Locate the speed control switch on the bottom of the car.
???Slide the switch to either slow speed  or fast speed
  .
.
???Press the ON/OFF button on top of the car to turn the car on. The car button lights up. The car is now ready to receive a signal from the remote controller.
Hint: If the car has not been driven for a few minutes, it turns off automatically. Press the ON/OFF button again for power in the car.
Adjusting Your Car???s
Wheel Alignment
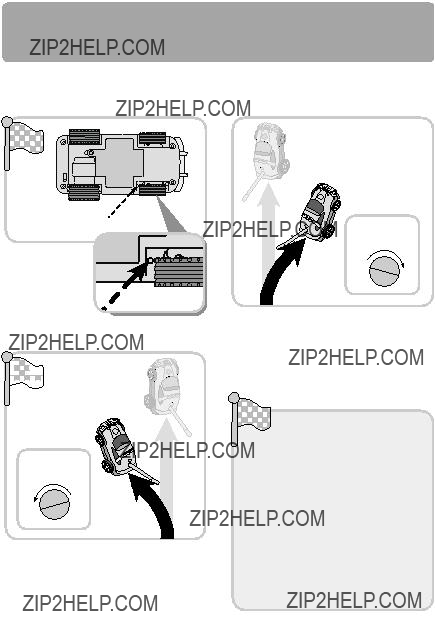
If in Mode II your car is not driving in a straight path on smooth surfaces, follow these instructions.
Screw Hole
???Turn the car over and locate the small screw hole near
front wheel on the driver???s side.

 2
2

 Car Pulls


 to the Left
Counter-
Clockwise
If your car is pulling to the left:
???Insert the small jeweler???s or eye- glass screwdriver into the screw and turn one or two complete turns counter-clockwise.
Clockwise
If your car is pulling to the right:
???Insert the small jeweler???s or eye- glass screwdriver into the screw and turn one or two complete turns clockwise.
Place the car on a smooth surface and test the align- ment by driving the car in mode II in a straight line (with the steering wheel centered). If the car drives straight you are finished.
If the car still pulls to one direction repeat step 2.

FCC Note (United States Only)
Note: This equipment has been tested and found to comply with the limits for a Class B digital device, pursuant to Part 15 of the FCC Rules. These limits are designed to provide reasonable protection against harmful interference in a residential installation. This equipment generates, uses and can radiate radio frequency energy and, if not installed and used in accordance with the instructions, may cause harmful interference to radio communications. However, there is no guarantee that interference will not occur in a particular installation. If this equipment does cause harmful interference to radio or television reception, which can be determined by turning the equipment off and on, the user is encouraged to try to correct the interference by one or more of the following measures:
???Reorient or relocate the receiving antenna.
???Increase the separation between the equipment and receiver.
???Consult the dealer or an experienced radio/TV technician for help
NOTE: Changes or modifications not expressly approved by the manufacturer responsible for compliance could void the user???s authority to operate this equipment.
Grow-with-Me??? RC Rally
Model Number: 77306
This device complies with Part 15 of the FCC Rules. Operation is subject to the following two conditions: (1) This device may not cause harmful interference and (2) this device must accept any interference received, including interference that may cause undesired operation.
Consumer Relations Department 636 Girard Avenue
East Aurora, New York 14052
Grow-with-Me??? RC Rally operates on 27 MHz radio frequency.
Radio interference can occur if more than one radio-controlled toy is operating on the same frequency. In the unlikely event that the remote interferes with the use of other remote controlled equipment, such as televisions and stereos, or if use of other electric or battery powered appliances interfere with operation of the RC Rally, do not use both devices at the same time.
One (1) Year Limited Warranty
Fisher-Price, Inc., 636 Girard Avenue, East Aurora, New York 14052, warrants that ???Grow with Me??? RC Rally??? is free from all defects in material and workmanship when used under normal conditions for a period of one (1) year from the date or purchase.
Should the product fail to perform properly, we will repair or replace it at our option, free of charge. Purchaser is responsible for shipping the product to Fisher-Price Consumer Relations at the address indicated below and for all associated freight and insurance cost. Fisher-Price, Inc. will bear the cost of shipping the repaired or replaced item to you. This warranty is void if the owner repairs or modifies the product. This warranty excludes any other liability other than that expressly stated above including but not limited to any incidental or consequential damages.
SOME STATES DO NOT ALLOW THE EXCLUSION OR LIMITATION
OF INCIDENTAL OR CONSEQUENTIAL DAMAGES, SO THE
ABOVE LIMITATION MAY NOT APPLY TO YOU.
THIS WARRANTY GIVES YOU SPECIFIC LEGAL RIGHTS, AND
YOU MAY ALSO HAVE OTHER RIGHTS WHICH MAY VARY FROM
STATE TO STATE.
Consumer Information
Questions? We'd like to hear from you!
Call Fisher-Price?? Consumer Relations, toll-free at 1-800-432-5437,
8 AM - 6 PM EST Monday through Friday. Hearing-impaired consumers using TTY/TDD equipment, please call 1-800-382-7470. Or, write to: Fisher-Price?? Consumer Relations, 636 Girard Avenue, East Aurora, New York 14052.
For other countries, outside the United States:
Canada: call 1-800-567-7724, or write to: Mattel Canada Inc, 6155 Freemont Blvd., Mississauga, Ontario L5R 3W2.
Great Britain: telephone 01628 500302.
Australia: Mattel Australia Pty. Ltd., 658 Church Street, Locked Bag #870, Richmond, Victoria 3121 Australia. Consumer Advisory Service 1300 135 312.
New Zealand: 16-18 William Pickering Drive, Albany 1331, Auckland.
 Fisher-Price, Inc., a subsidiary of Mattel, Inc., East Aurora, NY 14052 U.S.A.
??2002 Mattel, Inc. All Rights Reserved. ?? and ??? designate U.S. trademarks of Mattel, Inc.

 Door
Door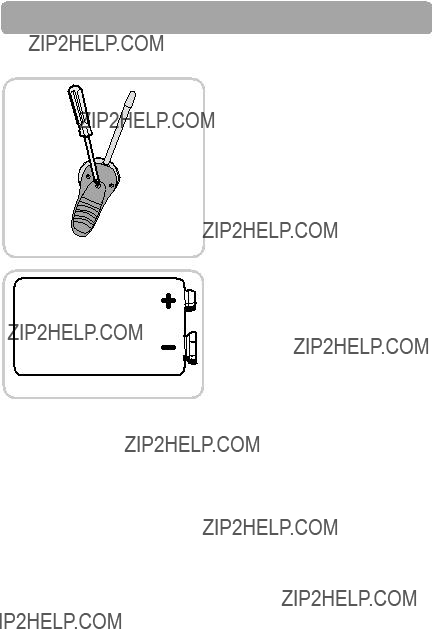
 Battery

 WARNING
 1
1

 Handle
 2
2


 Handle
 3
3



 .
. if the track is properly connected!
 or fast speed
 .
.
 WARNING
 on the remote controller. The car moves around the track, hugging all the way without steering!
 on the remote controller. The car moves around the track, hugging all the way without steering!
 or fast speed
  .
.
 .
. on the remote controller.The car moves forward.
 on the remote controller. The car moves backward.

 2
2

 3
3


 4
4


 5
5


 Crash
Crash

 6
6


 7
7


 8
8


 9
9


 10
10




 Car Pulls


 to the Left


