K0026
K0026
Consumer Information
 WARNING
Warning - Choking Hazard
Not recommended for children under 3 years because it contains small parts that can be swallowed.
???Please keep this instruction sheet for future reference, as it contains important information.
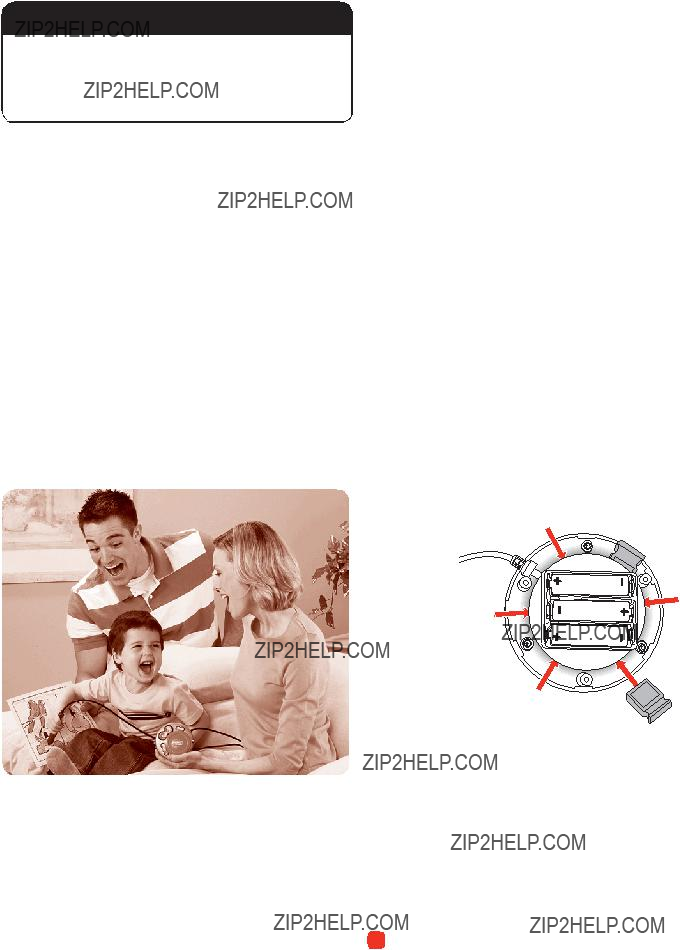
???Requires three ???AA??? (LR6) alkaline batteries (not included) for operation.
???Adult assembly is required. Tool needed for assembly: Phillips screwdriver (not included).
???This product contains magnets. Do not use around items that are sensitive to or affected by magnetic fields.
???Wipe this toy with a clean cloth dampened with a mild soap and water solution. Do not immerse this toy.
???This toy has no consumer serviceable parts. Do not take this toy apart.
Call our Consumer Relations Department,
Write to us at:
???The Inspiration Pod with Pen works with the accessories wherever you go. Clip the Inspiration Pod to your belt or carry it along.
???We recommend that your child uses markers or other drawing tools in the dominant hand and the Inspiration Pen in the other hand.
???For best results, keep tip of the pen clean.
???Spark Art Creativity System??? Easel accessories (sold separately) include an Inspiration Chip. To install the Inspiration Chip, loosen the screws in the Inspiration Pod battery compartment door. Remove the door.
???Press the Inspiration Chip into one of the slots inside the Pod, as shown.
Hint: You can insert up to six Inspiration Chips inside the Inspiration Pod.
??? Replace the door and tighten the screws.
2
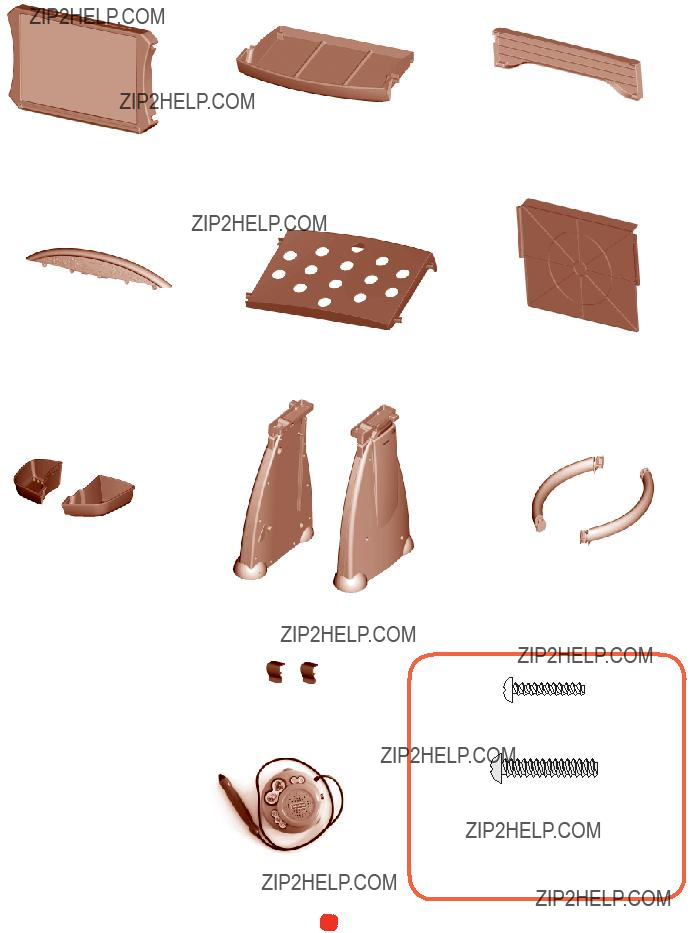
Easel Board
Cap
Parts
Brace
Artist???s Tray
2 Accessory Bins
Parts Not Shown
6
2 Scene Starter Backgrounds
5
12
2
*Additional
Storage Tray
2 Legs
2 Clips
Inspiration Pod
with Pen
Back Panel
2 Handles
#6 x 3/4" (1.9 cm) Chrome Screw ??? 21 (Assembly steps 1, 4, 8, 10, 12 and 16)
#8 x 1" (2.5 cm) Gold Tone Screw ??? 10 (Assembly steps 5, 7 and 14)
Both Shown Actual Size
Note: Tighten and loosen all screws with a Phillips screwdriver. Do not
3
Assembly
Clips
Easel Board
Handles
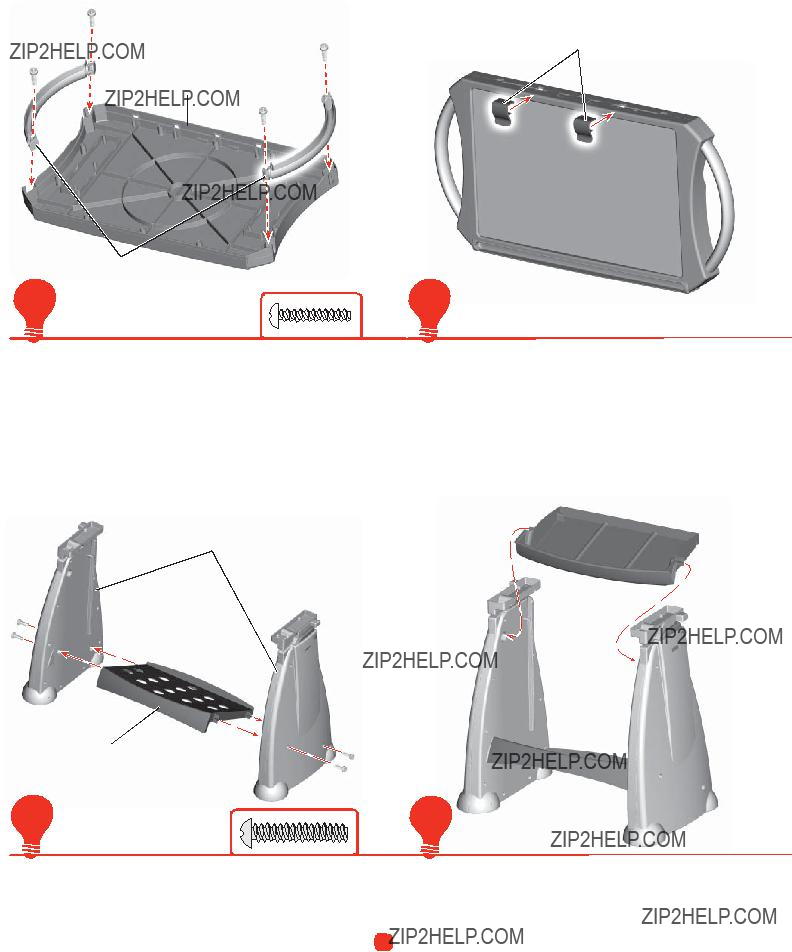
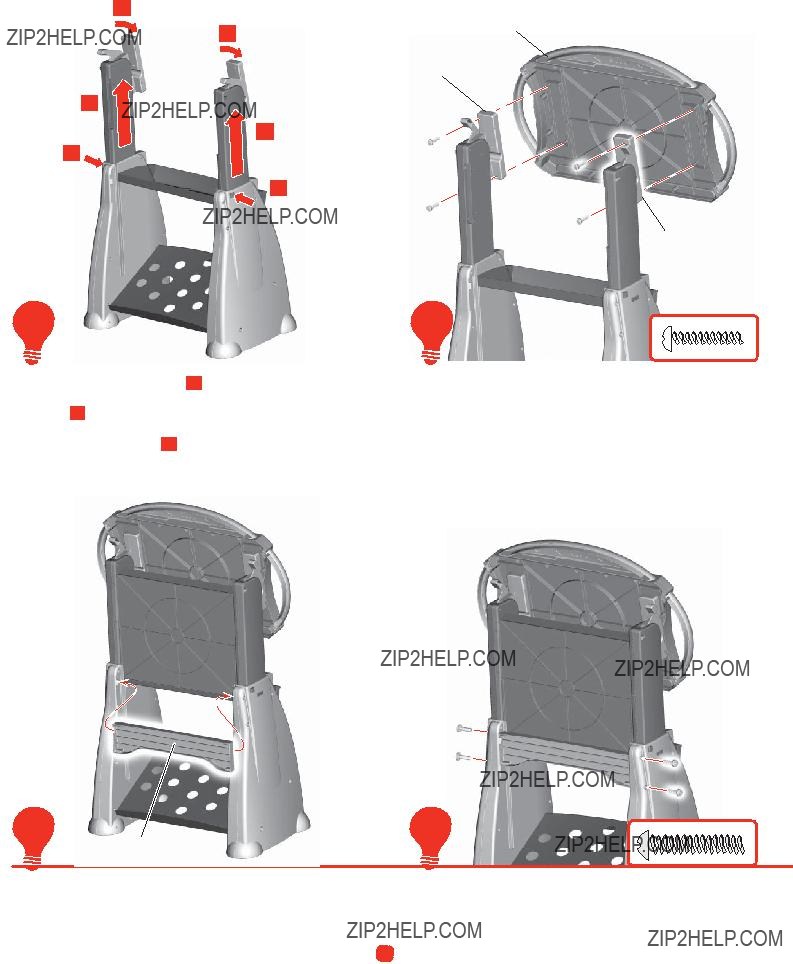
1
???Place the easel board face down.
???Fit the handles to the grooves in each side of the easel board.
???Insert two #6 x 3/4??? chrome screws into each handle and tighten.
Legs
Storage Tray
5
???Position the storage tray between the legs, as shown.
???Fit the pegs on the storage tray into the holes in the legs.
???Insert two #8 x 1??? gold tone screws through each leg and into the storage tray. Tighten the screws.
2
???Turn the easel board upright.
??????Snap??? both clips to the front side of the easel board.
 Artist???s Tray
6
??? Fit the pegs on the artist???s tray into the holes in the legs.
4
Assembly
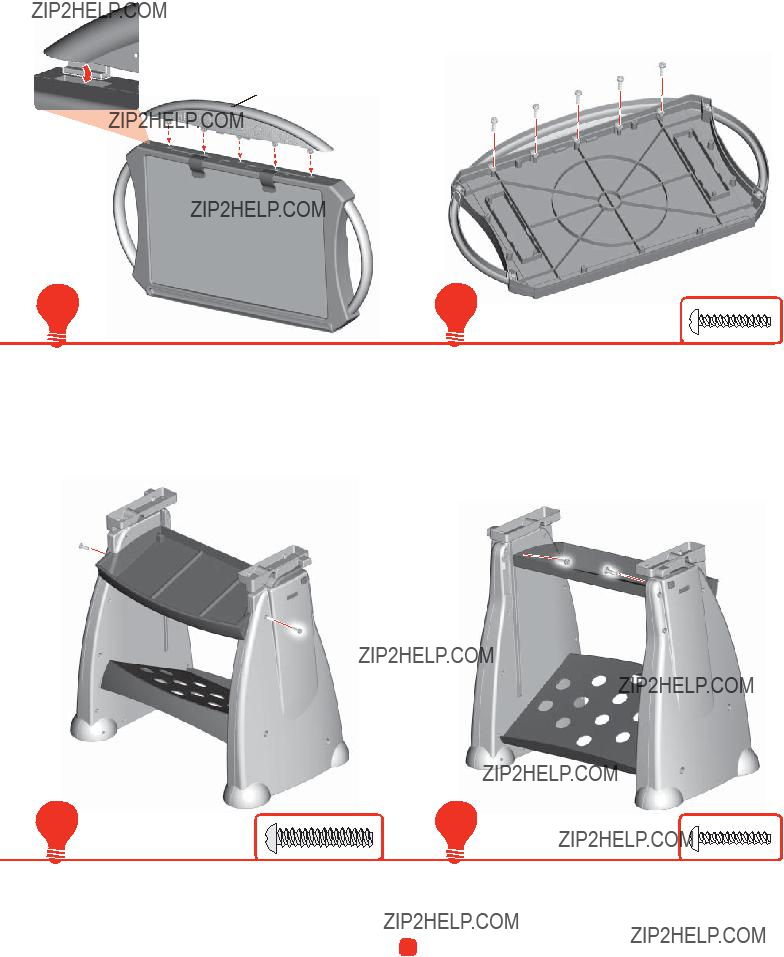
 Cap
Cap
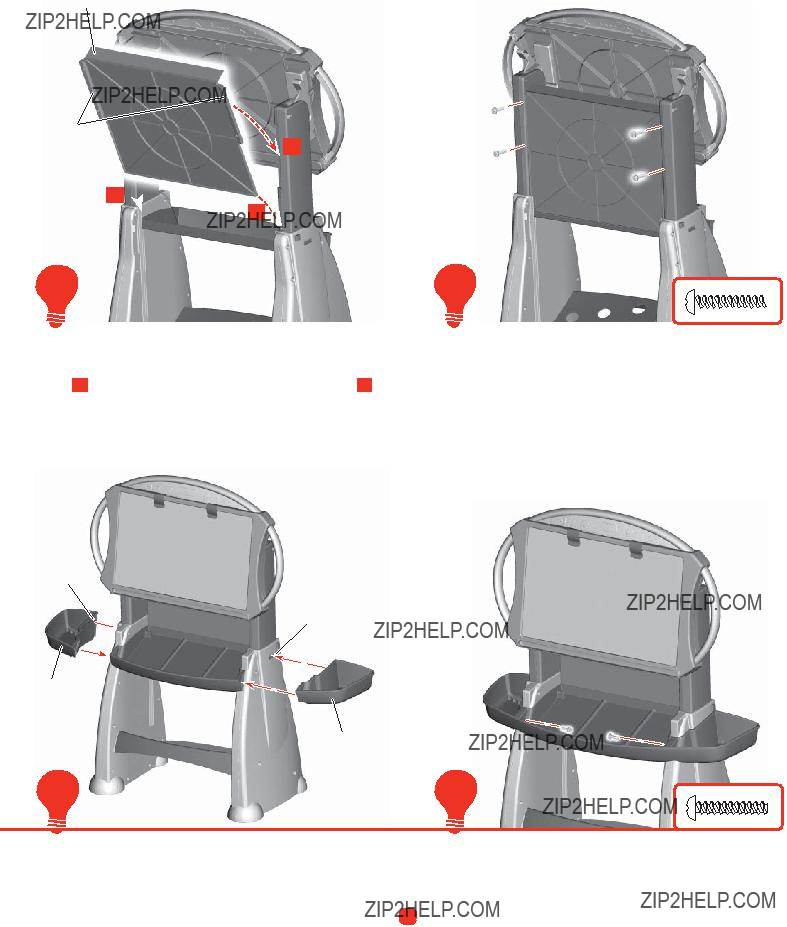
3
???Fit the cap to the top of the easel board.
???Make sure the tab on each end of the cap fits into the slots in the top of the easel board.
4
???Place the easel board face down again.
???Insert five #6 x 3/4??? chrome screws into the easel board and tighten.
???Set the easel board assembly aside.
7
???First, insert two #8 x 1??? gold tone screws through each leg and into the artist???s tray. Tighten the screws.
8
???Then, insert two #6 x 3/4??? chrome screws through the artist???s tray and into each leg. Tighten the screws.
5
Bracket
???Press the button on each leg A .
???Grasp the column inside each leg and lift to the highest position B .
???While holding the columns in place, turn the brackets until they ???click??? into position C .
???Position the easel board upright.
???Fit the easel board to the brackets.
???Insert two #6 x 3/4??? chrome screws into each bracket and tighten.
??? With the ribbed side facing you, fit the brace to the legs.
???Insert two #8 x 1??? gold tone screws though each leg and into the brace. Tighten the screws.
6
Back Panel
Tabs
A 
Assembly
B
A 
???Position the back panel with ribbed side facing you and the tabs at the top.
???First, fit the bottom edge of the back panel into the slot in the legs A . Then, fit the back panel tabs onto the columns B .
???Insert four #6 x 3/4??? chrome screws into the back panel and tighten.
Hooked
Tab
???Fit the hooked tab on each accessory bin into the slot in each leg.
???Insert two #6 x 3/4??? chrome screws into the artist???s tray and each accessory bin. Tighten the screws.
7

Battery Installation
1.5V x 3 "AA" (LR6)
 Inspiration Pod
???Loosen the screws in the battery compartment door with a Phillips screwdriver. Remove the battery compartment door.
???Insert three ???AA??? (LR6) alkaline batteries.
Hint: We recommend using alkaline batteries for longer battery life.
???Replace the battery compartment door and tighten the screws.
???When sounds become faint or stop, it's time for an adult to change the batteries!
???Protect the environment by not disposing of this product with household waste (2002/96/EC). Check your local authority for recycling advice and facilities (Europe only).
Battery Safety Information
In exceptional circumstances, batteries may leak fluids that can cause a chemical burn injury or ruin your product. To avoid battery leakage:
???Do not mix old and new batteries or batteries of different types: alkaline, standard
???Insert batteries as indicated inside the battery compartment.
???Remove batteries during long periods of
???Never
???Use only batteries of the same or equivalent type, as recommended.
???Do not charge
???Remove rechargeable batteries from the product before charging.
???If removable, rechargeable batteries are used, they are only to be charged under adult supervision.
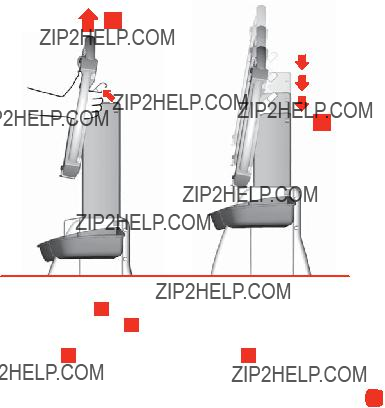
???Fit your hands through the handles and squeeze the release levers A .
???Turn the easel board down B .
???Lift the easel board slightly C and then lower it completely D .
???Fit your hands through the handles and press and hold both buttons under the easel board A .
???Lift and turn the easel board until it ???clicks??? into the highest position B .
8
FCC Statement
United States Only
This equipment has been tested and found to comply with the limits for a Class B digital device, pursuant to Part 15 of the FCC Rules. These limits are designed to provide reasonable protection against harmful interference in a residential instal- lation. This equipment generates, uses and can radiate radio frequency energy and, if not installed and used in accordance with the instructions, may cause harmful interference to radio communications. However, there is no guarantee that interfer- ence will not occur in a particular installation. If this equipment does cause harmful interference to radio or television reception, which can be determined by turning the equipment off and on, the user is encouraged to try to correct the interference by one or more of the following measures:
???Reorient or relocate the receiving antenna.
???Increase the separation between the equipment and receiver.
???Consult the dealer or an experienced radio/TV technician for help.
Note: Changes or modifications not expressly approved by the manufacturer responsible for compliance could void the user's authority to operate the equipment.
Notes About
???Use only the
???Dampen a soft cloth with water and wipe to clean the easel board or backgrounds.
IMPORTANT!
???To completely remove marker residue from the easel board or backgrounds, dampen the eraser and wipe after each use.
???Markers conform to ASTM D4236. Avoid contact with carpet, clothing, walls and furniture. Do not use permanent markers on the easel surface or
???To remove marker from the skin, simply use soap and water.
Easel Height Adjustment
Easel Adjusts to Three Different Heights!
B
D
???Fit your hands through the handles and squeeze the release levers A .
???Lift the easel board B and let go of the release levers.
???Lower the easel board until it ???clicks??? into the middle height
position C or the lowest height position D .
???To raise the easel board to a higher position again, simply lift until it ???clicks??? into place.
9
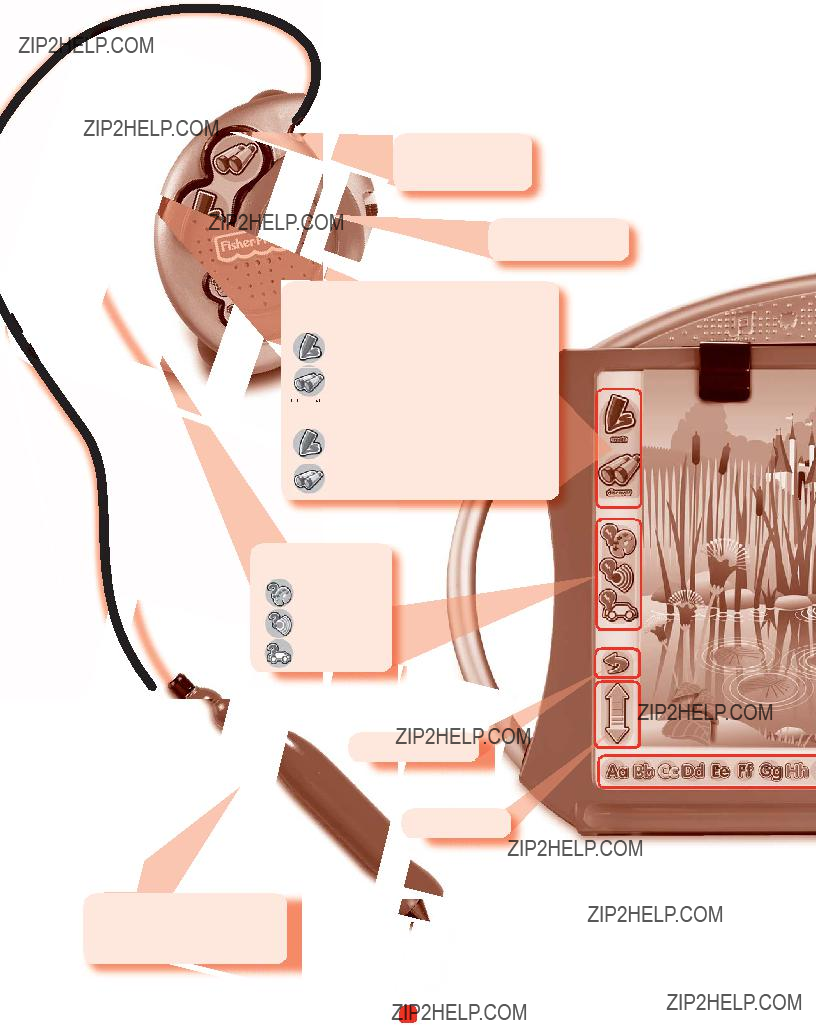
Spark Imagination an
Use the Inspiration Pen on the easel, scene starter backg
Use the tip of the pen to adjust volume higher or lower.
Slide the power switch on or off
 .
.
Use the tip of the pen to ???read??? areas or objects on scene starter backgrounds,
Create - Listen to fun sound effects.
Discover - Listen to items identified.
Use the tip of the pen to ???read??? areas or objects on
Create - Listen to coloring sug- gestions or fun sound effects.
Discover - Listen to fun sound effects.
Select to hear draw- ing suggestions.
Colors
Sounds
Objects
Repeat Last Sound
Adjust Volume
Optical reader technology lets the Inspiration Pen ???read??? hidden codes on
Note about
10
d Inspire Creativity!
rounds,
Place
easel board.
Slide scene starter back- grounds, activity sheets or regular drawing paper under the clips.
Alphabet - Select a letter to hear letter names and sounds or words that begin with that letter.
Inspire with Color!
Inspire
with Sound Effects!
Use
11
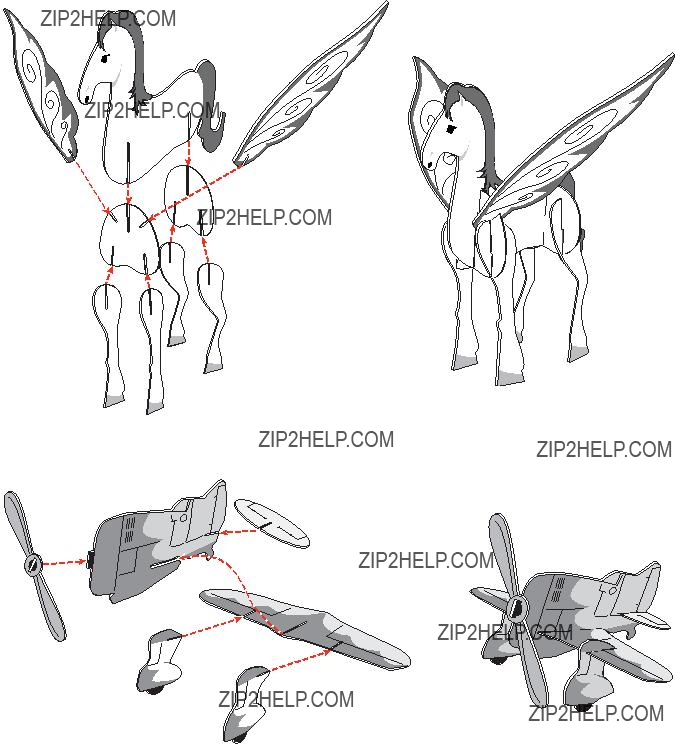
Build the 3D Models
For countries outside the United States:
CANADA: Questions?
GREAT BRITAIN: Mattel UK Ltd, Vanwall Business Park, Maidenhead SL6 4UB. Helpline: 01628 500303; www.service.mattel.com/uk
AUSTRALIA: Mattel Australia Pty. Ltd., 658 Church Street, Locked Bag #870, Richmond,Victoria 3121 Australia. Consumer Advisory Service 1300 135 312.
NEW ZEALAND:
ASIA: Mattel East Asia Ltd, Room 1106, South Tower, World Finance Centre, Harbour City, Tsimshatsui, HK, China.