Operating and assembly instructions
AH
Extractor hood
Operating and assembly instructions
AH
Extractor hood

AH
1
Preface
With your new extractor hood, working in the kitchen will be even more fun.
The appliance offers you a number of advantages:
???effective extraction thanks to the
???low operating noise
To ensure that you will be able to use this appli- ance in all its diversity, read through the operating and assembly instructions conscientiously before operating it for the first time. The instructions contain important notes on use, installation and maintenance of the appliance.
On the following page you will find important notes on safety and operation. These will serve to ensure your personal safety and the lasting value of your appliance.
You will find notes on Page 4 that you ought to observe before operating the appliance for the first time.
The chapters entitled ???Structure and operating principle??? and ???Operation??? will tell you all the things your extractor hood is capable of doing and how the appliance is operated.
Tips and hints in the chapter entitled ???Cleaning and care??? will make sure that your appliance will stay operable and beautiful for a long time.
And now we wish you lots of fun with your new extractor hood.

1. Important notes
1.1 For your safety
Damaged appliances must not be operated.
Connecting cables must not come into contact with hot cooking surfaces.
Do not operate the extractor hood without inserted lamps. Never operate the appliance without a grease filter.
Hazardous or explosive substances and vapours must not be extracted!
The user is responsible for expert use and the perfect condition of the appliance.
Only ever operate the appliance under supervision.
Fire risk!
Do not flamb?? meals under the extractor hood! Only ever
Operation of the extractor hood above a hearth for solid fuels (coal or wood etc.) is only partly permitted.
Gas appliances may only be used under the extractor hood when pots and pans are placed on them!
When using more than 2
Do not place any heavy objects on the appliance; this will have a detrimental effect on functioning.
Do not clean the appliance with a steam cleaning apparatus or with water pressure because this poses a risk of
Isolate the appliance from the mains during every maintenance operation. To do this, remove the mains plug or actuate the corresponding fuse.
If the mains plug is not accessible, the appliance must be disconnected by means of the domestic installation fuse.
Repairs must be carried out by authorised specialists, thus ensuring electrical safety.
No warranty claims can be lodged in the event of damage caused by failure to observe these instructions.
Adequate incoming air must be ensured if a wood, coal, gas or oil heater or an open hearth is operated in the same room as the one in which the hood is installed.
Safe operation is possible whenever the partial vacuum in the place where the firing equipment is installed does not exceed 4 Pa (0.04 mbar). This can be achieved whenever the air needed for combustion is able to enter through openings that cannot be sealed, for example in doors, windows, incoming/exhaust air wall boxes or other technical means.
Technical modifications reserved.
3

1.2 Operating for the first time
Before operating the appliance for the first time, please pay attention to the following notes:
The appliance must be installed and connected by a specialist before it is operated for the first time.
Conscientiously read through the operating and assembly instructions before operating the appliance for the first time.
Remove the packaging from the appliance and dispose of it properly. Pay attention to the fact that there are accessories in the packaging.
Keep packaging elements out of the reach of children!
Thoroughly clean the appliance before using it for the first time. (see chapter entitled ???Cleaning and care???).
Before operating the appliance for the first time, check that the mains connection is in proper working order.
1.3 About use
The appliance is intended solely for use in the household and must not be put to any other uses.
In the event of malfunctions, first of all check the household fuses. If the problem has nothing to do with the power supply, please contact your specialist dealer or your local Gaggenau
4
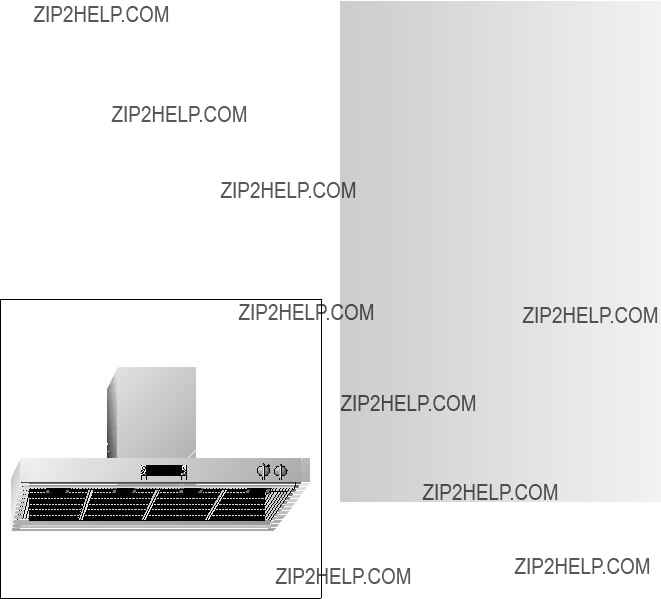
2. Structure and operating principle
2.1 Structure of the appliance
Fig. 3
2.2 Accessories/special accessories
You can order the following special accessories:
???Back draught flap RK
Back draught flap for insertion in the extractor???s
???Flexible aluminium pipe AR
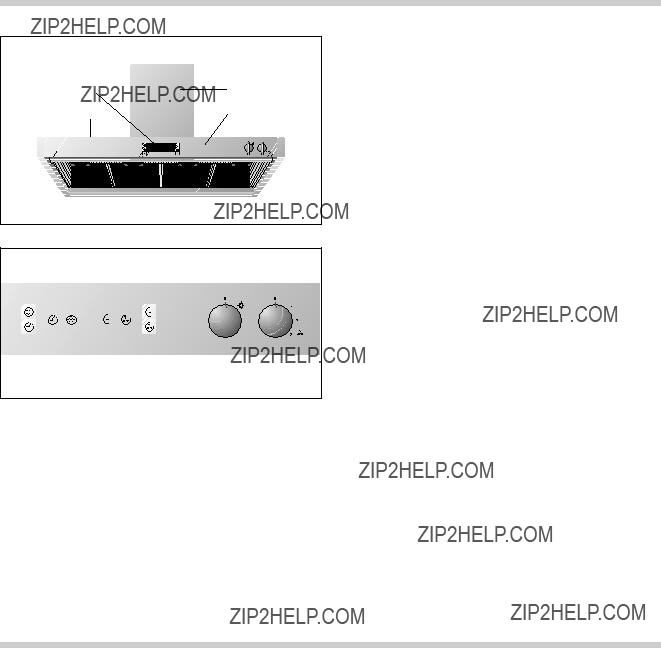
DN 150 up to 3.5 m length with 2 hose clamps
1 Display
2 Glass plates
3 Air duct
4 Control panel
5 Grease filter key
6 Ventilation level display
7 ???Coanda level??? key
8 ???Light??? control knob
9 ???Ventilation level??? control knob
10
11
12???Grease filter saturation??? symbol
13???Coanda level??? symbol
14???Intensive level??? symbol
15???Intensive level??? key
Installation accessories:
LK
LK
5

2.3 Operating principle
Fig. 4
Fig. 5
This extractor hood swiftly and silently extracts all odours produced while cooking. You can set
different intensity levels depending on the intensity of odours.
The fan in the extractor hood sucks in the kitchen vapours and passes them through the grease filter to outdoors. The grease filter absorbs the greasy components in the kitchen vapours (see Fig. 4).
The ???Coanda effect???
Kitchen vapours are extracted even better with the ???Coanda effect???. By means of an additional motor, kitchen vapours are passed swiftly and effectively into the hood???s extraction zone. An additional fan on the front edge of the kitchen extractor hood generates an air stream that is diverted around a cylinder towards the rear. This ensures that kitchen vapours are routed completely into the extractor hood???s filter area (see Fig. 5).
6

3. Operation
3.1 Switching on and off
Fig. 6
1
2
Fig. 7
Fig. 8
Switching on
???Turn the ???Ventilation level??? control knob to the ventilation level you require (Fig. 6).
set level is displayed.
a power failure, the extactor will not go on again automatically. You can recommence operation by turning a knob or by pressing any key.
Switching off
???Turn the ???Ventilation level??? control knob to the 0 position (Fig. 7).
???The set level 0 is displayed for a few seconds.
Note:
The light can be switched on and off at any time. To do this, turn the ???Light??? control knob to the  (Light) position.
Switching on the Coanda level
???Turn the ???Ventilation level??? control knob to the level you require.
???Press the Coanda level key.
???The level you have set and the Coanda level symbol appear on the display (Fig. 8).
Note: You can change to any ventilation level, and the Coanda level remains set.
Switching off the Coanda level:
???Press the ???Coanda level??? key or turn the ???Ventilation level??? knob to the 0 position.
7

3.2 Special functions
Fig. 9
Fig. 10
Fig. 11
Intensive level
You should select the intensive level when browning and frying in an open pan.
Switching on: (Fig. 9)
???Turn the control knob to a ventilation level
???Press the intensive level key. The intensive level symbol appears on the display. The previously selected ventilation level flashes on the display. After a few minutes, the appliance switches back automatically to the previously selected
ventilation level.
or
???Press the intensive level key. The intensive level symbol appears on the display. The appliance is now operated at the intensive level for a few minutes and then switches off automatically.
Ending the intensive level prematurely:
???Turn the ???Ventilation level??? knob to the 0 position or
???turn the ???Ventilation level??? knob to any level or
???press the intensive level key once again.
Switching on:
???Press the 
???The 
or
???Turn the ???Ventilation level??? control knob to any level.
???Press the 
???The 
???The extractor hood continues running for 10 minutes.
Switching off:
???Turn the ???Ventilation level??? control knob to the 0 position.
or
??? Press the 
8

4. Cleaning and care
Caution!
Cleaning the grease filters:
The  (Grease filter saturation) symbol flashes on the display after an operating time of 30 hours. Flashing of this symbol signals to you that the
grease filters have to be cleaned. The grease filters can be cleaned at any time, even if the  (Grease filter saturation) symbol does not flash. The metal filters can be removed easily for cleaning.
Proceed as follows:
???Grip the grease filter handles and press the slide towards the rear.
???Pull the grease filter out of its mount in the downward direction (Fig. 12).
???Repeat the operation with the other grease filters.
You can clean the metal grease filters in a dishwasher at a maximum temperature of 65 ??C. Place the grease filters vertically in the dishwasher to ensure that no food remainders will stay on them.
Note:
The handles of the grease filters must be visible after installation. They can no longer be removed if the handles are in the inner part of the housing.
Slight discoloration can occur when cleaning the grease filters in a dishwasher.
When replacing the grease filters, wipe out the inner part of the housing with hot detergent solution.
Reinsert the grease filters in the hood after cleaning. Install them in the reverse order to removal.
Press the  (Grease filter) key to set the elapsed hours counter to zero; the
  (Grease filter) symbol stops flashing.
Do not clean the appliance with a steam cleaning apparatus or with water pressure because this poses a risk of
9
Cleaning the glass plates
Apply commercially available window cleaning agent with a soft, moist cloth. To facilitate cleaning, you can detach the glass plates as follows:
Detach the grease filters. In the extractor hood, you will find two openings on the upper side through which you can lift the glass plates singly with a blunt object (e.g. handle of a wooden spoon) to detach them with greater ease.
If they are extremely soiled, the glass plates can be cleaned in a dishwasher at a maximum temperature of 55 ??C.
Cleaning the aluminium panel
Clean the aluminium panel with a soft cloth only. Do not use any strong or caustic cleaning agents or brushes and abrasive cleaner to clean it. Do not use strongly alkaline cleaning agents (such as oven spray) because these are aggressive to the aluminium surface. Do not use any abrasive sponges either.
Clean the stainless steel parts of the extractor hood (side panel, ventilation duct) with mild rinsing detergent and apply stainless steel care agent to the metal surfaces using a soft cloth.
10

5. Maintenance
Fig. 13
Fig. 14
First disconnect the appliance from the mains before carrying out any repairs.
In the event of malfunctions, first of all check the household fuses.
If the power supply is in proper working order, but the appliance is nevertheless not functioning, then please contact your specialist dealer or your responsible Gaggenau
Specify the appliance type (see rating plate).
Repairs must only be carried out by authorised specialists, thus ensuring the safety of the appliance. Improper tampering will render all warranty claims null and void.
Lamp replacement
Caution: Disconnect the power supply before replacing lamps (switch off the fuse)!
Caution: Lamps may still be hot shortly after use! Risk of burns.
???Detach the ring from the lamp cover.
Note: Make sure that the glass will not fall out (Fig. 13).
???Pull out the lamp (Fig. 14).
Defective lamps must only be replaced by lamps of the same type! (12 V/20 W/G4 lampholder)
Inserting the lamp
???Insert the lamp in the lampholder.
Note: Do not touch the halogen lamps with your hands. Use a cloth and touch the lamp only on its edges.
???Engage the lamp cover.
???Connect the appliance to the mains again.
11

6. Assembly instructions
6.1 Technical data
Weight: 41 kg without ventilation duct
Dimensions: 1198 x 560 mm
Electrical connection
Pay attention to the rating plate data.
The mains connecting cable must at least correspond to the type H 05
The appliance must only be connected by an authorised specialist, paying attention to the relevant regulations of the power supply companies and the regional construction regulations. He must explain to the user how the
appliance can be isolated from the mains whenever required.
The connector of the connecting cable is connec- ted to the socket that is located behind the duct cover on the wall. If this is not possible, it must be possible to isolate all poles of the appliance from the mains by way of the domestic fuse, or by means of accessible isolating device with a contact gap of at least 3 mm.
If the appliance is to be operated only with the window open (to ensure adequate incoming air), you can use the window switch.
A switch (normally open) is fitted on the window. On the appliance, this switch is connected to the window switch terminal on the main electronics. The appliance can now only be operated when the window is open.
Important: The window switch must only be connected by an authorised specialist.
Note: The light function works without restriction.
6.2 Installation
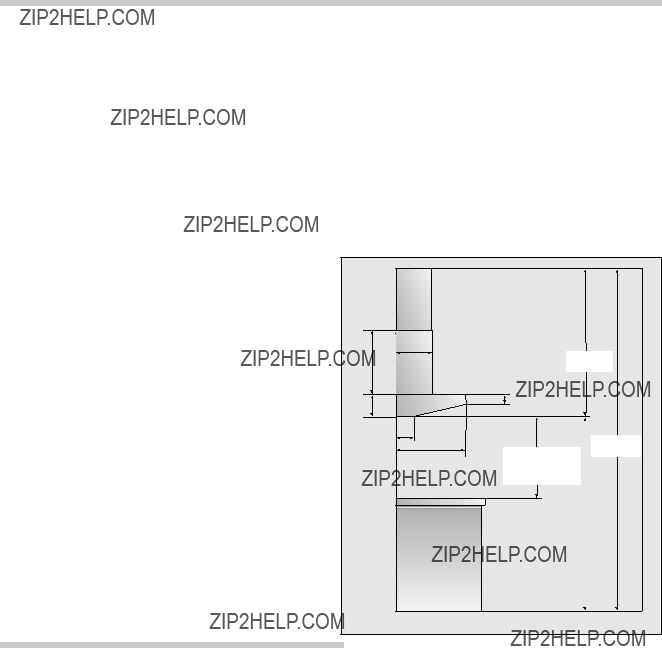
The applicable regulations of the energy supply companies and the regional construction regulations must be observed when installing the hood.
The minimum distance from the worktop to the bottom edge of the wall hood is for electrical appliances 650 mm and for gas appliances 750 mm.
The wall hood was conceived for the exhaust air mode. The exhaust air can be routed into a separate exhaust air shaft or directly into the open through the outside wall.
It is not allowed to pass the exhaust air into a flue or exhaust air chimney that is in operation or into a shaft that is linked to the heating basement. Consult the chimney sweep responsible for your district whenever you wish to pass the exhaust air into a chimney that is not in operation.
During the course of planning, a chimney sweep must be consulted if a room
Adequate incoming air must be ensured if a wood, coal, gas or oil heater or an open hearth is operated in the same room as the one in which the hood is installed.
Safe operation is possible whenever the partial vacuum in the place where the firing equipment is installed does not exceed 4 Pa (0.04 mbar).
This can be achieved whenever the air needed for combustion is able to enter through openings that cannot be sealed, for example in doors, windows, incoming/exhaust air wall boxes or other technical means.
12
Flexible aluminium pipes,
Pay particular attention to ensuring that
???the exhaust air ducts and pipes are kept as short as possible
???the pipes are not laid at an acute angle, but as bends and that they are inserted into the shaft at an inclined upward angle and
???there are no
As standard, the
To pass exhaust air through the outer wall, we recommend the use of our telescopic wall box TM
Note:
To prevent the ingress of water, e.g. condensate or rain water from an uncovered exhaust air shaft, our condensate separator RV
Planning note:
When installing the hood between wall cupboards it is advisable to leave a space of at least 5 cm on both sides of the hood.
Depending on the ceiling height, the following duct units are at your disposal for exhaust air operation:
???LK
???LK
The dimensions above refer to a distance of 1.60 m from the floor to the bottom edge of the hood.
If required, special ventilation ducts are available at an extra charge.
The socket must be place behind the duct cover on the wall.


???Secure the hood to the wall using the 4 screws b (Fig. 18).
???Establish the pipe connection.
???Establish the electrical connection.
???Extract the protective file from the chimney paneling.
Note: Avoid damaging the sensitive stainless steel surfaces.
???Fit the top of the chimney into the base. Make sure that the fastening holes on the side are at the top.
???Secure the top duct unit with 2 screws on the ceiling holder.
???Pull the shoe down into its final position (Fig. 19).
Note: Avoid scratches when fitting the elements into one another by placing the assembly template, for example, over the edge of the bottom chimney paneling to protect it.
???Reinsert the grease filters.
???Place the 3 glass plates on the hood.