Libretto d'istruzione e uso

Notice d'instructions et mode d'emploi

Instruction manual

Bedienungsanleitung

Manual de uso y manutencion

Gebruiksaanwijzing

Livro de instruc??oes e modo de emprego

Instrukcja obsl??ugi i konserwacji

Haszn??lati utas??t??s

N??vod k pou????v??n??

Brugsvejledning

Bruksanvisning

Bruks- og vedlikeholdsveiledning

K??ytt??ohjeet

Navodila za uporabo in vzdrz??evanje

Egceirivdio odhgiwvn crhvsh??

Rasaerba autoportante con motore a scoppio - Lama 67-76 cm Tondeuse autoportante avec moteur ?? explosion - Lame 67-76 cm. Ride-on Lawnmower with Petrol engine - 67-76cm blade Selbstfahrender Rasenm??her mit Berstmotor - Klinge 67-76 cm Cortadora de hierba autosustentador con motor de explosi??n - Cuchilla 67-76 cm.

Zelfdragende grasmaaimachine met verbrandingsmotor-Mes 67-76 cm Cortador de grama autoportante com motor de explos??o-Faca 67-76 cm Maszyna do cie%cia trawy samonosna>z silnikiem o zaplonie??iskrowym - Ostrze 67-76 cm

G??pes??tett fu??nyir?? robban?? motorral ??? K??s 67-76 cm Samohybn?? sekac??ka tr??vy s v??bu??n??m motore-sekac?? list 67-76 cm

Selvk??rende pl??neklipper med benzinmotor-Klinge 67-76 cm Sj??lvg??ende gr??sklippare med explosionsmotor-Knivblad 67-76 cm Selvf??rende gressklipper med eksplosjonsmotor ??? 67-76 cm klinge Itseliikkuva r??j??hdysmoottorilla varustettu ruohonleikkuri -

Ter?? 67-76 cm

Samohodna motorna kosilnica - rezilo 67-76 cm

Clookoptikhv autometaferovmenh mhcanhv me kinhthvra eswterikh??

kauvsh??? - Macaivri 67-76 cm

Il presente manuale rappresenta una parte integrante del prodotto. Vi preghiamo di conservarlo per ogni ulteriore utilizzo.

Le manuel pr??sent fait partie int??grante du produit; nous vous prions en cons??quence de le conserver pour toutes n??cessit??s ult??rieures.

The present manual constitutes an integral part of the product and it should be kept for all future reference.

Das vorliegende Handbuch geh??rt zu einem festen Bestandteile des Produktes und muss deshalb zur Einsichtnahme sorgf??ltig aufgehoben werden.

El presente manual representa una parte integrante del producto. Les rogamos que lo conserven para cualquier ulterior empleo.

Deze handleiding is een integrerend deel van het product. Wij verzoeken u hem te bewaren voor iedere mogelijke nadere raadpleging

Este manual representa uma parte integrante do produto. Recomendamos guard??-lo para outros usos.

Niniejsza instrukcja stanowi integralna% czesc%>> produktu. Prosimy przechowywac> ja% do kaz??dego dalszego uzytkowania.??

A jelen szakk??nyv a term??k szerves r??sz??t k??pezi. K??rj??k meg??rizni minden ut??lagos haszn??lat??rt. Tato uz????vatelsk?? pr????ruc??ka je neopomenutelnou souc??ast?? v??robku. Uschovejte ji pro dal???? pouz??it??.

H??ndbogen er en integreret del af produktet. Den skal opbevares omhyggeligt for yderligere konsultation.

Denna manual utg??r en integrerande del av produkten. Vi ber er spara den f??r senare bruk.

Dette h??ndboken representerer en fullende del av produkten. Det skal oppbevares for alle ytre anvendelser.

T??m?? k??ytt??opas kuuluu olennaisena osana tuotteeseen. S??ilyt?? se huolellisesti my??hemp???? k??ytt???? varten. Navodila za uporabo in vzdrz??evanje so sestavni del izdelka, zato prosimo, da jih shranite in upo??tevate za nadaljnjo uporabo.

To parovn egceirivdio apoteleiv ena oloklhrwtikov mevro?? tou proiovnto??. Sa?? parakalouvme na to fulavxete me prosochv gia kavqe peraitevrw crhvsh.

I

F

GB

D

E

NL

P

PL

H

SK

CZ

DK

S

N

SF

SLO

GR

La ringraziamo per la fiducia accordataci con l'acquisto del nostro rasaerba. Siamo certi che avr?? modo di apprezzare nel tempo e con soddisfazione la qualit?? del nostro prodotto. La preghiamo di leggere attentamente que- sto manuale predisposto appositamente per informarla circa il suo uso corretto in conformit?? ai requisiti essenziali di sicurezza.

Nous vous remercions de la pr??f??rence que vous nous avez accord??e en choisissant notre tondeuses. Nous sommes persuad??s que vous pourrez appr??cier dans le temps la qualit?? de notre produit et que vous en serez enti??rement satisfaits.Nous vous prions de lire attentivement ce manuel, sp??cialement con??u pour illustrer l'utilisation correcte de cette machine, dans le respect des normes de s??curit?? fondamentales.

We wish to thank you for choosing our Ride-on lawnmower.. We are confident that the high quality of our machine will meet with your satisfaction and appreciation and that your lawn mower will give you long-lasting service.Before starting to use your machine, make sure to read with care this manual, which has been purposely drawn up to provide you with all the necessary information for proper use, in compliance with basic safety requirements.

Wir danken Ihnen f??r Ihr Vertrauen, das Sie uns durch den Kauf unseres Rasenm??her entgegengebracht haben und sind sicher, da?? Sie mit der Qualit??t unseres Produkte zufrieden sein werden.Wir bitten Sie, dieses Handbuch aufmerksam durchzulesen, das Sie ??ber die richtige Verwendung in ??bereinstimmung mit den Sicherheitsvorschriften informiert.

Le damos las gracias por la confianza que nos ha demostrado al comprar nuestro cortacesped. Estamos seguros de que podr?? apreciar con el tiempo y con satisfacci??n la calidad de nuestro producto.Le rogamos lea atentamente este manual preparado expresamente para informarle sobre el uso correcto con arreglo a los requisitos b??sicos de seguridad.

Wij danken u voor het vertrouwen waarmee voor u onze maaimachine heeft gekozen.

U zult langdurig plezier hebben van de kwaliteit van dit produkt.

Leest u aandachtig dit handboek, dat speciaal bedoeld is om u te informeren over het juiste gebruik ervan volgens de vereiste veiligheidsvoorwaarden.

Agradecemos a prefer??ncia que nos deram, escolhendo a nossa cortadores de relva.Estamos seguros que, com o tempo, podereis apreciar a qualidade dos nossos produtos e ficareis plenamente satisfeitos.

Pedimos a leitura atenta deste manual, preparado especialmente para informar da utiliza????o correcta da m??quina e das normas de seguran??a fundamentais.

Gratulujemy Pan>stwu zakupu naszej kosiarka do trawy jestes> my pewni, z??e be%dziecie Pan> stwo usatysfakcjonowani wysoka% jakos> cia% naszego produktu.

Prosimy o uwaz??ne przeczytanie cal?? ej instrukcji obsl?? ugi i szczeg??l??owe zapoznanie sie% ze wskazaniami dotycza%cymi bezp??eczen>stwa uz??ytkowania urzadzenia.%

K??sz??nj??k Funy??r??g??p^megv??s??rl??sa ??tj??n bel??nkhelyezett bizalmat. Biztosak vagyunk, hogy meg lesz el??gedve gy??rtmanyunk mino^s??g??vel. K??rj??k, olvassa el figyelemmel ezt az utas??t??st a helyes haszn??lati mod ??s a biztons??gi eloir??sok betart??sa ??rdek??ben.

D??kujeme za Va??i d??v??ru, kterou jste projevili n??kupem na???? seka??ky na tr??vu. Jsme p??esv??d??eni, ??e vysok?? kvalita na??ich v??robk?? spln?? Va??e o??ek??v??n?? a seka??ka V??m bude spolehliv?? slou??it po dlouhou dobu. Ne?? seka??ku nastartujete, p??e??t??te si pozorn?? tento n??vod k pou????v??n??, kter?? V??m poskytne v??echny nezbytn?? informace t??kaj??c?? se pou??it?? stroje v souladu se z??kladn??mi bezpe??nostn??mi p??edpisy.

Vi takker dig for at have valgt en af vores pl??neklippere.Vi er overbeviste om, at maskinens h??je kvalitet og pr??stationer vil tilfredsstille dine forventninger og klippe din pl??ne lang tid fremover. L??s vejledningen grundigt igennem, da den indeholder vigtige r??d til en korrekt anvendelse i overensstemmelse med de vigtigste sikkerhedskrav.

Vi tackar er f??r det f??rtroende ni visat oss genom att k??pa v??r gr??sklippare. Vi ??r ??vertygade om att ni med tillfredsst??llelse kommer att uppskatta v??r produkts kvalitet under en l??ng tid fram??ver. Vi ber er att noggrannt l??sa denna bruksanvisning som har till uppgift att informera er om hur man ska anv??nda gr??sklipparen p?? ett korrekt s??tt i enlighet med n??dv??ndiga s??kerhetskrav.

Takk for tilliten du har vist ved ?? kj??pe v??r gressklipper. Vi er sikker p?? at du i fremtiden vil sette pris p?? og ha glede av kvaliteten til v??rt produkt.Vi ber deg om ?? lese denne veiledningen for ?? f?? all informasjon om riktig bruk i overensstemmelse med de viktigste sikkerhetskravene.

Kiit??mme ruohonleikkurimme valinnasta. Olemme varmoja, ett?? tuotteemme tarjoaa parhaan mahdollisen suorituskyvyn ja kest???? k??yt??ss?? pitk????n. Lue k??ytt??opas huolellisesti, sill?? se antaa t??rke???? laitteen oikeaan ja turvalliseen k??ytt????n liittyv???? tietoa.

Spo??tovani kupec, zahvaljujemo se Vam za nakup enega na??ih proizvodov in Vam zelimo??veliko zadovoljstva pri delu z novo kosilnico.

Preden pric?? nete z uporabo kosilnice, pozorno preberite navodila, predstavljena v tem priro??niku, da bi spoznali in razumeli njegovo vsebino glede pravilne uporabe kosilnice in temeljnih varnostnih ukrepov pri delu.

Sa?? eucaristouvme gia thn protivmhsh pou ma?? deivxate agoravzonta?? thn clookoptikhv ma?? mhcanhv. Eivmaste bevbaioi oti crhsimopoiwvnta?? thn qa mporevsete na ektimhvsete me eucarivsthsh thn poiovthta tou proiovnto?? ma??. Sa?? parakalouvme na diabavsete prosektikav to egceirivdio autov pou suntavcqhke epivthde?? gia na Sa?? plhroforeiv katav swstov trovpo ovson aforav thn swsthv crhvsh th?? mhcanh?? suvmfwna me tou?? basikouv?? kanovne?? asfaleiva??.

??????????????

10 Prima di qualsiasi intevento sull'utensile tagliente to- gliere la spina di alimentazione

D??connecter la fiche avant d'intervenir sur l'outil tranchant

Before carrying out any operations on the cutting tool, disconnect the plug

Vor jeglicher Arbeit am Schneidwerkzeug den Stecker abnehmen

Antes de intervenir en la herramienta de corte quitar la clavija

Voor alle onderhoudswerkzaamheden aan de snijinrichting de stekker uittrekken

Afastar o cabo de alimenta????o da parte de corte. Przew??d zasilaja% cy nie powiniwn znajdowac> sie% w zasie%gu pracy noz??a.

Elektromos k??belt a peng??to^l t??voltartani Elektrick?? s?? n??ra mus?? byt' d'aleko od rezacieho n??stroja.

Tag stikket ud af stikkontakten, inden der r??res ved kniven.

Innan n??got som helst ingrepp p?? klippnings- verktyget sker, tag ut kontakten f??r elektrisk mat- ning.

Ta av tilf??ringst??pselen f??r alle inngrepene p?? verket??yet.

Irrota pistotulppa pistorasiasta ennen mink????n leikkaavaan ter????n teht??v??n toimenpiteen suorittamista.

Ugasnite motor in snemite elektric?? ni kabel pred kakr??nemkoli vzdr???evalnem delu.

Protouv kavnete opoiadhvpote epevmbash sto kofterov ergaleivo bgavzete to fi?? trofodosiva??.

2

SIMBOLOGIA SULLA MACCHINA - SIGLES SUR L???APPAREIL - SYMBOLS ON THE MACHINE - SYMBOLE AM GER??T -

SIMBOLOG??A EN LA M??QUINA - YMBOLEN OP DE MACHINE - SIMBOLOS SOBRE A MAQUINA - SYMBOLE NA MASZYNIE -

GEPEN LEVO JELZESEK - SYMBOLY NA STROJI - MASKINSYMBOLER - MASKINSYMBOLER - SYMBOLER P?? MASKINEN

SIMBOLOGI P?? MASKINEN - KONEESSAK K??YTETYT SYMBOLIT - OZNAKE NA STROJU - SUMBOLA EPI THS MHCANHS

Dall???alto a sinistra:

-Attenzione, pericolo

-Leggere il manuale istruzioni prima dell???uso

-Coltello girevole, pericolo ferimento arti

-Pericolo di lancio oggetti

-Effettuare lavori di manutenzione o riparazioni solo dopo aver letto il ma- nuale d???istruzione ed aver tolto la chia- ve d???accensione.

-Mantenere la distanza di sicurezza per le persone non addette al lavoro quando il trattorino ?? in funzione

-Massima pendenza del prato durante la lavorazione: 10??

-Indice di rumorosit?? a norme di legge

Etiqueta ???ATENCI??N??? general. Desde arriba a la izquierda:

-Atenci??n, peligro

-Leer el manual de instrucciones antes del uso

-Cuchillo giratorio, peligro heridas extremidades

-Peligro de lanzamiento de objetos

-Efectuar trabajos de manutenci??n o reparaciones solamentedespu??sde haber le??do el manual de instrucciones y de haber quitado la llave de encendido.

-Mantener la distancia de seguridad para las personas no encargadas del trabajo cuando el peque??o tractor est?? en funcionamiento

-M??xima pendencia del prado durante el trabajo: 10??

-??ndice de ruido a normas de ley

haut ?? gauche :

-Attention danger

-Lire le mode d???emploi avant l???usage.

-Lame tournante, risque de blessures des membres.

-Danger : risque de projection d???objets

-Effectuer les travaux d???entretien ou es

r??parations apr??s avoir pris connaissance du mode d???emploi et apr??s avoir retir?? la cl?? de contact.

-Se tenir ?? une distance de s??curit?? de la tondeuse en marche (?? l???exception

de l???op??rateur).

-D??clivit?? maxi. de travail : 10%

-Puissance sonore aux termes de la loi.

Algemeen ???LET OP??? etiket.

Vanaf links boven:

-Let op, gevaar

-Lees de handleiding voor het gebruik

-Draaimes, gevaar voor verwondingen aan de ledematen

-Gevaar voor wegspringende voorwerpen

-Voer de onderhoudswerkzaamheden en de reparaties pas uit na de handleiding gelezen te hebben en de startsleutel verwijderd te hebben.

-Houd u op een afstand van onbevoegde personen wanneer de tractor in bedrijf is

-Maximale helling van het grasveld tijdens de bewerking: 10??

-Geluidsniveau overeenkomstig de normen
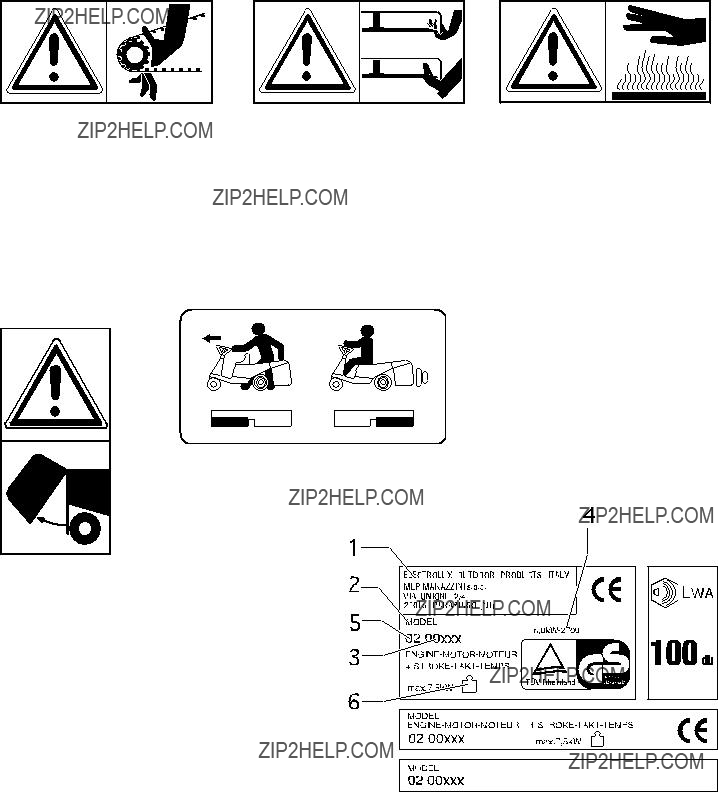
From top to left:

- Attention, danger

-Read the instruction manual before operating the ride-on lawnmower

-Rotating blade, risk of limb injury

-Danger, hurling objects

-Remove the ignition key and read the instruction manual before carrying out any service or maintenance work on the ride-on lawnmower.

-Keep the safety distance from the oper- ating rride-on lawnmower (except op- erator)

-Max. work slope: 10??

-Noise level in accordance with the law

Etiqueta ???ATEN????O??? geral.

Do alto ?? esquerda:

-Aten????o, perigo

-Ler o manual das instru????es antes do uso

-Cortador rotante, perigo machucamento dos artos

-Perigo lan??o objetos

-Executar a manuten????o ou as repara????es so depois da leitura do

manual das instru????es e de ter tirado a chave de igni????o.

-Os que n??o sao os operadores devem manter uma distancia de seguran??a quando o mini trator est?? funcionando.

-M??xima pendencia do gramado : 10??

-Indice de rumorosidade em conformidade com a lei.

Von oben nach links:

-Achtung Gefahr

-Lesen Sie die Bedienungsanleitung vor Inbetriebnahme

-Drehendes Messer Gefahr f??r Arme und Beine

-Schleuder-Gefahr von Gegenst??nden

-Instandsetzungs- oder Wartungsarbeiten erst nachdem Bedienungsanleitung gelesen und Z??ndschl??ssel abgezogen wurden, durchf??hren.

-Sicherheitsabstand bei laufendem Aufsitzm??her einhalten.

-Max. Hangneigung bei der Arbeit: 10??

-Ger??uschpegel gem??ss Gesetz.

Etykietka ???UWAGA??? og??lnie. Z g??ry na lewo:

- Uwaga, niebezpieczen>stwo

- Przeczytac> podre%cznik instrukcji przed uz>ywaniem

- N??z>obrotowy, niebezpieczen> stwo zranienia rak%i n??g

- Niebezpieczen> stwa wyrzutu przedmiot??w

- Wykonac>prace konserwacji lub reperacji tylko po przeczytaniu podre% cznika instrukcji i po wyje% ciu kluczyka zapl??onu.

- Utrzymywac>odleglos??c>>bezpieczenstwa> wzgledem%os??b nie upowaznionych>

do pracy gdy traktorek jest w dzial??aniu! - Maksymalne pochylenie trawnika

podczas pracy: 10??

- Wskaz> nik hal?? as> liwos> ci zgodnie z normami prawa.

Altal??nos ???FIGYELEM??? c??mke. Fentrol balra:

-Figyelem,vesz??ly

-Elolvasni az ??tas??t??sokat a haszn??lat elott

-Forg?? k??s, vesz??ly: v??gtagok megsebz??se

-Vesz??ly: t??rgyak kidob??sa

-A karbantart??st ??s a jav??t??sokot csak

az ??tas??t??sok elolvas??sa ??s a gy??jt??kulcs elt??vol??t??sa ut??n csin??lni.

-Betartatni a biztons??git??vols??got a szem??lyekkel akik nem dolgoznak a kis traktorral amikor ez mukod??sben van.

-A gyep maxim??lis lejt??se a megmunk??l??s alatt: 10??

-Zajszint a torv??nyrendeletek szerint.

Allminnelige etikettet ???FORSIKTIG??? Fra toppen i venstre siden:

-Farlig, forsiktig

-Les bruksanvisning h??ndboken f??r anvendelsen

-Rullende knive, hender og f??tter kan bli skadet

-Farlig for stykker kan kastes

-Vedlikehold eller reparere kun etter man leser bruksandvisning h??ndboken og etter at man tar av startn??kkelen.

-N??r apparatet er i gang alltid holde personer som ikke er interesserte med verken p?? sikringsavstanden.

-H??yeste engshellingen under verk: 10??

-Br??ksniv??et if??lge loven.

V??eobecn?? etiketa ???POZOR???.

Od horn?? lev?? strany:

-Pozor, nebezpec????

-Pr??ed pouz??it??m si pr??ec??t??te uz??ivatelskou pr????rucku??

-Otoc?? n?? nu?? z?? , nebezpec?? ?? porane?? n?? konc??etin

-Nebezpec???? odhozen??ch pr??edme??tu??

-Opravy a ??drzb??r????sk?? pr??ce prov??de??jte pouze po pr?? ec?? ten?? uz?? ivatelsk?? pr????ruc??ky a kdyz??jste pr??ed t??m vyt??hli startovac?? kl??c??.

-Pr??i provozu traktorku dbejte na to, aby osoby, kter?? se strojem nepracuj??, byly

vbezpec??n?? vzd??lenosti.

-Maxim??ln?? svah louky pro sec??en??: 10??

-Ukazatel hluc??nosti podle pr??edpisu??

Yleinen ???VAROITUS??? kyltti.

Ylh????lt?? vasemmalle:

-Varoitus, vaara

-Lue k??ytt??ohjeet ennen k??ytt????

-Py??riv?? ter??, k??siin ja jalkoihin kohdistuvien onnettomuuksien vaara

-Sinkoavien kappaleiden vaara

-Suorita huolto- tai korjaustoimenpiteet ainoastaan sen j??lkeen, kun olet lukenut k??ytt??oppaan ja poistanut virta- avaimen.

-??l?? anna asiattomien henkil??iden oleskella puutarhatraktorin toimintas??teell??

-Nurmikon maksimikaltevuus ty??skentelyn aikana: 10??

-Melutaso s????nn??sten mukaisesti

Alment ???ADVARSELSSKILT???.

Oppe fra og mod h??jre:

-Advarsel, fare

-L??s vejledningen grundigt igennem inden maskinen tages i brug

-Drejelig kniv, fare for tilf??jelse af s??r p?? kroppen

-Fare for flyvende genstande

-Enhver form for vedligeholdelse eller reparation m?? kun udf??res efter en grundig genneml??sning af vejledningen og med frakoblet t??ndingsn??gle.

-Hold uvedkommende personer p?? sikker afstand af traktoren, n??r den er i brug

-Maks. h??ldning af pl??nen under klipning: 10??

-St??jniveauet ligger inden for de lovpligtige normer

Splo??na oznaka ???POZOR???

Iz smeri zgornjega levega kota:

-Pozor, nevarnost

-Preden pri??nete z delom, preberite navodila za uporabo

-Rotirajo??e rezilo, nevarnost po??kodb rok in nog

-Nevarnost: lete??i predmeti

-Preden pri??nete s katerimkoli popravilom ali vzdr??evalnim delom, preberite

navodila za uporabo in iztaknite zagonski klju??

-Med delovanjem motorja, oddaljite vse nezaposlene osebe iz delovnega obmo??ja stroja

-Najve??ji dovoljeni nagib terena med delom: 10??

-Oznaka glasnosti v skladu s predpisi

Etikett allm??n ???VARNING???.

Fr??n l??ngst upp till v??nster:

-Varning, fara.

-L??s bruksanvisningen innan ni anv??nder maskinen.

-Vridbar kniv, risk f??r skada p?? extremiteterna.

-Risk f??r utslungning av f??rem??l.

-Genomf??r ingrepp f??r underh??ll eller reparation enbart efter det att ni har l??st bruksanvisningen och dragit ut startnyckeln.

-H??ll obeh??riga personer p?? s??kert avst??nd n??r traktorn ??r i funktion.

-Maximal lutning p?? gr??smattan under arbetet: 10??.

-Bullerniv??n respekterar g??llande normer.

Genikhv etikevta ???PROSOCH???

Apo to avnw mevro?? pro?? ta aristerav:

-Prosochv, kivnduno??!

-Privn crhsimopoihvsete thn mhcanhv sumbouleuteivte to egceirivdio odhgiwvn.

-Peristrofikov macaivri, kivnduno?? traumatismouv twn avkrwn.

-Kivnduno??? ektovxeush?? antikeimevnwn.

-Oi ergasive??? sunthvrhsh?? hv oi epidiorqwvsei?? prevpei na givnontai afouv prwvta diabavsete prosectikav to

egceirivdio crhvsh??? kai afouv bgavlete to kleidiv evnaush??.

-Diathreivte thn apovstash asfaleiva?? gia ta provswpa pou eivnai avsceta me thn ergasiva ovtan to trakteravki leitourgei.v

-Mevgisth klivsh tou edavfou?? katav thn ergasiva: 10??

-Deivkth?? qorubhtikovthta?? suvmfwna me ton novmo.

3

SIMBOLOGIA SULLA MACCHINA - SIGLES SUR L???APPAREIL - SYMBOLS ON THE MACHINE - SYMBOLE AM GER??T -

SIMBOLOG??A EN LA M??QUINA - YMBOLEN OP DE MACHINE - SIMBOLOS SOBRE A MAQUINA - SYMBOLE NA MASZYNIE -

GEPEN LEVO JELZESEK - SYMBOLY NA STROJI - MASKINSYMBOLER - MASKINSYMBOLER - SYMBOLER P?? MASKINEN

SIMBOLOGI P?? MASKINEN - KONEESSAK K??YTETYT SYMBOLIT - OZNAKE NA STROJU - SUMBOLA EPI THS MHCANHS

Attenzione: pericolo ferimento arti. Parti rotanti. Attention ! Danger de blessures des membres. Parties tournantes.

Warning: risk of limb injury. Rotating parts.

Achtung: Gliederverletzung Drehende Teile

Atenci??n: peligro heridas a extremidades. Piezas giratorias. Let op, gevaar voor verwondingen aan de ledematen. Draaiende delen.

Aten????o, perigo machucamento artos. Partes rotantes. Uwaga, niebezpieczen>stwo zranienie ra%k i n??g. Cze%s>ci obrotowe.

Figyelem, vesz??ly: v??gtagok megsebz??se. Forg?? r??szek. Pozor, nebezpec???? zrane??n?? konc??etin. Rotuj??c?? c????sti. Advarsel: Fare for tilf??jelse af s??r p?? kroppen. Roterende dele. Varning: risk f??r skada p?? extremiteterna. Roterande delar. Forsiktig: hender og f??tter kan bli skadet. Rullende deler. Varoitus: k??siin ja jalkoihin kohdistuvien onnettomuuksien vaara. Py??rivi?? teri??.

Pozor: nevarnost po??kodb rok in nog. Rotirajo??a orodja.

Prosochv: kivnduno?? traumatismouv twn avkrwn. Peristrefovmena mevrh.

Attenzione:pericolo ferimento mani e piedi. Attention! Danger de blessures des mains et des pieds. Warning: risk of hand and feet injury.

Achtung: Hand- und Fussverletzung

Atenci??n: peligro heridas a manos y pies.

Let op, gevaar voor verwondingen aan handen en voeten. Aten????o, perigo machucamento m??os e p??s.

Uwaga, niebezpieczen>stwo zranienia ra%k i n??g. Figyelem, vesz??ly: kezek ??s l??bak megsebz??se.

Pozor, nebezpec???? porane??n?? rukou a nohou.

Advarsel: Fare for tilf??jelse af s??r p?? h??nder og f??dder

Varning: risk f??r skada p?? h??nder och f??tter.

Forsiktig: hender og f??tter kan bli skadet.

Varoitus: k??siin ja jalkoihin kohdistuvien onnettomuuksien vaara.

Pozor: nevarnost po??kodb rok in nog.

Prosochv: kivnduno?? traumatismouv ceriwvn kai podiwvn.

Attenzione: pericolo di scottature. Parti calde. Attention! Danger de br??lures. Parties chaudes. Warning: risk of burns. Hot parts

Achtung: Heisse Teile - Verbrennungsgefahr.

Atenci??n: peligro de quemaduras. Piezas calientes. Let op, gevaar voor brandwonden. Hete delen. Aten????o, perigo queimaduras. Partes quentes. Uwaga, niebezpieczen>stwo poparzenia. Cze%s>ci gora%ce. Figyelem, vesz??ly: ??g??sisebek. Meleg r??szek.

Pozor, nebezpec???? pop??len??. Hork?? c????sti. Advarsel: Fare for forbr??nding. Varme dele. Varning: risk f??r br??nnskada. Varma delar. Forsiktig: branns??rfare. Varme deler. Varoitus: palovammojen vaara. Kuumia osia.

Pozor: nevarnost opeklin. Stroj je vro??.

Prosochv: kivnduno?? egkaumavtwn. Qermav mevrh.

Sbloccaggio differenziale D??blocage diff??rentiel Differential release Diferential-Freigabe Desbloqueo diferencial Ontgrendeling differentiaal Desbloqueio diferencial Odblokowanie zr??z>nicowane Differenci??lis felszabad??t??s Uvolne??n?? diferenci??lu. Differentialeudl??sning

F??r att lossa p?? differential Differensialsopphevelsen. Tasauspy??r??st??n vapautus.

Deblokada diferenciala

Diaforikov xemplokavrisma.

Attenzione: parte apribile. Attention ! Partie ouvrante. Warning: opening part. Achtung: aufklappbares Teil.

Atenci??n: parte que se puede abrir. Let op, delen die open kunnen. Aten????o, parte abr??vel.

Uwaga, cze%s>c> otwieralna. Figylem, kinyithat?? r??sz.

Pozor, tato c????st m??z??e b??t otevr??ena. Advarsel: Del, der kan ??bnes. Varning: del som kan ??ppnas. Forsiktig: ??pning siden.

Varoitus: aukaistava osa.

Pozor: premi??ni del.

Prosochv: anoigovmeno mevro??.

Etichetta di conformit?? CE - Etiquette de conformit?? CE - Conformity EC label - CE-Konformit??tsetikett - Etiqueta de conformidad CE - Etiket CE overeenstemming - Etiqueta de conformidade CE - Etykietka zgodnos>ci CE

C??mke amely igazolja,hogy a g??p az EU rendelkez??sei szerint volt gy??rtva - ??t??tek potvrzuj??c?? konformitu CE EU-m??rke ??? Etikett f??r ??verensst??mmelse med CE ??? Etikettet for UE overenmsstemmelsen - CE ??? kyltti - Nalepka o skladnosti s

predpisi EZ - Etikevta sumfwniva?? CE

1

COSTRUTTORE

CONSTRUCTEUR

MANUFACTURER

BAUFIRMA

CONSTRUCTOR

FABRIKANT

FABRICANTE

PRODUCENT

EPITO

V??ROBCE

FABRIKANT

TILLVERKARE

KONSTRUKT??REN

VALMISTAJA

IZDELOVALEC

KATASKEUASTHS

2

Modello Model

Mod??le Model

Model Modell

Modell

Modelo Modell

Model Malli

Modelo Modell

Model Montevlo

Tipus

4

TECHNICAL DETAILS

word accessory and replace with part.

UNPACKING/ ASSEMBLY

The ride-on lawnmower is packed in a carton and is ready assembled apart from the steering wheel, seat, grass collection bag and front wheels. Please observe the follow- ing sequence when unpacking the machine:

1.Unpack all the parts that have been delivered. Dispose of the carton and pallet in an environmentally friendly way.

2.Check all the parts

3.Begin assembly.

WHEEL ASSEMBLY (starts at page 85)

C1. Mount the front wheels on the pins (15), positioning a washer (16), the wheel (17) and a washer (18).

2.Secure with a stop (19).

3.Mount the rear wheels on the pins.

STEERING WHEEL ASSEMBLY (starts at page 86)

D1. Fix the steering wheel (2) pushing until it is connected with the steering column (20).

2. Secure the steering wheel (2) by means of the socket pin (21); put the socket pin through the openings (on the steering column and steering wheel)

ENGINE GUARD ASSEMBLY (see page 86)

D Insert the two rear ends into the special slots in the casing and fix the guard by 1 inserting the washers and M5 nuts on M5 x 20 screws and fix to the casing.

SEAT ASSEMBLY (starts at page 86)

D 1. Fasten the seat (1) to the support plate (22) through the 4 M8 x 18 screws. 2 Assemble with 4 washers ?? 9 x 24 and 4 grower.

2. Before tightening the screws, adjust the position of the seat on the holes of the plate to suit the user's needs.

It is strictly forbidden to start the ride-on lawnmower (even for trial purposes) without completing assembly.

Attention: Assemble the wheel with valve outwards.

The openings at the steering wheel and at the steering column must be in exact alignment.

Check at regular intervals that the nuts are tightly screwed down.

ASSEMBLY OF THE GRASS COLLECTION BAG (starts at page 86)

D3 Fasten the bin to the rear part of the ride-on-mower with the 2 H.H. 6x16, 2 screws, the 2 Z- shaped plates and 2 M5 nuts.

The cutting height is now set.

15

ENGLAND

EMPTYING THE GRASS COLLECTION BAG(starts at page 86)

Switch off the engine.

1.Hold the rod and swivel the bag. Shake the bag twice until it is completely empty.

2.Let the grass collection bag return slowly to its original position.

3.Switch on the engine.

CARE OF THE LAWN AND MOWING

The modern gardening technology has designed and developed labour-saving devices (mower with grass collection bag). For a good, healthy green lawn, it is essential to mow and aerate it regularly.

Fertilising is also essential.

Always make sure the blades are sharp and in perfect conditions to avoid grass fraying and yellowing of the lawn. .

You will achieve a clean cut with regular and straight windrows.

The mowing tracks should always overlap a few centimetres to avoid any uncut strips in between.

Lawn cutting frequency depends on the rate of growth. In the main growing season (May-June) often (twice a week) or at least once a week.The cutting height should be between 4-6 cm. and the growth before the next cut should not be more than 4- 5 cm.

During hot and dry periods, the lawn should be cut 1,5 cm. higher than normal, to avoid ground and root drying out.

If the grass is somewhat higher than normal, you should not make the mistake of cutting it immediately; you can damage the lawn. Do no cut to more than half the necessary height.

SAFETY PRECAUTIONS (starts at page 87)

FBefore mowing, remove all foreign objects from the lawn which may be thrown by the machine. While mowing, stay alert for any foreign objects which may have been missed.

(starts at page 87)

F1 Never place your hands or feet underneath the deck or into the rear discharge chute while the engine is running.

OPERATION

PUTTING THE RIDE-ON LAWNMOWER INTO OPERATION FOR THE

FIRST TIME

Don???t put the ride-on lawnmower into operation before you have completely finished its assembly. Before putting the ride-on lawnmower into operation for the first time, don???t forget to fill it with petrol and oil. Connect the red cables to the positive terminal and the black cables to the negative terminal (the battery is placed in battery holder under the motor safety housing on the right of the seat).

STARTING THE ENGINE

The ride-on lawnmower may be put into operation for the first time only by trained persons only who have read and fully understand the operating instructions.

Use the following on your ride-on lawnmower:

Start up the engine only after filling the tanks with sufficient petrol and oil.

Carefully follow the instructions in the enclosed engine manufacturer???s operating and maintenance manual.

REFUELLING (starts at page 87)

G

Danger of explosion! Fill the tank only only in an open area! Never refuel while the engine is running or is very hot! Do not smoke!

The petrol tank is placed in the engine block below the seat.

1.Lift the seat

2.Unscrew the tank cap (23) and fill up with lead-free petrol.

3.Screw the tank cap back.

TOPPING UP WITH OIL

Use only oil of type SAE 30 (???SE???, ???SF??? or ???SG???). Ensure that no oil is spilt onto the ground.

The oil filler cap is placed in the engine block, below the seat.

1.Lift the seat

2.Unscrew the oil filler cap (24)

3.Fill up the oil until the ???MAX.??? mark on the dip stick is reached

4.Replace the oil filler cap.

ELECTRIC ENGINE START

The exhaust fumes contain carbon monoxide, an odourless and deadly gas. Never start the engine in closed or badly ventilated rooms.

(starts at page 88)

HLook for a flat piece of ground with short grass for starting the engine.

Operate the electric start only when sitting on the tractor with the blade clutch (8) in stop position and with brake engaged.

1.Set the clutch blade (8) to STOP position

2.Set the throttle lever (6) to START position

3.Press the brake pedal (9 - Fig.I).

SWITCHING OFF THE ENGINE

To switch off the engine position the key to ???STOP???. The red light goes off.

Only switch the engine off when the machine is at a complete standstill.

Always remove the ignition key to prevent accidental starting.

16

Before starting up check the oil and petrol levels.
Do not smoke during the oil and petrol refuelling and checking operations. Top up with petrol or oil if necessary (as described in detail in the previous chapter).

ENGLAND

STARTING UP

Starting up (engine start) must be carried out as described in detail under the heading ???initial starting up???.

Never change gear while driving, the mower must always be at a standstill. MOVING WITHOUT GEAR PEDAL ENGAGED (starts at page 88)Never mow the grass with reverse gear engaged.

DRIVING INSTRUCTIONS (starts at page 88)

IEnsure that there are no persons or animals within the operating vicinity of the machine.

Select the required speed and drive carefully. Transportation of other persons is strictly forbidden.

OPERATING THE MOWER MECHANISM

The mower mechanism can only be switched on when the machine is at a standstill (parking brake engaged), with engine running, and throttle on (full) and with operator seated on the mower.

Transmission occurs on the rear wheels by means of the hydrostatic gear, braking is by pressing the pedal (9) on the right of the steering wheel column.

DRIVING

1. Release the lever (10) and press the brake pedal (15) slowly fully down. 2. Advance speed may also be varied by manually operating the gas throttle lever (6 pic

H1).

BRAKING

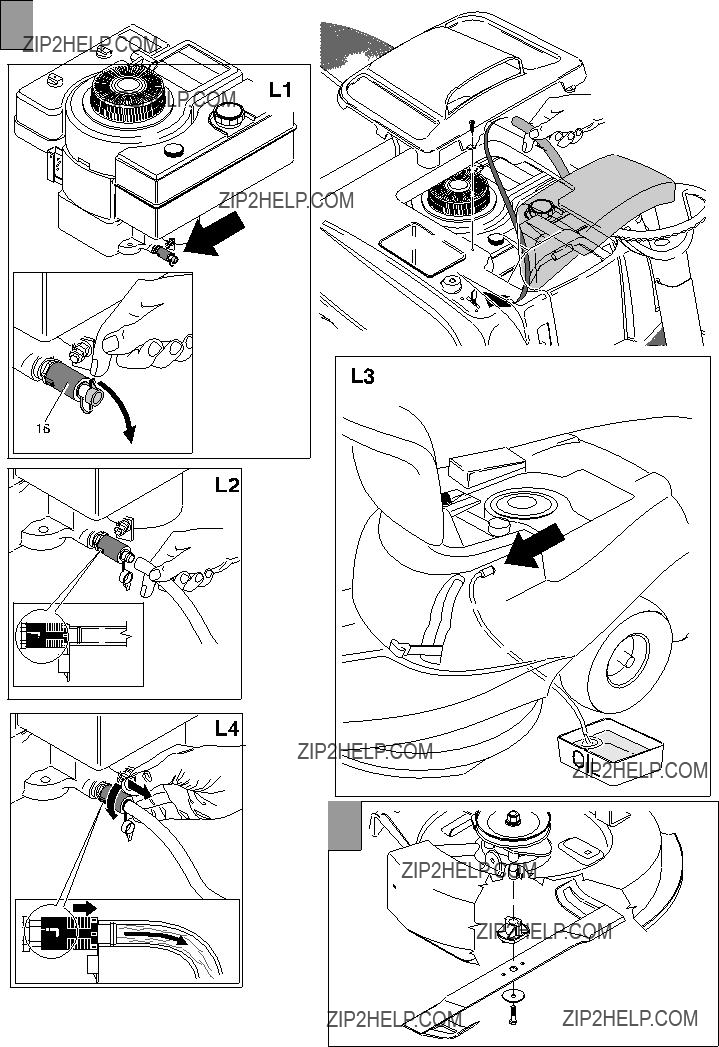
Remove the right foot from the drive pedal (15 pic I1). Press the brake pedal (9). To activate the parking brake, pull the lever (10 pic I2) upwards.

Pressing by the brake, the drive pedal will automatically position itself on neutral.

DRIVING NOTICE

If possible, avoid driving at full throttle.

3. It is possible to begin cutting in forward gear after having released the brake pedal.

If the user stands up from the seat during the mowing, the engine switches off.

SWITCHING OFF THE MOWER GEAR

Set the clutch blade lever (12) into STOP position.

The blade stops turning in about 5 seconds.

SAFETY RULES

1)All persons operating the ride-on lawnmower must be familiar with the operating instructions.

lVery important regulation: anybody under the age of 16 or under the effects of alcohol or medicines cannot operate the machine.

2)Exhaust fumes from petrol engines: these fumes contain harmful carbon monoxide, never operate the engine in closed environments.

3)When operating on the ride-on lawnmower make sure that no other persons, especially children or pets, are in the vicinity of the ride-on lawnmower.

4)Please ensure that foreign matters (strips, twigs, iron wire, etc.) are removed from the lawn. Splinters can be hurled outwards or the blades can get damaged.

5)No smoking in the vicinity of the mower during operation. 6)Only mow during daylight or under good lighting conditions.

7)Only Mow up or downwards a slope NEVER at an angle to the slope. Special care is needed when changing direction on slopes.

8)When driving to the area to be mowed, the ride-on lawnmower mechanism must not be switched on.

9)Never use machine in the event of damage to the bodywork or without protective equipment (i.e. grass collector bag, etc).

10)The correct position of the engine block has been specifically designed and set at the factory and must not be altered

11)Start by pressing the drive pedal with the greatest care, following the manufacturer???s instructions. Pay attention to feet positioning at a sufficient distance from the cutting blade.

12)Do not tilt the engine when departing and starting up.

13)This ride-on lawnmower has a safety device which switches off the engine every time that the operator leaves his seat.

14)Keep your hands or feet away from the rotating blades. Stay away from the discharge opening whilst the blade are rotating.

15)Do not manually move or lift the machine with engine running.

16)In the event of engine blockage, clogging of the discharge channel and in all maintenance operations on the cutter mechanism and in cases of temporary removal of the safety protections the engine must be switched off and the cutter mechanism disengaged.

Important: remove the ignition key. 17)The engine must also be switched off:

lwhen you leave the machine or during its transportation lbefore refuelling

lduring the grass collection bag emptying operations.

18)Take the greatest care during the cutter regulation operations. Risk of injury!! Keep fingers away from the area between cutter and bodywork. Wear gloves.

19)Only empty the petrol tank in the open.

20)Before storing in a closed room, let the engine cool down.

21)In order to avoid risk of fire, the engine and exhaust must be kept free of grass, leaves and leaking grease.

22)The grass collection bag must regularly be checked for signs of damage 23)Do not mow in reverse.

Maintenance and storage

1)Make sure that all nuts, bolts, and screws are kept well tightened to keep the mower in a safe operating condition.

2)Never leave the machine with fuel in the tank within an enclosed area where the fuel vapours could reach naked flames or sparks.

3)Allow the engine to cool before storing in any enclosure.

4)Keep the engine, silencer, battery compartment and petrol tank free from grass, leaves and excess lubricant, in order to reduce the danger of fire.

5)Frequently check the grass bag for wear or deterioration

6)For safety reasons, be sure to replace worn-out or damaged parts in due time. 7)If the fuel tank has to be drained, it is essential that this be done outdoor.

8)Assemble the blades following the corresponding instructions and use only blades bearing the maker's name or the trademark of the manufacturer or supplier and marked with the reference number.

9)To protect hands during disassembly or assembly of the blades, it is absolutely essential to wear suitable protective gloves.

17

ENGLAND

MAINTENANCE

All maintenance, service and cleaning work must be carried out only after the engine has stopped and cooled off. The following operations may be carried out by the user himself. All other maintenance, service and repair works must be carried out by an authorized dealer.

In the event of using this ride-on lawnmower under extreme conditions and very high temperatures, check more often.

OIL LEVEL CHECK

You can check the motor oil level with the dip stick placed in the oil filler tank cap. The oil level must be between ???MAX.??? and ???MIN.??? notches.

OIL CHANGE (starts at page 89)

LUsed oil can be removed from the oil tank mouth by means of an adapter (16).

Undertake the operations according to the sequence indicated in Fig. L. Once done repeat the same operations in reverse order being sure to close connection (16), replace the cap and remove the tube used for the exhaust oil.

Used oil must not be drained into the sewer system or waterworks. In order to prevent any pollution to the water-table.

Most garages have used oil deposits, or use the authorized deposits according to your local authority regulations.

AIR FILTER AND SPARK PLUG

Please follow the engine manufacturers operating instructions enclosed with this ride- on lawnmower and the fault finding guide.

BLADE SHARPENING AND REPLACEMENT (starts at page 89)

MAlways use only original spares!

Should you not have the necessary tools to undertake this operation, take the ride-on lawnmower to an authorized dealer for blade sharpening or replacement.

Remove the ignition key and always wear protective gloves when you replace the blade.

1. Release the blade. Fit a new blade or re-sharpen the old one and re-fit.

For safety reasons the blade should only be re-sharpened by an Authorsied Service Dealer.

BATTERY

Remove the battery during storage!

The ride-on lawnmower can be fitted with various types of battery (see battery sheet for instructions and use).

BATTERY CONNECTION

1.Open the engine cover (Fig.G)

2.Insert the battery (as illustrated in the relative instruction sheet)

3.Connect the red wire to the positive pole and the black wire to the negative pole

4.Replace the cover after connection.

Recharge the battery only in a dry room.

IMPORTANT! Protect the contacts from dirt, damp and moisture.

DO NOT SPRAY WITH WATER!

18

ENGLAND

MOWER CLEANING

For engine cleaning, remove the ignition key and wait 10-15 minutes for the engine to cool down.

With the mower tilted the carburettor must always point upwards. Always clean the mower with engine off.

FURTHER MAINTENANCE AND REPAIR ADVICE

Always wear protective gloves when handling the blades (during checking or cleaning operations).

Regularly check that the grass collection device is in good condition.

Due to the risk of fire it is essential that both the engine and exhaust are kept free of grass, leaves or any combustible material!

For safety reasons always replace used and or damaged parts immediately (by an authorized dealer).

Do not hose the engine casing from the outside to prevent any water getting onto the spark plugs or carburettor causing damage.

Use cloths or brushes to clean away any dirt of grass residue.

lFrequently check the blade for damage.

lThe lawn mower must be checked by a SERVICE DEALER.

STORAGE

Never store your mower with petrol in the tank in places where petrol vapours could come into contact with naked flames or sparks.

Before storing the mower in a closed room allow the engine to cool!

In any event never leave the machine unattended and with ignition key inserted in the ignition block.

TROUBLES - REMEDIES

19

E1

86

G

87

88

L

Tappo scarico olio Bouchon de vidange d'huile Oil drain plug ??labla??stutzen

Tap??n vaciado aceite Olie-aftapdop

Boj??o de esvaziamento do ??leo Korek spustu oleju Olajleereszto^ dug??

Vypou??t??c??otvormotorov??hooleje

Olieaftapningsprop

Lock f??r oljeurtappning

Plugg for oljeavtapping

Moottori??ljyn tyhjennyskorkki

Zama??ek za izpust olja

Tavpa ekfovrtwshV elaivou