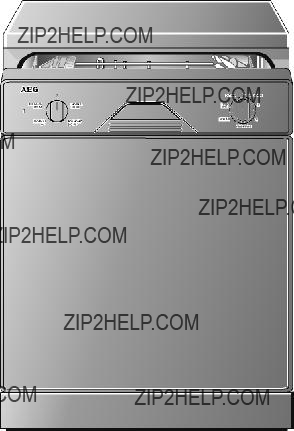
??KO_FAVORIT 40250 i
Dishwasher
User Instructions

??KO_FAVORIT 40250 i
Dishwasher
User Instructions

Dear customer,
Please read these user instructions carefully.
Please observe the safety instructions on the first few pages ofthese user instructions! Please keep these user instructions for later reference. Pass them on to any subsequent owner of the appliance.
1 The warning triangle and/or specific words (Warning!, Caution!, Important!) are used to highlight instructions that are important for your safety or for the function of the appliance. It is imperative that these instructions are observed.
0This symbol or numbered instruction steps lead you step by step through the operation of the appliance.
In the event of a malfunction, these operating instructions contain information on how to rectify faults yourself, see the "What to do, if..." section.
If these instructions are insufficient, please contact your AEG Service Force Centre.
In this respect please read the chapter "Service & Spare Parts".
Printed on paper manufactured with environmentally sound processes.
He who thinks ecologically acts accordingly ...
2

3

Contents
4

Operating Instructions
OPERATING INSTRUCTIONS
1 Safety Instructions
The safety aspects of AEG electrical appliances comply with accepted technical standards and the German Appliance Safety Law. Neverthe- less, as a manufacturer we consider it our obligation to make you aware of the following safety information:
Installation, Connection and Placing into Operation
???The dishwasher may only be transported upright.
???Check the dishwasher for transport damage. Do not in any circum- stances connect an appliance that is damaged. In the case of damage, please contact your retailer.
???Before installing the appliance, ensure that the nominal voltage and type of supply on the rating plate match that of the supply where the appliance is to be installed. The fuse rating is also to be found on the rating plate.
???For information on how to correctly install and connect up your dish- washer, please read the ???Installation??? section. Adaptors / connectors and extension cables must not be used.
Child Safety
???This appliance is designed to be oprated by adults. Children should not be allowed to tamper with the controls or play with the product.
???Keep all packaging away from children.
???Keep all detergents in a safe place out of children???s reach.
???The water in your dishwasher is not suitable for drinking. If there are still remnants of detergent in the appliance, there is a risk of burns!
???When disposing of an old appliance, cut off the power supply cable and remove any door catches, to prevent young children being trapped inside.
General Safety
???Repairs to the dishwasher are only to be carried out by qualified serv- ice engineers. Improper repairs can give rise to significant hazards for the user. If your appliance needs repairing, please contact your local AEG Service Force Centre.
5

Operating Instructions
???Never place the dishwasher in operation if the mains cable, water inlet or drain hose is damaged; or the control panel, work top or plinth area is damaged such that the inside of the appliance is freely accessible.
???If the mains lead is damaged, or is to be replaced for a longer lead, the cable (obtainable from AEG Service Force) must be replaced by a service engineer authorised by AEG.
???Never unplug the appliance by pulling on the cable, always pull the plug.
???Additions or modifications to the dishwasher are not permitted for safety reasons.
???Ensure that the door of the dishwasher is always closed when it is not being loaded or unloaded. In this way you will avoid anybody tripping over the open door and hurting themselves.
???Long bladed knives stored in an upright position are a potential haz- ard.
???Long and/or sharp items of cutlery such as carving knives must be positioned horizontally in the upper basket.
???When finished loading or unloading, close the door as an open door can be a hazard.
Correct Use
???Only wash household dishes using the dishwasher. If the appliance is used for other purposes, or is used incorrectly, the manufacturer can- not accept any liability for any damage caused.
???Only use detergents specifically designed for use in domestic dish- washers.
???Do not put any solvents in the dishwasher. There is a risk of an explo- sion!
???The
???The appliance must remain connected to the mains even when it is switched off.
???The dishwasher must be correctly installed.
???Always shut off the water supply at the tap when the dishwasher is not to be used for longer periods, e.g. when you are away on holiday.
???Do not sit or stand on the open door, the appliance may tip over.
6

Operating Instructions
???In the event of a fault, first close the tap, then switch off the appli- ance and unplug it from the mains. If the appliance is permanently wired to the mains: remove the fuse.
2 Disposal
Disposing of the Packaging Material
Dispose of the dishwasher packaging material correctly. All the packag- ing materials used are harmless to the environment and can be recy- cled.
??? Plastic parts are marked with standard international abbreviations:
???Cardboard packaging is manufactured from recycled paper and should be deposited in the waste paper collection for recycling.
Disposal of Old Appliances
When disposing of old appliances, remove the plug and ensure that any locks or catches are removed to prevent young children becoming trapped inside.
Use an authorised disposal site.
2Economical and Ecological Dishwashing
???Ensure that the water softener is correctly adjusted.
???Do not
???Select the wash programme to suit the nature and degree of the soil- ing on the dishes.
???Do not use more detergent, special salt or rinse aid than is recom- mended in these operating instructions and by the detergent manu- facturer.
7
Operating Instructions
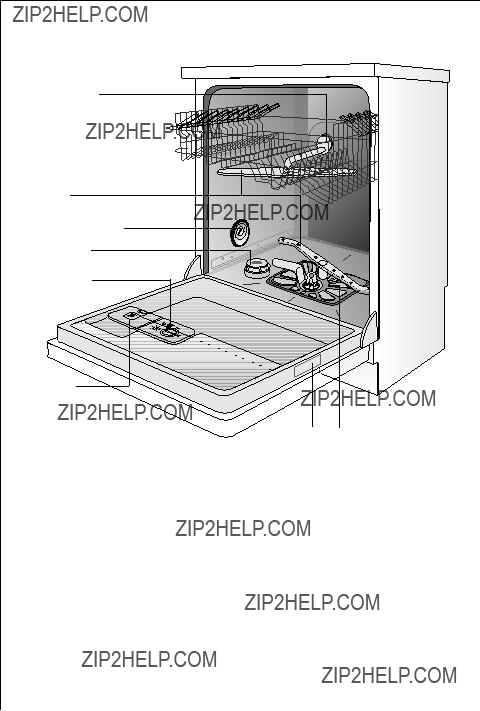
Appliance Features and Control Panel
Rubber Seal for
Connecting the
Water Feed to the
Upper Spray Arm
Spray Arms
Water Hardness Switch
Container for Salt Container for Rinse Aid
Container for
Detergent
8
Operating Instructions
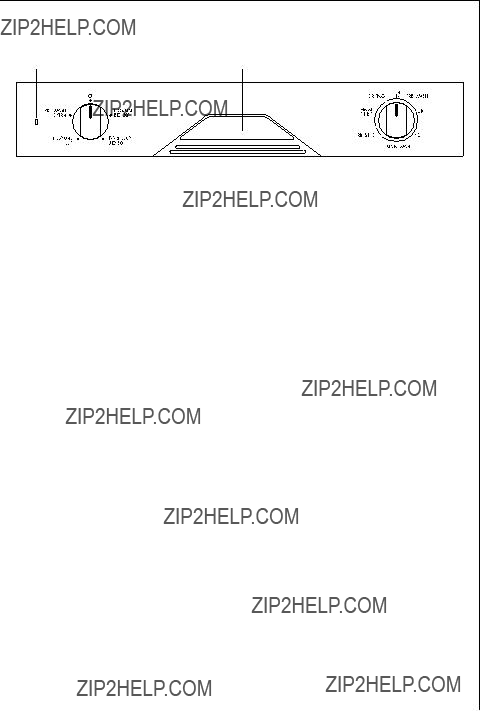
Control Panel
Set the point at which the wash programme is to start using the pro- gramme switch. The programme switch rotates during the wash pro- gramme and indicates the position that has been reached in the programme.
Switch on the dishwasher and start a wash programme using the pro- gramme selector.
Prior to using for the first time
Prior to using for the first time, remove all the clips with which the dish racks are secured for transport.
Then perform the following steps: 0 1. Adjust the water softener
2.Fill with Salt for the Water Softener
3.Fill with Rinse Aid
9
Operating Instructions
Adjust the Water Softener
To prevent the build up of scale on dishes and in the dishwasher, the dishes must be washed with soft, i.e. low lime content water. For this reason the dishwasher is fitted with a water softener in which tap water from a hardness of 4 ??d (German degrees) is softened with the aid of special salt.
1)(??d) German degree, measure of water hardness 2)(ppm) Parts Per Million (CaCO3)
*factory setting
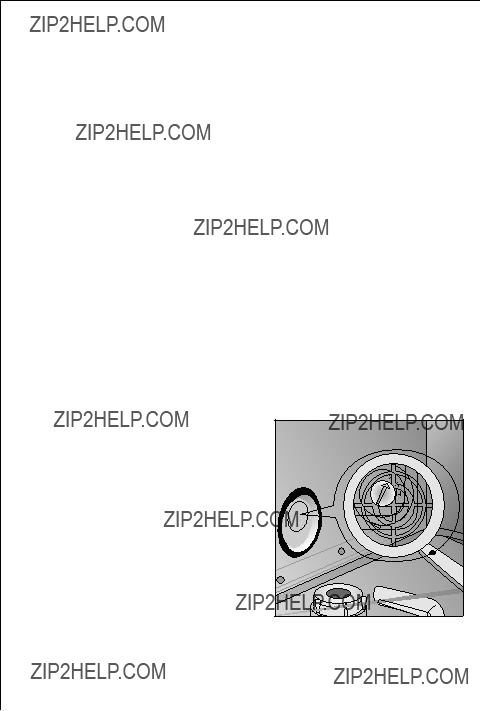
0Adjust the water softener in accord- ance with the table to suit your area:
1.Open the door on the dishwasher.
2. Remove the lower rack from the dishwasher.
3. Adjust the water hardness switch with, e.g. a coin.
4. Replace the lower rack and close the door of the dishwasher.
10
Operating Instructions
Filling with Salt for the Water Softener
1 Use only salt designed for dishwashers. Never fill the salt container with any another type of salt (e.g. culinary salt) or dishwasher deter- gent, as this would irreparably damage the water softener.
Prior to filling with salt, please check each time that you really do have a packet of dishwasher salt in your hand.
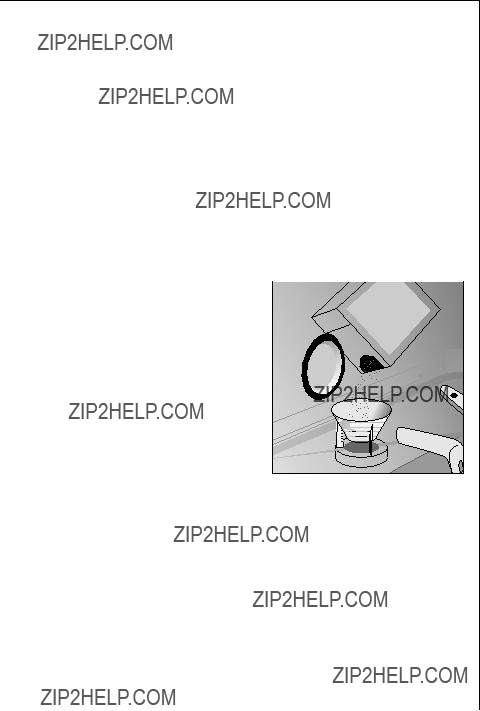
Fill with dishwasher salt:
???Prior to using the dishwasher for the first time
???If a green mark can be seen under the lid of the salt container, then there is sufficient salt. If the green mark cannot be seen, you must refill the container with salt.
3.When using for the first time: fill the salt container with water.
4.Place the funnel supplied on the con- 
tainer opening.
Fill the container with salt through 


the funnel; the capacity of the con- 
 tainer is approx.
  ing on the grain size. Do not overfill
the salt container with salt.
3 The water expelled by filling the salt container with special salt runs out of the salt container onto the base of the washing compartment. This is not a cause for concern, the water will be pumped out at the start of the next wash programme.
5.Clean any salt remnants on the container opening.
6.Turn the lid clockwise to the stop, otherwise dishwasher salt will leak into the wash water. Dull glasses may result.
again. The setting of the water softener and thus the consumption of salt are dependent on the hardness of the local water.
11
Operating Instructions
Filling with Rinse Aid
age the appliance.
Fill with rinse aid:
???Prior to using the dishwasher for the first time
???Then the window indicator has a dark centre surrounded by a light ring. If there is sufficient rinse aid in the container, the indicator win- dow is completely dark.
The rinse aid container is on the inside of the dishwasher door.
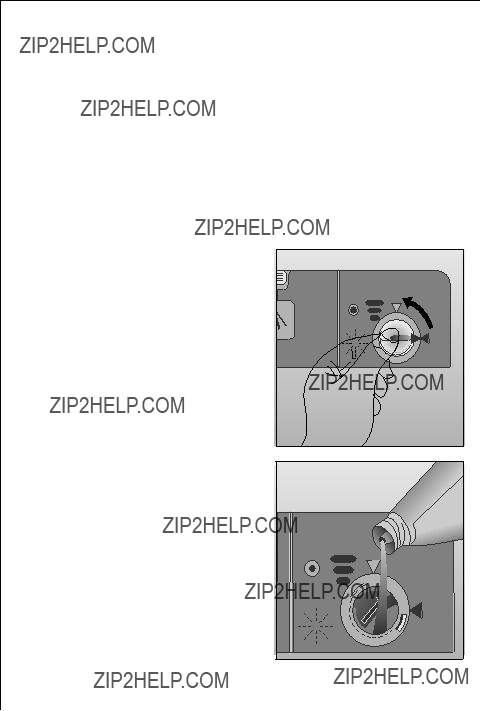
0 1. Open the door
2. Turn the lid of the container ?? of a turn anticlockwise and remove.
3.Fill with rinse aid, up to the broken line as a maximum; this line corre- sponds to a quantity of approx.
150 ml
4.Replace the lid and tighten by turn- ing clockwise.
5.If rinse aid has been spilt, wipe up with a cloth. Otherwise there will be too much foam during washing.
12

Gradually increase the dose if there are drops of water or lime spots on the dishes after washing. Reduce if it there are sticky whitish streaks on the dishes.
0 1. Turn the lid of the container ?? of a turn anticlockwise and
remove.
2. Adjust the dose setting with a tea spoon.
3. Replace the lid and tighten by turn- ing clockwise.
4. If rinse aid has run out, wipe up with a cloth.
13

Operating Instructions
In Daily Use
???Check the salt and rinse aid levels.
???Load cutlery and dishes into the dishwasher
???Fill with dishwasher detergent
???Select a wash programme suitable for the cutlery and dishes
???Start the wash programme
Loading Cutlery and Dishes
???Before loading the dishes, you should:
???Remove all scraps of food.
???Soften remnants of burnt food in pans.
???When loading the dishes and cutlery, please note:
???Dishes and cutlery must not impede the rotation of the spray arms.
???Load hollow items such as cups, glasses, pans, etc. with the opening downwards so that water cannot collect in the container or a deep base.
???Dishes and items of cutlery must not lie inside one another, or cover each other
14
Operating Instructions
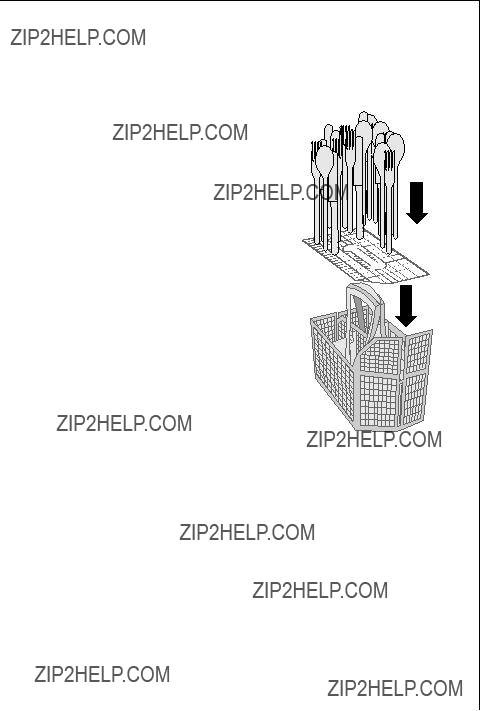
To ensure that all items of cutlery are completely washed, you should
1.Place the grid insert on the cutlery rack
2.Place short knives, forks and spoons in the grid insert with their handles pointing downwards.
15
Operating Instructions
Loading Pans, Frying Pans
and Large Plates
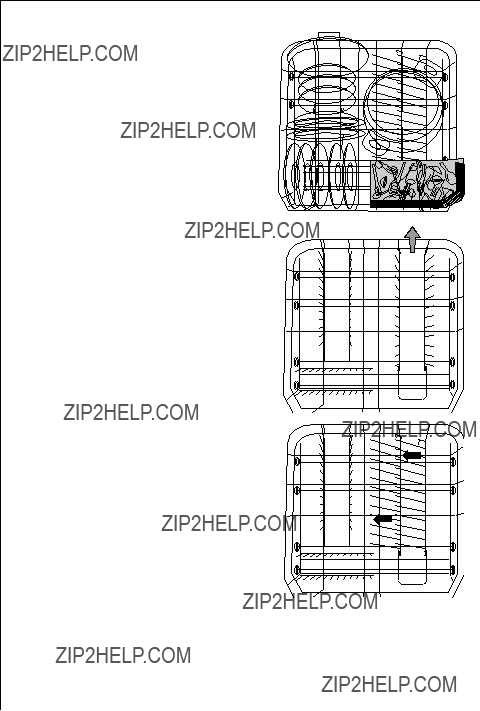
Load large and heavily soiled dishes in the lower rack.
3 To ease the loading of large items at some
0 1. Slightly lift the right plate insert.
2. Fold the plate insert to the left.
16
Operating Instructions
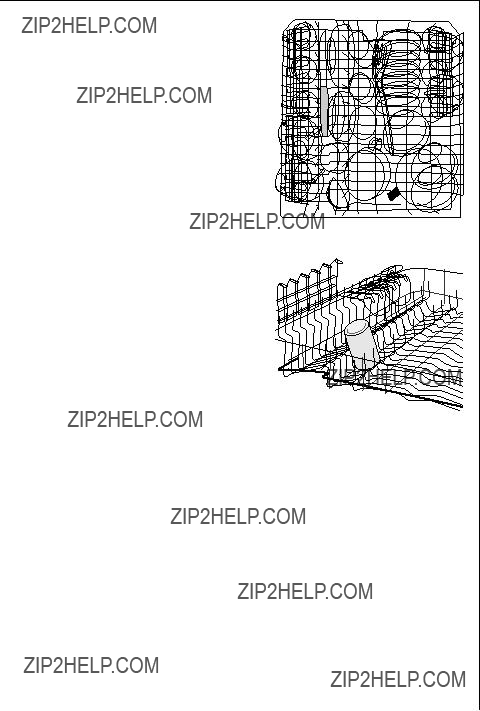
Loading Cups, Glasses and
Coffee Services
Load small, delicate items and long pointed cutlery in the upper rack.
???Arrange items of crockery on the folding cups racks so that they are
offset from each other and water can reach all items.
??? The cup racks can be folded up out of the way for tall items.
??? Lay or hang wine, champagne, and brandy glasses in the cut outs on the cup racks.
???Glasses, beakers, etc. can also be placed on the two rows of prongs on the left of the upper rack.
17
Operating Instructions
Filling with Detergent
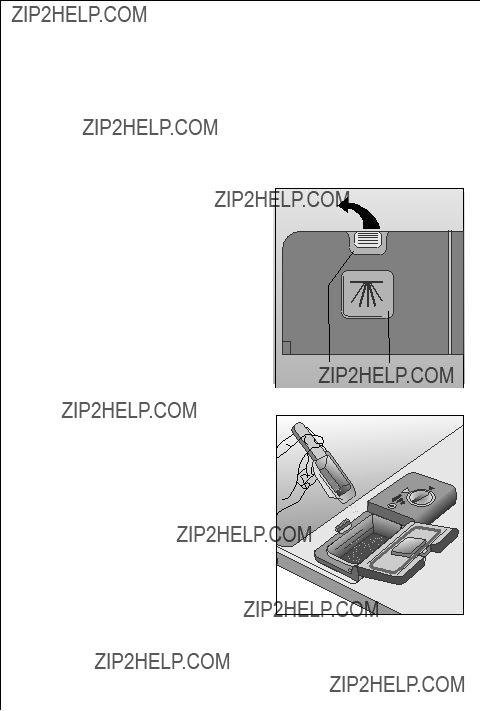
1 Use only dishwasher detergent.
Fill with Detergent:
???Prior to the start of a wash programme (not for the Pre Wash pro- gramme). The detergent is released into the wash water during the programme.
The detergent dispenser is on the inside of the door.
0 1. If the lid is closed: Press the latching lever (1) forwards. The lid springs open.
2.Fill the detergent dispenser with detergent. The markings are an aid to correct dosing:
"MIN" corresponds to approx. 30 ml detergent,
"MAX" corresponds to approx. 40 ml detergent.
3.Close the lid, press it down until the latch engages.
ity in the lid (2). This detergent is effective during the pre wash.
18

Operating Instructions
Bio Wash Programmes and Concentrated Detergents
Based on their chemical composition, dishwasher detergents can be split into two basic types:
???Conventional, alkaline detergents with caustic components
???Weak alkaline concentrated detergents with natural enzymes.
2 The use of BIO wash programmes in conjunction with concentrated detergents reduces pollution and is good for your dishes; the BIO wash programmes are specially matched to the soil dissolving properties of the enzymes in the concentrated detergent. It is for this reason that BIO wash programmes can achieve the same results at 50 ??C that can otherwise only be achieved using 65 ??C programmes.
3 Detergent tablets from different manufacturers dissolve at different rates. For this reason some detergent tablets cannot develop their full cleaning power during short programmes. Therefore please use normal programmes with pre wash when using detergent tablets.
Detergent Recommendations
For best results we recommend the use of Finish detergent, rinse aid and salt.
19

Operating Instructions
Selecting the Wash Programme (Programme Table)
Choose the most suitable wash programme with the aid of this table:
1)The consumption figures were measured under standard conditions. They are intended as a guide only as variations can occur during normal usage.
20

Operating Instructions
Starting the Wash Programme
0 1. Check that when the dishes and cutlery are loaded into the dishwasher the spray arms are free to rotate.
2.Open the tap fully.
3.Close dishwasher door.
4.Turn the programme selector clockwise to A, or B or C (see ???Programme Table???).
1For interference suppression reasons, only operate the programme selector with the dishwasher switched off. It is also possible that the automated addition of detergent will be triggered.
5.Turn the programme selector to the required programme (see ???Pro- gramme Table???).
Power indicator light illuminates. The selected wash programme starts. The programme selector rotates during the wash programme and indi- cates the position that has been reached in the programme.
2.Open dishwasher door and check whether there is still detergent in the container. Refill the container if necessary.
3.Close dishwasher door.
4.Turn the programme selector clockwise to A, or B or C (see ???Programme Table???).
5.Turn the programme selector to the required programme (see ???Pro- gramme Table???). Power indicator light illuminates, wash programme starts.
21

Operating Instructions
0 1. Open the door of the dishwasher. The wash programme stops. 2. Shut the door. The wash programme continues.
Switching Off the Dishwasher
When the wash programme is finished:
01. Turn the program selector to the Iposition. Power indicator light goes out.
1Hot steam may escape if the door is opened immediately after the end of the programme. Therefore:
2.Open the door carefully.
Emptying the Dishwasher
3 ??? Hot dishes are sensitive to knocks. The dishes should therefore be allowed to cool down before removing them from the appliance.
??? The dishes will dry quicker if, when the programme has finished, you briefly open the door fully and then leave it slightly ajar.
??? Leave the dishes in the dishwasher for approx. 15 minutes after the end of the programme so that they dry better and can cool down.
??? Empty the lower rack first, then the upper rack. In this way you will avoid any water left on the upper rack dripping onto the dishes in the lower rack and causing water spots.
Care and Cleaning
1 Do not under any circumstances use furniture care products or aggres- sive cleaners.
??? If necessary, clean the controls only with a soft cloth and pure warm water.
??? The spray arms do not need cleaning.
??? Occasionally check the internal containers, door seal, and water inlet for soiling, clean if necessary.
22
Operating Instructions
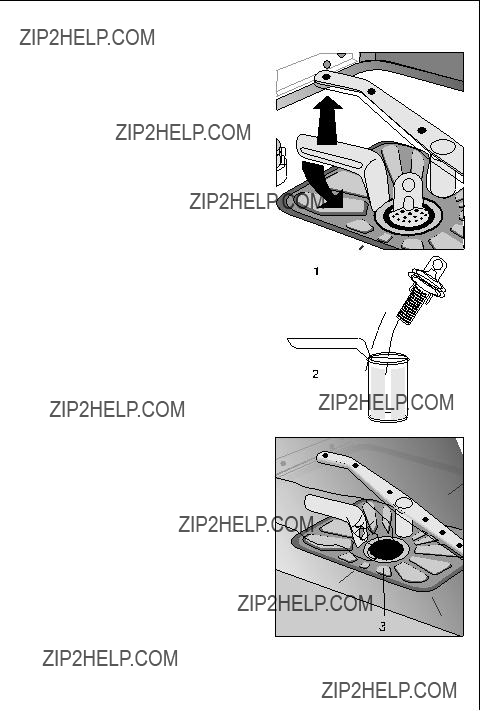
7. Put the flat filter back in the base of the washing compartment
8. Place the coarse/fine filter in the microfilter and press together.
9. Put the filter combination in place and lock by turning the handle clock- wise to the stop. During this process ensure that the flat filter does not protrude above the base of the wash- ing compartment.
stances.
23

Operating Instructions
What to do, if ...
Try to rectify minor faults on the dishwasher with the aid of the instructions given here. If you call an engineer to resolve a of fault listed here, or to repair a fault caused by incorrect use or installation, a charge will be made even if the appliance is in guarantee.
...there are problems with the operation of the dish- washer.
24

Operating Instructions
...the wash result is unsatisfactory.
The dishes are still dirty.
???The wrong wash programme was selected.
???The dishes were arranged in such a manner that water has not reached all parts. The dish racks must not be overloaded.
???The filter in the base of the washing compartment is dirty or incor- rectly positioned.
???Detergent was not used or too little was used.
???In the case of scale deposits on the dishes: the special salt container is empty or the water softener is incorrectly adjusted.
???The drain hose is incorrectly laid.
The dishes are wet and dull.
???Rinse aid was not used.
???The rinse aid container is empty.
There are streaks, milky spots or a bluish coating on glasses and dishes.
??? Decrease rinse aid dosing.
There are dried water drops on the glasses and dishes.
???Increase rinse aid dosing.
???The detergent may be the cause. Contact the detergent manufac- turer's consumer advisor.
25

Operating Instructions
Technical Data
Dishwashers that Can Be Integrated or Fully Integrated,
; This appliance conforms with the following EU Directives:
???73/23/EWG dated 19. 02. 1973 ??? Low Voltage Directive
???89/336/EWG dated 03. 05. 1989
(including Directive Amendment 92/31/EWG) ??? EMC Directive
26
Operating Instructions
Notes for Test Institutes
The salt container for the water softener and the rinse aid container must be completely full prior to the test.
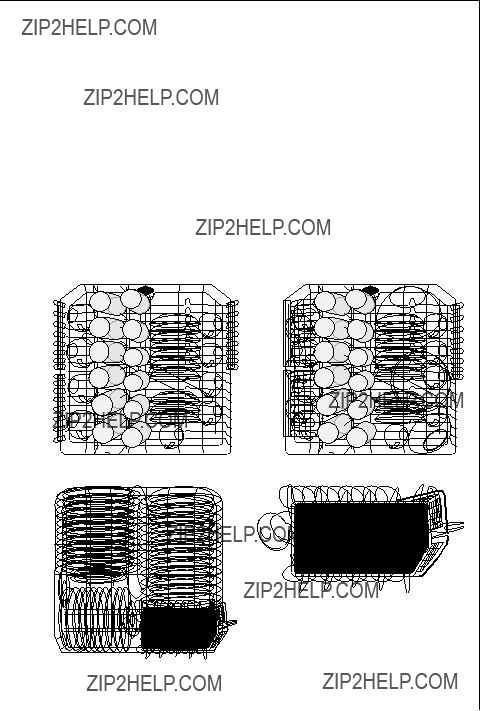
Example Loading Arrangement: Upper rack (lower and upper positions):
27
Installation and Connection Instructions
INSTALLATION AND CONNECTION
INSTRUCTIONS
Installing the Dishwasher
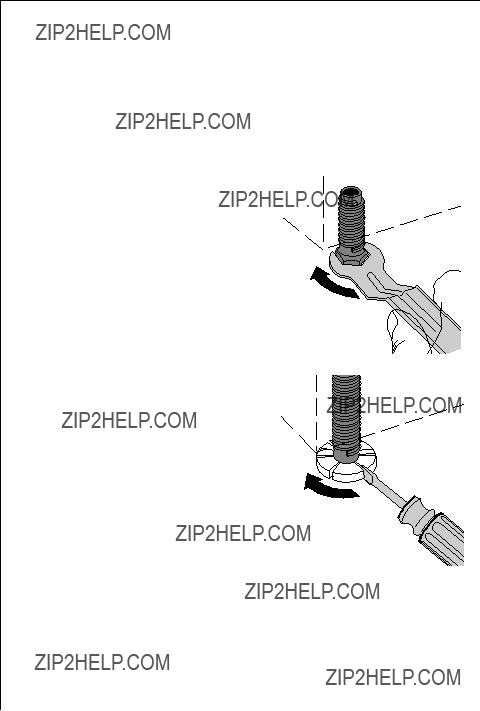
???The dishwasher must be installed on a firm floor and adjusted such that it is stable and level.
???To compensate for unevenness in the
floor and to match the height of the appliance to that of surrounding units extend the threaded feet by unscrew- ing. Depending on the design of the threaded feet use either
??? an
or
??? a screwdriver.
???For
???The drain hose, inlet hose and mains cable must be laid such that they are free to move in the rear of the plinth recess, so that they cannot be kinked or crushed.
???The dishwasher must also be screwed on tightly to the work surface or to the adjoining units. This is absolutely necessary so that its stability is guaranteed according to VDE regulations.
28

lating,
57.5 cm). The plate should have aluminium foil on the side facing the cooker.
29
Installation and Connection Instructions
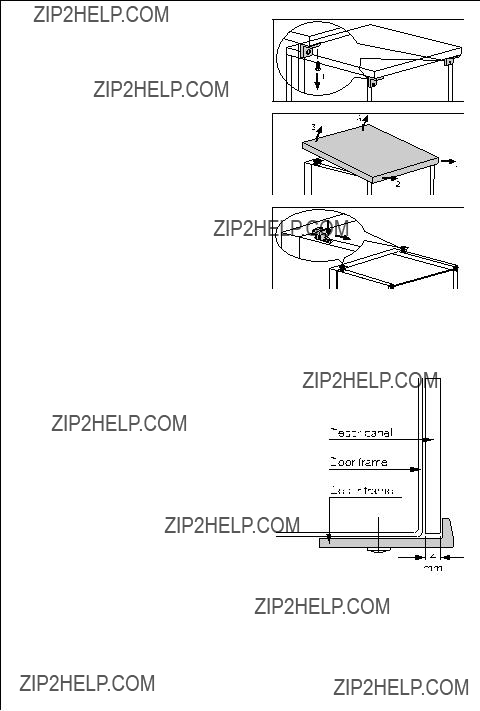
???If the dishwasher is installed under- neath a kitchen work surface, the original work surface of the dish- washer is to be removed as follows:
???Unscrew the screws (1) from the elbows on the back side.
???Slide the work surface approx. 1cm to the rear (2) , lift at the front (3) and remove.
???Press the work surface retaining brackets at the position shown in the diagram (4) and remove the bracket at an angle to the rear
(5).
3 The plinth on
???
match the facings of other kitchen equipment. The d??cor panels must be obtained from the kitchen man- ufacturer. A d??cor frame is neces- sary for installation, and can be obtained as an accessory from the dealer if not included in the scope of delivery.
??? Decor panel dimensions:
??? Height 590 mm
???Width 581 mm
???Clamp thickness: max. 4 mm
???To ensure that thin decor panels do not flex or distort, attach them to the door of the appliance using double sided adhesive tape.
30

Installation and Connection Instructions
Connecting the Dishwasher
Water Connection
The dishwasher is fitted with safety devices that prevent the return of wash water into the drinking water system and comply with the appli- cable plumbing regulations.
???The dishwasher should be connected to a cold water supply.
???The dishwasher should not be connected to a hot water supply.
Permitted water pressure
0Connect the threaded hose fitting (DIN 259) on the water inlet hose to a tap with an external thread (?? inch). Handtighten the threaded hose fitting only.
3 ??? In order that access to the tap in the kitchen is not limited by the use of the dishwasher, we recommend the installation of an additional tap, or the fitting a two way adapter to the existing tap.
??? If you need a longer water inlet hose contact your local AEG Service Force Centre.
31
Installation and Connection Instructions
Water drain
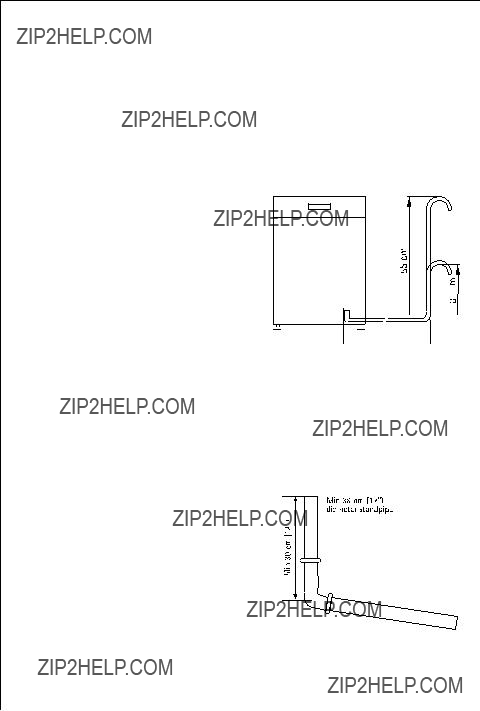
Drain hose
1 The drain hose must not be kinked, crushed or entangled.
???Connecting the drain hose:
???Maximum permitted height: 1 metre.
???Minimum required height 30 cm above the lower edge of the machine.
Extension hoses
??? Extension hoses are available from
AEG Service Force. The internal diameter of the extension hoses
must be 19 mm to ensure that the
function of the appliance is not impeded.
??? Hoses may be laid a maximum of  3 metres horizontally; the maxi-
 mum permitted height for the con-


 nection for the drain hose is then


85 cm.
Sink outlet connection
???The outlet of the drain hose (?? 19 mm) fits all commonly available sink outlet spigot types. The outer diameter of the spigot connection must be at least 15 mm.
???The drain hose must be fixed to the sink outlet connection using the hose clamp supplied.
Discharging into a standpipe
When discharging into a standpipe, the upright standpipe should have a minimum, length of 30 cm (12???) from the bottom of the elbow to the top of the pipe (see diagram). Make sure that it is designed in such a way that the end of the drain hose cannot be covered with water.
32

Installation and Connection Instructions
33

Installation and Connection Instructions
Electrical Connection
Any electrical work required to install this appliance should be car- ried out by a qualified electrician or competent person.
1 WARNING - This appliance must be earthed.
The manufacturer declines any responsibility should these safety measures not be observed.
Before switching on make sure the electricity supply voltage is the same as that indicated on the appliance rating plate.
To isolate the dishwasher from the mains, remove the mains plug. Important: The plug must still be accessible after the appliance has been installed.
Changing a fuse
The appliance is supplied with a 13amp plug fitted. In the event of hav- ing to change the fuse in the plug supplied, a 13amp ASTA approved (BS 1363A) fuse must be used.
Should the plug need to be replaced for any reason, proceed as described below.
The wires on the mains lead are coloured in accordance with the following code.
Green
& Yellow
Green and Yellow : Earth
Cord Clamp
???The wire coloured green and yellow must be connected to the termi-
nal marked with the letter ???E??? or by the earth symbol  or coloured green and yellow.
???The wire coloured blue must be connected to the terminal ???N??? or col- oured black.
???The wire coloured brown must be connected to the terminal marked ???L??? or coloured red.
???Upon completion there must be no cut, or stray strands of wire present and the cord clamp must be secure over the outer sheath.
1WARNING! A cut off plug inserted into a 13 amp socket is a seri- ous safety (shock) hazard. Ensure that, if it is necessary to cut off the plug, it is disposed of safely and not retained.
34
Installation and Connection Instructions
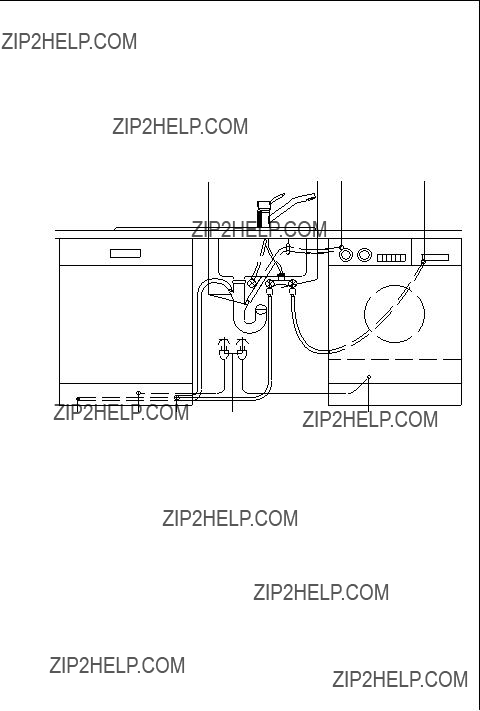
Connections
The water inlet and drain hoses, as well as the mains cable must be connected beside the dishwasher as there is insufficient space behind the appliance.
The plumbing and electrical installation example given below can only be regarded as a recommendation.
35

Guarantee Conditions
GUARANTEE CONDITIONS
Guarantee Conditions
AEG offer the following guarantee to the first purchaser of this appliance.
1.The guarantee is valid for 12 months commencing when the appliance is handed over to the first retail purchaser, which must be verified by purchase invoice or similar doc- umentation.
The guarantee does not cover commercial use.
2.The guarantee covers all parts or components which fail due to faulty workmanship or faulty materials. The guarantee does not cover appliances where defects or poor per- formance are due to misuse, accidental damage, neglect, faulty installation, unauthorised modification or attempted repair, commercial use or failure to observe requirements and recommendations set out in the instruction book.
This guarantee does not cover such parts as light bulbs, removable glassware or plastic, dust bags or filters.
3.Should guarantee repairs be necessary the purchaser must inform the nearest customer service office (manufacturer??s service or authorised agent). AEG reserves the right to stipulate the place of the repair (i. e. the customer??s home, place of installation or AEG workshop).
4.The guarantee or free replacement includes both labour and materials.
5.Repairs carried out under guarantee do not extend the guarantee period for the appli- ance. Parts removed during guarantee repairs become the property of AEG.
6.The purchaser??s statutory rights are not affected by this guarantee.
European Guarantee
If you should move to another country within Europe then your guarantee moves with you to your new home subject to the following qualifications:
???The guarantee starts from the date you first purchased your product.
???The guarantee is for the same period and to the same extent for labour and parts as exist in the new country of use for this brand or range of products.
???This guarantee relates to you and connot be transferred to another user.
???Your new home is within the European Community (EC) or European Free Trade Area.
???The product is installed and used in accordance with our instructions and is only used domestically, i. e. a normal household.
???The product is installed taking into account regulations in your new country.
Before you move please contact your nearest Customer Care Centre, listed below, to give them details of your new home. They will then ensure that the local Service Organisation is aware of your move and able to look after you and your appliances.
36

37

38
Service & Spare parts
SERVICE & SPARE PARTS
If you wish to purchase spare parts or require an engineer, contact your local AEG Service Force Centre by telephoning:
08705 929 929
Your telephone call will be automatically routed to the Service Centre covering your post code area.
When you contact the Service Centre they will need the following information:
1.Your name & address, including post code.
2.Your telephone number
3.Clear and concise details of the fault.
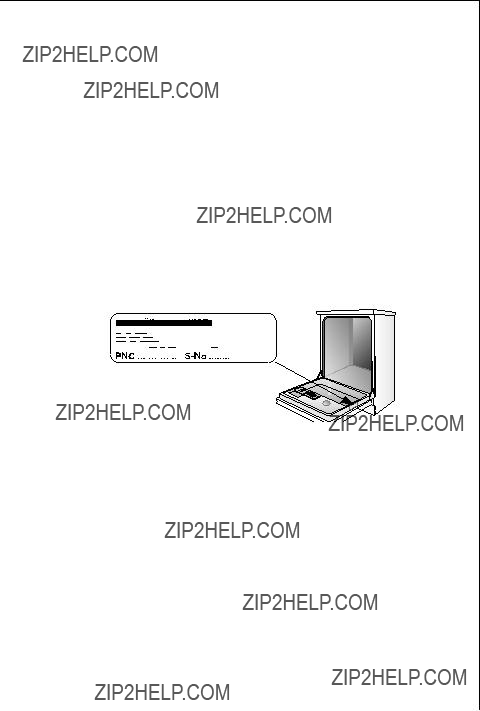
4.The model, serial and production number. This information can be found on the rating plate. The rating plate is on the inner edge of the door on the right.
5.Date of purchase. Please note that it will be necessary to provide proof of purchase for any in guarantee service call.
Customer Care
For general enquiries concerning your AEG appliance or for further information on AEG products please contact our Customer Care Department by letter or telephone as follows:
Customer Care Department
AEG Domestic Appliances
Berkshire, SL1 1DZ Tel. 08705 350350 (*)
(*) Calls may be recorded for training purposes
39
AEG Hausger??te GmbH
Postfach 1036
http://www.aeg.hausgeraete.de
?? Copyright by AEG
822 945 464 - 00 - 0600