Dell??? S300w Projector

User???s Guide

Notes, Notices, and Cautions

NOTE: A NOTE indicates important information that helps you make better use of your projector.

NOTICE: A NOTICE indicates either potential damage to hardware or loss of data and tells you how to avoid the problem.

CAUTION: A CAUTION indicates a potential for property damage, personal injury, or death.

____________________

Information in this document is subject to change without notice. ?? 2010 Dell Inc. All rights reserved.

Reproduction of these materials in any manner whatsoever without the written permission of Dell Inc. is strictly forbidden.

Trademarks used in this text: Dell and the DELL logo are trademarks of Dell Inc.; DLP and DLP logo are trademarks of TEXAS INSTRUMENTS INCORPORATED; Microsoft and Windows are either trademarks or registered trademarks of Microsoft Corporation in the United States and/or other countries.

Other trademarks and trade names may be used in this document to refer to either the entities claiming the marks and names or their products. Dell Inc. disclaims any proprietary interest in trademarks and trade names other than its own.

Model S300w

March 2010 Rev. A01

Contents

Contents 3

4 Contents

4 Troubleshooting Your Projector . . . . . . . . 90

Guiding Signals . . . . . . . . . . . . . . . . . . . . . 94 Changing the Lamp . . . . . . . . . . . . . . . . . . . . 96

5Specifications . . . . . . . . . . . . . . . . . . . . . 98

6Contacting Dell . . . . . . . . . . . . . . . . . . . 103

7Appendix: Glossary . . . . . . . . . . . . . . . . 104

Contents 5

1

Your Dell Projector

Your projector comes with all the items shown below. Ensure that you have all the items, and contact Dell??? if anything is missing.

Package Contents

Power cable1.8m VGA cable (VGA to VGA)

CD User???s Guide & Documentation AAA Batteries (2)

USB cable

6 Your Dell Projector

About Your Projector

CAUTION: Safety Instructions

1 Do not use the projector near appliances that generate a lot of heat.

2 Do not use the projector in areas where there is an excessive amount of dust. The dust may cause the system to fail and the projector will automatically shutdown.

3 Ensure that the projector is mounted in a well-ventilated area.

4 Do not block the ventilation slots and openings on the projector.

5 Ensure the projector operates between ambient temperatures (5??C to 35??C).

6 Do not try to touch the ventilation outlet as it can become very hot after the projector has been turned on or immediately after it is turned off.

7 Do not look into the lens while the projector is on as it may cause injury to your eyes.

8 Do not place any objects near or in front of the projector or cover its lens while the projector is on as the heat may cause the object to melt or burn.

9 Do not use the wireless projector near cardiac pacemakers. 10 Do not use the wireless projector near medical equipment. 11 Do not use the wireless projector near microwave ovens.

NOTE:

???Do not attempt to wall mount the projector yourself. It should be installed by a qualified technician.

???Recommended Projector Wall Mount Kit (P/N: 4TVT8/V3RTH). For more information, see the Dell Support website at support.dell.com.

???For more information, see the Safety Information that shipped with your projector.

???S300w projector only can use in indoor.

8 Your Dell Projector

2

Connecting Your Projector

21 20 19

18 17 16 15 14

13

12 11 10

CAUTION: Before you begin any of the procedures in this section, follow the Safety Instructions as described on page 7.

Installing the Antenna

Your projector comes with a wireless antenna for wireless networking. Refer to "Wireless Networking Installation" on page 55.

1Screw the antenna to the antenna connector at the back of your projector.

2 Raise the antenna to position as shown.

10 Connecting Your Projector

Connecting to a Computer

Connecting a Computer Using a VGA Cable

1

2

3

1Power cord

2VGA to VGA cable

3USB-A to Mini USB-B cable

NOTE: The Mini USB cable is not provided with your projector.

NOTE: The Mini USB cable must be connected if you want to use the Page Up and Page Down features on the remote control.

Monitor Loop-Through Connection Using VGA Cables

1

2 2

1Power cord

2VGA to VGA cable

NOTE: Only one VGA cable is shipped with your projector. An additional VGA cable can be purchased on the Dell website at support.dell.com.

12 Connecting Your Projector

Connecting a Computer Using an RS232 cable

1

2

1Power cord

2RS232 cable

NOTE: The RS232 cable is not shipped with your projector. Consult a professional installer for the cable and RS232 remote control software.

Connecting a Computer Using an USB Display

1

2

1Power Code

2USB-A to USB-B cable

NOTE: Need to install USB Driver, see "USB Display Driver Installation" on page 63.

14 Connecting Your Projector

Connecting a Computer Using Wireless

NOTE: Your computer must have wireless function and should be configured properly to detect the wireless connection. Refer to your computer???s documentation on how to configure wireless connection.

Connecting a DVD Player

Connecting a DVD Player Using an S-Video Cable

1

2

1Power cord

2S-Video cable

NOTE: The S-Video cable is not shipped with your projector. You can purchase the S-Video extension (50 ft/100 ft) cable on the Dell website at support.dell.com.

16 Connecting Your Projector

Connecting a DVD Player Using a Composite Video Cable

1

2

1Power cord

2Composite Video cable

NOTE: The Composite Video cable is not shipped with your projector. You can purchase the Composite Video Extension (50 ft/100 ft) cable on the Dell website at support.dell.com.

Connecting a DVD Player Using a Component Video Cable

1

2

1Power cord

2VGA to Component Video cable

NOTE: The VGA to Component Video cable is not shipped with your projector. You can purchase the VGA to Component Video Extension (50 ft/100 ft) cable on the Dell website at support.dell.com.

18 Connecting Your Projector

Connecting a DVD Player Using an HDMI Cable

1

2

1Power cord

2HDMI cable

NOTE: The HDMI cable is not shipped with your projector.

Connecting to Local Area Network

To project an image and control the projector that is connected to a network through an RJ45 cable.

1

2

Local Area Network (LAN)

1Power cord

2RJ45 cable

NOTE: The RJ45 cable is not shipped with your projector.

20 Connecting Your Projector

Professional Installation Options: Installation for Driving Automatic Screen

1

3

2

1Power cord

212V DC Plug

3Automatic Screen

NOTE: Use the dimension of 12V DC plug in 1.7 mm (ID) x 4.00 mm (OD) x 9.5 mm (shaft) to connect the automatic screen with the projector.

12V DC Plug

Connection With Commercial RS232 Control Box

1

3

2

1Power cord

2RS232 cable

3Commercial RS232 control box

NOTE: The RS232 cable is not shipped with your projector. Consult a professional technician to obtain the cable.

22 Connecting Your Projector

3

Using Your Projector

Turning Your Projector On

NOTE: Turn on the projector before you turn on the source (computer, DVD player, etc.). The Power button light blinks blue until pressed.

1 Remove the lens cap.

2 Connect the power cord and appropriate signal cables. For information about connecting the projector, see "Connecting Your Projector" on page 9.

3 Press the Power button (see "Using the Control Panel" on page 28 to locate the Power button).

4 Turn on your source (computer, DVD player, etc.)

5 Connect your source to the projector using the appropriate cable. See "Connecting Your Projector" on page 9 for instructions to connect your source to the projector.

6 By default, the input source of projector is set to VGA-A. Change the input source of projector if necessary.

7 If you have multiple sources connected to the projector, press the Source button on the remote control or control panel to select the desired source. See "Using the Control Panel" on page 28 and "Using the Remote Control" on page 30 to locate the Source button.

Turning Your Projector Off

NOTICE: Unplug the projector after properly shutting down as explained in the following procedure.

1 Press the Power button.

NOTE: The "Press Power Button to Turn off Projector" message will appear on the screen. The message disappears after 5 seconds or you can press the Menu button to clear it.

2 Press the Power button again. The cooling fans continue to operate for 120 seconds.

3 To power off the projector quickly, press the Power button and hold for 1 second while the projector???s cooling fans are still running.

NOTE: Before you turn on the projector again, wait for 60 seconds to allow the internal temperature to stabilize.

4 Disconnect the power cord from the electrical outlet and the projector.

Adjusting the Projected Image

Raising the Projector Height

1 Raise the projector to the desired display angle, and use the front two tilt adjustment wheel to fine-tune the display angle.

2 Use the two tilt adjustment wheel to fine-tune the display angle.

Lowering the Projector Height

1 Lower the projector, and use the front two tilt adjustment wheel to fine-tune the display angle.

1

1Front tilt adjustment wheel (Angle of tilt: -1 to 4 degree)

2Tilt adjustment wheel

24 Using Your Projector

Adjusting the Projector Focus

CAUTION: To avoid damaging the projector, ensure that the zoom lens and elevator foot are fully retracted before moving the projector or placing the projector in its carrying case.

1 Rotate the focus tab until the image is clear. The projector focuses at distances ranging between 1.64 ft to 10.83 ft (0.5 m to 3.3 m).

1

1 Focus tab

Adjusting Projection Image Size

294"(746.76cm)

294"76cm) . (746

223"(566.42 cm)

178"(452.12 cm)

26 Using Your Projector

Using the Control Panel

9 8 7

one of the following problems could be occurring:

??? Lamp is reaching its end of usable life

??? Lamp module is not properly installed

??? Lamp driver failure

??? Color wheel failure

For more information, see "Troubleshooting Your Projector" on page 90 and "Guiding Signals" on page 94.

28 Using Your Projector

Using the Remote Control

30 Using Your Projector

32 Using Your Projector

Installing the Remote Control Batteries

NOTE: Remove the batteries from the remote control when not in use.

1 Press the tab to lift the battery compartment cover.

2 Check the polarity (+/-) marking on the batteries.

3 Insert the batteries and align their polarity correctly according to the marking in the battery compartment.

NOTE: Avoid mixing different types of batteries or using new and old batteries together.

1

2

3

Operating Range With Remote Control

Angle

Operating range

Angle ??20??

Distance 7m/22.97feet

Distance

Angle

Distance

NOTE: Actual operating range may slightly differ from the diagram. Weak batteries will also prevent the remote control from properly operating the projector.

34 Using Your Projector

Using the On-Screen Display

???The projector has a multi-language On-Screen Display (OSD) Menu that can be displayed with or without an input source.

???To navigate through the tabs in the Main Menu, press the 
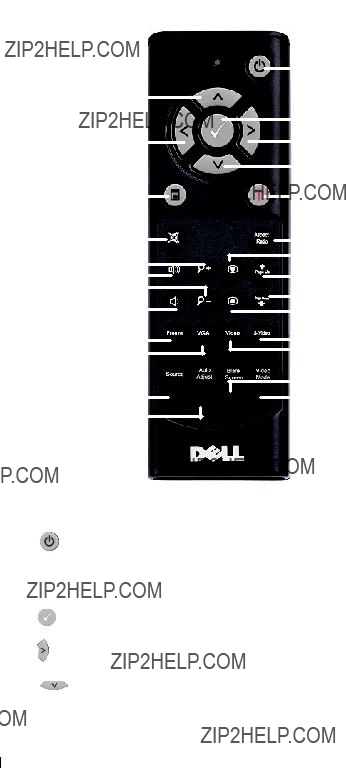
or buttons on your projectors control panel or remote control.

???To select a submenu, press the button on your projector???s control panel or remote control.

???To select an option, press the or buttons on your projector???s control panel or remote control. The color changes to dark blue. When an item is selected, the color changes to dark blue.

???Use the or buttons on the control panel or remote control to adjust the settings.

???To go back to Main Menu, go to Back tab and press the button on the control panel or the remote control.

???To exit the OSD, go to EXIT tab and press the button or press the Menu button directly on the control panel or the remote control.

Main Menu

AUTO-ADJUST

Auto Adjust automatically adjusts the projector's Horizontal, Vertical, Frequency and Tracking in PC mode. While Auto Adjustment is in progress, the following message appears on the screen:

INPUT SELECT

The Input Select menu allows you to select your projector???s input source.

AUTO SOURCE???Select Off (the default) to lock the current input signal. If you press the Source button when the Auto Source mode is set to Off, you can manually select the input signal. Select On to auto detect the available input signals. If you press the Source button when the projector is on, it automatically finds the next available input signal.

VGA-A???Press to detect VGA-A signal. VGA-B???Press to detect VGA-B signal. S-VIDEO???Press to detect S-Video signal.

COMPOSITE VIDEO???Press 
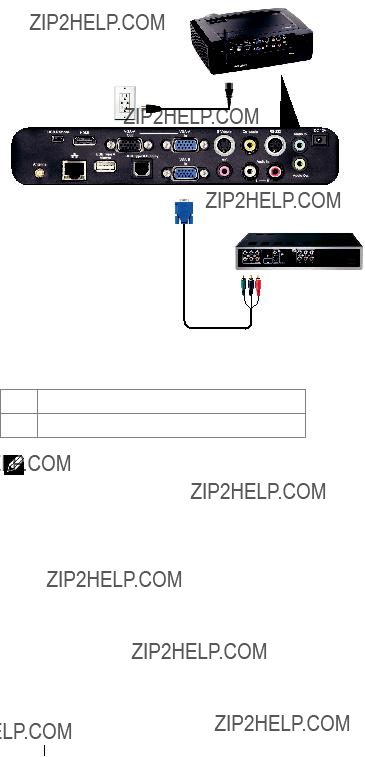
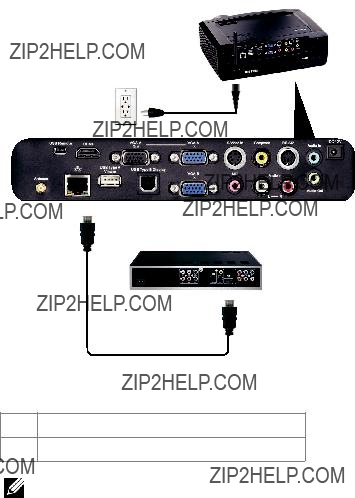
to detect Composite Video signal. HDMI???Press to detect HDMI signal.

Multiple Display???Press to activate Input Select Multiple Display menu.

NOTE: The Multiple Display can be used after "Wireless / Network" turn on. Default is Disable.

ADVANCED???Press to activate Input Select Advanced menu.

Input Select Multiple Display

The Input Select Multiple Display menu allows you to activate Wireless Display, USB Display and USB Viewer.

Wireless Display???Press 
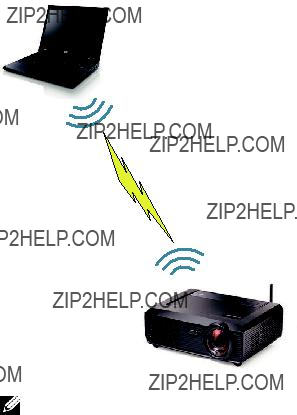
to access the projector's Wireless Guide screen. See

36 Using Your Projector

"Wireless Guide screen" on page 56.

USB Display???Allows you to via the USB cable to display PC/NB screen from your projector. See "USB Display Driver Installation" on page 63.

USB Viewer???Allows you to display photo and PPT files from your USB flash. See "Presentation to Go (PtG) Installation" on page 64.

INPUT SELECT ADVANCED

The Input Select Advanced menu allows you to enable or disable input sources.

VGA-A???Use and to enable or disable VGA-A input. VGA-B???Use and to enable or disable VGA-B input. S-VIDEO???Use and to enable or disable S-Video input.

COMPOSITE VIDEO???Use and to enable or disable Composite Video input. HDMI???Use and to enable or disable HDMI input.
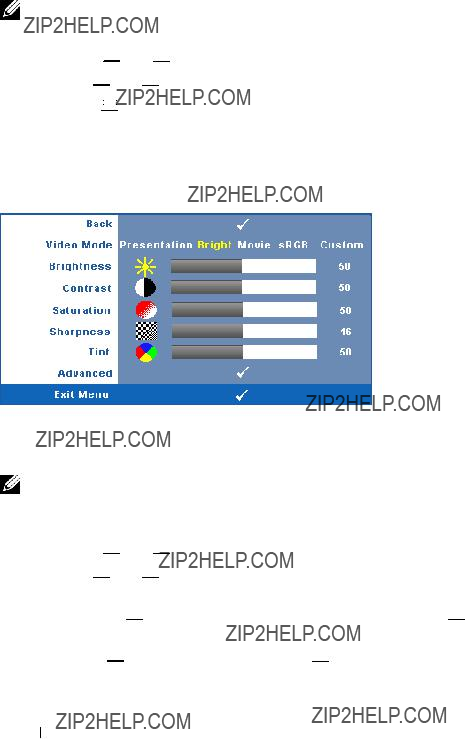
NOTE: You cannot disable your current input source. At anytime, a minimum of two input sources have to be enabled.

PICTURE (in PC Mode)

Using the Picture menu, you can adjust the display settings of your projector. The Picture menu provides the following options:

VIDEO MODE???Allows you to optimize the display image: Presentation, Bright, Movie, sRGB (provides more accurate color representation), and Custom (set your preferred settings).

NOTE: If you adjust the settings for Brightness, Contrast, Saturation, Sharpness, Tint, and Advanced the projector automatically switches to Custom.

BRIGHTNESS???Use and to adjust the brightness of the image. CONTRAST???Use and to adjust the display contrast.

ADVANCED???Press to activate Picture Advance Menu. See "PICTURE ADVANCED" on page 39.

PICTURE (in Video Mode)

Using the Picture menu, you can adjust the display settings of your projectors. The Picture menu provides the following options:

VIDEO MODE???Allows you to optimize the display image: Presentation, Bright, Movie, sRGB (provides more accurate color representation), and Custom (set your preferred settings).

NOTE: If you adjust the settings for Brightness, Contrast, Saturation,

Sharpness, Tint, and Advanced, the projector automatically switches to

Custom.

BRIGHTNESS???Use and to adjust the brightness of the image. CONTRAST???Use and to adjust the display contrast.

SATURATION???Allows you to adjust the video source from black and white to fully saturated color. Press to decrease the amount of color in the image and to increase the amount of color in the image.

SHARPNESS???Press to decrease the sharpness and to increase the sharpness.

38 Using Your Projector

TINT???Press to increase the amount of green in the image and to increase the amount of red in the image (available for NTSC only).

ADVANCED???Press to activate Picture Advance Menu. See "PICTURE ADVANCED" below.

NOTE: Saturation, Sharpness, and Tint are only available when input source is from Composite or S-Video.

PICTURE ADVANCED

Using the Picture Advanced menu, you can adjust the display settings of your projector. The Picture Advanced menu provides the following options:

WHITE INTENSITY???Use and to adjust the display white intensity.

COLOR TEMP???Allows you to adjust the color temperature. The screen appears cooler at higher color temperatures and warmer at lower color temperatures. When you adjust the values in the Color Adjust menu, the Custom mode is activated. The values are saved in the Custom mode.

CUSTOM COLOR ADJUST???Allows you to manually adjust the colors red, green, and blue.

COLOR SPACE???Allows you to select the color space, options are: RGB, YCbCr, and YPbPr.

DISPLAY (in PC Mode)

Using the Display menu, you can adjust the display settings of your projector. The Picture menu provides the following options:

ASPECT RATIO???Allows you to select the aspect ratio to adjust how the image appears.

???Original ??? Select Original to maintain the aspect ratio of image projected according to input source.

??? 4:3 ??? The input source scales to fit the screen and projects a 4:3 image.

??? Wide ??? The input source scales to fit the width of the screen to project a wide screen image.

ZOOM???Press to activate Zoom menu.

Select the area to zoom and press to view zoomed image.

Adjust the image scale by pressing or and press to view.

ZOOM NAVIGATION???Press to activate Zoom Navigation menu.

Use to navigate projection screen.

HORIZONTAL POSITION???Press to move the image to the left and to move the image to the right.

VERTICAL POSITION???Press to move the image down and to move the image up.

40 Using Your Projector

FREQUENCY???Allows you to change the display data clock frequency to match the frequency of your computer graphics card. If you see a vertical flickering wave, use Frequency control to minimize the bars. This is a coarse adjustment.

TRACKING???Synchronize the phase of the display signal with the graphic card. If you experience an unstable or flickering image, use Tracking to correct it. This is a fine adjustment.

DISPLAY (in Video Mode)

Using the Display menu, you can adjust the display settings of your projector. The Picture menu provides the following options:

ASPECT RATIO???Allows you to select the aspect ratio to adjust how the image appears.

???Original ??? Select Original to maintain the aspect ratio of image projected according to input source.

??? 4:3 ??? The input source scales to fit the screen and projects a 4:3 image.

??? Wide ??? The input source scales to fit the width of the screen to project a wide screen image.

ZOOM???Press to activate Zoom menu.

Select the area to zoom and press to view zoomed image.

Adjust the image scale by pressing or and press to view.

ZOOM NAVIGATION???Press to activate Zoom Navigation menu.

Use to navigate projection screen.

42 Using Your Projector

LAMP

The Lamp menu provides the following options:

LAMP HOUR???Displays the operating hours since the last lamp timer reset. LAMP HOUR RESET???Select Yes to reset the lamp timer.

SET UP

The Set Up menu allows you to adjust settings for Language, Projector Mode, V. Keystone, Alert Volume, Standby VGA Output, 3D Display and Wireless / Network.

LANGUAGE???Allows you to set the language for the OSD. Press to activate the

Language menu.

PROJECTOR MODE???Allows you to select the projector mode, depending upon how the projector is mounted.

??? Front Projection-Desktop ??? This is the default option.

???Front Projection-Wall Mount ??? The projector turns the image upside down for wall-mounted projection.

???Rear Projection-Desktop ??? The projector reverses the image so that you can project from behind a translucent screen.

??? Rear Projection-Wall Mount ??? The projector reverses and turns the image upside down. You can project from behind a translucent screen with a wall- mounted projection.

V.KEYSTONE???Manually adjust the vertical image distortion caused by tilting the projector.

ALERT VOLUME???Allows you to set buzzer alert loudness (Off, Low, Mid or High) for power on/off.

STANDBY VGA OUTPUT???Select On or Off the VGA output function at projector standby status. Default is Off.

3D DISPLAY???Select on to start the 3D display function. Default is off.

44 Using Your Projector

NOTE:

1.When you want to create 3D experience, you will need a few other components including:

a PC/NB with a 120 Hz signal output quad buffered graphics card. b "Active" 3D glasses with DLP Link???.

c 3D content. See "Note 4".

d 3D Player. (Example: Stereoscopic Player...)

2.Enable the 3D function when it satisfies any of the below-mentioned conditions:

a PC/NB with graphics card, capable of outputting at 120 Hz signal via VGA or HDMI cable.

b Input a suite of 3D content via Video and S-Video.

3.When projector detects either of the inputs (mentioned above), the enable 3D display on "SETUP" -> "3D Display" OSD works.

4.Current 3D support time is as indicated: a VGA/HDMI 1280 x 720 120 Hz

b Composite/S-Video 60 Hz c Component 480i

5.The recommended VGA signal for NB is Single mode output (Dual mode is not recommended)

3D Sync Invert???If you see a discrete or overlapping image while wearing DLP 3D goggles, you may need to execute 'Invert' to get best match of left/right image sequence to get the correct image. (For DLP 3D goggles)

Wireless / Network???Select On to activate wireless / network function. Press to configure the Wireless / Network settings.

WIRELESS / NETWORK

The Wireless / Network menu allows you to configure the network connection settings.

DHCP ADDRESS???If a DHCP server exists in the network to which the projector is connected, the IP address will automatically be acquired when you select DHCP On. If DHCP is Off, manually set the IP Address, Subnet Mask, and Gateway. Use 
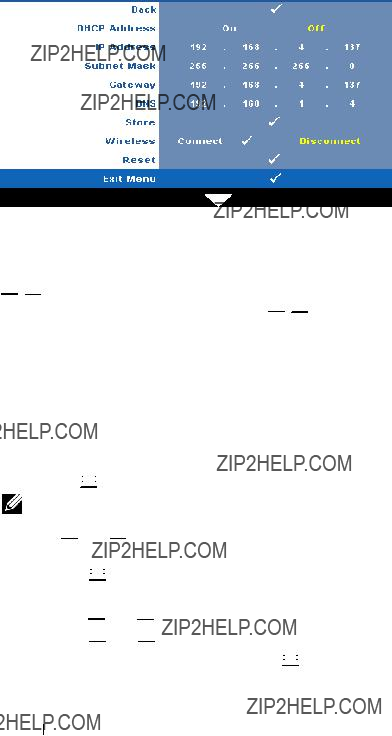
to select the number of IP Address, Subnet Mask, and Gateway. Key in Enter to confirm each number and then use to set the next item.

IP ADDRESS???Automatically or manually assigns the IP address to the projector connected to the network.

SUBNET MASK???Configure the Subnet Mask of the network connection.

GATEWAY???Check the Gateway address with your network/system administrator if you configure it manually.

DNS???Check the DNS Server IP address with your network/system administrator if you configure it manually.

STORE???Press to save the changes made in network configuration settings.

NOTE:

1Use and button to select IP Address, Subnet Mask, Gateway, DNS and Store.

2Press the button to enter IP Address, Subnet Mask, Gateway or DNS to set the value. (The selected option is highlighted in yellow)

a Use and button to select the option. b Use and button to set the value.

c After the setup is complete, press the button to exit.

46 Using Your Projector

3After the IP Address, Subnet Mask, Gateway and DNS is set up, select Store and press the button to store the settings.

4If select Store without press enter button, the system will keep in the original setting.

WIRELESS???Default is Connect. Select Disconnect to disable the wireless connection to use LAN networking only.

NOTE: It is recommended to use the default settings for Wireless Connect.

RESET???Press to reset network configuration.

INFORMATION

The Information menu displays the current projector settings.

OTHERS

The Others menu allows you to change settings for Menu, Screen, Audio, Power, Security, and Closed Caption (for NTSC only). You can also perform Test Pattern and Factory Reset.

MENU SETTINGS???Select and press to activate menu settings. The menu settings consists of the following options:

MENU POSITION???Allows you to change the position of the OSD menu on the screen.

MENU TRANSPARENCY???Select to change the transparency level of the OSD background.

MENU TIMEOUT???Allows you to adjust the time for an OSD timeout. By default, the OSD disappears after 20 seconds of non-activity.

MENU LOCK???Select On to enable Menu Lock and hide the OSD menu. Select OFF to disable the Menu Lock. If you want to disable the Menu Lock function and have the OSD disappear, press the Menu button on the control panel or remote control for 15 seconds, then disable the function.

48 Using Your Projector

SCREEN SETTINGS???Select and press to activate screen settings. The screen settings menu consists of the following options:

CAPTURE SCREEN???Select and press to capture the screen display, the following message appears on the screen.

NOTE: To capture a full image, ensure the input signal that is connected to the projector is 1280 x 800 resolution.

SCREEN???Select Dell to use the Dell logo as wallpaper. Select Captured to set the captured image as wallpaper.

RESET???Select and press to delete the captured picture and set back to the default setting.

AUDIO SETTINGS???Select and press to change audio settings. The audio settings menu consists of the following options:

AUDIO INPUT???Select the Audio input source, options are: Audio-A, Audio- B, HDMI and Microphone.

VOLUME???Press to decrease the volume and to increase the volume. SPEAKER???Select On to enable speaker. Select Off to disable speaker. MUTE???Allows you to mute the sounds for audio input and audio output.

POWER SETTINGS???Select and press to activate power settings. The power settings menu consists of the following options:

POWER SAVING???Select Off to disable Power Saving mode. By default, the projector is set to enter power saving mode after 120 minutes of no activity. A warning message appears on screen showing a 60-second countdown before switching to power saving mode. Press any key buttons during countdown period to stop power saving mode.

You can also set a different delay period to enter power saving mode. The delay period is the time you want the projector to wait without an input signal. Power saving can be set to 30, 60, 90, or 120 minutes.

If an input signal is not detected during the delay period, the projector turns off the lamp and goes into power saving mode. If an input signal is detected within the delay period, the projector automatically turns on. If an input signal is not detected within two hours during power saving mode, the projector switches from Power Saving mode to Power Off mode. To turn on the projector press the Power button.

QUICK SHUTDOWN???Select Yes to turn off the projector with a single press of the Power button. This function allows the projector to quick power off with an accelerated fan speed. Slightly higher acoustic noise is expected during quick power off.

NOTE: Before you turn on the projector again, wait for 60 seconds to allow the internal temperature to stabilize. The projector will take a longer time to turn on if you try to power on immediately. Its cooling fan will run at full speed for about 30 seconds to stabilize the internal temperature.

SECURITY SETTINGS???Select and press to activate security settings. The security settings menu allows you to enable and set password protection.

50 Using Your Projector

PASSWORD???When Password Protect is enabled, a Password Protect screen requesting you to enter a password will be displayed when the power plug is inserted into the electrical outlet and the power for the projector is first turned on. By default, this function is disabled. You can enable this feature, by selecting Enabled. If the password has been set before, key in the password first and select the function. This password security feature will be activated the next time you turn on the projector. If you enable this feature, you will be asked to enter the projector's password after you turn on the projector:

1 First time password input request:

aGo to Others menu, press and then select Password to Enable the password setting.

bEnabling the Password function will pop up a character screen, key in a 4-digit number from the screen and press .

cTo confirm, enter the password again.

dIf the password verification is successful, you may resume with accessing the projector's functions and its utilities.

2 If you have entered an incorrect password, you will be given another 2 chances. After the three invalid attempts, the projector will automatically turn off.

NOTE: If you forget your password, contact DELL??? or a qualified service personnel.

3To disable the password function, select Off to disable the function.

4To delete the password, select Delete.

52 Using Your Projector

CHANGE PASSWORD???Key in the original password, then enter the new password and confirm the new password again.

CLOSED CAPTION???Select On to enable close caption and activate the closed caption menu. Select an appropriate closed captions option: CC1, CC2, CC3, and CC4.

NOTE: Closed caption option is available for NTSC only.

TEST PATTERN???Test Pattern is used to test focus and resolution.

You can enable or disable the Test Pattern by selecting Off, 1 or 2. You can also invoke the Test Pattern 1 by pressing and holding down and buttons on the control panel simultaneously for 2 seconds. You can also invoke the test pattern 2 by pressing and holding down and buttons on the control panel simultaneously for 2 seconds.

Test Pattern 1:

Test Pattern 2:

FACTORY RESET???Select and press to reset all settings to its factory default, the warning message below appears.

Reset items include both computer sources and Video source settings.

54 Using Your Projector

Wireless Networking Installation

NOTE: Your computer must have the following minimum system requirements:

Operating System:

???Windows

Microsoft Windows 2000 with service pack 4 or later, Windows XP Home or Professional Service pack 2 32-bit(recommended), Windows Vista 32-bit, and Windows 7 Home or Professional 32-bit or 64-bit

???MAC

MacBook and above, MacOS 10.5 and above

Minimum Hardware:

aIntel Pentium III-800 MHZ (or greater)

b256MB of RAM required, 512 MB or more recommended.

c10MB of available hard-disk space

dSuper VGA supporting 800 x 600 16 bit high color or higher-resolution display recommended (PC and display)

eEthernet adapter (10 / 100 bps) for an Ethernet connection

fA supported WLAN adapter for a WLAN connection (any NDIS-compliant 802.11b or 802.11g Wi-Fi device)

Web browser

Microsoft Internet Explorer 6.0 or 7.0 (recommended) or 8.0, Firefox 1.5 or 2.0, and Safari 3.0 and above

In order to use your projector wirelessly, you need to complete the steps below:

1Install the wireless antenna. See "Installing the Antenna" on page 10.

2Enable wireless connection on the projector. See "WIRELESS / NETWORK" on page 46.

NOTE: When you start wireless, please wait about 50 seconds reboot the Wireless / Network.

3On INPUT SELECT menu, select Multiple Display and then select Wireless display on sub-menu. See "INPUT SELECT" on page 36. The Wireless Guide Screen shown below appears.

4Take note of the LOGIN CODE, NETWORK NAME (SSID), and IP ADDRESS. You will need these information to login later.

5Connect your computer to the S300w network.

56 Using Your Projector

NOTE:

???Your computer must have wireless network function to detect the connection.

???When you connect to the S300w network, you will lose wireless connectivity with other wireless networks.

6Open your internet browser. You will be automatically directed to the S300w Web Management web page.

NOTE: If the web page does not load automatically, enter the IP address noted from the projector???s screen in the browser???s address bar.

7 The S300w Web Management page opens. For first time use, click Download.

8 Select the appropriate operating system, then click Download.

9Click Run to proceed with the one-time installation of the software.

NOTE: You may choose to save the file and install it at latter time. To do this, click

Save.

NOTE: The following warning messages may appear, select Run and Allow respectively.

58 Using Your Projector

10The installation software will launch. Follow the on-screen instructions to complete setup.

S300w Wireless Application Software

Once the installation is complete, S300w Wireless Application software will launch and will search for the projector automatically. The screen below appears.

Login

To communicate with your projector, enter the Login Code provided for in Step 4 of "Wireless Networking Installation, then click OK.

NOTE: If IP Address is not detected, enter the IP Address displayed at the bottom left corner of the screen.

Understanding the Buttons

After a successful login, the following screen appears.

Projecting the Presentation

???To project the presenation, click any of the projection buttons .

???To pause the presentation, click . The icon turns green.

???To continue the presentation, click again.

???To stop the presentation, click .

60 Using Your Projector

NOTE: The following information is for wireless data presentation mode only. Image display could be slow or not displayed smoothly if displaying a video clip or animation, refer to the frame rate table below for reference.

NOTE:

1 The percentage of screen variation is based on 1024 x 768. Example, display a 320 x 240 video clip on 1024 x 768 desktop, the screen variation is 9.8%.

2 Actuate frame rate could be different depending on factors, such as network environment, image content, signal conditions, locations, and CPU performance.

3 Under clean WLAN environment using 802.11g connection, and no screen stretching.

4 Compressed to 1024 x 768 and under 802.11g.

NOTE: Your computer will not enter S1 (standby mode) / S3 (sleep mode) / S4 (hibernate mode) when running a wireless, USB Display and USB Viewer presentation.

Using the Menu

Click to display the menu.

WEB MANAGEMENT???Click to open the Web Management page. See "Managing the

Projector From Web Management" on page 70.

SEARCH FOR PROJECTOR???Click to search and connect to wireless projector..

MAKE APPLICATION TOKEN???Click to make application token. See "Make Application Token" on page 89.

INFO???Click to display system information. ABOUT???Click to display the application version. EXIT???Click to close the application.

62 Using Your Projector

USB Display Driver Installation

In order to use your USB Display, you need to complete the steps below:

1Enable Wireless / Network connection on the projector. See "WIRELESS / NETWORK" on page 46.

NOTE: When you start wireless, please wait about 50 seconds to reboot the Wireless / Network.

2Connecting the USB cable to your projector and computer. See "Connecting a Computer Using an USB Display" on page 14.

3On INPUT SELECT menu, select Multiple Display and then select USB Display on sub-menu. See "Input Select Multiple Display" on page 36.

4Start the installation manually by clicking "dousb_install.Cab" on CD Drive.

NOTE: If pop up "AutoPlay" installation window, please close it.

5System will start to install the Remote NDIS driver on your computer at first time.

NOTE:

???If the warning message appears, please ignore and allow for installation.

???You may require administrator level access to install the software.

6Start to display the computer screen through USB cable.

NOTE: When the computer resumes from standby or hibernation mode, the display over USB can also be resumed automatically. If it fails to resume automatically, you have to unplug and plug the USB cable again.

Presentation to Go (PtG) Installation

Your computer must have the following minimum system requirements. Operating System:

- Windows

Microsoft Windows XP Home or Professional Service pack 2/3 32-bit (recommended), Windows Vista 32-bit, and Windows 7 Home or Professional 32- bit or 64-bit

- Office 2003 and Office 2007

In order to use your USB Viewer, you need to complete the steps below:

1Enable Wireless / Network connection on the projector. See "WIRELESS / NETWORK" on page 46.

NOTE: When you start wireless, please wait about 50 seconds to reboot the Wireless / Network.

2Plug the USB Flash to your projector.

NOTE:

???Only support the JPEG format photo within 10Mb 40M pixels.

???The PtG converter can convert your PowerPoint files into PtG files. See "PtG Converter - Lite Application Software" on page 69

???You can download the "PtG Converter - Lite" from Dell Support site at: support.dell.com.

3On INPUT SELECT menu, select Multiple Display and then select USB Viewer on sub-menu. See "Input Select Multiple Display" on page 36. The

Presentation to Go Screen appears.

64 Using Your Projector

PtG Viewer

System will stay in this page when ready.

Photo Viewer

PtG/Photo Function Introduction

Show valid PtG and Photo files which are stored in USB disk.

NOTE: If only one disk is detected, system will skip this step.

PtG Overview

66 Using Your Projector

Photo Overview

NOTE: Support 14 languages of photo files name format (Language: English, Dutch, French, German, Italian, Japanese, Korean, Polish, Portuguese, Russian, Simplified Chinese, Spanish, Swedish and Traditional Chinese).

Buttons Introduction

Use up, down and left buttons to navigate and button on your projector's control panel or remote control to select.

NOTE: If you enter OSD menu while using PtG, PtG navigation by up, down and left buttons will not function.

Setup PtG Converter - Lite

Please follow the on-screen instructions to complete setup.

68 Using Your Projector

PtG Converter - Lite Application Software

Please launch the "PtG Converter - Lite". The screen below appears.

1Click to start conversion.

2Select the PowerPoint file you want to convert.

3 Click Browse button to select storage location and then press OK.

NOTE:

1 If not PowerPoint application on your computer, file convert will fail. 2 PtG converter only support up to 20 pages.

Managing the Projector From Web

Management

Configuring the Network Setting

If the projector is connected to a network, you can access the projector using a web browser. For configuring the network setting, refer to "WIRELESS / NETWORK" on page 46.

Accessing Web Management

Use Internet Explorer 5.0 and above or Firefox 1.5 and above and enter the IP address. You can now access Web Management and manage the projector from a remote location.

Home Page

???Access the Web Management Home page by entering the projector???s IP address at the web browser. See "WIRELESS / NETWORK" on page 46.

???Select the language for web management from the list.

???Click any menu item on the left tab to access the page.

70 Using Your Projector

Download the Wireless Application Software

See also "Wireless Networking Installation" on page 55.

Click the Download button of the corresponding operating system of your computer.

Conference Control

This allows you to host conference presentations from different sources without using projector cables and lets you control how each presentation will appear on screen.

Computer Name: Lists the computers logged for conference control.

Play Control: Click the buttons to control how each computer???s projection will appear on screen.

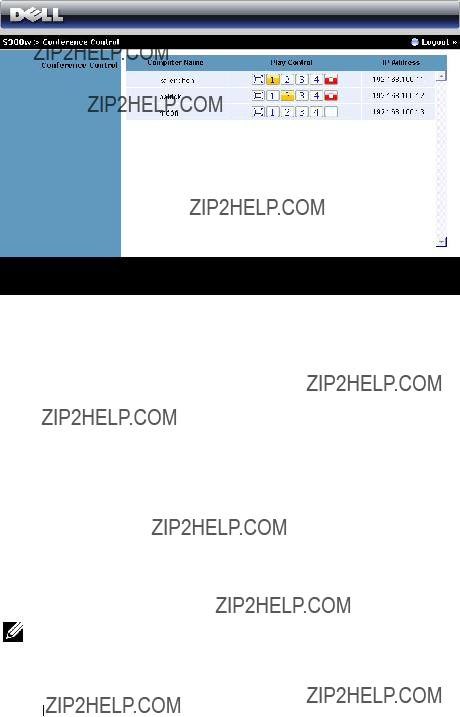
??? Full screen projection ??? The presentation from the computer occupies the whole screen.

??? Split 1 - The presenation from the computer appears on the upper left corner of the screen.

??? Split 2- The presenation from the computer appears on the upper right corner of the screen.

??? Split 3- The presenation from the computer appears on the lower left corner of the screen.

??? Split 4- The presenation from the computer appears on the lower right corner of the screen.

??? Stop - Projection from the computer is stopped.

IP Address: Shows each computer???s IP Address.

NOTE: To end the conference, click Logout.

72 Using Your Projector

Managing Properties

Admin

An administrator password is required to access the Admin page.

???Admin Password: Enter the administrator password then click Login. The default password is "admin". To change the password, see "Change Passwords" on page 78.

System Status

Displays the Network Status, Connection Status, and Projector Status information.

74 Using Your Projector

Network Status

See OSD section on page 46.

IP Setup

???Choose Obtain an IP address automatically to assign an IP address to the projector automatically, or Use the following IP address to assign an IP address manually.

DHCP Server Setup

???Choose Auto to automatically setup the Start IP, End IP, Subnet Mask,

Default Gateway, and DNS Server address from a DHCP server, or Disable to disable this function.

Wireless Setup

???Choose Enable to setup the Region, SSID, SSID Broadcast, Channel,

Encryption, and Key. Choose Disable to disable wireless setup.

SSID: Up to maximum length of 32 characters.

Encryption: You can Disable WPA key or select one of 64-bit or 128-bit in ASCII or HEX string.

Key: If Encryption is enabled, you have to set key value according to Encryption mode you selected.

RADIUS Server Setup

???Setup the IP address, Port and Key information.

GateKeeper

???There are 3 options:

All Pass: Allow users to access office network via wireless projector.

All Block: Block users to access all office network via wireless projector.

Internet Only: Block users from office network but still reserve Internet connection capability.

Set Security For SNMP

???Setup Write Community information.

Click the Apply button to save and apply changes. The projector must be restarted for the changes to take effect.

76 Using Your Projector

Projection Setup

Projection Setup

???Resolution: Allows you to select the resolution. Options are: XGA (1024 x 768) and WXGA (1280 x 800).

???Color Depth: Allows you to select the color depth for more vivid

presentations. Options are: Normal (16 bit) and High (32 bit).

???Login Code: Select how you want the login code to be generated by the projector. There are 3 options:

???Disable: Login code will not be required when logging in to the system.

???Random: Default is Random. Login code will be randomly generated.

???Use the following code: Enter a 4-digit code. This code will be used to login to the system.

Projector Setup

???Setup the Model Name, Projector Name, Location, and Contact information (up to 21 characters for each field).

Click the Apply button to save and apply changes. The projector must be restarted for the changes to take effect.

Change Passwords

This page allows you to change the administrator password.

???Enter New Password: Enter the new password.

???Confirm New Password: Enter the password again and click Apply.

NOTE: Contact Dell if you forget your administrator password.

78 Using Your Projector

Reset to Default

Click the Apply button to restore all wireless/network setup to its factory default settings.

Firmware Update

Use the Firmware Update page to update your projector???s wireless firmware.

To start firmware update, do the following steps:

1Press Browse to select the file to update.

2Click the Update button to start. Wait while the system updates the firmware in your device.

CAUTION: Do not interrupt the update process, this may cause the system to crash!

3 Click OK when update is complete.

80 Using Your Projector

Projector Control Panel

Projector Information

???Projector Status: There are 5 status: Lamp On, Standby, Power Saving, Cooling and Warming up. Click the Refresh button to refresh the status and control settings.

???Power Saving: Power Saving can be set to Off, 30, 60, 90, or 120 minutes. For more information, see "Power Saving" on page 50.

???Alert Status: There are 3alert status: Lamp warning, Low lamp life, and Temperature warning. Your projector might lock up in protection mode if any of the alerts are activated. To exit protection mode, click the Clear button to clear the Alert Status before you Power ON your projector.

Image Control

???Projector Mode: Allows you to select the projector mode, depending on how

the projector is mounted. There are 4 projection modes: Front Projection- Desktop, Front Projection-Wall Mount, Rear Projection-Desktop and Rear Projection-Wall Mount.

???Source Select: The Source Select menu allows you to select your projector input source. You can select VGA-A, VGA-B, S-Video, Composite Video, HDMI, Wireless Display, USB Display and USB Viewer.

???Video Mode: Select a mode to optimize the display image based on how the projector is being used:

-Presentation: Best for presentation slides.

-Bright: Maximum brightness and contrast.

-Movie: For viewing movie & photo.

-sRGB: Provide a more accurate color representation.

-Custom: User preferred settings.

???Blank Screen: You can select On or Off.

???Aspect Ratio: Allows you to select the aspect ratio to adjust how the image appears.

???Brightness: Select value to adjust the brightness of the image.

???Contrast: Select value to adjust the display contrast.

Click the Auto Adjust button to adjust the settings automatically.

Audio Control

???Audio Input: Select the input source. Options are: Audio-A, Audio-B, HDMI and Microphone.

???Volume: Select the value (0~20) for audio volume.

???Speaker: Select On to enable the audio function or select Off to disable the audio function.

???Alert Volume: Set the alert loudness (Off, Low, Mid, or High) for power on/off.

Click the Factory Reset button to restore the factory defaults settings.

82 Using Your Projector

Alert Setting

E-mail Alert: With standard SMPT server using default 25 port and not support encryption and authentication (SSL or TLS).

???E-mail Alert: You can set whether to be notified by email (Enable) or not (Disable).

???To/CC/From: You can enter email address of sender (From) and recipients (To/Cc) to receive notification when an abnormality or warning occurs.

???Subject: You can enter the subject line of the email.

Click the E-mail Alert Test button to test the e-mail alert settings.

SMTP Setting

???Out going SMTP server, User name and Password should be provided by your network administrator or MIS.

Alert Condition

???You can select the abnormalities or warnings to be notified by email. When any of the alert conditions occur, an email will be sent to the recipients (To/Cc).

Click the Save button to save settings.

Reboot System

Click Reboot to reboot the system.

Crestron

For Crestron function.

84 Using Your Projector

TIPS:

I would like to remotely access the projector via Internet. What is the better setting for the browser?

To have a better setting for the browser, please follow the steps below:

1 Open Control Panel Internet Options General tab Temporary Internet Files Settings Select Every visit to the pages.

2 Some firewall or anti-virus may block the HTTP application, if possible turn off the firewall or anti-virus.

I would like to remotely access the projector via Internet. What socket port number should I open for it in the firewall?

The following are TCP/IP socket ports which projector uses.

Why am I unable to access the projector via Internet?

1 Check whether your computer/laptop is connected to the Internet.

2 Check with your MIS or network administrator whether your computer/laptop is in the same subnet.

Why am I unable to access the SMTP server?

1 Check with your MIS or network administrator whether the SMTP server function is open for the projector and the IP assigned to the projector is allowed to access the SMTP server. The projector???s SMTP socket port number is 25, this cannot be changed.

2 Check if the out going SMTP server, user name, and password are set correctly.

3 Some SMTP servers will check whether the mail address of "From" correlates with the "User name" and "Password". For example, you use test@dell.com as the mail address in "From". You should also use test@dell.com account information for the User name and the password to log in the SMTP server.

Why am I unable to receive the test alert email even though the projector already indicates the test mail is already sent?

It could be because the SMTP server recognized the alert mail as a spam mail or because of the SMTP server restriction. Check with your MIS or network administrator for the SMTP server???s setting.

86 Using Your Projector

Firewall Configuration and FAQ

Q: Why can???t I access the Web Management Page?

A:Your computer???s firewall configuration may prevent you from accessing the Web Management Web Page. Please refer to the following configuration settings.

88 Using Your Projector

Make Application Token

The Application Token lets you perform Plug and Show using a USB token.

1From the application software, click > Make Application Token.

2The following screen appears. Click Next.

3Plug a flash drive into any of the USB ports on your computer. Select the drive from the list, then click Next.

4 Click Finish to close the wizard.

4

Troubleshooting Your Projector

If you experience problems with your projector, see the following troubleshooting tips. If the problem persists, contact Dell??? (see Contacting Dell??? on page 103).

90 Troubleshooting Your Projector

Lamp is burned out or makes a popping sound

When the lamp reaches its end of life, it may burn out and may make a loud popping sound. If this occurs, the projector does not turn back on. To replace the lamp, see "Changing the Lamp" on page 96.

92 Troubleshooting Your Projector

The OSD does not appear on the screen

Try to press the Menu button on the panel for 15 seconds to unlock the OSD. Check the Menu Lock on page 48.

The remote control is not operating smoothly or works only within a limited range

The battery may be low. Check if the laser beam transmitted from the remote is too dim. If so, replace with 2 new AAA batteries.

Guiding Signals

turn on the projector. If this problem persists, contact Dell.

94 Troubleshooting Your Projector

Changing the Lamp

CAUTION: Before you begin any of the procedures in this section, follow the Safety Instructions as described on page 7.

Replace the lamp when the message "Lamp is approaching the end of its useful life in the operation. Replacement suggested! www.dell.com/lamps" appears

on the screen. If this problem persists after replacing the lamp, contact Dell???. For more information, see Contacting Dell???on page 103.

CAUTION: Use an original lamp to ensure safe and optimal working condition of your projector.

CAUTION: The lamp becomes very hot when in use. Do not attempt to replace the lamp until the projector has been allowed to cool down for at least 30 minutes.

CAUTION: Do not touch the bulb or the lamp glass at any time. Projector lamps are very fragile and may shatter if touched. The shattered glass pieces are sharp and can cause injury.

CAUTION: If the lamp shatters, remove all broken pieces from the projector and dispose or recycle according to state, local, or federal law. For more information see www.dell.com/hg.

1 Turn off the projector and disconnect the power cord. 2 Let the projector cool for at least 30 minutes.

3 Loosen the two screws that secure the lamp cover, and remove the cover.

4 Loosen the two screws that secure the lamp.

5 Pull the lamp up by its metal handle.

NOTE: Dell??? may require lamps replaced under warranty to be returned to Dell???. Otherwise, contact your local waste disposal agency for the address of the nearest deposit site.

6 Replace with the new lamp.

7 Tighten the two screws that secure the lamp.

8 Replace the lamp cover and tighten the two screws.

96 Troubleshooting Your Projector

9 Reset the lamp usage time by selecting "Yes" for Lamp Reset in the OSD Lamp tab (see Lamp menu on page 43). When a new lamp module has been changed, the projector will automatically detect and reset the lamp hours.

CAUTION: Lamp Disposal (for the US only)

LAMP(S) INSIDE THIS PRODUCT CONTAIN MERCURY AND MUST BE

RECYCLED OR DISPOSED OF ACCORDING TO LOCAL, STATE OR FEDERAL

LAWS. FOR MORE INFORMATION, GO TO WWW.DELL.COM/HG OR CONTACT

THE ELECTRONIC INDUSTRIES ALLIANCE AT WWW.EIAE.ORG. FOR LAMP

SPECIFIC DISPOSAL INFORMATION CHECK WWW.LAMPRECYCLE.ORG.

5

Specifications

98 Specifications

VGA-A & VGA-B, for analog RGB/Component input signals.

VGA output: One 15-pin D-sub connector (Black) for VGA-A loop through.

S-Video input: One standard 4-pin min-DIN S-Video connector for Y/C signal.

Composite Video input: One Yellow RCA jack for CVBS signal.

HDMI input: One HDMI connector for supporting HDMI 1.3. HDCP compliant.

Analog Audio input: Three 3.5 mm stereo mini phone jack (Blue) & one pair of RCA connector (Red/White).

Variable audio output: One 3.5 mm stereo mini phone jack (Green).

Specifications 99

NOTE: The lamp life rating for any projector is a measure of brightness degradation only, and is not a specification for the time it takes a lamp to fail and cease light output. Lamp life is defined as the time it takes for more than 50 percent of a lamp sample population to have brightness decrease by approximately 50 percent of the rated lumens for the specified lamp. The lamp life rating is not guaranteed in any way. The actual operating life span of a projector lamp will vary according to operating conditions and usage patterns. Usage of a projector in stressful conditions which may include dusty environments, under high temperatures, many hours per day and abrupt powering-off will most likely result in a lamp???s shortened operating life span or possible lamp failure.

100 Specifications

RS232 Pin Assignment

RS232 Protocol

???Communication Settings

???Command types

To pop up the OSD menu and adjust the settings.

???Control command Syntax (From PC to Projector)

[H][AC][SoP][CRC][ID][SoM][COMMAND]

???Example: Power ON Command (Send low byte firstly)

--> 0xBE, 0xEF, 0x10, 0x05, 0x00, 0xC6, 0xFF, 0x11, 0x11, 0x01, 0x00, 0x01

???Control Commands List

To view the latest RS232 code, go to the Dell Support site at: support.dell.com.

Specifications 101

Compatibility Modes (Analog/Digital)

102 Specifications

Contacting Dell

For customers in the United States, call 800-WWW-DELL (800-999- 3355).

NOTE: If you do not have an active Internet connection, you can find contact information on your purchase invoice, packing slip, bill, or Dell product catalog.

Dell??? provides several online and telephone-based support and service options. Availability varies by country and product, and some services may not be available in your area. To contact Dell for sales, technical support, or customer service issues:

1Visit support.dell.com.

2Verify your country or region in the Choose A Country/Region drop- down menu at the bottom of the page.

3Click Contact Us on the left side of the page.

4Select the appropriate service or support link based on your need.

5Choose the method of contacting Dell that is convenient for you.

Appendix: Glossary

ANSI LUMENS ??? A standard for measuring the brightness. It is calculated by dividing a square meter image into nine equal rectangles, measuring the lux (or brightness) reading at the center of each rectangle, and averaging these nine points.

ASPECT RATIO ??? The most popular aspect ratio is 4:3 (4 by 3). Early television and computer video formats are in a 4:3 aspect ratio, which means that the width of the image is 4/3 times the height.

Brightness ??? The amount of light emitted from a display or projection display or projection device. The brightness of projector is measured by ANSI lumens.

Color Temperature ??? The color appearance of white light. Low color temperature implies warmer (more yellow/red) light while high color temperature implies a colder (more blue) light. The standard unit for color temperature is Kelvin (K).

Component Video ??? A method of delivering quality video in a format that consists of the luminance signal and two separate chrominance signals and are defined as Y'Pb'Pr' for analog component and Y'Cb'Cr' for digital component. Component video is available on DVD players.

Composite Video ??? A video signal that combines the luma (brightness), chroma (color), burst (color reference), and sync (horizontal and vertical synchronizing signals) into a signal waveform carried on a single wire pair. There are three kind of formats, namely, NTSC, PAL and SECAM.

Compressed Resolution ??? If the input images are of higher resolution than the native resolution of the projector, the resulting image will be scaled to fit the native resolution of the projector. The nature of compression in a digital device means that some image content is lost.

Contrast Ratio ??? Range of light and dark values in a picture, or the ratio between their maximum and minimum values. There are two methods used by the projection industry to measure the ratio:

1 Full On/Off ??? measures the ratio of the light output of an all white image (full on) and the light output of an all black (full off) image.

2 ANSI ??? measures a pattern of 16 alternating black and white rectangles. The average light output from the white rectangles is divided by the average light output of the black rectangles to determine the ANSI contrast ratio.

Full On/Off contrast is always a larger number than ANSI contrast for the same projector.

104 Glossary

dB ??? decibel ??? A unit used to express relative difference in power or intensity, usually between two acoustic or electric signals, equal to ten times the common logarithm of the ratio of the two levels.

Diagonal Screen ??? A method of measuring the size of a screen or a projected image. It measures from one corner to the opposite corner. A 9FT high, 12FT wide, screen has a diagonal of 15FT. This document assumes that the diagonal dimensions are for the traditional 4:3 ratio of a computer image as per the example above.

DHCP ??? Dynamic Host Configuration Protocol ??? A network protocol that enables a server to automatically assign a TCP/IP address to a device.

DLP?? ??? Digital Light Processing??? ??? Reflective display technology developed by Texas Instruments, using small manipulated mirrors. Light passes through a color filter is sent to the DLP mirrors which arrange the RGB colors into a picture projected onto screen, also known as DMD.

DMD ??? Digital Micro-Mirror Device ??? Each DMD consists of thousands of tilting, microscopic aluminum alloy mirrors mounted on a hidden yoke.

DNS ??? Domain Name System ??? An internet service that translates domain names into IP addresses.

Focal Length ??? The distance from the surface of a lens to its focal point.

Frequency ??? It is the rate of repetition in cycles per seconds of electrical signals. Measured in Hz (Hertz).

HDCP ??? High-Bandwidth Digital-Content Protection ??? A specification developed by Intel??? Corporation to protect digital entertainment across digital interface, such as DVI, HDMI.

HDMI ??? High-Definition Multimedia Interface ??? HDMI carries both uncompressed high definition video along with digital audio and device control data in a single connector.

Hz (Hertz) ??? Unit of frequency.

IEEE802.11 ??? A set of standards for wireless local are network (WLAN) communication. 802.11b/g uses the 2.4GHz band.

Keystone Correction ??? Device that will correct an image of the distortion (usually a wide-top narrow-bottom effect) of a projected image caused by improper projector to screen angle.

Maximum Distance ??? The distance from a screen the projector can be to cast an image that is usable (bright enough) in a fully darkened room.

Maximum Image Size ??? The largest image a projector can throw in a darkened room. This is usually limited by focal range of the optics.

Glossary 105

Minimum Distance ??? The closest position that a projector can focus an image onto a screen.

NTSC ??? National Television Standards Committee. North American standard for video and broadcasting, with a video format of 525 lines at 30 frames per second.

PAL ??? Phase Alternating Line. A European broadcast standard for video and broadcasting, with a video format of 625 lines at 25 frames per second.

Reverse Image ??? Feature that allows you to flip the image horizontally. When used in a normal forward projection environment text, graphics, etc. are backwards. Reverse image is used for rear projection.

RGB ??? Red, Green, Blue ??? typically used to describe a monitor that requires separate signals for each of the three colors.

S-Video ??? A video transmission standard that uses a 4-pin mini-DIN connector to send video information on two signal wires called luminance (brightness, Y) and chrominance (color, C). S-Video is also referred to as Y/C.

SECAM ??? A French and international broadcast standard for video and broadcasting, closely related to PAL but with a different method of sending color information.

SSID ??? Service Set Identifiers ??? A name used to identify the particular wireless LAN to which a user wants to connect.

SVGA ??? Super Video Graphics Array ??? 800 x 600 pixels count. SXGA ??? Super Extended Graphics Array, ??? 1280 x 1024 pixels count. UXGA ??? Ultra Extended Graphics Array ??? 1600 x 1200 pixels count. VGA ??? Video Graphics Array ??? 640 x 480 pixels count.

WEP ??? Wired Equivalent Privacy ??? This is a method for encrypting communication data. The encryption key is created and notified only to the communicating user, so the communication data cannot be decrypted by a third party.

XGA ??? Extended Video Graphics Array ??? 1024 x 768 pixels count. WXGA ??? Wide Extended Graphics Array ??? 1280 x 800 pixels count.

Zoom Lens ??? Lens with a variable focal length that allows operator to move the view in or out making the image smaller or larger.

Zoom Lens Ratio ??? Is the ratio between the smallest and largest image a lens can projector from a fixed distance. For example, a 1.4:1 zoom lens ratio means that a 10 foot image without zoom would be a 14 foot image with full zoom.

106 Glossary

Index

A

Adjusting the Projected Image 24 Adjusting the Projector Height

24

lower the projector

Front tilt adjustment wheel 24

Tilt adjustment wheel 24

Adjusting the Projector Zoom and Focus 25

Focus ring 25 Audio Input 49 Audio Settings 49

C

Capture Screen 49 Changing the Lamp 96 Closed Caption 53

Connecting the Projector Composite Video cable 17 Connecting a Computer with a

RS232 cable 13, 14 Connecting with a Component

Cable 18

Connecting with a Composite Cable 17

Connecting with an HDMI Cable 19

Connecting with an S-video

Cable 16

HDMI cable 19, 20, 22 Power cord 11, 12, 13, 14, 16,

17, 18, 19, 20, 21, 22 RS232 cable 13

S-Video cable 16 To Computer 11 USB to USB cable 11

USB-A to USB-B cable 14 VGA to VGA cable 11, 12 VGA to YPbPr cable 18

Connection Ports

+12V DC out connector 9 Antenna connector 9 Audio output connector 9 Audio-A input connector

connector 9

Audio-B left-channel input connector 9

Audio-B right-channel input connector 9

Composite Video connector 9 HDMI connector 9 Microphone connector 9

Mini USB connector for remote mouse and firmware upgrade 9

Power code connector 9 RJ45 connector 9 RS232 connector 9 Security bar 9

Security cable slot 9

Index 107

S-Video connector 9

USB Type A Viewer connector 9 USB Type B Display connector 9 VGA-A input (D-sub) connector

9

VGA-A output (monitor loop-through) 9

VGA-B input (D-sub) connector 9

Contact Dell 6, 92, 96 Control Panel 28

D

Dell

contacting 103

M

Main Unit 7

Antenna 7

Control panel 7

Focus tab 7

IR receivers 7

Lens 7

Lens cap 7

Menu Position 48

Menu Settings 48

Menu Timeout 48

Menu Transparency 48

Mute 49

O

On-Screen Display 35

Auto-Adjust 37

Display (in PC Mode) 40

Display (in Video Mode) 42

Input Select 36

Lamp 43

Main Menu 35

Others 48

Picture (in PC Mode) 37

Picture (in Video Mode) 38

Set Up 43

P

Password 51

phone numbers 103

Power Saving 50

Power Settings 50

Powering On/Off the Projector

Powering Off the Projector 23

Powering On the Projector 23

Q

Quick Shutdown 50

R

Remote Control 30

IR receiver 29

Reset 49

Reset, Factory 54

108 Index

S

Screen 49

Screen Settings 49

Security Settings 50 Speaker 49

Specifications

Audio 98 Brightness 98

Color Wheel Speed 98 Contrast Ratio 98 Dimensions 99 Displayable Color 98 Environmental 99

I/O Connectors 99 Light Valve 98 Noise Level 98 Number of Pixels 98

Power Consumption 98 Power Supply 98 Projection Distance 98 Projection Lens 98 Projection Screen Size 98 RS232 Protocol 101 Uniformity 98

Video Compatibility 98 Weight 99

support

contacting Dell 103

T

telephone numbers 103 Test Pattern 54

Troubleshooting 90

Contact Dell 90

V

Volume 49

Index 109