Dell N20xx/N30xx
Series Switch
Getting Started Guide
Guide de mise en route
Handbuch zum Einstieg
?????????????????????? ???? ???????????? ????????????
Gu??a de introducci??n
Ba??lang???? K??lavuzu
?????????? ?????????? ??????????
Regulatory Models: N2024, N2024P, N2048, N2048P, N3024, N3024P, N3048, N3048P, N3024F
Dell N20xx/N30xx
Series Switch
Getting Started Guide
Regulatory Models: N2024, N2024P, N2048, N2048P, N3024, N3024P, N3048, N3048P, N3024F
Notes, Cautions, and Warnings
NOTE: A NOTE indicates important information that helps you make better use of your switch.
CAUTION: A CAUTION indicates either potential damage to hardware or loss of data and tells you how to avoid the problem.
WARNING: A WARNING indicates a potential for property damage, personal injury, or death.
____________________
?? 2013 Dell Inc.
Trademarks used in this text: Dell??, the DELL logo, OpenManage???, and ReadyRails??? are trademarks of Dell Inc. Microsoft??, and Windows?? are registered trademarks of Microsoft Corporation in the United States and/or other countries.
Regulatory Models N2024, N2024P, N2048, N2048P, N3024, N3024P, N3048, N3048P, N3024F
December 2013 P/N F5CWH Rev. A00
Contents
1Introduction . . . . . . . . . . . . . . . . . . . . . . . . 7
2N20xx Series Overview . . . . . . . . . . . . . . . 7
3N20xx Series Hardware Overview . . . . . . . 8
5 Starting and Configuring the N20xx Switch 20
6N30xx Series Overview . . . . . . . . . . . . . 31
7N30xx Series Hardware Overview . . . . . 31
9 Starting and Configuring the N30xx Switch 49

Introduction
This document provides basic information about the Dell N20xx/N30xx Series switches, including how to install a switch and perform the initial configuration. For information about how to configure and monitor switch features, see the User???s Configuration Guide, which is available on the Dell Support website at dell.com/support/manuals, for the latest updates on documentation and firmware.
This document contains the following sections:
???N20xx Series Overview
???N20xx Series Hardware Overview
???N20xx Series Installation
???Starting and Configuring the N20xx Switch
???N30xx Series Overview
???N30xx Series Hardware Overview
???N30xx Series Installation
???Starting and Configuring the N30xx Switch
NOTE: Switch administrators are strongly advised to maintain Dell Networking switches on the latest version of the Dell Networking Operating System (DNOS). Dell Networking continually improves the features and functions of DNOS based on feedback from you, the customer. For critical infrastructure, prestaging of the new release into a noncritical portion of the network is recommended to verify network configuration and operation with the new DNOS version.
N20xx Series Overview
The Dell N20xx switches are stackable Layer 2 Gigabit Ethernet switches and include the following models:
???Dell N2024
???Dell N2024P
???Dell N2048
???Dell N2048P
N20xx Series Hardware Overview
This section contains information about device characteristics and modular hardware configurations for the N20xx Series switches.
All N20xx non-PoE models are 1U, rack-mountable switches with the following physical dimensions:
???440.0 x 257.0 x 43.5 mm (W x D x H).
???17.3 x 10.1 x 1.7 inches (W x D x H).
All N20xx PoE models are 1U, rack-mountable switches with the following physical dimensions:
???440.0 x 387.0 x 43.5 mm (W x D x H).
???17.3 x 15.2 x 1.7 inches (W x D x H).
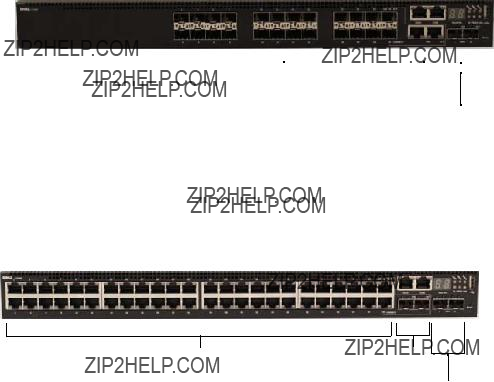
N20xx Series Front Panel
The following images show the front panels of the switch models in the N20xx Series.
Figure 1-1. N2048 Series with 48 10/100/1000BASE-T Ports (Front Panel)
In addition to the switch ports, the front panel of each model in the N20xx series includes the following ports:
???Console port
???USB port
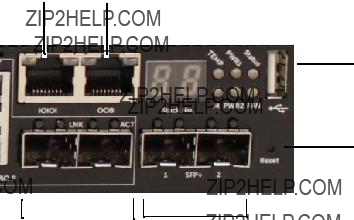
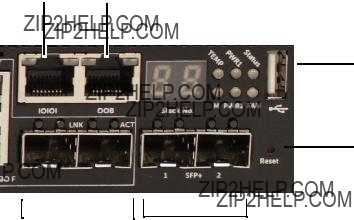
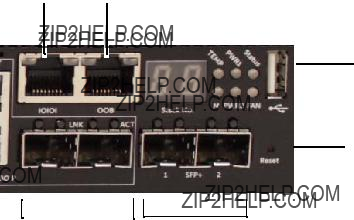
Figure 1-2. N2024 Close-up
The N20xx front panel, shown in Figure 1-2, has status LEDs for over- temperature alarm, internal power, and status on the top row. The bottom row of status LEDs displays stack master, redundant power supply (RPS) status and fan alarm status.
Figure 1-3. N2024P Close-up
The N20xxP front panel, shown in Figure 1-3, has status LEDs for over- temperature alarm, internal power and status on the top row. The bottom row of status LEDs displays stack master, modular power supply (MPS) status and fan alarm status.
Switch Ports
The N2024/N2024P front panel provides 24 Gigabit Ethernet (10/100/1000BASE-T) RJ-45 ports that support auto-negotiation for speed, flow control, and duplex. The N2024/N2024P models support two SFP+ 10G ports. Dell-qualified SFP+ transceivers are sold separately.
The N2048/N2048P front panel provides 48 Gigabit Ethernet (10BASE-T, 100BASE-TX, 1000BASE-T) RJ-45 ports that support auto-negotiation for speed, flow control, and duplex. The N2048/N2048P support two SFP+ 10G ports. Dell-qualified SFP+ transceivers are sold separately.
The front-panel switch ports have the following characteristics:
???The switch automatically detects the difference between crossed and straight-through cables on RJ-45 ports and automatically chooses the MDI or MDIX configuration to match the other end.
???SFP ports support Dell-qualified transceivers.
???RJ-45 ports support full-duplex mode 10/100/1000 Mbps speeds on standard Category 5 UTP cable.
???SFP+ ports support SFP+ transceivers and SFP+ copper twin-ax technology plus SFP transceivers operating at 1G.
???The N2024P/N2048P front panel ports support PoE (15.4W) and PoE+ (30W).
Console Port
The console port provides serial communication capabilities, which allows communication using RS-232 protocol. The serial port provides a direct connection to the switch and allows access to the CLI from a console terminal connected to the port through the provided serial cable (with RJ45 YOST to female DB-9 connectors).
The console port is separately configurable and can be run as an asynchronous link from 1200 baud to 115,200 baud.
The Dell CLI only supports changing the speed. The defaults are 9600 baud rate, 8 data bits, No Parity, 1 Stop Bit, No Flow Control.
USB Port
The Type-A, female USB port supports a USB 2.0-compliant flash memory drive. The Dell Networking switch can read or write to a flash drive formatted as FAT-32. You can use a USB flash drive to copy switch configuration files and images between the USB flash drive and the switch. You can also use the USB flash drive to move and copy configuration files and images from one switch to other switches in the network.
The USB port does not support any other type of USB device.
Reset Button
The reset button is accessed through the pinhole and allows you to perform a hard reset on the switch. To use the reset button, insert an unbent paper clip or similar tool into the pinhole. When the switch completes the boot process after the reset, it resumes operation with the most recently saved configuration. Any changes made to the running configuration that were not saved to the startup configuration prior to the reset are lost.
Port and System LEDs
The front panel contains light emitting diodes (LEDs) that indicate the status of port links, power supplies, fans, stacking, and the overall system status.
For information about the status that the LEDs indicate, see the User???s Configuration Guide.
Stack Master LED and Stack Number Display
When a switch within a stack is the master unit, the stack master LED, which is labeled M, is solid green. If the M LED is off, the stack member is not the master unit. The Stack No. panel displays the unit number for the stack member. If a switch is not part of a stack (in other words, it is a stack of one switch), the M LED is illuminated, and the unit number is displayed.
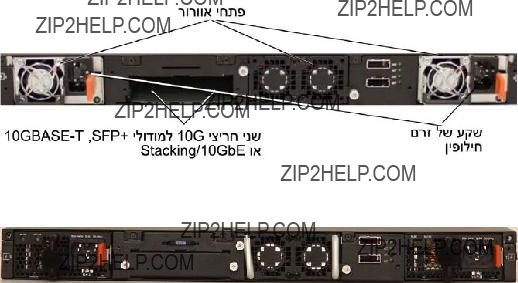
N20xx Series Back Panel
The following images show the back panels of the N20xx switches.
Figure 1-4. N20xx Back Panel
Fan Vents
AC Power Receptacle
Figure 1-5. N2024P/N2048P Back Panel
The term mini-SAS refers to the stacking port cable connections shown in Figure 1-6. See Stacking Multiple N20xx Switches for information on using the mini-SAS ports to connect switches.
Figure 1-6. N2048 Mini-SAS Stacking Ports and Fans
Mini-SAS stacking ports
Power Supplies
N2024 and N2048
N2024 and N2048 switches have an internal 100-watt power supply. The additional redundant power supply (Dell Networking RPS720) provides 180 watts of power and gives full redundancy for the switch.
N2024P and N2048P
Dell Networking N2024P and N2048P switches have an internal 1000-watt power supply feeding up to 24 PoE devices at full PoE+ power (850W). An additional external power supply (MPS1000) provides 1000 watts and gives full power coverage for all 48 PoE devices (1800W).
NOTE: PoE power is dynamically allocated. Not all ports will require the full PoE+ power.
CAUTION: Remove the power cable from the power supplies prior to removing the power supply module itself. Power must not be connected prior to insertion in the chassis.
Ventilation System
Two fans cool the N20xx switches.
N20xx Model Summary
Table 1-1. N20xx Model Summary
N20xx Series Installation
Site Preparation
N20xx Series switches can be mounted in a standard 48.26 cm (19-inch) rack or placed on a flat surface.
Make sure that the chosen installation location meets the following site requirements:
???Power ??? The switch is installed near an easily accessible 100???240 VAC, 50???60 Hz outlet.
???Clearance ??? There is adequate front and rear clearance for operator access. Allow clearance for cabling, power connections, and ventilation.
???Cabling ??? The cabling is routed to avoid sources of electrical noise such as radio transmitters, broadcast amplifiers, power lines, and fluorescent lighting fixtures.
???Ambient Temperature ??? The ambient switch operating temperature range is 0 to 45??C (32 to 113??F) at a relative humidity of up to 95 percent, non-condensing.
NOTE: Decrease the maximum temperature by 1??C (1.8??F) per 300 m (985 ft.) above 900m (2955 ft.).
???Relative Humidity ??? The operating relative humidity is 8% to 85% (noncondensing) with a maximum humidity gradation of 10% per hour.

Unpacking the N20xx Switch
Package Contents
When unpacking each switch, make sure that the following items are included:
???One Dell Networking switch
???One RJ-45 to DB-9 female cable
???One rack-mount kit (N20xx) for rack installation, two mounting brackets, bolts, and cage nuts
???One set of self-adhesive rubber pads for the free-standing switch (four pads are included)
Unpacking Steps
NOTE: Before unpacking the switch, inspect the container and immediately report any evidence of damage.
1Place the container on a clean, flat surface and cut all straps securing the container.
2Open the container or remove the container top.
3Carefully remove the switch from the container and place it on a secure and clean surface.
4Remove all packing material.
5Inspect the product and accessories for damage.
Rack Mounting a N20xx Switch
WARNING: Read the safety information in the Safety and Regulatory Information as well as the safety information for other switches that connect to or support the switch.
The AC power connector is on the back panel of the switch.
Installing in a Rack
WARNING: Do not use rack mounting kits to suspend the switch from under a table or desk, or attach it to a wall.
CAUTION: Disconnect all cables from the switch before continuing. Remove all self-adhesive pads from the underside of the switch, if they have been attached.
CAUTION: When mounting multiple switches into a rack, mount the switches from the bottom up.
1Place the supplied rack-mounting bracket on one side of the switch, ensuring that the mounting holes on the switch line up to the mounting holes in the rack-mounting bracket. Figure 1-7 illustrates where to mount the brackets.
Figure 1-7. Attaching the Brackets
2Insert the supplied bolts into the rack-mounting holes and tighten with a screwdriver.
3Repeat the process for the rack-mounting bracket on the other side of the switch.
4Insert the switch into the 48.26 cm (19 inch) rack, ensuring that the rack- mounting holes on the switch line up to the mounting holes in the rack.
5Secure the switch to the rack with either the rack bolts or cage nuts and cage-nut bolts with washers (depending on the kind of rack you have). Fasten the bolts on bottom before fastening the bolts on top.
CAUTION: Make sure that the supplied rack bolts fit the pre-threaded holes in the rack.
NOTE: Make sure that the ventilation holes are not obstructed.

Installing as a Free-standing Switch
NOTE: We strongly recommend mounting the switch in a rack.
Install the switch on a flat surface if you are not installing it in a rack. The surface must be able to support the weight of the switch and the switch cables. The switch is supplied with four self-adhesive rubber pads.
1Attach the self-adhesive rubber pads on each location marked on the bottom of the switch.
2Set the switch on a flat surface, and make sure that it has proper ventilation by leaving 5 cm (2 inches) on each side and 13 cm (5 inches) at the back.
Stacking Multiple N20xx Switches
You can stack N20xx switches up to 12 switches high using the mini-SAS ports located on the rear of the switch. N20xx switches support stacking only with other N20xx series switches. When multiple switches are connected together through the stack ports, they operate as a single unit with up to 576 front panel ports. The stack operates and is managed as a single entity.
NOTE: If you are installing a stack of switches, you need to assemble and cable the stack before powering up and configuring it. When a stack is powered up for the first time, the switches elect a Master Switch, which may occupy any location in the stack. The Master LED on the front panel is illuminated on the master unit.
Creating a Switch Stack
Create a stack by connecting adjacent units using the mini-SAS stacking ports on the back panel of the switch. Figure 1-8 on page 18 shows the switches connected in a ring topology, which is the recommended topology for a stack.
1Connect one of the mini-SAS cables into either of the stacking ports of the top switch and the switch directly below it.
If necessary, use a separately purchased, longer (1 meter or 3 meter) mini- SAS cable to connect the switches.
2Repeat this process until all of the devices are connected.
3Use the remaining stacking cable to connect the two remaining stacking ports together so that a ring topology is assembled.
Figure 1-8. Connecting a Stack of Switches
Unit 1
Unit 2
Unit 3
The stack in Figure 1-8 is connected in a ring topology and has the following physical connections between the switches:
???The bottom mini-SAS port on Unit 1 is connected to the top mini-SAS port on Unit 2.
???The bottom mini-SAS port on Unit 2 is connected to the top mini-SAS port on Unit 3.
???The bottom mini-SAS port on Unit 3 is connected to the top mini-SAS port on Unit 1.
Stacking Standby
The stacking feature supports a Standby or backup unit that assumes the Master unit role if the Master unit in the stack fails. As soon as a Master failure is detected in the stack, the Standby unit initializes the control plane and enables all other stack units with the current configuration. The Standby unit maintains a synchronized copy of the running configuration for the stack. The Standby unit is automatically selected in the stack; however, you can use the CLI to select a different stack member as Standby. See the User???s Configuration Guide or the CLI Reference Guide for more information.
Starting and Configuring the N20xx
Switch
The following flow chart provides an overview of the steps you use to perform the initial configuration after the switch is unpacked and mounted.
Figure 1-9. Installation and Configuration Flow Chart

Connecting a N20xx Switch to a Terminal
After completing all external connections, connect a terminal to a switch to configure the switch.
NOTE: Read the Release Notes for this product before proceeding. You can download the Release Notes from the Dell Support website at dell.com/support/manuals.
NOTE: We recommend that you obtain the most recent version of the user documentation from the Dell Support website at dell.com/support/manuals.
To monitor and configure the switch via serial console, use the console port on the front panel of the switch (see Figure 1-1 on page 8) to connect it to a VT100 terminal or to a computer running VT100 terminal emulation software. The console port is implemented as a data terminal equipment (DTE) connector.
The following equipment is required to use the console port:
???VT100-compatible terminal or a computer with a serial port running VT100 terminal emulation software, such as Microsoft HyperTerminal.
???A serial cable (provided) with an RJ-45 connector for the console port and DB-9 connector for the terminal.
Perform the following tasks to connect a terminal to the switch console port:
1Connect the DB-9 connector on the serial cable to the terminal or computer running VT100 terminal emulation software.
2Configure the terminal emulation software as follows:
a Select the appropriate serial port (for example, COM 1) to connect to the console.
b Set the data rate to 9600 baud.
c Set the data format to 8 data bits, 1 stop bit, and no parity. d Set the flow control to none.
e Set the terminal emulation mode to VT100.
f Select Terminal keys for Function, Arrow, and Ctrl keys. Make sure that the setting is for Terminal keys (not Microsoft Windows keys).

3Connect the RJ-45 connector on the cable directly to the switch console port. The Dell Networking console port is located on the right side of the front panel and is labeled with a |O|O| symbol, as shown in Figure 1-10 on page 22.
NOTE: Serial console access to the stack manager is available from any serial port via the local CLI. Only one serial console session at a time is supported.
Figure 1-10. N2024P Front Panel with Console Port
Console Port
Connecting a N20xx Switch to a Power Source
CAUTION: Read the safety information in the Safety and Regulatory Information manual as well as the safety information for other switches that connect to or support the switch.
All N20xx models have one internal power supply. The power receptacles are on the back panel.
AC and DC Power Connection
1Make sure that the switch console port is connected to a VT100 terminal or VT100 terminal emulator via the RJ-45 to DB-9 female cable.
2Using a 5-foot (1.5 m) standard power cable with safety ground connected, connect the power cable to the AC main receptacle located on the back panel (see Figure 1-11 on page 23).
3Connect the power cable to a grounded AC outlet.

4If you are using a redundant or external DC power supply, such as the Dell Networking RPS720 or Dell Networking MPS1000, connect the DC power cable to the DC receptacle located on the back panel. In Figure 1-11 on page 23, the redundant power supply feed is in the middle and is labeled RPS.
Figure 1-11. AC and DC Power Connection to an N2048 Switch
To DC Power Source (Optional)
To AC Power Source
Booting the N20xx Switch
When the power is turned on with the local terminal already connected, the switch goes through a power-on self-test (POST). POST runs every time the switch is initialized and checks hardware components to determine if the switch is fully operational before completely booting. If POST detects a critical problem, the program flow stops. If POST passes successfully, valid firmware is loaded into RAM. POST messages are displayed on the terminal and indicate test success or failure. The boot process runs for approximately 60 seconds.
You can invoke the Boot menu after the first part of the POST is completed. From the Boot menu, you can perform configuration tasks such as resetting the system to factory defaults, activating the backup image, or recovering a password. For more information about the Boot menu functions, see the CLI Reference Guide.

Performing the N20xx Initial Configuration
The initial configuration procedure is based on the following assumptions:
???The Dell Networking switch was never configured before.
???The Dell Networking switch booted successfully.
???The console connection was established, and the Dell Easy Setup Wizard prompt appears on the screen of a VT100 terminal or terminal equivalent.
The initial switch configuration is performed through the console port. After the initial configuration, you can manage the switch from the already- connected console port or remotely through an interface defined during the initial configuration.
NOTE: The switch is not configured with a default user name, password, or IP address.
Before setting up the initial configuration of the switch, obtain the following information from your network administrator:
???The IP address to be assigned to the management interface.
???The IP subnet mask for the network.
???The IP address of the management interface default gateway.
These settings are necessary to allow the remote management of the switch through Telnet (Telnet client) or HTTP (Web browser).
Enabling Remote Management
On the N20xx switches, you can use any of the switch ports on the front panel for in-band management. By default, all in-band ports are members of VLAN 1.
The Dell Easy Setup Wizard includes prompts to configure network information for the VLAN 1 interface on the N20xx switch. You can assign a static IP address and subnet mask or enable DHCP and allow a network DHCP server to assign the information.
See the CLI Reference Guide for information about the CLI commands you use to configure network information.

Initial Configuration Procedure
You can perform the initial configuration by using the Dell Easy Setup Wizard or by using the CLI. The wizard automatically starts when the switch configuration file is empty. You can exit the wizard at any point by entering [ctrl+z], but all configuration settings specified will be discarded, and the switch will use the default values.
NOTE: If you do not run the Dell Easy Setup Wizard or do not respond to the initial Easy Setup Wizard prompt within 60 seconds, the switch enters CLI mode. You must reset the switch with an empty startup configuration in order to rerun the Dell Easy Setup Wizard.
For more information about performing the initial configuration by using the CLI, see the CLI Reference Guide. This Getting Started Guide shows how to use the Dell Easy Setup Wizard for initial switch configuration. The wizard sets up the following configuration on the switch:
???Establishes the initial privileged user account with a valid password. The wizard configures one privileged user account during the setup.
???Enables CLI login and HTTP access to use the local authentication setting only.
???Sets up the IP address for the VLAN 1 routing interface, of which all in-band ports are members.
???Sets up the SNMP community string to be used by the SNMP manager at a given IP address. You may choose to skip this step if SNMP management is not used for this switch.
???Allows you to specify the network management system IP address or permit management access from all IP addresses.
???Configures the default gateway IP address for the VLAN 1 interface.

Example Session
This section describes a Dell Easy Setup Wizard session. The following values are used by the example session:
???The SNMP community string to be used is public.
???The network management system (NMS) IP address is 10.1.2.100.
???The user name is admin, and the password is admin123.
???The IP address for the VLAN 1 routing interface is 10.1.1.200 with a subnet mask of 255.255.255.0.
???The default gateway is 10.1.1.1
The setup wizard configures the initial values as defined above. After completing the wizard, the switch is configured as follows:
???SNMPv2 is enabled and the community string is set up as defined above. SNMPv3 is disabled by default.
???The admin user account is set up as defined.
???A network management system is configured. From the management station, you can access the SNMP, HTTP, and CLI interfaces. You may also choose to allow all IP addresses to access these management interfaces by choosing the (0.0.0.0) IP address.
???An IP address is configured for the VLAN 1 routing interface.
???A default gateway address is configured.
NOTE: In the example below, the possible user options or default values are enclosed in [ ]. If you press <Enter> with no options defined, the default value is accepted. Help text is in parentheses.
Dell Easy Setup Wizard Console Example
The following example contains the sequence of prompts and responses associated with running an example Dell Easy Setup Wizard session, using the input values listed above.
After the switch completes the POST and is booted, the following dialog appears:
Unit 1 - Waiting to select management unit)>
Applying Global configuration, please wait...
Welcome to Dell Easy Setup Wizard
The Setup Wizard guides you through the initial switch configuration, and gets you up and running as quickly as possible. You can skip the setup wizard, and enter CLI mode to manually configure the switch. You must respond to the next question to run the setup wizard within 60 seconds, otherwise the system will continue with normal operation using the default system configuration. Note: You can exit the setup wizard at any point by entering [ctrl+z].
Would you like to run the setup wizard (you must answer this question within 60 seconds)? [Y/N] y
Step 1:
The system is not set up for SNMP management by default. To manage the switch using SNMP (required for Dell Network Manager) you can
. Set up the initial SNMP version 2 account now.
. Return later and set up other SNMP accounts. (For more information on setting up an SNMP version 1 or 3 account, see the user documentation).
Would you like to set up the SNMP management interface now? [Y/N] y
To set up the SNMP management account you must specify the management system IP address and the ???community string??? or password that the particular management system uses to access the switch. The wizard

automatically assigns the highest access level [Privilege Level 15] to this account. You can use Dell Network Manager or other management interfaces to change this setting, and to add additional management system information later. For more information on adding management systems, see the user documentation.
To add a management station:
Please enter the SNMP community string to be used. [public]: public
NOTE: If it is configured, the default access level is set to the highest available access for the SNMP management interface. Initially only SNMPv2 will be activated. SNMPv3 is disabled until you return to configure security access for SNMPv3 (e.g. engine ID, view, etc.).
Please enter the IP address of the Management System (A.B.C.D) or wildcard (0.0.0.0) to manage from any Management Station. [0.0.0.0]: 10.1.2.100
Step 2:
Now we need to set up your initial privilege (Level 15) user account. This account is used to login to the CLI and Web interface. You may set up other accounts and change privilege levels later. For more information on setting up user accounts and changing privilege levels, see the user documentation.
To set up a user account:
Please enter the user name. [root]:admin
Please enter the user password: ********
Please reenter the user password: ********
Step 3:
Next, an IP address is set up on the VLAN 1 routing interface.
You can use the IP address to access the CLI, Web interface, or SNMP interface of the switch.
To access the switch through any Management Interface you can
. Set up the IP address for the Management Interface.
. Set up the default gateway if IP address is manually configured on the routing interface.
Step 4:
Would you like to set up the VLAN1 routing interface now? [Y/N] y
Please enter the IP address of the device (A.B.C.D) or enter ???DHCP??? (without the quotes) to automatically request an IP address from the network DHCP server:
10.1.1.200
Please enter the IP subnet mask (A.B.C.D or /nn):
255.255.255.0
Step 5:
Finally, set up the default gateway. Please enter the IP address of the gateway from which this network is reachable. [0.0.0.0]: 10.1.1.1
This is the configuration information that has been collected:
SNMP Interface = ???public???@10.1.2.100 User Account setup = admin
Password = ********
VLAN1 Router Interface IP = 10.1.1.200 255.255.255.0 Default Gateway = 10.1.1.1
Step 6:
If the information is correct, please enter (Y) to save the configuration and copy the settings to the start-up configuration file. If the information is incorrect, enter (N) to discard the configuration and restart the wizard: [Y/N] y
Thank you for using the Dell Easy Setup Wizard. You will now enter CLI mode.
Applying Interface configuration, please wait...
Next Steps
After completing the initial configuration described in this section, you can connect any of the front-panel switch ports to your production network for in- band remote management.
If you specified DHCP for the VLAN 1 management interface IP address, the interface will acquire its IP address from a DHCP server on the network. To discover the dynamically-assigned IP address, use the console port connection to issue the following command:
???For the VLAN 1 routing interface, enter show ip interface.
To access the Dell OpenManage Switch Administrator interface, enter the VLAN 1 management interface IP address into the address field of a Web browser. For remote management access to the CLI, enter the VLAN 1 management interface IP address into a Telnet or SSH client. Alternatively, you can continue to use the console port for local CLI access to the switch.
Your N20xx switch supports basic switching features such as VLANs and spanning tree protocol. Use the Web-based management interface or the CLI to configure the features your network requires. For information about how to configure the switch features, see the User???s Configuration Guide or CLI Reference Guide available on the support site: dell.com/support/manuals.
N30xx Series Overview
The Dell N30xx switches are stackable Layer 2 and Layer 3 Gigabit Ethernet switches and include the following models:
???Dell N3024
???Dell N3024P
???Dell N3048
???Dell N3048P
???Dell N3024F
N30xx Series Hardware Overview
This section contains information about device characteristics and modular hardware configurations for the N30xx Series switches.
All N30xx models are 1U, rack-mountable switches with the following physical dimensions:
???434.0 x 407.0 x 43.5 mm (W x D x H).
???17.1 x 16.0 x 1.7 inches (W x D x H).
N30xx Series Front Panel
The following images show the front panels of the switch models in the N30xx Series.
In addition to the switch ports, the front panel of each model in the N30xx series includes the following ports:
???Console port
???USB port
???Out-of-band (OOB) management port
Figure 1-12. N3024F with 24 10/100/1000BASE-T Ports (Front Panel)
The N30xx series switch includes two combo ports. The combo ports are SFP on the N30xx series and 1000BaseT on the N3024F switch.
Figure 1-13. N3048 with 48 10/100/1000BASE-T Ports (Front Panel)
SFP+
Ports
The additional ports are on the right side of the front panel, as shown in Figure 1-13 and Figure 1-14 on page 33.
Figure 1-14. Additional N30xx Series Ports
Console Port Out-of-Band Management Port
USB Port
Reset Button
The N30xx front panel above also contains a reset button (pinhole) and several status LEDs. See Figure 1-14.
Figure 1-15. N30xx Close-up
The N30xx/N3024F/N30xxP front panel in Figure 1-15 displays status LEDs for over-temperature alarm, internal power supply 1 and switch status on the top row. The bottom row of status LEDs displays stack master, internal power supply 2 and fan alarm.
Switch Ports
The N3024/N3024P front panel provides 24 Gigabit Ethernet (10/100/1000BASE-T) RJ-45 ports that support auto-negotiation for speed, flow control, and duplex. The N3024/N3024P models support two SFP+ 10G ports. Dell-qualified SFP+ transceivers are sold separately.
The N3024F front panel provides 24 Gigabit Ethernet 100BASE- FX/1000BASE-X SFP ports plus 2 1000BASE-T combo ports. Dell-qualified SFP transceivers are sold separately.
The N3048/N3048P front panel provides 48 Gigabit Ethernet (10BASE-T, 100BASE-TX, 1000BASE-T) RJ-45 ports that support auto-negotiation for speed, flow control, and duplex. The N3048/N3048P support two SFP+ 10G ports. Dell-qualified SFP+ transceivers are sold separately.
The front-panel switch ports have the following characteristics:
???The switch automatically detects the difference between crossed and straight-through cables on RJ-45 ports and automatically chooses the MDI or MDIX configuration to match the other end.
???SFP ports support Dell-qualified transceivers.
???RJ-45 ports support full-duplex mode 10/100/1000 Mbps speeds on standard Category 5 UTP cable.
???SFP+ ports support SFP+ transceivers and SFP+ copper twin-ax technology plus SFP transceivers operating at 1G.
???The N3024P/N3048P front panel ports support PoE (15.4W) and PoE+ (30W).
Console Port
The console port provides serial communication capabilities, which allows communication using RS-232 protocol. The serial port provides a direct connection to the switch and allows access to the CLI from a console terminal connected to the port through the provided serial cable (with RJ45 YOST to female DB-9 connectors).
The console port is separately configurable and can be run as an asynchronous link from 1200 baud to 115,200 baud.
The Dell CLI only supports changing the speed.
The defaults are 9600 baud rate, 8 data bits, No Parity, 1 Stop Bit, No Flow Control.
Out-of-Band Management Port
The Out-of-Band (OOB) management port is a 10/100/1000BASE-T Ethernet port dedicated to remote switch management. Traffic on this port is segregated from operational network traffic on the switch ports and cannot be switched or routed to or from the operational network.
USB Port
The Type-A, female USB port supports a USB 2.0-compliant flash memory drive. The Dell Networking switch can read or write to a flash drive formatted as FAT-32. You can use a USB flash drive to copy switch configuration files and images between the USB flash drive and the switch. You can also use the USB flash drive to move and copy configuration files and images from one switch to other switches in the network.
The USB port does not support any other type of USB device.
Reset Button
The reset button is accessed through the pinhole and allows you to perform a hard reset on the switch. To use the reset button, insert an unbent paper clip or similar tool into the pinhole. When the switch completes the boot process after the reset, it resumes operation with the most recently saved configuration. Any changes made to the running configuration that were not saved to the startup configuration prior to the reset are lost.
Port and System LEDs
The front panel contains light emitting diodes (LEDs) that indicate the status of port links, power supplies, fans, stacking, and the overall system status.
For information about the status that the LEDs indicate, see the User???s Configuration Guide.
Stack Master LED and Stack Number Display
When a switch within a stack is the master unit, the stack master LED, which is labeled M, is solid green. If the M LED is off, the stack member is not the master unit. The Stack No. panel displays the unit number for the stack member. If a switch is not part of a stack (in other words, it is a stack of one switch), the M LED is illuminated, and the unit number is displayed.
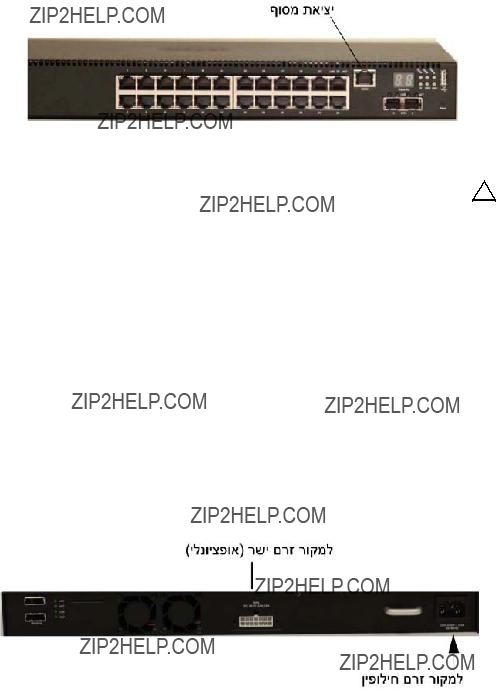
N30xx Series Back Panel
The following images show the back panels of the N30xx switches.
Figure 1-16. N30xx Back Panel
Fan Vents
Figure 1-18. N3048 Mini-SAS Stacking Ports Close-up
Mini-SAS stacking ports
The term mini-SAS refers to the stacking port cable connections shown in Figure 1-18. See Stacking Multiple N30xx Switches for information on using the mini-SAS ports to connect switches.
Expansion Slots for Plug-in Modules
One expansion slot is located on the back of the N30xx models and can support the following modules:
???10GBASE-T module
???SFP+ module
Each plug-in module has two ports. The plug-in modules include hot-swap support, so you do not need to reboot the switch after you install a new module.

Power Supplies
N3024, N3024F and N3048
N3024, N3024F and N3048 switches support two 200-watt Field Replaceable Unit (FRU) power supplies which give full power redundancy for the switch. The N3024, N3024F and N3048 switches offer the V-lock feature for users desiring the need to eliminate accidental power disconnection. The V-lock receptacle on the Power Supply Unit (PSU) allows for the use of a power cord that has the V-lock feature to create an integral secure locking connection.
N3024P and N3048P
Dell Networking N3024P and N3048P switches support one or two 1100-watt FRU power supplies. The N3024P switch comes with a single 715-watt power supply (the default configuration), and supports either one or two 1100-watt supplies. For the N3048P switch, an 1100-watt power supply is the default configuration.
A single 1100-watt power supply can feed up to 24 PoE devices at full PoE+ power (950W). Dual-equipped switches will feed up to 48 PoE devices at full PoE+ power (1800W), as well as provide power supply redundancy.
NOTE: PoE power is dynamically allocated. Not all ports will require the full PoE+ power.
CAUTION: Remove the power cable from the power supplies prior to removing the power supply module itself. Power must not be connected prior to insertion in the chassis.
Ventilation System
Two fans cool the N30xx switches. The N30xx switches additionally have a fan in each internal power supply. The N30xx fan is a FRU.
N30xx Model Summary
Table 1-2. N30xx Model Summary
Redundant Pluggable
PSUs/48x PoE+ ports/12
UPoE Capable Ports/1x
Removable Fan Module
N30xx Series Installation
Site Preparation
N30xx Series switches can be mounted in a standard 48.26 cm (19-inch) rack or placed on a flat surface.
Make sure that the chosen installation location meets the following site requirements:
???Power ??? The switch is installed near an easily accessible 100???240 VAC, 50???60 Hz outlet.
???Clearance ??? There is adequate front and rear clearance for operator access. Allow clearance for cabling, power connections, and ventilation.
???Cabling ??? The cabling is routed to avoid sources of electrical noise such as radio transmitters, broadcast amplifiers, power lines, and fluorescent lighting fixtures.
???Ambient Temperature ??? The ambient switch operating temperature range is 0 to 45??C (32 to 113??F) at a relative humidity of up to 95 percent, non-condensing.
NOTE: Decrease the maximum temperature by 1??C (1.8??F) per 300 m (985 ft.) above 900m (2955 ft.).
???Relative Humidity ??? The operating relative humidity is 8% to 85% (noncondensing) with a maximum humidity gradation of 10% per hour.
Unpacking the N30xx Switch
Package Contents
When unpacking each switch, make sure that the following items are included:
???One Dell Networking switch
???One RJ-45 to DB-9 female cable
???One ReadyRail kit for rack installation, two mounting brackets, bolts, and cage nuts
???One set of self-adhesive rubber pads for the free-standing switch (four pads are included)
???One PSU
Unpacking Steps
NOTE: Before unpacking the switch, inspect the container and immediately report any evidence of damage.
1Place the container on a clean, flat surface and cut all straps securing the container.
2Open the container or remove the container top.
3Carefully remove the switch from the container and place it on a secure and clean surface.
4Remove all packing material.
5Inspect the product and accessories for damage.

Rack Mounting a N30xx Switch
You may either place the switch on the rack shelf or mount the switch directly into a 19" wide, EIA-310-E compliant rack (four-post, two-post, or threaded methods). The Dell ReadyRail system is provided for 1U front-rack, and two- post installations. The ReadyRail system includes two separately packaged rail assemblies.
WARNING: This is a condensed reference. Read the safety instructions in your Safety, Environmental, and Regulatory information booklet before you begin.
NOTE: The illustrations in this document are not intended to represent a specific switch.
Rack Mounting Safety Considerations
???Rack loading???Overloading or uneven loading of racks may result in shelf or rack failure, causing damage to equipment and possible personal injury. Stabilize racks in a permanent location before loading begins. Mount components beginning at the bottom of the rack, then work to the top. Do not exceed your rack load rating.
???Power considerations???Connect only to the power source specified on the unit. When multiple electrical components are installed in a rack, ensure that the total component power ratings do not exceed circuit capabilities. Overloaded power sources and extension cords present fire and shock hazards.
???Elevated ambient temperature???If installed in a closed rack assembly, the operating temperature of the rack environment may be greater than room ambient. Use care not to exceed the 45 degrees C maximum ambient temperature of the switch.
???Reduced air flow???Install the equipment in the rack so that the amount of airflow required for safe operation of the equipment is not compromised.
???Reliable earthing???Maintain reliable earthing of rack-mounted equipment. Pay particular attention to supply connections other than direct connections to the branch circuit, for example: use of power strips.
???Product should not be mounted with the rear panel facing in the downward position.

Installing the Dell ReadyRail System
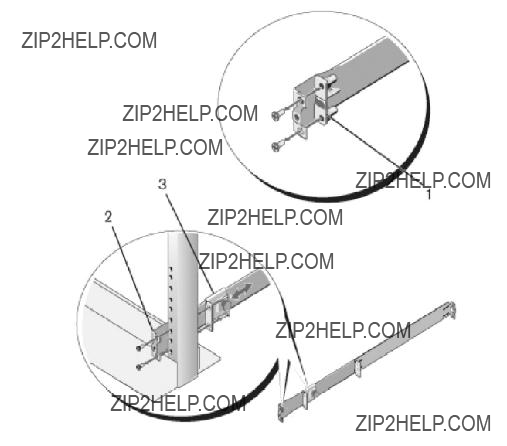
The ReadyRail rack mounting system is provided to easily configure your rack for installation of your switch. The ReadyRail system can be installed using the 1U tool-less method or one of three possible 1U tooled methods (two- post flush mount, two-post center mount, or four-post threaded).
1U Tool-less Configuration (Four-post Square Hole or Unthreaded Round Hole)
1With the ReadyRail flange ears facing outward, place one rail between the left and right vertical posts. Align and seat the rear flange rail pegs in the rear vertical post flange. In Figure 1-19, item 1 and its extractions illustrate how the pegs appear in both the square and unthreaded round holes.
Figure 1-19. 1U Tool-less Configuration
2Align and seat the front flange pegs in the holes on the front side of the vertical post. See Figure 1-19, item 2.
3Repeat this procedure for the second rail.
4To remove each rail, pull on the latch release button on each flange ear and unseat each rail. See Figure 1-19, item 3.
Two-post Flush-mount Configuration
1For this configuration, the castings must be removed from the front side of each ReadyRail assembly. See Figure 1-20, item 1 on page 44. Use a Torx driver to remove the two screws from each front flange ear (on the switch side of the rail) and remove each casting. Retain the castings for future rack requirements. It is not necessary to remove the rear flange castings.
Figure 1-20. Two-post Flush-mount Configuration
2Attach one rail to the front post flange with two user-supplied screws. See Figure 1-20, item 2.
3Slide the plunger bracket forward against the vertical post and secure the plunger bracket to the post flange with two user-supplied screws. See Figure 1-20, item 3.
4Repeat this procedure for the second rail.
Two-post Center-mount Configuration
1Slide the plunger bracket rearward until it clicks into place and secure the bracket to the front post flange with two user-supplied screws. See Figure 1-21, item 1.
Figure 1-21. Two-post Center-mount Configuration
2Slide the back bracket towards the post and secure it to the post flange with two user-supplied screws. See Figure 1-21, item 2.
3Repeat this procedure for the second rail.
Four-post Threaded Configuration
1For this configuration, the flange ear castings must be removed from each end of the ReadyRail assemblies. Use a Torx driver to remove the two screws from each flange ear and remove each casting. See Figure 1-22, item 1. Retain the castings for future rack requirements.
2For each rail, attach the front and rear flanges to the post flanges with two user-supplied screws at each end. See Figure 1-22, item 2.
Figure 1-22. Four-post Threaded Configuration

Installing as a Free-standing Switch
NOTE: We strongly recommend mounting the switch in a rack.
Install the switch on a flat surface if you are not installing it in a rack. The surface must be able to support the weight of the switch and the switch cables. The switch is supplied with four self-adhesive rubber pads.
1Attach the self-adhesive rubber pads on each location marked on the bottom of the switch.
2Set the switch on a flat surface, and make sure that it has proper ventilation by leaving 5 cm (2 inches) on each side and 13 cm (5 inches) at the back.
Stacking Multiple N30xx Switches
You can stack N30xx switches up to 12 switches high using the mini-SAS ports located on the rear of the switch. N30xx switches only support stacking with other N30xx switches. When multiple switches are connected together through the stack ports, they operate as a single unit with up to 576 front panel ports. The stack operates and is managed as a single entity.
NOTE: If you are installing a stack of switches, you need to assemble and cable the stack before powering up and configuring it. When a stack is powered up for the first time, the switches elect a Master Switch, which may occupy any location in the stack. The Master LED on the front panel is illuminated on the master unit.
Creating a Switch Stack
Create a stack by connecting adjacent units using the mini-SAS stacking ports on the back panel of the switch. Figure 1-23 on page 48 shows the switches connected in a ring topology, which is the recommended topology for a stack.
1Connect one of the mini-SAS cables into either of the stacking ports of the top switch and the switch directly below it.
If necessary, use a separately purchased, longer (1 meter or 3 meter) mini- SAS cable to connect the switches.
2Repeat this process until all of the devices are connected.
3Use the remaining stacking cable to connect the two remaining stacking ports together so that a ring topology is assembled.

Figure 1-23. Connecting a Stack of Switches
Unit 1
Unit 2
Unit 3
The stack in Figure 1-23 is connected in a ring topology and has the following physical connections between the switches:
???The bottom mini-SAS port on Unit 1 is connected to the top mini-SAS port on Unit 2.
???The bottom mini-SAS port on Unit 2 is connected to the top mini-SAS port on Unit 3.
???The bottom mini-SAS port on Unit 3 is connected to the top mini-SAS port on Unit 1.
Stacking Standby
The stacking feature supports a Standby or backup unit that assumes the Master unit role if the Master unit in the stack fails. As soon as a Master failure is detected in the stack, the Standby unit initializes the control plane and enables all other stack units with the current configuration. The Standby unit maintains a synchronized copy of the running configuration for the stack. The Standby unit is automatically selected in the stack; however, you can use the CLI to select a different stack member as Standby. See the User???s Configuration Guide or the CLI Reference Guide for more information.
Starting and Configuring the N30xx
Switch
The flow chart in Figure 1-24 provides an overview of the steps you use to perform the initial configuration after the switch is unpacked and mounted.
Figure 1-24. Installation and Configuration Flow Chart

Connecting a N30xx Switch to a Terminal
After completing all external connections, connect a terminal to a switch to configure the switch.
NOTE: Read the Release Notes for this product before proceeding. You can download the Release Notes from the Dell Support website at dell.com/support/manuals.
NOTE: We recommend that you obtain the most recent version of the user documentation from the Dell Support website at dell.com/support/manuals.
To monitor and configure the switch via serial console, use the console port on the front panel of the switch (see Figure 1-25 on page 51) to connect it to a VT100 terminal or to a computer running VT100 terminal emulation software. The console port is implemented as a data terminal equipment (DTE) connector.
The following equipment is required to use the console port:
???VT100-compatible terminal or a computer with a serial port running VT100 terminal emulation software, such as Microsoft HyperTerminal.
???A serial cable (provided) with an RJ-45 connector for the console port and DB-9 connector for the terminal.
Perform the following tasks to connect a terminal to the switch console port:
1Connect the DB-9 connector on the serial cable to the terminal or computer running VT100 terminal emulation software.
2Configure the terminal emulation software as follows:
gSelect the appropriate serial port (for example, COM 1) to connect to the console.
hSet the data rate to 9600 baud.
iSet the data format to 8 data bits, 1 stop bit, and no parity.
jSet the flow control to none.
kSet the terminal emulation mode to VT100.
lSelect Terminal keys for Function, Arrow, and Ctrl keys. Make sure that the setting is for Terminal keys (not Microsoft Windows keys).

3Connect the RJ-45 connector on the cable directly to the switch console port. The Dell Networking console port is located on the right side of the front panel and is labeled with a |O|O| symbol, as shown in Figure 1-25.
NOTE: Serial console access to the stack manager is available from any serial port via the local CLI. Only one serial console session at a time is supported.
Figure 1-25. N3048 Console Port Location
Console Port
The RJ-45 port to the right of the console port is for out-of-band Ethernet management.
Connecting a N30xx Switch to a Power Source
CAUTION: Read the safety information in the Safety and Regulatory Information manual as well as the safety information for other switches that connect to or support the switch.
The N30xx switches have two FRU power supplies for redundant or load- sharing operation.
AC and DC Power Connection
1Make sure that the switch console port is connected to a VT100 terminal or VT100 terminal emulator via the RJ-45 to DB-9 female cable.
2Using a 5-foot (1.5 m) standard power cable with safety ground connected, connect the power cable to the AC main receptacle located on the back panel (see Figure 1-26 on page 52).
3Connect the power cable to a grounded AC outlet.
Figure 1-26. Two Redundant Power Supplies on N3048 Switch
To AC Power Source
Booting the N30xx Switch
When the power is turned on with the local terminal already connected, the switch goes through a power-on self-test (POST). POST runs every time the switch is initialized and checks hardware components to determine if the switch is fully operational before completely booting. If POST detects a critical problem, the program flow stops. If POST passes successfully, valid firmware is loaded into RAM. POST messages are displayed on the terminal and indicate test success or failure. The boot process runs for approximately 60 seconds.
You can invoke the Boot menu after the first part of the POST is completed. From the Boot menu, you can perform configuration tasks such as resetting the system to factory defaults, activating the backup image, or recovering a password. For more information about the Boot menu functions, see the CLI Reference Guide.

Performing the N30xx Initial Configuration
The initial configuration procedure is based on the following assumptions:
???The Dell Networking switch was never configured before.
???The Dell Networking switch booted successfully.
???The console connection was established, and the Dell Easy Setup Wizard prompt appears on the screen of a VT100 terminal or terminal equivalent.
The initial switch configuration is performed through the console port. After the initial configuration, you can manage the switch from the already- connected console port or remotely through an interface defined during the initial configuration.
NOTE: The switch is not configured with a default user name or password. The default IP address is set to DHCP for the out-of-band (OOB) port.
Before setting up the initial configuration of the switch, obtain the following information from your network administrator:
???The IP address to be assigned to the management interface.
???The IP subnet mask for the network.
???The IP address of the management interface default gateway.
These settings are necessary to allow the remote management of the switch through Telnet (Telnet client) or HTTP (Web browser).
Enabling Remote Management
The N30xx switch???s front panel contains a Gigabit Ethernet port for OOB management. The OOB port is located to the right of the console port. On the N30xx switches, you can use the OOB port or any of the switch ports on the front panel for in-band management. By default, all in-band ports are members of VLAN 1.
The Dell Easy Setup Wizard includes prompts to configure network information for the OOB management interface on the N30xx switch and the VLAN 1 interface on the N30xx switches. For either management interface, you can assign a static IP address and subnet mask or enable DHCP and allow a network DHCP server to assign the information.
See the CLI Reference Guide for information about the CLI commands you use to configure network information.

Initial Configuration Procedure
You can perform the initial configuration by using the Dell Easy Setup Wizard or by using the CLI. The wizard automatically starts when the switch configuration file is empty. You can exit the wizard at any point by entering [ctrl+z], but all configuration settings specified will be discarded, and the switch will use the default values.
NOTE: If you do not run the Dell Easy Setup Wizard or do not respond to the initial Easy Setup Wizard prompt within 60 seconds, the switch enters CLI mode. You must reset the switch with an empty startup configuration in order to rerun the Dell Easy Setup Wizard.
For more information about performing the initial configuration by using the CLI, see the CLI Reference Guide. This Getting Started Guide shows how to use the Dell Easy Setup Wizard for initial switch configuration. The wizard sets up the following configuration on the switch:
???Establishes the initial privileged user account with a valid password. The wizard configures one privileged user account during the setup.
???Enables CLI login and HTTP access to use the local authentication setting only.
???Sets up the IP address for the OOB management interface.
???Sets up the IP address for the VLAN 1 routing interface, of which all in-band ports are members.
???Sets up the SNMP community string to be used by the SNMP manager at a given IP address. You may choose to skip this step if SNMP management is not used for this switch.
???Allows you to specify the network management system IP address or permit management access from all IP addresses.
???Configures the default gateway IP address for the VLAN 1 interface.

Example Session
This section describes a Dell Easy Setup Wizard session. The following values are used by the example session:
???The SNMP community string to be used is public.
???The network management system (NMS) IP address is 10.1.2.100.
???The user name is admin, and the password is admin123.
???The OOB management interface uses DHCP for IP address assignment.
???The IP address for the VLAN 1 routing interface is 10.1.1.200 with a subnet mask of 255.255.255.0.
???The default gateway is 10.1.1.1
The setup wizard configures the initial values as defined above. After completing the wizard, the switch is configured as follows:
???SNMPv2 is enabled and the community string is set up as defined above. SNMPv3 is disabled by default.
???The admin user account is set up as defined.
???A network management system is configured. From the management station, you can access the SNMP, HTTP, and CLI interfaces. You may also choose to allow all IP addresses to access these management interfaces by choosing the (0.0.0.0) IP address.
???DHCP is enabled on the OOB management interface.
???An IP address is configured for the VLAN 1 routing interface.
???A default gateway address is configured.
NOTE: In the example below, the possible user options or default values are enclosed in [ ]. If you press <Enter> with no options defined, the default value is accepted. Help text is in parentheses.
Dell Easy Setup Wizard Console Example
The following example contains the sequence of prompts and responses associated with running an example Dell Easy Setup Wizard session, using the input values listed above.
After the switch completes the POST and is booted, the following dialog appears:
Unit 1 - Waiting to select management unit)>
Applying Global configuration, please wait...
Welcome to Dell Easy Setup Wizard
The Setup Wizard guides you through the initial switch configuration, and gets you up and running as quickly as possible. You can skip the setup wizard, and enter CLI mode to manually configure the switch. You must respond to the next question to run the setup wizard within 60 seconds, otherwise the system will continue with normal operation using the default system configuration. Note: You can exit the setup wizard at any point by entering [ctrl+z].
Would you like to run the setup wizard (you must answer this question within 60 seconds)? [Y/N] y
Step 1:
The system is not set up for SNMP management by default. To manage the switch using SNMP (required for Dell Network Manager) you can
. Set up the initial SNMP version 2 account now.
. Return later and set up other SNMP accounts. (For more information on setting up an SNMP version 1 or 3 account, see the user documentation).
Would you like to set up the SNMP management interface now? [Y/N] y
To set up the SNMP management account you must specify the management system IP address and the ???community string??? or password that the particular management system uses to access the switch. The wizard

automatically assigns the highest access level [Privilege Level 15] to this account. You can use Dell Network Manager or other management interfaces to change this setting, and to add additional management system information later. For more information on adding management systems, see the user documentation.
To add a management station:
Please enter the SNMP community string to be used. [public]: public
NOTE: If it is configured, the default access level is set to the highest available access for the SNMP management interface. Initially only SNMPv2 will be activated. SNMPv3 is disabled until you return to configure security access for SNMPv3 (e.g. engine ID, view, etc.).
Please enter the IP address of the Management System (A.B.C.D) or wildcard (0.0.0.0) to manage from any Management Station. [0.0.0.0]: 10.1.2.100
Step 2:
Now we need to set up your initial privilege (Level 15) user account. This account is used to login to the CLI and Web interface. You may set up other accounts and change privilege levels later. For more information on setting up user accounts and changing privilege levels, see the user documentation.
To set up a user account:
Please enter the user name. [root]:admin
Please enter the user password: ********
Please reenter the user password: ********
Step 3:
Next, IP addresses are set up on the OOB (Out-Of-Band) Interface and/or the VLAN 1 routing interface.
You can use these IP addresses to access the CLI, Web interface, or SNMP interface of the switch.
To access the switch through any Management Interface you can
. Set up the IP address for the Management Interface.
. Set up the default gateway if IP address is manually configured on both routing and OOB interface.
Would you like to set up the Out-Of-Band interface now? [Y/N] y
Please enter the IP address of the device (A.B.C.D) or enter ???DHCP??? (without the quotes) to automatically request an IP address from the network DHCP server. [DHCP]: dhcp
Step 4:
Would you like to set up the VLAN1 routing interface now? [Y/N] y
Please enter the IP address of the device (A.B.C.D) or enter ???DHCP??? (without the quotes) to automatically request an IP address from the network DHCP server:
10.1.1.200
Please enter the IP subnet mask (A.B.C.D or /nn):
255.255.255.0
Step 5:
Finally, set up the default gateway. Please enter the IP address of the gateway from which this network is reachable. [0.0.0.0]: 10.1.1.1
This is the configuration information that has been collected:
SNMP Interface = ???public???@10.1.2.100 User Account setup = admin
Password = ********
Out-of-band IP address = DHCP
VLAN1 Router Interface IP = 10.1.1.200 255.255.255.0 Default Gateway = 10.1.1.1
Step 6:
If the information is correct, please enter (Y) to save the configuration and copy the settings to the start-up configuration file. If the information is incorrect, enter (N) to discard the configuration and restart the wizard: [Y/N] y
Thank you for using the Dell Easy Setup Wizard. You will now enter CLI mode.
Applying Interface configuration, please wait...
Next Steps
After completing the initial configuration described in this section, you can connect the OOB port to your management network for out-of-band remote management, or you can connect any of the front-panel switch ports to your production network for in-band remote management.
If you specified DHCP for the OOB or VLAN 1 management interface IP address, the interface will acquire its IP address from a DHCP server on the network. To discover the dynamically-assigned IP address, use the console port connection to issue the following commands:
???For the OOB interface, enter show ip interface out-of-band.
???For the VLAN 1 routing interface, enter show ip interface.
To access the Dell OpenManage Switch Administrator interface, enter the OOB management interface IP address into the address field of a Web browser. For remote management access to the CLI, enter the VLAN 1 management interface IP address into a Telnet or SSH client. Alternatively, you can continue to use the console port for local CLI access to the switch.
Your N30xx switch supports basic switching features such as VLANs and spanning tree protocol. The N30xx switches also support advanced Layer 3 features such as dynamic routing and multicast. Use the Web-based management interface or the CLI to configure the features your network requires. For information about how to configure the switch features, see the
User???s Configuration Guide or CLI Reference Guide available on the support site: dell.com/support/manuals.
Commutateur de s??rie
N20xx/N30xx Dell
Guide de mise en route
Mod??les r??glementaires : N2024, N2024P, N2048, N2048P, N3024, N3024P, N3048, N3048P, N3024F
Remarques, pr??cautions et avertissements
REMARQUE : Une REMARQUE indique des informations importantes qui peuvent vous aider ?? mieux utiliser votre commutateur.
PR??CAUTION : Une PR??CAUTION vous avertit d'un risque de dommage mat??riel ou de perte de donn??es et vous indique comment ??viter le probl??me.
AVERTISSEMENT : UN AVERTISSEMENT indique un risque potentiel d'endommagement du mat??riel, de blessure corporelle ou de mort.
____________________
?? 2013 Dell Inc.
Marques utilis??es dans ce document : Dell??, le logo DELL, OpenManage??? et ReadyRails??? sont des marques commerciales de Dell Inc. Microsoft??, et Windows?? sont des marques d??pos??es de Microsoft Corporation aux Etats-Unis et/ou dans d'autres pays.
Mod??le r??glementaire N2024, N2024P, N2048, N2048P, N3024, N3024P, N3048, N3048P, N3024F
D??cembre 2013 P/N F5CWH R??v. A00
Tables des mati??res
Tables des mati??res
1Introduction . . . . . . . . . . . . . . . . . . . . . . . 67
2Pr??sentation de la s??rie N20xx . . . . . . . . 67
3Pr??sentation du mat??riel
de la s??rie N20xx . . . . . . . . . . . . . . . . . . 68
5D??marrage et configuration
du commutateur N20xx . . . . . . . . . . . . . . 81
6Pr??sentation de la s??rie N30xx . . . . . . . . 96
7Pr??sentation du mat??riel
de la s??rie N30xx . . . . . . . . . . . . . . . . . . 96
8 Installation de la s??rie N30xx . . . . . . . . 106
9D??marrage et configuration
du commutateur N30xx . . . . . . . . . . . . . 116

Introduction
Ce document contient des informations g??n??rales sur les commutateurs de la s??rie N20xx/N30xxDell, ainsi que des informations relatives ?? l'installation et ?? la configuration initiale d'un commutateur. Pour obtenir des informations sur la configuration et le contr??le des fonctions du commutateur, reportez- vous au User's Configuration Guide (Guide de configuration), disponible sur le site du Support Dell ?? l'adresse dell.com/support/manuals et prenez connaissance des derni??res mises ?? jour concernant la documentation et le micrologiciel.
Ce document contient les sections suivantes :
???Pr??sentation de la s??rie N20xx
???Pr??sentation du mat??riel de la s??rie N20xx
???Installation de la s??rie N20xx
???D??marrage et configuration du commutateur N20xx
???Pr??sentation de la s??rie N30xx
???Pr??sentation du mat??riel de la s??rie N30xx
???Installation de la s??rie N30xx
???D??marrage et configuration du commutateur N30xx
???Informations NOM (Mexique uniquement)
REMARQUE : Nous conseillons fortement aux administrateurs de commutateur de s'assurer que les commutateurs de mise en r??seau Dell disposent de la derni??re version de Dell Networking Operating System (DNOS). La mise en r??seau Dell am??liore continuellement les fonctionnalit??s et les fonctions du DNOS en fonction des commentaires des clients. Pour une infrastructure critique, impliquant la sortie d'une partie non critique du r??seau, il est recommand?? de v??rifier la configuration du r??seau et son fonctionnement avec la nouvelle version de DNOS.
Pr??sentation de la s??rie N20xx
Les commutateurs N20xx Dell sont des commutateurs Ethernet Gigabit de couche 2 empilables et comprennent les six mod??les suivants :
???Dell N2024
???Dell N2024P
???Dell N2048
???Dell N2048P

Pr??sentation du mat??riel de la s??rie
N20xx
Cette section contient des informations sur les caract??ristiques du dispositif et sur les configurations mat??rielles des modules des commutateurs de la s??rie N20xx.
Tous les mod??les N20xx sans fonction PoE sont des commutateurs 1U montables sur rack avec les dimensions suivantes :
???440,0 x 257,0 x 43,5 mm (Largeur x Profondeur x Hauteur)
???17,3 x 10,1 x 4,32 cm (Largeur x Profondeur x Hauteur)
Tous les mod??les N20xx avec fonction PoE sont des commutateurs 1U montables sur rack avec les dimensions suivantes :
???440,0 x 387,0 x 43,5 mm (Largeur x Profondeur x Hauteur)
???17,3 x 15,2 x 4,32 cm (Largeur x Profondeur x Hauteur)
Panneau avant de la s??rie N20xx
Les images suivantes pr??sentent les panneaux avant des mod??les de commutateurs de la s??rie N20xx.
Figure 1-1. S??rie N2048 avec 48 ports 10/100/1000 BASE-T (Panneau avant)
En plus des ports de commutateur, le panneau avant de chaque mod??le de la s??rie N20xx comprend les ports suivants :
???Port de console
???Port USB
Figure 1-2. N2024 Gros plan
Le panneau avant N20xx, affich?? ?? la Figure 1-2, est ??quip?? de voyant d'??tat pour pr??venir en cas de temp??rature excessive, d'alimentation interne et d'??tat sur la premi??re rang??e. La deuxi??me rang??e de voyants d'??tat affiche l'??tat du ma??tre de la pile, du bloc d'alimentation redondant (RPS) et l'alarme du ventilateur.
Figure 1-3. N2024P Gros plan
Le panneau avant P N20xx, affich?? ?? la Figure 1-3, est ??quip?? de voyant d'??tat pour pr??venir en cas de temp??rature excessive, de l'??tat de l'alimentation interne et de l'??tat sur la premi??re rang??e. La deuxi??me rang??e de voyants d'??tat affiche l'??tat du ma??tre de la pile, du bloc d'alimentation modulaire (MPS) et l'alarme du ventilateur.
Ports de commutateur
Le panneau avant N2024/N2024P est ??quip?? de 24 ports Gigabit Ethernet (10/100/1000BASE-T) RJ-45 qui prennent en charge la n??gociation automatique de la vitesse, le contr??le du d??bit et le mode duplex.
Les mod??les N2024/N2024P prennent en charge deux ports SFP+ 10G.
Les ??metteurs-r??cepteurs SFP+ approuv??s par Dell sont vendus s??par??ment.
Le panneau avant N2048/N2048P est ??quip?? de 48 ports Gigabit Ethernet (10BASE-T, 100BASE-TX, 1000BASE-T) RJ-45 qui prennent en charge la n??gociation automatique de la vitesse, le contr??le du d??bit et le mode duplex. Les mod??les N2048/N2048P prennent en charge deux ports SFP+ 10G.
Les ??metteurs-r??cepteurs SFP+ approuv??s par Dell sont vendus s??par??ment.
Les ports de commutateurs du panneau avant disposent des caract??ristiques suivantes :
???Le commutateur d??tecte automatiquement le type de c??ble branch?? sur les ports RJ-45 (directs ou crois??s) et choisit automatiquement la configuration MDI ou MDIX pour correspondre ?? l'autre extr??mit??.
???Les ports SFP prennent en charge les ??metteurs-r??cepteurs SFP+ approuv??s par Dell.
???Les ports RJ-45 prennent en charge les vitesses (10/100/1 000 Mpbs) du mode duplex int??gral pour un c??ble UTP standard de cat??gorie 5.
???Les ports SFP+ prennent en charge les ??metteurs-r??cepteurs SFP+ et les ??metteurs-r??cepteurs SFP+ avec c??ble de cuivre twinax fonctionnant ?? 1G.
???Les ports du panneau avant N2024P/N2048P prennent en charge la fonction PoE (15,4 W) et PoE+ (30 W).
Port de console
Le port de console offre des capacit??s de communication de s??rie qui permettent d'effectuer des communications ?? l'aide du protocole RS-232. Ce port de s??rie offre une connexion directe au commutateur et vous permet d'acc??der ?? l'interface CLI depuis un terminal de console connect?? au port via le c??ble s??rie fourni (RJ-45 YOST vers des connecteurs DB-9 femelles).
Le port de console est configurable s??par??ment et peut ??tre ex??cut?? comme lien asynchrone avec un d??bit compris entre 1 200 bauds et 115 200 bauds.
Le CLI Dell ne prend en charge que le changement de vitesse. Les valeurs par d??faut : d??bit de 9 600 bauds, 8 bits de donn??es, pas de parit??, 1 bit d'arr??t, aucun contr??le de flux.
Port USB
Le port USB femelle de type A prend en charge un lecteur ?? m??moire flash compatible USB 2.0. Le commutateur Dell Networking peut lire ou ??crire des donn??es sur un lecteur flash format?? en FAT-32. Vous pouvez utiliser un lecteur USB flash pour transf??rer des fichiers ou des images de configuration entre le lecteur USB flash et le commutateur. Vous pouvez ??galement utiliser le lecteur flash USB pour d??placer et copier les fichiers et les images de configuration d'un commutateur vers les autres commutateurs du r??seau.
Le port USB ne prend en charge aucun autre type de p??riph??rique USB.
Bouton Reset (R??initialisation)
Le bouton de r??initialisation est accessible par l'interm??diaire du trou d'??pingle et vous permet d'effectuer une r??initialisation ?? froid du commutateur. Pour utiliser ce bouton, ins??rez un trombone d??pli?? ou un outil similaire dans le trou d'??pingle. Lorsque le commutateur a termin?? le processus de red??marrage apr??s la r??initialisation, il reprend son fonctionnement avec la derni??re configuration enregistr??e. Toute modification apport??e ?? la configuration en cours qui n'a pas ??t?? enregistr??e dans la configuration de d??marrage avant la r??initialisation, sera perdue.
Voyants des ports et du syst??me
Le panneau avant est ??quip?? de voyants indiquant l'??tat des liaisons des ports, des blocs d'alimentation, des ventilateurs, de l'empilement et de l'ensemble du syst??me.
Pour obtenir des informations sur l'??tat indiqu?? par les voyants, reportez-vous au User's Configuration Guide (Guide de configuration).
Voyant ma??tre de la pile et affichage du num??ro de la pile
Lorsque qu'un commutateur de la pile est l'unit?? ma??tre, le voyant ma??tre de la pile, d??sign?? par M, est en vert fixe. Si le voyant M est ??teint, le membre de la pile n'est pas l'unit?? ma??tre. Le panneau du num??ro de la pile affiche le num??ro de l'unit?? du membre de la pile. Si un commutateur ne fait pas partie d'une pile (en d'autres termes, il s'agit d'un pile d'un commutateur), le voyant M est allum?? et le num??ro de l'unit?? de la pile est affich??.
Panneau arri??re de la s??rie N20xx
Les images suivantes pr??sentent les panneaux arri??re des commutateurs N20xx.
Figure 1-4. Panneau arri??re N20xx
Ouvertures des ventilateurs
Prise d'alimentation en CA
Figure 1-5. Panneau arri??re N2024P/N2048P
Le terme mini-SAS reprend les connexions du c??ble du port d'empilage pr??sent?? ?? la Figure 1-6. Reportez-vous ?? Empilage de plusieurs commutateurs N20xx pour obtenir des information sur l'utilisation des ports mini-SAS pour connecter des commutateurs.
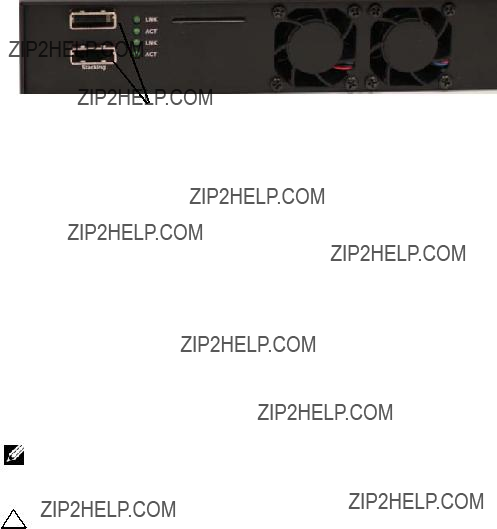
Figure 1-6. Ventilateurs et ports d'empilage mini-SAS N2048
Ports d'empilage mini-SAS
Les blocs d'alimentation
N2024 et N2048
N2024 et N2048 les commutateurs poss??dent un bloc d'alimentation interne de 100 watts. Le bloc d'alimentation redondant suppl??mentaire (Dell Networking RPS720) fournit une puissance de 180 watts et offre une pleine redondance au commutateur.
N2024P et N2048P
les commutateurs Dell Networking N2024P et N2048P sont ??quip??s d'un bloc d'alimentation 1 000 Watts pouvant alimenter jusqu'?? 24 p??riph??riques PoE ?? une puissance totale PoE+ (850 W). Un bloc d'alimentation externe suppl??mentaire (MPS1000) offre 1 000 Watts ainsi qu'une couverture ??nerg??tique totale pour les 48 p??riph??riques PoE (1 800 Watts).
REMARQUE : L'alimentation PoE est allou??e de mani??re dynamique. Tous les ports n'ont pas besoin de l'alimentation PoE+ maximale.
PR??CAUTION : Retirez le c??ble d'alimentation des blocs d'alimentation avant de retirer le bloc d'alimentation lui-m??me. L'alimentation ne doit pas ??tre connect??e avant l'insertion du bloc dans le ch??ssis.
Syst??me de ventilation
Deux ventilateurs refroidissent les commutateurs N20xx.
R??capitulatif des mod??les N20xx
Tableau 1-1. N20xx R??capitulatif des mod??les
Installation de la s??rie N20xx
Pr??paration du site
Les commutateurs de la s??rie N20xx peuvent ??tre mont??s dans un rack standard de 19 pouces (48,26 cm) ou pos??s sur une surface plane.
V??rifiez que l'emplacement de l'installation choisi r??pond aux conditions suivantes :
???Alimentation : le commutateur doit ??tre install?? ?? proximit?? d'une prise ??lectrique facilement accessible de 100-240 VCA ?? 50-60 Hz.
???D??gagement : l'avant et l'arri??re de l'unit?? doivent ??tre suffisamment d??gag??s pour rester accessibles ?? un op??rateur. Pr??voyez un d??gagement pour le c??blage, les connexions ??lectriques et la ventilation.
???C??blage : les c??bles doivent ??tre achemin??s de fa??on ?? ??viter les sources de bruit ??lectrique, telles que les ??metteurs radio??lectriques, les amplificateurs de diffusion, les lignes ??lectriques et les luminaires pour lampes fluorescentes.
???Temp??rature ambiante : la temp??rature ambiante du commutateur doit ??tre comprise entre 0 et 45?? C (32 et 113?? F), avec une humidit?? relative maximale de 95 % sans condensation.
REMARQUE : Au-dessus de 900 m??tres (2 955 pieds), r??duisez la temp??rature maximale d'un degr?? Celsius (1,8??F) par 300 m??tres (985 pieds).
???Humidit?? relative : l'humidit?? relative de fonctionnement est comprise entre 8 % et 85 % (sans condensation) avec une augmentation maximale de 10 % par heure.

D??ballage du commutateur N20xx
Contenu du carton
Lors du d??ballage de chaque commutateur, v??rifiez que le carton contient les ??l??ments suivants :
???Un commutateur Dell Networking
???Un c??ble RJ-45 vers un connecteur DB-9 femelle
???Un kit de montage (N20xx) pour l'installation en rack, deux supports de fixation, boulons et ??crous ?? cage
???Quatre patins adh??sifs en caoutchouc pour l'installation du commutateur autonome
??tapes du d??ballage
REMARQUE : Avant de d??baller le commutateur, examinez le carton et signalez imm??diatement tout dommage apparent.
1Posez le carton sur une surface plane et propre et coupez toutes les sangles d'attache.
2Ouvrez le carton ou retirez le couvercle.
3Retirez avec pr??caution le commutateur de son carton et posez-le sur une surface propre et stable.
4Retirez tout le mat??riel d'emballage.
5V??rifiez que le produit et ses accessoires ne sont pas endommag??s.
Montage en rack d'un commutateur N20xx
AVERTISSEMENT : Prenez connaissance des consignes de s??curit?? figurant dans le document Safety and Regulatory Information (Informations sur la s??curit?? et les r??glementations), ainsi que des informations concernant la s??curit?? des autres appareils connect??s au commutateur.
Le connecteur d'alimentation en CA se trouve sur le panneau arri??re du commutateur.

Montage en rack
AVERTISSEMENT : N'utilisez pas les kits de montage en rack pour fixer le commutateur sous une table ou un bureau, ni pour une installation murale.
PR??CAUTION : D??branchez tous les c??bles du commutateur avant de continuer la proc??dure. Retirez tous les patins adh??sifs situ??s sous le commutateur, le cas ??ch??ant.
PR??CAUTION : Si vous installez plusieurs commutateurs dans un rack, commencez par les emplacements du bas et proc??dez en remontant vers le haut du rack.
1Placez le support de fixation du rack sur un c??t?? du commutateur, en alignant les orifices de montage des deux ??l??ments. La Figure 1-7 indique l'emplacement appropri?? pour le montage des supports.
Figure 1-7. Fixation des supports
2Ins??rez les boulons qui vous ont ??t?? fournis dans les orifices de montage, puis serrez-les ?? l'aide d'un tournevis.
3R??p??tez l'op??ration de l'autre c??t?? du commutateur.
4Ins??rez le commutateur dans le rack de 19 pouces (48,26 cm), en veillant ?? ce que ses orifices de montage soient bien align??s sur ceux du rack.
5Fixez le commutateur dans le rack en utilisant le syst??me de fixation appropri?? ?? votre rack (boulons, ??crous ?? cage ou avec rondelles). Fixez les boulons du bas avant ceux du haut.
PR??CAUTION : Assurez-vous que les boulons fournis correspondent aux orifices pr??-filet??s du rack.
REMARQUE : V??rifiez que les entr??es d'air ne sont pas obstru??es.

Installation d'un commutateur autonome
REMARQUE : Nous vous recommandons fortement de monter le commutateur dans un rack.
Si vous n'installez pas le commutateur dans un rack, posez-le sur une surface plane. Cette surface doit pouvoir supporter le poids de l'appareil et de ses c??bles. Le commutateur est livr?? avec quatre patins adh??sifs en caoutchouc.
1Fixez les patins adh??sifs en caoutchouc sur les emplacements marqu??s, sous le commutateur.
2Installez le commutateur sur une surface plane. Pour une ventilation correcte, laissez un espace de 5 cm (2 pouces) de chaque c??t?? et de 13 cm (5 pouces) ?? l'arri??re.
Empilage de plusieurs commutateurs N20xx
Vous pouvez empiler jusqu'?? 12 commutateurs N20xx gr??ce aux ports mini- SAS situ??s sur l'avant du commutateur. Les commutateurs N20xx prennent en charge uniquement l'empilage avec d'autres commutateurs de la s??rie N20xx. Lorsque plusieurs commutateurs sont connect??s ensemble ?? l'aide des ports d'empilage, ils fonctionnent comme une seule unit?? avec un maximum de 576 ports sur le panneau avant. La pile fonctionne est g??r??e comme une seule entit??.
REMARQUE : Si vous installez une pile de commutateurs, vous devez terminer son montage et son c??blage avant de la mettre sous tension et de la configurer. Lorsqu'une pile est mise sous tension pour la premi??re fois, l'un des commutateurs est d??sign?? comme commutateur ma??tre de la pile. Ce commutateur peut occuper n'importe quel emplacement. Le voyant ma??tre situ?? sur le panneau avant est allum?? sur l'unit?? ma??tre.
Cr??ation d'une pile de commutateurs
Cr??ez une pile en connectant les unit??s adjacentes ?? l'aide des ports d'empilage mini-SAS situ??s sur le panneau arri??re du commutateur.
La Figure 1-8 ?? la page 80 pr??sente les commutateurs connect??s selon une typologie en anneau, qui est la topologie recommand??e pour une pile.
1Utilisez un c??ble mini-SAS pour relier l'un des ports d'empilage
du commutateur situ?? en haut de la pile au commutateur situ?? juste en-dessous.
Au besoin, utilisez un c??ble mini-SAS plus long (1 ou 3 m??tres, non fourni) pour connecter les commutateurs.
2R??p??tez l'op??ration jusqu'?? ce que toutes les unit??s soient connect??es.
3Utilisez le c??ble d'empilage restant pour connecter les deux derniers ports d'empilage restants ensemble afin de terminer la topologie en anneau.
Figure 1-8. Connexion d'une pile de commutateurs
Unit?? 1
Unit?? 2
Unit?? 3 
La pile illustr??e ?? la Figure 1-8 est connect??e selon une typologie en anneau et pr??sente les connexions suivantes entre les commutateurs :
???Le port mini-SAS situ?? en bas de l'unit?? 1 est connect?? au port mini-SAS de l'unit?? 2.
???Le port mini-SAS situ?? en bas de l'unit?? 2 est connect?? au port mini-SAS de l'unit?? 3.
???Le port mini-SAS situ?? en bas de l'unit?? 3 est connect?? au port mini-SAS de l'unit?? 1.
Unit?? de secours
La fonction d'empilage permet d'utiliser une unit?? de secours pr??vue pour prendre le relais en cas de panne de l'unit?? ma??tre de la pile. D??s qu'une panne de l'unit?? ma??tre de la pile est d??tect??e, l'unit?? de secours initialise la carte de contr??le et active la configuration en cours sur toutes les autres unit??s de la pile. Cette unit?? de secours g??re une copie synchronis??e de la configuration en cours pour la pile. L'unit?? de secours de la pile est s??lectionn??e automatiquement, mais vous pouvez utiliser l'interface CLI pour s??lectionner un autre membre de la pile comme unit?? de secours. Pour obtenir plus d'informations, reportez-vous au User's Configuration Guide (Guide de configuration) ou au CLI Reference Guide (Guide de r??f??rence CLI).
D??marrage et configuration du commutateur N20xx
L'organigramme ci-dessous pr??sente un aper??u des ??tapes que vous devez effectuer lors de la configuration initiale apr??s avoir d??ball?? et mont?? le commutateur.
Figure 1-9. Organigramme des proc??dures d'installation et de configuration
Connexion de l'alimentation et de la console
Mise sous tension

Connexion du commutateur N20xx ?? un terminal
Une fois toutes les connexions externes effectu??es, connectez un terminal ?? un commutateur pour configurer ce dernier.
REMARQUE : avant de continuer, lisez les notes de publication concernant ce produit. Vous pouvez les t??l??charger ?? partir du site du Support Dell ?? l'adresse dell.com/support/manuals.
REMARQUE : nous vous recommandons de vous procurer la version la plus r??cente de la documentation utilisateur disponible sur le site du Support Dell ?? l'adresse http://support.dell.com/manuals.
Pour pouvoir g??rer et configurer le commutateur ?? partir d'une console s??rie, utilisez le port de console situ?? ?? l'avant du commutateur (voir la Figure 1-1 ?? la page 68) pour le relier ?? un terminal VT100 ou ?? un syst??me ex??cutant un logiciel d'??mulation de terminal VT100. Le port de console est impl??ment?? en tant que connecteur d'??quipement de terminal de donn??es (DTE).
Pour utiliser le port de console, vous devez disposer de l'??quipement suivant :
???un terminal compatible VT100, ou un ordinateur ??quip?? d'un port s??rie et ex??cutant un logiciel d'??mulation de terminal VT100, par exemple, Microsoft HyperTerminal ;
???un c??ble s??rie (fourni) dot?? d'un connecteur RJ-45 pour le port de console et d'un connecteur DB-9 pour le terminal.
Pour connecter un terminal au port de console du commutateur, proc??dez comme suit :
1Reliez le connecteur DB-9 du c??ble s??rie au terminal ou ?? l'ordinateur ex??cutant le logiciel d'??mulation de terminal VT100.
2Configurez le logiciel d'??mulation de terminal comme suit :
a S??lectionnez le port s??rie appropri?? (par exemple COM 1) pour vous connecter ?? la console.
b R??glez le d??bit de donn??es sur 9 600 bauds.
c Configurez le format de donn??es sur 8 bits de donn??es, 1 bit d'arr??t et aucune parit??.
d D??finissez le contr??le de flux sur aucun.
e R??glez le mode d'??mulation du terminal sur VT100.
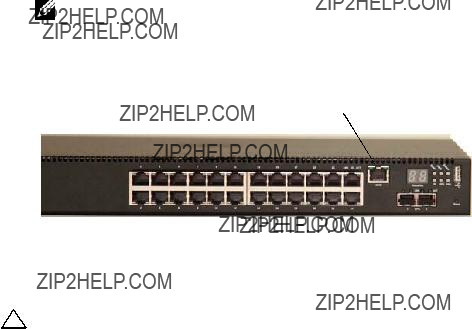
fChoisissez les touches de terminal pour les touches de fonction, de direction et Ctrl. V??rifiez que le param??trage correspond bien ?? Touches de terminal (et non ?? Touches Microsoft Windows).
3Branchez le connecteur RJ-45 du c??ble directement au commutateur du port de console. Le port de console Dell Networking est situ?? sur le c??t?? droit du panneau avant et est d??sign?? par le symbole |O|O|, comme indiqu?? sur la Figure 1-10 ?? la page 84.
REMARQUE : L'acc??s de la console de s??rie au ma??tre de la pile est possible depuis n'importe quel port de s??rie via le CLI local. Une seule session de console de s??rie est prise en charge ?? la fois.
Figure 1-10. Panneau avant N2024P avec port de console
Port de console
Connexion d'un commutateur N20xx ?? une source d'alimentation
PR??CAUTION : Prenez connaissance des consignes de s??curit?? figurant dans le manuel Safety and Regulatory Information (Informations sur la s??curit?? et les r??glementations), ainsi que des informations concernant la s??curit?? des autres appareils connect??s au commutateur.
Tous les mod??les N20xx sont ??quip??s d'un bloc d'alimentation interne. Les prises d'alimentation se trouvent sur le panneau arri??re.
Connexion des c??bles d'alimentation en CA et en CC
1Assurez-vous que le port de console du commutateur est connect?? ?? un terminal VT100 ou ?? un ??mulateur de terminal VT100 via le c??ble RJ-45 vers le c??ble DB-9 femelle.
2Branchez un c??ble d'alimentation standard de 1,5 m (5 pieds) avec mise ?? la terre ?? la prise CA principale, situ??e sur le panneau arri??re (voir la Figure 1-11 ?? la page 85).
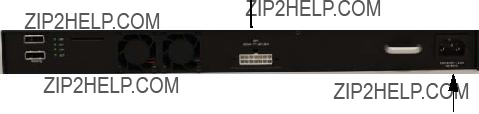
3Branchez le c??ble d'alimentation ?? une prise CA avec mise ?? la terre.
4Si vous utilisez un bloc d'alimentation en CC redondant ou externe (Dell Networking RPS720 ou Dell Networking MPS1000), branchez le c??ble d'alimentation en CC sur la prise correspondante, situ?? sur le panneau arri??re de l'appareil. Sur la Figure 1-11 ?? la page 85, le bloc d'alimentation redondant se trouve au milieu et est nomm?? RPS.
Figure 1-11. Connexion des c??bles d'alimentation en CA et en CC ?? un commutateur N2048
Vers une source d'alimentation en CC (facultatif)
Vers une source d'alimentation en CA
D??marrage du commutateur N20xx
?? la mise sous tension, lorsque le terminal local est d??j?? connect??, le commutateur effectue un auto-test de d??marrage. Ce test s'ex??cute ?? chaque initialisation du commutateur ; il passe les composants mat??riels en revue pour v??rifier que le commutateur est totalement op??rationnel avant de terminer le d??marrage. Si le test d??tecte un probl??me critique, le processus s'arr??te. Si l'auto-test de d??marrage se d??roule sans incident, le micrologiciel valide est charg?? dans la RAM. Les messages de l'auto-test de d??marrage sont affich??s sur le terminal et indiquent le succ??s ou l'??chec du test. Le processus de d??marrage dure environ 60 secondes.
Vous pouvez faire appel au menu Boot (Amor??age), ?? la fin de la premi??re partie de l'auto-test de d??marrage. Depuis ce menu, vous pouvez effectuer des t??ches de configuration, telles que r??tablir le syst??me sur les param??tres d'usine par d??faut, activer l'image de sauvegarde ou r??cup??rer un mot de passe. Pour obtenir plus d'informations sur les fonctions du menu Boot (Amor??age), reportez-vous au CLI Reference Guide (Guide de r??f??rence CLI).

R??alisation de la configuration initiale N20xx
La proc??dure de configuration initiale repose sur les conditions suivantes :
???Le commutateur Dell Networking n'a jamais ??t?? configur?? avant.
???Le commutateur Dell Networking a d??marr?? correctement.
???La connexion ?? la console est ??tablie et l'invite de l'Assistant Dell Easy Setup est affich??e sur l'??cran d'un terminal VT100 ou ??quivalent.
La configuration initiale du commutateur est effectu??e via le port de console. Une fois cette premi??re ??tape effectu??e, le commutateur peut ??tre g??r?? soit ?? partir de la console connect??e, soit ?? distance, via une interface d??finie lors de la configuration initiale.
REMARQUE : Le commutateur ne poss??de pas de nom d'utilisateur, de mot de passe, ni d'adresse IP par d??faut.
Avant de proc??der ?? la configuration initiale du commutateur, demandez les informations suivantes ?? votre administrateur r??seau :
???l'adresse IP ?? affecter ?? l'interface de gestion ;
???le masque de sous-r??seau IP ;
???l'adresse IP correspondant ?? la passerelle par d??faut de l'interface de gestion.
Ces param??tres sont n??cessaires pour permettre la gestion ?? distance du commutateur via Telnet (client Telnet) ou HTTP (navigateur Web).
Activation de la gestion ?? distance
Sur les commutateurs N20xx, vous pouvez utiliser n'importe quels ports
de commutateur du panneau avant pour une gestion intrabande. Par d??faut, tous les ports intrabande sont membres du VLAN 1.
L'Assistant Dell Easy Setup inclut des invites afin de configurer les informations du r??seau de l'interface VLAN 1 sur le commutateur N20xx. Vous pouvez assigner une adresse IP statique et un masque de sous-r??seau, ou activer le protocole DHCP et permettre ?? un serveur r??seau DHCP d'assigner les informations.
Reportez-vous au CLI Reference Guide (Guide de r??f??rence CLI) pour obtenir des informations sur les commandes CLI que vous utilisez pour configurer les informations r??seau.

Proc??dure de configuration initiale
Vous pouvez effectuer la configuration initiale ?? l'aide de l'interface CLI ou de l'Assistant Dell Easy Setup. Cet assistant d??marre automatiquement si le fichier de configuration du commutateur est vide. Vous pouvez quitter l'assistant ?? tout moment en appuyant sur [ctrl+z]. Dans ce cas, tous les param??tres de configuration sp??cifi??s sont supprim??s et le commutateur utilise les valeurs par d??faut.
REMARQUE : Si vous n'ex??cutez pas l'Assistant Dell Easy Setup ou ne r??pondez pas ?? l'invite de l'Assistant Easy Setup dans les 60 secondes, le commutateur entre en mode CLI. Vous pouvez r??initialiser le commutateur avec une configuration de d??marrage vide afin d'ex??cuter ?? nouveau l'Assistant Dell Easy Setup.
Pour plus d'informations sur la configuration initiale ?? l'aide de l'interface CLI, reportez-vous au CLI Reference Guide (Guide de r??f??rence CLI). Ce Getting Started Guide (Guide de mise en route)pr??sente la mani??re d'utiliser l'Assistant Dell Easy Setup pour effectuer le configuration initiale du commutateur. L'assistant effectue les op??rations de configuration suivantes sur le commutateur :
???Il met en place le compte utilisateur privil??gi?? initial et lui attribue un mot de passe valide. Un compte utilisateur privil??gi?? est configur?? par l'assistant lors de l'installation.
???Il configure l'ouverture de session de l'interface CLI et l'acc??s HTTP de sorte qu'ils utilisent uniquement l'authentification locale.
???Il configure l'adresse IP pour l'interface de routage VLAN 1, o?? tous les ports intrabandes y sont membres.
???Il d??finit la cha??ne de communaut?? SNMP de sorte que le gestionnaire SNMP l'utilise sur une adresse IP donn??e. Vous pouvez ignorer cette ??tape si le commutateur n'est pas g??r?? via SNMP.
???Il vous permet d'indiquer l'adresse IP du syst??me de gestion du r??seau ou d'autoriser l'acc??s aux fonctions de gestion ?? partir de toutes les adresses IP.
???Il configure l'adresse IP de la passerelle par d??faut pour l'interface VLAN 1.

Exemple de session
Cette section d??crit une session Assistant Dell Easy Setup. Les valeurs suivantes sont utilis??es dans l'exemple :
???La cha??ne de communaut?? SNMP ?? utiliser est public.
???L'adresse IP du syst??me de gestion du r??seau (NMS) est 10.1.2.100.
???Le nom d'utilisateur est admin et le mot de passe est admin123.
???L'adresse IP pour l'interface de routage VLAN 1 est 10.1.1.200 ; le masque de sous-r??seau est 255.255.255.0.
???La passerelle par d??faut est 10.1.1.1.
L'assistant d??finit les valeurs initiales comme indiqu?? ci-dessus. Une fois l'ex??cution de l'assistant termin??e, le commutateur est configur?? de la fa??on suivante :
???SNMPv2 est activ?? et la cha??ne de communaut?? est d??finie comme indiqu?? ci-dessus. SNMPv3 est d??sactiv?? par d??faut.
???Le compte utilisateur admin est configur?? comme indiqu?? ci-dessus.
???Un syst??me de gestion du r??seau est configur??. ?? partir de la station de gestion, vous pouvez acc??der aux interfaces SNMP, HTTP et CLI.
Vous pouvez ??galement d??cider d'autoriser toutes les adresses IP ?? acc??der ?? ces interfaces de gestion en s??lectionnant l'adresse IP 0.0.0.0.
???Une adresse IP est configur??e pour l'interface de routage du VLAN 1.
???Une adresse de passerelle par d??faut est configur??e.
REMARQUE : Dans l'exemple ci-apr??s, les options que l'utilisateur peut s??lectionner ou les valeurs par d??faut sont pr??sent??es entre crochets [ ]. Si vous appuyez sur <Entr??e> sans avoir d??fini d'options, la valeur par d??faut est accept??e. Le texte de l'aide se trouve entre parenth??ses.
Exemple console de l'Assistant Dell Easy Setup
L'exemple suivant montre une suite d'invites et de r??ponses affich??es dans l'Assistant Dell Easy Setup. Les valeurs utilis??es sont indiqu??es ci-dessus.
Au d??marrage du commutateur (apr??s l'auto-test de d??marrage), la bo??te de dialogue suivante s'affiche :
Unit 1 - Waiting to select management unit)> (Unit?? 1 ??? En attente de s??lection d'une unit?? de gestion)
Applying Global configuration, please wait ...
(Application de la configuration globale, veuillez patienter???)
Welcome to Dell Easy Setup Wizard (Bienvenue dans l'Assistant Dell Easy Setup)
The Setup Wizard guides you through the initial switch configuration, and gets you up and running as quickly as possible. (L'Assistant de configuration vous guide au cours de la configuration initiale du commutateur et vous permet une mise en route aussi rapide que possible.) You can skip the setup wizard, and enter CLI mode to manually configure the switch. (Vous pouvez passer cet assistant et entrer en mode CLI afin de configurer manuellement le commutateur.) You must respond to the next question to run the setup wizard within 60 seconds, otherwise the system will continue with normal operation using the default system configuration. (Vous devez r??pondre ?? la question suivante dans les 60 secondes pour ex??cuter l'Assistant de configuration, sinon le syst??me va utiliser la configuration syst??me par d??faut et poursuivre son fonctionnement normal.) Note: You can exit the setup wizard at any point by entering [ctrl+z]. (Remarque : vous pouvez quitter l'assistant de configuration ?? tout moment en appuyant sur [ctrl+z].)
Would you like to run the setup wizard (you must answer this question within 60 seconds)? (Souhaitez- vous ex??cuter l'assistant de configuration [vous devez r??pondre ?? la question dans les 60 secondes] ?) [Y/N] y ([O/N] o)
Step 1: (??tape 6 :)
The system is not set up for SNMP management by default. (Le syst??me n'est pas configur?? par d??faut pour la gestion SNMP.) To manage the switch using SNMP (required for Dell Network Manager) you can (Pour g??rer le commutateur ?? l'aide de SNMP (requis pour Dell Network Manager) vous pouvez)
Set up the initial SNMP version 2 account now. (configurer le compte initial SNMP version 2 maintenant.)
documentation). [Pour obtenir plus d'informations sur le param??trage de comptes utilisant la version 1 ou 3, reportez-vous ?? la documentation d'utilisation.]
Would you like to set up the SNMP management interface now? (Souhaitez-vous configurer l'interface de gestion SNMP imm??diatement ?) [Y/N] y ([O/N] o)
To set up the SNMP management account you must specify the management system IP address and the "community string" or password that the particular management system uses to access the switch. (Pour configurer le compte de gestion SNMP, vous devez indiquer l'adresse IP du syst??me de gestion ainsi que la ?? cha??ne de communaut?? ?? ou le mot de passe que le syst??me de gestion utilise pour acc??der au commutateur.) The wizard automatically assigns the highest access level [Privilege Level 15] to this account. (L'assistant assigne automatiquement le niveau d'acc??s le plus ??lev?? [niveau de privil??ge 15] ?? ce compte.)

You can use Dell Network Manager or other management interfaces to change this setting, and to add additional management system later. (Vous pouvez utiliser Dell Network Manager ou d'autres interfaces pour modifier ce param??tre et pour ajouter des informations syst??me de gestion suppl??mentaires ult??rieurement.) For more information on adding management systems, see the user documentation. (Pour obtenir plus d'informations sur l'ajout de syst??mes de gestion, reportez-vous ?? la documentation utilisateur.)
To add a management station: (Pour ajouter une station de gestion :)
Please enter the SNMP community string to be used. (Veuillez entrer la cha??ne de communaut?? SNMP ?? utiliser.) [public]: public
REMARQUE : S'il est configur??, le niveau d'acc??s par d??faut est d??fini sur l'acc??s maximum disponible pour l'interface de gestion SNMP. Initialement, seul SNMPv2 est activ??. SNMPv3 est d??sactiv?? jusqu'?? ce que vous l'activiez de mani??re explicite en param??trant l'ID du moteur, la vue, etc.
Please enter the IP address of the Management System (A.B.C.D) or wildcard (0.0.0.0) to manage from any Management Station. (Veuillez entrer l'adresse IP du syst??me de gestion (A.B.C.D) ou un masque (0.0.0.0) pour g??rer le syst??me depuis n'importe quelle station de gestion.) [0.0.0.0]: 10.1.2.100
Step 2: (??tape 2 :)
Now we need to set up your initial privilege (Level 15) user account. (?? pr??sent il faut configurer votre compte utilisateur privil??ge initial [niveau 15].) This account is used to login to the CLI and Web interface. (Ce compte est utilis?? pour se connecter ?? l'interface CLI et ?? l'interface Web.) You may set up other accounts and change privilege levels later. (Vous pouvez configurer d'autres comptes et modifier les niveaux de privil??ge ult??rieurement.)
For more information on setting up user accounts and changing privilege levels, see the user documentation. (Pour obtenir plus d'informations sur la configuration de comptes utilisateur et la modification des niveaux de privil??ge, reportez-vous ?? la documentation utilisateur.)
To set up a user account: (Pour configurer un compte utilisateur :)
Please enter the user name. (Veuillez entrer votre nom d'utilisateur.) [root]:admin
Please enter the user password: (Veuillez entrer votre mot de passe :) ********
Please reenter the user password: (Veuillez confirmer votre mot de passe :) ********
Step 3: (??tape 3 :)
Next, an IP address is set up on the VLAN 1 routing interface. (Ensuite, une adresse IP est configur??e pour l'interface de routage VLAN 1.)
You can use the IP address to access the CLI, Web interface, or SNMP interface of the switch. (Vous pouvez utiliser cette adresse IP pour acc??der ?? l'interface CLI, ?? l'interface Web ou ?? l'interface SNMP du commutateur.)
To access the switch through any Management Interface you can (Pour acc??der au commutateur via n'importe quelle interface de gestion, vous pouvez)
Set up the IP address for the Management Interface. (configurer l'adresse IP de l'interface de gestion.)
Set up the default gateway if IP address is manually configured on the routing interface. (configurer la passerelle par d??faut si l'adresse IP est configur??e manuellement sur l'interface de routage.)
Step 4: (??tape 4 :)
Would you like to set up the VLAN1 routing interface now? (Souhaitez-vous configurer l'interface de routage VLAN1 maintenant ?) [Y/N] y ([O/N] o)
Please enter the IP address of the device (A.B.C.D) or enter "DHCP" (without the quotes) to automatically request an IP address from the network DHCP server: (Veuillez entrer l'adresse IP du p??riph??rique (A.B.C.D) ou entrer ?? DHCP ?? (sans les guillemets) pour demander automatiquement une adresse IP depuis le serveur r??seau DHCP :) 10.1.1.200
Please enter the IP subnet mask (A.B.C.D or /nn): (Veuillez entrer le masque de sous-r??seau [A.B.C.D ou /nn] :) 255.255.255.0
Step 5: (??tape 5 :)
Finally, set up the default gateway. (Enfin, configurez la passerelle par d??faut.) Please enter the IP address of the gateway from which this network is reachable. (Veuillez entrer l'adresse IP de la passerelle ?? partir de laquelle ce r??seau est accessible.) [0.0.0.0]: 10.1.1.1
This is the configuration information that has been collected: (Voici les informations de configuration collect??es :)
SNMP Interface = ???????public???????@10.1.2.100 (Interface SNMP)
User Account setup = admin (Configuration compte utilisateur)
Password = ********** (Mot de passe)
VLAN1 Router Interface IP = 10.1.1.200 255.255.255.0 (Adresse IP de l'interface de routage VLAN1)
Default Gateway = 10.1.1.1 (Passerelle par d??faut)
Step 6: (??tape 6 :)
If the information is correct, please enter (Y) to save the configuration and copy the settings to the start-up configuration file. (Si les informations sont correctes, veuillez saisir (Y) pour enregistrer la configuration et copier les param??tres dans le fichier de configuration de d??marrage.) If the information is incorrect, enter (N) to discard the configuration and restart the wizard: (Si les informations sont incorrectes, entrez (N) pour annuler la configuration et red??marrer l'assistant :) [Y/N] y ([O/N] o)
Thank you for using the Dell Easy Setup Wizard. (Merci d'avoir utilis?? l'Assistant Dell Easy Setup.) You will now enter CLI mode. (Vous allez entrer maintenant en mode CLI.)
Applying Interface configuration, please wait...
(Application de la configuration d'interface, veuillez patienter???)
Prochaines ??tapes
Une fois la configuration initiale d??crite dans cette section termin??e, vous pouvez connecter n'importe quel port situ?? sur le panneau avant du commutateur ?? votre r??seau de production pour une gestion ?? distance intrabande.
Si vous avez sp??cifi?? DHCP pour l'adresse IP de l'interface de gestion VLAN 1, l'interface va obtenir son adresse IP ?? partir d'un serveur DHCP sur le r??seau. Pour d??tecter une adresse IP affect??e de mani??re dynamique, utilisez la connexion du port de console et entrez la commande suivante :
???Pour l'interface de routage VLAN 1, tapez show ip interface (afficher l'interface IP).
Pour acc??der ?? l'interface Dell OpenManage Switch Administrator, entrez l'adresse IP de l'interface de gestion VLAN 1 dans le champ d'adresse d'un navigateur Internet. Pour un acc??s de gestion ?? distance ?? l'interface CLI, entrez l'adresse IP de l'interface de gestion VLAN 1 dans un client Telnet ou SSH. Sinon, vous pouvez continuer d'utiliser le port de console pour un acc??s local via l'interface CLI au commutateur.
Votre commutateur N20xx prend en charge les fonctions de commutation de base telles que les protocoles VLAN et STP. Utilisez l'interface de gestion Web ou CLI pour configurer les fonctions requises par votre r??seau. Pour obtenir des informations sur la mani??re de configurer les fonctions du commutateur, reportez-vous au User's Configuration Guide (Guide de configuration) ou au CLI Reference Guide (Guide de r??f??rence CLI) disponible sur le site de Support ?? l'adresse : dell.com/support/manuals.
Pr??sentation de la s??rie N30xx
Les commutateurs N30xx Dell sont des commutateurs Ethernet Gigabit de couches 2 et 3 empilables et comprennent les mod??les suivants :
???Dell N3024
???Dell N3024P
???Dell N3048
???Dell N3048P
???Dell N3024F
Pr??sentation du mat??riel de la s??rie N30xx
Cette section contient des informations sur les caract??ristiques du dispositif et sur les configurations mat??rielles des modules des commutateurs de la s??rie N30xx.
Tous les mod??les N30xx sont des commutateurs 1U montables sur rack avec les dimensions suivantes :
???434,0 x 407,0 x 43,5 mm (Largeur x Profondeur x Hauteur)
???17,1 x 16,0 x 4,32 cm (Largeur x Profondeur x Hauteur)
N30xxPanneau avant de la s??rie
Les images suivantes pr??sentent les panneaux avant des mod??les de commutateurs de la s??rie N30xx.
En plus des ports de commutateur, le panneau avant de chaque mod??le de la s??rie N30xx comprend les ports suivants :
???Port de console
???Port USB
???Port de gestion hors bande (OOB)
Figure 1-12. S??rie N3024F avec 24 ports 10/100/1000 BASE-T (Panneau avant)
Le commutateur de s??rie N30xx comprend deux ports combo. Les ports combo sont des ports SFP pour le commutateur de s??rie N30xx et des ports 1000BaseT pour le commutateur de s??rie N3024F.
Figure 1-13. S??rie N3048 avec 48 ports 10/100/1000 BASE-T (Panneau avant)
Ports
SFP+
Les ports suppl??mentaires se trouvent sur le panneau avant du c??t?? droit, comme illustr?? sur la Figure 1-13 et la Figure 1-14 ?? la page 98.
Figure 1-14. Ports suppl??mentaires pr??sents sur les commutateurs N30xx
Port de console Port de gestion hors bande
Port USB
Bouton Reset (R??initialisation)
Le panneau avant N30xx comporte ??galement un bouton de r??initialisation (trou d'??pingle) et plusieurs voyants d'??tat. Voir la Figure 1-14.
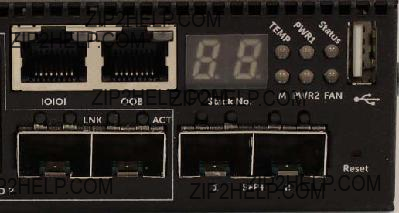
Figure 1-15. N30xx Gros plan
Le panneau avant N30xx/N3024F/N30xxP, affich?? ?? la Figure 1-15, est ??quip?? de voyant d'??tat pour pr??venir en cas de temp??rature excessive, de l'??tat du bloc d'alimentation interne 1 et de l'??tat du commutateur sur la premi??re rang??e. La deuxi??me rang??e de voyants d'??tat affiche l'??tat du ma??tre de la pile, du bloc d'alimentation interne 2 et l'alarme du ventilateur.
Ports de commutateur
Le panneau avant N3024/N3024P est ??quip?? de 24 ports Gigabit Ethernet (10/100/1000BASE-T) RJ-45 qui prennent en charge la n??gociation automatique de la vitesse, le contr??le du d??bit et le mode duplex. Les mod??les N3024/N3024P prennent en charge deux ports SFP+ 10G. Les ??metteurs-r??cepteurs SFP+ approuv??s par Dell sont vendus s??par??ment.
Le panneau avant N3024F est ??quip?? de 24 ports Gigabit Ethernet SFP 100BASE-FX/1000BASE-X et 2 ports combo 1000BASE-T. Les ??metteurs- r??cepteurs SFP approuv??s par Dell sont vendus s??par??ment.
Le panneau avant N3048/N3048P est ??quip?? de 48 ports Gigabit Ethernet (10BASE-T, 100BASE-TX, 1000BASE-T) RJ-45 qui prennent en charge la n??gociation automatique de la vitesse, le contr??le du d??bit et le mode duplex. Les mod??les N3048/N3048P prennent en charge deux ports SFP+ 10G.
Les ??metteurs-r??cepteurs SFP+ approuv??s par Dell sont vendus s??par??ment.
Les ports de commutateurs du panneau avant disposent des caract??ristiques suivantes :
???Le commutateur d??tecte automatiquement le type de c??ble branch?? sur les ports RJ-45 (directs ou crois??s) et choisit automatiquement la configuration MDI ou MDIX pour correspondre ?? l'autre extr??mit??.
???Les ports SFP prennent en charge les ??metteurs-r??cepteurs SFP+ approuv??s par Dell.
???Les ports RJ-45 prennent en charge les vitesses (10/100/1 000 Mpbs) du mode duplex int??gral pour un c??ble UTP standard de cat??gorie 5.
???Les ports SFP+ prennent en charge les ??metteurs-r??cepteurs SFP+ et les ??metteurs-r??cepteurs SFP+ avec c??ble de cuivre twinax fonctionnant ?? 1G.
???Les ports du panneau avant N3024P/N3048P prennent en charge la fonction PoE (15,4 W) et PoE+ (30 W).
Port de console
Le port de console offre des capacit??s de communication de s??rie qui permettent d'effectuer des communications ?? l'aide du protocole RS-232. Ce port de s??rie offre une connexion directe au commutateur et vous permet d'acc??der ?? l'interface CLI depuis un terminal de console connect?? au port via le c??ble s??rie fourni (RJ-45 YOST vers des connecteurs DB-9 femelles).
Le port de console est configurable s??par??ment et peut ??tre ex??cut?? comme lien asynchrone avec un d??bit compris entre 1 200 bauds et 115 200 bauds.
Le CLI Dell ne prend en charge que le changement de vitesse.
Les valeurs par d??faut : d??bit de 9 600 bauds, 8 bits de donn??es, pas de parit??, 1 bit d'arr??t, aucun contr??le de flux.
Port de gestion hors bande
Le port de gestion hors bande (OOB) est un port Ethernet 10/100/1000 BASE-T d??di?? ?? la gestion de commutateur distant. Le trafic sur ce port est s??par?? du trafic r??seau op??rationnel des ports de commutateur et ne peut ??tre bascul?? ou achemin?? vers ou depuis le r??seau op??rationnel.
Port USB
Le port USB femelle de type A prend en charge un lecteur ?? m??moire flash compatible USB 2.0. Le commutateur Dell Networking peut lire ou ??crire des donn??es sur un lecteur flash format?? en FAT-32. Vous pouvez utiliser un lecteur USB flash pour transf??rer des fichiers ou des images de configuration entre le lecteur USB flash et le commutateur. Vous pouvez ??galement utiliser le lecteur flash USB pour d??placer et copier les fichiers et les images de configuration d'un commutateur vers les autres commutateurs du r??seau.
Le port USB ne prend en charge aucun autre type de p??riph??rique USB.
Bouton Reset (R??initialisation)
Le bouton de r??initialisation est accessible par l'interm??diaire du trou d'??pingle et vous permet d'effectuer une r??initialisation ?? froid du commutateur. Pour utiliser ce bouton, ins??rez un trombone d??pli?? ou un outil similaire dans le trou d'??pingle. Lorsque le commutateur a termin?? le processus de red??marrage apr??s la r??initialisation, il reprend son fonctionnement avec la derni??re configuration enregistr??e. Toute modification apport??e ?? la configuration en cours qui n'a pas ??t?? enregistr??e dans la configuration de d??marrage avant la r??initialisation, sera perdue.
Voyants des ports et du syst??me
Le panneau avant est ??quip?? de voyants indiquant l'??tat des liaisons des ports, des blocs d'alimentation, des ventilateurs, de l'empilement et de l'ensemble du syst??me.
Pour obtenir des informations sur l'??tat indiqu?? par les voyants, reportez-vous au User's Configuration Guide (Guide de configuration).
Voyant ma??tre de la pile et affichage du num??ro de la pile
Lorsque qu'un commutateur de la pile est l'unit?? ma??tre, le voyant ma??tre de la pile, d??sign?? par M, est en vert fixe. Si le voyant M est ??teint, le membre de la pile n'est pas l'unit?? ma??tre. Le panneau du num??ro de la pile affiche le num??ro de l'unit?? du membre de la pile. Si un commutateur ne fait pas partie d'une pile (en d'autres termes, il s'agit d'un pile d'un commutateur), le voyant M est allum?? et le num??ro de l'unit?? de la pile est affich??.
Panneau arri??re de la s??rie N30xx
Les images suivantes pr??sentent les panneaux arri??re des commutateurs N30xx.
Figure 1-16. Panneau arri??re N30xx
Ouvertures
Logements 10G double port pour SFP+, 10G BASE-T ou modules d'empilage/10 GbE
Figure 1-17. Panneau arri??re N3024P/N3048P
Figure 1-18. Ventilateurs et ports d'empilage mini-SAS N3048
Ports d'empilage mini-SAS
Prise d'alimentation en CA
Le terme mini-SAS reprend les connexions du c??ble du port d'empilage pr??sent?? ?? la Figure 1-18. Reportez-vous ?? Empilage de plusieurs commutateurs N30xx pour obtenir des information sur l'utilisation des ports mini-SAS pour connecter des commutateurs.

Logements d'extension pour modules plug-in
Un logement d'extension est situ?? ?? l'arri??re du mod??les N30xx et peut prendre en charge les modules suivants :
???Module 10G BASE-T
???Module SFP+
Chaque module plug-in poss??de deux ports. Les modules plug-in permettent ??galement un remplacement ?? chaud, ainsi vous n'avez pas besoin de red??marrer le commutateur apr??s avoir install?? un nouveau module.
Blocs d'alimentation
N3024, N3024F et N3048
Les commutateurs N3024, N3024F et N3048 prennent en charge deux blocs d'alimentation FRU (Field Replaceable Unit) de 200 Watts qui offrent une redondance totale au commutateur. Les commutateurs N3024, N3024F et N3048 proposent la fonction V-lock pour les utilisateurs ayant le besoin d'??liminer les d??connexions accidentelles. Le r??ceptacle V-lock du bloc d'alimentation (PSU) permet l'utilisation d'un cordon d'alimentation ??quip?? de la fonction V-lock pour cr??er une connexion verrouill??e compl??tement s??curis??e.
N3024P et N3048P
Les commutateurs N3024P et N3048P Dell Networking prennent en charge un ou deux blocs d'alimentation FRU de 1 100 Watts. Le commutateur N3024P est fourni avec un bloc d'alimentation de 715 Watts (configuration par d??faut) et prend en charge un ou deux blocs de 1 100 Watts. Un bloc d'alimentation de 1 100 Watts correspond ?? la configuration par d??faut
du commutateur N3048P.
Un bloc d'alimentation de 1 110 Watts peut alimenter jusqu'?? 24 p??riph??riques PoE ?? une alimentation PoE+ maximale. Des commutateurs doublement ??quip??s peuvent alimenter jusqu'??
48 p??riph??riques PoE ?? une alimentation PoE+ maximale (1 800 W), et propose ??galement une redondance du bloc d'alimentation.
REMARQUE : L'alimentation PoE est allou??e de mani??re dynamique. Tous les ports n'ont pas besoin de l'alimentation PoE+ maximale.
PR??CAUTION : Retirez le c??ble d'alimentation des blocs d'alimentation avant de retirer le bloc d'alimentation lui-m??me. L'alimentation ne doit pas ??tre connect??e avant l'insertion du bloc dans le ch??ssis.
Syst??me de ventilation
Deux ventilateurs refroidissent les commutateurs N30xx. De plus, les commutateurs N30xx sont ??quip??s d'un ventilateur pour chaque bloc d'alimentation interne. Le ventilateur N30xx est un FRU.
R??capitulatif des mod??les N30xx
Tableau 1-2. R??capitulatif des mod??les N30xx
Tableau 1-2. R??capitulatif des mod??les N30xx
bloc d'alimentation redondant enfichable/48x port PoE+/12 ports UPoE/1x module de ventilateur amovible
Installation de la s??rie N30xx
Pr??paration du site
Les commutateurs de la s??rie N30xx peuvent ??tre mont??s dans un rack standard de 19 pouces (48,26 cm) ou pos??s sur une surface plane.
V??rifiez que l'emplacement de l'installation choisi r??pond aux conditions suivantes :
???Alimentation : le commutateur doit ??tre install?? ?? proximit?? d'une prise ??lectrique facilement accessible de 100-240 VCA ?? 50-60 Hz.
???D??gagement : l'avant et l'arri??re de l'unit?? doivent ??tre suffisamment d??gag??s pour rester accessibles ?? un op??rateur. Pr??voyez un d??gagement pour le c??blage, les connexions ??lectriques et la ventilation.
???C??blage : les c??bles doivent ??tre achemin??s de fa??on ?? ??viter les sources de bruit ??lectrique, telles que les ??metteurs radio??lectriques, les amplificateurs de diffusion, les lignes ??lectriques et les luminaires pour lampes fluorescentes.
???Temp??rature ambiante : la temp??rature ambiante du commutateur doit ??tre comprise entre 0 et 45?? C (32 et 113?? F), avec une humidit?? relative maximale de 95 % sans condensation.
REMARQUE : Au-dessus de 900 m??tres (2 955 pieds), r??duisez la temp??rature maximale d'un degr?? Celsius (1,8??F) par 300 m??tres (985 pieds).
???Humidit?? relative : l'humidit?? relative de fonctionnement est comprise entre 8 % et 85 % (sans condensation) avec une augmentation maximale de 10 % par heure.
D??ballage du commutateur N30xx
Contenu du carton
Lors du d??ballage de chaque commutateur, v??rifiez que le carton contient les ??l??ments suivants :
???Un commutateur Dell Networking
???Un c??ble RJ-45 vers un connecteur DB-9 femelle
???Un kit de montage ReadyRail pour l'installation en rack, deux supports de fixation, boulons et ??crous ?? cage
???Quatre patins adh??sifs en caoutchouc pour l'installation du commutateur autonome
???Un bloc d'alimentation
??tapes du d??ballage
REMARQUE : Avant de d??baller le commutateur, examinez le carton et signalez imm??diatement tout dommage apparent.
1Posez le carton sur une surface plane et propre et coupez toutes les sangles d'attache.
2Ouvrez le carton ou retirez le couvercle.
3Retirez avec pr??caution le commutateur de son carton et posez-le sur une surface propre et stable.
4Retirez tout le mat??riel d'emballage.
5V??rifiez que le produit et ses accessoires ne sont pas endommag??s.

Montage en rack d'un commutateur N30xx
Vous pouvez placez le commutateur sur l'??tag??re du rack ou le fixer directement dans un rack de 19 pouces de large conforme EIA-310-E (quatre colonnes, deux colonnes ou m??thodes filet??es). Le syst??me ReadyRail de Dell est con??u pour un rack avant 1U et une installation ?? deux colonnes.
Le syst??me ReadyRail comprend deux ensembles de rails s??par??s.
AVERTISSEMENT : Il s'agit d'une r??f??rence condens??e. Veuillez lire les consignes de s??curit?? contenues dans le livret S??curit??, environnement et r??glementations avant de commencer.
REMARQUE : Les illustrations de ce document ne repr??sentent pas un commutateur sp??cifique.
S??curit?? relative au montage d'un rack
???Chargement dans un rack ??? La surcharge ou un chargement instable des racks peut entra??ner un probl??me dans l'??tag??re ou le rack, endommageant l'??quipement et pouvant provoquer des blessures. Il faut stabiliser les racks dans un endroit d??finitif avant le d??but du chargement. La fixation des composants commence en bas du rack, puis poursuivez vers le haut.
Ne d??passez pas le chargement autoris?? du rack.
???Alimentation ??? Branchez-le uniquement ?? une source d'alimentation sp??cifi??e sur l'unit??. Lorsque de multiples composants ??lectriques sont install??s dans un rack, v??rifiez que la puissance totale des composants ne d??passent pas les capacit??s du circuit. Une surcharge ??lectrique ou une extension des cordons peuvent entra??ner un incendie ou des ??lectrocutions.
???Temp??rature ambiante ??lev??e ??? En cas d'installation dans un ensemble rack ferm??, la temp??rature de fonctionnement de l'environnement du rack peut ??tre sup??rieure ?? la temp??rature ambiante de la pi??ce. Veillez ?? ce que le commutateur ne d??passe pas une temp??rature ambiante maximale de 45 degr??s C.
???D??bit d'air r??duit ??? Installez l'??quipement dans un rack afin que le d??bit d'air requis pour un fonctionnement s??curis?? de l'??quipement ne soit pas compromis.
???Mise ?? la terre fiable ??? Maintien de la mise ?? la terre de l'??quipement mont?? en rack. Veillez ?? fournir des branchements autres que des branchements directs au circuit de d??rivation, par exemple : utilisation de multiprises.
???Le produit ne doit pas ??tre mont?? de sorte que le panneau arri??re se trouve vers le bas.
Installation du syst??me ReadyRail de Dell
Le syst??me de montage en rack ReadyRail est con??u pour configurer facilement le rack lors de l'installation du commutateur. Le syst??me ReadyRail peut ??tre install?? ?? l'aide d'une m??thode sans outil 1U ou d'une des trois m??thodes avec outils 1U possible (encastrement de deux colonnes, montage centr?? de deux colonnes ou filetage de quatre colonnes).
Configuration sans outil 1U (Trou carr?? dans les quatre colonnes ou trou rond non filet??)
1Placez un rail entre les colonnes verticales de droite et de gauche, les pattes du montant ReadyRail vers le haut. Alignez et installez les clips de fixation du rail du montant arri??re dans le montant de la colonne verticale arri??re. ?? la Figure 1-19, l'??l??ment 1 et ses extractions illustrent la mani??re selon laquelle les clips de fixation apparaissent dans les trous carr??s et les trous ronds non filet??s.
Figure 1-19. Configuration sans outil 1U
2Alignez et installez les clips de fixations du montant avant dans les trous ?? l'avant de la colonne verticale. Voir Figure 1-19, ??l??ment 2.
3R??p??tez cette proc??dure pour le deuxi??me rail.
4Pour retirer chaque rail, tirez sur le bouton de d??gagement du loquet sur chaque patte de montant et retirez le rail. Voir Figure 1-19, ??l??ment 3.
Configuration en encastrement ?? deux colonnes
1Pour cette configuration, les pi??ces moul??es doivent ??tre retir??es de l'avant de chaque ensemble ReadyRail. Voir Figure 1-20, ??l??ment 1 ?? la page 111. Utilisez un tournevis cruciforme pour retirer les deux vis des pattes du montant avant (sur le rail, du c??t?? du commutateur) et retirez chaque pi??ce moul??e. Conservez les pi??ces moul??es pour plus tard. Il n'est pas n??cessaire de retirer les pi??ces moul??es du montant arri??re.
Figure 1-20. Configuration en encastrement ?? deux colonnes
2Fixez un rail sur le montant de la colonne avant avec deux vis (non fournies). Voir Figure 1-20, ??l??ment 2.
3Faites glisser le support ajustable vers l'avant contre la colonne verticale puis fixez le support au montant avant ?? l'aide de deux vis (non fournies). Voir Figure 1-20, ??l??ment 3.
4R??p??tez cette proc??dure pour le deuxi??me rail.
Configuration de montage centr?? ?? deux colonnes
1Faites glisser le support ajustable vers l'arri??re jusqu'?? ce qu'il s'enclenche puis fixez le support au montant de la colonne avant ?? l'aide de deux vis (non fournies). Voir Figure 1-21, ??l??ment 1.
Figure 1-21. Configuration de montage centr?? ?? deux colonnes
2Faites glisser le support arri??re vers l'avant de la colonne et fixez-le au montant de la colonne ?? l'aide de deux vis (non fournies). Voir Figure 1-21, ??l??ment 2.
3R??p??tez cette proc??dure pour le deuxi??me rail.
Configuration filet??e ?? quatre colonnes
1Pour cette configuration, les pi??ces moul??es de la patte du montant doivent ??tre retir??es sur chaque extr??mit?? des ensembles ReadyRail. Utilisez un tournevis Torx pour retirer les deux vis de chaque patte de montant et retirez chaque pi??ce moul??e. Voir Figure 1-22, ??l??ment 1. Conservez les pi??ces moul??es pour plus tard.
2Pour chaque rail, fixez les montants avant et arri??re au montants de la colonne ?? l'aide de deux vis (non fournies) ?? chaque extr??mit??. Voir Figure 1-22, ??l??ment 2.
Figure 1-22. Configuration filet??e ?? quatre colonnes

Installation d'un commutateur autonome
REMARQUE : Nous vous recommandons fortement de monter le commutateur dans un rack.
Si vous n'installez pas le commutateur dans un rack, posez-le sur une surface plane. Cette surface doit pouvoir supporter le poids de l'appareil et de ses c??bles. Le commutateur est livr?? avec quatre patins adh??sifs en caoutchouc.
1Fixez les patins adh??sifs en caoutchouc sur les emplacements marqu??s, sous le commutateur.
2Installez le commutateur sur une surface plane. Pour une ventilation correcte, laissez un espace de 5 cm (2 pouces) de chaque c??t?? et de 13 cm (5 pouces) ?? l'arri??re.
Empilage de plusieurs commutateurs N30xx
Vous pouvez empiler jusqu'?? 12 commutateurs N30xx gr??ce aux ports mini- SAS situ??s sur l'avant du commutateur. Les commutateurs N30xx prennent en charge uniquement l'empilage avec d'autres commutateurs N30xx.
Lorsque plusieurs commutateurs sont connect??s ensemble ?? l'aide des ports d'empilage, ils fonctionnent comme une seule unit?? avec un maximum de 576 ports sur le panneau avant. La pile fonctionne et est g??r??e comme une seule entit??.
REMARQUE : Si vous installez une pile de commutateurs, vous devez terminer son montage et son c??blage avant de la mettre sous tension et de la configurer. Lorsqu'une pile est mise sous tension pour la premi??re fois, l'un des commutateurs est d??sign?? comme commutateur ma??tre de la pile. Ce commutateur peut occuper n'importe quel emplacement. Le voyant ma??tre situ?? sur le panneau avant est allum?? sur l'unit?? ma??tre.
Cr??ation d'une pile de commutateurs
Cr??ez une pile en connectant les unit??s adjacentes ?? l'aide des ports d'empilage mini-SAS situ??s sur le panneau arri??re du commutateur. La Figure 1-23 ?? la page 115 pr??sente les commutateurs connect??s selon une typologie en anneau, qui est la topologie recommand??e pour une pile.
1Utilisez un c??ble mini-SAS pour relier l'un des ports d'empilage du commutateur situ?? en haut de la pile au commutateur situ?? juste en- dessous.
Au besoin, utilisez un c??ble mini-SAS plus long (1 ou 3 m??tres, non fourni) pour connecter les commutateurs.
2R??p??tez l'op??ration jusqu'?? ce que toutes les unit??s soient connect??es.
3Utilisez le c??ble d'empilage restant pour connecter les deux derniers ports d'empilage restants ensemble afin de terminer la topologie en anneau.
Figure 1-23. Connexion d'une pile de commutateurs
Unit?? 1 
Unit?? 2 
Unit?? 3 
La pile illustr??e ?? la Figure 1-23 est connect??e selon une typologie en anneau et pr??sente les connexions suivantes entre les commutateurs :
???Le port mini-SAS situ?? en bas de l'unit?? 1 est connect?? au port mini-SAS de l'unit?? 2.
???Le port mini-SAS situ?? en bas de l'unit?? 2 est connect?? au port mini-SAS de l'unit?? 3.
???Le port mini-SAS situ?? en bas de l'unit?? 3 est connect?? au port mini-SAS de l'unit?? 1.
Unit?? de secours
La fonction d'empilage permet d'utiliser une unit?? de secours pr??vue pour prendre le relais en cas de panne de l'unit?? ma??tre de la pile. D??s qu'une panne de l'unit?? ma??tre de la pile est d??tect??e, l'unit?? de secours initialise la carte de contr??le et active la configuration en cours sur toutes les autres unit??s de la pile. Cette unit?? de secours g??re une copie synchronis??e de la configuration en cours pour la pile. L'unit?? de secours de la pile est s??lectionn??e automatiquement, mais vous pouvez utiliser l'interface CLI pour s??lectionner un autre membre de la pile comme unit?? de secours. Pour obtenir plus d'informations, reportez-vous au User's Configuration Guide (Guide de configuration) ou au CLI Reference Guide (Guide de r??f??rence CLI).
D??marrage et configuration du commutateur N30xx
L'organigramme de la Figure 1-24 pr??sente un aper??u des ??tapes que vous devez effectuer lors de la configuration initiale apr??s avoir d??ball?? et mont?? le commutateur.
Figure 1-24. Organigramme des proc??dures d'installation et de configuration
Connexion de l'alimentation et de la console
Mise sous tension

Connexion du commutateur N30xx ?? un terminal
Une fois toutes les connexions externes effectu??es, connectez un terminal ?? un commutateur pour configurer ce dernier.
REMARQUE : Avant de continuer, lisez les notes de publication concernant ce produit. Vous pouvez les t??l??charger ?? partir du site du Support Dell ?? l'adresse dell.com/support/manuals.
REMARQUE : Nous vous recommandons de vous procurer la version la plus r??cente de la documentation utilisateur disponible sur le site du Support Dell ?? l'adresse http://support.dell.com/manuals.
Pour pouvoir g??rer et configurer le commutateur ?? partir d'une console s??rie, utilisez le port de console situ?? ?? l'avant du commutateur (voir la Figure 1-25 ?? la page 119) pour le relier ?? un terminal VT100 ou ?? un syst??me ex??cutant un logiciel d'??mulation de terminal VT100. Le port de console est impl??ment?? en tant que connecteur d'??quipement de terminal de donn??es (DTE).
Pour utiliser le port de console, vous devez disposer de l'??quipement suivant :
???un terminal compatible VT100, ou un ordinateur ??quip?? d'un port s??rie et ex??cutant un logiciel d'??mulation de terminal VT100, par exemple, Microsoft HyperTerminal ;
???un c??ble s??rie (fourni) dot?? d'un connecteur RJ-45 pour le port de console et d'un connecteur DB-9 pour le terminal.
Pour connecter un terminal au port de console du commutateur, proc??dez comme suit :
1Reliez le connecteur DB-9 du c??ble s??rie au terminal ou ?? l'ordinateur ex??cutant le logiciel d'??mulation de terminal VT100.
2Configurez le logiciel d'??mulation de terminal comme suit :
a S??lectionnez le port s??rie appropri?? (par exemple COM 1) pour vous connecter ?? la console.
b R??glez le d??bit de donn??es sur 9 600 bauds.
c Configurez le format de donn??es sur 8 bits de donn??es, 1 bit d'arr??t et aucune parit??.
d D??finissez le contr??le de flux sur aucun.
e R??glez le mode d'??mulation du terminal sur VT100.

fChoisissez les touches de terminal pour les touches de fonction, de direction et Ctrl. V??rifiez que le param??trage correspond bien ?? Touches de terminal (et non ?? Touches Microsoft Windows).
3Branchez le connecteur RJ-45 du c??ble directement au commutateur du port de console. Le port de console Dell Networking est situ?? sur le c??t?? droit du panneau avant et est d??sign?? par le symbole |O|O|, comme indiqu?? sur la Figure 1-25.
REMARQUE : L'acc??s de la console de s??rie au ma??tre de la pile est possible depuis n'importe quel port de s??rie via le CLI local. Une seule session de console de s??rie est prise en charge ?? la fois.
Figure 1-25. Emplacement du port de console N3048
Port de console
Le port RJ-45 situ?? sur la droite du port de console est utilis?? pour la gestion hors bande Ethernet.
Connexion d'un commutateur N30xx ?? une source d'alimentation
PR??CAUTION : Prenez connaissance des consignes de s??curit?? figurant dans le manuel Safety and Regulatory Information (Informations sur la s??curit?? et les r??glementations), ainsi que des informations concernant la s??curit?? des autres appareils connect??s au commutateur.
Le commutateur N30xx poss??de deux blocs d'alimentation FRU pour un fonctionnement redondant ou en partage de la charge.

Connexion des c??bles d'alimentation en CA et en CC
1Assurez-vous que le port de console du commutateur est connect?? ?? un terminal VT100 ou ?? un ??mulateur de terminal VT100 via le c??ble RJ-45 vers le c??ble DB-9 femelle.
2Branchez un c??ble d'alimentation standard de 1,5 m (5 pieds) avec mise ?? la terre ?? la prise CA principale, situ??e sur le panneau arri??re (voir la Figure 1-26 ?? la page 120).
3Branchez le c??ble d'alimentation ?? une prise CA avec mise ?? la terre.
Figure 1-26. Deux blocs d'alimentation redondants sur le commutateur N3048
Vers une source d'alimentation en CA
D??marrage du commutateur N30xx
?? la mise sous tension, lorsque le terminal local est d??j?? connect??, le commutateur effectue un auto-test de d??marrage. Ce test s'ex??cute ?? chaque initialisation du commutateur ; il passe les composants mat??riels en revue pour v??rifier que le commutateur est totalement op??rationnel avant de terminer le d??marrage. Si le test d??tecte un probl??me critique, le processus s'arr??te. Si l'auto-test de d??marrage se d??roule sans incident, le micrologiciel valide est charg?? dans la RAM. Les messages de l'auto-test de d??marrage sont affich??s sur le terminal et indiquent le succ??s ou l'??chec du test. Le processus de d??marrage dure environ 60 secondes.
Vous pouvez faire appel au menu Boot (Amor??age), ?? la fin de la premi??re partie de l'auto-test de d??marrage. Depuis ce menu, vous pouvez effectuer des t??ches de configuration, telles que r??tablir le syst??me sur les param??tres d'usine par d??faut, activer l'image de sauvegarde ou r??cup??rer un mot de passe. Pour obtenir plus d'informations sur les fonctions du menu Boot (Amor??age), reportez-vous au CLI Reference Guide (Guide de r??f??rence CLI).

R??alisation de la configuration initiale N30xx
La proc??dure de configuration initiale repose sur les conditions suivantes :
???Le commutateur Dell Networking n'a jamais ??t?? configur?? avant.
???Le commutateur Dell Networking a d??marr?? correctement.
???La connexion ?? la console est ??tablie et l'invite de l'Assistant Dell Easy Setup est affich??e sur l'??cran d'un terminal VT100 ou ??quivalent.
La configuration initiale du commutateur est effectu??e via le port de console. Une fois cette premi??re ??tape effectu??e, le commutateur peut ??tre g??r?? soit ?? partir de la console connect??e, soit ?? distance, via une interface d??finie lors de la configuration initiale.
REMARQUE : Le commutateur ne poss??de pas de nom d'utilisateur ni de mot de passe par d??faut. L'adresse IP par d??faut est r??gl??e sur DHCP pour le port hors bande (OOB).
Avant de proc??der ?? la configuration initiale du commutateur, demandez les informations suivantes ?? votre administrateur r??seau :
???l'adresse IP ?? affecter ?? l'interface de gestion ;
???le masque de sous-r??seau IP ;
???l'adresse IP correspondant ?? la passerelle par d??faut de l'interface de gestion.
Ces param??tres sont n??cessaires pour permettre la gestion ?? distance du commutateur via Telnet (client Telnet) ou HTTP (navigateur Web).
Activation de la gestion ?? distance
Le panneau avant du commutateur N30xx contient un port Ethernet Gigabit pour la gestion hors bande. Le port OOB est situ?? sur la droite du port de console. Sur les commutateurs N30xx, vous pouvez utiliser n'importe le port OOB quels ports de commutateur du panneau avant pour une gestion intrabande. Par d??faut, tous les ports intrabande sont membres du VLAN 1.
L'Assistant Dell Easy Setup inclut des invites afin de configurer les informations du r??seau de l'interface de gestion OOB pour le commutateur N30xx et de l'interface VLAN 1 pour les commutateurs N30xx. Pour ces deux interfaces de gestion, vous pouvez assigner une adresse IP statique et un masque de sous-r??seau, ou activer le protocole DHCP et permettre ?? un serveur r??seau DHCP d'assigner les informations.

Reportez-vous au CLI Reference Guide (Guide de r??f??rence CLI) pour obtenir des informations sur les commandes CLI que vous utilisez pour configurer les informations r??seau.
Proc??dure de configuration initiale
Vous pouvez effectuer la configuration initiale ?? l'aide de l'interface CLI ou de l'Assistant Dell Easy Setup. Cet assistant d??marre automatiquement si le fichier de configuration du commutateur est vide. Vous pouvez quitter l'assistant ?? tout moment en appuyant sur [ctrl+z]. Dans ce cas, tous les param??tres de configuration sp??cifi??s sont supprim??s et le commutateur utilise les valeurs par d??faut.
REMARQUE : Si vous n'ex??cutez pas l'Assistant Dell Easy Setup ou ne r??pondez pas ?? l'invite de l'Assistant Easy Setup dans les 60 secondes, le commutateur entre en mode CLI. Vous pouvez r??initialiser le commutateur avec une configuration de d??marrage vide afin d'ex??cuter ?? nouveau l'Assistant Dell Easy Setup.
Pour plus d'informations sur la configuration initiale ?? l'aide de l'interface CLI, reportez-vous au CLI Reference Guide (Guide de r??f??rence CLI). Ce Getting Started Guide (Guide de mise en route)pr??sente la mani??re d'utiliser l'Assistant Dell Easy Setup pour effectuer le configuration initiale du commutateur. L'assistant effectue les op??rations de configuration suivantes sur le commutateur :
???Il met en place le compte utilisateur privil??gi?? initial et lui attribue un mot de passe valide. Un compte utilisateur privil??gi?? est configur?? par l'assistant lors de l'installation.
???Il configure l'ouverture de session de l'interface CLI et l'acc??s HTTP de sorte qu'ils utilisent uniquement l'authentification locale.
???Il d??finit l'adresse IP pour l'interface de gestion OOB.
???Il configure l'adresse IP pour l'interface de routage VLAN 1, o?? tous les ports intrabandes y sont membres.
???Il d??finit la cha??ne de communaut?? SNMP de sorte que le gestionnaire SNMP l'utilise sur une adresse IP donn??e. Vous pouvez ignorer cette ??tape si le commutateur n'est pas g??r?? via SNMP.
???Il vous permet d'indiquer l'adresse IP du syst??me de gestion du r??seau ou d'autoriser l'acc??s aux fonctions de gestion ?? partir de toutes les adresses IP.
???Il configure l'adresse IP de la passerelle par d??faut pour l'interface VLAN 1.

Exemple de session
Cette section d??crit une session Assistant Dell Easy Setup. Les valeurs suivantes sont utilis??es dans l'exemple :
???La cha??ne de communaut?? SNMP ?? utiliser est public.
???L'adresse IP du syst??me de gestion du r??seau (NMS) est 10.1.2.100.
???Le nom d'utilisateur est admin et le mot de passe est admin123.
???L'interface de gestion OOB utilise le protocole DHCP pour attribuer l'adresse IP.
???L'adresse IP pour l'interface de routage VLAN 1 est 10.1.1.200 ; le masque de sous-r??seau est 255.255.255.0.
???La passerelle par d??faut est 10.1.1.1.
L'assistant d??finit les valeurs initiales comme indiqu?? ci-dessus. Une fois l'ex??cution de l'assistant termin??e, le commutateur est configur?? de la fa??on suivante :
???SNMPv2 est activ?? et la cha??ne de communaut?? est d??finie comme indiqu?? ci-dessus. SNMPv3 est d??sactiv?? par d??faut.
???Le compte utilisateur admin est configur?? comme indiqu?? ci-dessus.
???Un syst??me de gestion du r??seau est configur??. ?? partir de la station de gestion, vous pouvez acc??der aux interfaces SNMP, HTTP et CLI.
Vous pouvez ??galement d??cider d'autoriser toutes les adresses IP ?? acc??der ?? ces interfaces de gestion en s??lectionnant l'adresse IP 0.0.0.0.
???DHCP est activ?? sur l'interface de gestion OOB.
???Une adresse IP est configur??e pour l'interface de routage du VLAN 1.
???Une adresse de passerelle par d??faut est configur??e.
REMARQUE : Dans l'exemple ci-apr??s, les options que l'utilisateur peut s??lectionner ou les valeurs par d??faut sont pr??sent??es entre crochets [ ]. Si vous appuyez sur <Entr??e> sans avoir d??fini d'options, la valeur par d??faut est accept??e. Le texte de l'aide se trouve entre parenth??ses.
Exemple console de l'Assistant Dell Easy Setup
L'exemple suivant montre une suite d'invites et de r??ponses affich??es dans l'Assistant Dell Easy Setup. Les valeurs utilis??es sont indiqu??es ci-dessus.
Au d??marrage du commutateur (apr??s l'auto-test de d??marrage), la bo??te de dialogue suivante s'affiche :
Unit 1 - Waiting to select management unit)> (Unit?? 1 ??? En attente de s??lection d'une unit?? de gestion)
Applying Global configuration, please wait ...
(Application de la configuration globale, veuillez patienter???)
Welcome to Dell Easy Setup Wizard (Bienvenue dans l'Assistant Dell Easy Setup)
The Setup Wizard guides you through the initial switch configuration, and gets you up and running as quickly as possible. (L'Assistant de configuration vous guide au cours de la configuration initiale du commutateur et vous permet une mise en route aussi rapide que possible.) You can skip the setup wizard, and enter CLI mode to manually configure the switch. (Vous pouvez passer cet assistant et entrer en mode CLI afin de configurer manuellement le commutateur.) You must respond to the next question to run the setup wizard within 60 seconds, otherwise the system will continue with normal operation using the default system configuration. (Vous devez r??pondre ?? la question suivante dans les 60 secondes pour ex??cuter l'Assistant de configuration, sinon le syst??me va utiliser la configuration syst??me par d??faut et poursuivre son fonctionnement normal.) Note: You can exit the setup wizard at any point by entering [ctrl+z]. (Remarque : vous pouvez quitter l'assistant de configuration ?? tout moment en appuyant sur [ctrl+z].)
Would you like to run the setup wizard (you must answer this question within 60 seconds)? (Souhaitez- vous ex??cuter l'assistant de configuration [vous devez r??pondre ?? la question dans les 60 secondes] ?) [Y/N] y ([O/N] o)
Step 1: (??tape 1 :)
The system is not set up for SNMP management by default. (Le syst??me n'est pas configur?? par d??faut pour la gestion SNMP.) To manage the switch using SNMP (required for Dell Network Manager) you can (Pour g??rer le commutateur ?? l'aide de SNMP (requis pour Dell Network Manager) vous pouvez)
Set up the initial SNMP version 2 account now. (configurer le compte initial SNMP version 2 maintenant.)
Return later and set up other SNMP accounts. (revenir plus tard et configurer d'autres comptes SNMP.) (For more information on setting up an SNMP version 1 or 3 account, see the user documentation). [Pour obtenir plus d'informations sur le param??trage de comptes utilisant la version 1 ou 3, reportez-vous ?? la documentation d'utilisation.]
Would you like to set up the SNMP management interface now? (Souhaitez-vous configurer l'interface de gestion SNMP imm??diatement ?) [Y/N] y ([O/N] o)
To set up the SNMP management account you must specify the management system IP address and the "community string" or password that the particular management system uses to access the switch. (Pour configurer le compte de gestion SNMP, vous devez indiquer l'adresse IP du syst??me de gestion ainsi que la ?? cha??ne de communaut?? ?? ou le mot de passe que le syst??me de gestion utilise pour acc??der au commutateur.) The wizard automatically assigns the highest access level [Privilege Level 15] to this account. (L'assistant assigne automatiquement le niveau d'acc??s le plus ??lev?? [niveau de privil??ge 15] ?? ce compte.) You can

use Dell Network Manager or other management interfaces to change this setting, and to add additional management system later. (Vous pouvez utiliser Dell Network Manager ou d'autres interfaces pour modifier ce param??tre et pour ajouter des informations syst??me de gestion suppl??mentaires ult??rieurement.) For more information on adding management systems, see the user documentation. (Pour obtenir plus d'informations sur l'ajout de syst??mes de gestion, reportez-vous ?? la documentation utilisateur.)
To add a management station: (Pour ajouter une station de gestion :)
Please enter the SNMP community string to be used. (Veuillez entrer la cha??ne de communaut?? SNMP ?? utiliser.) [public]: public
REMARQUE : S'il est configur??, le niveau d'acc??s par d??faut est d??fini sur l'acc??s maximum disponible pour l'interface de gestion SNMP. Initialement, seul SNMPv2 est activ??. SNMPv3 est d??sactiv?? jusqu'?? ce que vous l'activiez de mani??re explicite en param??trant l'ID du moteur, la vue, etc.
Please enter the IP address of the Management System (A.B.C.D) or wildcard (0.0.0.0) to manage from any Management Station. (Veuillez entrer l'adresse IP du syst??me de gestion (A.B.C.D) ou un masque (0.0.0.0) pour g??rer le syst??me depuis n'importe quelle station de gestion.) [0.0.0.0]: 10.1.2.100
Step 2: (??tape 2 :)
Now we need to set up your initial privilege (Level 15) user account. (?? pr??sent il faut configurer votre compte utilisateur privil??ge initial [niveau 15].) This account is used to login to the CLI and Web interface. (Ce compte est utilis?? pour se connecter ?? l'interface CLI et ?? l'interface Web.) You may set up other accounts and change privilege levels later. (Vous pouvez configurer d'autres comptes et modifier les niveaux de privil??ge ult??rieurement.) For more
information on setting up user accounts and changing privilege levels, see the user documentation. (Pour obtenir plus d'informations sur la configuration de comptes utilisateur et la modification des niveaux de privil??ge, reportez-vous ?? la documentation utilisateur.)
To set up a user account: (Pour configurer un compte utilisateur :)
Please enter the user name. (Veuillez entrer votre nom d'utilisateur.) [root]:admin
Please enter the user password: (Veuillez entrer votre mot de passe :) ********
Please reenter the user password: (Veuillez confirmer votre mot de passe :) ********
Step 3: (??tape 3 :)
Next, IP addresses are set up on the OOB (Out-Of-Band) Interface and/or the VLAN 1 routing interface. (Ensuite, les adresses IP sont configur??es sur l'interface OOB (hors-bande) et/ou sur l'interface de routage VLAN 1.)
You can use these IP addresses to access the CLI, Web interface, or SNMP interface of the switch. (Vous pouvez utiliser ces adresses IP pour acc??der ?? l'interface CLI, ?? l'interface Web ou ?? l'interface SNMP du commutateur.)
To access the switch through any Management Interface you can (Pour acc??der au commutateur via n'importe quelle interface de gestion, vous pouvez)
Set up the IP address for the Management Interface. (configurer l'adresse IP de l'interface de gestion.)
Set up the default gateway if IP address is manually configured on both routing and OOB interface. (configurer la passerelle par d??faut si l'adresse IP est configur??e manuellement sur les interfaces de routage et OOB.)
Would you like to set up the Out-Of-Band management interface now? (Souhaitez-vous configurer l'interface de gestion hors bande maintenant ?) [Y/N] y ([O/N] o)
Please enter the IP address of the device (A.B.C.D) or enter "DHCP" (without the quotes) to automatically request an IP address from the network DHCP server. (Veuillez entrer l'adresse IP du p??riph??rique (A.B.C.D) ou entrer ?? DHCP ?? (sans les guillemets) pour demander automatiquement une adresse IP depuis le serveur r??seau DHCP.) [DHCP]: dhcp
Step 4: (??tape 4 :)
Would you like to set up the VLAN1 routing interface now? (Souhaitez-vous configurer l'interface de routage VLAN1 maintenant ?) [Y/N] y ([O/N] o)
Please enter the IP address of the device (A.B.C.D) or enter "DHCP" (without the quotes) to automatically request an IP address from the network DHCP server: (Veuillez entrer l'adresse IP du p??riph??rique (A.B.C.D) ou entrer ?? DHCP ?? (sans les guillemets) pour demander automatiquement une adresse IP depuis le serveur r??seau DHCP :) 10.1.1.200
Please enter the IP subnet mask (A.B.C.D or /nn): (Veuillez entrer le masque de sous-r??seau [A.B.C.D ou /nn] :) 255.255.255.0
Step 5: (??tape 5 :)
Finally, set up the default gateway. (Enfin, configurez la passerelle par d??faut.) Please enter the IP address of the gateway from which this network is reachable. (Veuillez entrer l'adresse IP de la passerelle ?? partir de laquelle ce r??seau est accessible.) [0.0.0.0]: 10.1.1.1
This is the configuration information that has been collected: (Voici les informations de configuration collect??es :)
SNMP Interface = ???????public???????@10.1.2.100 (Interface SNMP)
User Account setup = admin (Configuration compte utilisateur)
Password = ********** (Mot de passe)
Out-of-band IP address = DHCP (Adresse IP hors bande) VLAN1 Router Interface IP = 10.1.1.200 255.255.255.0 (Adresse IP de l'interface de routage VLAN1)
Default Gateway = 10.1.1.1 (Passerelle par d??faut)
Step 6: (??tape 6 :)
If the information is correct, please enter (Y) to save the configuration and copy the settings to the start-up configuration file. (Si les informations sont correctes, veuillez saisir (Y) pour enregistrer la configuration et copier les param??tres dans le fichier de configuration de d??marrage.) If the information is incorrect, enter (N) to discard the configuration and restart the wizard: (Si les informations sont incorrectes, entrez (N) pour annuler la configuration et red??marrer l'assistant :) [Y/N] y ([O/N] o)
Thank you for using the Dell Easy Setup Wizard. (Merci d'avoir utilis?? l'Assistant Dell Easy Setup.) You will now enter CLI mode. (Vous allez entrer maintenant en mode CLI.)
Applying Interface configuration, please wait...
(Application de la configuration d'interface, veuillez patienter???)
Prochaines ??tapes
Apr??s avoir effectu?? la configuration initiale d??crite dans cette section, vous pouvez connecter le port OOB ?? votre r??seau de gestion pour une gestion ?? distance hors bande ou vous pouvez connecter n'importe quels ports de commutateur du panneau avant ?? votre r??seau de production pour une gestion ?? distance intrabande.
Si vous avez sp??cifi?? DHCP pour l'adresse IP de l'interface de gestion OOB ou VLAN1, l'interface va obtenir son adresse IP ?? partir d'un serveur DHCP sur le r??seau. Pour d??tecter une adresse IP assign??e de mani??re dynamique, utilisez la connexion du port de console pour effectuer les commandes suivantes :
???Pour l'interface OOB, tapez show ip interface out-of-band (afficher l'interface IP hors bande).
???Pour l'interface de routage VLAN 1, tapez show ip interface (afficher l'interface IP).
Pour acc??der ?? l'interface Dell OpenManage Switch Administrator, entrez l'adresse IP de l'interface de gestion OOB dans le champ d'adresse d'un navigateur Internet. Pour un acc??s de gestion ?? distance ?? l'interface CLI, entrez l'adresse IP de l'interface de gestion VLAN 1 dans un client Telnet ou SSH. Sinon, vous pouvez continuer d'utiliser le port de console pour un acc??s local via l'interface CLI au commutateur.
Votre commutateur N30xx prend en charge les fonctions de commutation de base telles que les protocoles VLAN et STP. Les commutateurs N30xx prennent ??galement en charge les fonctions de couche 3 comme le routage dynamique et de multidiffusion. Utilisez l'interface de gestion Web ou CLI pour configurer les fonctions requises par votre r??seau. Pour obtenir des informations sur la mani??re de configurer les fonctions du commutateur, reportez-vous au User's Configuration Guide (Guide de configuration) ou au CLI Reference Guide (Guide de r??f??rence CLI) disponible sur le site de Support ?? l'adresse : dell.com/support/manuals.
Dell Switch
der Reihe N20xx/N30xx
Handbuch zum Einstieg
Genormte Modelle: N2024, N2024P, N2048, N2048P, N3024, N3024P, N3048, N3048P, N3024F
Anmerkungen, Vorsichtshinweise und Warnungen
ANMERKUNG: Eine ANMERKUNG macht auf wichtige Informationen aufmerksam, mit denen Sie den Switch besser einsetzen k??nnen.
VORSICHTSHINWEIS: Ein VORSICHTSHINWEIS warnt vor m??glichen Besch??digungen der Hardware oder vor Datenverlust und informiert dar??ber, wie dies zu vermeiden ist.
WARNUNG: Durch eine WARNUNG werden Sie auf Gefahrenquellen hingewiesen, die materielle Sch??den, Verletzungen oder sogar den Tod von Personen zur Folge haben k??nnen.
____________________
?? 2013 Dell Inc.
Marken in diesem Text: Dell??, das DELL Logo, OpenManage??? und ReadyRails??? sind Marken von Dell Inc. Microsoft?? und Windows?? sind eingetragene Marken von Microsoft Corporation in den USA und/oder anderen L??ndern.
Genormte Modelle N2024, N2024P, N2048, N2048P, N3024, N3024P, N3048, N3048P, N3024F
Dezember 2013 Teilenr. F5CWH Rev. A00
Inhalt
1Einf??hrung . . . . . . . . . . . . . . . . . . . . . . . 137
2??bersicht ??ber die Reihe N20xx . . . . . . 137
3??bersicht ??ber die Hardware
der Reihe N20xx . . . . . . . . . . . . . . . . . . 138
4Installation von Modellen
der Reihe N20xx . . . . . . . . . . . . . . . . . . 144
Standortvorbereitung . . . . . . . . . . . . . . . . . . 144
5Starten und Konfigurieren eines
Switches der Reihe N20xx . . . . . . . . . . 151
6??bersicht ??ber die Reihe N30xx . . . . . . 166
7??bersicht ??ber die Hardware
der Reihe N30xx . . . . . . . . . . . . . . . . . . 166
8Installation von Modellen
der Reihe N30xx . . . . . . . . . . . . . . . . . . 176
9Starten und Konfigurieren
eines Switches der Reihe N30xx . . . . . 186

Einf??hrung
Dieses Dokument enth??lt grundlegende Informationen ??ber die Switches der Reihe Dell N20xx/N30xx, einschlie??lich der Switch-Installation und der Erstkonfiguration. Informationen ??ber das Konfigurieren und ??berwachen von Switch-Funktionen finden Sie im User???s Configuration Guide (Konfigurationsanleitung) auf der Dell Support-Website dell.com/support/manuals, wo Sie auch die neuesten Updates f??r Dokumentation und Firmware erhalten.
Dieses Dokument umfasst die folgenden Abschnitte:
?????bersicht ??ber die Reihe N20xx
?????bersicht ??ber die Hardware der Reihe N20xx
???Installation von Modellen der Reihe N20xx
???Starten und Konfigurieren eines Switches der Reihe N20xx
?????bersicht ??ber die Reihe N30xx
?????bersicht ??ber die Hardware der Reihe N30xx
???Installation von Modellen der Reihe N30xx
???Starten und Konfigurieren eines Switches der Reihe N30xx
ANMERKUNG: Switch-Administratoren wird dringend empfohlen, f??r Dell Networking-Switches die neueste Version des Dell Netzwerkbetriebssystems (Dell Networking Operating System, DNOS) zu verwenden. Dell Networking optimiert auf Basis des Feedbacks seiner Kunden kontinuierlich die F??higkeiten und Funktionen von DNOS. Bei einer kritischen Infrastruktur wird ein Prestaging der neuen Version in einen nicht kritischen Bereich des Netzwerks empfohlen, um die Netzwerkkonfiguration und den Netzwerkbetrieb mit der neuen DNOS-Version zu ??berpr??fen.
??bersicht ??ber die Reihe N20xx
Die Switches der Reihe Dell N20xx sind stackf??hige Gigabit-Ethernet- Switches (Layer 2) und umfassen die folgenden Modelle:
???Dell N2024
???Dell N2024P
???Dell N2048
???Dell N2048P
USB-Port
??bersicht ??ber die Hardware der Reihe N20xx
Dieser Abschnitt enth??lt Informationen ??ber Ger??temerkmale und die Hardwarekonfiguration von Switches der Reihe N20xx.
Alle N20xx Modelle ohne PoE-Unterst??tzung sind rackmontierbare Switches (1 HE bzw. 1U) mit den folgenden Abmessungen:
???440,0 x 257,0 x 43,5 mm (B x T x H)
???17,3 x 10,1 x 1,7 Zoll (B x T x H)
Alle N20xx Modelle mit PoE-Unterst??tzung sind rackmontierbare Switches (1 HE bzw. 1U) mit den folgenden Abmessungen:
???440,0 x 387,0 x 43,5 mm (B x T x H)
???17,3 x 15,2 x 1,7 Zoll (B x T x H)
N20xx Reihe - Vorderseite
Die folgenden Abbildungen zeigen die Vorderseiten der Switchmodelle in der Reihe N20xx.
Abbildung 1-1. N2048 Reihe mit 48 10/100/1000BASE-T-Ports (Vorderseite)
Konsolen-Port
Zus??tzlich zu den Switch-Ports sind auf der Vorderseite aller Modelle in der Reihe N20xx die folgenden Ports vorhanden:
???Konsolen-Port
???USB-Port
Abbildung 1-2. N2024 Nahaufnahme
Auf der Vorderseite der N20xx (siehe Abbildung 1-2) befinden sich in der oberen Reihe Status-LEDs f??r den ??bertemperatur-Alarm, das interne Netzteil und den Status. Die untere Reihe enth??lt Status-LEDs f??r den Stack-Master, das redundante Netzteil (RPS) und den L??fteralarm.
Abbildung 1-3. N2024P Nahaufnahme
Auf der Vorderseite der N20xxP (siehe Abbildung 1-3) befinden sich in der oberen Reihe Status-LEDs f??r den ??bertemperatur-Alarm, die interne Stromversorgung und den Status. Die untere Reihe enth??lt Status-LEDs f??r den Stack-Master, das modulare Netzteil (MPS) und den L??fteralarm.
Switch-Ports
Auf der Vorderseite von N2024/N2024P befinden sich 24 Gigabit-Ethernet (10/100/1000BASE-T) RJ-45-Ports, die die Autonegotiation von Datenrate, Flusskontrolle und Duplexmodus unterst??tzen. Die N2024/N2024P Modelle unterst??tzen zwei SFP+ 10G-Ports. Von Dell zugelassene SFP+ Transceiver sind separat zu erwerben.
Auf der Vorderseite von N2048/N2048P befinden sich 48 Gigabit-Ethernet (10BASE-T, 100BASE-TX, 1000BASE-T) RJ-45-Ports, die die Autonegotiation von Datenrate, Flusskontrolle und Duplexmodus unterst??tzen. Die N2048/N2048P Modelle unterst??tzen zwei SFP+ 10G-Ports. Von Dell zugelassene SFP+ Transceiver sind separat zu erwerben.
Die Switch-Ports auf der Vorderseite haben die folgenden Eigenschaften:
???Der Switch erkennt automatisch den Unterschied zwischen gekreuzten und durchgehenden Kabeln an RJ-45-Ports und w??hlt automatisch die f??r das andere Ende passende MDI- oder MDIX-Konfiguration.
???SFP-Ports unterst??tzen von Dell zugelassene Transceiver.
???RJ-45-Ports unterst??tzen den Vollduplexbetrieb mit 10/100/1000 Mbit/s ??ber ein handels??bliches UTP-Kabel (Kategorie 5).
???SFP+ Ports unterst??tzen SFP+ Transceiver und SFP+ Kupfer- Twinaxkabel plus SFP-Transceiver, die mit 1G betrieben werden.
???Die Ports auf der Vorderseite von N2024P/N2048P Modellen unterst??tzen PoE (15,4 W) and PoE+ (30 W).
Konsolen-Port
Der Konsolen-Port bietet die M??glichkeit der seriellen Kommunikation, die eine Kommunikation unter Verwendung des RS-232-Protokolls erm??glicht. Der serielle Port stellt eine direkte Verbindung zum Switch her und erm??glicht den CLI-Zugang von einem Konsolenterminal aus, das ??ber das mitgelieferte serielle Kabel (mit RJ45 Yost auf DB-9-Buchsen) angeschlossen wird.
Der Konsolen-Port kann gesondert konfiguriert werden und als asynchrone Verbindung von 1200 Baud bis 115.200 Baud ausgef??hrt werden.
Der Dell CLI unterst??tzt lediglich das ??ndern der Datenrate. Die Standardeinstellung lautet: Baudrate 9600, 8 Datenbits, keine Parit??t, 1 Stoppbit, keine Flusskontrolle.
USB-Port
Der USB-Port (Typ A, Buchse) unterst??tzt ein USB 2.0-konformes Flash- Speicherlaufwerk. Der Dell Networking-Switch kann ein Flash-Laufwerk beschreiben, das mit FAT-32 formatiert ist. Mit einem USB-Flash-Laufwerk k??nnen Sie Switch-Konfigurationdateien und Images zum Switch oder vom Switch ??bertragen. Au??erdem lassen sich mit dem USB-Flash-Laufwerk Konfigurationsdateien und -Images von einem Switch auf andere Switches im Netzwerk kopieren oder verschieben.
Der USB-Port unterst??tzt keine anderen USB-Ger??te.
Reset-Taste
Die Reset-Taste wird durch das kleine Loch hindurch bet??tigt und erm??glicht einen harten Reset des Switches. Um die Reset-Taste zu dr??cken, f??hren Sie das Ende einer B??roklammer oder ein ??hnliches Werkzeug gerade in das kleine Loch ein. Wenn der Switch nach dem Zur??cksetzen wieder hochgefahren ist, wird der Betrieb mit der zuletzt gespeicherten Konfiguration fortgesetzt. ??nderungen an der laufenden Konfiguration,
die vor dem Reset nicht gespeichert wurden, gehen verloren.
Port- und System-LEDs
Auf der Vorderseite befinden sich Leuchtdioden (LEDs), die den Status der Port-Verbindungen, der Netzteile, der L??fter, des Stacks und des Gesamtsystems anzeigen.
Informationen ??ber die anzeigten LED-Zust??nde finden Sie im User???s Configuration Guide (Konfigurationsanleitung).
Stack-Master-LED und Stack-Nummernanzeige
Wenn ein Switch in einem Stack als Master-Ger??t festgelegt ist, leuchtet die Stack-Master-LED (mit M gekennzeichnet) stetig gr??n. Wenn die M-LED aus ist, ist das Stack-Mitglied nicht das Master-Ger??t. Das Feld ???Stack No.??? zeigt die Ger??tenummer des Stack-Mitglieds an. Wenn ein Switch nicht zu einem Stack geh??rt (anders gesagt ist es ein Stack, bestehend aus einem Switch), leuchtet die M-LED und die Ger??tenummer wird angezeigt.
N20xx Reihe - R??ckseite
Die folgenden Abbildungen zeigen die R??ckseite von Switches der Reihe N20xx.
Abbildung 1-4. N20xx - R??ckseite
Bel??ftungs??ffnungen
Netzstromanschluss
Abbildung 1-5. N2024P/N2048P - R??ckseite
Der Begriff ???Mini-SAS??? bezieht sich auf die Stacking-Port- Kabelverbindungen, die in Abbildung 1-6 dargestellt sind. Informationen ??ber die Verwendung der Mini-SAS-Ports zum Anschluss von Switches finden Sie unter Stacking von mehreren Switches der Reihe N20xx.
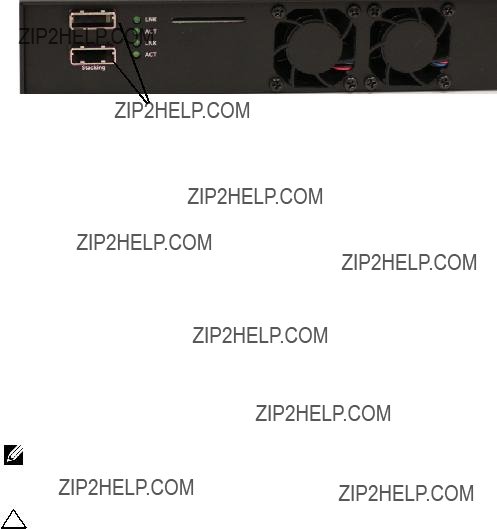
Abbildung 1-6. N2048 Mini-SAS-Stacking-Ports und L??fter
Mini-SAS-Stacking-Ports
Netzteile
N2024 und N2048
Die Switches N2024 und N2048 sind mit einem internen 100-Watt-Netzteil ausgestattet. Das zus??tzliche redundante Netzteil (Dell Networking RPS720) stellt 180 Watt Leistung zur Verf??gung und sorgt f??r vollst??ndige Redundanz des Switches.
N2024P und N2048P
Die Dell Networking-Switches N2024P aund N2048P sind mit einem internen 1000-Watt-Netzteil ausgestattet, das bis zu 24 PoE-Ger??ten bei voller PoE+ Leistung (850W) versorgt. Ein zus??tzliches externes Netzteil (MPS1000) stellt 1000 Watt Leistung zur Verf??gung und sorgt f??r vollst??ndige Leistungsabdeckung bei allen 48 PoE-Ger??ten (1800 W).
ANMERKUNG: Die PoE-Leistung wird dynamisch zugewiesen. Nicht alle Ports ben??tigen die volle PoE+ Leistung.
VORSICHTSHINWEIS: Entfernen Sie das Stromkabel von den Netzteilen, bevor Sie das Netzteilmodul selbst entfernen. Das Stromkabel darf beim Einf??hren in das Geh??use nicht angeschlossen sein.
Bel??ftungssystem
Die Switches der Reihe N20xx werden von zwei L??ftern gek??hlt.
N20xx Modell??bersicht
Installation von Modellen der Reihe
N20xx
Standortvorbereitung
Switches der Reihe N20xx k??nnen in einem 19-Zoll-Standardrack (48,26 cm) installiert oder auf einer ebenen Fl??che platziert werden.
Stellen Sie sicher, dass am Ort der Installation die folgenden Voraussetzungen erf??llt sind:
???Stromversorgung ??? Der Switch sollte in der N??he einer leicht zug??nglichen Steckdose mit 100-240 V Wechselspannung bei 50-60 Hz installiert werden.
???Zugang ??? Der Bediener sollte an der Vorder- und R??ckseite des Ger??ts ausreichend Bewegungsfreiheit haben. Auch Verkabelung, Stromanschl??sse und Bel??ftungs??ffnungen sollten problemlos zug??nglich sein.
???Verkabelung ??? Die Kabel sollten so verlegt sein, dass elektrisches Rauschen durch Funksender, Funkverst??rker, Stromleitungen sowie fluoreszierende Beleuchtungsk??rper vermieden wird.

???Umgebungstemperatur ??? Die Umgebungstemperatur des Switches liegt zwischen 0 und 45 ??C (32 bis 113 ??F) bei einer relativen Luftfeuchtigkeit von bis zu 95 % (nicht kondensierend).
ANMERKUNG: Oberhalb von 900 m (2955 Fu??) verringert sich die maximale Temperatur um 1 ??C (1,8 ??F) je 300 m (985 Fu??).
???Relative Luftfeuchtigkeit ??? Die relative Luftfeuchtigkeit beim Betrieb liegt zwischen 8 % und 85 % (nicht-kondensierend) bei einer maximalen Feuchtigkeits??nderung von 10 % pro Stunde.
Auspacken eines Switches der Reihe N20xx
Inhalt der Verpackung
Kontrollieren Sie beim Auspacken der einzelnen Switches, ob jeweils die folgenden Teile vorhanden sind:
???Ein Dell Networking-Switch
???Ein Kabel f??r RJ-45 auf DB-9-Buchse
???Ein Montagekit f??r die Installation im Rack (N20xx), zwei Montagehalter, Schrauben und K??figmuttern
???Ein Satz von selbstklebenden Gummiunterlagen f??r die frei stehende Installation (vier St??ck)
Auspacken
ANMERKUNG: ??berpr??fen Sie vor dem Auspacken des Switches den Transportbeh??lter und melden Sie etwaige Besch??digungen unverz??glich.
1Stellen Sie das Paket auf eine saubere, ebene Fl??che und zerschneiden Sie alle Befestigungsb??nder.
2??ffnen Sie die Verpackung oder entfernen Sie die obere Abdeckung.
3Nehmen Sie den Switch vorsichtig aus der Verpackung und stellen Sie ihn auf eine stabile, saubere Fl??che.
4Entfernen Sie das gesamte Verpackungsmaterial.
5Untersuchen Sie das Produkt und das Zubeh??r auf Besch??digungen.

Rack-Montage eines Switches der Reihe N20xx
WARNUNG: Lesen Sie die Sicherheitshinweise im Dokument Safety and Regulatory Information (Sicherheitshinweise und Betriebsbestimmungen) sowie die Sicherheitshinweise f??r andere Switches, die mit dem Switch verbunden werden oder diesen unterst??tzen.
Der Netzstromanschluss befindet sich auf der R??ckseite des Switches.
Montage in einem Rack
WARNUNG: Rack-Montagekits d??rfen nicht dazu verwendet werden, den Switch unter einem Tisch, unter einer Platte oder an der Wand zu befestigen.
VORSICHTSHINWEIS: Trennen Sie vor dem Fortfahren alle Kabel vom Switch. Entfernen Sie gegebenenfalls alle selbstklebenden Unterlagen vom Boden des Switches.
VORSICHTSHINWEIS: Wenn Sie mehrere Switches in einem Rack installieren, sollten Sie die Ger??te von unten nach oben einsetzen.
1Halten Sie einen der mitgelieferten Montagehalter auf eine Seite des Switches, wobei sich die Montagebohrungen am Switch mit den entsprechenden Bohrungen am Halter decken m??ssen. In Abbildung 1-7 ist die Position der Montagehalter dargestellt.
Abbildung 1-7. Befestigen der Montagehalter
2F??hren Sie die mitgelieferten Schrauben in die Rack-Montagebohrungen ein und ziehen Sie sie mit einem Schraubendreher fest.

3Wiederholen Sie den Vorgang f??r den Rack-Montagehalter auf der anderen Seite des Switches.
4Setzen Sie den Switch im 19-Zoll-Rack ein (48,3 cm), wobei die Montagebohrungen am Ger??t mit den entsprechenden Bohrungen am Rack zur Deckung kommen m??ssen.
5Befestigen Sie den Switch am Rack mit den Rack-Schrauben oder mit K??figmuttern und den entsprechenden Schrauben mit Unterlegscheiben (je nach Rack). Ziehen Sie zuerst die unteren und danach die oberen Schrauben fest.
VORSICHTSHINWEIS: Vergewissern Sie sicher, dass die mitgelieferten Rack- Schrauben in die Gewindel??cher im Rack passen.
ANMERKUNG: Achten Sie darauf, dass die L??ftungs??ffnungen nicht versperrt sind.
Installation als frei stehender Switch
ANMERKUNG: Es wird nachdr??cklich empfohlen, den Switch in einem Rack zu installieren.
Falls kein Rack verwendet wird, installieren Sie den Switch auf einer ebenen Fl??che. Die Tragf??higkeit der Fl??che muss f??r den Switch und die zugeh??rigen Kabel ausreichen. Der Switch wird mit vier selbstklebenden Gummiunterlagen geliefert.
1Befestigen Sie die Gummiunterlagen an den jeweils markierten Stellen am Geh??useboden.
2Stellen Sie den Switch auf eine ebene Fl??che und achten Sie dabei auf ausreichende Bel??ftungsabst??nde, d. h. 5 cm (2 Zoll) auf jeder Seite und 13 cm (5 Zoll) auf der R??ckseite.

Stacking von mehreren Switches der Reihe
N20xx
Switches der Reihe N20xx k??nnen ??ber die Mini-SAS-Ports auf der Switch- R??ckseite bis zu 12 Switches hoch gestapelt werden. N20xx-Switches unterst??tzen lediglich das Stacking mit anderen Switches der Reihe N20xx. Wenn mehrere Switches ??ber die Stack-Ports verbunden werden, funktionieren Sie wie ein einzelnes Ger??t mit bis zu 576 Ports auf der Vorderseite. Ein Stack wird als Einheit betrieben und verwaltet.
ANMERKUNG: Wenn Sie einen Stack von Switches installieren, m??ssen Sie den Stack vor dem Einschalten und Konfigurieren zusammenf??gen und verkabeln. Beim ersten Einschalten eines Stack wird der Master-Switch bestimmt, der sich an beliebiger Position im Stack befinden kann. Am Master-Ger??t leuchtet die Master- LED auf der Vorderseite.
Erstellen eines Switch-Stacks
Erstellen Sie einen Stack, indem Sie benachbarte Ger??te ??ber die Stack-Ports auf der Switch-R??ckseite miteinander verbinden. Abbildung 1-8 auf
Seite 149 zeigt die Switches in einer Ring-Topologie, die f??r Stacks empfohlen wird.
1Installieren Sie eines der kurzen Mini-SAS-Kabel zwischen einem der Stacking-Ports am obersten Switch und am Switch direkt darunter.
Verwenden Sie gegebenenfalls ein separat erworbenes langes Mini-SAS- Kabel (1 Meter oder 3 Meter), um die Switches zu verbinden.
2Wiederholen Sie diesen Vorgang, bis alle Ger??te verbunden sind.
3Verbinden Sie mit dem verbleibenden Stacking-Kabel die beiden verbleibenden Stacking-Ports miteinander, damit eine Ring-Topologie entsteht.
Abbildung 1-8. Verbinden eines Switch-Stacks
Ger??t 1
Ger??t 2
Ger??t 3
Der Stack in Abbildung 1-8 ist in einer Ring-Topologie verbunden und weist folgende physische Verbindungen zwischen den Switches auf:
???Der untere Mini-SAS-Port an Ger??t 1 ist mit dem oberen Mini-SAS-Port an Ger??t 2 verbunden.
???Der untere Mini-SAS-Port an Ger??t 2 ist mit dem oberen Mini-SAS-Port an Ger??t 3 verbunden.
???Der untere Mini-SAS-Port an Ger??t 3 ist mit dem oberen Mini-SAS-Port an Ger??t 1 verbunden.
Stacking-Standby
Die Stacking-Funktion unterst??tzt ein Standby- bzw. Reserveger??t, das bei einem Ausfall des Master-Ger??ts im Stack dessen Rolle ??bernimmt. Sobald im Stack ein Ausfall des Master-Ger??ts festgestellt wird, initialisiert das Standby-Ger??t die Steuerplatine und aktiviert alle anderen Stack-Ger??te mit der aktuellen Konfiguration. Auf dem Standby-Ger??t wird eine synchronisierte Kopie der aktiven Stack-Konfiguration verwaltet. Das Standby-Ger??t wird im Stack automatisch ausgew??hlt. Sie k??nnen jedoch ??ber die CLI ein anderes Stack-Mitglied als Standby-Ger??t ausw??hlen. Weitere Informationen finden Sie im User???s Configuration Guide (Konfigurationsanleitung) oder dem CLI Reference Guide (CLI- Referenzhandbuch).
Starten und Konfigurieren eines Switches der Reihe N20xx
Das folgende Flussdiagramm ist ein ??berblick ??ber die Durchf??hrung der Erstkonfiguration, nachdem der Switch ausgepackt und eingebaut wurde.

Verbinden eines Switches der Reihe N20xx mit einem Terminal
Nachdem Sie alle externen Verbindungen vorgenommen haben, schlie??en Sie das Ger??t an ein Terminal an, um den Switch zu konfigurieren.
ANMERKUNG: Lesen Sie die Versionshinweise f??r dieses Produkt, bevor Sie fortfahren. Sie k??nnen die Versionshinweise von der Dell Support-Website unter dell.com/support/manuals herunterladen.
ANMERKUNG: Es wird empfohlen, die neueste Version der Benutzerdokumentation von der Dell Support-Website dell.com/support/manuals herunterzuladen.
Um den Switch ??ber die serielle Konsole zu ??berwachen und zu konfigurieren, verbinden Sie den Konsolen-Port auf der Switch-Vorderseite (siehe Abbildung 1-1 auf Seite 138) mit einem VT100-Terminal oder einem Computer mit VT100-Terminal-Emulationssoftware. Der Konsolen-Port ist als DTE-Anschluss (Data Terminal Equipment) implementiert.
Zur Verwendung des Konsolen-Ports wird Folgendes ben??tigt:
???Ein VT100-kompatibles Terminal oder ein Computer mit seriellem Anschluss und VT100-Terminal-Emulationssoftware, wie etwa Microsoft HyperTerminal
???Ein serielles Kabel (mitgeliefert) mit RJ-45-Stecker f??r den Konsolen-Port und DB-9-Stecker f??r das Terminal.
Gehen Sie wie folgt vor, um ein Terminal mit dem Switch-Konsolen-Port zu verbinden:
1Verbinden Sie den DB-9-Stecker am seriellen Kabel mit dem Terminal oder dem Computer mit VT100-Terminal-Emulationssoftware.
2Konfigurieren Sie die Terminal-Emulationssoftware wie folgt:
a W??hlen Sie die geeignete serielle Schnittstelle (zum Beispiel COM 1) zur Verbindung mit der Konsole.
b Setzen Sie die Datenrate auf 9600 Baud.
c Setzen Sie das Datenformat auf 8 Datenbit, 1 Stoppbit, keine Parit??t. d Deaktivieren Sie die Flusskontrolle.
e Setzen Sie den Terminal-Emulationsmodus auf VT100.

fW??hlen Sie f??r die Belegung der Funktions-, Pfeil und Strg-Tasten die Option ???Terminal???. Stellen Sie sicher, dass die Tastenbelegung f??r ???Terminal??? (nicht ???Microsoft Windows???) ausgew??hlt wurde.
3Verbinden Sie den RJ-45-Stecker am Kabel direkt mit dem Switch- Konsolen-Port. Der Dell Networking Konsolen-Port befindet sich auf der Vorderseite rechts und ist mit dem Symbol |O|O| gekennzeichnet, siehe Abbildung 1-10 auf Seite 153.
ANMERKUNG: Der serielle Konsolenzugriff auf den Stack-Manager ist von jedem seriellen Port ??ber die CLI m??glich. Es wird nur jeweils eine serielle Konsolensitzung unterst??tzt.
Abbildung 1-10. N2024P Vorderseite mit Konsolen-Port
Konsolen-Port
Verbinden eines Switches der Reihe N20xx mit einer Stromquelle
VORSICHTSHINWEIS: Lesen Sie die Sicherheitshinweise im Dokument Safety and Regulatory Information (Sicherheitshinweise und Betriebsbestimmungen) sowie die Sicherheitshinweise f??r andere Switches, die mit dem Switch verbunden werden oder diesen unterst??tzen.
Alle anderen Modelle der Reihe N20xx sind mit einem internen Netzteil ausgestattet. Die Stromkabelanschl??sse befinden sich auf der R??ckseite.
Wechselstrom- und Gleichstromversorgung
1Stellen Sie sicher, dass der Switch-Konsolen-Port ??ber das serielle Kabel (RJ-45 auf DB-9-Buchse) mit einem VT100-Terminal oder einem System mit VT100-Terminal-Emulator verbunden ist.
2Verbinden Sie ein handels??bliches 1,5 m (5 Fu??) langes, ordnungsgem???? geerdetes Stromkabel mit dem Netzstromanschluss auf der Ger??ter??ckseite (siehe Abbildung 1-11 auf Seite 154).
3Verbinden Sie das Stromkabel mit einer geerdeten Netzsteckdose.
4Wenn Sie ein redundantes oder externes Gleichstromnetzteil wie Dell Networking RPS720 oder Dell Networking MPS1000 verwenden, verbinden Sie das Gleichstromkabel mit dem Gleichstromeingang auf der R??ckseite. In Abbildung 1-11 auf Seite 154 befindet sich das redundante Netzteil in der Mitte und ist mit RPS gekennzeichnet.
Abbildung 1-11. Wechselstrom- und Gleichstromversorgung zu einem N2048 Switch
Zur Gleichstromquelle (optional)
Zur Wechselstromquelle
Starten eines Switches der Reihe N20xx
Wenn das Ger??t mit dem lokalen Terminal bereits verbunden ist und der Strom eingeschaltet wird, durchl??uft der Switch den Einschaltselbsttest (Power-On Self-Test = POST). Der Einschalt-Selbsttest wird bei jeder Initialisierung des Switches durchlaufen; dabei werden Hardwarekomponenten ??berpr??ft, um vor dem eigentlichen Startvorgang festzustellen, ob das Ger??t vollst??ndig betriebsbereit ist. Wenn beim POST ein kritisches Problem festgestellt wird, bricht der Programmablauf ab. Bei erfolgreicher Ausf??hrung des POST wird eine g??ltige Firmware in den RAM geladen. Die Fehler- bzw. Erfolgsmeldungen des POST werden auf dem Terminal angezeigt. Der Startvorgang dauert ungef??hr 60 Sekunden.
Sie k??nnen das Boot-Men?? aufrufen, wenn der erste Teil des POST abgeschlossen ist. Vom Boot-Men?? aus lassen sich z. B. folgende Konfigurationsaufgaben durchf??hren: Zur??cksetzen des Systems auf die Herstellervorgaben, Aktivieren des Backup-Images und Wiederherstellen eines Kennworts. Weitere Informationen ??ber die Boot-Men??funktionen finden Sie im CLI Reference Guide (CLI-Referenzhandbuch).

Durchf??hren der Erstkonfiguration eines N20xx
Die Erstkonfiguration setzt folgende Punkte voraus:
???Der Dell Networking-Switch wurde noch nie konfiguriert.
???Der Dell Networking-Switch wurde erfolgreich gestartet.
???Es besteht eine Konsolenverbindung, und die Befehlszeile des Dell Easy- Setup-Assistent wird auf dem Bildschirm des VT100-Terminals bzw. des entsprechenden Systems angezeigt.
Die Erstkonfiguration des Switches wird ??ber den Konsolen-Port vorgenommen. Nach der Erstkonfiguration k??nnen Sie den Switch entweder ??ber die bereits bestehende Konsolenverbindung verwalten oder aus der Ferne ??ber eine Schnittstelle, die bei der Erstkonfiguration definiert wird.
ANMERKUNG: Der Switch ist nicht mit Standardvorgaben f??r Benutzername, Kennwort oder IP-Adresse konfiguriert.
Bevor Sie die Erstkonfiguration des Switches durchf??hren, erfragen Sie beim Netzwerkadministrator die folgenden Informationen:
???Die IP-Adresse, die der Verwaltungsschnittstelle zugewiesen werden soll
???Die IP-Subnetzmaske f??r das Netzwerk
???Die IP-Adresse des Standard-Gateways f??r die Verwaltungsschnittstelle.
Diese Einstellungen sind f??r die Fernverwaltung des Switches ??ber Telnet (Telnet-Client) oder HTTP (Web-Browser) erforderlich.
Aktivieren der Fernverwaltung
Bei Switches der Reihe N20xx k??nnen Sie zus??tzlich jeden der Switch-Ports auf der Vorderseite f??r die Inbandverwaltung verwenden. Standardm????ig geh??ren alle Inband-Ports zu VLAN 1.
Der Dell Easy-Setup-Assistent umfasst Befehlszeilen zur Konfiguration der Netzwerkinformationen f??r die VLAN 1-Schnittstelle am N20xx-Switch. Sie k??nnen eine feste IP-Adresse und Subnetzmaske zuweisen oder DHCP aktivieren und somit und einem DHCP-Server im Netzwerk diese Aufgabe ??bertragen.
Im CLI Reference Guide (CLI-Referenzhandbuch) erhalten Sie Informationen ??ber die CLI-Befehle zum Konfigurieren von Netzwerkinformationen.

Durchf??hren der Erstkonfiguration
Sie k??nnen die Erstkonfiguration mit dem Dell Easy-Setup-Assistent vornehmen oder ??ber die CLI (Befehlszeilenschnittstelle) durchf??hren. Der Assistent wird automatisch gestartet, wenn die Switch-Konfigurationsdatei leer ist. Sie k??nnen den Assistenten jederzeit beenden, indem Sie [Strg+z] eingeben, doch gehen dabei alle festgelegten Konfigurationeinstellungen verloren und der Switch verwendet die Standardwerte.
ANMERKUNG: Wenn Sie den Dell Easy-Setup-Assistent nicht ausf??hren oder auf die anf??ngliche Easy Setup-Eingabeaufforderung nicht reagieren, wechselt der Switch in die CLI-Betriebsart. Der Switch muss mit einer leeren Startkonfiguration zur??ckgesetzt werden, damit der Dell Easy-Setup-Assistent erneut ausgef??hrt werden kann.
Weitere Informationen ??ber das Durchf??hren der Erstkonfiguration mit der CLI erhalten Sie im CLI Reference Guide (CLI-Referenzhandbuch). Im vorliegenden Getting Started Guide (Handbuch zum Einstieg) ist erkl??rt, wie Sie den Dell Easy-Setup-Assistent f??r die Switch-Erstkonfiguration verwenden. Der Assistent konfiguriert den Switch wie folgt:
???Einrichtung des anf??nglichen uneingeschr??nkten Benutzerkontos mit g??ltigem Kennwort. Der Assistent konfiguriert beim Setup ein uneingeschr??nktes Benutzerkonto.
???M??glichkeit f??r CLI-Login und HTTP-Zugriff zur Verwendung der lokalen Authentisierungseinstellungen.
???Einrichtung der IP-Adresse f??r die VLAN 1-Routingschnittstelle, zu der alle Inband-Ports geh??ren.
???Einrichtung des SNMP-Community-Strings f??r den SNMP-Manager an einer bestimmten IP-Adresse. Sie k??nnen diesen Schritt auslassen, wenn f??r den Switch kein SNMP-Management verwendet wird.
???M??glichkeit zum Festlegen der IP-Adresse des Verwaltungssystems oder Zulassen des Verwaltungszugriffs von allen IP-Adressen.
???Konfiguration der Standard-Gateway-IP-Adresse f??r die VLAN 1- Schnittstelle.

Beispielsitzung
Dieser Abschnitt beschreibt einen Sitzung mit dem Dell Easy-Setup- Assistent. Folgende Werte werden in diesem Beispiel verwendet:
???Der zu verwendende SNMP-Community-String lautet public.
???Die IP-Adresse des Netzwerk-Verwaltungssystems (NMS) lautet
10.1.2.100.
???Der Benutzername lautet admin und das Kennwort ist admin123.
???Die IP-Adresse f??r die VLAN 1-Routingschnittstelle ist 10.1.1.200 und die Subnetzmaske lautet 255.255.255.0.
???Das Standard-Gateway ist 10.1.1.1.
Der Setup-Assistent konfiguriert die Anfangswerte wie oben definiert. Nach dem Abschlie??en des Assistenten ist der Switch wie folgt konfiguriert:
???SNMPv2 ist aktiviert, und der Community-String ist eingerichtet wie oben definiert. SNMPv3 ist standardm????ig deaktiviert.
???Das admin-Benutzerkonto ist eingerichtet wie definiert.
???Ein Netzwerk-Verwaltungssystem ist konfiguriert. Von dieser Verwaltungsstation k??nnen Sie auf die SNMP-, HTTP- und CLI- Schnittstelle zugreifen. Sie k??nnen auch festlegen, dass diese Verwaltungsschnittstellen von allen IP-Adressen zug??nglich sein sollen, indem Sie die IP-Adresse (0.0.0.0) w??hlen.
???Eine IP-Adresse ist f??r die VLAN 1-Routingschnittstelle konfiguriert.
???Eine Standard-Gateway-Adresse ist konfiguriert.
ANMERKUNG: Im folgenden Beispiel stehen die f??r den Benutzer w??hlbaren Optionen oder die Standardwerte in eckigen Klammern [ ]. Wenn Sie die <Eingabetaste> dr??cken, ohne eine Option gew??hlt zu haben, akzeptieren Sie damit den Standardwert. Hilfetexte sind in Klammern gesetzt.
Konsolenbeispiel mit dem Dell Easy-Setup-Assistenten
Das folgende Beispiel enth??lt eine Abfolge von Eingabeaufforderungen und Reaktionen im Rahmen einer beispielhaften Sitzung mit dem Dell Easy- Setup-Assistent, wobei die oben genannten Eingabewerte verwendet werden.
Nachdem der Switch den Einschaltselbsttest durchlaufen und den Startvorgang abgeschlossen hat, wird der folgende Dialog angezeigt:
Unit 1 - Waiting to select management unit)> (Ger??t 1
-Warten auf Auswahl des Verwaltungsger??ts)
Applying Global configuration, please wait ...
(Globale Konfiguration wird angewendet, bitte warten
...)
Welcome to Dell Easy Setup Wizard (Willkommen beim Dell Easy-Setup-Assistenten)
The Setup Wizard guides you through the initial switch configuration, and gets you up and running as quickly as possible. (Der Setup-Assistent f??hrt Sie durch die Erstkonfiguration des Switches und macht das System auf schnellstem Weg einsatzbereit.) You can skip the setup wizard, and enter CLI mode to manually configure the switch (Sie k??nnen den Setup-Assistenten umgehen und den Switch im CLI-Modus manuell konfigurieren.) You must respond to the next question to run the setup wizard within 60 seconds, otherwise the system will continue with normal operation using the default system configuration. (Sie m??ssen innerhalb von 60 Sekunden best??tigen, dass Sie den Setup-Assistenten wirklich starten m??chten. Anderenfalls wird der normale Systembetrieb mit der Standard- Systemkonfiguration fortgesetzt.) Note (Hinweis): You can exit the setup wizard at any point by entering [ctrl+z]. (Der Setup-Assistent l??sst sich jederzeit durch Dr??cken von [STRG+Z] beenden.)
Would you like to run the setup wizard (you must answer this question within 60 seconds)? (M??chten Sie den Setup-Assistenten jetzt aufrufen (diese Frage muss innerhalb von 60 Sekunden beantwortet werden)?) [Y/N] y ([J/N] j)
Step 1 (Schritt 1):
The system is not set up for SNMP management by default. (Das System ist standardm????ig nicht f??r SNMP- Verwaltung eingerichtet.) To manage the switch using SNMP (required for Dell Network Manager) you can (Zur Verwaltung des Switches mit SNMP [notwendig f??r Dell Network Manager] bestehen folgende M??glichkeiten:)
. Set up the initial SNMP version 2 account now. (Ersteinrichtung eines SNMP-Accounts (Version 2) jetzt durchf??hren.)
. Return later and set up other SNMP accounts. (Sp??ter hierher zur??ckkehren und weitere SNMP-Konten
Would you like to set up the SNMP management interface now? (M??chten Sie die SNMP-Verwaltungsschnittstelle jetzt einrichten?) [Y/N] y ([J/N] j)
To set up the SNMP management account you must specify the management system IP address and the ???community string??? or password that the particular management system uses to access the switch. (Um das SNMP- Verwaltungskonto einzurichten, m??ssen Sie die IP- Adresse des Verwaltungssystems und den ???Community- String??? oder das Kennwort des spezifischen Verwaltungssystems f??r den Switch-Zugriff festlegen.) The wizard automatically assigns the highest access level [Privilege Level 15] to this account. (Der Assistent weist diesem Konto automatisch die h??chste Zugangsstufe zu [Berechtigungsstufe 15].) You can use

Dell Network Manager or other management interfaces to change this setting, and to add additional management system later. (Mit Dell Network Manager oder anderen Verwaltungsschnittstellen k??nnen Sie diese Einstellung sp??ter ??ndern oder weitere Informationen zum Verwaltungssystem hinzuf??gen.) For more information on adding management systems, see the user documentation. (Weitere Informationen ??ber das Hinzuf??gen von Verwaltungssystemen erhalten Sie in der Benutzerdokumentation.)
To add a management station: (So f??gen Sie eine Verwaltungsstation hinzu:)
Please enter the SNMP community string to be used. (Geben Sie den zu verwendenden SNMP-Community-String ein.) [public]: public
ANMERKUNG: Falls konfiguriert, ist die Standard-Zugriffsebene f??r die SNMP- Verwaltungsschnittstelle auf den h??chstm??glichen Wert gesetzt. Anf??nglich ist nur SNMPv2 aktiviert. SNMPv3 ist deaktiviert, bis Sie zur??ckkehren und den Sicherheitszugriff f??r SNMPv3 konfigurieren (z. B. engine ID, view etc.).
Please enter the IP address of the Management System (A.B.C.D) or wildcard (0.0.0.0) to manage from any Management Station. (Geben Sie die IP-Adresse des Verwaltungssystems (A.B.C.D) ein oder verwenden Sie den Platzhalter (0.0.0.0), um die Verwaltung von jeder Verwaltungsstation aus zu erm??glichen.) [0.0.0.0]:
10.1.2.100
Step 2 (Schritt 2):
Now we need to set up your initial privilege (Level 15) user account. (Nun wird das Benutzerkonto mit der anf??nglichen Berechtigungsstufe [Stufe 15] eingerichtet.) This account is used to login to the CLI and Web interface. (Dieses Konto dient zur Anmeldung bei der Befehlszeilenschnittstelle und der Webschnittstelle.) You may set up other accounts and change privilege levels later. (Sie k??nnen sp??ter weitere Konten anlegen und die Berechtigungsstufen
??ndern.) For more information on setting up user accounts and changing privilege levels, see the user documentation. (Weitere Informationen zum Einrichten von Benutzerkonten und ??ndern von Berechtigungsstufen finden Sie in der Benutzerdokumentation.)
To set up a user account: (So richten Sie ein Benutzerkonto ein:)
Please enter the user name. (Geben Sie den Benutzernamen ein.) [root]:admin
Please enter the user password: (Geben Sie das Benutzerkennwort ein:) ********
Please reenter the user password: (Geben Sie das Benutzerkennwort erneut ein:) ********
Step 3 (Schritt 3):
Next, an IP address is set up on the VLAN 1 routing interface. (Als N??chstes wird eine IP-Adresse an der VLAN 1-Routingschnittstelle eingerichtet.)
You can use the IP address to access the CLI, Web interface, or SNMP interface of the switch. (Sie k??nnen diese IP-Adresse f??r den Zugriff auf die CLI-, Web- und SNMP-Schnittstelle des Switches verwenden.)
To access the switch through any Management Interface you can (F??r den Switch-Zugriff ??ber eine beliebige Verwaltungsschnittstelle k??nnen Sie)
. Set up the IP address for the Management Interface. (IP-Adresse f??r die Verwaltungsschnittstelle einrichten)
. Set up the default gateway if IP address is manually configured on the routing interface. (Standard-Gateway festlegen, wenn die IP-Adresse manuell auf der Routing-Schnittstelle konfiguriert wird.)
Step 4 (Schritt 4):
Would you like to set up the VLAN1 routing interface now? (M??chten Sie die VLAN 1-Routingschnittstelle jetzt einrichten?) [Y/N] y ([J/N] j)
Please enter the IP address of the device (A.B.C.D) or enter ???DHCP??? (without the quotes) to automatically request an IP address from the network DHCP server: (Bitte geben Sie die IP-Adresse des Ger??ts [A.B.C.D] ein bzw. ???DHCP??? (ohne Anf??hrungszeichen), um eine IP- Adresse vom DHCP-Netzwerkserver zu beziehen:)
10.1.1.200
Please enter the IP subnet mask (A.B.C.D or /nn): (Geben Sie die IP-Subnetzmaske ein [A.B.C.D oder /nn]:) 255.255.255.0
Step 5 (Schritt 5):
Finally, set up the default gateway. (Zum Schluss wird das Standard-Gateway eingerichtet.) Please enter the IP address of the gateway from which this network is reachable. (Geben Sie die IP-Adresse des Gateways ein, ??ber die das Netzwerk erreichbar ist.) [0.0.0.0]:
10.1.1.1
This is the configuration information that has been collected: (Die folgenden Konfigurationsdaten wurden erfasst:)
SNMP Interface = ???public???@10.1.2.100 (SNMP- Schnittstelle = ???public???@10.1.2.100)
User Account setup = admin (Eingerichtetes Benutzerkonto = admin)
Password = ******** (Kennwort = ********)
VLAN1 Router Interface IP = 10.1.1.200 255.255.255.0 (IP der VLAN1-Routingschnittstelle = 10.1.1.200 255.255.255.0)
Default Gateway = 10.1.1.1 (Standard-Gateway = 10.1.1.1)
Step 6 (Schritt 6):
If the information is correct, please enter (Y) to save the configuration and copy the settings to the start-up configuration file. (Wenn die Informationen korrekt sind, geben Sie [J] ein, um die Konfiguration zu speichern und die Einstellungen in die Start- Konfigurationdatei zu kopieren.) If the information is incorrect, enter (N) to discard the configuration and restart the wizard: (Wenn die Angaben nicht korrekt sind, geben Sie [N] ein, um die Konfiguration zu verwerfen und den Assistenten neu zu starten:) [Y/N] y ([J/N] j)
Thank you for using the Dell Easy Setup Wizard. (Der Dell Easy Setup-Assistant ist damit abgeschlossen.) You will now enter CLI mode. (Sie gelangen nun in den CLI-Modus.)
Applying Interface configuration, please wait ...
(Schnittstellenkonfiguration wird angewendet, bitte warten ...)
N??chste Schritte
Nach der Erstkonfiguration gem???? diesem Abschnitt k??nnen Sie jeden der Switch-Ports auf der Vorderseite mit dem Produktionsnetzwerk zur inbandigen Remote-Verwaltung verbinden.
Wenn Sie f??r die IP-Adresse der VLAN 1-Verwaltungsschnitttstelle DHCP festgelegt haben, fordert die Schnittstelle deren IP-Adresse von einem DHCP-Server im Netzwerk an. Um die dynamisch zugewiesene IP-Adresse anzuzeigen, geben Sie ??ber die Konsolen-Port-Verbindung den folgenden Befehl ein:
???Geben Sie f??r die VLAN 1-Routingschnittstelle ein: show ip interface.
Um auf die Dell OpenManage Switch Administrator-Schnittstelle zuzugreifen, geben Sie die IP-Adresse der VLAN 1-Verwaltungsschnittstelle in die Adresszeile eines Webbrowsers ein. Um CLI-Fernverwaltungszugriff zu erhalten, geben Sie die IP-Adresse der VLAN 1-Verwaltungsschnittstelle in einen Telnet- oder SSH-Client ein. Alternativ k??nnen Sie weiterhin den Konsolen-Port zum lokalen CLI-Zugriff auf den Switch verwenden.
Der N20xx-Switch unterst??tzt grundlegende Switch-Funktionen wie VLANs und das Spanning Tree-Protokoll. Verwenden Sie die Web- Verwaltungsschnittstelle oder die CLI, um die Funktionen so zu konfigurieren, wie Ihr Netzwerk sie erfordert. Informationen ??ber das Konfigurieren von Switch-Funktionen finden Sie im User???s Configuration Guide (Konfigurationsanleitung) oder im CLI Reference Guide (CLI- Referenzhandbuch) auf der Support-Website: dell.com/support/manuals.
??bersicht ??ber die Reihe N30xx
Die Switches der Reihe Dell N30xx sind stackf??hige Gigabit-Ethernet- Switches (Layer 2 und Layer 3) und umfassen die folgenden Modelle:
???Dell N3024
???Dell N3024P
???Dell N3048
???Dell N3048P
???Dell N3024F
??bersicht ??ber die Hardware der Reihe N30xx
Dieser Abschnitt enth??lt Informationen ??ber Ger??temerkmale und die Hardwarekonfiguration von Switches der Reihe N30xx.
Alle Modelle der Reihe N30xx sind rackmontierbare Switches (1 HE bzw. 1U) mit den folgenden Abmessungen:
???434,0 x 407,0 x 43,5 mm (B x T x H)
???17,1 x 16,0 x 1,7 Zoll (B x T x H)
N30xx Reihe - Vorderseite
Die folgenden Abbildungen zeigen die Vorderseiten der Switchmodelle in der Reihe N30xx.
Zus??tzlich zu den Switch-Ports sind auf der Vorderseite aller Modelle in der Reihe N30xx die folgenden Ports vorhanden:
???Konsolen-Port
???USB-Port
???Au??enband (OOB)-Verwaltungsschnittstelle
Abbildung 1-12. N3024F mit 24 10/100/1000BASE-T-Ports (Vorderseite)
Ein Switch der Reihe N30xx ist mit zwei Combo-Ports ausgestattet. Die Combo-Ports sind auf einem Switch der Reihe N30xx SFP-Ports und auf einem Switch der Reihe N3024F 1000BaseT-Ports.
Abbildung 1-13. N3048 mit 48 10/100/1000BASE-T-Ports (Vorderseite)
SFP+
Ports
Die zus??tzlichen Ports befinden sich auf der Vorderseite rechts (Abbildung 1-13 und Abbildung 1-14 auf Seite 168).
Abbildung 1-14. Zus??tzliche Ports bei Modellen der Reihe N30xx
Konsolen-Port Au??enband-Verwaltungsschnittstelle
USB-Port
Reset-Taste
Auf der Vorderseite der N30xx-Modelle befinden sich au??erdem eine Reset- Taste (kleines Loch) und verschiedene Status-LEDs. Siehe Abbildung 1-14.

Abbildung 1-15. N30xx Nahaufnahme
Auf der Vorderseite der N30xx/N3024F/N30xxP (siehe Abbildung 1-15) befinden sich in der oberen Reihe Status-LEDs f??r den ??bertemperatur- Alarm, das interne Netzteil 1 und den Switch-Status. Die untere Reihe enth??lt Status-LEDs f??r den Stack-Master, das interne Netzteil 2 und den L??fteralarm.
Switch-Ports
Auf der Vorderseite der Modelle N3024/N3024P befinden sich 24 Gigabit- Ethernet (10/100/1000BASE-T) RJ-45-Ports, die die Autonegotiation von Datenrate, Flusskontrolle und Duplexmodus unterst??tzen. Die Modelle N3024/N3024P unterst??tzen zwei SFP+ 10G-Ports. Von Dell zugelassene SFP+ Transceiver sind separat zu erwerben.
Auf der Vorderseite des N3024F befinden sich 24 Gigabit-Ethernet-SFP-Ports (100BASE-FX/1000BASE-X) plus zwei 1000BASE-T-Combo-Ports. Von Dell zugelassene SFP-Transceiver sind separat zu erwerben.
Auf der Vorderseite der Modelle N3048/N3048P befinden sich 48 Gigabit- Ethernet (10BASE-T, 100BASE-TX, 1000BASE-T) RJ-45-Ports, die die Autonegotiation von Datenrate, Flusskontrolle und Duplexmodus unterst??tzen. Die Modelle N3048/N3048P unterst??tzen zwei SFP+ 10G- Ports. Von Dell zugelassene SFP+ Transceiver sind separat zu erwerben.
Die Switch-Ports auf der Vorderseite haben die folgenden Eigenschaften:
???Der Switch erkennt automatisch den Unterschied zwischen gekreuzten und durchgehenden Kabeln an RJ-45-Ports und w??hlt automatisch die f??r das andere Ende passende MDI- oder MDIX-Konfiguration.
???SFP-Ports unterst??tzen von Dell zugelassene Transceiver.
???RJ-45-Ports unterst??tzen den Vollduplexbetrieb mit 10/100/1000 Mbit/s ??ber ein handels??bliches UTP-Kabel (Kategorie 5).
???SFP+ Ports unterst??tzen SFP+ Transceiver und SFP+ Kupfer- Twinaxkabel plus SFP-Transceiver, die mit 1G betrieben werden.
???Die Ports auf der Vorderseite der Modelle N3024P/N3048P unterst??tzen PoE (15,4 W) and PoE+ (30 W).
Konsolen-Port
Der Konsolen-Port bietet die M??glichkeit der seriellen Kommunikation, die eine Kommunikation unter Verwendung des RS-232-Protokolls erm??glicht. Der serielle Port stellt eine direkte Verbindung zum Switch her und erm??glicht den CLI-Zugang von einem Konsolenterminal aus, das ??ber das mitgelieferte serielle Kabel (mit RJ45 Yost auf DB-9-Buchsen) angeschlossen wird.
Der Konsolen-Port kann gesondert konfiguriert werden und als asynchrone Verbindung von 1200 Baud bis 115.200 Baud ausgef??hrt werden.
Der Dell CLI unterst??tzt lediglich das ??ndern der Datenrate.
Die Standardeinstellung lautet: Baudrate 9600, 8 Datenbits, keine Parit??t, 1 Stoppbit, keine Flusskontrolle.
Au??enband-Verwaltungsschnittstelle
Die Au??enband-Verwaltungsschnittstelle (Out-of-Band = OOB) ist ein 10/100/1000BASE-T Ethernet-Port f??r die Switch-Fernverwaltung. Der Datenverkehr an diesem Port ist vom Betriebsnetzwerk an den Switch-Ports getrennt und l??sst sich nicht per Switch oder Routing auf das Betriebsnetzwerk lenken.
USB-Port
Der USB-Port (Typ A, Buchse) unterst??tzt ein USB 2.0-konformes Flash- Speicherlaufwerk. Der Dell Networking-Switch kann ein Flash-Laufwerk beschreiben, das mit FAT-32 formatiert ist. Mit einem USB-Flash-Laufwerk k??nnen Sie Switch-Konfigurationdateien und Images zum Switch oder vom Switch ??bertragen. Au??erdem lassen sich mit dem USB-Flash-Laufwerk Konfigurationsdateien und -Images von einem Switch auf andere Switches im Netzwerk kopieren oder verschieben.
Der USB-Port unterst??tzt keine anderen USB-Ger??te.
Reset-Taste
Die Reset-Taste wird durch das kleine Loch hindurch bet??tigt und erm??glicht einen harten Reset des Switches. Um die Reset-Taste zu dr??cken, f??hren Sie das Ende einer B??roklammer oder ein ??hnliches Werkzeug gerade in das kleine Loch ein. Wenn der Switch nach dem Zur??cksetzen wieder hochgefahren ist, wird der Betrieb mit der zuletzt gespeicherten Konfiguration fortgesetzt. ??nderungen an der laufenden Konfiguration, die vor dem Reset nicht gespeichert wurden, gehen verloren.
Port- und System-LEDs
Auf der Vorderseite befinden sich Leuchtdioden (LEDs), die den Status der Port-Verbindungen, der Netzteile, der L??fter, des Stacks und des Gesamtsystems anzeigen.
Informationen ??ber die anzeigten LED-Zust??nde finden Sie im User???s Configuration Guide (Konfigurationsanleitung).
Stack-Master-LED und Stack-Nummernanzeige
Wenn ein Switch in einem Stack als Master-Ger??t festgelegt ist, leuchtet die Stack-Master-LED (mit M gekennzeichnet) stetig gr??n. Wenn die M-LED aus ist, ist das Stack-Mitglied nicht das Master-Ger??t. Das Feld ???Stack No.??? zeigt die Ger??tenummer des Stack-Mitglieds an. Wenn ein Switch nicht zu einem Stack geh??rt (anders gesagt ist es ein Stack, bestehend aus einem Switch), leuchtet die M-LED und die Ger??tenummer wird angezeigt.
N30xx Reihe - R??ckseite
Die folgenden Abbildungen zeigen die R??ckseite von Switches der Reihe N30xx.
Abbildung 1-16. N30xx - R??ckseite
Bel??ftungs??ffnung
Abbildung 1-18. N3048 Mini-SAS-Stacking-Ports - Nahaufnahme
Mini-SAS-Stacking-Ports
Der Begriff ???Mini-SAS??? bezieht sich auf die Stacking-Port- Kabelverbindungen, die in Abbildung 1-18 dargestellt sind. Informationen ??ber die Verwendung der Mini-SAS-Ports zum Anschluss von Switches finden Sie unter Stacking von mehreren Switches der Reihe N30xx.

Erweiterungssteckpl??tze f??r Plug-in-Module
Ein Erweiterungssteckplatz befindet sich auf der R??ckseite von Modellen der Reihe N30xx. Dieser Steckplatz kann die folgenden Module unterst??tzen:
???10GBASE-T-Modul
???SFP+ Modul
Jedes Plug-in-Modul ist mit zwei Ports ausgestattet. Die Plug-in-Module sind hot-swap-f??hig, daher brauchen Sie den Switch nach der Installation eines neuen Moduls nicht neu zu starten.
Netzteile
N3024, N3024F und N3048
Die Switch-Modelle N3024, N3024F und N3048 unterst??tzen zwei 200-Watt- FRU-Netzteile (Field Replaceable Unit, Austauschbare Funktionseinheit), die eine vollst??ndig redundante Stromversorgung des Switches erm??glichen. Die Switch-Modelle N3024, N3024F und N3048 bieten die V-Lock-Funktion f??r Benutzer, die das Risiko einer versehentliche Stromabschaltung beseitigen m??chten. Der V-Lock-Anschluss an der Netzteileinheit (PSU) erlaubt die Verwendung eines Stromkabels mit V-Lock-Funktion, die eine feste und sicher verriegelte Verbindung erm??glicht.
N3024P und N3048P
Die Dell Networking-Switches N3024P und N3048P unterst??tzen ein oder zwei 1100-Watt-FRU-Netzteile. Das Switch-Modell N3024P ist mit einem einzelnen 715-Watt-Netzteil ausgestattet (die Standardkonfiguration) und unterst??tzt entweder ein oder zwei 1100-Watt-Netzteile. F??r das Switch- Modell N3048P bildet ein 1100-Watt-Netzteil die Standardkonfiguration.
Ein einzelnes 1100-Watt-Netzteil kann bis zu 24 PoE-Ger??te bei voller PoE+ Leistung (950 W) versorgen. Switches, die mit zwei Netzteilen ausgestattet sind, versorgen bis zu 48 PoE-Ger??te bei voller PoE+ Leistung (1800 W) und bieten eine redundante Stromversorgung.
ANMERKUNG: Die PoE-Leistung wird dynamisch zugewiesen. Nicht alle Ports ben??tigen die volle PoE+ Leistung.
VORSICHTSHINWEIS: Entfernen Sie das Stromkabel von den Netzteilen, bevor Sie das Netzteilmodul selbst entfernen. Das Stromkabel darf beim Einf??hren in das Geh??use nicht angeschlossen sein.
Bel??ftungssystem
Die Switches der Reihe N30xx werden von zwei L??ftern gek??hlt. Die Switches der Reihe N30xx besitzen in jedem internen Netzteil zus??tzlich einen L??fter. Der N30xx-L??fter ist eine FRU.
N30xx Modell??bersicht
modularer Schacht/N+1 redundante steckbare PSUs/24x PoE+ Ports/12 UPoE-f??hige Ports/1x L??fter-Wechselmodul
redundante steckbare PSUs/48x PoE+ Ports/12 UPoE-f??hige Ports/1x L??fter-Wechselmodul
Installation von Modellen der Reihe N30xx
Standortvorbereitung
Switches der Reihe N30xx k??nnen in einem 19-Zoll-Standardrack (48,26 cm) installiert oder auf einer ebenen Fl??che platziert werden.
Stellen Sie sicher, dass am Ort der Installation die folgenden Voraussetzungen erf??llt sind:
???Stromversorgung ??? Der Switch sollte in der N??he einer leicht zug??nglichen Steckdose mit 100-240 V Wechselspannung bei 50-60 Hz installiert werden.
???Zugang ??? Der Bediener sollte an der Vorder- und R??ckseite des Ger??ts ausreichend Bewegungsfreiheit haben. Auch Verkabelung, Stromanschl??sse und Bel??ftungs??ffnungen sollten problemlos zug??nglich sein.
???Verkabelung ??? Die Kabel sollten so verlegt sein, dass elektrisches Rauschen durch Funksender, Funkverst??rker, Stromleitungen sowie fluoreszierende Beleuchtungsk??rper vermieden wird.
???Umgebungstemperatur ??? Die Umgebungstemperatur des Switches liegt zwischen 0 und 45 ??C (32 bis 113 ??F) bei einer relativen Luftfeuchtigkeit von bis zu 95 % (nicht kondensierend).
ANMERKUNG: Oberhalb von 900 m (2955 Fu??) verringert sich die maximale Temperatur um 1 ??C (1,8 ??F) je 300 m (985 Fu??).
???Relative Luftfeuchtigkeit ??? Die relative Luftfeuchtigkeit beim Betrieb liegt zwischen 8 % und 85 % (nicht-kondensierend) bei einer maximalen Feuchtigkeits??nderung von 10 % pro Stunde.
Auspacken eines Switches der Reihe N30xx
Inhalt der Verpackung
Kontrollieren Sie beim Auspacken der einzelnen Switches, ob jeweils die folgenden Teile vorhanden sind:
???Ein Dell Networking-Switch
???Ein Kabel f??r RJ-45 auf DB-9-Buchse
???Ein ReadyRail-Kit f??r die Installation im Rack, zwei Montagehalter, Schrauben und K??figmuttern
???Ein Satz von selbstklebenden Gummiunterlagen f??r die frei stehende Installation (vier St??ck)
???Eine Netzteileinheit
Auspacken
ANMERKUNG: ??berpr??fen Sie vor dem Auspacken des Switches den Transportbeh??lter und melden Sie etwaige Besch??digungen unverz??glich.
1Stellen Sie das Paket auf eine saubere, ebene Fl??che und zerschneiden Sie alle Befestigungsb??nder.
2??ffnen Sie die Verpackung oder entfernen Sie die obere Abdeckung.
3Nehmen Sie den Switch vorsichtig aus der Verpackung und stellen Sie ihn auf eine stabile, saubere Fl??che.
4Entfernen Sie das gesamte Verpackungsmaterial.
5Untersuchen Sie das Produkt und das Zubeh??r auf Besch??digungen.

Rack-Montage eines Switches der Reihe N30xx
Sie k??nnen den Switch entweder auf dem Rack-Regal platzieren oder den Switch direkt in ein 19 Zoll breites, EIA-310-E-konformes Rack (Methoden mit vier St??tzen, zwei St??tzen oder Gewindel??chern) montieren. Das Dell ReadyRail System ist f??r ein 1-HE-Front-Rack (1U) und Installationen mit zwei St??tzen vorgesehen. Das ReadyRail-System umfasst zwei getrennt verpackte Schienenbaugruppen.
WARNUNG: Dies ist ein gek??rzter Hinweis. Lesen Sie, bevor Sie beginnen, die Sicherheitshinweise in der Brosch??re Safety, Environmental, and Regulatory Information (Sicherheitshinweise, Umwelt- und Betriebsbestimmungen).
ANMERKUNG: Die Abbildungen in diesem Dokument sollen keinen bestimmten Switch darstellen.
Sicherheitserw??gungen bei der Rack-Montage
???Rack-Beladung - Ein ??berladen oder ungleichm????iges Beladen von Racks kann einen Defekt an einem Regal oder Rack verursachen, was zu einer Besch??digung der Ger??te und zu m??glichen Verletzungen f??hren kann. Stabilisieren Sie Racks vor der Beladung an einem dauerhaften Standort. Beginnen Sie beim Montieren der Komponenten am Boden des Racks und arbeiten Sie sich dann nach oben. ??berschreiten Sie nicht die Tragf??higkeit des Racks.
???Stromerw??gungen - Verwenden Sie zum Anschluss nur die Stromquelle, die auf der Einheit angegeben ist. Wenn in einem Rack mehrere elektrische Komponenten installiert werden, stellen Sie sicher, dass die Gesamtnennleistung der Komponenten die M??glichkeiten des Stromnetzes nicht ??bersteigt. ??berlastete Stromquellen und Erweiterungskabel stellen eine Brand- und Stromschlaggefahr dar.
???Erh??hte Umgebungstemperatur - Bei Installation in einer geschlossenen Rack-Aufstellung kann die Betriebstemperatur der Rack-Umgebung h??her sein als die Raumtemperatur. Achten Sie darauf, die maximale Umgebungstemperatur des Switches von 45 Grad Celsius nicht zu ??berschreiten.
???Reduzierter Luftstrom - Installieren Sie die Ger??te so in dem Rack, dass der f??r einen sicheren Betrieb der Ger??te erforderliche Umfang des Luftstroms nicht gef??hrdet wird.
???Zuverl??ssige Erdung - Halten Sie eine zuverl??ssige Erdung der in Racks montierten Ger??te aufrecht. Achten Sie insbesondere darauf, andere Verbindungen als direkte Verbindungen zur Verzweigungsleitung bereitzustellen, z. B. unter Verwendung von Mehrfachsteckdosen.
???Das Produkt sollte nicht mit der R??ckseite nach unten gewandt montiert werden.
Installieren des Dell ReadyRail-Systems
Das ReadyRail-Rack-Montagesystem dient dazu, das Rack auf einfache Weise f??r die Installation des Switches zu konfigurieren. Das ReadyRail-System kann mit der werkzeuglosen 1-HE-Methode oder einer der drei m??glichen 1-HE-Methoden mit Werkzeugen (b??ndige Montage mit zwei St??tzen, mittige Montage mit zwei St??tzen oder vier St??tzen mit Gewindel??chern) installiert werden.
Werkzeuglose 1-HE-Konfiguration (Vierkantloch- oder Rundloch-Racks mit vier St??tzen)
1Positionieren Sie bei nach au??en zeigenden ReadyRail-Flanschohren eine Schiene zwischen den linken und rechten vertikalen St??tzen. Richten Sie die Zapfen der hinteren Flanschschiene aus und befestigen Sie sie am Flansch der hinteren vertikalen St??tze. In Abbildung 1-19 zeigen Element 1 und dessen Ausz??ge, wie die Zapfen sowohl in die Vierkantl??cher und die Rundl??cher ohne Gewinde eingepasst werden m??ssen.
Abbildung 1-19. Werkzeuglose 1-HE-Konfiguration
2Richten Sie die Zapfen des vorderen Flansches aus und befestigen Sie sie an der Vorderseite der vertikalen St??tze (siehe Abbildung 1-19, Element 2).
3Wiederholen Sie diese Schritte f??r die zweite Schiene.
4Um die Schienen zu entfernen, ziehen Sie am Entriegelungsmechanismus jedes Flanschohrs und l??sen Sie die einzelnen Schienen. N??here Informationen finden Sie in Abbildung 1-19, Element 3.
B??ndige Konfiguration mit zwei St??tzen
1F??r diese Konfiguration m??ssen die Beschl??ge von der Vorderseite jeder ReadyRail-Baugruppe entfernt werden (siehe Abbildung 1-20, Element 1 auf Seite 181). L??sen Sie die beiden Schrauben mit einem Torx- Schraubendreher von den vorderen Flanschohren (an der Ger??teseite der Schiene) und entfernen Sie die Beschl??ge. Bewahren Sie die Beschl??ge f??r die eventuelle zuk??nftige Verwendung am Rack auf. Die hinteren Beschl??ge m??ssen nicht entfernt werden.
Abbildung 1-20. B??ndige Konfiguration mit zwei St??tzen
2Befestigen Sie eine Schiene mit zwei Schrauben (nicht im Lieferumfang enthalten) am Flansch der vorderen St??tze (siehe Abbildung 1-20, Element 2).
3Schieben Sie den Halteb??gel nach vorne in Richtung der vertikalen St??tze und befestigen Sie ihn mit zwei Schrauben (nicht im Lieferumfang enthalten) am St??tzenflansch (siehe Abbildung 1-20, Element 3).
4Wiederholen Sie diese Schritte f??r die zweite Schiene.
Mittige Konfiguration mit zwei St??tzen
1Schieben Sie den Halteb??gel nach hinten, bis er einrastet, und befestigen Sie ihn mit zwei Schrauben (nicht im Lieferumfang enthalten) am Flansch der vorderen St??tze (siehe Abbildung 1-21, Element 1).
Abbildung 1-21. Mittige Konfiguration mit zwei St??tzen
2Schieben Sie den hinteren B??gel in Richtung der St??tze und befestigen Sie ihn mit zwei Schrauben (nicht im Lieferumfang enthalten) am St??tzenflansch (siehe Abbildung 1-21, Element 2).
3Wiederholen Sie diese Schritte f??r die zweite Schiene.
Gewindeloch-Konfiguration mit vier St??tzen
1Bei dieser Konfiguration m??ssen die Beschl??ge der Flanschohren von allen Seiten der ReadyRail-Baugruppen entfernt werden. L??sen Sie die beiden Schrauben mit einem Torx-Schraubendreher von den beiden Flanschohren und entfernen Sie die Beschl??ge (siehe Abbildung 1-22, Element 1). Bewahren Sie die Beschl??ge f??r die eventuelle zuk??nftige Verwendung am Rack auf.
2Befestigen Sie bei jeder Schiene den vorderen und den hinteren Flansch mit zwei Schrauben (nicht im Lieferumfang enthalten) an den St??tzenflanschen (siehe Abbildung 1-22, Element 2).
Abbildung 1-22. Gewindeloch-Konfiguration mit vier St??tzen

Installation als frei stehender Switch
ANMERKUNG: Es wird nachdr??cklich empfohlen, den Switch in einem Rack zu installieren.
Falls kein Rack verwendet wird, installieren Sie den Switch auf einer ebenen Fl??che. Die Tragf??higkeit der Fl??che muss f??r den Switch und die zugeh??rigen Kabel ausreichen. Der Switch wird mit vier selbstklebenden Gummiunterlagen geliefert.
1Befestigen Sie die Gummiunterlagen an den jeweils markierten Stellen am Geh??useboden.
2Stellen Sie den Switch auf eine ebene Fl??che und achten Sie dabei auf ausreichende Bel??ftungsabst??nde, d. h. 5 cm (2 Zoll) auf jeder Seite und 13 cm (5 Zoll) auf der R??ckseite.
Stacking von mehreren Switches der Reihe
N30xx
Switches der Reihe N30xx k??nnen ??ber die Mini-SAS-Ports auf der Switch- R??ckseite bis zu 12 Switches hoch gestapelt werden. N30xx-Switches unterst??tzen lediglich das Stacking mit anderen Switches der Reihe N30xx. Wenn mehrere Switches ??ber die Stack-Ports verbunden werden, funktionieren Sie wie ein einzelnes Ger??t mit bis zu 576 Ports auf der Vorderseite. Ein Stack wird als Einheit betrieben und verwaltet.
ANMERKUNG: Wenn Sie einen Stack von Switches installieren, m??ssen Sie den Stack vor dem Einschalten und Konfigurieren zusammenf??gen und verkabeln. Beim ersten Einschalten eines Stack wird der Master-Switch bestimmt, der sich an beliebiger Position im Stack befinden kann. Am Master-Ger??t leuchtet die Master- LED auf der Vorderseite.
Erstellen eines Switch-Stacks
Erstellen Sie einen Stack, indem Sie benachbarte Ger??te ??ber die Stack-Ports auf der Switch-R??ckseite miteinander verbinden. Abbildung 1-23 auf
Seite 185 zeigt die Switches in einer Ring-Topologie, die f??r Stacks empfohlen wird.
1Installieren Sie eines der kurzen Mini-SAS-Kabel zwischen einem der Stacking-Ports am obersten Switch und am Switch direkt darunter.
Verwenden Sie gegebenenfalls ein separat erworbenes langes Mini-SAS- Kabel (1 Meter oder 3 Meter), um die Switches zu verbinden.
2Wiederholen Sie diesen Vorgang, bis alle Ger??te verbunden sind.
3Verbinden Sie mit dem verbleibenden Stacking-Kabel die beiden verbleibenden Stacking-Ports miteinander, damit eine Ring-Topologie entsteht.
Abbildung 1-23. Verbinden eines Switch-Stacks
Ger??t 1
Ger??t 2
Ger??t 3
Der Stack in Abbildung 1-23 ist in einer Ring-Topologie verbunden und weist folgende physische Verbindungen zwischen den Switches auf:
???Der untere Mini-SAS-Port an Ger??t 1 ist mit dem oberen Mini-SAS-Port an Ger??t 2 verbunden.
???Der untere Mini-SAS-Port an Ger??t 2 ist mit dem oberen Mini-SAS-Port an Ger??t 3 verbunden.
???Der untere Mini-SAS-Port an Ger??t 3 ist mit dem oberen Mini-SAS-Port an Ger??t 1 verbunden.
Stacking-Standby
Die Stacking-Funktion unterst??tzt ein Standby- bzw. Reserveger??t, das bei einem Ausfall des Master-Ger??ts im Stack dessen Rolle ??bernimmt. Sobald im Stack ein Ausfall des Master-Ger??ts festgestellt wird, initialisiert das Standby-Ger??t die Steuerplatine und aktiviert alle anderen Stack-Ger??te mit der aktuellen Konfiguration. Auf dem Standby-Ger??t wird eine synchronisierte Kopie der aktiven Stack-Konfiguration verwaltet. Das Standby-Ger??t wird im Stack automatisch ausgew??hlt. Sie k??nnen jedoch ??ber die CLI ein anderes Stack-Mitglied als Standby-Ger??t ausw??hlen. Weitere Informationen finden Sie im User???s Configuration Guide (Konfigurationsanleitung) oder dem CLI Reference Guide (CLI- Referenzhandbuch).
Starten und Konfigurieren eines Switches der Reihe N30xx
Das Flussdiagramm in Abbildung 1-24 ist ein ??berblick ??ber die Durchf??hrung der Erstkonfiguration, nachdem der Switch ausgepackt und eingebaut wurde.

Verbinden eines Switches der Reihe N30xx mit einem Terminal
Nachdem Sie alle externen Verbindungen vorgenommen haben, schlie??en Sie das Ger??t an ein Terminal an, um den Switch zu konfigurieren.
ANMERKUNG: Lesen Sie die Versionshinweise f??r dieses Produkt, bevor Sie fortfahren. Sie k??nnen die Versionshinweise von der Dell Support-Website unter dell.com/support/manuals herunterladen.
ANMERKUNG: Es wird empfohlen, die neueste Version der Benutzerdokumentation von der Dell Support-Website dell.com/support/manuals herunterzuladen.
Um den Switch ??ber die serielle Konsole zu ??berwachen und zu konfigurieren, verbinden Sie den Konsolen-Port auf der Switch-Vorderseite (siehe Abbildung 1-25 auf Seite 189) mit einem VT100-Terminal oder einem Computer mit VT100-Terminal-Emulationssoftware. Der Konsolen-Port ist als DTE-Anschluss (Data Terminal Equipment) implementiert.
Zur Verwendung des Konsolen-Ports wird Folgendes ben??tigt:
???Ein VT100-kompatibles Terminal oder ein Computer mit seriellem Anschluss und VT100-Terminal-Emulationssoftware, wie etwa Microsoft HyperTerminal
???Ein serielles Kabel (mitgeliefert) mit RJ-45-Stecker f??r den Konsolen-Port und DB-9-Stecker f??r das Terminal.
Gehen Sie wie folgt vor, um ein Terminal mit dem Switch-Konsolen-Port zu verbinden:
1Verbinden Sie den DB-9-Stecker am seriellen Kabel mit dem Terminal oder dem Computer mit VT100-Terminal-Emulationssoftware.
2Konfigurieren Sie die Terminal-Emulationssoftware wie folgt:
a W??hlen Sie die geeignete serielle Schnittstelle (zum Beispiel COM 1) zur Verbindung mit der Konsole.
b Setzen Sie die Datenrate auf 9600 Baud.
c Setzen Sie das Datenformat auf 8 Datenbit, 1 Stoppbit, keine Parit??t. d Deaktivieren Sie die Flusskontrolle.
e Setzen Sie den Terminal-Emulationsmodus auf VT100.

fW??hlen Sie f??r die Belegung der Funktions-, Pfeil und Strg-Tasten die Option ???Terminal???. Stellen Sie sicher, dass die Tastenbelegung f??r ???Terminal??? (nicht ???Microsoft Windows???) ausgew??hlt wurde.
3Verbinden Sie den RJ-45-Stecker am Kabel direkt mit dem Switch- Konsolen-Port. Der Konsolen-Port der Dell Networking befindet sich auf der Vorderseite rechts und ist mit dem Symbol |O|O| gekennzeichnet, siehe Abbildung 1-25.
ANMERKUNG: Der serielle Konsolenzugriff auf den Stack-Manager ist von jedem seriellen Port ??ber die CLI m??glich. Es wird nur jeweils eine serielle Konsolensitzung unterst??tzt.
Abbildung 1-25. Position des Konsolen-Ports am N3048
Konsolen-Port
Der RJ-45-Port rechts vom Konsolen-Port dient zur Ethernet- Au??enbandverwaltung.
Verbinden eines Switches der Reihe N30xx mit einer Stromquelle
VORSICHTSHINWEIS: Lesen Sie die Sicherheitshinweise im Dokument Safety and Regulatory Information (Sicherheitshinweise und Betriebsbestimmungen) sowie die Sicherheitshinweise f??r andere Switches, die mit dem Switch verbunden werden oder diesen unterst??tzen.
Die Switches der Reihe N30xx sind mit zwei FRU-Netzteilen f??r Redundanz- oder Lastverteilungsbetrieb ausgestattet.

Gleich- und Wechselstromversorgung
1Stellen Sie sicher, dass der Switch-Konsolen-Port ??ber das serielle Kabel (RJ-45 auf DB-9-Buchse) mit einem VT100-Terminal oder einem System mit VT100-Terminal-Emulator verbunden ist.
2Verbinden Sie ein handels??bliches 1,5 m (5 Fu??) langes, ordnungsgem???? geerdetes Stromkabel mit dem Netzstromanschluss auf der Ger??ter??ckseite (siehe Abbildung 1-26 auf Seite 190).
3Verbinden Sie das Stromkabel mit einer geerdeten Netzsteckdose.
Abbildung 1-26. Zwei redundante Netzteile am Switch-Modell N3048
Zur Wechselstromquelle
Starten eines Switches der Reihe N30xx
Wenn das Ger??t mit dem lokalen Terminal bereits verbunden ist und der Strom eingeschaltet wird, durchl??uft der Switch den Einschaltselbsttest (Power-On Self-Test = POST). Der Einschalt-Selbsttest wird bei jeder Initialisierung des Switches durchlaufen; dabei werden Hardwarekomponenten ??berpr??ft, um vor dem eigentlichen Startvorgang festzustellen, ob das Ger??t vollst??ndig betriebsbereit ist. Wenn beim POST ein kritisches Problem festgestellt wird, bricht der Programmablauf ab. Bei erfolgreicher Ausf??hrung des POST wird eine g??ltige Firmware in den RAM geladen. Die Fehler- bzw. Erfolgsmeldungen des POST werden auf dem Terminal angezeigt. Der Startvorgang dauert ungef??hr 60 Sekunden.
Sie k??nnen das Boot-Men?? aufrufen, wenn der erste Teil des POST abgeschlossen ist. Vom Boot-Men?? aus lassen sich z. B. folgende Konfigurationsaufgaben durchf??hren: Zur??cksetzen des Systems auf die Herstellervorgaben, Aktivieren des Backup-Images und Wiederherstellen eines Kennworts. Weitere Informationen ??ber die Boot-Men??funktionen finden Sie im CLI Reference Guide (CLI-Referenzhandbuch).

Durchf??hren der Erstkonfiguration eines N30xx
Die Erstkonfiguration setzt folgende Punkte voraus:
???Der Dell Networking-Switch wurde noch nie konfiguriert.
???Der Dell Networking-Switch wurde erfolgreich gestartet.
???Es besteht eine Konsolenverbindung, und die Befehlszeile des Dell Easy- Setup-Assistent wird auf dem Bildschirm des VT100-Terminals bzw. des entsprechenden Systems angezeigt.
Die Erstkonfiguration des Switches wird ??ber den Konsolen-Port vorgenommen. Nach der Erstkonfiguration k??nnen Sie den Switch entweder ??ber die bereits bestehende Konsolenverbindung verwalten oder aus der Ferne ??ber eine Schnittstelle, die bei der Erstkonfiguration definiert wird.
ANMERKUNG: Der Switch ist nicht mit einem Standardbenutzernamen oder - kennwort konfiguriert. Die Standard-IP-Adresse f??r den Au??enband (OOB)-Port ist auf DHCP eingestellt.
Bevor Sie die Erstkonfiguration des Switches durchf??hren, erfragen Sie beim Netzwerkadministrator die folgenden Informationen:
???Die IP-Adresse, die der Verwaltungsschnittstelle zugewiesen werden soll
???Die IP-Subnetzmaske f??r das Netzwerk
???Die IP-Adresse des Standard-Gateways f??r die Verwaltungsschnittstelle.
Diese Einstellungen sind f??r die Fernverwaltung des Switches ??ber Telnet (Telnet-Client) oder HTTP (Web-Browser) erforderlich.
Aktivieren der Fernverwaltung
Auf der Vorderseite eines Switches der Reihe N30xx befindet sich ein Gigabit- Ethernet-Port f??r die Au??enbandverwaltung (OOB). Die Position des OOB- Ports ist rechts neben dem Konsolen-Port. Bei Switches der Reihe N30xx k??nnen Sie den OOB-Port oder jeden der Switch-Ports auf der Vorderseite f??r die Inbandverwaltung verwenden. Standardm????ig geh??ren alle Inband-Ports zu VLAN 1.
Der Dell Easy-Setup-Assistent umfasst Befehlszeilen zur Konfiguration der Netzwerkinformationen f??r die OOB-Verwaltungsschnittstelle am N30xx- Switch und die VLAN 1-Schnittstelle an den N30xx-Switches. Bei beiden

Verwaltungsschnittstellen k??nnen Sie eine feste IP-Adresse und Subnetzmaske zuweisen oder DHCP aktivieren und somit und einem DHCP- Server im Netzwerk diese Aufgabe ??bertragen.
Im CLI Reference Guide (CLI-Referenzhandbuch) erhalten Sie Informationen ??ber die CLI-Befehle zum Konfigurieren von Netzwerkinformationen.
Durchf??hren der Erstkonfiguration
Sie k??nnen die Erstkonfiguration mit dem Dell Easy-Setup-Assistent vornehmen oder ??ber die CLI (Befehlszeilenschnittstelle) durchf??hren. Der Assistent wird automatisch gestartet, wenn die Switch- Konfigurationsdatei leer ist. Sie k??nnen den Assistenten jederzeit beenden, indem Sie [Strg+z] eingeben, doch gehen dabei alle festgelegten Konfigurationeinstellungen verloren und der Switch verwendet die Standardwerte.
ANMERKUNG: Wenn Sie den Dell Easy-Setup-Assistent nicht ausf??hren oder auf die anf??ngliche Easy Setup-Eingabeaufforderung nicht reagieren, wechselt der Switch in die CLI-Betriebsart. Der Switch muss mit einer leeren Startkonfiguration zur??ckgesetzt werden, damit der Dell Easy-Setup-Assistent erneut ausgef??hrt werden kann.
Weitere Informationen ??ber das Durchf??hren der Erstkonfiguration mit der CLI erhalten Sie im CLI Reference Guide (CLI-Referenzhandbuch).
Im vorliegenden Getting Started Guide (Handbuch zum Einstieg) ist erkl??rt, wie Sie den Dell Easy-Setup-Assistent f??r die Switch-Erstkonfiguration verwenden. Der Assistent konfiguriert den Switch wie folgt:
???Einrichtung des anf??nglichen uneingeschr??nkten Benutzerkontos mit g??ltigem Kennwort. Der Assistent konfiguriert beim Setup ein uneingeschr??nktes Benutzerkonto.
???M??glichkeit f??r CLI-Login und HTTP-Zugriff zur Verwendung der lokalen Authentisierungseinstellungen.
???Einrichtung der IP-Adresse f??r die OOB-Verwaltungsschnittstelle.
???Einrichtung der IP-Adresse f??r die VLAN 1-Routingschnittstelle, zu der alle Inband-Ports geh??ren.
???Einrichtung des SNMP-Community-Strings f??r den SNMP-Manager an einer bestimmten IP-Adresse. Sie k??nnen diesen Schritt auslassen, wenn f??r den Switch kein SNMP-Management verwendet wird.
???M??glichkeit zum Festlegen der IP-Adresse des Verwaltungssystems oder Zulassen des Verwaltungszugriffs von allen IP-Adressen.
???Konfiguration der Standard-Gateway-IP-Adresse f??r die VLAN 1-Schnittstelle.
Beispielsitzung
Dieser Abschnitt beschreibt einen Sitzung mit dem Dell Easy-Setup- Assistent. Folgende Werte werden in diesem Beispiel verwendet:
???Der zu verwendende SNMP-Community-String lautet public.
???Die IP-Adresse des Netzwerk-Verwaltungssystems (NMS) lautet
10.1.2.100.
???Der Benutzername lautet admin und das Kennwort ist admin123.
???Die OOB-Verwaltungsschnittstelle verwendet DHCP f??r das Zuweisen von IP-Adressen.
???Die IP-Adresse f??r die VLAN 1-Routingschnittstelle ist 10.1.1.200 und die Subnetzmaske lautet 255.255.255.0.
???Das Standard-Gateway ist 10.1.1.1.
Der Setup-Assistent konfiguriert die Anfangswerte wie oben definiert. Nach dem Abschlie??en des Assistenten ist der Switch wie folgt konfiguriert:
???SNMPv2 ist aktiviert, und der Community-String ist eingerichtet wie oben definiert. SNMPv3 ist standardm????ig deaktiviert.
???Das admin-Benutzerkonto ist eingerichtet wie definiert.
???Ein Netzwerk-Verwaltungssystem ist konfiguriert. Von dieser Verwaltungsstation k??nnen Sie auf die SNMP-, HTTP- und CLI- Schnittstelle zugreifen. Sie k??nnen auch festlegen, dass diese Verwaltungsschnittstellen von allen IP-Adressen zug??nglich sein sollen, indem Sie die IP-Adresse (0.0.0.0) w??hlen.
???DHCP ist an der OOB-Verwaltungsschnittstelle aktiviert.
???Eine IP-Adresse ist f??r die VLAN 1-Routingschnittstelle konfiguriert.
???Eine Standard-Gateway-Adresse ist konfiguriert.
ANMERKUNG: Im folgenden Beispiel stehen die f??r den Benutzer w??hlbaren Optionen oder die Standardwerte in eckigen Klammern [ ]. Wenn Sie die <Eingabetaste> dr??cken, ohne eine Option gew??hlt zu haben, akzeptieren Sie damit den Standardwert. Hilfetexte sind in Klammern gesetzt.
Konsolenbeispiel mit dem Dell Easy-Setup-Assistenten
Das folgende Beispiel enth??lt eine Abfolge von Eingabeaufforderungen und Reaktionen im Rahmen einer beispielhaften Sitzung mit dem Dell Easy- Setup-Assistent, wobei die oben genannten Eingabewerte verwendet werden.
Nachdem der Switch den Einschaltselbsttest durchlaufen und den Startvorgang abgeschlossen hat, wird der folgende Dialog angezeigt:
Unit 1 - Waiting to select management unit)>
(Ger??t 1 - Warten auf Auswahl des Verwaltungsger??ts)
Applying Global configuration, please wait ...
(Globale Konfiguration wird angewendet, bitte warten ...)
Welcome to Dell Easy Setup Wizard (Willkommen beim Dell Easy-Setup-Assistenten)
The Setup Wizard guides you through the initial switch configuration, and gets you up and running as quickly as possible. (Der Setup-Assistent f??hrt Sie durch die Erstkonfiguration des Switches und macht das System auf schnellstem Weg einsatzbereit.) You can skip the setup wizard, and enter CLI mode to manually configure the switch (Sie k??nnen den Setup-Assistenten umgehen und den Switch im CLI-Modus manuell konfigurieren.) You must respond to the next question to run the setup wizard within 60 seconds, otherwise the system will continue with normal operation using the default system configuration. (Sie m??ssen innerhalb von 60 Sekunden best??tigen, dass Sie den Setup-Assistenten wirklich starten m??chten. Anderenfalls wird der normale Systembetrieb mit der Standard-Systemkonfiguration fortgesetzt.) Note (Hinweis): You can exit the setup
wizard at any point by entering [ctrl+z]. (Der Setup- Assistent l??sst sich jederzeit durch Dr??cken von [STRG+Z] beenden.)
Would you like to run the setup wizard (you must answer this question within 60 seconds)? (M??chten Sie den Setup-Assistenten jetzt aufrufen (diese Frage muss innerhalb von 60 Sekunden beantwortet werden)?) [Y/N] y ([J/N] j)
Step 1 (Schritt 1):
The system is not set up for SNMP management by default. (Das System ist standardm????ig nicht f??r SNMP- Verwaltung eingerichtet.) To manage the switch using SNMP (required for Dell Network Manager) you can (Zur Verwaltung des Switches mit SNMP [notwendig f??r Dell Network Manager] bestehen folgende M??glichkeiten:)
. Set up the initial SNMP version 2 account now. (Ersteinrichtung eines SNMP-Accounts (Version 2) jetzt durchf??hren.)
. Return later and set up other SNMP accounts. (Sp??ter hierher zur??ckkehren und weitere SNMP-Konten
Would you like to set up the SNMP management interface now? (M??chten Sie die SNMP-Verwaltungsschnittstelle jetzt einrichten?) [Y/N] y ([J/N] j)
To set up the SNMP management account you must specify the management system IP address and the ???community string??? or password that the particular management system uses to access the switch. (Um das SNMP- Verwaltungskonto einzurichten, m??ssen Sie die IP- Adresse des Verwaltungssystems und den ???Community- String??? oder das Kennwort des spezifischen Verwaltungssystems f??r den Switch-Zugriff festlegen.)

The wizard automatically assigns the highest access level [Privilege Level 15] to this account. (Der Assistent weist diesem Konto automatisch die h??chste Zugangsstufe zu [Berechtigungsstufe 15].) You can use Dell Network Manager or other management interfaces to change this setting, and to add additional management system later. (Mit Dell Network Manager oder anderen Verwaltungsschnittstellen k??nnen Sie diese Einstellung sp??ter ??ndern oder weitere Informationen zum Verwaltungssystem hinzuf??gen.) For more information on adding management systems, see the user documentation. (Weitere Informationen ??ber das Hinzuf??gen von Verwaltungssystemen erhalten Sie in der Benutzerdokumentation.)
To add a management station: (So f??gen Sie eine Verwaltungsstation hinzu:)
Please enter the SNMP community string to be used. (Geben Sie den zu verwendenden SNMP-Community-String ein.) [public]: public
ANMERKUNG: Falls konfiguriert, ist die Standard-Zugriffsebene f??r die SNMP- Verwaltungsschnittstelle auf den h??chstm??glichen Wert gesetzt. Anf??nglich ist nur SNMPv2 aktiviert. SNMPv3 ist deaktiviert, bis Sie zur??ckkehren und den Sicherheitszugriff f??r SNMPv3 konfigurieren (z. B. engine ID, view etc.).
Please enter the IP address of the Management System (A.B.C.D) or wildcard (0.0.0.0) to manage from any Management Station. (Geben Sie die IP-Adresse des Verwaltungssystems (A.B.C.D) ein oder verwenden Sie den Platzhalter (0.0.0.0), um die Verwaltung von jeder Verwaltungsstation aus zu erm??glichen.) [0.0.0.0]:
10.1.2.100
Step 2 (Schritt 2):
Now we need to set up your initial privilege (Level 15) user account. (Nun wird das Benutzerkonto mit der anf??nglichen Berechtigungsstufe [Stufe 15] eingerichtet.) This account is used to login to the CLI and Web interface. (Dieses Konto dient zur
Anmeldung bei der Befehlszeilenschnittstelle und der Webschnittstelle.) You may set up other accounts and change privilege levels later. (Sie k??nnen sp??ter weitere Konten anlegen und die Berechtigungsstufen ??ndern.) For more information on setting up user accounts and changing privilege levels, see the user documentation. (Weitere Informationen zum Einrichten von Benutzerkonten und ??ndern von Berechtigungsstufen finden Sie in der Benutzerdokumentation.)
To set up a user account: (So richten Sie ein Benutzerkonto ein:)
Please enter the user name. (Geben Sie den Benutzernamen ein.) [root]:admin
Please enter the user password: (Geben Sie das Benutzerkennwort ein:) ********
Please reenter the user password: (Geben Sie das Benutzerkennwort erneut ein:) ********
Step 3 (Schritt 3):
Next, IP addresses are set up on the OOB (Out-Of-Band) Interface and/or the VLAN 1 routing interface. (Als N??chstes werden IP-Adressen an der Au??enbandschnittstelle [OOB = Out-Of-Band] und/oder der VLAN 1-Routingschnittstelle eingerichtet.)
You can use these IP addresses to access the CLI, Web interface, or SNMP interface of the switch. (Sie k??nnen diese IP-Adressen f??r den Zugriff auf die CLI- , Web- und SNMP-Schnittstelle des Switches verwenden)
To access the switch through any Management Interface you can (F??r den Switch-Zugriff ??ber eine beliebige Verwaltungsschnittstelle k??nnen Sie)
. Set up the IP address for the Management Interface. (IP-Adresse f??r die Verwaltungsschnittstelle einrichten)
. Set up the default gateway if IP address is manually configured on both routing and OOB interface.
(Standard-Gateway festlegen, wenn die IP-Adresse manuell auf der Routing- und der OOB-Schnittstelle konfiguriert wird.)
Would you like to set up the Out-Of-Band interface now? (M??chten Sie jetzt die au??enbandige Schnittstelle einrichten?) [Y/N] y ([J/N] j)
Please enter the IP address of the device (A.B.C.D) or enter ???DHCP??? (without the quotes) to automatically request an IP address from the network DHCP server. (Bitte geben Sie die IP-Adresse des Ger??ts [A.B.C.D] ein bzw. ???DHCP??? (ohne Anf??hrungszeichen), um eine IP- Adresse vom DHCP-Netzwerkserver zu beziehen.) [DHCP]:
dhcp
Step 4 (Schritt 4):
Would you like to set up the VLAN1 routing interface now? (M??chten Sie die VLAN 1-Routingschnittstelle jetzt einrichten?) [Y/N] y ([J/N] j)
Please enter the IP address of the device (A.B.C.D) or enter ???DHCP??? (without the quotes) to automatically request an IP address from the network DHCP server: (Bitte geben Sie die IP-Adresse des Ger??ts [A.B.C.D] ein bzw. ???DHCP??? (ohne Anf??hrungszeichen), um eine IP- Adresse vom DHCP-Netzwerkserver zu beziehen:)
10.1.1.200
Please enter the IP subnet mask (A.B.C.D or /nn): (Geben Sie die IP-Subnetzmaske ein [A.B.C.D oder /nn]:) 255.255.255.0
Step 5 (Schritt 5):
Finally, set up the default gateway. (Zum Schluss wird das Standard-Gateway eingerichtet.) Please enter the IP address of the gateway from which this network is reachable. (Geben Sie die IP-Adresse des Gateways ein, ??ber die das Netzwerk erreichbar ist.) [0.0.0.0]:
10.1.1.1
This is the configuration information that has been collected: (Die folgenden Konfigurationsdaten wurden erfasst:)
SNMP Interface = ???public???@10.1.2.100 (SNMP-Schnittstelle = ???public???@10.1.2.100) User Account setup = admin (Eingerichtetes Benutzerkonto = admin) Password = ******** (Kennwort = ********)
Out-of-band IP address = DHCP (Au??enband-IP-Adresse = DHCP)
VLAN1 Router Interface IP = 10.1.1.200 255.255.255.0 (IP der VLAN1-Routingschnittstelle = 10.1.1.200 255.255.255.0)
Default Gateway = 10.1.1.1 (Standard-Gateway = 10.1.1.1)
Step 6 (Schritt 6):
If the information is correct, please enter (Y) to save the configuration and copy the settings to the start-up configuration file. (Wenn die Informationen korrekt sind, geben Sie [J] ein, um die Konfiguration zu speichern und die Einstellungen in die Start- Konfigurationdatei zu kopieren.) If the information is incorrect, enter (N) to discard the configuration and restart the wizard: (Wenn die Angaben nicht korrekt sind, geben Sie [N] ein, um die Konfiguration zu verwerfen und den Assistenten neu zu starten:) [Y/N] y ([J/N] j)
Thank you for using the Dell Easy Setup Wizard. (Der Dell Easy Setup-Assistant ist damit abgeschlossen.) You will now enter CLI mode. (Sie gelangen nun in den CLI-Modus.)
Applying Interface configuration, please wait ...
(Schnittstellenkonfiguration wird angewendet, bitte warten ...)
N??chste Schritte
Nach dem Durchf??hren der Erstkonfiguration gem???? diesem Abschnitt k??nnen Sie den OOB-Port mit dem Verwaltungsnetzwerk f??r Au??enband- Fernverwaltung verbinden oder jeden der Switch-Ports auf der Vorderseite mit dem Produktionsnetzwerk f??r Inband-Fernverwaltung verbinden.
Wenn Sie f??r die IP-Adresse des OOB- oder VLAN 1- Verwaltungsschnitttstelle DHCP festlegen, fordert die Schnittstelle seine IP- Adresse von einem DHCP-Server im Netzwerk an. Um die dynamisch zugewiesene IP-Adresse anzuzeigen, geben Sie ??ber die Konsolen-Port- Verbindung folgende Befehle ein:
???Geben Sie f??r die OOB-Schnittstelle ein: show ip interface out-of-band.
???Geben Sie f??r die VLAN 1-Routingschnittstelle ein: show ip interface.
Um auf die Dell OpenManage Switch Administrator-Schnittstelle zuzugreifen, geben Sie die IP-Adresse der OOB-Verwaltungsschnittstelle in die Adresszeile eines Webbrowsers ein. Um CLI-Fernverwaltungszugriff zu erhalten, geben Sie die IP-Adresse der VLAN 1-Verwaltungsschnittstelle in einen Telnet- oder SSH-Client ein. Alternativ k??nnen Sie weiterhin den Konsolen-Port zum lokalen CLI-Zugriff auf den Switch verwenden.
Der N30xx-Switch unterst??tzt grundlegende Switch-Funktionen wie VLANs und das Spanning Tree-Protokoll. Die Switches der Reihe N30xx unterst??tzen zudem erweiterte Layer 3-Funktionen wie etwa das dynamische Routing und Multicast. Verwenden Sie die Web-Verwaltungsschnittstelle oder die CLI, um die Funktionen so zu konfigurieren, wie Ihr Netzwerk sie erfordert.
Informationen ??ber das Konfigurieren von Switch-Funktionen finden Sie im
User???s Configuration Guide (Konfigurationsanleitung) oder im CLI Reference Guide (CLI-Referenzhandbuch) auf der Support-Website: dell.com/support/manuals.
???????????????????? Dell ??????????
N20xx/N30xx
?????????????????????? ???? ????????????
????????????
?????????????????????? ????????????: N2024, N2024P, N2048, N2048P, N3024, N3024P, N3048, N3048P, N3024F

????????????????????, ???????????????????????????? ?? ??????????????????????????????
????????????????????: ?? ?????????????????????? ???????????????????? ???????????? ????????????????????, ?????????????? ?????????????? ???????????????????????? ???????????????????? ?????????? ????????????????????.
????????????????: ???????????????? ?????????????????? ???? ?????????????????????? ?????????????????????? ???????????????????????? ?????? ???????????? ???????????? ?? ??????????????????, ?????? ?????????? ????????????????.
????????????????????????????: ???????????????????????????? ?????????????????? ???? ?????????????????????????? ?????????????????? ??????????????????????, ?????????????????? ?????????? ?????? ???????????? ?????? ??????????.
____________________
?? 2013 Dell Inc.
???????????????? ??????????, ???????????????????? ?? ???????????? ??????????????????: Dell??, ?????????????? DELL, OpenManage??? ?? ReadyRails??? ???????????????? ?????????????????? ?????????????? ???????????????????? Dell Inc. Microsoft?? ?? Windows??
???????????????? ?????????????????? ?????????????? ???????????????????? Microsoft Corporation ?? ?????? ??/?????? ???????????? ??????????????.
?????????????????????? ???????????? N2024, N2024P, N2048, N2048P, N3024, N3024P, N3048, N3048P, N3024F
??????????????, 2013 ??. P/N F5CWH ??????. A00
????????????????????
1???????????????? . . . . . . . . . . . . . . . . . . . . . . . 207
2?????????? ?????????? N20xx . . . . . . . . . . . . . . . . 207
3?????????? ?????????????????????? ??????????????????????
?????????? N20xx . . . . . . . . . . . . . . . . . . . . . . 208
4 ?????????????????? ?????????? N20xx . . . . . . . . . . . . . 215
?????????????????? ?? ???????????? ????????????????????
???????????????????????? N20xx. . . . . . . . . . . . . . . . . . . . 219
???????????????? ?????????? ???????????????????????? . . . . . . . . . . . . 219
5???????????? ?? ???????????????????????? ??????????????????????
?????????? N20xx . . . . . . . . . . . . . . . . . . . . . . 222
?????????????????????? ?????????????????????? ?????????? N20xx
6?????????? ?????????? N30xx . . . . . . . . . . . . . . . . . 235
7?????????? ?????????????????????? ??????????????????????
?????????? N30xx . . . . . . . . . . . . . . . . . . . . . . 235
?????????????????? ???????????????? ?????????????????????? ?????????? ?? ?????????????????????? ???????????? ?????????? . . . . . . . . . . . . . 240
???????????? ???????????? ?????????? N30xx. . . . . . . . . . . . . . . . 241
?????????? ???????????????????? ?????? ???????????????????????? ?????????????? . . 242
?????????????????? ??????????????. . . . . . . . . . . . . . . . . . . 243 ?????????????? ????????????????????. . . . . . . . . . . . . . . . . . 244
?????????????? ???????????? ???????????? N30xx . . . . . . . . . . . . . 244
8 ?????????????????? ?????????? N30xx . . . . . . . . . . . . . 246
9???????????? ?? ???????????????????????? ??????????????????????
?????????? N30xx . . . . . . . . . . . . . . . . . . . . . . 256
?????????????????????? ?????????????????????? ?????????? N30xx

????????????????
?? ?????????????????? ???????????????????????? ???????????????? ???????????????? ?? ???????????????????????? ?????????? Dell N20xx/N30xx, ?? ?????? ?????????? ???? ???? ?????????????????? ?? ?????????????????? ????????????????????????. ?????????? ????????????, ?????? ?????????????????? ???????????????????? ?? ?????????????????? ?????? ??????????????????, ???????????????????????? ?? ???????????????????? ???????????????? ?????????????????????? ???????????????????????? ?? ?????????????????????? ?? ?????????????????????? ??????????????????????, ???????????????????????? ?? ?????????????????????? ???? ??????????????????, ?????????????? ?????????? ?????????? ???? ??????-?????????? ?????????????????????? ?????????????????? ???????????????????? Dell dell.com/support/manuals.
???????????????? ???????????????? ?????????????????? ??????????????:
????????????? ?????????? N20xx
????????????? ?????????????????????? ?????????????????????? ?????????? N20xx
????????????????????? ?????????? N20xx
??????????????? ?? ???????????????????????? ?????????????????????? ?????????? N20xx
????????????? ?????????? N30xx
????????????? ?????????????????????? ?????????????????????? ?????????? N30xx
????????????????????? ?????????? N30xx
??????????????? ?? ???????????????????????? ?????????????????????? ?????????? N30xx
????????????????????: ?????????????????????????????? ???????????????????????? ???????????????????????? ?????????????????????????? ?????????????????? ???? ?????????????? ???????????????????????? Dell ???? ?????????????????? ???????????? ???????????????????????? ?????????????? Dell Networking (DNOS). Dell Networking
???????????????????? ???????????????????????????? ?????????????? ?? ???????????????????????????? ???? DNOS ???? ?????????????????? ???????????????????? ???? ???????????????? ??????????????. ?????? ?????????????????????????? ???????????? ???????????????????????????? ?????????????????????????? ???????????????????????????? ?????????????????????? ?? ???????????????????????????? ?????????? ???????????? ???? ?????????? ???????????? ?????????????? ????????, ?????????? ?????????????????? ?? ???????????????????? ???????????????????????? ?? ???????????? ?????????????????? ?? ?????????? ?????????????? ???? DNOS.
?????????? ?????????? N20xx
?????????????????????? Dell N20xx ??? ?????? ???????????????? ?????????????????????? Gigabit Ethernet 2-???? ????????????, ???????????????????? ?? ???????? ?????????????????? ????????????:
???Dell N2024
???Dell N2024P
???Dell N2048
???Dell N2048P

?????????? ?????????????????????? ?????????????????????? ?????????? N20xx
???????? ???????????? ???????????????? ???????????????????? ?? ?????????????????????????????? ???????????????????? ?? ???????????????????? ?????????????????????????? ?????????????? ???????????????????????? ?????????? N20xx.
?????? ???????????? N20xx ?????? ?????????????????? ???????????????????? PoE ???????????????????????? ?????????? ?????????????????????? ?????????????? 1U ?? ???????????????????????? ?????????????????? ?? ???????????? ?? ?????????? ?????????????????? ???????????????????? ??????????????:
???440,0 x 257,0 x 43,5 ???? (?? x ?? x ??).
???17,3 x 10,1 x 1,7 ???????????? (?? x ?? x ??).
?????? ???????????? N20xx ?? ???????????????????? ???????????????????? PoE ???????????????????????? ?????????? ?????????????????????? ?????????????? 1U ?? ???????????????????????? ?????????????????? ?? ???????????? ?? ?????????? ?????????????????? ???????????????????? ??????????????:
???440,0 x 387,0 x 43,5 ???? (?? x ?? x ??).
???17,3 x 15,2 x 1,7 ???????????? (?? x ?? x ??).
???????????????? ???????????? ?????????? N20xx
???? ?????????????????? ???????????????????????? ???????????????? ???????????????? ???????????? ?????????????? ???????????????????????? ?????????? N20xx.
?????????????? 1-1. ?????????? N2048 ?? 48 ?????????????? 10/100/1000BASE-T (???????????????? ????????????)
???????????????????? ???????? ???????? USB
?????????? ???????????? ???????????????????????? ???? ???????????????? ???????????? ???????????? ???????????? ?????????? N20xx ?????????????????????? ?????????????????? ??????????:
??????????????????????? ????????
??????????? USB
?????????????? 1-2. N2024 ?????????????????????? ??????????????????????
?? ?????????????? ???????? ???????????????? ???????????? N20xx, ???????????????????? ???? ??????. 1-2, ?????????????????????? ???????????????????? ?????????????????? ?????????????? ???????????????????? ??????????????????????, ?????????????????? ?????????????? ?? ?????????????????? ??????????????. ???????????????????? ?????????????????? ?? ???????????? ???????? ???????????????????? ?????????????????? ???????????????? ?????????????????????? ??????????, ???????????????????? ?????????????????? ?????????????? ?? ?????????????? ??????????????????????.

?????????????? 1-3. N2024P ?????????????????????? ??????????????????????
?? ?????????????? ???????? ???????????????? ???????????? N20xxP, ???????????????????? ???? ??????. 1-3, ?????????????????????? ???????????????????? ?????????????????? ?????????????? ???????????????????? ??????????????????????, ?????????????????? ?????????????? ?? ??????????????????. ???????????????????? ?????????????????? ?? ???????????? ???????? ???????????????????? ?????????????????? ???????????????? ?????????????????????? ??????????, ?????????????????? ?????????????? ?????????????????? ?????????????????????? ?? ?????????????? ??????????????????????.
?????????? ??????????????????????
???? ???????????????? ???????????? N2024/N2024P ?????????????????????????? 24 ?????????? Gigabit Ethernet (10/100/1000BASE-T) RJ-45 ?? ???????????????????? ?????????????? ?????????????????????????????? ???????????????????????? ????????????????, ???????????????????? ?????????????? ?? ?????????????????????? ????????????. ???????????? N2024/N2024P ???????????????????????? ?????? ?????????? SFP+ 10 ????????. ???????????????????? SFP+, ?????????????????????????????? ?????????????????????? Dell, ?????????????????? ????????????????.
???? ???????????????? ???????????? N2048/N2048P ?????????????????????????? 48 ???????????? Gigabit Ethernet (10BASE-T, 100BASE-TX, 1000BASE-T) RJ-45 ?? ???????????????????? ?????????????? ?????????????????????????????? ???????????????????????? ????????????????, ???????????????????? ?????????????? ?? ?????????????????????? ????????????. ???????????? N2048/N2048P ???????????????????????? ?????? ?????????? SFP+ 10 ????????. ???????????????????? SFP+, ?????????????????????????????? ?????????????????????? Dell, ?????????????????? ????????????????.
???????????????????????????? ???????????? ??????????????????????, ?????????????????????????? ???? ???????????????? ????????????.
??????????????????????? ?????????????????????????? ???????????????????????? ???????????? ?? ???????????????????????? ?????????????????????? ???????????? ?? ?????????? RJ-45 ?? ?????????????????????????? ???????????????? ???????????????????????? MDI ?????? MDIX ?????? ???????????????????????? ????????????????????, ?????????????????????????? ?? ?????????????? ?????????? ????????????.
????????????? SFP ???????????????????????? ???????????????????? SFP, ?????????????????????????????? ?????????????????????? Dell.
??????????? RJ-45 ???????????????????????? ???????????? ?? ?????????????????????????????? ???????????? ???? ?????????????????? 10/100/1000 ????????/?? ?????? ?????????????????????????? ?????????????????????? ?????????? ???????? ?????????????????? 5.
????????????? SFP+ ???????????????????????? ?????????????????????????? ?????????????????????? SFP+ ?? ?????????????? ?????????????????????????????? ???????????? SFP+, ?? ?????????? ?????????????????????? SFP, ???????????????????? ???? ?????????????????? 1 ????????/??.
????????????? ???? ???????????????? ???????????? N2024P/N2048P ???????????????????????? ????????????????????
PoE (15,4 ????) ?? PoE+ (30 ????).
???????????????????? ????????
???????????????????? ???????? ???????????????????????? ?????????????????????? ?????????????????????????????????? ????????????????????, ?????? ?????????????????? ???????????????????? ?????????? ?? ?????????????? ?????????????????? RS-232. ?? ?????????????? ?????????????????????????????????? ?????????? ?????????? ?????????????????? ???????????? ?????????????????????? ?? ?????????????????????? ?? ???????????????? ???????????? ?? ???????????????????? ?????????????????? ???????????? (CLI) ???? ?????????????????????? ??????????????????, ?????????????????????????? ?? ?????????? ?? ?????????????? ?????????????????? ???????????? (?? ???????????????? RJ45 YOST ?????? ???????????? DB-9).
???????????????????? ???????? ?????????? ?????????????????????? ???????????????? ?? ???????????????????????? ?????? ?????????????????????? ?????????? ???? ???????????????? ???? 1200 ???? 115 200 ??????.
?????????????????? ?????????????????? ???????????? Dell ???????????????????????? ???????????? ?????????????????? ????????????????. ???? ?????????????????? ?????????????????????? ?????????? ??????????????????: ???????????????? 9600 ??????, 8 ?????? ????????????, ???????????????? ???????????????? ????????????????, 1 ???????????????? ??????, ???????????????????? ?????????????? ??????????????????.
???????? USB
USB-???????????? ???????? A ???????????????????????? ????????-????????????????????, ?????????????????????? ?? USB 2.0. ???????????????????? Dell Networking ???????????????????????? ?????????????? ???????????? ?????? ???????????? ?????? ?????????????????????????? ????????-????????????????????, ???????????????????????????????????? ?? FAT-32. ????????- ???????????????????? USB ?????????? ???????????????????????? ?????? ?????????????????????? ???????????? ???????????????????????? ?? ?????????????????????? ?????????????????????? ?????????? ????????-?????????????????????? USB ?? ????????????????????????. ????????-???????????????????? USB ?????????? ?????????? ???????????????????????? ?????? ?????????????????????? ?? ?????????????????????? ???????????? ???????????????????????? ?? ?????????????????????? ???? ???????????? ?????????????????????? ???? ???????????? ?????????????????????? ?? ????????.
USB-???????? ???? ???????????????????????? ?????????????????????????? USB-?????????????????? ???????????? ??????????.
???????????? ??????????????
???????????? ?????????????? ???????????????? ?? ?????????????? ???????????????????? ?????????????????? ?? ?????????????????? ?????????????????? ???????????????????? ???????????????????????? ??????????????????????. ?????? ?????????????????????????? ???????????? ???????????? ???????????????? ?? ?????????????????? ???????????????????????? ???????????????????????? ?????????????? ?????? ???????????????? ??????????????. ?????????? ???????????????????? ???????????????? ?????????????????????? ?? ???????????????????? ???????????????????? ???????????? ???? ???????????????????? ???????????? ?????? ?????????????????????????? ?????????????????? ?????????????????????? ????????????????????????. ?????? ??????????????????, ?????????????? ???????? ?????????????? ?? ?????????????? ????????????????????????, ???? ???? ???????? ?????????????????? ???? ???????????? ???????????????????? ????????????, ?????????? ??????????????.
???????????????????? ???????????? ?? ?????????????????? ????????????????????
???? ???????????????? ???????????? ?????????????????????? ???????????????????????? ????????????????????, ???????????????????????? ?????????????????? ????????????????????, ???????????????????? ??????????????, ????????????????????????, ???????????????????????? ?? ?????????? ?????????????????? ??????????????.
?????? ?????????????????? ???????????????????? ???? ???????????????????????? ???????????????????????? ?????????????????? ????.
?????????????????????? ???? ??????????????????.
?????????????????? ???????????????? ?????????????????????? ?????????? ?? ?????????????????????? ???????????? ??????????
???????? ???????????????????? ?? ?????????? ???????????????? ?????????????? ??????????????????????, ?????????????????? ???????????????? ?????????????????????? ?????????? ?? ???????????????? M ???????????????????? ???????????????? ?????????????? ????????????. ???????? ?????????????????? ?? ???????????????? M ???? ????????????????, ???????????????????? ?? ?????????? ???? ???????????????? ?????????????? ??????????????????????. ???? ???????????? ???????????? ?????????? ???????????????????????? ?????????? ???????????????????? ?? ??????????. ???????? ???????????????????? ???? ???????????????? ???????????? ?????????? (?????????????? ??????????????, ???????? ?????????????? ???? ???????????? ??????????????????????), ?????????????????? ?? ???????????????? M ???????????????? ?? ???????????????????????? ?????????? ????????????????????.
???????????? ???????????? ?????????? N20xx
???? ?????????????????? ???????????????????????? ???????????????? ???????????? ???????????? ???????????????????????? N20xx.
?????????????? 1-4. ???????????? ???????????? N20xx
?????????????? 1-5. ???????????? ???????????? N2024P/N2048P
???????????? ??mini-SAS?? ?????????????????? ?? ?????????????????? ???????????????????????? ?? ???????????????? ????????????, ???????????????????? ???? ??????. 1-6. ???????????????????????????? ???????????????????? ???? ?????????????????????????? ???????????? mini-SAS ?????? ?????????????????????? ???????????????????????? ????. ?? ?????????????????? ?? ???????????? ???????????????????? ???????????????????????? N20xx.
?????????????? 1-6. ???????????????? ?????????? Mini-SAS ?? ?????????????????????? N2048
???????????????? ??????????
Mini-SAS

?????????????????? ??????????????
N2024 ?? N2048
?????? ???????????????????????? N2024 ?? N2048 ???????????????????????? ???????????????????? ???????????????? ?????????????? 100 ????. ???????????????????????????? ?????????????????? ???????????????? ?????????????? (Dell Networking RPS720) ???????????????????????? ?????? ?????????????????????? ?????????????? 180 ???????? ?? ???????????? ?????????? ????????????????.
N2024P ?? N2048P
?????? ???????????????????????? Dell Networking N2024P ?? N2048P ???????????????????????? ???????????????????? ???????????????? ?????????????? 1000 ????, ???????????????????????????? ???????????????? ???? 24 ?????????????????? PoE ?????? ???????????? ???????????????? PoE+ (850 ????). ???????????????????????????? ?????????????? ???????????????? ?????????????? (MPS1000) ???????????????????????? ???????????????? 1000 ???????? ?? ?????????????????? ???????????????????????? ???????????????? ?????? 48 ?????????????????? PoE (1800 ????).
????????????????????: ???????????????? PoE ???????????????????????????? ??????????????????????. ???? ?????? ???????? ???????????? ?????????????????? ???????????? ???????????????? PoE+.
????????????????: ???????????? ?????? ?????????????? ???????? ??????????????, ?????????????????? ???????????? ?????????????? ???? ??????????????????????. ???? ?????????????????????? ???????????????? ?????????????? ?????????? ???????????????????? ?? ????????????.
?????????????? ????????????????????
???????????????????? ???????????????????????? N20xx ???????????????????????????? ?? ?????????????? ???????? ????????????????????????.
?????????????? ???????????? ???????????? N20xx
?????????????? 1. N20xx ?????????????? ???????????? ????????????

?????????????? 1. N20xx ?????????????? ???????????? ???????????? (??????????????????????)
?????????????????? ?????????? N20xx
???????????????????? ??????????
?????????????????????? ?????????? N20xx ?????????? ???????????????????? ?? ?????????????????????? ???????????? 48,26 ???? ?????? ???? ?????????????? ??????????????????????.
??????????????????, ?????? ?????????????????? ?????????? ?????? ?????????????????? ???????????????? ?????????????????? ??????????????????????.
?????????????????. ???????????????????? ???????????????????? ?????????? ???????????????????????????? ?????????????? ?????????????? 100???240 ?? ??????????. ????????, 50???60 ????.
????????????????????? ????????????????????????. ???????????? ???????? ???????????????????? ?????????? ?????????????? ?? ?????????? ?????? ???????????? ??????????????????. ?????????? ???????????????? ???????????????????? ?????????? ?????? ?????????????????? ??????????????????????, ?????????????? ?????????????? ?? ????????????????????.
????????????????????? ??????????????????????. ?????? ?????????????????? ?????????????? ?????????????? ???????????????? ???????????????????? ?????????????????????????? ??????????, ???????????????? ??????????????????????????????????, ???????????????????????????? ????????????????????, ?????????????????????????????? ?? ???????????????????????????? ?????????????????????????? ????????????????????.

????????????????????????? ???????????????????? ??????????. ???????????????????? ???????????????????????? ?????? ???????????? ?? ?????????????????? ???????????????????? ???? 0 ???? 45C ?????? ?????????????????????????? ?????????????????? ???? 95 ??????????????????, ?????? ???????????????????? ??????????????????????.
????????????????????: ???????????????????? ?????????????????????? ???????????????????? ?????????????????????? ???? 1 ??C (1.8??F) ???????????? 300(985 ??????.) ?? ???? ???????????? ?????????? 900
??(2955 ??????.).
????????????????????????????? ??????????????????. ???????????????????? ???????????????? ?????? ?????????????????????????? ?????????????????? ?? ???????????????? 8???85% (?????? ???????????????????? ??????????????????????). ???????????????????????? ?????????????? ?????????????????? ???????????????????? 10% ?? ??????.
???????????????????? ?????????????????????? N20xx
???????????????? ????????????????
?????? ???????????????????? ?????????????????????? ?????????????????? ?????????????? ?????????????????? ??????????????????????.
??????????? ???????????????????? Dell Networking
??????????? ???????????? ?? ?????????????????? RJ-45/DB-9
??????????? ???????????????? ?????? ?????????????? ?? ???????????? (N20xx), ?????? ?????????????????? ????????????????????, ?????????? ?? ?????????????????? ??????????
??????????? ?????????? ?????????????????????????? ?????????????????? ?????????????????? ?????? ???????????????? ???????????????? ?????????????????????? (???????????? ?????????????????? ?? ??????????????????)
?????????????????? ????????????????????
????????????????????: ?????????? ?????????????????????? ?????????????????????? ?????????????????? ?????????????????????? ???????????????? ?? ???????????????????? ???????????????? ?? ?????????? ???????????????????????? ??????????????????????.
1?????????????????? ?????????????????????? ?????????????? ???? ???????????? ?????????????? ?????????????????????? ?? ???????????????????? ?????? ?????????????????? ??????????.
2???????????????? ?????????????????????? ?????????????? ?????? ?????????????? ?? ?????? ?????????????? ????????????.
3?????????????????? ?????????????????? ???????????????????? ???? ?????????????????????? ?????????????? ?? ?????????????????? ?????? ?? ???????????????????? ?? ???????????? ??????????.
4???????????????? ?? ?????????????? ???????? ?????????????????????? ????????????????.
5?????????????????? ???????????????????? ?? ???????????????????????????? ???? ?????????????? ??????????????????????.

???????????? ?????????????????????? N20xx ?? ????????????
????????????????????????????: ???????????????????????? ?? ???????????????????????? ???? ?????????????? ????????????????????????, ?????????????????????? ?? ?????????????????? ?? ???????????????????????? ?? ????????????????????, ?? ?????????? ?? ???????????????????????? ???? ?????????????? ???????????????????????? ?????? ???????????? ????????????????????????, ???????????????????????? ?? ?????????????? ?????????????????????? ?????? ???????????????????????????? ??????.
???????????? ?????????????? ?????????????????????? ???????? ???????????????????? ???? ???????????? ???????????? ??????????????????????.
?????????????????? ?? ????????????
????????????????????????????: ???? ?????????????????????? ?????????????????? ?????? ?????????????? ?? ????????????, ?????????? ?????????????????? ???????????????????? ?????? ?????????????? ???????????? ?????? ???? ??????????.
????????????????: ???????????? ?????? ????????????????????, ?????????????????? ???? ?????????????????????? ?????? ????????????. ?????????????? ???? ???????????? ?????????? ?????????????????????? ?????? ?????????????????????????? ??????????????????, ???????? ?????? ???????? ??????????????????????.
????????????????: ?????? ?????????????????? ?? ???????????? ???????????????????? ???????????????????????? ???????????????????????????? ?????????????????????? ?????????? ??????????.
1?????????????????????? ?????????????????????? ?????????????????? ?????? ?????????????????? ?????????????? ?? ?????????? ?????????????? ?????????????????????? ?? ??????????????????, ?????? ?????????????????? ?????????????????? ???? ?????????????????????? ?????????????????? ?? ???????????????????? ?????????????????????? ?? ???????????????????? ?????? ?????????????????? ??????????????. ???? ??????. 1-7 ???????????????? ?????????? ?????????????????? ????????????????????.

?????????????? 1-7. ?????????????????? ??????????????????????
2???????????????? ?????????????????????? ?????????? ?? ?????????????????? ?????? ?????????????????? ?????????????? ?? ???????????????? ???? ?? ?????????????? ????????????????.
3?????????????????? ???????????? ???????????????? ?????? ???????????????????? ?????? ?????????????????? ??????????????, ???????????????????????????? ?? ???????????? ?????????????? ??????????????????????.
4???????????????? ???????????????????? ?? ???????????? 48,26 ???? (19") ?? ??????????????????, ?????? ?????????????????? ?????? ?????????????????? ?????????????? ???? ?????????????????????? ?????????????????? ?? ?????????????????????? ?????? ?????????????????? ?????????????? ?? ????????????.
5???????????????????? ???????????????????? ?? ???????????? ?? ?????????????? ???????????? ?????? ?????????????????? ?????????????? ?????? ?????????????????? ???????? ?? ???????????? ?????? ?????????????????? ???????? ?? ?????????????? (?? ?????????????????????? ???? ???????? ???????????????????????? ????????????). ?????????????? ?????????????????? ?????????? ??????????, ?????????? ??? ????????????.
????????????????: ??????????????????, ?????? ?????????????????????? ?????????? ?????? ?????????????????? ?????????????? ?????????????????????????? ???????????????????????????? ?????????????????????????? ???????????????????? ?? ????????????.
????????????????????: ??????????????????, ?????? ???????????????????????????? ?????????????????? ???? ??????????????.
?????????????????? ???????????????? ???????????????? ??????????????????????
????????????????????: ???????????????????????? ?????????????????????????? ?????????????????????????? ???????????????????? ?? ????????????.
???????? ???????????????????? ?????????????????????????????? ???? ?? ????????????, ???????????????????? ?????? ???? ?????????????? ??????????????????????. ?????????????????????? ???????????? ?????????????????????? ?????? ?????????????????????? ?? ?????????????? ??????????????????????. ???????????????? ?????????????????????? ???????????????? ?? ???????? ???????????? ??????????????????????????- ?????????????????? ??????????????????.

1???????????????????? ?????????????????????????? ?????????????????? ?????????????????? ?? ?????????????? ?????????????????????? ???????????????????????????? ???? ???????????? ???????????? ??????????????????????.
2???????????????????? ???????????????????? ???? ?????????????? ?????????????????????? ?? ?????????????????? ?? ?????????????????????? ???????????????????? ????????????????????, ?????????????? ?????????? 5 ???? ???? ???????????? ?????????????? ???????????? ?? 13 ???? ???? ???????????? ????????????.
?????????????????? ?? ???????????? ???????????????????? ???????????????????????? N20xx
?????????? ???????????????????? ?? ???????????? ???? 12 ???????????????????????? N20xx ?? ?????????????? ???????????? mini-SAS, ?????????????????????????? ???? ???????????? ???????????? ????????????????????????. ?????????????????????? N20xx ???????????????????????? ???????????????????????? ???????????? ?????????????????? ?? ?????????????????????????? ?????????? N20xx. ???????? ?????????????????? ???????????????????????? ???????????????????? ???????? ?? ?????????? ?? ?????????????? ???????????????? ????????????, ?????? ?????????????????????????? ?? ???????????????? ?????????????? ???????????????????? ?? ?????????? ?????????????????????? ???? 576 ???????????? ???? ???????????????? ????????????. ???????? ???????????????? ?? ?????????????????????? ?????? ???????????? ??????????.
????????????????????: ?? ???????????? ?????????????????? ?????????? ???? ???????????????????????? ?????????? ???????????????????? ?????????????? ?? ???????????????????? ???????????????????? ?????????????????? ?????????????? ?? ?????????????????? ???????????????? ?????? ?????????????????????? ?? ??????????. ?????? ???????????????????????????? ?????????????????? ?????????????? ?????????? ?????????????????????? ???????????????? ?????????????? ????????????????????, ?????????????? ?????????? ???????????? ?????????? ???????????????????????????? ?? ??????????. ???? ???????????????? ???????????? ???????????????? ???????????????????? ???????????????? ?????????????????? ???????????????? ??????????????????????.
???????????????? ?????????? ????????????????????????
?????? ???????????????? ?????????? ?????????????????? ???????????????? ???????????????????? ?????????? ???????????????? ?????????? mini-SAS ???? ???????????? ???????????? ??????????????????????. ???? ??????. 1-8, ??????. 220 ???????????????? ??????????????????????, ???????????????????????? ???? ???????????????? ?????????????????? ??????????????????, ???????????????????? ?????????????????????????? ?????? ????????????.
1???????????????????? ???????? ???? ?????????????? mini-SAS ?? ???????????? ???? ???????????????? ???????????? ???? ?????????????? ?????????????????????? ?? ???? ??????????????????????, ?????????????????????? ?????????? ?????? ??????.
?????? ?????????????????????????? ?????? ???????????????????? ???????????????????????? ?????????????????????? ?????????????? (1- ?????? 3-????????????????) ???????????? mini-SAS, ?????????????????????????? ????????????????.
2?????????????????? ?????? ??????????????????, ???????? ?????? ???????????????????? ???? ?????????? ?????????????????? ???????? ?? ????????????.
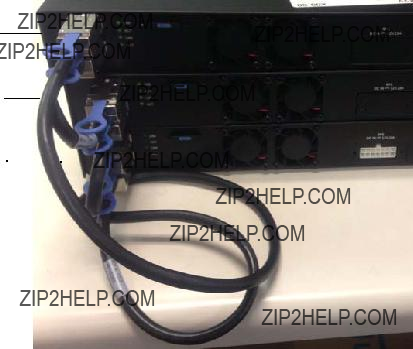
3?? ?????????????? ?????????????????????? ???????????? ???????????????????? ?????? ???????????????????? ???????????????? ?????????? ?????? ???????????????????? ?????????????????? ??????????????????.
?????????????? 1-8. ???????????????????? ???????????????????????? ?? ??????????
???????????????????? 1
???????????????????? 2
???????????????????? 3 
????????, ???????????????????????? ???? ??????. 1-8, ?????????????????? ???? ???????????????? ?????????????????? ??????????????????; ?????????????????????? ?????????????????? ???????? ?? ???????????? ?? ?????????????? ?????????????????? ???????????????????? ??????????????????????.
??????????????? ???????? mini-SAS ???? ???????????????????? 1 ?????????????????? ?? ???????????????? ?????????? mini-SAS ???? ???????????????????? 2.
??????????????? ???????? mini-SAS ???? ???????????????????? 2 ?????????????????? ?? ???????????????? ?????????? mini-SAS ???? ???????????????????? 3.
??????????????? ???????? mini-SAS ???? ???????????????????? 3 ?????????????????? ?? ???????????????? ?????????? mini-SAS ???? ???????????????????? 1.
?????????????? ?? ?????????? ???????????????????? ????????????????????
?????????????? ?????????????? ?????????? ???????????????????????? ?????????????????? ?????? ???????????????? ????????????????????, ?????????????? ?????????? ???? ???????? ???????? ???????????????? ????????????????????, ???????? ?????????????? ???????????????????? ?? ?????????? ?????????????? ???? ??????????. ?????? ???????????? ?? ?????????? ???????????????????????????? ?????????? ???? ?????????? ???????????????? ????????????????????, ?????????????????? ???????????????????? ???????????????????????????? ???????????? ???????????????????? ?? ???????????????? ?????? ?????????????????? ???????????????????? ?? ?????????? ?? ?????????????? ??????????????????????????. ?????????????????? ???????????????????? ?????????????????? ???????????????????????????????????? ?????????? ?????????????????????????? ???????????????????????? ?????? ??????????. ?????????? ???????????????????? ???????????????????? ?? ?????????? ?????????????????????? ??????????????????????????, ???????????? ?????????? ???????????????????????? ?????????????????? ?????????????????? ???????????? ?????? ???????????? ?????????????? ???????????????????? ?? ?????????? ?? ???????????????? ????????????????????. ???????????????????????????? ???????????????????? ????. ?? ?????????????????????? ????
?????????????????? ?????? ???????????????????? ?????????????????????? ???? ?????????????????????????? ???????????????????? ?????????????????? ????????????.

?????????????????????? ?????????????????????? ?????????? N20xx ?? ??????????????????
?????????? ???????????????????? ???????? ?????????????? ???????????????????? ???????????????????? ???????????????? ?? ??????????????????????, ?????????? ???????????????????????????????? ????????????????????.
????????????????????: ???????????? ?????? ???????????????????? ?? ????????????????????, ???????????????? ???????????????????? ?? ???????????? ?????? ?????????????? ????????????????. ???? ?????????? ?????????? ???? ??????-?????????? ?????????????????????? ?????????????????? ???????????????????? Dell ???? ???????????? dell.com/support/manuals..
????????????????????: ?????????????????????????? ?????????????????? ?????????? ?????????? ???????????? ???????????????????????? ?????? ?????????????????????????? ?? ??????-?????????? ?????????????????????? ??????????????????
Dell ???? ???????????? dell.com/support/manuals.
?????? ???????????????? ?? ?????????????????? ?????????????????????? ?? ?????????????? ???????????????????????????????? ???????????? ???????????????????? ?????????????????????? ???????????????????? ???????? ???? ???????????????? ???????????? ?????????????????????? (????. ??????. 1-1 ???? ??????. 208) ?????? ?????????????????????? ?? ?????????????????? VT100 ?????? ????????????????????, ?????????????????????????? ?????????????????????? ?????????????????????? ???????????????? ?????????????????? VT100. ???????????????????? ???????? ???????????????????????? ?????????? ???????????? ?????? ???????????????????????? ?????????????????? ???????????? (DTE).
?????? ?????????????????????????? ?????????????????????? ?????????? ???????????????????? ?????????????????? ????????????????????????.
???VT100-?????????????????????? ???????????????? ?????? ?????????????????? ?? ???????????????????????????????? ???????????? ?? ?????????????????????? ?????????????????????? ???????????????? ?????????????????? VT100,
????????????????, Microsoft HyperTerminal.
????????????????????????? ???????????????????????????????? ???????????? ?? ???????????????? RJ-45 ?????? ?????????????????????? ?????????? ?? ???????????????? DB-9 ?????? ??????????????????.
?????????? ???????????????????? ???????????????? ?? ?????????????????????? ?????????? ??????????????????????, ?????????????????? ?????????????????? ???????? ????????????????.
1???????????????????????? ???????????? DB9 ???? ???????????????????????????????? ???????????? ?? ?????????????????? ?????? ????????????????????, ?????????????????????????? ?????????????????????? ?????????????????????? ???????????????? ?????????????????? VT100.
2?????????????????? ?????????????????????? ?????????????????????? ???????????????? ?????????????????? ?????????????????? ??????????????.
A ?????? ?????????????????????? ?? ???????????? ???????????????????? ???????????????? ???????????????????? ???????????????????????????????? ???????? (????????????????, COM 1).
B ???????????????????? ???????????????? ???????????????? 9600 ??????.

C???????????????????? ???????????? ???????????? ?????????????????? ??????????????: 8 ?????????? ????????????, 1 ???????????????? ??????, ???????????????????? ???????????????? ????????????????.
D?????? ?????????????????? ?????????????????????? ???????????????? ???????????????? ???????????????? ??????????.
E???????????????????? ?????? ???????????? ???????????????? ?????????????????? ???????????????? VT100.
F???????????????? ?????????????? ?????????????????? ?????? ?????????????????? ????????????: ????????????????????????????, ???? ?????????????????? ?? Ctrl. ?????????????????? ?? ??????, ?????? ?????????????????? ?????????????????? ?????? ???????????? ?????????????????? (?? ???? ?????? ????????????
Microsoft Windows).
3???????????????????????? ???????????? RJ-45 ?????????????????????????????? ?? ?????????????????????? ?????????? ??????????????????????. ???????????????????? ???????? Dell Networking ?????????????????? ???? ???????????? ?????????????? ???????????????? ???????????? ?? ?????????????????? ???????????????? |O|O|, ?????? ???????????????? ?? ??????. 1-10 ???? ??????. 224.
????????????????????: ???????????? ???????????????????????????????? ???????????? ???????????????????? ?? ???????????????????? ?????????? ???????????????? ?? ?????????????? ???????????? ?????????? ?????????????????????? ???????????????????? ???????????????????? ?????????????????? ????????????. ???????????????????????? ???????????????????????????? ???????????? ???????? ?????????? ???????????????????????????????? ???????????? ????????????????????.
?????????????? 1-10. ???????????????? ???????????? N2024P ?? ???????????????????? ????????????
???????????????????? ????????

?????????????????????? ?????????????????????? N20xx ?? ?????????????????? ??????????????
????????????????: ???????????????????????? ?? ???????????????????????? ???? ?????????????? ????????????????????????, ?????????????????????? ?? ?????????????????? ?? ???????????????????????? ?? ????????????????????, ?? ?????????? ?? ???????????????????????? ???? ?????????????? ???????????????????????? ?????? ???????????? ????????????????????????, ???????????????????????? ?? ?????????????? ?????????????????????? ?????? ???????????????????????????? ??????.
?????? ???????? ?????????????? N20xx ???????????????????????? ???????? ???????????????????? ???????????????? ??????????????. ?????????????? ?????????????? ?????????????????????? ???? ???????????? ????????????.
?????????????????????? ?? ?????????????????? ?????????????????????? ?? ?????????????????????? ????????
1??????????????????, ?????? ???????????????????? ???????? ?????????????????????? ?????????????????? ?? ?????????????????? VT100 ?????? ?????????????????? ?????????????????? VT100 ?? ?????????????? ???????????? ?? ??????????????????
RJ-45/DB-9.
2???????????????????? ?????????????????????? ???????????? ?????????????? ???????????? 1,5 ?? ?? ?????????????????????? ?????????????????? ?? ???????????????? ?????????????? ?????????????? ?????????????????????? ????????, ?????????????????????????? ???? ???????????? ???????????? (????. ??????. 1-11 ???? ??????. 226).
3???????????????????????? ???????????? ?????????????? ?? ?????????????????????? ????????????????????????????.
4?????? ?????????????????????????? ???????????????????? ?????? ???????????????? ?????????????????? ?????????????? ?????????????????????? ????????, ???????????????? Dell Networking RPS720 ?????? Dell Networking MPS1000, ???????????????????? ???????????? ?????????????? ?????????????????????? ???????? ?? ?????????????? ?????????????? ?????????????????????? ????????, ?????????????????????????? ???? ???????????? ????????????. ?? ??????. 1-11 ???? ??????. 226 ?????????????????? ???????????????? ?????????????? ???????????????????? ?? ???????????? ?? ?????????????? ?????? RPS (?????????????????? ???????????????? ??????????????).

?????????????? 1-11. ?????????????????????? ?????????????????? ?????????????? ?????????????????????? ??
?? ?????????????????? ?????????????? ?????????????????????? ???????? (??????????????????????????)
?? ?????????????????? ?????????????? ?????????????????????? ????????
?????????????????????? ???????? ?? ?????????????????????? N2048
???????????????? ?????????????????????? ???????????? N20xx
?????? ?????????????????? ?????????????? ?? ?????? ???????????????????????? ?????????????????? ???????????????????? ???????????????????? ?????????????????? ?????????????????? POST (Power-ON Self Test, ???????????????????????????????? ?????? ?????????????????? ??????????????). ?????????????????? POST ?????????????????????? ???????????? ?????? ?????? ?????????????????????????? ??????????????????????. ?????? ???? ???????????????????? ?????????????????????? ???????????????????? ?????????????????????? ??????????????????????, ?????????? ?????????? ???????????? ?????????????????? ?????????????????????? ????????????????????, ?????????????????? ???? ???? ?? ?????????????? ????????????. ???????? ?? ???????????????? ???????????????????????? (POST) ???????????????????? ?????????????????????? ????????????, ???????????????? ?????????????????? ????????????????????????. ???????? ?????????????????? POST ???????????????? ??????????????, ?? ?????? ?????????????????????? ???????????????????????????? ???????????????????? ?????????????????????? ??????????????????????. ?????????????????? POST ?????????????????? ???? ???????????????? ?? ?????????????????????? ???? ???????????????? ???????????????????? ?????????? ?????? ????????. ?????????????? ???????????????? ???????????????? ???????????????????????????? 60 ????????????.
?????????? ?????????????? ???????? Boot (????????????????) ?????????? ???????????????????? ???????????? ?????????? ???????????????? ???????????????????????????????? (POST). ?? ???????? ???????????????? ?????????? ?????????????????? ?????????????????? ???????????? ???? ??????????????????, ???????????????? ???????????????? ???? ?????????????????? ???????????????? ???? ??????????????????, ???????????????????????? ?????????? ?????? ???????????????????? ???????????????????????????? ?????? ???????????????????????? ????????????. ???????????????????????????? ???????????????? ?? ???????????????? ???????? ????????????????
?????????? ?????????? ?? ???????????????????? ?????????????????????? ???? ?????????????????????????? ???????????????????? ?????????????????? ????????????.

???????????????????? ???????????????????????????? ?????????????????? ???????????? N20xx
???????? ?????????????????????? ??????????????????, ???????????????????????? ?????? ???????????????????????????? ????????????????????????.
????????????????????? ?????????????????????? Dell Networking ?????????? ???? ??????????????????????.
??????????????????? ?????????????????????? Dell Networking ?????????????????? ??????????????.
????????????????????????? ???????????? ???????????????????? ??????????????????, ?? ???? ???????????? ?????????????????? VT100 ?????? ?????? ?????????????????????? ???????????????????????? ???????????? ???????????? ?????????????? ?????????????????? Dell.
???????????????????????????? ?????????????????? ?????????????????????? ?????????????????????? ?????????? ???????????????????? ????????. ?????????? ???????????????????????????? ?????????????????? ???????????????????????? ?????????? ?????????????????? ???????? ?????????? ?????? ???????????????????????? ???????????????????? ????????, ???????? ???????????????????????? ?????????? ??????????????????, ???????????????????????? ?? ???????????????? ???????????????????????????? ????????????????????????.
????????????????????: ?????? ?????????????????????? ???? ?????????????????? ?????? ????????????????????????, ???????????? ?? IP-?????????? ???? ??????????????????.
???????????? ?????? ?????????????????? ???????????????????????????? ?????????????????? ??????????????????????, ???????????????????? ???????????????? ?? ???????????????????????????? ???????? ?????????????????? ????????????????:
???IP-??????????, ?????????????? ???????????????????? ?????????????????? ?????? ???????????????????? ????????????????????;
????????????? ?????????????? IP ?????? ????????;
???IP-?????????? ?????????? ???? ?????????????????? ???????????????????? ????????????????????.
?????? ?????????????????? ???????????????????? ?????? ???????????????????? ???????????????????? ???????????????????????? ??????????
Telnet (???????????? Telnet) ?????? HTTP (??????-??????????????).

?????????????????? ???????????????????? ????????????????????
???? ???????????????????????? N20xx ?????????? ???????????????????????? ?????????? ???????? ?????????????????????? ???? ???????????????? ???????????? ?????? -?????????????????????????????? ????????????????????. ???? ?????????????????? ?????? ???????????????????? ?????????? ???????????????? ?????????????? ?????????????????????? ?????????????????? ???????? 1.
???????????? ?????????????? ?????????????????? Dell ???????????????? ?? ???????? ?????????????????? ?? ?????????????????? ?????? ?????????????????? ???????????????? ?? ???????? ?????? ???????????????????? ?????????????????????? ?????????????????? ???????? 1 ???? ?????????????????????? N20xx. ?????????? ?????????????????? ?????????????????????? IP-?????????? ?? ?????????? ?????????????? ?????? ???????????????? DHCP ?? ?????????????????? ???????????????? ?????????????? DHCP ?????????????????? ???????????? ????????????????.
????. ???????????????????? ?????????????????????? ???? ?????????????????????????? ???????????????????? ?????????????????? ???????????? ?????? ?????????????????? ???????????????? ?? ???????????????? ???????????????????? ?????????????????? ????????????, ???????????????????????? ?????? ?????????????????? ???????????????? ?? ????????.
?????????????????? ?????????????????? ????????????????????????
???????????????????????????? ?????????????????? ?????????? ?????????????????? ?? ?????????????? ???????????? ?????????????? ?????????????????? Dell ?????? ???????????????????? ?????????????????? ????????????. ???????? ???????????? ???????????????????? ??????????????????????????, ???????? ???????? ???????????????????????? ?????????????????????? ???? ???????????????? ????????????. ???? ???????????? ?????????? ???? ?????????????? ?? ?????????? ?????????? ???????????????? ???????????? [ctrl+z], ???? ?????? ?????????????????? ?????????????????? ?????????? ????????????????, ?? ???????????????????? ?????????? ???????????????????????? ???????????????? ???? ??????????????????.
????????????????????: ???????? ???? ???? ?????????????????? ???????????? ?????????????? ??????????????????
Dell ?????? ???? ?????????????????? ???? ?????? ???????????? ?? ?????????????? 60 ????????????, ???????????????????? ???????????? ?? ?????????? ???????????????????? ?????????????????? ????????????. ?????????? ?????????????????????????? ???????????? ?????????????? ?????????????????? Dell, ???????????????????? ?????????????????? ?????????? ?? ?????????????? ???????????? ???????????????????????? ??????????????.
???????????????????????????? ???????????????????? ?? ?????????????????? ???????????????????????????? ?????????????????? ?? ?????????????? ???????????????????? ?????????????????? ???????????? ????. ?? ???????????????????? ?????????????????????? ????
?????????????????????????? ???????????????????? ?????????????????? ????????????. ?? ?????????????????????? ???? ???????????? ???????????? ??????????????, ?????? ?????????????????? ???????????????????????????? ?????????????????? ?????????????????????? ?? ?????????????? ???????????? ?????????????? ?????????????????? Dell. ???????????? ?????????????????????? ?????? ?????????????????????? ?????????????????? ????????????????????????.
????????????????? ?????????????? ???????????? ???????????????????????????????????? ???????????????????????? ?? ???????????????????????????? ??????????????. ???????????? ?????????????????????????? ?????????????? ???????????? ???????????????????????????????????? ???????????????????????? ???? ?????????? ??????????????????.
????????????????? ?????? ???????????????????????? ?????? ???????????????????? ?????????????????? ???????????? ?? ?????????????????? ???????????? ???? ?????????????????? HTTP ?????? ?????????????????????????? ?????????????????? ???????????????????? ??????????????????????????.
????????????????????????? IP-?????????? ?????? ???????????????????? ?????????????????????????? ?????????????????????? ?????????????????? ???????? 1, ?? ?????????????? ?????????????????????? ?????? -???????????????????? ??????????.
??????????????? ???????????? ?????????? ?? ???????????? SNMP ?????? ?????????????????????????? ???????????????????? SNMP ???? ???????????????????? IP-????????????. ???????????? ?????? ?????????? ????????????????????, ???????? ???????????????????? SNMP ???? ?????????? ???????????????????????????? ???? ??????????????????????.
????????????????????? ?????????????? IP-?????????? ?????????????? ???????????????????? ?????????? ?????? ?????????????? ???????????? ?????? ???????????????????? ???? ???????? IP-??????????????.
????????????????????????? IP-?????????? ?????????? ???? ?????????????????? ?????? ???????????????????? ?????????????????????? ?????????????????? ???????? 1.
????????????
?? ???????????? ?????????????? ???????????? ?????????? ???????????? ?????????????? ?????????????????? Dell. ?? ?????????????? ???????????????????????? ?????????????????? ????????????????.
????????????????? ???????????????????? SNMP, ?????????????? ???????????????????? ????????????????????????, ???????????????? public.
???IP-?????????????? ?????????????? ???????????????????? ?????????? ???????????????? 10.1.2.100.
????????? ????????????????????????: admin, ????????????: admin123.
???IP-?????????????? ?????? ???????????????????? ?????????????????????????? ?????????????????????? ?????????????????? ???????? 1 ???????????????? 10.1.1.200 ?? ???????????? ?????????????? 255.255.255.0.
??????????? ???? ?????????????????? ??? 10.1.1.1
???????????? ?????????????????? ???????????? ?????????????????? ???????? ????????????????. ?????????? ???????????????????? ???????????? ?????????????? ???????????????????? ?????????????????????????? ?????????????????? ??????????????.
???SNMPv2 ?????????????? ?? ???????????? ???????????????????? ??????????????????????, ?????? ?????????????? ????????. ???? ?????????????????? SNMPv3 ????????????????.
????????????????? ???????????? ???????????????????????????? ?????????????? ?????? ???????? ??????????????.
????????????????? ???????????????????? ?????????? ??????????????????. ?? ???????????? ?????????????? ???????????????????? ?????????????????????? ???????????? ?? ?????????????????????? SNMP, HTTP ?? CLI. ?????????? ?????????????? ???????????? ?? ???????????? ?????????????????????? ?????? ???????? IP-??????????????, ???????????? IP-??????????
(0.0.0.0).

???IP-?????????? ???????????????? ?????? ???????????????????? ?????????????????????????? ?????????????????????? ?????????????????? ???????? 1.
????????????? ?????????? ???? ?????????????????? ????????????.
????????????????????: ?? ?????????????????????? ???????? ?????????????? ?????????????????? ???????????????? ?? ???????????????? ???? ?????????????????? ?????????????? ?? ???????????????????? ??????????????. ???????? ???????????? <Enter> (????????), ???? ?????????? ????????????????, ???????????????????????????? ?????????? ???????????????? ???? ??????????????????. ?????????? ?????????????? ?????????????????? ?? ?????????????? ??????????????.
???????????? ???????????? ???????????????????? ?????????????? ?????????????? ??????????????????
Dell
?? ?????????????????? ?????????????? ?????????????? ???????????????????????????????????? ???????????????? ?? ?????????????? ???? ?????????? ???????????? ???????????? ?????????????? ?????????????????? Dell ?? ???????????????????????????? ?????????????????? ???????? ????????????????.
?????????? ????????, ?????? ???????????????????? ???????????????? ?????????????? ???????????????????????? ?? ????????????????????????????, ?????????????????????? ?????????????????? ???????????????????? ????????.
???????????????????? 1 ??? ???????????????? ???????????? ???????????????? ????????????????????)> ???????????????????? ?????????? ????????????????, ??????????????????...
?????? ???????????????????????? ???????????? ?????????????? ?????????????????? Dell
???????????? ?????????????????? ???????????????? ?????????????????? ???????????????????????????? ?????????????????? ?????????????????????? ?? ?????????????????? ???????????? ???????????? ?? ?????????????????????? ?????? ??????????????????????. ???? ???????????? ???? ?????????????????? ?? ?????????????? ?????????????? ?????????????????? ?? ?????????????????? ???????????????????????? ?????????????????????? ?????????????? ?? ?????????????? ?????????????????? ????????????. ???? ???????????? ???????????????? ???? ?????????????????? ???????????? ?? ?????????????? ?????????????????? 60 ????????????, ?????????? ?????????????????? ????????????, ?????????? ?????????????? ?????????????????? ???????????????? ?? ?????????????? ???????????? ?? ???????????????????????????? ???????????????????????? ???? ??????????????????. ????????????????????. ???? ???????????? ?????????? ???? ?????????????? ?? ?????????? ???????????? ????????????????
[ctrl+z].
?????????????? ???????????? ??????????????????? ???????????????????? ???????????????? ?? ?????????????? ?????????????????? 60 ????????????. [Y/N] y

?????????????????? ?????????????? ?????????????? ?????????????????? SNMP ???????????? 1 ?????? 3 ????. ???????????????????????????????? ????????????????????????).
?????????????????? ?????????????????? ???????????????????? ???? ?????????????????? SNMP ????????????? [Y/N] y
?????????? ?????????????????? ?????????????? ???????????? ???????????????????? ???? ?????????????????? SNMP, ???????????????????? ?????????????? IP-?????????? ?????????????? ?? ?????????????? ?????????????????????? ?????? ????????????, ???????????????????????? ???????????????????? ???????????????? ???????????????????? ?????? ?????????????????? ?????????????? ?? ??????????????????????. ???????????? ?????????????????????????? ?????????????????? ?????????? ?????????????? ?????????????? ?????????????? [?????????????? ???????????????????? 15] ?????? ???????? ?????????????? ????????????. ???? ???????????? ?????????????????????????????? Dell Network Manager ?????? ?????????????? ???????????????????????? ????????????????????, ?????????? ???????????????? ?????? ?????????????????? ?? ???????????????? ???????????????? ?? ???????????????????????????? ???????????????? ???????????????????? ??????????????. ?????????? ?????????????????? ???????????????????? ?? ???????????????????? ???????????? ???????????????????? ????. ?? ???????????????????????????????? ????????????????????????.
?????????? ???????????????? ?????????????? ????????????????????, ?????????????????? ?????????????????? ???????? ????????????????.
?????????????? ???????????? ???????????????????? SNMP, ?????????????? ???????????????????? ????????????????????????. [public]: public
????????????????????: ???????? ?????????? ?????????????????? ??????????????, ???? ?????? ???????????????????? ???????????????????? SNMP ?????????????????????????????? ?????????????????? ?????????????? ??????????????. ???? ?????????????????? ?????????? ?????????????????????? ???????????? SNMPv2. SNMPv3 ???????????????? ???? ?????? ??????, ???????? ???? ???? ?????????????????? ?? ???????????????????? ???????????????????????? ?????????????? ?????? SNMPv3 (????????????????, ?????????????????????????? ????????, ???????????????? ?? ??. ??.).
?????????????? IP-?????????? ?????????????? ???????????????????? (A.B.C.D) ?????? ???????????? (0.0.0.0), ?????????? ?????????????????? ???????????????????? ?? ?????????? ??????????????. [0.0.0.0]: 10.1.2.100
?????? 2.
???????????? ???????????????????? ?????????????????? ?????????????????? ?????????????? ???????????? ?? ???????????? ?????????????? ???????????????????? (?????????????? 15). ?????? ???????????? ???????????????????????? ?????? ?????????? ?? ?????????? ?????????????????? ???????????? ?? ??????-??????????????????. ?????????? ???? ???????????? ?????????????????? ???????????? ???????????? ?? ???????????????? ???????????? ??????????????. ?????????? ?????????????????? ???????????????????? ?? ?????????????????? ?????????????? ?????????????? ?? ?????????????????? ?????????????? ?????????????? ????. ?? ???????????????????????????????? ????????????????????????.
?????????? ?????????????????? ?????????????? ???????????? ????????????????????????, ?????????????????? ?????????????????? ???????? ????????????????.
?????????????? ?????? ????????????????????????. [root]:admin
?????????????? ???????????? ????????????????????????: ********
?????????????????????? ???????????? ????????????????????????: ********
?????? 3.
?????????? IP-?????????? ?????????? ???????????????? ???? ???????????????????? ?????????????????????????? ?????????????????????? ?????????????????? ???????? 1.
?????????? ???????????????????????? ???????????? IP-??????????, ?????????? ???????????????? ???????????? ?? ???????????????????? ?????????????????? ????????????, ??????-???????????????????? ?????? ???????????????????? ?????????????????? SNMP ??????????????????????.
?????????? ???????????????? ???????????? ?? ?????????????????????? ?????????? ?????????? ?????????????????? ????????????????????, ??????????
. ?????????????????? IP-?????????? ?????? ???????????????????? ????????????????????;
. ?????????????????? ???????? ???? ??????????????????, ???????? ???? ???????????????????? ?????????????????????????? IP-?????????? ???????????????? ??????????????.
?????? 4.
?????????????????? ?????????????????? ?????????????????????????? ?????????????????????? ?????????????????? ???????? 1 ????????????? [Y/N] y
?????????????? IP-?????????? ???????????????????? (A.B.C.D) ?????? ?????????????? ??DHCP?? (?????? ??????????????) ?????? ?????????????????????????????? ?????????????? IP-???????????? ???? ???????? ?????????? ???????????? DHCP: 10.1.1.200
?????????????? IP-?????????? ?????????? ?????????????? (A.B.C.D ?????? /nn):
255.255.255.0
?????? 5.
?????????????????? ????????????????: ?????????????????? ??????????, ?????????????????????????? ???? ??????????????????. ?????????????? IP-?????????? ??????????, ?? ???????????????? ?????????????? ???????????? ?? ????????. [0.0.0.0]: 10.1.1.1
???????? ???????????? ?????????????????? ?????????????????? ????????????????????????:
?????????????????? SNMP = ??public?? ?????? 10.1.2.100
?????????????????? ?????????????? ???????????? ???????????????????????? = admin
???????????? = ********
IP-?????????? ???????????????????? ???????????????????????????? ?????????????????????? ?????????????????? ???????? 1 = 10.1.1.200 255.255.255.0
???????? ???? ?????????????????? = 10.1.1.1 ?????? 6.
???????? ???????????????????? ??????????, ?????????????? (Y), ?????????? ?????????????????? ???????????????????????? ?? ?????????????????????? ?????????????????? ?? ???????? ???????????????????????? ??????????????. ?????? ?????????????? ???????????? ?????????????? (N), ?????????? ???????????????? ?????????????????? ?? ?????????????????????????? ????????????: [Y/N]
y
???????????????????? ???? ?????????????????????????? ?????????????? ?????????????? ?????????????????? Dell. ???????????? ?????????? ?????????????? ?????????? ?????????????????? ????????????.
???????????????????? ???????????????? ????????????????????, ??????????????????...
?????????????????? ????????
?????????? ???????????????????? ???????????????????????????? ??????????????????, ?????????????????? ?? ???????????? ??????????????, ?????????? ???????????????????? ?????????? ???????? ???? ???????????????? ???????????? ?? ???????? ?????????????????????? ?? ?????????????????? ???? ????????????????.
???????? ?????? IP-???????????? ?????????????????????? ???????????????????? ???????????????????? ???????????? ???????????????? DHCP, ?????????????????? ?????????????? IP-?????????? ???? DHCP-?????????????? ?? ????????. ?????????? ???????????????????? ?????????????????????? ?????????????????????? IP-??????????, ???????????????????????? ?? ?????????????????????? ?????????? ?? ?????????????????? ??????????????:
????????? ???????????????????? ?????????????????????????? ?????????????????????? ?????????????????? ???????? 1 ?????????????? show ip interface.
?????????? ???????????????? ???????????? ?? ???????????????????? ???????????????????????????? ?????????????????????? Dell OpenManage, ?????????????? IP-?????????? ?????? ???????????????????? ???????????????????? ?????????????????????? ?????????????????? ???????? 1 ?? ???????????????? ???????????? ??????-????????????????. ?????????? ???????????????? ???????????? ?? ???????????????????????????? ???????????????????? ?? ?????????????? ?????????????????? ????????????, ?????????????? IP- ?????????? ???????????????????? ???????????????????? ?????????????????????? ?????????????????? ???????? 1 ?? ?????????????? Telnet ?????? SSH. ?????????? ?????? ???????????????????? ?????????????? ?? ?????????????????????? ?? ?????????????? ?????????????????? ???????????? ?????????? ???????????????????? ???????????????????????? ???????????????????? ????????.
???????????????????? N20xx ???????????????????????? ???????????????? ?????????????????? ?????? ??????????????????????, ?? ?????? ?????????? ?????????????????????? ?????????????????? ???????? ?? ???????????????? ???????????????????? ???????????? (STP). ?????????? ?????????????????? ??????????????????, ?????????????????????? ?????? ?????????? ????????, ???????????????????????????? ??????-?????????????????????? ???????????????????? ?????? ?????????????????? ??????????????. ???????????????????? ?? ?????????????????? ?????????????? ?????????????????????? ????. ?? ?????????????????????? ???? ?????????????????? ??????
???????????????????? ?????????????????????? ???? ?????????????????????????? ???????????????????? ?????????????????? ????????????,
?????????????????? ???? ?????????? ?????????????????????? ??????????????????: dell.com/support/manuals.
?????????? ?????????? N30xx
?????????????????????? Dell N30xx ??? ?????? ???????????????? ?????????????????????? Gigabit Ethernet ???????????? 2 ?? 3, ???????????????????? ?? ???????? ?????????????????? ????????????:
???Dell N3024
???Dell N3024P
???Dell N3048
???Dell N3048P
???Dell N3024F
?????????? ?????????????????????? ?????????????????????? ?????????? N30xx
???????? ???????????? ???????????????? ???????????????????? ?? ?????????????????????????????? ???????????????????? ?? ???????????????????? ?????????????????????????? ?????????????? ???????????????????????? ?????????? N30xx.
?????? ???????????? N30xx ???????????????????????? ?????????? ?????????????????????? ?????????????? 1U ?? ???????????????????????? ?????????????????? ?? ???????????? ?? ?????????? ?????????????????? ???????????????????? ??????????????:
???434.0 x 407.0 x 43,5 ???? (?? x ?? x ??).
???17.1 x 16.0 x 1,7 ???????????? (?? x ?? x ??).
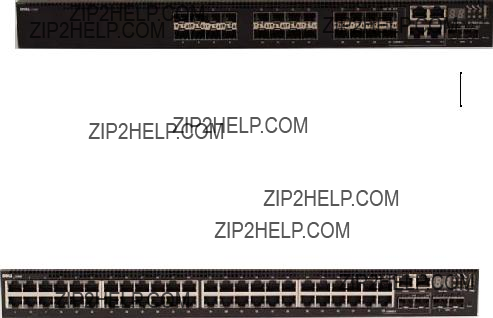
???????????????? ???????????? ?????????? N30xx
???? ?????????????????? ???????????????????????? ???????????????? ???????????????? ???????????? ?????????????? ???????????????????????? ?????????? N30xx.
?????????? ???????????? ???????????????????????? ???? ???????????????? ???????????? ???????????? ???????????? ?????????? N30xx ?????????????????????? ?????????????????? ??????????:
??????????????????????? ????????
??????????? USB
????????????????????????? (OOB) ???????? ????????????????????
?????????????? 1-12. ?????????? N3024F ?? 24 ?????????????? 10/100/1000BASE-T (???????????????? ????????????)
???????????????????? ?????????? N30xx ???????????????? ?? ???????? ?????? ?????????????????????????????? ??????????. ???????????????????????????????? ?????????????? ???? ?????????????????????? ?????????? N30xx ???????????????? SFP, ???? ?????????????????????? ?????????? N3024F ??? 1000BaseT.
?????????????? 1-13. ?????????? N3048 ?? 48 ?????????????? 10/100/1000BASE-T (???????????????? ????????????)
???????????????????????????? ?????????? ?????????????????????? ?? ???????????? ?????????????? ???????????????? ????????????, ?????? ???????????????? ???? ??????. 1-13 ?? ??????. 1-14, ??????. 237.
?????????????? 1-14. ???????????????????????????? ?????????? ?????????? N30xx
???????? USB
???????????? ????????????
?????????????????????????????? ?????????? ?????????? SFP+
???? ???????????????? ???????????? ?????????? N30xx, ?????????????????? ????????, ?????????????????????? ???????????? ???????????? (?????????????????? ??????????????????) ?? ?????????????????? ?????????????????????? ??????????????????. ????.
??????. 1-14.

?????????????? 1-15. N30xx ?????????????????????? ??????????????????????
?? ?????????????? ???????? ???????????????? ???????????? N30xx/N3024F/N30xxP, ???????????????????? ???? ??????. 1-15, ?????????????????????? ???????????????????? ?????????????????? ?????????????? ???????????????????? ??????????????????????, ?????????????????????? ?????????????????? ?????????????? ?? ?????????????????? ??????????????????????. ???????????????????? ?????????????????? ?? ???????????? ???????? ???????????????????? ?????????????????? ???????????????? ?????????????????????? ??????????, ?????????????????????? ?????????????????? ?????????????? 2 ?? ?????????????? ??????????????????????.
?????????? ??????????????????????
???? ???????????????? ???????????? N3024/N3024P ?????????????????????????? 24 ?????????? Gigabit Ethernet (10/100/1000BASE-T) RJ-45 ?? ???????????????????? ?????????????? ?????????????????????????????? ???????????????????????? ????????????????, ???????????????????? ?????????????? ?? ?????????????????????? ????????????. ???????????? N3024/N3024P ???????????????????????? ?????? ?????????? SFP+ 10????????. ???????????????????? SFP+, ?????????????????????????????? ?????????????????????? Dell, ?????????????????? ????????????????.
???? ???????????????? ???????????? N3024F ?????????????????????????? 24 ?????????? Gigabit Ethernet 100BASE-FX/1000BASE-X SFP ?? 2 ?????????????????????????????? ?????????? 1000BASE-T.
???????????????????? SFP, ?????????????????????????????? ?????????????????????? Dell, ?????????????????? ????????????????.
???? ???????????????? ???????????? N3048/N3048P ?????????????????????????? 48 ???????????? Gigabit Ethernet (10BASE-T, 100BASE-TX, 1000BASE-T) RJ-45 ?? ???????????????????? ?????????????? ?????????????????????????????? ???????????????????????? ????????????????, ???????????????????? ?????????????? ?? ?????????????????????? ????????????. ???????????? N3048/N3048P ???????????????????????? ?????? ?????????? SFP+ 10????????. ???????????????????? SFP+, ?????????????????????????????? ?????????????????????? Dell, ?????????????????? ????????????????.
???????????????????????????? ???????????? ??????????????????????, ?????????????????????????? ???? ???????????????? ????????????.
??????????????????????? ?????????????????????????? ???????????????????????? ???????????? ?? ???????????????????????? ?????????????????????? ???????????? ?? ?????????? RJ-45 ?? ?????????????????????????? ???????????????? ???????????????????????? MDI ?????? MDIX ?????? ???????????????????????? ????????????????????, ?????????????????????????? ?? ?????????????? ?????????? ????????????.
????????????? SFP ???????????????????????? ???????????????????? SFP, ?????????????????????????????? ?????????????????????? Dell.
??????????? RJ-45 ???????????????????????? ???????????? ?? ?????????????????????????????? ???????????? ???? ?????????????????? 10/100/1000 ????????/?? ?????? ?????????????????????????? ?????????????????????? ?????????? ???????? ?????????????????? 5.
????????????? SFP+ ???????????????????????? ?????????????????????????? ?????????????????????? SFP+ ?? ?????????????? ?????????????????????????????? ???????????? SFP+, ?? ?????????? ?????????????????????? SFP, ???????????????????? ???? ?????????????????? 1 ????????/??.
????????????? ???? ???????????????? ???????????? N3024P/N3048P ???????????????????????? ????????????????????
PoE (15,4 ????) ?? PoE+ (30 ????).
???????????????????? ????????
???????????????????? ???????? ???????????????????????? ?????????????????????? ?????????????????????????????????? ????????????????????, ?????? ?????????????????? ???????????????????? ?????????? ?? ?????????????? ?????????????????? RS-232. ?? ?????????????? ?????????????????????????????????? ?????????? ?????????? ?????????????????? ???????????? ?????????????????????? ?? ?????????????????????? ?? ???????????????? ???????????? ?? ???????????????????? ?????????????????? ???????????? (CLI) ???? ?????????????????????? ??????????????????, ?????????????????????????? ?? ?????????? ?? ?????????????? ?????????????????? ???????????? (?? ???????????????? RJ45 YOST ?????? ???????????? DB-9).
???????????????????? ???????? ?????????? ?????????????????????? ???????????????? ?? ???????????????????????? ?????? ?????????????????????? ?????????? ???? ???????????????? ???? 1200 ???? 115 200 ??????.
?????????????????? ?????????????????? ???????????? Dell ???????????????????????? ???????????? ?????????????????? ????????????????.
???? ?????????????????? ?????????????????????? ?????????? ??????????????????: ???????????????? 9600 ??????, 8 ?????? ????????????, ???????????????? ???????????????? ????????????????, 1 ???????????????? ??????, ???????????????????? ?????????????? ??????????????????.
?????????????????????? (OOB) ???????? ????????????????????
?????????????????????? (OOB) ???????? ???????????????????? ???????????????????????? ?????????? ???????? Ethernet 10/100/1000BASE-T, ?????????????????????????????? ?????? ???????????????????? ???????????????????? ????????????????????????. ????????????, ???????????????????? ?????????? ???????????? ????????, ?????????????? ???? ?????????????? ???????????????????????? ????????, ?????????????????????? ?????????? ?????????? ??????????????????????, ?? ???? ?????????? ???????? ???????????????????? ?????? ?????????????????? ?? ?????????????? ???????????????????????? ???????? ?????? ???? ??????.
???????? USB
USB-???????????? ???????? A ???????????????????????? ????????-????????????????????, ?????????????????????? ?? USB 2.0. ???????????????????? Dell Networking ???????????????????????? ?????????????? ???????????? ?????? ???????????? ?????? ?????????????????????????? ????????-????????????????????, ???????????????????????????????????? ?? FAT-32. ????????- ???????????????????? USB ?????????? ???????????????????????? ?????? ?????????????????????? ???????????? ???????????????????????? ?? ?????????????????????? ?????????????????????? ?????????? ????????-?????????????????????? USB ?? ????????????????????????. ????????-???????????????????? USB ?????????? ?????????? ???????????????????????? ?????? ?????????????????????? ?? ?????????????????????? ???????????? ???????????????????????? ?? ?????????????????????? ???? ???????????? ?????????????????????? ???? ???????????? ?????????????????????? ?? ????????.
USB-???????? ???? ???????????????????????? ?????????????????????????? USB-?????????????????? ???????????? ??????????.
???????????? ??????????????
???????????? ?????????????? ???????????????? ?? ?????????????? ???????????????????? ?????????????????? ?? ?????????????????? ?????????????????? ???????????????????? ???????????????????????? ??????????????????????. ?????? ?????????????????????????? ???????????? ???????????? ???????????????? ?? ?????????????????? ???????????????????????? ???????????????????????? ?????????????? ?????? ???????????????? ??????????????. ?????????? ???????????????????? ???????????????? ?????????????????????? ?? ???????????????????? ???????????????????? ???????????? ???? ???????????????????? ???????????? ?????? ?????????????????????????? ?????????????????? ?????????????????????? ????????????????????????. ?????? ??????????????????, ?????????????? ???????? ?????????????? ?? ?????????????? ????????????????????????, ???? ???? ???????? ?????????????????? ???? ???????????? ???????????????????? ????????????, ?????????? ??????????????.
???????????????????? ???????????? ?? ?????????????????? ????????????????????
???? ???????????????? ???????????? ?????????????????????? ???????????????????????? ????????????????????, ???????????????????????? ?????????????????? ????????????????????, ???????????????????? ??????????????, ????????????????????????, ???????????????????????? ?? ?????????? ?????????????????? ??????????????.
?????? ?????????????????? ???????????????????? ???? ???????????????????????? ???????????????????????? ?????????????????? ????.
?????????????????????? ???? ??????????????????.
?????????????????? ???????????????? ?????????????????????? ?????????? ?? ?????????????????????? ???????????? ??????????
???????? ???????????????????? ?? ?????????? ???????????????? ?????????????? ??????????????????????, ?????????????????? ???????????????? ?????????????????????? ?????????? ?? ???????????????? M ???????????????????? ???????????????? ?????????????? ????????????. ???????? ?????????????????? ?? ???????????????? M ???? ????????????????, ???????????????????? ?? ?????????? ???? ???????????????? ?????????????? ??????????????????????. ???? ???????????? ???????????? ?????????? ???????????????????????? ?????????? ???????????????????? ??
??????????. ???????? ???????????????????? ???? ???????????????? ???????????? ?????????? (?????????????? ??????????????, ???????? ?????????????? ???? ???????????? ??????????????????????), ?????????????????? ?? ???????????????? M ???????????????? ?? ???????????????????????? ?????????? ????????????????????.
???????????? ???????????? ?????????? N30xx
???? ?????????????????? ???????????????????????? ???????????????? ???????????? ???????????? ???????????????????????? N30xx.
?????????????? 1-16. ???????????? ???????????? N30xx
????????????????

?????????????? 1-18. ???????????????? ?????????? Mini-SAS N3048, ?????????????????????? ??????????????????????
???????????????? ?????????? Mini-SAS
???????????? ??mini-SAS?? ?????????????????? ?? ?????????????????? ???????????????????????? ?? ???????????????? ????????????, ???????????????????? ???? ??????. 1-18. ???????????????????????????? ???????????????????? ???? ?????????????????????????? ???????????? mini-SAS ?????? ?????????????????????? ???????????????????????? ????. ?? ?????????????????? ?? ???????????? ???????????????????? ???????????????????????? N30xx.
?????????? ???????????????????? ?????? ???????????????????????? ??????????????
???????? ???????? ???????????????????? ???????????????????? ???? ???????????? ???????????? ?????????????? N30xx ?? ???????????????????????? ?????????????????????????? ?????????????????? ??????????????:
??????????????? 10GBASE-T;
??????????????? SFP+.
?????? ?????????????? ?????????????????????????? ???????????? ?????????????????????????? ?????? ??????????. ???????????????????????? ???????????? ???????????????? ?? ???????? ?????????????????? ???????????????? ??????????????, ?????? ?????????????????? ?????????????????????????? ?? ???????????????????????? ?????????????????????? ?????????? ?????????????????? ???????????? ????????????.

?????????????????? ??????????????
N3024, N3024F ?? N3048
?????????????????????? N3024, N3024F ?? N3048 ???????????????????????? ?????????????????????????? ???????? ???????????????????? ?????????????? 200 ????, ???????????????????? ?? ???????? ???????????????????????? ?? ???????????????????????????? ?????? ?????????????????????? ???????????? ?????????? ????????????????. ?????? ???????????????????????? N3024, N3024F ?? N3048 ?????????????????????????? ?????????????? V- ????????????????????, ?????????????????????????????? ?????? ??????????????????????????, ?????????????? ???????????????????? ?????????????????????????? ?????????????????????? ???????????????????? ???????????????????? ??????????????. ?????????????? ?????????????? ?? ???????????????? V-???????????????????? ???? ?????????? ?????????????? ?????????????????? ???????????????????????? ???????? ?????????????? ?? ???????????????? V-???????????????????? ?????? ???????????????? ???????????????????????? ?????????????????? ?????????????????????? ?? ??????????????????????.
N3024P ?? N3048P
?????????????????????? N3024P ?? N3048P Dell Networking ???????????????????????? ?????????????????????????? ???????????? ?????? ???????? ???????????????????? ?????????????? 1100 ????, ???????????????????? ?? ???????? ????????????????????????. ???????????????????? N3024P ???????????????????????? ?? ?????????????????? ???????????????????? ?????????????? 715 ???? (???????????????????????? ???? ??????????????????) ?? ???????????????????????? ?????????????????????????? ???????????? ?????? ???????? ???????????????????? ?????????????? 1100 ????. ???????????????????????? ???? ?????????????????? ?????????????????????? N3048P ?????????????????????????????? ???????????????? ??????????????
1100 ????.
?????????????????? ???????????????? ?????????????? 1100 ???? ?????????? ???????????????????? ???????????????? ???? 24 ?????????????????? PoE ?????? ???????????? ???????????????? PoE+ (950????). ?????????????????????? ?? ?????????? ?????????????????????? ?????????????? ???????????????????????? ???????????????? ???? 48 ?????????????????? PoE ?????? ???????????? ???????????????? PoE+ (1800 ????), ?? ?????????? ???????????????????????? ???????????? ?????????? ???????????????? ?????????????????? ??????????????.
????????????????????: ???????????????? PoE ???????????????????????????? ??????????????????????. ???? ?????? ???????? ???????????? ?????????????????? ???????????? ???????????????? PoE+.
????????????????: ???????????? ?????? ?????????????? ???????? ??????????????, ?????????????????? ???????????? ?????????????? ???? ??????????????????????. ???? ?????????????????????? ???????????????? ?????????????? ?????????? ???????????????????? ?? ????????????.
?????????????? ????????????????????
???????????????????? ???????????????????????? N30xx ???????????????????????????? ?? ?????????????? ???????? ????????????????????????. ?????????? ????????, ?? ???????????? ???????????????????? ?????????????????? ?????????????? ???????????????????????? N30xx ???????????????????? ????????????????????. ???????????????????? N30xx ???????????????????????? ?????????????? ???????????? ?? ???????? ????????????????????????.
?????????????? ???????????? ???????????? N30xx
?????????????? 2. ?????????????? ???????????? ???????????? N30xx
?????????????? 2. ?????????????? ???????????? ???????????? N30xx
1x ?????????????????? ??????????/N+1 ?????????????????? ???????????????????????? ???????????????? ??????????????/48x ????????????
PoE+/12 ???????????? ?? ???????????????????? UPoE/1x ?????????????? ???????????? ??????????????????????
?????????????????? ?????????? N30xx
???????????????????? ??????????
?????????????????????? ?????????? N30xx ?????????? ???????????????????? ?? ?????????????????????? ???????????? 48,26 ???? ?????? ???? ?????????????? ??????????????????????.
??????????????????, ?????? ?????????????????? ?????????? ?????? ?????????????????? ???????????????? ?????????????????? ??????????????????????.
?????????????????. ???????????????????? ???????????????????? ?????????? ???????????????????????????? ?????????????? ?????????????? 100???240 ?? ??????????. ????????, 50???60 ????.
????????????????????? ????????????????????????. ???????????? ???????? ???????????????????? ?????????? ?????????????? ?? ?????????? ?????? ???????????? ??????????????????. ?????????? ???????????????? ???????????????????? ?????????? ?????? ?????????????????? ??????????????????????, ?????????????? ?????????????? ?? ????????????????????.
????????????????????? ??????????????????????. ?????? ?????????????????? ?????????????? ?????????????? ???????????????? ???????????????????? ?????????????????????????? ??????????, ???????????????? ??????????????????????????????????, ???????????????????????????? ????????????????????, ?????????????????????????????? ?? ???????????????????????????? ?????????????????????????? ????????????????????.
????????????????????????? ???????????????????? ??????????. ???????????????????? ???????????????????????? ?????? ???????????? ?? ?????????????????? ???????????????????? ???? 0 ???? 45C ?????? ?????????????????????????? ?????????????????? ???? 95 ??????????????????, ?????? ???????????????????? ??????????????????????.
????????????????????: ???????????????????? ?????????????????????? ???????????????????? ?????????????????????? ???? 1 ??C (1.8??F) ???????????? 300(985 ??????.) ?? ???? ???????????? ??????????
900?? (2955 ??????.).
????????????????????????????? ??????????????????. ???????????????????? ???????????????? ?????? ?????????????????????????? ?????????????????? ?? ???????????????? 8???85% (?????? ???????????????????? ??????????????????????). ???????????????????????? ?????????????? ?????????????????? ???????????????????? 10% ?? ??????.

???????????????????? ?????????????????????? N30xx
???????????????? ????????????????
?????? ???????????????????? ?????????????????????? ?????????????????? ?????????????? ?????????????????? ??????????????????????.
??????????? ???????????????????? Dell Networking
??????????? ???????????? ?? ?????????????????? RJ-45/DB-9
??????????? ???????????????? ReadyRail ?????? ?????????????? ?? ????????????, ?????? ?????????????????? ????????????????????, ?????????? ?? ?????????????????? ??????????
??????????? ?????????? ?????????????????????????? ?????????????????? ?????????????????? ?????? ???????????????? ???????????????? ?????????????????????? (???????????? ?????????????????? ?? ??????????????????)
??????????? ???????????????? ??????????????
?????????????????? ????????????????????
????????????????????: ?????????? ?????????????????????? ?????????????????????? ?????????????????? ?????????????????????? ???????????????? ?? ???????????????????? ???????????????? ?? ?????????? ???????????????????????? ??????????????????????.
1?????????????????? ?????????????????????? ?????????????? ???? ???????????? ?????????????? ?????????????????????? ?? ???????????????????? ?????? ?????????????????? ??????????.
2???????????????? ?????????????????????? ?????????????? ?????? ?????????????? ?? ?????? ?????????????? ????????????.
3?????????????????? ?????????????????? ???????????????????? ???? ?????????????????????? ?????????????? ?? ?????????????????? ?????? ?? ???????????????????? ?? ???????????? ??????????.
4???????????????? ?? ?????????????? ???????? ?????????????????????? ????????????????.
5?????????????????? ???????????????????? ?? ???????????????????????????? ???? ?????????????? ??????????????????????.

???????????? ?????????????????????? N30xx ?? ????????????
?????????? ???????????????????? ???????????????????? ???? ?????????? ???????????? ?????? ?????????????????? ?????? ?????????????????????????????? ?? ???????????? ???????? EIA-310-E ?????????????? 19 ???????????? (?? ?????????????? ???????? ?????? ?????????????? ?????????????? ???????? ?? ?????????????? ????????????). ?????????????? Dell ReadyRail ?????????????????????????? ?????? ?????????????????? ?? ?????????????? ?????????? ???????????? ?????????????? 1U ?????? ?? ???????? ????????????. ?????????????? ReadyRail ?????????????? ???? ???????? ?????????????????? ?????????????????????? ???????????????????? ?????????????????? ????????.
????????????????????????????: ???????? ?????????????????? ?????????????? ??????????????????????. ?????????? ?????????????? ???????????????????????? ?? ???????????????????????? ???? ?????????????? ????????????????????????, ?????????????????????? ?? ?????????????? ?????????????????? ?? ????????????????????????, ???????????????????? ?? ?????????????????????? ???? ???????????????????? ????????????.
????????????????????: ?????????????????????? ?? ?????? ???? ?????????????????? ?? ??????????-???????? ???????????????????? ???????????? ??????????????????????.
???????????????????? ???? ???????????????????????? ?????? ?????????????? ?? ????????????
??????????????????? ???? ????????????. ???????????????????? ?????? ?????????????????????????? ???????????????? ???????????? ?????????? ???????????????? ?? ???????????????????? ?????????? ?????? ???????????? ?? ???????????? ?????? ???????????????????????? ?? ??????????????. ???????????? ?????? ?????????????????? ????????????, ?????????????? ???????????????????? ???? ?? ?????? ??????????, ?????? ?????? ???????????? ?????????????????? ????????????????????. ???????????????????????????? ????????????????????, ?????????????? ?? ???????????? ?????????? ????????????, ???????????????????? ???????????????????? ?? ??????????. ???? ???????????????????? ?????????????????????? ???????????????????? ???????????????? ???? ????????????.
????????????????????????? ?? ?????????????????? ??????????????. ?????????????????????? ???????????? ?? ???????????????????? ??????????????, ?????????????????? ???? ????????????????????. ???????? ???? ?????????? ???????????? ?????????????????????? ?????????????????? ??????????????????????????????, ??????????????????, ?????? ???? ?????????? ???????????????? ???? ?????????????????? ????????????????????. ???????????????????? ???????????????????? ?????????????? ?? ?????????????????????? ?????????? ?????????? ???????????????? ???????????? ?? ???????????????????????????? ??????????.
??????????????????????? ?????????????????????? ???????????????????? ??????????. ???????? ???????????????????? ?????????????????????? ?? ???????????????? ??????????????, ?????????????? ?????????????????????? ???????????? ???????????? ?????????? ???????? ????????, ?????? ?? ?????????????? ?? ??????????????????. ?????????????? ???? ??????, ?????????? ?????????????????????? ???????????? ?????????????????????? ???? ?????????????????? 45??C.
??????????????? ????????????????????. ???????????????????????????? ???????????????????????? ?? ???????????? ??????, ?????????? ?????????? ???? ???????????????????????????? ???????????????????? ?????????????? ??????????????, ???????????????????????? ?????? ???????????????????? ????????????????????????.
??????????????????? ????????????????????. ?????????????????? ???????????????? ???????????????????? ???????????????????????? ?? ????????????. ???????????????? ???????????? ???????????????? ???? ?????????????????????? ?? ????????, ?????????????????????? ???? ????????????????, ????????????????, ?? ???????????????????????????? ?????????????? ????????????????.
??????????????????????? ???????????? ?????????????????????????? ???????????? ?????????????? ????????.
?????????????????? ?????????????? Dell ReadyRail
?????????????? ?????????????? ?? ???????????? ReadyRail ???????????????????????? ?????????????? ?????????????????? ???????????? ?????? ?????????????????????? ?????????????????? ??????????????????????. ?????????????? ReadyRail ?????????? ?????????????????????????? ?????? ???????????? ???????????????????????? ?????? ?????????????????? ?????????????? 1U, ?? ?????????? ?????????? ?????????????? ?????????????? ?????????????????? ?? ?????????????? ???????????????????????? (???????????????????? ?????????????????? ???? ???????? ????????????, ?????????????????????? ?????????????????? ???? ???????? ???????????? ?????? ?????????????????? ?????????????? ???? ?????????????? ????????????).
???????????????????????? 1U ?????? ???????????????????????? (???????????? ???????????????????? ?????????????????? ?????? ?????????????? ?????????????????? ?????? ????????????)
1???????????????? ???????????? ???????????? ?????????????? ReadyRail, ???????????????????? ???????? ???? ???????? ?????????? ???????????? ?? ?????????? ?????????????????????????? ??????????????. ???????????????????? ???? ?? ???????????????? ?????????? ???????????? ?????????? ?? ?????????????????? ???????????? ???????????? ???????????????????????? ??????????. ???? ??????. ??????. 1-19 ?????????? 1 ????????????????????, ?????? ???????????????? ?????????? ?? ???????????????????? ?? ?????????????? ????????????????????.

?????????????? 1-19. ???????????????????????? 1U ?????? ???????????????????? ????????????????????????
2???????????????????? ?? ???????????????? ?????????? ???? ?????????????? ???????????? ?? ?????????????????? ?? ?????????????? ?????????? ???????????????????????? ??????????. ????. ??????. ??????. 1-19, ?????????? 2.
3?????????????????? ???? ???? ???????????????? ???? ???????????? ????????????.
4?????????? ?????????? ??????????, ???????????????? ?????????????? ???? ???????????? ?????????????? ???? ?????????????? ?? ???????????????? ??????????. ????. ??????. ??????. 1-19, ?????????? 3.
???????????????????????? ???? ???????? ???????????? ?? ???????????????????? ????????????????????
1?? ???????? ???????????????????????? ?????????? ?????????????? ?????????????? ?? ???????????????? ?????????? ???????????? ???????????? ReadyRail. ????. ??????. ??????. 1-20, ?????????? 1 ???? ??????. 251. ?????????????????????? ???????????????? Torx, ?????????? ?????????????????? ?????? ?????????? ?? ?????????????? ???????????? ????????????
(?? ???????????????????? ?????????????? ??????????) ?? ?????????????? ??????????????. ?????????????????? ?????????????? ?????? ???????????????????? ?????????????????????????? ?? ??????????????. ???? ?????????? ?????????????? ?????????????? ?? ?????????????? ????????????.
?????????????? 1-20. ???????????????????????? ???? ???????? ???????????? ?? ???????????????????? ????????????????????
2???????????????????? ???????? ?????????? ?? ???????????? ???????????????? ?????????? ?? ?????????????? ???????? ???????????? (???? ??????????????????????). ????. ??????. ??????. 1-20, ?????????? 2.
3?????????????????? ?????????????????? ?????????????????? ?? ???????????????????????? ?????????? ?? ???????????????????? ?????? ?? ?????? ?? ?????????????? ???????? ????????????. ????. ??????. ??????. 1-20, ?????????? 3.
4?????????????????? ???? ???? ???????????????? ???? ???????????? ????????????.
???????????????????????? ???? ???????? ???????????? ?? ?????????????????????? ????????????????????
1???????????????? ?????????????????? ?????????????????? ??????????, ???????? ???? ???? ?????????????????????? ???? ??????????, ?????????? ???????????????????? ?????? ?? ???????????????? ?????????? ?? ?????????????? ???????? ????????????. ????. ??????. ??????. 1-21, ?????????? 1.
?????????????? 1-21. ???????????????????????? ???? ???????? ???????????? ?? ??????????????????????
????????????????????
2?????????????????????? ???????????? ?????????????????? ?? ?????????? ?? ???????????????????? ?????? ?? ???????????? ?????????? ?? ?????????????? ???????? ????????????. ????. ??????. ??????. 1-21, ?????????? 2.
3?????????????????? ???? ???? ???????????????? ???? ???????????? ????????????.
???????????????????????? ???? ?????????????? ???????????? ?? ??????????????
1?????? ???????? ???????????????????????? ?????????? ?????????????? ?????????????? ?? ?????????????? ?????????? ?????????????????? ???????????? ReadyRail. ?????????????????????? ???????????????? Torx, ?????????? ?????????????????? ?????? ?????????? ?? ???????????? ???????????? ?? ?????????????? ??????????????. ????. ??????. 1-22, ?????????? 1. ?????????????????? ?????????????? ?????? ???????????????????? ?????????????????????????? ?? ??????????????.
2?????? ?????????????? ???????????? ???? ???????? ???????????????????? ???????????????? ?? ???????????? ???????????? ?? ???????????? ?????????? ?? ?????????????? ???????? ???????????? (???? ??????????????????????). ????. ??????. ??????. 1-22, ?????????? 2.
?????????????? 1-22. ???????????????????????? ???? ?????????????? ???????????? ?? ??????????????

?????????????????? ???????????????? ???????????????? ??????????????????????
????????????????????: ???????????????????????? ?????????????????????????? ?????????????????????????? ???????????????????? ?? ????????????.
???????? ???????????????????? ?????????????????????????????? ???? ?? ????????????, ???????????????????? ?????? ???? ?????????????? ??????????????????????. ?????????????????????? ???????????? ?????????????????????? ?????? ?????????????????????? ?? ?????????????? ??????????????????????. ???????????????? ?????????????????????? ???????????????? ?? ???????? ???????????? ??????????????????????????- ?????????????????? ??????????????????.
1???????????????????? ?????????????????????????? ?????????????????? ?????????????????? ?? ?????????????? ?????????????????????? ???????????????????????????? ???? ???????????? ???????????? ??????????????????????.
2???????????????????? ???????????????????? ???? ?????????????? ?????????????????????? ?? ?????????????????? ?? ?????????????????????? ???????????????????? ????????????????????, ?????????????? ?????????? 5 ???? ???? ???????????? ?????????????? ???????????? ?? 13 ???? ???? ???????????? ????????????.
?????????????????? ?? ???????????? ???????????????????? ???????????????????????? N30xx
?????????? ???????????????????? ?? ???????????? ???? 12 ???????????????????????? N30xx ?? ?????????????? ???????????? mini-SAS, ?????????????????????????? ???? ???????????? ???????????? ????????????????????????. ?????????????????????? N30xx ???????????????????????? ???????????????????????? ???????????? ?????????????????? ?? ?????????????????????????? ?????????? N30xx. ???????? ?????????????????? ???????????????????????? ???????????????????? ???????? ?? ?????????? ?? ?????????????? ???????????????? ????????????, ?????? ?????????????????????????? ?? ???????????????? ?????????????? ???????????????????? ?? ?????????? ?????????????????????? ???? 576 ???????????? ???? ???????????????? ????????????. ???????? ???????????????? ?? ?????????????????????? ?????? ???????????? ??????????.
????????????????????: ?? ???????????? ?????????????????? ?????????? ???? ???????????????????????? ?????????? ???????????????????? ?????????????? ?? ???????????????????? ???????????????????? ?????????????????? ?????????????? ?? ?????????????????? ???????????????? ?????? ?????????????????????? ?? ??????????. ?????? ???????????????????????????? ?????????????????? ?????????????? ?????????? ?????????????????????? ???????????????? ?????????????? ????????????????????, ?????????????? ?????????? ???????????? ?????????? ???????????????????????????? ?? ??????????. ???? ???????????????? ???????????? ???????????????? ???????????????????? ???????????????? ?????????????????? ???????????????? ??????????????????????.
???????????????? ?????????? ????????????????????????
?????? ???????????????? ?????????? ?????????????????? ???????????????? ???????????????????? ?????????? ???????????????? ?????????? mini-SAS ???? ???????????? ???????????? ??????????????????????. ???? ??????. 1-23, ??????. 255 ???????????????? ??????????????????????, ???????????????????????? ???? ???????????????? ?????????????????? ??????????????????, ???????????????????? ?????????????????????????? ?????? ????????????.

1???????????????????? ???????? ???? ?????????????? mini-SAS ?? ???????????? ???? ???????????????? ???????????? ???? ?????????????? ?????????????????????? ?? ???? ??????????????????????, ?????????????????????? ?????????? ?????? ??????.
?????? ?????????????????????????? ?????? ???????????????????? ???????????????????????? ?????????????????????? ?????????????? (1- ?????? 3-????????????????) ???????????? mini-SAS, ?????????????????????????? ????????????????.
2?????????????????? ?????? ??????????????????, ???????? ?????? ???????????????????? ???? ?????????? ?????????????????? ???????? ?? ????????????.
3?? ?????????????? ?????????????????????? ???????????? ???????????????????? ?????? ???????????????????? ???????????????? ?????????? ?????? ???????????????????? ?????????????????? ??????????????????.
?????????????? 1-23. ???????????????????? ???????????????????????? ?? ??????????
???????????????????? 1 
???????????????????? 2 
???????????????????? 3 
????????, ???????????????????????? ???? ??????. 1-23, ?????????????????? ???? ???????????????? ?????????????????? ??????????????????; ?????????????????????? ?????????????????? ???????? ?? ???????????? ?? ?????????????? ?????????????????? ???????????????????? ??????????????????????.
??????????????? ???????? mini-SAS ???? ???????????????????? 1 ?????????????????? ?? ???????????????? ?????????? mini-SAS ???? ???????????????????? 2.
??????????????? ???????? mini-SAS ???? ???????????????????? 2 ?????????????????? ?? ???????????????? ?????????? mini-SAS ???? ???????????????????? 3.
??????????????? ???????? mini-SAS ???? ???????????????????? 3 ?????????????????? ?? ???????????????? ?????????? mini-SAS ???? ???????????????????? 1.
?????????????? ?? ?????????? ???????????????????? ????????????????????
?????????????? ?????????????? ?????????? ???????????????????????? ?????????????????? ?????? ???????????????? ????????????????????, ?????????????? ?????????? ???? ???????? ???????? ???????????????? ????????????????????, ???????? ?????????????? ???????????????????? ?? ?????????? ?????????????? ???? ??????????. ?????? ???????????? ?? ?????????? ???????????????????????????? ?????????? ???? ?????????? ???????????????? ????????????????????, ?????????????????? ???????????????????? ???????????????????????????? ???????????? ???????????????????? ?? ???????????????? ?????? ?????????????????? ???????????????????? ?? ?????????? ?? ?????????????? ??????????????????????????. ?????????????????? ???????????????????? ?????????????????? ???????????????????????????????????? ?????????? ?????????????????????????? ???????????????????????? ?????? ??????????. ?????????? ???????????????????? ???????????????????? ?? ?????????? ?????????????????????? ??????????????????????????, ???????????? ?????????? ???????????????????????? ?????????????????? ?????????????????? ???????????? ?????? ???????????? ?????????????? ???????????????????? ?? ?????????? ?? ???????????????? ????????????????????. ???????????????????????????? ???????????????????? ????. ?? ?????????????????????? ????
?????????????????? ?????? ???????????????????? ?????????????????????? ???? ?????????????????????????? ???????????????????? ?????????????????? ????????????.
???????????? ?? ???????????????????????? ?????????????????????? ?????????? N30xx
???? ????????-?????????? ???? ??????. 1-24 ???????????????? ?????????????????? ?????????????????? ???????????????????????? ?????????? ???????????????????? ?? ?????????????????? ??????????????????????.
?????????? ???????????????????? ???????? ?????????????? ???????????????????? ???????????????????? ???????????????? ?? ??????????????????????, ?????????? ???????????????????????????????? ????????????????????.

????????????????????: ???????????? ?????? ???????????????????? ?? ????????????????????, ???????????????? ???????????????????? ?? ???????????? ?????? ?????????????? ????????????????. ???? ?????????? ?????????? ???? ??????-?????????? ?????????????????????? ?????????????????? ???????????????????? Dell ???? ???????????? dell.com/support/manuals..
????????????????????: ?????????????????????????? ?????????????????? ?????????? ?????????? ???????????? ???????????????????????? ?????? ?????????????????????????? ?? ??????-?????????? ?????????????????????? ??????????????????
Dell ???? ???????????? dell.com/support/manuals.
?????? ???????????????? ?? ?????????????????? ?????????????????????? ?? ?????????????? ???????????????????????????????? ???????????? ???????????????????? ?????????????????????? ???????????????????? ???????? ???? ???????????????? ???????????? ?????????????????????? (????. ??????. 1-25 ???? ??????. 259) ?????? ?????????????????????? ?? ?????????????????? VT100 ?????? ????????????????????, ?????????????????????????? ?????????????????????? ?????????????????????? ???????????????? ?????????????????? VT100. ???????????????????? ???????? ???????????????????????? ?????????? ???????????? ?????? ???????????????????????? ?????????????????? ???????????? (DTE).
?????? ?????????????????????????? ?????????????????????? ?????????? ???????????????????? ?????????????????? ????????????????????????.
???VT100-?????????????????????? ???????????????? ?????? ?????????????????? ?? ???????????????????????????????? ???????????? ?? ?????????????????????? ?????????????????????? ???????????????? ?????????????????? VT100,
????????????????, Microsoft HyperTerminal.
????????????????????????? ???????????????????????????????? ???????????? ?? ???????????????? RJ-45 ?????? ?????????????????????? ?????????? ?? ???????????????? DB-9 ?????? ??????????????????.
?????????? ???????????????????? ???????????????? ?? ?????????????????????? ?????????? ??????????????????????, ?????????????????? ?????????????????? ???????? ????????????????.
1???????????????????????? ???????????? DB9 ???? ???????????????????????????????? ???????????? ?? ?????????????????? ?????? ????????????????????, ?????????????????????????? ?????????????????????? ?????????????????????? ???????????????? ?????????????????? VT100.
2?????????????????? ?????????????????????? ?????????????????????? ???????????????? ?????????????????? ?????????????????? ??????????????.
A ?????? ?????????????????????? ?? ???????????? ???????????????????? ???????????????? ???????????????????? ???????????????????????????????? ???????? (????????????????, COM 1).
B ???????????????????? ???????????????? ???????????????? 9600 ??????.
C ???????????????????? ???????????? ???????????? ?????????????????? ??????????????: 8 ?????????? ????????????, 1 ???????????????? ??????, ???????????????????? ???????????????? ????????????????.
D?????? ?????????????????? ?????????????????????? ???????????????? ???????????????? ???????????????? ??????????.
E???????????????????? ?????? ???????????? ???????????????? ?????????????????? ???????????????? VT100.

F???????????????? ?????????????? ?????????????????? ?????? ?????????????????? ????????????: ????????????????????????????, ???? ?????????????????? ?? Ctrl. ?????????????????? ?? ??????, ?????? ?????????????????? ?????????????????? ?????? ???????????? ?????????????????? (?? ???? ?????? ????????????
Microsoft Windows).
3???????????????????????? ???????????? RJ-45 ?????????????????????????????? ?? ?????????????????????? ?????????? ??????????????????????. ???????????????????? ???????? Dell Networking ?????????????????? ???? ???????????? ?????????????? ???????????????? ???????????? ?? ?????????????????? ???????????????? |O|O|, ?????? ???????????????? ???? ??????. 1-25.
????????????????????: ???????????? ???????????????????????????????? ???????????? ???????????????????? ?? ???????????????????? ?????????? ???????????????? ?? ?????????????? ???????????? ?????????? ?????????????????????? ???????????????????? ???????????????????? ?????????????????? ????????????. ???????????????????????? ???????????????????????????? ???????????? ???????? ?????????? ???????????????????????????????? ???????????? ????????????????????.
?????????????? 1-25. ???????????????????????????? ?????????????????????? ?????????? N3048
???????????????????? ????????
???????? RJ-45, ?????????????????????????? ???????????? ???? ?????????????????????? ??????????, ???????????????????????? ?????? ???????????????????????? ???????????????????? Ethernet.

?????????????????????? ?????????????????????? N30xx ?? ?????????????????? ??????????????
????????????????: ???????????????????????? ?? ???????????????????????? ???? ?????????????? ????????????????????????, ?????????????????????? ?? ?????????????????? ?? ???????????????????????? ?? ????????????????????, ?? ?????????? ?? ???????????????????????? ???? ?????????????? ???????????????????????? ?????? ???????????? ????????????????????????, ???????????????????????? ?? ?????????????? ?????????????????????? ?????? ???????????????????????????? ??????.
?????? ???????????????????????? N30xx ?????????????????????????? ?????? ?????????????????? ??????????????, ???????????????????? ?? ???????? ????????????????????????, ?????????????????????????????? ?????? ???????????? ???????????? ?? ?????????????????????????????? ?????? ?????????????????????? ????????????????.
?????????????????????? ?? ?????????????????? ?????????????????????? ?? ?????????????????????? ????????
1??????????????????, ?????? ???????????????????? ???????? ?????????????????????? ?????????????????? ?? ?????????????????? VT100 ?????? ?????????????????? ?????????????????? VT100 ?? ?????????????? ???????????? ?? ??????????????????
RJ-45/DB-9.
2???????????????????? ?????????????????????? ???????????? ?????????????? ???????????? 1,5 ?? ?? ?????????????????????? ?????????????????? ?? ???????????????? ?????????????? ?????????????? ?????????????????????? ????????, ?????????????????????????? ???? ???????????? ???????????? (????. ??????. 1-26 ???? ??????. 260).
3???????????????????????? ???????????? ?????????????? ?? ?????????????????????? ????????????????????????????.
?????????????? 1-26. ?????? ?????????????????? ?????????????????? ?????????????? ???? ?????????????????????? N3048
?? ?????????????????? ?????????????? ?????????????????????? ????????
???????????????? ?????????????????????? ???????????? N30xx
?????? ?????????????????? ?????????????? ?? ?????? ???????????????????????? ?????????????????? ???????????????????? ???????????????????? ?????????????????? ?????????????????? POST (Power-ON Self Test, ???????????????????????????????? ?????? ?????????????????? ??????????????). ?????????????????? POST ?????????????????????? ???????????? ?????? ?????? ?????????????????????????? ??????????????????????. ?????? ???? ???????????????????? ?????????????????????? ???????????????????? ?????????????????????? ??????????????????????, ?????????? ?????????? ???????????? ?????????????????? ?????????????????????? ????????????????????, ?????????????????? ???? ???? ?? ?????????????? ????????????. ???????? ?? ???????????????? ???????????????????????? (POST) ???????????????????? ?????????????????????? ????????????, ???????????????? ?????????????????? ????????????????????????. ???????? ?????????????????? POST ???????????????? ??????????????, ?? ?????? ?????????????????????? ???????????????????????????? ???????????????????? ?????????????????????? ??????????????????????. ?????????????????? POST ?????????????????? ???? ???????????????? ?? ?????????????????????? ???? ???????????????? ???????????????????? ?????????? ?????? ????????. ?????????????? ???????????????? ???????????????? ???????????????????????????? 60 ????????????.
?????????? ?????????????? ???????? Boot (????????????????) ?????????? ???????????????????? ???????????? ?????????? ???????????????? ???????????????????????????????? (POST). ?? ???????? ???????????????? ?????????? ?????????????????? ?????????????????? ???????????? ???? ??????????????????, ???????????????? ???????????????? ???? ?????????????????? ???????????????? ???? ??????????????????, ???????????????????????? ?????????? ?????? ???????????????????? ???????????????????????????? ?????? ???????????????????????? ????????????. ???????????????????????????? ???????????????????? ?? ???????????????? ????????
???????????????? ????. ?? ???????????????????? ?????????????????????? ???? ?????????????????????????? ???????????????????? ?????????????????? ????????????.

???????????????????? ???????????????????????????? ?????????????????? ???????????? N30xx
???????? ?????????????????????? ??????????????????, ???????????????????????? ?????? ???????????????????????????? ????????????????????????.
????????????????????? ?????????????????????? Dell Networking ?????????? ???? ??????????????????????.
??????????????????? ?????????????????????? Dell Networking ?????????????????? ??????????????.
????????????????????????? ???????????? ???????????????????? ??????????????????, ?? ???? ???????????? ?????????????????? VT100 ?????? ?????? ?????????????????????? ???????????????????????? ???????????? ???????????? ?????????????? ?????????????????? Dell.
???????????????????????????? ?????????????????? ?????????????????????? ?????????????????????? ?????????? ???????????????????? ????????. ?????????? ???????????????????????????? ?????????????????? ???????????????????????? ?????????? ?????????????????? ???????? ?????????? ?????? ???????????????????????? ???????????????????? ????????, ???????? ???????????????????????? ?????????? ??????????????????, ???????????????????????? ?? ???????????????? ???????????????????????????? ????????????????????????.
????????????????????: ?????? ?????????????????????? ???? ?????????????????? ?????? ???????????????????????? ?? ???????????? ???? ??????????????????. ?????? ???????????????????????? ?????????? (OOB) IP-?????????? ???? ?????????????????? ???????????????? ?????? DHCP.
???????????? ?????? ?????????????????? ???????????????????????????? ?????????????????? ??????????????????????, ???????????????????? ???????????????? ?? ???????????????????????????? ???????? ?????????????????? ????????????????:
???IP-??????????, ?????????????? ???????????????????? ?????????????????? ?????? ???????????????????? ????????????????????;
????????????? ?????????????? IP ?????? ????????;
???IP-?????????? ?????????? ???? ?????????????????? ???????????????????? ????????????????????.
?????? ?????????????????? ???????????????????? ?????? ???????????????????? ???????????????????? ???????????????????????? ??????????
Telnet (???????????? Telnet) ?????? HTTP (??????-??????????????).
?????????????????? ???????????????????? ????????????????????
???? ???????????????? ???????????? ?????????????????????? N30xx ???????????????????? ???????? Gigabit Ethernet ?????? ???????????????????????? ???????????????????? (OOB) ?????????????????????? ???????? (OOB) ???????????????????? ???????????? ???? ?????????????????????? ??????????. ???? ???????????????????????? N30xx ?????? -?????????????????????????????? ???????????????????? ?????????? ???????????????????????? ?????????????????????? ???????? (OOB) ?????? ?????????? ???? ???????????? ??????????????????????, ?????????????????????????? ???? ???????????????? ????????????. ???? ?????????????????? ?????? ???????????????????? ?????????? ???????????????? ?????????????? ?????????????????????? ?????????????????? ???????? 1.

???????????? ?????????????? ?????????????????? Dell ???????????????? ?? ???????? ?????????????????? ?? ?????????????????? ?????? ?????????????????? ???????????????? ?????? ???????????????????? ???????????????????????? ???????????????????? ???? ?????????????????????? N30xx ?? ???????????????????? ?????????????????????? ?????????????????? ???????? 1 ???? ???????????????????????? N30xx. ?????? ?????????????? ???????????????????? ???????????????????? ?????????? ?????????????????? ?????????????????????? IP-?????????? ?? ?????????? ?????????????? ?????? ???????????????? DHCP ?? ?????????????????? ???????????????? ?????????????? DHCP ?????????????????? ???????????? ????????????????.
????. ???????????????????? ?????????????????????? ???? ?????????????????????????? ???????????????????? ?????????????????? ???????????? ?????? ?????????????????? ???????????????? ?? ???????????????? ???????????????????? ?????????????????? ????????????, ???????????????????????? ?????? ?????????????????? ???????????????? ?? ????????.
?????????????????? ?????????????????? ????????????????????????
???????????????????????????? ?????????????????? ?????????? ?????????????????? ?? ?????????????? ???????????? ?????????????? ?????????????????? Dell ?????? ???????????????????? ?????????????????? ????????????. ???????? ???????????? ???????????????????? ??????????????????????????, ???????? ???????? ???????????????????????? ?????????????????????? ???? ???????????????? ????????????. ???? ???????????? ?????????? ???? ?????????????? ?? ?????????? ?????????? ???????????????? ???????????? [ctrl+z], ???? ?????? ?????????????????? ?????????????????? ?????????? ????????????????, ?? ???????????????????? ?????????? ???????????????????????? ???????????????? ???? ??????????????????.
????????????????????: ???????? ???? ???? ?????????????????? ???????????? ?????????????? ??????????????????
Dell ?????? ???? ?????????????????? ???? ?????? ???????????? ?? ?????????????? 60 ????????????, ???????????????????? ???????????? ?? ?????????? ???????????????????? ?????????????????? ????????????. ?????????? ?????????????????????????? ???????????? ?????????????? ?????????????????? Dell, ???????????????????? ?????????????????? ?????????? ?? ?????????????? ???????????? ???????????????????????? ??????????????.
???????????????????????????? ???????????????????? ?? ?????????????????? ???????????????????????????? ?????????????????? ?? ?????????????? ???????????????????? ?????????????????? ???????????? ????. ?? ???????????????????? ?????????????????????? ????
?????????????????????????? ???????????????????? ?????????????????? ????????????. ?? ?????????????????????? ???? ???????????? ???????????? ??????????????, ?????? ?????????????????? ???????????????????????????? ?????????????????? ?????????????????????? ?? ?????????????? ???????????? ?????????????? ?????????????????? Dell. ???????????? ?????????????????????? ?????? ?????????????????????? ?????????????????? ????????????????????????.
????????????????? ?????????????? ???????????? ???????????????????????????????????? ???????????????????????? ?? ???????????????????????????? ??????????????. ???????????? ?????????????????????????? ?????????????? ???????????? ???????????????????????????????????? ???????????????????????? ???? ?????????? ??????????????????.
????????????????? ?????? ???????????????????????? ?????? ???????????????????? ?????????????????? ???????????? ?? ?????????????????? ???????????? ???? ?????????????????? HTTP ?????? ?????????????????????????? ?????????????????? ???????????????????? ??????????????????????????.
????????????????????????? IP-?????????? ?????? ???????????????????? ???????????????????????? ????????????????????.
????????????????????????? IP-?????????? ?????? ???????????????????? ?????????????????????????? ?????????????????????? ?????????????????? ???????? 1, ?? ?????????????? ?????????????????????? ?????? -???????????????????? ??????????.
??????????????? ???????????? ?????????? ?? ???????????? SNMP ?????? ?????????????????????????? ???????????????????? SNMP ???? ???????????????????? IP-????????????. ???????????? ?????? ?????????? ????????????????????, ???????? ???????????????????? SNMP ???? ?????????? ???????????????????????????? ???? ??????????????????????.
????????????????????? ?????????????? IP-?????????? ?????????????? ???????????????????? ?????????? ?????? ?????????????? ???????????? ?????? ???????????????????? ???? ???????? IP-??????????????.
????????????????????????? IP-?????????? ?????????? ???? ?????????????????? ?????? ???????????????????? ?????????????????????? ?????????????????? ???????? 1.
????????????.
?? ???????????? ?????????????? ???????????? ?????????? ???????????? ?????????????? ?????????????????? Dell. ?? ?????????????? ???????????????????????? ?????????????????? ????????????????.
????????????????? ???????????????????? SNMP, ?????????????? ???????????????????? ????????????????????????, ???????????????? public.
???IP-?????????????? ?????????????? ???????????????????? ?????????? ???????????????? 10.1.2.100.
????????? ????????????????????????: admin, ????????????: admin123.
????????????????????? ???????????????????????? ???????????????????? ???????????????????? DHCP ?????? ???????????????????? IP-????????????.
???IP-?????????????? ?????? ???????????????????? ?????????????????????????? ?????????????????????? ?????????????????? ???????? 1 ???????????????? 10.1.1.200 ?? ???????????? ?????????????? 255.255.255.0.
??????????? ???? ?????????????????? ??? 10.1.1.1
???????????? ?????????????????? ???????????? ?????????????????? ???????? ????????????????. ?????????? ???????????????????? ???????????? ?????????????? ???????????????????? ?????????????????????????? ?????????????????? ??????????????.
???SNMPv2 ?????????????? ?? ???????????? ???????????????????? ??????????????????????, ?????? ?????????????? ????????. ???? ?????????????????? SNMPv3 ????????????????.
????????????????? ???????????? ???????????????????????????? ?????????????? ?????? ???????? ??????????????.
????????????????? ???????????????????? ?????????? ??????????????????. ?? ???????????? ?????????????? ???????????????????? ?????????????????????? ???????????? ?? ?????????????????????? SNMP, HTTP ?? CLI. ?????????? ?????????????? ???????????? ?? ???????????? ?????????????????????? ?????? ???????? IP-??????????????, ???????????? IP-??????????
(0.0.0.0).
??????? ???????????????????? ???????????????????????? ???????????????????? ?????????????? DHCP.

???IP-?????????? ???????????????? ?????? ???????????????????? ?????????????????????????? ?????????????????????? ?????????????????? ???????? 1.
????????????? ?????????? ???? ?????????????????? ????????????.
????????????????????: ?? ?????????????????????? ???????? ?????????????? ?????????????????? ???????????????? ?? ???????????????? ???? ?????????????????? ?????????????? ?? ???????????????????? ??????????????. ???????? ???????????? <Enter> (????????), ???? ?????????? ????????????????, ???????????????????????????? ?????????? ???????????????? ???? ??????????????????. ?????????? ?????????????? ?????????????????? ?? ?????????????? ??????????????.
???????????? ???????????? ???????????????????? ?????????????? ?????????????? ??????????????????
Dell
?? ?????????????????? ?????????????? ?????????????? ???????????????????????????????????? ???????????????? ?? ?????????????? ???? ?????????? ???????????? ???????????? ?????????????? ?????????????????? Dell ?? ???????????????????????????? ?????????????????? ???????? ????????????????.
?????????? ????????, ?????? ???????????????????? ???????????????? ?????????????? ???????????????????????? ?? ????????????????????????????, ?????????????????????? ?????????????????? ???????????????????? ????????.
???????????????????? 1 ??? ???????????????? ???????????? ???????????????? ????????????????????)> ???????????????????? ?????????? ????????????????, ??????????????????...
?????? ???????????????????????? ???????????? ?????????????? ?????????????????? Dell
???????????? ?????????????????? ???????????????? ?????????????????? ???????????????????????????? ?????????????????? ?????????????????????? ?? ?????????????????? ???????????? ???????????? ?? ?????????????????????? ?????? ??????????????????????. ???? ???????????? ???? ?????????????????? ?? ?????????????? ?????????????? ?????????????????? ?? ?????????????????? ???????????????????????? ?????????????????????? ?????????????? ?? ?????????????? ?????????????????? ????????????. ???? ???????????? ???????????????? ???? ?????????????????? ???????????? ?? ?????????????? ?????????????????? 60 ????????????, ?????????? ?????????????????? ????????????, ?????????? ?????????????? ?????????????????? ???????????????? ?? ?????????????? ???????????? ?? ???????????????????????????? ???????????????????????? ???? ??????????????????. ????????????????????. ???? ???????????? ?????????? ???? ?????????????? ?? ?????????? ???????????? ????????????????
[ctrl+z].
?????????????? ???????????? ??????????????????? ???????????????????? ???????????????? ?? ?????????????? ?????????????????? 60 ????????????. [Y/N] y

?????????????????? ?????????????? ?????????????? ?????????????????? SNMP ???????????? 1 ?????? 3 ????. ???????????????????????????????? ????????????????????????).
?????????????????? ?????????????????? ???????????????????? ???? ?????????????????? SNMP ????????????? [Y/N] y
?????????? ?????????????????? ?????????????? ???????????? ???????????????????? ???? ?????????????????? SNMP, ???????????????????? ?????????????? IP-?????????? ?????????????? ?? ?????????????? ?????????????????????? ?????? ????????????, ???????????????????????? ???????????????????? ???????????????? ???????????????????? ?????? ?????????????????? ?????????????? ?? ??????????????????????. ???????????? ?????????????????????????? ?????????????????? ?????????? ?????????????? ?????????????? ?????????????? [?????????????? ???????????????????? 15] ?????? ???????? ?????????????? ????????????. ???? ???????????? ?????????????????????????????? Dell Network Manager ?????? ?????????????? ???????????????????????? ????????????????????, ?????????? ???????????????? ?????? ?????????????????? ?? ???????????????? ???????????????? ?? ???????????????????????????? ???????????????? ???????????????????? ??????????????. ?????????? ?????????????????? ???????????????????? ?? ???????????????????? ???????????? ???????????????????? ????. ?? ???????????????????????????????? ????????????????????????.
?????????? ???????????????? ?????????????? ????????????????????, ?????????????????? ?????????????????? ???????? ????????????????.
?????????????? ???????????? ???????????????????? SNMP, ?????????????? ???????????????????? ????????????????????????. [public]: public
????????????????????: ???????? ?????????? ?????????????????? ??????????????, ???? ?????? ???????????????????? ???????????????????? SNMP ?????????????????????????????? ?????????????????? ?????????????? ??????????????. ???? ?????????????????? ?????????? ?????????????????????? ???????????? SNMPv2. SNMPv3 ???????????????? ???? ?????? ??????, ???????? ???? ???? ?????????????????? ?? ???????????????????? ???????????????????????? ?????????????? ?????? SNMPv3 (????????????????, ?????????????????????????? ????????, ???????????????? ?? ??. ??.).
?????????????? IP-?????????? ?????????????? ???????????????????? (A.B.C.D) ?????? ???????????? (0.0.0.0), ?????????? ?????????????????? ???????????????????? ?? ?????????? ??????????????. [0.0.0.0]: 10.1.2.100
?????? 2.
???????????? ???????????????????? ?????????????????? ?????????????????? ?????????????? ???????????? ?? ???????????? ?????????????? ???????????????????? (?????????????? 15). ?????? ???????????? ???????????????????????? ?????? ?????????? ?? ?????????? ?????????????????? ???????????? ?? ??????-??????????????????. ?????????? ???? ???????????? ?????????????????? ???????????? ???????????? ?? ???????????????? ???????????? ??????????????. ?????????? ?????????????????? ???????????????????? ?? ?????????????????? ?????????????? ?????????????? ?? ?????????????????? ?????????????? ?????????????? ????. ?? ???????????????????????????????? ????????????????????????.
?????????? ?????????????????? ?????????????? ???????????? ????????????????????????, ?????????????????? ?????????????????? ???????? ????????????????.
?????????????? ?????? ????????????????????????. [root]:admin
?????????????? ???????????? ????????????????????????: ********
?????????????????????? ???????????? ????????????????????????: ********
?????? 3.
?????????? IP-???????????? ?????????????????????????? ???? ?????????????????? ???????????????????????? ???????????????????? ??/?????? ???????????????????? ?????????????????????????? ?????????????????????? ?????????????????? ???????? 1.
?????????? ???????????????????????? ?????? IP-????????????, ?????????? ???????????????? ???????????? ?? ?????????????????? ????????????, ??????-???????????????????? ?????? ???????????????????? ?????????????????? SNMP ?? ??????????????????????.
?????????? ???????????????? ???????????? ?? ?????????????????????? ?????????? ?????????? ?????????????????? ????????????????????, ??????????
. ?????????????????? IP-?????????? ?????? ???????????????????? ????????????????????;
. ?????????????????? ???????? ???? ??????????????????, ???????? ???? ???????????????????? ?????????????????????????? ?? ?????????????????????? ???????????????????? IP-?????????? ???????????????? ??????????????.
?????????????????? ?????????????????????? ?????????????????? ????????????? [Y/N] y
?????????????? IP-?????????? ???????????????????? (A.B.C.D) ?????? ?????????????? ??DHCP?? (?????? ??????????????) ?????? ?????????????????????????????? ?????????????? IP-???????????? ???? ???????? ?????????? ???????????? DHCP. [DHCP]: dhcp
?????? 4.
?????????????????? ?????????????????? ?????????????????????????? ?????????????????????? ?????????????????? ???????? 1 ????????????? [Y/N] y
?????????????? IP-?????????? ???????????????????? (A.B.C.D) ?????? ?????????????? ??DHCP?? (?????? ??????????????) ?????? ?????????????????????????????? ?????????????? IP-???????????? ???? ???????? ?????????? ???????????? DHCP: 10.1.1.200
?????????????? IP-?????????? ?????????? ?????????????? (A.B.C.D ?????? /nn):
255.255.255.0
?????? 5.
?????????????????? ????????????????: ?????????????????? ??????????, ?????????????????????????? ???? ??????????????????. ?????????????? IP-?????????? ??????????, ?? ???????????????? ?????????????? ???????????? ?? ????????. [0.0.0.0]: 10.1.1.1
???????? ???????????? ?????????????????? ?????????????????? ????????????????????????:
?????????????????? SNMP = ??public?? ?????? 10.1.2.100
?????????????????? ?????????????? ???????????? ???????????????????????? = admin
???????????? = ********
?????????????????????? IP-?????????? = DHCP
IP-?????????? ???????????????????? ???????????????????????????? ?????????????????????? ?????????????????? ???????? 1 = 10.1.1.200 255.255.255.0
???????? ???? ?????????????????? = 10.1.1.1 ?????? 6.
???????? ???????????????????? ??????????, ?????????????? (Y), ?????????? ?????????????????? ???????????????????????? ?? ?????????????????????? ?????????????????? ?? ???????? ???????????????????????? ??????????????. ?????? ?????????????? ???????????? ?????????????? (N), ?????????? ???????????????? ?????????????????? ?? ?????????????????????????? ????????????: [Y/N] y
???????????????????? ???? ?????????????????????????? ?????????????? ?????????????? ?????????????????? Dell. ???????????? ?????????? ?????????????? ?????????? ?????????????????? ????????????.
???????????????????? ???????????????? ????????????????????, ??????????????????...
?????????????????? ????????
?????????? ???????????????????? ???????????????????????????? ??????????????????, ?????????????????? ?? ???????????? ??????????????, ?????????? ???????????????????? ?????????????????????? ???????? ?? ???????? ???????????????????? ?????? ???????????????????????? ???????????????????? ????????????????????. ?????? ?????????? ???????????????????? ?????????? ???? ???????????? ??????????????????????, ?????????????????????????? ???? ???????????????? ????????????, ?? ???????? ?????????????????????????????????? ?????????????????????? ?????? ?????????????????????????????? ???????????????????? ????????????????????.
???????? ?????? IP-???????????? ???????????????????????? ???????????????????? ???????????????????? ?????? ???????????????????? ???????????????????? ?????????????????????? ?????????????????? ???????? 1 ???????????? ???????????????? DHCP, ?????????????????? ?????????????? IP-?????????? ???? DHCP-?????????????? ?? ????????. ?????????? ???????????????????? ?????????????????????? ?????????????????????? IP-??????????, ???????????????????????? ?? ?????????????????????? ?????????? ?? ?????????????????? ?????????????????? ??????????????.
????????? ???????????????????????? ???????????????????? ?????????????? show ip interface out-of-band.
????????? ???????????????????? ?????????????????????????? ?????????????????????? ?????????????????? ???????? 1 ?????????????? show ip interface.
?????????? ???????????????? ???????????? ?? ???????????????????? ???????????????????????????? ?????????????????????? Dell OpenManage, ?????????????? IP-?????????? ?? ???????????????? ???????????? ??????-????????????????. ?????????? ???????????????? ???????????? ?? ???????????????????????????? ???????????????????? ?? ?????????????? ?????????????????? ????????????, ?????????????? IP-?????????? ???????????????????? ???????????????????? ?????????????????????? ?????????????????? ???????? 1 ?? ?????????????? Telnet ?????? SSH. ?????????? ?????? ???????????????????? ?????????????? ?? ?????????????????????? ?? ?????????????? ?????????????????? ???????????? ?????????? ???????????????????? ???????????????????????? ???????????????????? ????????.
???????????????????? N30xx ???????????????????????? ???????????????? ?????????????????? ?????? ??????????????????????, ?? ?????? ?????????? ?????????????????????? ?????????????????? ???????? ?? ???????????????? ???????????????????? ???????????? (STP). ?????????????????????? N30xx ?????????? ???????????????????????? ???????????????????????????? ?????????????? 3-???? ????????????, ???????????????? ???????????????????????? ?????????????????????????? ?? ?????????????????? ????????????????. ?????????? ?????????????????? ??????????????????, ?????????????????????? ?????? ?????????? ????????, ???????????????????????????? ??????-?????????????????????? ???????????????????? ?????? ?????????????????? ??????????????. ???????????????????? ?? ?????????????????? ?????????????? ?????????????????????? ????. ?? ?????????????????????? ???? ?????????????????? ??????
???????????????????? ?????????????????????? ???? ?????????????????????????? ???????????????????? ?????????????????? ????????????,
?????????????????? ???? ?????????? ?????????????????????? ??????????????????: dell.com/support/manuals.
Conmutador
Dell Serie N20xx/N30xx
Gu??a de introducci??n
Modelos reglamentarios: N2024, N2024P, N2048, N2048P, N3024, N3024P, N3048, N3048P, N3024F
Notas, precauciones y avisos
NOTA: Una NOTA proporciona informaci??n importante que le ayudar?? a utilizar mejor el conmutador.
PRECAUCI??N: Un mensaje de PRECAUCI??N indica la posibilidad de da??os en el hardware o la p??rdida de datos, e informa de c??mo evitar el problema.
AVISO: Un mensaje de AVISO indica el riesgo de da??os materiales, lesiones o incluso la muerte.
____________________
?? 2013 Dell Inc.
Marcas comerciales utilizadas en este texto: Dell??, el logotipo de DELL, OpenManage??? y ReadyRails??? son marcas comerciales de Dell Inc. Microsoft?? y Windows?? son marcas comerciales registradas de Microsoft Corporation en los Estados Unidos o en otros pa??ses.
Modelos reglamentarios N2024, N2024P, N2048, N2048P, N3024, N3024P, N3048, N3048P, N3024F
Diciembre de 2013 N/P F5CWH Rev. A00
Contenido
1Introducci??n . . . . . . . . . . . . . . . . . . . . . 277
2Informaci??n general sobre
la serie N20xx . . . . . . . . . . . . . . . . . . . . 277
3Informaci??n general sobre
el hardware de la serie N20xx . . . . . . . 278
6Informaci??n general sobre
la serie N30xx . . . . . . . . . . . . . . . . . . . . 303
7Informaci??n general sobre
el hardware de la serie N30xx . . . . . . . 303
8 Instalaci??n de la serie N30xx . . . . . . . . 313
9Inicio y configuraci??n del conmutador N30xx
. . . . . . . . . . . . . 323

Introducci??n
Este documento proporciona informaci??n b??sica sobre los conmutadores Dell de la serie N20xx/N30xx, incluidos los procedimientos de instalaci??n y configuraci??n inicial del conmutador. Para obtener informaci??n sobre c??mo configurar y supervisar las funciones del conmutador, consulte la Gu??a de configuraci??n del usuario, que se encuentra disponible en la p??gina web de asistencia de Dell (dell.com/support/manuals), para obtener las actualizaciones m??s recentes de la documentaci??n y el firmware.
Este documento consta de las secciones siguientes:
???Informaci??n general sobre la serie N20xx
???Informaci??n general sobre el hardware de la serie N20xx
???Instalaci??n de la serie N20xx
???Inicio y configuraci??n del conmutador N20xx
???Informaci??n general sobre la serie N30xx
???Informaci??n general sobre el hardware de la serie N30xx
???Instalaci??n de la serie N30xx
???Inicio y configuraci??n del conmutador N30xx
???Informaci??n de la NOM (s??lo para M??xico)
NOTA: Se recomienda encarecidamente a los administradores de los conmutadores que mantengan los conmutadores Dell Networking actualizados con la versi??n m??s reciente del sistema operativo de Dell Networking (DNOS por sus siglas en ingl??s). Dell Networking mejora continuamente las caracter??sticas y las funciones del DNOS bas??ndose en las observaciones que recibe de sus clientes. Para las infraestructuras cr??ticas, se recomienda probar previamente la nueva versi??n en un ??rea de la red que no sea cr??tica para comprobar la configuraci??n
y el funcionamiento de la misma con la nueva versi??n del DNOS.
Informaci??n general sobre la serie N20xx
Los conmutadores Dell de la serie N20xx son dispositivos Ethernet Gigabit de nivel 2 apilables, y se encuentran disponibles en los modelos siguientes:
???Dell N2024
???Dell N2024P
???Dell N2048
???Dell N2048P
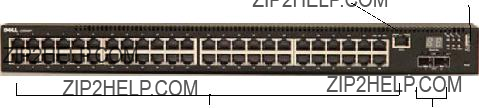
Informaci??n general sobre el hardware de la serie N20xx
Esta secci??n contiene informaci??n sobre las caracter??sticas de los dispositivos y las configuraciones de hardware de los m??dulos correspondientes a los conmutadores de la serie N20xx.
Todos los modelos sin PoE de la serie N20xx son conmutadores que se pueden montar en rack 1U con las dimensiones f??sicas siguientes:
???440,0 x 257,0 x 43,5 mm (ancho x largo x alto).
???17,3 x 10,1 x 1,7 pulgadas (ancho x largo x alto).
Todos los modelos con PoE de la serie N20xx son conmutadores que se pueden montar en rack 1U con las dimensiones f??sicas siguientes:
???440,0 x 387,0 x 43,5 mm (ancho x largo x alto).
???17,3 x 15,2 x 1,7 pulgadas (ancho x largo x alto).
Panel frontal de la serie N20xx
Las im??genes siguientes muestran los paneles frontales de los modelos de conmutador de la serie N20xx.
Ilustraci??n 1-1. Serie N2048 con 48 puertos 10/100/1000Base-T (panel frontal)
Puerto de consola Puerto USB
Adem??s de los puertos de conmutaci??n, el panel frontal de cada modelo de la serie N20xx incluye los puertos siguientes:
???Puerto de consola
???Puerto USB
Ilustraci??n 1-2. N2024 : ampliaci??n
El panel frontal de N20xx, que se muestra en la Ilustraci??n 1-2, cuenta con LED de estado que indican una alarma en caso de sobretemperatura, la alimentaci??n interna y el estado en la fila superior. En la fila inferior de los LED de estado se muestran el estado del maestro de la pila, de la fuente de alimentaci??n redundante (RPS) y de la alarma del ventilador.
Ilustraci??n 1-3. N2024P : ampliaci??n
El panel frontal de N20xxP, que se muestra en la Ilustraci??n 1-3, cuenta con LED de estado que indican una alarma en caso de sobretemperatura, la alimentaci??n interna y el estado en la fila superior. En la fila inferior de los LED de estado se muestran el estado del maestro de la pila, de la fuente de alimentaci??n modular (MPS) y de la alarma del ventilador.
Puertos de conmutaci??n
El panel frontal de N2024/N2024P cuenta con 24 puertos RJ-45 Ethernet Gigabit (10/100/1000Base-T) que admiten la negociaci??n autom??tica de la velocidad, el control de flujo y el modo d??plex. Los modelos N2024/N2024P admiten dos puertos SFP+ 10G. Los transceptores SFP+ homologados por Dell se venden por separado.
El panel frontal de N2048/N2048P cuenta con 48 puertos RJ-45 Ethernet Gigabit (10Base-T, 100Base-TX, 1000Base-T) que admiten la negociaci??n autom??tica de la velocidad, el control de flujo y el modo d??plex. Los modelos N2048/N2048P admiten dos puertos SFP+ 10G. Los transceptores SFP+ homologados por Dell se venden por separado.
Los puertos de conmutaci??n del panel frontal presentan las caracter??sticas siguientes:
???El conmutador detecta autom??ticamente la diferencia entre los cables cruzados y directos en los puertos RJ-45 y selecciona de forma autom??tica la configuraci??n MDI o MDIX para adaptarse al otro extremo.
???Los puertos SFP son compatibles con los transceptores homologados por Dell.
???Los puertos RJ-45 admiten velocidades de 10/100/1000 Mbps en modo d??plex completo con el cable UTP est??ndar de categor??a 5.
???Los puertos SFP+ admiten transceptores SFP+ y la tecnolog??a twin-ax de cobre SFP+ adem??s de transceptores SFP que funcionan a 1G.
???Los puertos del panel frontal de N2024P/N2048P admiten PoE (15,4 W) y PoE+ (30 W).
Puerto de consola
El puerto de consola ofrece capacidades de comunicaci??n en serie, lo que permite la comunicaci??n mediante el protocolo RS-232. Este puerto serie proporciona una conexi??n directa al conmutador y permite acceder a la CLI desde un terminal de consola conectado al puerto a trav??s del cable serie suministrado (conectores de RJ-45 YOST a DB-9 hembra).
El puerto de consola se configura por separado y puede utilizarse como un enlace as??ncrono desde 1 200 a 115 200 baudios.
La CLI de Dell s??lo admite cambios de velocidad. Los valores predeterminados son velocidad de 9 600 baudios, 8 bits de datos, sin paridad, un bit de paro y sin control de flujo.
Puerto USB
El puerto USB hembra tipo A admite una unidad de memoria flash compatible con USB 2.0. El conmutador Dell Networking puede leer o escribir en una unidad flash con formato FAT-32. Puede utilizar una unidad flash USB para copiar los archivos de configuraci??n y las im??genes del conmutador entre la unidad flash USB y el conmutador. Tambi??n puede utilizar la unidad flash USB para mover y copiar los archivos de configuraci??n y las im??genes de un conmutador a otros conmutadores de la red.
El puerto USB no admite ning??n otro tipo de dispositivo USB.
Bot??n de restablecimiento
El bot??n de restablecimiento, al que se accede a trav??s del orificio, permite realizar un restablecimiento forzado del conmutador. Para utilizar el bot??n de restablecimiento, inserte un clip sujetapapeles enderezado o un utensilio similar en el orificio. Cuando el conmutador ha completado el proceso de inicio tras restablecerse, reanuda su funcionamiento con la ??ltima configuraci??n guardada. Los cambios de la configuraci??n en ejecuci??n que no se hayan guardado en la configuraci??n de inicio antes del restablecimiento se perder??n.
Indicadores LED de puerto y de sistema
El panel frontal incluye diodos emisores de luz (LED) que indican el estado de los enlaces del puerto, las fuentes de alimentaci??n, los ventiladores, el apilamiento y el sistema en general.
Para obtener informaci??n sobre el estado que indican los LED, consulte la Gu??a de configuraci??n del usuario.

LED maestro de la pila y panel del n??mero de pila
Cuando un conmutador de una pila es la unidad maestra, el LED maestro de la pila, con la etiqueta "M", emite una luz verde fija. Si el LED M est?? apagado, el miembro de la pila no es la unidad maestra. El panel del n??mero de pila muestra el n??mero de unidad del miembro de la pila. Cuando un conmutador no forma parte de una pila (es decir, cuando se trata de una pila de un solo conmutador), el LED M se ilumina y se muestra el n??mero de unidad.
Panel posterior de la serie N20xx
En las im??genes siguientes se muestran los paneles posteriores de los conmutadores N20xx.
Ilustraci??n 1-4. Panel posterior de N20xx
Rejillas de ventilaci??n
Enchufe de CA
Ilustraci??n 1-5. Panel posterior de N2024P/N2048P
El t??rmino mini-SAS se refiere a las conexiones de los cables de los puertos de apilamiento que se muestran en la Ilustraci??n 1-6. Consulte Apilamiento de varios conmutadores N20xx para obtener informaci??n sobre c??mo utilizar los puertos mini-SAS para conectar conmutadores.

Ilustraci??n 1-6. Ventiladores y puertos de apilamiento mini-SAS N2048
Puertos de apilamiento mini-SAS
Fuentes de alimentaci??n
N2024 y N2048
Los conmutadores N2024 y N2048 disponen de una fuente de alimentaci??n interna de 100 vatios. La fuente de alimentaci??n redundante adicional (Dell Networking RPS720) proporciona una alimentaci??n de 180 vatios, dotando as?? al conmutador de redundancia completa.
N2024P y N2048P
Los conmutadores Dell Networking N2024P y N2048P disponen de una fuente de alimentaci??n interna de 1 000 vatios que alimenta hasta
24 dispositivos PoE a plena potencia PoE+ (850 W). La fuente de alimentaci??n externa adicional (MPS1000) proporciona 1 000 vatios y una cobertura de potencia total para los 48 dispositivos PoE (1 800 W).
NOTA: La potencia PoE se asigna de manera din??mica. No todos los puertos requerir??n la m??xima potencia PoE+.
PRECAUCI??N: Antes de extraer el m??dulo de las fuentes de alimentaci??n, retire el cable de alimentaci??n de las mismas. La alimentaci??n no debe conectarse antes de la inserci??n en el chasis.
Sistema de ventilaci??n
Los conmutadores N20xx cuentan con dos ventiladores para su refrigeraci??n.
N20xx : resumen del modelo
Tabla 1-1. N20xx : resumen del modelo
Instalaci??n de la serie N20xx
Preparaci??n del emplazamiento
Los conmutadores de la serie N20xx se pueden montar en un rack est??ndar de 48,26 cm (19 pulgadas) o se pueden colocar sobre una superficie plana.
Aseg??rese de que la ubicaci??n elegida para la instalaci??n cumpla los requisitos siguientes:
???Alimentaci??n: el conmutador est?? instalado cerca de una toma el??ctrica de 100-240 V CA y 50-60 Hz de f??cil acceso.
???Espacio libre: existe espacio libre suficiente delante y detr??s del equipo para permitir el acceso del operador. Deje espacio libre para el cableado, las conexiones de alimentaci??n y la ventilaci??n.
???Cableado: el cableado est?? canalizado para evitar fuentes de ruido el??ctrico, como radiotransmisores, amplificadores de transmisi??n, l??neas de alimentaci??n e instalaciones fijas de luz fluorescente.

???Temperatura ambiente: el intervalo de temperatura ambiente de funcionamiento del conmutador es de 0 a 45 ??C con una humedad relativa de hasta el 95% sin condensaci??n.
NOTA: Para altitudes superiores a los 900 m (2955 pies) debe reducirse la temperatura m??xima en 1??C (1.8??F) cada 300m (985 pies).
???Humedad relativa: la humedad relativa de funcionamiento es de 8 a 85% (sin condensaci??n), con una gradaci??n de humedad m??xima del 10% por hora.
Desembalaje del conmutador N20xx
Contenido del paquete
Al desembalar un conmutador, compruebe que se incluyen los elementos siguientes:
???Un conmutador Dell Networking
???Un cable de RJ-45 a DB-9 hembra
???Un kit de montaje para instalaci??n en rack (N20xx), dos soportes de montaje, pernos y tuercas prisioneras
???Un conjunto de almohadillas de goma autoadhesivas para instalar el conmutador sin motarlo en un rack (se incluyen cuatro)
Pasos del desembalaje
NOTA: Antes de desembalar el conmutador, examine el contenedor e informe inmediatamente de cualquier da??o.
1Coloque el contenedor en una superficie plana y limpia, y corte todas las tiras que sujetan el contenedor.
2Abra el contenedor o extraiga la parte superior de ??ste.
3Extraiga con cuidado el conmutador del contenedor y col??quelo en una superficie estable y limpia.
4Retire todo el material de embalaje.
5Compruebe que el conmutador y los accesorios no est??n da??ados.

Montaje en rack de un conmutador N20xx
AVISO: Lea las instrucciones de seguridad incluidas en Informaci??n sobre normativas y seguridad y la informaci??n de seguridad de los otros conmutadores que est??n conectados o asociados al conmutador.
El conector de alimentaci??n de CA se encuentra en el panel posterior del conmutador.
Instalaci??n en un rack
AVISO: No utilice los kits de montaje en rack para instalar el conmutador suspendido bajo una mesa o un escritorio, ni para fijarlo a la pared.
PRECAUCI??N: Antes de continuar, desconecte todos los cables del conmutador. Si se han fijado las almohadillas autoadhesivas en la parte inferior del conmutador, ret??relas.
PRECAUCI??N: Cuando monte varios conmutadores en un rack, empiece desde abajo.
1Coloque el soporte de montaje en rack suministrado en uno de los lados del conmutador de modo que los orificios de montaje del conmutador coincidan con los orificios del soporte de montaje en rack. En la Ilustraci??n 1-7 se muestra d??nde deben montarse los soportes.
Ilustraci??n 1-7. Fijaci??n de los soportes
2Inserte los pernos suministrados en los orificios de montaje en rack y apri??telos con un destornillador.

3Repita el proceso para el soporte de montaje en rack del otro lado del conmutador.
4Inserte el conmutador en el rack de 48,26 cm (19 pulgadas) de modo que los orificios de montaje en rack del conmutador coincidan con los orificios de montaje del rack.
5Fije el conmutador al rack con los pernos o con las tuercas prisioneras y los pernos de las tuercas prisioneras con arandelas (seg??n el tipo de rack del que disponga). Apriete primero los pernos de la parte inferior y despu??s los de la parte superior.
PRECAUCI??N: Aseg??rese de que los pernos del rack suministrados son los adecuados para los orificios de rosca del rack.
NOTA: Aseg??rese de que los orificios de ventilaci??n no est??n obstruidos.
Instalaci??n como conmutador independiente
NOTA: Se recomienda montar el conmutador en un rack.
Si no instala el conmutador en un rack, inst??lelo en una superficie plana. La superficie debe poder soportar el peso del conmutador y de los cables.
El conmutador se suministra con cuatro almohadillas de goma autoadhesivas.
1Fije las almohadillas de goma autoadhesivas en cada una de las zonas marcadas de la parte inferior del conmutador.
2Coloque el conmutador sobre una superficie plana y aseg??rese de que tenga una ventilaci??n adecuada; para ello, deje 5 cm (2 pulgadas) a cada lado y 13 cm (5 pulgadas) en la parte posterior.
Apilamiento de varios conmutadores N20xx
Puede apilar hasta 12 conmutadores N20xx mediante el uso de los puertos mini-SAS que se encuentran en la parte posterior de los conmutadores. Los conmutadores N20xx ??nicamente pueden apilarse con otros conmutadores de la serie N20xx. Cuando se conectan varios conmutadores juntos a trav??s de los puertos de la pila, ??stos funcionan como una ??nica unidad con hasta 576 puertos en el panel frontal. La pila funciona y se administra como una ??nica entidad.
NOTA: Si va a instalar una pila de conmutadores, debe ensamblarla y cablearla antes de encenderla y configurarla. La primera vez que se enciende una pila, los conmutadores eligen un conmutador maestro, que puede ocupar cualquier posici??n de la pila. El LED maestro del panel frontal est?? iluminado en la unidad maestra.
Creaci??n de una pila de conmutadores
Para crear una pila, conecte unidades adyacentes mediante los puertos de apilamiento mini-SAS situados en el panel posterior del conmutador. En la Ilustraci??n 1-8 de la p??gina 289 se muestran los conmutadores
conectados en una topolog??a de anillo, que es la recomendada para una pila.
1Con uno de los cables mini-SAS, conecte uno de los puertos de apilamiento de la parte superior del conmutador y el conmutador inmediatamente inferior.
Si es necesario, utilice un cable mini-SAS largo (1 o 3 metros), adquirido por separado, para conectar los conmutadores.
2Repita este proceso hasta que todos los dispositivos est??n conectados.
3Utilice el cable de apilamiento restante para conectar juntos los otros dos puertos de apilamiento de forma que se cree una topolog??a de anillo.
Ilustraci??n 1-8. Conexi??n de una pila de conmutadores
Unidad 1
Unidad 2
Unidad 3
La pila de la Ilustraci??n 1-8 est?? conectada en una topolog??a de anillo y cuenta con las siguientes conexiones f??sicas entre los conmutadores:
???El puerto mini-SAS inferior de la Unidad 1 est?? conectado al puerto mini-SAS superior de la Unidad 2.
???El puerto mini-SAS inferior de la Unidad 2 est?? conectado al puerto mini-SAS superior de la Unidad 3.
???El puerto mini-SAS inferior de la Unidad 3 est?? conectado al puerto mini-SAS superior de la Unidad 1.
Reserva de la pila
La funci??n de apilamiento admite una unidad de reserva o en espera que adopta el papel de unidad maestra si se produce un error en la unidad maestra de la pila. En cuanto se detecta un error en la unidad maestra de la pila, la unidad en espera inicializa el plano de control y habilita el resto de unidades de la pila con la configuraci??n actual. La unidad en espera conserva una copia sincronizada de la configuraci??n en ejecuci??n de la pila. La unidad en espera se selecciona de forma autom??tica en la pila, aunque puede utilizar la CLI para seleccionar un miembro de la pila distinto como unidad en espera. Para obtener m??s informaci??n, consulte la Gu??a de configuraci??n del usuario o la
Gu??a de referencia de la CLI.
Inicio y configuraci??n del conmutador N20xx
En el diagrama de flujo siguiente se proporciona informaci??n general sobre los pasos necesarios para realizar la configuraci??n inicial una vez que se ha desembalado y montado el conmutador.

Conexi??n de un conmutador N20xx a un terminal
Una vez realizadas todas las conexiones externas, conecte un terminal a un conmutador para configurar el conmutador.
NOTA: Antes de continuar, lea las notas de la versi??n de este producto. Puede descargar las notas de la versi??n desde la p??gina web de asistencia de Dell (dell.com/support/manuals).
NOTA: Se recomienda descargar la versi??n m??s reciente de la documentaci??n del usuario desde la p??gina web de asistencia de Dell (dell.com/support/manuals).
Para supervisar y configurar el conmutador mediante la consola serie, utilice el puerto de consola del panel frontal del conmutador (vea la Ilustraci??n 1-1 de la p??gina 278) para conectarlo a un terminal VT100 o a un ordenador que ejecute software de emulaci??n de terminal VT100. El puerto de consola se implementa como un conector de equipo terminal de datos (DTE).
Para utilizar el puerto de consola, se requiere lo siguiente:
???Un terminal compatible con VT100 o un equipo con un puerto serie que ejecute software de emulaci??n de terminal VT100, como por ejemplo HyperTerminal de Microsoft.
???Un cable serie (suministrado) con un conector RJ-45 para el puerto de consola y un conector DB-9 para el terminal.
Para conectar un terminal al puerto de consola del conmutador, realice los pasos siguientes:
1Enchufe el conector DB-9 del cable serie en el terminal o equipo que ejecuta software de emulaci??n de terminal VT100.
2Configure el software de emulaci??n de terminal como se indica a continuaci??n:
a Seleccione el puerto serie adecuado (por ejemplo, COM 1) para la conexi??n a la consola.
b Establezca la velocidad de datos en 9 600 baudios.
c Establezca el formato de datos en 8 bits de datos, 1 bit de paro y sin paridad.
d Establezca el control de flujo en None (Ninguno).
e Establezca el modo de emulaci??n de terminal en VT100.

fSeleccione Terminal keys (Teclas de terminal) para las teclas de funci??n, de flecha y Ctrl. Aseg??rese de que configura el valor para las teclas del terminal, y no para las de Microsoft Windows.
3Enchufe el conector RJ-45 del cable directamente en el puerto de consola del conmutador. El puerto de consola Dell Networking se encuentra en el lado derecho del panel frontal y tiene una etiqueta con el s??mbolo |O|O|, como se muestra en la Ilustraci??n 1-10 de la p??gina 293.
NOTA: El acceso de la consola serie al administrador de la pila se encuentra disponible desde cualquier puerto serie a trav??s de la CLI local. S??lo se puede iniciar una sesi??n de la consola serie al mismo tiempo.
Ilustraci??n 1-10. Panel frontal de N2024P con puerto de consola
Puerto de consola
Conexi??n de un conmutador N20xx a una fuente de energ??a
PRECAUCI??N: Lea las instrucciones de seguridad incluidas en el manual
Informaci??n sobre normativas y seguridad y la informaci??n de seguridad de los otros conmutadores que est??n conectados o asociados al conmutador.
Todos los modelos N20xx cuentan con una fuente de alimentaci??n interna.
Los enchufes se encuentran en el panel posterior.
Conexi??n de la alimentaci??n de CA y CC
1Aseg??rese de que el puerto de consola del conmutador est?? conectado a un terminal VT100 o a un emulador de terminal VT100 a trav??s del cable de RJ-45 a DB-9 hembra.

2Conecte un cable de alimentaci??n est??ndar de 1,5 m con conexi??n a tierra al enchufe principal de CA situado en el panel posterior (vea la Ilustraci??n 1-11 de la p??gina 294).
3Conecte el cable de alimentaci??n a una toma el??ctrica de CA con conexi??n a tierra.
4Si utiliza una fuente de alimentaci??n de CC redundante o externa, como por ejemplo Dell Networking RPS720 o Dell Networking MPS1000, conecte el cable de alimentaci??n de CC al enchufe de CC situado en
el panel posterior. En la Ilustraci??n 1-11 de la p??gina 294, la fuente de alimentaci??n redundante se encuentra situada en el medio y aparece marcada con la etiqueta RPS.
Ilustraci??n 1-11. Conexi??n de la alimentaci??n de CA y CC a un conmutador N2048
A la fuente de energ??a de CC (opcional)
A la fuente de energ??a de CA
Inicio del conmutador N20xx
Cuando la alimentaci??n se enciende con el terminal local ya conectado, el conmutador realiza una autoprueba de encendido (POST). La POST se ejecuta cada vez que se inicializa el conmutador y comprueba los componentes de hardware para determinar si el conmutador funciona correctamente antes del inicio completo. Si la POST detecta un problema
cr??tico, el flujo de programa se detiene. Si la POST se ejecuta correctamente, se carga el firmware v??lido en la RAM. Se muestran mensajes de la POST en el terminal que indican si la prueba ha finalizado correctamente o no.
El proceso de inicio dura aproximadamente 60 segundos.

Puede abrir el men?? Boot (Inicio) una vez completada la primera parte de la POST. Desde el men?? Boot (Inicio), puede realizar tareas de configuraci??n, como por ejemplo, restablecer el sistema a la configuraci??n predeterminada de f??brica, activar la imagen de copia de seguridad o recuperar una contrase??a. Para obtener m??s informaci??n sobre las funciones del men?? Boot
(Inicio), consulte la Gu??a de referencia de la CLI.
Realizaci??n de la configuraci??n inicial del conmutador N20xx
Para el procedimiento de configuraci??n inicial, se da por sentado lo siguiente:
???El conmutador Dell Networking no se ha configurado antes.
???El conmutador Dell Networking se ha iniciado correctamente.
???La conexi??n de la consola se ha establecido y se muestra el indicador del
Easy Setup Wizard (Asistente para instalaci??n f??cil) de Dell en la pantalla de un terminal VT100 o equivalente.
La configuraci??n inicial del conmutador se lleva a cabo a trav??s del puerto de consola. Despu??s de la configuraci??n inicial, puede administrar el conmutador desde el puerto de consola ya conectado o bien remotamente a trav??s de una interfaz definida durante la configuraci??n inicial.
NOTA: El conmutador no est?? configurado con un nombre de usuario, contrase??a o direcci??n IP predeterminados.
Antes de establecer la configuraci??n inicial del conmutador, solicite esta informaci??n al administrador de la red:
???La direcci??n IP que se debe asignar a la interfaz de administraci??n
???La m??scara de subred IP para la red
???La direcci??n IP de la puerta de enlace predeterminada de la interfaz de administraci??n
Estos valores son necesarios para poder administrar de forma remota el conmutador mediante Telnet (cliente Telnet) o HTTP (explorador web).

Habilitaci??n de la administraci??n remota
En los conmutadores N20xx puede utilizar cualquiera de los puertos de conmutaci??n del panel frontal para la administraci??n en banda. De forma predeterminada, todos los puertos en banda son miembros de la VLAN 1.
El Easy Setup Wizard (Asistente para instalaci??n f??cil) de Dell incluye indicadores para configurar la informaci??n de la red para la interfaz de la VLAN 1 en el conmutador N20xx. Puede asignar una direcci??n IP y una m??scara de subred est??ticas o habilitar DHCP y permitir que un servidor DHCP de la red asigne la informaci??n.
Consulte la Gu??a de referencia de la CLI para obtener informaci??n sobre los comandos de la CLI que se utilizan para configurar la informaci??n de la red.
Procedimiento de configuraci??n inicial
La configuraci??n inicial se puede realizar con el Easy Setup Wizard (Asistente para instalaci??n f??cil) de Dell o con la CLI. El asistente se inicia autom??ticamente cuando el archivo de configuraci??n del conmutador est?? vac??o. Puede cerrar el asistente en cualquier momento pulsando [Ctrl+z], pero se perder??n todos los valores de configuraci??n que haya especificado y el conmutador utilizar?? los valores predeterminados.
NOTA: Si no ejecuta el Easy Setup Wizard (Asistente para instalaci??n f??cil) de Dell o no responde al indicador inicial del mismo antes de 60 segundos, el conmutador entra en el modo de la CLI. Debe restablecer el conmutador con una configuraci??n de inicio vac??a para volver a ejecutar el Easy Setup Wizard (Asistente para instalaci??n f??cil) de Dell.
Para obtener m??s informaci??n sobre c??mo realizar la configuraci??n inicial mediante la CLI, consulte la Gu??a de referencia de la CLI. En esta Gu??a de introducci??n se muestra c??mo utilizar el Easy Setup Wizard (Asistente para instalaci??n f??cil) de Dell para realizar la configuraci??n inicial del conmutador. El asistente realiza la configuraci??n siguiente en el conmutador:
???Establece la cuenta inicial de usuario con privilegios y le otorga una contrase??a v??lida. El asistente configura una cuenta de usuario con privilegios durante la configuraci??n.
???Habilita el inicio de sesi??n de CLI y el acceso HTTP para el uso ??nicamente de la configuraci??n de autenticaci??n local.
???Configura la direcci??n IP para la interfaz de enrutamiento de VLAN 1, de la que todos los puertos en banda son miembros.
???Configura la cadena de comunidad SNMP que va a usar el administrador SNMP en una direcci??n IP determinada. Puede omitir este paso si no utiliza la administraci??n SNMP en este conmutador.
???Permite especificar la direcci??n IP del sistema de administraci??n de red o autorizar el acceso a la administraci??n desde todas las direcciones IP.
???Configura la direcci??n IP de la puerta de enlace predeterminada para la interfaz de VLAN 1.
Sesi??n de ejemplo
En esta secci??n se describe una sesi??n con el Easy Setup Wizard (Asistente para instalaci??n f??cil) de Dell. Para el ejemplo de sesi??n, se utilizan los valores siguientes:
???La cadena de comunidad SNMP utilizada es public.
???La direcci??n IP del sistema de administraci??n de red (NMS) es 10.1.2.100.
???El nombre de usuario es admin y la contrase??a es admin123.
???La direcci??n IP de la interfaz de enrutamiento de VLAN 1 es 10.1.1.200 y la m??scara de subred es 255.255.255.0.
???La puerta de enlace predeterminada es 10.1.1.1.
El asistente para instalaci??n define los valores iniciales como se ha indicado anteriormente. Una vez completado el asistente, el conmutador estar?? configurado del modo siguiente:
???SNMPv2 est?? habilitado y la cadena de comunidad est?? configurada como se indica m??s arriba. SNMPv3 est?? deshabilitado de forma predeterminada.
???La cuenta de usuario admin est?? configurada de la forma indicada.
???Se ha configurado un sistema de administraci??n de red. Desde la estaci??n de administraci??n puede acceder a las interfaces SNMP, HTTP y CLI. Tambi??n puede permitir que todas las direcciones IP tengan acceso a estas interfaces de administraci??n especificando la direcci??n IP (0.0.0.0).
???Se ha configurado una direcci??n IP para la interfaz de enrutamiento de VLAN 1.
???Se ha configurado una direcci??n de puerta de enlace predeterminada.
NOTA: En el ejemplo siguiente, las opciones de usuario posibles o los valores predeterminados se incluyen entre corchetes [ ]. Si pulsa <Intro> sin definir ninguna opci??n, se aceptar?? el valor predeterminado. El texto de ayuda se muestra entre par??ntesis.
Ejemplo de la consola del Easy Setup Wizard (Asistente para instalaci??n f??cil) de Dell
En el ejemplo siguiente se muestra la secuencia de indicadores y respuestas asociados a la ejecuci??n de un ejemplo de sesi??n del Easy Setup Wizard (Asistente para instalaci??n f??cil) de Dell con los valores indicados anteriormente.
Cuando el conmutador finaliza la POST y se inicia, aparece el di??logo siguiente:
Unidad 1 - A la espera de seleccionar unidad de administraci??n)>
Aplicando configuraci??n global, espere...
Bienvenido al Asistente para instalaci??n f??cil de Dell
Este asistente le gu??a por la configuraci??n inicial del conmutador y le permite empezar a utilizarlo de la forma m??s r??pida y sencilla posible. Puede optar por no utilizar el asistente para instalaci??n y entrar en el modo de la CLI para configurar el conmutador manualmente. Para poder ejecutar el asistente para instalaci??n debe responder a la siguiente pregunta antes de que transcurran 60 segundos, de lo contrario el sistema continuar?? con el funcionamiento normal utilizando la configuraci??n predeterminada del sistema. Nota: puede salir del asistente para instalaci??n en cualquier momento; para ello, pulse [Ctrl+z].
??Desea ejecutar el asistente para instalaci??n? (Debe responder a esta pregunta antes de que transcurran 60 segundos.) [Y/N] y

Paso 1:
El sistema no est?? configurado para la administraci??n SNMP de forma predeterminada. Para administrar el conmutador mediante SNMP, necesario para Dell Network Manager, puede
. Configurar ahora la cuenta de la versi??n 2 de SNMP inicial.
. Volver posteriormente y configurar otras cuentas de SNMP. (Para obtener m??s informaci??n sobre c??mo configurar una cuenta de la versi??n 1 o 3 de SNMP, consulte la documentaci??n del usuario).
??Desea configurar la interfaz de administraci??n SNMP ahora? [Y/N] y
Para configurar la cuenta de administraci??n de SNMP debe especificar la direcci??n IP del sistema de administraci??n y la "cadena de comunidad" o la contrase??a que ese sistema de administraci??n utiliza para acceder al conmutador. El asistente asigna de forma autom??tica el nivel de acceso m??s elevado [privilegio de nivel 15] a esta cuenta. Puede utilizar Dell Network Manager u otras interfaces de administraci??n para cambiar esta configuraci??n y a??adir informaci??n adicional del sistema de administraci??n m??s tarde. Para obtener m??s informaci??n sobre c??mo a??adir sistemas de administraci??n, consulte la documentaci??n del usuario.
Para a??adir una estaci??n de administraci??n:
Introduzca la cadena de comunidad SNMP que va a utilizar. [public]: public
NOTA: Si se configura, el nivel de acceso predeterminado se establece en el valor m??s alto disponible para la interfaz de administraci??n SNMP. Inicialmente s??lo se activar?? SNMPv2. SNMPv3 se deshabilitar?? hasta que vuelva a configurar el acceso de seguridad para SNMPv3 (por ejemplo, ID de motor, vista, etc.).
Introduzca la direcci??n IP del sistema de administraci??n (A.B.C.D) o un comod??n (0.0.0.0) para realizar la administraci??n desde cualquier estaci??n de administraci??n. [0.0.0.0]: 10.1.2.100
Paso 2:
Ahora debe configurar su cuenta de usuario con privilegios (nivel 15) inicial. Esta cuenta se utiliza para iniciar sesi??n en la CLI y la interfaz web. Podr?? configurar otras cuentas y cambiar los niveles de privilegio m??s adelante. Para obtener informaci??n sobre c??mo configurar cuentas de usuario y cambiar niveles de privilegio, consulte la documentaci??n del usuario.
Para configurar una cuenta de usuario:
Especifique el nombre de usuario. [root]:admin
Introduzca la contrase??a del usuario: ********
Vuelva a introducir la contrase??a del usuario:
********
Paso 3:
A continuaci??n, se configura una direcci??n IP en la interfaz de enrutamiento de VLAN 1.
Puede utilizar la direcci??n IP para acceder a la CLI, la interfaz web o la interfaz SNMP del conmutador.
Para acceder al conmutador a trav??s de cualquier interfaz de administraci??n, puede
. Configurar la direcci??n IP para la interfaz de administraci??n.
. Configurar la puerta de enlace predeterminada si la direcci??n IP se configura manualmente en la interfaz de enrutamiento.
Paso 4:
??Desea configurar la interfaz de enrutamiento de VLAN1 ahora? [Y/N] y
Introduzca la direcci??n IP del dispositivo (A.B.C.D) o teclee "DHCP" (sin las comillas) para solicitar autom??ticamente una direcci??n IP del servidor DHCP de la red: 10.1.1.200
Introduzca la m??scara de subred IP (A.B.C.D o /nn):
255.255.255.0
Paso 5:
Por ??ltimo, configure la puerta de enlace predeterminada. Introduzca la direcci??n IP de la puerta de enlace desde la que se puede acceder a esta red. [0.0.0.0]: 10.1.1.1
??sta es la informaci??n de configuraci??n que se ha recopilado:
Interfaz SNMP = ???public???@10.1.2.100 Configuraci??n de la cuenta de usuario = admin Contrase??a = ********
IP de la interfaz de enrutador VLAN1 = 10.1.1.200 255.255.255.0
Puerta de enlace predeterminada = 10.1.1.1
Paso 6:
Si la informaci??n es correcta, seleccione (Y) para guardar la configuraci??n, y copie los valores en el archivo de configuraci??n de inicio. Si la informaci??n es incorrecta, seleccione (N) para descartar la configuraci??n y reiniciar el asistente: [Y/N] y
Muchas gracias por utilizar el Asistente para instalaci??n f??cil de Dell. Ahora entrar?? en el modo de la CLI.
Aplicando configuraci??n de interfaz, espere...
Pasos siguientes
Una vez completada la configuraci??n inicial descrita en esta secci??n, puede conectar cualquiera de los puertos del panel frontal del conmutador a la red de producci??n para la administraci??n remota en banda.
Si ha especificado DHCP para la direcci??n IP de la interfaz de administraci??n VLAN 1, la interfaz obtendr?? su direcci??n IP a partir de un servidor DHCP de la red. Para detectar la direcci??n IP asignada de forma din??mica, utilice la conexi??n del puerto de consola para emitir el comando siguiente:
???Para la interfaz de enrutamiento de VLAN 1, escriba show ip interface.
Para acceder a la interfaz de Dell OpenManage Switch Administrator, introduzca la direcci??n IP de la interfaz de administraci??n VLAN 1 en el campo de direcci??n de un explorador web. Para el acceso de administraci??n remoto a la CLI, escriba la direcci??n IP de la interfaz de administraci??n VLAN 1 en un cliente Telnet o SSH. Tambi??n puede seguir utilizando el puerto de consola para el acceso local de la CLI al conmutador.
El conmutador N20xx admite funciones de conmutaci??n b??sicas, como redes VLAN y protocolo de ??rbol de extensi??n. Utilice la interfaz de administraci??n basada en web o la CLI para configurar las funciones necesarias para la red.
Para obtener informaci??n sobre c??mo configurar las funciones del conmutador, consulte los documentos Gu??a de configuraci??n del usuario o Gu??a de referencia de la CLI, disponibles en la p??gina web de asistencia:
dell.com/support/manuals.
Informaci??n general sobre la serie N30xx
Los conmutadores Dell de la serie N30xx son dispositivos Ethernet Gigabit de nivel 2 y 3 apilables, y se encuentran disponibles en los modelos siguientes:
???Dell N3024
???Dell N3024P
???Dell N3048
???Dell N3048P
???Dell N3024F
Informaci??n general sobre el hardware de la serie N30xx
Esta secci??n contiene informaci??n sobre las caracter??sticas de los dispositivos y las configuraciones de hardware de los m??dulos correspondientes a los conmutadores de la serie N30xx.
Todos los modelos N30xx son conmutadores que se pueden montar en rack 1U con las dimensiones f??sicas siguientes:
???434,0 x 407,0 x 43,5 mm (ancho x largo x alto).
???17,1 x 16,0 x 1,7 pulgadas (ancho x largo x alto).
Panel frontal de la serie N30xx
Las im??genes siguientes muestran los paneles frontales de los modelos de conmutador de la serie N30xx.
Adem??s de los puertos de conmutaci??n, el panel frontal de los modelos de la serie N30xx incluye los puertos siguientes:
???Puerto de consola
???Puerto USB
???Puerto de administraci??n fuera de banda (OOB)
Ilustraci??n 1-12. N3024F con 24 puertos 10/100/1000Base-T (panel frontal)
Los conmutadores de la serie N30xx disponen de dos puertos combinados. Estos puertos son SPF en la serie N30xx y 1000BaseT en el conmutador N3024F.
Ilustraci??n 1-13. N3048 con 48 puertos 10/100/1000Base-T (panel frontal)
Los puertos adicionales se encuentran en el lado derecho del panel frontal, tal como se muestra en la Ilustraci??n 1-13 y la Ilustraci??n 1-14 de la p??gina 305.
Ilustraci??n 1-14. Puertos adicionales de la serie N30xx
Puerto de consola Puerto de administraci??n fuera de banda
Puerto USB
Bot??n de restablecimiento
El panel frontal de N30xx que figura arriba tambi??n contiene un bot??n de restablecimiento (orificio) y varios LED de estado. Consulte la Ilustraci??n 1-14.

Ilustraci??n 1-15. N30xx Ampliaci??n
El panel frontal de N30xx/N3024F/N30xxP, que se muestra en la Ilustraci??n 1-15, cuenta con LED de estado que indican una alarma en caso de sobretemperatura, el estado de la fuente de alimentaci??n interna 1 y del conmutador en la fila superior. En la fila inferior de los LED de estado se muestran el estado del maestro de la pila, la fuente de alimentaci??n interna 2 y la alarma del ventilador.
Puertos de conmutaci??n
El panel frontal de N3024/N3024P cuenta con 24 puertos RJ-45 Ethernet Gigabit (10/100/1000Base-T) que admiten la negociaci??n autom??tica de la velocidad, el control de flujo y el modo d??plex. Los modelos N3024/N3024P admiten dos puertos SFP+ 10G. Los transceptores SFP+ homologados por Dell se venden por separado.
El panel frontal de N3024F cuenta con 24 puertos SFP Ethernet Gigabit 100Base-FX/1000Base-X m??s 2 puertos combinados 1000Base-T. Los transceptores SFP homologados por Dell se venden por separado.
El panel frontal de N3048/N3048P cuenta con 48 puertos RJ-45 Ethernet Gigabit (10Base-T, 100Base-TX, 1000Base-T) que admiten la negociaci??n autom??tica de la velocidad, el control de flujo y el modo d??plex. Los modelos N3048/N3048P admiten dos puertos SFP+ 10G. Los transceptores SFP+ homologados por Dell se venden por separado.
Los puertos de conmutaci??n del panel frontal presentan las caracter??sticas siguientes:
???El conmutador detecta autom??ticamente la diferencia entre los cables cruzados y directos en los puertos RJ-45 y selecciona de forma autom??tica la configuraci??n MDI o MDIX para adaptarse al otro extremo.
???Los puertos SFP son compatibles con los transceptores homologados por Dell.
???Los puertos RJ-45 admiten velocidades de 10/100/1000 Mbps en modo d??plex completo con el cable UTP est??ndar de categor??a 5.
???Los puertos SFP+ admiten transceptores SFP+ y la tecnolog??a twin-ax de cobre SFP+ adem??s de transceptores SFP que funcionan a 1G.
???Los puertos del panel frontal de N3024P/N3048P admiten PoE (15,4 W) y PoE+ (30 W).
Puerto de consola
El puerto de consola ofrece capacidades de comunicaci??n en serie, lo que permite la comunicaci??n mediante el protocolo RS-232. Este puerto serie proporciona una conexi??n directa al conmutador y permite acceder a la CLI desde un terminal de consola conectado al puerto a trav??s del cable serie suministrado (conectores de RJ-45 YOST a DB-9 hembra).
El puerto de consola se configura por separado y puede utilizarse como un enlace as??ncrono desde 1 200 a 115 200 baudios.
La CLI de Dell s??lo admite cambios de velocidad.
Los valores predeterminados son velocidad de 9 600 baudios, 8 bits de datos, sin paridad, un bit de paro y sin control de flujo.
Puerto de administraci??n fuera de banda
El puerto de administraci??n fuera de banda (OOB) es un puerto Ethernet 10/100/1000Base-T dedicado a la administraci??n remota de conmutadores. El tr??fico de este puerto se separa del tr??fico de la red operativa en los puertos del conmutador y no se puede conmutar ni direccionar hacia o desde la red operativa.
Puerto USB
El puerto USB hembra tipo A admite una unidad de memoria flash compatible con USB 2.0. El conmutador Dell Networking puede leer o escribir en una unidad flash con formato FAT-32. Puede utilizar una unidad flash USB para copiar los archivos de configuraci??n y las im??genes del conmutador entre la unidad flash USB y el conmutador. Tambi??n puede utilizar la unidad flash USB para mover y copiar los archivos de configuraci??n y las im??genes de un conmutador a otros conmutadores de la red.
El puerto USB no admite ning??n otro tipo de dispositivo USB.
Bot??n de restablecimiento
El bot??n de restablecimiento, al que se accede a trav??s del orificio, permite realizar un restablecimiento forzado del conmutador. Para utilizar el bot??n de restablecimiento, inserte un clip sujetapapeles enderezado o un utensilio similar en el orificio. Cuando el conmutador ha completado el proceso
de inicio tras restablecerse, reanuda su funcionamiento con la ??ltima configuraci??n guardada. Los cambios de la configuraci??n en ejecuci??n que no se hayan guardado en la configuraci??n de inicio antes del restablecimiento se perder??n.
Indicadores LED de puerto y de sistema
El panel frontal incluye diodos emisores de luz (LED) que indican el estado de los enlaces del puerto, las fuentes de alimentaci??n, los ventiladores,
el apilamiento y el sistema en general.
Para obtener informaci??n sobre el estado que indican los LED, consulte la Gu??a de configuraci??n del usuario.
LED maestro de la pila y panel del n??mero de pila
Cuando un conmutador de una pila es la unidad maestra, el LED maestro de la pila, con la etiqueta "M", emite una luz verde fija. Si el LED M est?? apagado, el miembro de la pila no es la unidad maestra. El panel del n??mero de pila muestra el n??mero de unidad del miembro de la pila. Cuando un conmutador no forma parte de una pila (es decir, cuando se trata de una pila de un solo conmutador), el LED M se ilumina y se muestra el n??mero de unidad.
Panel posterior de la serie N30xx
En las im??genes siguientes se muestran los paneles posteriores de los conmutadores N30xx.
Ilustraci??n 1-16. Panel posterior de N30xx
Rejillas de ventilaci??n
Ilustraci??n 1-18. Ampliaci??n de los puertos de apilamiento mini-SAS de N3048
Puertos de apilamiento mini-SAS
El t??rmino mini-SAS se refiere a las conexiones de los cables de los puertos de apilamiento que se muestran en la Ilustraci??n 1-18. Consulte Apilamiento de varios conmutadores N30xx para obtener informaci??n sobre c??mo utilizar los puertos mini-SAS para conectar conmutadores.

Ranuras de expansi??n para m??dulos de complemento
En la parte posterior de los modelos N30xx hay una ranura de expansi??n, que admite los m??dulos siguientes:
???M??dulo 10GBase-T
???M??dulo SFP+
Cada m??dulo de complemento posee dos puertos. Los m??dulos de complemento admiten el intercambio activo, de modo que no tendr?? que reiniciar el conmutador despu??s de instalar un m??dulo nuevo.
Fuentes de alimentaci??n
N3024, N3024F y N3048
Los conmutadores N3024, N3024F y N3048 admiten dos fuentes de alimentaci??n reemplazables in situ (FRU) de 200 vatios que dotan al conmutador de redundancia completa de la alimentaci??n. Los conmutadores N3024, N3024F y N3048 ofrecen la funci??n V-lock para aquellos usuarios que desean evitar desconexiones accidentales de la alimentaci??n. El enchufe V- lock de la unidad de fuente de alimentaci??n (PSU) permite utilizar un cable de alimentaci??n que posee la funci??n V-lock para crear una conexi??n de bloqueo segura e integral.
N3024P y N3048P
Los conmutadores Dell Networking N3024P y N3048P admiten una o dos fuentes de alimentaci??n FRU de 1 100 vatios. El conmutador N3024P cuenta con una fuente de alimentaci??n ??nica de 715 vatios (la configuraci??n predeterminada) y admite una o dos fuentes de alimentaci??n de 1 000 vatios. En el caso del conmutador N3048P, la configuraci??n predeterminada consiste en una fuente de alimentaci??n de 1 100 vatios.
Una ??nica fuente de alimentaci??n de 1 100 vatios puede alimentar hasta 24 dispositivos PoE a plena potencia PoE+ (850 W). Los conmutadores que cuentan con dos fuentes de alimentaci??n pueden alimentar hasta 48 dispositivos PoE a plena potencia PoE+ (1 800 W), adem??s de proporcionar redundancia de la fuente de alimentaci??n.
NOTA: La potencia PoE se asigna de manera din??mica. No todos los puertos requerir??n la m??xima potencia PoE+.
PRECAUCI??N: Antes de extraer el m??dulo de las fuentes de alimentaci??n, retire el cable de alimentaci??n de las mismas. La alimentaci??n no debe conectarse antes de la inserci??n en el chasis.
Sistema de ventilaci??n
Los conmutadores N30xx cuentan con dos ventiladores para su refrigeraci??n. Adem??s, poseen un ventilador en cada fuente de alimentaci??n interna.
El ventilador de los conmutadores N30xx es una unidad FRU.
N30xx : resumen del modelo
Tabla 1-2. N30xx : resumen del modelo
Tabla 1-2. N30xx : resumen del modelo
fuente de alimentaci??n (PSU) enchufables con redundancia N+1/48x puertos PoE+/12 puertos compatibles con UPoE/1x m??dulo de ventilador extra??ble
Instalaci??n de la serie N30xx
Preparaci??n del emplazamiento
Los conmutadores de la serie N30xx se pueden montar en un rack est??ndar de 48,26 cm (19 pulgadas) o se pueden colocar sobre una superficie plana.
Aseg??rese de que la ubicaci??n elegida para la instalaci??n cumpla los requisitos siguientes:
???Alimentaci??n: el conmutador est?? instalado cerca de una toma el??ctrica de 100-240 V CA y 50-60 Hz de f??cil acceso.
???Espacio libre: existe espacio libre suficiente delante y detr??s del equipo para permitir el acceso del operador. Deje espacio libre para el cableado, las conexiones de alimentaci??n y la ventilaci??n.
???Cableado: el cableado est?? canalizado para evitar fuentes de ruido el??ctrico, como radiotransmisores, amplificadores de transmisi??n, l??neas de alimentaci??n e instalaciones fijas de luz fluorescente.
???Temperatura ambiente: el intervalo de temperatura ambiente de funcionamiento del conmutador es de 0 a 45 ??C con una humedad relativa de hasta el 95% sin condensaci??n.
NOTA: Para altitudes superiores a los 900 m (2955 pies) debe reducirse la temperatura m??xima en 1??C (1.8??F) cada 300m (985 pies).
???Humedad relativa: la humedad relativa de funcionamiento es de 8 a 85% (sin condensaci??n), con una gradaci??n de humedad m??xima del 10% por hora.
Desembalaje del conmutador N30xx
Contenido del paquete
Al desembalar un conmutador, compruebe que se incluyen los elementos siguientes:
???Un conmutador Dell Networking
???Un cable de RJ-45 a DB-9 hembra
???Un kit de montaje para instalaci??n en rack (ReadyRail), dos soportes de montaje, pernos y tuercas prisioneras
???Un conjunto de almohadillas de goma autoadhesivas para instalar el conmutador sin motarlo en un rack (se incluyen cuatro)
???Una PSU
Pasos del desembalaje
NOTA: Antes de desembalar el conmutador, examine el contenedor e informe inmediatamente de cualquier da??o.
1Coloque el contenedor en una superficie plana y limpia, y corte todas las tiras que sujetan el contenedor.
2Abra el contenedor o extraiga la parte superior de ??ste.
3Extraiga con cuidado el conmutador del contenedor y col??quelo en una superficie estable y limpia.
4Retire todo el material de embalaje.
5Compruebe que el conmutador y los accesorios no est??n da??ados.

Montaje en rack de un conmutador N30xx
Puede colocar el conmutador en la plataforma del rack o montarlo directamente en un rack de 48,26 cm que cumpla la especificaci??n EIA-310-E (cuatro postes, dos postes m??todos de roscado). El sistema ReadyRail de Dell se encuentra disponible para instalaciones en rack frontal 1U y de dos postes. Este sistema incluye dos ensamblajes de rieles embalados por separado.
AVISO: Este documento es una referencia resumida. Lea las instrucciones de seguridad de su folleto informativo sobre seguridad, medio ambiente y normativas antes de comenzar.
NOTA: Las ilustraciones que contiene este documento no representan un conmutador espec??fico.
Consideraciones de seguridad para el montaje en rack
???Carga del rack: la sobrecarga o la carga desigual de los racks puede ocasionar que la plataforma o el rack cedan, da??os en los equipos y posibles lesiones personales. Antes de comenzar a cargarlos, estabilice los racks en una ubicaci??n permanente. Monte los componentes comenzando desde la parte inferior del rack hasta llegar a la parte superior del mismo. No sobrepase la capacidad de carga del rack.
???Consideraciones de alimentaci??n: conecte el conmutador ??nicamente a la fuente de energ??a que se indica en la unidad. Cuando instale varios componentes el??ctricos en un rack, aseg??rese de que la alimentaci??n total de los mismos no sobrepase la capacidad del circuito. La sobrecarga de las fuentes de energ??a y los alargadores pueden presentar riesgos de incendios y descargas el??ctricas.
???Temperatura ambiente alta: cuando un conmutador se instala en un montaje de rack cerrado, la temperatura de funcionamiento del entorno del rack puede ser superior a la temperatura ambiente de la sala. Tenga cuidado de que no se sobrepase la temperatura ambiente m??xima de 45 ??C del conmutador.
???Flujo de aire reducido: instale el equipo en el rack sin comprometer la cantidad de flujo de aire necesaria para que el equipo funcione de forma segura.
???Conexi??n a tierra fiable: realice una conexi??n a tierra fiable de los equipos montados en rack. Preste especial atenci??n a las conexiones del suministro que no sean conexiones directas al circuito de derivaci??n, por ejemplo: al uso de regletas de enchufes.
???El producto no debe montarse con el panel posterior mirando hacia abajo.
Instalaci??n del sistema ReadyRail de Dell
El sistema de montaje en rack ReadyRail permite configurar f??cilmente el rack para la instalaci??n del conmutador. Este sistema puede instalarse mediante el m??todo sin herramientas 1U o uno de los tres m??todos 1U que utilizan herramientas (montaje a ras de dos postes, montaje centrado de dos postes o montaje roscado de cuatro postes).
Configuraci??n sin herramientas 1U (cuatro postes con orificio cuadrado u orificio redondo sin rosca)
1Con las pesta??as laterales del sistema ReadyRail orientadas hacia afuera, coloque un riel entre los postes verticales izquierdo y derecho. Alinee y encaje las espigas del riel de la parte posterior en la parte trasera del poste vertical. En la Ilustraci??n 1-19, el elemento 1 y sus extracciones muestran c??mo aparecen las espigas en los orificios cuadrados y en los orificios redondos sin rosca.
Ilustraci??n 1-19. Configuraci??n sin herramientas 1U
2Alinee y encaje las espigas de la parte frontal en los orificios situados en la parte frontal del poste vertical. Consulte la Ilustraci??n 1-19, elemento 2.
3Repita este paso para el segundo riel.
4Para extraer los rieles, tire del bot??n de liberaci??n de las pesta??as laterales y desencaje los rieles. Consulte la Ilustraci??n 1-19, elemento 3.
Configuraci??n de montaje a ras de dos postes
1Para esta configuraci??n, deben extraerse las piezas fundidas de la parte frontal de cada ensamblaje ReadyRail . Consulte la Ilustraci??n 1-20, elemento 1 de la p??gina 318. Utilice un destornillador Torx para extraer los dos tornillos de cada pesta??a de la parte frontal (en el lado del conmutador del riel) y retire las piezas fundidas. Conserve estas piezas para futuras necesidades del rack. No es necesario que extraiga las piezas fundidas de la parte trasera.
Ilustraci??n 1-20. Configuraci??n de montaje a ras de dos postes
2Monte un riel en la parte frontal del poste con dos tornillos suministrados por el usuario. Consulte la Ilustraci??n 1-20, elemento 2.
3Deslice el soporte del fiador hacia el poste vertical y f??jelo al mismo con dos tornillos suministrados por el usuario. Consulte la Ilustraci??n 1-20, elemento 3.
4Repita este paso para el segundo riel.
Configuraci??n de montaje centrado de dos postes
1Deslice el soporte del fiador hacia atr??s hasta que se encaje en su lugar con un chasquido para, entonces, fijarlo en la parte frontal del poste con dos tornillos suministrados por el usuario. Consulte la Ilustraci??n 1-21, elemento 1.
Ilustraci??n 1-21. Configuraci??n de montaje centrado de dos postes
2Deslice el soporte trasero hacia el poste y f??jelo al mismo con dos tornillos suministrados por el usuario. Consulte la Ilustraci??n 1-21, elemento 2.
3Repita este paso para el segundo riel.
Configuraci??n de montaje roscado de cuatro postes
1Para esta configuraci??n, deben extraerse las piezas fundidas de las pesta??as laterales situadas a cada extremo de los ensamblajes del sistema ReadyRail. Utilice un destornillador Torx para extraer los dos tornillos de cada pesta??a lateral y retire las piezas fundidas. Consulte la Ilustraci??n 1-22, elemento 1. Conserve estas piezas para futuras necesidades del rack.
2En cada riel, fije las partes frontal y trasera al poste con dos tornillos suministrados por el usuario en cada extremo. Consulte la Ilustraci??n 1-22, elemento 2.
Ilustraci??n 1-22. Configuraci??n de montaje roscado de cuatro postes

Instalaci??n como conmutador independiente
NOTA: Se recomienda montar el conmutador en un rack.
Si no instala el conmutador en un rack, inst??lelo en una superficie plana. La superficie debe poder soportar el peso del conmutador y de los cables.
El conmutador se suministra con cuatro almohadillas de goma autoadhesivas.
1Fije las almohadillas de goma autoadhesivas en cada una de las zonas marcadas de la parte inferior del conmutador.
2Coloque el conmutador sobre una superficie plana y aseg??rese de que tenga una ventilaci??n adecuada; para ello, deje 5 cm (2 pulgadas) a cada lado y 13 cm (5 pulgadas) en la parte posterior.
Apilamiento de varios conmutadores N30xx
Puede apilar hasta 12 conmutadores N30xx mediante el uso de los puertos mini- SAS que se encuentran en la parte posterior de los conmutadores. Los conmuta- dores N30xx ??nicamente pueden apilarse con otros conmutadores de esta serie. Cuando se conectan varios conmutadores juntos a trav??s de los puertos de la pila, ??stos funcionan como una ??nica unidad con hasta 576 puertos en el panel frontal. La pila funciona y se administra como una ??nica entidad.
NOTA: Si va a instalar una pila de conmutadores, debe ensamblarla y cablearla antes de encenderla y configurarla. La primera vez que se enciende una pila, los conmutadores eligen un conmutador maestro, que puede ocupar cualquier posici??n de la pila. El LED maestro del panel frontal est?? iluminado en la unidad maestra.
Creaci??n de una pila de conmutadores
Para crear una pila, conecte unidades adyacentes mediante los puertos de apilamiento mini-SAS situados en el panel posterior del conmutador. En la Ilustraci??n 1-23 de la p??gina 322 se muestran los conmutadores
conectados en una topolog??a de anillo, que es la recomendada para una pila.
1Con uno de los cables mini-SAS, conecte uno de los puertos de apilamiento de la parte superior del conmutador y el conmutador inmediatamente inferior.
Si es necesario, utilice un cable mini-SAS largo (1 o 3 metros), adquirido por separado, para conectar los conmutadores.
2Repita este proceso hasta que todos los dispositivos est??n conectados.

3Utilice el cable de apilamiento restante para conectar juntos los otros dos puertos de apilamiento de forma que se cree una topolog??a de anillo.
Ilustraci??n 1-23. Conexi??n de una pila de conmutadores
Unidad 1 
Unidad 2 
Unidad 3 
La pila de la Ilustraci??n 1-23 est?? conectada en una topolog??a de anillo y cuenta con las siguientes conexiones f??sicas entre los conmutadores:
???El puerto mini-SAS inferior de la Unidad 1 est?? conectado al puerto mini-SAS superior de la Unidad 2.
???El puerto mini-SAS inferior de la Unidad 2 est?? conectado al puerto mini-SAS superior de la Unidad 3.
???El puerto mini-SAS inferior de la Unidad 3 est?? conectado al puerto mini-SAS superior de la Unidad 1.
Reserva de la pila
La funci??n de apilamiento admite una unidad de reserva o en espera que adopta el papel de unidad maestra si se produce un error en la unidad maestra de la pila. En cuanto se detecta un error en la unidad maestra de la pila, la unidad en espera inicializa el plano de control y habilita el resto de unidades de la pila con la configuraci??n actual. La unidad en espera conserva una copia sincronizada de la configuraci??n en ejecuci??n de la pila. La unidad en espera se selecciona de forma autom??tica en la pila, aunque puede utilizar la CLI para seleccionar un miembro de la pila distinto como unidad en espera. Para obtener m??s informaci??n, consulte la Gu??a de configuraci??n del usuario o la
Gu??a de referencia de la CLI.
Inicio y configuraci??n del conmutador N30xx
En el diagrama de flujo de la Ilustraci??n 1-24 se proporciona informaci??n general sobre los pasos necesarios para realizar la configuraci??n inicial una vez que se ha desembalado y montado el conmutador.

Conexi??n de un conmutador N30xx a un terminal
Una vez realizadas todas las conexiones externas, conecte un terminal a un conmutador para configurar el conmutador.
NOTA: Antes de continuar, lea las notas de la versi??n de este producto. Puede descargar las notas de la versi??n desde la p??gina web de asistencia de Dell (dell.com/support/manuals).
NOTA: Se recomienda descargar la versi??n m??s reciente de la documentaci??n del usuario desde la p??gina web de asistencia de Dell (dell.com/support/manuals).
Para supervisar y configurar el conmutador mediante la consola serie, utilice el puerto de consola del panel frontal del conmutador (vea la Ilustraci??n 1-25 de la p??gina 325) para conectarlo a un terminal VT100 o a un ordenador que ejecute software de emulaci??n de terminal VT100. El puerto de consola se implementa como un conector de equipo terminal de datos (DTE).
Para utilizar el puerto de consola, se requiere lo siguiente:
???Un terminal compatible con VT100 o un equipo con un puerto serie que ejecute software de emulaci??n de terminal VT100, como por ejemplo HyperTerminal de Microsoft.
???Un cable serie (suministrado) con un conector RJ-45 para el puerto de consola y un conector DB-9 para el terminal.
Para conectar un terminal al puerto de consola del conmutador, realice los pasos siguientes:
1Enchufe el conector DB-9 del cable serie en el terminal o equipo que ejecuta software de emulaci??n de terminal VT100.
2Configure el software de emulaci??n de terminal como se indica a continuaci??n:
a Seleccione el puerto serie adecuado (por ejemplo, COM 1) para la conexi??n a la consola.
b Establezca la velocidad de datos en 9 600 baudios.
c Establezca el formato de datos en 8 bits de datos, 1 bit de paro y sin paridad.
d Establezca el control de flujo en None (Ninguno).
e Establezca el modo de emulaci??n de terminal en VT100.

fSeleccione Terminal keys (Teclas de terminal) para las teclas de funci??n, de flecha y Ctrl. Aseg??rese de que configura el valor para las teclas del terminal, y no para las de Microsoft Windows.
3Enchufe el conector RJ-45 del cable directamente en el puerto de consola del conmutador. El puerto de consola de Dell Networking se encuentra en el lado derecho del panel frontal y tiene una etiqueta con el s??mbolo |O|O|, como se muestra en la Ilustraci??n 1-25.
NOTA: El acceso de la consola serie al administrador de la pila se encuentra disponible desde cualquier puerto serie a trav??s de la CLI local. S??lo se puede iniciar una sesi??n de la consola serie al mismo tiempo.
Ilustraci??n 1-25. Ubicaci??n del puerto de consola en el conmutador N3048
Puerto de consola
El puerto RJ-45 de la derecha del puerto de consola est?? destinado a la administraci??n mediante Ethernet fuera de banda.
Conexi??n de un conmutador N30xx a una fuente de energ??a
PRECAUCI??N: Lea las instrucciones de seguridad incluidas en el manual
Informaci??n sobre normativas y seguridad y la informaci??n de seguridad de los otros conmutadores que est??n conectados o asociados al conmutador.
Los conmutadores N30xx cuentan con dos fuentes de alimentaci??n FRU para un funcionamiento redundante o con distribuci??n de carga.

Conexi??n de la alimentaci??n de CA y CC
1Aseg??rese de que el puerto de consola del conmutador est?? conectado a un terminal VT100 o a un emulador de terminal VT100 a trav??s del cable de RJ-45 a DB-9 hembra.
2Conecte un cable de alimentaci??n est??ndar de 1,5 m con conexi??n a tierra al enchufe principal de CA situado en el panel posterior (vea la Ilustraci??n 1-26 de la p??gina 326).
3Conecte el cable de alimentaci??n a una toma el??ctrica de CA con conexi??n a tierra.
Ilustraci??n 1-26. Conmutador N3048 con dos fuentes de alimentaci??n redundantes
A la fuente de energ??a de CA
Inicio del conmutador N30xx
Cuando la alimentaci??n se enciende con el terminal local ya conectado, el conmutador realiza una autoprueba de encendido (POST). La POST se ejecuta cada vez que se inicializa el conmutador y comprueba los componentes de hardware para determinar si el conmutador funciona correctamente antes del inicio completo. Si la POST detecta un problema
cr??tico, el flujo de programa se detiene. Si la POST se ejecuta correctamente, se carga el firmware v??lido en la RAM. Se muestran mensajes de la POST en el terminal que indican si la prueba ha finalizado correctamente o no.
El proceso de inicio dura aproximadamente 60 segundos.
Puede abrir el men?? Boot (Inicio) una vez completada la primera parte de la POST. Desde el men?? Boot (Inicio), puede realizar tareas de configuraci??n, como por ejemplo, restablecer el sistema a la configuraci??n predeterminada de f??brica, activar la imagen de copia de seguridad o recuperar una contrase??a. Para obtener m??s informaci??n sobre las funciones del men?? Boot
(Inicio), consulte la Gu??a de referencia de la CLI.

Realizaci??n de la configuraci??n inicial del conmutador N30xx
Para el procedimiento de configuraci??n inicial, se da por sentado lo siguiente:
???El conmutador Dell Networking no se ha configurado antes.
???El conmutador Dell Networking se ha iniciado correctamente.
???La conexi??n de la consola se ha establecido y se muestra el indicador del
Easy Setup Wizard (Asistente para instalaci??n f??cil) de Dell en la pantalla de un terminal VT100 o equivalente.
La configuraci??n inicial del conmutador se lleva a cabo a trav??s del puerto de consola. Despu??s de la configuraci??n inicial, puede administrar el conmutador desde el puerto de consola ya conectado o bien remotamente a trav??s de una interfaz definida durante la configuraci??n inicial.
NOTA: El conmutador no est?? configurado con un nombre de usuario y contrase??a predeterminados. La direcci??n IP predeterminada est?? establecida como DHCP para el puerto fuera de banda (OOB).
Antes de establecer la configuraci??n inicial del conmutador, solicite esta informaci??n al administrador de la red:
???La direcci??n IP que se debe asignar a la interfaz de administraci??n
???La m??scara de subred IP para la red
???La direcci??n IP de la puerta de enlace predeterminada de la interfaz de administraci??n
Estos valores son necesarios para poder administrar de forma remota el conmutador mediante Telnet (cliente Telnet) o HTTP (explorador web).
Habilitaci??n de la administraci??n remota
El panel frontal de conmutador N30xx contiene un puerto Ethernet Gigabit para la administraci??n fuera de banda (OOB). El puerto OOB se encuentra a la derecha del puerto de consola. En los conmutadores N30xx puede utilizar el puerto OOB o cualquiera de los puertos de conmutaci??n del panel frontal para la administraci??n en banda. De forma predeterminada, todos los puertos en banda son miembros de la VLAN 1.

El Easy Setup Wizard (Asistente para instalaci??n f??cil) de Dell incluye indicadores para configurar la informaci??n de la red para la interfaz de administraci??n OOB en el conmutador N30xx y para la interfaz de VLAN 1 en los conmutadores N30xx. Para cualquiera de las interfaces de administraci??n, puede asignar una direcci??n IP y una m??scara de subred est??ticas o habilitar DHCP y permitir que un servidor DHCP de la red asigne la informaci??n.
Consulte la Gu??a de referencia de la CLI para obtener informaci??n sobre los comandos de la CLI que se utilizan para configurar la informaci??n de la red.
Procedimiento de configuraci??n inicial
La configuraci??n inicial se puede realizar con el Easy Setup Wizard (Asistente para instalaci??n f??cil) de Dell o con la CLI. El asistente se inicia autom??ticamente cuando el archivo de configuraci??n del conmutador est?? vac??o. Puede cerrar el asistente en cualquier momento pulsando [Ctrl+z], pero se perder??n todos los valores de configuraci??n que haya especificado y el conmutador utilizar?? los valores predeterminados.
NOTA: Si no ejecuta el Easy Setup Wizard (Asistente para instalaci??n f??cil) de Dell o no responde al indicador inicial del mismo antes de 60 segundos, el conmutador entra en el modo de la CLI. Debe restablecer el conmutador con una configuraci??n de inicio vac??a para volver a ejecutar el Easy Setup Wizard (Asistente para instalaci??n f??cil) de Dell.
Para obtener m??s informaci??n sobre c??mo realizar la configuraci??n inicial mediante la CLI, consulte la Gu??a de referencia de la CLI. En esta Gu??a de introducci??n se muestra c??mo utilizar el Easy Setup Wizard (Asistente para instalaci??n f??cil) de Dell para realizar la configuraci??n inicial del conmutador. El asistente realiza la configuraci??n siguiente en el conmutador:
???Establece la cuenta inicial de usuario con privilegios y le otorga una contrase??a v??lida. El asistente configura una cuenta de usuario con privilegios durante la configuraci??n.
???Habilita el inicio de sesi??n de CLI y el acceso HTTP para el uso ??nicamente de la configuraci??n de autenticaci??n local.
???Configura la direcci??n IP para la interfaz de administraci??n OOB.
???Configura la direcci??n IP para la interfaz de enrutamiento de VLAN 1, de la que todos los puertos en banda son miembros.
???Configura la cadena de comunidad SNMP que va a usar el administrador SNMP en una direcci??n IP determinada. Puede omitir este paso si no utiliza la administraci??n SNMP en este conmutador.
???Permite especificar la direcci??n IP del sistema de administraci??n de red o autorizar el acceso a la administraci??n desde todas las direcciones IP.
???Configura la direcci??n IP de la puerta de enlace predeterminada para la interfaz de VLAN 1.
Sesi??n de ejemplo
En esta secci??n se describe una sesi??n con el Easy Setup Wizard (Asistente para instalaci??n f??cil) de Dell. Para el ejemplo de sesi??n, se utilizan los valores siguientes:
???La cadena de comunidad SNMP utilizada es public.
???La direcci??n IP del sistema de administraci??n de red (NMS) es 10.1.2.100.
???El nombre de usuario es admin y la contrase??a es admin123.
???La interfaz de administraci??n OOB utiliza DHCP para la asignaci??n de la direcci??n IP.
???La direcci??n IP de la interfaz de enrutamiento de VLAN 1 es 10.1.1.200 y la m??scara de subred es 255.255.255.0.
???La puerta de enlace predeterminada es 10.1.1.1.
El asistente para instalaci??n define los valores iniciales como se ha indicado anteriormente. Una vez completado el asistente, el conmutador estar?? configurado del modo siguiente:
???SNMPv2 est?? habilitado y la cadena de comunidad est?? configurada como se indica m??s arriba. SNMPv3 est?? deshabilitado de forma predeterminada.
???La cuenta de usuario admin est?? configurada de la forma indicada.
???Se ha configurado un sistema de administraci??n de red. Desde la estaci??n de administraci??n puede acceder a las interfaces SNMP, HTTP y CLI. Tambi??n puede permitir que todas las direcciones IP tengan acceso a estas interfaces de administraci??n especificando la direcci??n IP (0.0.0.0).
???DHCP est?? habilitado en la interfaz de administraci??n OOB.
???Se ha configurado una direcci??n IP para la interfaz de enrutamiento de VLAN 1.

???Se ha configurado una direcci??n de puerta de enlace predeterminada.
NOTA: En el ejemplo siguiente, las opciones de usuario posibles o los valores predeterminados se incluyen entre corchetes [ ]. Si pulsa <Intro> sin definir ninguna opci??n, se aceptar?? el valor predeterminado. El texto de ayuda se muestra entre par??ntesis.
Ejemplo de la consola del Easy Setup Wizard (Asistente para instalaci??n f??cil) de Dell
En el ejemplo siguiente se muestra la secuencia de indicadores y respuestas asociados a la ejecuci??n de un ejemplo de sesi??n del Easy Setup Wizard (Asistente para instalaci??n f??cil) de Dell con los valores indicados anteriormente.
Cuando el conmutador finaliza la POST y se inicia, aparece el di??logo siguiente:
Unidad 1 - A la espera de seleccionar unidad de administraci??n)>
Aplicando configuraci??n global, espere...
Bienvenido al Asistente para instalaci??n f??cil de Dell
Este asistente le gu??a por la configuraci??n inicial del conmutador y le permite empezar a utilizarlo de la forma m??s r??pida y sencilla posible. Puede optar por no utilizar el asistente para instalaci??n y entrar en el modo de la CLI para configurar el conmutador manualmente. Para poder ejecutar el asistente para instalaci??n debe responder a la siguiente pregunta antes de que transcurran 60 segundos, de lo contrario el sistema continuar?? con el funcionamiento normal utilizando la configuraci??n predeterminada del sistema. Nota: puede salir del asistente para instalaci??n en cualquier momento; para ello, pulse [Ctrl+z].
??Desea ejecutar el asistente para instalaci??n? (Debe responder a esta pregunta antes de que transcurran 60 segundos.) [Y/N] y

Paso 1:
El sistema no est?? configurado para la administraci??n SNMP de forma predeterminada. Para administrar el conmutador mediante SNMP, necesario para Dell Network Manager, puede
. Configurar ahora la cuenta de la versi??n 2 de SNMP inicial.
. Volver posteriormente y configurar otras cuentas de
??Desea configurar la interfaz de administraci??n SNMP ahora? [Y/N] y
Para configurar la cuenta de administraci??n de SNMP debe especificar la direcci??n IP del sistema de administraci??n y la "cadena de comunidad" o la contrase??a que ese sistema de administraci??n utiliza para acceder al conmutador. El asistente asigna de forma autom??tica el nivel de acceso m??s elevado [privilegio de nivel 15] a esta cuenta. Puede utilizar Dell Network Manager u otras interfaces de administraci??n para cambiar esta configuraci??n y a??adir informaci??n adicional del sistema de administraci??n m??s tarde. Para obtener m??s informaci??n sobre c??mo a??adir sistemas de administraci??n, consulte la documentaci??n del usuario.
Para a??adir una estaci??n de administraci??n:
Introduzca la cadena de comunidad SNMP que va a utilizar. [public]: public
NOTA: Si se configura, el nivel de acceso predeterminado se establece en el valor m??s alto disponible para la interfaz de administraci??n SNMP. Inicialmente s??lo se activar?? SNMPv2. SNMPv3 se deshabilitar?? hasta que vuelva a configurar el acceso de seguridad para SNMPv3 (por ejemplo, ID de motor, vista, etc.).
Introduzca la direcci??n IP del sistema de administraci??n (A.B.C.D) o un comod??n (0.0.0.0) para realizar la administraci??n desde cualquier estaci??n de administraci??n. [0.0.0.0]: 10.1.2.100
Paso 2:
Ahora debe configurar su cuenta de usuario con privilegios (nivel 15) inicial. Esta cuenta se utiliza para iniciar sesi??n en la CLI y la interfaz web. Podr?? configurar otras cuentas y cambiar los niveles de privilegio m??s adelante. Para obtener informaci??n sobre c??mo configurar cuentas de usuario y cambiar niveles de privilegio, consulte la documentaci??n del usuario.
Para configurar una cuenta de usuario:
Especifique el nombre de usuario. [root]:admin
Introduzca la contrase??a del usuario: ********
Vuelva a introducir la contrase??a del usuario:
********
Paso 3:
A continuaci??n, se configuran las direcciones IP en la interfaz OOB (fuera de banda) o la interfaz de enrutamiento de VLAN 1.
Puede utilizar estas direcciones IP para acceder a la CLI, la interfaz web o la interfaz SNMP del conmutador.
Para acceder al conmutador a trav??s de cualquier interfaz de administraci??n, puede
. Configurar la direcci??n IP para la interfaz de administraci??n.
. Configurar la puerta de enlace predeterminada si la direcci??n IP se configura manualmente en la interfaz OOB y de enrutamiento.
??Desea configurar la interfaz fuera de banda (OOB) ahora? [Y/N] y
Introduzca la direcci??n IP del dispositivo (A.B.C.D) o teclee "DHCP" (sin las comillas) para solicitar autom??ticamente una direcci??n IP del servidor DHCP de la red. [DHCP]: dhcp
Paso 4:
??Desea configurar la interfaz de enrutamiento de VLAN1 ahora? [Y/N] y
Introduzca la direcci??n IP del dispositivo (A.B.C.D) o teclee "DHCP" (sin las comillas) para solicitar autom??ticamente una direcci??n IP del servidor DHCP de la red: 10.1.1.200
Introduzca la m??scara de subred IP (A.B.C.D o /nn):
255.255.255.0
Paso 5:
Por ??ltimo, configure la puerta de enlace predeterminada. Introduzca la direcci??n IP de la puerta de enlace desde la que se puede acceder a esta red. [0.0.0.0]: 10.1.1.1
??sta es la informaci??n de configuraci??n que se ha recopilado:
Interfaz SNMP = ???public???@10.1.2.100 Configuraci??n de la cuenta de usuario = admin Contrase??a = ********
Direcci??n IP fuera de banda = DHCP
IP de la interfaz de enrutador VLAN1 = 10.1.1.200 255.255.255.0
Puerta de enlace predeterminada = 10.1.1.1
Paso 6:
Si la informaci??n es correcta, seleccione (Y) para guardar la configuraci??n, y copie los valores en el archivo de configuraci??n de inicio. Si la informaci??n es incorrecta, seleccione (N) para descartar la configuraci??n y reiniciar el asistente: [Y/N] y
Muchas gracias por utilizar el Asistente para instalaci??n f??cil de Dell. Ahora entrar?? en el modo de la CLI.
Aplicando configuraci??n de interfaz, espere...
Pasos siguientes
Una vez completada la configuraci??n inicial descrita en esta secci??n, puede conectar el puerto OOB a la red de administraci??n para la administraci??n remota fuera de banda, o puede conectar cualquiera de los puertos de conmutaci??n del panel frontal a la red de producci??n para la administraci??n remota en banda.
Si ha especificado DHCP para la direcci??n IP de la interfaz de administraci??n OOB o VLAN 1, la interfaz obtendr?? su direcci??n IP a partir de un servidor DHCP de la red. Para detectar la direcci??n IP asignada de forma din??mica, utilice la conexi??n del puerto de consola para emitir los comandos siguientes:
???Para la interfaz OOB, escriba show ip interface out-of-band.
???Para la interfaz de enrutamiento de VLAN 1, escriba show ip interface.
Para acceder a la interfaz de Dell OpenManage Switch Administrator, introduzca la direcci??n IP de la interfaz de administraci??n OOB en el campo de direcci??n de un explorador web. Para el acceso de administraci??n remoto a la CLI, escriba la direcci??n IP de la interfaz de administraci??n VLAN 1 en un cliente Telnet o SSH. Tambi??n puede seguir utilizando el puerto de consola para el acceso local de la CLI al conmutador.
El conmutador N30xx admite funciones de conmutaci??n b??sicas, como redes VLAN y protocolo de ??rbol de extensi??n, adem??s de funciones avanzadas de nivel 3, como el enrutamiento din??mico y la multidifusi??n. Utilice la interfaz de administraci??n basada en web o la CLI para configurar las funciones necesarias para la red. Para obtener informaci??n sobre c??mo configurar las funciones del conmutador, consulte los documentos Gu??a de configuraci??n del usuario o Gu??a de referencia de la CLI, disponibles en la p??gina web de asistencia: dell.com/support/manuals.
Dell N20xx/N30xx
Serisi Anahtar
Ba??lang???? K??lavuzu
D??zenleyici Modeller: N2024, N2024P, N2048, N2048P, N3024, N3024P, N3048, N3048P, N3024F
Notlar, Dikkat Edilecek Noktalar ve Uyar??lar
NOT: NOT, anahtar??n??zdan daha iyi ??ekilde yararlanman??za yard??mc?? olacak ??nemli bilgiler verir.
D??KKAT: D??KKAT, donan??mda olabilecek hasarlar?? ya da veri kayb??n?? belirtir ve size, bu sorunun nas??l ??nlenece??ini anlat??r.
 UYARI: UYARI, meydana gelebilecek olas?? maddi hasar, ki??isel yaralanma veya ??l??m tehlikesi anlam??na gelir.
____________________
?? 2013 Dell Inc.
Bu metinde kullan??lan Ticari Markalar: Dell??, DELL logosu, OpenManage??? ve ReadyRails??? Dell Inc. ticari markalar??d??r. Microsoft??, Windows?? ABD ve/veya di??er ??lkelerde Microsoft Corporation?????n ticari markalar?? veya tescilli ticari markalar??d??r.
D??zenleyici Modeller N2024, N2024P, N2048, N2048P, N3024, N3024P, N3048, N3048P, N3024F
Aral??k 2013 P/N F5CWH Rev. A00
I??erik
1 Giri?? . . . . . . . . . . . . . . . . . . . . . . . . . . 341
2 N20xx Serisine Genel Bak???? . . . . . . 341
3N20xx Serisinin Donan??m??na
Genel Bak???? . . . . . . . . . . . . . . . . . . . 342
4 N20xx Serisinin Kurulumu . . . . . . . . 348
Saha Haz??rl?????? . . . . . . . . . . . . . . . . . . . . 348
5N20xx Anahtar??n Ba??lat??lmas??
ve Yap??land??r??lmas?? . . . . . . . . . . . . . 353
6 N30xx Serisine Genel Bak???? . . . . . . 365
7N30xx Serisinin Donan??m??na
Genel Bak???? . . . . . . . . . . . . . . . . . . . 365
8 N30xx Serisinin Kurulumu . . . . . . . . 375
Birden Fazla N30xx Anahtar??n
K??melenmesi . . . . . . . . . . . . . . . . . . . . 382
Bir Anahtar K??mesi Olu??turma . . . . . . . . 382
9N30xx Anahtar??n Ba??lat??lmas?? ve Yap??land??r??lmas?? . . . . . . . . . . . . . . . . 384
N30xx Anahtar??n bir Terminale

Giri??
Bu belge bir anahtar??n kurulmas?? ve ba??lang???? yap??land??r??lmas??n??n yap??lmas?? dahil olmak ??zere Dell N20xx/N30xx serisi anahtarlar hakk??nda temel bilgileri sunar. Anahtar ??zelliklerinin yap??land??r??lmas?? ve izlenmesi hakk??nda daha fazla bilgi i??in, Dell Destek sitesinde dok??mantasyon ve ayg??t yaz??l??m?? konusunda en son g??ncellemelere ili??kin dell.com/support/manuals i??inde yer alan Kullan??c?? Yap??land??rma K??lavuzu???na bak??n??z.
Bu belge a??a????daki b??l??mleri kapsar:
???N20xx Serisine Genel Bak????
???N20xx Serisinin Donan??m??na Genel Bak????
???N20xx Serisinin Kurulumu
???N20xx Anahtar??n Ba??lat??lmas?? ve Yap??land??r??lmas??
???N30xx Serisine Genel Bak????
???N30xx Serisinin Donan??m??na Genel Bak????
???N30xx Serisinin Kurulumu
???N30xx Anahtar??n Ba??lat??lmas?? ve Yap??land??r??lmas??
NOT: Anahtar y??neticilerinin Dell A?? Olu??turma anahtarlar??n?? mutlaka en g??ncel Dell A?? Olu??turma ????letim Sistemi (DNOS) ile kullanmalar?? ??nerilir. Dell A?? Olu??turma, siz de??erli m????terilerinden gelen geri bildirimleri temel alarak DNOS ??zelliklerini ve i??levlerini s??rekli geli??tirmektedir. Kritik altyap??larda, a?? yap??land??rmas??n??n ve yeni DNOS s??r??m??yle uyumlu i??letimin teyit edilmesi i??in yeni s??r??m??n a????n kritik olmayan bir b??l??m??nde ??nceden denenmesi ??nerilir.
N20xx Serisine Genel Bak????
Dell N20xx anahtarlar?? k??melenebilir Layer 2 Gigabit Ethernet anahtarlard??r ve a??a????daki modelleri kapsar:
???Dell N2024
???Dell N2024P
???Dell N2048
???Dell N2048P
N20xx Serisinin Donan??m??na
Genel Bak????
Bu k??s??m N20xx serisi anahtarlar i??in ayg??t ??zellikleri ve mod??ler donan??m yap??land??rmalar?? hakk??ndaki bilgileri i??erir.
PoE olmayan t??m N20xx modeller a??a????daki fiziksel ebatlara sahip, 1U, rafa monte edilebilir anahtarlard??r:
???440 x 257 x 43,5 mm (G x D x Y).
???17,3 x 10,1 x 1,7 in?? (G x D x Y).
T??m N20xx PoE t??m modeller a??a????daki fiziksel ebatlara sahip, 1U, rafa monte edilebilir anahtarlard??r:
???440 x 387 x 43,5 mm (G x D x Y).
???17,3 x 15,2 x 1,7 in?? (G x D x Y).
N20xx Serisi ??n Panel
A??a????daki resimler N20xx Serisindeki i??in anahtar modellerinin ??n panellerini g??stermektedir.
??ekil 1-1. 48 10/100/1000BASE-T Ba??lant?? Noktal?? N2048 Serisi (??n Panel)
Anahtar ba??lant?? noktalar??na ilave olarak N20xx serisindeki her modelin ??n paneli a??a????daki ba??lant?? noktalar??n?? i??erir:
???Konsol ba??lant?? noktas??
???USB ba??lant?? noktas??
342 Ba??lang???? K??lavuzu
??ekil 1-2. N2024 Yak??ndan g??r??n??m
??ekil 1-2 no'lu resimde g??r??nen N20xx ??n panelinde, a????r?? s??cakl??k alarm??, dahili g???? ve ??st s??radaki durumu g??steren durum LED'leri mevcuttur. Durum LED'lerinin alt s??ras?? k??me master, yedekli g???? kayna???? (RPS) durumu ve fan alarm?? durumunu g??sterir.
??ekil 1-3. N2024P Yak??ndan g??r??n??m
??ekil 1-3 no'lu resimde g??r??nen N20xx ??n panelinde, a????r?? s??cakl??k alarm??, dahili g???? ve ??st s??radaki durumu g??steren durum LED'leri mevcuttur. Durum LED'lerinin alt s??ras?? k??me master, mod??ler g???? kayna???? (MPS) durumu ve fan alarm?? durumunu g??sterir.

Anahtar Ba??lant?? Noktalar??
N2024/N2024P ??n paneli, h??z, ak???? kontrol?? ve dupleks i??in otomatik anla??may?? destekleyen 24 Gigabit Ethernet (10/100/1000BASE-T) RJ-45 ba??lant?? noktalar?? sunar. N2024/N2024P modelleri iki SFP+ 10G ba??lant?? noktas??n?? destekler. Dell ile uyumlu SFP+ al??c?? vericileri ayr?? olarak sat??l??r.
N2048/N2048P ??n paneli, h??z, ak???? kontrol?? ve dupleks i??in otomatik anla??may?? destekleyen 48 Gigabit Ethernet (10BASE-T, 100BASE-TX, 1000BASE-T) RJ-45 ba??lant?? noktalar?? sunar. N2048/N2048P iki SFP+ 10G ba??lant?? noktas??n?? destekler. Dell ile uyumlu SFP+ al??c?? vericileri ayr?? olarak sat??l??r.
??n panel anahtar ba??lant?? noktalar?? a??a????daki ??zelliklere sahiptir:
???Anahtar otomatik olarak RJ-45 ba??lant?? noktalar??ndaki kros ve d??z kablolar aras??ndaki fark?? tespit eder ve di??er uca uygun MDI veya MDIX yap??land??rmas??n?? otomatik olarak se??er.
???SFP ba??lant?? noktalar??, Dell uyumlu al??c?? vericileri destekler.
???RJ-45 ba??lant?? noktalar?? standart bir Kategori 5 UTP kablosunda tam dupleks modu 10/100/1000 Mbps h??zlar??n?? destekler.
???SFP+ ba??lant?? noktalar?? SFP+ al??c?? vericileri, SFP+ bak??r ??ift aks teknolojisini ve 1G h??zla ??al????an SFP al??c?? vericileri destekler.
???N2024P/N2048P ??n panelindeki ba??lant?? noktalar?? PoE (15,4W) ve PoE+ (30W) destekler.
Konsol Ba??lant?? Noktas??
Konsol ba??lant?? noktas??, RS-232 protokol?? kullanarak ileti??ime imk??n tan??yan seri ileti??im ??zellikleri sunar. Bu seri ba??lant?? noktas?? anahtara do??rudan bir ba??lant?? sa??lar ve sa??lanan seri kablo (RJ-45 YOST'tan di??i DB-9 konekt??rlere) ??zerinden ba??lant?? noktas??na ba??lanan bir konsol terminalinden CLI'a eri??menize imk??n tan??r.
Konsol ba??lant?? noktas?? ayr??ca yap??land??r??labilir ve 1200 baud ila 115.200 baud aras??nda asenkron bir ba??lant?? olarak ??al????t??r??labilir.
Dell CLI sadece h??z de??i??imini destekler. Varsay??lan h??zlar 9600 baud h??z??, 8 veri biti, E??lik Yok, 1 Durdurma Biti, Ak???? Kontrol?? Yok ??eklindedir.
344 Ba??lang???? K??lavuzu
USB Ba??lant?? Noktas??
Tip-A, di??i USB ba??lant?? noktas?? bir adet USB 2.0 uyumlu fla?? s??r??c??y?? destekler. Dell A?? Olu??turma anahtar FAT-32 olarak bi??imlendirilen bir fla?? s??r??c??ye okuma veya yazma yapabilir. Bir USB fla?? s??r??c??y?? anahtar yap??land??rma dosyalar?? ve resimleri USB fla?? s??r??c?? ve anahtar aras??nda kopyalamak i??in kullanabilirsiniz. USB fla?? s??r??c??y?? ayr??ca yap??land??rma dosyalar?? ve resimleri bir anahtardan a?? i??erisindeki di??er anahtarlara ta????mak ve kopyalamak i??in de kullanabilirsiniz.
USB ba??lant?? noktas?? di??er USB ayg??t?? t??rlerini desteklemez.
S??f??rlama D????mesi
S??f??rlama d????mesine i??ne deli??inden eri??ilir ve anahtar ??zerinde zorlay??c?? s??f??rlama yapman??za imk??n sa??lar. S??f??rlama d????mesini kullanmak i??in b??k??lmemi?? bir ata?? veya benzer bir aleti i??ne deli??ine sokun. S??f??rlamadan sonra anahtar ??ny??kleme s??recini tamamlad??????nda en son kaydedilen yap??land??rma ile i??letimi ba??lat??r. S??f??rlamadan ??nce ba??lang???? yap??land??rmas??na kaydedilmemi?? olan ??al????an yap??land??rma ??zerindeki de??i??iklikler kaybedilir.
Ba??lant?? Noktas?? ve Sistem LED???leri
??n panelde ba??lant?? noktas?? linkleri, g???? kaynaklar??, fanlar, k??meleme ve t??m sistemin durumunu g??steren ??????k yayan diyotlar (LED???ler) bulunur.
LED???lerin g??sterdikleri hakk??nda daha fazla bilgi i??in bkz. Kullan??c?? Yap??land??rma K??lavuzu.
K??me Master LED ve K??me Say?? G??sterimi
Bir k??me i??erisindeki bir anahtar master birim oldu??unda M olarak etiketlenen k??me master LED???i devaml?? olarak ye??il renkte yanar. M LED???i kapal?? ise, k??me eleman?? master birim de??ildir. K??me No. paneli k??me eleman??n??n birim numaras??n?? g??sterir. Bir anahtar bir k??menin par??as?? de??ilse (yani tek anahtarl?? bir k??meyse), M LED???i yanar ve k??me birim numaras??n?? 1 g??sterir.
N20xx Serisi Arka Panel
A??a????daki resimler N20xx anahtarlar??n arka panellerini g??sterir.
??ekil 1-4. N20xx Arka Panel
Fan Delikleri
AC G???? Prizi
??ekil 1-5. N2024P/N2048P Arka Panel
Mini-SAS terimi, ??ekil ??ekil 1-6'de g??sterilen y??????n ba??lant?? noktas?? kablo ba??lant??lar??n?? ifade eder. Anahtarlar?? ba??lamak i??in mini-Sas kullanmak hakk??nda daha fazla bilgi almak i??in, bkz. Birden Fazla N20xx Anahtar??n K??melenmesi.
??ekil 1-6. N2048 Mini-SAS Y??????n Ba??lant?? Noktalar?? ve Fanlar
Mini-SAS y??????n ba??lant?? noktalar??
G???? Kaynaklar??
N2024 ve N2048
N2024 ve N2048 anahtarlar dahili bir 100 watt g???? kayna????na sahiptir. ??lave yedekli g???? kayna???? (Dell A?? Olu??turma RPS720) 180 watt g???? sa??lar ve anahtar i??in tam yedekleme olana???? sunar.
346 Ba??lang???? K??lavuzu
N2024P ve N2048P
Dell A?? Olu??turma N2024P ve N2048P anahtarlar??, maks. 24 PoE ayg??t??n?? tam PoE+ g????le (850W) besleyen dahili bir 1000 watt g???? kayna????na sahiptir. ??lave bir harici g???? kayna???? (MPS1000) 1000 watt daha g???? sunar ve 48 PoE ayg??t??n t??m?? i??in (1800W) gereken g??c??n elde edilmesini sa??lar.
NOT: PoE g??c?? dinamik olarak atan??r. Her ba??lant?? noktas?? tam PoE+ g??c??ne ihtiya?? duymaz.
D??KKAT: G???? kayna???? mod??l??n??n kendisini ????karmadan ??nce g???? kayna???? mod??llerindeki g???? kablosunu ????kar??n. ??aseye yerle??tirmeden ??nce g??c??n ba??lanmas?? gerekir.
Havaland??rma Sistemi
??ki fan N20xx anahtarlar?? so??utur.
N20xx Model ??zeti
Tablo 1-1. N20xx Model ??zeti

N20xx Serisinin Kurulumu
Saha Haz??rl??????
N20xx serisi anahtarlar 48,26 cm (19 in??) standart bir rafa monte edilebilir veya d??z bir zemine yerle??tirilebilir.
Se??ilen kurulum konumunun a??a????daki saha gerekliliklerini kar????lad??????n?? teyit edin:
???G???? ??? Anahtar kolayl??kla eri??ilebilen 100-240 VAC, 50???60 Hz bir prizin yak??n??na kurulur.
???A????kl??k ??? Operat??r??n eri??imi i??in ??n ve arkada yeterli a????kl??k olmal??d??r. Kablolar, elektrik ba??lant??lar?? ve havaland??rma i??in yeterli a????kl??k b??rak??n.
???Kablolama ??? Kablolar radyo vericileri, yay??n y??kselticileri, elektrik hatlar?? ve floresan ayd??nlatma te??hizat?? gibi elektriksel parazit kaynaklar??ndan uzak kalacak ??ekilde y??nlendirilmelidir.
?????evre S??cakl?????? ??? Y??zde 95???e kadar yo??u??mas??z g??reli nemde anahtar ??al????ma s??cakl?????? 0 - 45??C (32 - 113??F)???dir.
NOT: Maksimum s??cakl?????? 900m'nin (2955 ft) ??zerinde, 300 m (985 ft) ba????na 1??C (1.8??F) azalt??n.
???Ba????l Nem - ??al????ma ba????l nemi, saatte maksimum %10'luk nem de??i??imli %8 ila %85'tir (yo??u??mas??z).
348 Ba??lang???? K??lavuzu

Anahtar??n N20xxPaketinin A????lmas??
Paket Muhteviyat??
Anahtarlar??n paketini a??arken a??a????daki ????elerin pakette yer ald??????ndan emin olun:
???Bir adet Dell A?? Olu??turma anahtar
???Bir adet RJ-45???den DB-9???a di??i kablo
???Rafa montaj i??in bir adet rafa montaj kiti (N20xx), iki montaj braketi, c??vatalar ve tespit somunlar??
???Ba????ms??z duran anahtarlar i??in bir set kendinden yap????kan lastik ped (i??erisinde d??rt adet ped bulunur)
Paketi A??ma Ad??mlar??
NOT: Paketi a??madan ??nce, kutuyu kontrol edin ve herhangi bir hasara ili??kin her t??rl?? kan??t?? derhal rapor edin.
1Paketi temiz, d??z bir y??zey ??zerine yerle??tirin ve kutu ??zerindeki bantlar?? kesin.
2Kutuyu a????n veya ??st k??sm??n?? ????kar??n.
3Anahtar?? kutu i??erisinden dikkatlice ????kar??n ve emniyetli ve temiz bir y??zey ??zerine yerle??tirin.
4T??m paketleme malzemelerini kald??r??n.
5??r??n??n ve ek birimlerinin hasarl?? olup olmad??????n?? kontrol edin.
Bir N20xx Anahtar?? Rafa Monte Etme
 UYARI: Anahtara ba??lanan veya anahtar?? destekleyen di??er anahtarlar??n emniyet bilgileri ile birlikte Emniyet ve D??zenleyici Bilgiler i??erisinde yer alan emniyet bilgilerini okuyun.
AC g???? konekt??rleri anahtar??n arka paneli ??zerindedir.
Raf ????erisine Kurulum
 UYARI: Rafa montaj kitini anahtar?? bir masan??n alt??nda ask??ya almak veya bir duvara monte etmek i??in kullanmay??n.
D??KKAT: Devam etmeden ??nce anahtardan t??n kablolar?? ????kar??n. Tak??lm???? durumda ise anahtar??n alt??ndaki kendinden yap????kan pedleri ????kar??n.
D??KKAT: Bir rafa birden fazla anahtar monte ederken, anahtarlar?? a??a????dan yukar??ya do??ru monte edin.
1Rafa montaj braketini, anahtar ??zerindeki montaj delikleri rafa montaj braketi ??zerindeki delikler ile hizaya gelecek ??ekilde anahtar??n bir taraf??na yerle??tirin. ??ekil 1-7 braketlerin nereye monte edilece??ini g??sterir.
??ekil 1-7. Braketlerin Tak??lmas??
2C??vatalar?? rafa montaj deliklerine tak??n ve bir tornavida ile s??k????t??r??n.
3????lemi anahtar??n di??er taraf??ndaki rafa montaj braketi i??in tekrarlay??n.
4Anahtar??, raf ??zerindeki montaj delikleri ile anahtar ??zerindeki montaj delikleri hizal?? olacak ??ekilde 48,26 cm (19 in??) rafa tak??n.
5Anahtar??, raf c??vatalar?? veya sabitleme somunlar?? ve pullu sabitleme somunu c??vatalar?? ile rafa sabitleyin (sahip oldu??unuz raf??n t??r??ne g??re). ??st taraftaki c??vatalar?? s??kmadan ??nce alt taraftakileri s??k??n.
D??KKAT: Elinizdeki raf c??vatalar??n??n rafta ??nceden a????lm???? olan deliklere uydu??undan emin olun.
350 Ba??lang???? K??lavuzu
NOT: Havaland??rma deliklerinin kapanmad??????ndan emin olun.
Ba????ms??z bir Anahtar??n Kurulumu
NOT: Anahtar??n bir rafa monte edilmesini ??iddetle tavsiye ediyoruz.
Anahtar?? bir rafa monte etmiyorsan??z, d??z bir y??zey ??zerine monte edin. Y??zey, anahtar ve anahtar kablolar??n??n a????rl??????n?? ta????yabilmelidir. Anahtar ile birlikte d??rt adet kendinden-yap????kanl?? plastik ped verilir.
1Kendinden yap????kanl?? plastik pedleri anahtar??n alt??nda i??aretlenmi?? olan her konum ??zerine tak??n.
2Anahtar?? d??z bir y??zeye yerle??tirin ve her iki yan??ndan 5 cm (2 in??) ve arkas??ndan 13 cm (5 in??) bo??luk b??rakarak uygun havaland??rman??n sa??land??????ndan emin olun.
Birden Fazla N20xx Anahtar??n
K??melenmesi
N20xx anahtarlar?? anahtar??n arkas??ndaki mini-SAS ba??lant?? noktalar??n?? kullanarak 12 anahtar y??ksekli??inde k??meleyebilirsiniz. N20xx anahtarlar?? sadece di??er N20xx serisi anahtarlarla k??melemeyi destekler. K??melenen ba??lant?? noktalar?? ??zerinden birden fazla anahtar birbirine ba??land??????nda, maks. 576 ??n panel ba??lant?? noktas??na sahip tek bir birim gibi ??al??????rlar. K??me tek bir varl??k olarak i??letilir ve y??netilir.
NOT: Bir anahtar k??mesini monte ediyorsan??z, ??al????t??rmadan ve yap??land??rmadan ??nce k??meyi birle??tirmeniz ve kablo ba??lant??lar??n?? yapman??z gerekir. Bir k??me ilk kez ??al????t??r??ld??????nda, anahtarlar k??me i??erisinde herhangi bir yerde bulunabilecek olan Master Anahtar?? se??erler. ??n panel ??zerindeki Master LED master birim ??zerinde yanar.
Bir Anahtar K??mesi Olu??turma
Anahtar??n arka panelinde bulunan mini-SAS k??meleme ba??lant?? noktalar??n?? kullanarak biti??ik birimleri ba??lamak suretiyle bir k??me olu??turun. sayfa 352. sayfada yer alan ??ekil ??ekil 1-8, bir k??me i??in tavsiye edilen yap?? olan halka topolojisinde ba??lanan anahtarlar?? g??sterir.
1Mini-SAS kablolar??ndan birini ??stteki anahtar??n ve hemen alt??ndaki anahtar??n k??meleme ba??lant?? noktalar??ndan birine ba??lay??n.
Gerekiyorsa, anahtarlar?? ba??lamak i??in ayr??ca temin edebilece??iniz daha uzun (1 veya 3 metre) bir mini-SAS kablosu kullan??n.
2Bu i??lemi t??m ayg??tlar ba??lanana kadar tekrarlay??n.
3Kalan iki k??meleme ba??lant?? noktas??n?? birbirine ba??lay??p bir halka topolojisi olu??turmak i??in kalan k??meleme kablosunu kullan??n.
??ekil 1-8. Bir Anahtar K??mesinin Ba??lanmas??
Birim 1
Birim 2
Birim 3
??ekil 1-8' deki k??me halka topolojisi ile ba??lanm????t??r ve anahtarlar aras??nda a??a????daki fiziksel ba??lant??lara sahiptir.
???Birim 1 ??zerindeki alt mini-SAS ba??lant?? noktas?? Birim 2 ??zerindeki ??st mini-SAS ba??lant?? noktas??na ba??lanm????t??r.
???Birim 2 ??zerindeki alt mini-SAS ba??lant?? noktas?? Birim 3 ??zerindeki ??st mini-SAS ba??lant?? noktas??na ba??lanm????t??r.
???Birim 3 ??zerindeki alt mini-SAS ba??lant?? noktas?? Birim 1 ??zerindeki ??st mini-SAS ba??lant?? noktas??na ba??lanm????t??r.
352 Ba??lang???? K??lavuzu
K??meleme Yede??i
K??meleme ??zelli??i, k??medeki Master birimin ar??zalanmas?? durumunda Master birim rol??n?? devralacak olan bir Beklemedeki veya yedek birimi destekler K??me i??erisinde Master ar??za durumunu tespit edilir edilmez Beklemedeki birim kontrol panelini ba??lat??r ve mevcut yap??lanmadaki di??er t??m k??me birimlerini etkinle??tirir. Beklemedeki birim k??menin ??al????an yap??lanmas??n??n senkron bir kopyas??n?? tutar. Beklemedeki birim k??me i??erisinde otomatik se??ilmi?? durumdad??r, ancak CLI kullanarak farkl?? bir k??me ??yesini Beklemedeki olarak se??ebilirsiniz. Daha fazla bilgi i??in bkz. Yap??land??rma Kullan??c?? K??lavuzu veya CLI Referans K??lavuzu.
N20xx Anahtar??n Ba??lat??lmas?? ve Yap??land??r??lmas??
A??a????daki ak???? ??izelgesi, anahtar paketinden ????kar??l??p kurulduktan sonra ba??lang???? yap??land??rmas??n?? ger??ekle??tirmek i??in kullanaca????n??z ad??mlara genel bir bak???? sa??lar.
354 Ba??lang???? K??lavuzu

N20xx Anahtar??n bir Terminale
Ba??lanmas??
T??m harici ba??lant??lar tamamland??ktan sonra, anahtar?? yap??land??rmak i??in anahtara bir terminal ba??lay??n.
NOT: Devam etmeden ??nce bu ??r??n??n S??r??m Notlar??n?? okuyun. S??r??m Notlar??n??, dell.com/support/manuals adresindeki Dell Destek web sitesinden indirebilirsiniz.
NOT: Kullan??c?? belgelerinin en son s??r??m??n?? dell.com/support/manuals adresindeki Dell Destek web sitesinden edinmenizi tavsiye ederiz.
Anahtar??n seri konsol ??zerinden izlenmesi ve yap??land??r??lmas?? i??in bir VT100 terminaline veya VT100 terminal em??lasyon yaz??l??m??na sahip bir bilgisayara ba??lant?? yapmak i??in anahtar??n ??n panelindeki konsol ba??lant?? noktas??n?? (bkz. sayfa sayfa 342, ??ekil ??ekil 1-1) kullan??n. Konsol ba??lant?? noktas?? bir veri terminali ekipman?? (DTE) konekt??r?? olarak d??zenlenmi??tir.
Konsol ba??lant?? noktas??n??n kullan??lmas?? i??in a??a????daki ekipman gereklidir:
???VT100 uyumlu terminal veya VT100 terminal em??lasyon yaz??l??m??na sahip bir bilgisayar; Microsoft HyperTerminal gibi.
???Konsol ba??lant?? noktas?? i??in RJ-45 konekt??re sahip seri bir kablo ve terminal i??in DB-9 konekt??re sahip seri bir kablo.
Bir terminali anahtar konsol ba??lant?? noktas??na ba??lamak i??in a??a????daki i??lemleri uygulay??n:
1Seri kablo ??zerindeki DB-9 konekt??r??n?? VT100 terminal em??lasyon yaz??l??m??na sahip terminale veya bilgisayara ba??lay??n.
2Terminal em??lasyon yaz??l??m??n?? a??a????daki ??ekilde yap??land??r??n:
a Konsola ba??lanmak i??in uygun seri ba??lant?? noktas??n?? (??rne??in COM1) se??in.
b Veri h??z??n?? 9600 baud olarak ayarlay??n.
c Veri format??n?? 8 veri biti, 1 stop biti olacak ve e??lik biti olmayacak ??ekilde ayarlay??n.
d Ak???? kontrol??n?? hi??biri olarak ayarlay??n.
e Terminal em??lasyon modunu VT100 olarak ayarlay??n.

f????lev, Ok ve Ctrl tu??lar?? i??in Terminal tu??lar??n?? se??in. Ayar??n Terminal tu??lar?? i??in oldu??undan (Microsoft Windows tu??lar?? de??il) emin olun.
3Kablo ??zerindeki RJ-45 konekt??r??n?? do??rudan anahtar konsol ba??lant?? noktas??na ba??lay??n. Dell A?? Olu??turma konsol ba??lant?? noktas?? ??n panelin sa?? taraf??nda yer al??r ve sayfa 356. sayfadaki ??ekil 1-10'da g??sterildi??i gibi bir |O|O| sembol?? ile etiketlenmi??tir.
 NOT: K??me y??neticisine seri konsol eri??imi, yerel CLI kullan??larak herhangi bir ba??lant?? noktas?? ??zerinden sa??lanabilir. Ayn?? anda sadece bir seri konsol oturumu desteklenir.
??ekil 1-10. N2024P Konsol Ba??lant?? Noktal?? ??n Panel
Konsol Ba??lant?? Noktas??
Bir N20xx Anahtar?? G???? Kayna????na
Ba??lama
D??KKAT: Anahtara ba??lanan veya anahtar?? destekleyen di??er anahtarlar??n emniyet bilgileri ile birlikte Emniyet ve D??zenleyici Bilgiler k??lavuzu i??inde yer alan emniyet bilgilerini okuyun.
T??m N20xx modelleri bir adet dahili g???? kayna????na sahiptir. G???? prizleri arka panel ??zerindedir.
AC ve DC G???? Ba??lant??s??
1Anahtar konsol ba??lant?? noktas??n??n RS-45 ??zerinden di??i DB-9 kablosu ile bir VT100 terminaline veya VT100 terminal em??lat??r??ne ba??land??????ndan emin olun.
356 Ba??lang???? K??lavuzu

2Emniyet topraklamas?? yap??lm???? 1,5 m standart bir g???? kablosu kullanarak, g???? kablosunu arka panel ??zerinde yer alan AC ??ebeke prizine ba??lay??n (bkz. sayfa sayfa 357, ??ekil ??ekil 1-11).
3G???? kablosunu topraklanm???? bir AC ????k??????na ba??lay??n.
4Dell A?? Olu??turma RPS720 veya Dell A?? Olu??turma MPS1000 gibi yedekli veya harici bir DC g???? kayna???? kullan??yorsan??z, DC g???? kablosunu arka panel ??zerinde bulunan DC prizine ba??lay??n. sayfa 357. sayfadaki ??ekil ??ekil 1-11'de, yedekli g???? kayna???? beslemesi ortadad??r ve RPS olarak etiketlenmi??tir.
??ekil 1-11. N2048 Anahtara AC ve DC G???? Ba??lant??s??
DC G???? Kayna????na (??ste??e Ba??l??)
AC G???? Kayna????na
Anahtar??n N20xx ??ny??klenmesi
Lokal terminal ba??l?? iken g???? a????ld??????nda, anahtar g???? a????k otomatik s??nama (POST) i??lemini yapar. POST, anahtar her ba??lat??ld??????nda uygulan??r ve tamamen ??ny??klenmeden ??nce anahtar??n tamamen i??levsel oldu??unu belirlemek i??in donan??m bile??enlerini kontrol eder. POST kritik bir problem tespit ederse program ak?????? durur. POST ba??ar??l?? ??ekilde tamamlan??rsa ge??erli ??r??n bilgisi RAM ??zerine y??klenir. POST mesajlar?? terminal ??zerinde g??r??nt??lenir ve s??naman??n ba??ar??l?? veya ba??ar??s??z oldu??unu g??sterir. ??ny??kleme s??reci yakla????k olarak 60 saniye s??rer.
POST???un ilk k??sm?? tamamland??ktan sonra ??ny??kleme men??s??n?? ??a????rabilirsiniz. ??ny??kleme men??s??nden, sistemi fabrika ayarlar??na geri d??nd??rme, yedekleme imaj??n?? aktif hale getirme veya bir parolan??n kurtar??lmas?? gibi yap??land??rma g??revlerini yerine getirebilirsiniz. ??ny??kleme men??s?? i??levleri hakk??nda daha fazla bilgi i??in, bkz. CLI Referans K??lavuzu.

N20xx Ba???lang???? Yap??land??rmas??n??n
Yap??lmas??
Ba??lang???? yap??land??rma prosed??r?? a??a????daki varsay??mlara dayan??r:
???Dell A?? Olu??turma anahtar ??nceden yap??land??r??lmam????t??r.
???Dell A?? Olu??turma anahtar?? ba??ar??l?? ??ekilde ??ny??klenmi??tir.
???Konsol ba??lant??s?? yap??lm????t??r ve Dell Kolay Kurulum Sihirbaz?? iletisi VT100 terminali veya e??de??eri bir terminal ekran?? ??zerinde g??r??nmektedir.
Ba??lang???? anahtar yap??land??rmas?? konsol ba??lant?? noktas?? ??zerinden yap??l??r. Ba??lang???? yap??land??rmas??ndan sonra, anahtar?? ba??l?? durumdaki konsol ba??lant?? noktas?? ??zerinden veya ba??lang???? yap??land??rmas?? s??ras??nda tan??mlanan bir arabirim ??zerinden uzaktan y??netebilirsiniz.
NOT: Anahtar varsay??lan kullan??c?? ad??, parola veya IP adresi ile yap??land??r??lmaz.
Anahtar??n ba??lang???? yap??land??rmas??n?? ayarlamadan ??nce a?? y??neticinizden a??a????daki bilgileri al??n:
???Y??netim arabirimine tahsis edilecek olan IP adresi.
???A????n IP alt a?? maskesi.
???Y??netim arabirimi varsay??lan a?? ge??idi IP adresi.
Anahtar??n Telnet (Telnet istemcisi) veya HTTP (Web taray??c??s??) ??zerinden uzaktan y??netimine izin vermek i??in bu ayarlar gereklidir.
Uzaktan Y??netimin Etkinle??tirilmesi
N20xx anahtarlarda, ba??lant?? noktalar??ndan herhangi birini -bant i??i y??netim i??in kullanabilirsiniz. Varsay??lan olarak t??m bant i??i ba??lant?? noktalar?? VLAN 1???in ??yesidir.
Dell Kolay Kurulum Sihirbaz??, N20xx anahtar??ndaki VLAN1 arabirimi i??in a?? bilgisi yap??land??rma komutlar??n?? da i??erir. Bir statik IP adresi ve alt a?? maskesi atayabilir veya DHCP'yi etkinle??tirip bir a?? DHCP sunucusunun bilgileri atamas??n?? sa??layabilirsiniz.
A?? bilgilerini yap??land??rmak i??in kullan??lan CLI komutlar?? hakk??nda bilgi almak i??in bkz. CLI Referans K??lavuzu.
358 Ba??lang???? K??lavuzu

Ba??lang???? Yap??land??rma Prosed??r??
Ba??lang???? yap??land??rmas??n?? Dell Kolay Kurulum Sihirbaz?? veya CLI kullanarak yapabilirsiniz. Anahtar yap??land??rma dosyas?? bo?? oldu??unda sihirbaz otomatik olarak ba??lar. [Ctrl+z] tu??lar??na basarak herhangi bir a??amada sihirbazdan ????kabilirsiniz ancak bu durumda belirlenen t??m yap??land??rma ayarlar?? kaybedilir ve anahtar varsay??lan de??erleri kullan??r.
NOT: Dell Kolay Kurulum Sihirbaz?? ??al????t??rmazsan??z veya ba??lang???? Kolay Kurulum Sihirbaz??n??n bilgi istemine 60 saniye i??inde cevap vermezseniz anahtar CLI moduna girer. Dell Kolay Kurulum Sihirbaz??'?? yeniden ??al????t??rabilmek i??in bo?? bir ba??lang???? yap??land??rmas??yla anahtar?? s??f??rlaman??z gerekir.
CLI kullanarak ba??lang???? yap??land??rmas??n?? yapma hakk??nda daha fazla bilgi i??in bkz. CLI Referans K??lavuzu. Bu Ba??lang???? K??lavuzu, Dell Kolay Kurulum Sihirbaz??'n??n ??n anahtar yap??land??rmas?? i??in kullan??lmas??n?? g??sterir. Sihirbaz anahtar ??zerinde a??a????daki yap??land??rmay?? ayarlar:
???Ge??erli bir parola ile ilk ayr??cal??kl?? kullan??c?? hesab??n?? olu??turur. Sihirbaz kurulum s??ras??nda bir adet ayr??cal??kl?? kullan??c?? hesab??n?? yap??land??r??r.
???Sadece yerel kimlik do??rulama ayar??n?? kullanmak i??in CLI oturum a??ma ve HTTP eri??imini etkinle??tirir.
???T??m bant-i??i ba??lant?? noktalar??n??n ??yesi oldu??u VLAN 1 y??nlendirme arabirimi i??in IP adresini ayarlar.
???Belirli bir IP adresinde SNMP y??neticisi taraf??ndan kullan??lmak ??zere SNMP ortak dizgiyi ayarlar. Bu anahtar i??in SNMP y??netimi kullan??lm??yorsa bu ad??m?? atlayabilirsiniz.
???A?? y??netim sistemi IP adresini belirlemenize veya t??m IP adreslerinden y??netim i??in eri??ime izin vermenize imkan sa??lar.
???VLAN1 arabirimi i??in varsay??lan a?? ge??idi IP adresini yap??land??r??r.

??rnek Oturum
Bu b??l??m bir Dell Kolay Kurulum Sihirbaz?? oturumunu a????klar. A??a????daki de??erler ??rnek oturum i??in kullan??lm????t??r:
???Kullan??lacak olan SNMP ortak dizgisi: public.
???A?? y??netim sistemi (NMS) IP adresi 10.1.2.100.
???Kullan??c?? ad??: admin, ve parola: admin123.
???VLAN 1 y??nlendirme arabirimi i??in IP adresi: 10.1.1.200 alt a?? maskesi:
255.255.255.0.
???Varsay??lan a?? ge??idi: 10.1.1.1
Kurulum sihirbaz?? yukar??da belirtildi??i gibi ba??lang???? de??erlerini yap??land??r??r. Sihirbaz?? tamamlad??ktan sonra anahtar a??a????daki ??ekilde yap??land??r??l??r:
???SNMPv2 etkinle??tirilir ve ortak dizgi yukar??da belirtildi??i ??ekilde ayarlan??r. SNMPv3 varsay??lan olarak devre d?????? b??rak??l??r.
???Y??netici kullan??c?? ad?? tan??mland?????? ??ekilde ayarlan??r.
???Bir a?? y??netim sistemi yap??land??r??l??r. Y??netim istasyonundan SNMP, HTTP ve CLI arabirimlerine eri??ebilirsiniz. Ayr??ca (0.0.0.0) IP adresini se??erek t??m IP adreslerinden bu y??netim arabirimlerine eri??ime izin verebilirsiniz.
???VLAN 1 y??nlendirme arabirimi i??in bir IP adresi yap??land??r??l??r.
???Varsay??lan a?? ge??idi adresi yap??land??r??l??r.
NOT: A??a????daki ??rnekte muhtemel kullan??c?? se??enekleri veya varsay??lan de??erler [ ] i??erisinde g??sterilmi??tir. Herhangi bir se??ene??i belirlemeden <Enter> tu??una basarsan??z varsay??lan de??er kabul edilir. Yard??m metni parantez i??erisindedir.
360 Ba??lang???? K??lavuzu
Dell Kolay Kurulum Sihirbaz?? Konsol ??rne??i
A??a????daki ??rnekte, yukar??da listelenen girdi de??erleri kullan??larak Dell Kolay Kurulum Sihirbaz?? ??rnek oturumunun ??al????t??r??lmas??na ili??kin istem ve cevaplar yer al??r.
Anahtar POST i??lemini tamamlad??ktan ve ??ny??kleme yap??ld??ktan sonra a??a????daki ileti??im kutusu g??r??nt??lenir:
Birim 1 ??? Y??netim birimi se??mek i??in bekliyor)>
Genel yap??land??rma uygulan??yor, l??tfen bekleyin ...
Dell Kolay Kurulum Sihirbaz??na Ho?? Geldiniz
Kurulum Sihirbaz??, ba??lang???? anahtar yap??land??rmas??n?? yapman??za yard??mc?? olur ve m??mk??n olan en k??sa s??rede anahtar?? ??al??????r duruma getirmenizi sa??lar. Kurulum sihirbaz??ndan ????karak anahtar?? man??el olarak yap??land??rmak i??in CLI moduna ge??ebilirsiniz. Kurulum sihirbaz??n?? ??al????t??rmak i??in bir sonraki soruya 60 saniye i??erisinde cevap vermelisiniz aksi takdirde sistem varsay??lan sistem yap??land??rmas??n?? kullanarak normal ??al????mas??na devam edecektir. Not: [Ctrl+z] tu??lar??na basarak herhangi bir a??amada kurulum sihirbaz??ndan ????kabilirsiniz.
Kurulum sihirbaz??n?? ??al????t??rmak istiyor musunuz (bu soruya 60 saniye i??inde cevap vermelisiniz)? [E/H] e
Ad??m 1:
Sistem varsay??lan olarak SNMP y??netimi i??in ayarlanmam????t??r. SNMP kullanarak anahtar?? y??netmek i??in (Dell A?? Y??neticisi i??in gereklidir)
. Ba??lang???? SNMP s??r??m 2 hesab??n?? ??imdi olu??turabilirsiniz.
.Daha sonra geri d??nerek di??er SNMP hesaplar??n??
SNMP y??netim arabirimini ??imdi ayarlamak istiyor musunuz? [E/H] e

SNMP y??netim hesab??n?? olu??turmak i??in y??netim sistemi IP adresini ve anahtara eri??mek i??in belirli y??netim sistemlerinin kulland?????? ???ortak dizgi??? veya parolay?? belirlemelisiniz. Sihirbaz en y??ksek eri??im seviyesini [Ayr??cal??k Seviyesi 15] otomatik olarak bu hesaba verir. Bu ayar?? de??i??tirmek i??in Dell A?? Y??neticisini veya di??er y??netim arabirimlerini kullanabilir ve ilave y??netim sistem bilgilerini daha sonra ekleyebilirsiniz. Y??netim sistemlerinin eklenmesi hakk??nda daha fazla bilgi i??in kullan??c?? belgelerine bak??n.
Bir y??netim istasyonu eklemek i??in:
L??tfen kullan??lacak olan SNMP ortak dizgesini girin. [public]: public
NOT: Yap??land??r??lm????sa, varsay??lan eri??im seviyesi SNMP y??netim aray??z?? i??in m??mk??n olan en y??ksek eri??im seviyesidir. Ba??lang????ta sadece SNMPv2 aktif edilecektir. SNMPv3 i??in g??venlik eri??imini yap??land??rmak ??zere geri d??nene kadar SNMPv3 devre d??????d??r (??rne??in motor ID, g??r??nt??leme vs.).
L??tfen Y??netim Sisteminin IP adresini (A.B.C.D) veya herhangi bir Y??netim ??stasyonundan y??netmek i??in wildcard (0.0.0.0) IP adresini girin. [0.0.0.0]:
10.1.2.100
Ad??m 2:
??imdi ilk ayr??cal??kl?? (Seviye 15) kullan??c?? hesab??n??z?? olu??turman??z gerekir. Bu hesap CLI ve Web arabirimine oturum a??mak i??in kullan??l??r. Ba??ka hesaplar olu??turabilir ve ayr??cal??k seviyelerini daha sonra de??i??tirebilirsiniz. Kullan??c?? hesab?? olu??turma ve ayr??cal??k seviyesini de??i??tirme hakk??nda daha fazla bilgi i??in kullan??c?? belgelerine bak??n??z.
Bir kullan??c?? hesab?? olu??turmak i??in:
L??tfen kullan??c?? ad??n?? girin. [root]:admin
L??tfen kullan??c?? parolas??n?? girin: ********
L??tfen kullan??c?? parolas??n?? tekrar girin: ********
362 Ba??lang???? K??lavuzu
Ad??m 3:
Ard??ndan, VLAN 1 y??nlendirme arabirimi i??in bir IP adresi olu??turulur.
Bu IP adresini anahtar??n CLI, Web arabirimi veya SNMP arabirimine eri??im i??in kullanabilirsiniz.
Herhangi bir Y??netim Arabirimi ??zerinden anahtara eri??mek i??in
.Y??netim Arabirimi i??in IP adresini ayarlay??n.
. IP adresi y??nlendirme arabiriminde man??el olarak yap??land??r??ld??ysa varsay??lan a?? ge??idini ayarlay??n.
Ad??m 4:
VLAN 1 y??nlendirme arabirimini ??imdi ayarlamak istiyor musunuz? [E/H] e
L??tfen ayg??t??n IP adresini (A.B.C.D) girin veya a?? DHCP sunucusundan otomatik olarak bir IP adresi talep etmek i??in ???DHCP??? (t??rnak olmadan) girin: 10.1.1.200
L??tfen IP alt a?? maskesini (A.B.C.D veya /nn) girin:
255.255.255.0
Ad??m 5:
Son olarak varsay??lan a?? ge??idini ayarlay??n. L??tfen ??zerinden bu a??a eri??imin sa??land?????? a?? ge??idinin IP adresini girin. [0.0.0.0]: 10.1.1.1
Toplanan yap??land??rma bilgileri a??a????dad??r:
SNMP Arabirimi = "public"@10.1.2.100 Kullan??c?? Hesap ayar?? = admin Parola = ********
VLAN1 Y??nlendirici Arabirimi IP Adresi = 10.1.1.200 255.255.255.0
Varsay??lan A?? Ge??idi = 10.1.1.1

Ad??m 6:
Bilgiler do??ruysa l??tfen yap??land??rmay?? kaydetmek i??in (E) se??ene??ini belirleyin ve ba??latma yap??land??rma dosyas??n?? ayarlara kopyalay??n. Bilgiler hatal??ysa yap??land??rmadan ????kmak ve sihirbaz?? yeniden ba??latmak i??in (H) se??ene??ini belirleyin: [E/H] e
Dell Kolay Kurulum Sihirbaz??n?? kulland??????n??z i??in te??ekk??r ederiz. ??imdi CLI moduna ge??eceksiniz.
Arabirim yap??land??rma uygulan??yor, l??tfen
bekleyin ...
Sonraki Ad??mlar
Bu k??s??mda a????klanan ba??lang???? yap??land??rmas??n?? tamamlad??ktan sonra, bant i??i uzaktan y??netim i??in ??n panel anahtar ba??lant?? noktalar??n?? ??retim a????n??za ba??layabilirsiniz.
VLAN 1 y??netim arabirimi IP adresi i??in DHCP belirlediyseniz, arabirim kendi IP adresini a?? ??zerindeki bir DHCP sunucudan alacakt??r. Dinamik olarak atanm???? IP adresini ????renmek i??in konsol ba??lant?? noktas??ndan a??a????daki komutu verin:
???VLAN 1 y??nlendirme arabirimi i??in show ip interface komutunu girin.
Dell OpenManage Anahtar Y??neticisi arabirimine eri??mek i??in VLAN 1 y??netim arabirimi IP adresini bir Web taray??c??s??n??n adres alan??na girin. CLI???a uzaktan y??netim eri??imi i??in VLAN 1 y??netim arabirimi IP adresini bir Telnet veya SSH istemcisine girin. Alternatif olarak, anahtara yerel CLI eri??imi i??in konsol ba??lant?? noktas??n?? kullanmaya devam edebilirsiniz.
N20xx anahtar??n??z VLAN'lar ve kapsama a??ac?? protokol?? gibi temel anahtarlama ??zelliklerini destekler. A????n??z??n gerektirdi??i ??zellikleri yap??land??rmak i??in Web tabanl?? y??netim arabirimi veya CLI kullan??n. Anahtar ??zelliklerini yap??land??rma hakk??nda bilgi i??in, bkz. Kullan??c?? Yap??land??rma K??lavuzu veya dell.com/support/manuals destek sitesi i??indeki CLI Ba??vuru K??lavuzu..
364 Ba??lang???? K??lavuzu
N30xx Serisine Genel Bak????
Dell N30xx anahtarlar?? k??melenebilir Layer 2 ve Layer 3 Gigabit Ethernet anahtarlard??r ve a??a????daki modelleri kapsar:
???Dell N3024
???Dell N3024P
???Dell N3048
???Dell N3048P
???Dell N3024F
N30xx Serisinin Donan??m??na
Genel Bak????
Bu k??s??m N30xx serisi anahtarlar i??in ayg??t ??zellikleri ve mod??ler donan??m yap??land??rmalar?? hakk??ndaki bilgileri i??erir.
T??m N30xx modelleri a??a????daki fiziksel ebatlara sahip, 1U, rafa monte edilebilir anahtarlard??r.
???434.0 x 407.0 x 43,5 mm (G x D x Y).
???17,1 x 16 x 1,7 in?? (G x D x Y).
N30xx Serisi ??n Panel
A??a????daki resimler N30xx Serisindeki i??in anahtar modellerinin ??n panellerini g??stermektedir.
Anahtar ba??lant?? noktalar??na ilave olarak N30xx serisindeki her modelin ??n paneli a??a????daki ba??lant?? noktalar??n?? i??erir:
???Konsol ba??lant?? noktas??
???USB ba??lant?? noktas??
???Bant d?????? (OOB) y??netim ba??lant?? noktas??
??ekil 1-12. 24 10/100/1000BASE-T Ba??lant?? Noktal?? N3024F Serisi (??n Panel)
N30xx serisi anahtar iki combo ba??lant?? noktas?? i??erir. Combo ba??lant?? noktalar?? N30xx serisinde SFP, N3024F anahtarda ise 1000BaseT'dir.
??ekil 1-13. 48 10/100/1000BASE-T Ba??lant?? Noktal?? N3048 Serisi (??n Panel)
366 Ba??lang???? K??lavuzu
??lave ba??lant?? noktalar??, sayfa 367???deki ??ekil 1-13 ve ??ekil 1-14 ile g??sterildi??i gibi ??n panelin sa?? taraf??nda yer al??r.
??ekil 1-14. ??lave N30xx Serisi Ba??lant?? Noktalar??
Konsol Ba??lant??
Bant D?????? Y??netim Ba??lant?? Noktas??
USB Ba??lant??
Noktas??
S??f??rlama
D????mesi
Combo Ba??lant?? Noktalar?? SFP+ Ba??lant?? Noktalar??
N30xx ??n panelinde ayn?? zamanda bir s??f??rlama d????mesi (i??ne deli??i) ve ??e??itli durum LED???leri bulunur. Bkz. ??ekil 1-14.
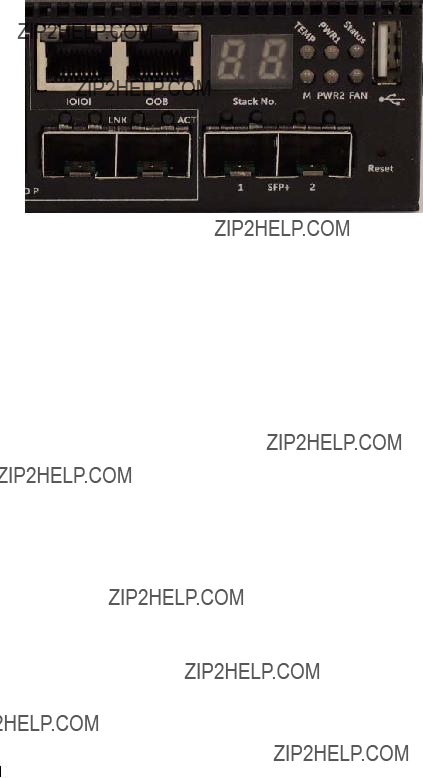
??ekil 1-15. N30xx Yak??ndan g??r??n??m
??ekil 1-15'de g??sterilen N30xx/N3024F ??n panelinde, a????r?? s??cakl??k alarm??, dahili g???? kayna???? 1 ve ??st s??radaki anahtar durumunu g??steren durum LED'leri mevcuttur. Durum LED'lerinin alt s??ras?? k??me master, dahili g???? kayna???? 2 ve fan alarm??n?? g??sterir.
Anahtar Ba??lant?? Noktalar??
N3024/N3024P ??n paneli, h??z, ak???? kontrol?? ve dupleks i??in otomatik anla??may?? destekleyen 24 Gigabit Ethernet (10/100/1000BASE-T) RJ-45 ba??lant?? noktalar?? sunar. N3024/N3024P modelleri iki SFP+ 10G ba??lant?? noktas??n?? destekler. Dell ile uyumlu SFP+ al??c?? vericileri ayr?? olarak sat??l??r.
N3024F ??n paneli, 24 adet Gigabit Ethernet 100BASE-FX/1000BASE-X SFP ba??lant?? noktas?? ve 2 adet 1000BASE-T combo ba??lant?? noktas?? sunar. Dell ile uyumlu SFP al??c?? vericileri ayr?? olarak sat??l??r.
N3048/N3048P ??n paneli, h??z, ak???? kontrol?? ve dupleks i??in otomatik anla??may?? destekleyen 48 Gigabit Ethernet (10BASE-T, 100BASE-TX, 1000BASE-T) RJ-45 ba??lant?? noktalar?? sunar. N3048/N3048P iki SFP+ 10G ba??lant?? noktas??n?? destekler. Dell ile uyumlu SFP+ al??c?? vericileri ayr?? olarak sat??l??r.
??n panel anahtar ba??lant?? noktalar?? a??a????daki ??zelliklere sahiptir:
???Anahtar otomatik olarak RJ-45 ba??lant?? noktalar??ndaki kros ve d??z kablolar aras??ndaki fark?? tespit eder ve di??er uca uygun MDI veya MDIX yap??land??rmas??n?? otomatik olarak se??er.
???SFP ba??lant?? noktalar??, Dell uyumlu al??c?? vericileri destekler.
???RJ-45 ba??lant?? noktalar?? standart bir Kategori 5 UTP kablosunda tam dupleks modu 10/100/1000 Mbps h??zlar??n?? destekler.
368 Ba??lang???? K??lavuzu
???SFP+ ba??lant?? noktalar?? SFP+ al??c?? vericileri, SFP+ bak??r ??ift aks teknolojisini ve 1G h??zla ??al????an SFP al??c?? vericileri destekler.
???N3024P/N3048P ??n panelindeki ba??lant?? noktalar?? PoE (15,4W) ve PoE+ (30W) destekler.
Konsol Ba??lant?? Noktas??
Konsol ba??lant?? noktas??, RS-232 protokol?? kullanarak ileti??ime imk??n tan??yan seri ileti??im ??zellikleri sunar. Bu seri ba??lant?? noktas?? anahtara do??rudan bir ba??lant?? sa??lar ve sa??lanan seri kablo (RJ-45 YOST'tan di??i DB-9 konekt??rlere) ??zerinden ba??lant?? noktas??na ba??lanan bir konsol terminalinden CLI'a eri??menize imk??n tan??r.
Konsol ba??lant?? noktas?? ayr??ca yap??land??r??labilir ve 1200 baud ila 115.200 baud aras??nda asenkron bir ba??lant?? olarak ??al????t??r??labilir.
Dell CLI sadece h??z de??i??imini destekler.
Varsay??lan h??zlar 9600 baud h??z??, 8 veri biti, E??lik Yok, 1 Durdurma Biti, Ak???? Kontrol?? Yok ??eklindedir.
Bant D?????? Y??netim Ba??lant?? Noktas??
Bant D?????? (OOB) y??netim ba??lant?? noktas?? uzaktan anahtar y??netimine adanm???? bir 10/100/1000BASE-T Ethernet ba??lant?? noktas??d??r. Bu ba??lant?? noktas?? ??zerindeki trafik anahtar ba??lant?? noktas?? ??zerindeki i??letimsel a?? trafi??inden ayr??lm????t??r ve i??letimsel a??a/a??dan anahtarlanamaz veya y??nlendirilemez.
USB Ba??lant?? Noktas??
Tip-A, di??i USB ba??lant?? noktas?? bir adet USB 2.0 uyumlu fla?? s??r??c??y?? destekler. Dell A?? Olu??turma anahtar FAT-32 olarak bi??imlendirilen bir fla?? s??r??c??ye okuma veya yazma yapabilir. Bir USB fla?? s??r??c??y?? anahtar yap??land??rma dosyalar?? ve resimleri USB fla?? s??r??c?? ve anahtar aras??nda kopyalamak i??in kullanabilirsiniz. USB fla?? s??r??c??y?? ayr??ca yap??land??rma dosyalar?? ve resimleri bir anahtardan a?? i??erisindeki di??er anahtarlara ta????mak ve kopyalamak i??in de kullanabilirsiniz.
USB ba??lant?? noktas?? di??er USB ayg??t?? t??rlerini desteklemez.

S??f??rlama D????mesi
S??f??rlama d????mesine i??ne deli??inden eri??ilir ve anahtar ??zerinde zorlay??c?? s??f??rlama yapman??za imk??n sa??lar. S??f??rlama d????mesini kullanmak i??in b??k??lmemi?? bir ata?? veya benzer bir aleti i??ne deli??ine sokun. S??f??rlamadan sonra anahtar ??ny??kleme s??recini tamamlad??????nda en son kaydedilen yap??land??rma ile i??letimi ba??lat??r. S??f??rlamadan ??nce ba??lang???? yap??land??rmas??na kaydedilmemi?? olan ??al????an yap??land??rma ??zerindeki de??i??iklikler kaybedilir.
Ba??lant?? Noktas?? ve Sistem LED???leri
??n panelde ba??lant?? noktas?? linkleri, g???? kaynaklar??, fanlar, k??meleme ve t??m sistemin durumunu g??steren ??????k yayan diyotlar (LED???ler) bulunur.
LED???lerin g??sterdikleri hakk??nda daha fazla bilgi i??in bkz. Kullan??c?? Yap??land??rma K??lavuzu.
K??me Master LED ve K??me Say?? G??sterimi
Bir k??me i??erisindeki bir anahtar master birim oldu??unda M olarak etiketlenen k??me master LED???i devaml?? olarak ye??il renkte yanar. M LED???i kapal?? ise, k??me eleman?? master birim de??ildir. K??me No. paneli k??me eleman??n??n birim numaras??n?? g??sterir. Bir anahtar bir k??menin par??as?? de??ilse (yani tek anahtarl?? bir k??meyse), M LED???i yanar ve k??me birim numaras??n?? 1 g??sterir.
N30xx Serisi Arka Panel
A??a????daki resimler N30xx anahtarlar??n arka panellerini g??sterir.
??ekil 1-16. N30xx Arka Panel
Fan Delikleri
370 Ba??lang???? K??lavuzu
??ekil 1-17. N3024P/N3048P Arka Panel
??ekil 1-18. N3048 Mini-SAS Y??????n Ba??lant?? Noktalar?? Yak??ndan G??r??n??m
Mini-SAS y??????n ba??lant?? noktalar??
Mini-SAS terimi, ??ekil ??ekil 1-18'de g??sterilen y??????n ba??lant?? noktas?? kablo ba??lant??lar??n?? ifade eder. Anahtarlar?? ba??lamak i??in mini-Sas kullanmak hakk??nda daha fazla bilgi almak i??in, bkz. Birden Fazla N30xx Anahtar??n K??melenmesi.
Eklenti Mod??lleri i??in Geni??leme Yuvalar??
N30xx modellerinin arkas??nda bir adet geni??leme yuvas?? bulunur ve bunlar a??a????daki mod??lleri desteklerler:
???10GBASE-T mod??l??
???SFP+ mod??l??
Her eklenti mod??l??n??n iki ba??lant?? noktas?? bulunur. Eklenti mod??lleri ??al??????rken de??i??tirme deste??i sunar, bu sayede yeni bir mod??l y??kledi??inizde anahtar?? yeniden ba??latman??z gerekmez.

G???? Kaynaklar??
N3024, N3024F ve N3048
N3024, N3024F ve N3048 anahtarlar, anahtar i??in tam g???? yedekli??i sa??layan iki adet 200 watt Sahada De??i??tirilebilir ??nite (FRU) g???? kayna????n?? destekler. N3024, N3024F ve N3048 anahtarlar yanl????l??kla g???? kesmeye kar???? tedbir almak isteyen kullan??c??lar i??in V kilidi ??zelli??i sunar. G???? Kayna???? ??nitesindeki (PSU) V kilidi prizi, t??mle??ik g??venli kilit ba??lant??s?? olu??turmak i??in V kilidi ??zelli??ine sahip bir elektrik kablosu kullan??labilmesini m??mk??n k??lar.
N3024P ve N3048P
Dell A?? Olu??turma N3024P ve N3048P anahtarlar?? bir veya iki adet 1100 watt FRU g???? kayna????n?? destekler. N3024P anahtar tekli 715 watt g???? kayna???? ile (varsay??lan yap??land??rma) sunulur ve bir ya da iki adet 1100 watt g???? kayna????n?? destekler. N3048P anahtar??nda bir adet 1100 watt g???? kayna???? kullan??lmas?? varsay??lan yap??land??rmad??r.
Tekli bir 1100 watt g???? kayna???? tam PoE+ g???? alt??nda (950W) maks. 24 PoE ayg??t?? besleyebilir. ??ift donan??ml?? anahtarlar maks. 48 adet PoE ayg??t?? tam PoE+ g???? alt??nda (1800W) beslemenin yan?? s??ra g???? kayna???? yedekli??i de sunar.
NOT: PoE g??c?? dinamik olarak atan??r. Her ba??lant?? noktas?? tam PoE+ g??c??ne ihtiya?? duymaz.
D??KKAT: G???? kayna???? mod??l??n??n kendisini ????karmadan ??nce g???? kayna???? mod??llerindeki g???? kablosunu ????kar??n. ??aseye yerle??tirmeden ??nce g??c??n ba??lanmas?? gerekir.
Havaland??rma Sistemi
??ki fan N30xx anahtarlar?? so??utur. N30xx anahtarlarda ayr??ca her dahili g???? kayna????nda bir fan mevcuttur. N30xx fan?? bir FRU'dur.
372 Ba??lang???? K??lavuzu
N30xx Model ??zeti
Tablo 1-2. N30xx Model ??zeti
(PSU)/1x S??k??lebilir Fan
Mod??l??
Tablo 1-2. N30xx Model ??zeti
N3048P 48x1G/2x1G combo/2x10G 1100W/715W E06W E06C002 SFP+/2x K??meleme/ 1x
Mod??ler B??lme/N+1 Yedek
Tak??labilir PSU'lar/48x PoE+ ba??lant?? noktalar??/12 UPoE Uyumlu Ba??lant?? Noktas??/1x S??k??lebilir Fan Mod??l??
374 Ba??lang???? K??lavuzu
N30xx Serisinin Kurulumu
Saha Haz??rl??????
N30xx serisi anahtarlar 48,26 cm (19 in??) standart bir rafa monte edilebilir veya d??z bir zemine yerle??tirilebilir.
Se??ilen kurulum konumunun a??a????daki saha gerekliliklerini kar????lad??????n?? teyit edin:
???G???? ??? Anahtar kolayl??kla eri??ilebilen 100-240 VAC, 50???60 Hz bir prizin yak??n??na kurulur.
???A????kl??k ??? Operat??r??n eri??imi i??in ??n ve arkada yeterli a????kl??k olmal??d??r. Kablolar, elektrik ba??lant??lar?? ve havaland??rma i??in yeterli a????kl??k b??rak??n.
???Kablolama ??? Kablolar radyo vericileri, yay??n y??kselticileri, elektrik hatlar?? ve floresan ayd??nlatma te??hizat?? gibi elektriksel parazit kaynaklar??ndan uzak kalacak ??ekilde y??nlendirilmelidir.
?????evre S??cakl?????? ??? Y??zde 95???e kadar yo??u??mas??z g??reli nemde anahtar ??al????ma s??cakl?????? 0 - 45??C (32 - 113??F)???dir.
NOT: Maksimum s??cakl?????? 900m'nin (2955 ft) ??zerinde, 300 m (985 ft) ba????na 1??C (1.8??F) azalt??n.
???Ba????l Nem - ??al????ma ba????l nemi, saatte maksimum %10'luk nem de??i??imli %8 ila %85'tir (yo??u??mas??z).
Anahtar??n N30xxPaketinin A????lmas??
Paket Muhteviyat??
Anahtarlar??n paketini a??arken a??a????daki ????elerin pakette yer ald??????ndan emin olun:
???Bir adet Dell A?? Olu??turma anahtar
???Bir adet RJ-45???den DB-9???a di??i kablo
???Rafa montaj i??in bir adet ReadyRail kiti, iki montaj braketi, c??vatalar ve tespit somunlar??
???Ba????ms??z duran anahtarlar i??in bir set kendinden yap????kan lastik ped (i??erisinde d??rt adet ped bulunur)
???Bir PSU
Paketi A??ma Ad??mlar??
NOT: Paketi a??madan ??nce, kutuyu kontrol edin ve herhangi bir hasara ili??kin her t??rl?? kan??t?? derhal rapor edin.
1Paketi temiz, d??z bir y??zey ??zerine yerle??tirin ve kutu ??zerindeki bantlar?? kesin.
2Kutuyu a????n veya ??st k??sm??n?? ????kar??n.
3Anahtar?? kutu i??erisinden dikkatlice ????kar??n ve emniyetli ve temiz bir y??zey ??zerine yerle??tirin.
4T??m paketleme malzemelerini kald??r??n.
5??r??n??n ve ek birimlerinin hasarl?? olup olmad??????n?? kontrol edin.
376 Ba??lang???? K??lavuzu

Bir N30xx Anahtar?? Rafa Monte Etme
Anahtar?? rafa yerle??tirebilir veya do??rudan 19" geni??li??inde, EIA-310-E uyumlu bir raf??n (d??rt direkli, iki direkli veya di??li ba??lant?? y??ntemleriyle) i??ine monte edebilirsiniz. Dell ReadyRail sistemi 1U ??n raf ve iki direkli kurulumlar i??in tedarik edilmektedir. ReadyRail sistemi ayr?? olarak paketlenmi?? iki ray grubu i??erir.
 UYARI: Bu k??sa bir ba??vuru kayna????d??r. ??al????maya ba??lamadan ??nce Emniyet, ??evre ve D??zenleyici bilgileri kitap????????ndaki emniyet talimatlar??n?? mutlaka okuyun.
NOT: Bu dok??mandaki ??izimler belli bir anahtar?? temsil etmeye y??nelik de??ildir.
Raf Montaj?? Emniyet Hususlar??
???Rafa y??kleme, a????r?? y??kleme veya raflar??n e??it olmayan ??ekilde y??klenmesi raf??n ar??za yapmas??na neden olarak ekipman??n zarar g??rmesine veya ki??isel yaralanmaya yol a??abilir. Y??kleme i??lemine ba??lamadan ??nce raflar?? kal??c?? bir konumda sabitleyin. Bile??enleri raf??n alt k??sm??ndan yukar??ya do??ru monte edin. Raf y??k?? de??erlerini a??may??n.
???G????le ilgili hususlar - Sadece ??nitede belirtilen g???? kayna????na ba??lay??n. Bir rafa birden fazla elektrikli bile??en tak??lacaksa, toplam bile??en g??c?? de??erinin devre kapasitelerini a??mayaca????ndan emin olun. A????r?? y??klenmi?? g???? kaynaklar?? ve uzatma kablolar?? yang??n ve elektrik ??arpmas?? riski bar??nd??r??r.
???Y??ksek ortam s??cakl??klar?? - Kapal?? veya birden fazla ??niteyi i??eren bir raf aksam??na monte edilirse, raf ortam??n??n i??letim s??cakl?????? oda ortam??ndan daha y??ksek olabilir. Anahtar??n 45??C azami i??letim s??cakl??????n??n a????lmamas??na ??zen g??sterin.
???K??s??tl?? hava ak?????? - Ekipman??, ekipman??n g??venli bir ??ekilde i??letilmesi i??in gereken hava ak???? miktar?? k??s??tlanmayacak ??ekilde rafa yerle??tirin.
???G??venli topraklama - Rafa monte edilen ekipman?? g??venli bir ??ekilde topraklay??n. Ayr?? devreye yap??lan do??rudan ba??lant??lar d??????ndaki besleme ba??lant??lar??na ??zellikle dikkat edin; ??rne??in: ??oklu priz kullan??m??.
?????r??n, arka paneli a??a???? bakacak ??ekilde monte edilmemelidir.

Dell ReadyRail Sisteminin Tak??lmas??
ReadyRail rafa montaj sistemi anahtar??n??z??n tak??lmas?? amac??yla raf??n??z??n kolayca yap??land??r??lmas?? i??in sa??lanm????t??r. ReadyRail sistemi 1U aletsiz montaj y??ntemiyle veya ???? farkl?? 1U aletli montaj y??nteminden (iki direkli sal??n??ml?? montaj, iki direkli merkezi montaj veya d??rt direkli di??li sabitlemeyle montaj) biri uygulanarak tak??labilir.
1U Aletsiz Montaj (d??rt direkli kare delik veya di??siz ba??lant??l?? yuvarlak delik)
1ReadyRail flan?? mapalar?? d????a bakacak ??ekilde sa?? ve sol dikey direklerin aras??na bir ray yerle??tirin. Arka flan?? ray kaz??klar??n?? hizalay??n ve arka dikey direk flan????n??n i??ine oturtun. ??ekil 1-19'deki ????e 1 ve di??leri, kare delik ve di??siz yuvarlak delik i??inde kaz??klar??n nas??l g??r??nd??????n?? temsil eder.
??ekil 1-19. 1U Aletsiz Montaj
2??n flan?? kaz??klar??n?? hizalay??n ve dikey dire??in ??n taraf??ndaki deliklerin i??ine oturtun. Bkz. ??ekil 1-19, ????e 2.
3??kinci ray i??in ayn?? prosed??r?? tekrarlay??n.
4Raylar?? s??kmek i??in her flan?? mapas??n??n ??zerindeki a??ma mandal??n?? se??in ve ray?? yerinden ????kar??n. Bkz. ??ekil 1-19, ????e 3.
378 Ba??lang???? K??lavuzu
??ki Direkli Sal??n??ml?? Montaj
1Bu t??r bir montaj yap??land??rmas??nda kal??plar her bir ReadyRail grubunun ??n taraf??ndan ????kar??lmal??d??r. Bkz. sayfa 379, ??ekil 1-20, ????e 1. Torx tornavida kullanarak her bir ??n flan?? mapas??ndaki (ray??n anahtar taraf??ndaki) iki viday?? s??k??n ve her bir kal??b?? ????kar??n. Kal??plar?? gelecekteki raf ihtiya??lar?? i??in saklay??n. Arka flan?? kal??plar??n??n s??k??lmesine gerek yoktur.
??ekil 1-20. ??ki Direkli Sal??n??ml?? Montaj
2Tedarik edece??iniz iki viday?? kullanarak ??n direk flan????na bir ray tak??n. Bkz. ??ekil 1-20, ????e 2.
3Plancer braketini dikey dire??e do??ru kayd??r??n ve temin etti??iniz iki vidayla direk flan????na sabitleyin. Bkz. ??ekil 1-20, ????e 3.
4??kinci ray i??in ayn?? prosed??r?? tekrarlay??n.
??ki Direkli Merkezi Montaj
1Plancer braketini yerine sabitlenene kadar kayd??r??n ve temin etti??iniz iki vidayla braketi ??n direk flan????na sabitleyin. Bkz. ??ekil 1-21, ????e 1.
??ekil 1-21. ??ki Direkli Merkezi Montaj
2Arka braketi dire??e do??ru kayd??r??n ve temin etti??iniz iki vidayla direk flan????na sabitleyin. Bkz. ??ekil 1-21, ????e 2.
3??kinci ray i??in ayn?? prosed??r?? tekrarlay??n.
380 Ba??lang???? K??lavuzu
D??rt Direkli Di??li Montaj
1Bu t??r bir montaj yap??land??rmas??nda flan?? mapas?? kal??plar?? ReadyRail gruplar??n??n ??n taraf??ndan ????kar??lmal??d??r. Torx tornavida kullanarak her flan????n iki vidas??n?? da s??k??n ve kal??plar?? yerinden ????kar??n. Bkz. ??ekil 1-22, ????e 1. Kal??plar?? gelecekteki raf ihtiya??lar?? i??in saklay??n.
2Her ray i??in, ??n ve arka flan??lar?? temin etti??iniz iki vidayla her iki u??tan direk flan??lar??na tak??n. Bkz. ??ekil 1-22, ????e 2.
??ekil 1-22. D??rt Direkli Di??li Montaj

Ba????ms??z bir Anahtar??n Kurulumu
NOT: Anahtar??n bir rafa monte edilmesini ??iddetle tavsiye ediyoruz.
Anahtar?? bir rafa monte etmiyorsan??z, d??z bir y??zey ??zerine monte edin. Y??zey, anahtar ve anahtar kablolar??n??n a????rl??????n?? ta????yabilmelidir. Anahtar ile birlikte d??rt adet kendinden-yap????kanl?? plastik ped verilir.
1Kendinden yap????kanl?? plastik pedleri anahtar??n alt??nda i??aretlenmi?? olan her konum ??zerine tak??n.
2Anahtar?? d??z bir y??zeye yerle??tirin ve her iki yan??ndan 5 cm (2 in??) ve arkas??ndan 13 cm (5 in??) bo??luk b??rakarak uygun havaland??rman??n sa??land??????ndan emin olun.
Birden Fazla N30xx Anahtar??n
K??melenmesi
N30xx anahtarlar?? anahtar??n arkas??ndaki mini-SAS ba??lant?? noktalar??n?? kullanarak 12 anahtar y??ksekli??inde k??meleyebilirsiniz. N30xx anahtarlar?? sadece di??er N30xx anahtarlarla k??melemeyi destekler. K??melenen ba??lant?? noktalar?? ??zerinden birden fazla anahtar birbirine ba??land??????nda, maks. 576 ??n panel ba??lant?? noktas??na sahip tek bir birim gibi ??al??????rlar. K??me tek bir varl??k olarak i??letilir ve y??netilir.
NOT: Bir anahtar k??mesini monte ediyorsan??z, ??al????t??rmadan ve yap??land??rmadan ??nce k??meyi birle??tirmeniz ve kablo ba??lant??lar??n?? yapman??z gerekir. Bir k??me ilk kez ??al????t??r??ld??????nda, anahtarlar k??me i??erisinde herhangi bir yerde bulunabilecek olan Master Anahtar?? se??erler. ??n panel ??zerindeki Master LED master birim ??zerinde yanar.
Bir Anahtar K??mesi Olu??turma
Anahtar??n arka panelinde bulunan mini-SAS k??meleme ba??lant?? noktalar??n?? kullanarak biti??ik birimleri ba??lamak suretiyle bir k??me olu??turun. sayfa 383. sayfada yer alan ??ekil ??ekil 1-23, bir k??me i??in tavsiye edilen yap?? olan halka topolojisinde ba??lanan anahtarlar?? g??sterir.
1Mini-SAS kablolar??ndan birini ??stteki anahtar??n ve hemen alt??ndaki anahtar??n k??meleme ba??lant?? noktalar??ndan birine ba??lay??n.
Gerekiyorsa, anahtarlar?? ba??lamak i??in ayr??ca temin edebilece??iniz daha uzun (1 veya 3 metre) bir mini-SAS kablosu kullan??n.
382 Ba??lang???? K??lavuzu
2Bu i??lemi t??m ayg??tlar ba??lanana kadar tekrarlay??n.
3Kalan iki k??meleme ba??lant?? noktas??n?? birbirine ba??lay??p bir halka topolojisi olu??turmak i??in kalan k??meleme kablosunu kullan??n.
??ekil 1-23. Bir Anahtar K??mesinin Ba??lanmas??
Birim 1
Birim 2
Birim 3
??ekil 1-23' deki k??me halka topolojisi ile ba??lanm????t??r ve anahtarlar aras??nda a??a????daki fiziksel ba??lant??lara sahiptir.
???Birim 1 ??zerindeki alt mini-SAS ba??lant?? noktas?? Birim 2 ??zerindeki ??st mini-SAS ba??lant?? noktas??na ba??lanm????t??r.
???Birim 2 ??zerindeki alt mini-SAS ba??lant?? noktas?? Birim 3 ??zerindeki ??st mini-SAS ba??lant?? noktas??na ba??lanm????t??r.
???Birim 3 ??zerindeki alt mini-SAS ba??lant?? noktas?? Birim 1 ??zerindeki ??st mini-SAS ba??lant?? noktas??na ba??lanm????t??r.
K??meleme Yede??i
K??meleme ??zelli??i, k??medeki Master birimin ar??zalanmas?? durumunda Master birim rol??n?? devralacak olan bir Beklemedeki veya yedek birimi destekler K??me i??erisinde Master ar??za durumunu tespit edilir edilmez Beklemedeki birim kontrol panelini ba??lat??r ve mevcut yap??lanmadaki di??er t??m k??me birimlerini etkinle??tirir. Beklemedeki birim k??menin ??al????an yap??lanmas??n??n senkron bir kopyas??n?? tutar. Beklemedeki birim k??me i??erisinde otomatik se??ilmi?? durumdad??r, ancak CLI kullanarak farkl?? bir k??me ??yesini Beklemedeki olarak se??ebilirsiniz. Daha fazla bilgi i??in bkz. Yap??land??rma Kullan??c?? K??lavuzu veya CLI Referans K??lavuzu.

N30xx Anahtar??n bir Terminale Ba??lanmas??
T??m harici ba??lant??lar tamamland??ktan sonra, anahtar?? yap??land??rmak i??in anahtara bir terminal ba??lay??n.
NOT: Devam etmeden ??nce bu ??r??n??n S??r??m Notlar??n?? okuyun. S??r??m Notlar??n??, dell.com/support/manuals adresindeki Dell Destek web sitesinden indirebilirsiniz.
NOT: Kullan??c?? belgelerinin en son s??r??m??n?? dell.com/support/manuals adresindeki Dell Destek web sitesinden edinmenizi tavsiye ederiz.
Anahtar??n seri konsol ??zerinden izlenmesi ve yap??land??r??lmas?? i??in bir VT100 terminaline veya VT100 terminal em??lasyon yaz??l??m??na sahip bir bilgisayara ba??lant?? yapmak i??in anahtar??n ??n panelindeki konsol ba??lant?? noktas??n?? (bkz. sayfa sayfa 386, ??ekil ??ekil 1-25) kullan??n. Konsol ba??lant?? noktas?? bir veri terminali ekipman?? (DTE) konekt??r?? olarak d??zenlenmi??tir.
Konsol ba??lant?? noktas??n??n kullan??lmas?? i??in a??a????daki ekipman gereklidir:
???VT100 uyumlu terminal veya VT100 terminal em??lasyon yaz??l??m??na sahip bir bilgisayar; Microsoft HyperTerminal gibi.
???Konsol ba??lant?? noktas?? i??in RJ-45 konekt??re sahip seri bir kablo ve terminal i??in DB-9 konekt??re sahip seri bir kablo.
Bir terminali anahtar konsol ba??lant?? noktas??na ba??lamak i??in a??a????daki i??lemleri uygulay??n:
1Seri kablo ??zerindeki DB-9 konekt??r??n?? VT100 terminal em??lasyon yaz??l??m??na sahip terminale veya bilgisayara ba??lay??n.
2Terminal em??lasyon yaz??l??m??n?? a??a????daki ??ekilde yap??land??r??n:
a Konsola ba??lanmak i??in uygun seri ba??lant?? noktas??n?? (??rne??in COM1) se??in.
b Veri h??z??n?? 9600 baud olarak ayarlay??n.
c Veri format??n?? 8 veri biti, 1 stop biti olacak ve e??lik biti olmayacak ??ekilde ayarlay??n.
d Ak???? kontrol??n?? hi??biri olarak ayarlay??n.
e Terminal em??lasyon modunu VT100 olarak ayarlay??n.
f ????lev, Ok ve Ctrl tu??lar?? i??in Terminal tu??lar??n?? se??in. Ayar??n Terminal tu??lar?? i??in oldu??undan (Microsoft Windows tu??lar?? de??il) emin olun.
3Kablo ??zerindeki RJ-45 konekt??r??n?? do??rudan anahtar konsol ba??lant?? noktas??na ba??lay??n. Dell A?? Olu??turma konsol ba??lant?? noktas?? ??n panelin sa?? taraf??nda yer al??r ve ??ekil 1-25' de g??sterildi??i gibi bir |O|O| sembol?? ile etiketlenmi??tir.
 NOT: K??me y??neticisine seri konsol eri??imi, yerel CLI kullan??larak herhangi bir ba??lant?? noktas?? ??zerinden sa??lanabilir. Ayn?? anda sadece bir seri konsol oturumu desteklenir.
??ekil 1-25. N3048 Konsol Ba??lant?? Noktas?? Konumu
Konsol Ba??lant?? Noktas??
Konsol ba??lant?? noktas??n??n sa????ndaki RJ-45 ba??lant?? noktas?? bant d?????? Ethernet y??netimi i??indir.
Bir N30xx Anahtar?? G???? Kayna????na
Ba??lama
D??KKAT: Anahtara ba??lanan veya anahtar?? destekleyen di??er anahtarlar??n emniyet bilgileri ile birlikte Emniyet ve D??zenleyici Bilgiler k??lavuzu i??inde yer alan emniyet bilgilerini okuyun.
N30xx anahtarlar??n??n yedekli ve y??k dengeli i??letim i??in iki adet g???? kayna???? mevcuttur.
AC ve DC G???? Ba??lant??s??
1Anahtar konsol ba??lant?? noktas??n??n RS-45 ??zerinden di??i DB-9 kablosu ile bir VT100 terminaline veya VT100 terminal em??lat??r??ne ba??land??????ndan emin olun.
386 Ba??lang???? K??lavuzu

2Emniyet topraklamas?? yap??lm???? 1,5 m standart bir g???? kablosu kullanarak, g???? kablosunu arka panel ??zerinde yer alan AC ??ebeke prizine ba??lay??n (bkz. sayfa sayfa 387, ??ekil ??ekil 1-26).
3G???? kablosunu topraklanm???? bir AC ????k??????na ba??lay??n.
??ekil 1-26. N3048 Anahtar??ndaki ??ki Yedek G???? Kayna????
AC G???? Kayna????na
Anahtar??n N30xx ??ny??klenmesi
Lokal terminal ba??l?? iken g???? a????ld??????nda, anahtar g???? a????k otomatik s??nama (POST) i??lemini yapar. POST, anahtar her ba??lat??ld??????nda uygulan??r ve tamamen ??ny??klenmeden ??nce anahtar??n tamamen i??levsel oldu??unu belirlemek i??in donan??m bile??enlerini kontrol eder. POST kritik bir problem tespit ederse program ak?????? durur. POST ba??ar??l?? ??ekilde tamamlan??rsa ge??erli ??r??n bilgisi RAM ??zerine y??klenir. POST mesajlar?? terminal ??zerinde g??r??nt??lenir ve s??naman??n ba??ar??l?? veya ba??ar??s??z oldu??unu g??sterir. ??ny??kleme s??reci yakla????k olarak 60 saniye s??rer.
POST???un ilk k??sm?? tamamland??ktan sonra ??ny??kleme men??s??n?? ??a????rabilirsiniz. ??ny??kleme men??s??nden, sistemi fabrika ayarlar??na geri d??nd??rme, yedekleme imaj??n?? aktif hale getirme veya bir parolan??n kurtar??lmas?? gibi yap??land??rma g??revlerini yerine getirebilirsiniz. ??ny??kleme men??s?? i??levleri hakk??nda daha fazla bilgi i??in, bkz. CLI Referans K??lavuzu.

N30xx Ba??lang???? Yap??land??rmas??n??n
Yap??lmas??
Ba??lang???? yap??land??rma prosed??r?? a??a????daki varsay??mlara dayan??r:
???Dell A?? Olu??turma anahtar ??nceden yap??land??r??lmam????t??r.
???Dell A?? Olu??turma anahtar?? ba??ar??l?? ??ekilde ??ny??klenmi??tir.
???Konsol ba??lant??s?? yap??lm????t??r ve Dell Kolay Kurulum Sihirbaz?? iletisi VT100 terminali veya e??de??eri bir terminal ekran?? ??zerinde g??r??nmektedir.
Ba??lang???? anahtar yap??land??rmas?? konsol ba??lant?? noktas?? ??zerinden yap??l??r. Ba??lang???? yap??land??rmas??ndan sonra, anahtar?? ba??l?? durumdaki konsol ba??lant?? noktas?? ??zerinden veya ba??lang???? yap??land??rmas?? s??ras??nda tan??mlanan bir arabirim ??zerinden uzaktan y??netebilirsiniz.
NOT: Anahtar varsay??lan kullan??c?? ad?? veya parola ile yap??land??r??lmaz. Varsay??lan IP adresi, bant d?????? (OOB) ba??lant?? yuvas?? i??in DHCP'ye ayarlanm????t??r.
Anahtar??n ba??lang???? yap??land??rmas??n?? ayarlamadan ??nce a?? y??neticinizden a??a????daki bilgileri al??n:
???Y??netim arabirimine tahsis edilecek olan IP adresi.
???A????n IP alt a?? maskesi.
???Y??netim arabirimi varsay??lan a?? ge??idi IP adresi.
Anahtar??n Telnet (Telnet istemcisi) veya HTTP (Web taray??c??s??) ??zerinden uzaktan y??netimine izin vermek i??in bu ayarlar gereklidir.
Uzaktan Y??netimin Etkinle??tirilmesi
N30xx anahtar??n ??n panelinde OOB y??netimi i??in bir Gigabit Ethernet ba??lant?? noktas?? bulunur. OOB ba??lant?? noktas?? konsol ba??lant?? noktas??n??n sa????nda yer al??r. N30xx anahtarlarda, anahtar ba??lant?? noktalar??ndan birini veya OOB'yi -bant i??i y??netim i??in kullanabilirsiniz. Varsay??lan olarak t??m bant i??i ba??lant?? noktalar?? VLAN 1???in ??yesidir.
Dell Kolay Kurulum Sihirbaz??, N30xx anahtar??ndaki OOB y??netimi ve N30xx anahtarlar??ndaki VLAN1 aray??z?? i??in a?? bilgisi yap??land??rma komutlar??n?? da i??erir. Her iki y??netim arabirimi i??in statik bir IP adresi ve alt a?? maskesi atayabilir veya bu bilgileri bir a?? DHCP sunucusunun atamas?? i??in DHCP???yi etkinle??tirebilirsiniz.
388 Ba??lang???? K??lavuzu

A?? bilgilerini yap??land??rmak i??in kullan??lan CLI komutlar?? hakk??nda bilgi almak i??in bkz. CLI Referans K??lavuzu.
Ba??lang???? Yap??land??rma Prosed??r??
Ba??lang???? yap??land??rmas??n?? Dell Kolay Kurulum Sihirbaz?? veya CLI kullanarak yapabilirsiniz. Anahtar yap??land??rma dosyas?? bo?? oldu??unda sihirbaz otomatik olarak ba??lar. [Ctrl+z] tu??lar??na basarak herhangi bir a??amada sihirbazdan ????kabilirsiniz ancak bu durumda belirlenen t??m yap??land??rma ayarlar?? kaybedilir ve anahtar varsay??lan de??erleri kullan??r.
NOT: Dell Kolay Kurulum Sihirbaz?? ??al????t??rmazsan??z veya ba??lang???? Kolay Kurulum Sihirbaz??n??n bilgi istemine 60 saniye i??inde cevap vermezseniz anahtar CLI moduna girer. Dell Kolay Kurulum Sihirbaz??'?? yeniden ??al????t??rabilmek i??in bo?? bir ba??lang???? yap??land??rmas??yla anahtar?? s??f??rlaman??z gerekir.
CLI kullanarak ba??lang???? yap??land??rmas??n?? yapma hakk??nda daha fazla bilgi i??in bkz. CLI Referans K??lavuzu. Bu Ba??lang???? K??lavuzu, Dell Kolay Kurulum Sihirbaz??'n??n ??n anahtar yap??land??rmas?? i??in kullan??lmas??n?? g??sterir. Sihirbaz anahtar ??zerinde a??a????daki yap??land??rmay?? ayarlar:
???Ge??erli bir parola ile ilk ayr??cal??kl?? kullan??c?? hesab??n?? olu??turur. Sihirbaz kurulum s??ras??nda bir adet ayr??cal??kl?? kullan??c?? hesab??n?? yap??land??r??r.
???Sadece yerel kimlik do??rulama ayar??n?? kullanmak i??in CLI oturum a??ma ve HTTP eri??imini etkinle??tirir.
???OOB y??netim arabirimi i??in IP adresini ayarlar.
???T??m bant-i??i ba??lant?? noktalar??n??n ??yesi oldu??u VLAN 1 y??nlendirme arabirimi i??in IP adresini ayarlar.
???Belirli bir IP adresinde SNMP y??neticisi taraf??ndan kullan??lmak ??zere SNMP ortak dizgiyi ayarlar. Bu anahtar i??in SNMP y??netimi kullan??lm??yorsa bu ad??m?? atlayabilirsiniz.
???A?? y??netim sistemi IP adresini belirlemenize veya t??m IP adreslerinden y??netim i??in eri??ime izin vermenize imkan sa??lar.
???VLAN1 arabirimi i??in varsay??lan a?? ge??idi IP adresini yap??land??r??r.

??rnek Oturum
Bu b??l??m bir Dell Kolay Kurulum Sihirbaz?? oturumunu a????klar. A??a????daki de??erler ??rnek oturum i??in kullan??lm????t??r:
???Kullan??lacak olan SNMP ortak dizgisi: public.
???A?? y??netim sistemi (NMS) IP adresi 10.1.2.100.
???Kullan??c?? ad??: admin, ve parola: admin123.
???OOB y??netim arabirimi IP adresi tahsisi i??in DHCP kullan??r.
???VLAN 1 y??nlendirme arabirimi i??in IP adresi: 10.1.1.200 alt a?? maskesi:
255.255.255.0.
???Varsay??lan a?? ge??idi: 10.1.1.1
Kurulum sihirbaz?? yukar??da belirtildi??i gibi ba??lang???? de??erlerini yap??land??r??r. Sihirbaz?? tamamlad??ktan sonra anahtar a??a????daki ??ekilde yap??land??r??l??r:
???SNMPv2 etkinle??tirilir ve ortak dizgi yukar??da belirtildi??i ??ekilde ayarlan??r. SNMPv3 varsay??lan olarak devre d?????? b??rak??l??r.
???Y??netici kullan??c?? ad?? tan??mland?????? ??ekilde ayarlan??r.
???Bir a?? y??netim sistemi yap??land??r??l??r. Y??netim istasyonundan SNMP, HTTP ve CLI arabirimlerine eri??ebilirsiniz. Ayr??ca (0.0.0.0) IP adresini se??erek t??m IP adreslerinden bu y??netim arabirimlerine eri??ime izin verebilirsiniz.
???OOB y??netim arabiriminde DHCP etkindir.
???VLAN 1 y??nlendirme arabirimi i??in bir IP adresi yap??land??r??l??r.
???Varsay??lan a?? ge??idi adresi yap??land??r??l??r.
NOT: A??a????daki ??rnekte muhtemel kullan??c?? se??enekleri veya varsay??lan de??erler [ ] i??erisinde g??sterilmi??tir. Herhangi bir se??ene??i belirlemeden <Enter> tu??una basarsan??z varsay??lan de??er kabul edilir. Yard??m metni parantez i??erisindedir.
390 Ba??lang???? K??lavuzu
Dell Kolay Kurulum Sihirbaz?? Konsol ??rne??i
A??a????daki ??rnekte, yukar??da listelenen girdi de??erleri kullan??larak Dell Kolay Kurulum Sihirbaz?? ??rnek oturumunun ??al????t??r??lmas??na ili??kin istem ve cevaplar yer al??r.
Anahtar POST i??lemini tamamlad??ktan ve ??ny??kleme yap??ld??ktan sonra a??a????daki ileti??im kutusu g??r??nt??lenir:
Birim 1 ??? Y??netim birimi se??mek i??in bekliyor)>
Genel yap??land??rma uygulan??yor, l??tfen bekleyin ...
Dell Kolay Kurulum Sihirbaz??na Ho?? Geldiniz
Kurulum Sihirbaz??, ba??lang???? anahtar yap??land??rmas??n?? yapman??za yard??mc?? olur ve m??mk??n olan en k??sa s??rede anahtar?? ??al??????r duruma getirmenizi sa??lar. Kurulum sihirbaz??ndan ????karak anahtar?? man??el olarak yap??land??rmak i??in CLI moduna ge??ebilirsiniz. Kurulum sihirbaz??n?? ??al????t??rmak i??in bir sonraki soruya 60 saniye i??erisinde cevap vermelisiniz aksi takdirde sistem varsay??lan sistem yap??land??rmas??n?? kullanarak normal ??al????mas??na devam edecektir. Not: [Ctrl+z] tu??lar??na basarak herhangi bir a??amada kurulum sihirbaz??ndan ????kabilirsiniz.
Kurulum sihirbaz??n?? ??al????t??rmak istiyor musunuz (bu soruya 60 saniye i??inde cevap vermelisiniz)? [E/H] e
Ad??m 1:
Sistem varsay??lan olarak SNMP y??netimi i??in ayarlanmam????t??r. SNMP kullanarak anahtar?? y??netmek i??in (Dell A?? Y??neticisi i??in gereklidir)
. Ba??lang???? SNMP s??r??m 2 hesab??n?? ??imdi olu??turabilirsiniz.
.Daha sonra geri d??nerek di??er SNMP hesaplar??n??
SNMP y??netim arabirimini ??imdi ayarlamak istiyor musunuz? [E/H] e

SNMP y??netim hesab??n?? olu??turmak i??in y??netim sistemi IP adresini ve anahtara eri??mek i??in belirli y??netim sistemlerinin kulland?????? ???ortak dizgi??? veya parolay?? belirlemelisiniz. Sihirbaz en y??ksek eri??im seviyesini [Ayr??cal??k Seviyesi 15] otomatik olarak bu hesaba verir. Bu ayar?? de??i??tirmek i??in Dell A?? Y??neticisini veya di??er y??netim arabirimlerini kullanabilir ve ilave y??netim sistem bilgilerini daha sonra ekleyebilirsiniz. Y??netim sistemlerinin eklenmesi hakk??nda daha fazla bilgi i??in kullan??c?? belgelerine bak??n.
Bir y??netim istasyonu eklemek i??in:
L??tfen kullan??lacak olan SNMP ortak dizgesini girin. [public]: public
NOT: Yap??land??r??lm????sa, varsay??lan eri??im seviyesi SNMP y??netim aray??z?? i??in m??mk??n olan en y??ksek eri??im seviyesidir. Ba??lang????ta sadece SNMPv2 aktif edilecektir. SNMPv3 i??in g??venlik eri??imini yap??land??rmak ??zere geri d??nene kadar SNMPv3 devre d??????d??r (??rne??in motor ID, g??r??nt??leme vs.).
L??tfen Y??netim Sisteminin IP adresini (A.B.C.D) veya herhangi bir Y??netim ??stasyonundan y??netmek i??in wildcard (0.0.0.0) IP adresini girin. [0.0.0.0]:
10.1.2.100
Ad??m 2:
??imdi ilk ayr??cal??kl?? (Seviye 15) kullan??c?? hesab??n??z?? olu??turman??z gerekir. Bu hesap CLI ve Web arabirimine oturum a??mak i??in kullan??l??r. Ba??ka hesaplar olu??turabilir ve ayr??cal??k seviyelerini daha sonra de??i??tirebilirsiniz. Kullan??c?? hesab?? olu??turma ve ayr??cal??k seviyesini de??i??tirme hakk??nda daha fazla bilgi i??in kullan??c?? belgelerine bak??n??z.
Bir kullan??c?? hesab?? olu??turmak i??in:
L??tfen kullan??c?? ad??n?? girin. [root]:admin
L??tfen kullan??c?? parolas??n?? girin: ********
L??tfen kullan??c?? parolas??n?? tekrar girin: ********
392 Ba??lang???? K??lavuzu
Ad??m 3:
Daha sonra, OOB (Bant D??????) arabirimi ve/veya VLAN 1 y??nlendirme arabirimi ??zerindeki IP adresleri ayarlan??r.
Bu IP adreslerini anahtar??n CLI, Web arabirimi veya SNMP arabirimine eri??im i??in kullanabilirsiniz.
Herhangi bir Y??netim Arabirimi ??zerinden anahtara eri??mek i??in
.Y??netim Arabirimi i??in IP adresini ayarlay??n.
. IP adresi hem y??nlendirme hem de OOB arabiriminde man??el olarak yap??land??r??ld??ysa varsay??lan a?? ge??idini ayarlay??n.
Bant d?????? arabirimini ??imdi ayarlamak istiyor musunuz? [E/H] e
L??tfen ayg??t??n IP adresini (A.B.C.D) girin veya a?? DHCP sunucusundan otomatik olarak bir IP adresi talep etmek i??in ???DHCP??? (t??rnak olmadan) girin. [DHCP]: dhcp
Ad??m 4:
VLAN 1 y??nlendirme arabirimini ??imdi ayarlamak istiyor musunuz? [E/H] e
L??tfen ayg??t??n IP adresini (A.B.C.D) girin veya a?? DHCP sunucusundan otomatik olarak bir IP adresi talep etmek i??in ???DHCP??? (t??rnak olmadan) girin: 10.1.1.200
L??tfen IP alt a?? maskesini (A.B.C.D veya /nn) girin:
255.255.255.0
Ad??m 5:
Son olarak varsay??lan a?? ge??idini ayarlay??n. L??tfen ??zerinden bu a??a eri??imin sa??land?????? a?? ge??idinin IP adresini girin. [0.0.0.0]: 10.1.1.1
Toplanan yap??land??rma bilgileri a??a????dad??r:

SNMP Arabirimi = "public"@10.1.2.100 Kullan??c?? Hesap ayar?? = admin Parola = ********
Bant D?????? IP adresi = DHCP
VLAN1 Y??nlendirici Arabirimi IP Adresi = 10.1.1.200 255.255.255.0
Varsay??lan A?? Ge??idi = 10.1.1.1
Ad??m 6:
Bilgiler do??ruysa l??tfen yap??land??rmay?? kaydetmek i??in (E) se??ene??ini belirleyin ve ba??latma yap??land??rma dosyas??n?? ayarlara kopyalay??n. Bilgiler hatal??ysa yap??land??rmadan ????kmak ve sihirbaz?? yeniden ba??latmak i??in (H) se??ene??ini belirleyin: [E/H] e
Dell Kolay Kurulum Sihirbaz??n?? kulland??????n??z i??in te??ekk??r ederiz. ??imdi CLI moduna ge??eceksiniz.
Arabirim yap??land??rma uygulan??yor, l??tfen bekleyin
...
Sonraki Ad??mlar
Bu k??s??mda a????klanan ba??lang???? yap??land??rmas??n?? tamamlad??ktan sonra bant d?????? uzaktan y??netim i??in OOB ba??lant?? noktas??n?? y??netim a????n??za ba??layabilirisiniz veya bant i??i uzaktan y??netim i??in ??n panel anahtar ba??lant?? noktalar??n?? ??retim a????n??za ba??layabilirsiniz.
OOB veya VLAN 1 y??netim arabirimi IP adresi i??in DHCP belirlediyseniz, arabirim kendi IP adresini a?? ??zerindeki bir DHCP sunucudan alacakt??r. Dinamik olarak atanm???? IP adresini ????renmek i??in konsol ba??lant?? noktas??ndan a??a????daki komutlar?? verin:
???OOB arabirimi i??in show ip interface out-of-band komutunu girin.
???VLAN 1 y??nlendirme arabirimi i??in show ip interface komutunu girin.
Dell OpenManage Anahtar Y??neticisi arabirimine eri??mek i??in OOB y??netim arabirimi IP adresini bir Web taray??c??s??n??n adres alan??na girin. CLI???a uzaktan y??netim eri??imi i??in VLAN 1 y??netim arabirimi IP adresini bir Telnet veya SSH istemcisine girin. Alternatif olarak, anahtara yerel CLI eri??imi i??in konsol ba??lant?? noktas??n?? kullanmaya devam edebilirsiniz.
394 Ba??lang???? K??lavuzu
N30xx anahtar??n??z VLAN'lar ve kapsama a??ac?? protokol?? gibi temel anahtarlama ??zelliklerini destekler. N30xx anahtarlar??, dinamik y??nlendirme veya multicast (??oklu g??nderim) gibi geli??mi?? Layer 3 ??zelliklerini de destekler. A????n??z??n gerektirdi??i ??zellikleri yap??land??rmak i??in Web tabanl?? y??netim arabirimi veya CLI kullan??n. Anahtar ??zelliklerini yap??land??rma hakk??nda bilgi i??in, bkz. Kullan??c?? Yap??land??rma K??lavuzu veya dell.com/support/manuals destek sitesi i??indeki CLI Ba??vuru K??lavuzu.
396 Ba??lang???? K??lavuzu
???????????? ?????????? ?????????? | 460
?????????? ????????????
?????????? ???? ???????? ???????? , ???? ?????????? ???????????? ???????????????? ???????????? ?????????? ???? ???????????? ???????? ???????? ???? , ???????? ???????? ?????? ?????????? ?????????? ???? ???????????? ???????? ?????? ?????? ???????????? ?????? ???? OoB-?? ?????????? ???? ???????????? ???????? ?????? ?????? ???????????? ???????? ???? ?????????? ???????? ?????????????? ???????????????? ??????
.???????? ???????? ?????? ??????????
?????????? ,VLAN 1 ???????? ???? OoB ???????????? ???????? ???? IP-?? ???????????? DHCP ?????????? ???? ?????????????? IP-?? ?????????? ???? ?????????? ?????? .???????? DHCP ???????? ?????? IP-?? ?????????? ???? ????????
: ?????????? ?????????????? ???? ???????????? ?????? ?????????? ?????????? ???? ???????????? ?????????? ,?????????? ??????????
?????????? ???? ?????? ,Dell OpenManage Switch Administrator ?????????? ???????? ???????? ?????? ???????? ?????????? ???????? ?????? .?????????????? ?????????? ???? ???????????? ???????? OOB-?? ???????? ???? IP-??
?????????? VLAN 1 ???? ???????????? ???????? ???? IP-?? ?????????? ???? ?????? ,???????????? ?????????? ?????????????? ?????? ???????? ???? ?????????? ?????????? ???????????? ???????????? ???????????? ???????? ,?????????????? .SSH ???? Telnet
.???????????? ?????????? ????????
Spanning ?????????????????? VLAN ?????????? ?????? ?????????????? ?????????? ?????????????? ???????? N30xx ?????? ???????????? ?????????? ?????????? ???????? ,3 ???????? ???? ?????????????? ?????????????? ???? ???????????? N30xx ???????? .Tree
???????????? ?????? ???????????? ?????????? ???? ???????????????? ?????????? ???????????? ?????????? ?????????? .???????????? ???????????? , ???????? ???????????? ?????????? ???? ???????? ???????? ?????????? .?????? ???????? ?????????????? ?????????????? ?????????? ????
?????????????? ???????????? ???????? ???????? ???? ???????? ???????????? ???? ???????????? ???????????? ???????????? ????????
.dell.com/support/manuals :???????????? ,???????????? ???????? ????????????
459 | ???????????? ?????????? ??????????
DHCP = ?????????? ?????????? IP-?? ??????????
10.1.1.200 255.255.255.0 = VLAN1 ???? ???????????? ????????
(10.1.1.1 = ???????? ?????????? ??????
Step 6:
(:6 ??????)
If the information is correct, please enter (Y) to save the configuration and copy the settings to the start-up configuration file. If the information is incorrect, enter (N) to discard the configuration and restart the wizard: [Y/N] y
?????????????? ???????????? ???? ?????????? ?????? [??] ?????? ,???????? ?????????? ????) ?????? (??) ?????? ,???????? ?????????? ???? .???????????? ???? ???????????? ???????? ???? ?? (??/??) :???????? ???? ???????? ?????????????? ???????????? ???? ??????????
Thank you for using the Dell Easy Setup Wizard. You will now enter CLI mode.
?????? .Dell ???? ???????? ???????????? ???????? ???????????? ???? ???? ?????????? ??????) (.CLI ???????? ??????????
Applying Interface configuration, please wait...
(...???????? ,???????? ?????????? ????????)
???????????? ?????????? ?????????? | 458
Step 4:
(:4 ??????)
Would you like to set up the VLAN1 routing interface now? [Y/N] y
(?VLAN1 ???? ???????????? ???????? ???? ?????? ???????????? ???????????? ??????)
?? (??/??) [Y/N]
Please enter the IP address of the device (A.B.C.D) or enter "DHCP" (without the quotes) to automatically
request an IP address from the network DHCP server.
10.1.1.200
?????? ???? (A.B.C.D) ?????????? ???? IP-?? ?????????? ???? ?????? ????)
?????????????? ?????????? IP ?????????? ???????? ?????? [???????????????? ??????] "DHCP" (10.1.1.200 :???????? ???? DHCP-?? ????????
Please enter the IP subnet mask (A.B.C.D or /nn):
255.255.255.0
:(/nn ???? A.B.C.D) IP-?? ?????????? ???? ???????? ?????? ?????????? ??????)
255.255.255.0
Step 5:
(:5 ??????)
Finally, set up the default gateway. Please enter the IP address of the gateway from which this network is reachable. [0.0.0.0]: 10.1.1.1
???? IP-?? ?????????? ???? ?????? .?????????? ?????????? ?????? ???? ???????? ,?????????? 10.1.1.1 :[0.0.0.0] .???? ???????? ???????? ???????????? ?????????? ????????
This is the configuration information that has been collected:
(:?????????? ???????????? ???????? ??????)
SNMP Interface = ???public???@10.1.2.100 User Account setup = admin
Password = ********
Out-of-band IP address = DHCP
VLAN1 Router Interface IP = 10.1.1.200 255.255.255.0 Default Gateway = 10.1.1.1
???public???@10.1.2.100 = SNMP Interface) admin = ?????????? ?????????? ??????????
******** = ??????????
457 | ???????????? ?????????? ??????????
Please enter the user password: ********
******** :???????????? ?????????? ???? ?????? ????)
Please reenter the user password: ********
******** (:???????????? ?????????? ???? ???????? ?????? ????)
Step 3:
(:3 ??????)
Next, IP addresses are set up on the OOB (Out-Of- Band) Interface and/or the VLAN 1 routing interface.
?????????? ???????????? ???????????? ?????????? IP ???????????? ???????????? ,?????? ????????) (.VLAN 1 ???? ???????????? ?????????? ????/?? (OoB) ????????
You can use these IP addresses to access the CLI, Web interface, or SNMP interface of the switch.
?????????? ???? ???????? ???????? ?????? ?????? IP ?????????????? ???????????? ????????) (.???????? ???? SNMP-?? ???? ???????????????? ,CLI-??
To access the switch through any Management Interface you can
. Set up the IP address for the Management Interface
. Set up the default gateway if IP address is manually configured on both routing and OOB interface.
,???????????? ???????????? ?????? ?????????????? ???????? ???? ???????? ???????? ??????) ????????
.???????????? ???????? ???? IP-?? ?????????? ???? ???????????? .
???????????? IP-?? ?????????? ???? ?????????? ?????????? ?????? ???? ???????????? .
.(OoB ?????????? ?????? ???????????? ?????????? ???? ??????????
Would you like to set up the Out-Of-Band interface now? [Y/N] y
(?? (??/??) ??????? OoB-?? ???????? ???? ???????????? ???????????? ??????)
Please enter the IP address of the device (A.B.C.D) or enter "DHCP" (without the quotes) to automatically
request an IP address from the network DHCP server. [DHCP]: DHCP
?????? ???? (A.B.C.D) ?????????? ???? IP-?? ?????????? ???? ?????? ????) ?????????????? ?????????? IP ?????????? ???????? ?????? [???????????????? ??????] "DHCP"
(DHCP :[DHCP] .???????? ???? DHCP-?? ????????
???????????? ?????????? ?????????? | 456

???????? ?????????? ?????????? ???? ???????????? ?????????? ???????????? ???????? ???? ?????????? ???????? ,?????????? ???????????? ?????????? ???? ???????? ?????????? .???????? ?????????? (.???????????? ????????????
To add a management station:
(:?????????? ???????? ???????????? ??????)
Please enter the SNMP community string to be used. [public]: public
.???????????? ???????????? ?????? SNMP ?????????? ???????????? ???? ??????) (???????????? :????????????
???????????? ???????? ???????? ???????????? ?????????????? ?????????? ?????? ,???????????? ???? ???????????? ???? :????????
SNMPv3 .???????? SNMPv2 ?????????? ?????????? .SNMP ???? ???????????? ???????? ???????? ?????????? ???????? ,????????????) SNMPv3 ???????? ???????????? ???????? ???? ???????????? ???? ?????????? ???? ??????????
.('?????? ?????????? ,????????
Please enter the IP address of the Management System
(A.B.C.D) or wildcard (0.0.0.0) to manage from any Management Station. [0.0.0.0]: 10.1.2.100
?????????? ???? (A.B.C.D) ???????????? ?????????? ???? IP ?????????? ??????
.?????????? ?????????? ???????? ???????? ???????????? (0.0.0.0) ????????????
(10.1.2.100 :[0.0.0.0]
Step 2:
(:3 ??????)
Now we need to set up your initial privilege (Level 15) user account. This account is used to login to the CLI and Web interface. You may set up other accounts and change privilege levels later. For more information on setting up user accounts and changing privilege levels, see the user documentation.
???????????????? ???????????? ?????? ???????????? ?????????? ???? ???????????? ?????????? ??????) CLI-?? ?????????? ???? ???????????? ???????? ???? ?????????? .[15 ??????] ?????? ???????? ???? ???????????? ?????????? ?????????????? ???????????? ???????? .?????????????????? ?????????????? ?????????? ???? ???????? ???????? ?????????? .???????? ?????????? ????????????
.???????????? ???????????? ???????? ,?????????? ???????? ???????????? ??????????
To set up a user account:
(:?????????? ?????????? ???????????? ??????)
Please enter the user name.[root]:admin
admin :[root] .???????????? ???? ???? ??????)
455 | ???????????? ?????????? ??????????
Step 1:
(:1 ??????)
The system is not set up for SNMP management by default. To manage the switch using SNMP (required for Dell Network Manager) you can
. Set up the initial SNMP version 2 account now.
. Return later and set up other SNMP accounts. (For more information on setting up an SNMP version 1 or 3 account, see the user documentation)
???????? ?????? .???????? ???????????? SNMP ???????????? ???????????? ???????? ????????????) [Dell ???? ???????? ???????? ???????? ????????] SNMP ?????????????? ???????? ???? ????????????????
.2 ???????? SNMP ???? ?????????? ?????????? ?????? ???????????? .
.???????????? SNMP ?????????????? ?????????????? ???????? ?????????? ?????????? . ,3 ???? 1 ???????? SNMP ?????????? ?????????? ???? ???????? ???????? ??????????)
.(???????????? ???????????? ????????
Would you like to set up the SNMP management interface now? [Y/N] y
?? (??/??) ??????? SNMP-?? ?????????? ???????? ???? ???????????? ???????????? ??????)
To set up the SNMP management account you must specify the management system IP address and the "community string" or password that the particular management system uses to access the switch. The wizard automatically assigns the highest access level [Privilege Level 15] to this account. You can use Dell Network Manager or other management interfaces to change this setting, and to add additional management system information later. For more information on adding management systems, see the user documentation.
?????????? ???? ?????????? ???????? ,SNMP ?????????? ?????????? ???????????? ??????) ???????????? ???? ???? "???????????? ????????????" ?????? ???????????? ?????????? ???? IP-?? ???????? .???????? ???????? ?????????? ???????????????? ???????????? ?????????? ???? ???????????? ???????????? [15 ?????????? ??????] ?????????? ???????????? ?????????? ?????? ???? ???????? Dell Network Manager-?? ???????????? ???????? .?????????????? ?????????? ,???? ?????????? ?????? ?????????? ?????????? ???????????? ???? (Dell ???? ?????? ????????)
???????????? ?????????? ?????????? | 454
Dell ???? Easy Setup Wizard ?????????? ??????????
???? ???????????? ???????????? ???????????????? ???????????????? ?????????????? ?????? ???? ?????????? ???????? ????????????
.???????? ???????????????? ???????? ?????????? ?????????? ?????? ,Dell ???? Easy Setup Wizard
:???????? ??????-?????? ???????? ???????????? ,???????? ???????????? POST ?????????? ?????????? ????????
Unit 1 ??? Waiting to select management unit) >
<(?????????? ?????????? ???????????? ?????????? ??? 1 ??????????)
Applying configuration, please wait...
(???????? ,?????????? ????????)
Welcome to Dell Easy Setup Wizard
(Dell ???? ???????? ???????????? ???????? ?????? ????????)
The Setup Wizard guides you through the initial switch configuration, and gets you up and running as quickly as possible. You can skip the setup wizard, and enter CLI mode to manually configure the switch. You must respond to the next question to run the setup wizard within 60 seconds, otherwise the system will continue with normal operation using the default system configuration. Note: You can exit the setup wizard at any point by entering [ctrl+z].
???? ???????????????? ???????????? ?????????? ???????????? ???????? ???????? ???????????? ??????) ?????? ?????? ?????????????? ???????????? ?????????? ???? ?????????? ?????? ,???????? CLI ???????? ?????????????? ???????????? ?????? ???? ???????? ???????????????? .??????????
.???????? ?????????? ???????? ?????????? ???? ???????????? ?????? [?????????? ????????] 60 ???????? ???????????? ?????? ???????????? ???????? ?????????? ?????????? ???????? ?????????? ?????????????? ?????????? ?????????? ?????????? ???????????? ???????? ,?????????? ???????? ???????? ???????????????? :???????? .???????????? ???? ?????????? ??????????
.[ctrl+z] ???? ???????? ?????? ???? ?????? ?????? ????????????
Would you like to run the setup wizard (you must answer this question within 60 seconds)? [Y/N] y
???????? ???? ?????????? ????????] ???????????? ?????? ???? ???????????? ???????????? ??????) ?? (??/??) ?[?????????? 60 ???????? ????
453 | ???????????? ?????????? ??????????
???????????? ??????????
???????? ???????????? ???????????? .Dell ???? Easy Setup Wizard ???? ?????????? ???????? ???? ???????? :?????????? ???????????? ??????????
???????? . ???????? ???????????????? ?????????????????? ???????????? ???? ???????????? ???? ???????? ???????????? ?????? :???????????? ???????? ???????? ?????????? ,???????? ?????????? ????????????
???????? ?????????? ???????? ???? ?????????? ???????? ?????????????? ?????????????????? ,???????? ???????????? :????????
?????????? ?????? ?????????? ,???????????????? ???????????? ???????? <Enter> ???? ???????? ???? .[ ] ???????? ??????????????
.???????????????? ?????????? ???????? ???????? .??????????
???????????? ?????????? ?????????? | 452

???????????????? ???????????? ?????????? ??????????
???? Easy Setup Wizard ?????????????? ?????????????????? ???????????? ???????????? ???? ?????????? ????????????????
???????? ???????? ?????????????? ?????????? ?????????? ???????? .???????????? ???????? ???????? ?????????????? ???? Dell ???? ,[ctrl+z] ???? ???????? ?????? ???? ???? ?????? ?????????? ???????? ???????????????? .?????? ???????? ???? ????????????
. ?????????? ?????????? ?????????? ?????????? ?????????? ???????????? ???????????? ???????????? ???????????? ????
???????????? ???????? ?????? ???? Dell ???? Easy Setup Wizard ???? ?????????? ???? ???? :???????? ???????? ?????????? ?????????? ???????? ,?????????? 60 ???????? Easy Setup Wizard ???? ???????????????? ???? ???????? ???????????? ?????? ???????? ?????????? ?????????? ???? ???????? ???? ???????? ???????? .????????????
.Dell ???? Easy Setup Wizard
???????? ,(CLI) ???????????? ???????? ???????? ?????????????? ?????????????? ?????????? ?????????? ???? ???????? ???????? ??????????
???????? ???????? ???????????? ?????????? ?????????? .(???????????? ????????) CLI-?? ?????????? ???????? ????????????
???????? .???????? ???? ?????????????? ?????????? ???????????? Dell ???? Easy Setup Wizard-?? ???????????? :???????? ???????????? ???? ???????? ??????????
451 | ???????????? ?????????? ??????????

N30xx ???? ???????????????? ???????????? ??????????
: ?????????? ???????????? ???? ?????????? ???????????????? ???????????? ?????????? ??????????
???????????? ?????????? ???????? . ?????????? ?????????? ?????? ???????????? ???????? ???? ???????????????? ???????????? ?????????? ?????? ?????????? ?????? ?????? ?????????? ?????????? ?????????? ???????? ???? ???????? ???? ???????? ???????? ,????????????????
. ???????????????? ???????????? ?????????? ?????????? ???????????? ???????? ?????????????? ,??????????
?????????? .???????? ???????????? ???????????? ???????????? ???? ?????????? ???? ???? ?????????? ???????? ???????? :????????
.(OOB) ?????????? ?????????? ?????????? ???????? DHCP-?? ???????????? ???????? ???????????? ?????????????? IP-??
:?????????? ???????????? ???? ???????? ?????????? ?????? ,???????? ???? ???????????????? ???????????? ?????????? ?????????? ????????
(Telnet ????????) Telnet ?????????????? ???????? ???? ?????????? ?????????? ?????????? ?????? ???????????? ?????? ????????????
.(?????????????? ??????????) HTTP ????
?????????? ?????????? ??????????
?????????? .OOB ???????????? Gigabit Ethernet ?????????? ???????? N30xx ???????? ???? ?????????? ???????? ???? OOB-?? ???????????? ???????????? ???????? ,N30xx ?????????? . ?????????? ???????????? ?????????? ?????????? OoB
???? ,?????????? ???????????? .???????? ??????????- ???????????? ???????????? ?????????? ?????????? ???????????????? ?????? ??????
.VLAN 1-?? ?????????? ???????? ?????????? ?????????????? ??????????????
???????????? ?????? ???????? ???????? ???????? ???????????? ???????????? ???????? Dell ???? Easy Setup Wizard-?? ???????????? ?????? ?????? .N30xx ?????????? VLAN 1 ???????? ?????????? N30xx ???????? OOB ????
DHCP ???????????? ???? ???????? ?????? ?????????? ?????????? IP ?????????? ???????????? ?????????? ???????? ????????????
.?????????????? ???? ???????????? DHCP ???????? ????????????
???????? , ???????? ???????? ???? ???????????? ???????????? ?????????????? ???????????? ???????? ???????????? ???? ???????? ??????????
.???????????? ???????? ???????? ???? ???????? ????????????
???????????? ?????????? ?????????? | 450
N30xx ???????? ??????????
?????? ?????????? ?????????? ???????? ???????? , ?????????? ?????? ???????????? ?????????? ???????? ???????? ?????????? ?????? ???? ???????????? ?????????????? ,???????? ???? ?????????? ???? ???? ???????????? POST ?????????? .(POST) ???????????? ?????????? ???? . ???????????? ?????????? ???????? ???????????? ???????? ???????? ???? ?????????? ?????? ???????????? ?????????? ,???????????? ?????????? POST ?????????? ???? .???????????? ?????????????? ?????????? ,???????????? ???????? ???????? POST ?????????? ???????????? POST ???????????? .RAM ?????????????? ?????????? ?????????? ???????? ???? ???????? ??????????
.?????????? 60-?? ???????? ???????????? ?????????? . ?????????? ???? ???????????? ?????????? ???????????? ???? ????????????????
.POST-?? ?????????? ???? ???????????? ???????? ?????????? ???????? (??????????) Boot ?????????? ???? ???????????? ???????? ?????????? ?????????? ???????????? ?????????? ?????? ?????????? ?????????? ???????????? ???????? ???????? ,Boot ???????????? ???????? ?????????? .?????????? ???? ?????????? ???? ???????????? ?????????? ???? ?????????? ,?????????? ???? ?????????? ??????????
.???????????? ???????? ???????? ???? ???????? ???????????? ???????? ,Boot ???????????? ?????????????????? ???? ????????
449 | ???????????? ?????????? ??????????
?????????? ?????????? ?????????? N3048 .1-25 ????????
.???????? ?????????? Ethernet ???????????? ???????????? ?????????? ?????????? ???????????? ???????????? RJ-45-?? ??????????
?????? ?????????? N30xx ?????? ??????????
?????? ???????????? ???????????? ???????????? ???????? ???????????? ???????????????? ?????????? ???? ?????? :??????????
.???? ???????? ???? ???? ???????? ???????????? ?????? ?????? ?????? ?????????? ???????????????? ??????????
.???????????? ???????????? ???? ?????????????? FRU ???????? ?????? ???????? ?????? ???? N30xx ??????????
??"???? ??"???? ??????????
N3048 ???????? ???????????? ?????? ???????? ?????? .1-26 ????????
???????????? ?????????? ?????????? | 448

?????????? N30xx ?????? ??????????
.???????? ???? ?????????? ???????????? ???????? ???????? ?????? ,?????????????????? ???????????????? ???? ?????????? ????????
?????????? ???? ???????????? ???????? .???? ???????? ???????? ?????????? ?????????? ???? ?????? ,???????????? ???????? :????????
.dell.com/support/manuals ???????????? ,Dell ???? ???????????? ???????? ??????????
???????????? ???????? ???????????? ???????????? ???? ?????????? ?????????????? ?????????? ???? ?????????? ?????????? :????????
.dell.com/support/manuals ?????? ,Dell ????
?????????? ???????????? ?????????? , ???????? ???????? ?????????????? ???????????? ???? ?????????????? ???????? ???? ???????? ?????? ???? VT100 ?????????? ???????? ???????? ?????? (448 ?????????? 1-25 ???????? ??????) ???????? ???? ?????????? ??????????
?????????? ???????????? ?????????? ?????????? .VT100 ???????? ?????????????? ?????????? ?????????? ?????? ??????????
.(DTE) data terminal equipment
:?????????? ?????????? ?????????? ???????????? ,?????????? ???????????? ???????????? ??????
???????? ???????? ?????? ?????????? ?????????? ?????? ?????????? ???????????? ?????????? ?????????? ?????????? ???????? :????????
.???????? ?????? ???????? ???????? ???? ?????????? ?????????? ???????? ?????? ?????? .???????????? ????????????
447 | ???????????? ?????????? ??????????
?????????? ?????????? ?????????? .1-23 ????????
?????????????? ???????????????? ???? ?????????? ???????? ???????? ?????????????????????? ???????????? ???????????? ,1-23 ?????????? :???????????? ?????? ??????????
???????????? ???????? ?????? ??????????
???????? ?????? ???? ?????????? ???????????? ???????????? ???????????? ,?????????? ???????????? ?????????? ???????????? ?????????? ???????????? ?????????? ,???????????? ?????????? ?????????? ???????? ???????????? ???????? .?????????? ???????? ???? ?????????? ???????????? ?????????? ???????????? ?????????????? ?????? ???? ???? ?????????????? ?????????? ?????? ???? ???????????? ???? ???????????? ???????????? ???? ?????????????? ???????? ???????? ?????????? ???????? ???????????? ???????????? .??????????????
???????????? ???????? ,?????? ???? ; ???????????? ???????????? ?????????????? ?????????? ?????????? ???????????? ?????????? .???????????? ?????????? . ?????????? ???????????? ?????????? ???????????? ???????? ?????????? ?????????? ?????? ???????????? ???????? ??????????
???????? ???????? ???? ???????? ???????????? ???? ???????????? ???????????? ?????????? ???????????? ???????? ,???????? ????????
.????????????
445 | ???????????? ?????????? ??????????

?????????? ???????? ??????????
.?????????? ???????? ???? ???????????? ???????? ?????????? :????????
???????? ???????? ?????????? .?????? ???????? ?????? ???? ???????? ???????? ,?????????? ???????? ???? ?????????? ???????? ????
.???????????? ????????- ???????????? ???????? ???? ?????????? ???????? .???????? ?????????? ???????? ???????? ????
N30xx ???????? ???????????? ?????????? ??????????
?????????????? mini-SAS ???????????? ?????????????? N30xx ???????? 12 ???? ???? ???????????? ?????????? ???????????????? ???????????? ???????? .???????? ?????????? N30xx ???????? ???? ???????????? ???????????? N30xx ???????? .???????? ??????
???????????? 576 ???? ???? ?????? ???????????? ?????????????? ???? ,?????????? ???????????? ?????????????? ???????????? ??????????
.?????? ???????????? ?????????????? ?????????? ???????????? .?????????? ????????
???? ?????????? ???????????? ???? ???????????? ???????? ,?????????? ???? ?????????? ?????????? ?????? ???? :????????
,?????????? ???????????? ???? ?????????? ?????????? ???????? .???????????? ???????????? ?????????? ???????????? ???????? ???????????? ,???????????? ???????????? .???????????? ???????? ?????? ?????????? ?????????? ?????????? ,???????? ?????? ?????????? ????????????
.?????????? ???????? ?????????? ?????????? ???????? ??????????
?????????? ?????????? ??????????
???????? mini-SAS ???? ???????????? ???????????? ?????????????? ???????????? ???????????? ?????????? ??????-???? ?????????? ?????? ,???????? ?????????????????????? ???????????????? ???????????? ???? ???????? 445 ?????????? 1-23 ???????? .???????? ???? ????????????
.???????????? ?????????????? ???????????????????? ????????
???????????? ?????????? ?????????? | 444
???????????? ?????????? ???? ?????????? ???? ??????????
???????????? ?????????? ???? ?????????? ???? ?????????? .1-22 ????????
443 | ???????????? ?????????? ??????????
???????????? ?????? ???? ???????????? ?????? ???? ???? ??????????
???????????? ???? ???????? ???????????? ???????????? ?????????????? ???? ?????????? ???????????? ?????????? ???? ???????? 1
.1 ???????? ,1-21 ???????? ?????? .(???????????? ????) ?????????? ?????? ?????????? ?????????? ?????????? ??????????
???????????? ?????? ???? ???????????? ?????? ???? ???? ?????????? .1-21 ????????
???????????? ?????????? ?????????? | 442
???????????? ?????? ???? ???????????? ?????? ???? ???? ??????????
?????????? ???? ???? ?????????? ?????????? ?????????????? ???????????????? ???? ?????????? ???? ,???? ?????????? ???????? 1 ?????? ?????????? Torx ?????????? ?????????? .441 ?????????? 1 ???????? ,1-20 ???????? ?????? .ReadyRail
?????? ???? ???? ???????? (???????????? ?????? ???????? ??????) ???????? ???????? ?????? ?????? ???????????? ?????? . ?????????? ?????????? ???? ?????????????? ???????????? ???????????????? ???? ???????? .?????????????? ??????????????????
. ???????????????? ?????????????? ???? ???????????????? ???? ?????????? ????????
???????????? ?????? ???? ???????????? ?????? ???? ???? ?????????? .1-20 ????????
441 | ???????????? ?????????? ??????????

Dell ReadyRail ?????????? ??????????
.???????? ???????????? ?????????? ???? ?????????? ???????????? ???????????? ?????????? ???????????? ReadyRail ?????????? ???? ,???????? ?????? 1U ?????????? ???????????? ?????????? ?????????????? ReadyRail ?????????? ???? ???????????? ????????
?????? ???? ???????????? ?????? ????) ???????? ???? 1U ?????????? ???????????? ???????????????? ???????????? ?????????? ????????
.( ???????????? ?????????? ???? ?????????? ???? ???????????? ?????? ???? ?????????? ???? ,????????????
( ?????????? ?????? ???????? ?????? ???? ???????????? ???????????? ?????????? ??????) ???????? ?????? 1U ???????? ???? ??????????
?????????? ?????? ?????? ?????????? ?????? ,?????? ???????? ?????????? ReadyRail ???? ?????????? ???????? ???????? 1 ???? ?????????? ?????????????? ?????????? ???? ?????? ???? ???????????? ???? ?????????? ?????? .???????????? ?????????? ??????????
?????? ?????????? ???? ?????????????? ?????? ?????????????????? 1 ???????? ,1-19 ?????????? .???????????? ?????????? ??????????
. ???????????? ?????? ?????????? ???????? ?????? ???????????? ???????? ???? ?????????? ????????????
???????? ?????? 1U ???????? ???? ?????????? .1-19 ????????
???????????? ?????????? ?????????? | 440
?????????? N30xx ?????? ??????????
,'???????? 19 ?????????? ???????? ???????????? ?????????????? ???? ???????? ?????? ???? ???????? ???? ???????? ????????????????
?????????? .(?????????? ?????????? ???? ???????????? ?????? ,???????????? ??????????) EIA-310-E ???????? ??????????
.???????????? ?????? ???? ?????????????? ?????????????? 1U ?????????? ???????? ???????? ???????? ???????????? Dell ReadyRail
.?????????? ???????????? ???????????? ???????????? ?????? ?????????? ReadyRail ??????????
???????????? ???????????????? ?????????????? ???????????? ???? ?????????? ???? .?????????? ???????? ?????? :??????????
.???????????? ?????????? ???????? ?????????? ?????????? ???????????? ???????????? ,??????????????
.???????????? ?????? ?????????? ?????????? ???? ???? ?????????? ???????????????? ?????????????? :????????
?????????? ???????????? ???????????? ????????????
439 | ???????????? ?????????? ??????????
?????????????? N30xx ?????? ??????????
???????????? ??????????
:?????????? ?????????????? ???? ?????????????? ?????? ,?????????????? ?????? ???? ?????????? ??????
?????????????? ???????????? ???????????? ??????????
???? ???? ?????????? ?????????? ?????????? ???????????? ?????????? ???? ???????? ,?????????????? ???????? ?????????? ???????? :????????
.???????? ????????
???????????? ?????????? ?????????? | 438
N30xx Series ???????? ??????????
???????? ????????
19) ??"?? 48.26 ?????????? ,?????????????? ?????????? N30xx Series ?????????? ?????????? ???????????? ????????
.???????? ???????? ?????? ???? ???????? ?????????? ???? ,('????????
: ?????????? ?????????????? ???? ???????? ???????????? ?????????? ???????????? ??????
437 | ???????????? ?????????? ??????????
N30xx ?????? ??????????
N30xx ?????? ?????????? .1-2 ????????

?????? ????????
N3048-?? N3024F ,N3024
???????????? ???????????? ??????????' ???????? ?????? ?????????? ???????? N3048-?? N3024F ,N3024 ???????????? ,N3024 ???????????? . ???????? ???????? ?????? ???????????? ???????????????? ?????? 200 ???? (FRU) '???????? ???????????? ?????????? ???????????? ???????????????? V-lock ???????????? ???? ???????????? N3048-?? N3024F
???????????? ?????????? (PSU) ???????? ???????????? ???????????? ???????????? V-lock-?? ?????? .?????????? ????????
.???????????????? ???????????? ?????????? ?????????? ?????????? ?????? V-lock-?? ?????????? ???? ?????????? ????????
N3048P-?? N3024P
???????? ???????? ???? ?????? ?????? ???????? ???????????? Dell Networking ???? N3048P-?? N3024P ???????? ?????? 715 ???? ???????? ?????? ?????? ???? ???????? N3024P ???????? .?????? 1100 ???? FRU ???????? ??????
???????? ???????? .?????? 1100 ???? ?????????? ???? ?????? ?????? ???????? ?????????? (?????????? ?????????? ??????????)
.?????? 1100 ???? ?????? ?????? ?????? ?????????? ?????????? ?????????? ,N3048P
.(950W) ?????? PoE+ ???????? PoE ?????????? 24 ???? ?????????? ???????? ?????? 1100 ???? ???????? ?????? ?????? ?????????????? (?????? 1800) ?????? PoE+ ???????? PoE ?????????? 48 ???? ?????????? ???????? ???????? ???????? ??????????
.?????? ?????? ???? ????????????
.?????? PoE+ ?????? ???????????? ?????????????? ???? ???? .?????????? ?????????? ?????????? PoE ?????? :????????
.?????????? ???????? ?????? ?????????? ???????? ???????? ???????? ?????????? ???????? ?????? ???? ?????? :??????????
.???????????? ?????????? ???????? ?????????? ???????? ???????? ???????? ????????
?????????????? ??????????
?????? ?????? ???????????? ?????????? ???????????? N30xx ?????????? .N30xx ???????? ???? ???????????? ???????????????? ??????
.???????? ???????????? ???????????? ?????????? ?????? N30xx ?????????????? .?????????? ??????
435 | ???????????? ?????????? ??????????
N30xx Series ???????? ???? ???????????? ????????
.N30xx ???????? ???? ???????????????? ???????????? ???? ???????????? ?????????? ??????????????
N30xx ???? ???????????? ???????? .1-16 ????????
N3048P/N3024P ???? ???????????? ???????? .1-17 ????????
N3048 ???? Mini-SAS ?????????? ???????????? ???? ?????????? ?????? .1-18 ????????
?????? .1-18 ???????? ?? ?????????????? ???????????? ???????????? ???? ???????? ?????????????? ???????????? mini-SAS ?????????? mini-SAS ?????????????? ???????????? ???? ???????? ?????????? 'N30xx ???????? ???????????? ?????????? ??????????'
.?????????? ????????????
Plug-in ?????????????? ?????????? ??????????
:?????????? ???????????????? ?????????? ?????????? ,N30xx ???????? ???? ???????????? ???????? ???????? ?????? ?????????? ????????
???? ,?????? ???????????? ?????????? ???????????? plug-in-?? ???????????? .???????????? ?????? ???? plug-in ?????????? ??????
. ?????? ?????????? ?????????? ???????? ???????? ???????????? ???????? ????????
???????????? ?????????? ?????????? | 434
???????? ?????????? ???????????? ???????????? ??????????
Ethernet ?????????? ?????? (OoB) ???????? ?????????? ???????????? ???????????? ???????????? ?????????? ???? ???????????? ?????????????? .?????????????? ?????????? ???????????? ?????????????? 10/100/1000BASE-T
???????? ???? ???????????? ???????????? ???????? ???????? ???????????? ?????? ?????????????? ?????????????? ???????? ??????????????
.???????? ???? ?????????????? ???????? ???? ????????
USB ??????????
???????? .USB 2.0 ???????? Flash ???????????? ?????????? ?????????? A ???????? ???????? USB ?????????? ???????????????? .FAT-32-?? ?????????????? Flash ?????????? ?????????? ???? ?????????? ???????? Dell Networking ???????? ?????? ???????? ?????????? ???? ?????????????? ?????????? ???????????? ?????? USB Flash ?????????? ????????????
?????????? ???????????? ???????????? ?????????????? ???????????? ?????? ???? ???? ???????????? ???????? .???????? USB Flash-??
.???????? ???????? ?????? ????????
.?????????? ?????? ???????? USB ?????????? ?????????? ???? USB-?? ??????????
?????????? ????????
. ???????? ???? ???????? ?????????? ???????? ?????????? ???????? ?????????? .?????? ?????? ?????? ???????????? ???????? ???? ?????????? ?????????? .???????? ?????? ???? ?????????? ???????????? ???????? ???????? ???? ???????? ,???????????? ???????? ???? ?????????? ?????? ???????????????? ???????????? ?????????? ?????? ?????????? ?????????? ?????? ,???????????? ???????? ???????? ???? ???????????? ?????????? ?????????? ???????? ???????????? ???????????? ?????????? ???? ???????? ???? ???????????? ???????????? ?????????????? .????????????
.?????????? ??? ????????????
???????????? ?????? ?????????????? ???? ?????????? ????????????
???????????? ?????? ,?????????? ???????????? ???? ???????? ???? ???????????????? LED ???????????? ???????? ?????????? ????????
.???????????? ???? ?????????? ?????????? ?????????? ,???????????????? ,?????? ???????? ,????????????
. ???????????? ???????????? ?????????? ???????????? ???????? ,LED-?? ???????????? ???? ???????????? ???????? ???? ???????? ??????????
???????????? ???????? ???????????? ???????? ?????? ??????????
????????????) ?????????? ???????? ???? LED-?? ?????????? ,???????????? ???????? ???????? ?????????? ?????????? ?????? ???????? ?????? .?????????? ???????? ???????? ?????????? ???????? ,?????????? M-?? ?????????? ???????? .?????????? ?????????? (M-?? ?????? ???????? ?????????? ?????? ???? . ?????????? ?????????? ???????????? ???? ?????????? ???? ???????? '???????????? ????????' ?????????? ?????????? M ???????????? ,(?????? ?????? ???? ?????????? ?????? ???????? ,?????????? ????????????) ????????????
.???????? ????????????
433 | ???????????? ?????????? ??????????
???????????? ????????????
Gigabit Ethernet ???????????? 24 ???????? N3024P/N3024 ???? ?????????? ???????? ?????????? , ?????????????? ?????????????? ???????? ???????? ?????????? RJ-45 ???????? (10/100/1000BASE-T)
.SFP+ 10G ???????????? ???????? ???????????? N3024P/N3024 ???????? .???????????? ?????????? ??????????
.?????????? ???????????? Dell ??????-???? ???????????? SFP+ ???????? ??????"??????
Gigabit Ethernet 100BASE- ???????????? 24 ???????? N3024F ???? ?????????? ???????? ??????"?????? .1000BASE-T ???????? ?????????????? ???????????? 2-?? ?????????? FX/1000BASE-X SFP
.?????????? ???????????? Dell ??????-???? ???????????? SFP ????????
,10BASE-T) Gigabit Ethernet ???????????? 48 ???????? N3048P/N3048 ???? ?????????? ???????? , ?????????????? ?????????????? ???????? ???????? ?????????? RJ-45 ???????? (1000BASE-T ,100BASE-TX
.SFP+ 10G ???????????? ???????? ???????????? N3048P/N3048 ???????? .???????????? ?????????? ?????????? ??????????
.?????????? ???????????? Dell ??????-???? ???????????? SFP+ ???????? ??????"??????
: ???????????? ???? ?????????? ?????????? ?????????????? ?????????????? ????????
???????? ??????????
???????????????? ?????????????? ???????????? ???????????? , ?????????? ?????????????? ???????????? ?????????? ?????????? ?????????? ???????? ???????? ???? ???????? ?????????????? ???????? ???????? ?????????? ?????????? ???????????? ???????????? .RS-232
????) ?????????? ?????????? ???????? ?????????????? ???????????? ???? ???????????? ???????? ?????? ???????? ?????? ????????????
.(???????? DB-9 ???????????? RJ45 YOST ??????????
???????? ?????????????????? ???????????? ???????? ???????????? ?????????? ?????????? ???????????? ?????????? ?????????? ???? ????????????
.???????? 115,200 ???? ???????? 1,200-?? ??????????
.???????? ?????????????? ???????????? ???????? Dell ???? ???????????? ???????? ????????
?????????? ,???????????? ?????? ,???????????? ???????????? 8 ,???????? 9,600 ???? ?????????? ?????? ???? ?????????? ?????????? ????????
.?????????? ???????? ?????? ,?????? ??????????
???????????? ?????????? ?????????? | 432
N30xx Series ???????? ???? ???????????? ???????????? .1-14 ????????
.LED ???????????? ?????????? (??????) ?????????? ???????? ???? ???????? ???????? N30xx ???? ?????????? ????????
.1-14 ???????? ??????
?????????? ?????? ??? N30xx .1-15 ????????
?????????? ???????????? ???????? 1-15 ?????????? ?????????? ,N30xxP/N3024F/N30xx ???? ?????????? ???????? ?????????? ???????? ???????? 1 ???????????? ???????? ?????? ?????? ,?????? ?????????????? ???? ???????????? ?????????????? ???????????? ???????? ?????? , ?????????? ???????? ???? ?????????? ???????????? ???????????? ???? ?????????????? ?????????? .??????????????
.?????????????? ???? ?????????????? 2
431 | ???????????? ?????????? ??????????
N30xx Series ???????? ???? ?????????? ????????
???????? ???? ?????????????? ?????? ???? ???? ?????????? ???????? ???? ?????????? ?????????? ??????????????
.N30xx Series
???? ???? ???????? N30xx ?????????? ?????????????? ?????? ???? ???? ?????????? ???????? ,???????? ???????????? ???????? :?????????? ??????????????
(???????? ??????) 10/100/1000BASE-T ???????????? 24 ???? N3024F 1-12 ????????
SFP ?????????? ???? ???????????????? ?????????????? .?????????????? ???????????? ?????? ???????? N30xx ?????????? ????????
.N3024F ???????? 1000BaseT ???????????? N30xx Series ??????????
(???????? ??????) 10/100/1000BASE-T ???????????? 48 ???? N3048 1-13 ????????
1-14 ?????????? 1-13 ?????????? ?????????? , ?????????? ???????? ???? ?????????? ?????? ???????????? ???????????? ????????????
.431 ??????????
???????????? ?????????? ?????????? | 430
???????? ???? ?????????? ??????????
N30xx Series
3 ?????????? 2 ???????? ???? ???????????? ???????????? Gigabit Ethernet ???????? ???? Dell N30xx ???????? :?????????? ???????????? ???? ?????????? ????????????
???????? ?????????? ???? ?????????? ??????????
N30xx Series
?????????? ???????????? ?????????????????? ?????????? ?????????????? ?????????? ?????????????? ???? ???????? ???????? ???? ????????
.N30xx Series
:?????????? ?????????????? ???????????? ???? ,?????????? ???????????? 1U ???????? ???? N30xx ???????? ????
429 | ???????????? ?????????? ??????????
?????????? ????????????
?????? ???? ???????? ???????? , ???? ?????????? ?????????????? ?????????????? ???????????? ?????????? ???? ???????????? ???????? ???? ?? ?????? ?????????? ?????????? ?????????? ?????? ???????????? ???????? ???? ?????????? ?????????? ???????? ??????????????
.?????????? ???????????? ???? ???????? ?????????? ,VLAN 1 ???? ???????????? ???????? ???? IP-?? ???????????? DHCP ?????????? ???? ?????????? ?????????????? IP-?? ?????????? ???? ?????????? ?????? .???????? DHCP ???????? ?????? IP-?? ?????????? : ???????? ???????????? ???? ???????????? ?????? ?????????? ?????????? ???? ???????????? ?????????? ,??????????
.show ip interface ?????? ,VLAN 1 ???? ???????????? ?????????? ??? ?????????? ???? ?????? ,Dell OpenManage Switch Administrator ?????????? ???????? ???????? ?????? ???????? ?????? .?????????????? ?????????? ???? ???????????? ???????? VLAN 1 ???? ???????????? ???????? ???? IP-??
???? ???????????? ???????? ???? IP-?? ?????????? ???? ?????? ,???????????? ?????????? ?????????????? ???????? ?????????? ?????????? ???????????? ???????????? ???????????? ???????? ,?????????????? .SSH ???? Telnet ?????????? VLAN 1
.???????????? ?????????? ???????? ?????? ???????? ???? ?????????? Spanning ?????????????????? VLAN ?????????? ?????? ?????????????? ?????????? ?????????????? ???????? N20xx ?????? ?????????? ???? ???????????? ?????? ???????????? ?????????? ???? ???????????????? ?????????? ???????????? ?????????? ?????????? .Tree ???????????? ???????? , ???????? ???????????? ?????????? ???? ???????? ???????? ?????????? .?????? ???????? ?????????????? ??????????????
???????? ???????????? ?????????????? ???????????? ???????? ???????? ???? ???????? ???????????? ???? ???????????? ????????????
.dell.com/support/manuals :???????????? ,????????????
???????????? ?????????? ?????????? | 428
Step 6:
(:6 ??????)
If the information is correct, please enter (Y) to save the configuration and copy the settings to the start-up configuration file. If the information is incorrect, enter (N) to discard the configuration and restart the wizard: [Y/N] y
???? ?????????????? ???????????? ???? ?????????? ?????? [??] ?????? ,???????? ?????????? ???? ?????? (??) ?????? ,???????? ?????????? ???? .???????????? ???? ???????????? ???????? ?? (??/??) :???????? ???? ???????? ?????????????? ???????????? ???? ??????????
Thank you for using the Dell Easy Setup Wizard. You will now enter CLI mode.
?????? .Dell ???? ???????? ???????????? ???????? ???????????? ???? ???? ?????????? ??????) (.CLI ???????? ??????????
Applying Interface configuration, please wait...
(...???????? ,???????? ?????????? ????????)
427 | ???????????? ?????????? ??????????
?????? ???? (A.B.C.D) ?????????? ???? IP-?? ?????????? ???? ?????? ????)
?????????????? ?????????? IP ?????????? ???????? ?????? [???????????????? ??????] "DHCP" 10.1.1.200 :???????? ???? DHCP-?? ????????
Please enter the IP subnet mask (A.B.C.D or /nn):
255.255.255.0
:(/nn ???? A.B.C.D) IP-?? ?????????? ???? ???????? ?????? ?????????? ??????) (255.255.255.0
Step 5:
(5 ??????)
Finally, set up the default gateway. Please enter the IP address of the gateway from which this network is reachable. [0.0.0.0]: 10.1.1.1
???? IP-?? ?????????? ???? ?????? .?????????? ?????????? ?????? ???? ???????? ,?????????? 10.1.1.1 :[0.0.0.0] .???? ???????? ???????? ???????????? ?????????? ????????
This is the configuration information that has been collected:
SNMP Interface = ???public???@10.1.2.100 User Account setup = admin
Password = ********
VLAN1 Router Interface IP = 10.1.1.200 255.255.255.0 Default Gateway = 10.1.1.1
:?????????? ???????????? ???????? ??????
???public???@10.1.2.100 = SNMP Interface admin = ?????????? ?????????? ??????????
******** = ?????????? 10.1.1.200 255.255.255.0 = VLAN1 ???? ???????????? ????????
10.1.1.1 = ???????? ?????????? ??????
???????????? ?????????? ?????????? | 426
Please enter the user password: ********
(******** :???????????? ?????????? ???? ?????? ????)
Please reenter the user password: ********
******** :???????????? ?????????? ???? ???????? ?????? ????)
Step 3:
(:3 ??????)
Next, an IP address is set up on the VLAN 1 routing interface.
.VLAN 1 ???? ???????????? ?????????? ???????????? IP ?????????? ,?????? ????????
You can use the IP address to access the CLI, Web interface, or SNMP interface of the switch.
?????????? ???? ???????? ???????? ?????? IP-?? ???????????? ???????????? ????????) (.???????? ???? SNMP-?? ???? ???????????????? ,CLI-??
To access the switch through any Management Interface you can
. Set up the IP address for the Management Interface
. Set up the default gateway if IP address is manually configured on both routing and OOB interface.
,???????????? ???????????? ?????? ?????????????? ???????? ???? ???????? ???????? ??????) ????????
.???????????? ???????? ???? IP-?? ?????????? ???? ???????????? .
???????????? IP-?? ?????????? ???? ?????????? ?????????? ?????? ???? ???????????? .
.(???????????? ?????????? ??????????
Step 4:
(:4 ??????)
Would you like to set up the VLAN1 routing interface now? [Y/N] y
?? (??/??) ?VLAN1 ???? ???????????? ???????? ???? ?????? ???????????? ???????????? ??????
Please enter the IP address of the device (A.B.C.D) or enter "DHCP" (without the quotes) to automatically
request an IP address from the network DHCP server.
10.1.1.200
425 | ???????????? ?????????? ??????????

???????????? ?????????? ???? ???????? ?????????? .???????? ?????????? ???????? ?????????? (.???????????? ???????????? ???????? ,??????????
To add a management station:
(:?????????? ???????? ???????????? ??????)
Please enter the SNMP community string to be used. [public]: public
[????????????] .???????????? ???????????? ?????? SNMP ?????????? ???????????? ???? ??????)
????????????
???????????? ???????? ???????? ???????????? ?????????????? ?????????? ?????? ,???????????? ???? ???????????? ???? :????????
SNMPv3 .???????? SNMPv2 ?????????? ?????????? .SNMP ???? ???????????? ???????? ???????? ?????????? ???????? ,????????????) SNMPv3 ???????? ???????????? ???????? ???? ???????????? ???? ?????????? ???? ??????????
.('?????? ?????????? ,????????
Please enter the IP address of the Management System
(A.B.C.D) or wildcard (0.0.0.0) to manage from any Management Station. [0.0.0.0]: 10.1.2.100
?????????? ???? (A.B.C.D) ???????????? ?????????? ???? IP ?????????? ??????)
.?????????? ?????????? ???????? ???????? ???????????? (0.0.0.0) ????????????
(10.1.2.100 :[0.0.0.0]
Step 2:
(:2 ??????)
Now we need to set up your initial privilege (Level 15) user account. This account is used to login to the CLI and Web interface. You may set up other accounts and change privilege levels later. For more information on setting up user accounts and changing privilege levels, see the user documentation.
???????????????? ???????????? ?????? ???????????? ?????????? ???? ???????????? ?????????? ??????) CLI-?? ?????????? ???? ???????????? ???????? ???? ?????????? .[15 ??????] ?????? ???????? ???? ???????????? ?????????? ?????????????? ???????????? ???????? .?????????????????? ?????????????? ?????????? ???? ???????? ???????? ?????????? .???????? ?????????? ???????????? (.???????????? ???????????? ???????? ,?????????? ???????? ???????????? ??????????
To set up a user account:
(:?????????? ?????????? ???????????? ??????)
Please enter the user name. [root]:admin
(admin :[root] :???????????? ???? ???? ??????)
???????????? ?????????? ?????????? | 424
Step 1:
(:1 ??????)
The system is not set up for SNMP management by default. To manage the switch using SNMP (required for Dell Network Manager) you can
. Set up the initial SNMP version 2 account now.
. Return later and set up other SNMP accounts. (For more information on setting up an SNMP version 1 or 3 account, see the user documentation)
?????? .(???????? ???????????? SNMP ???????????? ???????????? ???????? ????????????) ???? ???????? ???????? ???????? ????????] SNMP ?????????????? ???????? ???? ???????? ???????????????? [Dell
.2 ???????? SNMP ???? ?????????? ?????????? ?????? ???????????? .
.???????????? SNMP ?????????????? ?????????????? ???????? ?????????? ?????????? . ,3 ???? 1 ???????? SNMP ?????????? ?????????? ???? ???????? ???????? ??????????)
.(???????????? ???????????? ????????
Would you like to set up the SNMP management interface now? [Y/N] y
?? (??/??) ??????? SNMP-?? ?????????? ???????? ???? ???????????? ???????????? ??????)
To set up the SNMP management account you must specify the management system IP address and the "community string" or password that the particular management system uses to access the switch. The wizard automatically assigns the highest access level [Privilege Level 15] to this account. You can use Dell Network Manager or other management interfaces to change this setting, and to add additional management system information later. For more information on adding management systems, see the user documentation.
?????????? ???? ?????????? ???????? ,SNMP ?????????? ?????????? ???????????? ??????) ???????????? ???? ???? "???????????? ????????????" ?????? ???????????? ?????????? ???? IP-?? ???????? .???????? ???????? ?????????? ???????????????? ???????????? ?????????? ???? ???????????? ???????????? [15 ?????????? ??????] ?????????? ???????????? ?????????? ?????? ???? ???????? Dell Network -?? ???????????? ???????? .?????????????? ?????????? ,???? ?????? ?????????? ?????????? ???????????? ???? (Dell ???? ?????? ????????) Manager ?????????? ???? ???????????? ?????????? ???????????? ???????? ???? ?????????? ??????????
423 | ???????????? ?????????? ??????????
Dell ???? Easy Setup Wizard ?????????? ??????????
???? ???????????? ???????????? ???????????????? ???????????????? ?????????????? ?????? ???? ?????????? ???????? ????????????
.???????? ???????????????? ???????? ?????????? ?????????? ?????? ,Dell ???? Easy Setup Wizard
:???????? ??????-?????? ???????? ???????????? ,???????? ???????????? POST ?????????? ?????????? ????????
Unit 1 ??? Waiting to select management unit)>
<(?????????? ?????????? ???????????? ?????????? ??? 1 ??????????)
Applying configuration, please wait...
(???????? ,?????????? ????????)
Welcome to Dell Easy Setup Wizard
(Dell ???? ???????? ???????????? ???????? ?????? ????????)
The Setup Wizard guides you through the initial switch configuration, and gets you up and running as quickly as possible. You can skip the setup wizard, and enter CLI mode to manually configure the switch. You must respond to the next question to run the setup wizard within 60 seconds, otherwise the system will continue with normal operation using the default system configuration. Note: You can exit the setup wizard at any point by entering [ctrl+z].
???? ???????????????? ???????????? ?????????? ???????????? ???????? ???????? ???????????? ??????) ?????? ?????? ?????????????? ???????????? ?????????? ???? ?????????? ?????? ,???????? CLI ???????? ?????????????? ???????????? ?????? ???? ???????? ???????????????? .??????????
.???????? ?????????? ???????? ?????????? ???? ???????????? ?????? [?????????? ????????] 60 ???????? ???????????? ?????? ???????????? ???????? ?????????? ?????????? ???????? ?????????? ?????????????? ?????????? ?????????? ?????????? ???????????? ???????? ,?????????? ???????? ???????? ???????????????? :???????? .???????????? ???? ?????????? ?????????? (.[ctrl+z] ???? ???????? ?????? ???? ?????? ?????? ????????????
Would you like to run the setup wizard (you must answer this question within 60 seconds)? [Y/N] y
???????? ???? ?????????? ????????] ???????????? ?????? ???? ???????????? ???????????? ??????) ?? (??/??) (?[?????????? 60 ???????? ????
???????????? ?????????? ?????????? | 422
???????????? ??????????
???????? ???????????? ???????????? .Dell ???? Easy Setup Wizard ???? ?????????? ???????? ???? ???????? :?????????? ???????????? ??????????
???????? . ???????? ???????????????? ?????????????????? ???????????? ???? ???????????? ???? ???????? ???????????? ?????? :???????????? ???????? ???????? ?????????? ,???????? ?????????? ????????????
???????? ?????????? ???????? ???? ?????????? ???????? ?????????????? ?????????????????? ,???????? ???????????? :????????
?????????? ?????? ?????????? ,???????????????? ???????????? ???????? <Enter> ???? ???????? ???? .[ ] ???????? ??????????????
.???????????????? ?????????? ???????? ???????? .??????????
421 | ???????????? ?????????? ??????????

???????????????? ???????????? ?????????? ??????????
???? Easy Setup Wizard ?????????????? ?????????????????? ???????????? ???????????? ???? ?????????? ????????????????
???????? ???????? ?????????????? ?????????? ?????????? ???????? .???????????? ???????? ???????? ?????????????? ???? Dell ???? ,[ctrl+z] ???? ???????? ?????? ???? ???? ?????? ?????????? ???????? ???????????????? .?????? ???????? ???? ????????????
. ?????????? ?????????? ?????????? ?????????? ?????????? ???????????? ???????????? ???????????? ???????????? ????
???????????? ???????? ?????? ???? Dell ???? Easy Setup Wizard ???? ?????????? ???? ???? :????????
???????? ?????????? ?????????? ???????? ,?????????? 60 ???????? Easy Setup Wizard ???? ???????????????? Easy ???? ???????? ???????????? ?????? ???????? ?????????? ?????????? ???? ???????? ???? ???????? ???????? .????????????
.Dell ???? Setup Wizard
???????? ,(CLI) ???????????? ???????? ???????? ?????????????? ?????????????? ?????????? ?????????? ???? ???????? ???????? ??????????
???????? ???????? ???????????? ?????????? ?????????? .(???????????? ????????) CLI-?? ?????????? ???????? ????????????
???????? .???????? ???? ?????????????? ?????????? ???????????? Dell ???? Easy Setup Wizard-?? ???????????? :???????? ???????????? ???? ???????? ??????????
???????????? ?????????? ?????????? | 420

N20xx ???? ???????????????? ???????????? ??????????
: ?????????? ???????????? ???? ?????????? ???????????????? ???????????? ?????????? ??????????
???????????? ?????????? ???????? . ?????????? ?????????? ?????? ???????????? ???????? ???? ???????????????? ???????????? ?????????? ?????? ?????????? ?????? ?????? ?????????? ?????????? ?????????? ???????? ???? ???????? ???? ???????? ???????? ,????????????????
. ???????????????? ???????????? ?????????? ?????????? ???????????? ???????? ?????????????? ,??????????
.IP ?????????? ???? ?????????? ,?????????? ?????? ???????? ?????????? ???????? ???????? ???????????? ???? :????????
:?????????? ???????????? ???? ???????? ?????????? ?????? ,???????? ???? ???????????????? ???????????? ?????????? ?????????? ????????
(Telnet ????????) Telnet ?????????????? ???????? ???? ?????????? ?????????? ?????????? ?????? ???????????? ?????? ????????????
.(?????????????? ??????????) HTTP ????
?????????? ?????????? ??????????
???????????? ?????????? ?????????? ???????????????? ?????? ?????? ???????????? ???????? ,N20xx ?????????? ?????????? ???????? ?????????? ?????????????? ?????????????? ???? ,?????????? ???????????? .???????? ??????????-????????????
.VLAN 1-??
???????? ???????? ???????? ???????? ???????????? ???????????? ???????? Dell ???? Easy Setup Wizard-?? ???????????? ???? ???????? ?????? ???????????? ?????????? IP ?????????? ???????????? ???????? .N20xx ???????? VLAN 13
.?????????????? ???? ???????????? ???????? DHCP ???????? ???????????? DHCP
???????? , ???????? ???????? ???? ???????????? ???????????? ?????????????? ???????????? ???????? ???????????? ???? ???????? ??????????
.???????????? ???????? ???????? ???? ???????? ????????????
419 | ???????????? ?????????? ??????????
N20xx ???????? ??????????
?????? ?????????? ?????????? ???????? ???????? , ?????????? ?????? ???????????? ?????????? ???????? ???????? ?????????? ?????? ???? ???????????? ?????????????? ,???????? ???? ?????????? ???? ???? ???????????? POST ?????????? .(POST) ???????????? ?????????? ???? . ???????????? ?????????? ???????? ???????????? ???????? ???????? ???? ?????????? ?????? ???????????? ?????????? ,???????????? ?????????? POST ?????????? ???? .???????????? ?????????????? ?????????? ,???????????? ???????? ???????? POST ?????????? ???????????? POST ???????????? .RAM ?????????????? ?????????? ?????????? ???????? ???? ???????? ??????????
.?????????? 60-?? ???????? ???????????? ?????????? . ?????????? ???? ???????????? ?????????? ???????????? ???? ????????????????
.POST-?? ?????????? ???? ???????????? ???????? ?????????? ???????? (??????????) Boot ?????????? ???? ???????????? ???????? ?????????? ?????????? ???????????? ?????????? ?????? ?????????? ?????????? ???????????? ???????? ???????? ,Boot ???????????? ???????? ?????????? .?????????? ???? ?????????? ???? ???????????? ?????????? ???? ?????????? ,?????????? ???? ?????????? ??????????
.???????????? ???????? ???????? ???? ???????? ???????????? ???????? ,Boot ???????????? ?????????????????? ???? ????????
???????????? ?????????? ?????????? | 418
N2024P ?????? ???? ???????? ?????????? ???? ???????? ?????? .1-10 ????????
?????? ?????????? N20xx ?????? ??????????
?????? ???????????? ???????????? ???????????? ???????? ???????????? ???????????????? ?????????? ???? ?????? :??????????
.???? ???????? ???? ???? ???????? ???????????? ?????? ?????? ?????? ?????????? ???????????????? ??????????
.???????????? ???????? ???????????? ?????????? ???????? .???????? ?????? ?????????? ?????? ?????? ???????????? N20xx ???????? ????
??"???? ??"???? ??????????
?????????? ?????????? ???????? ?????? ???????? ,417 ?????????? 1-11 ?????????? .???????????? ???????? ??????????
.RPS ???????????? ??????????
N2048 ???????? ?????? ???????? ?????????????? ???????? ???????? ?????????? .1-11 ????????
417 | ???????????? ?????????? ??????????

?????????? N20xx ?????? ??????????
.???????? ???? ???????????? ???????????? ???????? ???????? ?????? ,?????????????????? ???????????????? ???? ?????????? ????????
?????????? ???? ???????????? ???????? .???? ???????? ???????? ?????????? ?????????? ???? ?????? ,???????????? ???????? :????????
.dell.com/support/manuals ???????????? ,Dell ???? ???????????? ???????? ??????????
???????????? ???????? ???????????? ???????????? ???? ?????????? ?????????????? ?????????? ???? ?????????? ?????????? :????????
.dell.com/support/manuals ?????? ,Dell ????
?????????? ???????????? ?????????? , ???????? ???????? ?????????????? ???????????? ???? ?????????????? ???????? ???? ???????? ?????? ???? VT100 ?????????? ???????? ???????? ?????? (403 ?????????? 1-1 ???????? ??????) ???????? ???? ?????????? ??????????
?????????? ???????????? ?????????? ?????????? .VT100 ???????? ?????????????? ?????????? ?????????? ?????? ??????????
.(DTE) data terminal equipment
:?????????? ?????????? ?????????? ???????????? ,?????????? ???????????? ???????????? ??????
???????? ???????? ?????? ?????????? ?????????? ?????? ?????????? ???????????? ?????????? ?????????? ?????????? ???????? :????????
.???????? ?????? ???????? ???????? ???? ?????????? ?????????? ???????? ?????? ?????? .???????????? ????????????
???????????? ?????????? ?????????? | 416
???????????? ???????? ?????? ??????????
???????? ?????? ???? ?????????? ???????????? ???????????? ???????????? ,?????????? ???????????? ?????????? ???????????? ?????????? ???????????? ?????????? ,???????????? ?????????? ?????????? ???????? ???????????? ???????? .?????????? ???????? ???? ?????????? ???????????? ?????????? ???????????? ?????????????? ?????? ???? ???? ?????????????? ?????????? ?????? ???? ???????????? ???? ???????????? ???????????? ???? ?????????????? ???????? ???????? ?????????? ???????? ???????????? ???????????? .??????????????
???????????? ???????? ,?????? ???? ; ???????????? ???????????? ?????????????? ?????????? ?????????? ???????????? ?????????? .???????????? ?????????? . ?????????? ???????????? ?????????? ???????????? ???????? ?????????? ?????????? ?????? ???????????? ???????? ??????????
???????? ???????? ???? ???????? ???????????? ???? ???????????? ???????????? ?????????? ???????????? ???????? ,???????? ????????
.????????????
???????????? ?????????? ?????????? | 414
?????????? ?????????? ?????????? .1-8 ????????
?????????????? ???????????????? ???? ?????????? ???????? ???????? ?????????????????????? ???????????? ???????????? ,1-8 ?????????? :???????????? ?????? ??????????
413 | ???????????? ?????????? ??????????

?????????? ???????? ??????????
.?????????? ???????? ???? ???????????? ???????? ?????????? :????????
???????? ???????? ?????????? .?????? ???????? ?????? ???? ???????? ???????? ,?????????? ???????? ???? ?????????? ???????? ????
. ???????????? ???????? ???????????? ???????? ???? ?????????? ???????? .???????? ?????????? ???????? ???????? ????
N20xx ???????? ???????????? ?????????? ??????????
?????????????? mini-SAS ???????????? ?????????????? N20xx ???????? 12 ???? ???? ???????????? ?????????? ????????????????
.???????? N20xx ?????????? ?????????? ?????????? ???? ???????????? ???????????? N20xx ???????? .???????? ?????? ???? ?????? ???????????? ?????????????? ???? , ?????????? ???????????? ?????????????? ???????????? ?????????? ???????????? ????????
.?????? ???????????? ?????????????? ?????????? ???????????? .?????????? ???????? ???????????? 576 ????
???? ?????????? ???????????? ???? ???????????? ???????? ,?????????? ???? ?????????? ?????????? ?????? ???? :????????
,?????????? ???????????? ???? ?????????? ?????????? ???????? .???????????? ???????????? ?????????? ???????????? ???????? ???????????? ,???????????? ???????????? .???????????? ???????? ?????? ?????????? ?????????? ?????????? ,???????? ?????? ?????????? ????????????
.?????????? ???????? ?????????? ?????????? ???????? ??????????
?????????? ?????????? ??????????
???????? mini-SAS ???? ???????????? ?????????? ?? ?????????????? ???????????? ???????????? ?????????? ??????-???? ?????????? ?????? ,???????? ?????????????????????? ???????????????? ???????????? ???? ???????? 413 ?????????? 1-8 ???????? .???????? ???? ????????????
.???????????? ?????????????? ???????????????????? ????????
???????????? ?????????? ?????????? | 412
?????????? ???????????? ???? ???? ?????? .???????????? ???????? ?????????? ???????????? ???? ???? ?????? :??????????
.???????? ?????????? ???? ,???????? ???????????? ???????????? ??????????????
.?????????? ?????????? ???????????? ???? ???????? ,?????????? ???????????? ?????????? ?????????? ?????? :??????????
?????????????? ???????? , ???????? ???? ?????? ?????? ?????????? ???????????? ?????????????? ?????????????? ???? ???????? 1 ?????????? ???????????? ???? ???????? 1-7 ???????? .???????????? ???????????? ???????????? ???????? ?????????????? ????????
.?????????????? ????
?????????????? ?????????? .1-7 ????????
.?????????? ???????? ???????????? ???????????? ?????????????? ???????????? ?????????? ???????????? ?????? :?????????? 
.???????????? ???????? ?????????????? ?????????? ?????? :????????
411 | ???????????? ?????????? ??????????
?????????????? N20xx ?????? ??????????
???????????? ??????????
:?????????? ?????????????? ???? ?????????????? ?????? ,?????????????? ?????? ???? ?????????? ??????
?????????????? ???????????? ???????????? ??????????
???? ???? ?????????? ?????????? ?????????? ???????????? ?????????? ???? ???????? ,?????????????? ???????? ?????????? ???????? :????????
.???????? ????????
?????????? N20xx ?????? ??????????
?????? ???????????? ???????????? ???????????? ???????? ?????????? ???????????????? ?????????? ???? ?????? :?????????? 
.???? ???????? ???? ???? ???????? ???????????? ?????? ?????? ?????? ?????????? ???????????????? ??????????
.???????? ???? ???????????? ???????? ???????????? ??"???? ??????????????
?????????? ???????????? ??????????
?????????? ???????????? ???????? ???? ?????????? ?????? ???????? ???????????? ???????????? ?????????? ???? :?????????? 
.???????? ???????? ???????? ?????? ????
???????????? ?????????? ?????????? | 410
N20xx Series ???????? ??????????
???????? ????????
19) ??"?? 48.26 ?????????? ,?????????????? ?????????? N20xx Series ?????????? ?????????? ???????????? ????????
.???????? ???????? ?????? ???? ???????? ?????????? ???? ,('????????
: ?????????? ?????????????? ???? ???????? ???????????? ?????????? ???????????? ??????
409 | ???????????? ?????????? ??????????
PoE-?? ?????????? 48 ?????? ?????? ?????? ?????????? ???????????? ?????? 1000 ???? ?????? ???????? (MPS1000)
.(1800W)
.?????? PoE+ ?????? ???????????? ?????????????? ???? ???? .?????????? ?????????? ?????????? PoE ?????? :????????
.?????????? ???????? ?????? ?????????? ???????? ???????? ???????? ?????????? ???????? ?????? ???? ?????? :??????????
.???????????? ?????????? ???????? ?????????? ???????? ???????? ???????? ????????
?????????????? ??????????
.N20xx ???????? ???? ???????????? ???????????????? ??????
N20xx ?????? ??????????
???????????? ?????????? ?????????? | 408

N20xx Series ???????? ???? ???????????? ????????
.N20xx ???????? ???? ???????????????? ???????????? ???? ???????????? ?????????? ??????????????
N20xx ???? ???????????? ???????? .1-4 ????????
N2024P/N2048P ???? ???????????? ???????? .1-5 ????????
?????? .1-6 ???????? ?? ?????????????? ???????????? ???????????? ???? ???????? ?????????????? ???????????? mini-SAS ?????????? mini-SAS ?????????????? ???????????? ???? ???????? ?????????? 'N20xx ???????? ???????????? ?????????? ??????????'
.?????????? ????????????
N2048 ???? ?????????????????? Mini-SAS ?????????? ???????????? .1-6 ????????
?????? ????????
N2048-?? N2024
?????????? ?????????? ???????? ?????? .?????? 100 ???? ?????????? ?????? ?????? ???????????? N2048-?? N2024 ????????????
.???????? ???????????? ???????? ???????????? ?????? 180 ???? ?????? ???????? (Dell Networking RPS720)
N2048P-?? N2024P
1000 ???? ?????????? ?????? ?????? ???????????? N2048P-?? N2024P ?????????? Dell Networking ???????? ???????? ???????????? ?????? ?????? .(850W) ?????? PoE+ ???????? PoE ?????????? 24 ???? ?????????? ??????
407 | ???????????? ?????????? ??????????
???????????? ???????????? ?????????????? ???????????? ?????? ???? ???? ???????????? ???????? .???????? USB Flash-?? ???????? ??????
.???????? ???????? ?????? ???????? ??????????
.?????????? ?????? ???????? USB ?????????? ?????????? ???? USB-?? ??????????
?????????? ????????
.???????? ???? ???????? ?????????? ???????? ?????????? ???????? ?????????? .?????? ?????? ?????? ???????????? ???????? ???? ?????????? ?????????? . ???????? ?????? ???? ?????????? ???????????? ???????? ???????? ???? ???????? ,???????????? ???????? ???? ?????????? ?????? ???????????????? ???????????? ?????????? ?????? ?????????? ?????????? ?????? ,???????????? ???????? ???????? ???? ???????????? ?????????? ?????????? ???????? ???????????? ???????????? ?????????? ???? ???????? ???? ???????????? ???????????? ?????????????? .????????????
.?????????? ??? ????????????
???????????? ?????? ?????????????? ???? ?????????? ????????????
???????????? ?????? ,?????????? ???????????? ???? ???????? ???? ???????????????? LED ???????????? ???????? ?????????? ????????
.???????????? ???? ?????????? ?????????? ?????????? ,???????????????? ,?????? ???????? ,????????????
. ???????????? ???????????? ?????????? ???????????? ???????? ,LED-?? ???????????? ???? ???????????? ???????? ???? ???????? ??????????
???????????? ???????? ???????????? ???????? ?????? ??????????
????????????) ?????????? ???????? ???? LED-?? ?????????? ,???????????? ???????? ???????? ?????????? ?????????? ?????? ???????? ?????? .?????????? ???????? ???????? ?????????? ???????? ,?????????? M-?? ?????????? ???????? .?????????? ?????????? (M-?? ?????? ???????? ?????????? ?????? ???? . ?????????? ?????????? ???????????? ???? ?????????? ???? ???????? '???????????? ????????' ?????????? ?????????? M ???????????? ,(?????? ?????? ???? ?????????? ?????? ???????? ,?????????? ????????????) ????????????
.???????? ????????????
???????????? ?????????? ?????????? | 406
???????????? ????????????
Gigabit Ethernet ???????????? 24 ???????? N2024P/N2024 ???? ?????????? ???????? ?????????? , ?????????????? ?????????????? ???????? ???????? ?????????? RJ-45 ???????? (10/100/1000BASE-T)
.SFP+ 10G ???????????? ???????? ???????????? N2024P/N2024 ???????? .???????????? ?????????? ??????????
.?????????? ???????????? Dell ??????-???? ???????????? SFP+ ???????? ??????"??????
,10BASE-T) Gigabit Ethernet ???????????? 48 ???????? N2048P/N2048 ???? ?????????? ???????? , ?????????????? ?????????????? ???????? ???????? ?????????? RJ-45 ???????? (1000BASE-T ,100BASE-TX
.SFP+ 10G ???????????? ???????? ???????????? N2048P/N2048 ???????? .???????????? ?????????? ?????????? ??????????
.?????????? ???????????? Dell ??????-???? ???????????? SFP+ ???????? ??????"??????
: ???????????? ???? ?????????? ?????????? ?????????????? ?????????????? ????????
???????? ??????????
???????????????? ?????????????? ???????????? ???????????? , ?????????? ?????????????? ???????????? ?????????? ?????????? ?????????? ???????? ???????? ???? ???????? ?????????????? ???????? ???????? ?????????? ?????????? ???????????? ???????????? .RS-232
????) ?????????? ?????????? ???????? ?????????????? ???????????? ???? ???????????? ???????? ?????? ???????? ?????? ????????????
.(???????? DB-9 ???????????? RJ45 YOST ??????????
???????? ?????????????????? ???????????? ???????? ???????????? ?????????? ?????????? ???????????? ?????????? ?????????? ???? ????????????
.???????? 115,200 ???? ???????? 1,200-?? ??????????
?????? ???? ?????????? ?????????? ???????? .???????? ?????????????? ???????????? ???????? Dell ???? ???????????? ???????? ???????? ???????? ?????? ,?????? ?????????? ?????????? ,???????????? ?????? ,???????????? ???????????? 8 ,???????? 9,600 ???? ??????????
.??????????
USB ??????????
.USB 2.0 ???????? Flash ???????????? ?????????? ?????????? A ???????? ???????? USB ??????????
.FAT-32-?? ?????????????? Flash ?????????? ?????????? ???? ?????????? ???????? Dell Networking ???????? ???????? ?????????? ???? ?????????????? ?????????? ???????????? ?????? USB Flash ?????????? ???????????? ????????????????
405 | ???????????? ?????????? ??????????
?????????? ?????? ??? N2024 .1-2 ????????
???? ???????????? ?????????????? ?????????? ???????????? ???????? ,1-2 ?????????? ?????????? ,N20xx ???? ?????????? ???????? ?????????????? ?????????? .?????????????? ?????????? ???????????? ???????? ???????????? ???????? ?????? ?????? ,?????? ?????????????? ?????????????? (RPS) ?????????? ???????? ?????? ?????? , ?????????? ???????? ?????? ???? ?????????? ???????????? ???????????? ????
.?????????????? ????
?????????? ?????? ??? N2024P .1-3 ????????
???? ???????????? ?????????????? ?????????? ???????????? ???????? ,1-3 ?????????? ?????????? ,N20xxP ???? ?????????? ???????? ?????????????? ?????????? . ?????????????? ?????????? ???????????? ???????? ???????????? ???????? ?????? ?????? ,?????? ?????????????? (MPS) ???????????????? ???????? ?????? ?????? , ?????????? ???????? ?????? ???? ?????????? ???????????? ???????????? ????
.?????????????? ???? ??????????????
???????????? ?????????? ?????????? | 404
???????? ?????????? ???? ?????????? ??????????
N20xx Series
?????????? ???????????? ?????????????????? ?????????? ?????????????? ?????????? ?????????????? ???? ???????? ???????? ???? ????????
.N20xx Series
?????????????? ???????????? ???? ,?????????? ???????????? ?????????????? 1U ???????? ???? N20xx non-PoE ???????? ???? :??????????
?????????????? ???????????? ???? ,?????????? ???????????? ?????????????? 1U ???????? ???? N20xx PoE ???????? ???? :??????????
N20xx Series ???????? ???? ?????????? ????????
N20xx ???????? ???? ?????????????? ?????? ???? ???? ?????????? ???????? ???? ?????????? ?????????? ??????????????
.Series
(???????? ??????) 10/100/1000BASE-T ???????????? 48 ???? N2048 Series ???????? .1-1 ????????
???? ???? ???????? N20xx ?????????? ?????????????? ?????? ???? ???? ?????????? ???????? ,???????? ???????????? ???????? :?????????? ??????????????
403 | ???????????? ?????????? ??????????

????????
?????????? ???????? ,N30xx Series/Dell N20xx ?????????? ?????????? ???? ?????????? ???????? ???????? ???? ???????? ???????????? ?????????? ???? ???????? ?????????? . ?????????? ?????????? ???? ?????????????? ?????????????? ???????????? ???????? ????
???? ???????????? ???????? ?????????? ,???????????? ???????????? ?????????? ???????????? ???????? ,???????????? ?????????? ???????? ???????????? ???????????? ???? ???????? ?????? ,dell.com/support/manuals ???????????? ,Dell Support
.???????????????? ?????????????? :?????????? ?????????????? ???? ???????? ??????????
?????????? Dell Networking ???? ???????????? ???? ???????????? ?????????? ???????????? ?????????????? ?????? :????????
Dell Networking .(DNOS) Dell Networking Operating System ???? ?????????????? ???????????? ?????????? ?????? ???? DNOS ???? ???????????????????? ?????????????? ?????????? ???? ???????????? ?????????? ?????????????? ???? ?????????????? ???????????? ???????? ?????????? ,???????????? ?????????? ???????? .?????????? ,?????? ???? ???????????? ?????? ???????? ?????????? ???? ?????????? ?????? ,?????????? ?????????? ???????? ???? ???????? ??????????
.?????????? DNOS ????????
???????? ???? ?????????? ??????????
N20xx Series
???????????? 2 ???????? ???? ???????????? ???????????? Gigabit Ethernet ???????? ???? Dell N20xx ???????? :?????????? ???????????? ???? ??????????
???????????? ?????????? ?????????? | 402
?????????????? ???????????? ,??????????
.?????????? ???????? ?????? ?????????? ?????????? ???? ???????????? ???????? ???????? ???????????? '????????' :????????
???????? ?????????????? ,???????????? ???????????? ???? ???????????? ???????? ???????????? ???????????? '??????????' :?????????? 
.???????????? ????????????
.???????? ???? ???????????? ?????????? ,?????????? ???????? ???????????? ???????????? ?????????? :?????????? 
____________________
Dell Inc. 2013 ??
???? ReadyRails???-?? OpenManage??? ,DELL ???? ?????????? ,Dell?? :???? ?????????? ?????????????? ?????????????? ???????????? Microsoft ???? ???????????? ?????????????? ???????????? ???? Windows??-?? Microsoft?? .Dell Inc. ???? ?????????????? ????????????
.?????????? ?????????????? ????/?? ?????????? ???????????? Corporation
N3024F ,N3048P ,N3048 ,N3024P ,N3024 ,N2048P ,N2048 ,N2024P , N2024 ?????????? ????????
A00 ???????????? F5CWH ?????? ???????? 2013 ??????????
Dell N20xx/N30xx Series ?????????? ??????
???????????? ?????????? ??????????
,P2024N ,2024N ?????????? ????????
,P3024N ,3024N ,P2048N ,2048N F3024N ,P3048N ,3048N