33.6 Data/Fax/Telephony Modem

Documentation Update

Use the information in this document to:

???Connect the modem to the sound (line-in) connector on the computer

???Locate the online user???s guide containing informa- tion you need to configure and use the modem

Cabling Instructions

In order to take advantage of the modem???s speakerphone capabilities, use the following instructions to connect the modem to the sound (line-in) connector on the computer or sound card.

NOTE: If the modem was part of an upgrade kit, install the modem in the computer before beginning this proce- dure. For instructions, see the section titled ???Expansion Cards??? in the User???s Guide that accompanied your Dell ?? system or the section titled ???Installing an Expan- sion Card??? in the online System User???s Guide available on some Dell computers.

1.Locate the audio cable that accompanied the computer or the modem upgrade kit.

2.Insert the blue connector on the audio cable into the sound (line-in) connector on the computer or on the sound card.

If the computer has on-board sound, the

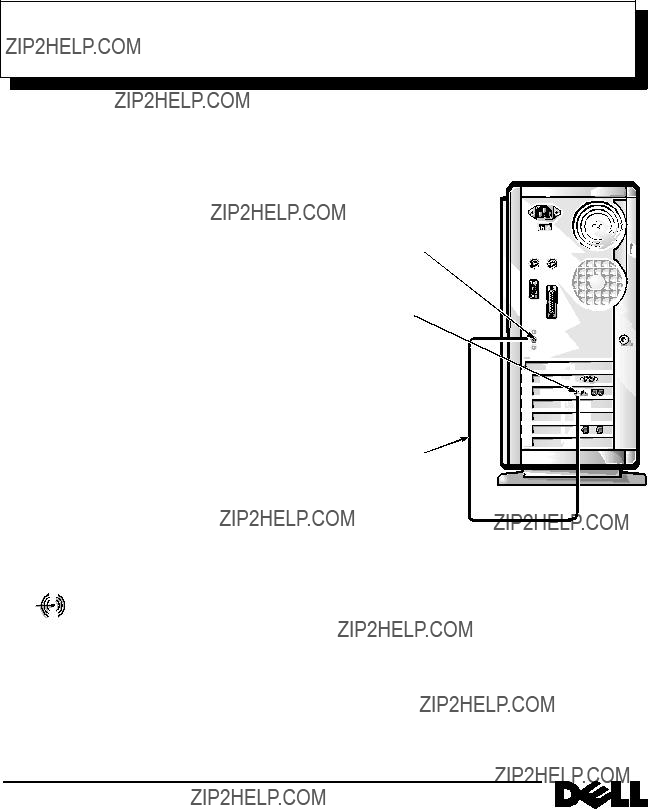
sound (line-in) connector on the back of the computer (see Figure 1) is marked by

the icon shown on the left.

NOTE: The configuration of your computer may look different than the one shown in Figure 1. For instance, the modem may be in a different expansion slot, or you may have a desktop computer instead of a minitower.

sound (line-in) connector on computer

SPEAKER connector on modem

audio cable

Figure 1. Connecting the Modem to a Computer With Built-In Sound

If the computer has a sound card instead of on-board sound, insert the blue connector on the audio cable into the sound (line-in) connector on the sound card (Figure 2). This connector may be blue on some sound cards, or it may be labeled ???LINE-IN.???

NOTE: The configuration of your computer may look different than the one shown in Figure 2. For instance, the sound card may be in a different

??

P/N 52037 August 1996

expansion slot, or you may have a desktop computer instead of a minitower.

5.Configure the communications software.

NOTE: If you do not configure the software, the modem will not work.

Figure 2. Connecting the Modem to a Sound Card

3.Insert the connector on the other end of the audio cable into the connector labeled ???SPEAKER??? on the modem.

4.Connect the microphone to the modem.

The microphone accompanied the computer or the modem upgrade kit. Insert the microphone cable connector into the modem connector labeled ???MIC.???

If Dell installed the modem, the configuration pro- gram is in the FocalPoint folder or group.

If you installed the modem yourself, first install the communications software from the four diskettes labeled ???FocalPoint??? that accompanied the modem upgrade kit. Then open the FocalPoint folder or group and use the configuration program.

For help in configuring the software, see ???Configur- ing Your Modem??? in the documentation that appears in the Modern Age folder or group. (See the next section of this document for more information about the online documentation for the modem.)

Online Documentation

The online documentation guide contains information you need to configure and use the modem.

If Dell installed the modem, look for the icon labeled ???U.S. Robotics Sportster Documenta- tion??? in the Modern Age Books folder or

group. As a backup, the online guide is also on the U.S. Robotics Sportster On-Line Documentation

diskette that accompanied the computer. Dell recom- mends that you store this diskette in a safe place so you can reinstall the guide if you install a new hard-disk drive or rebuild a corrupted drive.

If you installed the modem yourself, use the U.S. Robotics Sportster On-Line Documentation diskette to load the online documentation onto your hard-disk drive. Then store the diskette in a safe place. Installation instructions are on the diskette label.

To print any section of the online documentation, open the guide, and select File-->Print. From the Print menu, select the section you want to print and click the OK button.

_____________

?? 1996 Dell Computer Corporation. All rights reserved. Printed in the U.S.A.

Information in this document is subject to change without notice.

Trademarks used in this text: Dell and the DELL logo are registered trademarks of Dell Computer Corporation. Other trademarks and trade names may be used in this document to refer to either the entities claiming the marks and names or their products. Dell Computer Corporation disclaims any propri- etary interest in trademarks and trade names other than its own.