Dell??? Photo All-In-One Printer 922

Owner???s Manual

Look Inside For:

???Ordering Supplies

???Getting Started

???Using Your Printer

???Understanding the Software

???Maintenance and Troubleshooting

w w w. d e l l . c o m / s u p p l i e s | s u p p o r t . d e l l . c o m

Ordering Ink Cartridges and Supplies

Your Dell??? Photo All-In-One Printer 922 includes software installed to detect the ink levels in the printer. During a print job, a screen appears on your computer to warn you of low ink levels. You can order ink online at www.dell.com/supplies or by phone.

Your printer has been designed to print using the following ink cartridges.

Notes, Notices, and Cautions

NOTE: A NOTE indicates important information that helps you make better use of your printer.

NOTICE: A NOTICE indicates either potential damage to hardware or loss of data and tells you how to avoid the problem.

CAUTION: A CAUTION indicates a potential for property damage, personal injury, or death.

Information in this document is subject to change without notice. ?? 2004 Dell Inc. All rights reserved.

Reproduction in any manner whatsoever without the written permission of Dell Inc. is strictly forbidden.

Trademarks used in this text: Dell, the DELL logo, Inspiron, Dell Precision, Dimension, OptiPlex, and Latitude are trademarks of Dell Inc.; Microsoft and Windows are registered trademarks of Microsoft Corporation.

Other trademarks and trade names may be used in this document to refer to either the entities claiming the marks and names or their products. Dell Inc. disclaims any proprietary interest in trademarks and trade names other than its own.

UNITED STATES GOVERNMENT RESTRICTED RIGHTS

This software and documentation are provided with RESTRICTED RIGHTS. Use, duplication or disclosure by the Government is subject to restrictions as set forth in subparagraph (c)(1)(ii) of the Rights in Technical Data and Computer Software clause at DFARS 252.227-7013 and in applicable FAR provisions: Dell Inc., One Dell Way, Round Rock, Texas, 78682, USA.

w w w. d e l l . c o m / s u p p l i e s | s u p p o r t . d e l l . c o m

Contents

2 Using Your Printer

Contents 5

6 Contents

Index . . . . . . . . . . . . . . . . . . . . . . . . . . . . . . . . . . 105

Contents 7

8 Contents

CAUTION: SAFETY INSTRUCTIONS

Use the following safety guidelines to help ensure your own personal safety and to help protect your computer and working environment from potential damage.

???Use only the power cable provided with this product or the manufacturer???s authorized replacement power cable.

???Connect the power cable to an electrical outlet that is near the product and easily accessible.

???Refer service or repairs, other than those described in the user documentation, to a professional service person.

CAUTION: Do not use the fax feature during a lightning storm. Do not set up this product or make any electrical or cabling connections, such as the power cable or telephone, during a lightning storm.

9

w w w. d e l l . c o m / s u p p l i e s | s u p p o r t . d e l l . c o m

10

1

S E C T I O N 1

Getting Started

Understanding the Printer Parts

Accessing Your User???s Guide

Setting Up Your Printer

Using the Operator Panel

Understanding the Automatic Paper Type Sensor

Loading Paper

w w w. d e l l . c o m / s u p p l i e s | s u p p o r t . d e l l . c o m

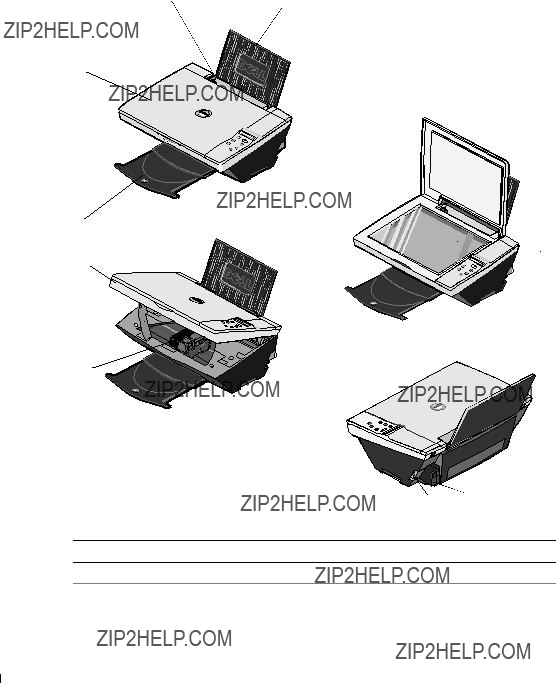
Understanding the Printer Parts

3

4

11 5

10

6

7

12 Getting Started

w w w. d e l l . c o m / s u p p l i e s | s u p p o r t . d e l l . c o m

Accessing Your User???s Guide

Click Start??? Programs or All Programs ??? Dell Printers??? Dell Photo AIO Printer 922??? View Dell User???s Guide.

NOTE: You cannot access your User???s Guide until you have installed the drivers for your printer.

Setting Up Your Printer

NOTE: The Dell Photo AIO Printer 922 supports Microsoft?? Windows?? 2000 and Windows XP.

Follow the instructions on your printer Setup Diagram to install the hardware and software. If you encounter problems during setup, see "Troubleshooting" on page 51.

You can use the Dell Photo All-In-One Printer 922 to do a variety of things. A few important things to note:

???If your printer is connected to a computer, you can use either the printer operator panel or the printer software to create your projects.

???You do need to connect your printer to a computer to scan, print, and fax.

???You do not need to connect your printer to a computer to copy.

14 Getting Started

Using the Operator Panel

The operator panel buttons allow you to scan, copy, and customize documents. The printer is on when the Power button illuminates.

1 9

2

3

4

8

7

6

5

NOTE: If using your printer without a computer, this button does not function.

w w w. d e l l . c o m / s u p p l i e s | s u p p o r t . d e l l . c o m

Operator Panel Menus

When you press the Menu button, the following menus appear.

16 Getting Started

Understanding the Automatic Paper Type

Sensor

Your printer has an automatic paper type sensor that detects the following paper types:

???Plain

???Transparency

???Glossy/photo

???Coated

If you load one of these paper types, the printer detects the paper type and automatically adjusts the Quality/Speed settings.

NOTE: Your printer cannot detect the paper size.

To choose paper size:

1With your document open, click File??? Print.

2In the Print dialog box, click Preferences or Properties (depending on your program or operating system).

The Print Properties screen appears.

3On the Paper Setup tab, select the paper size.

4Click OK.

Unless you turn off the automatic paper type sensor, it always remains on. To turn off the automatic paper type sensor for a specific print job:

1With your document open, click File??? Print.

2In the Print dialog box, click Preferences or Properties (depending on your program or operating system).

w w w. d e l l . c o m / s u p p l i e s | s u p p o r t . d e l l . c o m

The Printing Preferences screen appears.

3Click the Quality/Copies tab.

4Click the Use my choice button.

5Select the paper type in the drop-down menu.

6Click OK.

To turn off the automatic paper type sensor for all print jobs:

1In Windows XP, click Start??? Control Panel??? Printers and Other Hardware??? Printers and Faxes.

In Windows 2000, click Start??? Settings???Printers.

2Right-click the Printer icon.

3Click Printing Preferences.

4Click the Quality/Copies tab, and then click Paper Type Sensor Options.

5Click the Use my choice button.

6Select the paper type in the drop-down menu.

7Click OK.

Loading Paper

1Place the paper against the guide on the right side of the paper support.

2Squeeze and slide the left paper guide to the left edge of the paper.

NOTE: Do not force paper into the printer. The paper should be flat against the paper support surface and the right edge should be flush against the right paper guide.

18 Getting Started

Print Media Guidelines for the Paper Support

???You select Draft (select Photo if a photo cartridge is installed), Normal, or Photo print quality.

???You load the leading edge of the banner paper into the printer against the right side of the paper support.

???You squeeze and slide the paper guide to the left edge of the banner paper.

???You use banner paper designed for inkjet printers.

w w w. d e l l . c o m / s u p p l i e s | s u p p o r t . d e l l . c o m

???The paper guide rests against the left edge of the envelopes.

???You print the envelopes with Landscape orientation.

???You select the correct envelope size. Select the next biggest size if the exact envelope size is not listed, and set the left and right margins so that your envelope text will be correctly positioned.

20 Getting Started

Load up to: Make sure:

20 transparencies

???The rough side of the transparencies faces up.

???The paper guide rests against the left edge of the transparencies.

NOTE: You can load a single transparency into the paper support without removing plain paper.

???You select Normal or Photo print quality.

???The transparencies are loaded vertically against the right side of the paper support.

Placing Your Document on the Scanner Glass

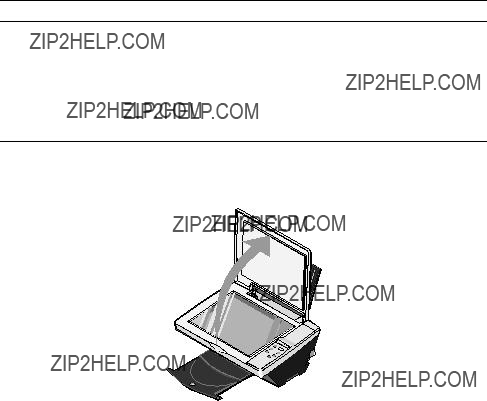
1 Open the top cover.

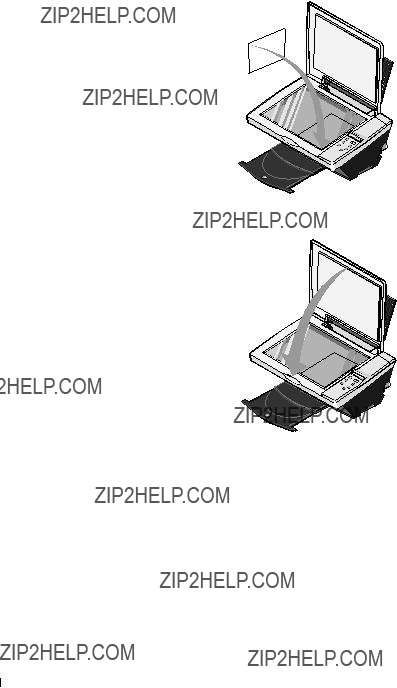
2Place the item you want to copy face down on the scanner glass in the lower right corner.

w w w. d e l l . c o m / s u p p l i e s | s u p p o r t . d e l l . c o m

NOTE: Make sure the upper left corner of the front of the item aligns with the arrow on the printer.

3 Close the top cover.

22 Getting Started

2

S E C T I O N 2

Using Your Printer

Printing

Copying

Scanning

Faxing

w w w. d e l l . c o m / s u p p l i e s | s u p p o r t . d e l l . c o m

Printing

Printing a Document

1Turn on your computer and printer, and make sure they are connected.

2Load paper with the print side facing up. For more information, see "Loading Paper" on page 18.

3With your document open, click File??? Print.

4Customize your print settings:

a Click Preferences, Properties, Options, or Setup (depending on the program or operating system).

The Print Properties dialog box appears.

bOn the Quality/Copies tab, select Quality/Speed, the paper type, the number of copies, and black and white or color printing.

cOn the Paper Setup tab, select the paper size and orientation.

dOn the Print Layout tab, select the layout and duplexing settings.

eTo see details about a setting, right-click the setting on the screen, and then select

What???s This?.

fAfter making the changes in Print Properties, click OK at the bottom of the screen to return to the Print dialog box.

5 Click OK or Print (depending on the program or operating system).

Printing Photos

1Load the photo paper with the print (glossy) side facing up. For more information, see "Print Media Guidelines for the Paper Support" on page 19.

2Make sure you have a color cartridge and a photo cartridge (sold separately) installed. For more information, see "Replacing Ink Cartridges" on page 44.

3With your document open, click File??? Print.

4To customize your print settings, click Preferences, Properties, Options, or Setup (depending on the program or operating system).

The Print Properties dialog box appears.

5On the Quality/Copies tab, select Photo and the paper type.

24 Using Your Printer

6On the Paper Setup tab, select the paper size and orientation.

NOTE: Photo/glossy or coated paper is recommended for printing photos.

7On the Print Layout tab, select the photo layout.

8When finished customizing your photo, click OK.

9Click OK or Print (depending on the program or operating system).

10To prevent your photos from sticking together or smudging, remove each photo after it exits the printer.

NOTE: Before placing your prints in a nonadhesive photo album or frame, allow sufficient time for the prints to dry thoroughly (12 to 24 hours, depending on the ambient conditions). This maximizes the life of your prints.

Printing Borderless Photos

1For best results, load photo/glossy paper and make sure the print side is facing up. For more information, see "Print Media Guidelines for the Paper Support" on page 19.

2Make sure you have a color cartridge and a photo cartridge installed.

3With your document open, click File??? Print.

4To customize your print settings, click Preferences, Properties, Options, or Setup (depending on the program or operating system).

The Print Properties dialog box appears.

5On the Print Layout tab, click Borderless.

6When finished customizing your photo, click OK.

w w w. d e l l . c o m / s u p p l i e s | s u p p o r t . d e l l . c o m

7 Click OK or Print (depending on the program or operating system).

Printing Other Projects

The I Want To menu provides wizards for creating projects. You may want to print a photo, print on an envelope, print a banner, make a poster, create a booklet, or print a greeting card.

1With your document open, click File??? Print.

2To customize print settings, click Preferences, Properties, Options, or Setup (depending on the program or operating system).

The Print Properties dialog box appears along with the I Want To menu.

3Select one of the available projects or click See more printing ideas.

4Follow the instructions on the screen to complete your project.

Copying

To make copies, you can use the printer operator panel or your computer. For easy one-touch color or black and white copies, press Color Copy or Black Copy on the operator panel.

Copying Documents Using the Operator Panel

1Turn on your printer.

2Load the paper. For more information, see "Loading Paper" on page 18.

3Open the top cover.

4Place the item you want to copy face down on the scanner glass. Make sure the upper left corner of the front of the item aligns with the arrow on the printer. For more information, see "Placing Your Document on the Scanner Glass" on page 21.

5Close the top cover.

6If you want to make more than one copy, press the up arrow on the operator panel to select the number of copies (1-99).

7Change any copy settings. For more information, see "Operator Panel Menus" on page 16.

NOTE: If you are using the Dell software on a computer instead of the operator panel buttons, see "Changing Copy Settings" on page 28.

26 Using Your Printer

8On the operator panel, press the Color Copy button to create a color copy or press the Black Copy button to create a black and white copy.

Copying appears on the display.

Copying Documents Using Your Computer

1Turn on your computer and printer, and make sure they are connected.

2Load the paper. For more information, see "Loading Paper" on page 18.

3Open the top cover.

4Place your document on the scanner glass. Make sure the upper left corner of the front of the item aligns with the arrow on the printer. For more information, see "Placing Your Document on the Scanner Glass" on page 21.

5Close the top cover.

6Click Start??? Programs or All Programs ??? Dell Printers??? Dell Photo AIO Printer 922??? Dell All-In-One Center.

The Dell All-In-One Center appears.

7Select a copy quantity (1-99) and color.

8Click See More Copy Settings to:

???Choose a copy quality.

???Select the blank paper size.

???Select the original document size.

???Lighten or darken your document.

Copying Photos Using Your Computer

1Turn on your computer and printer, and make sure they are connected.

2Load photo paper with the print side facing up. For more information, see "Print Media Guidelines for the Paper Support" on page 19.

3Place your document face down on the scanner glass. Make sure the upper left corner of the front of the item aligns with the arrow on the printer. For more information, see "Placing Your Document on the Scanner Glass" on page 21.

4Click Start??? Programs or All Programs ??? Dell Printers??? Dell Photo AIO Printer 922??? Dell All-In-One Center.

The Dell All-In-One Center appears.

w w w. d e l l . c o m / s u p p l i e s | s u p p o r t . d e l l . c o m

5Click Preview Now.

6Adjust the dotted lines to fit around the portion of the image you want to print.

7In the Copy section, select Photo.

8Select a copy quantity and color.

9To customize your photo, click See More Copy Settings.

10When you finish customizing your settings, click Copy Now.

Copying Photos Without a Computer

1Load photo paper. For more information, see "Print Media Guidelines for the Paper Support" on page 19.

2Open the top cover.

3Place the photo on the glass.

4Close the top cover.

5Select the copy quality. For more information, see "Operator Panel Menus" on page 16.

6Press the Color Copy button.

Changing Copy Settings

1Click Start??? Programs or All Programs??? Dell Printers??? Dell Photo AIO Printer 922??? Dell All-In-One Center.

The Dell All-In-One Center appears.

2Select a copy quantity and color.

3Click See More Copy Settings to:

???Choose a copy quality.

???Select the blank paper size.

???Select the original document size.

???Lighten or darken your document.

???Reduce or enlarge your document.

4Click the Advanced button to change options such as paper size and quality.

28 Using Your Printer

5 To make any changes, click the following tabs.

6 When you finish customizing your copy settings, click OK, and then click Copy Now.

w w w. d e l l . c o m / s u p p l i e s | s u p p o r t . d e l l . c o m

Scanning

1Turn on your computer and printer, and make sure they are connected.

2Place the document face down on the scanner glass and make sure the upper left corner of the front of the document aligns with the arrow on the printer. For more information, see "Placing Your Document on the Scanner Glass" on page 21.

3Press Scan on the operator panel.

The Dell All-In-One Center appears.

4In the Send scanned image to: drop-down menu, select a program as your scan destination.

5Customize your scan settings.

6Click Scan Now to complete your scan.

Scanning Photos

1Turn on your computer and printer, and make sure they are connected.

2Place the photo face down on the scanner glass and make sure the upper left corner of the front of the photo aligns with the arrow on the printer. For more information, see "Placing Your Document on the Scanner Glass" on page 21.

3Press Scan on the operator panel. The Dell All-In-One Center appears.

4Click Preview Now.

5Adjust the dotted lines to fit around the portion of the photo you want to scan.

6In the Send scanned image to: drop-down menu, select the photo program you want to use.

NOTE: If the program you want to use is not listed, select Search for more... in the drop-down menu. On the next screen, click Add to locate and add your program to the list.

7Change any settings.

8When you finish customizing your image, click Scan Now.

When your document has finished processing, the selected program opens.

30 Using Your Printer

Scanning Multiple Pages or Images

1Place the first sheet on the scanner glass and make sure the upper left corner of the front of the sheet aligns with the arrow on the printer. For more information, see "Placing Your Document on the Scanner Glass" on page 21.

2Click Start??? Programs or All Programs??? Dell Printers??? Dell Photo AIO Printer 922??? Dell All-In-One Center.

The Dell All-In-One Center appears.

3In the Send scanned image to: drop-down menu, select the program you want to use. For example, you might want to fax or e-mail multiple pages to someone.

4In the Scan section, click See More Scan Settings.

5Click the Advanced button.

6Click Display Advanced Scan Settings to change advanced options.

7On the Scan tab, click the Scan multiple items before output box.

8Click OK.

9When you finish customizing your settings, click Scan Now.

After you scan the first page, a prompt appears requesting the next page.

10Place the next sheet on the scanner glass and click Yes. Repeat until you finish scanning all pages.

11When finished, click No. The program appears with the multiple pages scanned.

Editing Scanned Text Using Optical Character Recognition (OCR)

Optical Character Recognition (OCR) software converts a scanned image into editable text within a word processing program.

NOTE: Japanese customers should use E-Typist OCR software. This software is located on a separate CD.

1Open the top cover.

2Place your document on the scanner glass. Make sure the upper left corner of the front of the document aligns with the arrow on the printer. For more information, see "Placing Your Document on the Scanner Glass" on page 21.

3Close the top cover.

4Click Start??? Programs or All Programs??? Dell Printers??? Dell AIO Printer A922??? Dell All-In-One Center.

w w w. d e l l . c o m / s u p p l i e s | s u p p o r t . d e l l . c o m

The Dell All-In-One Center appears.

5In the Send scanned images to: drop-down menu, select a word processing or text-editing program.

6In the How will the scan be used? drop-down menu, select To edit text (OCR and 300 DPI).

7Click Scan Now.

The scanned text appears.

Saving an Image on Your Computer

1Click Start??? Programs or All Programs??? Dell Printers??? Dell Photo AIO Printer 922??? Dell All-In-One Center.

The Dell All-In-One Center appears.

2In the Creative Tasks section, click Save an image on my computer.

3Follow the instructions on your screen.

E-mailing a Scanned Image or Document

To send scanned images or documents through e-mail:

1Open the top cover.

2Place the photograph or document you want to scan face down on the scanner glass. Make sure the upper left corner of the front of the photograph or document aligns with the arrow on the printer. For more information, see "Placing Your Document on the Scanner Glass" on page 21.

3Close the top cover.

4Click Start??? Programs or All Programs??? Dell Printers??? Dell Photo AIO Printer 922??? Dell All-In-One Center.

The Dell All-In-One Center appears.

5Click Preview Now.

6In the Creative Tasks section, click E-mail an image to a friend.

7In the What is being scanned? menu, make a selection.

8Follow the instructions on the screen to prepare the photograph for e-mail.

9Click Next.

32 Using Your Printer

10Open your e-mail program, write a note to accompany the attached photo, and then send it.

NOTE: If you have questions about how to do this, consult the Help for your e-mail program.

Enlarging or Reducing Images or Documents

If you are using your printer with a computer, you can enlarge or reduce your document between 25-400 percent using the Dell All-In-One Center.

If you are using your printer without a computer, you can enlarge or reduce your document by: 25, 50, 100, 150, 200 percent, and Fit-to options using the operator panel.

1Load the paper. For more information, see "Loading Paper" on page 18.

2Place your document on the scanner glass. Make sure the upper left corner of the front of the document aligns with the arrow on the printer. For more information, see "Placing Your Document on the Scanner Glass" on page 21.

3Click Start??? Programs or All Programs??? Dell Printers??? Dell Photo AIO Printer 922??? Dell All-In-One Center.

The Dell All-In-One Center appears.

4Click Preview Now.

5In the Creative Tasks section, select Enlarge or reduce an image.

6Follow the instructions on the screen to select the size of your new image.

7When you finish customizing your image, click Print Now.

Faxing

To use Microsoft Fax, you must have a Windows-based computer equipped with a modem. Before you do anything else, check to see that the Microsoft Fax software is on your computer:

Click Start???Programs or All Programs???Accessories???Communications.

For Windows XP:

???If you see Fax in the list that appears, you have Microsoft Fax on your computer. Continue with "Configuring Microsoft Fax" on page 35.

???If you do not see Fax in the list that appears, continue with "Installing Microsoft Fax in Windows XP" on page 34.

w w w. d e l l . c o m / s u p p l i e s | s u p p o r t . d e l l . c o m

For Windows 2000, Fax Service Management is automatically installed.

Sending a Fax

You can send single or multiple page faxes.

1Turn on your printer and computer, and make sure they are connected. Make sure your computer modem is connected to an active analog phone line. If you have DSL, you must have a DSL filter installed.

2Place your document on the scanner glass and make sure the upper left corner aligns with the arrow. For more information, see "Placing Your Document on the Scanner Glass" on page 21.

3Click Start??? Programs or All Programs??? Dell Printers??? Dell Photo AIO Printer 922??? Dell All-In-One Center.

The Dell All-In-One Center appears.

4In the Creative Tasks section of the Dell All-In-One Center you can either:

???Click Fax an image and follow the instructions on the screen.

NOTE: One of the questions on the screen asks if there is more than one page. If there are multiple pages in your fax, you should choose Yes, prompt me for each page.

???In the Scan or Fax section, customize your fax job by answering the questions that appear on your screen.

???If you want to send a single page fax, click Fax Now.

???If you want to send a multiple page fax, click Advanced???Scan multiple items before output???OK.

Installing Microsoft Fax in Windows XP

1Click Start ???Settings ???Control Panel. Under Pick a Category, click Add or Remove Programs.

The Add or Remove Programs dialog box opens.

2Click Add/Remove Windows Components.

3In the Components list, click to select the Fax Services box.

4Click Next.

5Click Finish.

6In the Add or Remove Programs dialog box, click Close.

34 Using Your Printer

Configuring Microsoft Fax

To configure for fax:

1Click Start ???Programs or All Programs???Accessories???Communications???Fax??? Fax Console (Windows XP) and Fax Service Management (Windows 2000).

2On the Welcome to Fax Configuration screen, click Next.

3On the Sender Information screen, type the information you want to be displayed on your fax cover page, and then click Next.

4On the Select Device for Sending or Receiving Faxes screen, click the modem that is installed in your computer in the Please select the fax device list.

5If you want to disable the sending of faxes, click to clear the Enable Send check box.

6Click the Manual answer button or Automatically answer after (user-defined number of rings) button.

7Click to select the Enable Receive check box if you want to receive faxes.

8Click Next.

9On the Transmitting Subscriber Identification (TSID) screen, type the identification information (usually your fax number and your name or business name) in the TSID box. This information will appear in the header area of the faxes you send and identifies your fax machine to the person who receives your faxes.

NOTE: The TSID is mandatory in some areas.

10 Click Next.

NOTE: Steps 10-13 only occur if you enabled your machine to receive faxes in step 6.

11On the Called Subscriber Identification (CSID) screen, type the CSID (appears to confirm that the fax is being sent to the correct recipient) that you want in the CSID box.

12Click Next.

13On the Routing Options screen, click to select the Print it on check box if you want each received fax to be automatically printed. When you select this check box, select the Dell Photo AIO Printer 922 to print the received fax.

14Click to select the Store a copy in a folder check box if you want to create an archive copy of each fax. When you select this check box, you are able to specify the storage location for the fax copy.

15Click Next.

w w w. d e l l . c o m / s u p p l i e s | s u p p o r t . d e l l . c o m

16Confirm the configuration settings in the Configuration Summary list, and then click

Finish.

You are now ready to send or receive faxes.

Changing the Fax Configuration

1Click Start ???Programs or All Programs ???Accessories ???Communications ???Fax, and then click Fax Console.

2In Fax Console, click Configure Fax on the Tools menu to start the Fax Configuration Wizard.

36 Using Your Printer

3

S E C T I O N 3

Understanding the

Software

Using the Dell All-In-One Center

Using Print Properties

Using the Dell Printer Solution Center

Using Dell Picture Studio v2.0

w w w. d e l l . c o m / s u p p l i e s | s u p p o r t . d e l l . c o m

Understanding the Printer Software

The printer software includes:

???Dell Printer Solution Center ??? Provides maintenance and troubleshooting help, basic usage information, and how-to???s for creating projects.

???Dell All-In-One Center ??? Allows you to perform various scan, copy, fax, and print operations with newly scanned and previously saved documents and images.

???Print Properties ??? Allows you to adjust printer settings.

???Dell Picture Studio v2.0 ??? Allows you to manage, edit, display, print, and convert photos and other types of images.

Using the Dell Printer Solution Center

Three tabs on the Dell Printer Solution Center provide you with a variety of printing options.

Advanced tab

???Printing Status button - Click this button to see your options for displaying printing status information on your screen.

???About button - Click this button to view software version information.

???Networking button - Click this button to see your networking options.

Maintenance tab

???Use Color Cartridge for all Black Printing icon - Click this icon and follow the instructions on the screen to use your color cartridge for black printing.

Contacts tab

???Customer support website - support.dell.com.

???Order ink or supplies - directs you to Dell???s cartridge ordering website, www.dell.com/supplies.

???Dell printer Service Tag number - displays your printer Service Tag number. To access the Dell Printer Solution Center:

Click Start??? Programs or All Programs??? Dell Printers??? Dell Photo AIO Printer 922??? Dell Printer Solution Center.

38 Understanding the Software

Using the Dell All-In-One Center

The Dell All-In-One Center allows you to:

???Scan, copy, fax, and perform creative tasks.

???Select where you want to send the scanned image.

???Select the quantity and color of your copies.

???Access troubleshooting and maintenance information.

???Preview images you want to print or copy.

???Manage photos (copy them to folders, print them, perform creative copying). To access the Dell All-In-One Center:

Click Start??? Programs or All Programs??? Dell Printers??? Dell Photo AIO Printer 922??? Dell All-In-One Center.

The Dell All-In-One Center includes four main sections: Scan or Fax, Copy, Creative

Tasks, and Preview.

w w w. d e l l . c o m / s u p p l i e s | s u p p o r t . d e l l . c o m

For more information on using the Dell All-In-One Center, see your User???s Guide on the CD. For more information about the Dell All-In-One Center, click Help in the Dell All-In-One Center.

Using Print Properties

Print Properties allows you to change the various printer settings. You can change your printer settings in Print Properties depending on the type of project you want to create.

To access Print Properties:

1With your document open, click File??? Print. The Print dialog box appears.

2In the Print dialog box, click Preferences, Properties, Options, or Setup (depending on the program or operating system).

The Print Properties screen appears.

To access Print Properties when a document is not open:

1In Windows XP, click Start??? Settings??? Printers and Faxes. In Windows 2000, click Start??? Settings??? Printers.

2Right-click on the printer icon, and then select Printer Preferences.

NOTE: Changes made to the printer settings from the Printers folder become the default settings for most programs.

40 Understanding the Software

Print Properties Tabs

Print Properties includes three main tabs.

Using Dell Picture Studio v2.0

In Dell Picture Studio v2.0, you can explore digital photography and learn how to organize, create, or print photos. There are three components to the Dell Picture Studio:

???Paint Shop Photo Album

Click Start??? Programs??? Dell Picture Studio v2.0???Paint Shop Photo Album 4??? Paint Shop Photo Album

???Dell Picture Studio Home

Click Start??? Programs??? Dell Picture Studio v2.0??? Dell Picture Studio Home

42 Understanding the Software

4

S E C T I O N 4

Ink Cartridge

Maintenance

Replacing Ink Cartridges

Aligning Ink Cartridges

Cleaning the Ink Cartridge Nozzles

w w w. d e l l . c o m / s u p p l i e s | s u p p o r t . d e l l . c o m

Replacing Ink Cartridges

CAUTION: Before performing any of the procedures listed in this section,

read and follow the "CAUTION: SAFETY INSTRUCTIONS" on page 9.

Dell ink cartridges are available only through Dell. You can order more ink online at www.dell.com/supplies or by phone. To order by phone, see "Ordering Ink Cartridges and Supplies" on page 2.

Dell recommends Dell ink cartridges for your printer. Dell does not provide warranty coverage for problems caused by using accessories, parts, or components not supplied by Dell.

1Turn on your printer.

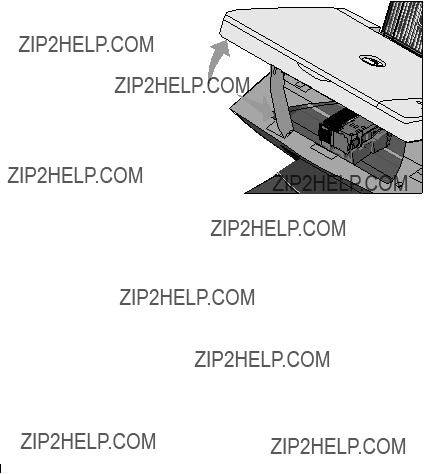
2Lift the printer unit and position the scanner support between the tabs to keep it open.

The ink cartridge carrier moves and stops at the loading position unless the printer is busy.

44 Ink Cartridge Maintenance

3 Press down on the ink cartridge lever to raise each ink cartridge lid.

4 Remove the old ink cartridges.

photo or black cartridge

5Store the cartridges in an air-tight container, such as the storage unit you received with your photo cartridge (sold separately), or dispose of them properly.

w w w. d e l l . c o m / s u p p l i e s | s u p p o r t . d e l l . c o m

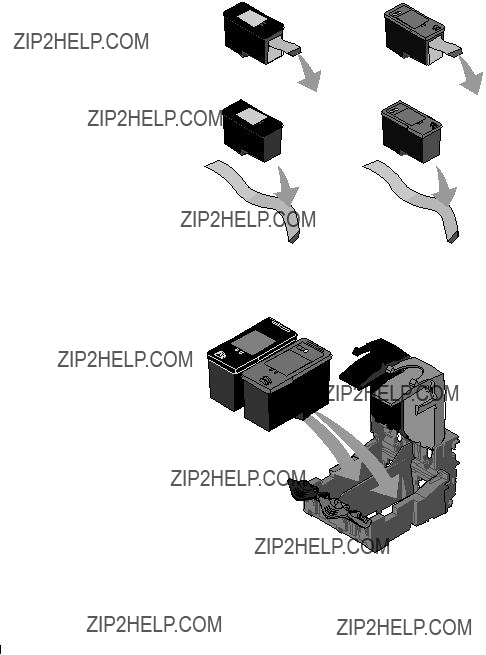
6If you are installing new ink cartridges, remove the sticker and transparent tape from the back and bottom of each ink cartridge.

NOTE: The illustration below shows a black cartridge and a color cartridge (use for normal printing). For photo printing, use a photo cartridge and a color cartridge.

7Insert the new ink cartridges. Make sure the black or photo ink cartridge is secure in the left ink cartridge carrier and the color ink cartridge is secure in the right ink cartridge carrier.

photo or black cartridge

46 Ink Cartridge Maintenance

8 Snap each lid closed.

9Lift the printer unit, and hold the scanner support up while lowering the printer unit until it is completely closed.

Aligning Ink Cartridges

Your printer automatically aligns the ink cartridges when they are installed or replaced. To verify your ink cartridges are aligned, you can print an alignment page. After you close the

printer unit, press the Menu button. The alignment page begins printing. During printing, the operator panel display reads Alignment Page Printing. When complete, the message reads Auto Alignment Complete. Your ink cartridges are now aligned for

optimal print quality.

You may also need to align ink cartridges when characters are not properly formed or are not aligned at the left margin, or when vertical or straight lines appear wavy.

w w w. d e l l . c o m / s u p p l i e s | s u p p o r t . d e l l . c o m

To align the ink cartridges:

1 Load plain paper. For more information, see "Loading Paper" on page 18.

2Click Start??? Programs or All Programs??? Dell Printers??? Dell Photo AIO Printer 922??? Dell Printer Solution Center.

3Click the Maintenance tab

4Click Align to fix blurry edges.

5Click Print.

The ink cartridges align when the page prints.

Cleaning the Ink Cartridge Nozzles

You may need to clean the nozzles when:

???White lines appear in graphics or solid black areas.

???Print appears smudged or too dark.

???Colors fade, do not print, or do not print completely.

???Vertical lines appear jagged or edges appear rough.

48 Ink Cartridge Maintenance

To clean the ink cartridge nozzles:

1 Load the paper. For more information, see "Loading Paper" on page 18.

2Click Start??? Programs or All Programs??? Dell Printers??? Dell Photo AIO Printer 922??? Dell Printer Solution Center.

3Click the Maintenance tab.

4Click Clean to fix horizontal streaks.

5Click Print.

When the page prints it forces ink through the clogged nozzles to clean them.

6Print your document again to verify the improved print quality.

7If you are not satisfied with the print quality, wipe the ink cartridge nozzles, and then print your document again.

w w w. d e l l . c o m / s u p p l i e s | s u p p o r t . d e l l . c o m

50 Ink Cartridge Maintenance

5

S E C T I O N 5

Tr ou b le s h oo t in g

Setup Problems

General Problems

Error Messages and Lights

Improving Print Quality

w w w. d e l l . c o m / s u p p l i e s | s u p p o r t . d e l l . c o m

Troubleshooting

Follow these tips when you troubleshoot your printer:

???If the printer does not work, ensure that the printer is properly connected to the electrical outlet and computer, if using a computer.

???If an error message appears on the operator panel display, write down the exact message.

Setup Problems

Computer Problems

VER IF Y T HAT YO UR PRI NTER I S C OM P ATI B LE W ITH Y OU R CO MP U TER ??? The Dell

Photo AIO Printer 922 supports Windows 2000 and Windows XP.

MAK E SU RE YO U TU RN ED ON B OTH Y OU R PRI NTER AN D YOU R CO MP U TE R

CH EC K T HE USB CA BLE ???

???Ensure that the USB cable is firmly connected to your printer and your computer.

???Shut down the computer, reconnect the USB cable as shown on the setup diagram for your printer, and then restart the computer.

IF T HE SOFTWA RE I N STALLA TI ON SC RE EN D OES N OT A PPEA R A UT OM ATI CA LLY,

I N STALL T HE SO FTWA RE MA N UA LLY ???

1 Insert the Drivers and Utilities CD.

2 Click Install.

DE TER MI N E I F T HE P RI NT ER SOFTW ARE I S I N STAL LED ??? Click Start???Programs or

All Programs???Dell Printers???Dell Photo AIO Printer 922. If the Dell Photo AIO Printer 922 does not appear in the list of programs, the printer software is not installed. Install the printer software. For more information, see "Removing and Reinstalling Software" on page 53

52 Troubleshooting

CO RR ECT CO MM U N IC AT I O N PRO BLE MS BE TWEEN THE PRI NTER A ND T HE

CO M PUTE R ???

???Remove the USB cable from your printer and your computer. Reconnect the USB cable to your printer and your computer.

???Turn off the printer. Unplug the printer power cable from the electrical outlet. Reconnect the printer power cable into the electrical outlet and turn on the printer.

???Restart your computer.

SE T YO UR PR IN TE R A S T HE DEF AU LT PR INTE R ???

Windows XP

1Click Start???Printers and Faxes.

2Right-click Dell Photo AIO Printer 922 and select Set as Default.

Windows 2000

1Click Start???Settings???Printers.

2Right-click Dell Photo AIO Printer 922 and select Set as Default.

Removing and Reinstalling Software

If your printer does not function properly or communication error messages appear when using your printer, you can remove and reinstall the printer software.

1Click Start???Programs or All Programs???Dell Printers???Dell Photo AIO Printer 922??? Uninstall Dell AIO Printer 922.

2Follow the instructions on the screen.

3Restart your computer.

4Insert the Drivers and Utilities CD, and then follow the instructions on the screen. If the installation screen does not appear:

aIn Windows XP, click Start???My Computer.

In Windows 2000, double-click My Computer from your desktop.

bDouble-click the CD-ROM drive icon. If necessary, double-click setup.exe.

cWhen the printer software installation screen appears, click Install or Install Now.

dFollow the instructions on your screen to complete the installation.

Troubleshooting 53

w w w. d e l l . c o m / s u p p l i e s | s u p p o r t . d e l l . c o m

Printer Problems

EN SU RE T HAT T HE PRI NTER POWE R C ABL E I S F IR ML Y CO N NE CTE D TO T HE PR INTE R

AN D T HE E LEC TRI CA L O U TLET ???

DETERMINE IF THE PRINTER HAS BEEN HELD OR PAUSED ???

Windows XP

1Click Start???Settings???Printers and Faxes.

2Double-click Dell Photo AIO Printer 922, and then click Printer.

3Make sure a check mark is not next to Pause Printing. If a check mark is next to Pause Printing, click it to deselect the option.

Windows 2000

1Click Start???Settings???Printers.

2Double-click Dell Photo AIO Printer 922, and then click Printer.

3Make sure a check mark is not next to Pause Printing. If a check mark is next to

Pause Printing, click Pause Printing to deselect it.

CH EC K FO R F LASH I N G LI G HTS ON T HE PRI NTER ??? For more information, see "Error

Messages and Lights" on page 57

EN SU RE YO U I NS TALLE D THE I N K CA RTRI D GES CO RR ECTL Y A ND R EM OV ED T HE

STI CK ER A ND TA PE FR OM E AC H CA RTRI D GE ???

MAK E SU RE YO U LOA DE D T HE PAPE R C OR REC TLY ??? For more information, see

"Loading Paper" on page 18.

54 Troubleshooting

General Problems

Fax Problems

MAK E SU RE YO U TUR N ED ON B OTH Y OU R P RI NT ER AN D YOU R CO MP U TE R A N D T HE

U SB CAB LE IS PRO P ERL Y C ON N ECTE D

EN SU RE T HE COM PU TER I S C ON N EC TED TO AN A CTI VE AN A LOG P H ON E LI NE ???

Using the fax function requires a phone connection to the fax/modem in your computer. When using DSL: to fax, make sure you have a DSL filter installed.

Make sure your computer is not connected to the Internet when trying to fax.

WH EN U SI N G AN EXTE RN AL M OD EM , MA KE SU RE I T I S TUR N ED ON A N D I T I S

CO RR ECTL Y C ON N ECTE D TO Y OU R CO MP U TER

Paper Problems

MAK E SU RE YO U LOA DE D T HE PAPE R C OR REC TLY ??? FOR M ORE I N FOR M ATI ON , SEE "LOAD I N G PA PER " O N PAG E 18.

USE O N LY PA PER RE COM M EN D ED FOR YO U R PR IN TE R ??? FOR M OR E

I NF OR MA TI ON , SEE "PR I NT MED I A GUI D ELI N ES FOR T HE PAPE R SUP P O RT" ON PAG E 19.

USE A SM AL LER AM OU N T O F PA PER WH EN P RI N T I N G M U LTI P LE PAGE S ??? FOR

M OR E I N FOR M ATI ON , SEE "PRI N T ME DI A GU I DEL IN E S FO R T HE PA PE R SUP P ORT" ON PA GE 19.

MAK E SU RE T HE PA PER I S N OT WRI N K LED , TO RN O R DAM A GED

MAK E SU RE T HE PA PER I S A GAI N ST T HE RI G HT SI DE OF T HE PA PER SU PPO RT AN D

T HE PA PER GU I DE RE STS A GA IN ST T HE LE FT E DG E O F T HE PAPE R.

Troubleshooting 55

w w w. d e l l . c o m / s u p p l i e s | s u p p o r t . d e l l . c o m

CH EC K FO R A PAPE R JAM

Using your printer and your computer

??? Follow the instructions on the screen for clearing the paper jam.

Using your printer only

If the paper jam is located in the paper support: 1 Turn off your printer.

2 Firmly grasp the paper and gently pull it from the printer. 3 Turn on your printer and print the document again.

If the paper jam is not visible: 1 Turn off your printer.

2 Lift the printer unit and position the scanner support between the tabs to keep it open.

3 Gently pull the paper from the printer.

4 Close the printer unit, turn on the printer, and print the document again.

56 Troubleshooting

Error Messages and Lights

The following error messages can be found on your computer screen or operator panel display.

Clear the paper jam. For more information, see "Check for a paper jam" on page 56.

Troubleshooting 57

w w w. d e l l . c o m / s u p p l i e s | s u p p o r t . d e l l . c o m

Improving Print Quality

If you are not satisfied with the print quality of your documents, there are several different ways to improve the print quality.

??? Use the appropriate paper. For example, use Dell Premium Photo Paper if you are printing photos with a photo ink cartridge.

??? Use paper that is a heavier weight, bright white, or coated. Use Dell Premium Photo Paper if you are printing photos.

??? Select a higher print quality. To select a higher print quality:

1 With your document open, click File???Print.

The Print dialog box appears.

58 Troubleshooting

2Click Preferences, Properties, or Options (depending on your program or operating system).

3On the Quality/Copies tab, select Quality/Speed and select a higher quality setting.

4Print your document again.

5If the print quality does not improve, try aligning or cleaning the ink cartridges. For more information on aligning, see "Aligning Ink Cartridges" on page 47. For more information on cleaning ink cartridges, see "Cleaning the Ink Cartridge Nozzles" on page 48.

For additional solutions, check your Dell Printer Solution Center or go to support.dell.com.

To access the Dell Printer Solution Center:

1Click Start???Programs or All Programs???Dell Printers???Dell Photo AIO Printer 922??? Dell Printer Solution Center.

2Click the Troubleshooting tab.

Troubleshooting 59

w w w. d e l l . c o m / s u p p l i e s | s u p p o r t . d e l l . c o m

60 Troubleshooting

6

S E C T I O N 6

Contacting Dell

Technical Assistance

Automated Order-Status Service

Contacting Dell

w w w. d e l l . c o m / s u p p l i e s | s u p p o r t . d e l l . c o m

Technical Assistance

If you need help with a technical problem, Dell is ready to assist you.

1Call technical support from a telephone near or at the printer so that technical support can assist you with any necessary procedures. When calling Dell, use your Express Service Code to help expedite the routing of your call to the proper support personnel.

The Express Service Code is located on the back panel of the printer near the serial number for the printer.

NOTE: Dell's Express Service Code system may not be available in all countries.

2In the U.S., Business customers should call 1-877-459-7298, and Consumer (Home and Home Office) customers should call 1-800-624-9896.

If you are calling from a different country or are in a different Service area, see "Contacting Dell" on page 63 for your local telephone number.

3Follow the menu prompts in the automated telephone system to speak with a technical support representative.

Automated Order-Status Service

To check on the status of any Dell products that you have ordered, you can go to support.dell.com, or you can call the automated order-status service. A recording prompts you for the information needed to locate and report on your order. See "Contacting Dell" on page 63 for the telephone number to call for your region.

62 Contacting Dell

Contacting Dell

To contact Dell electronically, you can access the following websites:

???www.dell.com

???support.dell.com (technical support)

???premiersupport.dell.com (technical support for educational, government, health care, and medium/large business customers, including Premier, Platinum, and Gold customers)

For specific web addresses for your country, find the appropriate country section in the table below.

NOTE: Toll-free numbers are for use within the country for which they are listed.

When you need to contact Dell, use the electronic addresses, telephone numbers, and codes provided in the following table. If you need assistance in determining which codes to use, contact a local or an international operator.

w w w. d e l l . c o m / s u p p l i e s | s u p p o r t . d e l l . c o m

64 Contacting Dell

w w w. d e l l . c o m / s u p p l i e s | s u p p o r t . d e l l . c o m

66 Contacting Dell

w w w. d e l l . c o m / s u p p l i e s | s u p p o r t . d e l l . c o m

68 Contacting Dell

w w w. d e l l . c o m / s u p p l i e s | s u p p o r t . d e l l . c o m

70 Contacting Dell

w w w. d e l l . c o m / s u p p l i e s | s u p p o r t . d e l l . c o m

72 Contacting Dell

w w w. d e l l . c o m / s u p p l i e s | s u p p o r t . d e l l . c o m

Area Codes,

Local Numbers, and

Toll-Free Numbers

512 728-4093

512 728-3619

512 728-3883

512 728-4397

512 728-4600 or 512 728-3772

3420808075 toll-free: 080016884 02 481 91 00 02 481 91 19 02 481 92 99 02 481 91 00

toll-free: 0800 582 604 633 4949 toll-free: 0800 581 toll-free: 1 800 888 298 04 633 4949 toll-free: 1 800 888 202

toll-free: 1 800 888 213

74 Contacting Dell

w w w. d e l l . c o m / s u p p l i e s | s u p p o r t . d e l l . c o m

76 Contacting Dell

w w w. d e l l . c o m / s u p p l i e s | s u p p o r t . d e l l . c o m

78 Contacting Dell

w w w. d e l l . c o m / s u p p l i e s | s u p p o r t . d e l l . c o m

80 Contacting Dell

7

S E C T I O N 7

Appendix

Limited Warranties and Return Policy

Dell Inc. Ink and Toner Cartridges Limited Warranties

Dell Software License Agreement

Regulatory Notices

w w w. d e l l . c o m / s u p p l i e s | s u p p o r t . d e l l . c o m

Limited Warranties and Return Policy

Dell-branded hardware products purchased in the U.S. or Canada come with either a 90-day, 1-year, 2-year, 3-year, or 4-year limited warranty. To determine which warranty came with your hardware product(s), see your packing slip or invoice. The following sections describe the limited warranties and return policy for the U.S., the limited warranties and return policy for Canada, and the manufacturer guarantee for Latin America and the Caribbean.

Limited Warranty for Dell-Branded Hardware Products (U.S. Only)

What is covered by this limited warranty?

This limited warranty covers defects in materials and workmanship in your???our end-user customer's???Dell-branded hardware products, including Dell-branded peripheral products.

What is not covered by this limited warranty?

This limited warranty does not cover:

???Software, including the operating system and software added to the Dell-branded hardware products through our factory-integration system, third-party software, or the reloading of software

???Non-Dell-branded and Solution Provider Direct products and accessories

???Problems that result from:

???External causes such as accident, abuse, misuse, or problems with electrical power

???Servicing not authorized by Dell

???Usage that is not in accordance with product instructions

???Failure to follow the product instructions or failure to perform preventive maintenance

???Problems caused by using accessories, parts, or components not supplied by Dell

???Products with missing or altered Service Tags or serial numbers

???Products for which Dell has not received payment

82 Appendix

THIS WARRANTY GIVES YOU SPECIFIC LEGAL RIGHTS, AND YOU MAY ALSO

HAVE OTHER RIGHTS WHICH VARY FROM STATE TO STATE (OR

JURISDICTION TO JURISDICTION). DELL'S RESPONSIBILITY FOR

MALFUNCTIONS AND DEFECTS IN HARDWARE IS LIMITED TO REPAIR AND

REPLACEMENT AS SET FORTH IN THIS WARRANTY STATEMENT. ALL

EXPRESS AND IMPLIED WARRANTIES FOR THE PRODUCT, INCLUDING BUT

NOT LIMITED TO ANY IMPLIED WARRANTIES AND CONDITIONS OF

MERCHANTABILITY AND FITNESS FOR A PARTICULAR PURPOSE, ARE

LIMITED IN TIME TO THE TERM OF THE LIMITED WARRANTY PERIOD

REFLECTED ON YOUR PACKING SLIP OR INVOICE. NO WARRANTIES,

WHETHER EXPRESS OR IMPLIED, WILL APPLY AFTER THE LIMITED

WARRANTY PERIOD HAS EXPIRED. SOME STATES DO NOT ALLOW

LIMITATIONS ON HOW LONG AN IMPLIED WARRANTY LASTS, SO THIS

LIMITATION MAY NOT APPLY TO YOU.

WE DO NOT ACCEPT LIABILITY BEYOND THE REMEDIES PROVIDED FOR

IN THIS LIMITED WARRANTY OR FOR CONSEQUENTIAL OR INCIDENTAL

DAMAGES, INCLUDING, WITHOUT LIMITATION, ANY LIABILITY FOR

THIRD-PARTY CLAIMS AGAINST YOU FOR DAMAGES, FOR PRODUCTS NOT

BEING AVAILABLE FOR USE, OR FOR LOST DATA OR LOST SOFTWARE. OUR

LIABILITY WILL BE NO MORE THAN THE AMOUNT YOU PAID FOR THE

PRODUCT THAT IS THE SUBJECT OF A CLAIM. THIS IS THE MAXIMUM

AMOUNT FOR WHICH WE ARE RESPONSIBLE.

SOME STATES DO NOT ALLOW THE EXCLUSION OR LIMITATION OF

INCIDENTAL OR CONSEQUENTIAL DAMAGES, SO THE ABOVE LIMITATION

OR EXCLUSION MAY NOT APPLY TO YOU.

How long does this limited warranty last?

This limited warranty lasts for the time period indicated on your packing slip or invoice, except for the following Dell-branded hardware:

???Portable computer batteries carry a 1-year limited warranty.

???Projector lamps carry a 90-day limited warranty.

???Memory carries a lifetime limited warranty.

???Monitors carry the longer of either a 3-year limited warranty or the remainder of the warranty for the Dell computer to which the monitor will be connected.

Appendix 83

w w w. d e l l . c o m / s u p p l i e s | s u p p o r t . d e l l . c o m

???Other add-on hardware carries the longer of either a 1-year limited warranty for new parts and a 90-day limited warranty for reconditioned parts or, for both new and reconditioned parts, the reminder of the warranty for the Dell computer on which such parts are installed.

The limited warranty on all Dell-branded products begins on the date of the packing slip or invoice. The warranty period is not extended if we repair or replace a warranted product or any parts. Dell may change the availability of limited warranties, at its discretion, but any changes will not be retroactive.

What do I do if I need warranty service?

Before the warranty expires, please call us at the relevant number listed in the following table. Please also have your Dell Service Tag or order number available.

What will Dell do?

During the 90 days of the 90-day limited warranty and the first year of all other limited

warranties: During the 90 days of the 90-day limited warranty and the first year of all other limited warranties, we will repair any Dell-branded hardware products returned to us that prove to be defective in materials or workmanship. If we are not able to repair the product, we will replace it with a comparable product that is new or refurbished.

84 Appendix

When you contact us, we will issue a Return Material Authorization Number for you to include with your return. You must return the products to us in their original or equivalent packaging, prepay shipping charges, and insure the shipment or accept the risk if the product is lost or damaged in shipment. We will return the repaired or replacement products to you. We will pay to ship the repaired or replaced products to you if you use an address in the United States (excluding Puerto Rico and U.S. possessions and territories). Otherwise, we will ship the product to you freight collect.

If we determine that the product is not covered under this warranty, we will notify you and inform you of service alternatives that are available to you on a fee basis.

NOTE: Before you ship the product(s) to us, make sure to back up the data on the hard drive(s) and any other storage device(s) in the product(s). Remove any confidential, proprietary, or personal information and removable media such as floppy disks, CDs, or PC Cards. We are not responsible for any of your confidential, proprietary, or personal information; lost or corrupted data; or damaged or lost removable media.

During the remaining years: For the remaining period of the limited warranty, we will replace any defective part with new or refurbished parts, if we agree that it needs to be replaced. When you contact us, we will require a valid credit card number at the time you request a replacement part, but we will not charge you for the replacement part as long as you return the original part to us within 30 days after we ship the replacement part to you. If we do not receive the original part within 30 days, we will charge to your credit card the then-current standard price for that part.

We will pay to ship the part to you if you use an address in the United States (excluding Puerto Rico and U.S. possessions and territories). Otherwise, we will ship the part freight collect. We will also include a prepaid shipping container with each replacement part for your use in returning the replaced part to us.

NOTE: Before you replace parts, make sure to back up the data on the hard drive(s) and any other storage device(s) in the product(s). We are not responsible for lost or corrupted data.

What if I purchased a service contract?

If your service contract is with Dell, service will be provided to you under the terms of the service agreement. Please refer to that contract for details on how to obtain service.

If you purchased through us a service contract with one of our third-party service providers, please refer to that contract for details on how to obtain service.

Appendix 85

w w w. d e l l . c o m / s u p p l i e s | s u p p o r t . d e l l . c o m

How will you fix my product?

We use new and refurbished parts made by various manufacturers in performing warranty repairs and in building replacement parts and systems. Refurbished parts and systems are parts or systems that have been returned to Dell, some of which were never used by a customer. All parts and systems are inspected and tested for quality. Replacement parts and systems are covered for the remaining period of the limited warranty for the product you bought. Dell owns all parts removed from repaired products.

May I transfer the limited warranty?

Limited warranties on systems may be transferred if the current owner transfers ownership of the system and records the transfer with us. The limited warranty on Dell-branded memory may not be transferred. You may record your transfer by going to Dell's website:

???If you are an Individual Home Consumer, go to www.dell.com/us/en/dhs/topics/sbtopic_015_ccare.htm

???If you are a Home Office, Small, Medium, Large, or Global Commercial Customer, go to www.dell.com/us/en/biz/topics/sbtopic_ccare_nav_015_ccare.htm

???If you are a Government, Education, or Healthcare Customer, or an Individual Home Consumer who purchased through an Employee Purchase Program, go to www.dell.com/us/en/pub/topics/sbtopic_015_ccare.htm

If you do not have Internet access, call your customer care representative or call 1-800-624-9897.

"Total Satisfaction" Return Policy (U.S. Only)

We value our relationship with you and want to make sure that you're satisfied with your purchases. That's why we offer a "Total Satisfaction" return policy for most products that you???the end-user customer???purchase directly from Dell. Under this policy, you may return to Dell products that you purchased directly from Dell for a credit or a refund of the purchase price paid, less shipping and handling and applicable return fees as follows:

86 Appendix

???New Hardware Products and Accessories ??? Unless you have a separate agreement with Dell, all hardware, accessories, peripherals, parts, and unopened software still in its sealed package, excluding the products listed below, may be returned within twenty-one (21) days from the date on the packing slip or invoice. New PowerEdgeTM, PowerConnectTM and PowerVaultTM products may be returned within thirty (30) days from the date on the packing slip or invoice except that new PowerEdgeTM SC servers and n series products purchased from the Small and Medium Business Sales Division may only be returned within fourteen (14) days from the date on the packing slip or invoice. To return applications software or an operating system that has been installed by Dell, you must return the entire computer. A different return policy applies to nondefective products purchased through Dell's Software and Peripherals division by customers of our Small and Medium Business divisions. Those products may be returned within (twenty-one) 21 days from the date on the packing slip or invoice, but a fifteen percent (15%) return fee will be deducted from any refund or credit. The "Total Satisfaction" Return Policy and Software and Peripherals division return policy are not available for Dell | EMC storage products, EMC-branded products, Unisys-branded products, PowerVault??? 160T tape libraries, or enterprise software, non-Dell branded enterprise products, software and/or software licenses purchased under any type of volume purchase agreement or any non-Dell customized hardware and/or software product(s).

???Reconditioned or Refurbished Dell-Branded Hardware Products and Parts ??? All reconditioned or refurbished PowerEdgeTM, PowerConnectTM and Power VaultTM products may be returned within thirty (30) days from the date on the packing slip or invoice. All other reconditioned or refurbished Dell-branded hardware products and parts may be returned within fourteen (14) days of the date on the packing slip or invoice.

How to Return

To return products, e-mail or call Dell customer service to receive a Credit Return Authorization Number within the return policy period applicable to the product you want to return. You must obtain a Credit Return Authorization Number in order to return the product. See "Contacting Dell" or ???Getting Help??? in your customer documentation (or www.dell.com/us/en/gen/contact.htm) to find the appropriate contact information for obtaining customer assistance.

Appendix 87

w w w. d e l l . c o m / s u p p l i e s | s u p p o r t . d e l l . c o m

You must ship the products to Dell within five (5) days of the date that Dell issues the Credit Return Authorization Number. You must also return the products to Dell in their original packaging, in as-new condition along with any media, documentation, and all other items that were included in the original shipment, prepay shipping charges, and insure the shipment or accept the risk of loss or damage during shipment.

Limited Warranty Terms for Dell-Branded Hardware Products (Canada Only)

What is covered by this limited warranty?

This limited warranty covers defects in materials and workmanship in your???our end-user customer's???Dell-branded hardware products, including Dell-branded peripheral products.

What is not covered by this limited warranty?

This limited warranty does not cover:

???Software, including the operating system and software added to the Dell-branded hardware products through our factory-integration system, or the reloading of the software

???Non-Dell branded and Solution Provider Direct products and accessories

???Problems that result from:

???External causes such as accident, abuse, misuse, or problems with electrical power

???Servicing not authorized by Dell

???Usage that is not in accordance with product instructions

???Failure to follow the product instructions or failure to perform preventive maintenance

???Problems caused by using accessories, parts, or components not supplied by Dell

???Products with missing or altered Service Tags or serial numbers

???Products for which Dell has not received payment

88 Appendix

THIS WARRANTY GIVES YOU SPECIFIC LEGAL RIGHTS, AND YOU MAY ALSO

HAVE OTHER RIGHTS WHICH VARY FROM PROVINCE TO PROVINCE. DELL'S

RESPONSIBILITY FOR MALFUNCTIONS AND DEFECTS IN PRODUCT IS

LIMITED TO REPAIR AND REPLACEMENT AS SET FORTH IN THIS WARRANTY

STATEMENT, FOR THE TERM OF THE WARRANTY PERIOD REFLECTED ON

YOUR PACKING SLIP OR INVOICE. EXCEPT FOR THE EXPRESS WARRANTIES

CONTAINED IN THIS WARRANTY STATEMENT, DELL DISCLAIMS ALL OTHER

WARRANTIES AND CONDITIONS, EXPRESS OR IMPLIED, INCLUDING

WITHOUT LIMITATION IMPLIED WARRANTIES AND CONDITIONS OF

MERCHANTABILITY AND FITNESS FOR A PARTICULAR PURPOSE, STATUTORY

OR OTHERWISE. SOME PROVINCES DO NOT ALLOW THE EXCLUSION OF

CERTAIN IMPLIED WARRANTIES OR CONDITIONS, OR LIMITATIONS ON HOW

LONG AN IMPLIED WARRANTY OR CONDITION LASTS. THEREFORE, THE

FOREGOING EXCLUSIONS AND LIMITATIONS MAY NOT APPLY TO YOU.

WE DO NOT ACCEPT LIABILITY BEYOND THE REMEDIES PROVIDED FOR IN

THIS WARRANTY STATEMENT OR FOR SPECIAL, INDIRECT, CONSEQUENTIAL,

OR INCIDENTAL DAMAGES, INCLUDING, WITHOUT LIMITATION, ANY

LIABILITY FOR THIRD-PARTY CLAIMS AGAINST YOU FOR DAMAGES, FOR

PRODUCTS NOT BEING AVAILABLE FOR USE, OR FOR LOST DATA OR LOST

SOFTWARE. OUR LIABILITY WILL BE NO MORE THAN THE AMOUNT YOU PAID

FOR THE PRODUCT THAT IS THE SUBJECT OF A CLAIM. THIS IS THE

MAXIMUM AMOUNT FOR WHICH WE ARE RESPONSIBLE.

SOME PROVINCES DO NOT ALLOW THE EXCLUSION OR LIMITATION OF

SPECIAL, INDIRECT, INCIDENTAL, OR CONSEQUENTIAL DAMAGES, SO THE

ABOVE LIMITATION OR EXCLUSION MAY NOT APPLY TO YOU.

How long does this limited warranty last?

This limited warranty lasts for the time period indicated on your packing slip or invoice, except that the limited warranty on Dell-branded batteries lasts only 1 year and the limited warranty on the lamps for Dell-branded projectors lasts only 90 days. The limited warranty begins on the date of the packing slip or invoice. The warranty period is not extended if we repair or replace a warranted product or any parts. Dell may change the terms and availability of limited warranties, at its discretion, but any changes will not be retroactive (that is, the warranty terms in place at the time of purchase will apply to your purchase).

Appendix 89

w w w. d e l l . c o m / s u p p l i e s | s u p p o r t . d e l l . c o m

What do I do if I need warranty service?

Before the warranty expires, please call us at the relevant number listed in the following table. Please also have your Dell Service Tag or order number available.

What will Dell do?

During the 90 days of the 90-day limited warranty and the first year of all other limited

warranties: During the 90 days of the 90-day limited warranty and the first year of all other limited warranties, we will repair any Dell-branded hardware products returned to us that prove to be defective in materials or workmanship. If we are not able to repair the product, we will replace it with a comparable product that is new or refurbished.

When you contact us, we will issue a Return Material Authorization Number for you to include with your return. You must return the products to us in their original or equivalent packaging, prepay shipping charges, and insure the shipment or accept the risk if the product is lost or damaged in shipment. We will return the repaired or replacement products to you. We will pay to ship the repaired or replaced products to you if you use an address in Canada. Otherwise, we will ship the product to you freight collect.

If we determine that the problem is not covered under this warranty, we will notify you and inform you of service alternatives that are available to you on a fee basis.

90 Appendix

NOTE: Before you ship the product(s) to us, make sure to back up the data on the hard drive(s) and any other storage device(s) in the product(s). Remove any confidential, proprietary or personal information, removable media, such as floppy disks, CDs, or PC Cards. We are not responsible for any of your confidential, proprietary or personal information; lost or corrupted data; or damaged or lost removable media.

During the remaining years following the first year of all limited warranties: We will replace any defective part with new or refurbished parts, if we agree that it needs to be replaced. When you contact us, we will require a valid credit card number at the time you request a replacement part, but we will not charge you for the replacement part as long as you return the original part to us within days after we ship the replacement part to you. If we do not receive the original part within 30 days, we will charge to your credit card the then-current standard price for that part.

We will pay to ship the part to you if you use an address in Canada. Otherwise, we will ship the part freight collect. We will also include a prepaid shipping container with each replacement part for your use in returning the replaced part to us.

NOTE: Before you replace parts, make sure to back up the data on the hard drive(s) and any other storage device(s) in the product(s). We are not responsible for lost or corrupted data.

What if I purchased a service contract?

If your service contract is with Dell, service will be provided to you under the terms of the service contract. Please refer to that contract for details on how to obtain service. Dell's service contracts can be found online at www.dell.ca or by calling Customer Care at 1-800-847-4096. If you purchased through us a service contract with one of our third-party service providers, please refer to that contract (mailed to you with your packing slip or invoice) for details on how to obtain service.

How will you fix my product?

We use new and refurbished parts made by various manufacturers in performing warranty repairs and in building replacement parts and systems. Refurbished parts and systems are parts or systems that have been returned to Dell, some of which were never used by a customer. All parts and systems are inspected and tested for quality. Replacement parts and systems are covered for the remaining period of the limited warranty for the product you bought. Dell owns all parts removed from repaired products.

Appendix 91

w w w. d e l l . c o m / s u p p l i e s | s u p p o r t . d e l l . c o m

May I transfer the limited warranty?

Limited warranties on systems may be transferred if the current owner transfers ownership of the system and records the transfer with us. The limited warranty on Dell-branded memory may not be transferred. You may record your transfer by going to Dell???s website:

???For Canada-purchased computers (in-country transfers) and to transfer from one customer to another, go to www.dell.ca/ca/en/gen/topics/segtopic_ccare_nav_013_ccare.htm

???For out-of-country transfers (outside of the original country of purchase), go to www.dell.com/us/en/biz/topics/sbtopic_ccare_nav_016_ccare.htm

If you do not have Internet access, call Dell at 1-800-847-4096 (Home Consumer customers) or 1-800-326-9463 (Corporate Commercial or Government customers).

"Total Satisfaction" Return Policy (Canada Only)

If you are an end-user customer who bought new products directly from Dell, you may return them to Dell up to 30 days after you receive them for a refund or credit of the product purchase price. If you are an end-user customer who bought reconditioned or refurbished products from Dell, you may return them to Dell within 14 days after the date on the packing slip or invoice for a refund or credit of the product purchase price. In either case, the refund or credit will not include any shipping and handling charges shown on your packing slip or invoice and will be subject to a fifteen percent (15%) restocking fee, unless otherwise prohibited by law. If you are an organization that bought the products under a written agreement with Dell, the agreement may contain different terms for the return of products than specified by this policy.

To return products, you must call Dell Customer Service at 1-800-847-4096 to receive a Credit Return Authorization Number. To expedite the process of your refund or credit, Dell expects you to return the products to Dell in their original packaging within 5 days of the date that Dell issues the Credit Return Authorization Number. You must also prepay shipping charges and insure the shipment or accept the risk of loss or damage during shipment. You may return software for a refund or credit only if the sealed package containing the floppy disk(s) or CD(s) is unopened. Returned products must be in as-new condition, and all of the manuals, floppy disk(s), CD(s), power cables, and other items included with a product must be returned with it. For customers who want to return, for refund or credit only, either application or operating system software that has been installed by Dell, the whole system must be returned, along with any media and documentation that may have been included in the original shipment.

92 Appendix

The "Total Satisfaction" Return Policy does not apply to Dell | EMC storage products. It also does not apply to products purchased through Dell's Software and Peripherals division. For those products, please instead refer to Dell's Software and Peripheral's then-current return policy (see the following section, "Dell Software and Peripherals [Canada Only]").

Dell Software and Peripherals (Canada Only)

Third-Party Software and Peripherals Products

Similar to other resellers of software and peripherals, Dell does not warrant third-party products. Third-party software and peripheral products are covered by the warranties provided by the original manufacturer or publisher only. Third-party manufacturer warranties vary from product to product. Consult your product documentation for specific warranty information. More information may also be available from the manufacturer or publisher.

While Dell offers a wide selection of software and peripheral products, we do not specifically test or guarantee that all of the products we offer work with any or all of the various models of Dell computers, nor do we test or guarantee all of the products we sell on the hundreds of different brands of computers available today. If you have questions about compatibility, we recommend and encourage you to contact the third-party software and peripheral product manufacturer or publisher directly.

Dell-Branded Peripheral Products

Dell does provide a limited warranty for new Dell-branded peripheral products (products for which Dell is listed as the manufacturer) such as monitors, batteries, memory, docking stations, and projectors. To determine which limited warranty applies to the product you purchased, see the Dell packing slip or invoice and/or the product documentation that accompanied your product. Descriptions of Dell's limited warranties are described in preceding sections.

Return Policy

If you are an end-user customer who bought Dell Software and Peripherals products directly from a Dell company, you may return Dell Software and Peripherals products that are in as-new condition to Dell up to 30 days from the date on the packing slip or invoice for a refund of the product purchase price if already paid. This refund will not include any shipping and handling charges shown on your packing slip or invoice; you are responsible for those.

Appendix 93

w w w. d e l l . c o m / s u p p l i e s | s u p p o r t . d e l l . c o m

To return products, you must call Dell Customer Service at 1-800-387-5759 to receive a Credit Return Authorization Number. You must ship the Dell Software and Peripherals products back to Dell in their original manufacturer's packaging (which must be in as-new condition), prepay shipping charges, and insure the shipment or accept the risk of loss or damage during shipment.

To qualify for refund or replacement, returned products must be in as-new condition, software products must be unopened, and all of the manuals, floppy disk(s), CD(s), power cables, and other items included with a product must be returned with it.

1-Year End-User Manufacturer Guarantee (Latin America and the Caribbean

Only)

Guarantee

Dell Computer Corporation ("Dell") warrants to the end user in accordance with the following provisions that its branded hardware products, purchased by the end user from a Dell company or an authorized Dell distributor in Latin America or the Caribbean, will be free from defects in materials, workmanship, and design affecting normal use, for a period of 1 year from the original purchase date. Products for which proper claims are made will, at Dell???s option, be repaired or replaced at Dell???s expense. Dell owns all parts removed from repaired products. Dell uses new and reconditioned parts made by various manufacturers in performing repairs and building replacement products.

Exclusions

This Guarantee does not apply to defects resulting from: improper or inadequate installation, use, or maintenance; actions or modifications by unauthorized third parties or the end user; accidental or willful damage; or normal wear and tear.

94 Appendix

Making a Claim

Claims must be made in Latin America or the Caribbean by contacting the Dell point of sale within the guarantee period. The end user must always supply proof of purchase, indicating name and address of the seller, date of purchase, model and serial number, name and address of the customer, and details of symptoms and configuration at the time of malfunction, including peripherals and software used. Otherwise, Dell may refuse the guarantee claim. Upon diagnosis of a warranted defect, Dell will make arrangements and pay for ground freight and insurance to and from Dell???s repair/replacement center. The end user must ensure that the defective product is available for collection properly packed in original or equally protective packaging together with the details listed above and the return number provided to the end user by Dell.

Limitation and Statutory Rights

Dell makes no other warranty, guarantee or like statement other than as explicitly stated above, and this Guarantee is given in place of all other guarantees whatsoever, to the fullest extent permitted by law. In the absence of applicable legislation, this Guarantee will be the end user???s sole and exclusive remedy against Dell or any of its affiliates, and neither Dell nor any of its affiliates shall be liable for loss of profit or contracts, or any other indirect or consequential loss arising from negligence, breach of contract, or howsoever.

This Guarantee does not impair or affect mandatory statutory rights of the end user against and/or any rights resulting from other contracts concluded by the end user with Dell and/or any other seller.

Dell World Trade LP

One Dell Way, Round Rock, TX 78682, USA

Dell Computadores do Brasil Ltda (CNPJ No. 72.381.189/0001-10)

Avenida Industrial Belgraf, 400 92990-000 - Eldorado do Sul ??? RS - Brasil

Dell Computer de Chile Ltda

Coyancura 2283, Piso 3- Of.302,

Providencia, Santiago - Chile

Dell Computer de Colombia Corporation

Carrera 7 #115-33 Oficina 603

Bogota, Colombia

Appendix 95

w w w. d e l l . c o m / s u p p l i e s | s u p p o r t . d e l l . c o m

Dell Computer de Mexico SA de CV

Paseo de la Reforma 2620 - 11?? Piso Col. Lomas Altas

11950 M??xico, D.F.

96 Appendix

Dell Inc. Ink and Toner Cartridges Limited

Warranties

The following sections describe the limited warranty for ink and toner cartridges for the U.S., Canada, and Latin America. Refer to the appropriate limited warranty accordingly.

Ink and Toner Cartridges Limited Warranty (U.S. and Canada Only)

Dell Inc. warrants to the original purchaser of genuine Dell-branded toner cartridges that they will be free from defects in material and workmanship for the life of the cartridge and that for genuine Dell-branded ink cartridges they will be free from defects in material and workmanship for two years beginning on the date of invoice. If this product proves defective in either material or workmanship, it will be replaced without charge during the limited warranty period if returned to Dell. You must first call our toll-free number to get your return authorization. In the U.S., call 1-800-822-8965; in Canada, call 1-800-387-5757. If we are not able to replace the product because it has been discontinued or is not available, we will either replace it with a comparable product or reimburse you for the cartridge purchase cost, at Dell???s sole option. This limited warranty does not apply to ink or toner cartridges that have been refilled or improperly stored or due to problems resulting from misuse, abuse, accident, neglect, mishandling, incorrect environments, or wear from ordinary use.

THIS WARRANTY GIVES YOU SPECIFIC LEGAL RIGHTS, AND YOU MAY ALSO HAVE OTHER RIGHTS

WHICH VARY FROM STATE TO STATE (OR JURISDICTION TO JURISDICTION). DELL???S

RESPONSIBILITY FOR MALFUNCTIONS AND DEFECTS IN HARDWARE IS LIMITED TO

REPLACEMENT AS SET FORTH IN THIS WARRANTY STATEMENT. FOR CANADIAN CUSTOMERS,

EXCEPT FOR THE EXPRESS WARRANTIES CONTAINED IN THIS WARRANTY STATEMENT, DELL

DISCLAIMS ALL OTHER WARRANTIES AND CONDITIONS, EXPRESS OR IMPLIED, STATUTORY OR

OTHERWISE, FOR THE PRODUCT. FOR U.S. CUSTOMERS, ALL EXPRESS AND IMPLIED

WARRANTIES FOR THE PRODUCT, INCLUDING BUT NOT LIMITED TO ANY IMPLIED WARRANTIES

AND CONDITIONS OF MERCHANTABILITY AND FITNESS FOR A PARTICULAR PURPOSE ARE

LIMITED IN TIME TO THE TERM OF THIS LIMITED WARRANTY. NO WARRANTIES, WHETHER

EXPRESS OR IMPLIED, WILL APPLY AFTER THE LIMITED WARRANTY PERIOD HAS EXPIRED. SOME

STATES OR JURISDICTIONS DO NOT ALLOW THE EXCLUSION OF CERTAIN IMPLIED

WARRANTIES OR CONDITIONS, OR LIMITATIONS ON HOW LONG AN IMPLIED WARRANTY OR

CONDITION LASTS, SO THIS LIMITATION MAY NOT APPLY TO YOU. THIS WARRANTY COVERAGE

TERMINATES IF YOU SELL OR OTHERWISE TRANSFER THIS PRODUCT TO ANOTHER PARTY.

DELL DOES NOT ACCEPT LIABILITY BEYOND THE REMEDIES PROVIDED FOR IN THIS LIMITED

WARRANTY OR FOR SPECIAL, INDIRECT, CONSEQUENTIAL OR INCIDENTAL DAMAGES,

INCLUDING, WITHOUT LIMITATION, ANY LIABILITY FOR THIRD-PARTY CLAIMS AGAINST YOU

FOR DAMAGES, FOR PRODUCTS NOT BEING AVAILABLE FOR USE, OR FOR LOST DATA OR LOST

SOFTWARE. DELL???S LIABILITY WILL BE NO MORE THAN THE AMOUNT YOU PAID FOR THE

PRODUCT THAT IS THE SUBJECT OF A CLAIM. THIS IS THE MAXIMUM AMOUNT FOR WHICH

DELL IS RESPONSIBLE.

SOME STATES OR JURISDICTIONS DO NOT ALLOW THE EXCLUSION OR LIMITATION OF SPECIAL,

INDIRECT, INCIDENTAL OR CONSEQUENTIAL DAMAGES, SO THE ABOVE LIMITATION OR

EXCLUSION MAY NOT APPLY TO YOU.

Appendix 97

w w w. d e l l . c o m / s u p p l i e s | s u p p o r t . d e l l . c o m

Ink and Toner Cartridges Limited Warranty (Latin America Only)

Dell Inc. warrants to the original purchaser of genuine Dell-branded toner cartridges that the cartridges will be free from defects resulting from material or manufacturing process for the life of the cartridge. For the original purchaser of genuine Dell-branded ink cartridges, Dell warrants that the cartridges will be free from defects resulting from material or manufacturing process for one year beginning from the date of delivery.

If this product presents defects resulting from either material or manufacturing process, it will be replaced without charge during the limited warranty period if returned to Dell.

In order to obtain the necessary information to enable the replacement, call the appropriate toll-free number. In Mexico, call 001-877-533-6230; in Puerto Rico, call 1-877-839-5123. In cases in which either the production of the cartridge has been discontinued or the cartridge is not available, Dell reserves the right, at its sole discretion, to choose between replacing it by a similar product or reimbursing you for the purchase cost.

This limited warranty does not apply to ink or toner cartridges that have been refilled or to defects resulting from misuse, abuse, accident, negligence, mishandling, improper storage or exposure to inappropriate environments.

Dell???s liability for the malfunction or defect of hardware after the period of the legal warranty (and specifically the period of the legal warranty of defective products stated in the consumer protections rules), is limited to either the substitution of the product or the reimbursement as stated above. This warranty coverage terminates if you sell or otherwise transfer this product to a third party.

Dell does not accept any additional liability for patrimonial, emotional or any other kind of damage caused to the consumer and/or to a third party, which exceeds the established liability either in this limited warranty or in legal rules that may apply.

98 Appendix

Dell Software License Agreement

This is a legal agreement between you, the user, and Dell Products, L.P ("Dell"). This agreement covers all software that is distributed with the Dell product, for which there is no separate license agreement between you and the manufacturer or owner of the software (collectively the "Software"). By opening or breaking the seal on the Software packet(s), installing or downloading the Software, or using the Software that has been preloaded or is embedded in your computer, you agree to be bound by the terms of this agreement. If you do not agree to these terms, promptly return all Software items (disks, written materials, and packaging) and delete any preloaded or embedded Software.

You may use one copy of the Software on only one computer at a time. If you have multiple licenses for the Software, you may use as many copies at any time as you have licenses. "Use" means loading the Software in temporary memory or permanent storage on the computer. Installation on a network server solely for distribution to other computers is not "use" if (but only if) you have a separate license for each computer to which the Software is distributed. You must ensure that the number of persons using the Software installed on a network server does not exceed the number of licenses that you have. If the number of users of Software installed on a network server will exceed the number of licenses, you must purchase additional licenses until the number of licenses equals the number of users before allowing additional users to use the Software. If you are a commercial customer of Dell or a Dell affiliate, you hereby grant Dell, or an agent selected by Dell, the right to perform an audit of your use of the Software during normal business hours, you agree to cooperate with Dell in such audit, and you agree to provide Dell with all records reasonably related to your use of the Software. The audit will be limited to verification of your compliance with the terms of this agreement.

The Software is protected by United States copyright laws and international treaties. You may make one copy of the Software solely for backup or archival purposes or transfer it to a single hard disk provided you keep the original solely for backup or archival purposes. You may not rent or lease the Software or copy the written materials accompanying the Software, but you may transfer the Software and all accompanying materials on a permanent basis if you retain no copies and the recipient agrees to the terms hereof. Any transfer must include the most recent update and all prior versions. You may not reverse engineer, decompile or disassemble the Software. If the package accompanying your computer contains compact discs, 3.5" and/or 5.25" disks, you may use only the disks appropriate for your computer. You may not use the disks on another computer or network, or loan, rent, lease, or transfer them to another user except as permitted by this agreement.

Appendix 99

w w w. d e l l . c o m / s u p p l i e s | s u p p o r t . d e l l . c o m

Limited Warranty

Dell warrants that the Software disks will be free from defects in materials and workmanship under normal use for ninety (90) days from the date you receive them. This warranty is limited to you and is not transferable. Any implied warranties are limited to ninety (90) days from the date you receive the Software. Some jurisdictions do not allow limits on the duration of an implied warranty, so this limitation may not apply to you. The entire liability of Dell and its suppliers, and your exclusive remedy, shall be (a) return of the price paid for the Software or (b) replacement of any disk not meeting this warranty that is sent with a return authorization number to Dell, at your cost and risk. This limited warranty is void if any disk damage has resulted from accident, abuse, misapplication, or service or modification by someone other than Dell. Any replacement disk is warranted for the remaining original warranty period or thirty (30) days, whichever is longer.

Dell does NOT warrant that the functions of the Software will meet your requirements or that operation of the Software will be uninterrupted or error free. You assume responsibility for selecting the Software to achieve your intended results and for the use and results obtained from the Software.

DELL, ON BEHALF OF ITSELF AND ITS SUPPLIERS, DISCLAIMS ALL OTHER

WARRANTIES, EXPRESS OR IMPLIED, INCLUDING, BUT NOT LIMITED TO,

IMPLIED WARRANTIES OF MERCHANTABILITY AND FITNESS FOR A

PARTICULAR PURPOSE, FOR THE SOFTWARE AND ALL ACCOMPANYING WRITTEN MATERIALS. This limited warranty gives you specific legal rights; you may have others, which vary from jurisdiction to jurisdiction.

IN NO EVENT SHALL DELL OR ITS SUPPLIERS BE LIABLE FOR ANY DAMAGES

WHATSOEVER (INCLUDING, WITHOUT LIMITATION, DAMAGES FOR LOSS OF

BUSINESS PROFITS, BUSINESS INTERRUPTION, LOSS OF BUSINESS

INFORMATION, OR OTHER PECUNIARY LOSS) ARISING OUT OF USE OR

INABILITY TO USE THE SOFTWARE, EVEN IF ADVISED OF THE POSSIBILITY OF SUCH DAMAGES. Because some jurisdictions do not allow an exclusion or limitation of liability for consequential or incidental damages, the above limitation may not apply to you.

100 Appendix

U.S. Government Restricted Rights

The software and documentation are "commercial items" as that term is defined at 48 C.F.R. 2.101, consisting of "commercial computer software" and "commercial computer software documentation" as such terms are used in 48 C.F.R. 12.212. Consistent with 48 C.F.R. 12.212 and 48 C.F.R. 227.7202-1 through 227.7202-4, all U.S. Government end users acquire the software and documentation with only those rights set forth herein. Contractor/manufacturer is Dell Products, L.P., One Dell Way, Round Rock, Texas 78682.

General

This license is effective until terminated. It will terminate upon the conditions set forth above or if you fail to comply with any of its terms. Upon termination, you agree that the Software and accompanying materials, and all copies thereof, will be destroyed. This agreement is governed by the laws of the State of Texas. Each provision of this agreement is severable. If a provision is found to be unenforceable, this finding does not affect the enforceability of the remaining provisions, terms, or conditions of this agreement. This agreement is binding on successors and assigns. Dell agrees and you agree to waive, to the maximum extent permitted by law, any right to a jury trial with respect to the Software or this agreement. Because this waiver may not be effective in some jurisdictions, this waiver may not apply to you. You acknowledge that you have read this agreement, that you understand it, that you agree to be bound by its terms, and that this is the complete and exclusive statement of the agreement between you and Dell regarding the Software.

Appendix 101

w w w. d e l l . c o m / s u p p l i e s | s u p p o r t . d e l l . c o m

Regulatory Notices

Electromagnetic Interference (EMI) is any signal or emission, radiated in free space or conducted along power or signal leads, that endangers the functioning of a radio navigation or other safety service or seriously degrades, obstructs, or repeatedly interrupts a licensed radio communications service. Radio communications services include but are not limited to AM/FM commercial broadcast, television, cellular services, radar, air-traffic control, pager, and Personal Communication Services (PCS). These licensed services, along with unintentional radiators such as digital devices, contribute to the electromagnetic environment.

Electromagnetic Compatibility (EMC) is the ability of items of electronic equipment to function properly together in the electronic environment. While this device has been designed and determined to be compliant with regulatory agency limits for EMI, there is no guarantee that interference will not occur in a particular installation. If this equipment does cause interference with radio communications services, which can be determined by turning the equipment off and on, you are encouraged to try to correct the interference by one or more of the following measures:

???Reorient the receiving antenna.

???Relocate the device with respect to the receiver.

???Move the device away from the receiver.

???Plug the device into a different outlet so that the device and the receiver are on different branch circuits.

If necessary, consult a Dell Technical Support representative or an experienced radio/television technician for additional suggestions.

For additional regulatory information, see the User???s Guide on your CD.

NOM Information (Mexico Only)

The following information is provided on the device(s) described in this document in compliance with the requirements of the official Mexican standards (NOM):

102 Appendix

Appendix 103

w w w. d e l l . c o m / s u p p l i e s | s u p p o r t . d e l l . c o m

104 Appendix

Index

A

aligning ink cartridges, 47

B

Black Copy button, 16

borderless printing, 25

buttons, operator panel Black Copy, 16 Cancel, 16

Color Copy, 15 down arrow, 16 Power, 16 Scan, 15

up arrow, 16

C

Cancel button, 16

cards loading, 20

cartridges, ink aligning, 47 replacing, 44

cleaning

ink cartridge nozzles, 48

Color Copy button, 15

copies, 26

copying

operator panel, 26 software, 27

D

Dell

contacting, 63

Dell All-In-One Center accessing, 39

Copy section, 39 Creative Tasks section, 40 Preview section, 40

Scan section, 39 using, 39

Dell Picture Studio v2.0

using, 41

Dell Printer Solution Center accessing, 38

using, 38

E

e-mail document, 32

scanned image, 32

envelopes loading, 20

error message

Blinking Power button, 57 Data error, 58

Ink Low Alert, 57 Paper feed, 58 Paper jam, 57 Paper tray empty, 58 Print carrier, 58 Printhead, 58 Reserve tank, 57 Scan carrier, 58 System control, 58

error messages Ink Low, 57 Paper jam, 57 Paper Out, 58

error messages and flashing lights, 57

F

faxing, 33

G

glossy paper loading, 20

greeting cards loading, 20

Index 105

106

I

index cards loading, 20

ink cartridges aligning, 47 cleaning, 48 replacing, 44

Ink Low message, 57

iron-on transfers loading, 20

L

loading cards, 20 envelopes, 20

greeting cards, 20 index cards, 20 iron-on transfers, 20 photo cards, 20 photo paper, 20 postcards, 20 transparencies, 21

M

messages, error Ink Low, 57 Paper feed, 58 Paper jam, 57 Paper out, 58 Print carrier, 58 Printhead, 58 Scan carrier, 58 System control, 58

multiple copies, 41

N

nozzles, ink cartridge cleaning, 48

O

operator panel copying with, 26 using, 15

P

paper exit tray, 12

Paper jam message, 57

Paper out message, 58

Paper Setup tab, 41

paper type sensor, 17 turning off, 17

photo cards loading, 20

photo paper loading, 20

photos printing, 24

postcards loading, 20

Print Layout tab, 41

Print Properties accessing, 40 Paper Setup tab, 41 Print Layout tab, 41

Quality/Copies tab, 41

problems drives, 52

Q

Quality/Copies tab, 41

S

safety information, 9

Scan button, 15

software

Dell All-In-One Center, 39 Dell Printer Solution

Center, 38

Print Properties, 40 understanding, 38

specialty media cards, 20 envelopes, 20 glossy, 20 greeting cards, 20 index cards, 20

iron-on transfers, 20 photo cards, 20 photo paper, 20 postcards, 20 transparencies, 21

support

contacting Dell, 63

T

troubleshooting

ink low message, 57 out of paper, 57 paper out message, 58

106 Index

W

warranty, 82

Index 107

108

108 Index