Operator's Manual
M
2-Cycle
WEEDWACKER_ GAS TRIMMER
Model No. 316.791900
W .pI .WJH TM
??? SAFETY
??? ASSEMBLY
??? OPERATION
??? MAINTENANCE
??? PARTS LIST
??? ESPANOL, E 13
CAUTION: Before using this product, read this manual and follow all safety rules and operating instructions.
Sears, Roebuck and Co., Hoffman Estates, IL 60179, U.S.A.
Visit our website" www.sears.com/craftsman

???This unit has a clutch. The cutting attachment remains stationary when the engine is idling. If it does not, take the unit to a Sears or other qualified service dealer for an adjustment.
???Adjust the D-handle to your size in order to provide the best grip.
???Be sure the cutting attachment is not in contact with anything before starting the unit.
???Use the unit only in daylight or good artificial light.
???Avoid accidental starting. Be in the starting position whenever pulling the starter rope. The operator and unit must be in a stable position while starting. Refer to Starting/Stopping Instructions.
???Use the right tool. Only use this tool for its intended purpose.
???Always hold the unit with both hands when operating. Keep a firm grip on both handles or grips.
???Keep hands, face, and feet away from all moving parts. Do not touch or try to stop the cutting attachment when it rotates.
???Use only replacement parts or accessories recommended for this tool that are distributed by Sears or a Craftsman outlet. Use of any replacement parts or accessories purchased elsewhere may be hazardous, and will also void your warranty.
???Keep unit clean of vegetation and other materials. They may become lodged between the cutting attachment and shield.
???To reduce fire hazard, replace a faulty muffler and spark arrestor. Keep the engine and muffler free from grass, leaves, excessive grease or carbon build up.
OTHER SAFETY WARNINGS
???Never store the unit with fuel in the tank, inside a building where fumes may reach an open flame (pilot lights, etc.) or sparks (switches, electrical motors, etc.).
???Allow the engine to cool before storing or transporting. Be sure to secure the unit while transporting.
???Do not touch the engine, gear housing or muffler. These parts get extremely hot from operation, even after the unit is turned off.
???Do not operate the engine faster than the speed needed to cut, trim or edge. Do not run the engine at high speed when not cutting.
???Always stop the engine when cutting is delayed or when walking from one cutting location to another.
???If you strike or become entangled with a foreign object, stop the engine immediately and check for damage. Do not operate before repairing damage. Do not operate the unit with loose or damaged parts.
???Turn the engine to off and disconnect the spark plug for maintenance or repair.
???Store the unit in a dry place, secured or at a height to prevent unauthorized use or damage. Keep out of the reach of children.
???Never douse or squirt the unit with water or any other liquid. Keep handles dry, clean and free from debris. Clean after each use, see Cleaning and Storage instructions (p. 11).
???Keep these instructions. Refer to them often and use them to
instruct other users. If you loan this unit to others, also loan them these instructions.
SAVE THESE INSTRUCTIONS
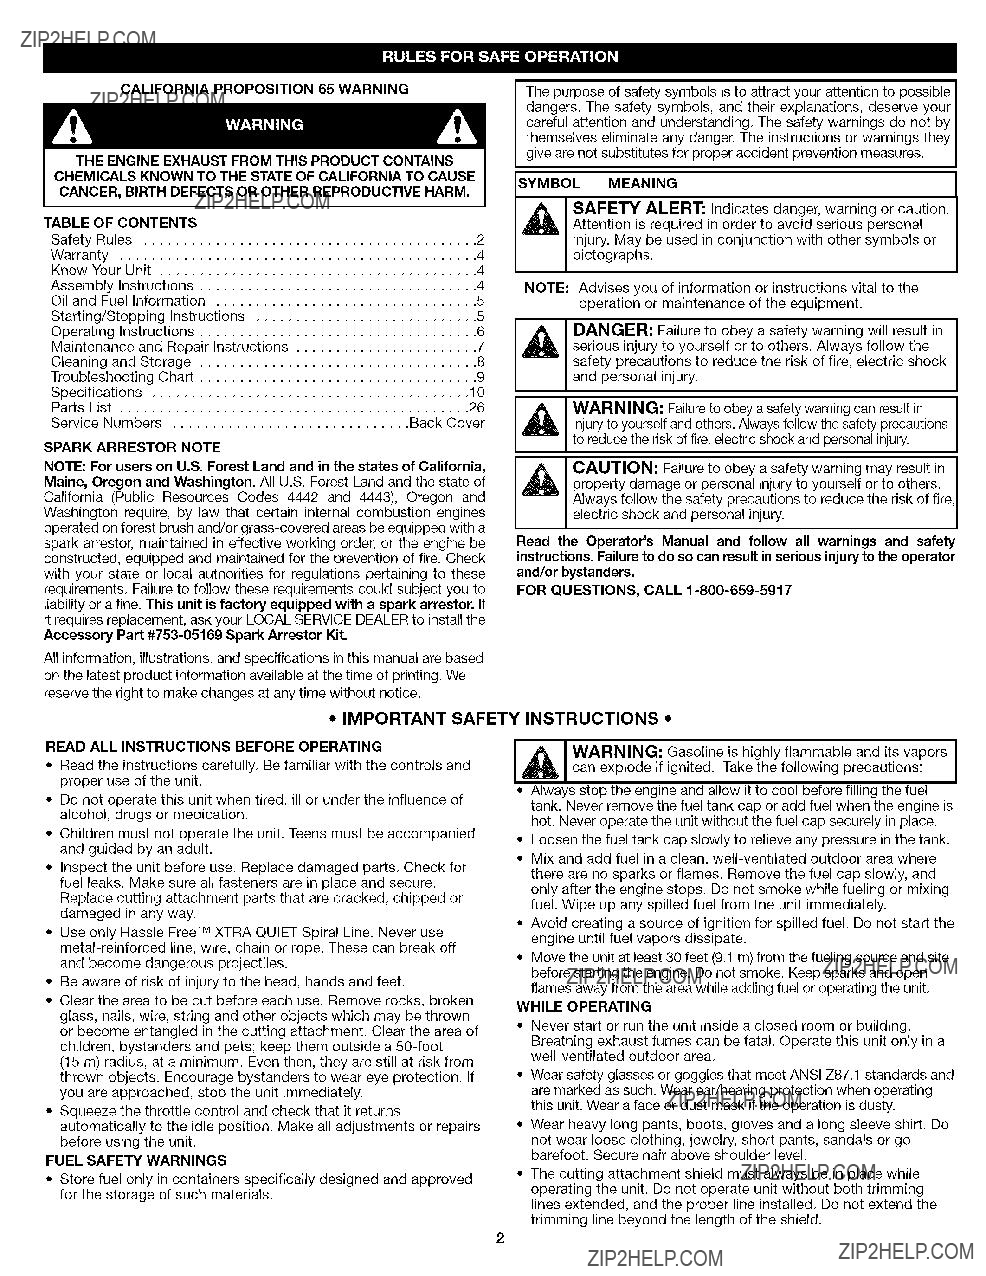
??? SAFETY & INTERNATIONAL SYMBOLS ???
This operator's manual describes safety and international symbols and pictographs that may appear on this product. Read the operator's manual for complete safety, assembly, operating and maintenance and repair information.
MEANING
THROWN OBJECTS AND ROTATING CUTTER CAN
CAUSE SEVERE INJURY
WARNING: small objects Can be propelled at high speed, causing injury. Keep away from the rotating rotor.
, KEEP BYSTANDERS AWAY:
WARNING: Keep all bystanders, especially children and pets, at least 50 feet (15 m.) from the operating area.
???WEAR EYE AND HEARING PROTECTION
WARNING: Thrown objects and loud noise can cause severe eye injuryand hearingloss. Weareye protection meeting ANSI Z87.1-1989 standards and ear protection when operating this unit. Use a fullface shield when needed.
I N% I. UNLEADEDFUEL
_ [ Always use clean, fresh unleaded fuel
i" ON/OFF STOP CONTROL
??? HOT SURFACE WARNING
Do not touch a hot muffler or Cylinder. You may get
burned. These parts get extremely hot from operation. When turned off they remain hot for a short time.
I ,OIL
Refer to 0perator;s manual for the proper type of 0il.
. PRIMER BULB
Push primer bulbl ful!y and slowly, t0 times,
L I I ON / START/RUN
t jI"ON/OFFSTOPCONTROLOFForSTOP
, SHARP BLADE
WARNING: Sharp blade on cutting attachment shield. Toprevent serious injury,do not touch the !ine cutting blade.

CRAFTSMAN FULL WARRANTY
If this Craftsman product fails due to a defect in material or workmanship within two years from the date of purchase, return it to any Sears store, Parts & Repair Service Center, or other Craftsman outlet in the United States for free repair (or replacement if repair proves impossible).
This warranty applies for only 90 days from the purchase date if this product is ever used for commercial or rental purposes.
This warranty covers ONLY defects in material and workmanship. Sears will NOT pay for:
???Expendable items that can wear out from normal use within the warranty period, such as cutting line, filters or spark plugs.
???Repairs necessary because of accident or failure to operate or maintain the product according to all supplied instructions.
???Preventive maintenance, or repairs necessary due to improper fuel mixture, contaminated or stale fuel.
This warranty gives you specific legal rights, and you may also have other rights which vary from state to state. Sears, Roebuck and Co., Hoffman Estates, IL 60179
On/Off Stop Control
Fuel Cap
Starter
Rope Grip
Shaft Grip
Shoulder Strap
Loop
Air Filter/
Muffler Cover
Primer Bulb
Muffler
Spark Plug
APPLICATIONS
As a trimmer:
???Cutting grass and light weeds.
???Edging
???Decorative trimming around trees, fences, etc. Other optional accessories may be used with this unit.
???Throttle Control
D-Handle
Shaft Housing
Convertible TM
Coupler
Line Cutting
Blade
Trimmer Attachment
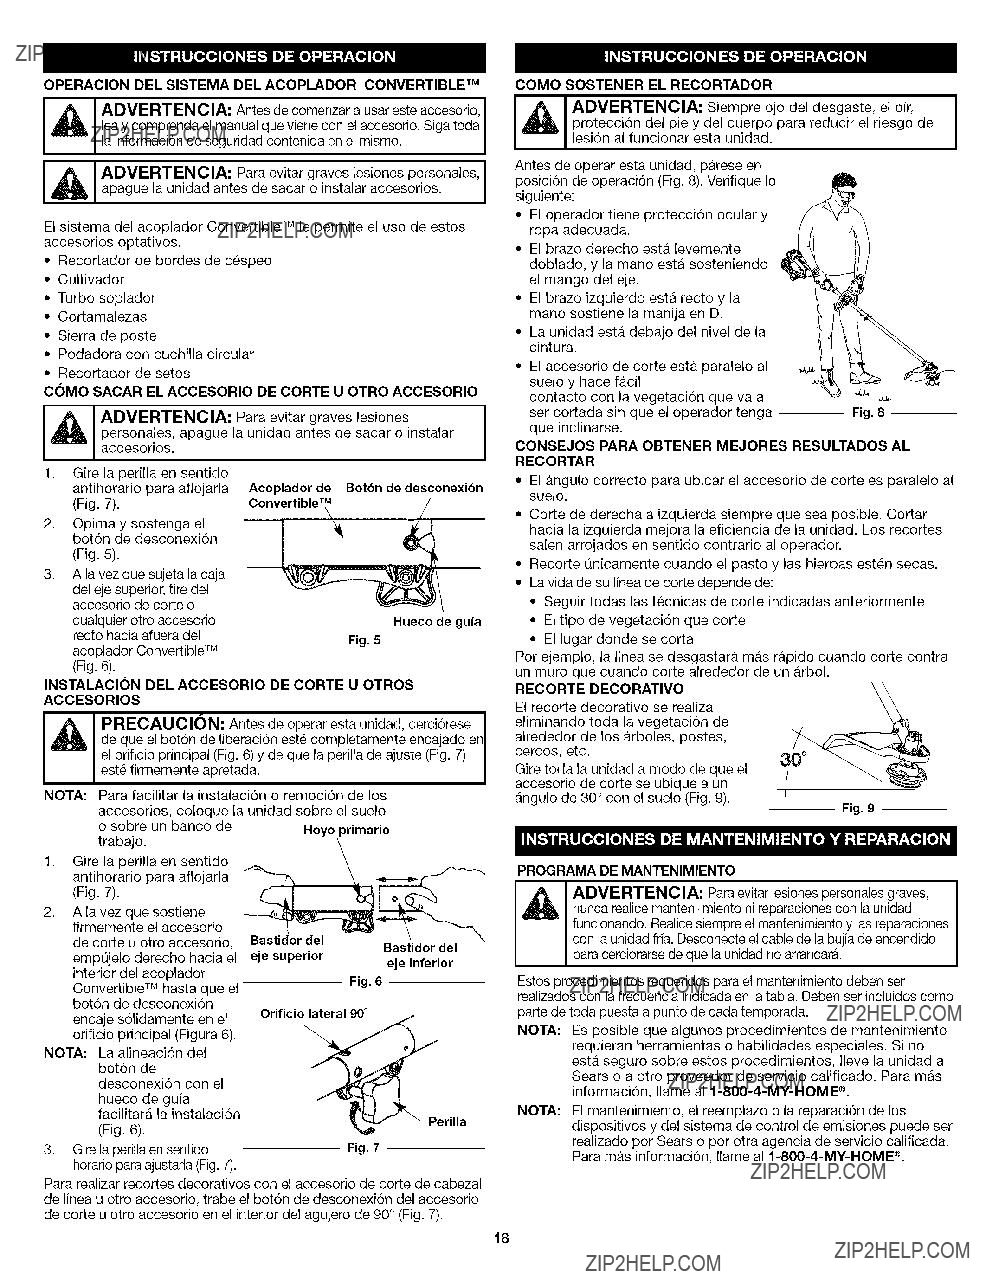
INSTALL AND ADJUST THE D-HANDLE
Cutting
J
Hassle Free?? Plus Cutting Head
Adjust
Install
1.Place D-handle over the shaft housing and onto the bottom clamp (Fig. 1). Place it a minimum of 6 inches (15.24 cm) from the end of the shaft grip.
2.Start screws with a flat- head or T-25 Torx screwdriver. Do not
tighten until handle is adjusted.
!
Minimum 6 it (15.24 cm)
Clamp
Fig. 1
3.While holding the unit in the operating position (Fig. 8), position the D-handle to the location that provides you the best grip.
4.Tighten the clamp screws evenly until the D-handle is secure.
INSTALLING THE TRIMMER ATTACHMENT
Prior to use, make sure trimmer attachment is installed correctly. Please refer to Operating the Convertible TM Coupler System for proper installation.
NOTE: Remove red cap or hanger from lower shaft housing prior to assembling to Convertible TM coupler
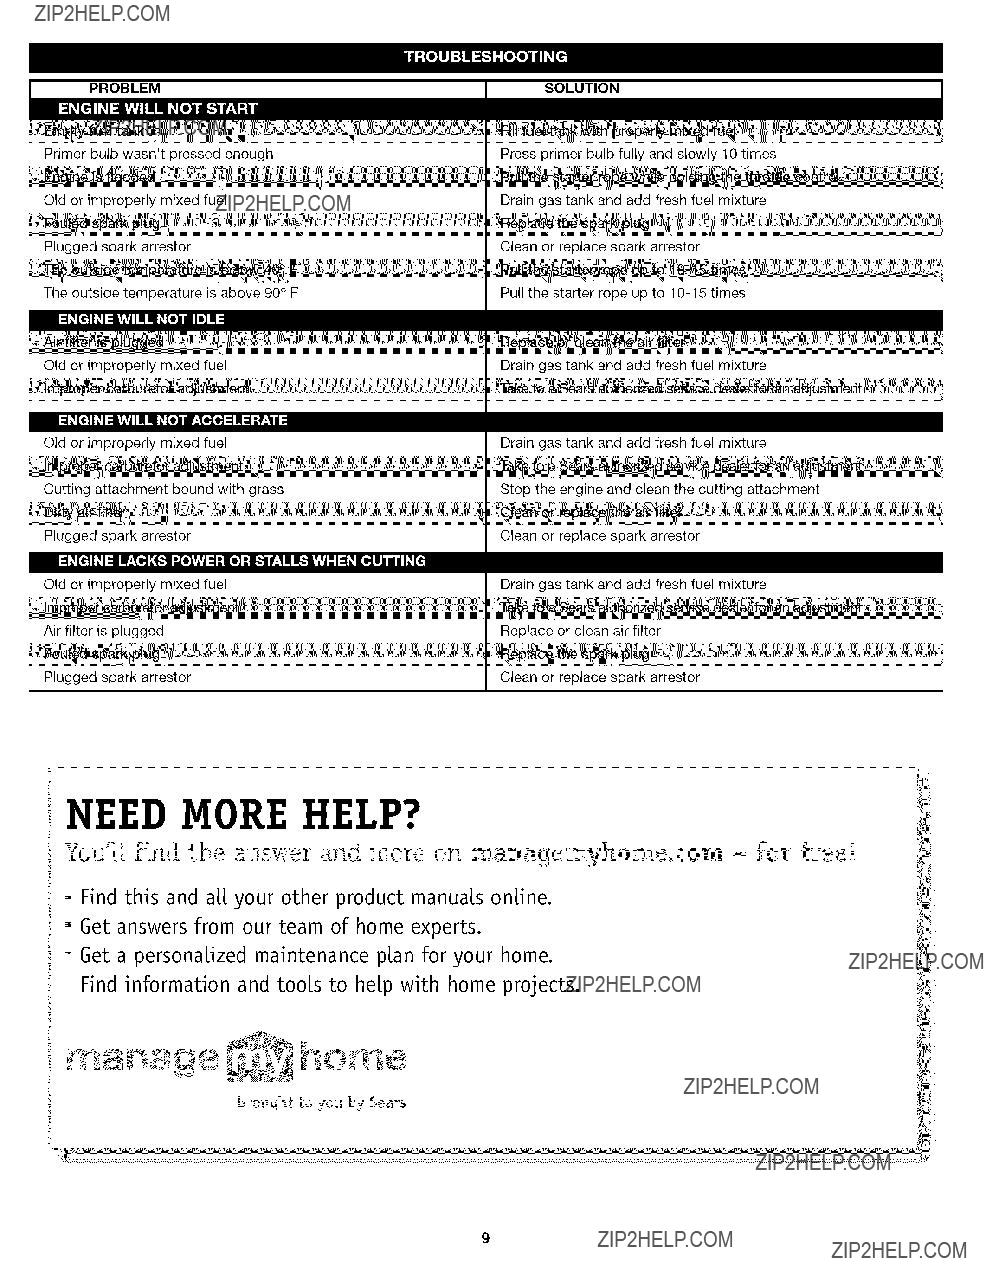
PROBLEM
Primer bulb wasn't pressed enough
Old or improperly mixed fuel
Plugged spark arrestor
The outside temperature is above 90 ?? F
Old or improperly mixed fuel
:1#[=tl#I:::U,vAI m111#toilf,_T_e.]::1n!::1:r, /
Old or improperly mixed fuel
Cutting attachment bound with grass
Plugged spark arrestor
Old or improperly mixed fuel
Air filter is plugged
Plugged spark arrestor
SOLUTION
Press primer bulb fully and slowly 10 times
Drain gas tank and add fresh fuel mixture
Clean or replace spark arrestor
Pull the starter rope up to 10-15 times
Drain gas tank and add fresh fuel mixture
Drain gas tank and add fresh fuel mixture
Stop the engine and clean the cutting attachment
Clean or replace spark arrestor
Drain gas tank and add fresh fuel mixture
Replace or clean air filter
Clean or replace spark arrestor
NEED MORE HELP?
Youq], fk_d, the a_wwe_: and mo_e on mal_agemyhOmeoCOm-for free!
o Find this and at[ your other product manuats ontine. o Get answers from our team of home experts.
o Get a personatized maintenance ptan for your home.
o Find information and toots to hetp with home projects.
/}fought te you b_ Sea_'s

llillill
All specifications are based on the latest product information available at the time of printing. We reserve the right to make changes at any time without notice.
REPAIR PROTECTION AGREEMENTS
Congratulations on making a smart purchase. Your new Craftsman?? product is designed and manufactured for years of dependable operation. But like all products, it may require repair from time to time. That's when having a Repair Protection Agreement can save you money and aggravation.
Here is what the Repair Protection Plan Agreement includes:
[] Expert service by our 10,000 professional repair specialists
[] Unlimited service and no charge for parts and labor on all covered repairs [] Product replacement up to $1500 if your cover product can not be fixed
[] Discount of 10% from regular price of service and related installed parts not covered by the agreement; also, 10% off regular price of preventive maintenance checks
[] Fast help by phone - we call it Rapid Resolution - phone support from a Sears representative. Think of us as a "talking owner's maunal." Once you purchase the Repair Protection Agreement, a simple phone call is all that it takes for you to schedule service. You can call anytime day or night, or schedule a service appointment online.
The Repair Protection Agreement is a risk-free purchase. If you cancel for any reason during the product warranty period, we will provide a full refund. Or a prorated refund anytime after the prodduct warranty period expires. Purchase you Repair Protection Agrrement today!
Some limitations and exclusions apply. For prices and additional information call 1-800-827-6655.
*Coverage in Canada varies on some items. For full datails call Sears Canada at 1-800-361-6665.
Sears Installation Service
For Sears professional installation of home appliances, garage door openers, water heaters, and other major home items, in the U.S.A. or Canada call 1-800-4-MY-HOME ??.

CALIFORNIA / EPA EMISSION CONTROL WARRANTY STATEMENT
Your Warranty Rights and Obligations
The California Air Resources Board, the Environmental Protection Agency, and Sears, Roebuck and Co. (Sears) are pleased to explain the emission control system warranty on your 2007 and later small off-road engine. In California and the 49 states, new small off-road engines must be designed, built and equipped to meet the state'sstringent anti-smog standards. Sears must warrant the emission control system on your small off-road engine for the periods of time listed below provided there has been no abuse, neglect or improper maintenance of your small off-road engine.
Your emission control system may include parts such as the carburetor or fuel-injection system, the ignition system, and catalytic converter. Also included may be hoses, belts, connectors and other emission-related assemblies.
Where a warrantable condition exists, Sears will repair your small off-road engine at no cost to you including diagnosis, parts and labor.
The 2007 and later small off-road engines are warranted for two years. If any emission-related part on your engine is defective, the part will be repaired or replaced by Sears.
Owners Warranty Responsibilities
As the small off-road engine owner, you are responsible for the performance of the required maintenance listed in your operator's manual. Sears recommends that you retain all receipts covering maintenance on your small off-road engine, but Sears cannot deny warranty solely for the lack of receipts or for your failure to ensure the performance of all scheduled maintenance.
???As the small off-road engine owner, you should however be aware that Sears may deny you warranty coverage if your small off-road engine or a part has failed due to abuse, neglect, improper maintenance or unapproved modifications.
???You are responsible for presenting your small off-road engine to a Sears Authorized Service Center as soon as a problem exists. The warranty repairs should be completed in a reasonable amount of time, not to exceed 30 days.
If you have any questions regarding your warranty rights and responsibilities, you should call f-800-4-MY-NOME ??.
Manufacturer's Warranty Coverage
???The warranty period begins on the date the engine or equipment is delivered to the retail purchaser.
???The manufacturer warrants to the initial owner and each subsequent purchaser, that the engine is free from defects in material and workmanship which cause the failure of a warranted part for a period of two years.
???Repair or replacement of warranted part will be performed at no charge to the owner at an Authorized Sears Service Center. For the nearest location please contact Sears at: f-800-4-MY-NOME ??.
???Any warranted part which is not scheduled for replacement, as required maintenance to the effect of "Repair or Replace as Necessary" is warranted for the warranty
or which is scheduled for only for regular inspection period. Any warranted part which is scheduled for
replacement as required maintenance will be warranted for the period of time up to the first scheduled replacement point for that part.
???The owner will not be charged for diagnostic labor which leads to the determination that a warranted part is defective, if the diagnostic work is performed at an Authorized Sears Service Center.
???The manufacturer is liable for damages to other engine components caused by the failure of a warranted part still under warranty.
???Failures caused by abuse, neglect or improper maintenance are not covered under warranty.
???The use of add-on or modified parts can be grounds for disallowing a warranty claim. The manufacturer is not liable to cover failures of warranted parts caused by the use of add-on or modified parts.
???In order to file a claim, go to your nearest Authorized Sears Service Center. Warranty services or repairs will be provided at all Authorized Sears Service Centers.
???Any manufacturer approved replacement part may be used in the performance of any warranty maintenance or repair of emission related parts and will be provided without charge to the owner. Any replacement part that is equivalent in performance or durability may be used in non-warranty maintenance or repair and will not reduce the warranty obligations of the manufacturer.
Emission Warranty Parts List:
The following components are included in the emission-related warranty of the engine: air filter, carburetor, primer, fuel lines, fuel pick up/fuel filter, ignition module, spark plug, and muffler. Valves and Cam are additionally included if your engine is a 4-Stroke Model.
CALIFORNIA EVAPORATIVE EMISSION CONTROL WARRANTY STATEMENT
Your Warranty Rights and Obligations
The California Air Resources Board and Sears, Roebuck and Co. (Sears) is pleased to explain the evaporative emission control system's warranty on your 2007 model year and later small off-road (equipment type) engine. In California, new equipment that use small off-engines must be designed, built, and equipped to meet the State'sstringent anti-smog standards Sears must warrant the evaporative emission control system on your small
off-road Lawn & Garden engine for the period listed below provided there has been no abuse, neglect or improper maintenance of your equipment.
Your evaporative emission control system may include parts such as: carburetors, fuel tanks, fuel lines, fuel caps, valves, canisters, filters, vapor hoses, clamps, connectors, and other associated components. For engines less than or equal to 80 cc, only the fuel tank is subject to the
evaporative emission control warranty requirements of this section. The displacement of your small off road engine is less than 80 cc.
Manufacturer's Warranty Coverage
This evaporative emission control system is warranted for two years. If any evaporative emission-related part on your equipment is defective, the part will be repaired or replaced by Sears.
Owner's Warranty Responsibilities
???As the small off-road Lawn & Garden engine owner, you are responsible for performance of the required maintenance listed in your owner's manual. Sears recommends that you retain all receipts covering maintenance on your Lawn & Garden Engine but Sears cannot deny warranty solely for the lack of receipts.
???As the small off-road Lawn & Garden engine owner, you should however be aware that the Sears may deny you warranty coverage if your fuel tank has failed due to abuse, neglect, or improper maintenance or unapproved modifications.
???You are responsible for presenting your Lawn & Garden fuel tank to Sears distribution center or service center as soon as the problem exists. The warranty repairs should be completed in a reasonable amount of time, not to exceed 30 days. If you have a question regarding your warranty coverage, you should contact Sears at f-800-4-MY-NOME ??.
DefectsWarrantyRequirements
(a)The warranty period begins on the date the engine or equipment is delivered to an ultimate purchaser.
(b)General Evaporative Emissions Warranty Coverage. The fuel tank must be warranted to the ultimate purchaser and any subsequent owner that the evaporative emission control system when installed was:
(1)Designed, built, and equipped so as to conform with all applicable regulations; and
(2)Free from defects in materials and workmanship that causes the failure of a warranted part for a period of two years.
(c)The warranty on evaporative emissions-related parts will be interpreted as follows:
(1)Any warranted part that is not scheduled for replacement as required maintenance in the written instructions must be warranted for the warranty period defined in subsection (b)(2). If any such part fails during the period of warranty coverage, it must be repaired or replaced by Sears. Any such part repaired or replaced under the warranty must be warranted for a time not less than the remaining warranty period.
(2)Any warranted part that is scheduled only for regular inspection in the written instructions must be warranted for the warranty period defined in
subsection (b)(2).A statement in such written instructions to the effect of "repair or replace as necessary" will not reduce the period of warranty coverage. Any such part repaired or replaced under warranty must be warranted for a time not less than the remaining warranty period.
(3)Any warranted part that is scheduled for replacement as required maintenance in the written instructions must be warranted for the period of time prior to the first scheduled replacement point for that part. If the part fails prior to the first scheduled replacement, the part must be repaired or replaced by the Sears. Any such part repaired or replaced under warranty must be warranted for a time not less than the remainder of the period prior to the first scheduled replacement point for the part.
(4)Repair or replacement of any warranted part under the warranty provisions of this article must be performed at no charge to the owner at a warranty station.
(5)Not withstanding the provisions of subsection (4) above, warranty services or repairs must be provided at distribution centers that are franchised to service the subject engines or equipment.
(6)The owner must not be charged for diagnostic labor that leads to the determination that a warranted part is in fact defective, provided that such diagnostic work is performed at a warranty station.
(7)Throughout the evaporative emission control system's warranty period set out in subsection (b)(2), Sears must maintain a supply of warranted parts sufficient to meet the expected demand for such parts.
(8)Manufacturer approved replacement parts must be used in the performance of any warranty maintenance or repairs and must be provided without charge to the owner. Such use will not reduce the warranty obligations of the manufacturer issuing the warranty.
(9)The use of any add-on or modified parts will be grounds for disallowing a warranty claim made in accordance with this article. The
manufacturer issuing the warranty will not be liable under this Article to warrant failures of warranted parts caused by the use of an add- on or modified part.
(10) Sears shall provide any documents that describe the warranty procedures or policies within five working days of request by the Air Resources Board. Emission Warranty Parts List
(1)Fuel Tank
Written instructions for the maintenance and use of the evaporative emissions control system by the owner shall be furnished with each new engine or equipment.
Manual del Operador
M
2-Tiempos
WEEDWACKER_ RECORTADOR A GASOLINA
Modelo No. 316.791900
W_.pI_.WJH TM
#!_BII_LIf[V,4BLI_ _ rAR r t tif 6 t: A S E _
??? SEGURIDAD
??? MONTAJE
??? FUNCIONAMIENTO
??? MANTENIMIENTO
??? LISTADO DE PIEZAS
PRECAUCION: Lea el manual
del operador y siga todas las advertencias e instrucciones
de seguridad.
Sears, Roebuck and Co., Hoffman Estates, IL 60179, U.S.A.
Visite nuestro sitio web" www.sears.com/craftsman

LAS EMISIONES DEL MOTOR DE ESTE PRODUCTO CONTIENEN SUBSTANCIAS QUlMICAS QUE EL ESTADO DE CALIFORNIA
CONOCE COMO CAUSANTES DECANCER, DEFECTOS DE
NACIMIENTO U OTROS DANOS REPRODUCTIVOS.
PARACHISPAS
NOTA:Para los usuariosen tierras forestales de los EE.UU.y en losestados de California, Maine, Oregon y Washington. Todos losterrenosforestales de
los EE.UU.y el estado de California(C6digos de Recursos P0blicos4442y 4443), Oregony Washington,requierenpor decreto, queciertos motores de combustion
Los simbolos de seguridad se utilizan para Ilamar su atencion sobre posibles peligros. Los dmbolos de seguridad y sus explicaciones merecen toda su atencion y comprensi6n. Los simbolos de seguridad no eliminan ningQnpeligro por si mismos. Las instrucciones o advertencias que ofrecen no substituyen las medidas adecuadas de prevencion de accidentes.
SIMBOLO SIGNIFICADO
ALERTAprecaucion. DebeprestarDE SEGURIDAD:atencion paraIndicaevitarpeligro,advertenciasufrir graves lesiones personales. Puede ser utilizadojunto con otros simbolos o figuras.
NOTA: Le ofrece informaci6n o instrucciones que son esenciales para la operaci6n o mantenimiento del equipo.
,_ conducirPELIGRO:a queElnoustedobedecerunauotraspersonasadvertenciadesultangravesseguridadpuedelesiones.Siga siempre lasprecaucionesde seguridadpara reducirel riesgo de incendio, descargaelectricay lesionespersonales.
,_ ADVERTENCIA"puede conducir a que ustedEl no seguirotrasunapersonasadvertenciasufrandelesionesseguridad. Siga siempre las precauciones de seguridad para reducir el riesgo de incendio, descarga electrica y lesiones personales.
interna que se hagan funcionar en zonas boscosas y/o zonas cubiertas por pastizales,est6n equipados con un parachispas,que sean mantenidos en buen estado de funcionamiento o que el motor sea construido, este equipado y sea mantenido para evitar incendios. Consulte los reglamentos pertinentes a esos requisitos con las autoridades estatales o locales. El incumplimiento de esos requisitespuede responsabilizarleo someterlea laimposicion de unamulta. Esta unidadrue equipada en lafabdca con unparachispas.Si requieresustitucbn, hay una Pantalla Parachispas disponible, Pieza #753-05169 al contactar el departamento de servicio.
seguridadPRECAUCI()N"puede conducirEl no seguira dafiounapatrimonialadvertenciao adeque usted u otras personas sufran lesiones personales. Siga siempre las precauciones de seguridad para reducir el riesgo de incendio, descarga electrica y lesiones personales.
Lea el manual del operador y siga todas los advertencias e instrucciones de seguddad. De no hacerlo, el operador y/o los espectadores pueden sufrir graves lesiones.
Sl TIENE PREGUNTAS, LLAME AL 1-800-659-5917
??? IMPORTANTE INFORMACION DE SEGURIDAD *
LEA TODAS LAS INSTRUCClONES ANTES DE LA OPERAClON
???Lea todas las instrucciones con cuidado. Conozca bien los controles y el uso correcto de la unidad.
???No opere esta unidad si esta cansado, enfermo, o bajo los efectos del alcohol, drogas o medicamentos.
???Los niSos y los adolescentes menores de 15 a_os no deben operar las unidades, excepto por los adolescentes guiados por un adulto.
???Inspeccione la unidad antes de utilizarla. Cambie las partes dafiadas. Verifiquesi existen perdidas de combustible. AsegQresede que los sujetadores esten bien colocados y asegurados. Cambie las partes accesorias de corte que esten quebradas, cascadas o dafiadas de cualquier forma. AsegQresede que el accesorio de corte esta bien instalado y ajustado con firmeza. AsegQresede que la proteccion accesoria de corte este bien conectada y colocada segQnse recomienda.
???Use s61o linea despiral Hassle Free TM XTRA QUIET. No use nunca Ifnea reforzada con metal, alambre, cadena ni soga, etc. Estas pueden desprenderse y convertirse en un proyectil peligroso.
???Tenga en cuenta el riesgo de lesiones en la cabeza, manos y pies.
???Oprima el control del regulador y verifique que regrese automaticamente a la posici6n de minima. Haga todos los ajustes o reparaciones antes de usar la unidad.
???Limpie el Area de corte antes de cada uso. Retiretodos los objetos como rocas, vidrios rotos, clavos, alambre o cuerda los cuales pueden ser despedidos o enredarse en el accesorio de corte. Aleje a todos los nifios, espectadores y animales domesticos. Mantenga todos los nifios, espectadores y animales domesticos a un radio de por Io menos 50 pies (15 m); aQnasi puede existir un riesgo de objetos despedidos contra los espectadores. Los espectadores deben usar proteccion para sus ojos. Si alguien se le acerca, pare el motor y el accesorio de corte de inmediato.
???Esta unidad no fue diseSada para set usada como cortamalezas. No conecte ni opere esta unidad con ningQn tipo de cuchilla ni accesorio para cortar malezas.
ADVERTENCIAS DE SEGURIDAD A GASOLINA
???Guarde el combustible en envases que hayan sido disefiados y aprobados para el almacenamiento de dichos materiales.
???Antes de Ilenar el tanque de combustible, apague siempre el motor y espere que se enfrfe. No retire nunca la tapa del tanque de combustible ni cargue combustible mientras el motor este caliente. No opere nunca la unidad sin la tapa del combustible colocada firmemente en su lugar. Afloje la tapa del combustible lentamente para disipar la presi6n del tanque.
???Mezcle y cargue el combustible en un Area exterior bien ventilada donde no haya chispas ni llamas. Quite lentamente la tapa del combustible s61o despues de apagar el motor. No fume mientras carga o mezcla el combustible. Limpie de inmediato todo el combustible que se haya derramado.
???Evite crear una fuente de encendido por combustible derramado.
No arranque el motor hasta que se hayan disipado los vapores del combustible.
???Aleje la unidad a por Io menos 30 pies (9.1 m.) del lugar de carga
de combustible antes de arrancar el motor. No fume, mantenga las chispas y las llamas abiertas lejos del Area mientras carga el combustible u opera la unidad.
DURANTE LA OPERAClON
???No arranque ni opere la unidad en una sala o edificio cerrado. Los gases de escape de monoxido de carbono pueden ser letales en un Area cerrada. Opere esta unidad solo en un Area exterior bien ventilada.
???Use lentes o gafas de protecci6n que cumplan con las normas ANSI Z87.1, y protecci6n para sus oidos/audici6n mientras opere esta unidad. Use siempre una mascara facial o para protegerse contra el polvo si la operaci6n levanta polvo.
???Usepantaloneslargosygruesos,botas,guantesycamisademanga ??? SigolpeaseenredaconalgQnobjetoextrado,apagueelmotorde
largaNouseropaholgada,alhajas,pantalonescortos,sandaliasni. inmediatoyverifiquesihaydadosReparetodoslosdadosantesde. estedescalzoSostengaelcabellosobreelniveldeloshombros.. volveraintentaroperarlaunidadNooperelaunidadsitienepiezas.
???LaprotecciCnaccesoriadecortedebeestarsiemprecolocadaen flojasdadadas. sulugarmientrasoperelaunidadNooperelaunidadconlasdos. ??? Apagueelmotorpararealizartodoelmantenimiento,
???EstaunidadnotieneembragueElaccesoriodecortecontinQa. originalparaestaunidadPuedeobtenerlossuproveedordeservicio. girandocuandoelmotorestaenmarchaenvacioParaevitar. autorizadoElusodepiezasyaccesoriosquenosonequipoorigina;.
lesiones,hagaqueuntecnicodeservicioautorizadoajustelaunidad.
???AjustelamanijaenDasutamaSodemodoquelebrindeelmejoragarre.
???AsegQresedequeelaccesoriodecortenoestaencontactocon ningQnobjetoantesdearrancarlaunidad.
???UselaunidadQnicamenteconlaluzdeldiaoconbuenaluzartificial.
???EvitearrancarlaunidadaccidentalmenteColCqueseenposici6n.
deiniciosiemprequetiredelacuerdadearranqueEloperadory.
launidaddebenestarenunaposici6nestablealcomenzarLea.
lasinstruccionesdeArranqueyApagado.
???UselaherramientaadecuadaNouseestaunidadparaninguna. tareaparalacualnohasidodiser_ada.
???NoseestiredemasiadoMantengasiempreunaposici6ny.
equilibrioadecuados.
???Sostengasiemprelaunidadconambasmanosmientrasesteen
funcionamientoSostengaconfirmezatantoelmangocomola.
manijaauxiliar.
???Mantengalasmanes,lacaraylospieslejosdetodaslaspartes m6vilesNointentetocarnidetenerelaccesoriodecortemientrasgira..
puedecausargraveslesionesaloperadoreldaSodesuunidad,yla
cancelaci6ndesugarantia.
???Mantengalaunidadlibredevegetaci6nyotrosmateriales.
Puedenalojarseentreelaccesoriodecorteylaprotecci6n.
???Parareducirelriesgodeincendio,cambielossilenciadoresy
amortiguadoresdechispasdefectuosos,mantengaelmotoryelsilenciador
libredepasto,hojas,grasaexcesivaoacumulacionesdecarbono.
OTRAS ABVERTENCIAS DE SEGURIDAB
???No guarde nunca la unidad con combustible en el tanque en un edificio donde los gases puedan Ilegar a una llama abierta o a una chispa.
???Espere que el motor se enfrie antes de guardar o transportar la unidad. AsegQrese de que la unidad este segura al transportarla.
???Guarde la unidad bajo Ilave en un lugar adecuado y seco para evitar que sea usada por personas no autorizadas y se dade, fuera del alcance de los ni_os.
???Nunca moje ni rocie la unidad con agua ni con ningOnotro liquido. Mantenga las manijas secas, limpias y sin residuos. Limpie la unidad luego de cada uso, lea las instrucciones de Limpieza y Almacenamiento.
???Notoqueelmotor,elbastidordelengranajenielsilenciador.
EstaspartessecalientanmuchoconlaoperaciCnLuegode.
apagarlaunidad,permanecencalientesduranteuntiempobreve.
???Noopereelmotoraunavelocidadmayorquelanecesariapara
cortar,recortarrecortarlosbordesNohagafuncionarelmotor.
aaltavelocidadmientrasnoestacortando.
???Apaguesiempreelmotorcuandodemoreelcorteomientras caminaentrezonasdecorte.
???Guarde estas instrucciones. ConsQItelas con frecuencia y utilicelas para enser_ar a otros usuarios. Si le presta esta unidad a alguien, prestele tambien estas instrucciones.
CONSERVE ESTAS INSTRUCCIONES
??? SIMBOLOS DE SEGURIDAD E INTERNACIONALES,
Este manual del operador describe los simbolos y figuras de seguridad e intemacionales que pueden aparecer en este producto. Lea el manual del operador para obtener informaci6n completa acerca de la seguridad, ensamble, operaci6n y mantenimiento y reparaci6n.
OPERADOR
O??? ADVERTENCIALea el manual del -operadorLEA EL yMANUALsiga todasDELlas advertencias e instrucciones de seguridad. De no hacerlo, el operador y/o los espectadores pueden sufrir graves lesiones.
ADVERTENCIA: Los objetos arrojados por la unidad y
el ruido fuerte pueden causar graves lesionesocularesy
' USE PROTECCION OCULAR Y AUDITIVA pCrdidaauditiva. Utilice protecci6n ocular que cumpla con las normas ANSI Z87.1 y protecci6n auditiva cuando opere esta
unidad. Use una careta completa cuando la necesite.
Use siempre combustible limpio, nuevo y sin plomo.
_ ??? COMBUSTIBLE SIN PLOMO
I ' ENCENDIDO/ARRANQUE/MARCHAYCONTROL DEAPAGADO
0
SIGNIFICADO
, LOS OBJETOS DESPEDIDOS Y LA CUCHILLA
ROTAT,VAPUEOENCAUSARGRAVESLES,ONES
ADVERTENCIA: No 0peie esta unidad si la protecciCn p!Astica de linea no esta colocada en su lugar. MantCngase alejado del accesorio de corte giratorio:
, MANTENGA ALEJADOS A LOS ESPECTADORES
ADVERTENCIA: Mantenga a todos 10SesPectadoresl
en especial a ninos y animales domCsticos a por Io menos 50 pies (15 m) del _.reade corte.
No toque un silenciador ni un cilindro caliente. Puede quemarse. Estas partes se calientan mucho con el
use. Luego de apagarse Permanecen ca!ientes durante un corto tiempo.
, INDICADOR DE ACEITE
Consulte el manual del operador para obtenei infoimaciCn acerca del tipo correcto de aceite.
Oprima la bombilla del cebador Completa y lentamente, de 10 veces
'CUCHILLA AFILADA
ADVERTENCIA: La protecciCn del accesorio de
corte contiene una cuchilla afilada. Pa[a prevenir graves lesiones, no toque la cuchilla.

GARANTIA TOTAL DE CRAFTSMAN
Si este producto de Craftsman Professional falla debido a un defecto en el material o en la mano de obra dentro de un perfodo de tres ahos a partir de la fecha de compra, devuelvalo a cualquier tienda o Centro de Servicio de Piezas y Reparaciones Sears u otro establecimiento de Craftsman en los Estados Unidos para que sea reparado sin costo alguno (o ser reemplazado si resulta imposible repararlo).
Esta garantfa se aplica solamente durante 90 dias si este producto en algQn momento se utiliza para fines comerciales o de alquiler.
Esta garantia abarca SOLAMENTE los defectos en el material o en la mano de obra. Sears NO pagara:
???Los articulos consumibles que se desgasten debido al uso normal dentro del perfodo de garantfa.
???Las reparaciones necesarias debidas a accidente asi como por no operar o no mantener el equipo de acuerdo con todas las instrucciones provistas.
???Mantenimiento preventivo, o las reparaciones necesarias debido a mezcla incorrecta de combustible, combustible contaminado o viejo.
Esta garantia le concede a usted derechos legales especificos, y usted pudiera tener otros derechos que varfan de un estado a otro. Sears, Roebuck and Co., Hoffman Estates, IL 60179
Adaptador de apoyo
Cubierta del silenciador / filtro de aire
Convertible
Accesorio de corte
Silenciador
Bujia de encendido
un dedo. Inicie los tornillos con un destornillador grande de pala o Torx #25. No los apriete hasta ajustar la manija.
Ajuste
3.Mientras sostiene la unidad en posici6n de operaci6n (Fig. 8), coloque la manija en Den la posici6n que le brinde el mejor agarre.
4.Ajuste los tornillos de la abrazadera en forma pareja hasta que la manija en D este firme.
INSTALACION DEL ACCESORIO RECORTADOR
Antes del uso, la marca la fijaci6n segura de trimmer es instalada correctamente. Refierase por favor a Operar el Convertible TM Sistema de Acoplador para la instalaci6n apropiada.
NOTA: Quite la tapa roja o el gancho de la cubierta inferior del eje antes de ensamblar al acoplador Convertible TM
CAUSA
La bombilla de cebado no fue oprimida Io suficiente
El combustible es viejo o esta mal mezclado
Parachispas obstruido
La temperatura exterior es per debajo de 32 ?? C (90?? F)
El combustible es viejo o esta mal mezclado
:1iH_v[o'ai[o]:! _[oT__To:1It:1:.]_:
El combustible es viejo o esta mal mezclado
ACCION
Oprima la bombilla de cebado total de 10 veces
Drene el tanque de gasolina / Agregue mezcla de combustible nueva
Limpie o cambie el parachispas
Hale el cord6n de arranque hasta un maximo de 10-15 veces
Drene el tanque con combustible/Agregue mezcla de combustible nueva
Drene el tanque con combustible/Agregue mezcla de combustible nueva
El accesorio de corte esta atascado de hierba
Parachispas obstruido
:1HE_v[o'ali[O]:l _[olla/ I::1I::l[,-llJ=[e']I::l_i / ::I"-.To'a/ ::1[e']r:Io_l _:I:
El combustible es viejo o esta mal mezclado
El filtro de aire esta sucio
Parachispas obstruido
Pare el motor y limpie el accesorio de corte
Limpie o cambie el parachispas
[oil:V: tie.[o]:iif:!:
Drene el tanque con combustible/Agregue mezcla de combustible nueva
Limpie o cambie el filtro de aire
Limpie o cambie el parachispas
.NF.CF.SITA MAS AYUDA?
Encontra_:&_,l_a_espuesta y mucho m&%en managemyhemeoCOm ......gratis!
o Busque este y todos sus demos rnanuales de productos en linea.
o Obtenga respuestas de nuestros expertos en productos para e[ hogar. o Redba un plan de rnantenirniento persona[izado para su hogar.
o Encuentre [a inforrnad6n y [as herrarnientas que [e ayudar_n en sus proyectos para su hogar.

'ii'l|'i[l
Toda las especificaciones contenidas en este manual se basan en la informaci6n mas reciente disponible en el momento de impresi6n del manual. Nos reservamos el derecho de hacer cambios en cualquier momento sin aviso previo.
CONVENIO DE PROTECCION DE REPARACION
Felicidades por haber realizado una compra inteligente. Su nuevo producto Craftsman?? esta dise_ado y fabricado para ofrecerle a_os de funcionamiento confiable. Pero como todos los productos, es posible que sea necesario repararlo de vez en cuando. Ahi es cuando tenet un Convenio de Protecci6n de Reparaci6n puede ahorrarle dinero y problemas.
Esto es Io que incluye el Convenio de Protecci6n de Reparaci6n*:
[] Servicio experto de nuestros 10,000 especialistas profesionales en reparaciones
[] Servicio ilimitado y sin costo alguno por piezas y mano de obra en todas las reparaciones cubiertas [] Reemplazo del producto por un valor de hasta $1500 si el producto cubierto no se puede reparar
[] Descuento del 10% en el precio regular del servicio, asf como de las piezas instaladas, que el convenio no cubra; igualmente, 10% de descuento en el precio regular de comprobaci6n de mantenimiento preventivo
[] Ayuda rapida pot tel_fono - la Ilamamos Soluci6n Rapida - asistencia tecnica por telefono de un representante de Sears. Piense en nosotros como si fueramos un "manual del usuario que habla".
Una vez que adquiera el Convenio de Protecci6n de Reparaci6n, todo Io que necesita es hacer una simple Ilamada para programar el servicio de reparaci6n. Puede Ilamar a cualquier hora del dfa o de la noche, o hacer una cita de servicio por Internet.
El Convenio de Protecci6n de Reparaci6n es una compra libre de riesgo. Si usted cancela por cualquier motivo durante el periodo de garantia del producto, proporcionaremos un reembolso completo. O, un reembolso prorrateado en cualquier momento despues de que venza el perfodo de garantia del producto, iAdquiera hoy mismo su Convenio de Protecci6n de Reparaci6n!
Aplican algunas limitaciones y exclusiones. Para obtener precios e informaci6n adicional en los Estados Unidos, Ilame al 1-800-827-6655.
*La cobertura en Canada varia en algunos articulos. Para obtener todos los detalles, Ilame a Sears en Canada al 1-800-361-6665. SERMIClO DE INSTALACIC)N SEARS
Para la instalaci6n de electrodomesticos, abridores de puertas de garaje, calentadores de agua, y otros productos para el hogar por profesionales de Sears, en los Estados Unidos o Canad& Ilame al 1-800-4-MY-HOME ??.
DECLARACION DE GARANTiA DE CONTROL DE EMISIONES EVAPORATIVAS DE LA EPA PARA CALIFORNIA
Los Derechos y Obligaciones de Usted seg_n la Garantia
El Consejo de Recursos del Aire (Air Resources Board) de California, la Agencia de Protecci6n del Medic Ambiente (EPA)y Sears, Roebuck and Co. (Sears) tienen el placer de explicar la garantia del sistema de control de emisiones en su motor "off-road" pequefio modelo del afio 2008 y posterior. En California
y los 49 estados, los nuevos motores "off-road" pequeflos deben ser disefiados, construidos y equipados Estado contra el "smog". Sears debe garantizar el sistema de control de emisiones en el motor "off-road"
para que cumplan con las exigentes normas del pequeflo de usted para los periodos de tiempo
que se indican a continuaci6n siempre y cuando no haya habido maltrato, negligencia o mantenimiento inadecuado de su motor "off-road" pequeflo.
El sistema de usted de control de emisiones pudiera incluir piezas tales como el carburador o sistema de inyecci6n de combustible, el sistema de encendido y el convertidor catalitico. Tambien pudiera incluir mangueras, correas, conectores y otros conjuntos relacionados con las emisiones.
Cuando exista una condici6n que este dentro de la garantia, Sears reparara su motor "off-road" pequefio sin costo alguno para usted, incluyendo diagn6stico, piezas y mano de obra.
Los motores "off-road" pequefios de12007y posteriores estan garantizados por dos afios. Si alguna piezade su motor relacionada con emisiones es defectuosa, Sears la reparara o la reemplazara.
Responsabilidades del Propietario segt_n la Garantia
Como propietario del motor "off-road" recomienda que usted conserve todos
pequefio, usted es responsable de realizar el mantenimiento requerido que se indica en su manual del operador. Sears los recibos que cubren el mantenimiento de su motor "off-road" pequefio, pero Sears no puede denegar la garantia
solamente porque usted no tenga los recibos ni porque usted no pueda asegurar que se ha realizado todo el mantenimiento programado.
???Sin embargo, como propietario del motor "off-road" peque_o, usted deberA estar consciente de que Sears pudiera denegarle cobertura de la garantia si su motor "off-road" pequeflo o una piezadel mismo ha presentadofallas debido a maltrato,negligencia,mantenimientoinadecuadoo modificaciones no aprobadas.
???Usted es responsable de presentar su motor "off-road" pequefio a un Centro de Servicio Autorizado per Sears tan pronto se detecte el problema. Las reparaciones en garantia deberan terminarse en un periodo de tiempo razonable, no mayor de 30 dias.
Si tiene alguna pregunta en relaci6n con sus derechos y responsabilidades de acuerdo con su garantia, debera Ilamar al 1-800-4-MY-HOME ??.
Cobertura de la Garantia del Fabricante
???Cualquier piezade reemplazo aprobada por elfabricante se puede usar al realizarcualquier mantenimiento o reparaci6n de piezasbajo garantia relacionadas
con emisiones y se proporcionaran sin cargo alguno para el propietario. Cualquier pieza de reemplazo que sea equivalente en rendimiento o durabilidad se puede usar en mantenimiento o reparaci6n sin garantia y no reducira las obligaciones de garantia del fabricante.
Lista de Piezas de Emisiones en Garantia
Los siguientes componentes se incluyen en la garantia del motor relacionada con emisiones: filtro de aire, carburador, cebador, tuberias de combustible, recuperaci6n de combustible/filtro de combustible, m6dulo de encendide, bujia y silenciador.
DECLARACION DE GARANTIA DE CONTROL DE EMISlONES EVAPORATIVAS PARA CALIFORNIA
Los Derechos y Obligaciones de Usted seg_n la Garantia
El Censejo de Recursos del Aire (Air Resources Board) de California y Sears, Roebuck and Co. (Sears)tienen el placer de explicar la garantia del sistema de control de emisienes evaporativas en su motor "off-road" pequeSo (tipo de equipo) modelo del afio 2007 y posterior. En California, los nuevos equipos que usen motores "off-road" pequefios deben ser disefiados, construidos y equipados para que cumplan con las exigentes normas del Estado contra el "smog". Sears debe garantizar el sistema de control de emisienes evaporativas en su motor "off-road" Lawn & Garden (para el cesped y el jardin) pequefio para el periodo que se indica a continuaci6n siempre y cuando no haya habido maltrato, negligencia o mantenimiento inadecuado de su equipo.
Su sistema de control de emisiones evaporativas pudiera incluir piezas tales como: carburadores, tanques de combustible, tuberias de combustible, tapas de combustible, valvulas, recipientes, filtros, mangueras de vapor, abrazaderas, conectores y otros componentes relacionados. En el caso de los motores de 80 cc o menos, solamente el tanque de combustible esta sujeto a los requisitos de la garantia de control de emisiones evaporativas de esta secci6n. El desplazamiento de su motor "off-road" pequeSo es de menos de 80 cc.
Cobertura de la Garantia del Fabricante
Este sistema de control de emisiones evaporativas esta garantizado por dos afios. Si cualquier pieza relacionada con lasemisiones evaporativas de su equipo es defectuosa, la pieza sera reparada o reemplazada por Sears.

Responsabilidades del Propietario segt_n la Garantia
???Como propietario del motor "off-road" Lawn & Garden pequefio, usted es responsable de realizar el mantenimiento requerido que se indica en su manual de propietario. Sears recomienda que usted conserve todos los recibos que cubren el mantenimiento de su Motor Lawn & Garden, pero Sears no puede denegar la garantia solamente porque usted no tenga los recibos.
???Sin embargo, como propietario del motor "off-road" Lawn & Garden pequefio, usted debera estar consciente de que Sears pudiera denegarle cobertura de la garantia si su tanque de combustible ha presentado fallas debido a maltrato, negligencia, mantenimiento inadecuado o modificaciones no aprobadas.
???Usted es responsable de presentar su tanque de combustible Lawn & Garden al centro de distribucion o al centro de servicio de Sears tan pronto se detecte el problema. Las reparaciones en garantia deberan terminarse en un perfodo de tiempo razonable, no mayor de 30 dias. Si tiene alguna pregunta en relaci6n con la cobertura de su garantia, debera comunicarse con Sears Ilamando al 1-800-4-MY-HOME ??.
Requisitos de la Garantia por Defectos
(a)El periodo de garantia comienza en la fecha en que se entrega el motor o el equipo a un comprador final.
(b)Cobertura General de la Garantia de Emisiones Evaporativas. Eltanque de combustible debe estar garantizado al comprador final y a cualquier propietario posterior en cuanto a que cuando se instalo el sistema de control de emisiones evaporativas estaba:
(2)Cualquier pieza garantizada queen las instrucciones por escrito este programada solamente para inspeccion regular,debe estar garantizada por el periodo de garantfa definido en la subseccion (b)(2).Una declaracion en dichas instrucciones per escrito al efecto de "reparar o reemplazar segQn sea necesario" no reducira el periodo de cobertura de la garantfa. Cualquier pieza reparada o reemplazada bajo la garantia debe estar garantizada por un tiempo no menor que el periodo de garantia restante.
(3)Cualquier pieza garantizada que este programada para reemplazo, segt]n exige el mantenimiento en lasinstrucciones por escrito, debe estar garantizada por el periodo de tiempo anterior al primer punto de reemplazo programado para esa pieza. Si la piezafalla antes del primer reemplazo programado, la
piezadebe serreparada o reemplaza por Sears. Cualquier pieza reparada o reemplazada bajo la garantia debe estar garantizada por un tiempo no menor que Io que testa del periodo anterior al primer punto de reemplazo programado para esa pieza.
(4)La reparacion o el reemplazo de cualquier pieza garantizada bajo las disposiciones de garantfa de este articulo se debe realizar sin costo alguno para el propietario en una estacion deride se hagan trabajos de garantia.
(5)Independientemente de las disposiciones de la subsecci6n (4) anterior, los servicios o reparaciones en garantia se deben proporcionar en centros de distribucion que esten franquiciados para prestar servicios a los motores o equipos en cuestion.
(6)No se debe cobrar al propietario per el trabajo de diagnostico para determinar que una pieza garantizada esta realmente defectuosa, siempre y cuando
dicho trabajo de diagn6stico se Ileve a cabo en una estacion donde se hagan trabajos de garantia.
(7)Durante el periodo de garantfadel sistema de control de emisiones evaporativas establecido en lasubsecci6n (b)(2),Sears debe mantener un suministro de piezas garantizadas suficiente para satisfacer la demanda esperada de dichas piezas.
(8)AI realizar cualquier mantenimiento o reparacion en garantia se deben usar piezas de reemplazo aprobadas por el fabricante y se deben proporcionar sin cargo alguno para el propietario. Tal uso no reducira las obligaciones de garantia del fabricante que emite la garantfa.
(9)El use de cualquier accesorio o pieza modificada sera motivo para desestimar una reclamacion de garantia hecha en conformidad con este artfculo. El
fabricante que emite la garantia no sera responsable, segt]n esteArticulo, de garantizar fallas de piezas garantizadas causadas por el uso de un accesorio o una pieza modificada.
(10)Sears proporcionarb, los documentos que describen los procedimientos o normas de la garantia, en un plazo de cinco dias habiles desde que los solicite el Consejo de Recursos del Aire.
Lista de Piezas de Emisiones en Garantia
(1) Tanque de Combustible
Con cada motor o equipo nuevo se proporcionaran instrucciones por escrito para el mantenimiento y use del sistema de control de emisiones evaporativas por parte del propietario.
REPLACEMENT PARTS - MODEL 316.791900
2-CYCLE GAS TRIMMER
l
@
Items Not Shown
REPLACEMENT PARTS - MODEL 316.791900
2-CYCLE GAS TRIMMER
3791-182690 Throttle Trigger Spring
4791-182405 Switch Assembly
5753-04405 Throttle Cable Assembly
6 753-04344 Upper Drive Shaft Housing
7791-180869 Deluxe D-Handle Assembly (includes 8-10)
8791-181070 Screw
9791-182167 D-Handle
10 791-182168 D-Handle Base
11 753-1190 Split Boom Coupler (includes 12-15)
12791-181981 Adjustment Knob (includes 15)
13791-182057 Screw
14791-181617 Bolt
15753-04386 Nut
16753-05267 Lower Flexible Drive Shaft
17753-04504 Lower Drive Shaft Housing
18791-182200 Shield Mount Screw Assembly
19791-182193 Gearbox Assembly (includes 20 & 21)
20 791-182195 Gearbox Screw
21 791-145569 Anti-Rotation Screw
22791-682061 Blade Assembly
23791-182189 Shield Assembly (includes 22)
24753-05779 Cutting Head Assembly (includes 25)
25753-05780 Cutting Head Cap
753-05038 Tube of Line
Items Not Shown
Your Home
For expert troubleshooting and home solutions advice:
anage o e
www.managemyhome.com
For repair - in your home - of all major brand appliances, lawn and garden equipment, or heating and cooling systems, no matter who made it, no matter who sold it!
For the replacement parts, accesspries and owner's manuals that you need to do-it-yourself.
For Sears professional installation of home appliances and items like garage door openers and water heaters.
1-800-4- MY-HOM E?? (1-800-469-4663)
Call anytime, day or night (U.S.A. and Canada)
www.sears.comwww.sears.ca
Our Home
For repair of carry-in items like vacuums, lawn equipment, and electronics, call anytime for the location of your nearest
Sears Parts & Repair Service Center
1-800-488-1222 (U.S.A.) 1-800-469-4663 (Canada)
www.sears.comwww.sears.ca
To purchase a protection agreement on a product serviced by Sears:
1-800-827-6655 (U.S.A.) 1-800-361-6665 (Canada)
(1-888-784-6427) Sealrs www.sears.ca
??Registered Trademark / TMTrademark / SMService Mark of Sears Brands, LLC
??Marca Registrada / TMMarca de F_.brica / SMMarca de Servicio de Sears Brands, LLC