Operator'sManual
5-in.TWIN CUTTER SAW
Model No. 286.17589
CAUTION: Read, understand and follow
all Safety Rules and Operating Instructions in this manual before using this product.
???SAFETY
???OPERATION
???MAINTENANCE
???ESPANOL, PAGE25
Sears, Roebuck and Co., Hoffman Estates, IL 60179 U.S.A.
SAVETHESE INSTRUCTIONS!
READ ALL INSTRUCTIONS!
/_, WARNING: BE SURE to read and understandall instructions. Failure to follow all instructions listed below may result in electric shock, fire and/or serious personal injury.
WORK AREA SAFETY
1.ALWAYS keep your work area clean and well lit. Clutteredbenches and dark areas inviteaccidents.
2.DO NOT operate power tools in explosive atmospheres, such as in the presence of flammable liquids, gases, or dust. Power toolscreate sparks which may ignite the dust or fumes.
3.ALWAYS keep bystanders, children, and visitors away while operating a power tool. Distractions can cause you to lose control
ELECTRICAL SAFETY
1.Double Insulated tools are equipped with a polarized plug (one blade is wider than the other.) This plug will fit In a polarized outlet only one way.
If the plug does not fit fully In the outlet, reverse the plug. If it still does not
fit, contact a qualified electrician to install a polarized outlet. Do not change the plug In any way.
2.Double insulation Deliminates the need for the three-wire groundedpower cord
and grounded power supply system.Applicableonly to Class II (double insulated) tools.
3.Before pluggingin the tool, BE SURE that the outlet voltage suppliedis within the voltage marked on the tool'sdata plate, DO NOT use "AC only" rated toolswith a
DC power supply.
4.ALWAYS avoid body contact with grounded surfaces, such as pipes,
radiators, ranges and refrigerators. There is an increasedrisk of electric shock if your body is grounded.
5.If operating the power tool in damp locations Is unavoidable, ALWAYS use a Ground Fault Circuit Interrupter to supply power to your tool. ALWAYS wear electrician'srubber gloves and footwear in damp conditions.
6.DO NOT expose power tools to rain or wet conditions. Water entering a power tool will increasethe risk of electric shock.
7, DO NOT abuse the cord, NEVER use the cord to carry the tools or pull the plug from the outlet. Keep cord away from heat, o11,sharp edges or moving parts. Replace damaged cords immediately, Damaged cordsincrease the risk of electricshock.
8.When operatinga power tool outside, ALWAYS use an outdoorextension cord marked '_V-A"or '_N"These. cords are rated for outdooruse and reduce the risk of electric shock.
NOTE: The extensioncord must have adequate wire size AWG (American Wire Gauge) for safe, efficientuse. Smaller gauge wires, have greater capacity (16 gauge wire has more capacity than 18 gauge wire),

PERSONALSAFETY
1.ALWAYSstayalert,watchwhatyouaredoingandusecommonsensewhen
operatingapowertool.DONOTusetoolwhiletiredorundertheInfluenceof drugs,alcohol,ormedicationA.moment of inattention while operating power
tools may result in serious personal injury.
2.ALWAYS dress properly. DO NOT wear loose clothing or jewelry. Pull back long hair. Keep your hair, clothing, and gloves away from moving parts. Loose clothes, jeweFry,or long hair can be caught in movingparts.
3.ALWAYS avoid accidental starting. BE SURE switch Is In the "Off" position before plugging in. DO NOT carry toolswith your finger on the switch.Carrying tools with your finger on the switch or pluggingin tools that have the switchin the "On" position invitesaccidents.
4.ALWAYS remove adjusting keys or wrenches before turning the tool "On". A wrench or a key that is left attached to a rotatingpart of the tool may result in personal injury.
5.DO NOT overreach. ALWAYS keep proper footing and balance at all times.
Proper footing and balance enables better controlof the tool in unexpected situations.
6.ALWAYS use safety equipment. Always wear eye protection. Dust mask,
non-skid safety shoes, hardhat, or hearing protection must be used for appropriate conditions,
TOOL USE AND CARE SAFETY
1.ALWAYS use clamps or other practical ways to secure and support the workplece to a stable platform. Holdingthe work by hand or against your body is unstable and may lead to loss of control.
2.DO NOT force the tool. Use the correct tool for your application, The correct tool will do the job better and safer at the rate for which it is designed,
3.DO NOT use the tool If the switch does not turn It "On" or "Off". Any tool that cannot be controlled with the switchis dangerous and must be repaired.
4.ALWAYS disconnect the plug from the power source before making any adjustments, changing accessories or storing the tool. Such preventive safety measures reduce the risk of starting the tool accidentally.
5.ALWAYS store Idle tools out of the reach of children and other untrained persons. Tools are dangerous in the handsof untrained users.
6.ALWAYS maintain tools with care. Keep cutting tools sharp and clean. Properlymaintained toolswith sharp cuttingedges ere less likelyto bind and are easier to control,
7.ALWAYS check for mlsalignment or binding of moving parts, breakage of parts, and any other condition that may affect the tool'soperation. If damaged, have the tool serviced before using. Many accidentsare caused by poorly maintained tools.
/'FORWARNING;USE WITH THISUSETOOLOFACCESSORIESTHATAREMAY CREATE HAZARDOUSNOTCONDITIONRECOMMENDED I
8.ALWAYS use only accessories that are recommended for this tool. Accessories that may be suitable for one tool can become hazardous when used on another tool.
SERVICESAFETY
1.Ifanypartofthissawis mlsslng or should break, bend, or fall In any way; or should any electrical component fall to perform properly: ALWAYS shut offthe powerswitchand remove the saw plug from the powersourceand have the missing, damaged or failed parts replaced BEFORE resumingoperation.
2.Tool service must be performed only at a Sears Parts and Repair Center.
Service or maintenanceperformedby unqualifiedpersonnelcould resurtin a risk of injury.
SAFETY RULES FOR SAWS
???'_ DANGERf Keep hands away from cutting area and blades. Keep your second hand on the auxiliary handle or motor housing. If both hands are holding the saw, they cannot be cut by the blades.
1.ALWAYS keep your body positioned to either side of the saw blades, but not in line with the saw blades.
2.DO NOT reach underneath the work. The guard cannot protectyou from the bladesbeneath the work.
3.ALWAYS check guard for proper closing BEFORE each use. DO NOT operate the saw if the guard does not move freely and close instantly. Never clamp or tie the blade guard In the open position. If the saw is accidentallydropped,the guard may be bent. Raise the guard and make sure that it movesfreely and does not touch the blades or any other part.
4.ALWAYS check the operation and condition of the guard spring. If the guard and the spring are not operating properly, they MUST be serviced before use,
The blade guard may operatesluggishly,due to damaged parts, gummy deposits, or a buildupof debris.
5.The guard should be retracted manually ONLY for making special cuts, such as pocket or compound cuts. ALWAYS raise the guard by retracting the handle. As soon as the blade enters the material, the guard MUST be released. Forall other sawing,the guard shouldoperateautomatically.
6.ALWAYS make sure that the guard Is covering the blades BEFORE placing the saw down on a work bench or floor. An unprotectedmoving bladeswillcause the saw to walk backwards,cuttingwhatever is in its path. Make note ofthe time it takes for the blades to stop spinningafter the switch is released.
7.NEVER hold the piece being cut In your hands or across your legs. It is important to supportthe work properly in order to minimizebodyexposure,blade binding, or lossof control
g.ALWAYS hold tool by Insulated gripping surfaces when performing an operation where the cutting tool may contact hidden wiring or Its own cord. Contactwith a 'live"wire will make the exposed meta]parts of the tool "live" and shockthe operator.
9.DO NOT leave the saw running when carrying It In your hand.The lower blade guard may be opened by contact with your clothing. Accidentalcontact withthe spinningsaw bladescould result in seriouspersonalinjury.
10.DO NOT use the tool If the switch does not turn "On" or "Off". Any toolthat cannotbe controlledwith the switch is dangerousand must be repaired.
SAFETYRULESFORSAWScont. 11.Whenremovingthebladesfromthetool,ALWAYSwearprotectivegloves when
grasping the blades or accessory.Accessories may be hot after prolongeduse.
KICKBACK..,WHAT CAUSES IT AND WAYS TO PREVENT IT
The Causes of Kickback
1.Kickbackis a sudden reaction to a pinched, bound or misaligned saw blades, which cause the uncontrolled saw to lift up and out of the workpiece and towards the operator.
2.When the blades are pinched or bound tightly by the kerr closing down, the blades
stall and the motor reaction drives the unit rapidly back towards the operator.
3.if the blades become twisted or misaligned in the cut, the teeth at the back edges of the blades can dig into the top surface of the wood, This causes the blades to climb out of the kerf and jump back towards the operator.
4.Kickback is a result of tool misuse and/or incorrect operating procedures or conditions, It can be avoided by taking the proper precautions, as listed below.
Ways to Prevent Kickback
1.ALWAYS maintain a firm grip with both hands on the saw and position your body and arms to allow you to resist KICKBACK forces, KICKBACK forces can be controlledby the operator, if the proper precautions are taken,
2.If the blades are binding, or when you are Interrupting a cut for any reason, ALWAYS turn off the saw and hold the saw motionless in the material until
the blades come to a complete stop. NEVER attempt to remove the saw from the work or pull the saw backward while the blades are in motion or KICKBACK may occur. ALWAYS check and be ready to take corrective actionto eliminate the cause of blade binding.
3.When restarting the saw In the workpiece, ALWAYS center the blades In the kerf and check to be sure that the saw teeth are not engaged Into the material. If the saw blades are binding,they may walk up or KICKBACK from the workpiece when the saw is restarted.
4.ALWAYS support large panels to minimize the risk of blades pinching and KICKBACK. Large panels tend to sag under their own weight. SupportsMUST be placed under the panel on both sides, near the line of cut and near the edge of the panel.
5.DO NOT use a dull or damaged blades, Unsharpened or improperly set blades
produce narrow kerf which causes excessive friction, blade binding and
KICKBACK.
6.ALWAYS use extra caution when making a "Pocket Cut" Into existing walls or other blind areas. The protruding blades may out objects that can cause
KICKBACK.
7.ALWAYS have the saw blades at full speed before contactingworkpiece
8.ALWAYS keep your body positioned to either side of the saw blades, but not in line with the saw blades. KICKBACK could cause the saw to jump backwards towards the operator. KICKBACK forcescan be controlled bythe operator, if proper precautions are taken.
ALWAYS hold tool by insulated gripping surfaces when performing an operation where the cutting tool may contact hidden wiring or its own cord. Contact with a "live" wire will make the exposed metal parts of the tool"live" and
ADDITIONAL RULES FOR SAFE OPERATION
followall instructions listed below may resultin electric shock, fire and/or serious
I Z_ WARNING: BE SURE to read and understand all instructions.Failureto I personal injury.
1. Know your power tool. Read operator'smanual carefully. Learn the applications and limitations, as well as the specific potential hazards related to this tool. Followingthis rule will reduce the risk of electric shock, fire or serious injury.
2. ALWAYS wear safety glasses or aye shields when using this saw. Everyday eyeglasses have only Impact-resistant lenses; they are NOT safety glasses. Followingthis rule willreduce the risk of serious personal injury.
3. ALWAYS protect your lungs.Wear a face mask or dust mask if the operation is dusty. Following this rule will reduce the risk of serious personal injury.
4.ALWAYS protect your hearing.Wear hearing protection during extended periods of operation. Following this rule will reduce the risk of serious personal injury.
5.ALWAYS Inspect the tool cords periodically and if damaged have them repaired at your nearest Sears Service Center or other Authorized Service
Facility.ALWAYS be aware of the cord location. Followingthis rule witl reduce the risk of electric shockor fire.
6.ALWAYS check for damaged parts. Before further use of the tool, a guard or other part that is damaged should be carefully checked to determine if it will operate properly and perform Its Intended function. Check for miaalignment or binding of moving parts, breakage of parts, and any other condition that may affect the tool'soperation. A guard or other part that Is damaged, should be properly repaired or replaced at a Sears Service Center. Followingthis rule will reduce the risk of electricshock,fire or serious injury,
7.DO NOT abuse the cord. NEVER use the cord to carry the tool or pull the plug from the outlet. Keep cord away from heat, o11,sharp edges or moving parts. Replace damaged cords Immediately. Damaged cords increasethe risk of electric shock. Followingthis rulewill reduce the risk of electric shock or fire.
8.ALWAYS make sure that your extension cord Is in good condition.When using an extension cord be sure to use one that Is heavy enough to carry the current that your tool will draw. A wire gauge size (A.W.G.) of at least 16 is recommended for an extension 100 feet or less in length. Using an extension cord that is over 100 feet Inlength is not recommended. If in doubt, use the next heavier gauge. Smaller gauge wires, have greater capacity (16 gauge wire has more capacity than 18 gauge wire). An undersized cord will cause a drop in line voltage, resultingin loss of power and overheating.
9.DO NOT use the tool while tired or under the influence of drugs, alcohol or any medication. Following this rule will reduce the risk of electric shock,fire or serious personal injury.
10.SAVE THESE INSTRUCTIONS. Refer to them frequently and use them to Instruct others who may use this tool. If someone borrows this tool, make sure they have these Instructions also.
ADDITIONALRULESFORSAFEOPERATIONcont.
,/_ WARNING: Some dust particles created by power sanding, sawing, grinding, drilling and other construction jobs contains chemicals known
to cause cancer, birth defects or other reproductive harm. Some examples of these chemicals are:
???Lead from lead-based paints.
???Crystalline silica from bricks and cement and other masonry products.
???Arsenic and chromium from chemically-treated lumber.
Your risk from these exposures varies, depending upon how often you do this type of work. To reduce your exposure to these chemicals:
??? Work in a well-ventilated area.
???Work with approved safety equipment, such as those dust masks that are specially designed to filter out microscopic particles.
WEAR YOUR
Z_ WARNING: The operation of any saw can result in
foreign objects being throwninto your eyes, whichcan result in severe eye damage. Before beginning powertool operation, ALWAYS wear safety goggles or safety glasses with side shield and a full face shield when needed. We recommend A Wide
Vision Safety Mask for use over eyeglasses or standard safety glasses with side shield, available at Sears Retail Stores.
The label on your tool may Include the following symbols.
Z_, ....................................................................Indicates danger, warning or caution.
It means attention! Your safety is involved,
IMPORTANT! READ ALL INSTRUCTIONS
Before attempting to use any tool, be sure to familiarize with all the operating features and safety instructions.
I ZRememberWARNING"thata careless90 NOTfractionlet familiarityof secondwithisyoursawsufficienttocausemake you carelesssevereLnjury. .
KNOWYOUR SAW (SEE Fig. 1)
YourTwin Cutter saw has many built-in conveniencefeatures for fast, efficientcutting. These features includea innovative 2-blade system with special blades that spin in opposite directionsto providesmooth, clean cuts. It also includesa pre-instailed blade lubricating system for use when cutting aluminum, copper, stainlesssteel and cast iron.The auxiliary handle mountson the top of the saw to providemaximum supportand ease of handling.
For your convenience,there is no assembly requiredfor yourTwin Cutter Saw. The special 2-blade cutting system and the wax lubricatingsystem are already installed.
Ni,li[o]o]l[q _"] "J_[_o,E_i[i]_ [,,_
Input
Output
Blade Diameter
Rating
No-load Speed
Maximum Depth of Cut
6 Amps
,96-Peak HP
5 in.(127mm)
120 volls,60 Hz AC
5500 RPM
wood (1 inch) metal (with a wall or sheet thickness of 1/16 in.)
UNPACKING
Your Twin Cutter Saw has been shipped completelyassembled. Inspectthe saw carefully to make sure that no breakage or damage has occurredduring shipping. If any parts are damaged or missing return the saw to your nearest Sears Store to have it replaced.
,/ik, WARNING: If any parts are missing, DO NOT operate this saw until the
missing parts are replaced. Failure to do so could result in possible serious personal injury

SAWBLADES
Eventhebestsawbladeswillnot cut efficientlyif they are not kept clean, sharp and properlyset. Using dull bladeswill place a heavy load on your saw and increase the danger of kickback.Keep extra blades on hand, so sharp blades are always available.
Gum and wood pitchhardened on your blades will slowyour saw down. Use gum and pitch remover, hot water or keroseneto remove these accumulations,
DO NOT use gasoline.
and no other typos or sizes of blades shouldever be used. Other typos and sizes of
I /_, WARNING: This Twin Cutter saw uses specially designed 5-in. blades I blados will not operate safely in this saw and could result in serious personal injury.
To order extra blades or to replace the blades that came with the saw, see page 21 of this manual for ordering instructions. To install new blades onto to your saw see the special instructions on pages 17 to 19 of this manual for proper removal and insta]lation of blades.
BLADE GUARD SYSTEM
The lower blade guard, attached to your saw, is there for your protection and safety. It should NEVER be altered for any reason. If It becomes damaged or begins to return slowly or sluggishly. DO NOT operate your saw until the problem has been corrected or the damaged part has been replaced. ALWAYS leave the guard in its correct operating position when using the saw.
./K DANGER: When sawingthrough a\ Fig.2
workpiece, the lower blade guard does not cover the blade on the underside of the
workpiece.Since the blade is exposed on the underside of the workpiece,ALWAYS keep your hands and fingers away from the cutting area (see Fig. 2). Any part of your body coming in contact with the moving blade will result in serious injury.
Lower Blade Guard is in UP position when making a cut. Blades are exposed on underside of workpiece.
Z_ WARNING: NEVER use the saw when the guard isnot operatingproperly.
The guard shouldbe checkedfor correctoperationbeforeeach use. If you drop your saw,checkthe lowerblade guard for damage beforeusing,
NOTE: The guard isoperatingproperlywhen it moves freely and then readily returnsto the closed position.If, for any reason,your lowerbladeguard does not closefreely, take it to your nearest Sears Repair Centerfor service beforeusingit.

KICKBACK
Kickbackoccurswhenthebladesstall rapidlyand the saw is driven back towards you. Blade stallingis caused by any action whichpinches the blade in the material being cut.
IMPORTANT: The best guard against kickback is to avoid dangerous practices.
ALWAYS provide proper support for the workpleoe and hold the saw with both hands
Kickback is Caused By:
1.Twistingthe blades while making a cut,
2.Making a cut with a dull, gummed up, or improperlyset blades,
3.Not providingproper supportfor workpiece,
ALWAYS provideproper support as shown in Fig. 3.
4.Forcinga cut.
5.Cuttingwarped or wet lumber.
6 Tool misuse or incorrectoperating procedures.
7.Contactingthe workpiece with blades at less than full speed.
To Lessen the Chance of Kickback
1.ALWAYS approachthe workpiece with the saw at an angle of approximately 30?? to the workpiece.(see Fig. 4.)
2.ALWAYS make straight cuts.
This will help prevent twistingthe blade in the cut,
3.ALWAYS use clean, sharp and properly set blades.NEVER make cutswith dull blades.
4.ALWAYS properlysupport the
workpiece before beginning a cut, This will help you avoid pinching the blades (see Fig. 3).
5.ALWAYS use steady, even pressure when making a cut. NEVER force the cut,
6.DO NOT cut wet or warped lumber.
7.ALWAYS hold the saw firmly with both hands and keep your body in a balanced position. ALWAYS keep your body positioned to either side of the saw blades, but
not in line with the saw blades. This will help you resist the forces of kickback, should it occur.
IMPORTANT:When using your saw, ALWAYS stay alert and exercise control.
DO NOT remove your saw from the workplece, while the blade Is moving.

STARTINGCUT
IMPORTANT:
BEFOREusingtheTwinCutterSawforthefirst time, ALWAYS familiarize yourself
with the saw by making practicecuts in scrap materials.
The weight of this saw helps to make the cuts smoother.Learn how to safely handle and controlthe weight of the saw.
ALWAYS be sure that you positionthe blades perpendicularto the plane of the workpiece. Make the cut at an approximate30?? angle to the workpiece surface. (See Fig. 5).
Practice the properfeed speed rate for the materials being cut.The blades spinat a consistent 5500 RPM (no-load speed).
Engage the on/off switchto start the saw.To engage, press down on the back of the switch, then push forward. ALWAYS let the blades reach full speed beforeyou begin the cut into the workpiece.
IMPORTANT: When using your saw, ALWAYS stay alert and exercise control.
DO NOT remove your saw from the workpiece, while the blade Is moving.
Blades perpendicular to workplece
Approximately 30 ??
/_ WARNING: ALWAYS
maintain proper controlof the saw
to make sawing safer and easier. Loss of control of the saw could
cause an accident resulting in possible serious injury.
Fig. 7

TOHELPMAINTAINCONTROL 1.ALWAYSsupporttheworkpiecenearthecut. 2.ALWAYSsupporttheworkpiecesothecutwillbeonyourright. 3.ALWAYSclamptheworkpiecesoitwillnot move duringthe cut.
Place the workpiecewith the good side down. NOTE: The good side is the side where appearance is important.
Before starting a cut, draw a guidelinealong the desired line of cut. Then place the front edge of the saw blades on the part of the workpiece that is solidlysupported.
4.NEVER place the saw on the part of the workpiece that will fall off when the cut is made.
5.ALWAYS keep the cordaway from the cutting area, ALWAYS place the cord so it does not hang up on the workpiece when makinga cut.
Z_ DANGER: If the cord hangs up on the workpieceduring a cut, release the on/offswitchimmediately.Unplug the saw and movethe cordto prevent it from
! hanging up again.
I
,/K DANGER" Usingthe saw with a damaged cordcould result in serious
injury or death. If the cord has been damaged, have it replaced before using the saw again.
Z_ WARNING: If the blades come in contact with the workpiece before they
reach fu!l speed, it could cause the saw to kickback towards you, resulting in serous nlury.
When making a cut, ALWAYS use steady, even pressure. Forcingthe saw causes roughcuts and could shorten the life of the saw or cause kickback.
does not cover the blades.The blades are exposed on the under side of the workpiece. ALWAYS keep your hands and fingers away from the cutting area.
Any,/_, DANGER:part of your body coming in contact with the moving blades will result When sawing through the workpiece, the lower blade guard
in serious injury.
After completingyour cut, release the on/off switch and allow the blades to come to a completestop. DO NOT remove the saw from the workplece while the blades are moving.
exposed on the under side of the saw until the lower blade guard closes. ALWAYS
MAKE SURE that the lower blade guard is closed before setting the saw down on I Z_ CAUTION: Whenever you liftyour saw from the workpiece,the blades are
work surface.
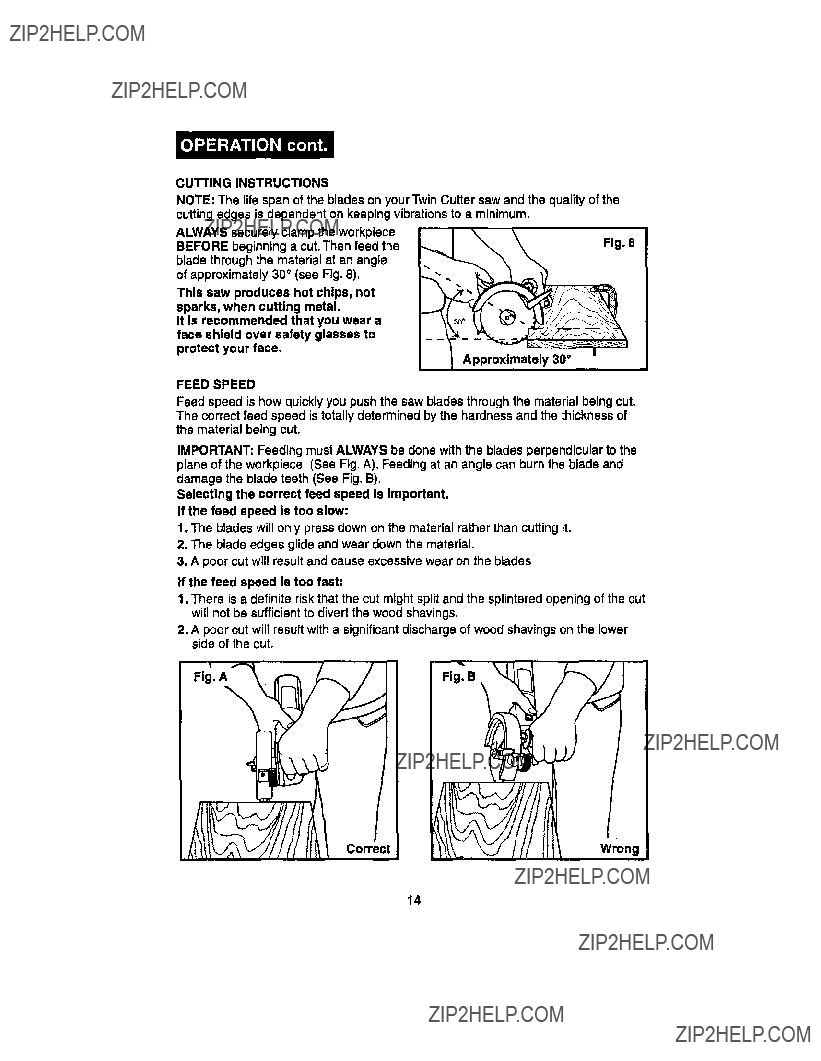
CUTTINGINSTRUCTIONS
NOTE:ThelifespanofthebladesonyourTwinCuttersawandthequalityofthe
cuttingedgesisdependentonkeepingvibrationstoaminimum.
of approximately 30 ?? (see Fig. 8). This saw produces hot chips, not sparks, when cutting metal.
It is recommended that you wear a face shield over safety glasses to protect your face,
FEED SPEED
Feed speed is how quickly you push the saw blades through the material being cut, The correct feed speed is totally determined by the hardness and the thickness of the material being cut,
IMPORTANT: Feeding mustALWAYS be done with the blades perpendicular to the plane of the workpiece (See Fig. A). Feeding at an angle can burn the blade and damage the blade teeth (See Fig. B).
Selecting the correct feed speed Is important.
If the feed speed Is too slow:
1.The blades will only press down on the material rather than cutting it,
2.The blade edges glide and wear down the material.
3.A poor cut will resultand cause excessivewear on the blades
If the feed speed Is too fast:
1.There is a definite riskthat the cut mFghtsplitand the splintered opening of the cut winnot be sufficientto divertthe wood shavings.
2.A poor cut will resultwith a significantdischargeof wood shavingson the lower side of the cut.
F,g'. J
ong
Correct

CUTTING INSTRUCTIONS cont.
WHAT IT CUTS
The blades supplied with the saw are universal In application and will give clean, smooth cuts in:
???Wood up to a maximum depth of 1 inch.
???Mild steel tubing or sheets with a maximum wall or sheet thickness of 1/16 inch.
???Copper, stainless steel, aluminum, cast Iron tubing or sheets with a wall thickness of 1/16 inch. When cutting these materials, the wax lubricating sticks MUST BE USED.
???Plastic pipe or sheets of a wall thickness of 1/16 inch.
IMPORTANT: The Twin Cutter WILL NOT CUT masonry, cement or brick material.
IMPORTANT: Once the blades become worn, chipped or dull, they MUST BE replace immediately.
CUTTING ALL MATERIALS
1.ALWAYS have the saw blades at full speed before contacting workpiece.
2.ALWAYS hold the saw so the blades feed perpendicularly into the workpiece. Hold the saw at an approximate 30 ?? angle.
3.ALWAYS keep your body positioned to either side of the saw blades, but not in line with the saw blades.
4. Feed the blades into the workpiece until the desired cut is made.
5.The kerf (width of the cut) of the twin blades Is approximately 3/16th of an inch. Always be sure to allow for this kerr width.
ThlaTwln Cutter Saw with It'sspecial blades and cutting action is s highly versatile tool that quickly and efficiently provides smooth, efficient cuts In a wide variety of materials:
/
/
Cutting other materials may require even more special handling.These Include cutting aluminum, copper, stainless steel and cast Iron or shaped plates
Cutting Aluminum, Copper, Stainless Steel and Cast, Iron up to 1/16-in. thick. (See Fig. 9).
1. ALWAYS use the wax lubricating device (included) when cutting these materials because they have a
tendency to soften and adhere to the blades. 15
Wax Lub_cating Device Stick
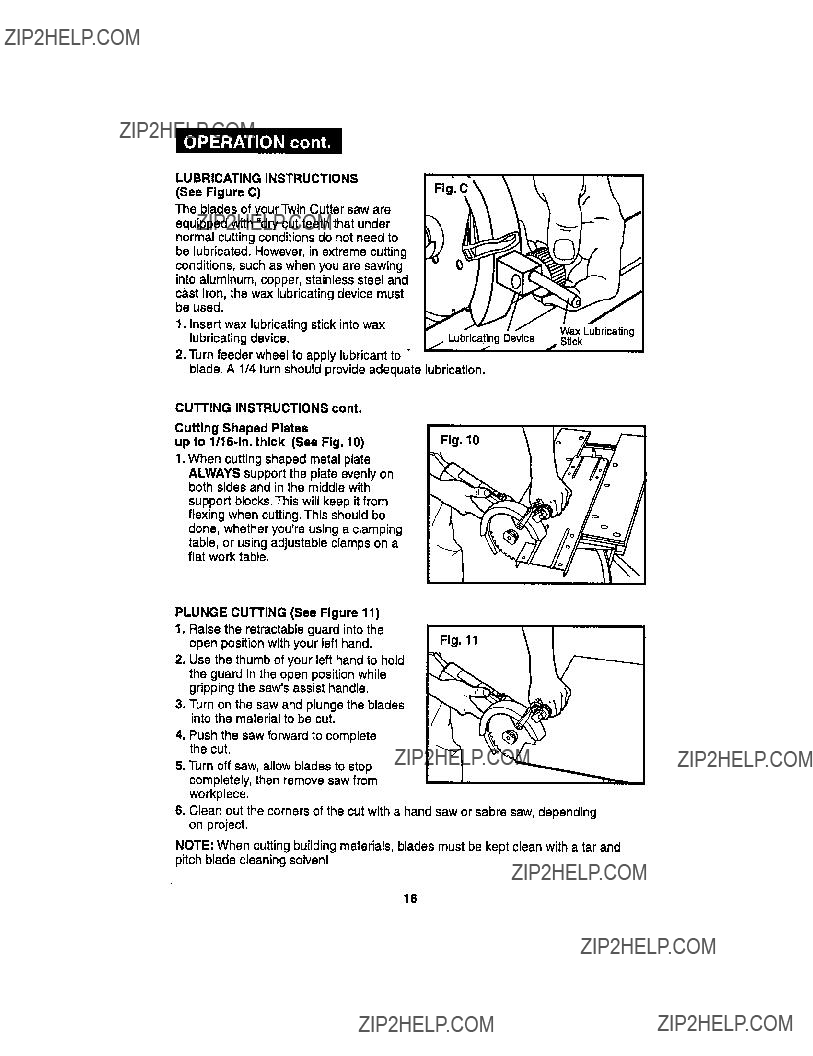
LUBRICATING INSTRUCTIONS
(See Figure C)
The blades of your Twin Cutter saw are
equipped with "dry cut teeth that under normal cuttingconditionsdo not need to be lubricated.However, in extreme cutting
conditions,such as when you are sawing into aluminum, copper, stainless steel and cast Iron, the wax lubricating device must be used.
2.Turn feeder wheel to apply lubricant to "
blade. A 1/4 turn should provide adequate lubrication.
ALWAYS supportthe plate evenly on both sides and in the middlewith
support blocks. This will keep it from flexing when cutting.This shouldbe done, whether you'reusing a clamping
table, or using adjustable clamps on a flat work table.
PLUNGE CUT'rING(See Figure 11)
1.Raise the retractable guard into the open positionwith your left hand,
2.Use the thumbof your left hand to hold the guard in the open positionwhile gripping the saw'sassist handle.
3.Turn on the saw and plunge the blades into the material to be cut.
4.Push the saw forward to complete the cut.
5.Turn off saw, allow blades to stop completely, then remove saw from workpiece.
6.Clean out the corners of the cut with a hand saw or sabre saw, depending on project.
NOTE: When cutting building materials, blades must be kept clean with a tar and pitch blade cleaning solvent
REMOVINGBLADESFROMSAW(SeeFigs,12- 16) 1.Unplugthesawandallow blades to cool.
/'lk WARNING: Failure to unplug the saw Couldresult in accidental starting I causing possible serious personal injury,I
2, Rotate the blades until the holes in both blades are aligned. Then place pin attached to the wrench through holes in blades. Unscrew Lock Nut counterclockwise and remove (see Fig. 12),
3.Open the retractable guard (see Fig. 13).
4.Lift up and remove Blade "B" (see Fig. 14),
5.Remove the arbor adapter (see Fig. 15).
6.Lift up and remove Blade "A" (see Fig, 16).
Fig. 13
Retracted
Fig. 15
rbor Adapter
Fig. 16
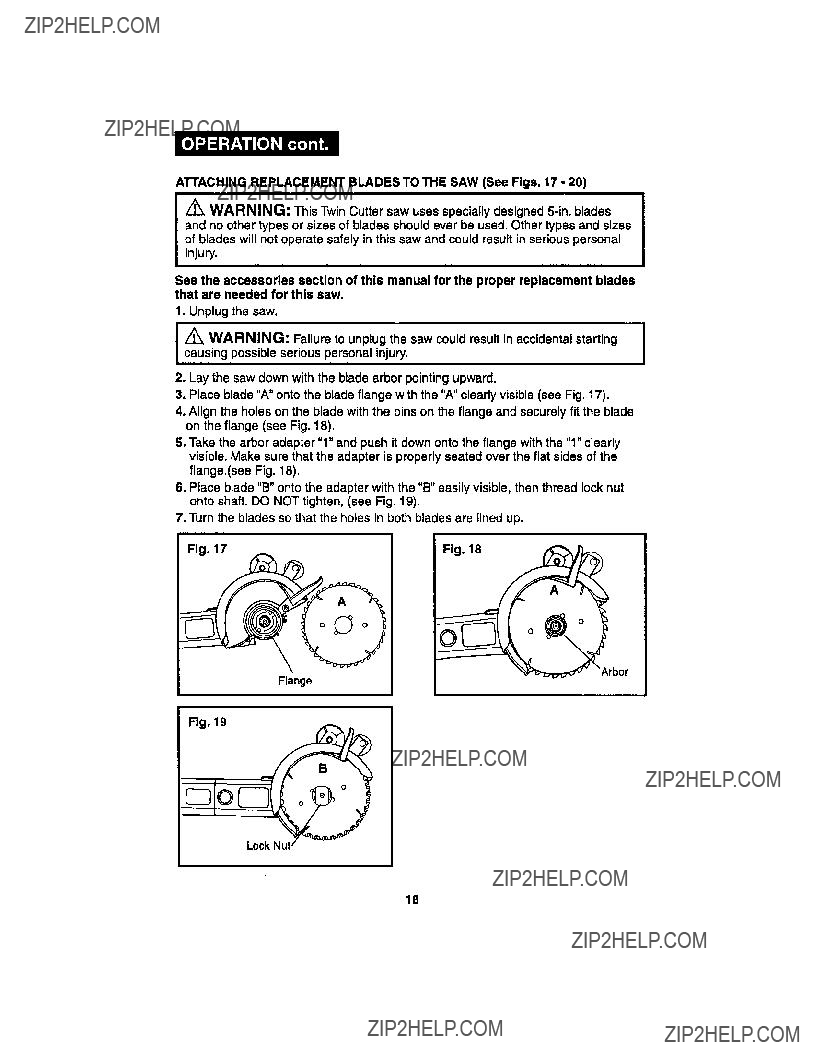
A'I-rACHINGREPLACEMENT BLADES TO THE SAW (See Figs. 17 - 20)
and no other types or sizes of blades shouldever be used. Other types and sizes I
of.blades will not operate safely in this saw and could result in serious personal ,/_ WARNING: ThisTwin Cutter saw uses specially designed5-in. blades injury.
See the accessories section of this manual for the proper replacement blades that are needed for this saw.
1, Unplug the saw,
,/causingWARNING:possibleseriousFailuretopersonalinjury,unplugthe saw could result in accidentalstarting I
2, Lay the saw clown with the blade arbor pointingupward.
3, Place blade"A" onto the bladeflange with the "A" clearlyvisible (see Fig. 17).
4.Align the holes on the blade with the pinson the flange and securely fitthe blade on the flange (see Fig, 18),
5.Take the arbor adapter "1" and push it down onto the flange with the "1" clearly visible.Make sure that the adapter is properly seated over the flat sides of the flange.(see Fig, 18),
6, Place blade "B" onto the adapter with the "B" easily visible,then thread lock nut onto shaft. DO NOT tighten, (see Fig. 19).
7. Turn the blades so that the holes in both blades are lined up.
Fig. 18
Flange
Fig. 19

A'I-I'ACHtNGREPLACEMENT BLADES TO THE SAW cont. (See Figs. 17 -20)
8, Place the pin (includedwith the
wrench) into the lined up holes,Fig, 20 9, Tighten the lock nut clockwisewith
the wrench and then remove the pin from the blades (see Fig. 20), This will allow the blades to turn freely.
10.Carefully turn blades with your hand to be sure they easily turn in opposite directions.
Lock Nut
GENERAL
All parts represent an importantpart of the doubleinsulationsystem and shouldbe serviced only at a Sears Service Center.
Avoidusing solventswhen cleaningplasticpads. Most plasticsare susceptibleto
damage from various types of commercial solventsand may be damaged by their use.
Use clean clothsto remove dirt, carbon dust, etc.
products,penetratingoils,etc.to come in contact with plasticparts.They contain I /_ WARNING: DO NOT at any time let brake fluids, gasoline,petroleum-based chemicalsthat can damage, weaken or destroy plastic.
It is a knownfact that electrictoolsare subjectto acceleratedwear and possible prematurefailure when theyare used to work on fiber glassboats and sportscars, wallboard,specklingcompoundsor plaster.The chips and grindingsfrom these materials are highlyabrasiveto electricaltool parts, such as bearings, brushes, commutators,etc.Consequently,it is not recommendedthat this toolbe used for extendedwork on any fiber glass material, wallboard, spacklingcompound,or piaster. Duringany use on these materials,it is extremelyimportantthat the tool is cleaned frequentlyby blowingwith an air jet.
or face shieldwhen blowingdustfrom toolwhen cleaningit.Ifoperationis dusty,also
???wear/1\ WARs dustmaskNING:. ALWAYS wear safetygogglesor safetyglasseswithside shields I

LUBRICATION
Allofthebearings in this tool are lubricatedwith a sufficientamountof high-grade lubricantfor the life of the tool under normal operating conditions.Therefore, no further lubricationis required.
DOUBLE INSULATION
Double insulation is a conceptin safety in electric power tools,which eliminates the need for the standard 3-wire grounded powercord. All exposed metal parts are isolatedfrom the internal motor componentswith protectveinsulation.Double insulatedtools do not need to be grounded.
IMPORTANT
The servicingof a tool with double insulationrequiresextreme care and knowledge of the system and should be performedonly by a qualified service technician. For service, we recommend that you return the tool to your nearest Sears Service Center for repair.ALWAYS use originalfactory replacement parts when servicing.
EXTENSION CORDS
The use of any extension cord will cause some loss of power.To keep the loss at a minimum and to preventoverheating,use an extensioncord that is heavy enoughto carry the current that the toolwill draw.
A wire gauge (AWG) of at least 16 is recommendedfor an extensioncord 100 feet or less in length. When workingoutdoorsALWAYS use an extension cord that is suitablefor outdoor use. The cord'sjacket will be marked WA.
I
I/_the cordCAUTION:so it will notKeepgetextensioncordsawaycaughtlumber,tools,frometcthe. duringcuttingthearea,cuttingandoperationposition I
Extension cords that are suitablefor use with your saw are available at your nearest Sears Store.
IMPORTANT: if a noticeable rise in temperature occurs in the motorhousing and the saw becomes uncomfortableto hold, turn the saw off, and allow it to cool downto roomtemperature and check the blade for wear before resumingyour cuttingproject. If this is not done, permanent damage to the saw will result.
Make sure that the material being cut is within the specificationof the saw'scapacity.
Review the cutting speed that you are applyingto the work piece.
Z_WARNING: ThisTwin Cutter saw uses specially designed 5-in. blades
and no other types of blades should ever be used. Other blades will not operate safely in this saw and could result in serious personal injury.
The following accessoriesfor your Twin Cutter saw are available at your local
Sears store.
9-32566 -- A packaged set of 2 UniversalTwln Cutter Saw Blades 9-26678 -- 6 Packaged Wax Lubricating Sticks
TWIN-CUTTER SAW - MODEL NUMBER 286.17589
The Model Number will be found on the Nameplate. Always mention the Model Number in all correspondence regarding your tool.
SEE BACK PAGE FOR PARTS ORDERING INSTRUCTIONS
Manual del usuario
SIERRA TWIN CUTTER de 5 pulg.
Modelo No. 286.17589
ATENClON: Lea, comprenda y siga todas
las Reglas de Seguridad y las Instrucciones de Funcionamiento incluidas en este manual
antes de usar esta herramienta.
??? SEGURIDAD
= FUNCIONAMIENTO
??? MANTENIMIENTO
Sears, Roebuck and Co., Hoffman Estates, IL 60179 U.S.A.
GARANTiA COMPLETA DE UN ANO DE LA
HERRAMIENTA CRAFTSMAN
Siesta herramienta Craftsman no es de su total satisfacci6n durante el
primer aSe a partir de la fecha de compra, DEVU_LVALA A LATIENDA
SEARS O AL CENTRO DE SERVIClO Y PIEZAS SEARS MAS
CERCANOS EN ESTADOS UNIDOS y Sears la reparard sin costo alguno, Siesta herramienta Craftsman se usa para fines comerciales o de arriendo, esta garantfa es vdlida t_nicamente durante los 90 dfas siguientes a ta fecha de compra.
Esta garantfa le otorga derechos legales especfficos. Usted puede tener otros derechos que varfan de un estado a otro.
Sears, Roebuck and Co., Dept. 817 WA, Hoffman Estates, IL 60179
iCONSERVE ESTAS INSTRUCCIONES! iLEATODAS LAS INSTRUCCIONES!

instruccionesEl. incumplimientode todaslas instruccionesindicadasa continuaci6n
/_ ADVERTENCIA" ASEGURESE de leery comprendertodas las puede ocasionarun choqueel_ctrico,incendioy/o lesi6npersonalgrave.
SEGURIDAD EN EL LUGAR DETRABAJO
1.SIEMPRE mantenga el lugar de trabajo limplo y blen Ilumlnado. Los bancos de trabajo desordenados y mal iluminadosfavorecen los accidentes.
2.NO utnlce las herramlentas eldctricas en una atmdefera exploslva, tal como en presencla de Iiquidos Inflamables, gases o polvo. Las herramientaseldctricas crean chispasque pueden inflamarel polvoo los vapores.
3.SIEMPRE mantenga a los espectadores, nl5os y visitantes a una distancia prudente cuando estd utillzando una herramienta eldctrica. Las distracciones pueden hacerle perder el control.
SEGURIDAD ELECTRICA
1.Lee herramlentas con alslamlento doble estdn equipadas con un enchufe polarizado {una hoja de contacto es rods ancha que Is otra.) Eats enchufe puede colocarse en un tomacordente polarlzado en una sola direccldn. Si el enchufe no oalza blenen el tomaoorrlente, Invlerta el enchufe. Sl todavla no calza, p6ngase en contacto con un electrlclsta calificado para que Instale un tomacorriente polarizado. NO modlflque el enchufe de nlnguna manera.
2.Elnde aislamientodoble elimina la necesidad del cord6nel_ctricotrifilarpuesto a
tierray del sistemade alimentaci6nde energ(a puestoa tierra.Aplicable solamente alas herramientas de la Clase II (con aislamiento doble).
3.Antes de enchufar la herramienta,ASEGURESE de que el voltaje del tomacorriente sst_ dentrodel voltajemarcado en la placa de datos de la herramienta.NO use herramientasclasificadas"CA solamente"con una fuente de energl'aCC.
4.SIEMPRE evite contacto del cuerpo con las superficies puestas a tierra tales ??omo tubeHas, radiadores, estufas y refrigeradores. Existemayor riesgode sufrirchoque eldctrico si su cuerpo estd a tierra.
5.SI es Inevitable el uso de la herramlenta en lugares h_imedos,SlEMPRE use un Interruptor de p6rdida a Uerra que le sumlnistre energfa a su herramlenta.
SIEMPRE use guantes y ??alzado de goma de electrlclsta cuando trabaje en ambientes h=imedos.
6.No exponga las herramientas el6ctricas a la Iluvia nl a amblentes h=imedos. Cuando entra agua a una herramientaeldctrica,se aumenta el riesgode sufrirun choque el@ctrico.
7.NO abuse del cord6n eldctrico. NUNCA use el cord6n para transportar lee herramlentas ni tire del cord6n pars desenchufarlas. Mantenga el cord6n aleJado del ??alor, del aoeite, bordes afilados o plezas m6vlles. Reemplace Inmedlatamente los cordones que est6n dafiados. Los cordonesdaSados aumentanel riesgo de sufrirun choqueel_ctrico.
8.Cuando utiliceuna hermmientaeldctricaal aire libre,SlEMPRE use un cord6n de extensi6n marcado "W-A"o "W". Estoscordonessstdn aprobados para uso al airs libre y reducen el riesgode choque eldctrico.
NOTA: El cordonde extensi6ndebe set de calibre adecuado (AWG -AmericanWire Gauge) para uso eficientey seguro.Los alambres de calibre m_.speque,_otienen mayor capacidad (alambrede calibre 16 tiene mds capacidadque el alambre de 18).

SEGURIDAD PERSONAL
1.SIEMPRE msntdngase alerts, observe Io qua est_ haeiendo y use sentldo comdn euando eat =t usando una herrsmlenta. NO use Is herramienta cuando estd cansado o bajo Is Influencla de drogas, alcohol o medieamentoa. Un memento de distracci6n cuando estd trabajando con las herramientas el_ctricas, puede ocaslonar una lesiSn personal grave.
2.SIEMPRE vistase sdecuadamente. NO use mpss $ueltes o Joyas. Atese el cabello largo. Mantengs su cabello, mpaa y guantes sleJados de las plezas m6vlles. Las ropes sueltas, [as joyas o el cabel]o largo pueden quedar atrapados en las piezas m6viles.
3.SIEMPRE evite la puesta en marcha accidental. ASEGURESE de qua el interrupter est_ en la pos|ci6n "Off" (apagado) antes de enchufar la herramlante. NO transports ]as herramientas con su dedo en el interrupter, Se puede producir un accidente si transporta la herramienta con su dedo en el interrupter o si enchufa la herramienta cuando el interrupter estd en la posici6n "On" (encendido).
4.SIEMPRE saquelas Ilevee de ajuste o/laves Inglesa$ antes de poner en marchs la herramlenta. Si se dsja una Ilave inglesa o una liars de ajuste en una pleza m6vil de la herramlenta, se puede producir una lesi6n personal.
5.NO use la herramients s una dietancla demaslsdo alejada. Mantengs SIEMPRE un buen equilibrio y una posicl6n flrme. El buen equilibdo y la poslciSnfirms permlten un major control de la herramienta en situaciones imprevIstas.
6.SIEMPRE use equlpo de segurldad. Use slempre lentes protectoree. Se debe usar mdsearas centre el polvo, zapatos de seguridad antirresbaladizos, casco de segurldad o protecoi6n auditiva de acuerdo con las eircunstaneias.
USO Y CUIDADO DE LAS HERRAMIENTAS DE SEGURIDAD
1.SIEMPRE use mordazas u otro mdtodo prdctico pare asegurar y apoyar Is plaza de trsbsjo enuns plataforms eatable. Si sujeta el trabajo con la mane o contra su cuerpo queda inestable y puede conducir ala pdrdida de control.
2.NO fuerce is herramienta. Use la herramienta spropleda pare el trabaJo. La herramienta corrects hard el trabajo meier y de manera rods segura, ala velocidad pars la coal fue dise_ada.
3.NO use la herramlenta sl el Interrupter no funciona debidamente. Es peligroso si [a herramienta no puede ser controlada con el interrupter y per Io tanto debe set reparada.
4.SIEMPRE deeenohufe la herramienta antes de hacer elgin ejuste, camblar
accesorios o guardarla. Estas medidas preventlvas de segurldad reducen el riesgo de qua la herramienta se ponga en marcha aecidentalmente.
5.SIEMPRE guarde las herrsmientas leJos del alcance de los nhSoey de otras personas inexpertae. Las herramientas son peligrosas en manes de personas inexpertas.
6.SlEMPRE mantenga bien cuidadas las herrsmlentas. I.as herramientas cortantee deben mantenerse sfiladas y limplas. I_asherramientas que se mantienen bien cuidadas y bien afiladas tienen manes probabi]idad de atascarse y se pueden controlar rodsfdcilmente.
7.SIEMPRE verlfique si hay plezae deselineadas o ataseadss, sl hay plazas quebradas oei exists cuslquler otre sltueci6n qua pueda afeeter el
funoionamiento de le herramlenta. SI Is herramlenta estd daSsda, debe repararse antes de usarla. Muchos aecldentes son causados debido al mal estado de las herramientas.
IUSADOSZ ADVERTENCIA:C;ON ESTA HERRAMIENTAEL USO DEPUEDENACCESORIOSCREARNOUNARECOMENDADOSSITUACION PELIGROSAPARA SER
8.SIEMPRE use solamente los acoesorloe recomendados per el fsbrlcante pars esta herramlenta. Los accesorios adecuados pars una herramienta, pueden set peligrosos sise utilizan en otra herramienta.

SEGURIDADSOBRELASREPARACIONES 1.Sifaltacualqulerplezadeeetasierrao ee romps, dobls o falls de cualquier
manera; o el slguno de Ice componentee eldctrioo_ no funclona en forma debida, SIEMPRE apague el interruptor de puesta en marcha, desenchufe la sierra y reempiace las piezas daFiadas, faltantes o falladas ANTES de volver a poneda en funcionamiento.
2.La raparacidn de las herramlentas debe eer efectusda eolamente en un Centro de
Repuestoe y Reparacldn Sears. La reparaci6n o mantenimiento efectuado por personal no especiallzado puede causer una lesidn.
REGLAS DE SEGURIDAD PARA LAS SIERRAS
/_, PELIGRO! Mantenga lee manoe alejades del drea de corte y de lee hojas. I
1.SlEMPRE mantenga su cuerpo colocado a cuslquier lado de lee hojas de la sierra, pero no en Ifnea con las hojae de la sierra.
2.NO trate de alcenzar nada pot debajo del trabajo. El protector no pueds protegerlo contra contacto con las hojas pot el lado inferior del trabajo.
3. SIEMPRE verlflque el el protector eet=t bien cerrado ANTES de cada uso. NO use la sierra el el protector no se mueve Ilbremente yee clerrs Instant_neamente.
Nunca eujete con mordazae nl ate el protector de la hoja en poelcidn abierta. Si la sierra se deja caer accidentalmente, el protector puede doblarse. Levante e[ protector y asegOrese de que se mueve libremente y qua no toca las hojas nl ninguna otra plaza.
4. SlEMPRE verlflque el funcionamiento y el eetado del resorts del protector. Si el protector y el reeorte no estdn funclonando de maners aproplada, DEBE hacarlos reparar antes del uso. El protector de la hoja puede funcionar en forma lenta debido a plazas daSadas, dep6sJtosgomosos o acumulaci6n de suciedad.
5. El protector de la hoja debe manipularse manualmente SOLAMENTE cuando ee
hacen cortes especiales, tal como cortes de cavldadee o cortes compueetos. SlEMPRE levante el protector mediante la manija.Tan pronto como Is hoja penetra
el material, ee DEBE soltar el protector. Para todos los otros cortes, el protector funcionard automndticaments.
6. SIEMPRE aseg_rase de qua el protector set6 cubdendo lee hojae ANTES de depositer la sierra en un benoo de trabajo o en el plso. Si las hojas en movimiento no estdn protegidas [a sierra se moverd hacia atr_.s, cortando Io qua encuentrs a su paso. Observe cuanto demoran las hojas en dejar de girar despu_s de que se suelta eK interruptor.
7. NUNCA eujete la plaza que eet=t slendo cortada en sue manoe o a trav=_sde sus piernae. Es importante apoyar la pieza de trabajo en forma debida para reducir a un mfnimo la exposicidn del cuerpo, atascamiento de las hojas o [a pdrdida de control.
8. SlEMPRE eostenga la herramlenta por las superficies de eujecldn aisladas cuando realice operaclonee en qua Is sierra puede toter slambrado oculto o su proplo corddn eldctrlco. Si se produce contacto con un alambre "bajotensi6n" las plazas de metal expuestas de la herramienta quedardn bajo tensi6n y el operador puede rscibir un choque eldctrico.
9. NO deJe la sierra funcionando cuando la transports en Is mano. El protector de
la hoJa Inferior puede abdree sl tocar su rope. El contacto accidental con las hojas rotatorias de la sierra puede causar una lesi6n personal grave.
10.NO use Is herramienta ei el interruptor no funciona debidamente. Cualquier herramienta que no puede ser controlada con el interruptor es peligrosa y debe ser reparada.
REGLAS DE SEGURIDAD PARA LAS SIERRAS cont.
11.Cuando retire las hojas de la herramienta, SIEMPRE use guantes protectores pars sujetar las hojas o accesorios. Los accesorios pueden estar calientes despu6s de uso prolongado.
RETROCESO...SUS CAUSASY COMO SE PUEDE EVITAR
Causas del Retrocaso
1.El retmceso esuna reacci6n repentina que se produce cuando las hojas de las sierras se aprietan, atascan o deealinean, causando que la sierra sin control se levante y se salga de la pieza de trabajo retmcediendo hacia el operador.
2.Cuando la entalla aprieta o atasca firmemente las hojas, 6stas se detienen y el motor reacciona impulsando r6pidarnente la sierra hacia atrSs, hacia el operador.
3.Si las hojas se tuercen o desalinean en el code, los dientes en los bordes traseros de las hojas pueden enterrarse en la supefficie superior de ]a madera. Esto causa qua ]as hojas se salgan de la entalla y salten hacia art&s, hacia el operador.
4.El retroceso se produce a causa del mal uso y/o procedimientos o condiciones de
operaci6n incorrectas. Puede evitarse tomando las precaucionas apropiadas, come se indica a continuaci6n.
Como Evltar el Retroceso
1, SIEMPRE sujete la sierra flrmemente con ambas manos y col0que su cuerpo y brazos de manere que puedan reslsUr las fuerzas del retroceso. El operador puede controlar las fuerzas del retroceso sise toman las precauciones apropiadas.
2. Si las hojas se est6n atascando o si por cualquier raz6n usted interrumps un code, SIEMPRE apague la sierra y mant_ogala inm6vil en el material hasta que ias hojas se detengan completamente. NUNCA letente sacar la sierra del trabaJo o tirar de la sierra hacla atr_s cuando las hojas est6n en movimlento pues puede ocurrir RETROCESO. SIEMPRE verifique y est6 preparado pars tomar medidas correctivas que eliminen la causa del atascamiento de las hojas.
3. Cuando ponga en marcha riuevamente la sierra en la plaza de trabajo, SIEMPRE centre las hojas en la entalla y compruebe qua los dlentes de la sierra no estdn enganchados en el material. Si las hojas de la sierra se atascan, puedan salirse
hacia arriba o RETROCEDER de la pieza de trabajo cuando la sierra es puesta en marcha nuevamente.
4.SIEMPRE apoye los pansies grandee a fin de reducir el riesgo de qua las hojas se aprieten y retrocedan. Los pansies grandes tienden a combarse bajo se pmpio peso. Los apoyos DEBEN co[ocarse en ambos lados, csrca de la linea de corte y cema del borde del panel.
5.NO use hojas desaflladae o da_adas. Las hojas desafiiadas o incorrectamente triscadas producen una entalla angosta que causa demasiada fricei6n, atascamiento de la hoja y RETROCESO.
6.SIEMPRE tenga sumo cuidado cuando haga "Cortes de Cavidadas" en paredas
exlstentes u otras _reas elegas. Las hojas salientes pueden cortar objetos qua causen RETROCESO.
7.SIEMPRE espere hasta que las hojas hayan alcanzado la velocidad plena antes de que toquen la pieza de trabajo.
8, SIEMPRE mantenga su cuerpo en cualquier lade de las hojas de la sierra, peru no en linea con las hojas. El RETROCESO puede lanzar la sierra hacia atrds hacia el
operador. Las fuerzas del RETROCESO pueden ser controladas por el operador, si se roman las debidas precauciones.
SIEMPRE sostenga la herramienta por lae superficies de eujeci6n aisladas cuando realice operaeiones an que la sierra puede tocar alambrado oculto o su propio cord6n el_ctrico. Si se produce contacto con un alambre "bajo tensi6n" las plazas de metal expuestas de la herramienta quedar&n ba}o tensi6n y el operador puede recibir un
REGLASADICIONALESPARAFUNCIONAMIENTOSEGURO
1.Conozca au herramlenta el_ctrlca. Lea culdadosamente el manual del usuarlo.
Aprenda sue apncacionea y Ilmltaciones ear como tambi,tn los rleagos potenclales sspecfficoa relacionados con eata herramlenta. Si se cumple esta
regis se reducird el riesgo de un choque eldctrlco, incendio o lesi6n grave.
2.Cuando use asta sierra SIEMPRE use lentes protectores o galas de aegurldad. Los anteojos regulares tlenen aolamente lentes raaletentea al Impacto; silos NO son lentea protectores. Sl se cumple esta regis se reducird el riesgo de sufdr una lesion personal grave.
3.SIEMPRE proteja sue pulmonea. Use una mdscara contra el polvo slla oparacl6n va a deapedlr mucho polvo. SI se cumple esta regla se reducird el riesgo de sufrir una lesi6n personal grave.
4.SlEMPRE proteJa su audlcl6n. Use proteccldn para los o|doe durante perfodos prolongados de funcionamlento. SI se cumple esta regla se reducird el riesgo de sufrir una lesi6n personal grave.
5.SlEMPRE Inapscclone pari6dicamente los cordones eldctrlcos de la herramlenta y ai est,'tnda_ados h;tgalos reparar an su Centro de Servlclo Sears m_ts cercano o an otro Centro de Servlclo Autorizado. SIEMPRE estd atento de la ublcaci6n del cord6n. Si se cumple esta regla se reducir_ el riesgo de un choque el_ctrico o incendio.
6.SlEMPRE veriflque al hay plazas dafiadaa. Antes de seguir utillzando la herramlenta, Inapeccione pars determlnar ai algdn protector o cuatquler plaza qua eat6 dafiada funclonsrd debidamente.Verlflque el allneamlanto de las piezas m6vlles, sl eatdn ataacadaa o sl hay plazas rotes y cuslqular otro estado qua pueda afectar el funclonamlento de la herramlenta. Sl se dafia un protector o cualquler otra pleza debeser reparada o reemplazada por un Centro de Servlclo
Autorlzado. Si se cumple esta regis se reducird el riesgo de un choque el_ctrico, incendio o lesion grave.
7.NO abuse del cord6n el_tctrlco. NUNCA transporte la herramlenta por el cordon nl tire del corddn para desenchufarla. Mantenga el corddn elajado del calor, del acelte, bordss afiladoe o plazas m6vlles. Reemplace Inmedlatamente los cordonea el_ctrlcoe que eat6n dafiados. Los cordones daSados aumentan el riesgo de sufrir un choque el_ctrico. Si se cumple esta regis se reducird el riesgo de un choque eldctrico o incendio.
8.SIEMPRE aaegdreae de qua su cord6n de extensl6n eat6 en buan estado. Cuando use un cord6n de extensl6n, asegt_reae de qua sea de calibre euficlente pars porter la corrlente qua neceaita su herramlenta. Se recomlanda un cord6n de por Io menoa calibre 16 (A.W.G.) para un cord6n de axtenal6n de 100 pies o menos de largo. No se recomlenda el ueo de un cord6n de sxtenal6n de m=ts de 100 pies de largo. SI tlene dude, use el calibre algulente de mayor capacldad. Los alambres da calibre m=ts pequefio tlenen mayor capacldad (el alambre da calibre 16 tlene m=tscapacldad qua el alambre de calibre 18). Un cord6n de calibre inferior
causard una pdrdida en el voltaje de Ifnea resultando en pdrdida de potencia y sobrecalentamiento.
9.SlEMPRE Inapeccione y aaque todos los clavos de la madera antes de cortarla. Si se cumple esta regis se reducird el riesgo de sufrir una ]esidn personal grave.
10.NO haga funclonar sets herramlenta cuando est_ canaado o baJo la Influencla de drogas, alcohol o haya tornado alguna mediclna. Sl ea cumple eeta regis ee reducird el rieago de un choque el,_ctrico, Incendlo o leaidn grave.
31
REGLAS ADICIONALES PARA FUNCIONAMIENTO SEGURO cont.
/_ ADVERTENCIA: Algunas part(culas de polvo creadas por el lijado mec_nlco, aserrado, rectlflcado, taladrado y otros trabajos de construcci6n contienen productos qufmicos que se sabe causan cdncer, defectos congdnttos u otros daSos al slstema reproductor. Algunos de estos productos qu{mlcos son:
???PLomoproventente de pinturas a base de plomo
???S[lice cristalizada de ladri(Ios y cemento y otros productos de albaSilerIa,
???Arsdnico y cromo de madera tratada qufmicamente.
Su riesgo de exposici6n a estos productos var(a dependiendo de cuan a menudo usted hace este tipo de trabajo. Para reducir su exposici6n a estos productos qufmicos:
???Trabaje en lugares bien ventnados
???Utilice equipo de seguridad aprobado, tal como m_scaras contra el polvo especlalmente dissSadas para filtrar partfculas microscbpicas.
ADVE RTE NCIA: La utilizaci6nde cualquiercepilladora
puede causar la proyecci6n de objetes extraSos a sue ojos, Io cua[ puede ocaslonar daSos oculares severos. Antes de comenzar a usar La herramienta mecdnica, SIEMPRE use sus lentes protectores o galas de seguridad con protecciSn lateral y una mdscara completa cuando sea necesario. Recomendamos una
Mdscam de Visi6n Amplia para usar sobre sue lentes protectores o sus lentes de seguridad estdndar, con protecci6n lateral, disponible en los Almacenes Sears.
REGLAS ADICIONALES PARA FUNCIONAMIENTO SEGURO cont.
La etiqueta de su herramienta puede incluir los siguientes s(mbolos.

Antes de intentar usar cualquler herramienta, as necesado familiarizarse con todas las caracterfsticas de funcionamiento y las instrucciones de seguridad.
I
descuidado. Recuerde que un desouido de una fracoi6n de segundo es suficiente para I I Z_ ADVERTENCIA! NO permita que su familiarldad con la sierra Io haga
ocasionar una lesi6n grave.
CONOZCA SU SIERRA (ver Fig. 1)
La sierra Twin Cutter tiene incorporadas muchas caracteristicas prdctieas para cortes eficlentes y rdpidos. Entre elias cabe mencionar un sistema innovador de 2 hojas
especiales que giran en direcci6n opuesta para Iograr cortes suaves y exactos con menos vibraci6n y retroceso. Tambi_n estd equipada con un sistema do lubricaci6n de la hoja preinstalado para usar cuando corte aluminio, cobre, acero inoxidable y hierro forjado. La manija auxiliar se instala en la parte superior de la sierra ofreclendo apoyo adiciona] y
facilidad de manipulaci6n.
Para mayor conveniencia, la sierra Twin Cutter no necesita set armada. Las hojas especialos y el sietema de lubrlcaci6n ya estd instalado.
Entrada
Salida
Di&metrode la hoja
Corrientenominal
Velocidadsincarga Pmfundidadm_xima de corte
6,0Amp. 0,96cf pico
5 pulg.(127ram)
120voltios,60HzCA
5.500RPM
madera(1")metal(conungrosordeparedo Idminade1/16")
DESEMPAQUE
SU sierra Twin Cutter fue embarcada completamente armada. Inspeccione atentamente la
sierra para asegurarse de que no ocurri6 daSo ni quebradura durante el embarque. Si alguna pieza est,. daSada o falta, devuelva la sierra a su AImac_n Sears rods cercano para que se la cambien.
hasta que se reemplacen las piezas faltantes. E[ incumplimiento de esta advertancia I puedatk ADVERTENClA:ocasionar una lesi6nsi personalhay piezasgravefaltantes,. NO haga funcionar esta sierra

HOJASDELASIERRA
A0nlas mejores hojasde sierras no eortardn de manera eficientesi no se mantienen limpias, afiladas y debidamente colocadas.Las hojas desafiladas ejeroen mayor esfuerzo en le sierrasy aumentan el peligrode retroceso.Mantenga hojas adicionales de modo que siempretenga hojas afiladas disponibles,
La goma y resina de le madera que se endurece en las hojas reducirdnla velocidad de la sierra. Use un disolventede goma y resina, agua caliente o keros_npara quitar estas acumulaciones.NO use gasoline,
Z_ ADVERTENCIA: Esta sierra de hoja doble usa hojas especiales de
5 pulg. Ningfln otto tipo o tamaSo de hoja debe ser usado con esta sierra. Otros tipos y tamafios de sierra no funcionar&n de manera segura en esta sierra y podrian causar lesiones personales graves.
Pare hacer pedidos de hojas adicionales o pare reemplazar las hojas que ven[an con la sierra, yea en ia p&gina 45 de este manual las instruccionespara hacer pedidos. Pare instalar las hojas nuevas en la sierra, yea las instrucciones especiales en las p&ginas 41 a 43 de este manual pare el desmontaje e instalaci6n apmpiada de las hojas.
SISTEMA DE PROTECCION DE LAS HOJAS
El protector inferior de le hoJa,Instalado en eu sierra, tlene por obJetovelar pot su protecci6n y segurldad. NUNCA debe ser modlflcado, por nlngfin motlvo. Sl se daSa o comlenza a funcionar mde lentamente, NO haga funclonar su sierra haeta que el problema no haya eldo corregldo o se hays reemplazado la pleza dafiada. SlEMPRE mantenga el protector en su posici6n correcta de funcionamiento cuando use la sierra.
El protector inferior de la hoja est'.en posici6n HACIA ARRIBA cuendo se hece un corte.
Las hojas est&n expuestas por el lado inferiorde la _ieza de trabajo
Z_ ADVERTENCIA: NUNCA use la sierra si el protector no estd funcionando
en forma debida.Se debe verificare] funcionamiento correctodel protectorantes de cada uso.Si la sierrase deja caer, antes de userlaverifiquesi se ha daSadoel protectorinferior de la hoja. NOTA: El protectorest&funcionando en forma clebida cuandose muevelibrementey retornaoportunamente ala posici6ncerrada.Si por cualquiermotive el protectorinferiorde la hoja no se cierra libremente, antes de usar la sierra ll_velaa su Centro de Reparaci6nSears mds eercanopare su reparaci6n.
RETROCESO
Elretrocesoocurrecuandolashojassedatienenr_.pidamentey lasierraes lanzada
hacia atr_.s,hacia usted. Las hojas pueden detenarse si la hoja quada apretada en el material qua est,. siendo cortado.
IMPORTANTE: La major protecci6n contra el retroceso es evltar las pr=tctlcas peligrosas.
???/_ PELIGRO: SIEMPRE apague inmediatamentela sierra si las hojas se
atascan o la sierra se detiene. El retroceso le puede hacer perder el controlde la sierra. La p_rdida de controlpuede ocasionar una lesi6n grave.
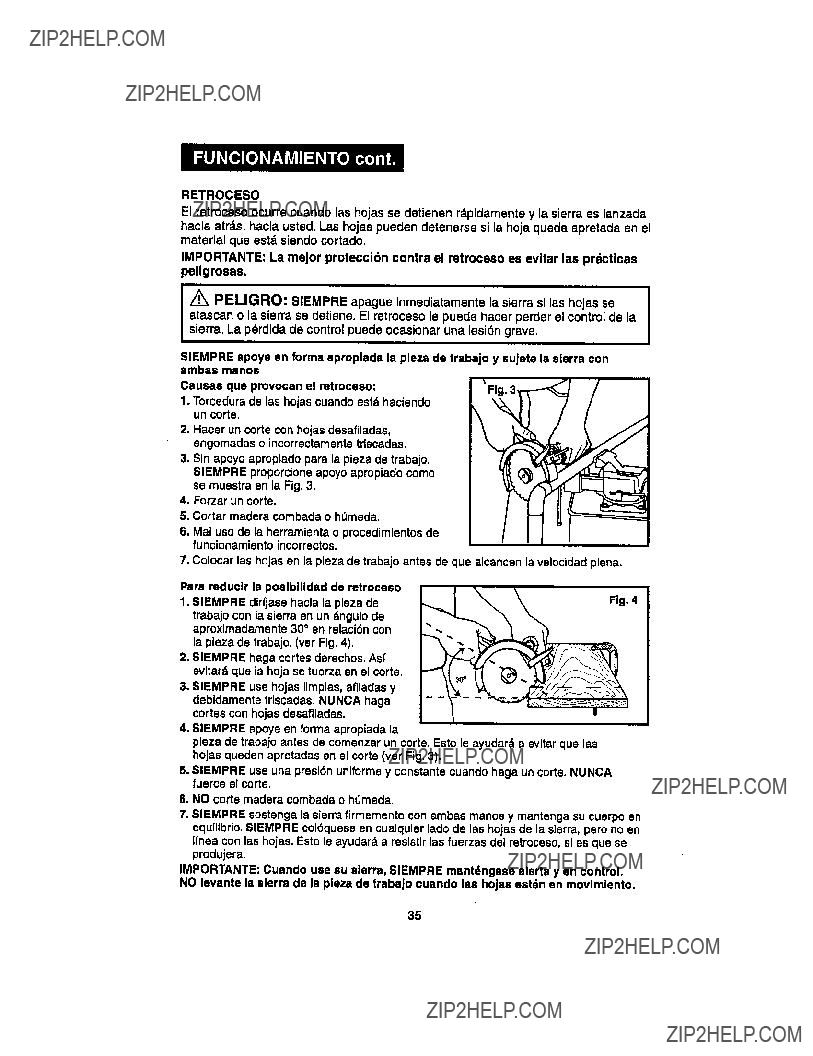
SIEMPRE apoye en forma aproplada la plaza de trabajo y suJete la sierra con embas manoa
Causes que provocan el retroceeo:
1.Torcedura de las hojas cuando estd haclendo un corte.
2, Hacer un corte con hojas desafiladas, engomadas o incorrectamente triscadas.
3.Sin apoyo apmplado para la pieza de trabajo.
SIEMPRE proporcione apoyo apropiado como se muestra en la Fig. 3.
4.Forzar un corte.
5.Cortar madera combada o h0meda.
6.Mal usa de la herramienta o procedimientos de funcionamiento incorrectos.
7.Colocar lee hojas en la pieza de trabajo antes de que aicancen la velocidad plane.
Pare reducir la poslbilldad de retroceeo
1.SIEMPRE dirijase hacia la plaza de trabajo con la sierra en un &ngulo de aproximadamente 30 ?? en relaci_n con la pieza de trabajo. (ver Fig. 4).
2, SIEMPRE haga cortes derechos. As[ evitard que la hoja se tuerza en el corte.
3. SIEMPRE use hojas limpias, aflladas y debidamente triscadas. NUNCA haga cortes con hojas desafiladas.
4. SIEMPRE apoye en forma apropiada la
pieza de trabajo antes de comenzar un corte. Esto le ayudar_ a evitar que lae hojas queden apretadas en el corte (ver Fig. 3).
5. SlEMPRE use una presi6n uniforme y constante cuando haga un corta. NUNCA fuerce el corte.
6. NO corte rnadera combada o h0meda.
7. SIEMPRE sostenga la sierra firmemente con ambas manos y mantenga su cuerpo en equllibrio. SIEMPRE col_quese en cualquier lado de las hojas de la s]erra, pero no en linea con las hojas. Esto ]e ayudar_ a resistir las fuerzas del retroceso, si es que se produjera.
IMPORTANTE: Cuando use eu sierra, SIEMPRE mant_ngase alerta y en control. NO levante la sierra de la pleza de trabeJo cuando lea hojaa est_n en movlmlento.

COMIENZODEUNCORTE
IMPORTANTE:
ANTESdeusarlasierraTwinCutterpor primate vez, SIEMPRE familiarl'cesecon la
sierra haciendocortes de prdcticaen materialessobrantes.
El peso de esta sierra ayuda e qua los cortes seen rods suaves,Aprenda a manipular y controlar en forma segura el peso de la sierra.
SIEMPRE aseg_rese de colocar las hojas perpendicularesal piano de la pieza de trabejo. Haga el corte a un dngulo aproximadode 30 ??en relaci6n con la superficiede le pieza de trabajo. (Ver Fig. 5).
Practique la velocidad de alimentaci6nadecuada pare el material a cortar.
Las hojas gimn a una velocidad constantede 5.500 RPM (velocidadsin carga). Active el interruptor"on/off" (encendido/apagado)para encender la sierra. Pare activar el interruptor,oprima la parte trasera del interruptory emp_jelo hacia adelante. SIEMPRE espere a que lee hojas Ileguen a su mdxima velocidad antes de comenzar a cortar la pieza de trabajo.
IMPORTANTE: Cuando use la sierra, SlEMPRE mant6ngase alerta yen control. NO levante Is sierra de la plaza de trabajo cuando lee hojas estdn en movimiento.
HoJae perpendiculares a la plaza de trabaJo Aproximadamente 30??
FIg. 5
Z_ ADVERTENClA:
SIEMPRE mantenga buencontrol de la sierrapara facilitary hacerrods segurosu uso.La p_rdidade control puede causerun accidentaqua ocasioneuna posible lesi6n grave.
NUNCA sostenga la sierra con una mano solamente (ver Fig. 6).
SIEMPRE sujete la sierra tomd.ndola del cuerpo del motory de la manija auxiliar(ver Fig. 7).

PARAAYUDAR MANTENERELCONTROL
1.SIEMPREapoyela pieza de trabajo cerca del corte.
2.SlEMPRE apoye la pieza de trabajo de modo qua el corte quede a su derecha.
3.SlEMPRE sujete la plaza de trabajo con mordazas a fin de que no se rnueva durante el corte, Coloque la plaza de trabajo con el lado bueno hacia abajo.
Coloque la plaza de trabajo con el lado bueno hacia abajo. NOTA: El lado bueno as aquel cuya apariencia es importante.
Antes de comenzar un corte, trace una Ifnea a Io largo de la Ifnea de corte deseada. Luego coloque el borde delantero de las hojas de la sierra en esa parte de la pieza de trabajo que est_ firmemente apoyada.
4.NUNCA coloque la sierra en la parte de la pieza de trabajo que se desprender& despu_s de hecho el corte.
5.SIEMPRE mantenga el cord6n el_ctrico alejado del _.reade corte. -_IEMPRE
coloque el cord6n de modo que no cuelgue de la pieza de trabajo cuando se hace el corte.
z_ PELIGRO: si el cord6n cuelge de la pieza de trabajo durante un corte,
suelte Inmediatamente el interruptor 'on/off'Desenchufe. la sierra y mueva J el cord6n e fin de evitar qua cuelgue del trabajo nuevamente
Z_ PELIG RO: Si se usa la sierra con un cord6n el_ctrico daSado se puede [
provocar una lesi6n grave o mortal. Si el cord6n se ha daSado, h_.galoreemplazar J antes de user la sierra nuevamente.
,/K ADVERTENCIA: Si las hojas tocan la pieza de trabajo antes de /
alcanzar la velocidad plena, la sierra puede retroceder hacia usted causando un J a lesi6n grave.
Cuando haga un corte, SlEMPRE aplique una presi6n firme y uniforme.Si fuerza la
sierra se producirdncortes dsperos y puede acortar la vide _til de la sierrao causer retroceso.
/K PELIGRO: Cuando estd cortando a trav6s de la pfeza de trabajo, el protector inferior de la hoja no cubre las hojas. Las hojas quedan expuestas por el lado inferior de la plaza de trabajo. SlEMPRE mantenga sue manos y dedos afeJados del =ireade corte. Cualqufer parte de su cuerpo qua toque las hojas en movimfento puede sufrir una lesidn grave.
Despu_s de completer el corte, suelte el interruptor'on/off'y espere haste qua las
hojas se detengan completamente. NO retire la sierra de la plaza de trabajo cuando lee hoJas eat6n en movlmlento.
/K ATENClON: Siempre que levanta la sierrade la pieza de trabajo, las hojas est_.nexpuestaspor el lado inferior de la sierra hasta qua el protectorinferiorde
las hojas se cierra. SIEMPRE ASEGURESE de que el protectorinferiorde las hojas se haya cerrado bien antes de depositer la sierra en la superficiede trabajo.

INSTRUCCIONESPARALOSCORTES
NOTA: La vida [_tiide las hojas de su sierraTwinCutter y la calidad de los bordes cortantesdepends de qua las vibracionesseen mducidas a un m[nimo.
VELOCIDAD DE AVANCE
La velocJdadde avance es la rapidez con que se empujan las hojas de la sierra a trav&sde material qua estd siendo cortado. La vetocidad de avance correcta es determinada totalmente per la dureza y grosordel material que estd siendo cortado.
IMPORTANTE: El avance dabs SlEMPRE ser hecho con las hojas perpendiculares al piano de la plaza de trabajo (Ver Fig. A). Si avanza las hojas en d.ngulopuede quemar la hoja y daSar los dientes de la hoja (Ver Fig. B).
Ee importante selecclonar la velocldad de avance correcta.
Si la veloclded de avance as demaslado lenta:
1.Las hojas solamente aplastardnel material an vez de cortarlo.
2.Los hordes de las hojas so deslizan y desgastan el material.
3.El corte serd deficientey causard desgaste excesivo de las hojas.
Si la veiocidad de avance ee demasiado rdplde:
1.Exists un riesgo definido qua el corte puede dividirse y que la abertura asti{lada del corte no serd sufieientepara desviar las virutas de madera.
2.El corte set& deficiente con una descarga significativade virutas de madera por el lado inferior del corte.
Fig"SJ
INSTRUCCIONES DE CORTE (cont,)
APLICACiONES
Las hojas proporcionadascon la sierra son de aplicaci6n universal y realizan cortes limpios y lisosen:
???Madera hasta un mdximo de lpulg, de profundidad.
???Tuberfas o Idminas de acero suave con un grosormdximo de pared o de Idmlna de 1/16 pulg.
???Tuberfas o Idminas de cobre, acero inoxidable, aluminioo hierro fundidocon un grosor mdx]mo de pared o de ]dminade 1/16 pulg. Cuando corte estos materiales, DEBE USAR las varil_asde lubricaciSnde cera.
???Tuberfas o Idminas de pldsticocon un grosormdximo de pared de 1/16 pulg. IMPORTANTE: La sierra de hoja doble NO CORTARA concreto,cements o Isdrillo.
IMPORTANTE: Una vez se hayan desgastado, partidc o desafilado las hojas, las mismas
DEBEN SER reemplazadas inmediatamente.
CORTES EN TODOS LOS MATERIALES
1.81EMPRE mantenga las hojas a mdxims velocidad antes de poner]a en contacts con la pleza de trsbajo.
2.SlEMPRE sostenga la sierra de manera que las hojas corten en posici6nperpendicular s Is pieza de trabajo. Sostenga la hoja en un dngulo de aproximadaments30 ??.
3.SlEMPRE mantenga su cuerpo en cualquier lads de Iss hojas de la sierra pets no en linea con las mismas.
4.Alimente las hojas aobre la pieze de trabajo hasta flnalizar el corte deseado.
6. E] ancho del corte de las hojas dobles ss de aproximadamente 3/16 pu[g.Siempm aseg_rese de planificar para este sncho de corte.
La sierra de hoJadoble con sue hoJas y acci6n de corte sspsclales es una herramlsnta
de gran vsreatllidad que proporclona cortes limpios y sficlentes on una gran variedad de materialss.
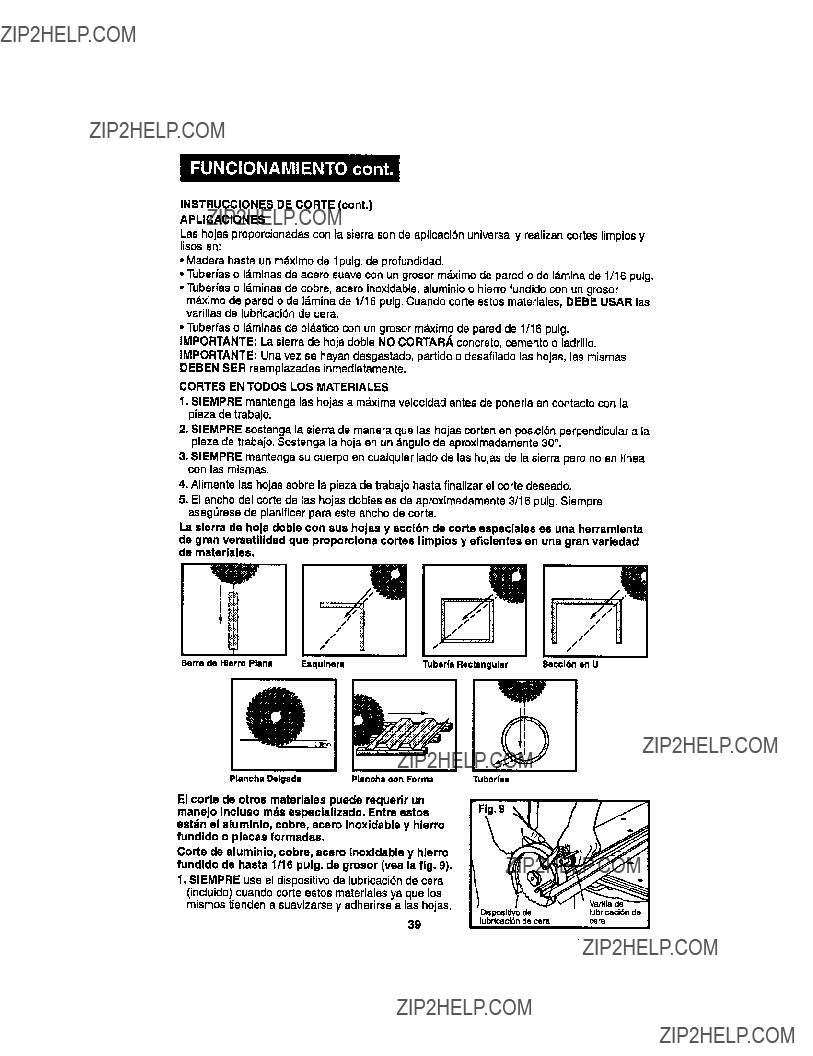
El corte de otroa materlales puede requsrir un manejo inclueo mda aspeclallzado. Entre ostos sst:in el aluminio, eobre, acero Inoxidabls y hlsrro fundido o placaa formadas.
Corte de aluminio, cobre, acero Inoxldable y hlsrro fundido de haste 1/16 pulg. de grosor (vea la fig. 9), 1. SIEMPRE use el dispositivode lubricaci6nde cera
(incluido) cuando corte estos rnaterialesya que los mismos tlenden a suavizarse y adherirse a ]as hojas.
INSTRUCCIONES DE LUBRICACION (Ver Figure C)
Las hojas de la sierraTwin Cutter est_.n equipadas con dientes de "code en seco" que bajo condicionesnormales no necesitan set lubricados. Sin embargo, bajo condicionesextremas, tal como cuando corta aluminio,cobra, ecero inoxidabley hierro forjado se debe user el
dispositivode lubricaci6n de cera debe ser usado.
1.Inserte la varilla lubdcadoraen el dispositivode lubricaci6n ala cera.
2.Gire la rueda distribuidora pare aplicar lubricante ala hoja. Un cuarto (1/4) de vuelta debe proporcionarlubricaci6nadecuada.
INSTRUCCIONES PARA LOS CORTES cont.
Corte de placas con forme
(no rectangulares) de hasta 1/16 pulg. de grosor (Ver Fig. 10).
1.Cuando corte planchas de metal con forma, SlEMPRE apoye la place de manera igual en ambos lados yen el medio con bloques de soporte. Esto impedird que la plancha se doble cuando se haee el corte. Esto se recomienda ya sea cuando est_ usando una mesa de
fijaci6n o mordazas ajustables en una mesa de trabajo plana.
CORTES POR PENETRACION
(Vet Figure 11)
1.Levante el protector retrdctilcon su mano izquierda hasta la posici6nabierta,
2.Use el pulgarde su mano izquierda para sujetar el protectoren posici6n abierta e le vez que sujeta la manija auxiliar.
3.Ponga en maroha la sierra y haga
penetrar las hojas en el material que va a cotter.
4.Empuje la sierra hacia adelante pare completar el torte.
5.Apague le sierra, espere a que las hojas
se detengan completamente,luego levante la sierra de la pieza de trabajo.
6.LImpie las esquinas del corte con una sierra de mano o con una sierra de sable, dependiendo del proyecto.
NOTA: Cuando corte materiales de construcci6n, lee hojas debe mantenerse limpias con un solvente de alquitrdn y resina pera hojas.
40
DESMONTAJELASHOJASDELASIERRA(VerFlgs.12- 16)
1.Desenchufelasierray deje que se enfrfen las hojas.
Z_ ADVERTENCIA: Si no se desenchufa la sierra se puede producir la puesta en marcha accidental causando una posible lesibn personal grave.
2.Gire las hojas hasta que los agujeros en ambas hojas est_n alineados. Luego coloque el pasador que est,, adjunto a la Ilave a trav_s de los agujeros de las hojas. Destornille la contratuerca girdndola a la izquierda y retfrela. (ver Fig. 12).
3.Abra el protector retr_,ct[I(ver Fig. 13).
4.Levante y retire ]a hoja "B" (ver Fig. 14).
5.Retire el adaptador del eje (ver Fig. 15).
6.Levante y retire la hoja "A" (ver Fig. 16),
Fig. 13
Fig. 16
Adaptador del Eje
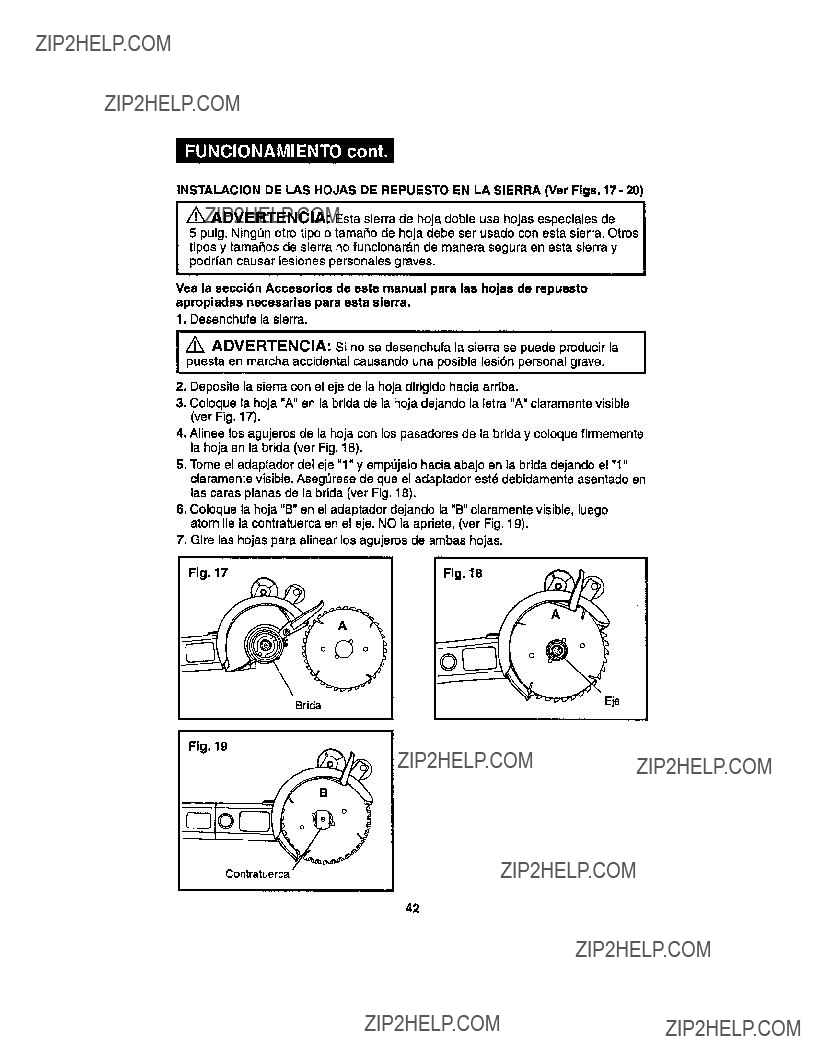
INSTALACION DE LAS HOJAS DE REPUESTO EN LA SIERRA (Ver Figs.17- 20)
ADVERTENCIA: Esta sierra de hoja doble usa hojas especiales de
5 pulg. NingL_notro tipo o tamafio de hoja debe ser usado con esta sierra, Otros tipos y tamafios de sierra no funcionar&nde manera segura en esta sierra y
podr an causer es ones persona es graves.
Vea la secci6n Aeceeorios de este manual para las hojas de repuesto apropiadas necesarlas para esta sierra,
1, Desenchufe la sierra.
Z_ ADVERTENClA: Si no se desenchufa la sierra se puede producir la puesta en marcha accidental causando una posible lesi6n personal grave.
2. Deposite la sierra con el eje de la hoja dirigido hacia arriba.
3.Coloque la hoja "A" en la bride de la hoja dejando la letra "A" claramente visible (vet Fig. 17).
4.Alinee los agujeros de la hoja con los pasadores de la brida y coloque firmemente la hoja en la bdda (ver Fig. 18).
5.Tome el adaptador del eje "1" y emp_jelo hacia abajo en ]a bride dejando el "1" claramente visible. Asegt_rese de que el adaptador est_ debidamente asentado en las caras planas de la bride (ver Fig. 18).
6.Coloque la hoja "B" en el adaptador dejando la "B" claramente visible, luego atornille la contratuerca en el eje. NO la apriete, (ver Fig. 19).
7.Gire las hojas para alinear los agujeros de ambas hojas.
Fig, 18
Brida
Fig, 19 .__

INSTALACION DE LAS HOJAS DE REPUESTO EN LA SIERRA cont, (Ver Figs, 17 - 20)
8. Coloque el pasador (se incluyecon la Fig. 20
Ilave) en los agujeros ya alineados, 9, Apriete la contratuercaa la derecha y luego retire el pasador de las hojas
(ver Fig. 20). Esto permitird que las hojas giren libremente,
10.Gire cuidadosamente las hojascon la mano para asegurarse de que giran con facilidad en direcci6n opuasta,
Contratuerca
GENERALIDADES
/'_ ADVERTENCIA: A fin de evitar acoidentes, SIEMPRE desenchufe la
herramienta de la fuente de alimentaci6n ANTES de la limpieza o de realizar cualquier labor de mantenimiento.
Todas las piezas representanuna parts importantedel sistemade aislamientodoble y deben ser reparadas solamente en un Centro de Servicio Sears.
Evite el use de solventescuando limpie las piezas de pldstico.La mayorla de los pldsticosson susceptiblesa diversos tiposde solventescomercialesy pueden daSarse con su uso.Use paSos limpiospara sacar la suciedad, polvo de carb6n, etc.
/_ ADVERTENCIA: Eviteen todo momento que los liquidos de frenos, gasolina,productosa base de petr61eo,aceitaspenetrantas,etc.entrenen contacto
con las piezas de pldsticoEIIos.contienen productosquimicosque pueden daSar, debilitaro destruirel pldstico.
Se ha comprobadoque las herramientasel6ctricasse someten a dasgaste acelerado y posiblefalla prematuracuando se utilizan en botas de libra de vidrio, autom6vilas deportivos,madera laminada, compuestosobturadoreso yeso. Las astillasy el polvo de la libra de vidrioson altamente abrasivospara los cojinetes,escobillas, conmutadores,etc. Pot 1otanto no se recomienda que esta herramienta se use para trabajo pmlongadoen cualquiermaterialde fibra de vidrio,madera laminada, compuestosobturadoreso yeso. Durantecualquier uso de estos materiales, es
extremadamenteimportanteque la herramienta se limpiecon frecuencia, sopld.ndola con un chorrode aire.
/_ ADVERTENCIA: SIEMPRE usegafasprotectoraso lentesde seguridad I con protecci6nlateralo una mdscarafacial cuandosoplepolvode una herramientaal I limpiada.Si laoperaci6nes polvorientatambidnuse una mdscaracontrael pofvo.

LUBRICAClON
Todoslos cojinetesen esta herramienta han sido lubricados con suficientecantidadde lubricantede alta calidadpare durar toda la vida 0til de la herramienta, bajo condiciones normalesde funcionamientoPor. Io tanto, no se requiera lubricaci6n adicional.
AISLAMIENTO DOBLE
El aislamiento doble es un concepto relacionadocon la seguridadde las herramientas el6ctricas, que elimina la necesidad del cord6n el_ctricotrifilarpuesto a tierray del sistema de alimentaci6n de energfa pusstoa tierra.Todas las piezas metdlicas expuestas estdn aisladas de los componentesinternosdel motor con aislamiento protector.Las herramientas con aislamientodoble no necesitan set puestas a tierra.
IMPORTANTE
La reparaci6n de une herramienta con aislamiento doble exige extramo cuidado y conocimiento del sistema por Io tanto debe ser realizada solamente por un tScnico de servicio calificado. En caso de necesitar servicio,recomendamos que devuelva la herramienta a su Centro de Servicio Sears m_.s cercano para su reparaci6n.
SlEMPRE use repuestos de fdbrica originales cuando repare la herramienta.
CORDONES DE EXTENSION
El uso de un cord6n de extensi6n causard una cierta p6rdida de potencia. Pare mantener la pdrdidaa un m[nimo y evitar e[ sobracalentamientode la herramienta, use un cord6n de extensi6n que sea Io suficientementegrueso como pare transporter la corrienteque necesitard su herramienta.
Para un cord6n de extensi6nde 100 pies o menos de largo se recomienda por Io menos el calibre 16 (A,W,G,), Cuando trabaje al aire libra, SIEMPRE use un cord6n de extensi6n adecuado pare uso al aira libra, La envoituradel cord6n estard marcada con las letras WA,
de{ corte y coloque el cord6n de tal manera que no se enredard en la madera, -/_ ATENCION: Mantenga los cordones de extensi6n alejados de la zona herramientas, etc., cuando este cortando
dafiados reempldcelosinmediatamente.NUNCA use una herramientacon un
cord6n dafiado pues al tocar el lugar dafiado puede causar un choque el6ctrico I _ PELIGRO: Revise los cordones de extensi6n antes de cada uso.Si est_,n
que resulte en una lesi6n grave.
Los corclones de extensi6n que son adecuados pare user con su sierra estdn disponibleen su Almacdn Sears m_,scercano.
SOLUClON
1, Raemplace las hojas
2.Aumente la velocidad de corte
3, Reemplace las hojas
1. Reduzca la velocidad
de C01_8
2. Reemplace las hojas
3, Reemplace fas hojas
4.Sostengafa sierra perpendicular a la superficiede trabajo
1.Reemplace las hojas
2.Reduzca la velocidad de corte
3, Reemplacs las hojas 4, Reemplace las hojas 5, Reemplace ]as hojas
1.Reduzca la Velocidadde corte
2.Reemplace las hojas
3.Reemplace las hojas
4, Reemplace las hoas y siga las
lnstruccionesapropiadespara Ja instalacidn de las hojas
5, Reemplace las hojas
6, Reemplace las hojasy cuando estdcortando sostenga siemprs
la sierra perpendiculara la superficiede trabajo
IMPORTANTE: Si ocurre un aumento notablede temperaturaen el alojamientode; motory la sierrase toma inc6moda,apague la sierray espere a que se enfrle a temperatura ambiente.Luego verifiqueque la hoja no este desgastadaantes de continuarcon el corte. De Io contrario,la sierra puede sufrirda_os permanentes. Aseg_rese de que el material que este cortandoestd dentre de las especificaciones
de capaeidad de la sierra.Verifiquela velocidadde corte que est,. aplicando a la pieza de trabajo
I
Ning_n otto tipo o tamaSo de hoja debe ser usadocon esta sierra. Otres tiposy
tamaSos de sierra no funcienar&n de manera segura en esta sierra y podrian
I Z_ADVERTENCIA: Esta sierra de hoja doble usa hojas especialesde 5 pulg. I causar lesiones persona es graves.
Los accesorios para su sierraTwin Cutter que se indicana eontinuaei6nestdn disponiblesen su Almac_n Sears local.
9-32566 - Juego empacado de 2 hojas unlversales pare sierras de hoja doble
9 26678 - 6 varillas de lubricecibn de cera empacadas.
Z_ ADVERTENCIA: El uso de accesorioso dispositivos no recomendados puede ser peligroso.
SIERRA DE HOJA DOBLE - MODELO NUMERO 286.17589
El n_merode modelo se encuentra en la placa de informaci6n.
Siempre mencione el n6mero de modelo en cualquier correspondencia que se refiera a su herramienta.
VEA LA CONTRAPORTADA PARA OBTENER INSTRUCCIONES PARA HACER PEDIDOS DE PIEZAS DE REPUESTO.
!!iii!iii_
i_i!i!iiiii
";i!_ i
i!iiiiiiii_
Our Home
For repair of carry-in products like vacuums, lawn equipment, and electronic, call or go on-line for the nearest
Sears Parts and Repair Center.
1-800-488-1222 Anytime,dayornight(U.S.A.)
www.seers.com
To purchase a protection agreement (U.S.A.) or maintenance
agreement (Canada) on a product serviced by Sears:
1-800-827-6655 (U.S.A.) 1-800-361-6665 (Canada)
Sears
??Sea_, RoebuckandCo.
??Registered Trademark / TM Trademark / sM Service Mark of Sears, Roebuck and Co.
??Mama Raglstrada / TMMarca de F,brl_a / su Mama de Serviclo de Sears, Roebuck and Co,
MC Marque de commerce / uo Marque d_pos_e de Seam, Roebuck and Co.