#E/ARSOwner'sManual
CRAFTSMAN??
4.5 HORSEPOWER
1800 PSI 2 GPM
HIGH PRESSURE WASHER
HOURS: Mon.- Fri. 8 a.m. to 5 p.m. (CST)
SEARS, ROEBUCK and CO., Hoffman Estates, IL 60179 U.S.A.
_t NoB,8,8. D_0 (i_/_n)
#E/ARSOwner'sManual
CRAFTSMAN??
4.5 HORSEPOWER
1800 PSI 2 GPM
HIGH PRESSURE WASHER
HOURS: Mon.- Fri. 8 a.m. to 5 p.m. (CST)
SEARS, ROEBUCK and CO., Hoffman Estates, IL 60179 U.S.A.
_t NoB,8,8. D_0 (i_/_n)

LIMITED ONE YEAR WARRANTY ON CRAFTSMAN HIGH PRESSURE WASHER
For one year from the date of purchase, when this Craftsman High Pressure Washer is maintained and operat- ed according to the instructions in the owner'smanual, Sears will repair, free of charge, any defect in material and workmanship.
If this high pressure washer is used for commercial purposes, this warranty applies for only 90 days from the date of purchase. If this high pressure washer is used for rental purposes, this warranty applies for only 30 days after date of purchase.
This warranty does not cover:
???Expendable items such as spark plugs and air filters, which become worn during normal use.
???Repairs necessary because of operator abuse or negligence, includingdamage resulting from no water being
supplied to pump or failure to maintain the equipment according to the instructions contained in the owner's manual.
WARRANTY SERVICE IS AVAILABLE BY RETURNING THE HIGH PRESSURE WASHER TO THE
NEAREST SEARS SERVICE CENTER OR DEALER IN THE UNITED STATES.
This warranty gives you specific legal rights and you may also have other rights, which vary from state to state.
SEARS, ROEBUCK AND CO,, D/817 WA, Hoffman Estates, IL 60179
2
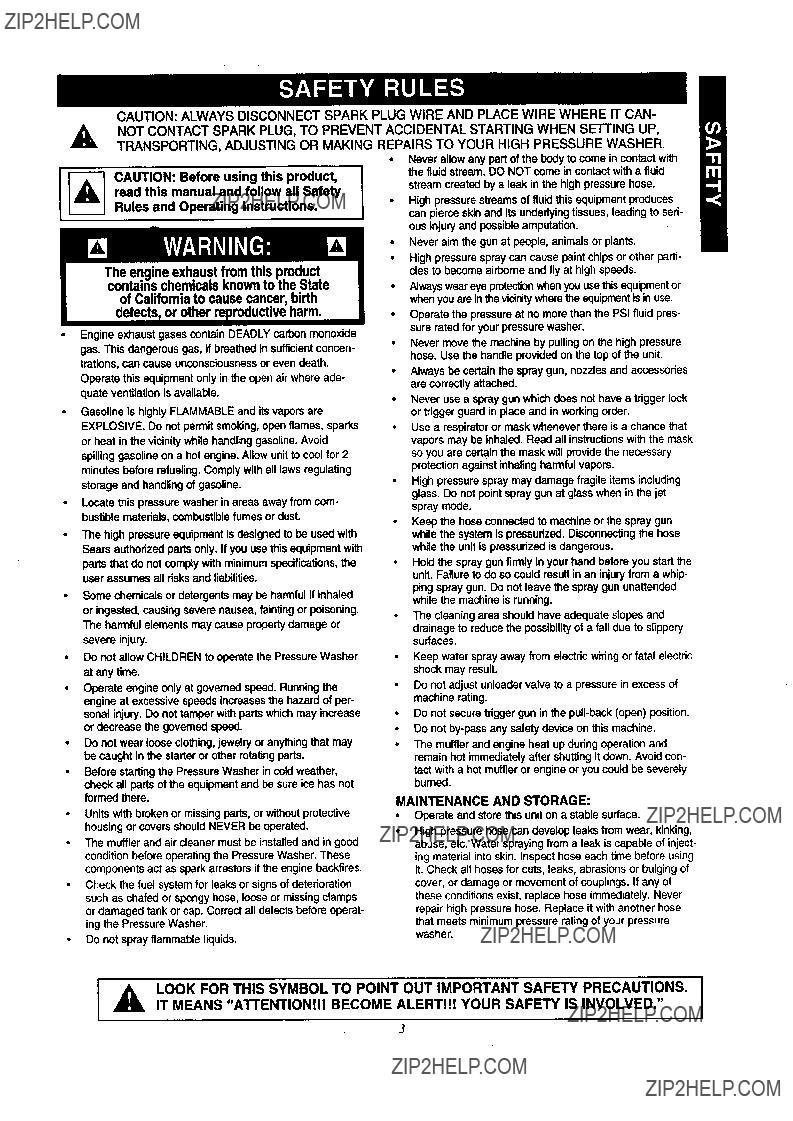
CAUTION: ALWAYS DISCONNECT SPARK PLUG WIRE AND PLACE WIRE WHERE IT CAN-
A NOT CONTACT SPARK PLUG,TO PREVENT ACCIDENTAL STARTING WHEN SETTING UP,
TRANSPORTING, ADJUSTING OR MAKING REPAIRS TO YOUR HIGH PRESSURE WASHER.
??? Never allow any part of the bodyto come in contact with the fluid stream. DO NOT come in contactwith a fluid
read this manual and follow all Safety
stream createdby a leak in the high pressurehose.
???High pressurestreamsof fluid this equipmentproduces can pierce skinand its underlyingtissues,leadingto seri- ousinjuryand possibleamputation.
???Never aim the gunat people, animalsor plants.
???High pressurespraycan cause paint chipsor other parti- cles to becomeairborneand fly at highspeeds.
???Engine exhaustgasescontain DEADLY carbon monoxide gas. This dangerousgas, if breathed in sufficientconcen- trations,can cause unconsciousnessor even death.
Operate thisequipmentonlyin the open air where ade- quate ventilationis available.
???Gasoline is highlyFLAMMABLEand itsvaporsare EXPLOSIVE. Do not permitsmoking,openflames, sparks or heat in the vicinitywhile handlinggasoline.Avoid spillinggasolineon a hot engine.Allowunitto coolfor 2 minutesbeforerefueling.Complywith all lawsregulating storage and handlingof gasoline.
???Locate thispressurewasher in areas awayfrom com- bustiblematerials,combustiblefumes or dust.
???The high pressureequipment is designedto be used with Sears authorizedpartsonly. If you usethis equipment with partsthat do notcomply with minimumspecifications,the user assumesall risks and liabilities.
???Some chemicalsor detergentsmay be harmfulif inhaled or ingested,causingsevere nausea,faintingor poisoning. The harmfulelementsmay cause propertydamage or severe injury.
???Do not allow CHILDREN to operate the PressureWasher at any time.
???Operate engine onlyat govemed speed. Running the engineat excessivespeedsincreasesthe hazard of per- sonal injury.Do not tamperwith partswhich may increase or decrease the governedspeed.
???Do notwear loose clothing,jewelry or anythingthat may be caughtin the starteror other rotatingparts.
???Beforestartingthe PressureWasher in coldweather,
check all parts of the equipmentand be sure ice has not formed there.
???Unitswith brokenor missingparts,or withoutprotective housingor covers shouldNEVER be operated.
???The mufflerand air cleaner must be installedand in good conditionbeforeoperatingthe Pressure Washer. These componentsact as sparkarrestorsif the engine backfires.
???Check the fuel systemfor leaks or signsof deterioration such as chafed or spongyhose, loose or missingclamps or damaged tankor cap. Correctall defectsbeforeoperat- ing the PressureWasher.
???Do not sprayflammable liquids.
???Always wear eye protectionwhen you use this equipmentor when you are in thevicinity where the equipmentis in use.
???Operate the pressure at no more than the PSI fluid pres- sure rated for your pressure washer.
???Never move the machine by pulling on the high pressure hose. Use the handle provided on the top of the unit.
???Always be certain the spray gun, nozzles and accessories are correctly attached.
???Never use a spray gun which does not have a trigger lock or trigger guard in place and in working order.
???Use a respirator or mask whenever there is a chance that vapors may be inhaled. Read all instructions with the mask so you are certain the mask will provide the necessary protection against inhaling harmful vapors.
???High pressure spray may damage fragile items including glass. Do not point spray gun at glass when in the jet spray mode.
???Keep the hose connected to machineor the spraygun while the systemis pressurized.Disconnectingthe hose while the unitis pressurizedis dangerous.
???Hold the spraygunfirmly in yourhand beforeyou startthe unit.Failureto do so could resultin an injuryfrom a whip- pingspraygun. Do not leave the spraygun unattended while the machineis running.
???The cleaningarea shouldhave adequate slopesand drainageto reducethe possibility of a falldue to slippery surfaces.
???Keep water sprayaway from electricwiringor fatal electdc shock may result.
???Do notadjust unloadervalve to a pressurein excess of machinerating.
???Do not securetriggergun in the
???Do not
???The muffler and engine heat up during operation and remain hot immediately after shutting it down. Avoid con- tact with a hot muffler or engine or you could be severely burned.
MAINTENANCE AND STORAGE:
???Operate and storethis uniton a stablesurface.
???High pressurehose can developleaks fromwear, kinking, abuse, etc. Water sprayingfroma leak is capable of inject- ing materialintoskin. Inspecthose each time before using it. Check all hosesfor cuts, leaks, abrasionsor bulgingof cover, or damageor movementof couplings. If any of these conditions exist, replace hose immediately.Never repairhigh pressurehose. Replace it with anotherhose that meets minimumpressureratingof yourpressHre washer.
,_ LOOK FOR THIS SYMBOL TO POINT OUT IMPORTANT SAFETY PRECAUTIONS. IT MEANS "A'FrENTION!!! BECOME ALERT!!! YOUR SAFETY IS INVOLVED."
3
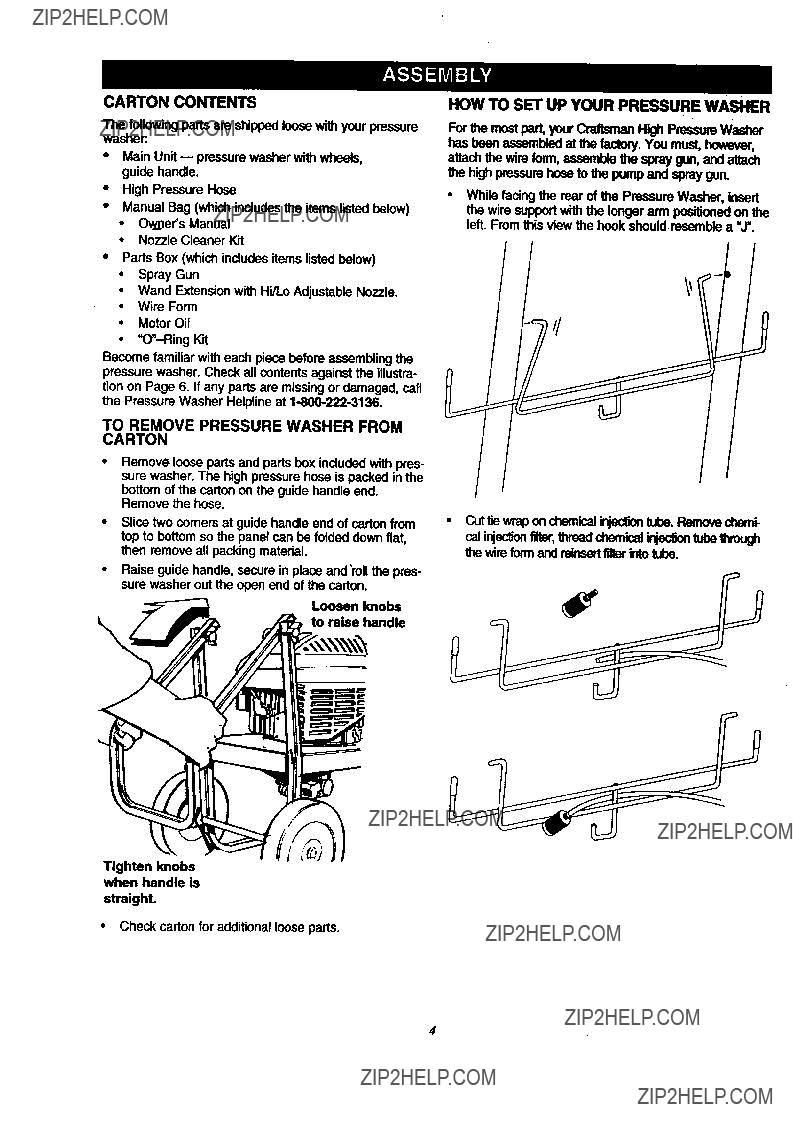
CARTON CONTENTS
The following parts are shippedloose with your pressure washer:.
*Main Unit
???High Pressure Hose
???Manual Bag (which includesthe items listed below)
???Ov_er'sManual
*Nozzle Cleaner Kit
???Parts Box (which includes items listed below)
??? Spray Gun
???Wand Extensionwith Hi/Lo Adjustable Nozzle.
???Wire Form
???Motor Oil
???
Become familiar with each piece before assembling the pressure washer. Check all contentsagainst the illustra- tion on Page 6. If any parts are missing or damaged, call the Pressure Washer Helpline at
HOW TO SET UP YOUR PRESSURE WASHER
Forthe most part, yourCraftsman High PressureWasher has been assembledatthe faclonj. You must, however, attachthe wire form, assemble the spray gun, and attach the high pressurehose to the pump and spray gurL
???While facing the rear of the Pre_;sureWasher, insert the wire supportwith the longer arm positk)nedon the left. From this view the hook should resemble a =,r'.
TO REMOVE PRESSURE WASHER FROM
CARTON
Removeloose parts and parts box included with pres- sure washer. The high pressure hose is packed in the bottom of the carton on the guide handle end.
Remove the hose.
Tighten knobs when handle is
straight.
???Check carton for additionalloose parts.
4

CHECKLIST
???Remove plastic cap and connect high pressure
??? Engine oil is at proper level
Important: Any attempt to crank or start the engine before it has been properly serviced with the recom- mended oil may result in an engine failure. See Page 8 for instructionson adding oil and proper oil specifi- cations.
Important: The water supply to your pressure wash- er must be connected and tumed on priorto starting your engine.
???Attach nozzle extension to spray gun.
??? Be sure gas tank is filled properlywith clean, fresh, unleaded gasoline.
??? Become familiar with all controls- their location and function. Operate those controlsbefore start-
ing the engine.
5
._

KNOW YOUR HIGH PRESSURE WASHER
Read this owner'smanual and safety rules before operating your high pressure washer. Compare the illustra- tions with your high pressure washer to familiarize yourself with the locations of various controlsand adjustments. Save this manual for future reference.
High Pressure Hose
Detergent
Gas Cap
Choke Lever
Water Inlet
Pump - Develops high water pressure.
Engine Throttle Control Lever - Sets engine in starting mode for recoil starter; STOPS running engine.
Recoil Starter - Used for starting the engine manually.
Choke Lever
Air Cleaner - Dry type filter element limits the amount of dirt and dust that gets in the engine,
Spray Gun Assembly - Controls the applicationof water
onto cleaning surface with trigger device. Includes safety latch.
Detergent
High Pressure Outlet - Connectionfor high pressure hose.
Water Inlet - Connection for garden hose.
6
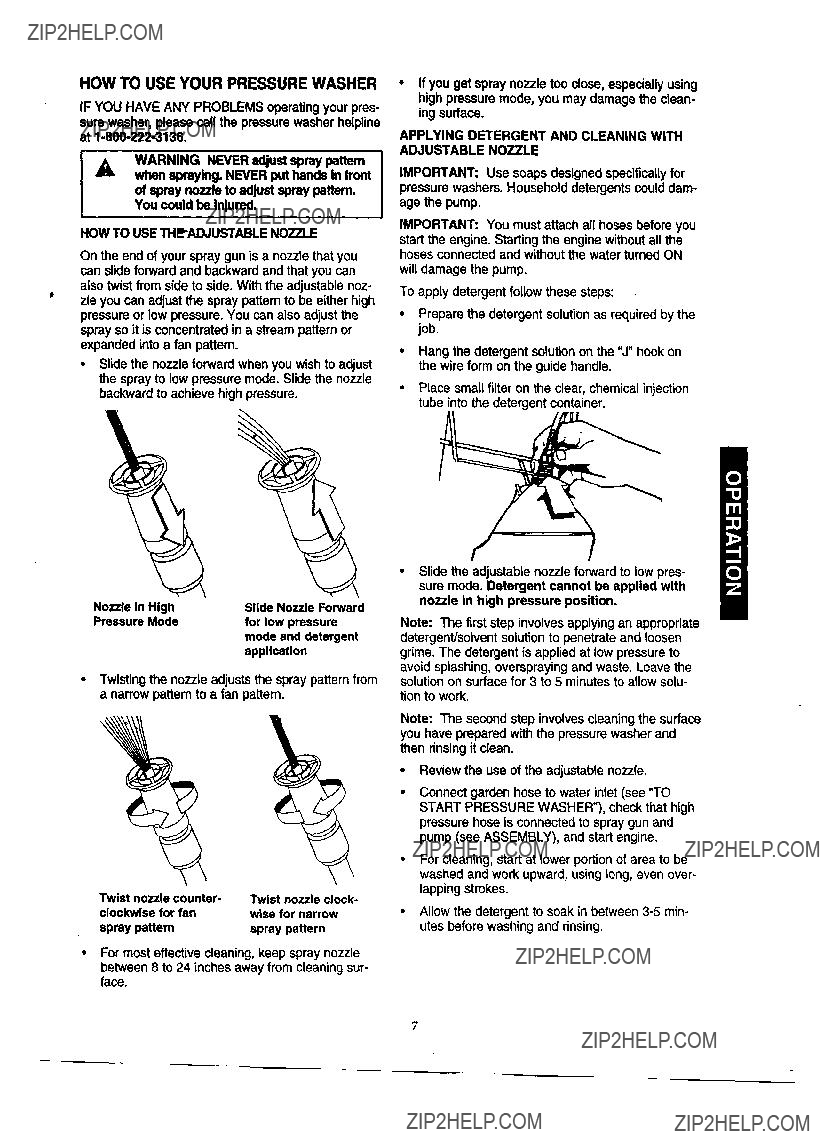
HOW TO USE YOUR PRESSURE WASHER
IF YOU HAVE ANY PROBLEMS operating your pres- sure washer, please call the pressure washer helpline at
HOW TO USE
On the end of your spray gun is a nozzle that you can slide forward and backward and that you can
also twist from side to side. With the adjustable noz- zle you can adjust the spray pattern to be either high pressure or low pressure. You can also adjust the spray so it is concentrated in a stream pattern or expanded into a fan pattern.
???Slide the nozzle forward when you wish to adjust the spray to low pressure mode. Slide the nozzle backward to achieve high pressure.
???If you get spray nozzle too close, especially using high pressure mode, you may damage the clean- ing surface.
APPLYING DETERGENT AND CLEANING WITH
ADJUSTABLE NOZZLE
IMPORTANT: Use soaps designed specifically for
pressure washers. Household detergents could dam-
age the pump.
IMPORTANT: You must attach all hoses before you
start the engine. Starting the engine withoutall the hoses connected and without the water turned ON
willdamage the pump.
To apply detergent follow these steps:
???Prepare the detergent solution as required by the job.
Hang the detergent solutionon the "J" hook on the wire form on the guide handle.
Place small filter on the clear, chemical injection tube into the detergent container.
???Twisting the nozzle adjusts the spray pattern from a narrow pattern to a fan pattern.
???Slide the adjustable nozzle forward to low pres- sure mode. Detergent cannot be applied with nozzle in high pressure position.
Note: The first step involves applying an appropriate detergent/solvent solutionto penetrate and loosen
grime. The detergent is applied at low pressure to
avoid splashing,oversprayingand waste. Leave the solution on surface for 3 to 5 minutes to allow solu-
tion to work.
Note: The second step involves cleaning the surface you have prepared with the pressure washer and
then rinsingit clean.
Review the use of the adjustable nozzle.
For most effective cleaning, keep spray nozzle
between 8 to 24 inches away from cleaning sur- face.
Connect garden hose to water inlet (see "TO START PRESSURE WASHER"), check that high pressure hose is connected to spray gun and pump (see ASSEMBLY), and start engine.
For cleaning, start at lower portion of area to be washed and work upward, using long, even over- lapping strokes.
Allow the detergent to soak in between

RINSING WITH THE PRESSURE WASHER
A WARNING Be extremely careful if you must use the pressure washer from ladder, scaf- folding or any other relatively unstable loca- tion. Pressure in a running washer builds in the wand as you climb. When you press the trigger, the recoil from the initial spray could force you to fall, or if you are too close to the cleaning surface, high pressure could force you off a climbing apparatus.
D
Hook up the water supply and start your pressure washer (see TO START THE PRESSURE WASHER).
Slide adjustable nozzle back to high pressure position and wait for detergent to clear. Detergent will not flow when in the high pressure mode.
When detergent has cleared you may want to expand the spray pattem for a more gentle rinsing action. Start at top of area to be dnsed, working down with same action as for cleaning.
You can also stop detergent from flowing by simply
removing siphon from bottle.
HOW TO STOP YOUR PRESSURE WASHER
???Move the Throttle Control Lever to the 'Slow'position,
Note: When addingoil to the engine crankcase in the future, use only high quality detergent oil rated with API service classificationSF or SG rated SAE 30 weight. Use no special additives.
Select the oil'sviscositygrade according to your expect- ed operating temperature.
Although
???Place pressure washer on a level surface
???Clean area around oil fill and remove oil dipstick.
???Wipe dipstick clean.
???Pour oil from enclosed bottle into the oil fill opening until oil reaches FULL mark on the dipstick. Stop and check the oil level periodically. DO NOT OVERFILL.
???Install oil dipstick, hand tighten securely.
ADD GASOLINE
Fast
SlowStop
???Wait for the engine to idle down.
???Move the Throttle Control Lever to the 'Stop'position.
???Simply shutting off the engine will not release pressure in the system. Squeeze trigger on the spray gun to relieve pressure in the hose.
Note: A small amount of water will squirt out when you release the pressure.
BEFORE STARTING THE PRESSURE WASHER
To operate the engine you will need to do the following:
ENGINE OIL
A 20 oz. bottle of SAE 30 weight oil is included in the parts carton. Fill engine crankcase with recommended
oil until oil level is at FULL point on dipstick. Do not overfill above that mark. POUR SLOWLY.
WARNING NEVER fill fuel tank indoors. NEVER fill fuel tank when engine is running or hot. DO NOT light a cigarette or smoke when filling the fuel tank.
A CAUTION: Do not overfill the fuel tank. Always leave room for expansion.
Use regular UNLEADED gasoline with the pressure washer engine. Regular leaded gasoline may also be used if UNLEADED is not available. Fuel tank capaci- ty is 1.6 U.S. quart.
IMPORTANT: It is importantto prevent gum deposits from forming in essential fuel system parts such as the carburetor,fuel filter, fuel hose or tank during storage. Also, experience indicatesthat
(called gasohol, ethanol or methanol) can attract moisture which leads to separation and formation of acids during storage. Acidic gas can damage the fuel system of an engine while in storage. To avoid engine problems, the fuel system shouldbe emptied before storage of 30 days or longer. See "Storage" on page 13. Never use engine or carburetorcleaner productsin the fuel tank or perma- nent damage may occur.
???Clean area around fuel fill cap, remove cap.
???Add "UNLEADED" regular gasoline, slowly, to fuel tank.
???Install fuel cap and wipe up any spilled gasoline.
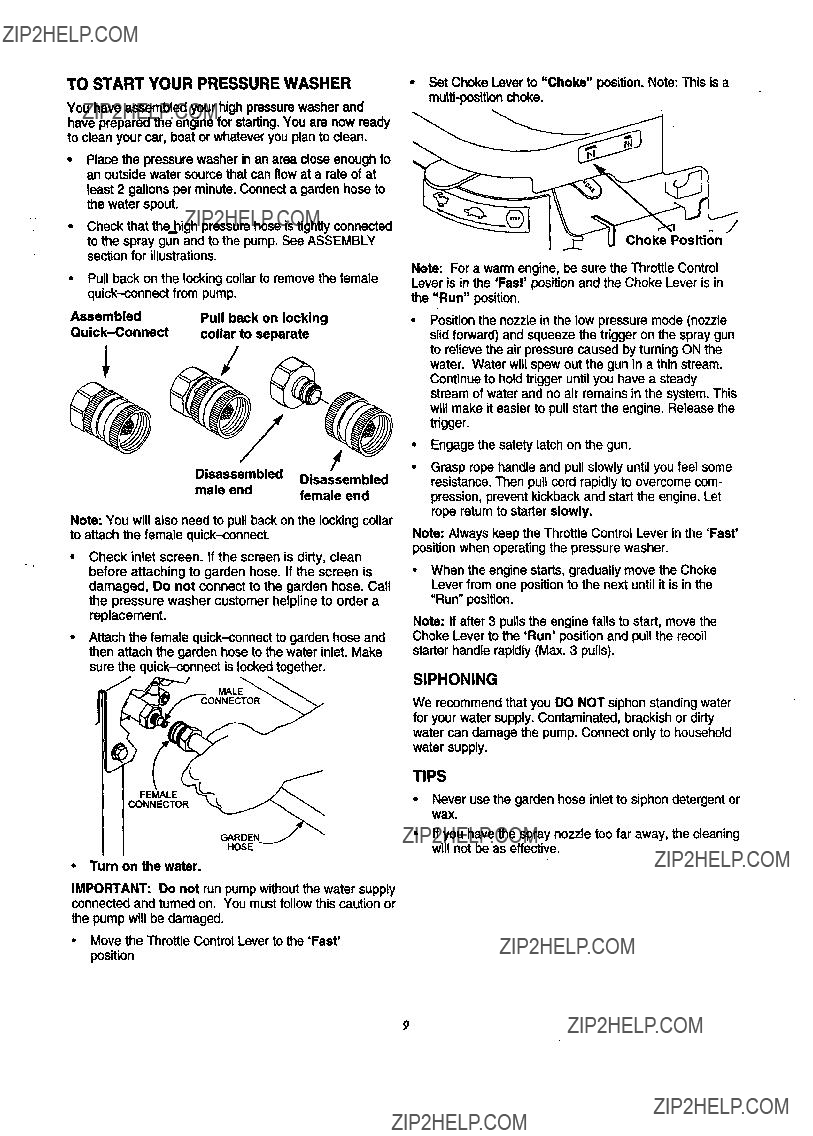
TO START YOUR PRESSURE WASHER
You have assembled your high pressurewasher and have prepared the engine for starting.You are now ready to clean your car, boat or whatever you plan to dean.
Place the pressure washer in an area close enough to an outside water source that can flow at a rate of at
least 2 gallons per minute. Connect a garden hose to the water spout.
Check that the.high pressure hose is tightlyconnected to the spray gun and to the pump. See ASSEMBLY section for illustrations.
Pull back on the locking collar to remove the female
Note: You will also need to pull back on the lockingcollar to attach the female
Check inlet screen. If the screen is dirty, clean before attaching to garden hose. If the screen is damaged, Do not connect to the garden hose. Call the pressure washer customer helpline to order a replacement.
Attach the female
sure the
MALE
FEMALE
CONNECTOR
???Set Choke Lever to "Choke" position.Note: This is a
.
/
Note: For a warm engine, be sure the Throttle Control Lever is in the 'Fast'position and the Choke Lever is in the "Run" position.
Positionthe nozzle in the low pressure mode (nozzle slidforward) and squeeze the trigger on the spray gun to relieve the air pressure caused by turning ON the water. Water will spew out the gun in a thin stream. Continue to hold trigger until you have a steady stream of water and no air remains in the system. This will make it easier to pull start the engine. Release the trigger.
Engage the safety latch on the gun.
Grasp rope handle and pull slowly until you feel some
resistance. Then pull cord rapidly to overcome com- pression, prevent kickback and start the engine. Let rope return to starter slowly.
Note: Always keep the Throttle Control Lever in the 'Fast' positionwhen operating the pressure washer.
???When the engine starts, gradually move the Choke Lever from one position to the next until it is in the "Run" position.
Note: If after 3 pulls the engine fails to start, move the Choke Lever to the 'Run'position and pull the recoil starter handle rapidly (Max. 3 pulls).
SIPHONING
We recommend that you DO NOT siphon standing water for your water supply. Contaminated, brackish or dirty water can damage the pump. Connect only to household water supply.
TIPS
???Never use the garden hose inlet to siphondetergent or
wax.
???
???Turn on the water.
IMPORTANT: Do not run pump withoutthe water supply connected and turned on. You must follow this caution or
the pump will be damaged.
???Move the Throttle Control Lever to the 'Fast' position
If you have the spray nozzle too far away, the cleaning will not be as effective.
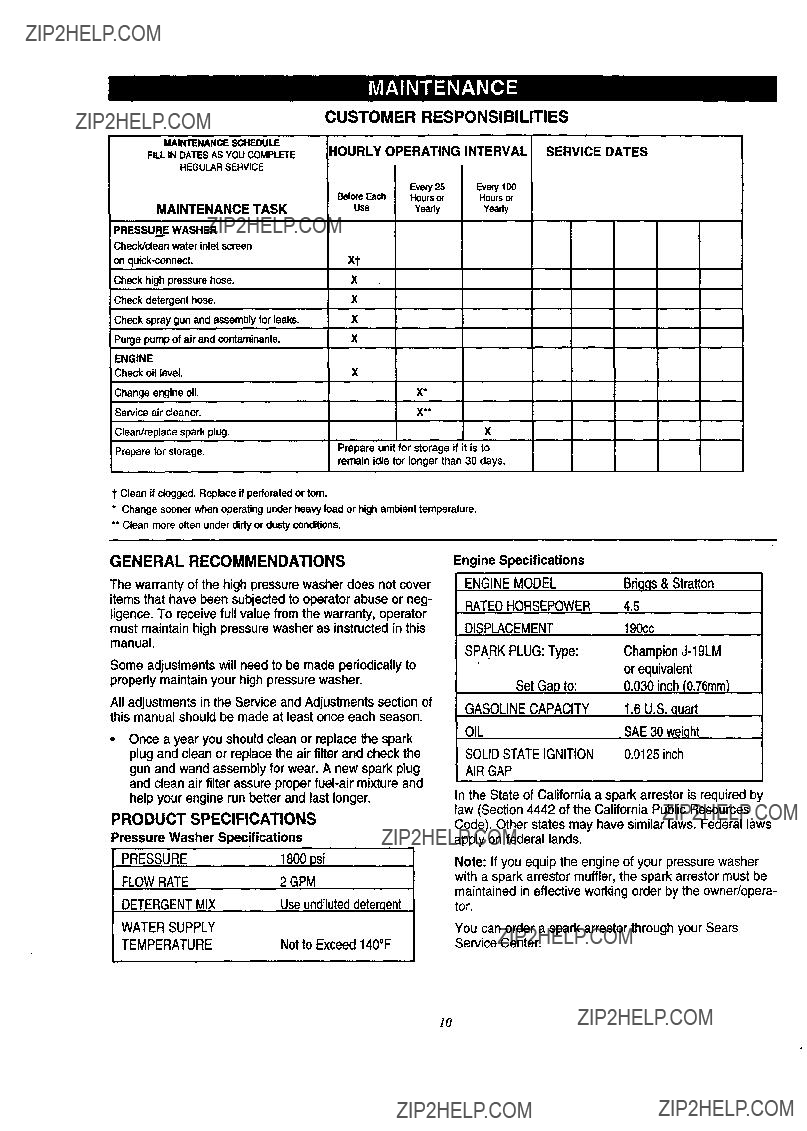
CUSTOMER RESPONSIBILITIES
MAINTENANCE SCHEDULE
RLL IN DATES AS YOU COMPLETE
REGULAR SERVICE
HOURLY OPERATING INTERVAL SERVICE DATES
remainidlefor longerthan30 days.
t Cleanifclogged. Replace if perforatedtom.
*Changesoonerwhenoperating under heavy loador high ambient temperature.
**Cleanmoreoftenunderdirty or dusty conditions.
GENERAL RECOMMENDATIONS
The warranty of the high pressure washer does not cover items that have been subjectedto operator abuse or neg- ligence. To receive full value from the warranty, operator
must maintain high pressure washer as instructedin this manual.
Some adjustments will need to be made periodicallyto properly maintain your high pressure washer.
All adjustments in the Service and Adjustments section of this manual should be made at least once each season.
???Once a year you should clean or replace the spark plug and clean or replace the air filter and check the gun and wand assembly for wear. A new spark plug and clean air filter assure
PRODUCT SPECIFICATIONS
Pressure Washer Specifications
In the State of Califomia a spark arrestor is required by law (Section 4442 of the California Public Resources Code). Other states may have similar laws. Federal laws apply on federal lands.
Note: If you equip the engine of your pressure washer with a spark arrestor muffler, the spark arrestor must be maintained in effective working order by the owner/opera- tor.
You can order a spark arrestor through your Sears Service Center.
10
BEFORE EACH USE
???Check water inlet screen for damage.
???Check high pressure hose for leaks.
???Check detergent inlet hose and filter for damage.
???Check gun and wand assembly for leaks.
???Purge pump of air and contaminants.
???Check engine oil level.
PRESSURE WASHER MAINTENANCE
Check and Clean Inlet Screen: Remove
tor, Clean if it is clogged or replace if it is torn.
Check High Pressure Hose: High pressure hose can develop leaks from wear, kinking, abuse. Inspect hose each time before using it. Check for cuts, leaks, abrasions or bulging of cover, or damage or move- ment of couplings. If any of these conditions exist, replace hose immediately.
DANGER: Water spraying from a leak is _IL capable of injecting material into skin.
NEVER repair high pressure hose, Replace with hose that meets minimum
Check Detergent Hose: Examine the filter on the detergent hose and clean if clogged. Hose shouldfit tightly on barbed fitting. Examine hose for leaks or tears. Replace the filter or hose if either is damaged.
Check Gun and Wand: Examine hose connectionto gun and make sure it is secure. Test triggerby press- ing it and making sure it springsback into place when you release it. Put safety latch in UP positionand test trigger. You shouldnot be able to press trigger.
Purge Pump of Air and Contaminants
To remove the air from the pump, follow these steps:
???Set up the pressure washer as described in the ASSEMBLY section and connectthe water sup- ply.
???Remove the wand extension from the gun.
???Pull the trigger on the gun and hold.
To remove the contaminantsfrom the pump, follow these steps:
???Set up the pressure washer as described in the ASSEMBLY section, and connectthe water sup- ply.
???Remove the nozzle attachment from the gun.
???Start the engine according to instructions in
OPERATION section.
Pull the trigger on the gun and hold.
When the water supply is steady and constant,
engage the safety latch and refasten the nozzle attachment.
ENGINE MAINTENANCE
CHECKING OIL LEVEL
Oil level should be checked prior to each use or at
least every 5 hours of operation, Keep oil level main- tained.
CHANGING ENGINE OIL
Change engine oil every 25 hours. If you are using
your pressure washer under extremely dirty or dusty
conditions,or in extremely hot weather, change oil more often.
Change oil while engine is still warm from run- ning, as follows:
Before you tip the pressure washer to drain oil, drain fuel tank by running pressure washer until fuel tank is empty.
Clean area around oil fill, remove oil fill cap/dip- stick. Wipe dipstick clean.
Tip your pressure washer to drain oil completely from the oil fill tube into a suitable container.
When crankcase is empty, return the pressure washer to upright position.
Fill engine crankcase with recommended oil until
oil level is at FULL point on dipstick.Do not over- fill above that mark. POUR SLOWLY.
???When engine crankcase is filled to proper level, installand tighten oil cap/dipstick.
SERVICE AIR CLEANER
Your engine will not run properly and may be dam- aged if you run it with a dirty air cleaner.
Clean or replace the air cleaner once every 25 hours of operation or once each year, whichever comes first. Clean or replace more often if operating under dirty or dusty conditions. Replacements are available at your local Sears Authorized Service Center.
To clean or replace the air cleaner, follow these steps:
???Remove screw on the air cleaner cover.
Remove air cleaner carefully to prevent debris from falling into carburetor.
Take air cleaner apart and clean all parts and ser- vice the foam element.
???Wash foam element in liquid detergent and water.
If the element is damaged or very dirty, replace the element.
Squeeze the element dry in a clean cloth.
Saturate the foam element in engine oil. Squeeze the saturated element in a clean cloth to remove excess oil.
???Reassemble all parts and fasten securely to the carburetorwith the screw.
I!

CLEAN/REPLACE SPARK PLUG
from spark plug and keep wire away from
A AUTION: Disconnect spark plug wire I spark plug.
Change the spark plug every 100 hours of operation or once each year, whichever comes first. This will help your engine to start easier and run better. Replace with champion
SET PLUG GAP AT 0.030 inch
(0.76 mm)
CARBURETOR
If you think your carburetor needs adjusting, see your nearest Sears Service dealer. Engine performance may be affected above 4,000 feet in altitude. To improve engine performance, see your nearest Sears Service dealer.
NOZZLE MAINTENANCE
If the nozzle becomes restrictedor clogged with foreign materials, such as dirt, excessive pump pressure may develop. A partially cloggednozzle can cause a pulsing sensation during use. This generally is not a pump relat-
ed problem, but rather a clogged or partially restricted nozzle.
If the nozzle becomes clogged or partially restricted, immediately clean the nozzle with the kit includedwith
your pressure washer by following these instructions:
???Shut off the engine and turn off the water supply.
???Separate the wand from the gun.
???Rotate to stream setting.
???Remove nozzle from the end of the wand using the allen wrench included with the kit or a 2mm or 5/64 allen wrench.
\
Use the wire included in the kit or a small paper clip
to free the foreign materials cloggingor restrictingthe nozzle.
Insert wire into nozzle and turn back and forth to clear obstruction.
Remove additionaldebris by back flushing water sup- ply through wand. Back flush between 30 to 60 sec- onds. Turn wand to stream spray and move nozzle from low to high pressure while flushing.
???Reinstall nozzle into wand. DO NOT overtighten.
???Reconnect wand extension to spray gun.
???Reconnect the water supply,turn ON the water, and start the engine.
???Test the pressure washer by operating with nozzle in the high and the low pressure positions.
/2
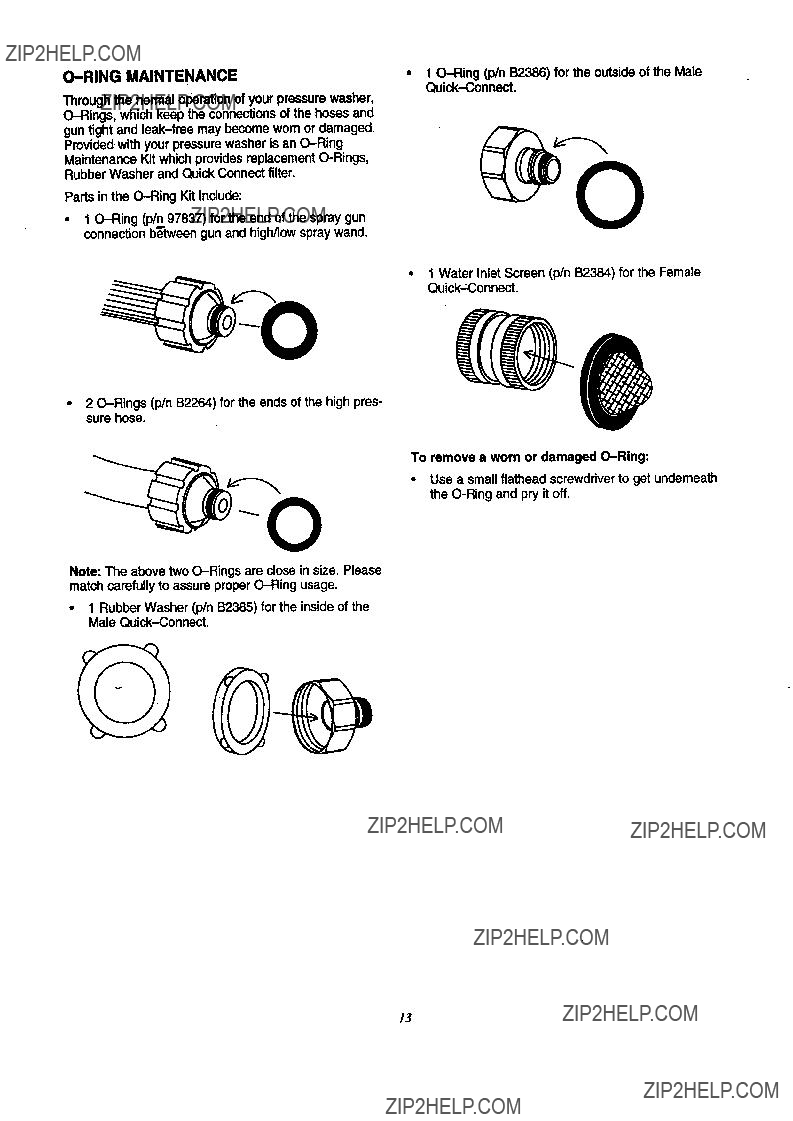
Through the normal operation of your pressure washer,
gun tight and
Provided with your pressurewasher is an
Parts in the
???1
1
O
???1 Water Inlet Screen (pin B2384) for the Female
???2
To remove a worn or damaged
??? Use a small flathead screwdriverto get undemeath the
Note: The above two
???1 Rubber Washer (pin B2385) for the inside of the
Male
13
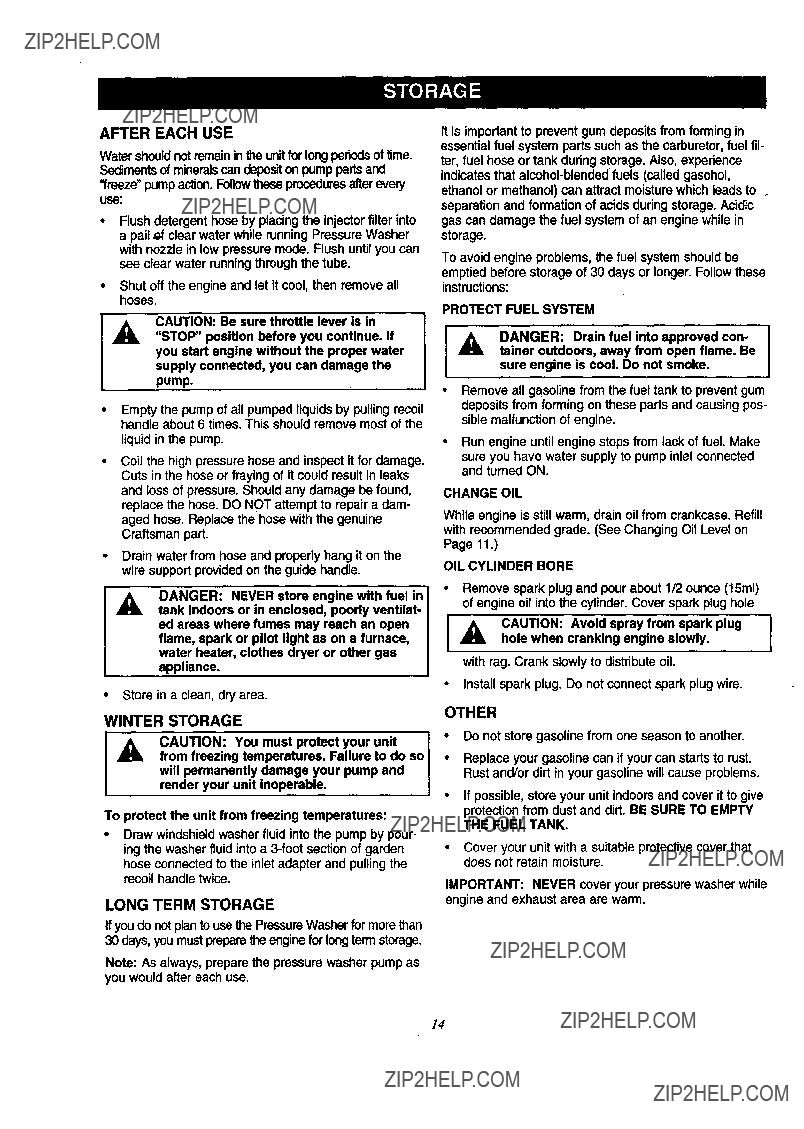
AFTER EACH USE
Water shouldnot remainin the unitfor longperiodsof time.
Sedimentsof mineralscan depositon pumppartsand "freeze" pumpaction.Followtheseproceduresalter every use:
Flush detergent hose by placing the injectorfilter into a pail _f clear water while running Pressure Washer with nozzle in low pressure mode. Flush until you can see clear water runningthrough the tube.
Shut off the engine and let it cool, then remove all hoses.
A CAUTION: Be sure throttle lever is in "STOP" position before you continue. If you start engine without the proper water supply connected, you can damage the pump.
Empty the pump of all pumped liquids by pulling recoil handle about 6 times. This should remove most of the
liquid in the pump.
Coil the high pressure hose and inspect it for damage. Cuts in the hose or fraying of it could result in leaks and loss of pressure. Should any damage be found, replace the hose. DO NOT attempt to repair a dam- aged hose. Replace the hose with the genuine Craftsman part.
Drain water from hose and properly hang it on the wire supportprovided on the guide handle.
,_ DANGER: NEVER store engine with fuel in I tank indoors or in enclosed, poorly ventilat- I
??? Store in a clean, dry area.
It is importantto prevent gum deposits from forming in essential fuel system parts such as the carburetor,fuel fil- ter, fuel hose or tank during storage. Also, experience indicates that
To avoid engine problems, the fuel system should be emptied before storage of 30 days or longer. Follow these instructions:
PROTECT FUEL SYSTEM
_k DANGER: Drain fuel into approved con- tainer outdoors, away from open flame. Be
sure engine is cool. Do not smoke.
Remove all gasoline from the fuel tank to prevent gum deposits from forming on these parts and causing pos- sible malfunctionof engine.
Run engine until engine stops from lack of fuel. Make sure you have water supply to pump inlet connected and turned ON.
CHANGE OIL
While engine is still warm, drain oil from crankcase. Refill with recommended grade. (See Changing Oil Level on Page 11.)
OIL CYLINDER BORE
-Remove spark plug and pour about 1/2 ounce (15ml) of engine oil intothe cylinder. Cover spark plug hole
/A CAUTION:hole when crankingAvoid sprayenginefromslowlyspark. plug
with rag. Crank slowly to distributeoil.
???Install spark plug. Do not connect spark plug wire.
WINTER STORAGE
CAUTION: You must protect your unit from freezing temperatures. Failure to do so will permanently damage your pump and render your unit inoperable.
To protect the unit from freezing temperatures:
???Draw windshieldwasher fluid into the pump by pour- ing the washer fluid into a
LONG TERM STORAGE
Ifyou do not plan to usethe PressureWasher for more than 30 days, you mustprepare the engine for long termstorage.
Note: As always, prepare the pressure washer pump as you would after each use.
OTHER
Do not store gasoline from one season to another.
Replace your gasoline can if your can startsto rust. Rust and/or dirt in your gasolinewill cause problems.
If possible, store your unit indoorsand cover it to give protectionfrom dust and dirt. BE SURE TO EMPTY
THE FUEL TANK.
Cover your unit with a suitable protective cover that does not retain moisture.
IMPORTANT: NEVER cover your pressure washer while engine and exhaust area are warm.
/4

PROBLEM
Pumphasfollowingproblems:
failure to producepressure,or
erraticpressure,chattering,lossof
pressure,lowwatervolume.
Detergentfailstomixwith.
spray.
Enginerunsgoodwhennotspraying but dieswhenyoubegintospray.
Enginewillnot start;or starts and runsrough
CAUSE
1.Nozzlein lowpressuremode.
2.Water inletis blocked.
3.Inadequatewatersupply
4.Inlet hose is kinked or leaking
5.Clogged water inlet screen.
6.Water supply is over 140??F.
7.Outlet hose is blocked.
8.Outlethoseleaks.
9.Gun leaks.
10.Nozzleis obstructed.
11.Pumpisfaulty.
1.Detergent line is not submerged. in detergent spray
2.Chemical filter is clogged.
3.Nozzle is in high pressure mode.
Engine speed is too slow.
1.Dirtyair cleaner
2.Out of gasoline.
3.Stalegasoline.
4.Sparkplugwire notconnected to spark plug.
5.Bad spark plug.
6.Water in gasoline.
7.Overchoking or flooded
CORRECTION
1.Pullnozzlebackwardfor high pressuremode.
2.Clearinlet
3.Provideadequatewaterflow at least2 gpm.
4.Straighteninlethose,patchleak.
5.Replace/ cleanwaterinletscreen.
6.Providecoolerwatersupply.
7.Clearblocksinoutlethose.
8, Replace outlet hose if leaking.
9.Replace
10.Clear nozzle.
11.Contact Sears Service Department,
1.Insert chemical line into detergent.
2.Clean or replace filter/detergent line.
3.Push nozzle forward for low pressure mode.
Contact Sears Service Department.
1.Clean or replace air cleaner.
2.Fill fuel tank.
3.Drain gas tank; fill with fresh fuel.
4.Connect wire to spark plug.
5.Replace spark plug.
6.Drain gas tank; fill with fresh fuel.
7.Set engine throttle control lever to fast position,choke in run position.
15
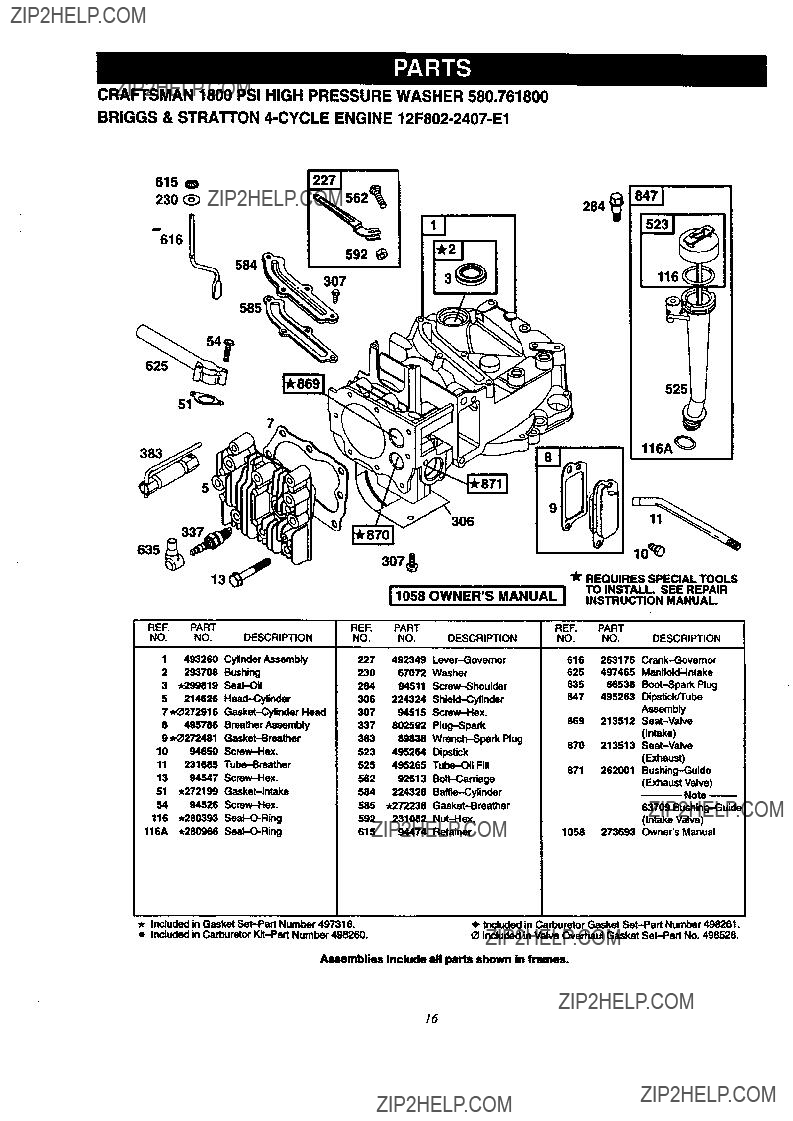
CRAFTSMAN 1800 PSI HIGH PRESSURE WASHER 580,761800
BRIGGS & STRATTON
615 O
230
616
592
116A _
3O6
337
Assemblies Include all parts shown in frames.
15
CRAFTSMAN 1800 PSI HIGH PRESSURE WASHER 580.761800
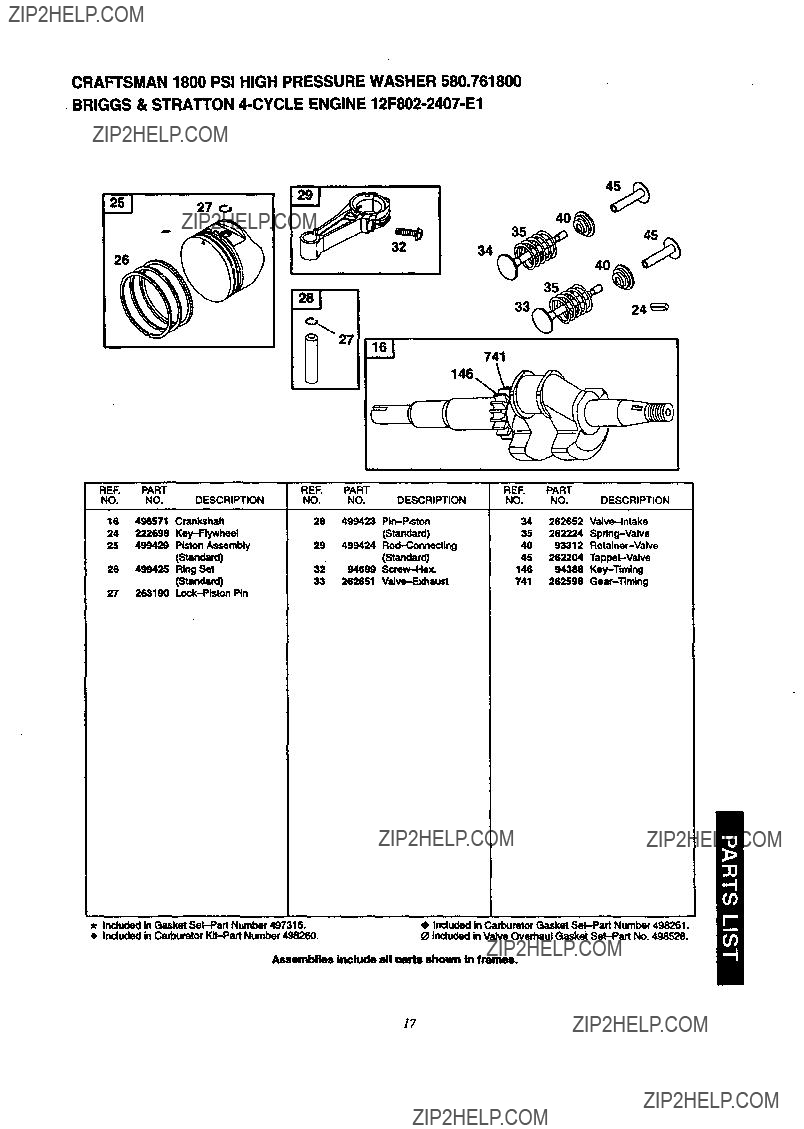
BRIGGS & STRATTON
33_24
27
741
146,
Assemblies include all milts shown in frames.
17
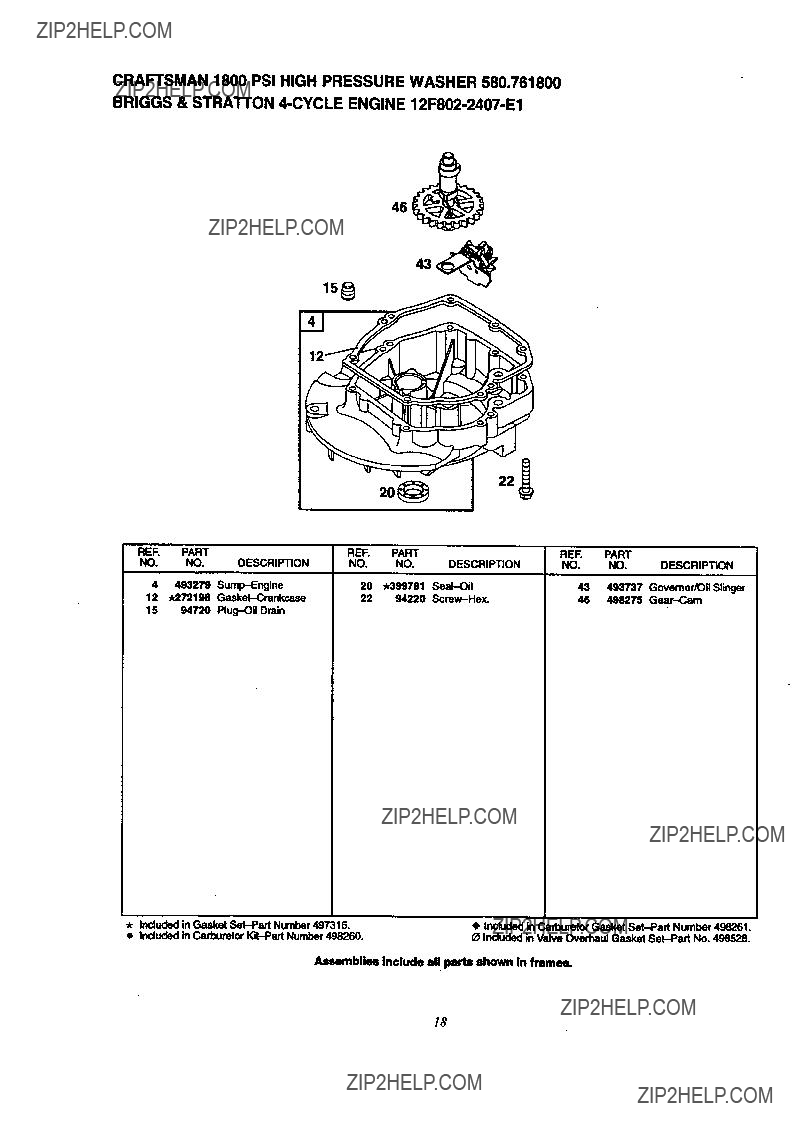
CRAFTSMAN 1800 PSl HIGH PRESSURE WASHER580.761800
BRIGGS & STRATTON
46
Assemblies include all parts shown in frames.
X8
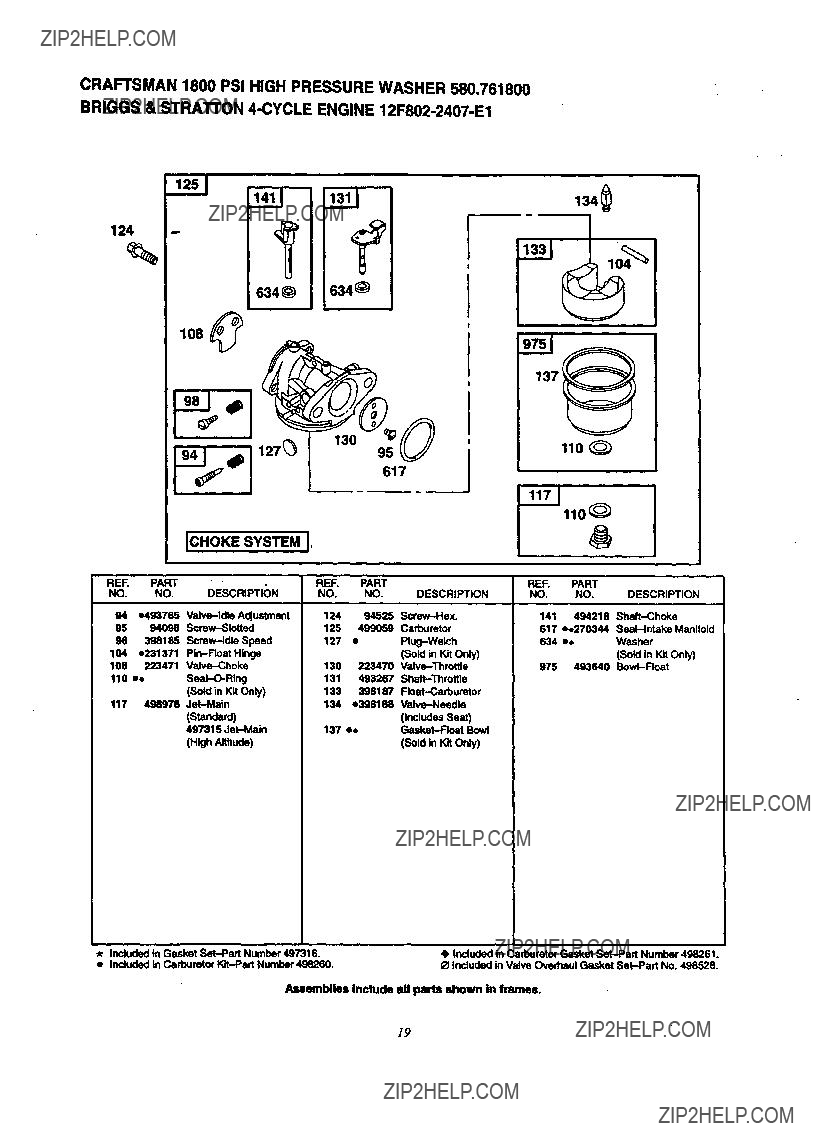
CRAFTSMAN 1800 PSI HIGH PRESSURE WASHER 580.761800
BRIGGS &
137_
11o
110_
Assemblies include all parts shown in frames.
/9

CRAFTSMAN 1800 PSI HIGH PRESSURE WASHER 580.761800
BRIGGS & STRATTON
843
621
265
670
Assemblies include all parts shown in frames.
2O
CRAFTSMAN 1800 PSI HIGH PRESSURE WASHER 580.761800 BRIGGS & STRATTON
971
16.
967
968
30
f 971A_
332_
455
231
REF. PART
NO. NO. DESCRIPTION
968281340
96994872
971 94873
971A 04749
974 224815
976 496115
1036 499341 Lable
Assemblies Include all parts shown in frames.
2!
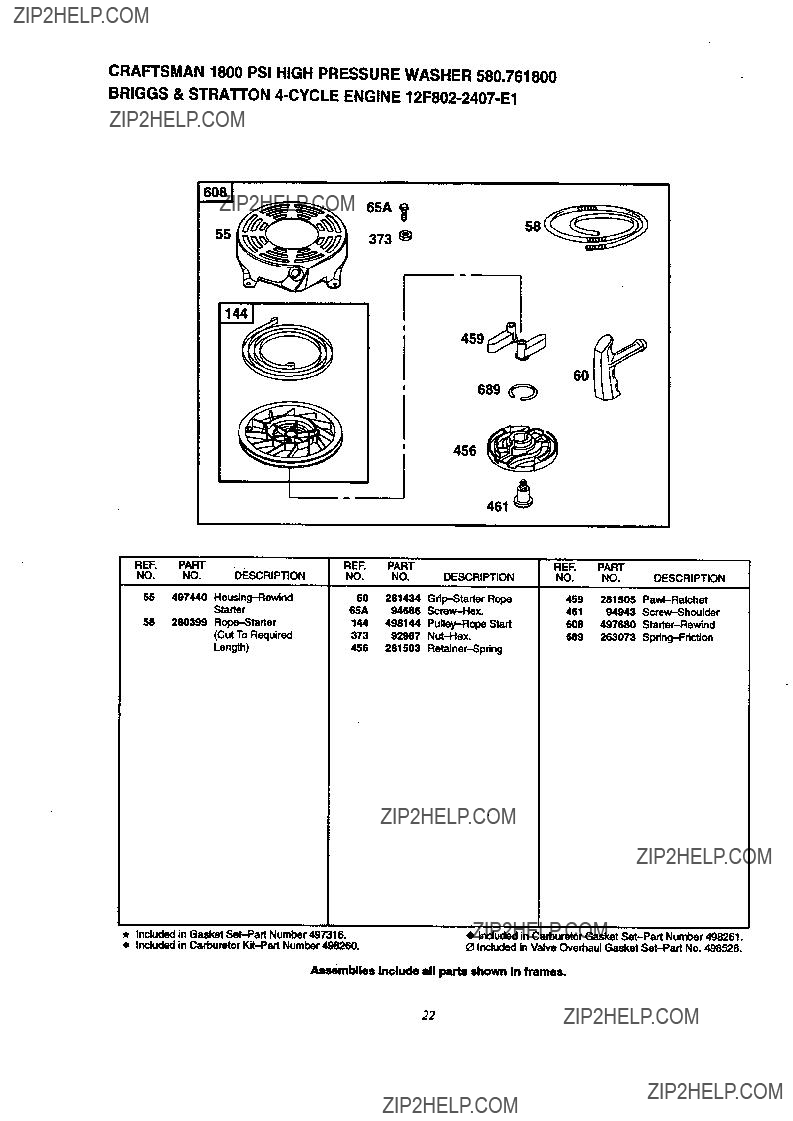
CRAFTSMAN 1800 PSI HIGH PRESSURE WASHER 580.761800
BRIGGS & STRATrON
i
I4o9 I i
6O
I
I 689 _=_
!
I
Assemblies Include all parts shown In frames,
22

CRAFTSMAN 1800 PSI HIGH PRESSURE WASHER 580.761800
BRIGGS &
358 GASKET SET
670
7
9
Assemblies include all parts shown in frames.
23
CRAFTSMAN 1800 PSI HIGH PRESSURE WASHER 580.761800
2
1
36
I1
37
10
40
41
42
18
19
16
29
20
21
23
46
24

CRAFTSMAN 1800 PSI HIGH PRESSURE WASHER 580,761800
25
CRAFTSMAN 1800 PSI HIGH PRESSURE WASHER 580.761800
59
0
26
CRAFTSMAN 1800 PSI MAQUINA LAVADORA DE ALTA PRESION 580.761800
PARA LISTE DE PARTES
VEA PAGINA 2 7
VERSION DE INGLES
2?
f
Sears se complace en ofrecer a sus clientes ser- vicio de reparaci6n de aparatos
En Sears, usted puede contar con operadores en espafiol, a los que puede Ilamar sin cargo alguno.
Para pedir servicio de reparaci6n a domicilio,
Llamme 24 horasaldfa.,7 diasa lasemana
Para ordernar piezas con entrega a domicilio,
Llame de 7 am a 7 pro, 7 dias a la semana
America's Repair Specialists