Owner???s Manual

ROTARY POWER TOOLS

Model No. 572.611200

Caution:

Before using this product, read this manual and follow all its Safety Rules and Operating Instructions.

???Safety

???Operation

???Maintenance

???Parts

???Espa??ol, p. 23

Sears, Roebuck and Co., Hoffman Estates, IL 60179

2610925488 10/04

FULL ONE YEAR WARRANTY

ON CRAFTSMAN ROTARY POWER TOOL

If this Craftsman Rotary Power Tool fails to give complete satisfaction within one year from the date of purchase, RETURN IT TO THE NEAREST SEARS STORE IN THE UNITED STATES, and Sears will repair it, free of charge.

If this Craftsman Rotary Power Tool is used for commercial or rental purposes, this warranty applies for only 90 days from the date of purchase.

This warranty gives you specific legal rights, and you may also have other rights which vary from state to state.

Sears, Roebuck and Co., Dept. 817 WA, Hoffman Estates, IL 60179

2

3

risk of starting the tool accidentally.

Store idle tools out of reach of children and other untrained persons. Tools are dangerous in the hands of untrained users.

Maintain tools with care. Keep cutting tools sharp and clean. Properly maintained tools, with sharp cutting edges are less likely to bind and are easier to control. Any alteration or modification is a misuse and may result in a dangerous condition.

Check for misalignment or binding of moving parts, breakage of parts, and any other condition that may affect the tools operation. If damaged, have the tool serviced before using. Many accidents are caused by poorly maintained tools. Develop a periodic maintenance schedule for your tool.

Use only accessories that are recommended by the manufacturer for

your model. Accessories that may be suitable for one tool, may become hazardous when used on another tool.

Service

Tool service must be performed only by qualified repair personnel. Service or maintenance performed by unqualified personnel could result in a risk of injury. For example: internal wires may be misplaced or pinched, safety guard return springs may be improperly mounted.

When servicing a tool, use only identical replacement parts. Follow instructions in the Maintenance section of this manual.

Use of unauthorized parts or failure to follow Maintenance Instructions may create a risk of electric shock or injury. Certain cleaning agents such as gasoline, carbon tetrachloride, ammonia, etc. may damage plastic parts.

SAFETY RULES FOR ROTARY TOOLS

Accessories must be rated for at least the speed recommended on the tool warning label. Wheels and other accessories running over rated speed can fly apart and cause injury.

Hold tool by insulated gripping surfaces when performing an operation where the cutting tool may contact hidden wiring or its own cord. Contact with a "live" wire will make exposed metal parts of the tool "live" and shock the operator. If cutting into existing walls or other blind areas where electrical wiring may exist is unavoidable, disconnect all fuses or circuit breakers feeding this worksite.

Do not operate the flexible shaft with a sharp bend. Over bending the shaft can generate excessive heat on the jacket or hand piece. The recommended minimum is 6" radius.

Always disconnect the power cord from the power source before making any adjustments or attaching any accessories.

You may unexpectedly cause the tool to start leading to serious personal injury.

Be aware of the switch location, when placing the tool down or when picking the tool up. You may accidentally activate the switch.

Always hold the hand piece firmly in your hands during the start-up. The reaction torque of the motor, as it accelerates to full speed, can cause the shaft to twist.

Always wear safety goggles and dust

mask. Use only in well ventilated area.

Using personal safety devices and working in safe environment reduces risk of injury.

After changing the bits or making any adjustments, make sure the collet nut and any other adjustment devices are securely tightened. Loose adjustment device can unexpectedly shift, causing loss of control, loose rotating components will be violently thrown.

Do not reach in the area of the spinning bit. The proximity of the spinning bit to your hand may not always be obvious.

Allow brushes to run at operating speed for at least one minute before using wheel. During this time no one is to stand in front or in line with the brush. Loose bristles or wires will be discharged during the run-in time.

Wire and bristle brushes must never be operated at speeds greater than 15,000/min. Direct the discharge of the spinning wire brush away from you. Small particles and tiny wire fragments may be discharged at high velocity during the ???cleaning??? action with these brushes and may become imbedded in your skin. Bristles or wires will be discharged from the brush at high speeds.

Carefully handle both the tool and individual grinding wheels to avoid chipping or cracking. Install a new wheel if tool is dropped while grinding. Do not use a wheel that may be damaged.

4

Fragments from a wheel that bursts during operation will fly away at great velocity possibly striking you or bystanders.

Never use dull or damaged bits. Sharp bits must be handled with care. Damaged bits can snap during use. Dull bits require more force to push the tool, possibly causing the bit to break.

Use clamps to support workpiece whenever practical. Never hold a small workpiece in one hand and the tool in the other hand while in use. Allow for sufficient space, at least 6", between your hand and the spinning bit. Round material such as dowel rods, pipes or tubing have a tendency to roll while being cut, and may cause the bit to ???bite??? or jump toward you. Clamping a small workpiece allows you to use both hands to control the tool.

Inspect your workpiece before cutting. When cutting irregularly shaped workpieces, plan your work so it will not slip and pinch the bit and be torn from your hand. For example, if carving wood, make sure there are no nails or foreign objects in the workpiece. Nails or foreign objects can cause the bit to jump.

Never start the tool when the bit is engaged in the material. The bit cutting edge may grab the material causing loss of control of the cutter.

Avoid bouncing and snagging the wheel, especially when working corners, sharp edges etc. This can cause loss of control and kick-back.

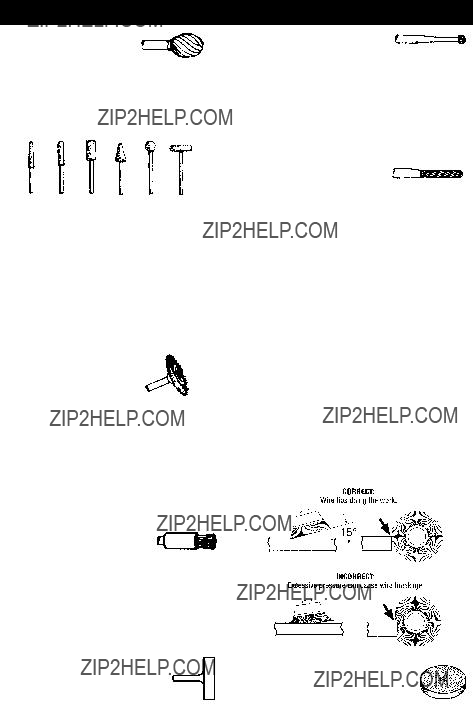
The direction of feed with the bit into the material when carving, routing or cutting is very important. Always feed the bit into the material in the same direction as the cutting edge is exiting from the material (which is the same direction as the chips are thrown). Feeding the tool in the wrong direction, causes the cutting edge of the bit to climb out of the work and pull the tool in the direction of this feed.

If the workpiece or bit becomes jammed or bogged down, turn the tool ???OFF??? by the switch. Wait for all moving parts to stop and unplug the tool, then work to free the jammed material. If the switch to the tool is left ???ON??? the tool could restart unexpectedly causing serious personal injury.

Do not leave a running tool unattended, turn power off. Only when tool comes to a complete stop it is safe to put it down.

Do not grind or sand near flammable materials. Sparks from the wheel could ignite these materials.

Do not touch the bit or collet after use.

After use the bit and collet are too hot to be touched by bare hands.

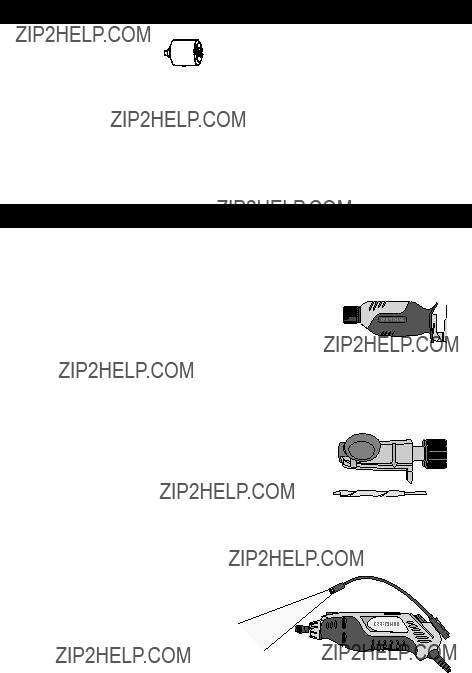
Regularly clean the tool's air vents with compressed air. Excessive accumulation of powdered metal inside the motor housing may cause electrical failures.

Do not allow familiarity gained from frequent use of your rotary tool to become commonplace. Always remember that a careless fraction of a second is sufficient to inflict severe injury.

Do not alter or misuse tool. Any alteration or modification is a misuse and may result in serious personal injury.

This product is not intended for use as a dental drill, in human or veterinary medical applications. Serious injury may result.

When using the steel saws, cutoff wheels, high speed cutters or tungsten carbide cutters, always have the work securely clamped. Never attempt to hold the work with one hand while using any of these accessories. The reason is that these wheels will grab if they become slightly canted in the groove, and can kickback causing loss of control resulting in serious in- jury. Your second hand should be used to steady and guide the hand holding the tool. When a cutoff wheel grabs, the wheel itself usually breaks. When the steel saw, high speed cutters or tungsten carbide cutter grab, it may jump from the groove and you could lose control of the tool.

! WARNING Some dust created by power drilling and other construction activities, contains chemicals known to cause cancer, birth defects or other reproductive harm. Some

examples of these chemicals are:

??? Lead from lead-based paints,

??? Crystalline silica from bricks and cement and other masonry products, and

??? Arsenic and chromium from chemically treated lumber.

Your risk from these exposures varies, depending on how often you do this type of work. To reduce your exposure to these chemicals, work in a well ventilated area, and work with approved safety equipment, such as those dust masks that are specially designed to filter out microscopic particles.

Use only accessories that are sold by Sears for your model. Accessories that may be suitable for one tool may become hazardous when used on another tool.

5

SYMBOLS

NOTE:! For tool specifications, refer to the nameplate on your tool.

7

To

Loosen

8

2
4
The ???golf??? grip method is used for more aggressive operations such as grinding or cutting.
work using very little pressure from your hand. Allow the accessory to do the work. Usually it is better to make a series of passes with the tool rather than to do the entire job with one pass. A gentle touch gives the best control and reduces the chance for error.
For best control in close work, grip the rotary tool like a pencil between your thumb and forefinger.
4
Keyless Chuck
3. Use the supplied wrench to completely tighten the keyless chuck if you are unable to apply sufficient tightening pressure to hold the bit or accessory.

ASSEMBLY (CONTINUED)

Keyless Chuck

The keyless chuck is used in place of the standard collet and collet nut to easily and quickly remove and install some accessories. The keyless chuck holds various accessories with shank sizes 1/32" to 1/8" and is intended

for light duty accessories such as drill bits, sanding drums, polishing accessories, wire and bristle brushes and cut-off wheels.

1. See steps 1???3, Changing Collets on page 8 to install the keyless chuck.

2. Thread the keyless chuck onto the rotary tool shank.

your hand. Blocking the air vents could cause the motor to overheat. IMPORTANT! Practice on scrap material first to see how the tool???s high-speed action performs. Keep in mind that your rotary tool will perform best by allowing the speed, along with the correct Craftsman accessory and attachment, do the work for you. Do not put pressure on the tool during use, if possible.

Instead, lower the spinning accessory lightly to the work surface and allow it to touch the point at which you want to begin. Concentrate on guiding the tool over the

2

9

OPERATING INSTRUCTIONS (CONTINUED)

Set the Speed Control to the desired setting.

2

Some guidelines regarding tool speed:

??? There is no accessory for the Craftsman Rotary tool that will drill or cut glass.

??? Plastic and other materials that melt at low temperatures should be cut at low speeds.

??? Polishing, buffing and cleaning with a wire brush must be done at speeds not greater than 15,000 RPM to prevent damage to the brush and your material.

??? Wood should be cut at high speed.

??? Iron or steel should be cut at high speed.

??? If a high speed steel cutter starts to vibrate, it usually indicates that it is running too slow.

??? Aluminum, copper alloys, lead alloys, zinc alloys and tin may be cut at various speeds, depending on the type of cutting being done. Use a paraffin (not water) or other suitable lubricant on the cutter to prevent the cut material from adhering to the cutter teeth.

NOTE: Increasing pressure on the tool is not the answer when it is not performing properly. Try a different accessory or speed setting to achieve the desired result. Please refer to the following Speed Setting tables.

10

SPEED SETTINGS

Use only Craftsman, high performance accessories.

11

SPEED SETTINGS (CONTINUED)

Use only Craftsman, high performance accessories.

12

SPEED SETTINGS (CONTINUED)

Use only Craftsman, high performance accessories.

13

MAINTENANCE

! WARNING Preventative maintenance performed by unauthorized personnel may result in misplacing of

internal wires and components which could cause serious hazard. We recommend that all tool service be performed by a Sears Parts and Repair Centers.

! WARNING To avoid injury from unexpected starting or electrical shock, always remove plug

from wall outlet before performing service or cleaning.

Carbon Brushes

The brushes in your tool have been engineered for many hours of dependable service.

To prepare the brushes for use, run the tool at full speed for 5 minutes under no load. This will properly ???seat??? the brushes, and extend the life of the tool.

To maintain peak efficiency of the motor, examine the brushes for wear every 50-60 hours.

! CAUTION Using the tool with worn brushes will permanently

damage the motor.

Use only original Craftsman replacement brushes.

Inspect the rotary tool brushes after 40-50 hours of use. If the rotary tool runs erratically, loses power, or makes unusual noises check the brushes for wear and possible replacement. Remember: brushes in the rotary tool are similar to oil in a car; the more you check/service, the better the performance.

Follow these steps to check/change the rotary tool brushes.

1. With the power cord unplugged, place the tool on a clean surface. Use the tool wrench to pry up and release the clip on the brush cover (Figure A).

2. Remove the brushes from the tool by pulling the shunt and brass clip which are attached to the brush (Figure B).

NOTE: Be sure to note how the brass clip slides out of the slot next to the brush pocket. Also, note how the detent on brass clip fits into brush pocket slot, which secures the brass clip into proper position.

3. Check each brush for wear. If brush is less than 3/8" long, or if contact end is rough or pitted, replace the brush.

A

2

4

Removing Brush Cover

B

Removing/Inspecting Brushes

C

"V" Notch

Installing Brushes

14

MAINTENANCE (CONTINUED)

15

ACCESSORIES

For availability of all accessories and attachments, refer your local Sear center.

! WARNING Use only Craftsman, high-performance accessories. Other accessories are not designed for this tool and may lead to personal injury or

property damage.

When using a template (outlet box) behind the drywall, cut in a counterclockwise direction.

High Speed Router Bits

For routing, inlaying and mortising in wood and other soft materials. Use only with Craftsman Router Attachment or Shape/Router Table.

Mandrels

A mandrel is a shank with a threaded or screw head used with polishing accessories, cutting wheels, sanding discs and polishing points. The mandrel is a permanent shank, allowing for replacement of the worn head when necessary.

Screw Mandrel

For use with the felt polishing 1/8" shank tip and felt polishing wheels.

Aluminum Oxide Grinding

Stones (red/brown)

These grinding stones 1/8" shank come round, pointed or flat

and are made of aluminum

oxide. Use them for every possible grinding operation: sharpening lawn mower blades, screwdriver tips, knives, scissors, chisels and other cutting tools. Use to remove flash from metal castings, deburring any kind of metal. These grinding stones can be resharpened with a dressing stone. In machine shops, high speed drills and cutters are normally ground with aluminum oxide wheels.

For use with wall tile, cement board and plaster.

Start the bit into the material at a 45?? angle and then slowly bring it to a 90?? angle to

Multipurpose Cutting Bit

For use in wood, plastics, drywall, fiberglass, vinyl or aluminum siding, acoustical tile and laminates.

Start the bit into the material at a 45?? angle and then slowly bring it to a 90?? angle to begin the cut.

16

Bristle Brushes1/8" shank
Bristle brushes are used for cleaning tools
on silverware, jewelry and antiques. The three shapes make it possible to get into tight corners and other difficult spaces. They can be used with polishing compound for faster cleaning or polishing.

17

1/8" shank

ACCESSORIES (CONTINUED)

Sanding Accessories

Sanding discs in fine, medium and coarse grades are made to fit mandrel. They can be

used for nearly any small sanding job from model making to fine furniture finishing.

In addition, the drum sander makes it possible to shape wood, smooth fiberglass, sand inside curves and other difficult places. Drum bands are replaceable and come in fine and coarse grades.

Flapwheels grind and polish flat or contoured surfaces. They are used most effectively as a finishing sander, after heavier surface sanding and material removal is completed. Flapwheels come in fine and coarse grades.

Buffs are a great finishing accessory for cleaning and light sanding. They work effectively on metal, glass, wood, aluminum and plastics. Buffs are available in medium and coarse grades.

ATTACHMENTS

The following attachments are part of the Craftsman Rotary Tool System; increasing the versatility of your rotary tool.

MultiSaw

The MultiSaw turns your rotary tool into a multipurpose saw that will allow you to make straight and curved cuts in a variety of materials. Scroll cutting patterns is now fast and easy. Using standard jigsaw blades, you can cut soft & hard wood, plywood, metal, PVC, plastic, and much more!

Planer

Convert your corded rotary tool into a planer.

??? The planer is designed for two types of planing: straight planing and 45?? planing, up to 2-18".

??? In addition, the straight planing technique can be used for limited shaping and carving.

??? Ideal for fixing a warped or stuck door!

Flex Light

The flex light uses Lithium Ion batteries (batteries included).

??? LED lighting provides visibility in dimly lit areas and increases light on detailed projects

??? Easy to attach, no confusing wires or connections

??? Attaches to Workstation and Plunge Router.

6,000 - 35,000 RPM

18

ATTACHMENTS (CONTINUED)

Plunge Router

Converts you corded rotary tool into a plunge router.

??? Clear base

??? Two depth stop

??? Includes edge guide and circle guide

??? Rout circles, parallel to edge, signs, inlay work, and lettering template adapters

Grout Removal

Fast and easy way to regrout any room or replace a broken tile!

??? Multiple side depth adjustment

??? 30?? angle for control cutting

??? Guides 180?? apart to keep bit centered between tiles

??? Easy screw mounting

??? Includes 1/16" grout removal bit

327 6 5 4

19

ATTACHMENTS (CONTINUED)

Cutting Guide

Provides controlled cutting in a variety of materials

??? Allows for sturdy controlled cuts with maximum visibility

??? Easy depth adjustment. Set to the correct cutting depth for the project material.

Shaper / Router Table

Converts your corded rotary tool into a bench mounted wood shaper.

??? Features an adjustable fence and large 8" x 6" worktable

??? Slot, groove, sand and trim edges

Lawn / Garden Sharpener

The fastest, easiest, safest way to sharpen your lawn mower blade and other garden tools.

??? Guide provides optimum sharpening angle

??? Sharpens most rotary lawn mower blades

??? Includes sharpening stone

0

Chain Saw Sharpener

??? Easily sharpen the dullest of chains

??? Contains: sharpening attachment, 3 sharpening stones, gauge, 2 spacers, wrench, instruction manual

30

30

GAGE

20

ATTACHMENTS (CONTINUED)

Right Angle

Enhances the versatility of the rotary tool by allowing you to get into hard-to-reach places.

??? Ball bearings and spiral gears provide smooth and cool operation

??? Coupling system allows you to orient the attachment on your tool in 12 different directions

??? Quick disconnect system easily attaches to your rotary tool in place of the housing cap, no wrenches required

Flex Shaft Tool Holder

Conveniently suspends any Dremel rotary tool above your workbench.

??? Perfect for use with the Flex-Shaft attachment

??? Clamps to workbenches up to 1-3/4" thick, and adjusts in height from 12" to 42"

??? Store extra bits on base

Tool Holder and Base

??? Firmly holds rotary tools in any position

??? Control workpiece (hands free) for better results.

21

SERVICE PARTS

Craftsman Rotary Tool Model 572.611200

22

Notes:

45

Notes:

46

Notes:

47

Get it fixed, at your home or ours!

Your Home

For repair in your home of all major brand appliances, lawn and garden equipment, or heating and cooling systems, no matter who made it, no matter who sold it!

For the replacement parts, accessories and owner???s manuals that you need to do-it-yourself.

For Sears professional installation of home appliances and items like garage door openers and water heaters.

Our Home

For repair of carry-in products like vacuums, lawn equipment, and electronics, call or go on-line for the nearest

Sears Parts and Repair Center.

1-800-488-1222 Anytime, day or night (U.S.A. only)

www.sears.com

To purchase a protection agreement on a product serviced by Sears:

Para pedir servicio de reparaci??n a domicilio, y para ordenar piezas:

1-888-SU-HOGARSM

(1-888-784-6427)

Au Canada pour service en fran??ais:

1-800-LE-FOYERMC

(1-800-533-6937) www.sears.ca

?? Sears, Roebuck and Co.

??Registered Trademark / TM Trademark / SM Service Mark of Sears, Roebuck and Co.

??Marca Registrada / TM Marca de F?? brica / SM Marca de Servicio de Sears, Roebuck and Co. MC Marque de commerce / MD Marque d??pos??e de Sears, Roebuck and Co.