Operator's Manual

CRRFTSMRH

22" LAWN MOWER

Model No. 247.38528

CAUTION: Before using this product, read this manual and follow all

safety rules and operating

instructions.

oSAFETY

ASSEMBLY

OPERATION

MAINTENANCE

PARTS LIST

o ESPANOL, p. 33

Sears Brands Management Corporation, Hoffman Estates, IL 60179, U.S.A.

Craftsman Full Warranty

IfthisCraftsmanproductfailsduetoadefectinmaterialorworkmanshipwithintwoyearsfromthedateofpurchase,returnittoanySearsstore,

Parts&RepairServiceCenter,orotherCraftsmanoutletintheUnitedStatesforfreerepair(orreplacementifrepairprovesimpossible).

Thiswarrantyappliesforonly90daysifthisproductiseverusedforcommercialorrentalpurposes.

Thiswarranty coversONLYdefects in material andworkmanship. Sears will NOT payfor:

???Expendableitemswhichcan wearout fromnormaluse withinthe warrantyperiod,suchas mowerblades,bladeadapters,belts,filters,or sparkplugs.

???Repairsnecessarybecauseof accident,suchas bentcrankshafts,or failureto operateor maintainthe productaccordingto all supplied instructions.

???Preventivemaintenanceor repairsnecessarydueto improperfuelmixture,contaminatedorstalefuel.

Thiswarrantygivesyou specificlegalrights,andyou mayalso haveotherrightswhichvaryfromstateto state.

Sears, Roebuck and Co., NoffmanEstates, IL 60179

Thissymbolpointsout importantsafetyinstructionswhich,if not followed,couldendangerthepersonalsafetyand/orpropertyof yourselfandothers. Readandfollowall instructionsin thismanual beforeattemptingto operatethismachine.Failureto complywith theseinstructionsmayresultin personalinjury.Whenyou seethis symbol,HEEDITSWARNING!

CALIFORNIA PROPOSITION 65

EngineExhaust,someof itsconstituents,andcertainvehicle componentscontainoremitchemicalsknownto Stateof California to causecancerandbirthdefectsorother reproductiveharm.

Batteryposts,terminals,and relatedaccessoriescontainleadand leadcompounds,chemicalsknownto the Stateof Californiato causecancerandreproductiveharm.Washhandsafterhandling.

GENERAL OPERATION

*Readthisoperator'smanual carefullyin itsentiretybefore

attemptingto assemblethis machine.Read,understand,and followall instructionsonthe machineandinthe manualsbefore

operation.Keepthismanualina safeplacefor futureand regular referenceandfor orderingreplacementparts

,Becompletelyfamiliarwiththe controlsandthe properuseof this machinebeforeoperatingit.

,Thismachineis a precisionpieceof powerequipment,not a plaything.Therefore,exerciseextremecautionat alltimes.This machinehas beendesignedto performonejob: to mowgrass. Do not useit for anyother purpose.

,Neverallowchildrenunder14yearsof ageto operatethis machine.Children14andover shouldreadandunderstandthe

instructionsandsafeoperationpracticesin thismanualandon the machineandshouldbetrainedandsupervisedbyan adult.

,Only responsibleindividualswhoarefamiliarwiththeserulesof safeoperationshouldbe allowedto usethis machine.

,Thoroughlyinspectthe areawherethe equipmentis to be used. Removeallstones,sticks,wire,bones,toysandotherforeign objects,whichcould betrippedoverorpickedupandthrownby the blade.Thrownobjectscancauseseriouspersonalinjury.

,Planyour mowingpatternto avoiddischargeof materialtoward roads,sidewalks,bystandersandthe like.Also,avoiddischarg- ingmaterialagainstawall orobstruction,whichmaycause dischargedmaterialto ricochetbacktowardthe operator.

,Tohelpavoidbladecontactor a thrownobjectinjury,stayin operatorzonebehindhandlesand keepchildren,bystanders, helpersandpetsat least75feetfrommowerwhileit is inopera- tion. Stopmachineif anyoneentersarea.

Thismachinewasbuiltto beoperatedaccordingto the safeopera- tion practicesinthis manual.As withanytypeof powerequipment, carelessnessorerroron the partof the operatorcan resultin serious injury.Thismachineis capableof amputatingfingers,hands,toes andfeetandthrowingdebris.Failureto observethe followingsafety instructionscouldresultin seriousinjuryor death.

Your Responsibility--Restrict the useof this powermachineto personswho read,understandandfollowthewarningsand instruc- tionsin thismanualandon the machine.

SAVE THESE INSTRUCTIONS!

???Alwayswear safetyglassesor safetygogglesduringoperation andwhile performingan adjustmentor repairto protectyoureyes. Thrownobjectswhichricochetcancauseseriousinjuryto the eyes. Wearsturdy,rough-soledworkshoesandclose-fittingslacks and shirts.Shirtsand pantsthatcoverthe armsandlegsand steel-toedshoesare recommendedNeveroperatethis. machine inbarefeet,sandals,slipperyor light-weight(e.g.canvas)shoes. Donot put handsor feetnearrotatingpartsor underthe cutting

deck. Contactwith bladecan amputatefingers,hands,toesand feet.

A missingor damageddischargecovercan causebladecontact or thrownobjectinjuries.

Manyinjuriesoccuras a resultof the mowerbeingpulledoverthe footduringafall causedby slippingor tripping.Do not holdon to the mowerif you arefalling:releasethe handleimmediately. Neverpullthe mowerbacktowardyouwhileyou arewalking.If you mustbackthe mowerawayfroma wallor obstructionfirst lookdownandbehindto avoidtrippingandthen followthese steps:

1.Stepbackfrommowerto fullyextendyourarmsforward.

2.Besureyouare wellbalancedwithsurefooting.

3.Pullthe mowerbackslowly,no morethan half waytoward you.

4.Repeatthesestepsas needed.

Donot operatethe mowerwhileunderthe influenceof alcoholor drugs.

Donot engagethe self-propelledmechanismon machinesso equippedwhilestartingengine.

3

???The bladecontrolhandleis a safetydevice.Neverattemptto bypassits operation.Doingso makesthe safetydeviceinopera- tiveandmayresultin personalinjurythroughcontactwiththe rotatingblade.The bladecontrolhandlemustoperateeasily

in bothdirectionsandautomaticallyreturnto the disengaged positionwhenreleased.

???Neveroperatethe mowerinwetgrass.Alwaysbe sureof your footing. A slip andfall cancauseseriouspersonalinjury.Ifyou feelyou arelosingyourfooting,releasethe bladecontrolhandle immediatelyandthe bladewill stop rotatingwithinthreeseconds.

???Mowonly in daylightor goodartificiallight.Walk,neverrun.

???Stopthe bladewhencrossinggraveldrives,walksor roads.

???Ifthe equipmentshouldstart to vibrateabnormally,stopthe engineandcheckimmediatelyfor the cause.Vibrationis gener- allya warningof trouble.

???Shutthe engineoff andwaituntilthe bladecomesto a complete stopbeforeremovingthe grasscatcheror uncloggingthe chute. Thecuttingbladecontinuesto rotatefor afewsecondsafterthe bladecontrolis released.Neverplaceany partof the body inthe bladeareauntilyou aresurethe bladehasstoppedrotating.

???Neveroperatemowerwithoutpropertrail shield,dischargecover, grasscatcher,bladecontrolhandleor othersafetyprotectivede- vicesin placeandworking.Neveroperatemowerwithdamaged safetydevices.Failureto do socan resultinpersonalinjury. Mufflerandenginebecomehotandcan causea burn.Do not touch.

???Neverattemptto makea wheelorcuttingheightadjustmentwhile theengineis running.

???Onlyuse partsand accessoriesmadeforthis machineby the manufactureras listedin the Partspagesof thisOperator's Manual.Failureto doso can resultin personalinjury.

???Whenstartingengine,pullcordslowlyuntil resistanceis felt,then pullrapidly.Rapidretractionof startercord (kickback)willpull handandarm towardenginefasterthanyoucan let go. Broken bones,fractures,bruisesor sprainscould result.

???If situationsoccurwhicharenot coveredinthismanual,usecare

andgoodjudgement.Contact1-800-4MY-HOME??for information andassistance.

SLOPE OPERATION

Slopesare amajorfactor relatedto slipandfall accidents,whichcan resultinsevereinjury.Operationon slopesrequiresextracaution.If youfeel uneasyona slope,do not mowit. Foryour safety,usethe SlopeGuideincludedas partof thismanualto measureslopesbefore operatingthis machineon a slopedor hillyarea. Ifthe slopeis greater than 15degrees,donot mowit.

Do:

oMowacrossthefaced slopes;neverupanddown.Exercise extremecautionwhenchangingdirectiononslopes.

???Watchfor holes,ruts, rocks,hiddenobjects,or bumpswhichcan causeyou to slip ortrip. Tallgrasscan hideobstacles.

???Alwaysbesureof yourfooting.A slipandfall can causeserious personalinjury.Ifyou feelyou arelosingyourbalance,release the bladecontrolhandleimmediatelyandthe bladewillstop rotatingwithinthree (3) seconds.

Do Not:

???Donot mowneardrop-offs,ditchesor embankments,because you couldloseyourfootingorbalance.

???Donot mowslopesgreaterthan 15degreesas shownon the slopeguide.

???Donot mowon wetgrass.Unstablefootingcouldcauseslipping.

CHILDREN

Tragicaccidentscan occurif the operatoris not alertto the presence of children.Childrenareoftenattractedto themowerandthe mowing activity.Theydonot understandthe dangers.Neverassumethat childrenwill remainwhereyou lastsawthem.

Keepchildrenout of the mowingareaandunderwatchfulcareof

a responsibleadultotherthan theoperator.

???Bealertandturn moweroffif achild entersthe area.

???Beforeandwhilemovingbackwards,look behindanddown for smallchildren.

???Useextremecare whenapproachingblindcorners,doorways, shrubs,trees,orotherobjectsthatmayobscureyourvisionof a child whomayrunintothe mower.

???Keepchildrenawayfromhot or runningengines.Theycan suffer burnsfroma hot muffler.

???Neverallowchildrenunder14yearsof ageto operatethis machine.Children14andovershouldreadand understandthe instructionsandsafeoperationpracticesinthis manualandon the machineand betrainedandsupervisedby an adult.

SERVICE

Safe HandlingOf Gasoline:

???Toavoid personalinjuryor propertydamageuseextremecare in handlinggasoline.Gasolineis extremelyflammableandthe vaporsareexplosive.Seriouspersonalinjurycanoccurwhen gasolineis spilledon yourselfor yourclothes,whichcan ignite. Washyour skinandchangeclothesimmediately.

???Useonly anapprovedgasolinecontainer.

???Neverfill containersinsidea vehicleoron atruck ortrailer bed witha plasticliner.Alwaysplacecontainerson thegroundaway fromyourvehiclebeforefilling.

???Removegas-poweredequipmentfromthetruck ortrailerand refuelit on the ground.Ifthisis notpossible,then refuelsuch equipmenton atrailer witha portablecontainer,ratherthanfrom a gasolinedispensernozzle.

???Keepthe nozzleincontactwiththe rimof the fueltankor containeropeningat all timesuntilfuelingis complete.Donot use a nozzlelock-opendevice.

4

???Extinguishall cigarettes,cigars,pipesandothersources of ignition.

???Neverfuelmachineindoorsbecauseflammablevaporswill accumulateinthe area.

???Neverremovegas cap oraddfuel whileengineis hotor running. Allowengineto coolat leasttwo minutesbeforerefueling.

???Neverover-fillfuel tank.Toallowfor expansionof the fuel,donot fill abovethe bottomof the fueltankneck.

???Replacegasolinecapandtightensecurely.

???If gasolineis spilled,wipe it offthe engineandequipment.Move machineto anotherarea.Wait5 minutesbeforestartingengine.

???Neverstorethe machineorfuel containernearanopenflame, sparkor pilot lightas ona waterheater,spaceheater,furnace, clothesdryer orothergas appliances.

???Toreducefirehazard,keepmachinefreeof grass,leaves,or otherdebrisbuild-up.Cleanupoil orfuel spillageand removeany fuel-soakeddebris.

Allowmachineto cool at least5 minutesbeforestoring. GeneralService:

???Neverrunanengine indoorsor ina poorlyventilatedarea.Engine exhaustcontainscarbonmonoxide,anodorlessanddeadlygas.

???Beforecleaning,repairing,or inspecting,makecertainthe bladeandall movingpartshavestopped.Disconnectthe spark plugwireandgroundagainstthe engineto preventunintended starting.

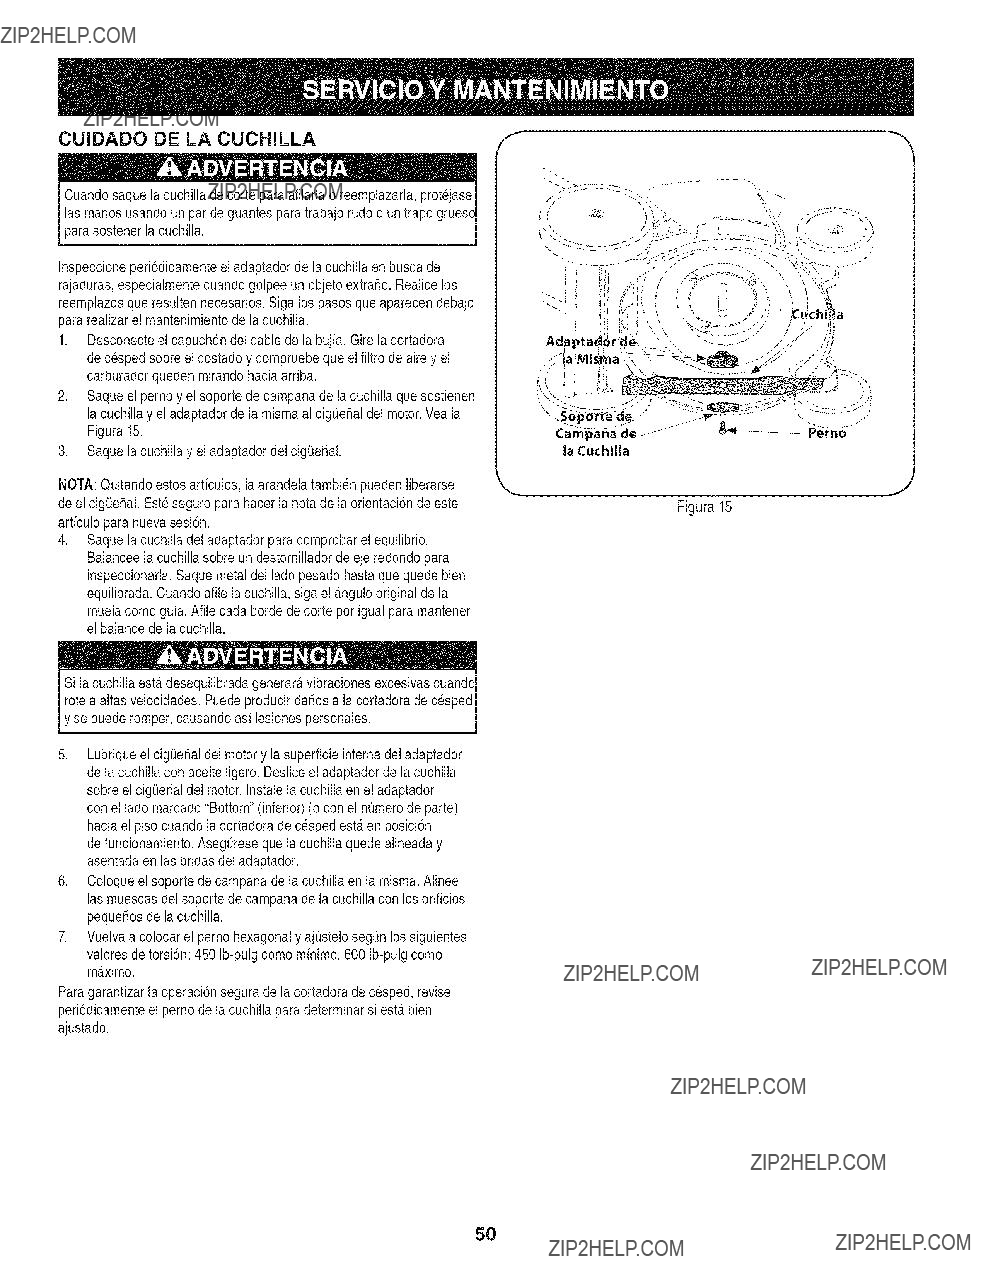
Checkthebladeand enginemountingboltsat frequentintervals for propertightness.Also,visuallyinspectbladefordamage(e.g., bent,cracked,worn). Replacebladewiththeoriginalequipment manufacture's(O.E.M.)bladeonly,listedin the Partspagesof this manual.Useof parts whichdonot meetthe originalequipment specificationsmayleadto improperperformanceandcompro- misesafety!

???Mowerbladesare sharpandcan cut. Wrapthe bladeor wear gloves,anduse extracautionwhen servicingthem.

Keepall nuts,bolts,andscrewstightto be suretheequipmentis in safeworkingcondition. Nevertamperwithsafetydevices.Checktheirproperoperation regularly.

Afterstrikinga foreignobject, stopthe engine,disconnectthe sparkplugwireand groundagainstthe engine.Thoroughly inspectthe mowerfor anydamage.Repairthe damagebefore startingandoperatingthe mower.

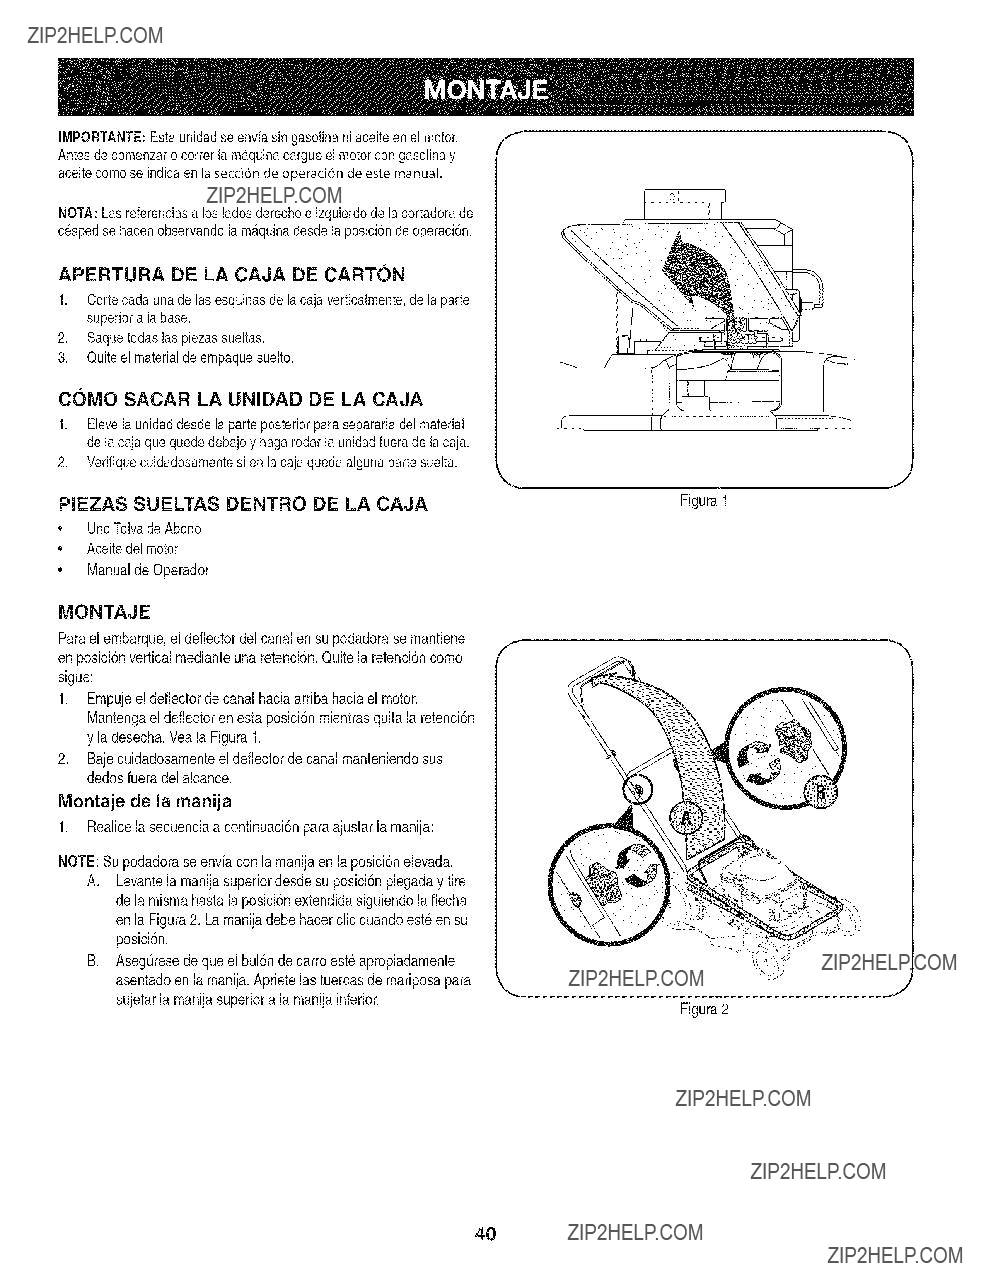
Neverattemptto makea wheelorcuttingheightadjustmentwhile the engineisrunning.

???Grasscatchercomponents,dischargecover,and trailshieldare subjectto wearand damagewhichcouldexposemovingpartsor allowobjectsto bethrown.Forsafetyprotection,frequentlycheck componentsand replaceimmediatelywithoriginalequipment manufacturer's(O.E.M.)partsonly,listed inthe Partspages

of thismanual.Useof partswhichdo notmeetthe original equipmentspecificationsmayleadto improperperformanceand compromisesafety!

Donot changethe engine'sgovernorsettingor over-speedthe engine.Thegovernorcontrolsthe maximumsafeoperatingspeed of the engine.

Checkfuel line,tank,cap,andfittingsfrequentlyfor cracksor leaks.Replaceifnecessary.

Donot crankenginewith sparkplugremoved.

???Maintainor replacesafetyand instructionlabels,as necessary.

???Observeproperdisposallawsand regulations.Improperdisposal of fluidsandmaterialscan harmthe environment.

Accordingto theConsumerProductsSafetyCommission(CPSC) andthe U.S.EnvironmentalProtectionAgency(EPA),this product hasan AverageUsefulLifeof seven(7)years,or 140hoursof operation.At the endof theAverageUsefulLifehavethe machine inspectedannuallyby a Searsorotherqualifiedservicedealer

to ensurethatall mechanicalandsafetysystemsareworking properlyand notwornexcessively.Failureto doso can result in accidents,injuriesor death.

DO NOT MODIFY ENGINE

Toavoidseriousinjuryor death,do not modifyengine inany way. Tamperingwiththe governorsettingcanleadto a runawayengineand cause itto operateat unsafespeeds.Nevertamperwithfactorysetting of enginegovernor.Doingso will voidthe productwarranty.

NOTICE REGARDING EMISSIONS

EngineswhicharecertifiedtocomplywithCaliforniaandfederal EPAemissionregulationsfor SORE(SmallOff RoadEquipment)are certifiedto operateon regularunleadedgasoline,and mayinclude the followingemissioncontrolsystems:EngineModification(EM) and ThreeWayCatalyst(TWC)ifso equipped.

SPARK ARRESTOR

Thismachineisequippedwithan internalcombustionengineand shouldnotbe usedonor nearany unimprovedforest-covered, brush-coveredorgrass-coveredlandunlessthe engine'sexhaust systemisequippedwitha sparkarrestermeetingapplicablelocalor statelaws(if any).

Ifa sparkarresterisused, itshouldbemaintainedin effectiveworking orderby theoperator.Inthe Stateof Californiathe aboveis required bylaw(Section4442of the CaliforniaPublicResourcesCode). Other statesmayhavesimilarlaws. Federallawsapplyonfederallands.

A sparkarresterfor the mufflerisavailablethroughyournearestSears PartsandRepairServiceCenter.

SAFETY SYMBOLS

Thispagedepictsanddescribessafetysymbolsthatmayappearonthisproduct. Read,understand,andfollowall instructionson the machine beforeattemptingto assembleandoperate.

6

Sight and hold this levelwith a verticaltree...

or a corner of a building...

15 ??

Use this page as a guide to determine slopes where you may not operate safely.

Do notoperateyour lawnmoweronsuchslopes.Donot mowon inclineswitha slopeinexcessof 15degrees(a riseof approximately2-1/2feetevery10feet). Operatewalk= behindmowersacrossthe faceof slopes,neverup anddownslopes.

This page left intentionallyblank.

8

9

IMPORTANT:Thisunit is shippedwithoutgasolineoroil inthe engine. Becertainto serviceenginewithgasolineandoilas instructedinthe Operationsectionbeforestartingor runningyourmachine.

NOTE:Referenceto rightand lefthandsideof the LawnMoweris observedfromthe operatingposition.

OPENING CARTON

1.Cuteachcornerof the cartonverticallyfromtop to bottom.

2.Removeall looseparts.

3.Removeloosepackingmaterial.

REMOVING UNIT FROM CARTON

1.Liftunit fromthe rearto detachit fromunderlyingcartonmaterial androllunit out of carton.

2.Checkcartonthoroughlyfor anyotherlooseparts.

LOOSE PARTS IN CARTON

???MulchingBaffle

???EngineOil

???Operator'sManual

Forshippingpurposes,the dischargecoveron yourmoweris heldin an uprightpositionby a retainer.Removethe retaineras follows:

1.Pushthe dischargecoverup towardstheengine.Holdingthe deflectorinthis position,removethe retaineranddiscard.See Figure1.

2.Lowerthe dischargecovercarefullykeepingyourfingersout of theway.

Attaching The Handle

1.Performthe followingsequenceforthe handlesetup:

NOTE:Yourmoweris shippedwiththe handlein the higherheight position.

A.Liftthe upperhandleupfromfoldedpositionandpullit to extendedpositionfollowingthe arrowin Figure2. The handle shouldclick intothis position.

B.Makesurethe carriageboltis seatedproperlyinthe handle. Tightenthe starknobssecuringthe upperhandleto the lowerhandle.

J

Figure1

Figure2

10

2.If satisfiedwiththe heightof the handle,tightenthe starknobsat the endsof the lowerhandleshownin Figure3. Forconvenience of operation,youmayadjustthe handleheightas follows:

NOTE:Eachendof the lowerhandlemustbe placedin the same positiononthe mountingbrackets.

A.Removethestar knobsshownin Figure3 and removethe lowerhandle.

B.Positioneach handlebracketstudintothe top holeinthe lowerhandle.

C.Tightenthe starknobs.

3.The ropeguideis attachedto the right sideof the upperhandle. SeeFigure4. Loosenthewing nutwhichsecuresthe ropeguide.

A.Holdbladecontrolagainstupperhandle.

B.Pullstarterropeout of the engine.Releasebladecontrol.

C.Slipstarterropeintoropeguide.

D.Tightenwingnut.

4.Insertpostoncable tie intoholeprovidedonthe lowerhandle. Pullcabletie tightandtrimexcess.See Figure5.

E

f

J

Figure3

J

Figure4

(

J

Figure5

11

Attaching the Mulching Baffle

Yourmowerisshippedfor sidedischargeoperation.Toconvertmower to the mulchingoperation,followthe sequenceindicatedhere:

1.Liftup andholdthe sidedischargecoverand insertthe bottomlip of the mulchingbaffleinsidethe chuteopeningSeeFigure6.

2.Snapthe hooksof the mulchingbaffleoverthe hingepinof the dischargecover.The hooksmustsnap intoplaceonthe hinge pin, lockingthe mulchingbafflefirmlyonto the mower.Release thedischargecover.

ADJUSTMENTS

Cutting Height

Eachwheelhasa heightadjustmentleverto changethe cuttingheight of the mower.Referto Figure7.

1.Depressheightadjustmentlevertowardswheel.

2.Slideleverto desiredpositionfor achangein cuttingheight.

3.Releaselevertowardsdeck.Figure6

IMPORTANT:Allwheelsmustbeplacedinthe sameposition.For roughor unevenlawns,moveeachheightadjustmentleverto a higher position.Thiswill preventyoufromcuttingthe grasstoocloseto the

J

Figure7

12

Recoil Starter

Cutting Height

Adjustment

Lever (one at

each wheel)

\

Mulching Baffle .....................

GasCap _

\

Spark Plug

/

Side Discharge Cover

J

Figure8

BLADE CONTROL

Thebladecontrolis attachedto the upperhandleof the mower. Depressandsqueezeit againstthe upperhandleto operatethe unit. Releaseit to stopengineandblade.

Thisbladecontrolis a safetydevice.Neverattemptto bypassits operations.

CUTTING HEIGHT ADJUSTMENT LEVERS

Oneadjustmentleveris locatedon eachwheelandis used toadjust the cuttingheight.Allfour levershaveto beat the samepositionto ensurea uniformcut.

RECOIL STARTER

The recoilstarteris attachedto the right upperhandle.Standbehind the unit andpullthe recoilstarterropeto startthe unit.

GAS CAP

Removethe gascap to addfuel to the fueltank. Useclean,fresh, regularunleadedgasolinewitha minimumof 87 octane.

OIL FILL CAP/DIPSTICK

Referto the Maintenancesectionfor instructionsoncheckingthe oil.

SPARK PLUG

Referto the Maintenancesectionfor instructionsonsparkplug replacement.

MULCHING BAFFLE

Themulchingbaffleis usedto recirculategrassclippingsbackto the lawn.Attachit as instructedinthe Assemblysectionof thismanual.

TRAIL SHIELD

The trail shieldis attachedto the rearof the mowerand isthere to protectthe operatorfromflyingdebris.Do not usethe mowerunless the shieldis fullyfunctionalandin place.

Meets ANSi Safety Standards

CraftsmanLawnMowersconformto the safetystandardof the AmericanNationalStandardsInstitute(ANSI).

13

IMPORTANT:Thisunit isshippedwithoutgasolineoroil inthe engine. Becertainto serviceenginewithgasolineandoilas instructedinthis sectionbeforestartingor runningyourmachine.

Oil (one 18 ounce bottle shipped with unit)

FirstTime Use

1.Removeoil fill dipstick(G). SeeFigure9.

2.Withthe moweron levelground,emptyentirecontentsof oil bottle providedintothe engineoil fill (H).

3.Replaceoil fill dipstickandtighten.

Subsequent Uses

Use4-strokemotoroil thatmeetsor exceedsthe requirementsfor API servicecategorySF,SG,SH,SJ or later.Alwayscheckthe APIservice labelonthe oilcontainerto be sureitincludesthe lettersSF,SG,SH, SJ or later.

Outdoortemperaturesdeterminethe properoilviscosityfor the engine. Usethechartto selectthe bestviscosityfor the outdoortemperature rangeexpected.

f

32

14

o4

??30

* Below40??F(4??C)the use of SAE30 will resultin hardstarting. **Above80??F(27??C)the use of 10W-30maycauseincreasedoil consumption.Checkoil levelmorefrequently.

1.Checkthe oil withthe enginestoppedand level.

2.Removethe oil fill dipstickandwipeit clean.

3.Insertandtightenthe oilfill dipstick.Removeit to checkthe oil level.SeeFigure9.

4.Ifthe oil levelis nearor belowthe lowerlimitmarkonthe dipstick, removethe oil fill dipstick,andfill withthe recommendedoil to the upperlimitmark(J). Do notoverfill.

5.Reinstallthe oilfill dipstick.

Gasoline

Do notuse unapprovedgasolines,suchas E85.Do not mixoil in gasolineor modifyengineto runonalternatefuels.Thiswill damage theenginecomponentsandvoid the engine warranty.

Fuelmustmeet these requirements:

???Clean,fresh,unleadedgasoline.

Figure9

???A minimumof 87 octane/87AKI (91RON).

???Gasolinewith upto 10%ethanol(gasohol)or upto 15%MTBE (methyltertiarybutylether)is acceptable.

Refuelina well-ventilatedareawiththe enginestopped.Ifthe engine hasbeenrunning,allowitto cool first. Neverrefuelthe engineinsidea buildingwheregasolinefumesmayreachflamesor sparks.

e

Gasolineis highlyflammableandexplosive,andyoucan be burnedor seriouslyinjuredwhenrefueling.Stopengineand keep heat,sparks,and flameaway.Refuelonly outdoors.Wipe upspills

immediately.

Ifyourequipmentwill be usedonan infrequentorintermittentbasis, pleasereferto the Off SeasonStoragesectionfor additionalinforma- tion regardingfuel deterioration.

NOTE:Fuelcandamagepaintand sometypesof plastic.Becareful notto spill fuelwhenfilling yourfueltank.

Neverusestaleorcontaminatedgasolineoroil/gasolinemixture. Avoidgettingdirt orwaterin the fueltank.

1.Removethe fuel tankcap.

2.Fillthe fuel tankwithfuel. To allowforexpansionof the fuel,do notfill abovethe bottomof the fuel tankneck.Do notoverfill. Wipe upspilledfuel beforestartingtheengine.

3.Installthe fuel tankcapandtightenit until it clicks.

4.Movelawnmowerat least10feet awayfromthe fuel container/ sourceandsitebeforestartin{ ine.

Besurenooneotherthan theoperatoris standingnearthe lawn mowerwhilestartingengineoroperatingmower.Neverrunengine indoorsorin enclosed,poorlyventilatedareas. Engineexhaust containscarbonmonoxide,an odorlessanddeadlygas. Keephands,

feet, hairand looseclothingawayfromany movingpartson engine andlawn mower.

14

TO START ENGINE

1.Standingbehindthe mower,squeezethe bladecontrolhandle againstupperhandle.

2.Holdingthesetwohandlestogetherfirmly,grasprecoilstarter handleandpull ropeslowlyuntil resistanceis felt, then pullwitha rapid,continuous,full arm stroke.SeeFigure10.Keepinga firm griponthe starterhandle,letthe roperewindslowly.Repeatuntil enginecranks.Letthe roperewindeachtimeslowly.

Rapidretractionof startercord (kickback)will pullhandandarm towardenginefasterthan youcan let go. Brokenbones,fractures, bruisesorsprainscould result.

TO STOP ENGINE

1.Releasebladecontrolto stopthe engineandblade.

Waitfor the bladeto stopcompletelybeforeperformingany workon the mowerorto removethe grasscatcher.

Figure10

USING YOUR LAWN MOWER

Besure lawnis clearof stones,sticks,wire,orotherobjectswhich coulddamagelawnmoweror engine.Suchobjectscouldbeaccidently thrownby themowerin anydirectionandcauseseriouspersonalinjury to the operatorandothers.

Theoperationof any lawnmowercan resultinforeignobjectsbeing thrownintothe eyes,whichcan damageyoureyesseverely.Always wearsafetyglasseswhileoperatingthe mower,or whileperforming anyadjustmentsor repairson it.

USING AS MULCHER

For mulchinggrass,installthe mulchingbaffleas instructedin the "Assembly"section.Foreffectivemulching,do not cutwetgrass.If the grasshas beenallowedto growin excessof fourinches,mulchingis not recommendedUsethe. grasscatcherto bagclippingsinstead.

Ifyou strikea foreignobject,stopthe engine.Removewirefromthe sparkplug,thoroughlyinspectmowerfor anydamage,and repair damagebeforerestartingandoperating.Extensivevibrationof mower duringoperationis an indicationof damage.The unit shouldbe promptlyinspectedandrepaired.

15

Cleanmoreoftenunderdustyconditionsor whenairbornedebrisis )resent.Replaceaircleanerifverydirty.

16

Alwaysstopengine,disconnectsparkplugwire,andgroundagainst enginebeforeperformingany typeof maintenanceon yourmachine.

GENERAL RECOMMENDATIONS

???Alwaysobservesafetyruleswhenperformingany maintenance.

???Thewarrantyon thislawnmowerdoesnot coveritemsthathave beensubjectedto operatorabuseor negligence.To receivefull valuefromwarranty,operatormustmaintainthe equipmentas instructedhere.

???Changingof engine-governedspeedwill voidenginewarranty.

???Alladjustmentsshouldbecheckedat leastonceeach season.

???Periodicallycheckall fastenersandmakesurethesearetight.

ENGINE MAINTENANCE

Spark Plug

Forgoodperformance,the sparkplugmustbeproperlygappedand freeof deposits.Replacethe sparkplugannually.

1.Disconnectthe cap fromthe sparkplug,andremoveanydirt from the sparkplugarea.

2.Usethe propersizesparkplugwrenchto removethe sparkplug.

NOTE: Replacewitha Champion??RC12YCsparkplug.

3.Checkthegapwitha wire gauge.SeeFigure11.Sparkpluggap shouldbe0.030in (0.76ram). If necessary,resetthe gap.

4.installandtightenthe sparkplugto the recommendedtorque(180 Ib-in[20 Nm]).

5.Attachthe sparkplugcapto thesparkplug.

Air Cleaner

A dirtyaircleanerwill restrictairflowto the carburetorandcausepoor engineperformance,inspectthe filtereachtimetheengineis oper- ated.Youwill needto cleanthe filtermorefrequentlyif youoperatethe enginein verydusty areas.

Cleantheair cleanerevery25hoursof operationoronce a season. Replacetheaircleanerannually.

Neverstartor runthe enginewiththe aircleanerassemblyor theair filterremoved.

NOTE:Do notuse pressurizedairor solventsto cleanthe filter.Pres- surizedair can damagethefilterandsolventswill dissolvethefilter.

1.Loosenscrewandtilt plastichousingcoveron sideof engine down.SeeFigure16.

2.Removeairfilterfromplastichousingcoverandreplacewith cleanor newfilter.

3.insertcover'stabsinto slotsin bottomof base.

4.Tiltcoverupinto placeandtightenscrew.

f

Electrode

Figure11

Figure12

17

Check Engine Oil

Checkoil levelbeforeeachoperation.Besureoil levelis maintained.

1.Checkthe oil withthe enginestoppedand level.

2.Removethe oil fill dipstickandwipeit clean.

3.Insertandtightendipstick.Removeitto checkthe oillevel.

4.Ifthe oil levelisnearor belowthe lowerlimitmarkonthe dipstick, removethe oil fillercap/dipstick,andfill withthe recommendedoil to the upperlimitmark.Do not overfill.

5.Reinstallthe oilfill dipstick.

Change Engine Oil

Gasolineand itsvaporsareextremelyflammableandexplosive.

Fireor explosioncancausesevereburnsor death.

Changeengineoil afterthefirst fivehoursof operation,andeveryfifty hoursoronce a seasonthereafter.

emptyor fuel canleak outand resultin afire or explosion.Toempty lWhen drainthe oil fromthe oil fill the fuel tankmustbe

the fuel tank, runthe engineuntilitstopsfromlackof fuel.

1.Withengineoffbutstillwarm,disconnectthesparkplugwireandkeep itawayfromthe sparkplug.

2.Placea suitablecontainernextto the engineto catchthe usedoil.

3.Removethe oil fill dipstickanddraintheoil intothecontainerby tippingtheenginetowardthe oil fillerneck.See Figure13.

Usedoil isa hazardouswasteproduct.Disposeof usedoil properly. IDonot discardwithhouseholdwaste.Checkwithyourlocalauthori- _tiesor SearsServiceCenterfor safedisposal/recyclingfacilities.

4.Withthe engineina levelposition,fill tothe upperlimitmarkon the dipstickwiththe recommendedoil.

Runningthe enginewitha lowoil levelcan causeenginedamage.

5.Reinstallthe oilfill dipsticksecurely.

Clean Engine

???Dailyor beforeeveryuse,cleangrass,chaffor accumulated debrisfromengine.Keeplinkage,spring,andcontrolsclean.

Keepareaaroundandbehindmufflerfreeof any combustible debris.

???Keepingenginecleanallowsairmovementaroundengine.

???Enginepartsshouldbe keptcleanto reducethe riskof overheat- ingand ignitionof accumulateddebris.

Do not usewaterto cleanengineparts.Watercouldcontaminatefuel system.Usea brushor dry cloth.

Oil Fill Dipstick

J

Figure13

Figure14

LUBRICATION

Blade Control

Lubricatepivotpointsonthe bladecontrolat leastoncea seasonwith

light oil.Thiscontrolmustoperatefreely inbothdirections.SeeFigure 14.

Wheels

Lubricatethe wheelsat leastoncea seasonwithlight oil (ormotoroil). Ifwheelsare removedfor any reason,lubricatesurfaceof the pivot arm and innersurfaceof the wheelwithlightoil. SeeFigure14.

Side Discharge Cover

Lubricatethe torsionspringsandpivotpointsonthe sidedischarge coverperiodicallywith lightoilto preventrust. SeeFigure14.

18

Cleanundersideof the mowerdeckonce aseasonto preventbuild-up of grassclippingsor otherdebris. Followstepsbelowfor thisjob.

1.Disconnectsparkplugwire. Runengineuntilit stopsfromlackof fuel.

2.Tip mowersothat it restson the housing,keepingthe mufflerside down. Referbackto Figure13.Holdmowerfirmly.

Nevertip the mowermorethan 900inany directionanddo not leave the mowertippedfor any lengthof time. Oilcandraininto the upper partof the enginecausinga startingproblem.

3.ScrapeandcleantheundersideofthedeckwithasuitabletoolDonot.

spraywithwater.

IMPORTANT:Donot usea pressurewasheror gardenhoseto clean yourunit. Thesemaycausedamageto bearings,orthe engine.The useof waterwill resultin shortenedlife andreduceserviceability.

Support

4. Putthe mowerbackon itswheelsonthe ground.

J

Figure15

BLADE CARE

Whenremovingthe cuttingbladefor sharpeningor replacement, protectyour handswitha pairof heavyglovesoruse a heavyragto holdthe blade.

Periodicallyinspectthe bladeadapterfor cracks,especiallyif you strikea foreignobject. Replacewhennecessary.Followthe steps belowfor bladeservice.

1.Disconnectsparkplugbootfromsparkplug.Turnmoweron its side makingsurethattheair filterandthecarburetorarefacing up.

2.Removethe boltandthe bladebellsupportwhichholdthe blade andthe bladeadapterto theenginecrankshaft.SeeFigure15.

3.Removebladeandadapterfromthe crankshaft.

4.Removebladefromthe adapterfor testingbalance.Balancethe bladeon a roundshaft screwdriverto check. Removemetalfrom the heavyside untilit balancesevenly.Whensharpeningthe blade,followthe originalangleof grind.Grindeachcuttingedge equallyto keepthe bladebalanced.

An unbalancedbladewill causeexcessivevibrationwhen rotatingat highspeeds.Itmaycausedamageto mowerandcouldbreakcausin( personalinjury.

5.Lubricatetheenginecrankshaftandthe innersurfaceof the blade adapterwithlightoil. Slidethe bladeadapterontothe engine crankshaft.Placethe bladeon the adaptersuchthatthe sideof the blademarked"Bottom"(orwithpart number)facestheground whenthe moweris in the operatingposition.Makesurethatthe bladeis alignedandseatedon thebladeadapterflanges.

6.Placebladebellsupporton theblade.Alignnotchesonthe blade bellsupportwithsmallholesin blade.

7.Replacehex boltandtightenhex boltto torque:450in. Ibs.rain., 600 in. Ibs.max.

Toensuresafeoperationof yourmower,periodicallycheckthe blade boltfor correcttorque.

19

Neverstorelawnmowerwithfuel intankindoorsorin poorly ventilatedareaswherefuel fumesmayreachan openflame,spark, or pilot lightas ona furnace,waterheater,clothesdryer,or gas appliance.

PREPARING THE ENGINE

Forenginesstoredover30days:

1.Topreventgum fromforminginfuel systemoron carburetor parts,runengineuntilit stopsfromlackof fuel oradda gasoline additiveto thegas in thetank. If youuse agas additive,runthe enginefor severalminutesto circulatethe additivethroughthe carburetor--afterwhichthe engineandfuel canbe storedupto 24months.

2.Whileengineis stillwarm,changethe oil.

3.Cleanengineof surfacedebris.

PREPARING THE LAWN MOWER

???Cleanandlubricatemowerthoroughlyas describedinthe lubrica- tion instructions.

???Donot usea pressurewasheror gardenhoseto cleanyour unit.

???Coatmower'scuttingbladewithchassisgreaseto prevent rusting.

???Referto PREPARINGTHE ENGINEfor correctenginestorage instructions.

???Store mowerin a dry,cleanarea. Do notstorenexttocorrosive materials,suchas fertilizer.

Whenstoringany typeof powerequipmentina poorlyventilatedor metalstorageshed,care shouldbetakento rust-prooftheequipment. Usinga lightoil orsilicone,coatthe equipment,especiallycablesand all movingpartsof yourlawnmowerbeforestorage.

20

1.Engagebladecontrol.

2.Connectwireto sparkboot.

3.Filltankwithclean,freshgasoline.

4.Clean,adjustgap,or replace.

5.Waita fewminutesto restart.

6.Contactyour SearsParts& RepairCenterto have fuellinecleaned.

1.Connectandtightensparkplugboot.

2.Filltankwithclean,freshgasoline.

3.Clearvent.

4.Runengineuntil it stopsfromlackof fuel. Refillwith freshfuel.

5.Referto AirCleanerinEngineMaintenancesection.

6.Contactyour SearsParts& RepairCenterto have fuellinecleaned.

1.Fillcrankcasewith properoil.

2.Cleanareaaroundandon topof engine.

1.Adjustgapto .030".

1.Resetgap to .030"or replacesparkplug.

2.Referto AirCleanerinEngineMaintenancesection.

1.Tightenbladeandadapter.Balanceblade.

2.Replaceblade.

1.Do notmowwhengrassis wet;waituntil laterto cut.

2.Mowonce at a highcuttingheight,then mowagain at desiredheightor makea narrowercuttingpath.

3.Sharpenor replaceblade.

1.Placeall fourwheelsinsameheightposition.

2.Sharpenor replaceblade.

21

Craftsman Mower B Model No. 247.38528

27

2827

38

10

11

J

22

Craftsman Mower B Model No. 247.38528

3.747-1161A-0637 BladeControlHandle

4.749-1092A-0637 UpperHandle

8.687-02048A-4044 DeckAssembly,22"

10.748-0376E BladeAdapter

11.942-0742A MulchingBlade,22"

12.736-0524B BladeBellSupport

14.712-04065 LockNut,3/8-16

15.741-0717 ThrustBearing

16.687-02553 RearPivotArm- LH

19.738-1172 ShoulderScrew

20.734-04542 FrontWheel

m

24.738-04267 ShoulderScrew

25.734-04546 RearWheel

26.982-3062A HandleBracketAssembly,RH

26a. 982-3063A HandleBracketAssembly,LH

27.720-04072A StarKnob

28.731-06952 Trailshield

29.732-04631 HingeClip

31.720-0426 Knob

32.732-0984B RearLever

33.732-1014 TorsionSpring

34. 17032AChuteHinge

35.747-0710 HingePin

36.931-1034B HingedChuteDeflectorAss'y

37.631-04045 MulchingBaffle

38.687-02342 FrontPivotArm

39.741-04242 HeightAdjusterBearing

23

Craftsman Engine Model No. 126TO2-O795-B1 For Craftsman Mower Model No. 247.38528

[ 48SHORTBLOCK] 11058OPERATOR'SMANUALI I 1329 REPLACEMENT ENGINE I 1330 REPAIR MANUAL

S

718 @

306

684 ?

[sos e

615 _ 307

1095 VALVE GASKET SET

883 _

358 ENGINE GASKET SET

3_2o

lO_

24@

524

22 g

883

24

Craftsman Engine Model No. 126T02=0795=B1 For Craftsman Mower Model No. 247.38528

425

443 _'

968

163 _

188

883

883 _/

25

Craftsman Engine Model No. 126T02-0795-B1 For Craftsman Mower Model No. 247.38528

6s

55

1211

1036 EMISSIONS LABEL ]

1210

969I

689 0

921

456

s64597

604

304

305 (_

332

78

z4s

455

922

621

23

334

635 (_

851

26

Craftsman Engine Model No. 126T02=0795=B1 For Craftsman Mower Model No. 247.38528

697322 CylinderAssembly

2 399269 Kit-Bushing/Seal(MagnetoSide)

3o 299819s Seal-Oil(MagnetoSide)

4493279 Sump-Engine

5691160 Head-Cylinder

7o+ 692249 Gasket-CylinderHead

8695250 BreatherAssembly

9699472 Gasket-Breather

10691125 Screw(BreatherAssembly)

11691781 Tube-Breather

15691680 Plug-OilDrain

16691450 Crankshaft

20, 399781s SeaI-Oil(PTOSide)

22 691092 Screw(CrankcaseCover/Sump)

23691987 Flywheel

24222698s Key-Flywheel

25797302 PistonAssembly(Standard)

797303 PistonAssembly(.020"Oversize)

26797304 RingSet (Standard)

797305 RingSet (.020"Oversize)

27691588 Lock-PistonPin

28298909 Pin-Piston

Rod-Connecting

32 691664 Screw(ConnectingRod) (Short)

32A 695759 Screw(ConnectingRod) (Long)

33262651s Valve-Exhaust

34262652s Valve-Intake

35691270 Spring-Valve(Intake)

36691270 Spring-Valve(Exhaust)

37793756 Guard-Flywheel

40 692194 Keeper-Valve

43 691997 Slinger-Governor/Oil

45690548 Tappet-Valve

46691449 Camshaft

48 792741 ShortBlock

50 794305 Manifold-Intake

51_ 794306 Gasket-Intake

54691650 Screw(IntakeManifold)

55691421 Housing-RewindStarter

58697316 Rope-Starter

60281434s Grip-StarterRope

65690837 Screw(RewindStarter)

78 691108 Screw(FlywheelGuard)

81 691740 Lock-MufflerScrew

97 696565 Shaft-Throttle

1040 691242 Pin-FloatHinge

108 795935 Valve-Choke

27

Craftsman Engine Model No. 126T02=0795=B1 For Craftsman Mower Model No. 247.38528

28

Craftsman Engine Model No. 126T02=0795=B1 For Craftsman Mower Model No. 247.38528

869691155 Seat-Valve(Intake)

870690380 Seat-Valve(Exhaust)

871262001 Bushing-ValveGuide(Exhaust)

63709 Bushing-ValveGuide(Intake)

Cap-FuelTank

966 795259 Base-AirCleanerBase

968692298 Cover-AirCleaner

969690700 Screw(BlowerHousingCover)

972699374 Tank-Fuel

975796611 Bowl-Float

976694395 Primer-Carburetor

1036Label-Emissions(Availablefroma Briggs&

StrattonAuthorizedDealer)

1058 277039 Operator'sManual

1059 692311 Kit-Screw/Washer(FuelTank)

1095 498528 GasketSet-Valve

1210 498144 Pulby/SpringAssembly(Pulley)

1211 498144 Pulby/SpringAssembly(Spring)

1329 126T02- ReplacementEngine

0625-F1

1330 270962 RepairManual

1386 790848 Vane-Air

1387 790849 Spring-AirVane

1388 790850 Screw(AirVane)

EngineGasketSet ReferenceNumber358

OCarburetorOverhaulKit ReferenceNumber121

+ValveGasketSetReferenceNumber1095

29

(Thispageapplicableinthe U.S.A.and Canadaonly.)

Sears, Roebuck and Co., U.S.A. (Sears), the California Air Resources Board (CARD)

and the United States Environmental Protection Agency (U.S. EPA)

Emission Control System Warranty Statement (Owner's Defect Warranty Rights and Obligations)

EMISSIONCONTROLWARRANTYCOVERAGEISAPPLICABLETOCERTI-

FIEDENGINESPURCHASEDIN CALIFORNIAIN 1995ANDTHEREAF-

TER,WHICHARE USEDINCALIFORNIA,ANDTOCERTIFIEDMODEL California and United States Emission

The CaliforniaAir ResourcesBoard(CARD),U.S.EPAand Searsare pleased to explainthe EmissionControlSystemWarrantyon your modelyear2000and latersmalloff-roadengine(SORE).In California,newsmall off-roadengines mustbe designed,builtand equippedto meettheState'sstringentanti-smog standards.Elsewherein theUnitedStates, newnon-road,spark-ignition enginescertifiedfor modelyear 1997and latermustmeetsimilarstandardsset forth bythe U.S.EPA.Sears mustwarranttheemissioncontrol systemon your

YEAR 1997AND LATERENGINESWHICHARE PURCHASEDAND USED

ELSEWHEREIN THE UNITEDSTATES(ANDAFTERJANUARY1,2001 IN CANADA).

Control Defects Warranty Statement

enginefor theperiodsoftime listedbelow,providedtherehas been noabuse, neglector impropermaintenanceof your smalloff-roadengine.Youremis- sion controlsystemincludespartssuch as thecarburetor,air cleaner,ignition system,mufflerand catalyticconverter.Also includedmaybe connectorsand otheremissionrelatedassembliesWherea. warrantableconditionexists,Sears will repairyour smalloff-roadengineat no costto you includingdiagnosis,parts and labor.

Sears Emission Control Defects Warranty Coverage

Smalloff-roadenginesarewarrantedrelativeto emissioncontrol partsdefects fora periodof one year,subjectto provisionsset forth below.Ifany covered

Owner's Warranty

Asthe smalloff-roadengine owner,you are responsiblefor theperformanceof therequiredmaintenancelistedin yourOperatingand MaintenanceInstruc- tions.Searsrecommendsthatyou retain all yourreceiptscoveringmaintenance on yoursmalloff-roadengine,butSears cannotdenywarrantysolelyfor the lackof receiptsorfor yourfailureto ensuretheperformanceof all scheduled maintenanceAs. the smalloff-roadengineowner,you shouldhoweverbe awarethat Searsmaydenyyou warrantycoverageif your smalloff-roadengine ora part hasfaileddueto abuse,neglect,impropermaintenanceor unap-

parton yourengineis defective,the part willbe repairedorreplacedbySears.

Responsibilities

provedmodifications.Youare responsiblefor presentingyour smalloff-road engineto an AuthorizedSearsServiceDealeras soonas a problemexists.The undisputedwarrantyrepairsshouldbe completedina reasonableamountof time,notto exceed30 days. Ifyou haveany questionsregardingyourwarranty rightsand responsibilities,you shouldcontacta SearsService Representative at 1-800-469-4663The. emissionwarrantyis a defectswarranty.Defectsare judged on normalengineperformance.Thewarrantyis notrelatedto an in-use emissiontest.

Sears Emission Control Defects Warranty Provisions

ThefollowingarespecificprovisionsrelativetoyourEmissionControlDefectsWarrantyCoverageItisinadditiontotheSearsenginewarrantyfornon.-regulated

Inthe USAandCanada,a 24 hour hotline, 1-800-469-4663,has a menu of pre-recordedmessagesofferingyou enginemaintenanceinformation. GDOC-100188Rev.A

30

Look For Relevant Emissions Durability Period and

Air index information On Your Engine Emissions Label

Engines that are certified to meet the California Air Resources Board (CARB) Tier 2 Emission Standards must display information regarding the Emissions Durability Period and the Air Index. Sears, Roebuck and Co., U.S.A. makes this information available to the consumer on our emission labels.

The Emissions Durability Period describes the number of hours of actual running time for which the engine is certified to be emissions compliant, assuming proper maintenance in accordance with the Operating & Mainte- nance Instructions. The following categories are used:

For example, a typical walk-behind lawn mower is used 20 to 25 hours per year. Therefore, the Emissions Durability Period of an engine with an intermediate rating would equate to 10 to 12 years.

The Air Index is a calculated number describing the relative level of emissions for a specific engine family. The lower the Air Index, the cleaner the engine. This information is displayed in graphical form on the emissions label.

After July 1,2000, Look For Emissions Compliance Period

On Engine Emissions Compliance Label

After July 1, 2000 certain Sears, Roebuck and Co., U.S.A. engines will be certified to meet the United States Environmental Protection Agency (USEPA) Phase 2 emission standards. For Phase 2 certified engines, the Emis- sions Compliance Period referred to on the Emissions Compliance label indicates the number of operating hours for which the engine has been shown to meet Federal emission requirements.

For engines less than 225 cc displacement, Category C = 125 hours, B = 250 hours and A = 500 hours.

For engines of 225 cc or more, Category C = 250 hours, B = 500 hours and A = 1000 hours.

This is a generic representation of the emission label typically found on a certified engine.

FAMILYYBSXS.3192VA 274812

GDOC-100182RevA.

31

Congratulationson makinga smartpurchase.YournewCraftsman@ productis designedandmanufacturedfor yearsof dependableopera- tion. But likeall products,it mayrequirerepairfromtimeto time.That's whenhavinga RepairProtectionAgreementcansaveyoumoneyand aggravation.

Here'swhatthe RepairProtectionAgreement*includes:

* Expert service byour 10,000professionalrepairspecialists

oUnlimitedserviceand no chargefor partsand laboron all coveredrepairs

oProduct replacementupto $1500if yourcoveredproductcan'tbe fixed

???Discountof 10%from regularprice of serviceand relatedinstalled partsnotcoveredby theagreement;also,10%off regularpriceof preventivemaintenancecheck

???Fast help by phone- we call it RapidResolution- phonesupport froma SearsrepresentativeThinkof. usas a "talkingowner's manual."

Onceyou purchasethe Agreement,a simplephonecall is all thatit takesfor youto scheduleservice.Youcan call anytimedayor night,or schedulea serviceappointmentonline.

The RepairProtectionAgreementis a risk-freepurchase.If youcancel for any reasonduringthe productwarrantyperiod,wewill provideafull refund.Or,a proratedrefundanytimeafterthe productwarrantyperiod expires.Purchaseyour RepairProtectionAgreementtoday!

Somelimitationsand exclusionsapply. For pricesand additional informationin the U.S.A. call 1-800-827-6655.

*Coverage in Canadavaries on some items. Forfull details call Sears Canadaat 1-800-361-6665.

Sears Installation Service

ForSearsprofessionalinstallationof homeappliances,garagedoor openers,waterheaters,andothermajorhomeitems,in the U.S.A.or Canadacall 1-800-4-MY-HOME??.

32

Garantia integro de Craftsman

SiesteproductoCraftsmanfalla debidoa undefectoen los materialeso la manodeobradentrodelos dos a_osde lafechade compra,sirvase devolverloa cualquiertiendaSears,Centrode servicioSears,uotro puntodeventaCraftsmanen los EstadosUnidosparasu reparaci6nsin cargo(o reemplazosi la reparaci6ndemuestraimposible).

Estagaranfias61otendr_validezdurante90 dias si esteproductose utilizaen cualquiermomentoparafinescomercialeso de alquiler. Esta garantiacubreSOLOdefectos en matedal y habilidad.Sears no pagar_para:

???Articulosde duraci6nlimitadaquepuedendesgastarsebajocondicionesnormalesdeuso duranteel periododegarantia,talescomo cuchillasdecortadorarotativas,adaptadoresdelamisma,correas,filtrosdeaire,y bujiasdeencendido.

???Las reparacionesrequeridasdebidoa abusoo negligenciadeloperador,incluiyendoabolladurasdel cig(Je_aly nooperaro mantenerel equipodeacuerdoconlas instruccionessuministradas.

???Mantenimientopreventivoo reparacionesnecesariasdebidoa mezcladecombustibleimpropia,combustiblecontaminadoo a_ejo.

Estagarantialeotorgaderechoslegalesespecificos,peroustedpodriagozarde otrosderechosen raz6nde su lugarde residencia. Sears, Roebuck and Co., HoffmanEstates, IL 60179

NSrnerode modelo ..........................................................

N_mero de serie ..............................................................

Fechade compra .............................................................

RegistreelnQmerode modelo,nQmerode seriey fechade compra m&sarriba.

Lapresenciade estesirnboloindicaque setratade instrucciones irnportantesde seguridadquese debenrespetarparaevitar ponerenpeligrosu seguridadpersonaly/o materialy lade otras personas.Leay sigatodaslasinstruccionesdeestemanualantes de poneren funcionarnientoestarn_.quinaSi. no respetaestas instruccionespodriaprovocarlesionespersonales.Cuandoveaeste sirnbolo,ipresteatenci6na la advertencia!

PROPOSICION 65 DE CALIFORNIA

Elescapedel motorde esteproducto,algunosdesuscornponentes y algunoscornponentesdelvehiculocontieneno liberansustancias quirnicasqueelestadode Californiaconsideraque puedenproducir c_.ncer,defectosde nacirnientouotrosproblernasreproductivos.

Losbornesdela bateriay losaccesoriosdines contienenplornoy cornpuestosde plorno,sustanciasqdrnicas quesegOnIoestableci- do pot el EstadodeCaliforniacausanc_.ncery da_osenel sisterna reproductivo.Ldveselas manos despu_sde estar en contacto con estoscomponentes.

Estarn_.quinarueconstruidaparaseroperadadeacuerdocon las reglasde seguridadcontenidasenestemanual.AI igualque concualquiertipo deequipornotorizado,undescuidoo errorpor partedeloperadorpuedeproducirlesionesgraves.Estarn_.quina es capazde arnputarrnanosy piesy dearrojarobjetoscon gran fuerza.De norespetarlas instruccionesde seguridadsiguientesse puedenproducirlesionesgraveso la rnuerte.

Su responsabilidad--Restrinja el usode estarn_.quina rnotorizadaa las personasque lean,cornprendany respetenlas advertenciase instruccionesqueaparecenenestemanualy en la rn_.quina.

iGUARDEESTASINSTRUCCIONES!

FUNCIONAIVIIENTO

Funcionarnientogeneral:

???Leay siga todaslas instruccionescontenidasen estemanual antesde intentarensarnblarestarn_.quinaLea,cornprenday. sigatodaslas instruccionesque figuranen la rn_.quinayen el o los rnanualesantesde intentaroperarla.Farniliaricesecornpleta- rnentecon loscontrolesy conel uso apropiadodeestarn_.quina antesde operarla.Guardeestemanualenun lugarseguropara referenciasfuturasy regulatesy parasolicitarrepuestos.

???Estarn_.quinaes unapiezade equipode precisi6n,no unjuguete. Portanto,tengala maximaprecauci6nen todornornento.Su unidadha sidodise_adapararealizarunatarea:cortarel c_sped. No la utilicecon ningOnottoprop6sito.

???No perrnitanuncaque losni_os rnenoresde 14a_osoperenesta rn_.quinaLos. ni_osde 14a_osy rn_.sdebenleery cornprender las instruccionescontenidasenestemanualy debenser capacitadosy supervisadospor unode los padres.Onicarnente los individuosresponsablesque se hayanfarniliarizadocon estasreglasdeseguridadparalaoperaci6ndeber_.nusaresta rn_.quina.

???Inspeccionerninuciosarnenteel _.reaendondeutilizar_el, equipo. Saquetodaslas piedras,palos,cables,huesos,juguetesy otros objetosextra_oscon los quepodriatropezaro quepodrianser arrojadosporla cuchilla.Losobjetosarrojadosporla rn_.quina puedenproducirlesionesgraves.Planifiqueel patr6nen elque va a ir descargandoel recorteparaevitarquela descargade materialse realicehacialoscarninos,las veredas,losobserva- dotes,etc. Eviteadern_.descargarmaterialcontralas paredesy obstruccionesquepodrianprovocarqueel materialdescargado rebotecontrael operador.

???Paraayudara evitarel contactocon lacuchillao unalesi6npor un objetoarrojado,rnant_ngaseen lazonadeloperadordetr_.s de las rnanijasy rnantengaa los ni_os,observadores,ayudantes y rnascotasapartadosal rnenos25 metrosde la podadora rnientrasest,. en operaci6n.Detengala rn_.quinasi alguienentra en lazona.

???Paraprotegerselosojos utilicesiernpreanteojoso antiparras de seguridadrnientrasoperala rn_.quinao rnientrasla ajusta o repara.Losobjetosarrojadosquerebotanpuedenlesionar gravernentelavista.

???Utilicezapatosde trabajoresistentes,desuelafuertey panta- Ionesy carnisasajustados.Se recorniendautilizarcarnisasy pantalonesquecubranlos brazosy las piernas,asi cornocalzado con puntasreforzadasen acero.Nuncaopereesta rn_.quinacon los pies desnudos,sandalias,o conzapatosligeroso con losque se puedaresbalar(porejernplo,calzadode Iona).

???Nopongalas rnanoso los piescercade las piezasrotatoriaso en latolvade lacortadora.Elcontactocon las cuchillaspuede producirlaarnputaci6nde rnanosy pies.

34

???Unacubiertade descargafaltanteo da_adapuedeprovocarel contactocon la cuchillao lesionesporobjetosarrojados. Muchaslesionesocurrencornoresultadode pasarlacortadora sobrelos piesduranteunacaida provocadaporderrapeso tropiezos.No se sostengade la podadorasi se est,. cayendo, sueltela rnanijainmediatarnente.

Nuncatire haciaustedlapodadorarnientrascarnina.Sidebe retrocederla podadoraparaevitarunaparedu obst_.culo,mire prirneroabajoy atr_.sparaevitartropezarsey luegosigaestos pasos:

1.Retrocedade la podadorahastaestirarcornpletarnentesus brazos.

2.AsegOresequeest,. bienequilibradoy bienparado.

3.Tirede la podadoralentarnentehaciausted,norn_.sall_.de la rnitadde ladistanciaentreustedy lapodadora.

4.Repitaestospasoscornose requiera.

???No opereestarn_.quinaestandobajolosefectosdelalcoholo de drogas.

???No ernbragueel mecanisrnode autopropulsi6nen unidadescon esteequipornientrasarrancael motor.

???Elrnecanisrnodecontroldela cuchillaes undispositivode seguridad.Nuncaintentedesviarsede su funcionarnientoDe. hacerlono funcionarianlos dispositivosde seguridady podrian producirselesionespersonalesporel contactocon lascuchillas giratorias.Lasrnanijasdecontrolde lacuchilladebenfuncionar bienenarnbasdireccionesy regresarautorn_.ticarnentela posici6ndedesengranecuandose las suelta.

???Nuncaoperelapodadoraen c_spedhOrnedoSiernpreest._ segurode su equilibrio.Si tropiezay cae puedelesionarse gravernenteSisienteque. pierdeelequilibrio,suelteinrnediata- rnentela rnanijade controlde lacuchillay lacuchilladejar_de, girarentressegundos.

???Corteel cespedsolarnentecon luz dedia o con unabuenaluz artificial.Carnine,nuncacorra.

???Detengala cuchillacuandocrucecarninosde gravilla,pasoso andadores.

???Si larn_.quinacornenzaraa vibrarde rnaneraanorrnal,detenga el motor,y busqueinrnediatarnentelacausa.Lavibraci6nporIo generales unaadvertenciadealgQnproblerna.

???Apagueelmotory esperehastaquela cuchillase detenga cornpletarnenteantesde retirarla guardaparael recortede cespedo desatorarlatolva. LacuchillacontinOagirandopor unoscuantossegundosdespu_squeel motorse haapagado. Nuncacoloqueningunapartedel cuerpoen el _.reade lacuchilla hastaqueest_ seguroquelacuchillahadetenidosu rnovirniento rotatorio.

Nuncaoperela cortadorasin las guardasapropiadas,cubiertade descarga,guardapararecorte,rnanijadecontroldela cuchilla

y otrosdispositivosde seguridady protecci6nensu lugary funcionando.Nuncaoperelacortadorasi los dispositivosde

seguridadest_.nda_ados.Si noIo hace,estopuedetenetcorno resultadolesiones.

???Elsilenciadory el motorse calientany puedenproducirquerna- duras. Nolos toque.

???Utilicesolarnentepartesy accesoriosfabricadosespecialrnente paraestarn_.quina,originalesdelfabricante(OEM). Sino Io hace,estopuedetenercornoresultadolesionespersonales.

???Paraencenderel motor,jale dela cuerdalentarnentehastaque sientaresistencia,luegojale r@idarnente.Elreplieguer@idode lacuerdadearranque(tensi6nde retroceso)lejalar_,larnanoy el brazohaciael motorrn_.sr@idode Ioque ustedpuedesoltar. Elresultadopuedenser huesosrotos,fracturas,hernatornaso

esguinces.

Sise presentansituacionesquenoest_.nprevistaseneste manualseacuidadosoy useel sentidocornQn.Contacto1-800- 659-5917parainforrnaci6ny asistencia.

DIENTES

Laspendientessonun factorirnportantequese relacionacon los accidentesproducidosporderrapesy caidasy quepuedenpro@@ lesionesgraves.La operaci6nen pendientesrequieremayorpre- cauci6n.Sino se sienteseguroen unapendiente,nola pode.Para seguridad,use el rnedidordependientesquese incluyecornopartede estemanualpararnedirla pendienteantesdeoperarlaunidaden una zonainclinada.Si lapendientesuperalos 15grados,nola pode. HagaIo siguiente:

???Muevala podadoraa travesde las carasde la pendiente,nunca haciaarribay abajo.Tengacuidadocuandocarnbiededirecci6n cuandooperela rn_.quinaenpendientes.

???Est_atentoa los agujeros,raices,rocas,objetosocultoso abultarnientosquepuedanprovocarque sederrapeo se tropiece. Elc_spedalto puedeocultarobst_.culos.

Siernpreest_ segurodesu equilibrio.Sitropiezay cae puede lesionarsegravernenteSi. sJentequepier@el equilibrio,suelte inrnediatarnentelarnanijadecontrolde lacuchillay lacuchilla dejar_,degirarentres(3) segundos.

No hagaIo siguiente:

???I/o corteel cespedcercade pozos,hundirnientos,bancos,podria perderel equilibrio.

???Nopodependientesrnayoresde 15gradoscornoIo indicael rnedidorde pendientes.

???Nopodeel cespedhOrnedoSi. noest,. firrnernenteparado,puede resbalarse.

35

N QOS

Puedenocurriraccidentestr_.gicossi eloperadornoest,. atentoa la presenciade ni_os.PorIogenerala los ni_osles atraenlas podadoras y la actividadde podarel c_sped.Noentiendenlos riesgosnilos peligros.Nuncad_ porsentadoquelos ni_osperrnanecer_.en el rnisrnolugardondelosvio por Oltirnavez.

???Mantengaa los ni_osfuera delAreadetrabajoy bajoestricta vigilanciade unadultoresponsableadern_.sdeloperador. Est_alerta y apaguela podadorasi un ni_oingresaalArea. Antesy rnientasse est,. rnoviendohaciaatr_.s,mirehaciaatr_.sy cuidequeno hayani_os. Tengaextrernaprecauci6ncuandoseaproxirnea esquinas ciegas,entradasdepuertas,_.rbolesu otrosobjetosque puedan obstaculizarlelavista deun ni_oque pudiesecorrerhaciala podadora.

Mantengaalejadosa los ni_osdelos rnotoresenrnarchao calientes.Puedensufrirquernadurascon un silenciadorcaliente.

Nuncaperrnitaqueni_osrnenoresde 14a_osoperenesta rn_.quinaLos. ni_osrnayoresde 14a_osdebenleery entender las instruccionesde operaci6ny reglasdeseguridadcontenidas enestemanualy debenser entrenadosy supervisadospor sus padres.

SERVIClO

Manejo segurode la gasolina:

???Paraevitarlesionespersonaleso daSosrnaterialessea surnarnentecuidadosoal rnanipularlagasolina.Lagasolinaes altarnenteinflarnabley losvaporesson explosivos.Sepuede lesionargravernentesi derrarnagasolinasobreustedo sobrela ropaya quese puedeencender.

???Utilices61orecipientesparagasolinaautorizados.

???NuncaIlenelos contenedoresenel interiordeunvehiculo ocarni6nocaja decarnionetacon recubrirnientospl_.sticos. Coloquesiernprelos recipientesenel pisoy lejosdelvehiculo antesde Ilenarlos.

???Retireel equipoa gasolinadelcarni6no rernolquey II_neloen el piso.Si estonoes posible,entoncesIlenedichoequipoenun rernolquecon un recipienteport_.til,en vezdedesdeundispen- sadordegasolina.

???Mantengala boquillade Ilenadoencontactocon elhordedela entradadeltanquede gasolinaocontenedoren todornornento hastaqueest_ Ileno.No utiliceundispositivoparaabrir/cerrarla boquilla.

???Apaguetodoslos cigarrillos,cigarros,pipasy otrasfuentesde cornbusti6n.

???Nuncacarguecombustibleen larn_.quinaen interioresporque Losvaporesinflarnablespodrianacurnularseen el _.rea.

Nuncasaquelatapadel gasni agreguecombustiblernientrasel motorest,. calienteo en rnarcha.Dejequeel motorse enfriepor Io rnenosdos rninutosantesde volvera cargarcombustible.

???Nuncarecargueel tanquedecombustible.Lleneel tanqueno rn_.sde 1 pulgadapor debajodela basedelcuellode Ilenado paradejarespacioparala expansi6ndelcombustible.

???Vuelvaa colocarlatapade la gasolinay ajOstelabien.

???Lirnpiela gasolinaderrarnadasobreel motory el equipo.Traslade la rn_.quina otrazona. Espere5 rninutosantesde encenderel motor.

???Nuncaalrnacenela rn_.quinao el recipientede combustibleen unespaciocerradodondehayafuego,chispaso aparatoscon pilotocornoporejernplo,calentadoresde agua,calentadores, hornos,secadoresde ropau otrosaparatosagas.

???Parareducirel riesgode incendiornantengala rn_.quinalirnpia de pasto,hojasy deacurnulaci6nde otrosescornbros.Lirnpielos derrarnesde aceiteo combustibley saquetodoslosdesechos ernbebidoscon combustible.

???Dejeque la rn_.quinase enfrie5 rninutospor Iornenosantesde alrnacenarla.

Funcionamientogenerah

???Nuncaenciendaunmotoren espacioscerradoso en unazona con pocaventilaci6n.Elescapedel motorcontienernon6xidode carbono,ungas inodoroy letal.

???Antesde lirnpiar,repararo inspeccionarlarn_.quina,cornpruebe que lacuchillay todaslas partesquese rnuevense handetenido. Desconecteel cablede la bujiay p6ngalode rnaneraque haga

rnasacontrael motorparaevitarquese enciendade rnanera accidental.

???Reviselos pernosde rnontajede lacuchillay delmotora intervalosfrecuentesparaverificarqueest_nbienapretados. Inspeccioneadern_.visualrnentela cuchillaenbuscade daSos (abolladuras,desgaste,roturas,etc.). Reernplacelacuchillacon equipooriginaldel fabricante(OEM)listadoenestemanual.La utilizaci6nde partesquenocurnplancon lasespecificacionesde equiposoriginalespodriatenetcornoresultadoun rendirniento incorrectoy adern_.sla seguridadpodriaestarcornprornetida.

???Lascuchillasde las podadorasson rnuyafiladasy podrian

cortarlo.Envuelvalacuchillao utiliceguantesy extremeprecau- clonescuandole de servicio.

???Mantengatodoslos pernos,tuercasy tornillosbienajustados paraasegurarseque la rn_.quinaseencuentraen condiciones segurasdeoperaci6n.

???Nuncarnanipulelosdispositivosde seguridaddernanera

irnprudente.Controleperi6dicarnentequefuncionendeforrna

adecuada.

36

???Despu_sdegolpearcon algOnobjetoextrafio,detengael motor, desconecteelcablede la bujfay conecteel motora rnasa. Inspeccionerninuciosarnentela rn_.quinaparadeterrninarsi est,. dafiada. Repareel dafio antesdeencenderlay operarla.

???Nuncatratedeajustaruna ruedao laalturade corternientrasel motorest,. en rnarcha.

???Loscornponentesde latolvapararecorte,cubiertade descargay escudode riel,est_.nsujetosa desgastey dafiosquepodriadejar expuestaspartesquese rnueveno perrnitirquese arrojenobje- tos. Paraprotegersu seguridad,verifiquefrecuenternentetodos los cornponentesy reernpl_.celoss61ocon partesde losfabri- cantesde equiposoriginales(O.E.M.)listadasenestemanual. La utilizaci6nde partesquenocurnplancon las especificaciones deequiposoriginalespodriatenercornoresultadoun rendirniento incorrectoy adern_.sla seguridadpodriaestarcomprornetida.

???No carnbielaconfiguraci6ndel reguladordelmotorni acelere dernasiadoelrnisrno.Elreguladorcontrolalavelocidadrn_.xirna segurade operaci6ndel motor.

???Verifiquefrecuenternentela Ifneadecombustible,eltanque,el tap6n,y losaccesoriosbuscandorajaduraso perdidas.Reern- placedeset necesario.

???No d_ arranqueal motorsi noest,. la bujfadeencendido.

???Mantengao reernpiace[asetiquetasde seguridad,segOnsea necesario.

???Observelasleyesy norrnasaplicablesparadisponeradecu- adarnentedelos desechos.Ladescargainapropiadadeliquidos o rnaterialespuededafiar e[ medicarnbiente.

???SegOnla Cornisi6nde Seguridadde Productosparael Consu- rnidordelos EstadosUnidos(CPSC)y laAgenciade Protecci6n Arnbientalde los EstadosUnidos(EPA),esteproductotiene una vidadtil media desiete(7)afios, 6 140horasdefuncionarniento. AI finaiizar[avida dtilmedia, adquieraunarn_.quinanuevao hagainspeccionaranualrnente_staSearsporunou otrodis- tribuidorde serviciosparacerciorarsedequetodoslos sisternas rnec_.nicosy de seguridadfuncionancorrectarnentey no tienen excesivodesgaste.Si no1ohace,puedenproducirseaccidentes, [esionesornuerte.

NO MODIFIQUE EL MOTOR

Paraevitarlesionesgraveso larnuerte,nornodifiqueel motorbajo ningunacircunstancia.Si carnbiala configuraci6ndel reguladorde[ motorelmotorpuededescontrolarsey operara velocidadesinsegu- ras. Nuncacarnbielaconfiguraci6ndef_.bricadelreguladordel motor.

AVISO REFERIDO A EMISIONES

Losrnotoresqueest&ncertificadosy curnplencon las regulaciones de ernisionesfederalesEPAy de CaliforniaparaSORE(Equipos pequefiostodoterreno)est_.ncertificadosparaoperarcon gasolina cornOnsinplornoy puedenincluirlossiguientessisternasde control de ernisiones:Modificaci6ndemotor(EM) y catalizadorde tresvias (TWO)si est_.nequipadosde esa rnanera.

GUARDACHISPAS

Estarn&quinaest,. equipadacon unmotorde cornbusti6ninternay nodebeser utiiizadaen o cercade unterrenoagrestecubiertopor bosque,rnalezaso hierbaexceptosi el sisternade escapedelmotor est,. equipadocon unarnortiguadorde chispasquecurnplaconlas [eyeslocaleso estataiescorrespondientes,encasodehaberlas.

Sise utiiizaun arnortiguadordechispasel operadorIo debernantener en condicionesde usoadecuadas.Enel Estadode California[as

rnedidasanteriorrnenternencionadassonexigidasporley (Arficulo 4442del C6digode RecursosPOblicosde California).Es posible queexistanleyessirnilaresenotrosestados.Lasleyesfederalesse aplicanenterritoriosfederaies. Puedeconseguirelarnortiguadorde chispasparael silenciadora travesde sudistribuidorautorizadode rnotoreso poni_ndoseen contactocon elcentrode servicioSears.

37

SilVIBOLOS DE SEGURIDAD

Estap&ginarepresentay describelaseguridadlos simbolosquepuedenpareceren esteproducto.Lea,comprenda,y sigatodas instrucciones en lam_quinaantesprocurarparareuniry operar.

Quite objetos que pueden ser lanzados por la I_imina en cualquier direcci6n. Lleve gafas de seguridad.

PELIGRO-- CUESTAS

Use extra la precauci6n en cuestas. No siegue cuestas mayores que 15 o

ADVERTENCIA DESPIDA

Para reducir el riesgo de incendio mantenga la m_iquina limpia de pasto, hojas y de acumulaci6n de otros escombros.

ADVERTENCIA VAPORES TOXICOS

Nunca encienda un motor en espacios cerrados o en una zona con poca ventilaci6n. Elescape del motor contiene mon6xido de carbono, un gas inodoro y letal.

ADVERTENCIA-- SUPERFICIE CALIENTE

Las partes del motor, especialmente el silenciador, Ilega a set muy caliente durante la operaci6n.

Permita motor y silenciador para ponerse frio antes de tocar.

38

Mireymantenc3aestenive[conun_rbo[vertical

Use esta pagina como guia para determinar en qu_ pendientes no puede operar eI tractor de manera segura.

Nooperelacortadoradec_speden dichaspendientes.No corteen inclinacionesmayoresde 15grados(elevaci6naproximadade 2 1/2 piespercada 10pies).Operelas podadorasQUESE EMPUJANde maneraquecrucenel frentede las pendientes,nuncahaciaarribay haciaabajo.

APERTURA DE LA CAJA DE CARTON

1.Corte cada una de ias esquinas de la caja verticaimente, de la parte superior a la base.

2.Saque todas las piezassueltas.

3.Quite el material de empaque suelto.

C6MO SACAR LA UNIDAD DE LA CAJA

1.Elevelaunidaddesdela parteposteriorparasepararladelmaterial deiacajaquequededebajoy hagarodaria unidadfuerade iacaja.

2.Verifiquecuidadosamentesi enlacajaquedaaigunapartesuelta.

J

UnoTolvadeAbono

Aceitedelmotor

???Manualde Operador

MONTAJE

Parael ernbarque,eldeflectordel canalensu podadorase rnantiene f en posici6nverticalmedianteuna retenci6n.Quitela retenci6ncorno sigue:

1.Empujeel deflectordecanal haciaarribahaciael motor. Mantengael deflectoren estaposici6nmientrasquitala retenci6n y la desecha.Veala Figura1.

2.Bajecuidadosamenteeldeflectorde canalmanteniendosus dedosfueradelalcance.

Montaje de la manija

1.Realicela secuenciaa continuaci6nparaajustarlamanija:

NOTE:Supodadoraseenvfacon la rnanijaen la posici6nelevada. A. Levantela manijasuperiordesde su posici6nplegaday tire

de lamismahastala posici6nextendidasiguiendolafiecha en laFigura2. Lamanijadebehacercliccuandoest_ en su posici6n.

B. AsegQresedequeel bul6nde carroest_ apropiadamente asentadoen lamanija.Aprietelastuercasde rnariposapara

sujetarla manijasuperiora la manijainferior.

J

Figura2

40

2.Si estasatisfecho con laaltura de lamanija, apriete lastuercas de marl posa en los extremes de la manijainferior mostradosen la Figura3. Para comodidadde laoperaci6n, puedeajustar la altura de la manija come sigue:

NOTA: Cada extrerno de la manija superior debe ser colocado en la misma posicidn relativa.

4.Inserte los pasadoresde ias uniones de cables dentro de Los orificios de la manija inferior.Tire de las uniones del cable apreta.ndolasy recortando el exceso. Vea la Figura 5.

J

Figure4

f

(

J

Figure5

41

Cone??i6n de la Tolva de Abono

Su cortadora de cesped se suministra para la operacidn de descarga lateral. Para convertir el cortacesped a la operaci6n mulching, siga el orden indicado aqui:

1.Levante y sostenga el deflector del lade de la descarga e inserte el labio inferior de la tolva de abono dentro de la apertura del canal. Vea la Figura 6.

2.Una los ganchos de ia tolva de abono sobre el pasador del deflector de canal. Los ganchos deben ajustarse en su lugar en el pasador de bisagra, sujetando la tolva de abono firmemente en la podadora. Suelte el deflector de canal.

AJUSTES

Ajuste de la altura de corte

Una placade ajuste y una palanca en cada rueda proporcionan el ajuste de la altura de corte. Vea la Figura 7.

1.Presione la palanca hacia la rueda.

2.Mu_vala a cualquier de las posiciones para la altura de corte deseado.

3.Libere la palanca hacia la cubierta de la podadora.

IMPORTANTE: Todas las ruedas deben set colocadas en la misma posici6n relativa. Cuando ei terreno es agreste o irregular cambie ia palanca de ajuste de la aitura a una posici6n ma.salta. De esta manerase cuida ma.sel cesped.

Figura6

J

Figura7

42

f

Control de cuchilla

Arrancador

de retroceso

Tap6n de aceite/varUla

de medici6n del nivel

de aceite

! Palanca de

ajuste de altura

de corte (en cada rueda)

Tolva de abono .....................

Tap6n De Gasolina

\

Bujia de encendido

Cubierta de descarga lateral

,J

Figura 8

CONTROL DE LA CUCHILLA

El control de la cuchilla est,. unido a la manija superior. Presione la manija de control de la cuchilla contra la manija superior para operar la unidad. Suelte la manija de control de la cuchilla para detenerel motor y la cuchilla.

El control de ia cuchiiia es un dispositivo de seguridad. Nunca intente anular su funcionamiento.

ARRANCADOR DE RETROCESO

Elarrancadorde retrocesoesta.unidoa la manijasuperiorderecha.Para encenderla unidadcol6quesedetra.sde lamismay tirede lacuerdadel arrancadorde retroceso.

TAPON DE GASOLINA

Retireel tap6n de gasolina para agregar combustible ai tanque de combustible. Use gasolina limpia, nueva, regular,sin plomo con un octanaje minimo de 86.

PALANCA DE AJUSTE DE LA ALTURA DE

CORTE

Estas paiancas esta.nubicadas una en cada rueda y se usan para corregir la altura de corte. Las cuatro paiancas tienen que estar en la misma posici6n reiativa para asegurar un corte uniforme.

TOLVA DE ABONO

La tolva de abono permite usar los recortes del cesped como abono, regresa.ndolosa ia podadora. Conecte ia tolva para recortes siguiendo las instrucciones en la secci6n de Montaje de este manual.

TAPON DE ACEITE/VARILLA DE MEDICION

DEL NIVEL DE ACEITE

Consulte ia secci6n Mantenimiento para obtener instrucciones sobre c6mo verificar el aceite.

BUJiA DE ENCENDIDO

Consulte la secci6n Mantenimiento para obtener instrucciones sobre el cambio de bujias.

ESCUDO DE RUTA

Elescudo de ruta se adjunta a la parte trasera de ia ma.quinay esta. ahi para proteger al operador de escombrosque vuelan. No utilice el

cortacesped a menos que el escudo es totalmente funcional yen su hgar.

Curnple con las norrnas de seguridad de ANSI

Las cortadoras de c_sped Craftsman cumplen con las normas de seguridad del Instituto Estadounidense de Normas Nacionales (ANSi).

43

Aceite (se envia una botella junto con la unidad) Primer uso

1.Saque la varilla del nivel de aceite (G).

2.Con la cortadora de cesped ubicada en suelo nivelado, vierta el aceite bntamente pot dentro del tubo de Ilenadode aceite del motor

(H) hasta la marca de limite alto en la varilla medidora del nivel de aceite (J). Vea la Figura 9.

3.Vuelva a colocar la varilla de Ilenadode aceite y ajQstela.

Usos posteriores

Use aceite para motor de 4 tiempos que cumpla o sobrepase los requisitos para la clasificaci6n de servicio APi SK SG, SH, SJ o equivalente.

Compruebe siempre ia etiqueta de servicio API en el recipiente dei aceite para asegurarse que incluye las letras SK SG, SH, SJ o equivalente. Temperaturasai aire libre de determinar la viscosidad dei aceite correcto para el motor. Use la tabla para seleccionar la mejor viscosidad para el rango de temperatura ai aire libre se espera.

C '_'t?'p?:C: *'?" 4,10

-_22

*Pot debajo de 40 oF (4 oC) el uso de SAE 30 dara.lugar a duros de partida.

**Pot encima de 80 oF (27 o C) el uso de 10W-30 puede provocar un aumentodei consumo de petr61eo.Nivel de aceite con ma.sfrecuencia.

1.Revise el aceite con el motor parado y nivelado.

2.Quite ia tapa del dep6sito de aceite/varilla medidora del nivel de aceite y limpiela.

3.Coioque y ajuste la varilla indicadora. Luego quitela para revisar el nivel de aceite. Vea ia Figura 9.

4.Si el nivel de aceite esta.cerca o pot debajo de la marcade limite bajo de la varilla medidora del nivel de aceite, quite la tapa del dep6sito de aceite/varilia medidoradei nivei de aceite y iBnelo con

el aceite recomendado hasta la marca de limite superior. No Ilene de ma.s.

5.Vuelva a instalar la tapa/varilla medidora del nivel de aceite.

Gasolina

No utilice gasolinas no aprobados, tales como E85. No mezcle el aceite en ia gasolina o modificar el motor para funcionar con combustibles aiternativos. Esto dafiara,los componentes del motor y anular la garantia del motor.

De combustible debe cumplir estos requisitos:

,,Limpia, fresca, la gasolina sin piomo.

???Un minimo de 87 octane/87 AKI (91 RON).

Figura 9

,,La gasoiina con hasta un 10% de etanol (gasohoi) o hasta el 15% de MTBE (metil terbutil _ter) es aceptable.

Eche gasolina en un a.reabien ventiiada y con ei motor parado. Si el motor ha estado funcionando, deje que se enfrie primero. No eche gasolina a

la ma.quinaen ei interior de un edificio donde los vapores de la gasolina suedanestar ex uestos a al una llama o chis a.

La gasolina es aitamente inflamable y explosiva y usted puede quemars_ o iesionarse gravementeai reabastecer. Pare el motor y mantenga iejos

el calor, las chispas y las llamas. Reabastezcas61oai aire libre. Limpie inmediatamente los derrames.

Si va a usar ei equipo de forma intermitente o s61oocasionalmente, consulte ia secci6n de Aimacenamiento Fuera de Temporada para obtener ma.sinformaci6nsobre el deterioro del combustible.

NOTA: El combustible puede dafiar la pintura y aigunos tipos de plastico. Tenga cuidado de no derramar combustible cuando Ilena el tanque.

No use nunca gasolina rancia o contaminada ni mezclas de aceite y gaso- lina. No permita que entre suciedad o agua en el tanque de combustible.

1.Quite ia tapa dei tanque de combustible.

2.Agregue combustible hasta ia parte inferior del iimite de nivel de combustible en ei tubo del tanque. No iiene de ma.s.Limpieel combustible derramado antes de arrancar el motor.

3.Aprieteeltap6n firmemente.

4.Antes de arrancar el motor,aBjese al menos 3 metros del emplazamiento y la fuente de la gasolina.

AsegQresede que ninguna persona aparte dei operador permanezca cerca de ia cortadora mientras arranca el motor u opera la misma. Nunca encienda el motor en espacios cerrados o en una zona con poca ventilaci6n. El escape del motor contiene mon6xido de carbono, un gas inodoro y ietai. Mantenga ias manos, los pies, el cabello y la ropa suelta alejados de las partes m6viles del motor y de la cortadora.

44

PARA ENCENDER EL MOTOR

1.Coi6quese detra.sde la podadora, apriete ia manija de control de la cuchilla y sostengala contra la manija superior.

2.Sostenga firmemente las dos manijas juntas, tome la manija del arrancador de retroceso y tire de ia cuerda para sacarla con un movimiento r@ido y continuo. Vea la Figura 10. Mantenga firme la manija del arrancador, deje que la cuerda regrese lentamente al arrancador.Repita hasta que el motor este en marcha. Deje que la cuerda se enrosque lentamente de regreso.

De retracci6n r@ida del cord6n de arranque (soborno) tirara,de mano y el brazo haciael motor ma.sr@ido de Io que puede dejar ir. Las fracturas Ide huesos, fracturas, contus ones o esgu nces podria resu tar.

PARA DETENER EL MOTOR

1.Suelte la manija de control de la cuchilla para detener el motor y la cuchilla.

USO DE LA CORTADORA DE CESPED

Aseguresede que el cesped est& librede piedras,palos, cablesu otros objetos que pudiesendafiar la cortadorao el motor.Dichos objetos pueden set arrojadosaccidentalmentepot la cortadora en cualquier direcci6ny provocarlesionespersonalesgraves ai operadory a otras personas.

AI operar una cortadora de cesped es posible que objetos extrafios sean arrojados a los ojos, Io cual puede dafiarlos gravemente. Utilice siempre galas de seguridad durante la operaci6n de la cortadora de cesped o mientras la ajusta o repara.

USO COMO ABONADORA

Para abonar ei cesped, conecte la tolva para recortes siguiendo las instrucciones en la secci6n de Montaje y Configuraci6n. Para un abono eficiente, no corte cesped hQmedo.Si el cesped ha crecido ma.sde 10,2 cm. (4 pulg.) no se recomienda el uso de la podadora como abonadora. En ese caso, use el colector de cesped para embolsar los recortes.

Si golpea un objeto extrafio, detenga ei motor. Retire ei cable de ia bujia, inspeccione detenidamente la cortadora para vet que no tenga dafios, y repareel dafio antes de volver a encender y operar. El exceso de vibraci6n de la cortadora durante ia operaci6n es una indicaci6n de dafio. Se debe inspeccionar y reparar la unidad Ioantes posible.

45

PROGRAMA DE iVlANTENllVllENTO

Antesde realizarcuaiquiertipo de mantenimientoo servicio,desenganche todos loscontrolesy detengael motor.Esperea que sedetengancomple- tamentetodas laspiezasm6viles.Desconecteelcane de labujia y p6ngalo haciendomasacontrael motorpara evitarque se enciendaaccidentaimente.

Siga el cronograma de mantenimientoque se presenta a continuaci6n. Esta tabla s61odescribe pautas de servicio. Utiiice ia columna Registro de Servicio para hacer ei seguimientode las tareas de mantenimiento completadas. Para ubicar el Centro de Servieio Sears m_s cercano o

para programar un servieio, simplemente comun/quese con Sears al tel_fono 1-800-4-MY-HOME??.

estabilizador de un tanque Ileno de combustible nuevo antes de su aimace- namiento.

Limpiorn_.sa menudoen condicionespolvorientaso cuandolos escombrosaerotransportadosest_.npresentes.Sustituyaelfiltrode airede ser muysucio.

46

Detengasiempreelmotor,desconecteelcabledela bujiay hagamasa contraelmotorantesde reaiizarcuaiquiertareade mantenimientosu mfiquina.

RECONIENDACIONES GENERALES

???Respetesiemprelasreglasdeseguridadcuandorealicetareasde mantenimiento.

???Lagaranfiadeestacortadoranocubreelementosquehan estadosujetosalmalusoola negligenciadeloperadorPara. recibirel reembolsototaldelagarantia,eioperadordeberfidar mantenimientoai equipotai y comoseindicaenestemanual.

???Elcambiode lavelocidadcontroladadelmotorinvalidarfilagarantia deimotor.

???TodoslosajustesdebenserverificadospotIo menosunavezen cadaestaci6n.

???Reviseperi6dicamentetodoslossujetadoresy compruebequeesten bienajustados.

IVIANTENIMIENTO DEL MOTOR

Bujia de encendido

Paraunbuenfuncionamiento,labujiadebeestaradecuadamente abiertay librededep6sitos.Cambielabujiacada50horaso unavezpor temporadaReemplacela. bujiaanualmente.

1.Desconecteelcapuch6nde labujiay retirecualquiersuciedaddel fireadeesta.

2.UselaIlavedebujiasdeltama_oadecuadoparaextraerla.

NOTA:Reemplazarcon unaChampion??RC12YCbujia.

3.Compruebeel entrehierroconuncalibradordealambre.La separaci6ncorrectaes 0,030in.(0,76mm).VealaFigura11.Sies necesario,reajusteelentrehierro.

4.Instaiey apriete[abujiaa[ parde aprieterecomendadoParael. ajustedelentrehierroo el pardeapriete,consultela secci6nde Especificaciones.

5.Coloqueel capuch6ndela bujia.

Filtro de aire

Un filtrode airesuciorestringir&elfiujo deaireal carburadory causar& el funcionamientodefectuosodelmotor.Inspeccioneelfiltrocada vez queopereel motor.Necesitar_limpiarcon. m_.sfrecuenciaelfiltro si ustedoperael motoren _.reasmuypolvorientas. Limpioe[filtrodeaire cada25horasde laoperaci6no unavezpot temporadaReemplaceel. filtrodeaireanualmente.

Nuncaarranqueuopereel motorsi removi6elconjuntodelfiltrode aireo el filtrode aire.

NOTA:Nouse airea presi6nni solventesparalimpiarel filtro.Elairea presi6npuededaSarel filtroy los solventespuedendisolverlo.

1.Aflojarel tornilloy la inclinaci6nde laviviendacubiertade pl_.sticoen el ladodel motorhaciaabajo.VerFigura16.

2.Quiteelfiltrode airedela viviendacubiertadepl_.sticoy limpiaro sustituirconfiltronuevo.

f

Electrodo

J

Figura11

Figura12

3.Inserteaquicubiertaen las ranurasenla parteinferiorde la base.

4.Tilt cubrirensu lugary aprietelostornillos.

4.7

Comprobar el aceite del motor

Comprobar el nivel de aceite antes de cada operaci6n. Aseg_resede que el nivei de aceite se mantiene.

1.Revise el aceite con ei motor parade y nivelado.

2.Quite ia tapa del dep6sito de aceite/varilla medidora del nivel de aceite y limpiela.

3.Coloque y ajuste la varilla indicadora. Luego quitela para revisar el nivel de aceite.

4.Si el nivel de aceite esta.cerca o pot debajo de la marcade limite bajo de la varilla medidora del nivel de aceite, quite la tapa del dep6sito de aceite/varilia medidoradei nivei de aceite y ilenelo con el aceite recomendado hasta la marca de limite superior. No Ilene de ma.s.

5.Vueiva a instaiar la tapa/variiia medidora dei nivel de aceite.

Cambiar el aceite del motor

Lagasolinay susvaporessonextremadamenteinflamablesy explosivos.Unincendioo unaexplosi6npuedencausargraves _quemaduraso a rnuerte.

Cambieel aceitedelmotordespu_sdelas primerascinco horasde operaci6n,y cadacincuentahoraso unaveza latemporadadespu_s.

Si drenael aceitedesdeel tubosuperiorde Ilenadodeaceite,el tanquedecombustibledebeestarvado o deIo contrariopodria presentarseunafugade combustiblequepodriaocasionarun incendioo unaexplosi6n.Paradesocuparel tanquede combustible, opereel motorhastaquese detengapor lafaltadecombustible.

1.Con el motor apagado pero a[3ncaliente, desconecte el cable de la bujfa y mant_ngalo a distancia de la bujia.

2.Coloque un recipiente adecuadocerca del motor para recoger el aceite usado.

3.Quite la tapa/varilia medidora del nivel de aceite y drene el aceite al recipiente inclinando el motor hacia el tube de Ilenadodel aceite. Vea la Figura 13.

El aceite usadoes un residue peligroso.Elimineel aceite usado adecuadamente.No Io arroje juntocon los residuesdomiciliarios.Consulte a lasautoridades locales o al centrede servicioSears para averiguar d6nde hay instalacionespara la eliminaci6n/reciclaje segura(o)del aceite usado.

Tap6n de

de medici6n aceite/varilla

del nivel de

aceite

SUenciaclor

Figura13

4.Con ei motoren una posici6n nivelada, liene hasta ia marcade limite alto en la varilla medidora del nivel de aceite con el aceite

recomendado.

Ponerenrnarchael motorcon unnivelde aceitebajopuedecausar da_osen el motor.

5.Vueiva a instaiar bien la tapa/varilla medidora del nivel de aceite.

Limpie el motor

Diariamenteo antes de cada use, limpie el cesped, la grasa o los residuos acumuladosdel motor. Mantenga limpios el varillaje, los resortes y los controles. Mantenga ei a.reaque rodea al silenciador y detra.sdei mismo iibre de cualquier residue combustible.

El mantenimientodel motor en condiciones limpias permite el movimiento de aire alrededor del mismo.

Las partes dei motor se deben mantener limpias para reducir el riesgo de sobrecalentamiento y combusti6n de los residues acumulados.

No use agua para limpiar ias piezas dei motor. Elagua puede contaminar el sistema de combustible. Use un cepillo o un trapo seco.

48

LUBRICACION

Control de la cuchilla

Lubriquecon aceite ligero los puntos de pivote del control de la cuchilla al menos una vez cada estaci6n. Este controle debe funcionar libremente en

ambas direcciones. Vea la Figura 14.

Ruedas

Lubriqueias ruedas pot io menos una vez por temporada con aceite ligero o aceite para motor. Sin embargo, si las ruedas se quitan pot cuaiquier raz6n, debe lubricar ia superficie del brazo giratorio y la superficie interna de ia rueda con aceite iigero. Vea la Figura 14.

Deflector de Canal

Lubriqueel resorte de torsi6n y los puntos cruciales dei deflector dei canal con aceite ligero una vez por temporada para prevenir la oxidaci6n. Vet la Figura 14.

LIMPIEZA DE LA PLATAFORIVIA

3.Raspey iimpie ia parte inferior de la plataforma mediante el uso de una herramienta adecuada. No la rode con agua.

IMPORTANTE: No utilice una lavadora a presi6n o manguera de jardin para limpiar su unidad. Pueden producir daSosa los rodamientos o al motor. El uso de agua acortara,la vida _til de la ma.quinay reducira,su capacidad de servicio.

4.Vuelva a colocar la cortadora de cesped sobre sus ruedas en el suelo.

49

Cuando saque la cuchilla de corte para afilarla o reemplazarla, protejase las manos usando un par de guantes para trabajo rudo o un trapo gruesc para sostener la cuchilla.

Inspeccione peri6dicamente el adaptador de la cuchiiia en busca de rajaduras, especialmente cuando golpee un objeto extra_o. Realice los reemplazos que resulten necesarios. Siga los pasos que aparecen debajo para realizar el mantenimiento de la cuchilla.

1.Desconecte el capuch6n del cable de la bujia. Gire la cortadora de cesped sobre ei costado y compruebe que el filtro de aire y el carburador queden mirando haciaarriba.

2.Saque el perno y el soporte de campana de ia cuchiiia que sostienen la cuchilla y el adaptador de la misma al cigQe_aidel motor. Vea la Figura 15.

3.Saque la cuchilla y el adaptador del cigQe_ai.

NOTA: Quitando estos articulos, la arandela tambien pueden iiberarse de el cigQe_al.Este seguro para hacer la nota de laorientaci6n de este arficulo para nueva sesi6n.

4.Saque ia cuchilia del adaptador para comprobar el equilibrio. Balancee la cuchilla sobre un destornillador de eje redondo para inspeccionarla. Saque metal dei iado pesado hasta que quede bien equilibrada. Cuando afile la cuchilla, siga el a.ngulooriginal de la

muela como guia. Afile cada horde de corte pot igual para mantener el balance de la cuchilla.

Si ia cuchiiia esta.desequiiibrada generara,vibraciones excesivas cuandoI rote a aitas velocidades. Puede producir da_os a ia cortadora de cesped I

[y se puede romper, causando asi es ones persona es.j

5.Lubrique el cigQehaidei motor y ia superficie interna del adaptador de ia cuchilla con aceite iigero. Desliceel adaptador de la cuchilla sobre el cigQe_aldel motor. Instale ia cuchiiia en ei adaptador

con el lado marcado "Bottom" (inferior) (o con el numerode parte) hacia ei piso cuando ia cortadora de cesped esta.en posici6n

de funcionamiento.AsegQreseque la cuchilla quede aiineaday asentada en ias bridas del adaptador.

6.Coloque el soporte de campana de la cuchilla en ia misma. Aiinee las muescas del soporte de campana de la cuchilla con los orificios peque_osde la cuchilla.

7.Vuelva a colocar el pemo hexagonal y ajQstelosegQnlos siguientes

valores de torsi6n: 450 Ib-pulg como minimo, 600 Ib-pulg como ma.ximo.

Para garantizar ia operaci6n segura de la cortadora de cesped, revise periddicamente el perno de la cuchilla para determinar siesta, bien ajustado.

Ad

J

Figura15

5O

Nunca almacene la cortadora de cesped con combustible en el tanque en un espacio cerrado o en a.reascon poca ventilaci6n, donde los gases dei combustible puedan alcanzar el fuego, chispaso una luz pilotocomo ia que tienen algunos homos, calentadores de agua, secadores de ropa o aigQnotto dispositivo a gas.

PREPARACI6N DEL MOTOR

Yaquelos motoresalmacenaronm_.sde30 dfas:

1.Paraimpedira la gomaformarseenel sistemade combustible o en partesdecarburador,dirijasel motorhastaqueestose parea faltadelcombustibleoa_adirunaditivode gasolinaal gas enel tanque.Si ustedusa unaditivodegas,dirigeel motor durantevariosminutosparaponerencirculaci6nel aditivoporel carburador-- despu_squeel motory el combustiblepuedenser almacenadoshasta24 meses.

2.Mientrasel motores todavfacaliente,cambioel petr61eo.

3.Limpieel motordeescombrossuperficiales.

PREPARACI6N DE LA CORTADORA DE

CO'SPED

Limpie y iubrique la cortadora como se describe en las instrucciones de lubricaci6n.

???No utilice una lavadora a presi6n ni una manguera de jardfn para limpiar su unidad.

Cubra la cuchilla de la cortadora con grasa para chasis para impedir la oxidaci6n.

???Refierasea la PREPARACIONDEL MOTOR para instrucciones de almacenaje de motor correctas.

???Almacene la unidad en una zona limpia y seca. No la almacene cerca de materiales corrosivos como pot ejemplo fertilizantes.

Cuando almacene cuaiquier tipo de equipo motorizadoen un gaip6n de dep6sito met_.iicoo con poca ventilaci6n, tenga especial cuidado de realizarle un tratamiento antioxidanteal equipo. Use aceite ligero o

silicona para recubrir ei equipo, especialmente los cables y partes m6viles de su cortadora antes de aimacenarla.

51

Elmotor no arranca

Elmotor funciona de manera errfitica

Elmotorrecalienta

Saltosocasionales

(pausas)

1.Control de ia cuchilla desenganchado.

2.Se ha desconectado el capuch6n de la bujia.

3.El dep6sito de combustible estfi vacio o el combustible se ha echado a perder.

4.La bujia nofuncionacorrectamente.

5.El motorsedesbord6.

6.Linea de combustible bloqueada.

1.El cable de la bujia estfi flojo.

2.EIcombustiblees viejo.

3.La ventilaci6n en la tapa del combustible estfi obstruida.

4.Agua o suciedad en el sistema del combustible.

5, Elfiitrodeaireest,.sucio.

6.Lineadecombustiblebloqueada.

1.Elnivelde aceitedel motores bajo.

2.Flujodeaire restringido.

1.Ladistanciadisruptivade labujiaes muy pequefia.

1.Engraneel control de ia cuchiila.

2.Conecte el cable al capuch6n de la bujia.

3.Llene el tanque con gasolina limpia y nueva.

4.Limpie, ajuste la separaci6n, o cambie la bujia.

5.Esperar unos minutos parareactivarse.

6.Contacte con su centro de partes y reparaciones Sears.

1.Conecte y ajuste el cable de la bujia.

2.Llene el tanque con gasolina limpia y fresca.

3.Destapelaventilaci6n.

4.Opereel motorhastaque se detengaporla faltade combustible.Vuelvaa Ilenarloconcombustiblelimpio.

5.Refieraseaiasecci6nde mantenimientodemotor.

6.Contacteconsucentrodepartesy reparacionesSears.

1.Lleneel c_.rterconaceiteadecuado.

2.Retireel alojamientodel sopladory limpielo.

1.Ajustela distanciadisruptivaa0,76mm(0,03 pulg).

Funcionarealen marchalenta

Demasiadavibraci6n

La cortadora de

cesped no regresa

el recorte de cesped como abono

Corte desiguai

1.Bujiaatorada,averiadao excesodedistancia disruptiva.

2.Elfiltrodeaire est,. sucio.

1.Cuchilladecorteflojao descentrada.

2.Cuchillaabollada.

1.CespedhQmedo.

2.Cesped demasiadoalto.

3.La cuchiiia de ia cortadora no estfi afiiada.

1.La posici6n de las ruedas no es correcta.

2.La cuchiiia de ia cortadora no estfi afiiada.

1.Reajusteladistanciadisruptivaa 0,76ram(0,03)o reemplacela bujia.

2.Refi_rasea la secci6ndemantenimientode motor.

1.Aprietelacuchillay eladaptadorBaianceelacuchilla.

2.Cambielacuchiiia.

1.No corte el cesped cuando este mojado, espere hasta que sea mils tarde para hacerlo.

2.Corte una vez a altura de corte elevada, luego vueiva a cortar a ia altura deseada o haga un sendero de corte mils angosto.

3.Afile o cambie la cuchilla.

1.Coloque ias cuatro ruedas en la misma posici6n de aitura.

2.Afiie o cambie ia cuchiiia.

_NECESITA MAS AYUDA?

_}ir_cor_tl'_l'I_ re_Due_t_ y m_ er_ managemy.com - isin cargo!

,,En linea podra encontrar este manual y los manuales de todos los otros productos que posea,

,,Sus preguntas ser_n respondidas pot nuestro equipo de espedalistas, Obtenga un plan de rnantenimiento personalizado para su hogar,

,,Encuentre information y herramientas que Io ayudar_n con los proyectos de su hogar.

manage _ home

b_;o_'Lgh_to ye_ by Sears

52

(Esta p_.ginase aplica s61oen EE.UU. y Canada.).

Sears, Roebuck and Co., U.S.A. (Sears), el Consejo de Recursos Arnbientales de California (CARB) y la Agencia de Protecci6n Arnbiental de los Estados Unidos (EPA)

Declaraci6n de garantia del sistema de control de emisiones (derechos y obligaciones de la garantia de defectos del propi=

etario)

Disposiciones de la garantJa Sears para defectos en el control de emJsiones

Las siguientesson disposicionesespecificasrelacionadascon la coberturade lagarantia paradefectosen el controlde emisiones.Esun a_adidoa lagarantiade motorSearspara motoresno reguladosque seencuentraen lasinstruccionesde funcionamientoy mantenimiento.

En los EstadosUnidosy Canad_hay unalinea de atenci6nde 24 horas,1-800-469--4GG3,quecuentacon un menL]con mensajespre-grabadosque contienen informaci6npara el mantenimientode motores.

Busque el periodo de duraci6n de emisiones importantes yla informaci6n de clasificaci6n de aire en

la etiqueta de emisiones de su motor

Los motores cuyo cumpiimiento con los estAndares de emisi6n Tier 2 de la Comisi6n de Recursos Ambientales de California (CARB) est6 certificado deben exhibir la informaci6n relacionada con el perJodo de duraci6n de las emisiones y la clasificaci6n de aire. Sears, Roebuck and Co., de los Estados Unidos ponen esta informaci6n a disposici6n deJ consumidor en nuestras etiquetas de emisiones.

El Periodo de Duraci6n de las Emisiones describe el nQmero de horas de tiempo real de funcionamiento para el cual se certifica que el motor cumple con las reglas de emisi6n, descontando el mantenimiento adecuado deJ mismo segQn las instrucciones de oper- aci6n y mantenimiento. Se utilizan las siguientes categorias:

Moderado:Se certifica que el motor cumpie con las reglas de emisi6n durante 125 horas de tiempo real de funcionamiento deJ motor.

Inmediato:Se certifica que el motor cumple con las reglas de emisi6n durante 250 horas de tiempo real de funcionamiento deJ motor.

Extendido:Se certifica que el motor cumple con las reglas de emisi6n durante 500 horas de tiempo real de funcionamiento deJ motor.

Por ejemplo, una cortadora de c6sped tJpica que se empuja desde atrAs se usa entre 20 y 25 horas por afio. Por Io tanto, el Periodo

de Duraci6n de Emisiones de un motor con una clasificaci6n intermedia seria equivalente a entre 10 y 12 afios.

Laclasificaci6n de aJre es un nQmero calculado para describir eJnivel reiativo de emisiones para un grupo de motores en particular. Cuanto menor sea Jaclasificaci6n de aire, mayor es JaJimpieza deJ motor. La informaci6n se presenta de forma gr&fica en Jaetiqueta de emisiones.

Despu_s del 1 de julio de 2000, busque el periodo de cumplimiento de las reglas de emisiones en la etiqueta de cumplimiento de las reglas de emisiones del motor

Despu_s deJ 1 de julio de 2000 se certificar_, que determinados motores Sears, Roebuck and Co., de los Estados Unidos cumpien con los estAndares de emisiones de la fase 2 de la Agencia de Protecci6n Ambiental de los Estados Unidos (USE- PA). Para los motores certificados para la etapa 2, el periodo de cumpiimiento con las reglas de emisiones al cual se hace referencia en la etiqueta de cumpiimiento con las reglas de emisiones indica el nQmero de horas de funcionamiento para el cuaJ se ha demostrado que el motor cumpie con los requerimientos federales de emisi6n.

Para los motores con desplazamiento inferior a 225 cc, Categoria C = 125 horas, B = 250 horas y A = 500 horas.

Para los motores con desplazamiento de 225 cc o mAs, Categoria C = 250 horas, B = 500 horas y A = 1000 horas.

El despiazamiento de los motores de la serie modelo 150112 es 249 cc.

La presente es una representaci6n gen_rica de la etiqueta de emisi6n que se encuentra generaimente en un motor certificado.

FAMILYYBSXS.3192VA 274812

GDOC-100182Rev.A

54

Felicitacionespor haberrealizadounaadquisici6ninteligente.El productoCraftsman@queha adquiridoest_ dise_adoy fabricado parabrindarrnuchosa_osde funcionarnientoconfiable.Perocorno todoslos productosa vecespuederequerirde reparaciones.Esen esernornentocuandoel disponerde unAcuerdode protecci6npara reparacionesle puedeahorrardineroy problernas.

A continuaci6nsedetallanlos puntosincluidosenel Acuerdo:

???Servicio experto prestadopornuestros10,000especialistasen reparacionesprofesionales

???Servicio ilirnitadosin cargopara laspiezasy la rnanodeobraen todaslas reparacionescubiertas

???Reernplazodel productohasta1500d61aressi no es posible repararel productocubierto

???Descuentode 10%del precionormaldel servicioy delas piezas relacionadascon el rnisrnoqueno est_ncubiertasporel acuerdo; adern&s,10%del precionormalde laverificaci6nde rnanten- irnientopreventivo

???Ayudar_pida pot tel_fono- IoIlarnarnosResoluci6nR_pida- el apoyotelef6nicode unCharnuscaal representantePienseen. nosotroscornoel manual"de undue_ohablador."

Unavezadquiridoel Acuerdo,puedeprograrnarel serviciocon tan s61orealizarunaIlarnadatelef6nica.PuedeIlarnarencualquier mornentodeldia o dela nocheo prograrnarun servicioen linea. ElAcuerdode Protecci6nde Reparaci6nes unacornprasin riesgo. Siustedanulaporalgunaraz6nduranteel periodode garantiade producto,proporcionarernosun reernbolsoIleno.O,un reernbolso prorrateadoencualquiermornentodespu_sdelperiodode garantia de productoexpira,iAdquieraboysu acuerdode protecci6npara reparaciones!

Seaplican deterrninadaslimitaciones y exclusiones.Paraobtener inforrnaci6nadicional y preciosen los Estados UnidosIlarne al

1-800-827-6655.

El*Coverage en Canad_variaen algunosarticulos. Paradetalles

Ilenosla IlarnadaCharnuscaCanad_en 1-800-361-6665.

Servicio de instalaci6nde Sears

Sideseasolicitarla instalaci6nprofesionalde Searsde aparatos dorn_sticos,dispositivosparaabrirportones,calentadoresde agua y otrosarficulosdorn_sticosirnportantes,en los EstadosUnidoso Canad_Ilarneal 1-800-4-MY-HOME??.

55

Your Home

For troubleshooting, product manuals and home solutions advice:

??anag??

www.managemyhome.com

For repair - in your home - of all major brand appliances, lawn and garden equipment, or heating and cooling systems, no matter who made it, no matter who sold it!

For the replacement parts, accessories and owner's manuals that you need to do-it-yourself.

For Sears professional installation of home appliances and items like garage door openers and water heaters.

1-800-4-MY-HOME ?? (1-800-469-4663)

Call anytime, day or night (U.S.A. and Canada)

www.sears.comwww.sears.ca

Our Home

For repair of carry-in items like vacuums, lawn equipment, and electronics, call anytime for the location of your nearest

Sears Parts & Repair Service Center

1-800-488-1222 (U.S.A.) 1-800-469-4663 (Canada)

www.sears.comwww.sears.ca

To purchase a protection agreement on a product serviced by Sears:

;ii

??Registered Trademark / TMTrademark of KCD IP, LLC in the United States, or Sears Brands, LLC in other countries

??Marca Registrada / TMMarca de Fabrica de KCD IP, LLC en Estados Unidos, o Sears Brands, LLC in otros paises MCMarque de commerce / MDMarque deposee de Sears Brands, LLC