Owner???s manual

Mode d???emploi

Manual de instrucciones

XDZ616

AM/FM CD PLAYER

WITH CD/MD CHANGER CONTROL

???

LECTEUR CD AM/FM AVEC

COMMANDE DE CHANGEUR CD/MD

???

RADIO DE AM/FM Y REPRODUCTOR DE DISCOS

COMPACTOS CON CONTROL DE CAMBIADOR

DE DISCOS COMPACTOS/MINIDISCOS

Clarion Co., Ltd.

PE-2398B 280-7628-00

Thank you for purchasing this Clarion product.

???Please read this owner???s manual in its entirety before operating this equipment.

???After reading this manual, be sure to keep it in a handy place (e.g., glove compartment).

???Check the contents of the enclosed warranty card and keep it carefully with this manual.

???This manual includes the operating procedures of the CD changer, MD changer, AUX, DAB, DSP DVD, PHONE MUTE and TV tuner connected via the CeNET cable. The CD changer, MD changer and TV tuner have their own manuals, but no explanations for operating them are described.

English

1.FEATURES

???Rotary Encoder Volume Control

???Touch-n-GO Flip Down Detachable Aluminum Face

???Controller for Optional DSP/EQ, TV Tuner and DVD Deck Modules

???Built-In CD TEXT, Also Reads CD TEXT Data from Clarion Compatible CD Changer

???BEAT EQ with 3 Adjustment Modes

???CeNET with Balanced Audio Line Transmission and Dynamic Noise Canceling

????? FM Reception System

???8-Times Oversampling Digital Filter and Dual 1-Bit D/A Converters

???Zero-Bit Detector??? Mute Circuit

???4V / Front 2-Channel + Rear 2-Channel Line Level Output with Fader Control

???4V / 2-Channel Non-Fade Line Level Output with Volume Control

???2-Channel AUX Input with 3Level Adjustments

???200W (50W ?? 4) Maximum Power Output

2 XDZ616

6. REMOTE CONTROL

2. PRECAUTIONS

Handling Compact Discs

Use only compact discs bearing the mark.

Do not play heart-shaped, octagonal, or other specially shaped compact discs.

English

Handling

???New discs may have some roughness around the edges. If such discs are used, the player may not work or the sound may skip. Use a ball-point pen or the like to remove any rough- ness from the edge of the disc.

Ball-point pen

Roughness

???To remove a compact disc from its storage case, press down on the center of the case and lift the disc out, holding it carefully by the edges.

???Do not use commercially available CD protec- tion sheets or discs equipped with stabilizers, etc. These may damage the disc or cause breakdown of the internal mechanism.

Storage

English

Remote control unit

This equipment has been tested and found to comply with the limits for a Class B digital de- vice, pursuant to Part 15 of the FCC Rules.

These limits are designed to provide reasonable protection against harmful interference in a resi- dential installation.

This equipment generates, uses, and can radi- ate radio frequency energy and, if not installed and used in accordance with the instructions, may cause harmful interference to radio com- munications. However, there is no guarantee that interference will not occur in a particular instal- lation.

If this equipment does cause harmful interfer- ence to radio or television reception, which can be determined by turning the equipment off and on, the user is encouraged to consult the dealer or an experienced radio/TV technician for help.

CAUTION

USE OF CONTROLS, ADJUSTMENTS, OR

PERFORMANCE OF PROCEDURES OTHER

THAN THOSE SPECIFIED HEREIN, MAY RE-

SULT IN HAZARDOUS RADIATION EXPO- SURE.

THE COMPACT DISC PLAYER and MINI DISC

PLAYER SHOULD NOT BE ADJUSTED OR

REPAIRED BY ANYONE EXCEPT PROPERLY

QUALIFIED SERVICE PERSONNEL.

CHANGES OR MODIFICATIONS NOT EX-

PRESSLY APPROVED BY THE MANUFAC-

TURER FOR COMPLIANCE COULD VOID

THE USER???S AUTHORITY TO OPERATE THE

EQUIPMENT.

INFORMATION FOR USERS:.

CHANGES OR MODIFICATIONS TO THIS

???Never stick labels on the surface of the com- pact disc or mark the surface with a pencil or pen.

???Never play a compact disc with any cellophane tape or other glue on it or with peeling off marks. If you try to play such a compact disc, you may not be able to get it back out of the CD player or it may damage the CD player.

???Do not use compact discs that have large scratches, are misshapen, cracked, etc. Use of such discs may cause misoperation or dam- age.

Cleaning

???To remove fingermarks and dust, use a soft cloth and wipe in a straight line from the cen- ter of the compact disc to the circumference.

???Do not use any solvents, such as commercially available cleaners, anti-static spray or thinner to clean compact discs.

???After using special compact disc cleaner, let the compact disc dry off well before playing it.

Inserting the Batteries

MODEL

PRODUCT NOT APPROVED BY THE MANU-

FACTURER WILL VOID THE WARRANTY AND

WILL VIOLATE FCC APPROVAL.

Flip Down Panel

This unit uses a flip-down structure that makes possible large-size displays.

1. Turn the remote control unit over, then slide the rear cover in the direction of the arrow.

2.Insert the AA (UM-3/1.5V) batteries that came with the remote control unit facing in

the directions shown in the figure, then close the rear cover.

Notes:

AA (UM-3/1.5V)

Batteries

Rear cover

12V GROUND

AM 530-1710kHz/FM 87.9-107.9 MHz

THIS DEVICE COMPLIES WITH PART 15 OF THE FCC RULES.

OPERATION IS SUBJECT TO THE FOLLOWING TWO CONDI-

TIONS: (1) THIS DEVICE MAY NOT CAUSE HARMFUL INTERFER-

ENCE, AND (2) THIS DEVICE MUST ACCEPT ANY INTER-

FERENCE RECEIVED, INCLUDING INTERFERENCE THAT MAY

CAUSE UNDESIRED OPERATION.

THIS PRODUCTION COMPLIES WITH DHHS RULES 21 CFR

SUB-CHAPTER J APPLICABLE AT DATE OF MANUFACTURE.

CLARION CO., LTD.

50 KAMITODA, TODA-SHI, SAITAMA-KEN, JAPAN.

MANUFACTURED:

Bottom View of Source Unit

CAUTION

When opening and closing the FLIP DOWN PANEL, be careful not to catch your fingers. They could be injured.

1.Always use this unit with the FLIP DOWN PANEL closed.

2.Do not force operations or use this device ab- normally when opening or closing the FLIP

DOWN PANEL.

3.Do not use the FLIP DOWN PANEL as a tray to place objects on when it is open.

4.When closing the FLIP DOWN PANEL, do not press OPEN button 1.

5.Strong impacts to the operating or display section can cause damage or deformation.

6.If the FLIP DOWN PANEL does not open fully, gently open it with your hand.

Be sure to unfold and read the next page. Veuillez d??plier et vous r??f??rer ?? la page suivante.

Cerci??rese de desplegar y de leer la p??gina siguiente.

3. CONTROLS / LES COMMANDES / CONTROLES

Source unit / Appareil pilote / Unidad fuente

4. NOMENCLATURE

Note:

??? Be sure to read this chapter referring to the front diagrams of chapter ???3. CONTROLS??? on page 5 (unfold).

Names of Buttons

5. DCP

The control panel can be detached to prevent theft. When detaching the control panel, store it in the DCP (DETACHABLE CONTROL PANEL) case to prevent scratches.

We recommend taking the DCP with you when leaving the car.

English

English

Removing the DCP

1.Hold down POWER button 3 for 1 second or longer to turn off the power.

Attaching the DCP

1.Insert the right side of the DCP into the source unit.

2.Insert the left side of the DCP into the source unit.

2.

English

With the FLIP DOWN PANEL opened / Ouverture du PANNEAU RABATTABLE / Apertura del PANEL ABATIBLE

Fran??ais

Display Items

Flip down panel

CAUTION

Espa??ol

Display / Afficheur / Visualizador

12

1 Operation status indication

??? Clock, Volume, etc. are displayed.

2 A-M (audio mode) indication

3 LD (loudness) indication

4 ST (stereo) indication

5Preset channel indication (1 to 6) Disc number indication (1 to 12)

???The disc numbers corresponding to the discs in the CD or MD changer light.

6 INFO (information) indication

7 PTY (programme type) indication

8 TP (traffic programme) indication

9 TA (traffic announcement) indication

0 Function mode indication

???The names of modes being selected, etc. are displayed.

!AF (alternative frequency) indication

@ MANU (manual) indication

# DAB (Digital audio broadcasting) indication $ RDM (random) indication

% RPT (repeat) indication

?? DSP (Digital signal processor) indication

& SCN (scan) indication

* DISC indication

( BEQ (Beat EQ) indication

3. Pull the DCP toward you and remove it.

DCP

4. Close the HOLD FLAP.

This results in damage to the DCP. So close the FLIP DOWN PANEL or remove the DCP to store into the case.

??? The connector connecting the source unit and the DCP is an extremely important part. Be careful not to damage it by pressing on it with fingernails, screwdrivers, etc.

Note:

???If the DCP is dirty, wipe off the dirt with a soft, dry cloth only.

* & ?????% $ # @ ! 0 9 8 7 6 5 4 3

Note: Be sure to unfold this page and refer to the front diagrams as you read each chapter.

Remarque: Veuillez d??plier cette page et vous r??f??rer aux sch??mas quand vous lisez chaque chapitre.

Nota: Cuando lea los cap??tulos, despliegue esta p??gina y consulte los diagramas.

HOLD FLAP

CAUTION

Be sure to close the HOLD FLAP for safety when removing the DCP.

Functions of Remote Control Unit Buttons

*Some of the corresponding buttons on the source unit and remote control unit have different functions.

English

XDZ616 9

7. OPERATIONS

English

CAUTION

Be sure to lower the volume before switching off the unit power or the ignition key. The unit remembers its last volume setting. If you switch the power off with the volume up, when you switch the power back on, the sudden loud volume may hurt your hearing and dam- age the unit.

The clock is displayed when the ignition key is turned to the ACC (accessory) or IGN (igni- tion-on) position even when the unit power is off. In some cars, the clock may momentarily disappear when the ignition key is turned to the START position. The clock will reappear after the engine has started and the ignition key is released to the IGN (ignition-on) posi- tion.

Turning on/off the power

Radio mode ??? CD mode ??? CD changer mode

??? MD changer mode ??? TV mode ??? DVD mode ??? DAB mode ??? DSP mode ??? AUX mode ??? Radio mode ...

???External equipment not connected with CeNET is not displayed.

Adjusting the volume

Turning the Rotary knob $ clockwise increases the volume; turning it counterclockwise de- creases the volume.

???The volume level is from 0 (minimum) to 33 (maxi- mum).

Switching the display

Press DISP button 0 to select the desired dis- play.

Each time you press DISP button 0, the display switches in the following order:

Note:

???Be careful about using this unit for a long time with- out running the engine. If you drain the car???s bat- tery too far, you may not be able to start the en- gine and this can reduce the service life of the battery.

1.Press POWER button 3.

2.The illumination and display on the unit light up. The unit automatically remembers its last operation mode and will automatically switch to display that mode.

3.Press and hold POWER button 3 for 1 sec- ond or longer to turn off the power for the unit.

Note:

???System check

The first time this unit is turned on after the wire connections are completed, it must be checked what equipment is connected. When the power is

turned on, ???SYSTEM CHCK??? appears in the dis- play, so press POWER button 3. The system check starts within the unit.When the system check

is complete, the power is turned off, so press POWER button 3 again.

Main display

Sub (title) display

Clock display

Main display...

Selecting a mode

1.Press FNC button 3 to change the mode of operation.

2.Each time you press FNC button 3, the mode of operation changes in the following order:

???Once selected, the preferred display becomes the display default. When a function adjustment such as volume is made, the screen will mo- mentarily switch to that function???s display, then revert back to the preferred display several seconds after the adjustment.

10 XDZ616

Setting the Beat EQ

This unit comes with 3 types of sound tone effects stored in memory. Select the one you prefer.

??? The factory default setting is ???OFF???.

Each time you press BEQ button 7, the tone effect changes in the following order:

???1 BASS BOOST??? ??????2 IMPACT??? ??????3 EXCITE??? ??? ???USER CUSTOM??? ??? ???TONE BYPASS??? ???

???1 BASS BOOST??? ...

??? 1 BASS BOOST : bass emphasized

???USER CUSTOM

???TONE BYPASS

Adjusting the tone

Press A-M button @ and select the item to ad- just. Each time you press A-M button @, the item changes in the following order:

??? When ???1 BASS BOOST??? is set

???BASS BOOST??? ??????BALANCE??? ??????FADER???

??????ST NO TITLE???

???When ???2 IMPACT??? is set

???HIGHT BOOST??? ??? ???BALANCE??? ??? ???FADER??? ??? ???ST NO TITLE???

??? When ???3 EXCITE??? is set

???IMPACT??? ??? ???BALANCE??? ??? ???FADER??? ???

???ST NO TITLE???

??? When ???USER CUSTOM??? is set

???BASS<GAIN>??? ??? ???MID<GAIN>??? ??? ???TREB <GAIN>??? ??????BALANCE??? ??????FADER??? ??????ST

NO TITLE???

??? When ???TONE BYPASS??? is set

???BALANCE??? ??? ???FADER??? ??? ???ST NO TITLE???

Adjusting the bass

1.Press A-M button @ and select ???BASS <GAIN>???.

2.Turning the Rotary knob $clockwise empha- sizes the bass; turning it counterclockwise attenuates the bass.

??? The factory default setting is ???0???. (Adjustment

Adjusting the MID

1.Press A-M button @and select ???MID<GAIN>???

2.Turning the Rotary Knob $clockwise empha- sizes the MID; turning it counterclockwise at- tenuates the MID.

???The factory default setting is ???0??? (Adjustment range: -6 to +6).

3.When the adjustment is complete, press A-M button @several times until function mode is reached.

Adjusting the treble

1.Press A-M button @ and select ???TREB <GAIN>???.

2.Turning the Rotary knob $clockwise empha- sizes the treble; turning it counterclockwise attenuates the treble.

???The factory default setting is ???0???. (Adjustment range: ???6 to +6)

3.When the adjustment is complete, press A-M button @several times until the function mode is reached.

Adjusting the balance

1.Press A-M button @ and select ???BAL???.

2.Turning the Rotary knob $clockwise empha- sizes the sound from the right speaker; turn- ing it counterclockwise emphasizes the sound from the left speaker.

???The factory default setting is ???0???. (Adjustment range: L13 to R13)

3.When the adjustment is complete, press A-M button @several times until the function mode is reached.

Adjusting the fader

1.Press A-M button @ and select ???FAD???.

2.Turning the Rotary knob $clockwise empha- sizes the sound from the front speakers; turn- ing it counterclockwise emphasizes the sound from the rear speakers.

???The factory default setting is ???0???. (Adjustment range: F12 to R12)

3.When the adjustment is complete, press A-M button @several times until the function mode is reached.

English

XDZ616 11

English

Basic Operations

Adjusting the Beat EQ

1.Press BEQ button 7 and select the Beat EQ mode (1 to 3) to adjust.

2.Press A-M button @ and select ???BEQ???.

3.Turning the Rotary knob $clockwise adjusts in the + direction; turning it counterclockwise adjusts in the ??? direction.

???When 1 BASS BOOST is selected, you can ad- just the bass in the range of ??3.

???When 2 IMPACT is selected, you can adjust the treble in the range of ??3.

???When 3 EXCITE is selected, you can adjust the bass and treble in the range of ??3.

4.When the adjustment is complete, press A-M button @several times until the function mode is reached.

Turning on/off the loudness

The loudness effect emphasizes the bass and treble to create a natural sound tone. When you are listening to music at a low volume, it is rec- ommended to use the loudness effect.

1.Press and hold LD button @ for 1 second or longer to turn on the loudness effect. When the loudness effect is turned on, ???LD??? lights in the display.

2.Press and hold LD button @ for 1 second or longer to turn off the loudness effect. ???LD??? goes off in the display.

Radio Operations

FM reception

tuner includes signal actuated stereo control and

Multipath noise reduction circuits.

Changing the reception area

This unit is initially set to USA frequency intervals of 10kHz for AM and 200kHz for FM.When using it outside the USA, the frequency reception range can be switched to the intervals below.

??? Setting the reception area

1.Press BND button ! and select the desired radio band (FM or AM).

2.While pressing DISP button 0, each time you press and hold the number ???6??? of the Preset buttons 8 for 2 seconds or longer, the recep- tion area switches from inside the USA to out- side the USA or from outside the USA to in- side the USA.

???Any station preset memories are lost when the reception area is changed.

Listening to the radio

1.Press FNC button 3 and select the radio mode.

2.Press BND button ! and select the radio band. Each time the button is pressed, the radio reception band changes in the follow- ing order:

FM1 ??? FM2 ??? FM3 ??? AM ??? FM1...

3.Press the right or left side of SEARCH button

% to tune in the desired station.

Tuning

There are 3 types of tuning mode available, seek tuning, manual tuning and preset tuning.

Seek tuning

1.Press BND button ! and select the desired band (FM or AM).

???If ???MANU??? is lit in the display, press and hold BND button !for 1 second or longer. ???MANU??? in the display goes off and seek tuning is now available.

2.Press the right or left side of SEARCH button

% to automatically seek a station.

When the right side of SEARCH button % is pressed, the station is sought in the direction of higher frequencies; if the left side of SEARCH button % is pressed, the station is sought in the direction of lower frequencies.

12 XDZ616

Radio Operations

There are 2 ways available: Quick tuning and step tuning.

When you are in the step tuning mode, the fre- quency changes one step at a time. In quick tun- ing mode, you can quickly tune the desired fre- quency.

1.Press BND button ! and select the desired band (FM or AM).

???If ???MANU??? is not lit in the display, press and hold BND button ! for 1 second or longer. ???MANU??? lights in the display and manual tun- ing is now available.

2.Tune into a station.

??? Quick tuning:

Press and hold the right or left side of SEARCH button % for 1 second or longer to tune in a station.

??? Step tuning:

Press the right or left side of SEARCH button

% to manually tune in a station.

Recalling a preset station

A total of 24 preset positions (6-FM1, 6-FM2, 6-

FM3, 6-AM) exists to store individual radio sta- tions in memory. Pressing the corresponding pre- set button recalls the stored radio frequency au- tomatically.

1.Press BND button ! and select the desired band (FM or AM).

2.Press the corresponding Preset button 8 to recall the stored station.

???Press and hold one of the Preset buttons 8 for 2 seconds or longer to store that station into preset memory.

Manual memory

Auto store is a function for storing up to 6 sta- tions that are automatically tuned in sequentially.

If 6 stations cannot be received, a previously stored station remains unoverwritten at the memory position.

1.Press BND button ! and select the desired band (FM or AM).

2.Press and hold AS button 4for 2 seconds or longer. The stations with good reception are stored automatically to the preset buttons.

Preset scan

Preset scan receives the stations stored in pre- set memory in order. This function is useful when searching for a desired station in memory.

1.Press PS button 4.

2.When a desired station is tuned in, press PS button 4again to continue receiving that sta- tion.

Note:

???Be careful not to press and hold PS button 4 for 2 seconds or longer, otherwise the auto store func- tion engages and the unit starts storing stations.

Instant station recall (ISR)

Instant station recall is a special radio preset that instantly accesses a favorite radio station at a touch of a button. The ISR function even oper- ates with the unit in other modes.

??? ISR memory

1.Select the station that you wish to store in ISR memory.

2.Press and hold ISR button 9 for 2 seconds or longer.

??? Recalling a station with ISR

English

station into preset memory.

XDZ616 13

CD Operations

English

Loading a CD

1.Press OPEN button 1 to access the CD in- sertion slot behind the FLIP DOWN PANEL.

2.Insert a CD into the center of the insertion slot with the label side facing up.The CD plays automatically after loading.

Notes:

???Never insert foreign objects into the CD insertion slot.

???If the CD is not inserted easily, there may be an- other CD in the mechanism or the unit may re- quire service.

???Discs not bearing themark and CD-ROMs cannot be played by this unit.

Loading 3" (8 cm) compact discs

???No adapter is required to play a 3" CD.

???Insert the 3" CD into the center of the insertion slot.

???When a 3" CD is loaded, ???SINGLE??? lights in the display.

3. Close the FLIP DOWN PANEL.

CAUTION

Be careful not to catch your hand or fingers while closing the FLIP DOWN PANEL.

Notes:

???If the FLIP DOWN PANEL does not open fully, gently open with your hand.

???After loading a CD, always close the FLIP DOWN

PANEL.

Listening to a CD already inserted

Press FNC button 3to select the CD mode. Play starts automatically. If no CD is loaded in the unit, ???NO DISC??? appears in the display.

Pausing play

1.Press Play/pause button # to pause play.

???PAUS??? appears in the display.

2.To resume CD play, press Play/pause button

# again.

CAUTION

Be careful not to catch your hand or fingers while closing the FLIP DOWN PANEL.

Notes:

???If the FLIP DOWN PANEL does not open fully, gently open with your hand.

???After taking out the CD, be sure to close the FLIP

DOWN PANEL.

???If a CD (12 cm) is left in the ejected position for 15 seconds, the CD is automatically reloaded (Auto reload).

???3" CDs (8 cm) are not auto reloaded. Be sure to remove it when ejected.

Notes:

???If you force a CD into before auto reloading, this can damage the CD.

??????DISC CHK??? in the display shows you a CD is left

in the unit. Be sure to press Eject button & and remove it in this case.

Selecting a track

??? Track-up

1.Press the right side of SEARCH button % to move ahead to the beginning of the next track.

2.Each time you press the right side of SEARCH button %, the track advances ahead to the beginning of the next track.

??? Track-down

1.Press the left side of SEARCH button % to move back to the beginning of the current track.

2.Press the left side of SEARCH button %twice to move to the beginning of the previous track.

Fast-forward/fast-backward

??? Fast-forward

Press and hold the right side of SEARCH button

% for 1 second or longer.

??? Fast-backward

Press and hold the left side of SEARCH button

% for 1 second or longer.

Ejecting a CD

1.Press OPEN button 1 to open the FLIP

DOWN PANEL.

2.Press Eject button & to eject the CD. Take it out from the ejected position.

??????NO DISC??? appears in the display when the CD is left in the ejected position.

3.Close the FLIP DOWN PANEL.

Top function

The top function resets the CD player to the first track of the disc. Press TOP button !to play the first track (track No. 1) on the disc.

14 XDZ616

CD Operations Other Handy Functions

Scan play

The scan play locates and plays the first 10 sec- onds of each track on a disc automatically. This function continues on the disc until it is canceled.

???The scan play is useful when you want to select a desired track.

1.Press SCN button 4 to start track scanning. ???SCN??? lights in the display.

2.To cancel the scan play, press SCN button 4 again. ???SCN??? goes off from the display and the current track continues to play.

Repeat play

The repeat play continuously plays the current track. This function continues automatically until it is canceled.

1.Press RPT button 5. ???RPT??? lights in the dis- play and the current track is repeated.

2.To cancel the repeat play, press RPT button

5 again. ???RPT??? goes off from the display and normal play resumes.

Random play

The random play selects and plays individual tracks on a disc in no particular order. This function con- tinues automatically until it is canceled.

1.Press RDM button 6. ???RDM??? lights in the dis- play, an individual track is selected randomly and play begins.

2.To cancel the random play, press RDM but- ton 6 again. ???RDM??? goes off from the display and normal play resumes.

Setting the clock

1.Press and hold ADJ button 2for 1 second or longer to switch to the adjustment selection display.

2.Press the right or left side of SEARCH button

%to select ???CLOCK???.

3.Press ENT button #.

4.Press the right or left side of SEARCH button

%to select the hour or the minute.

5.Turn the Rotary knob $ clockwise or coun- terclockwise to set the correct time.

??? The clock is displayed in 12-hour format.

6.Press ENT button #to store the time into memory.

7.Press ADJ button 2to return to the previous mode.

Note:

???You cannot set the clock when it is displayed with only the ignition on. If you drain or remove the car???s battery or take out this unit, the clock is reset. While setting the clock, if another button or operation is selected, the clock set mode is canceled.

Entering titles

Titles up to 10 characters long can be stored in memory and displayed for radio stations and CDs.

The numbers of titles that can be entered for each mode are as follows.

1.Press FNC button 3to select the mode you want to enter a title. (radio, CD, CD changer or TV)

??? Titles cannot be entered for MDs with this unit.

2.Select and play a CD or a CD in the CD changer or tune to an appropriate TV or radio station.

3.Press DISP button 0 and display the sub- title.

4.Press TITLE button 2. ???TITL??? appears in the display and the cursor position flashes.

5.Press the right or left side of SEARCH button

% to move the cursor.

6.Press DISP button 0 to select a character. Each time you press DISP button 0, the char- acter changes in the following order:

Capital letters ??? Numbers ??? Symbols ???

Capital letters...

English

XDZ616 15

Other Handy Functions

English

7.Turn the Rotary knob $ to select the desired character. Turning the Rotary knob $ clock- wise moves the cursor to the next character; turning it counterclockwise moves the cursor to the previous character.

8.Repeat steps 5 to 7 to enter up to 10 charac- ters for the title.

9.Press and hold ENT button # for 2 seconds or longer to store the title into memory and cancel title input mode.

Clearing titles

1.Play a CD or a CD in a CD changer or tune a radio station or TV station that you want to clear the title for.

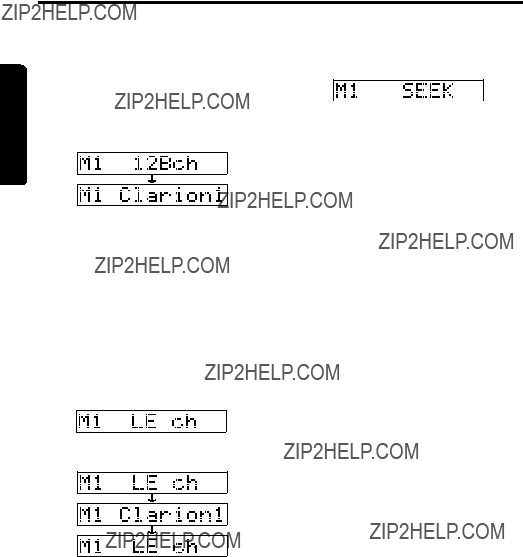
2.Press DISP button 0 and display the sub- title.

3.Press TITLE button 2. ???TITL??? appears in the display and the display switches to the title input display.

4.Press BND button !.

5.Press and hold ENT button # for 2 seconds or longer to clear the title and cancel the title input mode.

Hi / Lo dimmer control

You can adjust the reduced illumination level of the dimmer.

??? The factory default setting is ???ON???.

1.Press and hold ADJ button 2 for 1 second or longer to switch to the adjustment selection dis- play.

2.Press the right or left side of SEARCH button % to select ???DIMMER???.

3.Turn the Rotary knob $ clockwise to ???ON??? or counterclockwise to ???OFF???.

4.Press ADJ button 2 to return to the previous mode.

Message display

When the unit is powered on or off, a message is displayed. The user can turn this message dis- play ON or OFF.

??? The factory default setting is ???ON???.

1.Press and hold ADJ button 2 for 1 second or longer to switch to the adjustment selection display.

2.Press the right or left side of SEARCH button % to select ???MESSAGE???.

3.Turn the Rotary knob $ clockwise or coun- terclockwise to set message display ON or

OFF.

4.Press ADJ button 2 to return to the previous mode.

Turning the external output adjustment display on/off

When not using the external output, you can put out the ???NON-FADER??? display.

???The factory default setting is ???ON???.

???Even if the level adjustment display is set to ???OFF???, signals can be output from the external output.

1.Press and hold ADJ button 2 for 1 second or longer to switch to the adjustment selection display.

2.Press the right or left side of SEARCH button % to select ???NON-FADER???.

3.Turn the Rotary knob $clockwise to set ???ON??? or counterclockwise to set ???OFF???.

??? ON:

When you press A-M button @, the ???NON- FAD VOL??? item is displayed.

??? The output level can be adjusted.

??? OFF:

Even when you press A-M button @, the

???NON-FAD VOL??? item is not displayed.

??? The output level cannot be adjusted.

4.Press ADJ button 2 to return to the previous mode.

AUX function

This system has an external input jack so you can listen to sounds and music from external devices when connected to this unit.

Selecting AUX IN sensitivity

Make the following settings to select the sensi- tivity when sounds from external devices con- nected to this unit are difficult to hear even after adjusting the volume.

1.Press and hold the ADJ button 2 for 1 sec- ond or longer to set Adjust mode.

2.Press the SEARCH button %and select ???AUX SENS???.

3.Turn the Rotary knob $ clockwise or coun- terclockwise as needed and select from

???SENS HIGH???, ???SENS MID??? or ???SENS LOW???.

??? The factory default setting is ???SENS MID???.

4.Press ADJ button 2 to return the previous mode.

16 XDZ616

8. OPERATIONS OF ACCESSORIES

CD Changer Operations

CD changer functions

When an optional CD changer is connected through the CeNET cable, this unit controls all the CD changer functions. This unit can control a total of 2 changers (MD and/or CD).

Press FNC button 3 and select the CD changer mode to start play. If 2 CD changers are con- nected, press FNC button 3 to select the CD changer for play.

???If ???NO MAG??? appears in the display, insert the magazine into the CD changer. ???LOADING??? ap- pears in the display while the player loads (checks) the magazine.

???If ???NO DISC??? appears in the display, eject the maga- zine and insert discs into each slot. Then, reinsert the magazine back into the CD changer.

Selecting a CD

Each of the Direct button 8 corresponds to a disc loaded into the magazine.

??? Selecting a disc from 1 to 6

Press the corresponding Direct button 8 (1 to 6) to select the desired disc.

???Selecting a disc from 7 to 12 (only when a 12 disc CD changer is used.)

Press and hold the corresponding Direct button

8 (7 to 12) for 1 second or longer to select the desired disc.

??? If a CD is not loaded in a slot of the magazine, pressing the Direct button 8 corresponding to its disc number is invalid.

English

CD-ROM discs cannot be played in the CD changer.

Pausing play

1.Press Play/pause button # to pause play.

???PAUS??? appears in the display.

2.To resume play, press Play/pause button # again.

Displaying CD titles

This unit can display title data for CD-text CDs and user titles input with this unit.

1.Press DISP button 0 to display the title.

2.Each time you press and hold DISP button

0 for 1 second or longer, the title display changes in the following order:

User title ??? Disc title ??? Artist name ??? Track title

Note:

???If the CD playing is not a CD-text CD or no user title has been input, ???NO-TTL??? appears in the dis- play.

??? Scrolling a CD-text title

When a CD-text title is longer than 11 charac- ters, you can scroll the display as follows.

1.Display the CD-text title (disc or track).

2.Press TITLE button 2. The title scrolls.

1.Press the right side of SEARCH button % to move ahead to the beginning of the next track.

2.Each time you press the right side of SEARCH button %, the track advances ahead to the beginning of the next track.

??? Track-down

1.Press the left side of SEARCH button % to move back to the beginning of the current track.

2.Press the left side of SEARCH button %twice to move to the beginning of the previous track.

Fast-forward/fast-backward

??? Fast-forward

Press and hold the right side of SEARCH button

% for 1 second or longer.

??? Fast-backward

Press and hold the left side of SEARCH button

% for 1 second or longer.

XDZ616 17

CD Changer Operations

English

The top function plays from the first track (track No. 1) of the disc.

??? When playing a disc 1 to 6

Press the Direct button 8 (1 to 6) with the same number as the CD playing.

???When playing a disc 7 to 12 (only when a 12 disc CD changer is used.)

Press and hold for 1 second or longer the Direct button 8 (7 to 12) with the same number as the

CD playing.

???If a CD is not loaded in a slot of the magazine, pressing the Direct button 8 corresponding to its disc number is invalid.

Scan play

The scan play locates and plays the first 10 sec- onds of each track on a disc automatically. This function continues on the disc until it is canceled.

???The scan play is useful when you want to select a desired track.

1.Press SCN button 4 to start track scanning.

???SCN??? lights in the display.

After all the tracks on the current disc have been played, the disc repeat play automatically replays the current disc over from the first track.This func- tion continues automatically until it is canceled.

1.Press and hold RPT button 5 for 1 second or longer. ???DISC??? and ???RPT??? light in the dis- play and the disc repeat play starts.

2.To cancel the disc repeat play, press and hold RPT button 5 again. ???DISC??? and ???RPT??? go off from the display and normal play resumes on the current track.

Random play

The random play selects and plays individual tracks on the disc in no particular order.This func- tion continues automatically until it is canceled.

1.Press RDM button 6. ???RDM??? lights in the dis- play and the random play begins.

2.To cancel the random play, press RDM but- ton 6 again. ???RDM??? goes off from the display and normal play resumes.

2.To cancel the scan play, press SCN button 4 again. ???SCN??? goes off from the display and the current track continues to play.

Disc scan play

The disc scan play locates and plays the first 10 seconds of the first track on each disc in the cur- rently selected CD changer. This function con- tinues automatically until it is canceled.

???The disc scan play is useful when you want to se- lect a desired CD.

1.Press and hold SCN button 4 for 1 second or longer. ???DISC??? and ???SCN??? light in the dis- play and the disc scan play starts.

2.To cancel the disc scan play, press SCN but- ton 4 again. ???DISC??? and ???SCN??? go off from the display and the current track continues to play.

Repeat play

The repeat play continuously plays the current track.This function continues automatically until it is canceled.

1.Press RPT button 5. ???RPT??? lights in the dis- play and the current track is repeated.

2.To cancel the repeat play, press RPT button 5 again. ???RPT??? goes off from the display and normal play resumes.

Disc random play

The disc random play selects and plays individual tracks or discs automatically in no particular or- der. This function continues automatically until it is canceled.

1.Press and hold RDM button 6 for 1 second or longer. ???DISC??? and ???RDM??? light in the dis- play and the disc random play starts.

2.To cancel the disc random play, press and hold RDM button 6 again. ???DISC??? and ???RDM??? go off from the display and normal play resumes from the current track.

18 XDZ616

MD Changer Operations

MD changer functions

When an optional MD changer is connected through the CeNET cable, this unit controls all the MD changer functions. This unit can control a total of 2 changers (MD and/or CD).

Press FNC button 3and select the MD changer mode to start play. If 2 MD changers are con- nected, press FNC button 3 to select the MD changer for play.

???If ???NO DISC??? appears in the display, load MDs into the MD changer.

Pausing play

1.Press Play/pause button # to pause play.

???PAUSE??? appears in the display.

2.To resume play, press Play/pause button # again.

2.Each time you press the right side of SEARCH button %, the track advances ahead to the beginning of the next track.

??? Track-down

1.Press the left side of SEARCH button % to move back to the beginning of the current track.

2.Press the left side of SEARCH button %twice to move to the beginning of the previous track.

Fast-forward/fast-backward

??? Fast-forward

Press and hold the right side of SEARCH button

% for 1 second or longer.

??? Fast-backward

Press and hold the left side of SEARCH button

% for 1 second or longer.

English

Switching disc titles and track titles

This unit can display disc titles and track titles already entered on MDs. Titles up to 128 char- acters long can be displayed by scrolling the titles.

??? Titles cannot be entered for MDs with this unit.

1.Press DISP button 0 to display the title. The disc title or track title is displayed.

2.Each time you press and hold DISP button

0 for 1 second or longer, the display toggles between the disc title and the track title.

???Scrolling titles

When a title is longer than 11 characters, you can scroll through it with the following operation.

1.Display the MD title (disc or track).

2.Press TITLE button 2.

The display scrolls through the title.

Selecting an MD

Each of the Direct button 8 corresponds to an

MD loaded into the MD changer. Press the cor- responding Direct button 8 (1 to 6) to select the desired disc.

???If an MD is not loaded in a slot of the MD changer, pressing the Direct button 8 corresponding to its disc number is invalid.

Selecting a track

??? Track-up

1.Press the right side of SEARCH button % to move ahead to the beginning of the next track.

Top function

The top function plays from the first track (track No. 1) of the disc. Press the Direct button 8 (1 to 6) with the same number as the MD playing.

???If an MD is not loaded in a slot of the MD changer, pressing the Direct button 8 corresponding to its disc number is invalid.

Scan play

The scan play locates and plays the first 10 sec- onds of each track on a disc automatically. This function continues on the disc until it is canceled.

???The scan play is useful when you want to select a desired track.

1.Press SCN button 4 to start track scanning. ???SCN??? lights in the display.

2.To cancel the scan play, press SCN button 4 again. ???SCN??? goes off from the display and the current track continues to play.

Disc scan play

The disc scan play locates and plays the first 10 seconds of the first track on each disc in the cur- rently selected MD changer. This function con- tinues automatically until it is canceled.

???The disc scan play is useful when you want to se- lect a desired MD.

1.Press and hold SCN button 4 for 1 second or longer. ???DISC??? and ???SCN??? light in the dis- play and the disc scan play starts.

2.To cancel the disc scan play, press and hold SCN button 4 again. ???DISC??? and ???SCN??? go off from the display and the current track con- tinues to play.

XDZ616 19

English

MD Changer Operations

Repeat play

The repeat play continuously plays the current track. This function continues automatically until it is canceled.

1.Press RPT button 5. ???RPT??? lights in the dis- play and the current track is repeated.

2.To cancel the repeat play, press RPT button

5 again. ???RPT??? goes off from the display and normal play resumes.

Disc repeat play

After all the tracks on the current disc have been played, the disc repeat play automatically replays the current disc over from the first track.This func- tion continues automatically until it is canceled.

1.Press and hold RPT button 5 for 1 second or longer. ???DISC??? and ???RPT??? light in the dis- play and the disc repeat play starts.

2.To cancel the disc repeat play, press and hold

RPT button 5 again. ???DISC??? and ???RPT??? go off from the display and normal play resumes on the current track.

Random play

The random play selects and plays individual tracks on the disc in no particular order. This func- tion continues automatically until it is canceled.

1.Press RDM button 6. ???RDM??? lights in the dis- play and the random play begins.

2.To cancel the random play, press RDM but- ton 6 again. ???RDM??? goes off from the display and normal play resumes.

Disc random play

The disc random play selects and plays individual tracks or discs automatically in no particular or- der. This function continues automatically until it is canceled.

1.Press and hold RDM button 6 for 1 second or longer. ???DISC??? and ???RDM??? light in the dis- play and the disc random play starts.

2.To cancel the disc random play, press and hold RDM button 6 again. ???DISC??? and ???RDM??? go off from the display and normal play resumes from the current track.

TV Operations

TV tuner functions

When an optional TV tuner is connected through the CeNET cable, this unit controls all TV tuner functions. To watch TV requires a TV tuner and monitor.

Watching a TV

1.Press FNC button 3and select the TV mode.

2.Press BND button !to select the desired TV band (TV1 or TV2). Each time the button is pressed, the input selection toggles between TV1 and TV2.

3.Press the right or left side of SEARCH button % to tune in the desired TV station.

Watching a video

The TV tuner has a VTR input terminal to which

1 external device can be connected. Connect a

12V video cassette player (VCP) or video cas- sette recorder (VCR) to the TV tuner input termi- nal.

1.Press RDM button 6 to select VTR.

2.To return to the TV broadcast, press RDM button 6.

Tuning

There are 3 types of tuning mode available, Seek tuning, manual tuning and preset tuning.

Seek tuning

1.Press BND button ! and select the desired

TV band (TV1 or TV2).

???If ???MANU??? is lit in the display, press and hold BND button !for 1 second or longer. ???MANU??? in the display goes off and seek tuning is now available.

2.Press the right or left side of SEARCH button % to automatically seek a station.

Press the right side of SEARCH button % to automatically tune up the frequency band to the next available TV station; press the left side to automatically tune down.

20 XDZ616

TV Operations

There are 2 ways available: Quick tuning and step tuning.

When you are in the step tuning mode, the frequency changes one step at a time. In quick tuning mode, you can quickly tune the desired frequency.

1.Press BND button ! and select the desired band (TV1 or TV2).

???If ???MANU??? is not lit in the display, press and hold BND button ! for 1 second or longer. ???MANU??? lights in the display and manual tun- ing is now available.

2.Tune into a station.

??? Quick tuning:

Press and hold the right or left side of

SEARCH button % for 1 second or longer to tune in a station.

??? Step tuning:

Press the right or left side of SEARCH button % to manually tune in a station.

Recalling a preset station

A total of 12 TV stations can be stored (6-TV1 and 6-TV2). This allows you to select your favor- ite TV stations and store them in memory for later recall.

1.Press BND button ! and select the desired

TV band (TV1 or TV2).

2.To recall a stored TV station, press the de- sired Preset button 8 to select that station.

???Press and hold one of the Preset buttons 8 for 2 seconds or longer to store the current sta- tion into the preset memory.

Manual memory

1.Select the desired station with seek tuning, manual tuning or preset tuning.

2.Press and hold one of the Preset buttons 8 for 2 seconds or longer to store the current station to that preset memory.

Auto store selects 6 TV stations automatically and stores each one into a preset memory.

If there are not 6 stations with good reception, stations previously stored in memory remain and only the strong stations are stored into memory.

1.Press BND button ! and select the desired

TV band (TV1 or TV2).

2.Press and hold AS button 4for 2 seconds or longer. The stations with good reception are automatically stored to the Preset buttons 8.

Preset scan

Preset scan allows the user to view each preset position before it automatically advances to the next preset. This function is useful for searching for desired TV station in memory.

1.Press PS button 4.

2.When the desired station is found, press PS button 4 again to remain tuned to that sta- tion.

Note:

???Do not press and hold PS button 4 for 2 seconds or longer. Doing so will trigger the auto store func- tion and start storing stations into memory.

Setting the TV diver

You can change the reception setting for the TV antenna connected to the TV tuner.

1.Press and hold ADJ button 2 for 1 second or longer to switch to the adjustment selection display.

2.Press the right or left side of SEARCH button % to select ???TV DIVER???.

3.Press ENT button #.

4.Turn the Rotary knob $ clockwise to set to ???ON??? or counterclockwise to set to ???OFF???.

ON:

Sets reception emphasizing the visual.

OFF:

Sets the diver setting to OFF.

5.Press ENT button #.

6.Press ADJ button 2 to return to the previous mode.

English

XDZ616 21

AC Processor Operations

English

DSP control function

If the DSP (DPH910), sold separately, is con- nected to this unit using the CeNET cable, all functions of the AC Processor can be controlled.

DSF functions

There are 2 modes available in DPH910, STD mode and professional mode. Choose one of them and adjust the sound field and the sound quality.

??? Functions common to each mode:

Auto loudness, etc.

??? Standard mode:

Adjustment using the graphic equalizer function and the DSF function.

??? Professional mode:

Adjustment using the VSE function and the para- metric equalizer function.

???When the STD mode is selected, adjustment for the professional mode cannot be made. On the contrary, when the professional mode is selected, adjustment for the STD mode cannot be made.

???For details on functions of each mode, refer to the owner???s manual supplied with the DPH910.

???Hereafter the graphic equalizer is referred to as a G.EQ, the space equalizer referred to as VSE and the parametric equalizer referred to as P.EQ.

Operations common to each mode

Output adjustment of auto loudness, subwoofer and playback band

1.Press and hold ADJ button 2for 1 second or longer to switch to the adjustment selection display.

2.Press the right or left side of SEARCH button

%to select ???SOUND???.

3.Press ENT button #.

4.Press the right or left side of SEARCH button

%to select the adjustment item.

There are ???A.LD LEVEL???, ???WOOFER OUT???, ???WOOFER LPF???, ???HPF??? and ???TEST TONE??? available for the adjustment items.

???For details on each adjustment item, refer to the owner???s manual supplied with the DPH910.

5.Turn the Rotary knob $ clockwise or coun- terclockwise to make the adjustment.

6.Pressing ENT button #returns to the adjust- ment selection display.

7.Press ADJ button 2 to return to the previous mode.

Selecting the easy mode or the professional mode

??? The factory default setting is ???STD???.

1.Press and hold ADJ button 2 for 1 second or longer to switch to the adjustment selection display.

2.Press the right or left side of SEARCH button

% to select ???AC-P SEL???.

3.Turn the Rotary knob $ clockwise or coun- terclockwise to set the mode to ???STD??? or

???PRO???.

4.Press ADJ button 2 to return to the previous mode.

Entering titles

You can give a title to the user memory of the

DSF, G.EQ, VSE and P.EQ that you have adjusted yourself.

1.Press A-M button @ to select the adjustment mode in which you want to give a title.

2.Press BND button ! to select ???USR???. ???USR??? will be displayed in the function mode indica- tion 0.

3.Press one of Preset buttons 8 to select the user memory to which you want to give a title.

4.Press TITLE button 2.

5.Press the right or left side of SEARCH button % to move the cursor.

6.Press DISP button 0 to select the character fonts.

There are capital letters, small letters, num- bers, symbols and umlaut available for the character.

7.Turn the Rotary knob $clockwise or counter- clockwise to select the character you want to input.

8.Repeat steps 5 to 7 to input the title.

9.Press and hold ENT button # for 2 seconds or longer to put the title into memory. The title input mode is cancelled.

STD mode/G.EQ operations

Note:

???The adjustment made in standard mode is not re- flected in the adjustment in professional mode. On the contrary, the adjustment made in professional mode is not reflected in the adjustment in easy mode.

22 XDZ616

AC Processor Operations

While the ???G.EQ??? indication ?? is lit in the dis- play, the G.EQ effect is set to ???ON???.

??? The factory default setting is ???ON???.

1.Press A-M button @and select ???G.EQ???. While ???G.EQ??? is selected, ???G.EQ??? blinks in the dis- play.

2.Press DISP button 0.

3.Press A-M button @. ???G.EQ??? in the display is changed from blinking to lit or unlit.

???When ???G.EQ??? is unlit, the G.EQ effect is set to OFF.

Note:

???If the G.EQ effect is set to OFF, the adjustment made in ???G.EQ operations??? is not reflected in the music source.

DSF effect ON/OFF

When the ???DSF??? indication ?? is lit in the display, the DSF effect is set to ???ON???.

??? The factory default setting is ???ON???.

1.Press A-M button @ and select ???DSF???.

2.Press DISP button 0.

3.Press A-M button @. ???DSF??? in the display lit or unlit.

???When ???DSF??? is unlit, the DSF effect is set to OFF.

Note:

??? If the DSF effect is set to OFF, the adjustment made in ???DSF operations??? is not reflected in the music source.

English

Selecting a G.EQ menu

1.Press A-M button @ and select ???G.EQ???.

2.Press BND button ! to select ???BASC??? (ba- sic). ???BASC??? is displayed in the function mode indication 0 in the display.

3.Press one of Direct buttons 8 and select the desired G.EQ menu.

??? To select the user memory, press BND button !to select ???USR??? and press one of Direct but- tons 8.

Editing/storing a G.EQ menu (User memory)

1.Select a G.EQ menu which you want to edit on the basis of.

2.Press and hold ADJ button 2for 1 second or longer.

3.Press the right or left side of SEARCH button % to select the frequency to be adjusted. There are 50Hz, 100Hz, 200Hz, 400Hz, 1kHz, 3kHz and 12kHz available for the adjustment

frequency.

??? For details on each adjustment item, refer to the owner???s manual supplied with the DPH910.

4.Turn the Rotary knob $clockwise or counter- clockwise to make the adjustment.The adjust- ment range is from ???6dB to +6dB.

5.Repeat steps 3 to 4 to complete the adjust- ment and press ADJ button 2.

6.Press and hold one of Direct buttons 8 for 2 seconds or longer to store the edited contents.

??? You can give a title to the user memory. For the inputting method of titles, refer to the subsec- tion ???Entering titles??? in section ???Operations common to each mode???.

Setting the listening position menu

1.Press A-M button @ and select ???DSF???.

2.Press the right or left side of SEARCH button

% to set the listening position type.

There are FULL SEAT, FRONT-RIGHT,

FRONT-LEFT, FRONT (only front seats),

REAR (only rear seats) and PASS available for the listening position types.

??? The factory default setting is ???FULL SEAT???.

Making fine adjustment of the listening position

1.Upon completion of setting the listening posi- tion, press ENT button #.

2.Press the right or left side of SEARCH button

%to select ???BALANCE??? or ???FADER???. The se- lected item blinks.

3.Turn the Rotary knob $clockwise or counter- clockwise to adjust the balance and the fader.

4.Press ENT button # to return to the DSF mode.

Selecting a sound field menu

1.Press A-M button @ and select ???DSF???. ???DSF??? blinks in the display.

2.Press BND button ! to select ???BSC1??? (ba- sic-1) or ???BSC2??? (basic-2). ???BSC1??? or ???BSC2??? is displayed in the function mode indication

0 in the display.

3.Press one of Direct buttons 8 and select the desired sound field menu.

??? To select the user memory, press BND button !to select ???USR??? and press one of Direct but- tons 8.

XDZ616 23

English

AC Processor Operations

24 XDZ616

Selecting a P.EQ menu

1.Press A-M button @and select ???P.EQ???. ???P.EQ??? blinks in the display.

2.Press BND button ! to select ???BASC??? (ba- sic). ???BASC??? is displayed in the function mode indication 0 in the display.

3.Press one of Direct buttons 8 and select the desired P.EQ menu.

??? To select the user memory, press BND button !to select ???USR??? and press one of Direct but- tons 8.

Editing/storing a P.EQ menu (User memory)

1.Select a P.EQ menu which you want to edit on the basis of.

2.Press and hold ADJ button 2for 1 second or longer.

3.Press the right or left side of SEARCH button

% to select the item to be adjusted.

There are correction channel, correction band, selection of the centre frequency, gain adjust- ment and selection of the Q-curve available for the items to be adjusted.

???For details on each adjustment item, refer to the owner???s manual supplied with the DPH910.

4.Turn the Rotary knob $clockwise or counter- clockwise to make the adjustment.

5.Repeat steps 3 to 4 to complete the adjust- ment and press ADJ button 2.

6.Press and hold one of Direct buttons 8 for 2 seconds or longer to store the edited contents.

???You can give a title to the user memory. For the inputting method of titles, refer to the subsec- tion ???Entering titles??? in section ???Operations common to each mode???.

AC Processor Operations

English

XDZ616 25

Note: Be sure to read this chapter referring to the front diagrams of chapter ???3.CONTROLS??? on page 5 (unfold).

Digital Radio / DAB Operations

English

DAB control function

When a CeNET cable is used to connect a DAB

(sold separetely), all functions can be operated.

Listening to the DAB station

1.Press FNC button 3 to select DAB mode.

2.When the unit receives a DAB station, the display changes in the following order: Frequency channel ??? service label

Seek tuning

1.Press FNC button 3 to select DAB mode.

2.Press and hold right or left for 1 second or longer using SEARCH button %.

??????SEEK??? appears in the display.

3.???DAB??? lights up in the display when the main unit receives a DAB station.

???The main unit stops the seek tuning when it cannot find a DAB station. The display returns to the previous mode.

Switching displays

Press the DISP button for 1 second during the

Main (service label) display to select Main (ser- vice label) or Sub (PTY).

Note:

???The display shown in the normal reception mode and the preset reception mode is the same when a DAB station is received.

3.When the unit does not receive a DAB sta- tion, the display changes in the following or- der:

???Normal reception mode???

???Preset reception mode???

Notes:

???The number of programmes and broadcasting times depend on the DAB stations.

???When the strength of DAB signals is weak, audio output is muted.

Manual tuning

1.Press FNC button 3 to select DAB mode.

2.Press and hold BND button ! for 1 second or longer. ???MANU??? lights up in the display.

3.Press the right or left SEARCH button % to select a station.

???If no operation is performed for more than 7 seconds, manual tuning is cancelled and the display returns to the previous mode.

Switching programmes

1.Press FNC button 3 to receive a DAB sta- tion.

2.Press the right or left SEARCH button % to switch programmes in the DAB station.

Note:

???The programme name may be the same depending on DAB programmes.

Programme scan

This function scans through each receivable programme in a DAB station being received for

10 seconds sequentially. This is useful when you want to search for a desired programme.

1.Press FNC button 3to receive a DAB station.

2.Perform the following operation depending on the connected model.

Press SCN button 4. ???SCAN??? lights up and the unit starts scanning each programme for

10 seconds sequentially. Each time the main unit scans, the programme name is shown in the display.

3.To stop programme scan when a desired programme is tuned in.

Press SCN button 4.

26 XDZ616

Digital Radio / DAB Operations

The main unit has a manual memory function for DAB programmes. Up to 18 programmes

(6 programmes each) can be preset in the pre- set buttons.

[M1], [M2] and [M3]

1.Press FNC button 3 to select DAB mode.

2.Press BND button !to select any one shown above.

3.Press the right or left SEARCH button % to select a desired programme.

4.Press and hold one of Preset buttons (1 to 6) 8 for 2 seconds or longer to store the programme.

Note:

???The interrupt programme (PTY or INFO) cannot be written into a manual memory.

Recalling a preset programme

1.Press FNC button 3 to select DAB mode.

2.Press BND button !. Each time you press

BND button !, the display changes in the fol- lowing order:

In TA standby mode, when a traffic announcement broadcast starts, the traffic announcement broad- cast is received as top priority regardless of the function mode. Traffic programme (TP) automatic tuning is also possible.

???This function can only be used when ???TP??? is lit in the display. When ???TP??? is lit, this means that the DAB or RDS broadcast station being received has traffic announcement programmes.

???For details on ???TA???, refer to the section ???RDS op- eration??? of each owner???s manual.

???Setting TA standby mode

???Cancelling TA standby mode

???Searching for a TP station

Notes:

???If a TP station is not received, the main unit stops the search operation.

??????TP??? may be lit in the display when a TP broadcast

is transmitted from an RDS station. In this case, press ISR button 9 to perform TP seek tuning. Press ISR button 9 again to return to the previ- ous mode.

English

[M1] ??? [M2] ??? [M3] ??? [M1]...

3.Press one of Preset buttons 8 to recall a preset programme.

Note:

???Press and hold Preset button 8 for 2 seconds or longer to store the programme currently being re- ceived. (Manual memory)

INFO (Announcement)

In INFO standby mode, when the selected announcement programme starts, the main unit switches to the selected announcement programme automatically.

AF function

The AF function switches to a different frequency on the same network in order to maintain opti- mum reception.

???The factory default setting is ???ON???

???If the reception of the current broadcast station deteriorates, ???SEARCHING FOR SAME STATION??? or ???SEARCH ??? appears in the display and the radio searches for the same programme on another fre- quency.

???For details on ???AF function???, refer to the section ???RDS operation??? of each owner???s manual.

???Switching OFF the AF function

???Switching ON the AF function

???AF function between RDS and DAB

When the same programme is broadcast by both RDS and DAB, and this function is ON, the main unit switches to receiving the broadcast with the better reception automatically.

??? Setting INFO standby mode

If you press and hold ISR button 9 for 1 second or longer, ???INFO??? lights in the display and the main unit is set into INFO standby mode until the se- lected announcement is broadcast. When the selected announcement broadcast starts, the announcement item appears in the display. If you press and hold ISR button 9 for 1 second or longer while the selected announcement broad- cast is being received, the selected announce- ment broadcast reception is cancelled and the main unit goes into INFO standby mode.

??? Cancelling INFO standby mode

To cancel INFO standby mode, press and hold ISR button 9 for 1 second or longer.

XDZ616 27

Digital Radio / DAB Operations

English

??? Information select

This is a function for selecting INFORMATION ON or OFF in Information interrupt mode.

You can set ON up to 6 information items.

You can select any of the 6 items below:

INFORMATION item

1.Perform the following operation depending on the connected model.

Press and hold ADJ button 2 for 1 second or longer.

2.Press the right or left SEARCH button % to select ???INFO SEL???, then push ENT button # to enter ???INFO SEL??? mode.

3.Press the right or left SEARCH button % to select an information item.You can select any of 6 items:

4.Perform the following operation depending on the connected model.

Turn the Rotary knob $ clockwise or counterclock wise to set the information item for ON or OFF.

5.Press ADJ button 2to return to the previous display.

PTY

This function enables you to listen to the selected programme type, irrespective of the function mode.

???One common PTY can be selected for DAB or RDS.

???Of DAB PTY and RDS PTY, the PTY which is re- ceived earlier takes priority over the other.

???PTY broadcasts are not yet available in all countries.

???In INFO standby mode, INFO stations have prior- ity over PTY stations.

???In TA standby mode, TP stations have priority over PTY stations.

???For details on ???PTY???, refer to the section ???RDS operation??? of each owner???s manual.

???Setting PTY standby mode

???Cancelling PTY standby mode

???Cancelling a PTY interrupt broadcast

???Selecting PTY

???PTY seek

???PTY preset memory

Emergency broadcast

When an emergency broadcast is received, all the function mode operations are stopped.

???ALARM??? appears in the display and the emer- gency broadcast can be heard.

???For details on ???Emergency broadcast???, refer to the section ???RDS operation??? of each owner???s manual.

??? Cancelling an emergency broadcast

Switching the PTY and INFO display language

You can select one of 2 languages (English or

French) for the PTY and INFO shown in the dis- play.

???The factory default setting is ???English???.

???For details on ???Switching the PTY and INFO dis- play language???, refer to the section ???RDS opera- tion??? of each owner???s manual.

Volume setting of TA, INFO, emergency broadcast (ALARM) and PTY

The volume for TA, INFO, ALARM and PTY in- terrupts can be set during TA, INFO, ALARM and PTY interrupt. Perform the following operation depending on the connected model.

??? The factory default setting is ???15???.

During a TA, INFO, ALARM or PTY interrupt, turn the Rotary knob $ clockwise or coun- terclockwise to set the volume to a desired level (0 to 33).

???When the TA, INFO, ALARM or PTY interrupt ends, the volume returns to the level it had before the interrupt.

28 XDZ616

DVD operation

DVD deck control

When an optional DVD deck (sold separately) is connected through the CeNET cable, this unit controls some DVD deck functions.

Listening to DVD

Press FNC button 3 and select the DVD mode.

Adjust the volume

Turning the Rotary Knob $ clockwise increases the volume; turning it counterclockwise de- creases the volume.

Other operations refer to DVD deck???s owner???s manual.

English

XDZ616 29

English

9. TROUBLESHOOTING

30 XDZ616

10. ERROR DISPLAYS

If an error occurs, one of the following displays is displayed.

Take the measures described below to eliminate the problem.

If an error display other than the ones described above appears, press the reset button. If the problem persists, turn off the power and consult your store of purchase.

XDZ616 31

11. SPECIFICATIONS

English

FM Tuner

Frequency Range:

87.9 MHz to 107.9 MHz

Usable Sensitivity:

9 dBf

50dB Quieting Sensitivity:

15 dBf

Alternate Channel Selectivity:

70 dB

Stereo Separation (1 kHz):

35 dB

Frequency Response (??3 dB):

30 Hz to 15 kHz

AM Tuner

Frequency Range:

530 kHz to 1710 kHz

Usable Sensitivity:

25 ??V

CD Player

System:

Compact disc digital audio system

Usable Discs:

Compact disc

Frequency Response (??1 dB):

5 Hz to 20 kHz

Signal to Noise Ratio (1 kHz):

100 dB

Dynamic Range (1 kHz):

95 dB

Harmonic Distortion:

0.01%

Audio

Maximum Power Output:

200 W (50 W ?? 4) (EIAJ)

Continuous Average Power Output:

18 W ?? 4, into 4 ??, 20 Hz to 20 kHz, 1%THD

Bass Control Action (30 Hz):

+15 dB / -12dB

MID Control Action (1kHz):

??12dB

Treble Control Action (10 kHz):

??12 dB

Line Output Level (CD 1 kHz):

4 V

General

Power Supply Voltage:

14.4 V DC (10.8 to 15.6 V allowable), negative ground

Current Consumption:

Less than 15 A

Speaker Impedance:

4 ?? (4 ?? to 8 ?? allowable)

Weight / Source unit: 3.75 lb. (1.7 kg)

Weight / Remote control unit:

1 oz. (30 g) (including battery)

Dimensions / Source unit:

7" (Width) ?? 2" (Height) ?? 6-1/8" (Depth)

[178 (W) ?? 50 (H) ?? 155 (D) mm]

Dimensions / Remote control unit:

1-3/4" (Width) ?? 4-5/16" (Height) ?? 1-1/8" (Depth)

[44 (W) ?? 110 (H) ?? 27 (D) mm]

Notes:

???Specifications comply with EIA Standards.

???Specifications and design are subject to change without notice for further improvement.

32 XDZ616