Owner'smanual
Mode d'emploi
Manual de instrucciones
DXZ385US8
CD/USB/MP3IWMAlAAC RECEIVER WITH CeNET CONTROL AUTORADIO CD/USB/MP3IWMAlAAC I AVEC COMMANDE CeNET RECEPTOR CD/USB/MP3IWMAlAAC CON CONTROL CeNET
Owner'smanual
Mode d'emploi
Manual de instrucciones
DXZ385US8
CD/USB/MP3IWMAlAAC RECEIVER WITH CeNET CONTROL AUTORADIO CD/USB/MP3IWMAlAAC I AVEC COMMANDE CeNET RECEPTOR CD/USB/MP3IWMAlAAC CON CONTROL CeNET

This equipment has been tested and found to comply with the limits for a Class B digital device, pursuant to Part 15 of the FCC Rules.
These limits are designed to provide reasonable protection against harmful interference in a residential installation.
This equipment generates, uses, and can radiate radio frequency energy and, if not installed and used in accordance with the instructions, may cause harmful interference to radio communications. However, there is no guarantee that interference will not occur in a particular installation.
If this equipment does cause harmful interference to radio or television reception, which can be determined by turning the equipment off and on, the user is encouraged to consult the dealer or an experienced radiolTV technician for help.
Cet appareil a ???lte teste et juge conforme aux limites des appareils numeriques de Classe B, aux termes de la Section 15 des Reglements FCC.
Ces limites ont pour but d'assurerune protection raisonnable contre les interferences parasites dans une installation residentielle.
Cet appareil engendre, utilise et peut emettre une ???lnergie radioelectrique et, s'iln'estpas installe et utilise en stricte conformite avec ces instructions, il peut provoquer des interferences parasites sur les liaisons radiophoniques. Ceci ne garantit par pour autant qu'uneinstallation particuliere ne provoquera aucune interference.
Si I'appareilengendre des interferences sur la reception des ondes radio ou de television, ce qui peut etre veriM en mettant I'appareilhors tension puis sous tension, I'utilisateurest invite aconsulter son revendeur ou un technicien exprimente en radio/telEwision pour lui demander conseil.
Este equipo ha sido probado y se ha comprobado que cumple con los Iimites de un dispositivo digital de c1ase B, segun 10 indicado en la Parte 15 de las Normas de FCC.
Estos Iimites se han establecido para ofrecer una protecci6n razonable contra interferencias perjudiciales en instalaciones residenciales.
Este equipo genera, emplea, y puede radiar energia de radiofrecuencia y, si no se instala y emplea de acuerdo con las instrucciones, puede causar interferencias perjudiciales en las radiocomunicaciones. Sin embargo, no se garantiza que las interferencias no ocurran en una instalaci6n en particular.
Si este equipo causa interferencias perjudiciales en la recepcion de radio 0 de television, 10 cual podra determinarse conectando y desconectando la alimentacion del equipo, se aconseja al usuario que consulte al abastecedor 0 que pida ayuda a un tecnico en radio/television experimentado.
12V e GROUND
AM
THIS DEVICE COMPLIES WITH PART'5 OF THE FCC RULES. OPERATION IS SUBJECT TO THE FOLL~NG lWO CONDITIONS:
(1)THIS OEVICE MAY NOT CAUSE HARMFUL INTERFERENCE, AND
(2)THIS DEViCE MUST ACCEPT my INTERFERENCE RECEIVED,
INCLUDING INTERFERENCE THAT MAY CAUSE UNDESIRED
OPERATION
THIS PRODUCTION COMPLIES WITH OHHS RULES 21 CFR
SUBCHAPTER J APPLICABLE AT DATE OF MANUFACTURE.
CLARION CO_,l TO
This product includes technology owned by
Microsoft Corporation and cannot be used or distributed without a license from MSlGP.
MANUFACTURED
o
Bottom View of Source Unit Fond de I'appareilpilote
Vista inferior de la unidad fuente
2 DXZ385USB

CLARION PRODUCT REGISTRATION INFORMATION
For USA and Canada only
www.clarion.com
Dear Customer:
Congratulations on your purchase of a Clarion mobile electronic products. We are confident that you'llenjoy your Clarion experience.
There are many benefits to registering your product. We invite you to visit our website at www.clarion.com to register your Clarion product.
We have made product registration simple with our easy to use website. The registration form is short and easy to complete. Once you'reregistered, we can keep you informed of important product information.
Register at www.clarion.com - it'seasy to keep your Clarion product up to date.
Thank you for purchasing this Clarion product.
*Please read this owner'smanual in its entirety before operating this equipment.
*After reading this manual, be sure to keep it in a handy place (e.g., glove compartment).
*Check the contents of the enclosed warranty card and keep it carefully with this manual.
Contents
DXZ385USB 3
1.FEATURES
IAACI IUS~tHI rB!fINET
~ IQl Madefor
REA D Y
???USB Audio for iPod??
???USB Digital Media Streaming Capability
???
*"iPod" is for legal or
*XM and the XM logos are trademarks of XM Satellite Radio Inc.
.
RI?~
ID3TAG
2.PRECAUTIONS
1.When the inside of the car is very cold and the player is used soon after switching on the heater moisture may form on the disc or the optical parts of the player and proper playback may not be possible. If moisture forms on the disc, wipe it off with a soft cloth. If moisture forms on the optical parts of the player, do not use the player for about one hour. The condensation will disappear naturally allowing normal operation.
2.Driving on extremely bumpy roads which cause severe vibration may cause the sound to skip.
3.This unit uses a precision mechanism. Even in the event that trouble arises, never open the case, disassemble the unit, or lubricate the rotating parts.
A CAUTION
USE OF CONTROLS, ADJUSTMENTS, OR
PERFORMANCE OF PROCEDURES OTHER
THAN THOSE SPECIFIED HEREIN, MAY
RESULT IN HAZARDOUS RADIATION
EXPOSURE.
THE COMPACT DISC PLAYER SHOULD NOT
BE ADJUSTED OR REPAIRED BY ANYONE
EXCEPT PROPERLY QUALIFIED SERVICE
PERSONNEL.
CHANGES OR MODIFICATIONS NOT
EXPRESSLY APPROVED BY THE
MANUFACTURER FOR COMPLIANCE
COULD VOID THE USER'SAUTHORITY TO
OPERATE THE EQUIPMENT.
INFORMATION FOR USERS:
CHANGES OR MODIFICATIONS TO THIS
PRODUCT NOT APPROVED BY THE
MANUFACTURER WILL VOID THE
WARRANTY AND WILL VIOLATE FCC
APPROVAL.
4 DXZ385USB

Handling Compact Discs
Use only compact discs bearing the [Q]D~?? or
Storage
ffilm mark.
~
DIOITALAUDIO
Do not play
Some CDs recorded in
Handling
???Compared to ordinary music CDs,
Therefore, do not leave them for a long time in the car.
???New discs may
roughness Roughness
around the
edges. If such discs are used, the player may not work or the
sound may skip. Use a
???Never stick labels on the surface of the compact disc or mark the surface with a pencil or pen.
???Never playa compact disc with any cellophane tape or other glue on it or with peeling off marks. If you try to play such a compact disc, you may not be able to get it back out of the CD player or it may damage the CD player.
???Do not use compact discs that have large scratches, are misshapen, cracked, etc. Use of such discs may cause misoperation or damage.
???To remove a compact disc from its storage case, press down on the center of the case and lift the disc out, holding it carefully by the edges.
???Do not use commercially available CD protection sheets or discs equipped with stabilizers, etc. These may damage the disc or cause breakdown of the internal mechanism.
Cleaning
???To remove fingermarks and dust, use a soft cloth and wipe in a straight line from the center of the compact disc to the circumference.
???Do not use any solvents, such as commercially available cleaners,
???After using special compact disc cleaner, let the compact disc dry off well before playing it.
DXZ385USB 5

3. CONTROLS
Names of the Buttons and Their Functions
[RELEASE] ~(::;(~fD~~
[~]
[RELEASE] button
???Press the [RELEASE] button to unlock the DCP.
[rNI~] button
???Perform preset scan while in the radio mode. When the button is pressed and held, auto store is performed.
???Play or pause a track while in the CD/MP31 WMAlAAC mode.
???Confirm various settings.
[~](UP), [~] (ON) buttons
???Select the folder while in the MP3IWMAlAAC mode.
???Use the buttons to perform various settings.
[IR RECEIVER]
???Receiver for remote control unit. (Operating range: 30?? in all directions)
[CD SLOT]
??? CD insertion slof.
[USB SLOT]
???USB memory/MTP/iPod devices insertion slot.
[AUX] input jack
???The input jack for connecting an external device.
[USB SLOT]
~~J)
L..
[SOUND] button
???Use the button to switch to the sound adjust mode.
???Press and hold the button for 1 second or longer to turn on or off the MAGNA BASS EXTEND mode.
[DIRECT] buttons
???Store a station into memory or recall it directly while in the radio mode.
[ROM] button
???Perform random play while in the CD/MP31 WMAlAAC mode.
???Press and hold the button for 1 second or longer to perform folder random play while in the MP3IWMAlAAC mode.
[RPT] button
???Perform repeat play while in the CD/MP31 WMAlAAC mode.
???Press and hold the button for 1 second or longer to perform folder repeat play while in the MP3IWMAlAAC mode.
6 DXZ385USB
Names of the Buttons and Their Functions
[SCN] button
???Perform scan play for 10 seconds of each track while in the CD/MP3/wMAlAAC mode.
???Press and hold the button for 1 second or longer to perform folder scan play while in the MP3/wMAlAAC mode.
[ISR] button
???RecalliSR radio station in memory.
???Press and hold the button for 2 seconds or longer: Store current station into ISR memory (radio mode only).
[DISP] button
???Switch the display indication.
???Press and hold the button for 1 second or longer to enter the adjust mode.
[ROTARY] knob
???Adjust the volume by turning the knob clockwise or counterclockwise.
[BND] button
???Switch the band, or seek tuning or manual tuning while in the radio mode.
???Playa first track while in the CD/MP3/wMAI AAC mode.
???Press the button to change the character.
[SRC] button
???Press the button to turn on the power.
???Press and hold the button for 1 second or longer to turn off the power.
???Switch the operation mode among the radio mode, etc.
[~], [~] buttons
???Select a station while in the radio mode or select a track while in the CD/MP3/wMAlAAC mode.
This button is used to make various settings.
???Press and hold the button for 1 second or longer to enter the
[~](EJECT) button
???Eject a disc when it is loaded into the unit.
DXZ385USB 7
Display Items
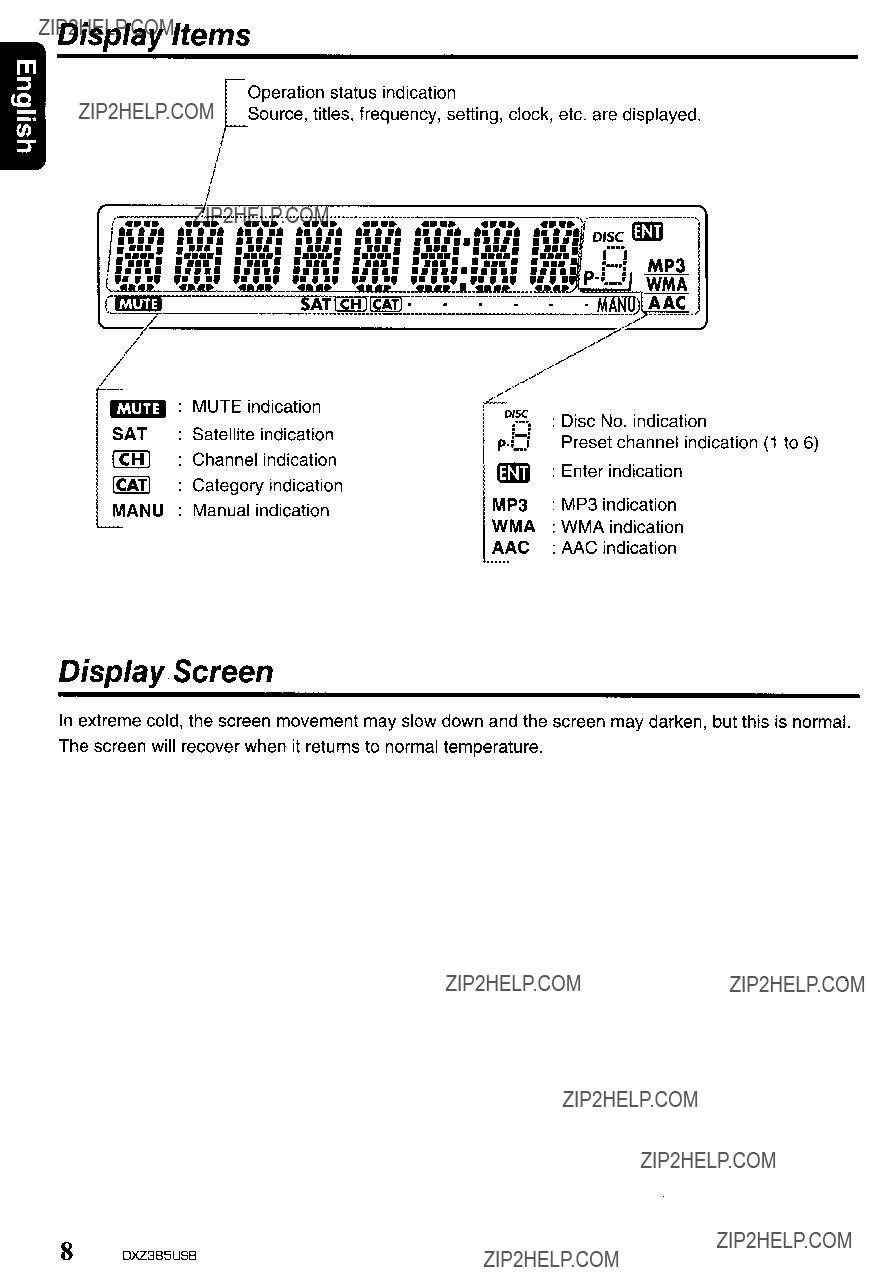
Operation status indication
Source, titles, frequency, setting, clock, etc. are displayed.
MUTE indication
SAT Satellite indication
ICHI Channel indication
ICATI Category indication
MANU Manual indication
AAC
Display Screen
In extreme cold, the screen movement may slow down and the screen may darken, but this is normal.
The screen will recover when it returns to normal temperature.
8 DXZ385USB
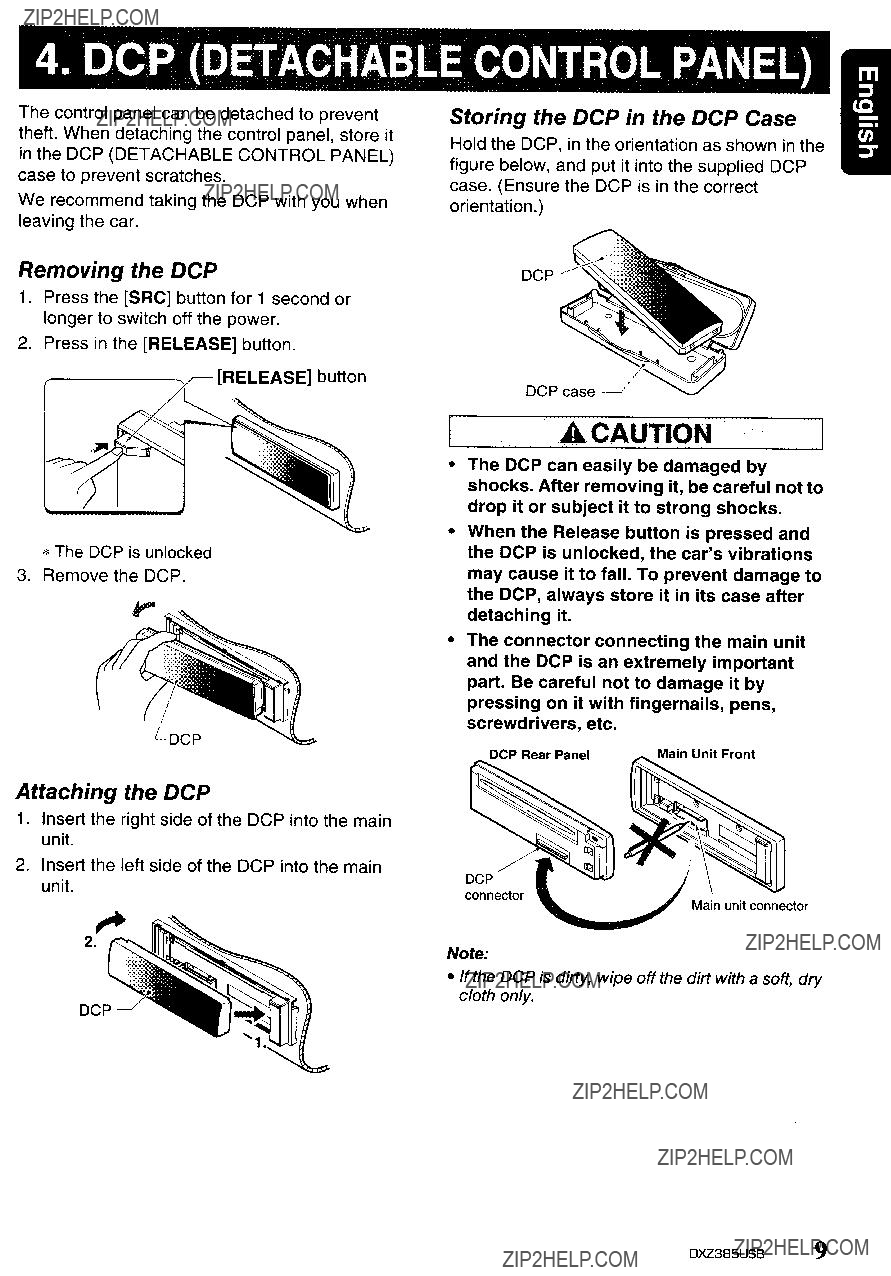
4. DCP (DETACHABLE CONTROL PANEL)
The control panel can be detached to prevent theft. When detaching the control panel, store it in the DCP (DETACHABLE CONTROL PANEL) case to prevent scratches.
We recommend taking the DCP with you when leaving the car.
Storing the DCP in the DCP Case
Hold the DCP, in the orientation as shown in the figure below, and put it into the supplied DCP case. (Ensure the DCP is in the correct orientation.)
Removing the DCP
1.Press the [SRC] button for 1 second or longer to switch off the power.
2.Press in the [RELEASE] button.
[RELEASE] button
*The OCP is unlocked
3.Remove the OCP.
Attaching the DCP
1.Insert the right side of the OCP into the main unit.
2.Insert the left side of the DCP into the main unit.
ACAUTION
???The DCP can easily be damaged by shocks. After removing it, be careful not to drop it or subject it to strong shocks.
???When the Release button is pressed and the DCP is unlocked, the car'svibrations may cause it to fall. To prevent damage to the DCP, always store it in its case after detaching it.
???The connector connecting the main unit and the DCP is an extremely important part. Be careful not to damage it by pressing on it with fingernails, pens, screwdrivers, etc.
OCP
connector
Note:
???If the DCP is dirty, wipe off the dirt with a soft, dry cloth only.
OXZ385USB 9

5. REMOTE CONTROL
Functions of Remote Control Unit Buttons
*Some buttons on the remote control unit have different functions from the corresponding buttons on the main unit.
[!J, [T]
II~':'l':'~~~
[MUTE]
clarion
[SRC] button
???Press the button to turn on the power. Press and hold the button for 1 second or longer to turn off the power.
???Use to alternate operation mode among the various modes.
LA], [....] buttons
??? Increases and decreases volume.
[MUTE] button
??? Turns mute function on and off.
[ISR] button
???Recalls ISR radio station stored in memory.
???Press and hold the button for 2 seconds or longer to store current station in ISR memory (radio mode only).
[BND] button
???Switches reception band.
[~], [~] buttons
???Moves preset channels up and down.
[SCN] button
???Press to perform preset scan.
???Press and hold the button for 2 seconds or longer to perform auto store.
???In the Satellite Radio mode, press once to perform category scan; hold depressed for 1 second or longer to perform preset scan.
???CDIMP3/WMAIAAC and USB/MTP modes
[BND] button
[DISP] button
??? Press to select the desired display.
???Press to play the first track.
[~], [~] buttons
???Press to move the tracks up and down.
???Press and hold the button for 1 second or longer to perform
10 DXZ385US8
??? Press to perform random play.
???When in MP3IWMAlAAC and USB/MTP modes, press and hold the button for 1 second or longer to perform folder random play.
???CD changerlDVD changer modes
[BND] button
???Press to switch to next disc in ascending order.
[~], [~] buttons
???Press to move the tracks up and down.
???Press and hold the button for 1 second or longer to perform
??? TV mode
[BND] button
???Switches reception band.
[~], [~] buttons
???Moves preset channels up and down.
[SCN] button
???Press to perform preset scan.
???Press and hold the button for 2 seconds or longer to perform auto store.
[ROM] button
??? Press to alternate between TV and VTR.
[~II] button
??? Switches between playback and pause.
[SCN] button
???Press to perform scan play.
???Press and hold the button for 1 second or longer to perform disc scan play.
[RPT] button
???Press to perform repeat play.
???Press and hold the button for 1 second or longer to perform disc repeat play.
[ROM] button
???Press to perform random play.
???Press and hold the button for 1 second or longer to perform disc random play.
DXZ385USB 11

Inserting the Battery
CD Turn over the remote control unit and slide the cover in the direction indicated by the arrow in the illustration.
?? Insert the battery (CR2025) into the insertion guides, with the printed side (+) facing upwards.
?? Press the battery in the direction indicated by the arrow so that it slides into the compartment.
@ Replace the cover and slide in until it clicks
into place.
Notes:
Insertion guide
Misuse may result in rupture of the battery, producing leakage of fluid and resulting in personal injury or damage to surrounding materials. Always follow these safety precautions:
???Use only the designated battery.
???When replacing the battery, insert properly, with +/- polarities oriented correctly.
???Do not subject battery to heat, or dispose of in fire or water. Do not attempt to disassemble the battery.
???Dispose of used batteries properly.
12 DXZ385USB

6. OPERATIONS
Note:
??? Be sure to read this chapter referring to the front diagrams of chapter "3. CONTROLS" on page 6.
Basic Operations
Be sure to lower the volume before switching off the unit power or the ignition key. The unit remembers its last volume setting. If you switch the power off with the volume up, when you switch the power back on, the sudden loud volume may hurt your hearing and damage the unit.
Turning on/off the power
Note:
???Be careful about using this unit for a long time without running the engine. If you drain the car's battery too far, you may not be able to start the engine and this can reduce the service life of the battery.
1.Press the [SAC] button.
2.The illumination and display on the unit light up. The unit automatically remembers its last operation mode and will automatically switch to display that mode.
3.Press and hold the [SAC] button for 1 second or longer to turn off the power for the unit.
Note:
???System check
The first time this unit is turned on after the wire connections are completed, it must be checked what equipment is connected. When the power is turned on, the
Selecting a mode
1.Press the [SAC] button to change the operation mode.
2.Each time you press the [SAC] button, the operation mode changes in the following order:
Radio'"(Satellite radio) CD/MP3/wMA/ AAC ... USB/MTP/iPod (CD changer) ...
(DVD changer) ... (TV) AUX ... Radio .
*External equipment not connected with CeNET is not displayed.
*iPod/MTP can connect to this unit via USB SLOT.
Adjusting the volume
1.Turning the [AOTAAY] knob clockwise increases the volume; turning it counterclockwise decreases the volume.
*The volume level is from 0 (minimum) to 33 (maximum).
Switching the display
Press the [DISP] button to select the desired display.
*Once selected, the preferred display becomes the display default. When a function adjustment such as volume is made, the screen will momentarily switch to that function'sdisplay, then revert back to the preferred display several seconds after the adjustment.
*If the button operation is performed with the screen saver function on, the operation display corresponding to the button operation is shown for about 30 seconds and the display returns to the screen saver display.
For details, refer to the subsection "Turning the screen saver function on or off'in section "Operations Common to Each Mode".
DXZ385USB 13

Basic Operations
Sound Adjustment
You can adjust a sound effect or tone quality to your preference.
To change sound setting
1.Press the [SOUND] button to switch to the sound adjustment selection display.
*The factory default sound setting is "Z- EHCR".
2.Then press the [~....] or [~] button to select the sound adjustment mode. Each time you press the [~] or [~] button, the sound adjustment mode changes as following order:
*In the case of display blinking "ENT", you can press the
*The sound adjustment mode will be displayed for 2 seconds before showing the sound setting.
3.Press the LA] or [T] button to adjust the selected audio mode.
4.After completing settings, press the [SOUND] button to return to the previous mode.
???Setting the
This unit is provided with 4 types of sound tone effects stored in memory.
Select the one you prefer.
* The factory default setting is "OFF".
"Z+FLAT"
When "Z+FLAT" is set:
When "CUSTOM" is set:
When
* The factory default setting is "0".
??? Adjusting the bass
This adjustment can be performed only when the
"BASS<G>"
* The factory default setting is "BASS<G>".
BASS<G>
:The factory default setting is "0". (Adjustment range: +7 to
BASS<F>
:The factory default setting is "60". (Adjustment range: 60/80/100/200)
BASS<Q>
:The factory default setting is "1". (Adjustment range: 1/1.25/1.5/2)
14 DXZ385US8

Basic Operations
??? Adjusting the treble
This adjustment can be performed only when the
"TREB<G>" ~ ''TREB<F>''
* The factory default setting is ''TREB<G>''.
TREB<G>:The factory default setting is "0". (Adjustment range: +7 to
TREB<F>: The factory default setting is "10k".
(Adjustment range: 10k/12.5k/15k/17.5k)
??? Adjusting the balance
*The factory default setting is "CENTER" (center). (Adjustment range: RIGHT12 to LEFT12 (right 12 to left 12))
???Adjusting the fader
*The factory default setting is "CENTER" (center). (Adjustment range: FRONT12 to REAR12 (front 12 to rear 12))
???Setting the subwoofer
You can set the low pass filter of subwoofer.
"THROUGH" ~ "LPF 50" ~ "LPF 80" ~ "LPF 120"
* The factory default setting is "THROUGH".
??? Adjusting the subwoofer output volume
You can adjust the volume output from the unit's subwoofer output terminal.
This adjustment can be performed only when the
*The factory default setting is "0". (Adjustment range: +6 to
*When the volume level is more than 30, the subwoofer volume adjustment value can not reach +6.
???Adjusting the high pass filter
The setting changes in the following order: "120" H ''THROUGH''
*The factory default setting is "THROUGH" (through).
*This is supported only with amplifiers equipped with this function. Output is not supported from RCA cables.
Note:
???During SOUND adjustment mode, if no operation is performed for more than 10 seconds, this mode can be cancelled and return to previous mode.
Setting the MAGNA BASS EXTEND
The MAGNA BASS EXTEND does not adjust the low frequencies like the normal sound adjustment function, but emphasizes the deep bass frequencies to provide you with a dynamic sound.
*The factory default setting is "OFF'(off).
1.Press and hold the [SOUND] button for 1 second or longer to turn on the MAGNA BASS EXTEND effect.
2.Press and hold the [SOUND] button for 1 second or longer to turn off the MAGNA BASS EXTEND effect.
DXZ385USB 15
Radio Operations
Listening to the radio
1.Press the [SRC] button and select the radio mode. The frequency appears in the display.
2.Press the [BND] button and select the radio band. Each time the button is pressed, the radio reception band changes in the following order:
F1 (FM1) ~ F2 (FM2) ~ F3 (FM3) ~ AM ~ F1 (FM1 )...
3.Press the [~] or [~] button to tune in the desired station.
Tuning
There are 3 types of tuning mode available, seek tuning, manual tuning and preset tuning.
Seek tuning
1.Press the [BND] button and select the desired band (FM or AM).
*If "MANU" is lit in the display, press and hold the [BND] button for 1 second or longer. "MANU" in the display goes off and seek tuning is now available.
2.Press the [~....] or [~] button to automatically seek a station.
When the [~] button is pressed, the station is sought in the direction of higher frequencies; if the [~....] button is pressed. the station is sought in the direction of lower frequencies.
Manual tuning
There are 2 ways available: Quick tuning and step tuning.
When you are in the step tuning mode, the frequency changes one step at a time. In the quick tuning mode, you can quickly tune the desired frequency.
1.Press the [BND] button and select the desired band (FM or AM).
*If "MANU" is not lit in the display, press and hold the [BND] button for 1 second or longer. "MANU" is lit in the display and manual tuning is now available.
2.Tune into a station.
??? Quick tuning
Press and hold the [~] or [~] button for 1 second or longer to tune in a station.
??? Step tuning
Press the [~....] or [~] button to manually tune in a station.
Recalling a preset station
A total of 24 preset positions
1.Press the [BND] button and select the desired band (FM or AM).
2.Press the corresponding [DIRECT] button or the [.A.] I [T) button to recall the stored station.
Note:
???Press and hold one of the [DIRECT] buttons for 2 seconds or longer to store that station into preset memory.
Manual memory
1.Select the desired station with seek tuning or manual tuning.
2.Press and hold one of the [DIRECT] buttons for 2 seconds or longer to store the current station into preset memory.
Auto store
Auto store is a function for storing up to 6 stations that are automatically tuned in sequentially. If 6 receivable stations cannot be received, a previously stored station remains unoverwritten at the memory position.
1.Press the [BND] button and select the desired band (FM o.r AM).
2.Press and hold the [~~~] button for 2 seconds or longer. The stations with good reception are stored automatically to the preset channels.
16 DXZ385USB
Radio Operations
Preset scan
Preset scan receives the stations stored in preset memory in order. This function is useful when searching for a desired station in memory.
1.Press the [~J~] button.
2.When a desired station is tuned in, press the [~J~ ] button again to continue receiving that station.
Note:
???Be careful not to press and hold the [~J~ J button for 2 seconds or longer, otherwise the auto store function is engaged and the unit starts storing stations.
Instant station recall (lSR)
Instant station recall is a special radio preset that instantly accesses a favorite radio station at a touch of a button. The ISR function even operates with the unit in other modes.
elSR memory
1.Select the station that you wish to store in ISR memory.
2.Press and hold the [ISR] button for 2 seconds or longer.
e Recalling a station with ISR
In any mode, press the [lSR] button to turn on the radio function and tune the selected radio station. "ISR" appears in the display. Press the [lSR] button again to return to the previous mode.
DXZ385USB 17
CDIMP31WMAIAAC Operations
MP31WMAIAAC
What is MP3?
MP3 is an audio compression method and classified into audio layer 3 of MPEG standards. This audio compression method has penetrated into PC users and become a standard format.
This MP3 features the original audio data compression to about 10 percent of its initial size with a high sound quality. This means that about 10 music CDs can be recorded on a
What is WMA?
WMA is the abbreviation of Windows Media Audio, an audio file format developed by Microsoft Corporation.
Notes:
???If you playa file with DRM (Digital Rights Management) for WMA remaining ON, no audio is output (The WMA indicator blinks).
???Windows Media TM, and the Windows ?? logo are trademarks, or registered trademarks of Microsoft Corporation in the United States and/or other countries.
???To disable DRM (Digital Rights Management)
1.When using Windows Media Player 9/10/11, click on TOOL ~ OPTIONS ~ MUSIC . RECORD tab, then under Recording settings, unclick the Check box for RECORD PROTECTED MUSIC. Then, reconstruct files.
Personally constructed WMA files are used at your own responsibility.
What is AAC?
???AAC is an acronym for uAdvanced Audio Coding" and refers to the audio compression method used with video compression standards
???AAC files composed with the following conditions can be played:
-AAC files encoded with iTunes.
-iTunes Ver. 7.0 or earlier.
-File extension U. m4a" (u.M4A")
???Tracks purchased at an iTunes Music store, and
???When playing AAC files that include image data, additional time may be required before playback begins.
???Files may not play properly, depending on the iTunes version under which an AAC file is encoded.
Precautions when creating MP31 WMAIAAC file
???Usable sampling rates and bit rates
1.MP3: Sampling rate 8
2.WMA: Bit rate 8
3.AAC: Sampling rate 8
???File extensions
1.Always add a file extension u.MP3", u.WMA" or ".M4A" to MP3, WMA or AAC file by using single byte letters. If you add a file extension other than specified or forget to add the file extension, the file cannot be played.
2.Files without MP3IWMAlAAC data will not play. The indication UNO FILE" appears in the play time display if you attempt to play files without MP3IWMAlAAC data.
*When VBR files are played, the play time display may differ the play location.
*When MP3IWMAlAAC files are played, a little no sound part is caused between tunes.
18 DXZ385USB

CDIMP31WMAIAAC Operations
???Logical format (File system)
1.When writing MP3IWMAJAAC file on a
2.The folder name and file name can be displayed as the title during MP3IWMAJAAC play but the title must be within 64 single byte alphabetical letters and numerals (including an extension).
3.Do not affix a name to a file inside a folder having the same name.
???Folder structure
1.A disc with a folder having more than 8 hierarchical levels will be impossible.
???Number of files or folders
1.Up to 255 files can be recognized per folder. Up to 510 files can be played.
2.Tracks are played in the order that they were recorded onto a disc. (Tracks might not always be played in the order displayed on the PC.)
3.Some noise may occur depending on the type of encoder software used while recording.
Set the type of file to be played
When a single disc holds both normal CD type tracks and MP3IWMAJAAC type tracks, use this command to select which type of track to play.
*Default setting is
???When only one type of track (either music CD or MP3IWMAIAAC) is recorded on a disc, selecting either type will allow playback of the disc.
???When playing CCCD
1.Press and hold the [BND] button for 1 second or longer.
Each time the button is held pressed in this way,
???
When playing music CD only.
???
When playing music MP3IWMAJAAC only.
2.When setting is completed, remove the disc and reinsert it.
As long as the ignition key is turned to the ON or ACC position, this function allows you to turn the power to the unit and start playing the disc automatically when the disc is inserted even if the power is not turned on.
I
???Do not try to put your hand or fingers in the disc insertion slot. Also never insert foreign objects into the slot.
???Do not insert discs where adhesive comes out from cellophane tape or a rental CD label, or discs with marks where cellophane tape or rental CD labels were removed. It may be impossible to extract these discs from the unit and they may cause the unit to break down.
Backup Eject function
Just pressing the [~] button, ejects the disc even if the power to the unit was not turned on.
1.Press the [~l button to eject the CD. Take it out from the ejected position. "EJECT" appears in the display.
Notes:
???If a CD (12 em) is left in the ejected position for 15 seconds, the CD is automatically reloaded (Auto reload).
???If you force a CD into before auto reloading, this can damage the CD.
DXZ385US8 19
CDIMP31WMAIAAC Operations
Listening to a disc already loaded in the unit
Press the [SRC] button to select the CD/MP3I WMAlAAC mode.
When the unit enters the CD/MP3/wMAlAAC mode, play starts automatically.
If there is no disc loaded, the indication "NO DISC" appears in the title display.
The mode changes each time the [SRC] button is pressed. (Modes are not displayed for equipment that is not connected.)
Radio (Satellite radio)'"CD/MP3IWMAI AAC USB/MTP/iPod (CD changer) ...
(DVD changer) ... (TV) AUX ... Radio .
Loading a CD
1.Insert a CD into the center of the CD SLOT with the labeled side facing up. "LOADING" appears in the display, the CD enters into the slot, and the play starts.
Notes:
???Never insert foreign objects into the CD SLOT.
???If the CD is not inserted easily, there may be another CD in the mechanism or the unit may
??? Some CDs recorded in
Pausing play
1.Press the [~J~] button to pause play. "PAUSE" appears in the display.
2.To resume CD play, press the [~NI~] button again.
Displaying CD titles
This unit can display title data for
1.Each time you press the [DISP] button to change the title display.
???
User'"Track'"Disc'"Artist ... User ...
???MP3IWMAlAAC disc
Track'"Folder'"Title'"Album ... Artist ...
Track ...
Notes:
???If the CD playing is not a
???If MP31WMAIAAC disc is not input TAG, "NO TITLE" appears in the display.
???For MP3, supports 103 Tags V2.3 I 2.2 11.1 11.0.
???Tag displays give priority to V2.3 I 2.2.
???In the case of album Tags for WMA, the information written into the extension header is displayed.
???Only ASCII characters can be displayed in Tags.
Selecting a track
???
1.Press the [~] button to move ahead to the beginning of the next track.
2.Each time you press the [~] button, the track advances ahead to the beginning of the next track.
???
1.Press the [~] button to move back to the beginning of the current track.
2.Press the [~] button twice to move back to the beginning of the previous track.
???
1.Press and hold the [~] button for 1 second or longer.
???
1.Press and hold the [~] button for 1 second or longer.
*For MP3IWMAJAAC discs, it takes some time until the start of searching and between tracks. In addition, the playing time may have a margin of error.
20 DXZ385USB
CDIMP31WMAIAAC Operations
Folder Select
This function allows you to select a folder containing MP3IWMAlAAC files and start playing from the first track in the folder.
1.Press the [T] or [??.] button.
Press the [??.] button to move the next folder. Press the [T] button to move the previous folder.
2.To select a track, press the [........] or [~] button.
Top function
The top function resets the CD player to the first track of the disc. Press the [BND] button to play the first track (track No.1) on the disc.
*In case of MP3IWMAlAAC, the first track of a folder being played will be returned.
Other various play functions
.Scan play
This function allows you to locate and play the first 10 seconds of all the tracks recorded on a disc.
1.Press the [SCN] button to perform scan play.
"SCAN" appears in the display for 2 seconds.
*Scan play starts from the next track after the track currently being played.
???Folder scan play
This function allows you to locate and play the first 10 seconds of the first track of all the folders on an MP3IWMAlAAC disc.
1.Press and hold the [SCN] button for 1 second or longer to perform folder scan play.
"ALL SCAN" appears in the display for 2 seconds.
*Folder scan play starts from the next folder after the folder??currentlybeing played.
??? Repeat play
This function allows you to play the current track repeatedly.
1.Press the [RPT] button to perform repeat play.
"REPEAT" appears in the display for 2 seconds.
??? Folder repeat play
This function allows you to playa track currently being played in the MP3IWMAlAAC folder repeatedly.
1.Press and hold the [RPT] button for 1 second or longer to perform folder repeat play.
"ALL RPT'appears in the display for 2 seconds.
???Random play
This function allows you to play all tracks recorded on a disc in a random order.
1.Press the [ROM] button to perform random play.
"RANDOM" appears in the display for 2 seconds.
???Folder random play
This function allows you to play all the tracks of all the folders recorded on an MP3IWMAlAAC disc in a random order.
1.Press and hold the [ROM] button for 1 second or longer to perform folder random play.
"ALL ROM" appears in the display for 2 seconds.
.To cancel play
1.Press the operating button previously selected.
*The various play mode is canceled and the various playoff mode appears in the display for 2 seconds.
DXZ385USB 21

Operations Common to Each Mode
To change adjustment setting
1.Press and hold the [DISP] button for 1 second or longer to switch to the adjustment selection display.
2.Press the [~] or [~] button to select the "item name".
"CLOCK" ~ "SETIINGS" ~ "SCRN SVR"
3.Press the [.] or [T] button to select the
"desired setting value".
*In the case of display blinking "ENT", you can press the [~~~ 1button to adjust the setting value.
*After completing settings, press the [DISP] button to return to the previous mode.
???Setting the clock
* The clock is displayed in
memory.
Note:
???You cannot set the clock when it is displayed with only the ignition on. If you drain or remove the car's battery or take out this unit, the clock is reset. While setting the clock, if another button or operation is selected, the clock set mode is canceled.
??? Displaying the settings
The number of indicator of this unit decreases, you can see the state of current settings at any operation mode.
*When the setting is selected, after 1 second the current state will be displayed.
??? Turning the screen saver function on or off
This unit is provided with the screen saver function which allows you to show various kinds of patterns and characters in the operation status indication area of the display in a random order. You can turn on or off this function. If the button operation is performed with the screen saver function on, the operation display corresponding to the button operation is shown for about 30 seconds and the display returns to the screen saver display.
* The factory default setting is "ON".
Each time you press the [.] or [T] button, the setting changes in the following order:
22 DXZ385USB

Operations Common to Each Mode
??? Entering message information
Message up to 30 characters long can be stored in memory and displayed as a type of screen saver setting.
*The factory default setting is "WELCOME TO CLARION".
Capital letters .. Numbers" Symbols ..
Capital letters...
*Press and hold the [BND] button for 1 second or longer to cancel the input message. Then press and hold the
???Setting the method for title scroll
Set how to scroll in
* The factory default setting is "ON".
??? ON:
To scroll automatically.
??? OFF:
To scroll just 1 time.
*When you want to see the title again, in the title mode, press and hold the [DISP] button for 3 seconds or longer to scroll the title.
??? Setting the dimmer control
You can set the dimmer control "ON" or "OFF".
* The factory default setting is "ON".
???Setting the external amplifier
*The factory default setting is "OFF'.
??? ON:
Use with connected AMP.
??? OFF:
Use with inside AMP.
???Setting the car speaker output for the cellular phone
*The factory default setting is "RIGHT'.
*To output the telephone calls, set the cellular phone interrupt to "ON".
When the AUX input jack is used to connect an AUX BLUETOOTH BB (BLT370) (sold separately):
??? RIGHT:
Telephone calls can be heard on the front right speaker connected to this unit.
??? LEFT:
Telephone calls can be heard on the front left speaker connected to this unit.
DXZ385USB 23

Operations Common to Each Mode
??? Cellular phone interrupt setting
If you connect this unit and your cellular phone with a separately sold cable, you can listen to your telephone calls on your car speakers.
* The factory default setting is "OFF".
"OFF"
??? OFF:
This unit continues normal operation even when the cellular phone is used.
??? ON:
You can listen to your telephone calls from the speakers connected to this unit.
*When listening to your calls on your car speakers, you can adjust the volume by turning the [ROTARYl knob.
???MUTE:
The sound from this unit is muted during telephone calls.
Note:
???If connecting a
???Performing a system check
This function allows you to perform a system check from the adjust mode when required.
Entering titles
Titles up to 8 characters long can be stored in memory and displayed for CD, CD changer, Radio stations and TV stations. The number of titles that can be entered for each mode are as follows.
1.Press the [SRC] button to select the mode you want to enter a title (Radio, CD, CD changer or TV).
2.Select and playa CD in the CD changer or tune in to a TV station or Radio for which you want to enter the title.
3.Press and hold the [DISP] button for 1 second or longer.
4.Press the [~~] or [~] button to select "TITLE IN".
5.Press the
The display switches to the title input display.
6.Press the [~....] or [~~] button to move the cursor.
7.Press the [BND] button to select a character type. Each time you press the [BND] button, the character type changes in the following order:
Capital letters ~ Numbers ~ Symbols ~ Capital letters...
8.Press the [.] or [T] button to select the desired character.
9.Repeat steps 6 to 8 to enter up to 8 characters for the title.
10.Press and hold the
24 DXZ385USB

Operations Common to Each Mode
Clearing titles
1.Select and playa CD in the CD changer or tune in to a TV station or Radio for which you want to clear the title.
2.Press and hold the [DISP] button for 1 second or longer.
3.Press the [~] or [~] button to select "TITLE IN".
4.Press the [~~~] button.
The display switches to the title input display.
5.Press and hold the [BND] button for 1 second or longer.
All characters in the title disappear.
6.Press and hold the [~~~ ] button for 2 seconds or longer to store the setting.
AUX function
This system has an external input jack on the front panel so you can listen to sounds and music from external devices connected to this unit.
??? Selecting AUX IN sensitivity
Make the following settings to select the sensitivity when sounds from external devices connected to this unit are difficult to hear even after adjusting the volume.
*The factory default setting is "MID".
1.Press and hold the [DISP] button for 1 second or longer.
2.Select "AUX SENS".
3.Press the [A] or [T] button to select "HIGH", "MID" or "LOW".
Note:
???When AUX mode is selected, AUX IN sensitivity can be set.
DXZ385USB 25

7. ACCESSORIES
USBIMTP Operations
USB memorylMTP device operation
Note:
???The following operations are the same as for CD mode:
*Pause
* Track selection
*Top function
*Scan play
*Repeat play *Random play *Folder selection
See "CDIMP3IWMAlAAC Operations" (page 18- 21) for details.
About USB memory
???USB is an acronym for Universal Serial Bus, and refers to an external bus standard supporting data transfer rates of 12 Mbps.
???This unit is compatible with USB 1.1/2.0 with maximum data transfer rates of 12 Mbps.
???USB memory devices that can be played by connecting to the unit'sUSB cable are limited to those recognized as "USB mass storage class devices"; operation is not guaranteed with all USB memory devices.
*Devices compatible with "USB Mass Storage Class" can be used merely by connecting to the host device. without need for special drivers or application software.
???Consult the manufacturer of your USB memory device for information regarding whether it is supported by "USB Mass Storage Class" standards.
???Audio files playable on this unit are limited to MP3IWMAlAAC files. For details, see the section "MP3IWMAlAAC" (page 18).
???To prevent the accidental loss of data, always back up important data on your computer.
???This unit does not support connections to a computer. In addition, connections made through a USB hub device are also not supported.
???When a USB memory device is composed of two or more drives, only one of the drives will be detected.
???USB memory devices with security functions cannot be played.
???The order in which tracks are recorded may differ depending on the USB memory device connected (the actual playback order may not be the same as that indicated on your computer'sdisplay).
???If you continuously operate folder up/down, the play time keeps as "00:00", and the sound is not emitted.
About USB Digital Media Streaming
This unit supports USB Digital Media Streaming. USB Digital Media Streaming is a function used to play music files transmitted using Media Transfer Protocol (MTP). This function also supports the playback of WMDRM 10 files.
During USB Digital Media Streaming, the unit displays the "MTP" mode indicator.
Use of USB Digital Media Streaming requires the purchase of a supported portable audio player. For information regarding supported portable audio players, consult your nearest Clarion dealer, or visit Clarion'swebsite.
ACAUTION
???Insert and remove a USB memory/MTP device only when the device is not being accessed. Connecting or disconnecting the device at the following times may result in the loss of data:
-If the USB memory/MTP device is removed or power is disconnected during writing to the device.
-When the device is subjected to static electricity or electric noise.
???Do not leave a USB memory/MTP device unattended in an automobile. Exposure to direct sunlight or high temperatures may cause deformation or other malfunction of the USB memory/MTP device.
26 DXZ385USB

USBIMTP Operations
Connecting a USB memorylMTP device
1.Connect the USB memory/MTP device to the USB slot.
Playback will begin from the first file recorded on the device.
Do not turn on vehicle ignition when the MTP device is connected, since it may result in loss or damage to data on the MTP device.
Connect the MTP device to the USB slot after vehicle ignition is turned on.
Confirm the proper orientation of the connector before inserting.
*If the device is not recognized. press the [SRC] button to switch the source to the device.
*Always insert the device fully into the connector. Incomplete connections may cause the device not to be recognized.
*Depending on the number of tracks recorded, some amount of time may be required until all tracks are read into the unit.
*The order in which tracks are recorded may differ depending on the device connected (the actual playback order may not be the same as that indicated on your computer'sdisplay).
To listen to tracks on a connected USB memorylMTP device
1.Press the [SRC] button to switch the source. When USB memory/MTP device is selected, playback (except DRM files) will begin from the location at which playback was previously stopped.
*When a USB memory/MTP device is connected the USB/MTP mode will be displayed.
*When a USB memory/MTP device is disconnected and then reconnected, playback will begin from the beginning of the USB memory/MTP device.
*When "MTP" mode is selected, AAC files on the MTP device cannot be played.
To stop play
1.Press the [SRC] button and switch the function to a source other than the USB memory.
[??j'~'.)~~~\TI~\~1I~;ijii;,\/~}eAQt'ON~1i;??~}I??i.ri,J~;.??m~1\'ct~i;1
Do not remove the USB memory/MTP device when the USB/MTP mode is selected, since it may result in loss or damage to data on the USB memory/MTP device.
Always backup and save important data on your computer.
2.Remove the USB memory/MTP device from the USB slot.
DXZ385USB 27

iPod Operations
This section describes operations when connected to an Apple iPod via the USB slot.
Notes:
???See the iPod Owner's Manual for details regarding operation conditions.
???The unit will not operate, or may operate improperly with unsupported versions.
???For a list of compatible Apple iPod unit with the this model, please contact your Clarion dealer or www.clarion.com.
Connecting an iPod
When an iPod is connected to the USB slot, "Shuffle" set on the iPod will become as follows:
???"Shuffle (Albums)" play ~ Random play
???"Shuffle (Songs)" play ~ All random play
The iPod has two modes, the "Play mode" and the "iPod menu mode" for selecting tracks. Switch between these modes by pressing the [BND] button for 1 second or longer.
Note:
???To connect iPod, please use the USB cable attached in iPod.
Select iPod mode
1.Press the [SRC] button.
Playback will begin from the last file that was played on the iPod.
iPod cable
Confirm the proper orientation of the iPod connector before inserting.
Note:
???The following operations in Play mode operate the same as in CD mode:
*Track selection: [~], [~]
*Pause: [~NI~]
*Top function: [BND]
See "CDIMP3IWMAIAAC Operations" (page 18-
21)for details.
Other various play functions (in Play mode)
Notes:
???These functions are not supported when in the iPod menu mode.
???The Random function set on the iPod remains the same after attachment/detachment of the iPod.
???The Repeat function on the iPod will be changed when you connect/disconnect the iPod to the unit.
???Repeat play
Play back one track repeatedly.
1.Press the [RPT] button.
???Random play
Play all albums within a selected category, in random order. (Corresponds to "Shuffle (Albums)" command on iPod.)
1.Press the [ROM] button.
???All random play
Play all tracks within a selected category, in random order. (Corresponds to "Shuffle (Songs)" command on iPod.)
1.Press and hold the [ROM] button for 1 second or longer.
???To cancel play
1.Press the same play button once again.
Notes:
???When the repeat play mode is canceled, after play all tracks within a selected category, playback will begin from the first track in the selected category.
???When playing the last track within a selected category in Random mode, if ACC is switched off then on again, playback will begin from a different track.
???Though the default setting of an iPod is "All Repeat", the indication on the mode status is not displayed.
28 DXZ385USB

iPod Operations
Selecting category from the iPod
menu
1.Press and hold the [BND] button for 1 second or longer to select the iPod menu mode.
The iPod menu categories will be displayed.
Notes:
???Repeat and Random mode operations are not supported when in the iPod menu mode.
???In iPod menu mode, if you press the [~]I[~] or [A]I[....] button fast, playback may not be performed.
2.Press the [.] or [T] button to switch between categories.
The iPod menu categories alternate in the following order:
"PLAVLlST"
"SONG"
Note:
The iPod menu mode can be canceled by performing one of the following operations:
???Press the [BND] button.
???When the category select screen is displayed, press the [~] button.
3.Press the [~] button to select the category.
4.When the track name display is showing, press the [~] button.
Playback will begin from the first track in the selected category, and the iPod menu mode will be canceled.
*Subfolders may be displayed, depending on the category.
In this case, use the [A] and [....] buttons to switch between subfolders, then use the [~] button to select the desired subfolder.
*When the track name display is showing, pressing the [~] button will return to the currently playing folder name display.
5.Use the [.] and [T] buttons to select a track within a category.
Selecting category using preset memory
1.Press and hold the [BND] button for 1 second or longer to select the iPod menu mode.
The category can be set as follows in the [DIRECT]
[1]: PLAVLlST
[2]: ARTIST
[3]: ALBUM
[4]: SONG
[5]: GENRE
[6]: COMPOSER
2.Press the desired [DIRECT]
* Subfolders may be displayed, depending on
the category.
In this case, use the L.&.] and [....] buttons to switch between subfolders, then use the [~] button to select the desired subfolder.
3.When the track name display is showing, press the [~~] button.
Playback will begin from the first track in the selected category, and the iPod menu mode will be canceled.
*Use the LA.] and [....] buttons to select a track within a category.
About title display
This unit supports the display of title information transmitted from a connected iPod.
???Character code information is
???Unsupported characters will be replaced by asterisks (*).
DXZ385USB 29

Satellite Radio Operations
This function is available when a Satellite Radio Receiver is connected through the CeNET cable.
This unit can control the following satellite radio receivers:
???XM Satellite Interface Adapter
Clarion cable for CNP2000UC : CNPCLA1
???SIRIUS Satellite Radio Receiver: SIRCL3
???SIRIUS Satellite Translator Adapter:
Note:
???When the function is differ depending to the connected receiver, they are distinguished by the following notations:
"XM": for an XM Satellite Radio Receiver
"SIRIUS": for a SIRIUS Satellite Radio Receiver
Selecting a Satellite Radio mode
1.Press the [SRC] button.
The system changes to the specified Satellite Radio mode.
Selecting a band
1. Press the [BND] button to select a band.
This changes the reception band as follows:
??XM:XM1 .. XM2 .. XM3 .. XM1 ...
??SIRIUS: SR1 .. SR2" SR3 .. SR1 ...
???Information displayed during reception
The following information is displayed when the satellite radio cannot be received normally.
???When the receiver is turned on the first time or after a reset: "UPDATING"
???When a channel is being tuned in (no signal is yet received):
XM: "LOADING", SIRIUS: "LINKING"
???A channel without a broadcast has been selected:
XM:
???A channel not covered by your contract: XM: "UPDATING", SIRIUS: "CALL 888" ~
Confirming your SIRIUS ID
1.Press and hold the [DISP] button for 1 second or longer to display the ADJUST item.
2.Press the [~] or [~] button to select "SID DISP".
3.Press the [rNI~] button, the display will display the upper 6 digits.
4.Press the LA] or [T] button to switch between the display for the upper 6 digits and lower 6 digits.
5.To return to the previous mode, press the [DISP] button.
Displaying channel labels
1.Press the [D1SP] button to select the desired channel label.
Channel" Category .. Title (Artist) .. Radio text .. Channel. ..
Channel selection
1.Channels are selected with the [~] or [~] button.
*For details, see the following operation descriptions.
Note:
???The audio output is muted and other button operations are not accepted during channel selection.
Tuning mode
There are two channel selection modes: quick tuning mode and step tuning mode.
???Quick tuning
1.Press and hold the [~] or [~] button for 1 second or longer.
???Step tuning
1.Press the [~] or [~] button.
30 DXZ385USB
Satellite Radio Operations
Recalling a preset station
A total of 18 satellite radio stations can be stored.
???XM:
???SIRIUS:
This allows you to store your favorite satellite radio stations in memory for later recall.
1.Press the [BND] button to select the desired band.
2.Press the [...] /
Preset memory
1.Press the [BND] button to select the desired band.
2.Select the desired channel with quick tuning or step tuning.
3.Press and hold the [DIRECT] button for 2 seconds or longer to store the current channel into preset memory.
Receiving stations selected by category
Satellite Radio allows you to select broadcast channel category (contents).
1.Press and hold the [BND] button for 1 second or longer to select the category selection mode.
*It press once again, return to the channel selection mode.
2.Press the [...] or
3.Press the [~] or [~] button to tune in a station.
Notes:
???When the category selection mode is entered, the category of the last received channel is displayed first.
???The category selection mode is canceled when no channel with the selected category can be found.
???The [~J or ~J button are not pressed within 7 seconds, the category selection mode is canceled, and resumes to the channel mode.
Presetting a category
A category can be preset by registering specific categories in [DIRECT] buttons 1 to 6. Then the desired category can be recalled by pressing the corresponding [DIRECT] button.
1.Press and hold the [BND] button for 1 second or longer to enter the category mode.
2.Press the L...] or
3.Press and hold one of the [DIRECT] buttons for 2 seconds or longer to store the current category into preset memory.
Notes:
???When the name of a channel stored in memory is changed by a broadcasting channel, the display may show a channel name that differs from the stored name.
???A channel stored in memory may be discontinued at the option of the broadcasting channel.
???If no operation is performed for more than 1 second, category seek tuning can automatically tune in a receivable broadcast channel category.
Scan function
There are two scan modes: the category scan mode and the preset scan mode.
During scanning channels are displayed in abbreviated form, the display mode cannot be switched.
??? Preset scan (PRESET SCN)
A preset scan scans the channels (up to 18 channels) stored in the preset memory about every 10 seconds.
Press and hold the [rrJ~] button for 1 second or longer to select the preset scan mode. And start the preset scanning.
??? Category scan (CAT SCN)
In a category scan, broadcast channels in the same category as the current channel are selected about every 10 seconds.
Press the [rrJ~] button to select the category scan mode. And start the category scanning.
Note:
???Category scanning is not available when no category is defined for the current channel.
DXZ385USB 31

CD Changer Operations
Note:
???The following operations are the same as for CD mode:
*Pause
* Track selection *Fast??forwardlfast??backward
*Scan play *Repeat play *Random play
See "CDIMP3IWMAIAAC Operations" (page 18- 21) for details.
CD changer functions
When an optional CD changer is connected through the CeNET cable, this unit controls all CD changer functions. This unit can control a total of 2 changers.
Press the [SRC] button and select the CD changer mode to start play. If 2 CD changers are connected, press the [SRC] button to select the CD changer for play.
*If "NO MAG" appears in the display, insert the magazine into the CD changer. "D??CHECK" appears in the display while the player loads (checks) the magazine.
*If "NO DISC" appears in the display, eject the magazine and insert discs into each slot. Then, reinsert the magazine back into the CD changer.
Note:
???Some CDs recorded in
ACAUTIQN
Displaying CD titles
This unit can display title data for
*Title data for
1.Press the [DISP] button to change the title display.
Notes:
???If the CD playing is not a
???If a
-
Procedure to scroll a title
Set "SCROLL" to "ON" or "OFF".
(The factory default setting is "ON". Refer to the subsection "Setting the method for title scroll" in section "Operations Common to Each Mode".)
??? When set to "ON"
The title is automatically kept scrolling.
??? When set to "OFF"
To scroll just 1 time.
When you want to see the title again, in the title mode, press and hold the [DISP] button for 3 seconds or longer to scroll the title.
Selecting a CD
1.Press the [.,&.] or [T] button to select the desired disc.
*If a CD is not loaded in a slot of magazine, pressing the [.&.] or [T] button can not work.
Other various play functions
??? Disc scan play
Disc scan play locates and plays the first 10 seconds of the first track on each disc in the currently selected CD changer. This function continues automatically until it is cancelled.
*Disc scan play is useful when you want to select a desired CD.
1.Press and hold the [SeN] button for 1 second or longer. "ALL SCAN" appears in the display and disc scan play starts.
???Disc repeat play
After all the tracks on the current disc have been played, disc repeat play automatically replays the current disc over from the first track. This function continues automatically until it is cancelled.
1.Press and hold the [RPT] button for 1 second or longer. "ALL RPT'appears in the display and disc repeat play starts.
???Disc random play
The disc random play selects and plays individual tracks or discs automatically in no particular order. This function continues automatically until it is cancelled.
1.Press and hold the [ROM] button for 1 second or longer. "ALL ROM" appears in the display and disc random play starts.
???To cancel play
1.Press the operating button previously selected.
32 DXZ385USB

DVD Changer Operations
By connecting an optional DVD changer that supports CeNET wiring, this unit can be used to control the DVD changer. To view DVDs, an optional monitor is required.
???The DVD control and display functions supported by this unit are limited; the unit does not support all the functions possible on a DVD changer.
For fullest functionality, use the remote control unit provided with your DVD changer to control its operations. For details, consult the Owner'sManual provided with your DVD changer.
Note:
???The following operations are the same as for CD and CD Changer modes:
*Pause
* Track selection
*Scan play
*Repeat play *Random play
See "CDIMP3IWMAIAAC Operations" (page 18- 21) and "CD Changer Operations" (page 32) for details.
TV Operations
Note:
???The following operations are performed the same as for radio mode:
*Channel selection
*Storing channels in memory *Calling channels from memory *Auto store
*Preset scan
See "Radio Operations" (page
TV tuner functions
When an optional TV tuner is connected through the CeNET cable, this unit controls all TV tuner functions. To watch TV requires a TV tuner and monitor.
Watching a TV
1.Press the [SRC] button and select the TV mode.
2.Press the [BND] button to select the desired TV band (TV1 or TV2). Each time the button is pressed, the input selection toggles between TV1 and TV2.
3.Press the [~] or [~] button to tune in the desired TV station.
Watching a video
The TV tuner has a VTR input terminal to which 1 external device can be connected. Connect a 12 V video cassette player (VCP) or video cassette recorder (VCR) to the TV tuner input terminal.
* The factory default setting is "TV".
1.Press and hold the [DISP] button for 1 second or longer to switch to the adjustment selection display.
2.Press the [~] or [~~] button to select "TV! VTR".
3.Press and hold the
4.To return to the TV broadcast, press and hold the [DISP] button for 1 second or longer to switch to the adjustment selection display.
5.Press the [~] or [~~] button to select "TV! VTR".
6.Press and hold the
Setting the TV diver
You can change the reception setting for the TV antenna connected to the TV tuner.
*The factory default setting is "ON".
1.Press and hold the [DISP] button for 1 second or longer to switch to the adjustment selection display.
2.Press the [~] or [~] button to select "TV DIVER".
3.Press the [A] or [T] button to set to "ON" or "OFF".
??? ON:
Sets the diver setting to ON.
??? OFF:
Sets the diver setting to OFF.
4.Press the [DISP] button to return to the previous mode.
DXZ385US8 33

8. TROUBLESHOOTING
Power does not turn on.
(No sound is produced.)
No sound output when operating
,the unit with
;amplifiers or
Incorrect wiring.
Power antenna lead is shorted to ground or excessive current is required for
Replace with a fuse of the same amperage. If the fuse blows again, consult your store of purchase.
Consult your store of purchase.
1.Turn the unit off.
2.Remove all wires attached to the power antenna lead. Check each wire for a possible short to ground using an ohm meter.
3.Turn the unit back on.
4.Reconnect each amplifier remote wire to the power antenna lead one by one. If the amplifiers turn off before all wires are attached, use an external relay to provide
Sound is cut or skipped.
Noise is generated or noise is mixed with sound.
Sound is bad directly after power is turned on.
DCP or main unit connectors Wipe the dirt off with a soft cloth moistened with are dirty.cleaning alcohol.
The speaker protection circuit 1. Turn down sound volume. Function can also be
MP3IWMAJAAC files are not Use MP3IWMAJAAC files encoded properly. encoded properly.
Water droplets may form on Let dry for about 1 hour with the power on. the internal lens when the car
is parked in a humid place.
34 DXZ385USB

The device contains no MP31 Record MP3IWMAlAAC files properly to the device. WMAlAAC files.
The files are not proper MP31 Use only properly encoded MP3IWMAlAAC files. WMAIAAC format.
The device isn't recognized.
The device is damaged.
According to the state of operation on the device, the communication fault is caused.
Disconnect the device and reconnect. If the device is still not recognized, try replacing with a different device.
Disconnect the device and reconnect.
The device has been inserted Try reversing the connection direction of the device improperly.(usually the brand name surface should be facing
left).
DXZ385USB 35
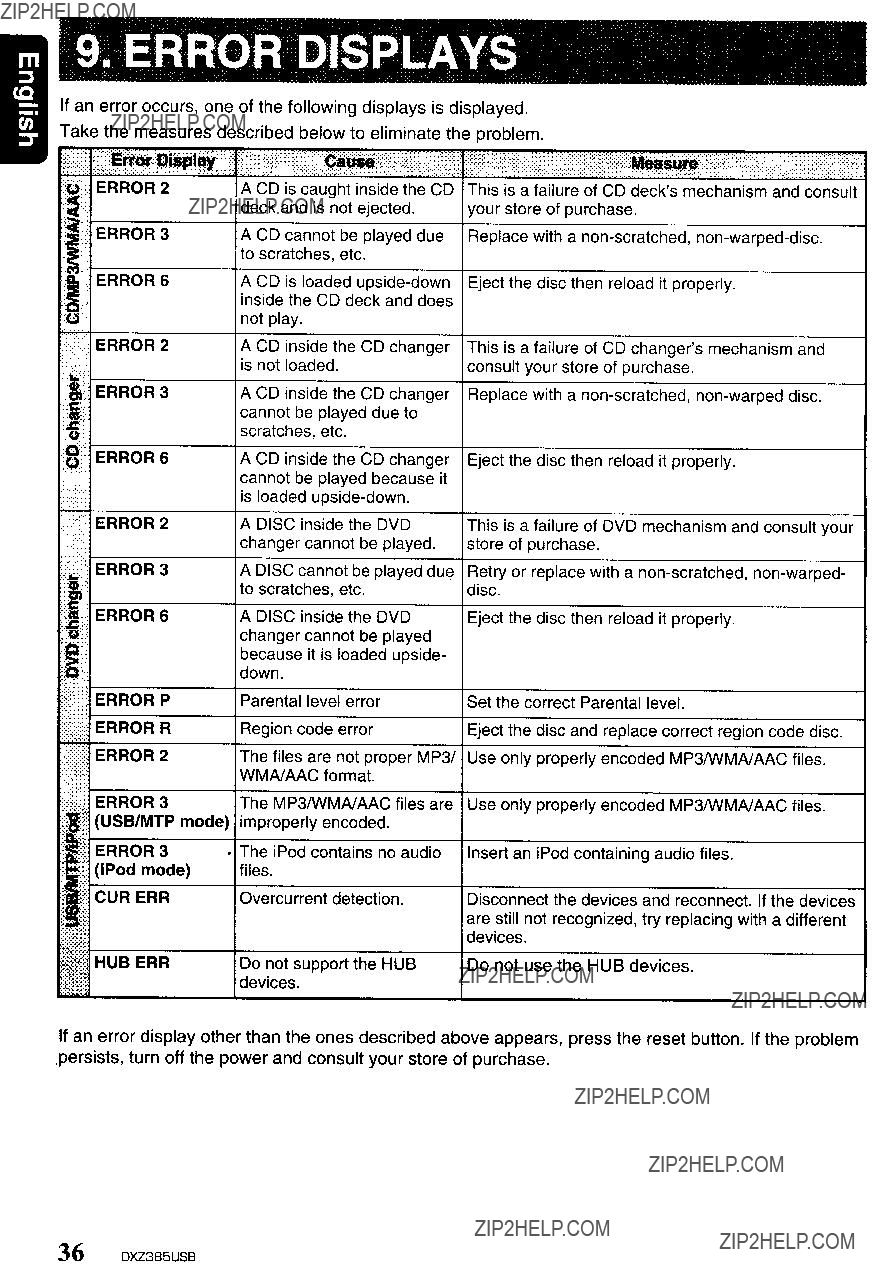
9. ERROR DISPLAYS
If an error occurs, one of the following displays is displayed.
Take the measures described below to eliminate the problem.
A CD is caught inside the CD deck and is not ejected.
A CD cannot be played due to scratches, etc.
This is a failure of CD deck'smechanism and consult your store of purchase.
Replace with a
A CD is loaded
not play.
" ERROR 2A CD inside the CD changer is not loaded.
This is a failure of CD changer'smechanism and consult your store of purchase.
'Ii'
ERROR 3 A DISC cannot be played due to scratches, etc.
Retry or replace with a
::c??!:I
The files are not proper MP3/ Use only properly encoded MP3IWMAJAAC files.
WMAJAAC format.
ERROR 3 The MP3IWMAJAAC files are Use only properly encoded MP3IWMAJAAC files. (USB/MTP mode) improperly encoded.
ERROR 3 ??? The iPod contains no audio
(iPod mode) files.
CUR ERROvercurrent detection.
HUB ERRDo not support the HUB devices.
Insert an iPod containing audio files.
Disconnect the devices and reconnect. If the devices are still not recognized, try replacing with a different devices.
Do not use the HUB devices.
If an error display other than the ones described above appears, press the reset button. If the problem ,persists, turn off the power and consult your store of purchase.
36 DXZ3B5USB

10. SPECIFICATIONS
FM Tuner
Frequency Range: 87.9 MHz to 107.9 MHz
Usable Sensitivity: 11 dB~V
50dB Quieting Sensitivity: 17 dB~V
Alternate Channel Selectivity: 60 dB
Stereo Separation (1 kHz): 30 dB
Frequency Response (??3 dB): 30 Hz to 15 kHz
AM Tuner
Frequency Range: 530 kHz to 1710kHz
Usable Sensitivity: 28 dBIJV
CD Player
System: Compact disc digital audio system
Usable Discs: Compact disc
Frequency Response (??1 dB): 20 Hz to 20 kHz
Dynamic Range (1 kHz): 80 dB
Harmonic Distortion: 0.03%
Audio
Maximum Power Output: 200 W (50 W X 4 ch)
Bass Control Action (100 Hz): +14 dB,
Treble Control Action (10 kHz): +14 dB,
Line Output Level (CD 1 kHz): 2 V
Note:
General
Power Supply Voltage:
14.4 V DC (10.8 to 15.6 V allowable), negative ground
Current Consumption: Less than 15 A
Speaker Impedance: 4 n (4 n to 8 n allowable)
Auto Antenna Rated Current: 500 mA or less
Weight / Source unit: 2.53 lb. (1.14 kg) Weight / Remote control unit:
1.41 oz. (40 g) (including battery) Dimensions / Source unit:
7" (Width) X 2" (Height) X
Dimensions / Remote control unit:
[44 (W) X 113 (H) X 11 (D) mm]
Power Output:
20 W RMS x 4 Channels at 4
and 1 % THD+N
Signal to Noise Ratio:
91 dBA (reference: 1 W into 4 )
??? Specifications and design are subject to change without notice for further improvement.
DXZ385USB 37

11.0THERS
WMDRM 10 for devices
???This product is protected by certain intellectual property rights of Microsoft. Use or distribution of such technology outside of this product is prohibited without a license from Microsoft.
???Content owners use Windows Media digital rights management technology (WMDRM) to protect their intellectual property, including copyrights. This device uses WMDRM software to access
38 DXZ385USB

Clarion Co., Ltd.
All Rights Reserved. Copyright ?? 2007: Clarion Co., Ltd.

Installation/Wire Connection Guide
Manuel d'installationet de connexion
Guia de instalacion/conexion de cables
mDliEraD ...
,
Car battery
Balterie de VOtture
Bateria del autom6vil
Figure 1 / Figure 1 / Figura 1
mDliEraD ...
1.Antes de comenzar, prepare todos los elementos necesarios para instalar la unidad fuente.
2.Instale la unidad con un angulo de 300 sobre el plano horizontal. (Figura 2)
3, Si tiene que realizar cualquier trabajo en la carreceria, como taladrado de orificios, etc., consulte al proveedor de su automovil.
4.Use los tornillos incluidos para la instalacion, EI uso de otres tornillos puede causar danos. (Figura 3)
Chassis??? I
mDliEraD ...
???Universal Mount
1.Place the universal mounting bracket into the instrument panel, use a screwdriver to bend each stopper of the universal mounting bracket inward, then secure the stopper as shown in Figure 4,
2.Wire as shown in Section 6.
3, Insert the source unit into the universal mounting bracket until it locks,
4, Take care of the top and bottom of the outer escutcheon and mount it so that all the hooks are locked,
??? Montage universel
Pld(;~' Ie ~up;Jor: 'emontage uni "ersel dans Ie tableau de bord utlliser un tournevis pour replier ers lexteneur chaque languette du support de montage universel pUiS fixer les JangJettes com me montre sur la Figure 4.
2.Cabler com me montre dans la Section 6,
3.Inserer I'appareilpilote dans Ie support de montage unlversel jusqu'a ce qu'ilsoit bloque.
4Reperer Ie haut elle bas de lecusson exteneur et Ie monter de l11anll3re que tous les crochets soient verrouilles,
???Montaje universal
1.Coloque el soporte de montaje universal en el tablero de instrumen- tos, utilice un destornillador para doblar cada reten del soporte de montaje universal hacia adentro, y despues asegure el reten como se muestra en la Figura 4.
2, Conecte los cables como se muestra en la Seccion 6.
3.Inserte la unidad fuente en el soporte de montaje universal hasta que quede enganchado.
4, Tenga cuidado con la partes superior e inferior de la pieza ornamen- tal exterior, y m6ntela de forma que todos los ganchos queden bloqueados,
Notes:
1)Some car models require special mounting kits for proper installation, Consult your Clarion dealer for details.
2)Fasten the front stopper securely to prevent the source unit from coming loose.
???Console opening dimensions
???Dimensions d'ouverturede la console
???Dimensiones de la abertura de la consola
\-
Tournevis
Destornillador
Installation direction . /l
Sens d'installation
Direcci6n de inslalaci6n
Boltom
Bas
Parte inferior
Outer escutcheon side view
Vue lateraIe de I'ecussonexterieur
Vista lateral de la pieza ornamental exterior
Spring
Ressort
Resorte
Figure 41 Figure 4/ Figura 4
??? Fixed Mount
(TOYOTA, NISSAN and other ISO/DIN equipped vehicles)
This unit is designed for fixed installation in the dashboard.
If the vehicle is equipped with a
If the vehicle is not equipped with a
Bend the stopper tollowing the procedures below when this source unit is installed to the TOYOTA, NISSAN and other ISOIDIN equipped vehicles.
1. Bend the stopper from the source unit. (Figure 5, 6)
??? Montage fixe
(TOYOTA, NISSAN et autres vehicules equipes ISO/DIN)
Cet apparell est concu pour ene Installation fixe dans Ie tableau de bard Si Ie vellicule est eqJlpe d'unauloradio tnslalle a ruslne, Installer l'appareilpilote avec les pieces et les eerous marquees de i*) (Figure 7).
Sllf''Je.,:culefl'estpas eqJipe
Coubez la outee apres les operations c!~dessous lorsque I'apparellpilote est installl?? sur un vehcule TOYOTA. fSSAN et autres vehlcules eqUipes ISO DIN
1. Coubez la butee de I apparel! source. (Figure 5. 6)
???Montaje fijo
(Automoviles TOYOTA, NISSAN, Y otros provistos
de normas ISO/DIN)
Esta unidad ha sido disenada para instalarse de forma fija en el tablero de instrumentos. Si el autom6vil dispone de una radio instalada en fabrica, instale la unidad luente can las piezas y los tornillos marcados can (*) en la Figura 7.
Si el autom6vil no dispone de una radio instalada en fabrica, adquiera un juego de instalaci6n para instalar la unidad luente de acuerdo con el procedimiento siguiente.
Doble de instalar esta unidad en vehiculos TOYOTA, NISSAN, Y otoros equipados con ISOIDIN, extraiga el reten siguiendo los procedimientos indicados a continuaci6n.
1. Doble el reten procedente de la unidad fuente. (Figura 5, 6)
STOPPERITOURNEVISIDESTORNILLAODR
SOURCE UNIT/APPAREIL PILOTE/UNlOAD FUENTE
2.Secure the mounting brackets to the chassis as shown in Figure 7. Holes are
3.Wire as shown in Section 8.
4.Secure the unit in the dashboard, and then reassemble the dashboard and the center panel.
Cenler Panel (Nole 1)
Panneau cenlral (Remarqure 1)
Panel central (Nola 1)
;The parts and screws with this mark are used to install radio or included in the installation kit.
*:The screws with this mark are originally attached to the vehicle.
Note 1: In some cases, the center panel may require some modification (trimming, filling, etc.).
Note 2: If a hook on the instal/ation bracket interferes with the unit, bend and flatten it with a nipper or a similar tool.
ammD _
1.When removing the source unit, disassemble it in the reverse of the order in Section "3. INSTALLING THE SOURCE UNIT".
2.Remove the Detachable Control Panel (DCP).
??? For instructions on removing the DCP, refer to the owner'smanual.
3.Press the outer escutcheon upward and remove it. (Figure 8)
4.Insert and lock the hook plates. (Figure 9)
5.Pull the hook plates to remove the source unit.
???1. Be sure to turn the power off when wiring.
2.Be particularly careful where you route the wires. Keep them well away from the engine, exhaust pipe, etc. Heat may damage the wires.
3.If the fuse should blow, check that the wiring is correct.
If it is, replace the fuse with a new one with the same amperage rating as the original one. (Figure 10)
Note:
There are various types of fuse holder. Do not let the battery side touch other metal parts.
4.Connect the CeNET extension cable fully and securely until it locks. When the CeNET extension cable is pulled, hold the slide cap part and pull it towards you.
???When the CeNET extension cable is extended or branches, use extension cable
???Use the CeNET extension cable made by Clarion.
5.When the main power supply fuse in the car is 15 A or less, purchase an automotive cable that can withstand 15 A and supply this unit with power directly from the battery to ensure that the unit will operate normally.
Note that a fuse must be installed at a distance no longer than 30 cm from the cable battery terminal to prevent accidents.
???1 S??assurcrde rnel1re i'apparei!hars Clrcu!t avaflt de falre Ie cab!age .
2.Falre parllcullerernent attention lars de rachemlnernent des fIls.
Les elolgner du motcur. des tuyaux d echappement. etc. La ctlaleur risque d??endonlf11ager ces fils,
3, Slle fUSible saute, verifier si Ie cablage est correct.
SI Ie fusible est grilie. Iepar un fUSible neuf de meme amperage que Ie fUSible d??origine. (Figure
Remarque:
II y a different type de porte?? fusible. La borne du cote batter,e ne doit pas toucher d'autres pieces metailiques.
4. Connecter Ie cable d'extensionCeNET sompletemenl et solide",ent Jusqu'ace qu'llsOIl verroUilie. Pour tirer Ie cable d'extenslonCeNET. len,,!a partie cou!lssante du capuctlOn et tlrer vers vous.AB
Pour etendre au deriver ie cable d'extensionCeNET. utlliser Ie cable
5.SI Ie fUSible d'allmentarionprincipale de la voiture est de 15 A au mains.
achelez un cable automobile qui peut SJpporter 15 A et alimenter cet appareil directement a parllr de la baltene et assurer que l'appareiltoncllonnera normalement.
Notez qu'unfUSible do!~ etre installe a une dIstance de moms 30 em de borne de la batlene pour E!Vlter tout accident.
???1. Antes de hacer las conexiones, asegurese de desconectar la alimentaci6n de la unidad.
2.Sea especialmente cuidadoso al dirigir y fijar los cables. mantengalos alejados del motor, tubo de escape, etc. EI calor puede danar los cables.
3.Si el fusible se quema, revise las conexiones.
Si esta quemado, reemplace el fusible par otro nuevo can el mismo valor de amperaje que el original. (Figura 10)
Nota:
Existen varios tipos de portafusib/es. No permita que el terminal del/ado de Ja bateria toque otras partes metalicas.
4.Conecte el cable prolongador CeNET completa y seguramente hasta que chasquee. Para desconectar el cable, sujete la parte de la tapa deslizable y tire hacia usted.
???Para prolongar a ramificar el cable prolongador CeNET, utilice un cable prolongador
???Utilice un cable prolongador CeNET labricado por Clarion.
5.Cuando el fusible de alimentaci6n principal del autom6vil sea de 15 A a menos,
adquiera un cable para autom6vil que pueda resistir 15 A Y alimente esta unidad directamente desde la bateria para cerciorarse de que pUeda funcionar normalmente._ Tenga en cuenta que para evitar accidentes, debera instalar un fusible en al cable que va a terminales de la bateria a una distancia no superior a 30 cm.
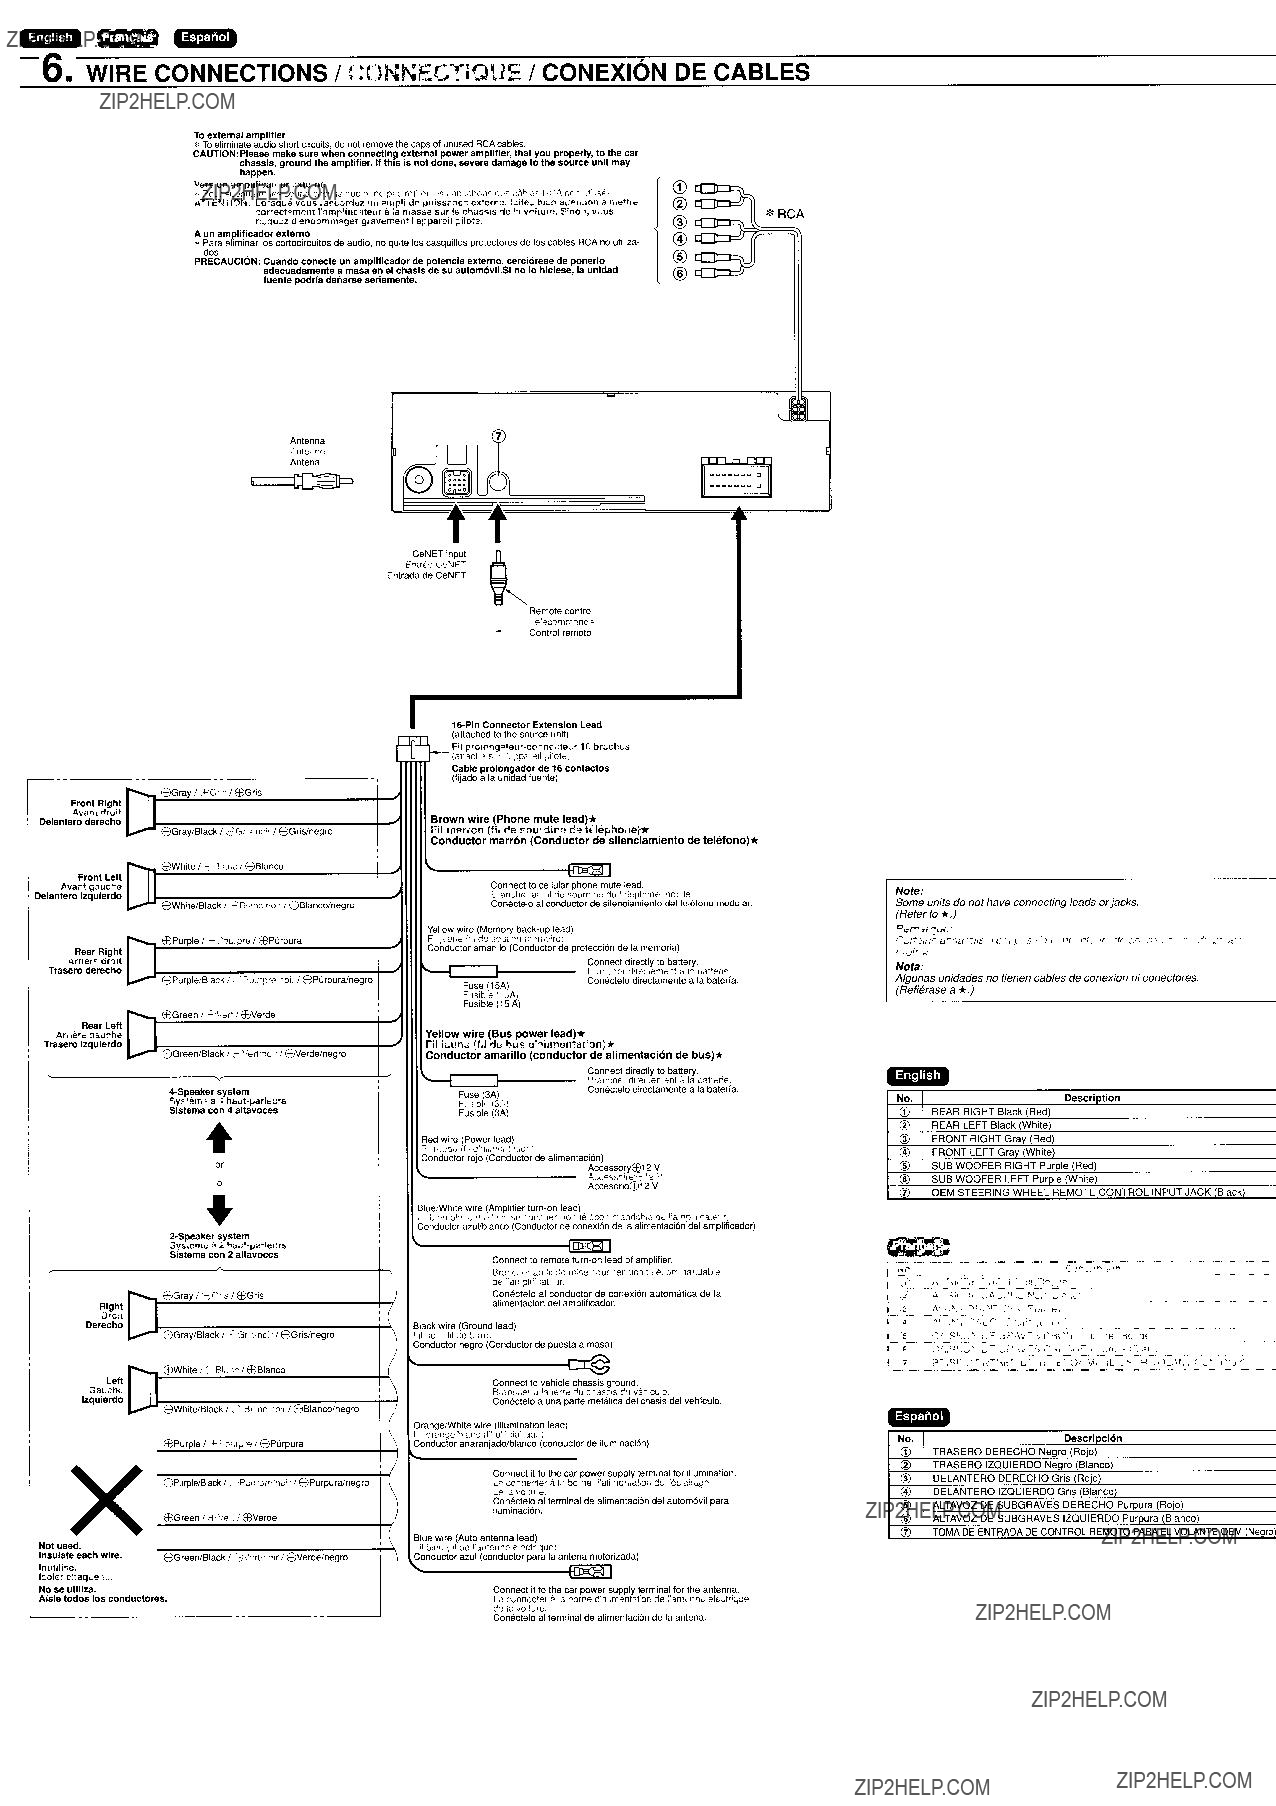
........
To external amplifier
* To eliminate audio short circuits, do not remove the caps of unused RCA cables.
CAUTION:Please make sure when connecling external power amplifier, Ihat you properly, 10 the car chassis, ground the amplifier. If this is not done, severe damage 10 Ihe source unil may happen.
Vers un ampJificateur externe
~; Pour suppnmer les
CD
AITENTlON: Lorsque vous raccordez un ampli de puissance externe. faites bien attention a mettre correctement I'amplificateura la masse sur Ie chassis de la voiture. Sinon, VOUS risquez d'endommagergravement I'appareilpilote.
??
??
*RCA
~~~r:r:;f~r~~~~:~~~~~~~Uitosde audio. no quite los casquillos proteetores de los cables RCA no utiliza-
dos. .
PRECAUCION: Cuando conecte un ampliflcador de potencla externo, cerci6rese de ponerio adecuadamente a masa en el chasis de su autom6vll.Si no 10 hiciese, la unidad fuente pOOr(a danarse seriamente.
Antenna
Antenne
Antena
CeNET input ~
Entree CeNET
Entrada de CeNET
Telecommande
Control remota
@
@
??
~
~
I Avant droit
Delanlero derecho
Fronl Left
Avant gauche Delantero izqulerdo
Rear RighI
Arriere droit
Ef)Gray IJ Gris I Ef)Gris
8GraylBIack I 2Gris nOl'I8Grislnegro
Ef)White I +Blanc I Ef)Blanco
8Whi1e/Black I :;Slanc'nolrI 8Blanco/negro
Ef)Purple I J.: Pourpre I Ef)Purpura
(attached to the source unit)
Fil
Cable prolongador de t 6 conlaclos (Iijado a la unidad fuente)
Brown wire (Phone mute lead)*
Fil marron (fil de sourdine de telephonef*
Conductor marr6n (Conductor de sllenclamiento de tehHono)*
Connect to cellular phone mute lead.
Brancher au Iii de sourdine du te!ephone mobile.
Conectelo al conductor de silenciamiento del telefono modular.
Yellow wire (Memory
FII Jaune (fll de soutlen memoire)
Conductor amarillo (Conductor de proteccion de la memoria)
Connect directly to battery.
Note:
Some units do not have connecting leads or jacks. (Refer to *.)
Remarque:
Certams aoparetls n 'one pas de COflOljr~t!tJrs do
VOjr* .l
Trasero derecho
Rear Left
8Purpie/BIack I S Pourpre noir 18Purpuralnegro
Fuse (15A)
Fusible (15A)
Fusible (15 A)
Brancher directement a la batlene. Conectelo dlrectamente a la bateria.
Nota:
Afgunas unidades no tienen cables de conexi6n ni conectores. (Refierase a *.)
Arriere gauche Trasero Izquierdo
Yellow wire (Bus power lead)*
Fil jaune (fil de bus d'alimentation)*
Conductor amarillO (conductor de allmentaci6n de bus)*
Fuse (3A)
Fusible (3A)
Fusible (3A)
Connect directly to battery.
Brancher directement a la batlerie.
Consctelo directamente a la bateria.
<D REAR RIGHT Black (Red)
RighI
Droit
Derecho
Left
Gauche
Izquierdo
~8WhiteiBIack I C') Blanc/nair 18Blanco/negro (
Ef)Purple l,f. Pourpre I Ef)Purpura
Red wire (Power lead)
Fii rouge {fil d'alimentatlOn)
Conductor rejo (Conductor de alimentacion)
AccessoryE??)12 V
~~~~~~~g;;2vV
BluelWhite wire (Amplifier
Fil bleu blanc (f'lde mise SOLlS tension tehkommandable de I'amplificateur) Conductor azullblanco (Conductor de conexi6n de la alimentati6n del amplificador)
Connect to remote
Brancher au fIl de mise sous tension telecommandable de I'amplilica:eur.
Conectelo al conductor de conexi6n automatica de la alimentaci6n del amplificador.
Biack wire (Ground lead)
Fil noir IfIi de terre)
Conductor negro (Conductor de puesta amasa)
Connect to vehicle chassis ground.
Brancher a la terre du chassis du vehicule.
Coniletelo a una parte metalica del chasis del vehiculo.
OrangelWhite wire (Illumination lead)
Ftl orange/blanc (fll d'eclairage)
Conductor anaranjado/blanco (conductor de iluminaci6n)
??REAR LEFT Black (White) @ FRONT RIGHT Gray (Red) @ FRONT LEFT Gray (White)
??SUB WOOFER RIGHT Purple (Red)
??SUB WOOFER LEFT Purple (White)
('f) OEM STEERING WHEEL REMOTE CONTROL INPUT JACK (Black)
,)
Connect it to the car power supply terminal lor illumination.
Le connecter a la borne d'alimentalionde I'eclairage de la voiture.
Consctelo al terminal de alimentaci6n dei autom6vit para
iluminacion.
Blue wire (Auto antenna lead)
Fil bleu (fil de I'antenneelectrique)
Conduclor azul (conductor para la antena motorizada)
Connect it to the car power supply terminal for the antenna.
Le connecter a la borne d'alimentatlonde I'antenneelectrique de la voiture.
Conectelo al terminal de alimentacion de la antena.
??TRASERO IZQUIERDO Neqro (Blanco) @ DELANTERO DERECHO Gris (Rojo)
@ DELANTERO IZQUIERDO Gris (Blanco)
??ALTAVOZ DE SUBGRAVES DERECHO Purpura (Rajo)
??ALTAVOZ DE SUBGRAVES IZQUIERDO Purpura (Blanco)
('f) TOMA DE ENTRADA DE CONTROL REMOTO PARA EL VOLANTE OEM (Neara)

.... IlEa
CD
~
I
I
I
??
frontal para poder escuchar las lIamadas telef6nicas 0 la musica de los dispositivos externos pcr los altavoces del autom6vil.
CD Main unit
??CeNET extension cable
??
??DVD chan~er
??RCA extension cable (sold separately)
??Power amplifier (2- or
??Front speakers
??Rear speakers
@) Monitor
@Satellite radio receiver
@TV tuner module
@5.1 ch surround decoder
@5.1 ch surround decoder control unit
@Optical connector cable
@Center speaker (with amplifier)
??Subwoofer (with amplifier)
@External unit
??Aux Bluetooth BB (BLT370)
??Stereo
20.Cilble stereo a
CD Unidad principal
??Cable prolonaador CeNET
??Adaptador en V (vendido aparte) @ Cambiador de discos compactos
??Cambiadar de DVD
??Cable de extension RCA
??Amplificador de patencia (2 0 4 canales)
??Altavoces delanteros
??Altavaces traseros
@) Monitor
@Receptor de radio via satelite
@Modulo sintanizador de television
@Decodificadar de sonido envolvente Surround de 5.1 canales
@Unidad de control del decodificador de sonido envolvente Surround de 5.1 canales
@Cable con canector optico
@Altavoz central (con amplificadarl
??Altavoz de subaraves (con amplificadorl
@Unidad externa
??Bluetooth BB auxiliar (BLT370)
??Cable de minlclaviia estereo (vendida por separado)
.. IBiD IlEa
1.Do not open the case. There are no user serviceable parts inside. If you drop anything into the unit during installation, consult your dealer or an authorized CLARION service center.
2.Use a soft, dry cloth to clean the case. Never use hard cloth, thinner, benzen, alcohol, etc. For tough dirt, apply a little cold or warm water to a soft cloth and wipe off the dirt gentry.
IMPORTANT:
Improper installation may cause damage to your unit or car. If you do not have the appropriate experience, consult a qualified installer. Cutting chassis wire leads voids the warranty.
Ne pas OLJvm Ie coffret Ii n'ya pas de pieces reparables par :'ulilisateLJrit J interieur de I'appareil.SI un objet est tarnbe dans I'appar II pendant !'installation.consulter volie revendeur au un service
2Utillser un cllifton dou~ et sec pour ret oyer Ie coifret, ne Jamals utiliser un chiffon riglde. un diluant du oenzene. de I'alcool.etc. Pour enlever la salete lenace, applique'un peu d'eaufroide ou tiede sur un chiffon doux et essuyer dOL.cemenl la salete
IMPORTANT:
Une /fJstal!alion incorrecte peul endol77mager (apparell ou Ie vehicule. 51 Ion (Ie possede pas les connalssances requises. consuller un 'I;s/allaleur qualifie. Coupel 'e Iii du cN'Issis annule la garamie.
1.No abra la caja. En el interior no hay piezas que pueda reparar el usuario. Si dentro de la unidad entra algo durante la instalaci6n, con suite a su proveedor 0 a un centro de servicio autorizado pcr
CLARION.
2.Para limpiar la caja, utilice un pano suave y seco. no use nunca un pano duro, diluidor de pintura, benceno, alcohol, etc. Para la suciedad resistente, aplique un poco de agua fria 0 caliente a un pano suave y frote suavemente la parte sucia.
/MPORTANTE:
La instalaci6n inapropiada puede causar dafios en su unidad 0 su autom6vif. Si usted no posee la experiencia apropiada, consulte a un insta/ador cualificado. EI corte de los conductores de puesta amasa (carrocerfa) anu/ara /a garantfa.
Clarion Co., Ltd.

'itii,' .
clarion GARANTIE LIMITEE DE CLARION 2007
Pour Ie Canada et les
Amoins
** DRZ9255 DXZ775USB DXZ675USB DXZ575USB DFZ675MC DPX11500 DPX1800 DPX2250
Tous les cables, fils et autres accessoires Clarion achetes chez un revendeur autorise Clarion sont garantis contre tous les defauts de materiaux et de mise en oeuvre pour une periode de 90 jours.
TOUS LES PRODUITS CLARION ACHETES CHEZ UN REVENDEUR NON AUTORISE PAR CLARION SONT
SOUMIS AUX RESTRICTIONS DE GARANTIE SUPPLEMENTAIRES DECRITES
Les conditions de cette garantie limitee et I'etenduede la responsabilite de Clarion Corporation of America (( Clarion??) d'aprescette garantie limitee sont les suivantes :
1.UNE PREUVE DE LA DATE D'ACHATEST REQUISE POUR TOUTE REPARATION SOUS GARANTIE DE CE PRODUIT.
DANS LE CAS D'UNPRODUIT L1STE
PREUVE DE LA DATE 0'ACHAT ET UNE PREUVE QUE L'INSTALLATIONA ETE EFFECTUEE PAR UN REVENDEUR
AUTORISE SONT REQUISES. TOUTE L'INFORMATIONA. PROPOS DES CENTRES DE SERVICES SOUS GARANTIE
AUTORISES DE CLARION PEUT ETRE OBTENUE EN COMMUNIQUANT AUX ADRESSES L1STEES
2.Cette garantie limitee sera annulee pour tout dommage encouru lors d'unereparation effectuee par du personnel non autorise par un centre de services sous garantie Clarion.
3.Cette garantie limitee ne s'appliquepas aux produits negliges, accidentes ou ayant subi un usage incorrect, ou dont Ie numero de serie a ete modifie, obstrue ou efface, ou qui ont ete raccordes, installes, ajustes ou repares autrement qu'ensuivant les instructions fournies par Clarion.
4.Cette garantie Iimitee ne couvre pas I'interferenceelectrostatique produite ou non par Ie vehicule, ni Ie nettoyage ou Ie reglage de la tete de lecture ou des elements laser, ni les couts de manutention pour Ie retrait ou la reinstallation du lecteur pour reparation.
5.La seule responsabilite de Clarion, d'aprescette garantie limitee, est restreinte a la reparation du produit ou au remplacement du produit, a la discretion absolue de Clarion.
6.Le produit doit etre envoye a Clarion dans son emballage original ou dans un emballage equivalent. Le colis doit etre entierement assure et tous les frais de transport doivent etre prepayes.
Clarion n'assumeraaucune responsabilite en cas de perte ou de dommages encourus lors du transport.
7.LES PRODUITS CLARION ACHETES CHEZ UN REVENDEUR AUTRE QU'UNREVENDEUR CLARION AUTORISE,
INCLUANT TOUS LES ACHATS EFFECTUES SUR INTERNET CHEZ UN REVENDEUR NON AUTORISE PAR
CLARION, NE SONT PAS COUVERTS LES GARANTIES L1MITEES DE CLARION ET CE, EN ACCORD AVEC LES
L1MITES PRESCRITES PAR LA LOI. DANS LE CAS OU LES LOIS APPLICABLES NE PERMETIENT PAS
L'ELIMINATIONDES GARANTIES SOUS CES CONDITIONS, LA PERIODE DE GARANTIE L1MITEE QUI
S'APPLIQUE AU PRODUIT SERA DE QUINZE (15) JOURS A. PARTIR DE LA DATE D'ACHAT ORIGINELLE.
8.AUCUNE GARANTIE IMPLICITE NE POURRA
DECRITE
POURRA EN AUCUN CAS ETRE TENUE RESPONSABLE DES PERTES OU DOMMAGES DIRECTS OU
INDIRECTS ENCOURUS PAR L'USAGEDU PRODUIT OU L'IMPOSSIBILITED'UTILISERLE PRODUIT.
PUISQUE CERTAINS ETATS NE PERMETIENT PAS DE LIMITER LA DUREE DES GARANTIES IMPLICITES,
OU DE LIMITER LA RESPONSABILITE EN CAS DE DOMMAGES DIRECTS OU INDIRECTS, CES LIMITATIONS
OU EXCLUSIONS PEUVENT NE PAS S'APPLIQUER A. VOUS.
9.CETIE GARANTIE LIMITEE VOUS OCTROIE DES DROITS LEGAUX PRECIS.
VOUS POUVEZ POSSEDER DES DROITS SUPPLEMENTAIRES SELON VOTRE LIEU DE RESIDENCE.
10. Les lois de l'Etatde la Californie contr61ent totalement cette garantie limitee, son interpretation et sa mise en execution.
11.Si vous eprouvez des problemes de performance du produit pendant la periode garantie, veuillez communiquer avec Clarion ou visitez notre site Web a
aux adresses

clarion CLARION 2007 LIMITED WARRANTY
For USA and Canada only
Except as noted, Clarion products purchased from an authorized Clarion dealer are warranted against all defects in materials and workmanship for a period of one (1) year from the date of original purchase.
The following Clarion products noted below ** are warranted against all defects in materials and workmanship for a two
(2)year period from the date of original purchase when purchased from AND installed by an authorized Clarion dealer.
**DRZ9255 DXZ775USB DXZ675USB DXZ575USB DFZ675MC DPX11500 DPX1800 DPX2250
All Clarion cables, wires and other accessories if purchased from an authorized Clarion dealer are warranted against all defects in materials and workmanship for ninety (90) days from the date of original purchase.
ALL PURCHASES OF CLARION PRODUCTS FROM
TO FURTHER WARRANTY RESTRICTIONS AS DESCRIBED BELOW.
The conditions of this Limited Warranty and the extent of responsibility of Clarion Corporation of America ("Clarion") under this Limited Warranty are as follows:
1.PROOF OF DATE OF PURCHASE FROM AN AUTHORIZED CLARION DEALER WILL BE REQUIRED FOR
WARRANTY SERVICE OF THIS PRODUCT. IN THE CASE OF THE TWO (2) YEAR LIMITED WARRANTY FOR THE
CLARION PRODUCTS NOTED ABOVE, PROOF OF DATE OF PURCHASE AND PROOF OF INSTALLATION BY AN
AUTHORIZED CLARION DEALER IS REQUIRED. INFORMATION ABOUT CLARION AUTHORIZED WARRANTY
SERVICE CENTERS MAY BE OBTAINED BY CONTACTING CLARION AT THE ADDRESS LISTED BELOW.
2.This Limited Warranty will become void if service performed by anyone other than an approved Clarion Warranty Service Center results in damage to the products.
3.This Limited Warranty does not apply to any product which has been subject to misuse, neglect or accident, or which has had the serial number altered, defaced or removed, or which has been connected, installed, adjusted or repaired, other than in accordance with the instructions furnished by Clarion.
4.This Limited Warranty does not cover car static or other electrical interferences, tape head or laser
5.The sole responsibility of Clarion under this Limited Warranty shall be limited to the repair of the products or replacement of the product, at the sole discretion of Clarion.
6.Product must be shipped in its original carton or equivalent carton, fully insured, with shipping charges prepaid. Clarion will not assume any responsibility for any loss or damage incurred in shipping.
7.CLARION PRODUCTS PURCHASED FROM A SOURCE OTHER THAN AN AUTHORIZED CLARION DEALER,
INCLUDING ANY AND ALL PURCHASES VIA THE INTERNET FROM A NON INTERNET AUTHORIZED
CLARION DEALER, SHALL NOT BE COVERED BY ANY CLARION LIMITED WARRANTY TO THE EXTENT
ALLOWED BY APPLICABLE LAW. IN THE EVENT AND TO THE EXTENT APPLICABLE LAW PROHIBITS
ELIMINATION OF WARRANTIES UNDER THESE CIRCUMSTANCES, THE APPLICABLE LIMITED WARRANTY
PERIOD SHALL BE DEEMED TO BE FIFTEEN (15) DAYS FROM THE DATE OF ORIGINAL PURCHASE.
8.ALL IMPLIED WARRANTIES EXCEPT TO THE EXTENT PROHIBITED BY APPLICABLE LAW SHALL HAVE NO
GREATER DURATION THAN THE WARRANTY PERIOD SET FORTH ABOVE. UNDER NO CIRCUMSTANCES
SHALL CLARION BE LIABLE FOR ANY LOSS OR DAMAGE, DIRECT OR CONSEQUENTIAL, ARISING OUT
OF THE USE OR INABILITY TO USE THE PRODUCT. BECAUSE SOME STATES DO NOT ALLOW LIMITATIONS
ON HOW LONG AN IMPLIED WARRANTY LASTS OR EXCLUSIONS OR LIMITATIONS OF INCIDENTAL OR
CONSEQUENTIAL DAMAGES, THE ABOVE LIMITATIONS OR EXCLUSIONS MAY NOT APPLY TO YOU.
9.THIS LIMITED WARRANTY GIVES YOU SPECIFIC LEGAL RIGHTS, AND YOU MAY ALSO HAVE OTHER RIGHTS
WHICH VARY FROM STATE TO STATE.
10.The laws of the State of California shall govern and control this limited warranty, its interpretation and enforcement.
11.Should you have any difficulties with the performance of this product during the warranty period. please call Clarion or visit our web site for a listing of Authorized Warranty Service Centers in your area. You may also contact the Clarion Customer Service at the address listed below for any service help you may need with Clarion products.