??? Esempio di installazione della copertura della portiera

1.Rimuovere la ???nitura della portiera e, con l'apposita dima, ricavarvi il foro in cui inserire lo spaziatore per montaggio incassato.

2.Inserire nel foro appena ricavato nella ???nitura della portiera lo spaziatore per montaggio incassato (???gura 2).

3.Dal lato posteriore della ???nitura della portiera collocare il braccio di leva e, con il dado, ???ssarvi saldamente lo spaziatore per montaggio incassato (???gura 3).

??? Dashboard installation example

1.Using the provided mounting screws and speed nuts, install the mount adapter on the dashboard.

2.Pass the tweeter lead wire through the hole in the mount adapter.

3.Turning the tweeter in the direction of the arrow, insert it into the mount adapter and ???x it ???rmly in place.

??? Exemple d???installation en tableau de bord

1.Au moyen des vis ?? t??le et de ??crous fendus, installez l???adaptateur de montage sur le tableau de bord.

2.Faites passer le cordon du tweeter par le trou de l'adaptateur de montage.

3.En tournant le tweeter dans le sens de la ?????che, ins??rez-le dans l'adaptateur de montage et ???xez-le solidement en place.

??? Beispiel f??r Armaturenbrett-Montage

1.Den Montageadapter mit den mitgelieferten Befestigungsschrauben und Klemmmuttern am Armaturenbrett befestigen.

2.F??hren Sie den Tweeter-Leitungsdraht durch das Loch im Montageadapter.

3.Drehen Sie den Tweeter in Pfeilrichtung, f??hren Sie ihn in den Montageadapter ein, und sichern Sie ihn.

??? Esempio di installazione sul cruscotto

1.Usando le viti di montaggio e dei dadi rapidi in dotazione, ???ssare l???adattatore di montaggio sul cruscotto.

2.Fare scorrere il cavo del tweeter nel foro dell'adattatore di montaggio.

3.Mentre lo si ruota in direzione della freccia, inserire il tweeter nell'adattatore di montaggio e ???ssarlo quindi saldamente in posizione.

??? Ejemplo de instalaci??n en el tablero de instrumentos

1.Empleando los tornillos de montaje y las tuercas r??pidas suministrados, instale el adaptador de montaje en el tablero de instrumentos.

2.Pase el conductor del altavoz de agudos a por el ori???cio del adaptador de montaje.

3.Girando el altavoz de agudos hacia la ???echa, ins??rtelo en el adaptador de montaje y f??jelo ???rmemente en posici??n.

de adorno de la puerta con la tuerca. (Figura 3)

2.HOW TO DETACH THE TWEETER FROM THE MID-WOOFER / D??MONTAGE DU TWEETER DU HAUT-PARLEUR DE M??DIUM-

GRAVE / ABNEHMEN DES TWEETERS VOM MITTELT??NER / RIMOZIONE DEL TWEETER DAL MID-WOOFER / C??MO SACAR EL

ALTAVOZ DE AGUDOS DEL ALTAVOZ DE GAMA MEDIA/GRAVES

1.Turn the tweeter in the direction of the arrow to remove it. (Figure 4)

CAUTION:

When removing and attaching the tweeter or phase plug, take care to avoid damaging the voice coil or letting dirt get inside.

2.Turn the phase plug in the direction of the arrow until it is ???xed ???rmly in place. (Figure 5)

1.Tournez le tweeter dans le sens de la ?????che pour le d??poser. (Figure 4)

ATTENTION:

Lors de la d??pose et du montage du tweeter ou du bouchon de phase, veillez ?? ne pas endommager la bobine mobile et ?? ne pas laisser de corps ??tranger p??n??trer ?? l'int??rieur.

2.Tournez le bouchon de phase dans le sens de la ?????che jusqu'?? ce qu'il soit solidement ???x?? en place. (Figure 5)

1.Drehen Sie den Tweeter in Pfeilrichtung, um ihn zu entfernen. (Abbildung 4)

VORSICHT:

Achten Sie beim Entfernen und Anbringen des Tweeters oder Phasensteckers darauf, die Stimmenspule nicht zu besch??digen und keinen Schmutz eindringen zu lassen.

Figure 4 / Figure 4 / Abbildung 4 / figura 4 / Figura 4

2. Drehen Sie den Phasenstecker in Pfeilrichtung, bis er fest sitzt. (Abbildung 5)

1.Per rimuovere il tweeter ?? suf???ciente ruotarlo in direzione della freccia (???gura 4).

AVVERTENZA:

durante la rimozione e l'installazione del tweeter o del fasatore di equalizzazione occorre evitare di danneggiare il voice coil e di lasciar penetrare la sporcizia.

2.Ruotare quindi il fasatore di equalizzazione in direzione della freccia sino a bloccarlo saldamente in posizione (???gura 5).

1.Gire el altavoz de agudos hacia la ???echa para sacarlo. (Figura 4)

PRECAUCI??N:

Cuando saque y ???je el altavoz de agudos o corrector de fase, tenga cuidado en no da??ar la bobina m??vil o en no dejar suciedad en el interior.

2.Gire el corrector de fase hacia la ???echa hasta que se ???je ???rmemente en posici??n. (Figura 5)

Phase plug

Bouchon de phase Phasenstecker

Fasatore di equalizzazione

Corrector de fase

Figure 5 / Figure 5 / Abbildung 5 / figura 5 / Figura 5

??? Door trim installation example

1.Remove the door trim, then use the template and open the mounting hole for the ???ush-mount spacer.

2.Insert the ???ush-mount spacer into the mounting hole in the door trim. (Figure 2)

3.Fit the lever arm from the back of the door trim and ???x the ???ush-mount spacer ???rmly to the door trim with the nut. (Figure 3)

??? Exemple d???installation en garniture de porte

1.Enlevez la garniture de porte, puis utilisez le gabarit et d??gagez le trou de ???xation pour la monture encastrable.

2.Ins??rez la monture encastrable dans le trou de ???xation de la garniture de porte. (Figure 2)

3.Ajustez le bras de levier par le dos de la garniture de porte et ???xer solidement la monture encastrable ?? la garniture de porte avec l'??crou.

(Figure 3)

??? Beispiel f??r T??rleisten-Montage

1.Entfernen Sie die T??rleiste, verwenden Sie dann die Schablone, und ??ffnen Sie die Montage??ffnung f??r den eingelassenen Abstandhalter.

2.F??hren Sie den eingelassenen Abstandhalter in die Montage??ffnung in der T??rleiste ein. (Abbildung 2)

3.Befestigen Sie den Hebelarm auf der R??ckseite der T??rleiste, und befestigen Sie den eingelassenen Abstandhalter mit der Mutter fest an der T??rleiste. (Abbildung 3)

Flush-mount spacer Monture encastrable Eingelassener Abstandhalter Spaziatore per montaggio incassato

Separador para montaje a ras

Tweeter

Tweeter

Tweeter

Tweeter

Altavoz de agudos

Door trim Garniture de porte T??rleiste

Finitura della portiera

Panel de adorno de la puerta

Figure 2 / Figure 2 / Abbildung 2 / figura 2 / Figura 2

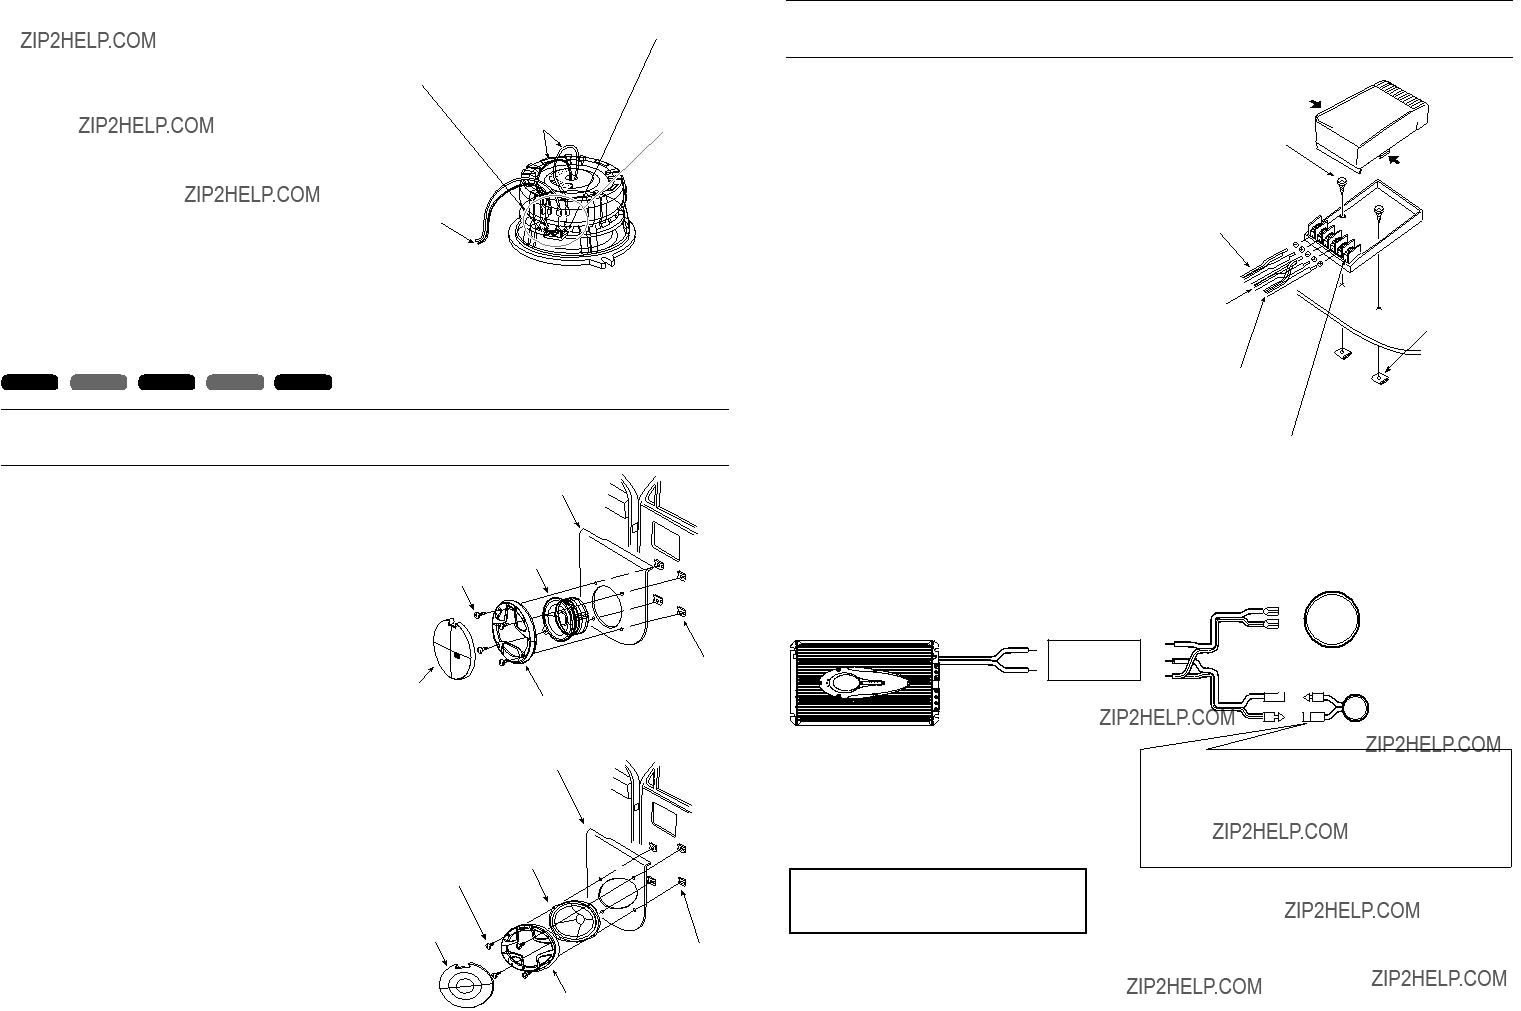
3.HOW TO CONNECT WHEN THE UNIT WILL BE USED WITH THE TWEETERATTACHED TO THE MID-WOOFER / RACCORDEMENT QUAND L'UNIT?? DOIT ??TRE UTILIS??EAVEC LE TWEETER MONT??

SUR LE HAUT-PARLEUR DE M??DIUM-GRAVE /ANSCHLIESSEN, WENN DER TWEETERAM MITTELT??NER BEFESTIGT IST / ESECUZIONE DEI COLLEGAMENTI IN CASO D'USO DELL'UNIT?? CON IL

TWEETER INSTALLATO SUL MID-WOOFER / C??MO CONECTAR CUANDO SE UTILIZAR?? LAUNIDAD CON ELALTAVOZ DEAGUDOS INSTALADO EN ELALTAVOZ DE GAMAMEDIA/GRAVES

1.Cut off the bullet terminal of the tweeter lead wire from the tweeter lead wire and cross-over network; then arrange wire to the Faston terminal. (Figure 6)

2.Connect the tweeter lead wire and the tweeter lead wire coming from the cross-over network to the terminal on the tweeter side. (Figure 7)

CAUTION:

When connecting the tweeter lead wire, be sure to check the terminal indications (TWEETER) on the label on the bottom of the speaker.

1.Coupez la cosse cylindrique de cordon de tweeter du cordon du tweeter et de celui du r??seau de ???ltres s??parateurs; puis ???xez une cosse Faston ?? chaque conducteur. (Figure 6)

2.Raccordez le cordon du tweeter et le cordon de tweeter venant du r??seau de

???ltres s??parateurs aux bornes du c??t?? tweeter. (Figure 7)

ATTENTION:

Lors du raccordement des cordons de tweeter, veillez ?? contr??ler les indications de bornes (TWEETER) se trouvant sur l'??tiquette situ??e ?? la base du haut-parleur.

Figure 6 / Figure 6 / Abbildung 6 / figura 6 / Figura 6

Tweeter lead wire Cordon de tweeter Tweeter-Leitungsdraht Cavo del tweeter Conductor del altavoz de agudos

Tweeter terminal for faston terminal (S) <-> Borne de tweeter pour cosse Faston (S) <-> Tweeter-Buchse f??r die Faston-Buchse (S) <-> Presa del tweeter per terminale Faston (S) <->

Tweeter terminal for faston terminal (L) <+> Borne de tweeter pour cosse Faston (L) <+> Tweeter-Buchse f??r die Faston-Buchse (L) <+> Presa del tweeter per terminale Faston (L) <+> Terminal del altavoz de agudos para el terminal de Faston (L) <+>

5.HOW TO CONNECTION / RACCORDEMENT / ANSCHLIESSEN / COME SEGUIRE I COLLEGAMENTI / C??MO

CONECTAR

1.Tagliare e rimuovere lo spinotto lungo del cavo del tweeter e della rete di cross-over; collegare quindi il cavo al terminale Faston (???gura 6).

2.Collegare al terminale lato tweeter il cavo del tweeter stesso e il cavo per tweeter proveniente dalla rete di cross-over (???gura 7).

Terminal del altavoz de agudos para el terminal de Faston (S) <->

Tweeter side C??t?? tweeter Tweeter-Seite Lato tweeter Lado del altavoz de agudos

1.Open the case by pushing it in the direction of the arrow. 2.Connect the relay cords to each terminal.

CAUTION:

When connecting the speaker lead wire, check the terminal indications (WOOFER and TWEETER) on the label on the bottom of the speaker and on the network terminals. Refer to Figure 6 for how to arrange the wires.

1.Ouvrez le coffret en poussant dans le sens de la ?????che.

2-Mounting screws

2-Vis ?? t??le

2 Befestigungsschrauben

2-viti di montaggio

2-Tornillos de montaje

4.GRAVE / BEISPIEL F??R MITTELT??NER-MONTAGE / ESEMPIO D'INSTALLAZIONE DEL MID-WOOFER / EJEMPLO

DE INSTALACI??N DEL ALTAVOZ DE GAMA MEDIA/GRAVES

2.Raccordez les cordons de relais ?? chaque borne.

ATTENTION:

Lors du raccordement des cordons de haut-parleurs, contr??lez les indications de bornes (WOOFER et TWEETER) se trouvant sur l'??tiquette situ??e ?? la base du haut-parleur et sur les bornes du r??seau de ???ltres. Pour la disposition des cordons, reportez-vous ?? la Figure 6.

1.Den Kasten durch Schieben in Pfeilrichtung ??ffnen.

2.Die Relaiskabel an die Klemmen anschlie??en.

VORSICHT:

??berpr??fen Sie beim Anschlie??en des Lautsprecherleitungsdrahts die Klemmenanzeigen (MITTELT??NER und TWEETER) auf dem Aufkleber, der sich auf der Bodenseite des Lautsprechers und den Netzklemmen be???ndet. Siehe Abbildung 6 f??r Hinweise, wie die Dr??hte anzuordnen sind.

1.Aprire la scatola spingendola nella direzione della freccia.

From amplifier De l???amplificateur vom Verst??rker Dall???amplificatore

Desde el amplificador

Use this terminal to get the tweeter ???3dB.

Utilisez cette borne pour que l???aigu soit ?? ???3dB.

1.Remove the punching net.

2.Using the template, open holes for the mid-woofer and for the screws.

3.Use the speed nuts and mounting screws to mount the mid-woofer.

4.Attach the punching net.

(SRP4620M) Door trim / Garniture de porte / T??rleiste / Finitura della portiera /

Panel de adorno de la puerta

1.Abra la caja empuj??ndola en el sentido de la ???echa. 2.Conecte los conectores de rel?? a cada uno de los terminales.

PRECAUCI??N:

Cuando conecte el conductor del altavoz, compruebe las indicaciones del terminal (WOOFER y TWEETER) en la etiqueta en la parte inferior del altavoz y en los terminales de la red. Re?????rase a la Figura 6 para ver c??mo disponer los conductores.

Diese Klemme verwenden, um ???3dB vom Hocht??ner zu erhalten. Usare questo terminale per ottenere ???3dB sul tweeter.

Utilice este terminal para aplicar ???3dB al altavoz de agudos.

Figure 10 / Figure 10 / Abbildung 10 / figura 10 / Figura 10

1.Entfernen Sie das Stanznetz.

2.Verwenden Sie die Schablone, um L??cher f??r den Mittelt??ner und die Schrauben zu bohren.

3.Verwenden Sie die Klemmmuttern und Befestigungsschrauben, um den Mittelt??ner zu montieren.

4.Befestigen Sie das Stanznetz.

1.Rimuovere la griglia di protezione.

2.Con l'ausilio dell'apposita dima ricavare i fori per il mid-woofer e per le viti.

3.Con i dadi rapidi e le viti di montaggio montare il mid-woofer.

4.Applicare la griglia di protezione.

Power Amplifier Amplificateur de puissance Leistungsverst??rker Amplificatore di potenza Amplificador de potencia

To attach the tweeter to the mid-woofer, refer to HOW TO CONNECT WHEN THE UNIT WILL BE USED WITH

THE TWEETER ATTACHED TO THE MID-WOOFER.

Pour le montage du tweeter sur le haut-parleur de m??dium-grave, reportez-vous ?? la partie RACCORDEMENT

QUAND L'UNIT?? DOIT ??TRE UTILIS??E AVEC LE TWEETER MONT?? SUR LE HAUT-PARLEUR DE

M??DIUM-GRAVE.

Um den Tweeter am Mittelt??ner zu befestigen, siehe ???ANSCHLIESSEN, WENN DER TWEETER AM

MITTELT??NER BEFESTIGT IST???.

Per istruzioni sul fissaggio del tweeter al mid-woofer si prega di vedere la sezione ESECUZIONE DEI

COLLEGAMENTI IN CASO D'USO DELL'UNIT?? CON IL TWEETER INSTALLATO SUL MID-WOOFER.

Para fijar el altavoz de agudos al altavoz de gama media/graves, consulte la secci??n C??MO CONECTAR

CUANDO SE UTILIZAR?? LA UNIDAD CON EL ALTAVOZ DE AGUDOS FIJADO AL ALTAVOZ DE GAMA

MEDIA/GRAVES.

As for the left side speaker, connect as in the right side speaker.

Raccordez le haut-parleur gauche de la m??me mani??re que le haut-parleur droit. Den Lautsprecher auf der linken Seite auf gleiche Weise wie den Lautsprecher auf der rechten Seite anschlie??en.

Collegare il diffusore sinistro come quello destro.

Conecte el altavoz izquierdo de la misma forma que el derecho.

Figure 11 / Figure 11 / Abbildung 11 / figura 11 / Figura 11

Figure 9 / Figure 9 / Abbildung 9 / figura 9 / Figura 9