Quick Start Guide
CI S C O AI R O N E T 340 SE R I E S BA S E ST A T I O N
Wireless device
1
TAKE OUT WHAT YOU NEED
2
CONNECT AND POWER UP THE BASE STATION
3
CONFIGURE THE BASE STATION
Quick Start Guide
CI S C O AI R O N E T 340 SE R I E S BA S E ST A T I O N
Wireless device
1
TAKE OUT WHAT YOU NEED
2
CONNECT AND POWER UP THE BASE STATION
3
CONFIGURE THE BASE STATION

 Take Out What You Need
Cisco Aironet 340 Series Base Station
AC to DC power adapter and telephone cable (option)
Cisco Aironet 340 Series Base Station CD with documentation
Additional Requirements
???The Cisco Aironet 340 Series Client Radio Card must contain firmware version V4.02 or later to communicate with the base station using the Base Station Client Utility.
???A computing device (laptop, notebook, portable or
???If you are connecting the base station to a LAN, DSL modem, cable modem, or ISDN modem, you must supply an Ethernet cable.
???If you are using the modem option connection, a telephone cable will be supplied to connect from the base station modem to your telephone jack.
2
 Connect and Power Up the Base Station
The base station provides data communications by using one of the following network connections:
???
???Cable or DSL modem (default setting)
???PPP over Ethernet
???Access Point
Caution Make sure the unit is disconnected from the power source. Do not connect a data cable when the base station is powered up or damage to the base station could result.
This guide describes how to set up a
mode, refer to the Cisco Aironet 340 Series Base Station Hardware Installation Guide. You
must also refer to this guide if you have a radio card from another vendor.
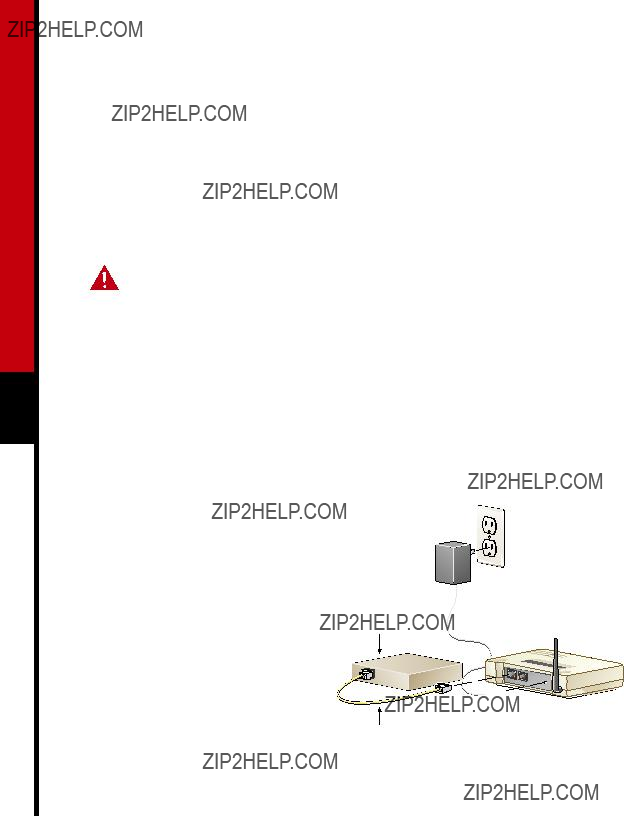
Connecting to a Cable or DSL modem
Follow these steps to connect an Ethernet cable from the base station to a cable or DSL modem (broadband Ethernet device):
1 Connect the Ethernet cable to the
DSL
or cable modem
Ethernet cable to DSL or cable modem.


 45997
45997
Connecting to a Telephone Line
If the base station is configured to use the
45998
Telephone
Connecting the Power cable
Adapter
The base station does not have an on/off switch. Power is applied when the power adapter is plugged into the unit and connected to the wall outlet.
Follow these steps to connect the power adapter to the base station:
The base station begins the
The base station begins the
???The Radio LED blinks several times.
???The Status LED continuously flashes an
and is waiting for a wireless device to communicate configuration settings to it.

 Configure the Base Station
The base station uses an IP address setting of 192.168.200.1 for the internal network when configured for cable or DSL modem,
Setting the configuration parameters of the base station requires a wireless PC (with an
IEEE 802.11 DSSS radio card with
Base Station Client Utility
You can use the BSCU to configure the base station and the associated Cisco Aironet client IEEE 802.11 DSSS radio card in the wireless PC. You can use this utility to check the connection status, provide information on the operation of the base station during the
4 connection process, determine the current version of firmware on the radio card, and load the latest firmware into the client card.
Installing BSCU
The BSCU utility supports Microsoft Windows 95, Microsoft Windows 98, Microsoft Windows NT, Microsoft Windows 2000, or Microsoft Windows ME operating systems. It is installed from the Cisco Aironet 340 Series Base Station CD shipped with the device.
Note To run the BSCU in a Windows 95 or Windows 95A environment, installation of Internet Explorer 4.0 or greater is required for the necessary networking files.
Follow these steps to install the BSCU:

Note A warning message might be displayed that indicates the SSID and radio network encryption are set to default values. Click OK.

Cable or DSL Modem Configuration
The base station uses its IP address of 192.168.200.1 on the wireless network.
Telephone
The base station uses its IP address of 192.168.200.1 on the wireless network.

Note The modem is not equipped with a speaker so you will not hear the base station dialing.
7 Set the Dial On Demand status by clicking On or Off. We recommend that you set the parameter to on. When set to On, the Dial On Demand feature allows the
Note If
8 Select the country where the modem operates by using the up and down buttons on the Country selection box. For North American sites, the USA default option is correct.
Note If your operating country is not shown, contact Technical Support for assistance.
10 Click OK to accept the settings. Click Edit Base Station Settings if you want to change the settings. After the base station IP address appears in the status line at the bottom of the BSCU screen, the base station configuration is complete, and you can close the utility.
When you have changed the radio wireless network parameters, all PCs must match this set up. To make other wireless PCs match, go to the Edit Client Properties selection in the Client
11 After the connection is established, the Base Station Connection Status screen appears in the background. Click Ok when you finish reviewing the status of the connection.
???In order to comply with FCC RF exposure limits, base station dipole antennas should be located at a minimum distance of 7.9 inches (20 cm) or more from the body of all persons.
???Warning for laptop users: In order to comply with the FCC RF exposure limits, it is recommended when using a laptop with a PC client adapter, that the adapter???s integrated antenna should not be positioned closer than 2 inches (5 cm) from your body or nearby persons for extended periods of time while it is transmitting (or operating). If the antenna is positioned less than 2 inches (5 cm) from the user, it is recommended that the user limit exposure time.

Cisco Systems has more than 200 offices in the following countries. Addresses, phone numbers, and fax numbers are listed on the
C i s c o C o n n e c t i o n O n l i n e W e b s i t e a t h t t p : / / w w w . c i s c o . c o m / g o / o f f i c e s
Copyright ?? 2001, Cisco Systems, Inc. All rights reserved. Access Registrar, AccessPath, Are You Ready, ATM Director, Browse with Me, CCDA, CCDE, CCDP, CCIE, CCNA, CCNP, CCSI,
All other brands, names, or trademarks mentioned in this document or Web site are the property of their respective owners. The use of the word partner does not imply a partnership relationship between Cisco and any other company. (0010R)
Printed in the USA on recycled paper containing 10% postconsumer waste.