User Guide
Cisco Unified IP Phone Guide 7970G/7971G (SCCP) Cisco Unified Communications Manager Express
User Guide
Cisco Unified IP Phone Guide 7970G/7971G (SCCP) Cisco Unified Communications Manager Express
1 Overview
This guide provides phone, soft key, and features descriptions for the Cisco Unified IP Phone 7970G/7971G Skinny Client Control Protocol
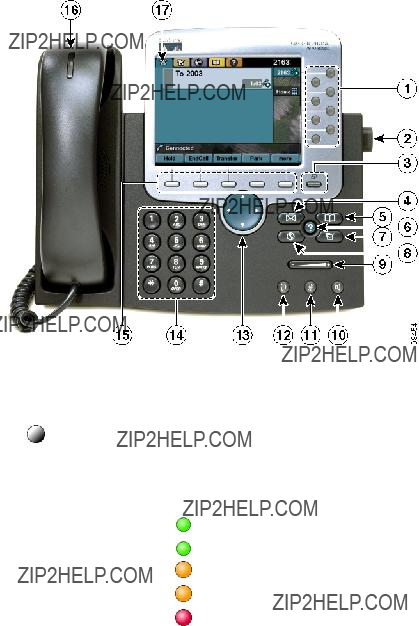
Physical Layout
Your Cisco Unified IP Phone 7970 and Cisco Unified IP Phone 7971 provides
2

3

Connecting Your Phone
This section shows how to use the connectors on your Cisco IP phone.
.
109
1
DC48V 
8
 5 4
5 4 
113951
1. Your phone may show 10/100/1000.
4

Adjusting the Handset Rest
When you connect your phone, you can adjust the handset rest so that the receiver will not slip out of the cradle. Use the following method to adjust the handset:
1.Set the handset aside and pull the square plastic tab from the handset rest.
2.Rotate the tab 180 degrees.
3.Slide the tab back into the handset rest. An extension protrudes from the top of the rotated tab. Return the handset to the handset rest.
120521
Touch Screen Features
This is what your main touch screen might look like with active calls and several feature menus open.
5

Choosing Touch Screen Items
To choose items on your phone???s touch screen, use one of the following methods:
???By touch, press (or tap)
???By item number, press the corresponding number on your keypad. For example, press 4 to choose the fourth item in a menu.
???By scrolling, press the Navigation button to highlight an item. Press a soft key to finish the action, or tap the item on the touch screen with your fingertip.
Cleaning and Maintaining the Touch Screen
To disable the touch screen for cleaning, press  and hold for more than one second.
  flashes. The screen remains disabled for about a minute, unless you enable it.
To enable the touch screen (after disabling it), press  (flashing) and hold for more than one second.
To wake the touch screen from sleep mode, press the touch screen or any button, or lift the handset. After a period of inactivity (determined by your system administrator), the touch screen enters sleep mode to save power. In this mode, the touch screen appears blank and  remains lit.
Caution Use only a soft, dry cloth to wipe the touch screen. Do not use any liquids or powders on the phone, because they can contaminate phone components and cause failures.
Feature Buttons and Menus
To open or close a feature menu, press a feature button:
Messages
Services
Help
Directories
Settings
To scroll through a list or menu, press the Navigation button.
To go back one level in a feature menu, press Exit. Pressing Exit from the top level of a menu closes the menu.
To switch between open feature menus, press a feature tab on your touch screen. Each feature menu has a corresponding tab. The tab is visible when the feature menu is open.
6
Line and Call Icons
The difference between lines and calls is as follows:
???
To see your phone lines, look at the right side of your touch screen. You have as many lines as you have directory numbers and phone line icons:  .
.
???
Your phone displays icons to indicate the line and call state.
2 Operating Your Phone
You can perform basic
Note The following procedures may require you to enter information using the keypad. Press the backspace (<<) soft key to erase digits that were entered incorrectly.
Placing a
To place a call using the handset, pick up the handset and enter a number. To place a call using the speakerphone, press  and enter a number.
To place a call using a headset, press  and enter a number. Or, if
  is lit, press New Call and enter a number.
To redial a number, press Redial to dial the last number, or press the Navigation button (with the phone idle) to see your Placed Calls.
To place a call while another call is active (using the same line), use the following procedure:
1.Press Hold.
2.Press New Call.
3.Enter a number.
To dial from a call log, use the following procedure:
1. Choose  > Missed Calls, Received Calls, or Placed Calls.
7
2. Press the listing on the touch screen.
To dial  , or
, or  .
.
When you predial, your phone tries to anticipate the number you are dialing by displaying matching numbers (if available) from your Placed Calls log. This is called Auto Dial. To call a number displayed with Auto Dial, press the number, or scroll to it and go
If you make a mistake while dialing, press << to erase digits.
Placing a
To place a call while another call is active (using a different line), use the following method:
1.Press  for a new line. The first call is automatically placed on hold.
2.Enter a number.
To speed dial a number, use one of the following methods:
???Press  (a
(a
???Use the Abbreviated Dial feature.
???Use the Fast Dial feature.
To dial from a corporate directory on your phone, use the following method:
1.Choose  > Corporate Directory (name can vary).
2.Enter a name and press Search.
3.Highlight a listing and go
To use Cisco CallBack to receive notification when a busy or ringing extension is available, use the following method:
1.Press CallBack while listening to the busy tone.
2.Hang up. Your phone alerts you when the line is free.
3.Place the call again.
To see if a line associated with a
To dial from a Personal Address Book (PAB) entry, use the following method:
1.Choose  > Personal Directory to log in.
2.Choose Personal Address Book and search for a listing.
To place a call using your Extension Mobility profile, log in to the Extension Mobility service on a phone.
Answering a Call
To answer with a headset, press  , if unlit. Or, if
  is lit, press Answer or
  (flashing). To answer with the speakerphone, press
  , Answer, or
  (flashing).
To switch from a connected call to answer a new call, press Answer or, if the call is ringing on a different line, press  (flashing).
To answer using call waiting, press Answer.
To send a call to your voice messaging system, press DND.
To retrieve a parked call on another phone, use Call Pickup.
To use your phone to answer a call ringing elsewhere, use Call Pickup.
8

Ending a Call
To hang up while using the handset, return the handset to its cradle. Or press EndCall.
To hang up while using a headset, press  . Or, to keep headset mode active, press EndCall. To hang up while using the speakerphone, press
  or EndCall.
To hang up one call, and preserve another call on the same line, press EndCall. If necessary, remove the call from hold first.
Using Hold and Resume
Engaging the Hold feature typically generates music or a beeping tone. A held call is indicated by the  To put a call on hold, use the following method:
1.Make sure the call you want to put on hold is highlighted.
2.Press Hold.
To remove a call from hold on the current line, use the following method:
1.Make sure the appropriate call is highlighted.
2.Press Resume.
To remove a call from hold on a different line, press (flashing) for the appropriate line. If a single call is holding on this line, the call automatically resumes. If multiple calls are holding, scroll to the appropriate call and press Resume.
Using Mute
With Mute enabled, you can hear other parties on a call and they cannot hear you. You can use Mute in conjunction with the handset, speakerphone, or a headset.
To toggle Mute on, press  . To toggle Mute off, press
  .
.
Switching Between Multiple Calls
You can switch between multiple calls on one or more lines. If the call that you want to switch to is not automatically highlighted, press the call appearance on your touch screen or scroll to it.
To switch between connected calls on one line, use the following method:
1.Make sure the call that you want to switch to is highlighted.
2.Press Resume. Any active call is placed on hold and the selected call is resumed.
To switch between connected calls on different lines, press for the line that you are switching to. If a single call is holding on the line, the call automatically resumes. If multiple calls are holding, highlight the appropriate call and press Resume.
To switch from a connected call to answer a ringing call, press Answer, or if the call is ringing on a different line, press  (flashing). Any active call is placed on hold and the selected call is resumed.
Viewing Multiple Calls
In standard viewing mode, your phone displays calls as follows for the highlighted line:
???Calls with the highest precedence and longest duration display at the top of the list.
???Calls of a similar type are grouped together. For example, calls that you have interacted with are grouped near the top, and calls on hold are grouped last.
9

Transferring Calls
To transfer a call without talking to the transfer recipient, use the following method:
1.From an active call, press Transfer.
2.Enter the target number.
3.Press Transfer again to complete the transfer or EndCall to cancel.
Note If your phone supports
To talk to the transfer recipient before transferring a call (consult transfer), use the following method:
1.From an active call, press Transfer.
2.Enter the target number.
3.Wait for the transfer recipient to answer.
4.Press Transfer again to complete the transfer or EndCall to cancel.
Note If your phone supports
To redirect a ringing call to your voice messaging system, press DND. The call is automatically transferred to your voice message greeting.
Forwarding All Calls to Another Number
To set up call forwarding on your primary line, press CFwdALL and enter a target phone number exactly as you would dial it from your phone. For example, enter an access code or the area code, if necessary. You can forward your calls to a traditional analog phone or to another IP phone, although your system administrator can restrict the call forwarding feature to numbers within your company. Call forwarding is phone line specific. If a call reaches you on a line where call forwarding is not enabled, the call will ring as usual. Your system administrator can change call forwarding conditions for your phone lines.
To cancel call forwarding on your primary line, press CFwdALL.
To verify that call forwarding is enabled on your primary line, look for:
???The call forward icon above the primary phone number:  .
.
???The call forward target number in the status line.
Do Not Disturb
Use the Do Not Disturb (DND) feature to block incoming calls on your phone with a busy tone. When DND is turned on, the DND blocking feature applies to all the lines on your phone. Received calls are not logged to the Missed Calls directory on your phone.
When DND and Call Forward All are both enabled on your phone, Call Forward All takes precedence on incoming calls. That is, calls will be forwarded and the caller will not hear a busy tone.
If DND is not enabled on your phone, see your system administrator.
To activate DND, use the following method:
1.Press the more soft key to locate the DND soft key.
2.Press the DND soft key. A display text message indicates that the phone is in
Note Pressing the DND soft key immediately forwards the call to the
To deactivate the
10
Conference Calls
Your Cisco Unified IP Phone provides three types of conference calls: Standard,
Standard Conference Calls
A standard conference call involves three parties.
You can create a standard conference in different ways, depending on your needs and the soft keys available on your phone:
???
???
A
You can create a
Ad Hoc Conference Calls
An Ad Hoc conference call involves up to 8 parties.
You can create an Ad Hoc conference call the same way you do a standard conference call.
Starting and Joining a Standard Conference
Create a conference by calling participants. Calls must be on the same line before you can add them to a conference. If calls are on different lines, transfer them to a single line before using Confrn or Join.
Depending on how your phone is configured, if you leave a conference after creating it, the conference might end. To avoid this, transfer the conference before hanging up.
To add new participants to an existing conference, use the following method:
1.From a connected call, press Confrn. (You may need to press the more soft key to see Confrn.)
2.Enter the participant???s phone number.
3.Wait for the call to connect.
4.Press Confrn again to add the participant to your call.
5.Repeat to add additional participants.
Participate in a conference
Answer the phone when it rings.
To view a list of conference participants, use the following method:
1.Highlight an active conference.
2.Press ConfList. Participants are listed in the order in which they join the conference with the most recent additions at the top.
To get an updated list of participants, while viewing the conference list, press Update.
To see who started the conference, while viewing the conference list, locate the person listed at the bottom of the list with an asterisk (*) next to the name.
To drop the last party added to the conference, press RmLstC. You can remove participants only if you initiated the conference call.
To remove any conference participant, use the following method:
1.Highlight the participant???s name.
2.Press Remove. You can remove participants only if you initiated the conference. To end your participation in a conference, hang up or press EndCall.
11
Starting or Joining a
To start a
1.Obtain a
2.Distribute the number to participants.
3.When you are ready to start the meeting, go
4.Dial the
Participants hear a busy tone if they call the conference before the initiator has joined. In this case, participants must call back.
To join a
To end a
Starting or Joining an Ad Hoc Conference Call
Ad hoc conferences are created when one party calls another, then either party decides to add another party to the call. This is the default behavior. Your system can be configured so that only the conference creator can add parties to the conference.
The default is that the conference is maintained as long as three parties remain in the conference. Any party can hang up and the conference is maintained. Your system can be configured so that the conference drops when the creator hangs up. Your system can also be configured so that the conference drops when the last local party hangs up.
Ad Hoc conferenceing supports up to eight parties.
Start a Conference Call
To add new participants to an existing conference, use the following method:
1.From a connected call, press Confrn. (You may need to press the more soft key to see Confrn.)
2.Enter the participant???s phone number.
3.Wait for the call to connect.
4.Press Confrn again to add the participant to your call.
5.Repeat to add additional participants.
View a List of Participants
To view a list of conference participants, use the following method:
1.Highlight an active conference.
2.Press ConfList. Participants are listed in the order in which they join the conference with the most recent additions at the top.
To get an updated list of participants, while viewing the conference list, press Update.
To see who started the conference, while viewing the conference list, locate the person listed at the bottom of the list with an asterisk (*) next to the name.
To drop the last party added to the conference, press RmLstC. You can remove participants only if you initiated the conference call.
Remove Participants
To remove any conference participant, use the following method:
1.Highlight the participant???s name.
2.Press Remove. You can remove participants only if you initiated the conference. To end your participation in a conference, hang up or press EndCall.
12

Speed Dialing
Speed dialing allows you to enter an index number, press a button, or select a phone screen item to place a call. Depending on the configuration, your phone can support the following
???
???Abbreviated Dialing
???Fast Dials
???To set up Fast Dials, you must access the Personal Directory feature.
???Alternately, your system administrator can configure
1.Set up
2.To place a call, press  (a
(a
Note If your phone supports the Busy Lamp Field (BLF)
Use Abbreviated Dial
1.Set up Abbreviated Dialing codes.
2.To place a call, enter the Abbreviated Dialing code and press AbbrDial.
Use Fast Dial
1.Create a Personal Address Book entry and assign a Fast Dial code.
2.To place a call, access the Fast Dial service on your phone.
Picking Up a Redirected Call on Your Phone
Call PickUp allows you to answer a call that is ringing on a coworker???s phone by redirecting the call to your phone. You might use Call PickUp if you share
If you have multiple lines and want to pick up the call on a nonprimary line, first press  for the desired line, then press a Call PickUp soft key.
To answer a call that is ringing on another extension within your call pickup group, use the following method:
1.Do one of the following:
???If the PickUp soft key is available, press it.
???If the PickUp soft key is not available, go
2.If the call rings, press Answer to connect to the call.
To answer a call that is ringing on another extension outside of your group, use the following method:
1.Do one of the following:
???If the GPickUp soft key is available, press it.
???If the GPickUp soft keys not available, go
2.Enter the group pickup code. If your phone supports
3.If the call rings, press Answer to connect to the call.
13

Using a Shared Line
Your system administrator can ask you to use a shared line if you:
???Have multiple phones and want one phone number
???Share
???Handle calls on behalf of a manager
The  appears when another phone that shares your line has a connected call. You can place and receive calls as usual on the shared line, even when the
Storing and Retrieving Parked Calls
You can park a call when you want to store the call so that you or someone else can retrieve it from another phone in the Cisco Unified Communications Manager system (for example, a phone at a coworker???s desk or in a conference room).
To store an active call using Call Park, use the following method:
1.During a call, press Park. (You may need to press the more soft key to see Park.)
2.Note the call park number displayed on your phone screen.
3.Hang up.
To retrieve a parked call, enter the call park number from any Cisco Unified IP Phone in your network to connect to the call.
Note You have a limited amount of time to retrieve a parked call before it reverts to ringing at the original number. See your system administrator for details.
Making and Receiving Secure Calls
Depending on how your system administrator has configured your phone system, your phone can support making and receiving secure calls.
Your phone is capable of supporting these types of calls:
???Authenticated
???Encrypted
???Nonsecure
To check the security level of a call, look for a security icon in the top right corner of the call activity area, next to the call duration timer:
Authenticated call
Encrypted call
Neither security icon appears if the call is nonsecure.
To determine if secure calls can be made in your company, contact your system administrator.
Note There are interactions, restrictions, and limitations that affect how security features work on your phone. For more information, ask your system administrator.
14

Using Cisco Extension Mobility
Cisco Extension Mobility (Cisco EM) allows you to temporarily configure a Cisco Unified IP phone as your own. After you log in to EM, the phone adopts your user profile, including your phone lines, features, established services, and
EM automatically logs you out after a specified amount of time. This time limit is established by your system administrator. Changes that you make to your Cisco EM profile (from the User Options web pages) take effect the next time that you log in to Cisco EM on a phone. Settings that are controlled on the phone only are not maintained in your Cisco EM profile.
To log in to Cisco EM, use the following method:
1.Choose  > Cisco EM Service (name can vary).
2.Enter your user ID and PIN (provided by your system administrator). To log out of Cisco EM, use the following method:
1.Choose  > Cisco EM Service (name can vary).
2.When prompted to log out, press Yes.
Using BLF to Determine a Line State
Depending on the configuration, you can use the Busy Lamp Field (BLF) feature to determine the state of a phone line associated with a
To see the state of a
+  Line is
  Line is idle.
BLF indicator unavailable for this line.
To see the state of a line listed in a call log or directory, look for one of these indicators next to the line number:
Line is
Line is idle.
BLF indicator unavailable for this line.
Using a Handset, Headset, and Speakerphone
To use the handset, lift it to go
To use a headset, press  to toggle headset mode on and off. If you use AutoAnswer, see the ???Using AutoAnswer??? section on page 16 for exceptions. You can use the headset in conjunction with all of the controls on your phone, including
  and
and  .
.
To use the speakerphone, press  to toggle speakerphone mode on or off. Many of the actions you can take to dial a number or answer a call will automatically trigger speakerphone mode, assuming that the handset is in its cradle and
  is not lit.
To switch to the speakerphone or a headset (from the handset) during a call, press  or
or  , then hang up the handset. To switch to the handset (from the speakerphone or headset) during a call, lift the handset (without pushing any buttons).
To adjust the volume level for a call, press  during a call or after invoking a dial tone. This action adjusts the volume for the handset, speakerphone, or headset, depending on which device is in use. Press Save to preserve the volume level for future calls.
15

Using AutoAnswer
When AutoAnswer is enabled, your phone answers incoming calls automatically after a few rings. Your system administrator configures AutoAnswer to use either the speakerphone or a headset. You can use AutoAnswer if you receive a high volume of incoming calls.
To use AutoAnswer with a headset, keep headset mode active (in other words, keep  lit), even when you are not on a call. To keep headset mode active, do the following:
???Press EndCall to hang up.
???Press NewCall or Dial to place new calls.
If your phone is set up to use AutoAnswer in headset mode, calls are automatically answered only if  is lit. Otherwise, calls ring normally and you must manually answer them.
To use AutoAnswer with the speakerphone, keep the handset in the cradle and headset mode inactive ( unlit). Otherwise, calls ring normally and you must manually answer them.
Customizing Rings and Message Indicators
You can customize how your phone indicates an incoming call and a new voice mail message. You can also adjust the ringer volume for your phone.
To change the ring tone per line, use the following method:
1.Choose  > User Preferences > Rings.
2.Choose a phone line or the default ring setting.
3.Choose a ring tone to play a sample of it.
4.Press Select and Save to set the ring tone, or press Cancel.
To change the ring pattern per line
1.Log in to your User Options web pages.
2.Access your call ring pattern settings.
Note Before you can access this setting, your system administrator needs to enable it for you.
To adjust the volume level for the phone ringer, press  while the handset is in the cradle and the headset and speakerphone buttons are off. The new ringer volume is saved automatically.
To change the way that the voice message light on your handset works, use the following method:
1.Log in to your User Options web pages.
2.Access your message indicator settings.
Note Typically, the default system policy is to indicate a new voice message by displaying a steady light on the handset light strip.
16
Customizing the Touch Screen
To change the touch screen brightness, use the following method:
1.Choose  > User Preferences > Brightness.
2.To make adjustments, press Up, Down or  .
.
3.Press Save, or press Cancel.
To adjust the touch screen to accommodate your viewing angle, use the following method:
1.Choose  > User Preferences > Viewing Angle.
2.To make adjustments, press Up, Down or  .
.
3.Press Save, or press Cancel.
To change the background image, use the following method:
1.Choose  > User Preferences > Background Images.
2.Scroll through available images and press Select to choose an image.
3.Press Preview to see a larger view of the background image.
4.Press Exit to return to the selection menu.
5.Press Save to accept the new image, or press Cancel.
To change the language on your touch screen, use the following method:
1.Log in to your User Options web pages.
2.Access your user settings.
To change the line text label, use the following method:
1.Log in to your User Options web pages.
2.Access your line label settings.
17
3 Phone Features and Functions List
The following list is an alphabetical list of features and functions for your Cisco Unified IP phone.
Adjusting the Handset Rest, page 5
Choosing Touch Screen Items, page 6
Cleaning and Maintaining the Touch Screen, page 6
Customizing Rings and Message Indicators, page 16
Customizing the Touch Screen, page 17
Feature Buttons and Menus, page 6
Forwarding All Calls to Another Number, page 10
Making and Receiving Secure Calls, page 14
Picking Up a Redirected Call on Your Phone, page 13
Placing a
Placing a
Starting and Joining a Standard Conference, page 11
Starting or Joining a
Storing and Retrieving Parked Calls, page 14
Switching Between Multiple Calls, page 9
Using a Handset, Headset, and Speakerphone, page 15
Using BLF to Determine a Line State, page 15
Using Cisco Extension Mobility, page 15
Viewing Multiple Calls, page 9
18
19

Cisco Systems has more than 200 offices in the following countries. Addresses, phone numbers, and fax numbers are listed on the
C i s c o W e b s i t e a t w w w . c i s c o . c o m / g o / o f f i c e s
Argentina ??? Australia ??? Austria ??? Belgium ??? Brazil ??? Bulgaria ??? Canada ??? Chile ??? China PRC ??? Colombia ??? Costa Rica ??? Croatia ??? Cyprus ??? Czech Republic ??? Denmark Dubai, UAE ??? Finland ??? France ??? Germany ??? Greece ??? Hong Kong SAR ??? Hungary ??? India ??? Indonesia ??? Ireland ??? Israel ??? Italy ??? Japan ??? Korea ??? Luxembourg ??? Malaysia Mexico ??? The Netherlands ??? New Zealand ??? Norway ??? Peru ??? Philippines ??? Poland ??? Portugal ??? Puerto Rico ??? Romania ??? Russia ??? Saudi Arabia ??? Scotland ??? Singapore Slovakia ??? Slovenia ??? South Africa ??? Spain ??? Sweden ??? Switzerland ??? Taiwan ??? Thailand ??? Turkey ??? Ukraine ??? United Kingdom ??? United States ??? Venezuela ??? Vietnam Zimbabwe
CCSP, CCVP, the Cisco Square Bridge logo, Follow Me Browsing, and StackWise are trademarks of Cisco Systems, Inc.; Changing the Way We Work, Live, Play, and Learn, and iQuick Study are service marks of Cisco Systems, Inc.; and Access Registrar, Aironet, ASIST, BPX, Catalyst, CCDA, CCDP, CCIE, CCIP, CCNA, CCNP, Cisco, the Cisco Certified Internetwork Expert logo, Cisco IOS, Cisco Press, Cisco Systems, Cisco Systems Capital, the Cisco Systems logo, Cisco Unity, Empowering the Internet Generation, Enterprise/Solver, EtherChannel, EtherFast, EtherSwitch, Fast Step, FormShare, GigaDrive, GigaStack, HomeLink, Internet Quotient, IOS, IP/TV, iQ Expertise, the iQ logo, iQ Net Readiness Scorecard, LightStream, Linksys, MeetingPlace, MGX, the Networkers logo, Networking Academy, Network Registrar, Packet, PIX,
All other trademarks mentioned in this document or Website are the property of their respective owners. The use of the word partner does not imply a partnership relationship between Cisco and any other company. (0502R)
 Printed in the USA on recycled paper containing 10% postconsumer waste.