

0The 1997 Chevrolet Carnaro Owner???s Manual
This section tells you how to use your seats and safety belts properly. It also explains the air bag system.
This section explains how to start and operate your Chevrolet.
This section tells you how to adjustthe ventilation and comfort controls and how to operate your audio system.
4- 1 Your Driving and the Road
Here you???ll find helpful information and tips about the road and how to drive under different conditions.
5- 1 Problems on the Road
This section tells what todo if you have a problem while driving, such as a flat tireor overheated engine, etc.
Here the manual tells you how to keep your Chevrolet running properly and looking good.
7- 1 Maintenance Schedule
This section tells you when to perform vehicle maintenance and what fluids and lubricants to use.
This section tells you how to contact Chevrolet for assistance and how to get service and owner publications. It also gives you information on ???Reporting Safety Defects??? on page8- 10.
Here???s an alphabetical listing of almost every subjectin this manual.You can use it to quickly find something you want to read.
i

GENERAL MOTORS, GM, the GM Emblem, CHEVROLET, the CHEVROLET Emblem and Ithe name CAMARO are registeredtrademarks of General Motors Corporation.
This manual includes the latest information at the time it was printed. We reserve the right to make changes in the product after that time without further notice. For vehicles first sold in Canada, substitute the name ???General Motors of Canada Limited??? for Chevrolet Motor Division whenever it appears in this manual.
Please keep this manual in your Chevrolet, so it will be there if you ever need it when you???re on the road. If you sell the vehicle, please leave thismanual in it so the new owner can use it.
Litho in U.S.A.
Part No. 10293225 B First Edition
We support voluntary technician certification.
LC E R.T I F I .E D A
r w r TM
WE SUPPORT
VOLUNTARY TECHNICIAN
CERTIFICATIONTHROUGH
National Institutefor
AUTOMOTIVE
SERVICE
EXCELLENCE
For Canadian OwnersWho Prefer a
French Language Manual:
Aux proprictaires canadiens: Vous pouvez vous procurer un exemplaire de ce guide en fraqaischez votre concessionaire ou au:
DGN Marketing Services Ltd. 1500 Bonhill Rd. Mississauga, Ontario L5T IC7
@CopyrightGeneral Motors Corporation 1996
All Rights Reserved
ii

I
Louis Chevrolet, the other half of the team, at the wheel of his experimental ???Classic Six, ??? which entered production in 1912.
That year 2999 vehicles were produced.
iii

The Chevrolet blend of value and performance has become an American tradition
the racetrack like the legendary Corvette and Camaro, or
created for the pleasure of the open road.
Every decade, Chevrolet has reinforced its heritage of affordable performance
with quality and value crafted
into each vehicle.It's not
surprising thatfor 80 years
"Genuine Chevrolet" has been
America's automobile.
We're proud to continue that
heritage in your Chevrolet,
In 1932 Chevrolet introduced
and transmission offered a host of
accessories
I
I
8
I
Thelegucy of America Sfavoritesportscar
iv

and we are pledged to
make ownership of your
Chevrolet an enjoyable
and rewarding experience.
60's automotive excitement included Chevrolet landmarks like the Corvette Sting Ray,
sportythe Camaro, and powerplants like the legendary 327 V8.
I
I
I
I
I
I
I
I
I
I
I
I
I
I
I
I
I
I
I
I
I
I
I
I
The 1957 Chevy started u romance with the American public
Your new Clzevrolet continues u tradition of valuequalityand.
V

How to Use this Manual
Many people read their owner???s manual from beginning to end when they first receivetheir new vehicle. If you do this, it will help you learn aboutthe features and controls for your vehicle. In this manual, you???ll find that pictures and words work together to explain
things quickly.
Index
A good place tolook for what you need is the Index in the back of the manual. It???s an alphabetical list of all that???s in the manual, and the page number where you???ll find it.
Safety Warnings and Symbols
You will find a number of safety cautionsin this book. We use a box and the word CAUTION to tell you about things that could hurt you if you were to ignore the warning.
These mean thereis something thatcould hurt you or other people.
In the caution area, we tell you what the hazard is. Then we tell you what to do tohelp avoid or reducethe hazard. Please read these cautions.If you don???t, you or others couldbe hurt.
You will also find a circle with a slash through it in this book. This safety symbol means ???Don???t,?????? ???Don???t do this,?????? or ???Don???t let thishappen.???
vi

Vehicle Damage Warnings
Also, in thisbook you will find these notices:
I NOTICE:
These mean thereis something thatcould damage your vehicle.
In the notice area, we tell you about something that can damage your vehicle. Many times, thisdamage would not be covered by your warranty, and it could be costly. But the notice will tell you what to do to help avoid thedamage.
When you read other manuals, you might see CAUTION and NOTICE warnings indifferent colors or in different words.
You???ll also seewarning labels on your vehicle. They use the same words, CAUTION or NOTICE.
vii

Vehicle Symbols
These aresome of the symbols you
may find on your vehicle.
WINDOW
DEFOGGER
FOG LAMPS $0
indicator lights:
ENGINE t FUSE
COOLANT
...
0Section 1 SeatsandRestraintSystems
Here you???ll find information about the seats yourin Chevrolet and how to use your safety belts properly. You can also learn about some thingsyou should nut do with air bags and safety belts.

Seats and Seat Controls
This section tells you about the
Manual Front Seat
I
/&CAU [ON:
You can lose controlof the vehicle if you try to adjust a manual driver???s seat while the vehicle is moving. The sudden movement could startle and confuse you, or make you push a pedal whenyou don???t want to. Adjust the driver???s seat only when the vehicle isnot moving.
Move the lever under the passenger???s front seat to unlock it.
Slide the seat to where you want it. Then release the lever and try to move the seatwith your body to make sure the seat is locked into place. Be sure the lever returns to its original position after moving the seat.

There are two leversat the frontof the driver???s seat. The left lever adjusts theseat forward and rearward. The right lever adjuststhe angle of the front of the seat.
To adjust the seats forward and rearward,lift the lever under the leftfront of the seat. Slide the seat to whereyou want it. Then releasethe lever andtry to move the seat with your body to make sure the seatislocked into place.
To raise orlower the frontof the seat, liftthe right lever and lean forward or backward.
The driver???s seat has three controls on theleft side.
A.The front controlmakes the front of the seatgo up and down.
B.The center controlmakes the whole seat go up and down or forward and backward.
C.The back control makes the back of the seat go up and down.

Reclining Front Seatbacks
I
To adjust the seatback, lift the lever on the outer sideof the seat. Release the lever to lock the seatback where you want it. Pull up on the lever, and the seat will go to its original upright position.
But don't have seatback reclined if your vehicleis moving.
Sitting in a reclined position when your vehicleis in motion can be dangerous. Even if you buckle
CAUTION: (Continued)
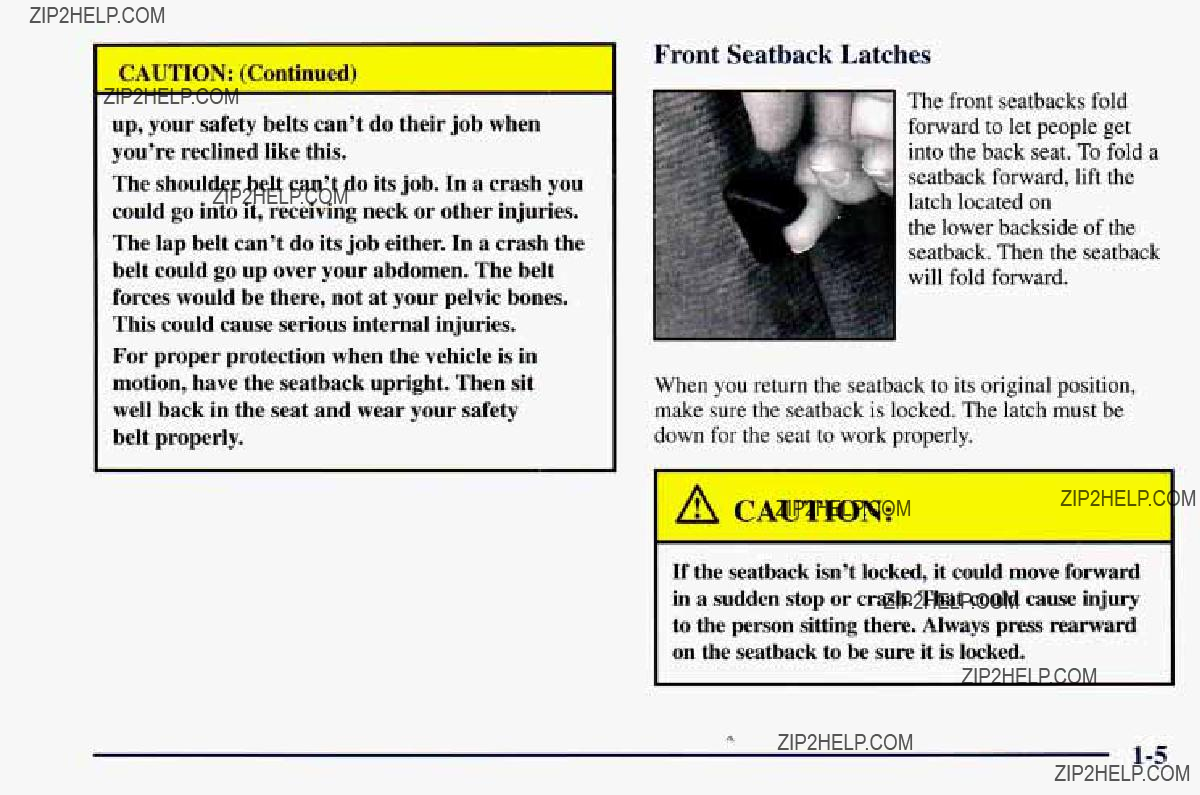
Front Seatback Latches
IThe front seatbacks fold
up, your safety belts can???tdo their job when you???re reclined like this.
The shoulder belt can???t do its job. In a crash you could go into it, receiving neckor other injuries.
The lapbelt can???tdo its job either. In a crash the belt could go up over your abdomen. The belt forces would bethere, not at your pelvic bones. This could cause seriousinternal injuries.
For properprotection when the vehicle isin motion, have the seatback upright. Then sit well back inthe seat and wear your safety belt properly.
forward to let people get into the back seat. To fold a seatback forward, liftthe latch located on
the lower backside of the seatback. Then the seatback will fold forward.
When you return the seatback to its original position, make sure the seatback is locked. Thelatch must be down for the seat to work properly.
If the seatback isn???t locked,it could move forward in a sudden stopor crash. That could cause injury to the personsitting there. Always press rearward on the seatback tobe sure it is locked.
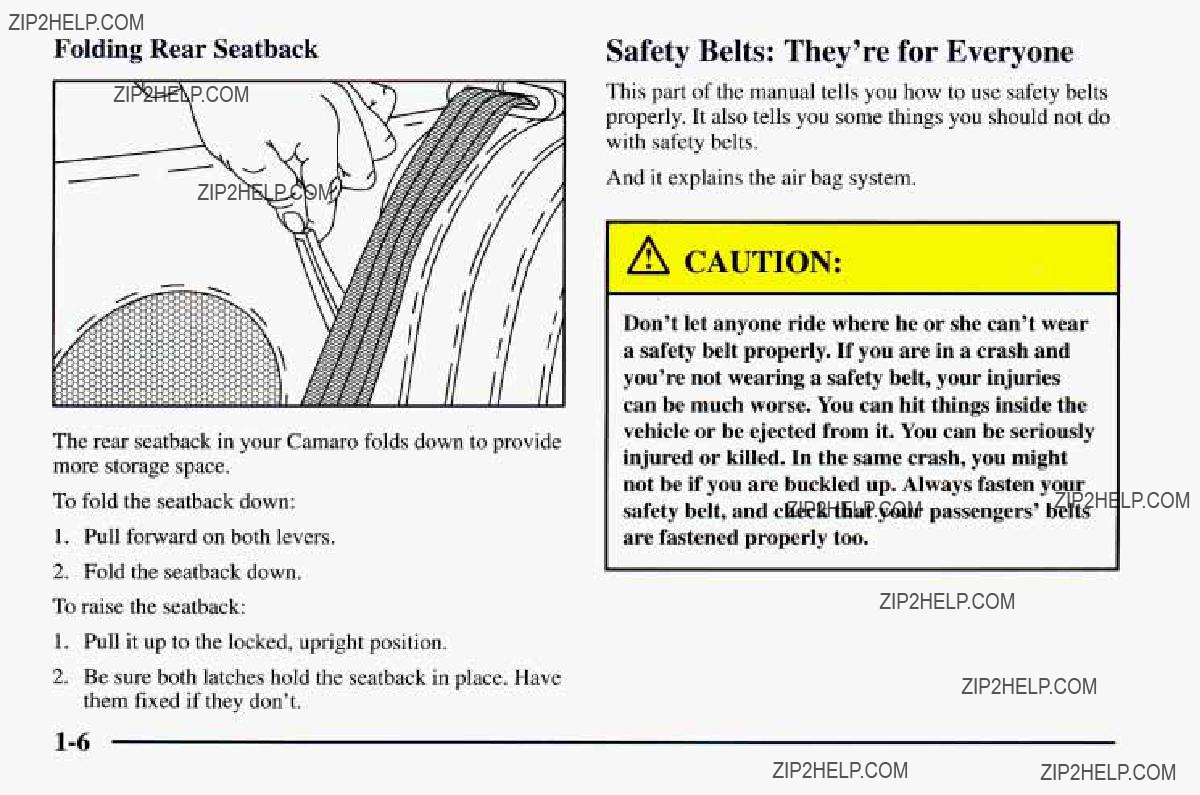
Folding Rear Seatback
The rear seatback in your Camaro folds down to provide more storage space.
To fold the seatback down:
1.Pull forward on both levers.
2.Fold the seatback down. To raise the seatback:
1.Pull it up to the locked, upright position.
2.Be sure both latches hold the seatback in place. Have them fixed if they don???t.
Safety Belts: They???re forEveryone
This part of the manual tells you how to use safety belts properly. It also tells you some things you should not do with safety belts.
And it explains the air bag system.
Don???t let anyone ride where he or she can???t wear a safety belt properly.If you are in a crash and you???re not wearinga safety belt,your injuries
can be muchworse. You can hit things inside the vehicle or be ejected fromit. You can be seriously injured or killed. In the same crash,you might
not beif you are buckled upAlways. fasten your safety belt, and check that your passengers??? belts are fastened properlytoo.

It is extremely dangerous to ride in a cargo area, inside or outside of a vehicle. In a collision, people riding in these areas are more likely to be seriously injured or killed. Do not allow people to ride in any area of your vehicle that is not equipped with seats and safety belts.Be sure everyone in your vehicle isin a seat and using a safety belt properly.
Your vehicle has a light that comes on as areminder to buckle up. (See ???Safety
Belt Reminder Light???in the Index.)
In most states and Canadianprovinces, the law says to wear safety belts. Here???s why: They work.
You never know if you???ll be in acrash. If you do have a crash, you don???t know if it will be a bad one.
A few crashes aremild, and some crashes can beso serious that even buckled up a person wouldn???t survive. But most crashes arein between. In many of them, people who buckle up can surviveand sometimes walk away. Without belts they could have been badly hurt
or killed.
After more than 25 years of safety belts in vehicles, the facts are clear. In most crashes buckling up does matter ...a lot!
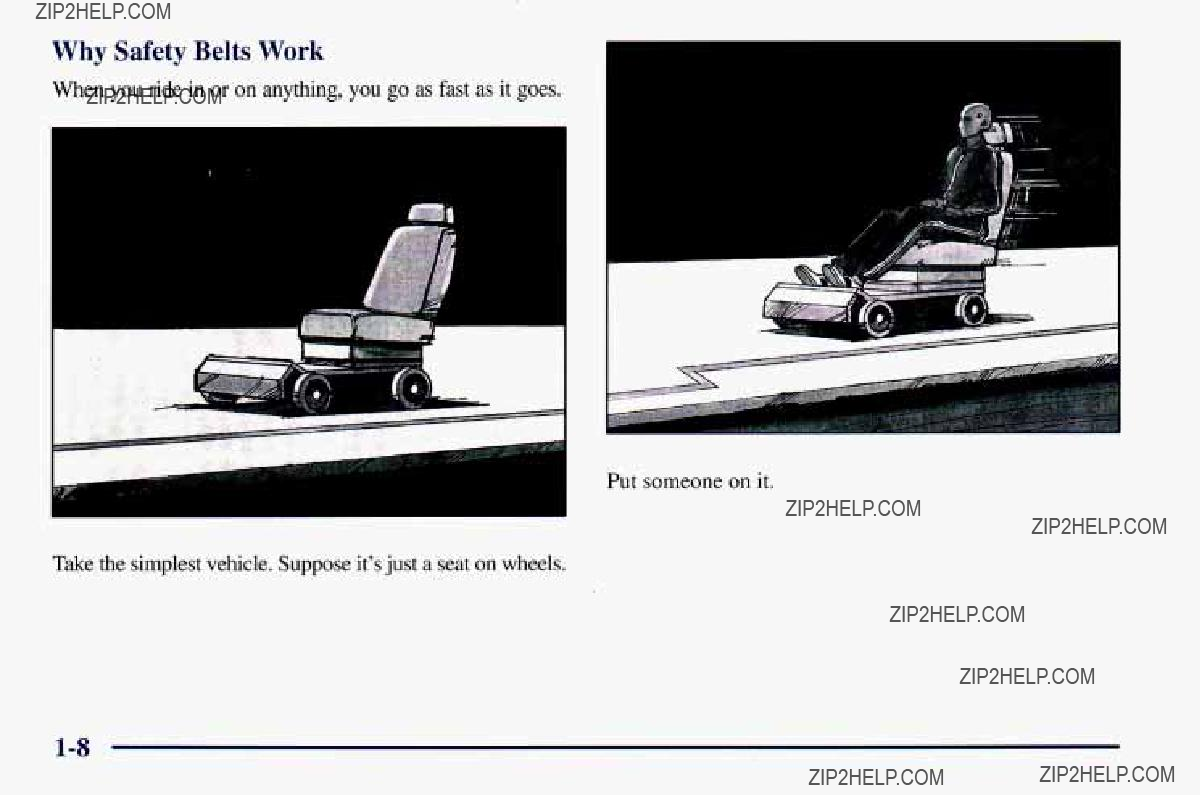
Why Safety Belts Work
When you ride in or on anything, you go as fast as it goes,
Put someone on it.
Take the simplest vehicle. Suppose justit's a seat on wheels.
143


Here Are Questions Many People Ask About Safety
Q: Won???t I be trapped in the vehicle after an accident if I???m wearing safety belt?
A: You could be
&: If my vehicle has air bags,why should I have to wear safety belts?
A: Air bags are in many vehicles today and will be in most of them in the future.But they are supplemental systems only; so they work with safety belts
system ever offered for salehas required the use of safety belts. Even if you???re in a vehicle that has air bags, you still have to buckle up to getthe most protection. That???s true not only in frontal collisions, but especially in side and other collisions.
&: If I???m a good driver, andI never drivefar from home, why shouldI wear safety belts?
A: You may be an excellent driver, but if you???re in an accident
Most accidents occur within 25 miles (40 km) of home. And the greatest number of serious injuries and deaths occur at speeds of less than 40 mph (65 kmh).
Safety belts are for everyone.

How to Wear Safety Belts Properly
Adults
This part is only for people of adult size.
Be aware that there are special things knowto about safety belts and children. And thereare different rulesfor smaller children and babies.If a child will be ridingin your Chevrolet, see the part of this manual called ???Children.??? Follow those rules for everyone???s protection.
First, you???ll want to know which restraint systems your vehicle has.
We???ll start with the driver position.
Driver Position
This part describes the driver???s restraint system.
The driverhas a
1.Close and lock the door.
2.Adjust the seat (to see how, see ???Seats??? in the Index) so you can sit up straight.
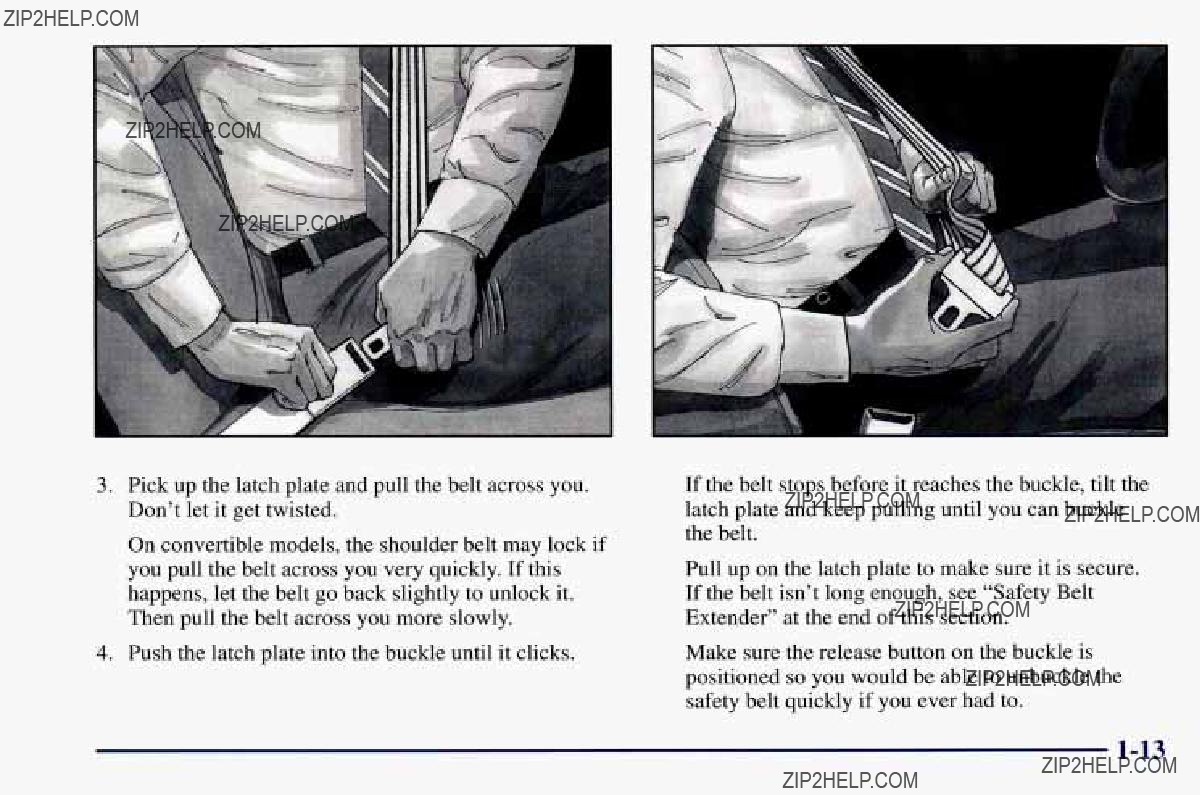
3.Pick up the latch plate and pull the belt across you. Don???t let it gettwisted.
On convertible models, the shoulder belt may lock if you pull the belt across you very quickly. If this happens, let the belt go back slightly to unlock it. Then pull the belt across you more slowly.
4.Push the latch plate into the buckle until it clicks.
If the belt stops before it reaches the buckle, tilt the latch plate and keep pulling until you can buckle the belt.
Pull up on the latch plate to make sure it issecure. If the belt isn???t long enough, see ???Safety Belt Extender??? at the end of this section.
Make sure the release button on the buckle is positioned so you would be able to unbuckle the safety belt quickly if you ever had to.

5.To make the lap part tight, pull down on the buckle end of the belt as you pull up on the shoulder belt.
The lap part of the belt should be worn low and snugon the hips,just touching the thighs. In a crash, this applies force to the strong pelvic bones. And you???d be less likely to slide underthe lap belt. If you slid under it, the belt would apply force at your abdomen. This could cause serious or even fatal injuries. The shoulder belt shouldgo over the shoulder and across the chest. Theseparts of the body are best able to take belt restraining forces.
The safety belt locks if there???s a sudden stop or crash. On convertible models, the safety belt also locks if you pull the belt veryquickly out of the retractor.

Q: What's wrong with this?
A: The shoulder belt is too loose. It won't give nearly as much protection thisway.
A CAUTION:
You can be seriously hurt if your shoulder beltis too loose. In a crash, you would move forward too much, which could increase injury. The shoulder belt shouldfit against your body.

@ What's wrong with this?
r
A: The belt is buckled in the wrong place.
&.' What's wrong with this?
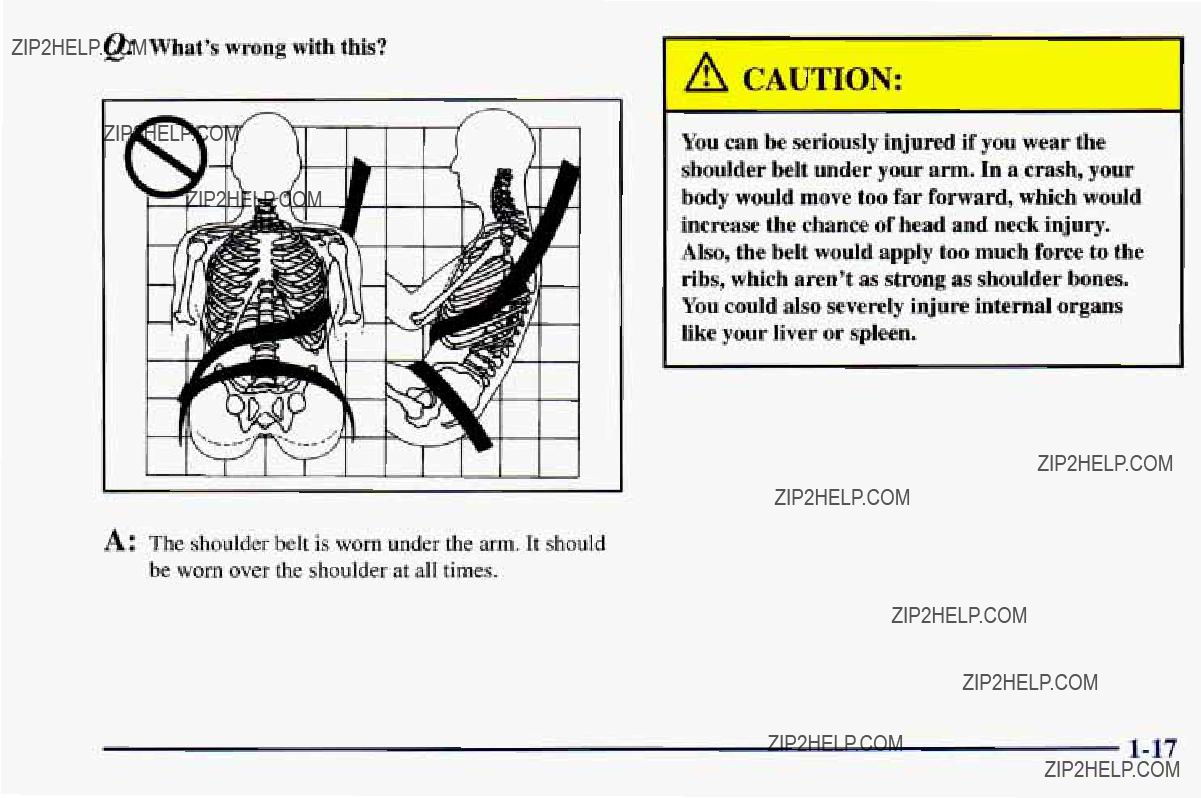
You can be seriouslyinjured if you wear the shoulder belt under your arm. In a crash, your body would movetoo far forward, which would increase the chance of head and neck injury. Also, the belt would apply too much force to the ribs, which aren't as strong as shoulder bones. You could also severely injure internal organs like your liver or spleen.
A: The shoulderbelt is worn under the arm. It should be worn over the shoulder atall times.

@??? What???s wrong with this?
You can be seriously injured by a twisted beltIn. a crash,you wouldn???t have thefull width of the belt to spread impact forcesIf.a belt is twisted, make it straightso it can work properly, or ask your dealerto fix it.
A: The belt is twisted across the body.
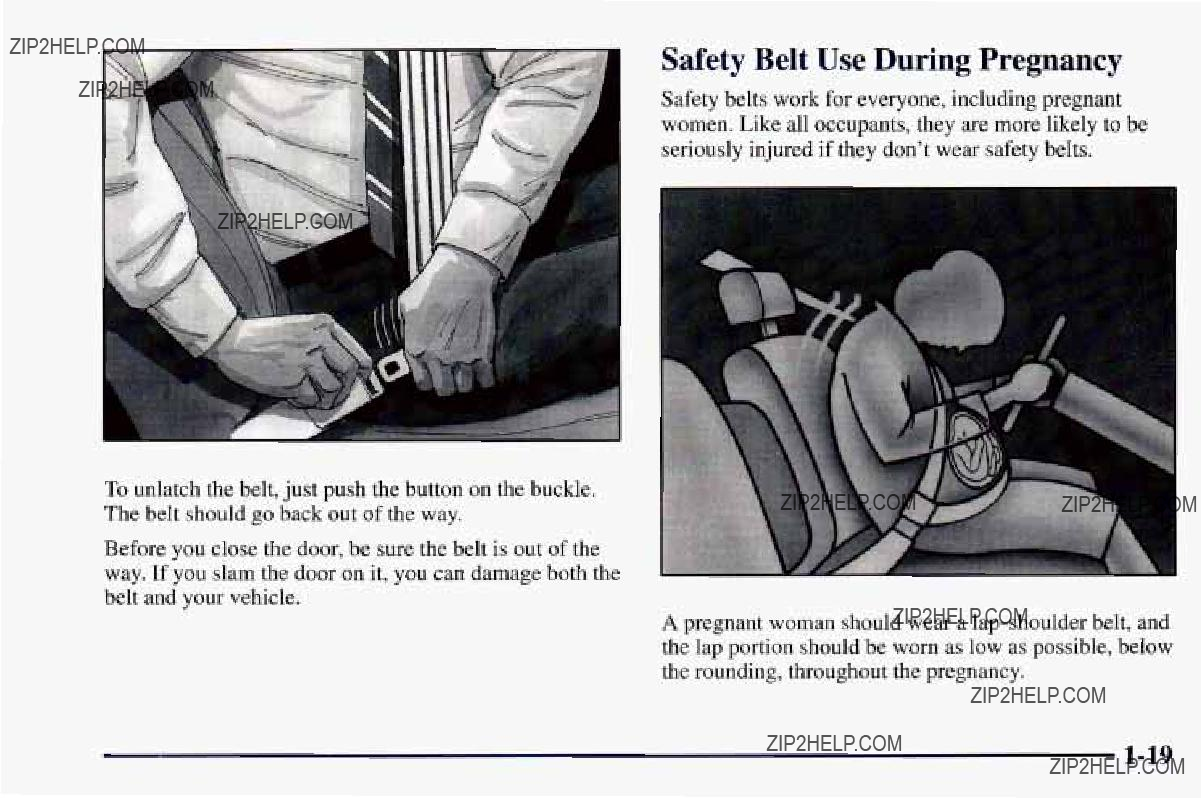
To unlatch the belt, just push the button on the buckle. The belt should go back out of the way.
Before you close the door, be sure the belt is out of the way. If you slam the door on it, you can damageboth the belt and your vehicle.
Safety Belt Use During Pregnancy
Safety belts work for everyone, including pregnant women. Like all occupants, they are more likely to be seriously injured if they don???t wear safety belts.
I
A pregnant woman should wear a

The best way to protect the fetus is to protect the mother. When a safety belt is worn properly, it???s more likely that the fetus won???t be hurt in a crash. For pregnant women, as foranyone, the key to making safety belts effective is wearing them properly.
Right Front Passenger Position
The right front passenger???s safety belt works the same way as the driver???s safety belt. See ???Driver Position,??? earlier in this section.
Air Bag System
This part explains the air bag system.
Your Chevrolet has two air bags
Here arethe most important things to know about the air bag system:
You can be severelyinjured or killed ina crash if you aren???t wearing your safety
all in rollover,rear, side or
A CAUTION:
Air bags inflate with great force, faster thanthe blink of an eye. If you???re tooclose to aninflating air bag, it could seriouslyinjure you. Safety belts help keepyou in position beforeand during a crash. Always wearyour safety belt, even withair bags. The driver should sit as far back as possible while stillmaintaining control of the vehicle.
A CAUTION:
An inflating air bag can seriously injure small children. Always secure children properly in your vehicle. To read how, seethe part of this manual called ???Children??? and the caution label on the right front passenger???s safety belt.
BAG
The system checks theair bag electrical system for malfunctions. The light tellsyou if there is an electrical problem. See ???Air Bag Readiness Light??? in the Index for more information.

How the Air Bag System Works
A
A
The right front passenger???s air bag is in the instrument panel on the passenger???s side.
Where are the airbags?
The driver???s airbag is in the middleof the steering wheel.

Don???t attach anythmgto, or put anytnmg between, an occupant andan airbag. If something is betweenan occupant andan airbag, the bag might not inflate properly or it might force the object into you and cause injury. The path of an inflating air bag must be kept clear, so don???t attach or put anythingon the steering wheel hub oron or nearany air bag covering.
When should an air bag inflate?
An air bag is designed to inflate in a moderate to severe frontal or
it can be somewhat above or below this range. If your vehicle strikes something that will move or deform, such as a parked car, the threshold level will be higher. The air bag is not designed to inflate in rollovers, side impacts or rear impacts, because inflation would not help the occupant.
In any particular crash, no one can say whether an air bag should have inflated simply because of the damage to a vehicle or because of what the repair costs were. Inflation is determined by the angle of the impact and how quickly the vehicle slows down in frontal or
What makes an airbag inflate?
In an impact of sufficient severity, the air bag sensing system detects that the vehicle is in a crash. The sensing system triggers a release of gas fromthe inflator, which inflates the air bag. The inflator, air bag and related hardware are all part of the air bag modules inside the steering wheel and in the instrument panel in front of the right front passenger.
How doesan air bag restrain?
In moderate to severe frontalor
even belted occupants can contact the steering wheel or the instrument panel.Air bags supplement the protection provided by safety belts. Air bags distribute theforce of
the impact more evenlyover the .occupant???s upper body, stopping the occupant more gradually. But air bags would not help youin many types of collisions, including rollovers, rear impacts andside impacts, primarily because
an occupant???s motion is not toward thoseair bags. Air bags should never be regardedas anything more than a supplement to safety belts, and then only in moderate to severe frontalor
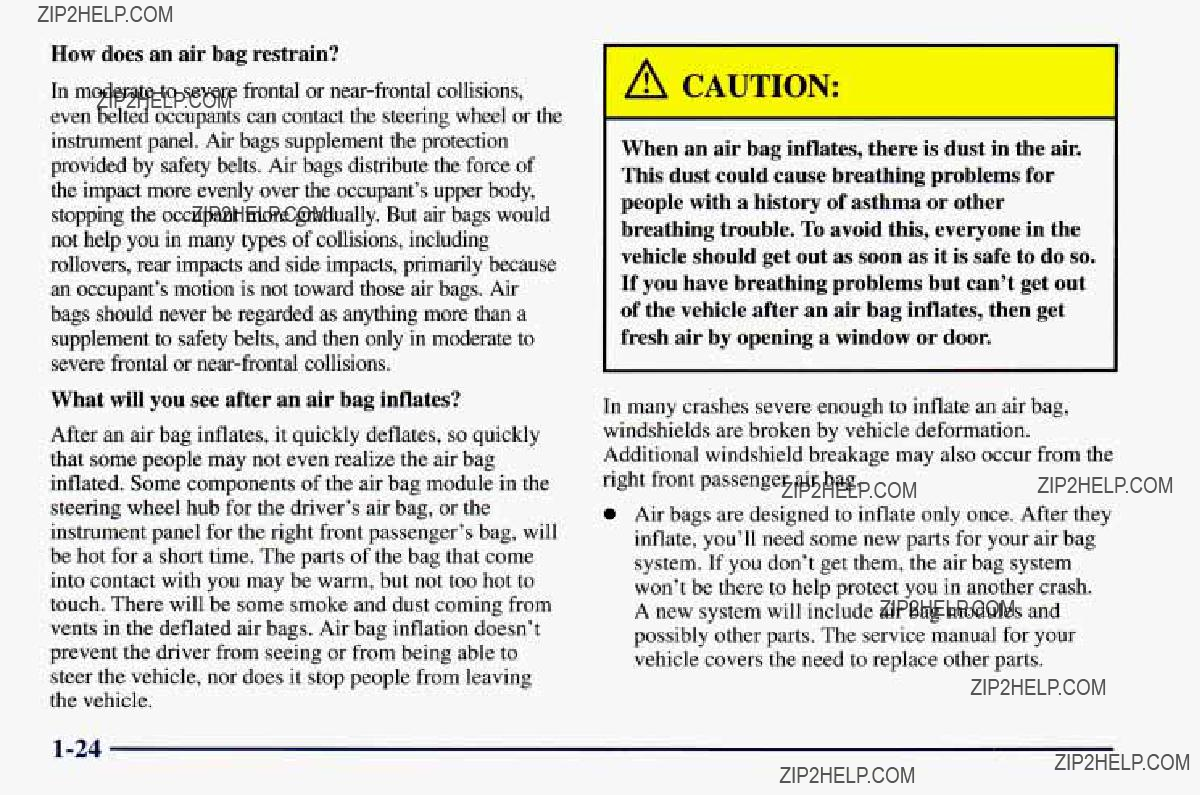
When an air bag inflates, thereis dust in the air. This dust could cause breathing problems for people with a history of asthma or other breathing trouble.To avoid this, everyone in the vehicle should get outas soon as it is safe todo so. If you have breathing problems but can???t outget of the vehicle after an air bag inflates, then get fresh airby opening a windowor door.
What will you see afteran air bag inflates?
After an air bag inflates, it quickly deflates, so quickly that some people may not even realize the air bag inflated. Somecomponents of the airbag module in the steering wheel hub for the driver???s air bag, or the instrument panel for the right front passenger???s bag, will be hot for a short time. The parts of the bag that come into contact with you may be warm, but not too hot to touch. There will be some smoke and dust coming from vents in the deflated air bags. Air bag inflation doesn???t prevent the driver from seeing or from being able to steer thevehicle, nor does it stop people from leaving the vehicle.
In many crashes severe enough to inflate an air bag, windshields are broken by vehicle deformation. Additional windshield breakage may also occur from the right front passenger air bag.
Air bags are designed to inflate only once. After they inflate, you???ll need some new parts for your air bag system. If you don???t get them, the air bag system won???t bethere to help protect you in another crash. A new system will include air bag modules and possibly other parts. The service manual for your vehicle covers the need to replace other parts.

0Your vehicle is equipped with a crash sensing and diagnostic module, which records information about the airbag system. The module records information about the readiness of the system, when the sensors are activated and driver???s safety belt usage at deployment.
0Let only qualified technicians work on your air bag system. Improper service can mean that your
air bag system won???t work properly. See your dealer for service.
Servicing Your Air
Chevrolet
Air bags affect how your Chevrolet should be serviced. There areparts of the air bag system in several places around your vehicle. You don???t want the system to inflate while someone is working on your vehicle. Your Chevrolet dealer and the Camaro Service Manual have information about servicing your vehicle and the air bag system. To purchase a service manual, see ???Service and Owner Publications??? in the Index.
NOTICE:
If you damage the covering for the driver???s or the right front passenger???s air bag, the bag may not work properly.You may haveto replace the air bag module inthe steering wheel or both the air bag moduleand the instrument panel for the right front passenger???s air bag. Do not open or break the air bag coverings.
For upto 10 minutes after the ignition key is turned off and the battery is disconnected,an air bag can still inflate during improperservice. You can beinjured if you are close to anair bag when it inflates. Avoid wires wrapped with yellowtape or yellow connectors. Theyare probably part of the air bag system.Be sure tofollow proper service procedures, and make sure the person performing work for you isqualified to do so.
The airbag system does not need regular maintenance.

Rear Seat Passengers
It???s very important for rear seat passengers to buckle up! Accident statistics show that unbelted people in the rear seat are hurt more often in crashes than those who are wearing safety belts.
Rear passengers who aren???t safety belted can be thrown out of the vehicle in a crash. And they can strike others in the vehicle who are wearing safety belts.
The rear seats have
I
1.Pick up the latch plate and pull the belt across you. Don???t let it get twisted.
On convertible models, the shoulderbelt may lock if you pull the belt across you very quickly. If this happens, let the belt go back slightly to unlock it. Then pull the belt across you more slowly.
2. Push the latch plate into the buckle until it clicks.

If the belt stops before it reachesthe buckle, tilt the latch plate and keep pulling until you can buckle it.
Pull up on the latchplate to make sure itis secure.
If the beltis not longenough, see ???Safety Belt Extender??? at the end of this section.Make sure the release button on the buckle is positioned so you would be able to unbuckle the safety belt quickly if you ever had to.
3.To make the lap part tight, pull down on the buckle end of the belt as you pull up on the shoulder part.

I I
The lap part of the belt should be worn low and snug on the hips, just touching the thighs. In a crash, this applies force to the strong pelvic bones. And you???d be less
likely to slide under the lap belt. If you slid under it, the belt would apply force at your abdomen. This could cause serious or even fatal injuries. The shoulder belt should go over the shoulder and across the chest. These parts of the body are best able to take belt restraining forces.
The safety belt locks if there???s a sudden stop or a crash.
On convertible models, the safety belt also locks if you pull the belt very quickly out of the retractor.
r A CAUTION:
You can be seriously hurtif your shoulder beltis too loose. In a crash,you would move forward too much, which could increase injury. The shoulder belt should fit against your body.

Children
Everyone in a vehicleneeds protection! That includes infants and all children smallerthan adult size. In fact, the law in every state in the United States and in every Canadian province says childrenup to some age must be restrained whilein a vehicle.
I
Smaller childrenand babies should always be restrained in a child or infant restraint. The instructions for the restraint will say whether it is the right type and size for your child.A very
To unlatch the belt, just push the button on the buckle. young child'ship bones are so small that a regular belt mightnot stay low on the hips, as it should. Instead, the belt will likely be overthe child's abdomen.In a crash, the belt would apply force right on the child's abdomen, which could cause seriousor fatal injuries. So, be sure that
any child small enoughfor one is always properly restrained in a child or infant restraint.
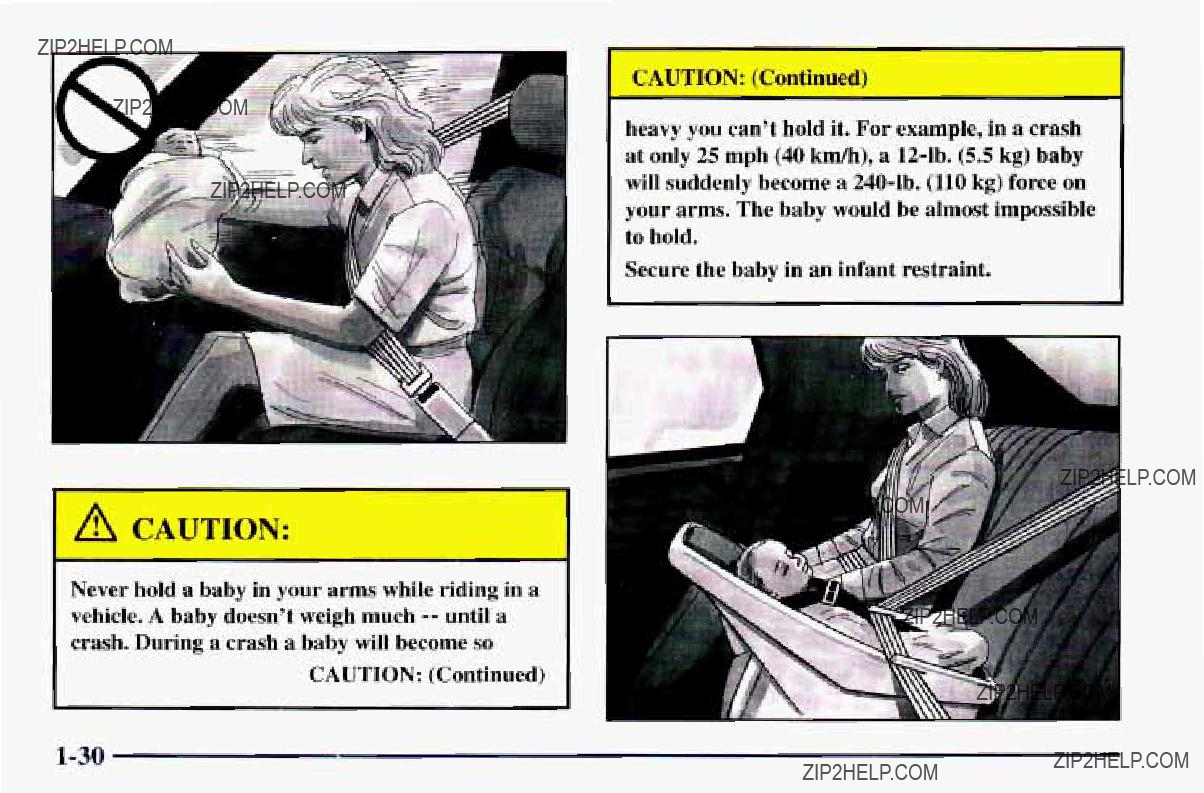
CAUTION: (Continued)
heavy you can???t holdit. For example, ina crash a t only 25 mph (40 km/h), a
your arms. The baby would be almost impossible
to hold.
Secure the babyin an infant restraint.
Never hold a baby in your armswhile riding in a vehicle. A baby doesn???t weigh much
CAUTION: (Continued)
Child Restraints
Be sure the child restraintis designed to be used in a vehicle. If it is, itwill have a label saying that it meets Federal Motor Vehicle Safety Standards.
Then follow the instructionsfor the restraint. You may find these instructionson the restraint itself or in a booklet, or both. These restraintsuse the belt system in your vehicle, but the child also has to be secured within the restraint to help reduce thechance of personal injury. The instructionsthat come with the infant or child restraint will show you how to do that.
Where to Put the Restraint
Accident statistics show that children are saferif they are restrainedin the rear ratherthan the front seat.We at General Motors therefore recommend that you put your child restraintin the rear seat.Never put a
r
A child in a rewfacing child restraint can be seriously injured if the right front passenger???s air bag inflates.This is because the back of a
You may, however, secure a
Or, secure the child restraint in the rear seat.
Wherever you install it, be sure to securethe child restraint properly.
Keep in mind that an unsecured child restraintcan move around in a collision orsudden stop and injure people in the vehicle. Be sureto properly secure any child restraint in your vehicle
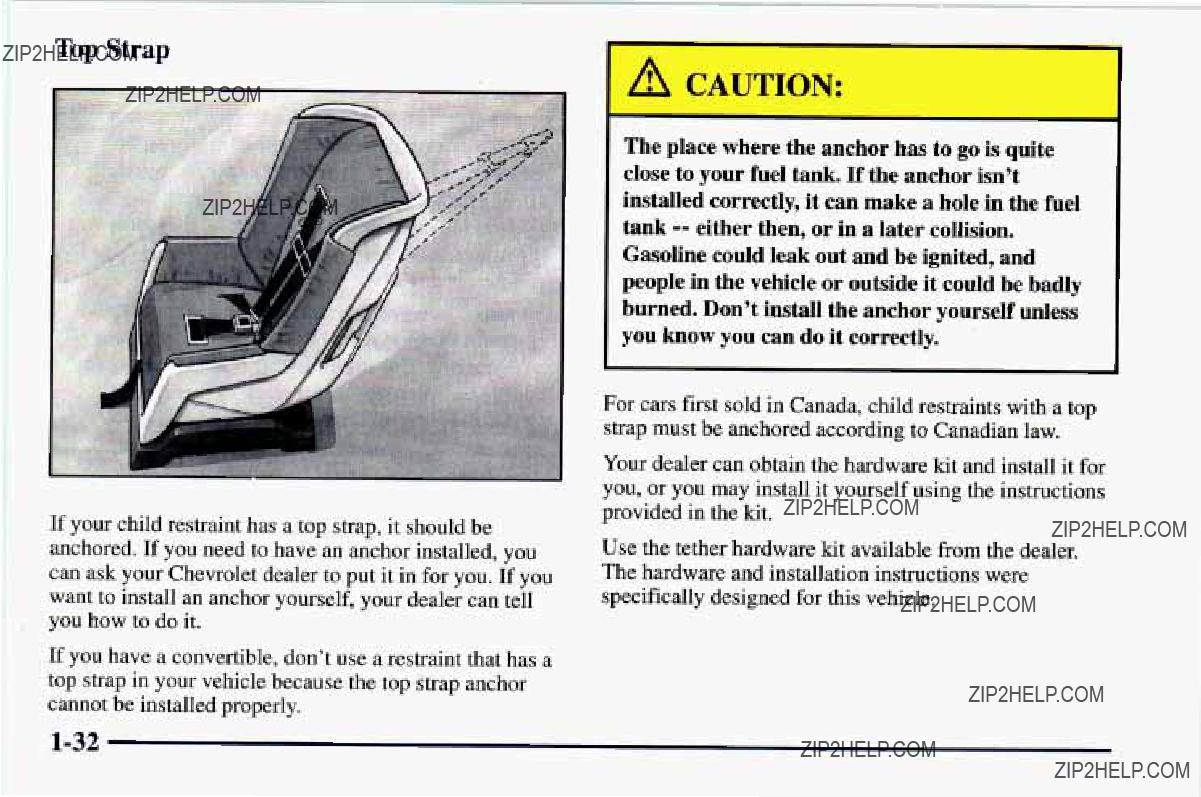
Top Strap

Securing a Child Restraint ina
Rear Seat Position
n
W
You???ll be using the
1.Put the restrainton the seat. Follow the instructions for the child restraint.

5.Buckle the belt. Make sure the release button is positioned so you would be able tounbuckle the safety belt quickly if you ever had to.
6.To tighten the belt, pull up on the shoulder belt while you push down on the child restraint.
7.Push .and pull the child restraint in different directions to be sure it is secure.
To remove the child restraint, just unbuckle the vehicle???s safety belt and let it go back all the way. The safety belt will move freely again and be ready to work for an adult or larger child passenger.
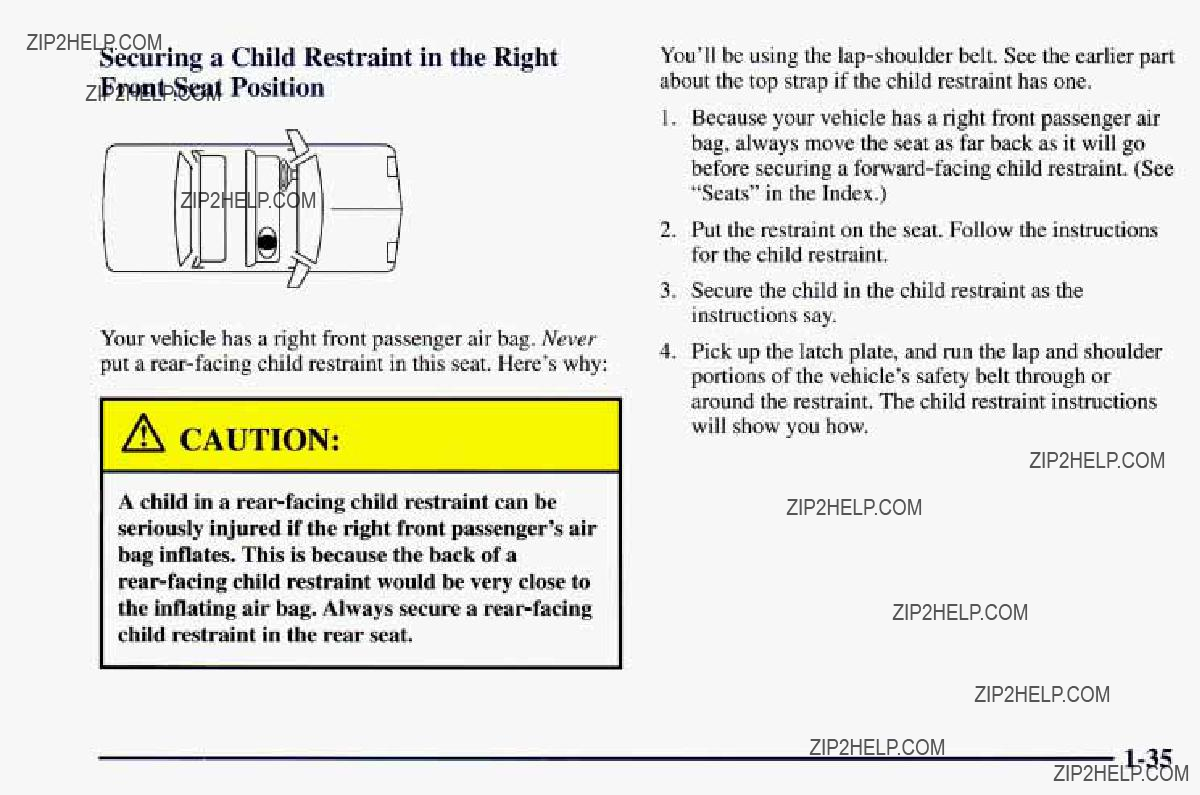
Securing a Child Restraint the Right
Front Seat Position
U
Your vehicle has a right front passenger air bag.Never put a
ION:
A child in a rearfacing child restraintcan be seriously injured if the right front passenger???s air bag inflates. This is because the back of a
the inflating air bag. Always secure a
You???ll be using the
1.Because your vehicle has a right front passenger air bag, always move the seat as far back as it will go before securing a
2.Put the restraint on the seat. Follow the instructions for the child restraint.
3.Secure the child in the child restraint as the instructions say.
4.Pick up the latch plate, and run the lap and shoulder portions of the vehicle???s safety belt through or around the restraint. The child restraint instructions will show you how.

A
A
I???
5.Tilt the latch plate to adjust the belt if needed.
If the shoulder belt goes in front of the child???s face or neck, put it behind the child restraint.
6.Buckle the belt. Make sure the release button is positioned so you would be able tounbuckle the safety belt quickly if you ever had to.

Larger Children
I
7.To tighten the belt, pull up on the shoulder belt while you push down on the child restraint.
8. Push and pull the child restraint in different directions to be sure it is secure.
To remove the child restraint, just unbuckle the vehicle???s safety belt and let it goback all the way. The safety belt will move freely again and be ready to work for an adult or larger child passenger.
Children who have outgrown child restraints should wear the vehicle???s safety belts.
Accident statistics show that children are safer if they are restrained in the rear seat. But they need to use the safety belts properly.
0Children who aren???t buckled up can be thrown out in a crash.
0Children who aren???t buckled up can strike other people who are.

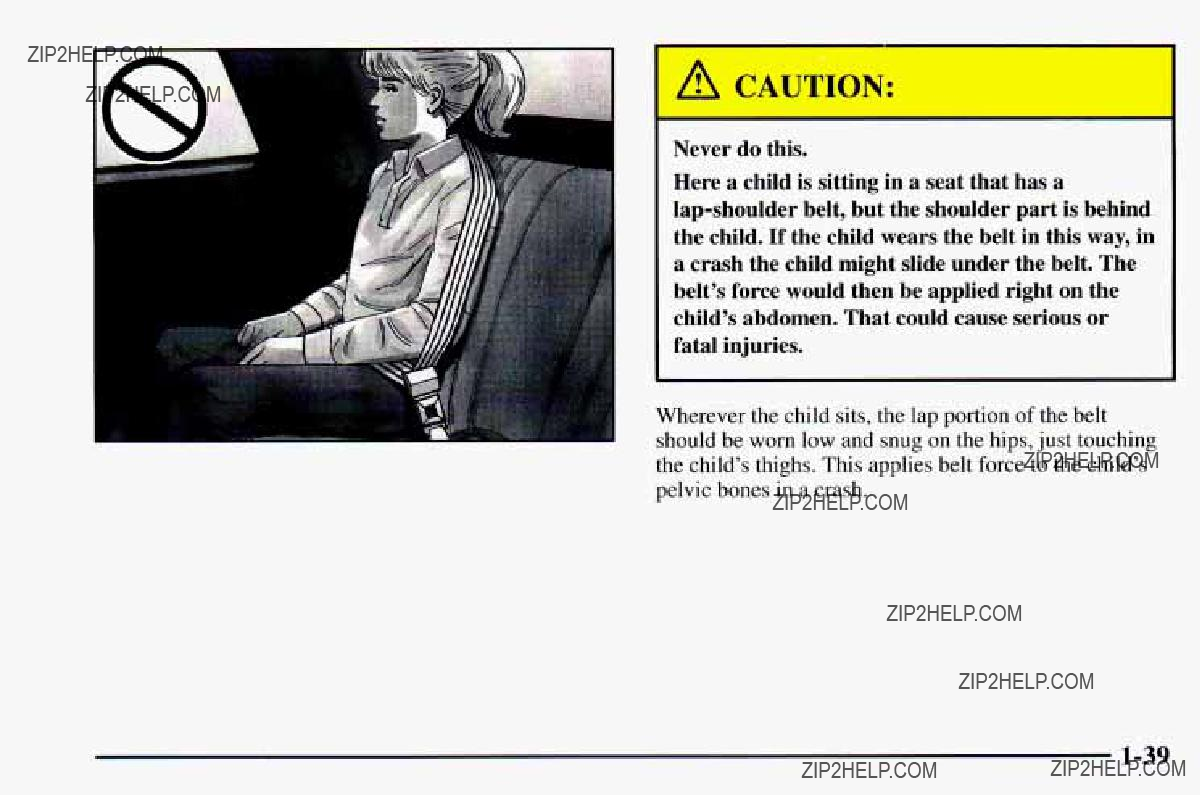
A CAUTION:
Never do this.
Here two childrenare wearing the same belt. The belt can???tproperly spread the impact forces. In a crash, the two children can be crushed together and seriously injured. A belt must be used by only one personat a time.
What if a child is wearing
A: Move the child toward the center of the vehicle, but be sure that the shoulder beltstill is on the child???s shoulder, so that in a crash thechild???s upper body would have the restraint that belts provide.

Safety Belt Extender
If the vehicle???s safety belt will fasten around you, you should use it.
But if a safety belt isn???t long enough to fasten,your dealer will order you an extender. It???s free. When you go in to order it,take the heaviest coatyou will wear, so the extender will be long enough for you. The extenderwill be just foryou, and just for the seatin your vehicle that you choose. Don???t let someone else useit, and use it only for the seat it ismade to fit.To wear it, just attach it to the regular safety belt.
Checking Your Restraint Systems
Now and then, make sure thesafety belt reminder light and all your belts, buckles, latch plates, retractors and anchorages are working properly. Look for any other loose ordamaged safety belt system parts. If you see anything that might keep a safety belt system from doing its job,have it repaired.
Torn or frayed safety belts may not protect you in a crash. They can ripapart under impact forces. If a belt is torn or frayed, geta new one right away.
Also look for any opened or broken air bag covers, and have them repaired or replaced. (The airbag system does not need regular maintenance.)
Replacing Restraint System Parts
After a Crash
If you???ve had a crash, do you need new belts?
After a very minor collision, nothing may be necessary. But if the belts were stretched, as they would be if worn during a more severe crash,then you need newbelts.
If belts are cut ordamaged, replace them. Collision damage also may mean you will need to have safety belt or seat parts repaired or replaced.New parts and repairs may be necessary even if the belt wasn???t being used at the time of the collision.
If an air bag inflates, you???ll need to replace airbag system parts. See the part on the airbag system earlier in this section.
a Section 2 Features and Controls
Here you can learn about the many standard and optional features on your Chevrolet, and information on starting, shifting and braking. Also explained are the instrument panel and the warning systems that tell you if everything is working properly

Keys-
I A CAUTION:
Leaving young children ina vehicle with the ignition key is dangerous for many reasons. A child or others could be badly injured or even killed.
They could operate power windows or other controls or even make the vehicle move. Don???t leave the keys ina vehicle with young children.

The doorkeys are for the doors and allother locks.
II
When a new Camaro is delivered, the dealer removes the plugs fiom the keys, and gives them to the first owner.
Each plug has a codeon itthat tells your dealer or a qualified locksmithhow to make extradoor keys. Keep the plugs in a safeplace. If you lose your door keys, you'll be able to havenew ones madeusing these plugs.
The ignition keys don't have plugs. Instead, they have
If you need a new ignition key, go to your Chevrolet dealer, who can obtain the correctkey code. In an emergency, call ChevroletRoadside Assistance at
NOTICE:
Your Chevrolet hasa number of features that can help prevent theft. But you can havelot
of trouble getting into your vehicle if you ever lock your keys inside. You may even have to damage your vehicle to get inSo. be sure you have extra keys.
Door Locks
Unlocked doors can be dangerous.
Passengers
Outsiders can easilyenter through an unlocked door when you slow downor stop your vehicle.
This may not be so obvious: You increase the chance of being thrown out of the vehicle ina crash if the doors aren???t locked. Wear safety belts properly, lockyour doors, and you will befar better off whenever youdrive your vehicle.
There are several ways to lock and unlock your vehicle.
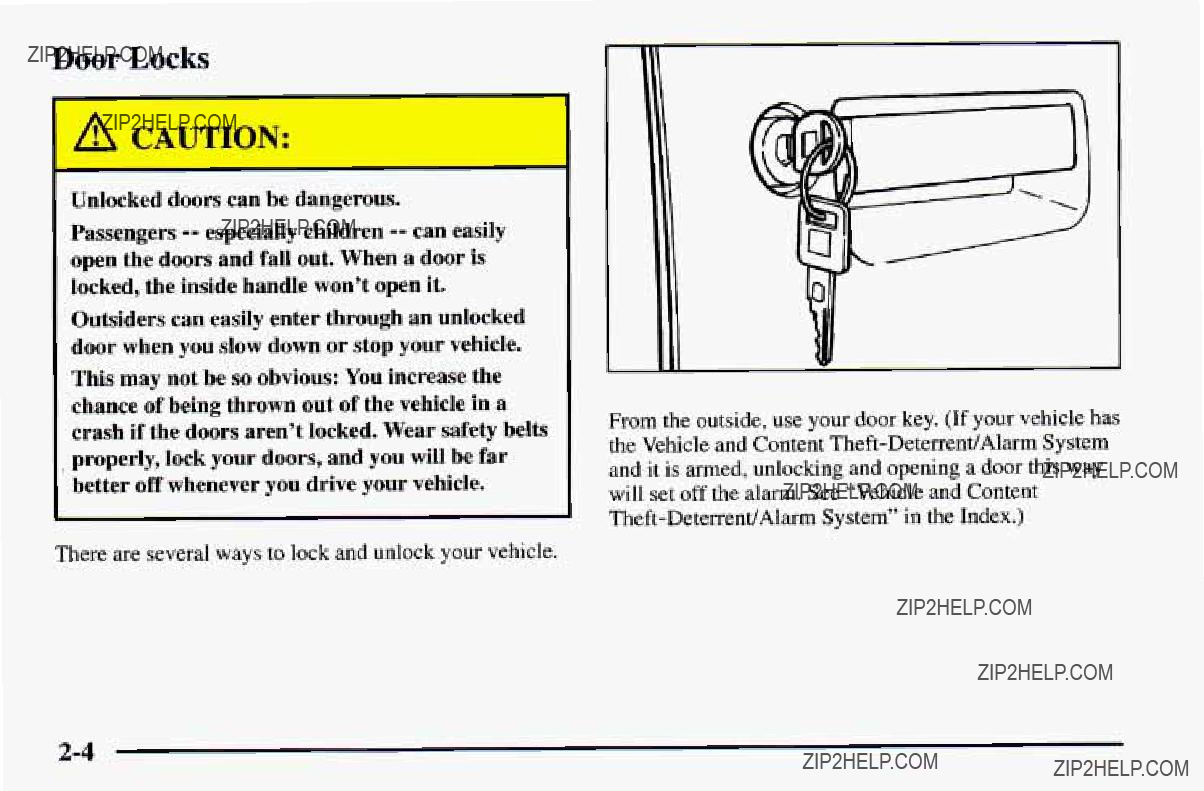
From the outside, use your door key. (If your vehicle has the Vehicle and Content

Power DoorLocks (If Equipped)
From the inside, to lock thedoor, move the lock control on the doorbackward.
To unlock the door, move thelock control on the door forward.
Push the power door lock switch tolock or unlock both doors at once. Note: Operatingthe power locks may affect the Vehicle and Content
The lock switch works at all times, except during ???Lockout Prevention??? (if that feature isprogrammed). The unlock switch only works in RUN, ACC and RAP. (See ???Retained Accessory Power??? in the Index.)

Last Door Closed Locking(If Equipped)
If you have power door locks, you can programa last door closed locking feature for your vehicle.This feature allows for a delayed locking of the doors so that you or your passengersmay exit the vehicle after you???ve pressed the power door lock switch and still have thedoors
locked once everyone has gottenout of the vehicle.
When the power door lock switch is pressed, a chime will sound three times, indicating that last door closed locking has been activated. Pressing the LOCK switch again will lock the doors immediately. Pressing the UNLOCK switch will cancel apreviously requested last door closed locking.
This feature is shipped from the factory in the off position. To turn this feature on, see ???Feature Customization??? in the Index.
Lockout Prevention(If Equipped)
To protect you from locking your keys in the vehicle, this feature stopsthe power door locks from locking when the keys are in the ignition and a door is open.
If the power lock switch is pressed when a door isopen, a chime will sound five times as a reminder to take the keys out of the ignition before locking the door. This feature is shipped from the factory in the on position.
If you would like toturn this feature off, see???Feature Customization??? in the Index.
Leaving Your Vehicle
If you are leaving the vehicle, takeyour keys, open your door and set the locks from the inside. Then get outand close the door.

Remote Keyless Entry(If Equipped)
If your Chevrolet hasthis option, you can lock and unlock your doors orunlock your hatch from about
3 feet (1 m) up to 30 feet (9 m) away using the remote keyless entry transmitter suppliedwith your vehicle.
Your Remote Keyless Entry operateson a radio frequency subject to Federal Communications Commission (FCC) Rules and with Industry andScience Canada.
This device complies withPart 15 of the FCC Rules. Operation is subjectto the following two conditions:
(1)this device may notcause harmful interference, and
(2)this device must accept any interference received, including interference that may cause undesired operation.
This devicecomplies with
Changes or modificationsto this system by other thanan authorized servicefacility could void authorization to use this equipment.

Operation
The driver???s door will unlock automatically when UNLOCK is pressed. If UNLOCK is pressed again within five seconds, the passenger doorwill also unlock. All doors will lock when LOCK is pressed.
The hatch will unlock when the button with the trunk symbol is pressed twice within five seconds, as long as the ignition isturned to the OFF position. If the ignition is on, thetrunk button will only work if the transmission is in PARK (P) for an automatic transmission, or if the parking brake is set on a manual transmission.
The system will turn on the interiorlamps for about 40 seconds (or until the ignition switchis turned to the RUN position), when you unlock the doors or hatch. The interior lamps will go off when you lock the doors.
Operating the Remote Keyless Entry transmitter may interact with the Vehicle and Content
Alarmanic Mode
If your vehicle is equipped with the Vehicle and Content
Wansmitter Range
The range of your Remote Keyless Entry system should be about 3 feet (1 m) up to 30 feet (9 m). At times you may notice a decrease in the range. This isnormal for the Remote Keyless Entry system. If the transmitter does not work, or you have to stand closer to your vehicle for the transmitter to work:
You may have to replace the battery in your transmitter. See the instructionsfor battery replacement.
0You may be too far from your vehicle. Check your distance. You may have to stand closerto your vehicle in rain or snow.
0Check the location. Other vehicles or objects may be blocking the signal. Take a few steps tothe right orleft.
0You may have to synchronize your transmitter to the receiver in your vehicle. See the instructions for synchronization.
You may have to match the transmitters to your vehicle. See instructions.
If none of the above apply, see your Chevrolet dealer or qualified technician for service.
Synchronization
Synchronization maybe necessary due to the security method used by the Remote Keyless Entry system.The transmitter does not send thesame signal twice to the receiver. The receiver will not respondto a signal it has been sent previously.This prevents anyone from recoding and playing back the signalfrom the transmitter. To resynchronize the transmitter withthe receiver:
0While standing close to your vehicle, simultaneously press and hold the LOCK and UNLOCK buttons on the transmitter for eight seconds. The door locks should cycle and the parking lamps flash toconfirm synchronization. If this doesnot happen, you may need to replacethe battery in your transmitter or match the transmitter to your vehicle.
Transmitter Verification(If Equipped)
This feature providesfeedback to the holderof the Remote Keyless Entry transmitter that a command has been received by the Remote Keyless Entry receiver. The parking lamps will flash on every lock and unlock command and the horn will sound only if the LOCK button is pushed twice within five seconds. This allows for silent operationof locking and unlocking, unless a confirming horn chirp is desired. Other options may be selected for this feature(see ???Feature Customization??? in the Index).
Matching Transmitter(s)To Your Vehicle
Each remote keyless entrytransmitter is coded to prevent another transmitter fromunlocking your vehicle. If a transmitter is lost or stolen,areplacement can be purchased through your dealer. Remember to bring any remaining transmitters withyou when you go toyour dealer. When the dealermatches the replacement transmitter toyour vehicle, any remaining transmitters must also bematched. Once your dealer hascoded the new transmitter, the losttransmitter will not unlock your vehicle. Each vehicle canhave up to fourtransmitters matched to it.

Have each transmitter you intend to match ready for the next steps. To match transmitters to your vehicle:
1.Turn the ignition to the RUN position, then to the OFF position. This will disarm the Vehicle and Content
2.Remove the RADIO fuse. This fuseis located in the main fuse block, located on the left sideof your main instrument panel. See ???Fuses and Circuit Breakers??? in the Index.
3.Turn the ignition switch from the OFF to the RUN position three times quickly(within five seconds). The vehicle will respond by locking the doors, unlocking the driver???s doors and releasing the hatch. Your transmitter is now ready to match the vehicle.
4.Press and hold the LOCK and UNLOCK buttons on the firsttransmitter for 15 seconds. Thevehicle will respond as in step 3.
5. Repeat Step 4 for the remaining transmitters.
6.When you have finished matching all of your transmitters, replace theRADIO fuse.
7.Check that all transmitters work by pressing their buttons.
If the transmitters don???t work,or if you???d rather not match the transmitters yourself, see your Chevrolet dealer.
Battery Replacement
Under normal use, the battery in your remote keyless entry transmitter should last about two years.
You can tell the battery is weak if the transmitter won???t work at the normal range in any location. If you have to get close to your vehicle before the transmitter works, it???s probably time to change the battery.
Use onebattery, type CR2032, or a similar type.
NOTICE:
When replacing the battery, use care not to touch any of the circuitry. Static from your body transferred to these surfaces may damage
the transmitter.
To replace the batteryin the RemoteKeyless Entry transmitter:
1.Carefully pry off the coverby inserting a dime (or similar object)in a slotbetween the coversand twist.
2.Lift off the back cover.
3.Remove and replace thebattery. Use one battery, type CR2032, or a similartype. Put the new battery in, printed side down.
4.Replace the front cover. Make sure the cover ison tightly so water won???t get in.
5 . Check the transmitter operationIf. the transmitter does not work after battery replacement, itmay need to be resynchronized or matched to your vehicle. See ???Resychronization??? inthe Index.
N:
It can be dangerous to drive with the hatch open because carbon monoxide (CO) gascan come into your vehicle. You can???t seeor smell CO.It can cause unconsciousness and even death.
If you must drive with the hatch open or if electrical wiring or other cable connections must pass through the seal betweenthe body and the hatch:
Make sure all windows are shut.
Thrn the fanon your heating or cooling system to its highest speed withthe setting on VENT. That will force outsideair into your vehicle. See ???Comfort Controls???in the Index.
If you have air outlets on or under the instrument panel, openthem all the way.
See ???EngineExhaust??? in the Index.
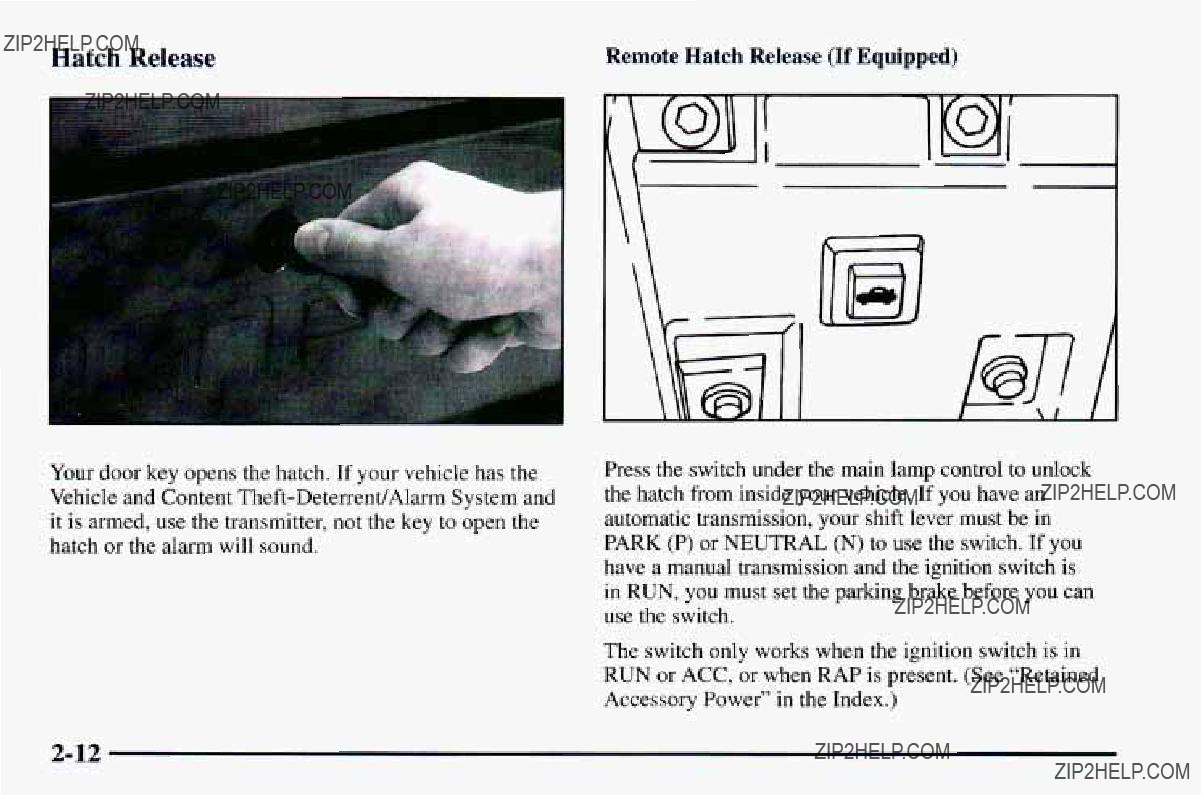
\ \IB
Your door key opens the hatch. If your vehicle has the Vehicle and Content
Press the switch under the main lamp control to unlock the hatch from inside your vehicle. If you have an automatic transmission, your shift lever mustbe in PARK (P) or NEUTRAL (N) to use the switch. If you have a manual transmission andthe ignition switch is in RUN, you must set the parking brake before youcan use the switch.
The switch only works when the ignition switch is in RUN or ACC, or when RAP ispresent. (See ???Retained Accessory Power??? in the Index.)
NOTICE:
On vehicles with the Vehicle and Content
Theft
Vehicle theft is big business, especially insome cities. Although your Chevrolethas a number of
Key in the Ignition
If you leave your vehicle with the keys inside, it???s an easy target for joy riders or professional
When you park your Chevrolet and open the driver???s door, you???ll hear a chimereminding you to remove your key from the ignition and take it with you. Always do this. Your steering wheel will be locked, and so will your ignition. If you have an automatic transmission, taking your key out alsolocks your transmission. And remember to lock the doors.
Parking
Park in a lighted spot, closeall windows and lock your vehicle. Remember to keep your valuables out of sight. Put them in a storage area,or take them with you.
Parking Lots
If you park in a lot where someone will be watching your vehicle, it???s best to lock it up and take your keys. But what if you have to leave your ignition key? What if you have to leave something valuable in your vehicle?
0Put your valuables in a storage area, like your trunk or glove box.
0 Lock the glove box.
@Lock all the doors except the driver???s. Then take the door key with you.

Vehicle and Content
(If Equipped)
If your vehicle hasthis option, it has a
Shock Sensor
CoupeConvertible
The shock sensor iswhat triggers the alarm when it detects a blow to your vehicle. It is located over the right rear wheelhouse near the spare tirein the hatch area. There are two levels of alarms via the shock sensor: Two horn blasts and parking lamp flashes for
To adjust, remove the label covering theadjustment knob on the sensorand adjust as desired. Turn clockwise to increase sensitivity and turn counterclockwise to decrease sensitivity. The shock sensor isignored by the alarm system when the ignition is on,when the hatch is open, when the alarm is disarmed,when customized to be ignored and for fiveseconds after the horn sounds an alarm or chirp. Theshock sensor isignored after triggering three full alarmsuntil the system is rearmed.
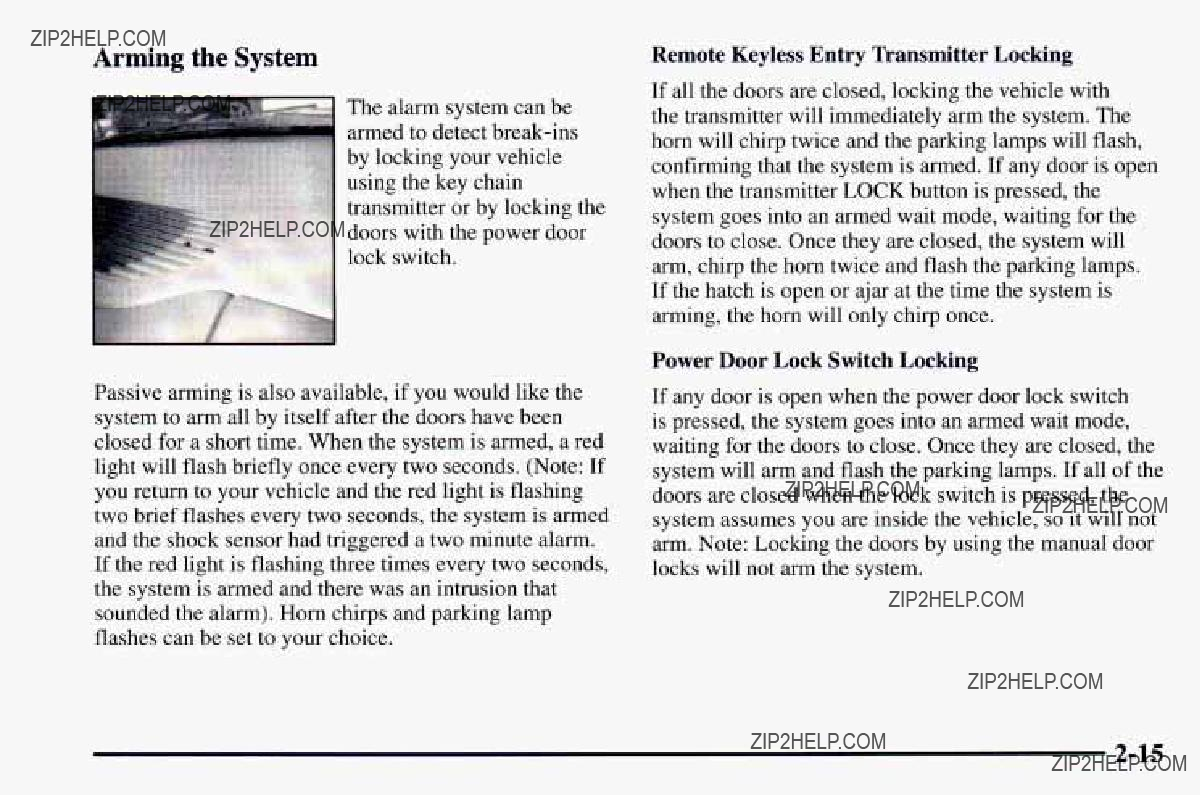
Arming the System
Passive arming is also available, if you would like the system to arm all by itself after the doors havebeen closed for a short time. When the system is armed, a red light will flash briefly once every two seconds. (Note:If you return to your vehicle and the red light is flashing two brief flashes every two seconds,the system is armed and the shock sensor had triggered atwo minute alarm. If the red light is flashing three timesevery two seconds, the system is armed and there was an intrusion that sounded the alarm).Horn chirps and parking lamp flashes can be set toyour choice.
Remote Keyless Entry Transmitter Locking
If all the doors are closed, locking the vehiclewith the transmitter will immediately arm the system. The horn will chirp twiceand the parking lamps will flash,
confirming that the system is armed. If any door is open when the transmitter LOCK button is pressed, the system goes into an armed wait mode, waiting for the doors to close.Once they are closed, thesystem will arm, chirp the horn twice and flash the parking lamps. If the hatch is open or ajar at the time the system is arming, the horn will only chirp once.
Power Door Lock Switch Locking
If any door is open when the power door lock switch is pressed, the system goes into an armed wait mode, waiting for the doors to close. Oncethey are closed,the
system will arm and flash the parking lamps. If all of the doors are closedwhen the lock switch is pressed, the system assumes you are inside the vehicle, so it will not arm. Note: Locking the doors by using the manual door locks will not arm the system.

Passive Arming
If the ignition was just turned off and a door was opened, thesystem will arm six seconds after all doors are closed, whether or not you lock them. In all other cases, the system will wait 30 seconds afterall doors are closed beforearming, allowing you time to get into the vehicle and put the key in the ignition. The parking lamps will flash when the system arms. Passive arming is not enabledfrom the factory.
Disarming the System
There are two ways to disarm the system:
1.Press the UNLOCK buttonon the key chain transmitter. If the horn chirpstwo or three times when you unlock car, the alarm sounded in your absence. Two chirps means that the shock sensor was offsetand three chirps means thata door or the hatch was opened.
2 . Turn the ignition to the RUN position with the proper key.
For more informationon customizing the features mentioned here, see ???Feature Customization???in the Index.
lhrning Off the Alarm
If you started the alarm by pressing thepanic button on the key chain transmitter, you must either push that
button again or turn the ignition switch to the ON position to stopthe alarm.
If the alarm is sounding due to the shock sensor ora door or hatch opening, it can be turned off by either turning the ignition switch with a proper key inserted or by pressing any button on the key chain transmitter. If you use your key chain transmitter to silence the alarm, additional things will happen depending upon which button you press.
0Pressing the UNLOCK button will turn the alarm off, unlock the driver???s door and disarm the system.
0Pressing the LOCK button will turn the alarm off, keep the doorslocked and keep the system armed.
the0 Pressing the trunk symbol button twice within five seconds will turn the alarm off and will unlock and disarm the hatch only.
0Pressing the panic button will turn the alarm off, keep the doorslocked and keep the system armed.
If the alarm is sounding because an incorrect ignition key was used, press any button on the key chain transmitter to turn the alarm off.
The alarm will stop by itself after two minutes.
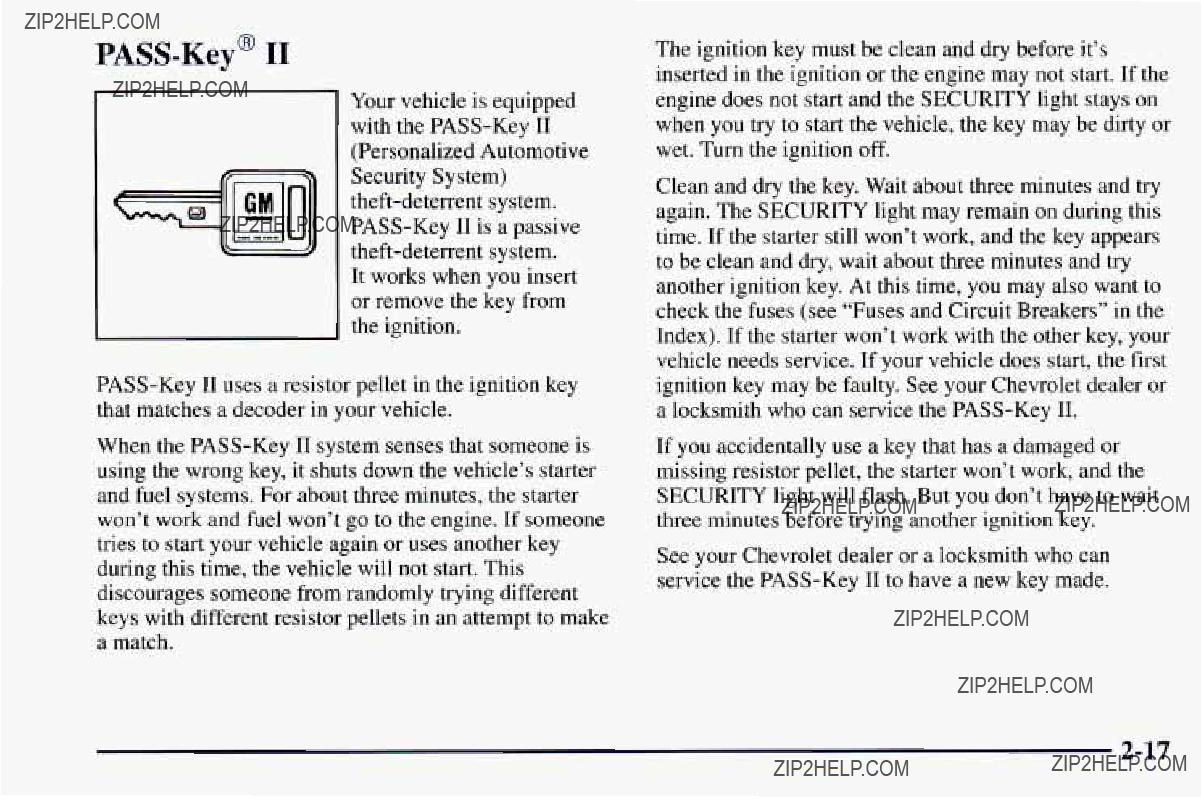
Your vehicle is equipped with the
It works when you insert or remove the key from the ignition.
When the
The ignition key must be clean and dry before it???s inserted in the ignition or the engine may not start. If the engine doesnot start and the SECURITY light stays on when you try to start the vehicle, the key may be dirty or wet. Turn the ignition off.
Clean and dry the key. Wait about threeminutes and try again. TheSECURITY light may remain on during this time. If the starter still won???t work, and the key appears to be clean and dry, wait about threeminutes and try another ignition key. At this time, you may also want to check the fuses (see ???Fuses and Circuit Breakers??? in the Index). If the starter won???t work with the other key, your vehicle needs service. If your vehicle does start, the first ignition key may be faulty. See your Chevrolet dealer or a locksmith who can service
If you accidentally use a key that has adamaged or missing resistor pellet, the starterwon???t work, and the SECURITY lightwill flash. But you don???t have to wait three minutes before trying another ignitionkey.
See your Chevrolet dealeror a locksmith who can service
If you???re ever drivingand the SECURITY light comes on and stays on,you will be able to restart your engine if you turn it off. Your
If you lose ordamage a
Feature Customization(If Equipped)
Your Chevrolet???s locks and lighting systems can be programmed with several different features. The features you can program depend upon the options that came withyour vehicle. The followinglist tells you the features that can be programmed. Listed next to each feature is the option you need to have on your vehicle in order tobe able to program that particular feature.
Exit Lighting (available for all)
0 Delayed Illumination (available for all)
0Last Door Closed Locking (if equipped with power door locks)
Lockout Prevention (if equipped with power door locks)
Remote Keyless Entry Verification (if equipped with Vehicle and Content
Driver???s Door Alarm Delay (if equipped with Vehicle and Content
Shock Sensor Enable (if equipped with Vehicle and Content
To program features, your vehicle must be in the programming mode. Follow these steps:
1. Put your key in the ignition.
2. Turn the ignition to theRUN position to disarm the Vehicle and Content
3.Turn the ignition to theOFF position.
4.Remove the RADIO fuse. Thisfuse is in themain fuse block, locatedon the left sideof your instrument panel.When the main fuse block is open, the RADIO fuse is located in thelower right hand corner of the fuse panel. See???Fuses and Circuit Breakers?????? in the Index.
5 , Turn the ignition to the ACC position.
You should heara chime toverify that the system is in programming mode, If the chime sounds once, you will be ableto program Exit Lighting,Delayed Illumination, LastDoor Closed Locking and Lockout Prevention only. If the chimesounds twice andyour vehicle isequipped with theVehicle and Content
Exit Lighting and Delayed Illumination
Exit Lighting:Your interior lights will come on for up to 25 seconds when the key is removed from the ignition switch.
Delayed Illumination:Your interior lights willcome on and stay on for up to 25 seconds when entering the vehicle and for upto five seconds when leaving your vehicle.
Your vehicle comes with both features enabled. (Mode4) To change the factory setting,do the following:
1.Turn the courtesy la~npson by turning the instrument panel brightness control knob allthe way up.
2.Count the number of chimes you hear. The number of chimes tells you which mode your vehicle is set for.
3.Turn the courtesy lamp switch to OFF.
4.Turn the courtesy lamp switch fromON to OFF until you hear the number of chimes that correspond tothe mode selection you want.
Mode 1: Both Off
Mode 2: Delayed Illumination Only
Mode 3: Exit LightingOnly
Mode 4: Both On
Last Door Closed Locking and
Lockout Prevention
Your vehicle comes with this feature set in Mode2. This means that your power door lockswill not lock when the keys arein the ignition and a door is open. To change the factory setting, do the following:
1.Press the LOCK switch on the door.
2.Count the number of chimes you hear. The number of chimes tellsyou which mode your vehicle is set for.
3.Press the LOCK switch on the door until you hear the number of chimes that correspond to the mode selection you want.
Mode 1: Both Off (Doors will lockhnlock when you press the power door lock switch).
Mode 2: Lockout Prevention Only (If you leave your keys in the ignition and get out the driver???s door, you won???t be able tolock the doors with the power door lock switch).
Mode 3: Last Door Closed Locking Only (If the power door lock switch is used to lock the vehicle while any door is open, you will hear three chimes. The doors will not lock until after all doors are closed).
Mode 4: Both On (This combines Mode 2 and 3).
Remote Keyless Entry Verification
Your vehicle comes with this feature set inMode 5. This means that when you use the key chain transmitter to lockhnlock your vehicle, your parking lamps will flash briefly upon the first push on LOCK. Your horn will sound briefly, your parking lamps will flash briefly upon the second push on LOCK and your parking lamps will flash briefly upon any push on UNLOCK. To change the factory setting, dothe following:
1.Press the UNLOCK switch on the Remote Keyless Entry transmitter.
2.Count the number of chimes you hear. The number of chimes tells you which mode your vehicleis set for.
3.Press the UNLOCK switch on the Remote Keyless Entry transmitter untilyou hear the numberof chimes that correspond to the mode selectionyou want.
Mode 1: All Off (The headlamps will not flash and the horn will not sound to provideyou feedback that a lockhnlock command has been received by the Remote Keyless Entry transmitter).
Mode 2: Horn and Lamps/Lamps (Your horn will sound briefly and your parlung lamps will flash when you press LOCK on the key chain transmitter. Only your parking lamps will flash when you press UNLOCK).
Mode 3: Horn and Lamps (Your horn will sound briefly and your parking lamps will flash every timeyou push LOCK and UNLOCK).
Mode 4: Lamps (Your parking lamps will flash every time you push LOCK and UNLOCK).
Mode 5: Lamps/Horn and LampsLamps (Your lamps will flash upon the firstpush on LOCK, your lamps will flash and your horn will sound upon the second push on LOCK and your lamps will flash upon any push on UNLOCK).
Your vehicle comeswith this feature setin Mode 3. This means that both your Remote Keyless Entry transmitter and the power door lock switch will actively arm the system. To change the factory setting,do the following:
1.Press the UNLOCK switch on the door.
2.Count the numberof chimes you hear. The number of chimes tells you which mode your vehicleis set for.
3.Press the UNLOCK switch on the door until you hear the number of chimes that correspond to the mode selection you want.
Mode 1: Alarm System Off (The system will not arm).
Mode 2: Remote Keyless Entry Transmitter Lock (When you lock your doors using the Key Chain Transmitter, the system will arm itself).
Mode 3: Remote Keyless Entry Transmitter/Power Door Lock Switch (If you use either the Remote Keyless Entry transmitter orthe power door lock switch to lock the doors, the system will arm itself).
Mode 4: Passive arming and Remote Keyless Entry Transmitter/Power Door Lock Switch Arming (The system will arm itself after all doors are closed,plus arming per mode 3).

Your vehicle comes with this featureset in Mode 3. This means that if you arm the system using the key chain transmitter, your parking lamps will flash and your horn will chirp twice to verify that the system is armed. If it only chirps once, the hatch isopen or unlatched. If you arm the system using either the power door lock switch or by passive arming, only the parking lamps will flash for verification. To change the factory setting, do the following:
1.Press the LOCK switch on the Remote Keyless Entry Transmitter.
2.Count the number of chimes you hear. The number of chimes tells you which mode your vehiclesetis for.
3.Press the LOCK switch on the transmitter until you hear the number of chimes that correspond to the mode selection you want.
Mode 1: All Off (No horn chirps orparking lamp flash).
Mode 2:Horn and Lamps (Your parking lamps will flash and your horn will chirp twice to verify the system is armed using any arming method).
Mode 3: Horn and LampsLamps (If you use the transmitter to arm the system, your parking lamps will flash and your horn will chirp twice toverify that the system is armed. If you use either the power door lock switch or passive arming, only your lamps will flash for verification).
Mode 4: Lamps (When your vehicle arms,only your parking lamps will flash for verification).
Driver???s Door Alarm Delayand Shock
Sensor Enable
Your vehicle comes withthis feature set in Mode 4. This means that if you open the driver???s door using your key, the alarm will not sound for eight seconds.Also the shock sensor, ableto detect sharp blows to your vehicle is active. To change the factory setting,do the following:
1.Turn the parking lamps on and off.
2.Count the number of chimes you hearThe. number of chimes tells you which mode your vehicleis setfor.
3.Turn the parking lamps on and off until you hear the number of chimes that correspond to themode selection you want.

Mode 1: Zero Delay and Shock Sensor Disabled
(The alarm willsound immediately if the driver???s door is openedwith your key and theshock sensor will not be available to measure sharp blowsyourto vehicle).
Mode 2: Eight SecondDelay and Shock Sensor Disabled (The alarm willsound eight seconds after the driver???s dooris opened with your key and the shock sensor willnot be available tomeasure sharp blowsto your vehicle).
Mode 3: Zero Delay and Shock Sensor Enabled (The alarm willsound immediately after the driver???s door is opened with your key and the shock sensor willbe available tomeasure sharp blowsto your vehicle).
Mode 4: Eight SecondDelay and Shock Sensor Enabled (The alarm will sound eight seconds after the driver???s door is opened with your key and the shock sensor will be available to measure sharpblows to your vehicle).
Leaving ProgrammingMode
When programming is done, turn the ignitionswitch to the OFF position and replace theRADIO fuse.
New Vehicle
NOTICE:
Your modern Chevrolet doesn???t needan elaborate
0 Keep your speed at 55 mph (88 km/h) or
0Don???t drive at any one
Don???t make
0Avoid making hard stops for the first
200 miles (322 km) or so. During this time your new brake linings aren???t yet broken in. Hard stops with new liningscan mean premature wear and earlierreplacement. Follow this
time you get newbrake linings.
0Don???t tow a trailer

Ignition Positions
With the ignition key in the ignition switch, you can turn the switch to fivepositions.
C
AE
ACC (A): Position in which you can operate your electrical power accessories. Press in the ignition switch as you turn the top of it toward you.
LOCK (B): The only position in which you can remove the key. This locks your steering wheel, ignition and automatic transmission.
If you have an automatic transmission, the ignition switch can???t be turned to LOCK unless the shift lever is in the PARK (P) position.
OFF (C): Unlocks the steering wheel, ignition and automatic transmission, but does not send electrical power to any accessories. Use this position if your vehicle must be pushed or towed.A warning tone will sound if you open the driver???s door when the ignition is in OFF and the key is in the ignition.
RUN (D): Position to which the switchreturns after you start your engine and release the switch. The switch stays in the RUN position when the engine is running. But even when the engine isnot running, you can
use RUN to operate your electrical power accessories and to display some instrument panel warning and indicator lights.

START (E): Starts the engine. When the engine starts, release thekey. The ignition switch will return to RUN for normal driving.
Note that even if the engineis not running, ACC and RUN allow you to operate your electrical accessories, such as the radio and ventilation fan.
Key Release Button
If you have a manual transmission, your ignition lock has akey release button. You must press the button beforeyou can take your key out of the ignition lock.
On manual transmissionvehicles, turning thekey
to LOCK will lock the steering column and result in a loss of ability to steer thevehicle. This could cause a collision. If you need toturn the engine
off while the vehicle is moving,turn thekey only
to OFF.
NOTICE:
If your key seems stuck inLOCK and you can???t turn it,be sure you are using the correctkey; if so, is it all theway in? If it is, then turn the steering wheel left and rightwhile youturn the key hard. But turn thekey only with your hand. Using a tool to force it could break keythe or the ignition switch.If none of this works, then your vehicle needs service.
Starting Your Engine
Automatic Transmission
Move your shift lever toPARK (P)or NEUTRAL (N). Your engine won???t start inany other position
NOTICE:
Don???t try to shiftto PARK (P) if your Chevrolet is moving. If you do, you could damage the transmission. Shift toPARK (P) only when your vehicle is stopped.
Manual Transmission
The gearselector should be in NEUTRAL (N). Hold the clutch pedal to the floorand start the engine. Your vehicle won???t start if the clutch pedal is not all the way down
1.Without pushing the accelerator pedal,turn your ignition key to START. When the engine starts, let go of the key. The idlespeed will go down as your engine getswarm.
I NOTICE:
Holding your key inSTART for longer than
15 seconds at a time will cause your battery to be drained much sooner. And the excessive heat can damage your starter motor.
2.If it doesn???t start right away, hold your key in START for aboutthree to fiveseconds at a time until your engine starts. Wait about 15 seconds between each try to help avoid draining your battery.
3.If your engine still won???t start(or starts but then stops), it could be flooded with too much gasolineTry. pushing your accelerator pedal all theway to the floor and holdingit there as you hold the keyin START for about three seconds. If the vehicle starts briefly but
then stops again,do the same thing, butthis time keep the pedal down forfive or six seconds.This clears the extra gasolinefkom the engine. After waiting about 15 seconds, repeat the normal starting procedure.
NOTICE:
Your engine is designedto work with the electronics in your vehicle. If you add electrical parts or accessories, you could changethe way the engine operates. Before adding electrical equipment, check withyour dealer. If you don???t, your engine might not perform properly.
If you ever haveto have your vehicle towed, see the part of this manual that tells howto do it without damaging your vehicle. See ???Towing Your Vehicle??? in theIndex.
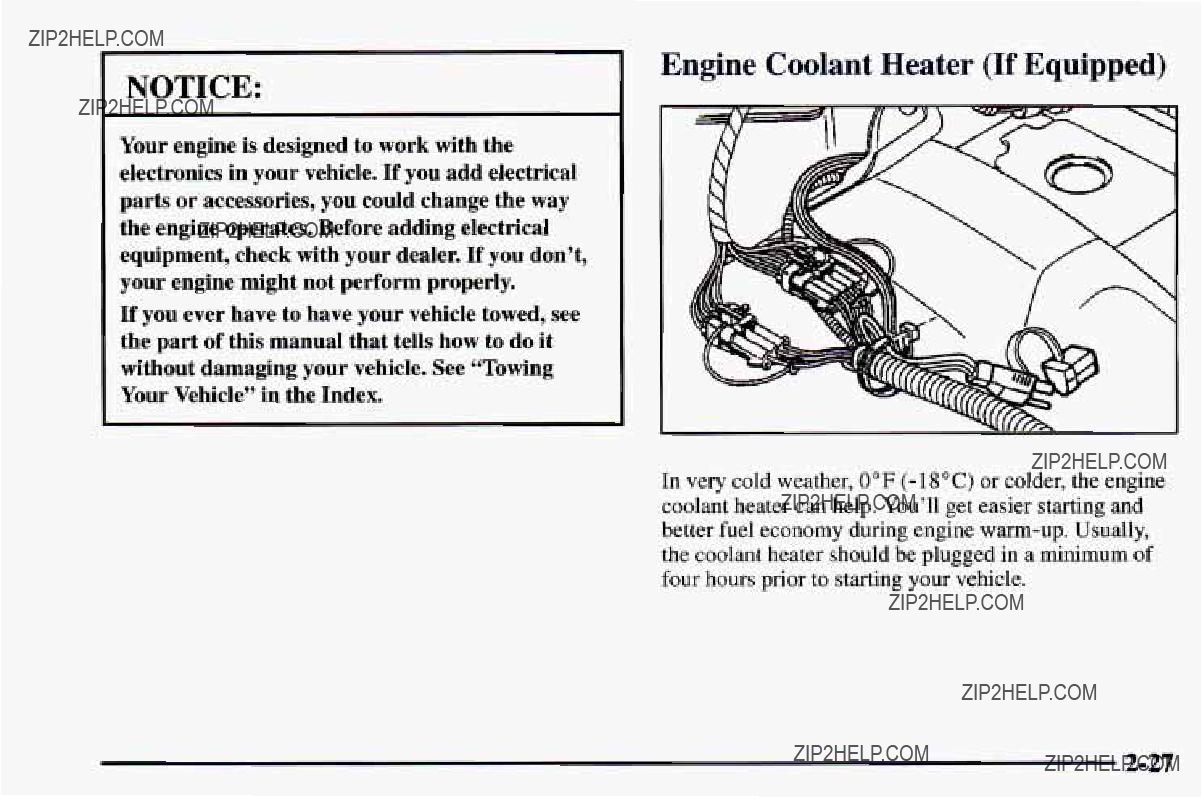
Engine Coolant Heater (If Equipped)
In very cold weather, 0??F
To Use the Coolant Heater
1.Turn off the engine.
2.Open the hood and unwrap the electrical cord.
3.Plug it into anormal, grounded
Plugging the cord into an ungrounded outlet could causean electrical shock.Also, the wrong kind of extension cord could overheatand cause a fire.You could be seriously injured. Plugthe cord into a properly
4.Before starting the engine, be sure to unplug and store the cord asit was before tokeep it away from hot pipes, manifold or moving engine parts. If you don???t, it could be damaged.
How long should you keep the coolant heater plugged in? The answer depends on the outside temperature, the kind of oil you have, and some other things. Instead of trying to list everything here, we ask that you contact your Chevrolet dealerin the area where you???ll be parking your vehicle. The dealer cangive you the best advice for that particular area.
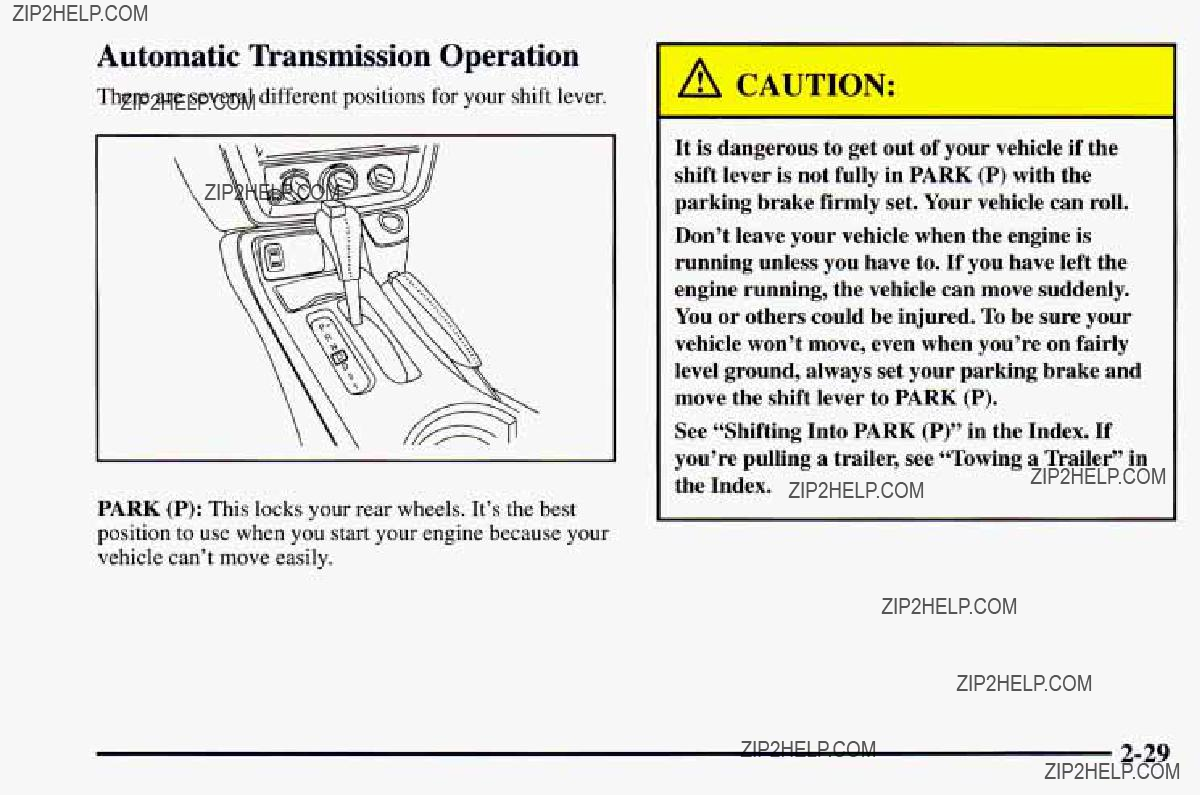
Automatic Transmission Operation
There are several different positions foryour shift lever.
PARK (P): This locks your rear wheels. It???s the best position to use when youstart your engine becauseyour vehicle can???t moveeasily.
I
It is dangerous to get outof your vehicle if the shift leveris not fully in PARK(P) with the parking brake firmlyset. Your vehiclecan roll.
Don???t leave yourvehicle when the engineis running unless you haveto. If you have left the engine running, thevehicle can move suddenly. You or others could be injuredTo. be sure your vehicle won???t move, evenwhen you???re onfairly level ground, always set your parking brake and move the shift lever toPARK (P).
See ???Shifting Into PARK(P)???in the IndexIf. you???re pulling a trailer,see ???Towing a Trailer?????? in the Index.

Ensure the shift leveris fully inPARK (P) before starting the engine. Your Chevrolet has a
PARK (P), ease pressure on the shift
shift lever button onfloor shift console models asyou maintain brake application. Then move the shift lever into the gear you wish. (Press the shift lever button before moving the shift lever on floor shift console models.) See ???Shifting Out of PARK (P)??? in this section.
REVERSE (R):Use this gearto back up.
NOTICE:
Shiftingto REVERSE (R)while your vehicle is moving forward could damage your transmission. Shift to REVERSE (R) only after your vehicle
is stopped.
To rock your vehicle back and forth to get outof snow, ice orsand without damaging your transmission, see ???Stuck: In Sand, Mud, Ice or Snow???in the Index.
NEUTRAL (N): In this position,your engine
doesn???t connect with the wheels. To restart when you???re already moving, use NEUTRAL (N) only. Also, use NEUTRAL (N) when your vehicle is being towed.
Shifting out of PARK (P) or NEUTRAL (N)while your engine is ???racing???(running at high speed) is dangerous. Unlessyour foot is firmly onthe brake pedal, your vehicle could move very rapidly. You could losecontrol and hit people or objects. Don???t shift out of PARK (P)or NEUTRAL (N) while your engine is racing.
I NOTICE:
Damage to your transmission causedby shifting out of PARK (P)or NEUTRAL (N) with the engine racing isn???t coveredby your warranty.
AUTOMATIC OVERDRIVE(@):
This position is fornormal driving. If you need more power for passing, andyou???re:
-Going less than about35 mph (56 km/h), push your accelerator pedal abouthalfway down.
-Going about 35 mph (56 km/h) or more, push the accelerator all theway down.
You???ll shift downto the next gear and have more power.
DRIVE (D):This position is alsoused for normal driving, however, it offers morepower and lower fuel economy than AUTOMATIC OVERDRIVE (a).
Here are some timesyou might choose DRIVE (D) instead of AUTOMATIC OVERDRIVE (a):
-When driving on hilly, winding roads.
-When towing a trailer, so there is less shifting between gears.
-When going down a steep hill.
SECOND (2): This position gives you more power but lower fuel economy. You can useSECOND (2) on hills. It can help controlyour speed as you go down steep mountain roads, but then you would also want to use your brakesoff and on.
NOTICE:
Don???t drive inSECOND (2) for more than25 miles (40km), or atspeeds over 55 mph (88 km/h),
or you can damage your transmissionUse. AUTOMATIC OVERDRIVE (@)or DRIVE (D) as much as possible.
Don???t shift into SECOND(2) unless you are going slower than65 mph (105 k d ) , or you can damage your engine.
FIRST (1): This position givesyou even more power (but lower fuel economy) than SECOND (2).You can use iton very steep hills, orin deep snow or mud. If the selectorlever is put in first gear, the transmission won???t shift into FIRST( 1 ) until the vehicle is going slowly enough.
NOTICE:
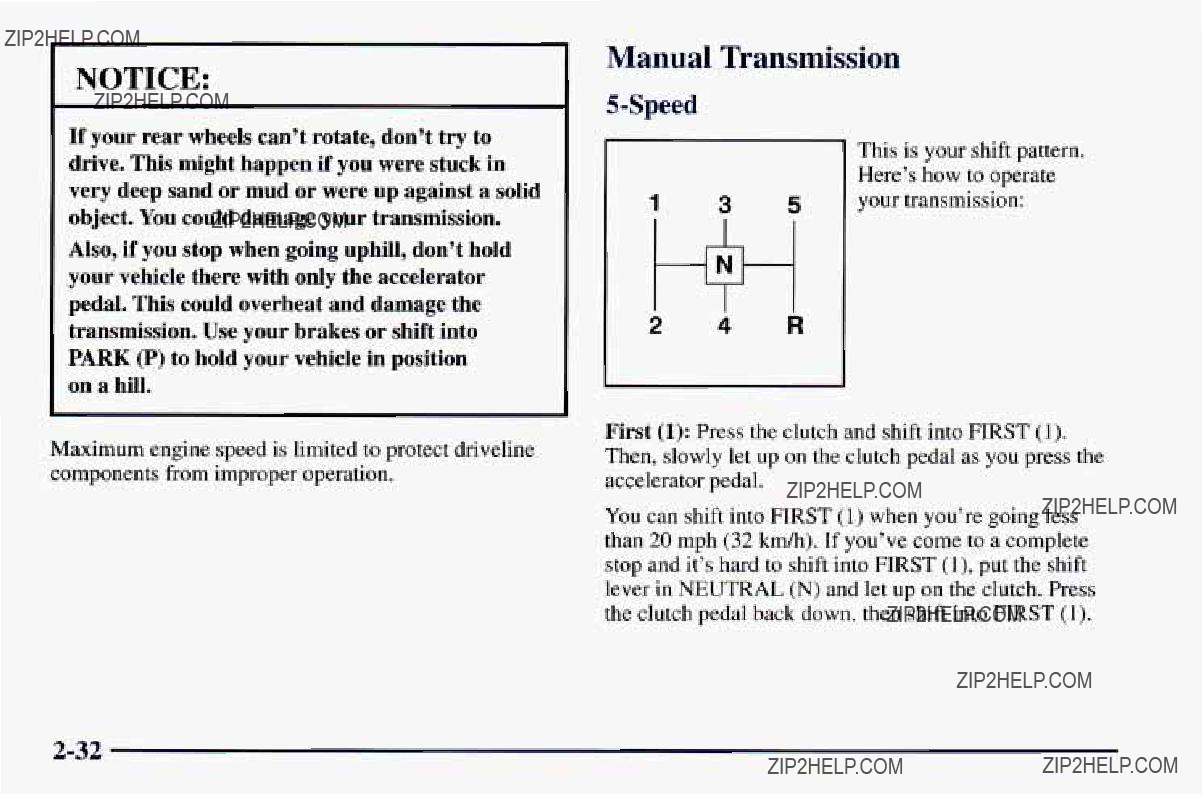
If your rear wheels can???trotate, don???t try to drive. This mighthappen if you were stuck in very deepsand or mud or were up against a solid object. You could damage your transmission.
Also, if you stop when going uphill, don???t hold your vehiclethere with onlythe accelerator pedal. This could overheat and damage the transmission. Use your brakes or shift into PARK (P) to hold your vehicle in position
on a hill.
Maximum engine speed is limited to protect driveline components from improper operation.
Manual Transmission
2 4 R
First (1): Press the clutch and shift into FIRST (1). Then, slowly let up on the clutch pedal as you press the accelerator pedal.
You can shift into FIRST (1) when you???re going less than 20 mph (32 kmh) . If you???ve come to a complete stop and it???s hard to shift into FIRST (l), put the shift lever in NEUTRAL (N) and let up on the clutch. Press the clutch pedal back down. then shift into FIRST(1).
SECOND (2):Press the clutch pedalto the flooras you let up on the accelerator pedal andshift into SECOND (2). Then, slowly let up on the clutch pedal youas press the accelerator pedal.
THIRD (3), FOURTH (4) AND FIFTH (5): Shift into THIRD (3), FOURTH (4) and FIFTH (5 ) the same way you do for SECOND(2). Slowly let up on theclutch as you press the accelerator pedal.
To Stop, let up on the accelerator pedal and press the brake pedal.Just before the vehicle stops, press the clutch pedal and brake pedal, andshift to NEUTRAL (N).
NEUTRAL (N):Use this position when you start or idle your engine.
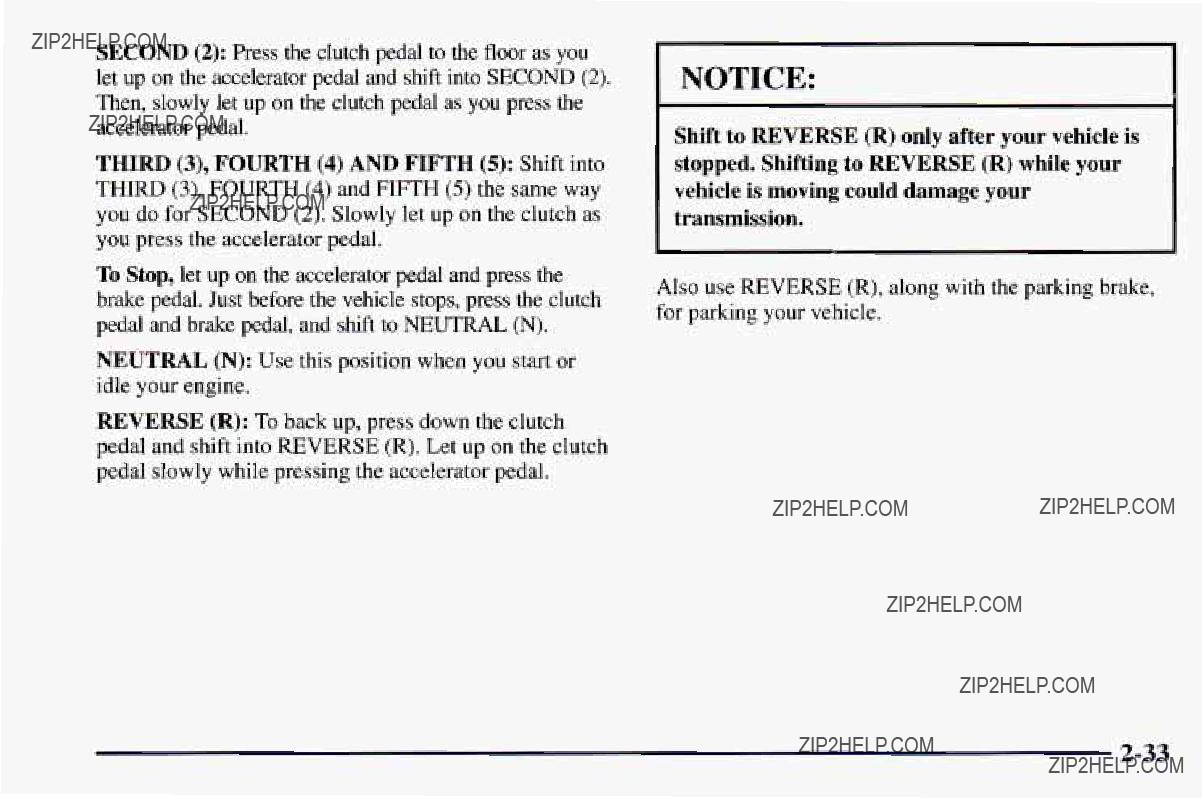
REVERSE (R):To back up, press down the clutch pedal and shift into REVERSE (R). Let up on the clutch pedal slowly while pressing the accelerator pedal.
NOTICE:
Shift to REVERSE(R) only after your vehicleis stopped. Shiftingto REVERSE (R) while your vehicle is moving could damage your transmission.
Also use REVERSE (R), along with the parking brake, for parking your vehicle.

This is your shift pattern. Here???s how to operate
1 3 5 R your transmission:
2 4 6
FIRST (1): Press the clutch pedal and shift into FIRST (1). Then,slowly let up on the clutch pedal as you press the accelerator pedal.
You can shift into FIRST (1)when you???re going less than 20 mph (30 kmh). If you???ve come to a complete stop and it???s hard toshift into FIRST(l), put the shift lever in NEUTRAL (N) and let up on the clutch. Press the clutch pedal back down. Then shift into FIRST (1).
SECOND (2): Press the clutch pedal as you let up on the accelerator pedaland shift into SECOND(2). Then, slowly let up on the clutch pedal as you press the accelerator pedal.
THIRD (3), FOURTH (4), FIFTH (5) AND
SIXTH (6): Shift into THIRD(3), FOURTH (4), FIFTH (5) AND SIXTH (6) gear the same way you do for SECOND(2). Slowly let up on the clutch pedal as you press the acceleratorpedal.
To Stop, let upon the accelerator pedal and press the brake pedal. Just before the vehicle stops, pressthe clutch pedal and brake pedal, and shift to NEUTRAL(N).
NEUTRAL (N):Use this position when you start or idle your engine.
REVERSE (R):To back up, press down the clutch pedal and shift into REVERSE (R).Let up on the clutch pedal slowly while pressing the accelerator pedal. If you shift from SIXTH (6) into REVERSE (R), the shift lever must be first placed in the NEUTRAL (N) position centered between SECOND (2) and THIRD (3) prior to shifting into REVERSE (R).
Your
If you have turned your ignition off and want to park your car in REVERSE (R),you will have to move the shift lever quickly to the right, then forward into gear.
f??? iff lpeeds
A CAUTION:
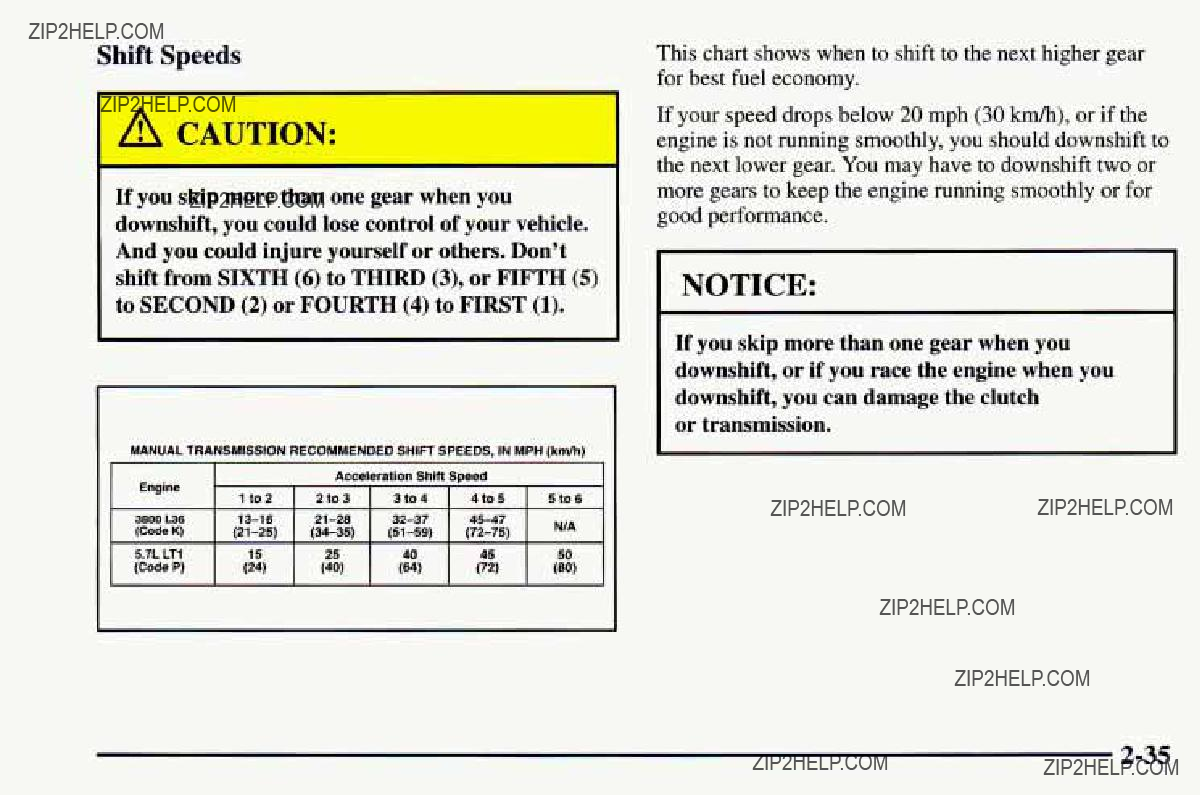
If you skip more than one gear when you downshift, you could losecontrol of your vehicle. And you couldinjure yourself or others. Don???t shift from SIXTH (6) to THIRD (3), or FIFTH (5) to SECOND (2) or FOURTH (4) to FIRST (1).
MANUAL TRANSMISSIONRECOMMENDEDSHIFT SPEEDS, IN MPH (kmlh)
This chart shows when to shift to thenext higher gear for best fuel economy.
If your speed drops below 20 mph (30 km/h), or if the engine is not running smoothly, you should downshift to the next lower gear. You may have to downshift two or more gears to keep the engine running smoothly or for good performance.
NOTICE:
If you skip more than one gear when you downshift, or if you race the engine whenyou downshift, you can damage the clutch
or transmission.

Skip Shift Light (5.7L Engine)
When this light comes on, you can only shift from FIRST (1)to FOURTH (4) instead of FIRST (1)to SECOND (2). Thishelps you to get the best possible fuel economy.
This lightwill come on under these conditions:
The engine coolanttemperature is greater than 170??F (77??C).
You are going 15 to 20 mph (24 to 32 km/h) and
You are at 35 percent throttle or less.
When this light is on, the gear shift leverwill rer you shift from FIRST (1) to FOURTH (4) only. Once you are in FOURTH (4), you can press the clutch again and shift into another gear.
Follow the shift speedson this chartwhen the SKIP SHIFT light is on.
Computer Aided Manual Transmission ShiftSpeeds:
1st to4th15mph (24 km/h)
4th to 5th 25 mph (40 km/h)*
5th to 6th 49 mph (64 km/h)**
Each time you come to a stop, the engine's Powertrain Control Module (PCM) determineswhen to activate the SKIP SHIFTupshift system. Use SECOND (2) gear only when you accelerate very quickly from a stop.You can then follow the full gear shift pattern.
"30 mph (48 km/h)when accelerating to highway speeds.
**45 mph (72 km/h) when accelerating to highway speeds.
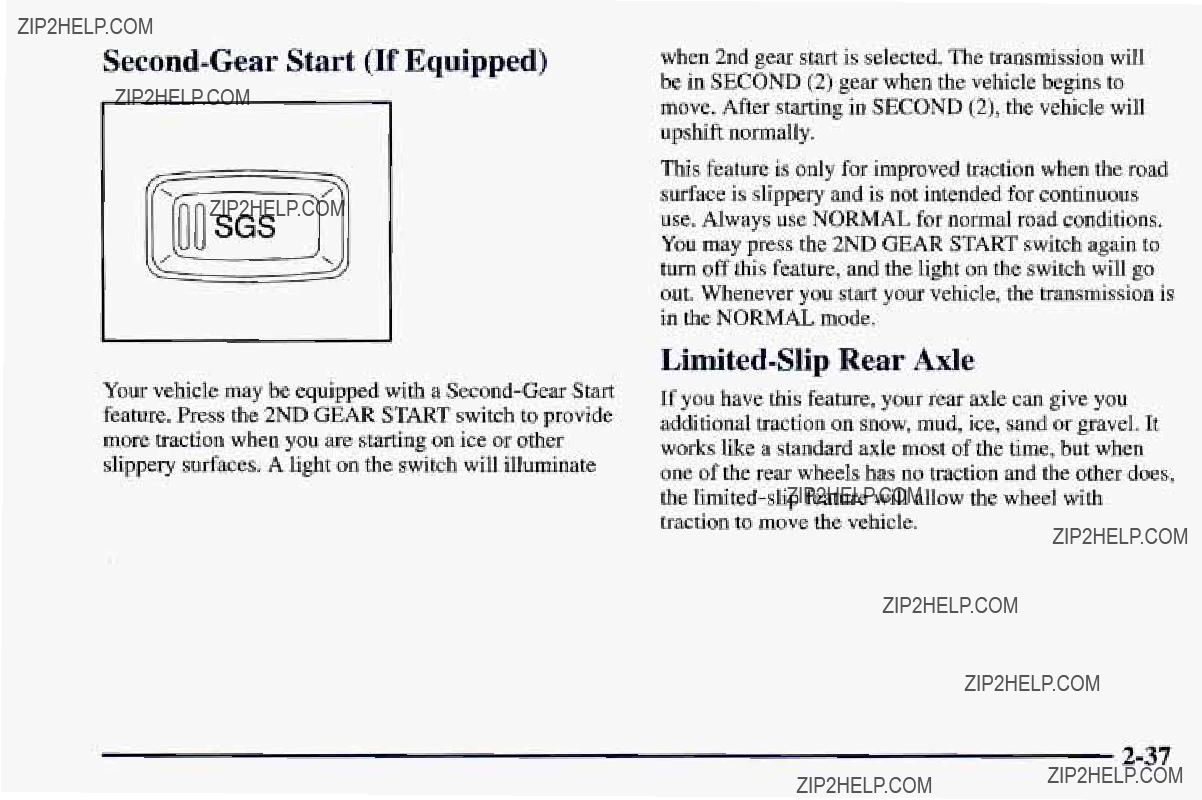
Your vehicle may be equipped with a
when 2nd gear start is selected. The transmission will be in SECOND (2) gear when the vehicle begins to move. After starting in SECOND (2), the vehicle will upshift normally.
This feature is only for improved traction when the road surface is slippery and is not intended for continuous use. Always use NORMAL for normal road conditions. You may press the 2ND GEARSTART switch again to turn off this feature, and the light on the switch will go out. Whenever you start your vehicle, the transmission is in the NORMAL mode.
If you have this feature, your rear axle can give you additional traction on snow, mud, ice, sand or gravel. It works like a standard axle most of the time, but when one of the rear wheels has no traction and the other does, the

Parking Brake
To set the parking brake, hold the brake pedal down and pull up on the parking brake lever. If the ignition is on, the brake system warning light will come on.
To release the parking brake, hold the brake pedal down. Pull the parking brake lever up until you can push in the release button. Hold the release button in as you move the brake lever all the way down.

NOTICE:
Driving withthe parking brakeon can cause your rear brakes to overheat. You may have to replace them, and you could also damage other parts of your vehicle.
If you are towing a trailer and are parking on any hill, see ???Towing a Trailer??? in the Index. That section shows what to do first to keep the trailer from moving.
Shifting Into PARK (P) (Automatic
Transmission Models Only)
It can be dangerous to get out of your vehicle if the shift lever is not fully in PARK (P)with the parking brakefirmly set. Your vehiclecan roll.
If you haveleft the engine running, the vehicle can move suddenly.You or others could be injured. To be sure your vehicle won???t move, even when you???reon fairly level ground, use the steps that follow. If you???re pulling trailer, see ???Towing a Trailer??? in the Index.

Leaving Your Vehicle With the Engine
Running (Automatic Transmission
Models Only)
1 . Hold the brake pedal down with your right foot and set the parking brake.
2.Move the shift lever into PARK (P) position by holding in the button on the lever and push the lever all the way toward the front of your vehicle.
3.Move the ignition key to theLOCK position.
4.Remove the key and take it with you. If you can leave your vehicle with the key in your hand, your vehicle is in PARK (P).
It can be dangerous to leave yourvehicle with the engine running.Your vehiclecould move suddenly if the shift lever is notfully in PARK (P) with the parking brakefirmly set. And, if you
leave thevehicle withthe engine running, it could overheat andeven catch fire. You or others could be injured. Don???t leave your vehicle with the engine running unlessyou have to.
If you have to leaveyour vehicle with the engine running, be sure your vehicle is in PARK (P) and your parking brake is firmly set before you leave it. After you???ve moved the shift lever intothe PARK (P) position, hold the regular brake pedal down. Then, seeif you can move the shift lever away from PARK (P) without first pushing the button. If you can, itmeans that the shift lever wasn???t fully locked into PARK (P).
Torque Lock (Automatic Transmission)
If you are parking on a hilland you don???t shift your transmission into PARK (P) properly, the weight of the vehicle may put too much force on the parking pawl in the transmission.You may find it difficult to pull the shift lever out of PARK (P). This is called ???torquelock.??? To prevent torque lock, setthe parking brake and then shift into PARK (P) properly before you leave the driver???s seat. To find out how, see ???ShiftingInto
PARK (P)??? in the Index.
When you are ready to drive, move the shift lever out of PARK (P) before you release theparking brake.
If torque lock does occur, you may need to have another vehicle push yours a little uphill to take some of the pressure from theparking pawl in the transmission, so you can pull the shift lever out of PARK (P).
Parking Your Vehicle
(Manual Transmission)
Before you get outof your vehicle, put your manual transmission in REVERSE (R) and firmly apply the parking brake.
If your vehicle isequipped to tow a trailer, see ???Towing a Trailer???in the Index.
Shifting Out of PARK(P)
(Automatic Transmission)
Your Chevrolet has
If you cannot shiftout of PARK (P), ease pressure on the shift
If you ever hold the brakepedal down but still can???t shift outof PARK (P), try this:
1.Turn the key to the OFF position.
2.Apply and hold the brake.
3.Shift to NEUTRAL (N).
4.Start the engine and then shift to the drive gear you want.
5. Have the vehicle fixed as soon as you can.

Things that can burn could touch hot exhaust parts under yourvehicle and ignite. Don't park over papers,leaves, dry grass or other things that can burn.
Engine exhaust cankill. It contains the gas carbon monoxide (CO), which you can't see or smell. It can cause unconsciousness and death.
You might have exhaust coming in if:
Your exhaust system sounds strange or different.
Your vehicle gets rusty underneath.
0 Your vehicle was damaged in a collision.
0Your vehicle was damaged when driving over high points on the roador over road debris.
Repairs weren't done correctly.
Your vehicle or exhaust system had been modified improperly.
If you ever suspect exhaustis coming into your vehicle:
0 Drive it only with all thewindows down to blow out anyCO; and
0 Have your vehicle fixed immediately.

Running Your Engine While You???re
Parked (Automatic Transmission)
It???s better not to park with the engine runningBut. if you ever haveto, here aresome things to know.
Idling the engme withthe air system control off could allowdangerous exhaust into your vehicle (seethe earlierCaution under ???Engine Exhaust???).
Also, idling in a
CO
Another
A CAUTION:
It can be dangerous to get out of your vehicle if the shift lever is not fullyin PARK (P) with the parking brakefirmly set.Your vehicle can roll. Don???t leaveyour vehicle whenthe engine is running unless youhave to. If you???ve left the engine running, the vehicle can move suddenly. You or otherscould beinjured. To be sure your vehicle won???t move, even when you???reon fairly level ground, always set your parking brake and move the shift lever to PARK (P).
Follow the proper steps to be sure your vehicle won???t move. See ???Shifting IntoPARK (P)???in the Index.
If you are parking on a hilland if you???re pulling a trailer, also see???Towing a Trailer?????? in the Index.

Windows
Manual Windows
Rotate thewindow crank handle toopen and close each door window.
Power Windows
With power windows, switches on the door control each window when the ignition is on or when RAP is present. (See ???Retained Accessory Power??? in the Index.)
You can open the passenger???s window any amount by pressing the switch and releasing it when the window has lowered to the position you want.
The switch for thedriver???s window has an
You can also open the driver???s window any amount by pressing the switch again while the window is in the
Horn
To sound the horn, press either horn symbol on your steering wheel.
If your horn sounds two or three chirps when unlocking your vehicle with the key chain transmitter (if you have
that option), the alarm was triggered while you were away. Check the vehicle before entering.
Tilt Steering Wheel
A tilt steering wheel allows you to adjust the steering wheel before you drive.
You can also raise it to the highest level to give your legs more room when you exit and enter the vehicle.
To tilt the wheel, hold the steering wheel and pull the lever. Move the steering wheel to a comfortable level, then release the lever to lock the wheel in place.

Tbrn SignaVMultifunction Lever
The lever on the left side of the steering column includes your:
Turn Signal and Lane Change Indicator
Headlamp HighLow Beam Changer and Passing Signal
Windshield Wipers
Windshield Washer
0 Cruise Control (If Equipped)
lbrn Signal and Lane Change Indicator
The turn signal has two upward (for right)and two downward (for left)positions. These positions allow you to signal a turn or a lane change.
To signal a turn, move the lever all theway up or down. When the turnis finished, the lever will return automaticall
An arrow on the instrument panel will flash in the direction of the turn or lane change.
To signal a lane change, just raise orlower the lever until the arrow starts to flash. Hold it there until you complete your lane change. The leverwill return by itself when you release it.

As you signal aturn or a lane change,if the arrows don???t flash but juststay on as you signal a turn or lane change, a signal bulbmay be burned out and other driverswon???t see your turn signal.
If a bulb isburned out, replace it to helpavoid an accident. If the arrows don???tgo on at all when you signal a turn,check the fuse (see???Fuses and Circuit Breakers??? in the Index).
Headlamp High/Low Beam Changer
To change the headlamps from low beam to high or high to low, pull the turn signal lever allthe way toward you. Then release it. When the highbeams are on, this lighton the instrument panel also
will be on.
Windshield Wipers
You control the windshield wipers by turning the band with the wiper symbol on it.
For a singlewiping cycle, turn the band to MIST. Hold it there until the wipers start, then let go. Thewipers will stop after one cycle. If you want more cycles, hold the band on MIST longer.

You can set thewiper speed for along or short delay between wipes. This can be very useful in light rain or snow. Turn the band to choose thedelay time. The closer toLO, the shorter thedelay.
For steady wiping at low speed, turn the band away from you to theLO position. For
Damaged wiper blades may prevent you from seeing well enough to drivesafely. To avoid damage,be sure to clear iceand snow from the wiper blades beforeusing them. If they???re frozen to the windshield, carefully loosen or thaw them. If your blades do become damaged, getnew blades or blade inserts.
Heavy snow or icecan overload your wipers. A circuit breaker will stopthem until the motor cools. Clearaway snow or iceto prevent an overload.
Windshield Washer
At the topof the turn signal/multifunction lever, there???s a paddle with the word PUSH on it. To spray washer fluid on the windshield, just push the paddle. The washer will continue to spray until you release the paddle for less than a second. Thewipers will clear the window and wipe a few more times before stoppingor returning to the previous setting.
In freezing weather, don???t use your washer until the windshield is warmed. Otherwise the washer fluid can form iceon the windshield. blockine your vision.

Cruise Control
This can really help on longtrips. Cruise controldoes not work at speeds below about 25 mph
(40 kmh).
When you apply your brakes, or push the clutch pedal, if you have a manual transmission, the cruise control shuts off.
Cruise control can be dangerous whereyou can???t drivesafely at a steady speed. So, don???t use your cruise control on winding roads or inheavy traffic.
Cruise control can be dangerous on
slippery roads. On such roads, fast changes in tire traction can cause needlesswheel spinning, andyou could lose control. Don???t use cruise control on slippery roads.
II
If your vehicle is in cruise control when the optional ASR system begins to limit wheel spin, the cruise control will automatically disengage. (See???ASR System??? in the Index.) When road conditions allow you to safely use it again, you may turn the cruise control back on.

Setting Cruise Control
I
If you leave your cruise control switch on when you???re not using cruise, you might hit a button and go into cruise when you don???t wantYouto. could be startled and even lose control. Keep
the cruise control switchOFF until you want to use it.
1. Move the cruise control switch to ON.
2.Get up to the speed you want.
3.Push in the SET button at the end of the lever and release it.
4.Take your foot off the accelerator pedal.

Resuming a Set Speed
Suppose you set your cruise controlat a desired speed and then applythe brake or clutch pedal. This,of course, shuts off the cruise control.But you don???t need to reset it. Onceyou???re going about 25 mph (40 km/h) or more, you can move the cruise control switch from ON to
R/A (Resume/Accelerate) for abouthalf a second.
You???ll go right back up to your chosen speed and stay there.
Increasing Speed While UsingCruise Control
There are two ways to go toa higher speed:
0Use the accelerator pedal to get to the higher speed. Push the button at the end of the lever, thenrelease the button and the accelerator pedal.You???ll now cruise atthe higher speed.
Move the cruise switch from ON to R/A. Hold it there until you get up to the speed you want, and then release the switch. (To increase your speed in very small amounts, move the switch to R/A for less than half a second and then release it. Each time you do this, your vehicle will go about 1 mph (1.6km/h) faster.)
Reducing Speed While Using Cruise Control
There are twoways to reduce your speed while using cruise control:
0Push in the button at the end of the lever until you reach thelower speed you want, then release it.
To slow down in very small amounts, push the button for lessthan half a second. Each timeyou do this, you???ll go 1 mph (1.6kmh) slower.
Passing Another Vehicle While Using Cruise Control
Use the accelerator pedalto increase your speed. When you take your foot off the pedal,your vehicle will slow down to the cruise controlspeed you set earlier.
Using Cruise Controlon Hills
How well your cruise control willwork on hills depends upon your speed, loadand the steepnessof the hills. When going up steep hills,you may have to step on the accelerator pedalto maintain your speed. When going
downhill, you may have to brake orshift to a lower gear to keep your speed down. Of course, applyingthe brake takes you out of cruise control.Many drivers findthis to be too much trouble and don???t use cruise controlon steep hills.
Ending Outof Cruise Control
There are severalways to turn off the cruise control:
0Step lightly on the brake pedal or push the clutch pedal, if you have amanual transmission; OR
0 Move the cruise switch to OFF.
Erasing Speed Memory
When you turn off the cruise control orthe ignition, your cruise control setspeed memory is erased.
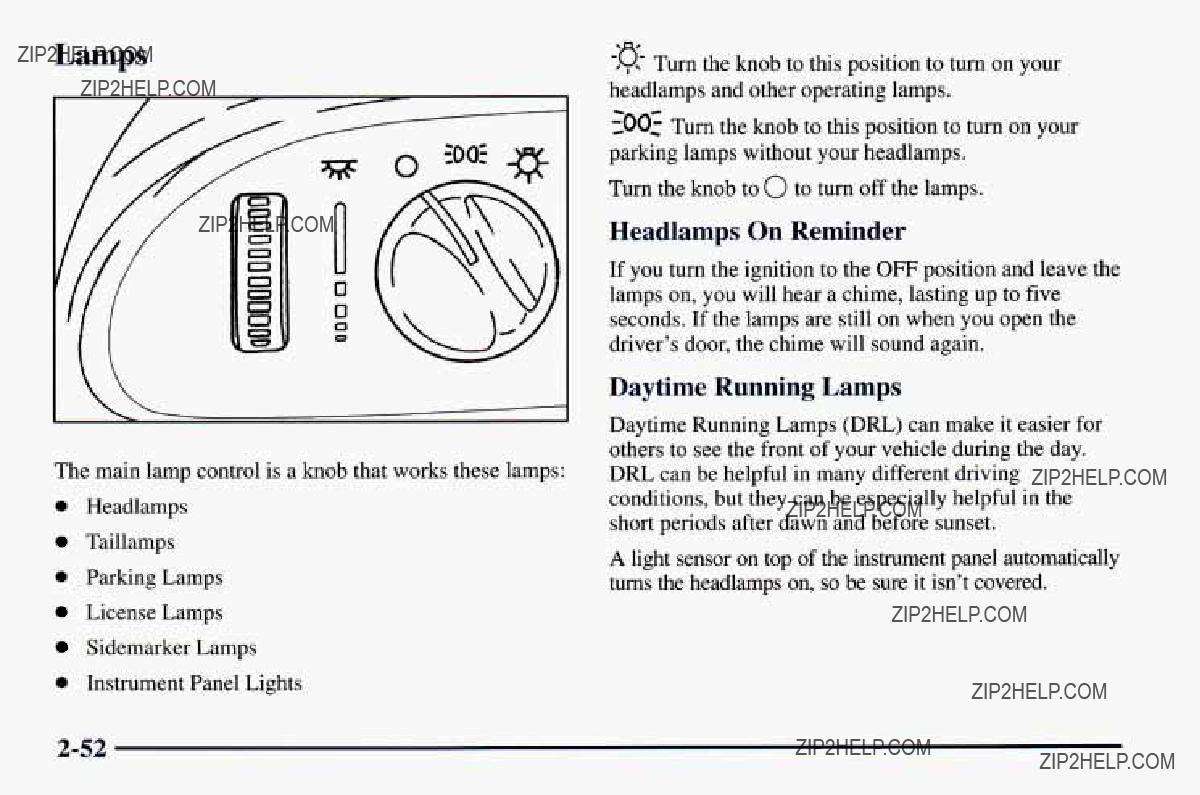

If it???s bright enough outside, theDRL system will make your front turn signal lamps come onwhen:
0 The ignition is on,
0 The headlamp switch is off and
0 The parking brake is released.
When the DRL are on, only your front turn signal lamps will be on. The taillamps, sidemarker and other lamps won???t be on. Your instrument panel won???t be lit up either. When you use your turn signals, the front turn signal and the taillamp of the desired side will flash.
When it???s dark enough outside,your front turn signal lamps will go out andyour headlamps will come on. The otherlamps that come onwith your headlamps will also comeon.
When it???s bright enough outside, the regularlamps will go off, and your front turn signal lampswill come on.
As with any vehicle, you should turn on the regular headlamp system when you need it.
Fog Lamps (If Equipped)
Use your fog lamps for better vision in foggy or misty conditions. Your parking lamps must be on or your fog lamps won???t work.
$0To turn the fog lamps on, push the top of the fog lamp switch. Push the bottom of the switch to turn the fog lamps off. A light on the switch will come on when the fog lamps are on.
Fog lamps will go off whenever your high beams come on. When the high beams go off, the foglamps will come on again.
If your vehicle is equipped with the Vehicleand Content

Interior Lamps
Instrument Panel Brightness Control
5
This switch controls the brightness of your instrument panel lights. Turn the switch upward to brighten or down to dim the lights. If you turn the switch all the way up, your courtesy lamps will come on.
Courtesy Lamps
When any door is opened, several interior lamps go on. These lamps are courtesy lamps. They make it easier for you to enterand leave your vehicle.
Courtesy lamps include the domelamp and other lamps throughout the interior of your vehicle.
To prevent battery rundown, your interior lamps will be disabled about 10 minutes after the ignition is turned to the OFF position. The 10 minute timer will be restarted if you do any of the following:
1.Turn the ignition on.
2.Open either door.
3.Press any button on your Remote Keyless Entry transmitter.
4.Turn the interior lamp switch from OFF to ON.
5.Open thehatch.

Delayed Illumination
With delayed illumination, the courtesy lamps will come on and stay on for 25 seconds afteryou close the doors when entering the vehicle. They will also stayon for five seconds after you close the doorswhen exiting the vehicle. The times will be shortenedif the ignition is turned to the RUN position or if the power locks are activated. To turn this featureon or off,see ???Feature Customization??? in the Index.
Exit Lighting
With exit lighting, the interiorlamps will come on when you remove thekey from the ignitionto help you see while exiting the vehicleTo. turn this feature on or off, see ???FeatureCustomization??? in the Index.
Front Map Lamps
Your inside rearview mirror includes two map lamps. Each lamp has its own switch. Use the switch closestto the lamp to turn it on. Thelamps will also go on when a door is opened.
Courtesy lamps include the dome lampand other lamps throughout the interior of your vehicle.

Retained Accessory Power (RAP)
Your vehicle is equipped with a Retained Accessory Power (RAP) feature which will allow certain features of your vehicle to continue to work up to 10 minutes after the ignition key is turned to the OFF position.
Your convertible top, power windows, and audio system will work when the ignition key is in the RUN or ACC positions. Once the key is turned from RUN to OFF, these features will continue to work for up to 10 minutes or until either door is opened.
Your power door unlock and remote hatch release features will work when the ignition key is in the RUN or ACC positions or if either door is open. Once the key is turned to OFF, these features will continue to work for up to 10 minutes. If either dooris open and the ignition key is off, these features will continue towork until both doors have been closed for about30 seconds or until the
The power door lock function will work at all times except during Lockout Prevention (if this feature is enabled). See???Lockout Prevention??? in the Index.
Mirrors
Inside Daymight Rearview Mirror
An inside rearview mirror is attached to your windshield. The mirror has pivotsso that you can adjust it.
You can adjust the mirror for day or night driving. Pull the tab for night driving to reduce glare. Push the tab for daytime driving.
Outside Manual Adjustable Mirror
Adjust the passenger???s side outsidemirror by hand so that you can just see the side of your vehicle when you are sitting in a comfortable drivingposition.

Manual Remote Control Mirror
Adjust the driver???s side outsidemirror with the lever on the door. Adjust the mirror so that you can just see the side of your vehicle when you are sittingin a comfortable driving position.
Power Remote Control Mirror
(If Equipped)
The power mirror control ison the driver???s door. To adjust eithermirror, turn the switch to left(L) or right (R). Then usethe control to adjustthe mirror.
Convex Outside Mirror
Your passenger???s side mirror is convex.A convex mirror???s surface is curved so you can see more from the
driver???s seat.
could hita vehicle on your right. Check your inside mirror or glance over your shoulder before changing lanes.


Removing the
1.Close the panel. If the
2.Pull the panel toward you to unsnap it. Then slide the
Reverse the steps to installthe panel.
When carrying large or heavy items, it isa good idea to open the panel and place the items in the rear area.
An improperly

Ashtray and Lighter
Lift up the cover toopen the ashtray. To remove it, lift up on the right side of the ashtray. If you have an automatic transmission, the ashtray is near the front of your console. If you have a manual transmission, the ashtray is near your cupholder.
NOTICE:
Don???t put papers and otherthings that burninto your ashtrays. If you do,cigarettes or other smoking materials could set them on fire, causing damage.
To use the lighter, push it in all the way and let go. When it???s ready, it will pop back by itself.
NOTICE:
Don???t hold a cigarette lighter in with yourhand while it is heating. If you do,it won???t be able to back awayfrom the heating element when it???s ready. That can make it overheat, damaging the lighter and the heating element.
If you plug accessories into your cigarette lighter, such as heating devices or air compressors, theseaccessories should have a rated current of less than 15 amps.
Exceeding this limit will result in a blown fuse.
Sun Visors
To block out glare,you can swing down the visors. You can also swing them to the side. The elasticbands on your visor provide extra storage formaps or papers.
Covered Visor Vanity Mirror
Pull down the sun visor and lift thecover to expose the vanity mirror.
Accessory Plug
This plugis located inside the front sectionahead of the shift lever in the console. The plug can be used to connect electricalequipment such as a cellular phone or CB radio. Ee sure to follow theinstallation instructions included with the equipment.
The plug has three separate wires:
0 The orange wire connects tothe battery.
0The pink wire connects tothe ignition. Power is only available with the ignition in the RUN position.
0 The black wire connects to the ground.
I NOTICE:
When using the accessory plug:
0The maximum load of any electrical equipment should not exceed three amps.
0Be sure to turn off any electrical equipment when not in use. Leaving electrical equipment on for extended periodscan drain your battery.
We recommend that yousee a qualified technician or your dealer for the proper installationof your equipment.

Floor Mats
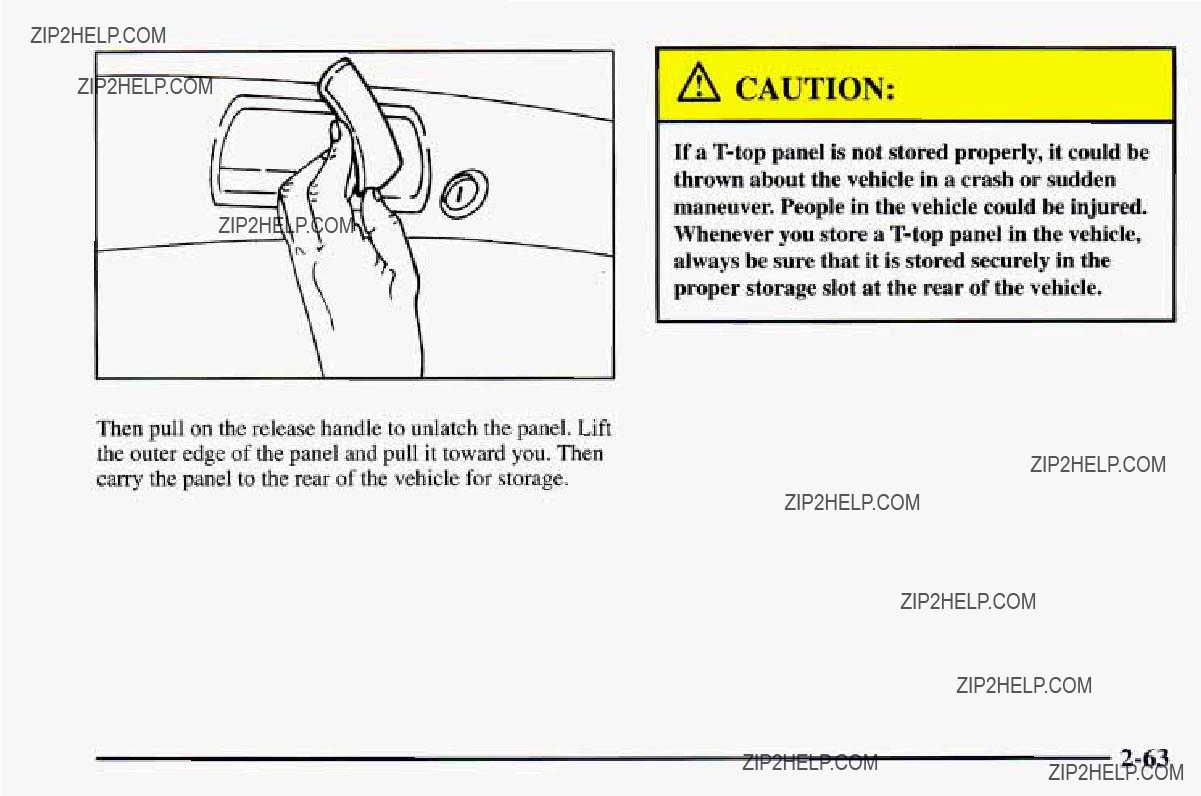
' A CAUTION:
II
If a
Then pull on the release handle tounlatch the panel. Lift the outer edge of the panel andpull it toward you. Then carry the panelto the rear of the vehicle for storage.


Reverse the steps toremove the
1.When installing the panelsto the roof,keep the outboard edgeof the panel raised about3 inches above theroof while placing the inboard edgeof the panelunder the center roof rail.
2.After the inboard edgeof the panel is in position under the centerroof rail, lower the outboard edge of the panel into position, close the latch andlock the
I NOTICE:
Do not attempt to install the panels by sliding them horizontally towards the center roof rail. Doing so may cause the weatherstrips to be aligned improperly, which may result in leaks and possible damage to the weatherstrips.

An improperly installed
NOTICE:
High pressure car washes may causewater to enter your vehicle. Neverspray water directly at the roof paneljoints, This will cause leaks.
1.Start with the panel marked DRIVER FRONT. Unlatch the driver???s side
2.With the topraised and resting on the center roof rail, slide the flat edgeof the sunshade panel (with the vinyl side to the glass) between the glass and plastic trim, making sure the edgemarked DRIVER FRONT is pointing to the frontof the vehicle.

3.Open the latch and close the
4.Once the sunshade is installed properly, you can stick the Velcro@buttons on theglass for a proper fit every time you install the sunshades. To do this, first remove the
5.Pull the sunshade back a little and remove the backing paper
6. Install

You can store the sunshades twodifferent ways:
When the
@When you have the
Convertible Top
The following procedures explain the proper operation of your convertible top.
Lowering Your Convertible Top
NOTICE:
Don???t leaveyour convertible out with the top down for any long periodsof time. Thesun and the rain can damageyour seat material and other things insideyour vehicle.
1.Park on a level surface. Set the parking brakef d y . Shift an automatic transmission into PARIS (P) or a manual transmission into REVERSE (R). The ignition must be in the ACC or RUN position. Lower both sun visors.
I NOTICE:
Don???t lowerthe top if it is damp orwet. When the top is down,trapped water can cause stains, mildew and damage to the inside of your vehicle. Be sure to dry off the top before you lower it.
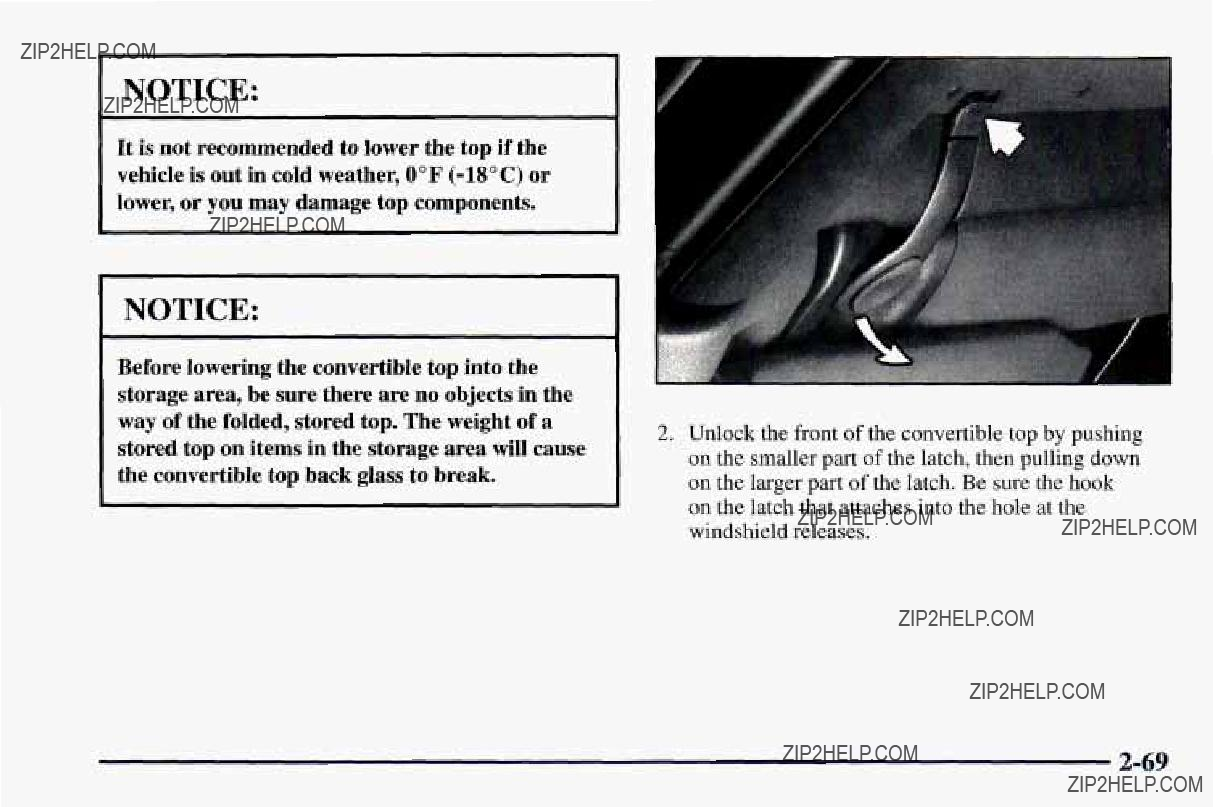
[ NOTICE:
It is not recommended to lower the top if the vehicle is out incold weather,0??F
NOTICE:
Before loweringthe convertible top into the storage area, be sure thereare no objects in the way of the folded, stored top. The weight of a stored top on items in thestorage area will cause the convertible top back glass to'break.
2.Unlock the front of the convertible topby pushing on the smaller part of the latch,then pulling down on the larger part of the latch.Be sure the hook on thelatch that attaches into the hole at the windshield releases.

3.Be sure no one or nothing is on or around the top. Pushandhold DOWN or ontheconvertibletop switch. The switch is on the console near the cigarette lighter. The top will automaticallylower into the storage area.
Installing the Boot Cover
After lowering the convertible top, you???ll want to install the boot cover. The
1.Open the trunk and remove the two side covers from the storage bag.
2.Install the two side covers by engaging the tab into the front seatbelt cover. Lower the covers onto the vehicle.
Raising Your Convertible Top
1. Park on a levelsurface. Set theparking brake firmly. If you have an automatic transmission, shift into PARK (P). If you have a manual transmission, shift into REVERSE(R).The ignitionmust be in the
ACC or RUN position or RAPmust be on. Then lower both sun visors and lower both windows at least 3 inches (8 cm). If the boot cover is in place, it must beremoved first.
3.Install the middle secuonof the coverby sliding the tabs into the slotson the right sidecover. Lower the cover and engage the latch.
4.Close the trunk.
2. Open the trunk. Remove the middle pieceof the cover by pushing in on the latch and liftingup on the cover.
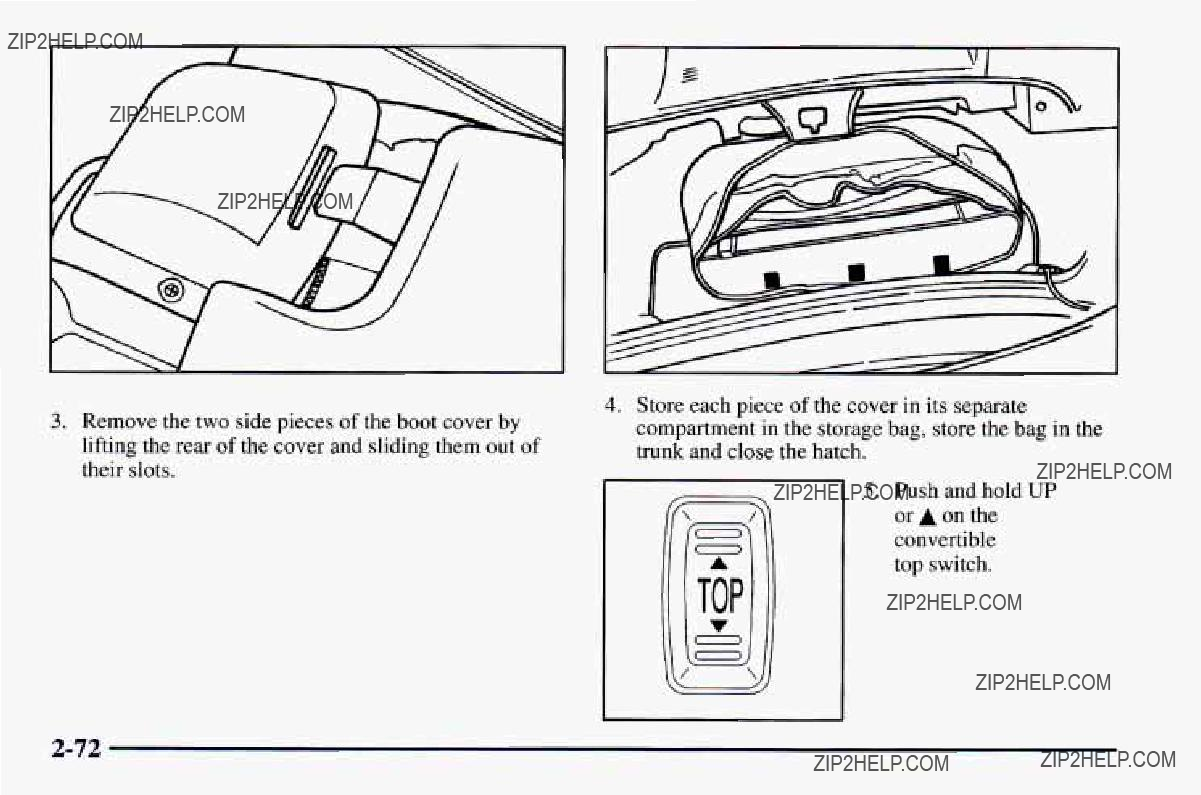
r
3.Remove the two side piecesof the boot cover by lifting the rear of the coverand sliding them out of their slots.
4.Store each piece of the cover in its separate compartment in the storagebag, store thebag in the trunk and close the hatch.
5.Push and hold UP or A on the convertible
top switch.
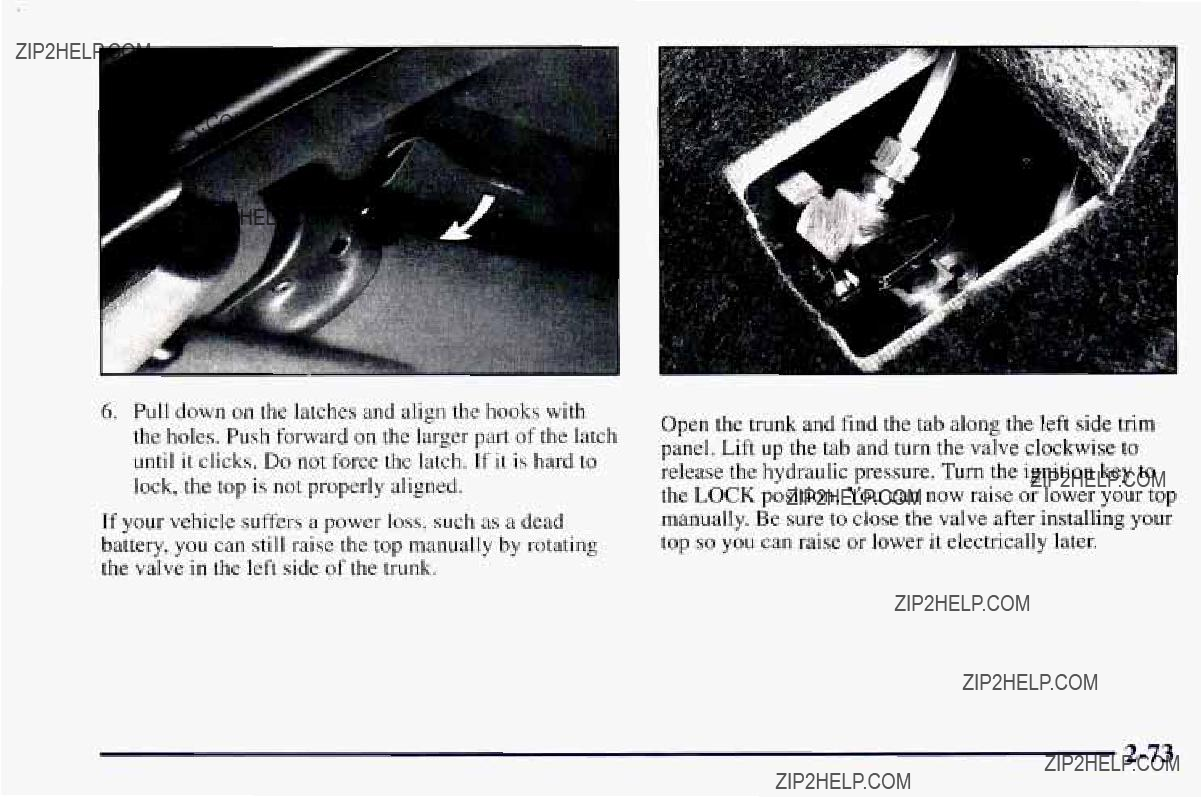
6.Pull down on the latches and align the hooks with the holes. Push forward on the larger part of the latch until it clicks.Do not force the latch. If it is hard to lock, the top is not properly aligned.
If your vehicle suffersa power loss, such as a dead battery, you can still raise the top manually by rotating the valve in the left side of the trunk.
Open the trunk and find the tab alongthe left side trim panel. Lift up the tab and turn the valve clockwise to release the hydraulic pressure. Turn the ignition key to the LOCK position. You can now raise orlower your top manually. Be sure to closethe valve after installing your top so you can raise or lower it electrically later.

Instrument Panel
I
A.Air Vents
B.Main Light Control
C.InstrumentCluster
D.Fog Lamp Switch (If Equipped)
E.Acceleration Slip Regulation (ASR) Switch or Second Gear Start Switch(If Equipped)
EAudio System G. Comfort Controls
H.Glove Box I. Cupholders
J.Parking Brake Lever
K.Storage Console
L.Shift Lever
M.Convertible Top Switch (If Equipped)
N. Rear Window Defogger Switch
0. Horn
P.Remote Hatch Release
Q.Cigarette Lighter
R.Ashtray

Instrument Panel Cluster
Your instrument cluster is designed to let you you???re going, your engine???s rpms, abouthow drive safely and economically.
know at a glancehow your vehicle is running.You???ll know how fast much fuel you have left and many other things you???ll need to know to

Speedometer and Odometer
Your speedometer lets you see your speed in both miles per hour (mph) and kilometers per hour (km/h). Your odometer shows how faryour vehicle has been driven, in either miles (used in theUnited States) or kilometers (used in Canada).
You may wonder what happens if your Chevrolet needs a new odometer installed.If possible, the newone has tobe set to the same reading the old one hadIf.it can???t be, then it???s set at zero, but a label on the driver???s door must show the old reading and whenthe new one was installed.
D i p Odometer
The trip odometer can tell you how faryour car hasbeen driven since you last set the trip odometer to zero.
To set the trip odometer to zero, press the knob.
Tachometer
The tachometer displays the engine speed in thousands of revolutions per minute (rpm).
NOTICE:
Do not operate the engine with the tachometer in the red area, or engine damage may occur.
Warning Lights, Gages and Indicators
This part describes the warning lights and gages that may be on your vehicle.The pictures will helpyou locate them.
Warning lights and gages can signal that something is wrong before it becomes serious enough to cause an expensive repair or replacement. Paying attention to your warning lights and gages could also save you or others from injury.
Warning lights come on whenthere may be or is a problem with oneof your vehicle???s functions.As you will see in the details on the next few pages, some warning lights come on briefly when youstart the enginejust to let you know they???re working.If you are familiar withthis section, you should notbe alarmed whenthis happens.
Gages can indicate when there may be oris a problem with one of your vehicle???s functions. Often gages and warning lights work together to let you know when there???s aproblem with your vehicle.
When oneof the warning lights comes on and stays on when you are driving, or when one of the gages???shows there may be a problem, check the section that tells you what to do about it. Please follow this manual???s advice. Waiting to do repairs can becostly
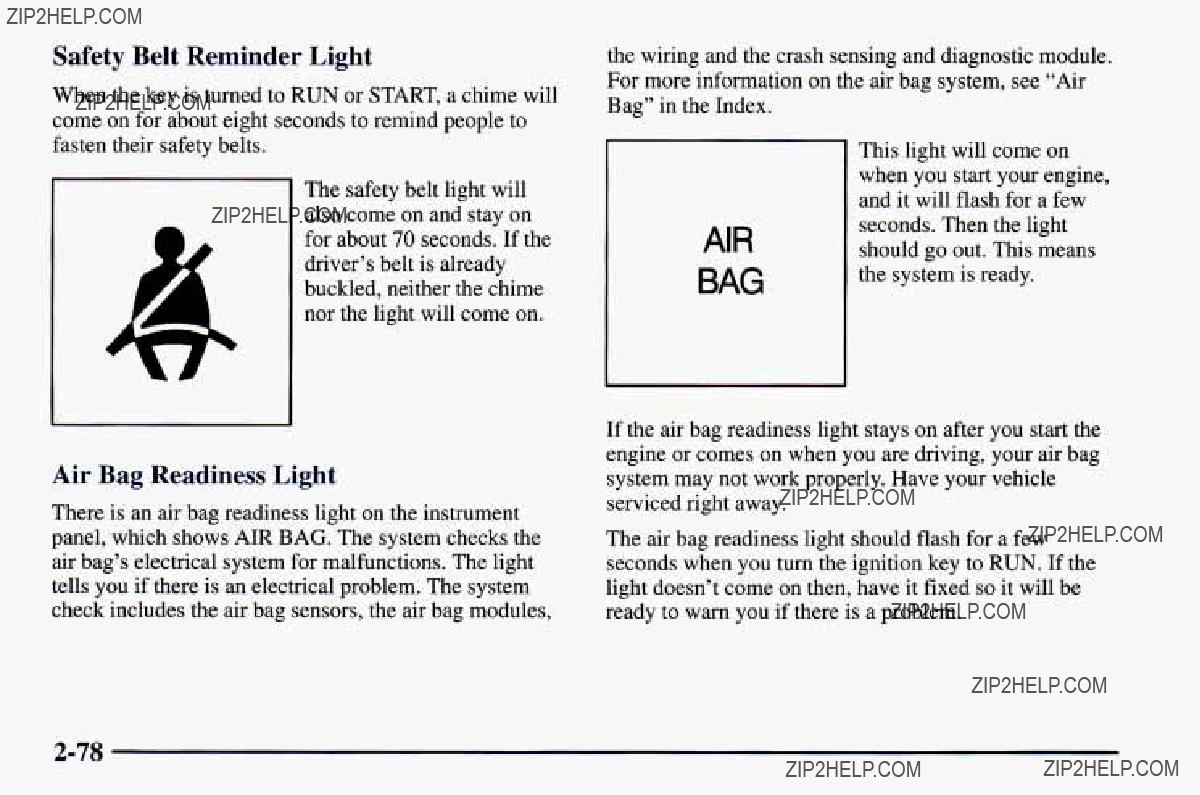
Safety Belt Reminder Light
When the key is turned to RUN or START, a chime will come on for about eight secondsremindto people to fasten their safety belts.
The safety belt light will also comeon and stay on for about70 seconds. If the driver???s belt is already buckled, neither the chime nor the lightwill come on.
Air Bag Readiness Light
There isan air bag readiness light on the instrument panel, which shows AIR BAG. The system checks the air bag???s electrical system for malfunctions. The light tells you if there isan electrical problem. The system check includes the air bag sensors, the airbag modules,
the wiring and the crash sensing and diagnostic module. For more information on the air bag system, see???Air Bag??? in the Index.
If the air bag readiness light stays on after you start the engine orcomes on when you are driving,your air bag system may not work properly. Have your vehicle serviced right away.
The air bag readiness light should flash for a few seconds when you turn the ignition key to RUN. If the light doesn???t come on then, haveit fixed so it will be ready to warn you if there isa problem.
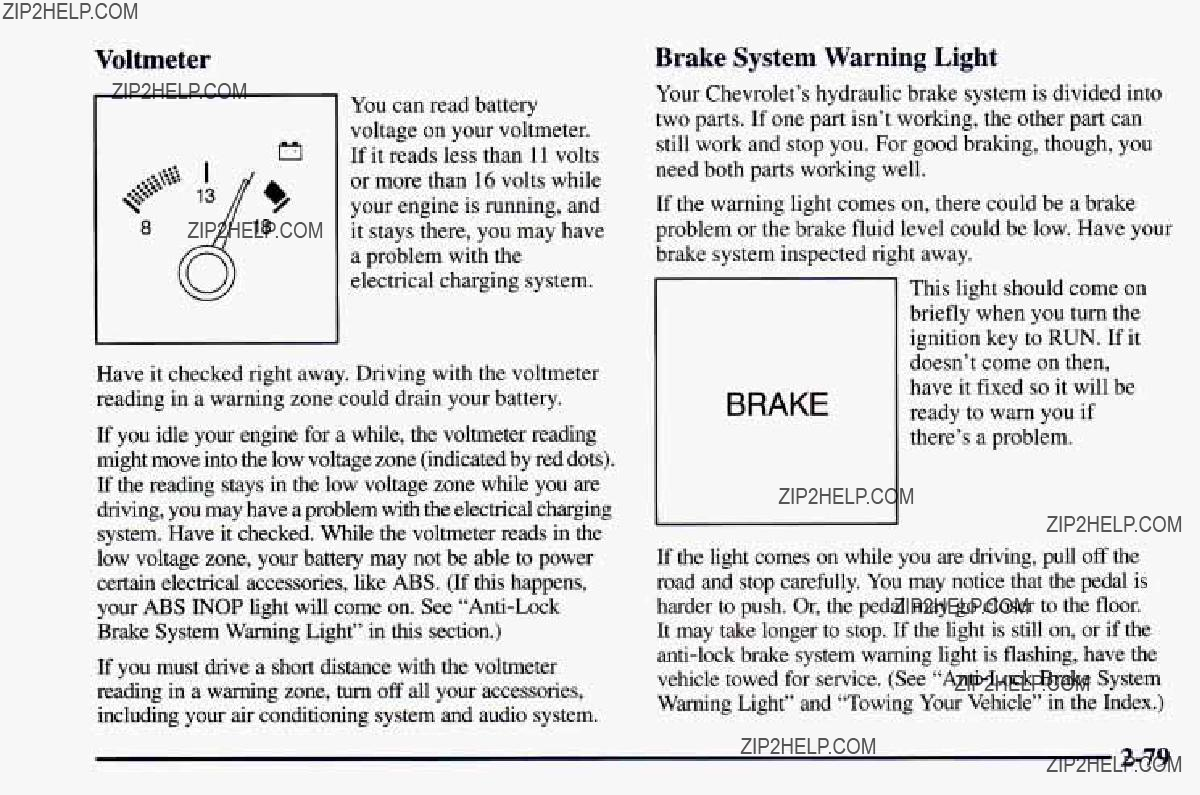

Your brake system maynot be working properly if the brake system warning light is on. Driving with the brake system warning light oncan lead to anaccident. If the light is still onor if the
When the ignition is on, the brake system warning light will also come on when you set your parking brake. The light will stay on if your parking brake doesn???t release fully. If it stays on after your parking brake is fully released, it means you have a brake problem.
If the light flashes when you???re driving, you don???t have
Your regular brake system maynot be working properly if
If the
The
ASR (Acceleration Slip Regulation) System
Warning Light(If Equipped)
If it stayson, or comes on when you???re driving, there may be a problem with your ASR system and your vehicle may need service. When thiswarning light is on, the system will not limit wheel spin. Adjust your driving accordingly.
If your brakes begin to overheat, the brake portion of the ASR system will shut down, but the throttle and engine spark control will continue to work. The warning light will not come on when this happens.
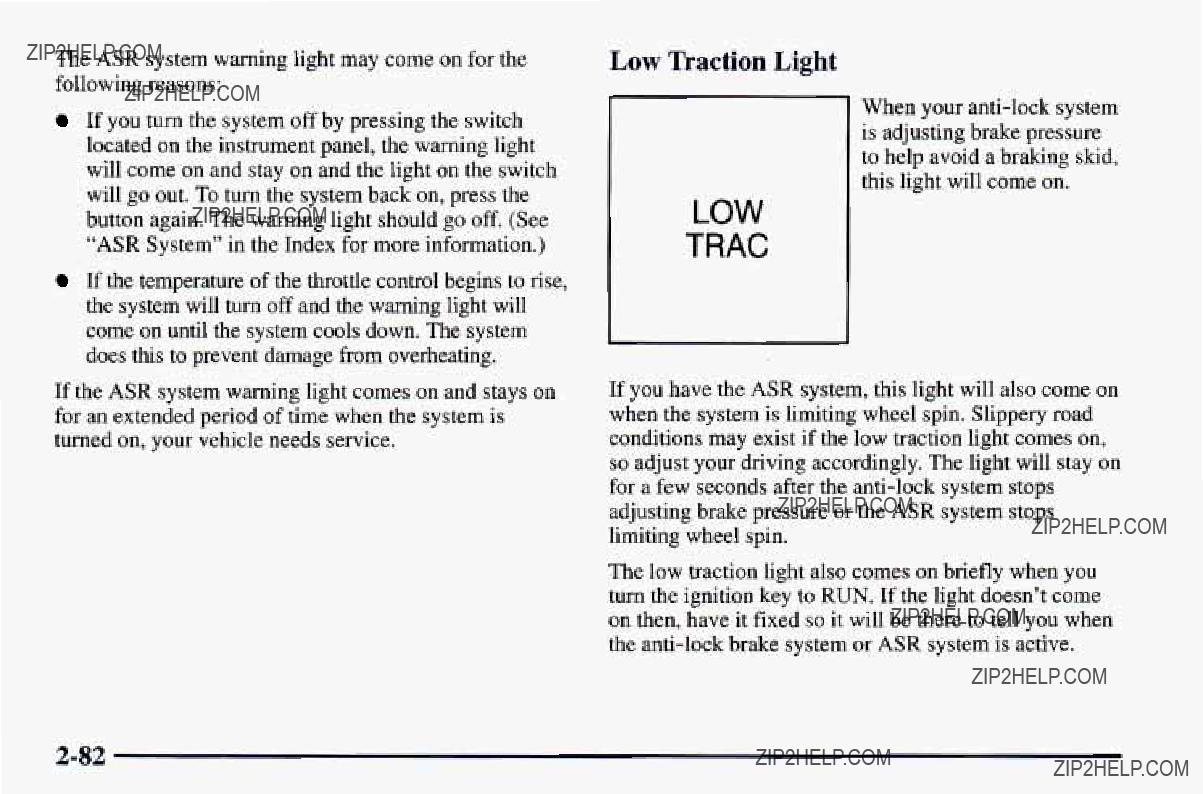
The ASR system warning light may come on forthe following reasons:
If you turn the system off by pressing the switch located on the instrument panel, thewarning light will come on and stay on and the lighton the switch will go out. To turn the system back on, press the button again. Thewarning light should go off. (See ???ASR System??? in the Index for more information.)
If the temperature of the throttle control begins to rise, the system will turn off and the warning light will come on until the system cools down. The system does this to prevent damage from overheating.
If the ASR system warning light comes on and stays on for an extended period of time when the system is turned on, your vehicle needs service.
Low Traction Light
When your
LOW
TRAC
If you have the ASR system, this light will also come on when the system is limiting wheel spin. Slippery road conditions may exist if the low traction light comes on, so adjust your driving accordingly. The light will stay on for a few secondsafter the
The low traction light also comes on briefly when you turn the ignition key to RUN. If the light doesn???t come on then, have itfixed so it will be thereto tell you when the

Engine Coolant TemperatureGage
Low Coolant Light (V8 Engine)
If you have been operating your vehicle under normal driving conditions,you should pull off the road, stop your vehicle and turn off the road as soon as possible.
In ???Problems on theRoad??? this sectionshows what to do. See ???Engine Overheating??? in the Index.
Your Camaro is equipped with a LOW COOLANT indicator that is designed to detectwhen the coolant level drops below the set limit. If the low coolant level sensor (on the radiator) detects that the level dropswhile the engine is running, theLOW COOLANT indicator will light and remain lit until the ignition switch is turned to the OFF position. Check the coolant leveland add coolant as needed.

The LOW COOLANT light might stay on after filling the radiator. Turn the ignition switch to the OFF position, then restart the engineto verify that the LOW COOLANT light goes out. See ???Engine Coolant?????? in the Index.
NOTICE:
Driving with theLOW COOLANT light on could cause your Chevroletto overheat. See ???Engine Overheating???in the Index.Your Chevrolet
could be damaged, andit wouldn???t be covered by your warranty.
Malfunction Indicator Lamp
(Service Engine Soon Light)
Your Chevrolet is equipped with a computer which monitors operation of the
SERVICE fuel, ignition and emission ENGINE control systems.
SOON
This system is called OBD I1

NOTICE:
If you keep driving your vehicle with this light on, after a while, your emission controls may not work as well, your fuel economy may not asbe good and your engine may not runassmoothly. This could leadto costly repairs thatmay not be covered by your warranty.
This light should come on,as a check toshow you it is working, when the ignition ison and the engine is not running. If the light doesn???t comeon, have itrepaired.
This light will also comeon during a malfunctionin one of two ways:
0Light
0Light On
If the LightIs Flashing
The followingmay prevent more serious damageto your vehicle:
0 Reducing vehicle speed.
0 Avoiding hard accelerations.
0 Avoiding steep uphill grades.
0If you are towing a trailer, reduce the amount of cargo being hauled as soon as it is possible.
If the light stops flashingand remains on steady, see ???If the Light Is On Steady??? following.
If the light continues to flash,when it is safeto do so, stop the vehicle. Find a safe place topark your vehicle. Turn the key off, wait at least 10 seconds and restart the engine. If the light remains on steady, see ???If the Light Is On Steady?????? following. If the light is still flashing, follow the previous steps, and drive the vehicleto your dealer or qualified service center for service.

If the Light Is On Steady
You may be able to correct the emission system malfunction by considering the following:
Did you recently put fuel intoyour vehicle?
If so, reinstall the fuel cap,making sure to fully install the cap. The diagnosticsystem can determine if the fuel cap has been left off or improperly installed. A loose or missing fuel capwill allow fuelto evaporate intothe atmosphere. A few driving trips with the cap properly installed should turn the light off.
Did you just drivethrough a deeppuddle of water?
If so, your electrical system may be wet. The condition will usually be corrected when the electrical system dries out.A few driving trips should turn the light off.
Are you low on fuel?
As your engine starts torun out of fuel, your engine may not run as efficiently as designed since smallamounts of air aresucked into the fuel line causing amisfire. The system can detect this. Adding fuel should correct this condition. Make sure to install the fuel capproperly. It will take afew driving trips to turn the lightoff.
Have you recently changed brands of fuel?
If so, be sureto fuel your vehicle with quality fuel (see ???Fuel??? in the Index). Poor fuel quality will cause your engine not to run as efficiently as designed. You may notice this as stalling after
If you experience one ormore of these conditions, change the fuel brand you use. It will require at least one full tank of the proper fuel to turn the light off.
If none of the above steps have made the light turn off, have your dealer orqualified service centercheck the vehicle. Your dealer has the proper test equipment and diagnostic tools to fix any mechanical or electrical problems that may have developed.
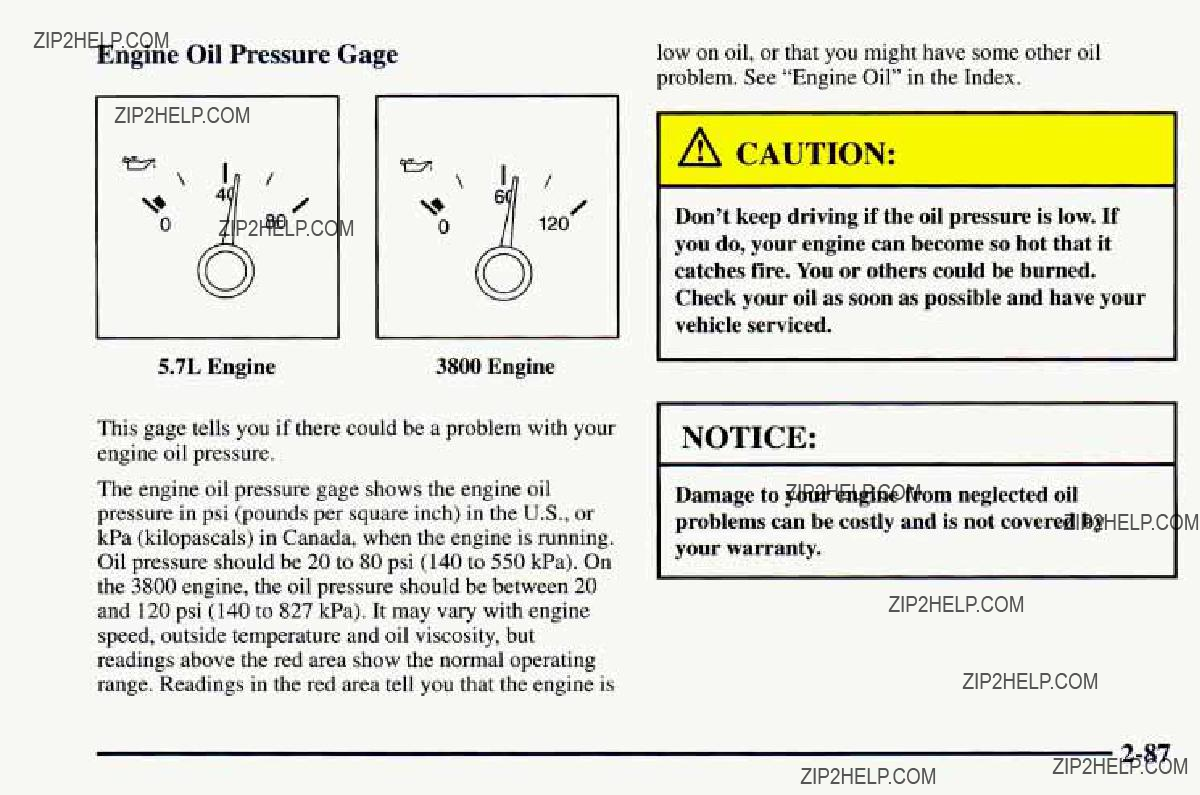
Engine Oil Pressure Gage
This gage tells you if there could be a problem with your engine oilpressure.
The engine oil pressure gage shows the engine oil pressure in psi (pounds per square inch) in the U.S., or kPa (kilopascals) in Canada, when the engine isrunning. Oil pressure should be 20 to 80 psi (140 to 550 kPa). On the 3800 engine, the oil pressure should be between 20 and 120 psi (140 to 827 kPa). It may vary with engine speed, outside temperature and oil viscosity, but readings above the red area show the normal operating range. Readings in the red area tell you that the engine is
low on oil, orthat you might have some other oil problem. See ???Engine Oil??? in the Index.
Don???t keep driving if the oil pressure is low. If you do,your engine can become so hot that it catches fire. You or others could beburned.
Check your oil as soon as possible and have your vehicle serviced.

Low Oil Light
LOW OIL
This warning light will come on briefly when you are startingthe engine. If the light comes on and stays on while you are driving, check your gages to
see if they are in the warning areas.
If the light stays on after startingyour engine, your engine oil level may be too low. You may need to add oil. See ???Engine Oil??? in the Index.
NOTICE:
The oil level monitoring systemonly checks the oil level when youare starting yourengine. It does not keep monitoring thelevel once the engine is running. Also, the oil level check only works when the engine has been turnedoff long enough for theoil to drain back into theoil pan.
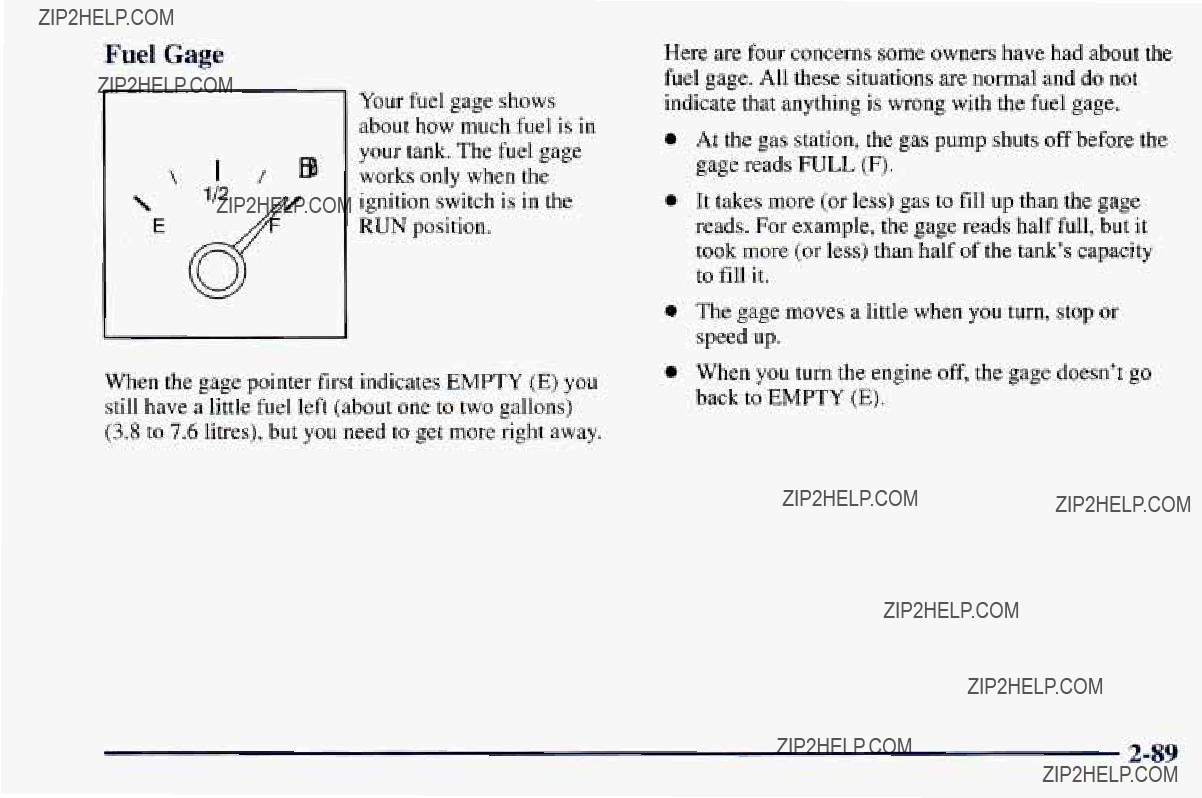
Fuel Gage
When the gagepointer first indicatesEMPTY (E) you still have a little fuelleft (about one to two gallons) (3.8 to 7.6 litres), but you need to get more right away.
Here are four concerns someowners have had about the fuel gage. All these situations arenormal and do not indicate that anything is wrong with the fuel gage.
aAt the gas station,the gas pump shuts off before the gage readsFULL (F).
0It takes more (or less) gas to fillup than thegage reads. For example, the gage readshalf full, but it took more (or less)than half of the tank???s capacity to fill it.
aThe gage moves a littlewhen you turn, stop or speed up.
0When you turn the engine off, the gage doesn???t go back to EMPTY (E).
b NOTES
Section 3 Comfort Controlsand Audio Systems
In this section,you???ll find outhow to operate the comfort control and audio systems offered with your Chevrolet. Be sureto read about the particularsystems supplied with your vehicle.
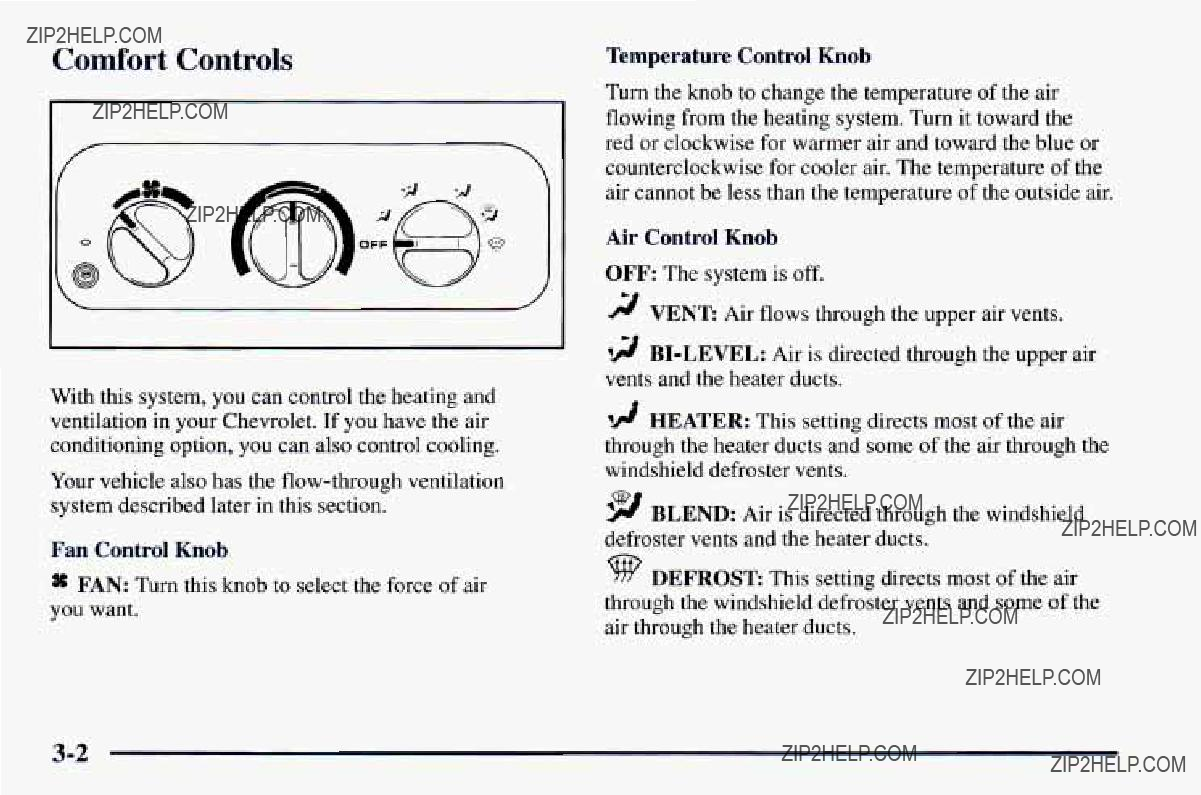
Comfort Controls
\ @
With this system, you can control theheating and ventilation in your Chevrolet. If you have the air conditioning option, you can also control cooling.
Your vehicle also has the
Fan Control Knob
* FAN: Turn this knob to select the force of air you want.
Temperature Control Knob
Turn the knob to change the temperature of the air flowing from the heating system. Turn it toward the red or clockwisefor warmer air and toward the blue or counterclockwise for coolerair. The temperature of the air cannot be lessthan the temperature of the outside air.
Air Control Knob
OFF: The system is off.
2 VENT: Air flows through the upper air vents.
12
' ! ! HEATER: This setting directs most of the air through the heater ductsand some of the air through the windshield defroster vents.
9 BLEND: Air is directed through the windshield defroster vents and the heater ducts.
DEFROST: This setting directs most of the air through the windshield defroster vents and some of the air through the heater ducts.

Air Conditioning (If Equipped)
I
The air conditioningsystem uses the same controls as the heating system, exceptthat the air control knob has two extra settings, describedbelow.
MAX: Provides maximum cooling or quick
A/C: Use for normal coolingon hot days. This setting
cools outside air and directs it through the upper air vents.
The air conditionercompressor operates in MAX, A/C,
Cooling
The air conditionerworks best if you keep your windows closed. On very hot days, openthe windows just long enough for the hot air to escape.
1.Turn the air controlknob to A/C for normal cooling. For faster coolingmove the knob to MAX.
2.Turn the temperature controlknob to a comfortable setting.
3.Turn the fan control knobto the desired speed.

Heating
The heater works best if you keep your windows closed while using it.
1.Turn the air control knob to HEATER.
2.Turn the fan control knob to the desired speed.
3.Turn the temperature control knob to a comfortable setting.
If your vehicle is equipped with an optional engine coolant heater, you can useit in cold weather
or lower) to improve heater performance on initial startup. Because an engine coolant heater warms theengine coolant, your vehicles heating systemcan more quickly and efficiently provide heatfor your vehicle???s passenger area. See ???Engine Coolant Heater??? in the Index.
You may want to use
1.Turn the air controlknob to
2.Turn the temperature control knob to a comfortable setting.
3.Turn the fan control knob to the desired speed.
Ventilation System
Adjust the directionof airflow by moving the louvered vents.
Your Chevrolet???s
For mild outside temperatures when little heating or cooling is needed, you can still direct outside air through your vehicle.
1.Turn the air control knob to VENT.
2.Turn the temperature control knob to a comfortable setting.
3.Turn the fan control knob to the desired speed.

Ventilation Tips
0Keep the hood and front air inlet freeof ice, snow, or any other obstruction(such as leaves). Theheater and defroster will work far better, reducing the chance of fogging the insideof your windows.
0When you enter a vehiclein cold weather, turn the fan control knob to the right forfewa moments
before driving off. This helps clear the intake ducts of snow and moisture,and reduces the chanceof fogging the insideof your windows.
0Keep the airpath under the front seats clearof objects. This helps air to circulate throughout your vehicle.
Defogging and Defrosting
1.Turn the air controlknob to DEFROST.
2.Turn the temperature control knobto the desired setting.
3.Turn the fan control knob to the desiredspeed. I
The sidewindow defogging works equally as well in the HEATER, BLEND and DEFROST modes.
Rear Window Defogger(If Equipped)
remove fog from the rear window.
Press the right sideof the switch to turn on the defogger. An indicator light will come onto remind you that the defogger is on.
The defoggerwill turn off automatically after aboutten minutes of use. If you turn it on again, thedefogger will operate for about fiveminutes only. You can also turn the defogger off by pressing the left sideof the switch.
Do not attach anything like atemporary vehicle license or a decal across the defoggergrid on the rear window.
NOTICE:
Don???t usea razor bladeor something else sharp on the insideof the rear window.If you do, you could cut or damage the warming grid, and the repairs wouldn???t be coveredby your warranty.

Audio Systems
Your Delco@audio system has been designed to operate easily and give yearsof listening pleasure. You will get the most enjoyment out of it if you acquaint yourself with it first. Find out what your Delco system can do and how to operate all its controls, tobe sure you???re getting the most out of the advanced engineering that went into it.
If you have power door locks, your vehicle has a feature called RetainedAccessory Power (RAP). With RAP, you can play your audio system even after the ignition is off. See ???Retained Accessory Power?????? in the Index.
Setting the Clock for Systems without Automatic Tone Control
Press SET. SET will appear on the display for five seconds. Within five seconds, pressand hold the right arrow on the SEEK button until the correctminute appears. Press and hold the left arrow on the SEEK button until the correcthour appears.
SettingtheClockfor Systl- with
Automatic Tone Contro,
Press and hold HR until the correct hour appears. Press and hold MN until the correctminute appears.
(If Equipped)
Playing the Radio
VOLUME: This knob turns the systemon and off and controls the volume.To increase volume and turnthe radio on, turn the knob clockwise.Turn it counterclockwise
to decrease volume.
RECALL: Display the time with the ignition off by pressing the RECALL knob. When the radio is playing, press this button to recall the station frequency.

Finding a Station
TUNE: Turn the lower knob to choose radio stations.
SEEK: Press the right orleft arrow to go tothe next higher or lower station and stay there.
PUSHBUTTONS: The four numbered pushbuttonslet you return to your favorite stations.You can set up to
21 stations (seven AM, seven FMl, and seven EM2 ). Just:
1.Press
2.Tune in the desired station.
3.Press SET. (SET will appear on the display.)
4, Press and hold one of the four numbered buttons, within five seconds. Thesound will mute. When it returns, releasethe button. Whenever you press that numbered button, the station you set will return.
5. Repeat the steps for each pushbutton.
In addition to the four stations already set,up to three more stations may be preset on each band by pressing two adjoiningbuttons at thesame time. Just:
1.Tune in the desired station.
2.Press SET. (SET will appear on the display.)
3.Press any two adjoining pushbuttonsat the same time, within five seconds. Thesound will mute. When it returns, release the buttons. Whenever you press the same buttons, thestation you set will return.
4.Repeat the steps foreach pair of pushbuttons.
P.SCAN: Press both SEEK arrows and P.SCAN will appear on the display. Use P.SCAN to listen to each of your preset stations for a few seconds. The radiowill go to the firstpreset station stored on your pushbuttons, stop for afew seconds, then go on to the next preset station. (If a preset station has weak reception, itwill not stop.) Press eitherSEEK arrow or the upper knob to stop scanning.
Setting theTone
BASS: Slide the lever up or down to increase or decrease bass.
TREB: Slide thelever up or down to increase or decrease treble.If a station is weak or noisy, you may want to decrease the treble.
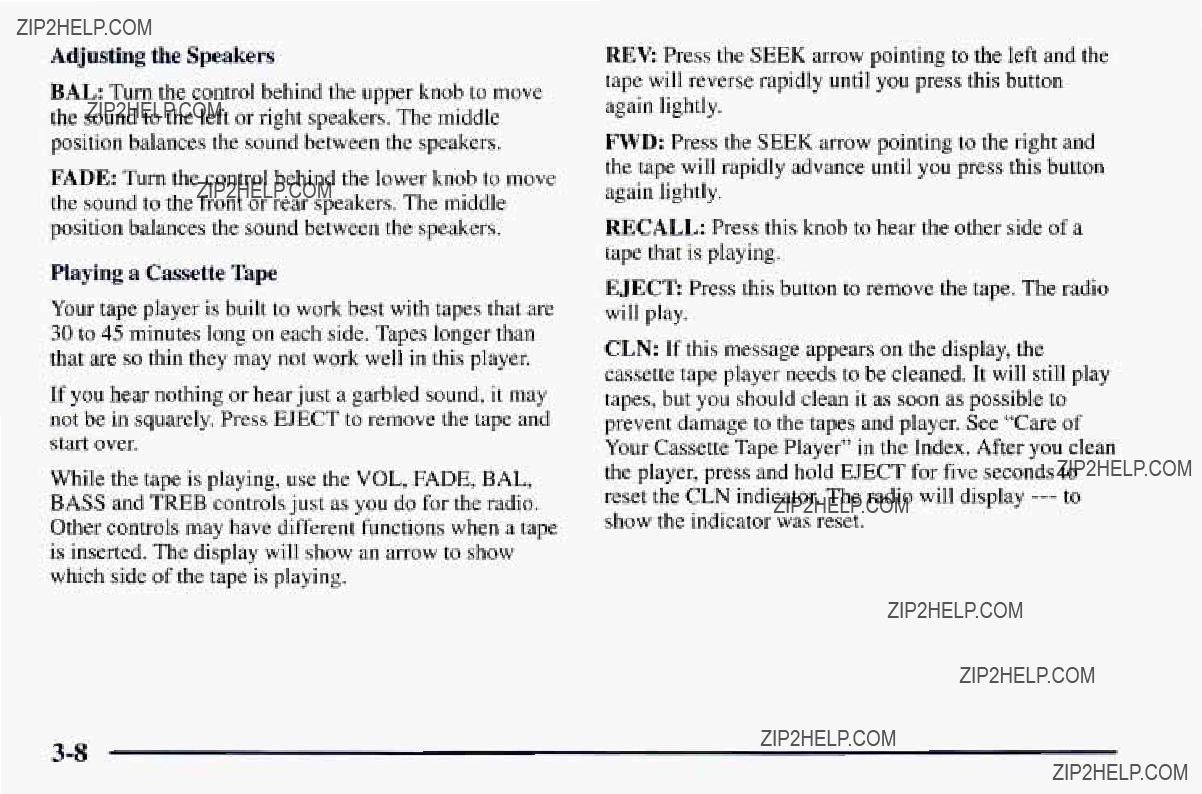
Adjusting the Speakers
BAL: Turn the control behind the upper knob to move the sound to the left or right speakers. Themiddle position balances the sound between the speakers.
FADE: Turn the control behind the lower knob to move the sound to the front or rear speakers. The middle position balances the sound between the speakers.
Playing a Cassette Tape
Your tape player is built to work best with tapes that are 30 to 45 minutes long on each side. Tapes longer than that are so thin they may not work well in this player.
If you hear nothing or hear just a garbled sound, it may not be in squarely. Press EJECT toremove the tape and start over.
While the tape is playing, use the VOL, FADE, BAL, BASS and TREB controls just asyou do for the radio. Other controls may have different functions when a tape is inserted.The display will show an arrow to show which side of the tape is playing.
REV Press the SEEK arrow pointing to theleft and the tape will reverse rapidly until you press this button again lightly.
FWD: Press the SEEK arrow pointing to the right and the tape will rapidly advance until you press this button again lightly.
RECALL: Press this knob to hear the other sideof a tape that is playing.
EJECT Press this button to remove the tape. The radio will play.
CLN: I f this message appears on the display, the cassette tape player needs to be cleaned.It will still play tapes, but you should clean it as soon as possible to prevent damage to the tapes and player. See ???Care of Your Cassette Tape Player??? in the Index. After you clean the player, press and hold EJECT for five seconds to reset the CLN indicator. The radio will display
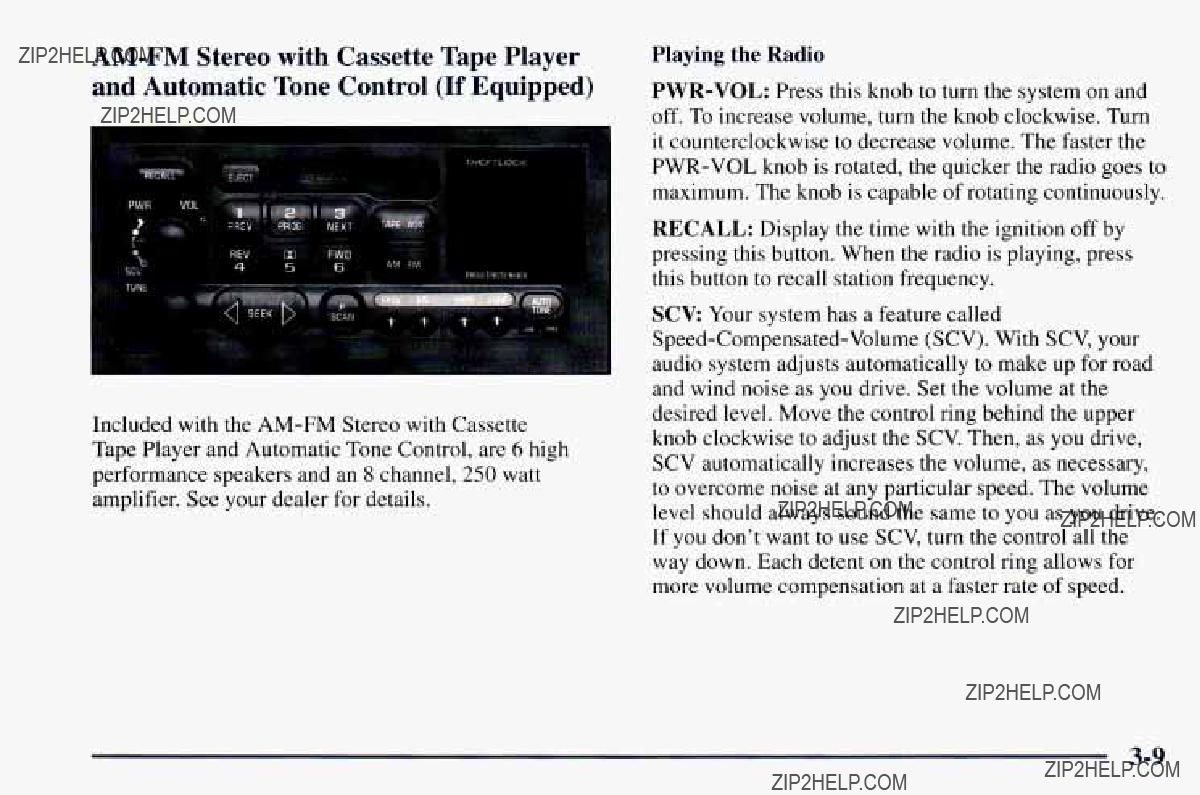
Included with the
Playing the Radio
RECALL: Display the timewith the ignition off by pressing this button. When the radio is playing, press this button to recall station frequency.
SCV Your system has a feature called

Finding a Station
TUNE: Press this knob lightly so it extends. Turn it to choose radio stations. Push the knob back into itsstored position when you???re not using it.
SEEK: Press the right or leftarrow to goto the next higher or lower station. The sound will mute while seeking.
SCAN: Press and hold SEEK for two seconds until SCAN appearson the display. SCAN allowsyou to listen to each station for a few seconds. The radiowill go toa station, stop fora few seconds,then go on to the next station. Press SEEK again to stop scanning. The sound will mute while scanning.
PUSHBUTTONS: The six numbered pushbuttons let you return to your favorite stations.You can set up to 18 stations (six AM, six FM 1 and six FM2). Just:
1.Press
2.Tune in the desired station.
3.Press AUTO TONE to select the equalization that best suits the type of station selected.
4.Press and hold one of the sixnumbered buttons. The sound will mute. When it returns, release thebutton. Whenever you press that numbered button, the station you set will return and the AUTO TONE equalization that you selected will also be automatically selected for thatbutton.
5 . Repeat the steps for each pushbutton.
P.SCAN: Press this button to listen to each of your favorite stations stored on your pushbuttons fora few seconds. Theradio will scan through each of the stations stored on your pushbuttons, except those stations with weak reception. The AUTO TONE setting stored for that pushbutton will be automatically chosen. Press P.SCAN or one of the pushbuttons again to stop scanning. P.SCAN will be displayedwhenever the tuner is in the P.SCAN mode. The channelnumber
Setting the Tone
BASS: Press this knob lightly so it extends. Turn the knob clockwise to increase bass and counterclockwise to decrease bass. When you use this control, the radio???s AUTO TONEsetting will switch to manual.
TREB: Press this knob lightly so it extends. Turn the knob clockwise to increase treble and counterclockwise to decrease treble. When you use this control, the radio???s AUTO TONEsetting will switch to manual. If a station is weak or noisy, you may want to decrease the treble.
Push these knobs back into their stored positions when you???re not using them.
AUTO TONE:This feature allows you to choose preset bass and treble equalization settings designed for classical, news, rock, pop, country/western and jazz stations. C/W will appear on thedisplay when you first press AUTO TONE.Each time you press it, another setting will appear on the display. Press it again after JAZZ appearsand the AUTO TONEdisplay will go blank. Tone control will return to the BASS and TREB knobs. Also, if you use the BASS and TREB knobs, control will return to them and the AUTO TONE display will go blank.
Adjusting the Speakers
BAL: Press this knob lightly so it extends.
Turn the knob clockwise for the right speakers and counterclockwise for the left speakers. The middle position balances the sound between the speakers.
FADE: Press this knob lightly so it extends. Turn the knob clockwise to adjust the sound to the front speakers and counterclockwise for the rear speakers. The middle position balances the sound between the speakers.
Push these knobs back into their stored positions when you???re not using them.
Playing a Cassette Tape
Your tape player is built to work best with tapes that are 30 to 45 minutes long on each side. Tapes longer than that are so thin they may not work well in this player. If a tape is inserted when the ignition is on but the radio is off, the tape will begin playing. A tape symbol is shown in the center of the graphic display whenever a tape is inserted. When a tape is active, the tape symbol will be accompanied by a direction arrow.
NEXT (3): Pressthis button or the SEEKright arrow to search for the next selection on the tape. If you hold the button or press it more than once, the player will continue moving forward through the tape. Your tape must have at least three seconds of silence between each selection for NEXT or SEEKto work. The tape direction arrow blinks during NEXT w SEEK operation. The sound will mute during m X T or SEEK operatioir, Press this button or one of the SEEK arrows again to return to normal play.
REV (4): Press this button to reverse the tape rapidly. Press it again to return to playingspeed. The radio will play the
CRI (5): Press this button to reduce background noise. Note that the
Dolby@Noise Reduction is manufactured under a license from Dolby Laboratories Licensing Corporation. Dolby and the
FWD (6): Press this button to advance quickly to another part of the tape. Press the button again to return to playing speed. The radio will play the
TAPE AUX: Press thisbutton to changeto the tape function when the radio is on. The tape symbol with an arrow will appear on the display when the tape is active. If your system is equipped with a remoteplayback device, pressing thisbutton a second time will allow the remote device to play.
EJECT: Press thisbutton to remove the tape. The radio will play. EJECT may be activatedwith either the ignition or radio off. Cassettesmay be loaded with the radio off if this button is pressed first.
CLN: If this message appears on the display, the cassette tapeplayer needs to be cleaned. It will still play tapes, but you should cleanit as soon as possible to prevent damage to the tapes and player. See ???Care of Your Cassette Tape Player??? in the Index. After you clean the player, press and hold EJECT for fiveseconds to reset the CLN indicator. The radio will display
CD Adapter Kits
It is possible to usea CD adapter kit with your cassette tape player after activatingthe bypass feature on your tape player.
To activate the bypass feature, the ignition must beon. Turn your radiooff. Press TAPE AUX and hold for three seconds. After three seconds, the tape symbolon the display will flash for two seconds indicating the feature is active. Turn the radio on and insert the adapter.
This override featurewill remain active until EJECT is pressed.
Trunk Mounted CD Changer
With the optional compact disc changer, you can play up to 12 discs continuously. Normal size discsmay be played using the trays supplied in the magazine. The small discs (8 cm) can be played only with specially designed trays.
NOTICE:
Objects in the trunk which may shift or slide during driving could damage yourCD changer. Protect yourCD changer by using the convenience net whenever possible. Place large objects in the trunk appropriatelyso that they will not come into contact with theCD changer.
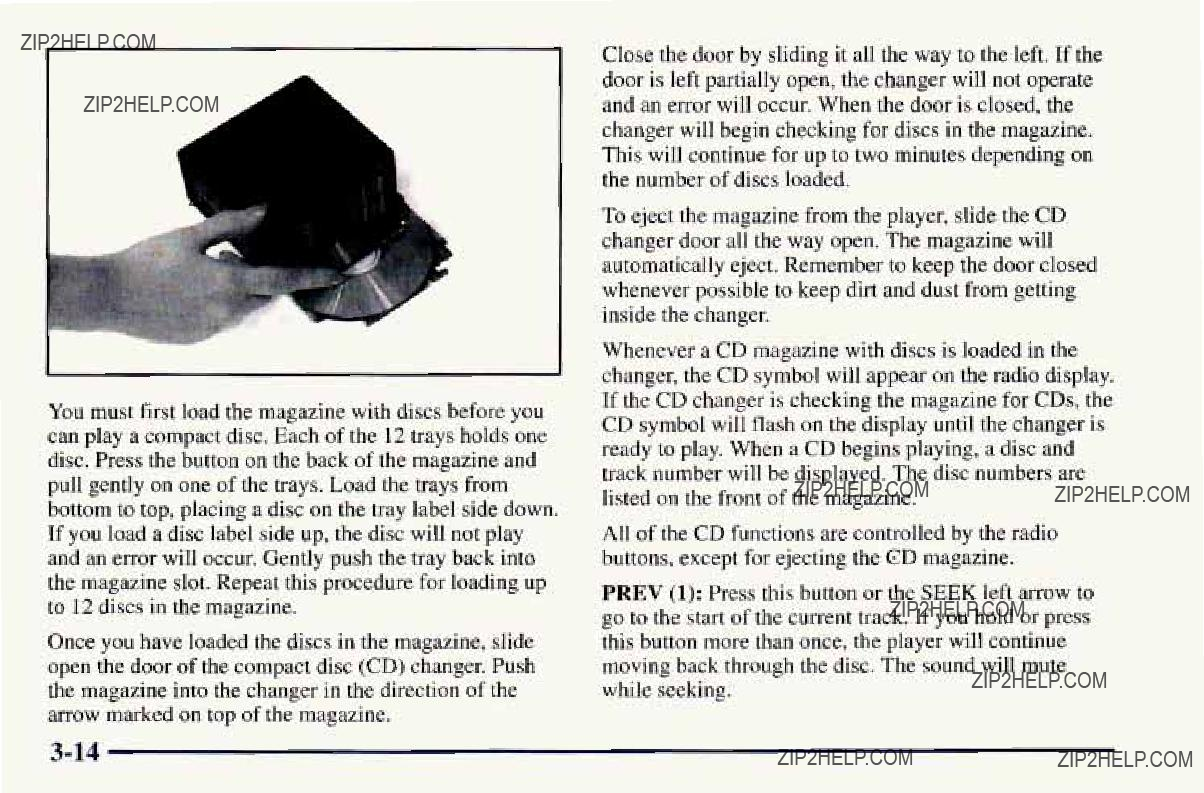
'I
You must first load the magazine with discs beforeyou can play a compact disc. Each of the 12 trays holds one disc. Pressthe button on the back of the magazine and pull gently on one of the trays. Load the trays from bottom to top,placing a disc on the tray label side down. If you load a disc label side up, the disc will not play and an error will occur. Gently push the tray back into the magazine slot. Repeat this procedure for loading up to 12 discs in the magazine.
Once you have loaded the discs in the magazine, slide open the door of the compact disc (CD) changer. Push the magazine into the changer in the direction of the arrow marked on top of the magazine.
Close the door by sliding it all the way to the left.If the door is left partially open, the changer will not operate and an error will occur. When the door is closed, the changer will begin checking for discs in the magazine. This will continue forup to two minutes depending on the number of discs loaded.
To eject the magazine from the player, slide the CD changer door all the way open. The magazine will automatically eject. Remember to keep the door closed whenever possible to keep dirt and dust from getting inside the changer.
Whenever a CDmagazine with discs is loaded in the changer, the CD symbol will appear on the radio display. If the CD changer is checking the magazine for CDs, the CD symbol will flash on the display until the changer is ready to play. When a CDbegins playing, a discand track number will be displayed. The disc numbers are listed on the front of the magazine.
All of the CD functions arecontrolled by the radio buttons, except for ejecting the CD magazine.
PREV (1): Press this button or the SEEK left arrow to go to the start of the current track. If you hold or press this button more than once, the player will continue moving back through the disc. The sound will mute while seeking.

PROG (2): Press thisbutton to selecta disc. The disc number and track number will be displayed.
NEXT (3): Press this buttonor the SEEK right arrowto to go to the next track.If you hold the button or press it more than once, the player will continue moving forward through the tape.The sound willmute while seeking.
REV (4): Press and hold this button to reverse quickly through a track selection. Release itto resume playing.
FWD (6): Press and hold this button to advance quickly through a track selection. Release itto resume playing.
SEEK: Press theright arrow to seek to the next selection onthe CD. Press the left arrow to search for the previous selectionon the CD. Thesound will mute while seeking.
SCAN: When you press SCAN whileplaying a CD, you will hear the first fewseconds of each disc.Press SCAN again to stop on a CD. The CD will mute while scanning and SCAN will appear on the display.
P.SCAN: Press thisbutton to hear the tracksin random, rather than sequential, order. RANDOM will appear on the display. Press P.SCAN again to.turn off random play.
TAPE AUX:Press thisbutton if you have a disc loaded in the changerand the radio is playing to play a compact disc.
compact disc is playing. PressTAPE AUX to switch between the tapeand compact disc if both are loaded.
EJECT: Slide the CD changer door all the way open and the disc holderwill automatically eject.
Compact Disc ChangerErrors
If an error occurs whiletrying to play a CD in the compact disc changer, the following conditionsmay have caused the error:
aThe road is too rough. The discshould play when the road is smoother.
0The disc is dirty, scratched, wet or loadedlabel side up.
0The air is very humid. If so, wait about an hour and try again.
0The CDchanger door is open. Completely close the changer door to restorenormal operation.
0An empty magazine is inserted inthe CD changer. Try the magazine again with a disc loaded on one of the trays.
If any error occursrepeatedly or if an error cannot be corrected, please contactyour dealer.
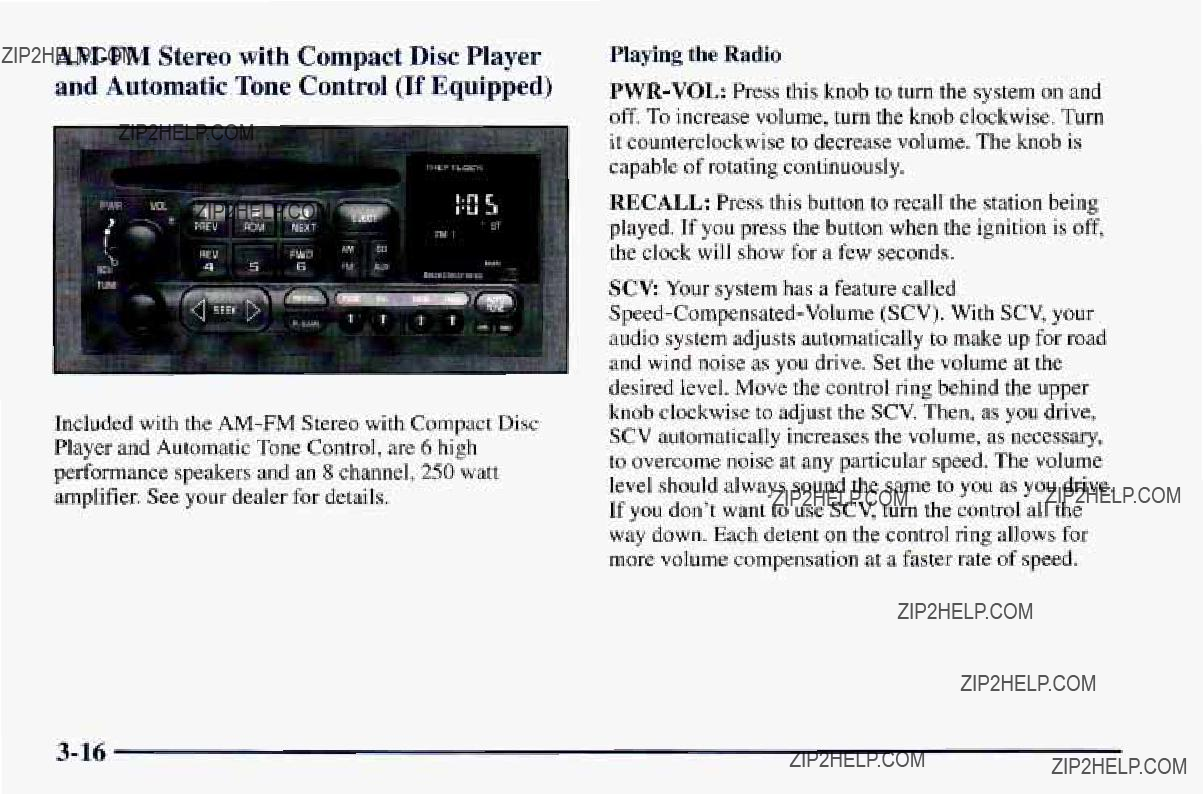
Included with the
Playing the Radio
RECALL: Press this button to recall the station being played. If you press the button when the ignition is off, the clock will show for a few seconds.
SCV: Your system has a feature called

Finding a Station
TUNE: Press this knoblightly so it extends.Turn it to choose radio stations.Push the knob back into its stored position when you???re not using it.
SEEK: Press theright or left arrow to go to the next higher orlower station and stay there. The sound will mute while seeking.
SCAN: Press one of the SEEK arrows for two seconds, and SCAN will appear on the display. Use SCAN to listen to stations for fewa seconds. The radio will go to a station, stop fora few seconds,then go on to the next station. PressSEEK again to stop scanning. Thesound will mute while scanning.
PUSHBUTTONS:The six numbered pushbuttons let you return to your favorite stations.You can set up to 18 stations (sixAM, six FM1 and six FM2). Just:
1.Press
2.Tune in the desired station.
3.Press AUTO TONE to select the equalizationthat best suits thetype of station selected.
4.Press and hold one of the six numbered buttons. The sound will mute. When it returns, releasethe button. Whenever you press that numbered button, the station you set will return and the AUTO TONE equalization that you selected will also be automatically selected for that button.
5 . Repeat the steps for each pushbutton.
P.SCAN: Press this button to listen to each of your favorite stationsstored on your pushbuttons for a few seconds. The radiowill scan through each of the stations stored on your pushbuttons, exceptthose stations with weak reception. The AUTO TONE settingstored for that pushbutton will be automatically chosen. Press P.SCAN or oneof the pushbuttons again to stop scanning. P.SCAN will be displayed whenever the
tuner is in the P.SCAN mode. The channelnumber (PI
Setting the Tone
BASS: Press this knob lightly so it extends. Turn the knob clockwise to increase bass and counterclockwise to decrease bass.When you use this control, theradio???s AUTO TONE settingwill switch to manual.

TREB: Press this knoblightly so it extends. Turn the knob clockwise to increase treble and counterclockwise to decreasetreble. When you use this control, the radio???s AUTO TONE setting will switch to manual. If a station is weak or noisy, you may want to decreasethe treble.
Push these knobs back into their stored positions when you???re not using them.
AUTO TONE:This featureallows you to choose preset bass and treble equalization settings designed for classical, news, rock, pop, country/western and jazz stations. C/W will appear on the display when you first press AUTO TONE. Each time you press it, another setting will appear on the display. Press it again after JAZZ appears and the AUTO TONE display will go blank. Tone control will return to the BASS and TREB knobs. Also, if you use the BASS and TREB knobs, control will return to them and the AUTO TONE display will go blank.
Adjusting the Speakers
BAL: Press this knob lightly so it extends. Turn the knob clockwise forright speakers and counterclockwise for left speakers. The middle position balances the sound between the speakers.
FADE: Press this knob lightly so it extends. Turn the knob clockwise to adjustthe sound to the front speakers and counterclockwise for the rear speakers. The middle position balances the sound between the speakers.
Push these knobs back into their stored positions when you???re not using them.
Playing a Compact Disc
Insert a disc partway into the slot, label side up. The player will pull it in. The disc should begin playing. The display will show CD and the CD symbol.
If you???re driving on a very rough road or if it???s very hot, the disc may not play and ERR (error) may appear on the display. Press RECALL to take ERR off the display. When things get back to normal, the discshould play. If the disc comes out, itcould be that:
The disc is upside down.
It is dirty, scratched or wet.
It is very humid. (If so, wait about an hour and try again.)

PREV (1): Press thisbutton or the left SEEK arrow to go back to the startof a current track. If you hold the button or pressit more than once, the player will continue moving back through the disc. Thesound will mute while seeking.
RDM (2): Press thisbutton to hear thetracks in random, rather than sequential, order. RANDOM will show on the display. Press RDM again to turn off random play. RDM is reset to off when the disc is ejected.
NEXT (3): Press this button or the right SEEK arrow to go to the nexttrack. If you hold the button or press it more than once, theplayer will continue moving forward through the disc.The sound will mute
while seeking.
REV (4): Press andhold this buttonto quickly reverse within a track. Releaseit toplay the passage.You can use the counter reading on the display to locate passage more easily.
FWD (6): Press and hold this button to advance quickly within a track. Release it to resume playing. You can use the counter readingon the display to locatea passage easily.
RECALL:Press this button to seewhich track is playing. Press it again within five seconds to seehow long it hasbeen playing (elapsed time). The track number also appearswhen you change the volume or when a new track starts toplay.
CD AUX:Press thisbutton to change to the disc function when the radio is on. A CD icon will appear on the display when the disc isin the player, whether it is active ornot.
EJECR Press this button to remove the disc. The radio will play. The disc will start at the first track when you reinsert it.
If you turn off the ignition or radio with a disc in the player, it will stay in the player. When you turn on the ignition or system, thedisc will start playing where it was stopped. If you press EJECT but don???tremove the disc, the player will pull the disc back in to protect it after about one minute.

THEFTLOCK" is designed to discourage theft of your radio. It works by using a secret code to disable all radio functions whenever battery power is removed.
The THEFTLOCK feature forthe radio may be used or ignored. If ignored, the system plays normally and the radio is not protected by the feature. If THEFTLOCK is activated, your radio will not operate if stolen.
When THEFTLOCK is activated,the radio will display LOC to indicate alocked condition anytime battery power is removed. If your battery loses power for any reason, you must unlock the radiowith the secret code before itwill operate.
Activating the
The instructions which follow, explain how to enter your secret code to activate the THEFTLOCK system. It is recommended that you read through all nine steps before starting the procedure.
NOTE: If you allow more than 15 seconds to elapse between any steps, the radio automatically reverts to time and you must start the procedure over at Step 4.
1.Write down any three or
2.Turn the ignition to ACCESSORY or RUN.
3.Turn the radio off.
4.Press the 1 and 4 buttons together. Hold them down until
5.Press MN and 000 will appear on the display.
6.Press MN again to make the last two digits agree with your code.
7.Press HR to make the first one or two digits agree with your code.
8.Press
9.Press
Unlocking the
Power Loss
Enter your secret codeas follows; pause no more than 15 seconds between steps:
1.LOC appears when the ignition is on.
2.Press MN and 000 will appear on the display.
3.Press MN again to make the last two digits agree with your code.
4.Press HR to make the first one or two digits agree with your code.
5.Press
If you enter the wrong code eight times, INOPwill appear on the display. You will have to wait an hour with the ignition on beforeyou can try again. When you try again, you will only have three chances to enterthe correct code before INOP appears.
If you lose or forget your code, contactyour dealer.
Disabling the
Enter your secret codeas follows; pause no more than 15 seconds between steps:
1.Turn the ignition to ACCESSORY or RUN.
2.Turn the radio off.
3.Press the 1 and 4 buttons together. Hold them down until SEC shows on the display.
4.Press MN and 000 will appear on the display.
5. Press MN again to make the last two digits agree with your code.
6.Press HR to make the first one or two digits agree with your code.
7.Press
If the code entered is incorrect, SECwill appear on the display. The radiowill remain secured until the correct code is entered.
When battery power is removed and later applied to a secured radio, the radio won???t turn on and LOC will appear on the display.
To unlock a secured radio, see???Unlocking the

Understanding Radio Reception
FM Stereo
FM stereo will give you the best sound. But FM signals will reach only about 10 to 40 miles (16 to 65 km). Tall buildings orhills can interfere with FM signals, causing the sound to come and go.
AM
The range formost AM stations is greater than for FM, especially at night. The longer range,however, can cause stations to interferewith each other. AM can pick up noise from things like stormsand power lines. Try reducing the treble to reduce this noise if you ever getit.
Tips AboutYour Audio System
Hearing damage from loud noise is almost undetectable until it is too late. Your hearing can adapt to higher volumes of sound. Sound that seems normal can be loud and harmful to your hearing. Take precautions by adjusting the volume control onyour radio toa safe sound level before your hearing adaptsto it.
To help avoidhearing loss or damage:
Adjust the volume control to the lowest setting.
Increase volume slowly until you hear comfortably and clearly.
NOTICE:
Before youadd any sound equipmentto your vehicle
So, before adding sound equipment, check with your dealer and be sure to check Federal rules covering mobileradio andtelephone units.

Care of Your Cassette Tape Player
A tape player that is not cleaned regularly can cause reduced sound quality, ruined cassettes or adamaged mechanism. Cassette tapesshould be stored intheir cases away from contaminants, direct sunlightand extreme heat. If they aren???t, they may not operate properly ormay cause failureof the tapeplayer.
Your tape player should be cleanedregularly after every 50 hours of use. Your radio may display CLN to indicate that you have used your tape player for50 hours without resetting the tape cleantimer. If this message appears on the display, your cassette tapeplayer needs to be cleaned. It will still play tapes, but you should clean itas soon as possibleto prevent damage toyour tapes and player. If you notice areduction in sound quality, try a known good cassette to seeif it is thetape or the tape player at fault.If this other cassettehas no improvement in sound quality, clean the tape player.
Cleaning may be done with a scrubbing action,
You may also choose a
After you clean the player, press and hold EJECT for five seconds to reset the CLN indicator. The radiowill display
Cassettes are subject towear and the sound quality may degrade over time.Always make sure the cassette tape is in good condition beforeyou have your tape
player serviced.
Care of Your Compact Discs
Handle discs carefully. Store them in their original cases or other protective cases and away from direct sunlight and dust. If the surface of a disc issoiled, dampen a clean, soft cloth in a mild, neutral detergent solution and clean it,wiping from the center to the edge.
Be sure never to touch the signal surfacewhen handling discs. Pick up discs by grasping the outer edges orthe edge of the hole and the outer edge.
Fixed Mast Antenna
The fixed mast antenna can withstand most car washes without being damaged. If the mast should ever become slightly bent, you can straighten it outby hand. If the mast is badly bent, as itmight be by vandals, you should replace it.
Check every once in a while to be surethe mast is still tightened to the rear quarter panel.

0Section 4 Your Driving and the Road
Here you???ll find information about driving on different kinds of roads and in varying weather conditions. We???ve also included many other useful tips on driving.

Defensive Driving
The best advice anyone can give aboutdriving is: Drive defensively.
Please start with a very important safety device in your Chevrolet: Buckle up. (See ???Safety Belts??? in the Index.)
Defensive driving really means ???be ready for anything.??? On city streets, rural roads or freeways,it means ???always expect the unexpected.???
Assume that pedestrians or other drivers are going to be careless and make mistakes. Anticipate what they might do. Be ready for their mistakes.
Drunken Driving
Death and injury associated with drinking and driving is a national tragedy. It???s the number one contributor to the highway death toll, claiming thousandsof victims every year.
Alcohol affects four things that anyone needs to drive a vehicle:
Judgment
Muscular Coordination
Vision
Attentiveness.
Police records show that almost half of all motor

Many adults
The obvious way to solve thishighway safety problem is for peoplenever to drink alcoholand then drive. But what if people do?How much is ???too much??? if the driver plans to drive?It???s a lot lessthan many might think. Although it depends on each person and situation, here is some general informationon the problem.
The Blood Alcohol Concentration (BAC)of someone who is drinkingdepends upon four things:
0 The amount of alcohol consumed  The drinker???s body weight
The amount of food that is consumed before and during drinking
0The length of time it hastaken the drinker to consume the alcohol.
According to the American Medical Association, a
same BAC by drinking three
It???s the amount of alcohol that counts. For example, if the same person drank three double martinis (3 ounces or 90 ml of liquor each) within an hour, the person???s BAC would be close to 0.12 percent. A person who consumes food just before orduring drinking will have a somewhat lower BAC level.
There is a gender difference, too. Women generally have a lower relative percentage of body water than men. Since alcoholis carried in body water, this means that a woman generally will reach a higher BAC level than a man of her samebody weight when each has thesame number of drinks.
The law in many U.S. states setsthe legal limit ata BAC of 0.10 percent. In a growing number of U.S. states, and throughout Canada, the limit is0.08 percent. In some other countries, it???s even lower. The BAC limit for all commercial drivers inthe United States is0.04 percent.
The BAC will be over0.10 percent afterthree to six drinks (in one hour). Of course, aswe???ve seen, it depends on how much alcohol is in the drinks, and how quickly the person drinks them.
But the ability to drive isaffected well below a BAC of 0.10 percent. Research shows that the driving skills of many people are impaired at a BAC approaching 0.05 percent, and that the effects areworse at night. All drivers are impaired at BAC levels above0.05 percent. Statistics show that the chance of being in a collision
increases sharply for drivers who have a BAC of 0.05 percent or above. A driver with a BAC level of 0.06 percent has doubled his orher chance of having a collision. At a BAC level of 0.10 percent, the chance of this driver having a collision is 12 times greater; at a level of 0.15 percent, the chance is25 times greater!
The body takes about an hour to rid itself of the alcohol in one drink. No amount of coffee ornumber of cold showers will speed that up. ???I???ll be careful??? isn???t the right answer. What if there???s an emergency, a need to take sudden action, aswhen a child dartsinto the street? A person with even a moderate BAC might not be able to react quickly enough to avoid the collision.
There???s something else aboutdrinking and driving that many people don???t know. Medical research shows that alcohol in a person???s system can make crash injuries worse, especially injuries to the brain, spinal cord or heart. This means that when anyone who has been drinking

A CAUTION:
I
Drinking and thendriving is very dangerous. Your reflexes, perceptions,attentiveness and judgment can be affected by evena small amount of alcohol. You can have a serious
if you???re with a group, designate a driverwho will not drink.
Control of a Vehicle
You have three systems that makeyour vehicle go where you want it to go.They are the brakes, thesteering and the accelerator. All three systems have to do theirwork at the places where the tiresmeet the road.
Sometimes, as when you???re drivingon snow or ice, it???s easy to ask more of those controlsystems than the tires and road can provide. Thatmeans you can lose control of your vehicle.

Braking
Braking action involves perception time and
reaction time.
First, you have to decide topush on the brake pedal. That???s perception time. Then you have to bring up your foot and do it. That???s reaction time.
Average reaction time is about 314 of a second. But that???s only anaverage. It might be less with one
driver and as long as two or three seconds ormore with another. Age, physical condition, alertness,coordination and eyesight all play a part. So do alcohol, drugs and frustration. But even in 3/4 of a second, a vehicle moving at 60 mph (100 km/h) travels 66 feet (20 m). That could bea lot of distance in an emergency, so keeping enough space between your vehicle and
others is important.
And, of course, actual stopping distancesvary greatly with the surface of the road (whether it???s pavement or gravel); the condition of the road (wet, dry, icy); tire tread; the condition of your brakes; the weight of the vehicle and the amount of brake forceapplied.
Avoid needless heavy braking. Some people drive in spurts
braking
If your engine everstops while you???re driving,brake normally but don???t pump your brakes. If you do, the pedal may get harder to push down. If your engine stops, you will still have some power brake assist. But you will use it when you brake. Once the power assist
is used up, it may take longer to stop and the brake pedal will be harder to push.
Your vehicle has
When you start your engine, orwhen you begin to drive away, your
Here???s how
You slam on the brakes.Here???s what happens with ABS.
A computer senses that wheels are slowing down. If one of the wheels is about to stop rolling, the computer will separately work the brakes at each front wheel and at the rear wheels.

The
You can steeraround the obstacle while braking hard.
As you brake, your computer keeps receiving updates on wheel speed and controls braking pressure accordingly.
Remember:
Using
Don???t pump the brakes. Just hold the brake pedal down and let
When your
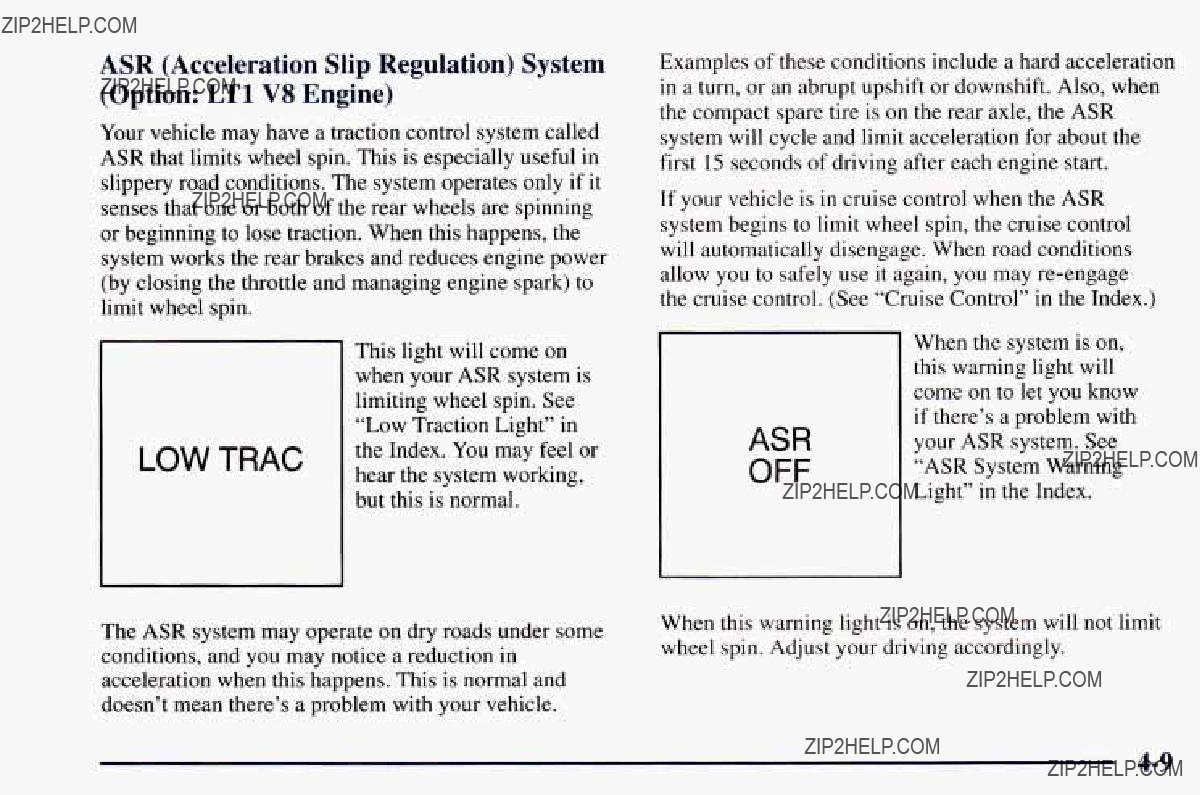
ASR (Acceleration Slip Regulation) System
(Option: LTl V8 Engine)
Your vehicle may have a traction controlsystem called ASR that limits wheel spin. This is especially usefulin slippery road conditions. Thesystem operates only if it senses that one orboth of the rear wheels are spinning or beginning to lose traction.When this happens, the system works the rear brakesand reduces enginepower (by closing the throttleand managing engine spark)to limit wheel spin.
This light will come on when your ASR system is limiting wheel spin. See ???Low Traction Light??? in
LOW TRAC the Index. You may feel or hear the system working,
but this is normal.
Examples of these conditions include hard acceleration in a turn, or an abrupt upshift or downshift. Also,when the compact spare tire is on the rear axle, the ASR system will cycle and limit acceleration for about the first 15 seconds of driving after each engine start.
If your vehicle is in cruise controlwhen the ASR system begins to limit wheel spin, the cruise control will automatically disengage.When road conditions allow you to safely use it again,you may
The ASR system may operate ondry roads under some conditions, and you may notice a reductionin acceleration when this happens. Thisis normal and doesn???t mean there???s a problem with your vehicle.
When this warning light is on, the system will not limit wheel spin. Adjust your driving accordingly.

The ASR system automatically comes on whenever you start your vehicle. To limit wheel spin, especially in slippery road conditions, you should always leave the system on. But you can turn the ASR system off if you ever need to. (You should turn the system off if your vehicle ever getsstuck in sand, mud, ice or snow. See ???Rocking Your Vehicle???in the Index.)
To turn the system off, press the switch on the instrument panel. The light on the switch will go out.
The ASR system warning light will come on and stay on. If the ASR system is limiting wheel spin when you press the switch, the warning light will come on
You can turn the system back on at any time by pressing the switch again. The ASR system warning light should go off and the light on the switch will come on.
If your car isequipped with P245/5OZR16 tires, the ASR system will automatically turn off at speeds above 108 mph (174 kmh). (The ASR system warning light will not come on.) When the vehicle speed drops below 103 mph (166 kmh) the system will automatically come on again.
Braking in Emergencies
With

Steering
Power Steering
If you lose power steering assist because the engine stops or thesystem is not functioning, you can steer but it will take much more effort.
Steering Tips
Driving on Curves
It???s important to take curvesat a reasonable speed.
A lot of the ???driver lost control?????? accidents mentioned on the news happen on curves. Here???s why:
Experienced driver orbeginner, each of us is subject to the samelaws of physics when driving on curves. The traction of the tires against theroad surface makes it possible forthe vehicle tochange its path when you turn the front wheels. If there???s no traction, inertiawill keep the vehicle going in the same direction.If you???ve ever tried to steer a vehicle on wet ice, you???ll understand this.
The traction you can get in a curve depends on the condition of your tires and the road surface, the angle atwhich the curve isbanked, and your speed. While you???re in a curve, speed is the one factoryou can control.
Suppose you???re steering through a sharp curve. Then you suddenly accelerate. Both control systems
What should you do if this everhappens? Ease up on the accelerator pedal, steer thevehicle the way you want it to go,and slow down.
Speed limit signs near curves warn that you should adjust your speed. Of course, the posted speeds are based on good weather and road conditions. Under less favorable conditionsyou???ll want to go slower.
If you need to reduce your speed as you approach a curve, do it before you enter the curve, whileyour front wheels are straight ahead.
Try to adjust your speed so you can ???drive??? through the curve. Maintain a reasonable, steady speed. Wait to accelerate until you are outof the curve, and then accelerate gently into thestraightaway.

Steering in Emergencies
There are timeswhen steering can be more effective than braking. For example, you come over a hill and find a truck stopped in your lane, or a car suddenly pulls outfrom nowhere, or a child darts out from between parked cars and stops right in front of you. You can avoid these problems by braking
Your Chevrolet can perform very well in emergencies like these. First apply your brakes. (See ???Braking in Emergencies??? earlier in this section.) It is better to remove as much speed as you can from a possible collision. Then steer around the problem, to the left or right depending on the space available.
An emergency like this requires close attention and a quick decision. If you are holding the steering wheel at the recommended 9 and 3 o???clock positions, you can turn it a full 180 degrees very quickly without removing either hand. But you have to act fast, steerquickly, and just as quickly straightenthe wheel once you have avoided the object.
The factthat such emergency situations are always possible is a good reason to practice defensive drivingat all timesand wear safety belts properly.

You may find sometime that your right wheels have dropped off the edgeof a road onto the shoulder while you???re driving.
If the level of the shoulder is only slightly below the pavement, recovery should be fairly easy. Ease off the accelerator and then, if there is nothing in the way, steer so that your vehicle straddles the edge of the pavement. You can turn the steering wheel up to
Passing
The driver of a vehicle aboutto pass another on a
Not necessarily! Passing another vehicle on a
So here aresome tips forpassing:
0???Drive ahead.??? Look down the road, to the sides and to crossroads for situationsthat might affect your passing patterns. If you have any doubt whatsoever about making a successful pass, wait for abetter time.
0Watch for traffic signs, pavement markings and lines. If you can see asign up ahead that might indicate a turn or an intersection, delay your pass. A broken center line usually indicates it???s all right to pass (providing the road ahead is clear). Never cross a solid line on your side of the lane ora double solid
line, even if the road seems empty of approaching traffic.
Do not get too close to the vehicle you want to pass while you???re awaiting an opportunity. For one thing, following too closely reduces your area of vision, especially if you???re following a larger vehicle. Also, you won???t have adequate spaceif the vehicle ahead suddenly slows orstops. Keep back a reasonable distance.
When it looks like a chance to pass is coming up, start to accelerate but stay in the right lane and don???t get too close.Time your move so you will be increasing speed as the time comes to move into the other lane. If the way is clearto pass, you will have a ???running start??? that more than makes up for the distance you would lose by dropping back. And if something happens to cause you to cancel your pass, you need only slow down and drop back again and wait for anotheropportunity.
If other cars arelined up to pass a slow vehicle, wait your turn. But take carethat someone isn???t trying to pass you as you pull out to pass the slow vehicle.
Remember to glance overyour shoulder and check the blind spot.
0Check your mirrors, glance over your shoulder, and start your left lane change signal before moving out
of the right lane to pass. When you are farenough ahead of the passed vehicle to see its frontin your inside mirror, activate your right lane change signal and move back into the right lane. (Remember that your right outside mirror is convex. The vehicle you just passed may seem to be farther away from you than it really is.)
Try not to pass more than one vehicle at a time on
Don???t overtake a slowly moving vehicle too rapidly. Even though the brake lamps are not flashing, it may be slowing down or starting to turn.
If you???re being passed, make it easy for the following driver to get ahead of you. Perhaps you can ease alittle to the right.
Loss of Control
Let???s review what driving expertssay about what happens when the three controlsystems (brakes, steering and acceleration) don???t have enough friction where the tires meet the road to do what the driver has asked.
In any emergency, don???t give up. Keep trying to steer and constantly seek an escape route or area of less danger.
Skidding
In a skid, a driver can lose control of the vehicle. Defensive drivers avoid most skidsby taking reasonable care suited to existing conditions, andby not ???overdriving??? those conditions. But skidsare always possible.
The three typesof skids correspond to your Chevrolet???s three controlsystems. In the braking skid,your wheels aren???t rolling. In the steering or cornering skid, too much speed or steeringin a curve causestires to slip and lose cornering force.And in the acceleration skid, too much throttle causes the drivingwheels to spin.
A cornering skid is best handled by easing your foot off the accelerator pedal.
If you have the ASR system, remember: It helps avoid only the acceleration skid.
If you do not have ASR, or if the system is off, then an acceleration skid is also best handled by easing your foot off the accelerator pedal.
If your vehicle starts to slide, ease your foot off the accelerator pedal and quickly steer the way you want the vehicle to go.If you start steering quickly enough, your vehicle may straighten out.Always be ready for a second skid if it occurs.
Of course, traction is reduced when water, snow, ice, gravel or other material is on the road. For safety, you???ll want to slow down and adjust your driving to these conditions. It is important to slow down on slippery surfaces because stopping distancewill be longer and vehicle control more limited.
While driving on a surfacewith reduced traction, try your best to avoid sudden steering, acceleration or braking (including engine braking by shifting to a lower gear). Any sudden changes could causethe tires to slide. You may not realize the surfaceis slippery until your vehicle is skidding. Learn to recognize warning clues
Remember: Any

...............
.............
..... ......... ,
. .. ...
Night driving is more dangerous than day driving. One reason is that some drivers are likely to be impaired
Here are some tips on night driving. 0 Drive defensively.
0 Don't drink and drive.
0Adjust your inside rearview mirror to reduce the glare from headlamps behind you.
0Since you can't see as well, you may need to slow down and keep more space between you and other vehicles.
0Slow down, especially on higher speed roads. Your headlamps can light up only so much road ahead.
0 In remote areas, watch for animals.
0If you're tired, pull off the road in a safe place and rest.
Night Vision
No one cansee as well at night as in the daytime.But as we get older these differences increaseA.
What you do in the daytimecan also affect your night vision. For example, if you spend the dayin bright sunshine you are wise to wear sunglasses. Your eyes will have less trouble adjusting to nightBut. if you???re driving, don???twear sunglasses atnight. They may cut down on glare from headlamps, but they also make a lot of things invisible.
You can be temporarily blinded by approaching headlamps. It can take asecond or two, or even several seconds, foryour eyes to readjust to the dark. When you are facedwith severe glare (asfrom a driverwho doesn???t lower the high beams, or a vehiclewith misaimed headlamps), slow down a little. Avoid staring directly into theapproaching headlamps.
Keep your windshield and all the glass on your vehicle clean
Remember that your headlamps light up far lessof a roadway when you are in a turn or curve.Keep your eyes moving; that way, it???s easier to pick out dimly lighted objects. Just asyour headlamps should be checked regularly for proper aim,so should your eyes be examined regularly. Some drivers sufferfrom night blindness
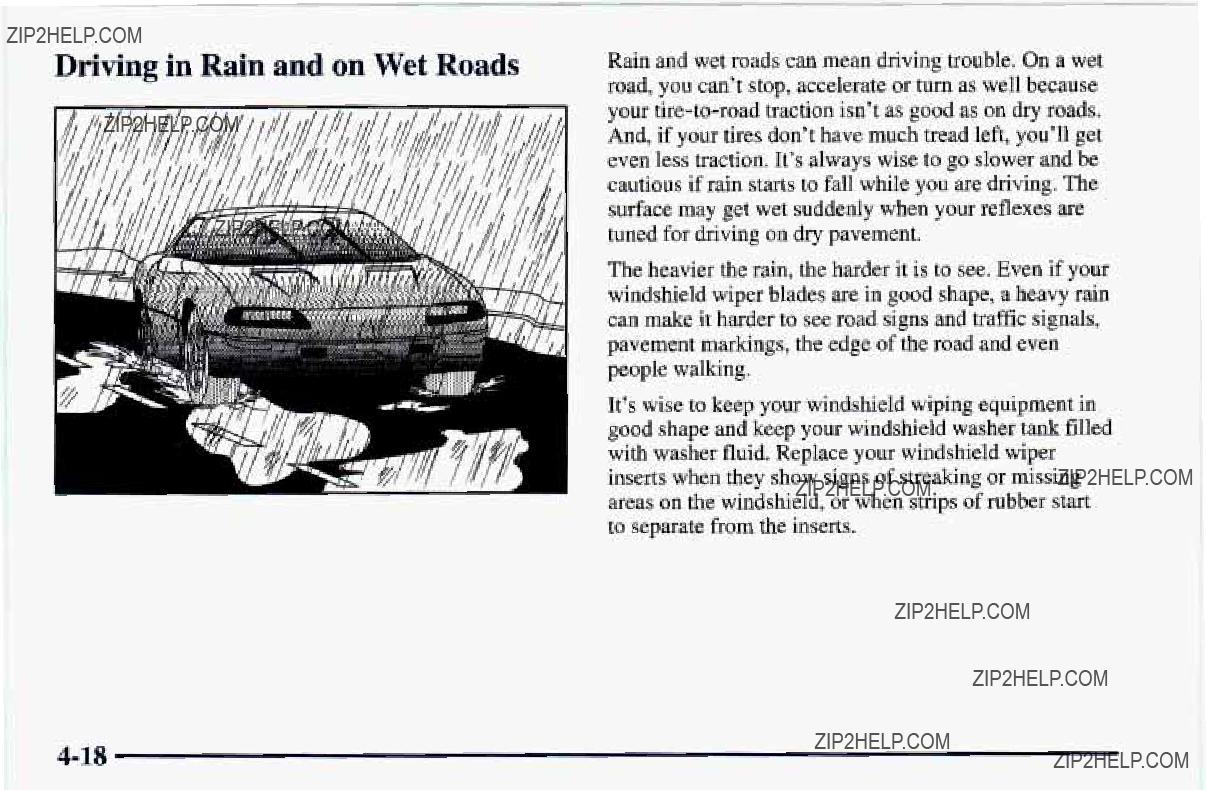
Driving in Rain and onWet Roads
Rain and wet roads can mean driving trouble. On a wet road, you can???t stop, accelerate or turn as well because your
The heavier the rain, the harder it is to see. Even if your windshield wiper blades are in good shape, a heavy rain can make it harder to seeroad signs and traffic signals, pavement markings, the edge of the road and even people walking.
It???s wise to keep your windshield wiping equipment in good shape and keep your windshield washer tank filled with washer fluid. Replace your windshield wiper inserts when they show signs of streaking or missing areas on the windshield, or when strips of rubber start to separate from the inserts.
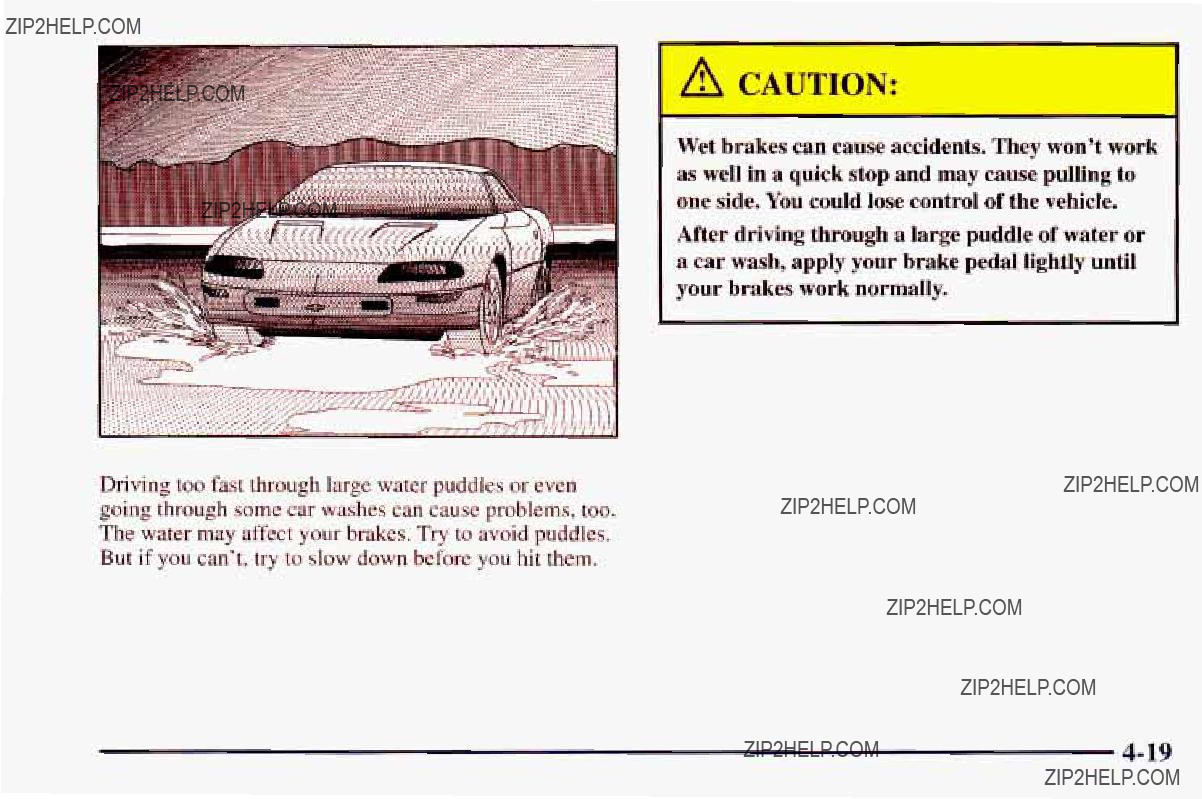
i -
Wet brakes can cause accidents. They won'twork as well in a quick stop and may cause pulling to one side.You could lose controlof the vehicle.
After driving througha large puddle of wateror a car wash, apply your brake pedal lightly until your brakes work normally.
Driving too fast through large water puddles or even going through some car washes can cause problems, too. The water may affect your brakes. Try to avoid puddles. But if you can't, try to slow down before you hit them.

Hydroplaning
Hydroplaning is dangerous. So much water can build up under your tires that they can actually ride on the water. This can happen if the road is wet enough and you???re going fast enough. When your vehicle is hydroplaning, it has little or no contact with the road.
Hydroplaning doesn???t happen often. But it can if your tires do not have much tread or if the pressure in one or more is low. It can happen if a lot of water is standing on the road. If you can seereflections from trees, telephone poles or other vehicles, and raindrops ???dimple??? the water???s surface, there could be hydroplaning.
Hydroplaning usually happens at higher speeds. There just isn???t a hard and fast ruleabout hydroplaning. The best advice is to slow down when it is raining.
Driving Through Deep Standing Water
NOTICE:
If you drive too quickly through deep puddles or standing water, water can come in through your engine???s air intake and badly damage your engine. Never drive through water thatis slightly lower than the underbodyof your vehicle.If you can???t avoid deep puddlesor standing water, drive through them very slowly.
Some Other Rainy Weather Tips
0Besides slowing down, allow some extra following distance. And be especially careful when you pass another vehicle. Allow yourself more clear room ahead, and be prepared to have your view restricted by road spray.
0Have good tires with proper tread depth. (See ???Tires??? in the Index.)
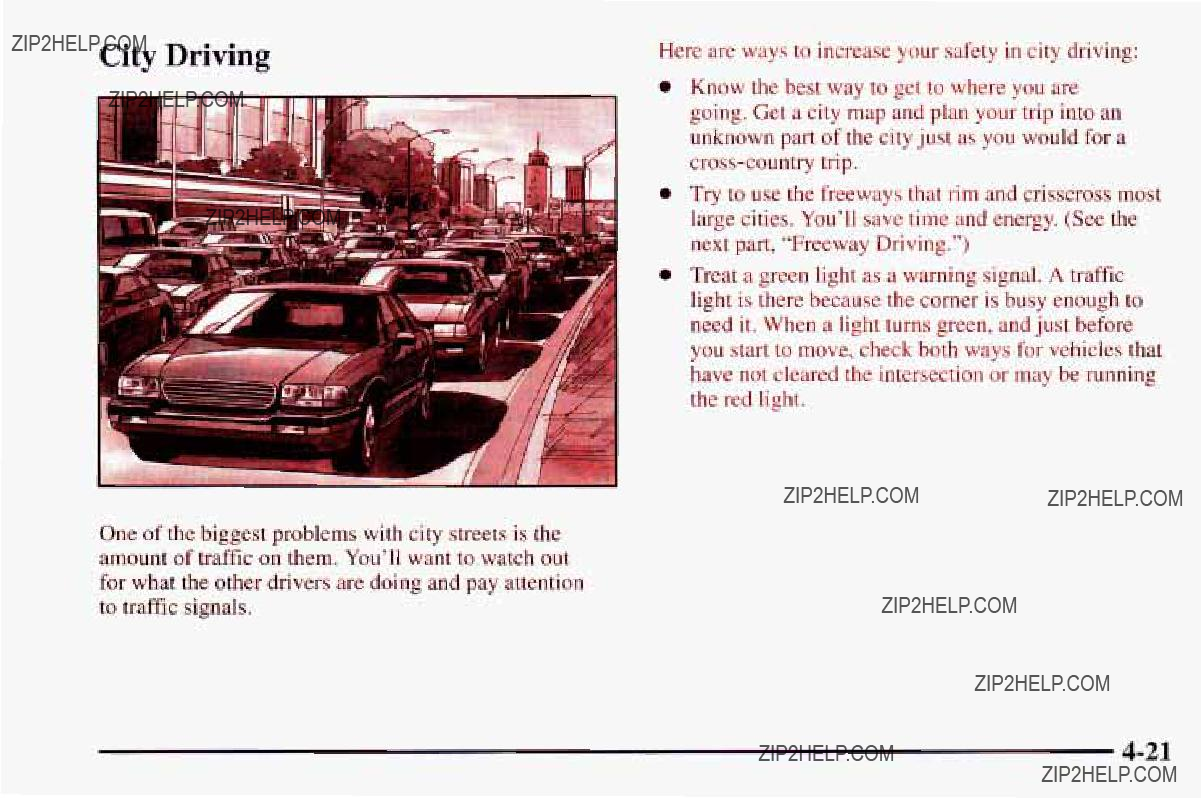
City Driving
One of the biggestproblems with city streetsis the amount of traffic on them. You???ll want to watch out for what the other drivers aredoing and pay attention to traffic signals.
Here are ways to increase your safety in city driving:
Know the best way to get to where you are going. Get a city map and plan your trip into an unknown part of the city just asyou would for a
0Try to use the freeways that rim and crisscross most large cities.You???ll save timeand energy. (See the next part, ???Freeway Driving.???)
0Treat a greenlight as awarning signal. A traffic light isthere because the corner is busy enough to need it. When a lightturns green, and just before you start to move, check both ways for vehicles that have not cleared the intersection or may be running the red light.

Freeway Driving
Mile for mile, freeways (also calledthruways, parkways, expressways, turnpikes or superhighways) are the safest of all roads. But they have their own special rules.
The most important adviceon freeway driving is: Keep up with traffic and keep to the right. Drive at the same speed most of the other drivers are
At the entrance, there is usually a ramp that leads to the freeway. If you have a clear view of the freeway as you drive along the entrance ramp, you should begin to check traffic. Try to determine where you expect to blend with the flow. Try to merge into the gap at close to the prevailing speed. Switch on your turn signal, check your mirrors and glance over your shoulder as often as necessary. Try to blend smoothly with the traffic flow.
Once you are on the freeway, adjust your speed to the posted limit or to the prevailing rate if it???s slower.Stay in the right lane unless you want to pass.
Before changing lanes, check your mirrors. Then use your turn signal.
Just before you leave the lane, glance quickly over your shoulder to make sure there isn???t another vehicle in your ???blind??? spot.
Once you are moving on the freeway, make certain you allow a reasonable following distance. Expect to move slightly slower at night.
When you want to leave the freeway, move to the proper lane well in advance. If you miss your exit, donot, under any circumstances, stop and back up. Drive on to the next exit.
The exit ramp can be curved, sometimes quite sharply.

The exit speed is usually posted.
Reduce your speed according to your speedometer, not to your sense of motion. After driving for any distance at higher speeds, you may tend to think you are going slower than you actually are.
Before Leavingon a Long Trip
Make sureyou???re ready. Try to be well rested. If you must start when you???re not fresh
Is your vehicle ready for a long trip? If you keep it serviced and maintained, it???s ready to go. If it needs service, have it done before starting out. Of course, you???ll find experienced and able service experts in Chevrolet dealerships all across North America. They???ll be ready and willing to help if you need it.
Here are some things you can checkbefore a trip:
0Windshield WasherFluid: Is the reservoir full? Are all windows clean inside and outside?
0 Wiper Blades: Are they in good shape?
0Fuel, Engine Oil, Other Fluids: Have you checked all levels?
0 Lamps: Are they all working? Are the lenses clean?
0Tires: They are vitally important to a safe,
0WeatherForecasts: What???s the weather outlook along your route? Should you delay your trip a short time to avoid a major storm system?
0 Maps: Do you have

Highway Hypnosis
Is there actually such a condition as ???highway hypnosis???? Or is it justplain falling asleep at the wheel? Call it highway hypnosis, lack of awareness, or whatever.
There issomething about an easy stretch of road with the same scenery, along with the hum of the tires on the road, the drone of the engine, and the rush of the wind against the vehicle that can make you sleepy. Don???t
let ithappen to you!If it does,your vehicle can leave the road in less than a second, and you could crashand be injured.
What can you do about highway hypnosis? First, be aware that it canhappen.
Then here aresome tips:
Make sure your vehicle is well ventilated, with a comfortably cool interior.
Keep your eyes moving. Scan the road ahead and to the sides. Check your rearview mirrors and your instruments frequently.
If you get sleepy, pull off the road into a rest, service or parking area and take a nap, get some exercise, or both. For safety, treat drowsiness on the highway as an emergency.
Hill and Mountain Roads
Driving on steep hills or mountains is different from driving in flat orrolling terrain.

If you drive regularlyin steep country, or if you???re planning tovisit there, here are some tipsthat can make your trips safer and more enjoyable.
Keep your vehicle in good shape. Check all fluid levels and also the brakes,tires, cooling system and transmission. These partscan work hard on mountain roads.
0Know how to go down hills. The most important thing to know is this: letyour engine do some of the slowing down. Shift to a lower gearwhen you go down a steep or long hill.
If you don???t shift down, your brakes could get so hot that they wouldn???t work well.You would then have poor braking or even none going down a hill.You could crash. Shift down to let your engine assistyour brakes on a steep downhill slope.
Coasting downhill inNEUTRAL (N) or with the ignition off is dangerous.Your brakes will haveto do all the workof slowing down. They could getso
hot that they wouldn???t work well. You would then have poor brakingor even none goingdown a hill.
You could crash.Always have your enginerunning and your vehicle in gear when yougo downhill.
0Know how to go uphill. You may want to shift down to a lower gear. The lower gears help cool your engine and transmission, and you can climb the hill better.
0Stay in your own lane when driving on
0As you go over the top of a hill, be alert. There could be something in your lane, like a stalled car or an accident.
0You may see highway signs on mountains thatwarn of special problems. Examplesare long grades, passingor

Winter Driving
Here are some tips for winter driving:
Have your Chevrolet in good shape for winter.
You may want to put winter emergency supplies in your trunk.
Include an ice scraper, a small brush or broom, a supply of windshield washer fluid, arag, some winter outer clothing, asmall shovel, aflashlight, a red cloth and a couple of reflective warning triangles. And, if you will be driving under severe conditions, include asmall bag of sand, a piece of old carpet or acouple of burlap bags to help provide traction. Be sure you properly secure these items in your vehicle.
Driving on Snow or Ice
Most of the time, those places where your tires meet the road probably have good traction.
However, if there issnow or icebetween your tires and the road,you can have avery slippery situation. You???ll have a lot less traction or ???grip??? and will need to be very careful.
What???s the worst time for this????Wet ice.?????? Verycold snow or ice canbe slick and hard to drive on.But wet ice canbe even more troublebecause it may offer the least traction of all. You can getwet ice when it???s about freezing (32??F; OOC) and freezing rain begins to fall. Try to avoid driving on wet ice until salt and sand crews can get there.
Whatever the condition
If you have ASR, keep thesystem on. It will improve your ability to accelerate when driving on a slippery road. Even though your vehicle has the ASR system, you???ll want to slow down and adjust your driving to the road conditions. See???ASR System??? in the Index.
If you don???t have the ASR system, accelerategently. Try not to break the fragile traction. If you accelerate too fast,the drive wheels will spin and polish the surface under the tires even more.
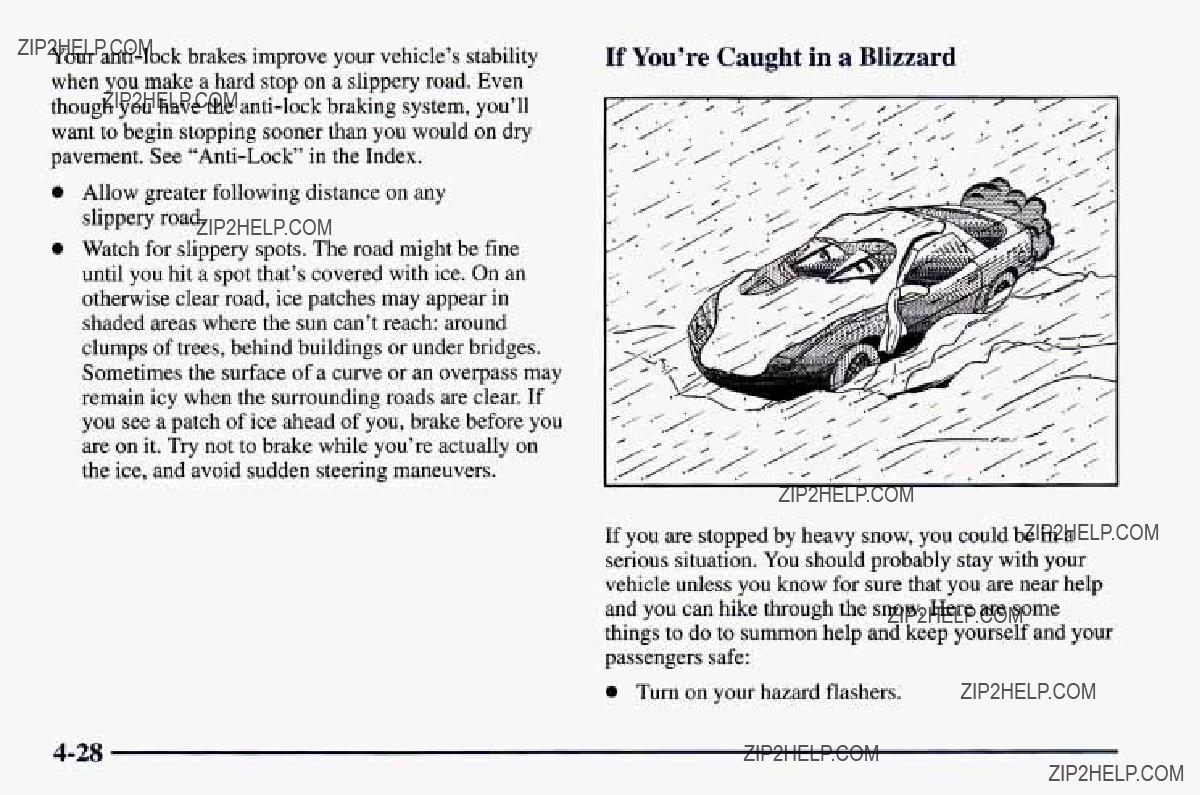
Your
0Allow greater following distance on any slippery road.
0 Watch for slippery spots. The road might be fine
_ _ -
until you hit a spot that???s covered with ice. On an otherwise clear road, ice patches may appear in shaded areas where the sun can???t reach: around clumps of trees, behind buildings or under bridges. Sometimes the surface of a curve or an overpass may remain icy when the surrounding roads are clear. If you see a patch of ice ahead of you, brake before you are on it. Try not to brake while you???re actually on the ice, and avoid sudden steering maneuvers.
If You???re Caught ina Blizzard
If you are stopped by heavy snow, you could be in a serious situation. You should probably stay with your vehicle unless you know for sure that you are near help and you can hike through the snow. Here are some things to do to summon help and keep yourself and your passengers safe:
0 Turn on your hazard flashers.

0Tie a red cloth to your vehicle to alert police that you???ve been stopped by the snow.
0Put on extra clothing or wrap a blanket around you. If you have no blankets or extra clothing, makebody
insulators from newspapers, burlap bags,rags, floor mats
Snow can trap exhaust gases under your vehicle. This can cause deadlyCO (carbon monoxide) gas to get inside.CO could overcome youand kill you. You can???t seeit orsmell it, so you might not know it is in your vehicle. Clear away snowfrom around the base of your vehicle, especiallyany that is blocking your exhaust pipe. And check around again from time to time to be sure snow doesn???t collect there.
Open a window just a little on the side of the vehicle that???s awayfrom the wind. This will help keep CO out.
IOU can run the engineto keep warm, but be careful.

Run your engine only as longas you must. This saves fuel. When you run the engine, make it go a little faster than just idle. That is, push the acceleratorslightly. This uses less fuel forthe heat that you get and it keeps the battery charged. You will need a
Then, shut the engineoff and close thewindow almost all theway to preserve the heat. Start the engineagain and repeat this onlywhen you feel really uncomfortable from the cold. But do it as little as possible. Preserve the fuel as long as you can. To help keep warm, you can get out of the vehicle and do some fairly vigorous exercises every half hour or so until helpcomes.
Loading Your Vehicle
.
PSUKPaRTG
FRT.
RR.
SPA.
IF TIRES ARE HOT, ADD 4PS1/28KPa
SEE OWNER'S MANUAL FOR ADDITIONAL
, INFORMATION
Two labels on your vehicle show how much weight it may properly carry. The

s
MFDBYGENERALMOTORSCORP
DATE GVWR GAWR FRT GAWR RR
THIS VEHICLE CONFORMS TO ALL APPLI-
CABLE U.S. FEDERAL MOTOR VEHICLE
SAFETY, BUMPER, AND THEFT PREVENTION
STANDARDS IN EFFECT ON THEDATE OF
MANUFACTURE SHOWN ABOVE.
The other labelis the Certification label,found on the rear edgeof the driver???sdoor. It tells you the gross weight capacity of your vehicle, called theGVWR (Gross Vehicle Weight Rating). TheGVWR includes the weight of the vehicle, all occupants,fuel and cargo. Never exceed the GVWR for your vehicle, or the Gross Axle Weight Rating GAWR for either the front or rear axle.
And, if you do have a heavy load, you should spread it out. Don???t carrymore than 100 lbs. (45 kg) in your rear area.
7???I
I A CAUTIl :
Do not load your vehicle any heavier than the GVWR, or either the maximum frontor rear GAWR. If you do, parts on your vehicle can break, orit can change theway your vehicle handles. These could causeyou to lose control. Also, overloading can shorten the life of your vehicle.
If you put things inside your vehicle
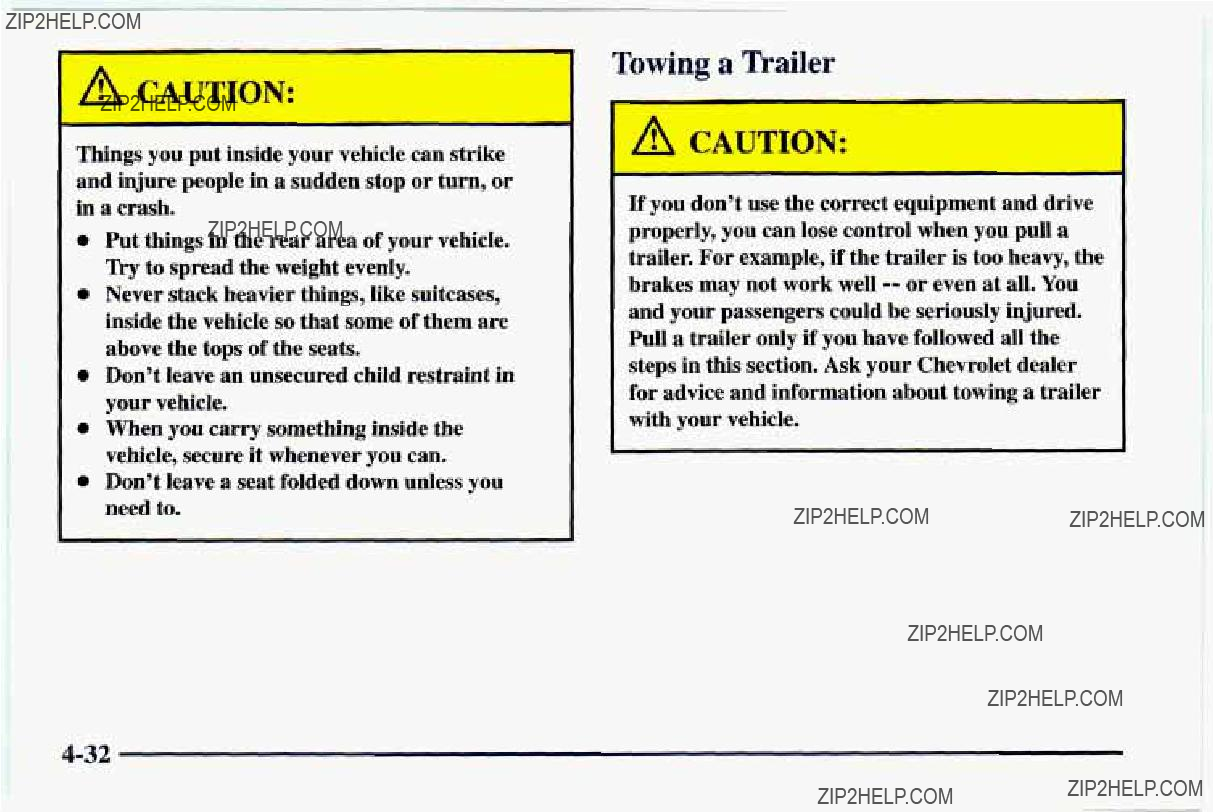
A CAUTION:
Things you put inside your vehicle can strike and injure people in a sudden stop or turn, or in a crash.
0 Put things in the rear areaof your vehicle. Try to spread the weight evenly.
0 Never stack heavier things, like suitcases, inside the vehicle so that some of them are above the tops of the seats.
0 Don???t leavean unsecured childrestraint in your vehicle.
0 When youcarry something insidethe vehicle, secure it whenever you can.
0Don???t leave aseat folded down unless you need to.
Towing a Trailer
A CAUTION:
If you don???t usethe correct equipment and drive properly, youcan lose control when you pulla trailer. For example, if the

NOTICE:
Pulling a trailer improperly can damage your vehicle and result in costly repairs not coveredby your warranty. To pull a trailer correctly, follow the advice in this part, and see your Chevrolet dealer for important information about towinga trailer with your vehicle.
Your vehicle can tow a trailer if it is equipped with either the 3800 or the 5.7L engine and proper trailer towing equipment. To identify what the vehicle trailering capacity is foryour vehicle, you should read the information in ???Weight of the Trailer??? that appears later in this section.But trailering is different than just driving your vehicle by itself. Traileringmeans changes in handling, durabilityand fuel economy. Successful, safe trailering takes correct equipment, and it hasto be used properly.
That???s the reason for this part. In it are many
If You Do DecideTo Pull A Trailer
If you do, here aresome important points:
There are many different laws, includingspeed limit restrictions, having to dowith trailering. Make sure your rig will be legal, not only where you live but also where you???ll be driving.A good source for this information can be state or provincial police.
0Consider using a sway control. You can ask a hitch dealer aboutsway controls.

aDon???t tow a trailer at all during the first 1,000miles (1 600 km)your new vehicle is driven. Your engine, axle or other parts could be damaged.
0Then, during the first 500 miles (800 km)that you tow a trailer, don???t drive over 50 mph (80 km/h) and don???t make starts at fullthrottle. This helps your engine and other parts of your vehicle wear in at the heavier loads.
0Obey speed limit restrictions when towing a trailer. Don???t drive faster than the maximumposted speed for trailers (or no more than 55 mph (90 km/h)) to save wear on your vehicle???s parts.
Three important considerations have to dowith weight: 0 the weight of the trailer,
0 the weight of the trailer tongue
0 and the total weight on your vehicle???s tires.
Weight of the Trailer
How heavy can a trailer safely be?
It should never weigh more than 1,500lbs. (680 kg) under normal driving conditions. It should never weigh more than 1,000lbs. (450 kg) when driven on long grades at high ambient temperatures (Above 90 deg. F). But even that can be too heavy.
It depends on how you plan to use your rig. For example, speed, altitude, road grades, outside temperature and how much your vehicle is used to pull a trailer are all important. And, it can alsodepend on any special equipment that youhave on your vehicle.
You can ask your dealer for our trailering information or advice, or you can write us at:
Chevrolet Motor Division Customer Assistance Department
P.O. Box 7047
Troy, MI
General Motors of Canada Limited Customer Communication Centre 1908 Colonel Sam Drive
Oshawa, Ontario L1H 8P7

Weight of the Trailer Tongue
The tongue load (A) of any trailer isan important weight to measure because it affects thetotal capacity weight of your vehicle. The capacityweight includes the curb weight of the vehicle,any cargo you may carry in it, and the people whowill be riding in thevehicle. And if you will tow a trailer, you must subtract the tongue load fromyour vehicle???s capacity weight because your vehicle will be carrying that weight, tooSee. ???Loading Your Vehicle???in theIndex for more information about your vehicle???s maximum load capacity.
If you???re using a
After you???ve loaded your trailer, weigh the trailer and then the tongue,separately, to see if the weights are proper. If they aren???t, you may be able to getthem right simply by moving some items around in the trailer.
Total Weighton Your Vehicle???s Tires
Be sureyour vehicle???s tires are inflated to the upper limit for coldtires. You???ll find these numbers on the Certification labelat the rear edgeof the driver???s door or see ???Loading Your Vehicle??? in the Index. Then be sure you don???t go over the GVW limit for your vehicle, including the weight of the trailer tongue.
AB

Hitches
It???s important to havethe correct hitch equipment. Crosswinds, large trucksgoing by and rough roads are a few reasonswhy you???ll need the right hitch. Here are some rules to follow:
0The bumpers on your vehicle are not intended for hitches. Do not attach rental hitches or other
Will you have to make any holes in the body of your vehicle when you install a trailer hitch?If you do, then be sure to sealthe holes laterwhen you remove the hitch. If you don???t sealthem, deadly carbon monoxide (CO) from your exhaust can get intoyour vehicle (see???Carbon Monoxide??? in the Index). Dirt and water can, too.
Safety Chains
You should always attach chains between your vehicle and your trailer. Cross the safety chainsunder the tongue of the trailer so that the tongue will not drop to the
road if it becomes separated from the hitch. Instructions about safety chains may be provided by the hitch manufacturer or by the trailer manufacturer. Follow the manufacturer???s recommendation for attaching safety chains and do not attach them to the bumper. Always leave justenough slack so you can turn with your rig. And, never allow safety chains to drag onthe ground.
Trailer Brakes
If your trailer weighs more than 1,000lbs. (450 kg) loaded, then it needs its own brakes
Driving witha Trailer
Towing a trailer requiresa certain amount of experience. Before setting out forthe open road, you???ll want to get to know your rig. Acquaint yourself with the feel of handling and braking with the added weight of the trailer. And always keep in mind that the vehicleyou are driving is now a good deal longerand not nearly as responsive asyour vehicle isby itself.
Before you start, check the trailer hitchand platform (and attachments), safety chains, electricalconnector, lamps, tires and mirror adjustment.If the trailer has electric brakes,start your vehicle and trailer moving and then apply the trailer brake controller by hand to be sure the brakes are working. This letsyou check your electrical connectionat the same time.
During your trip, check occasionally to be surethat the load is secure, and that the lamps and any trailer brakes are still working.
Following Distance
Stay at least twiceas far behind the vehicleahead as you would when driving your vehicle without a trailer. This can helpyou avoid situationsthat require heavy braking and sudden turns.
Passing
You???ll need mofe passing distance upahead when you???re towing a trailer. And, because you???re a good deal longer, you???ll need to go much farther beyond the passed vehicle beforeyou can return to your lane.
Backing Up
Hold the bottom of the steeringwheel with one hand. Then, to movethe trailer to the left, just move that hand to the left. To move the trailer to theright, move your hand to the right.Always back up slowly and,if possible, have someone guide you.

Making firns
I NOTICE:
Making very sharp turns while trailering could cause the trailer to come in contact with the vehicle. Your vehicle could be damaged. Avoid making very sharp turns while trailering.
When you???re turning with a trailer, make wider turns than normal. Do this so your trailer won???t strike soft shoulders, curbs, road signs, trees or other objects. Avoid jerky orsudden maneuvers. Signal well in advance.
%rn Signals When Towing a Trailer
When you tow a trailer, your vehicle may need a different turn signal flasher and/or extrawiring. Check with your Chevrolet dealer. The green arrowson your instrument panel will flash whenever you signal a turn or lane changeProperly. hooked up, the trailer lamps will also flash,telling other drivers you???reabout to turn, change lanes or stop.
When towing a trailer, the green arrows on your instrument panel will flash for turns even if the bulbs on the trailer are burned out. Thus, you may think drivers behind you are seeing your signal when they are not. It???s important to check occasionally to be surethe trailer bulbs are still working.
Driving On Grades
Reduce speed and shift to a lower gear before you
start down a long or steep downgrade. If you don???t shift down, you might have to use your brakes so much that they would get hot and no longer work well.
On a long uphill grade, shift down and reduce your speed to around 45 mph (70 km/h) to reduce the possibility of engine and transmission overheating.
If you are towing a trailer and you have an automatic transmission with overdrive, you may prefer to drive in DRIVE (D) instead of AUTOMATIC OVERDRIVE (@) (or, as you need to, a lower gear). Or, if you have a manual transmission with FIFTH (5) or SIXTH( 6 )gear and you are towing a trailer it isbetter not to use
FIFTH ( 5 )or SIXTH (6) gear. Just drive in FOURTH
(4) gear (FIFTH ( 5 )gear if you have a
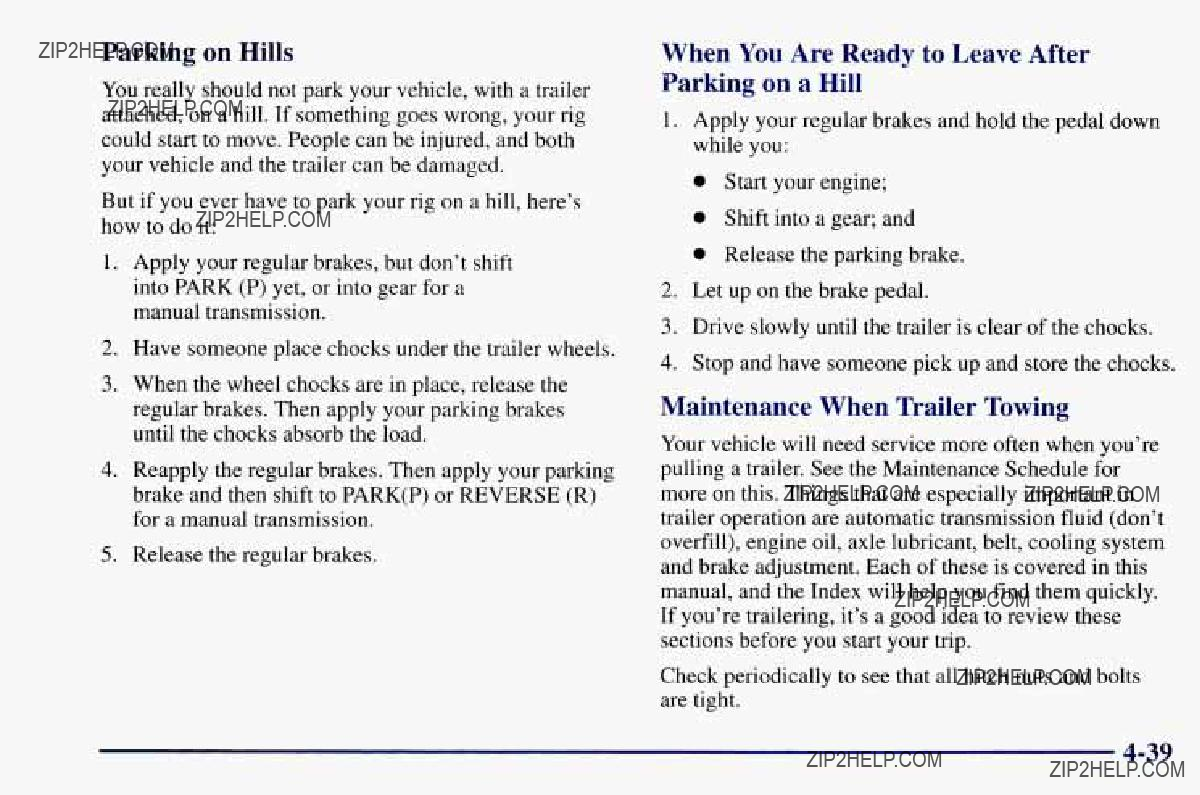
Parking on Hills
You really should not park your vehicle, with a trailer attached, ona hill. If something goes wrong, your rig could start to move. People can be injured, and both your vehicle and the trailer can be damaged.
But if you ever have topark your rig on a hill, here???s how to do it:
1.Apply your regular brakes, but don???tshift into PARK (P) yet, or into gear fora manual transmission.
2.Have someone place chocks under the trailer wheels.
3.When the wheel chocks arein place, release the regular brakes.Then apply your parking brakes until the chocks absorbthe load.
4.Reapply the regularbrakes. Then apply your parking brake and then shift to PARK(P) or REVERSE (R) for amanual transmission.
5. Release the regular brakes.
When You Are Ready to Leave After
Parking ona Hill
1.Apply your regular brakes and hold the pedal down while you:
 Start your engine;
0 Shiftintoagear; and
0 Release the parking brake.
2.Let up on the brake pedal.
3.Drive slowly until the trailer is clear of the chocks.
4.Stop and have someone pick up and store the chocks.
Maintenance When Trailer Towing
Your vehicle will need service more often when you???re pulling a trailer. See the Maintenance Schedule for more on this. Things that are especially important in trailer operation are automatictransmission fluid (don???t overfill), engine oil, axlelubricant, belt, cooling system and brake adjustment. Each of these is covered in this manual, and the Index will help you find them quickly. If you???re trailering, it???s a good idea to review these sections beforeyou start your trip.
Check periodically to see that all hitch nuts and bolts are tight.

b% NOTES
0Section 5 Problems on the Road
Here you???ll find what to do about someproblems that can occur on the road.

Hazard Warning Flashers
Press the button in to make
your front and rear turn
signal lamps flash on
and off.
Your hazard warning flashers work no matter what position your key is in, or even if the key isn???t in.
Your hazard warning flashers let you warn others. They also let police know you have a problem. Your front and rear turn signal lamps will flash on and off.

To turn off the flashers,pull out on the collar.
Jump Starting
If your battery has run down, you may want to use another vehicle and some jumper cables to startyour Chevrolet. But please follow the stepsbelow to do it safely.
I A Ct' 'JTION:
When the hazardwarning flashers are on,your turn signals won't work.
Other Warning Devices
If you carry reflective triangles,you can set oneup at the sideof the road about 300 feet (100 m) behind your vehicle.
Batteries can hurt you. They can be dangerous because:
They contain acid that can burn you.
They contain gas that can explodeor ignite.
They contain enough electricity to burn you.
If you don't follow these steps exactly, some allor of these things can hurt you.
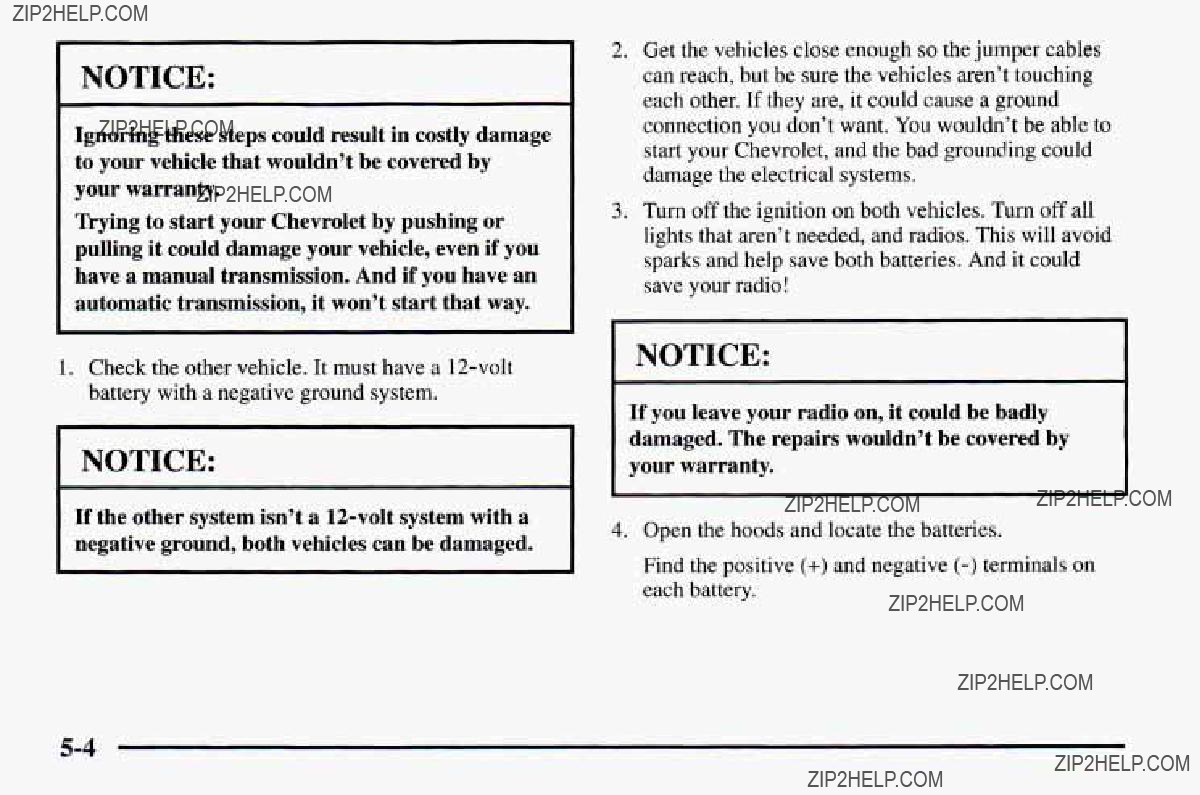
NOTICE:
Ignoring these steps could result in costly damage to your vehicle that wouldn???t be coveredby
your warranty.
Trying to start your Chevrolet by pushing or pulling it could damage your vehicle, even if you have a manual transmission. Andif you have an automatic transmission, it won???t start thatway.
1.Check the othervehicle. It must have a
NOTICE:
If the other system isn???ta
2.Get the vehicles close enough so the jumper cables can reach, but be sure the vehicles aren???t touching each other. If they are, it could cause aground connection you don???t want. You wouldn???t be able to start your Chevrolet, and the bad grounding could damage the electrical systems.
3.Turn off the ignition on both vehicles. Turn off all lights that aren???t needed, and radios. This will avoid sparks and help save both batteries. And it could save your radio!
I NOTICE:
If you leaveyour radio on, it could be badly damaged. The repairs wouldn???t be covered by your warranty.
4.Open the hoods and locate the batteries.
Find the positive (+) and negative
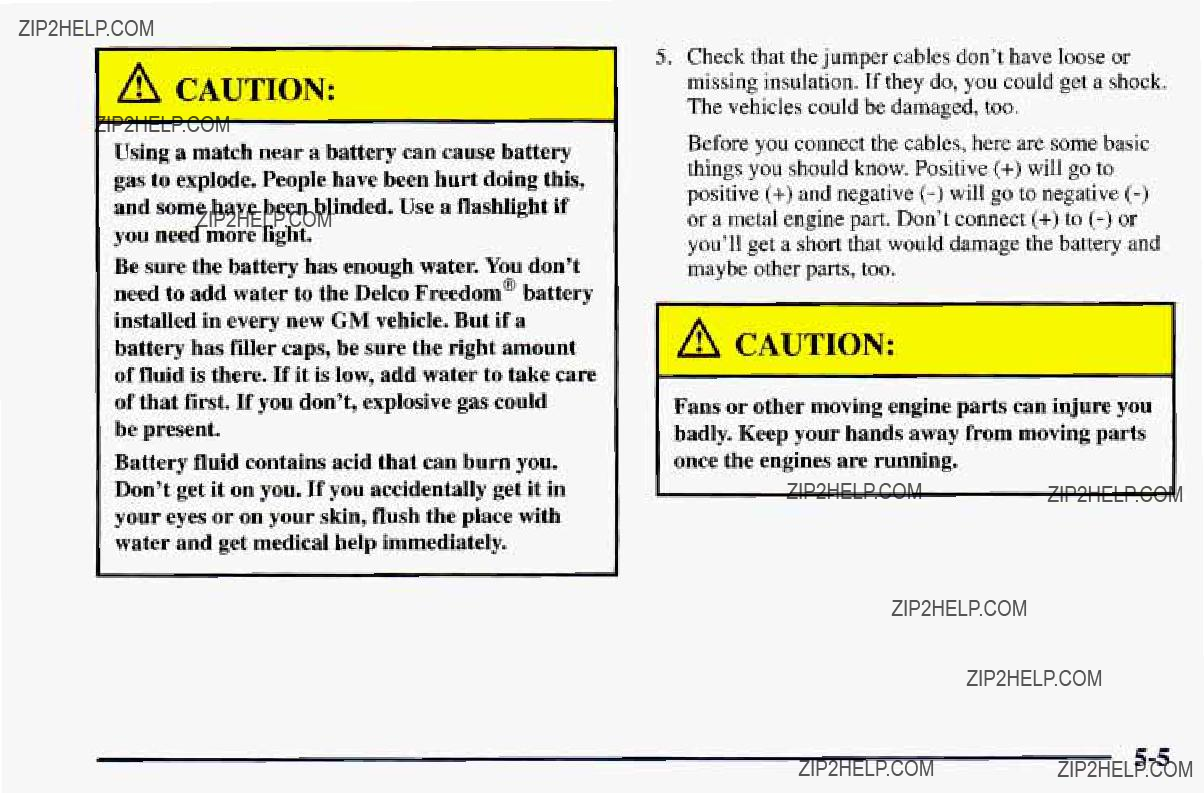
A CAUTIOR-
Using a match near a battery cancause battery gas to explode. People have beenhurt doing this, and some have been blinded. Use a flashlight if you needmore light.
Be sure the battery has enough water. You don???t need to add water to the Delco Freedom@battery installed in everynew GM vehicle. Butif a
battery has filler caps, be sure the right amount of fluid is thereIf. it is low, add water to take care of that first. If you don???t, explosive gas could
be present.
Battery fluid contains acid that can burn you. Don???t get it on you.If you accidentally getit in your eyes or on your skin, flush the place with water and get medical help immediately.
5. Check that the jumper cables don???t have loose or missing insulation. If they do, you could geta shock. The vehicles could be damaged, too.
Before you connect the cables, here are somebasic things you should know. Positive (+) will go to positive (+) and negative
r
ms or other moving engineparts can injure you badly. Keepyour hands away from moving parts once the engines are running.

6.Connect the red positive (+) cable to the positive(+) terminal of the vehicle with the dead battery.Use a remote positive(+) terminal if the vehicle has one.
7. Don???t let the other end touch metal. Connect it to the positive(+) terminal of the good battery. Use a remote positive (+) terminal if the vehicle has one. But don???t use the junction block on your Chevrolet.
8. Now connect the black negative
dead battery.
It goes to a heavy unpainted metal part on the engineof the vehicle with the dead battery.
9.Attach the cable at least 18 inches (45 cm) away from the dead battery, but not near engine parts that move. The electrical connectionis just asgood there, but the chanceof sparks gettingback to the battery is much less.
10.Now start the vehiclewith the good battery and run the engine for awhile.
11.Try to start the vehicle with the dead battery. If it won???t start after afew tries, it probably needs service.
12.Remove the cables in reverse orderto prevent electrical shorting. Take care that they don???t touch each other or any other metal.
A. Heavy Metal Engine Part
B. Good Battery
C. Dead Battery
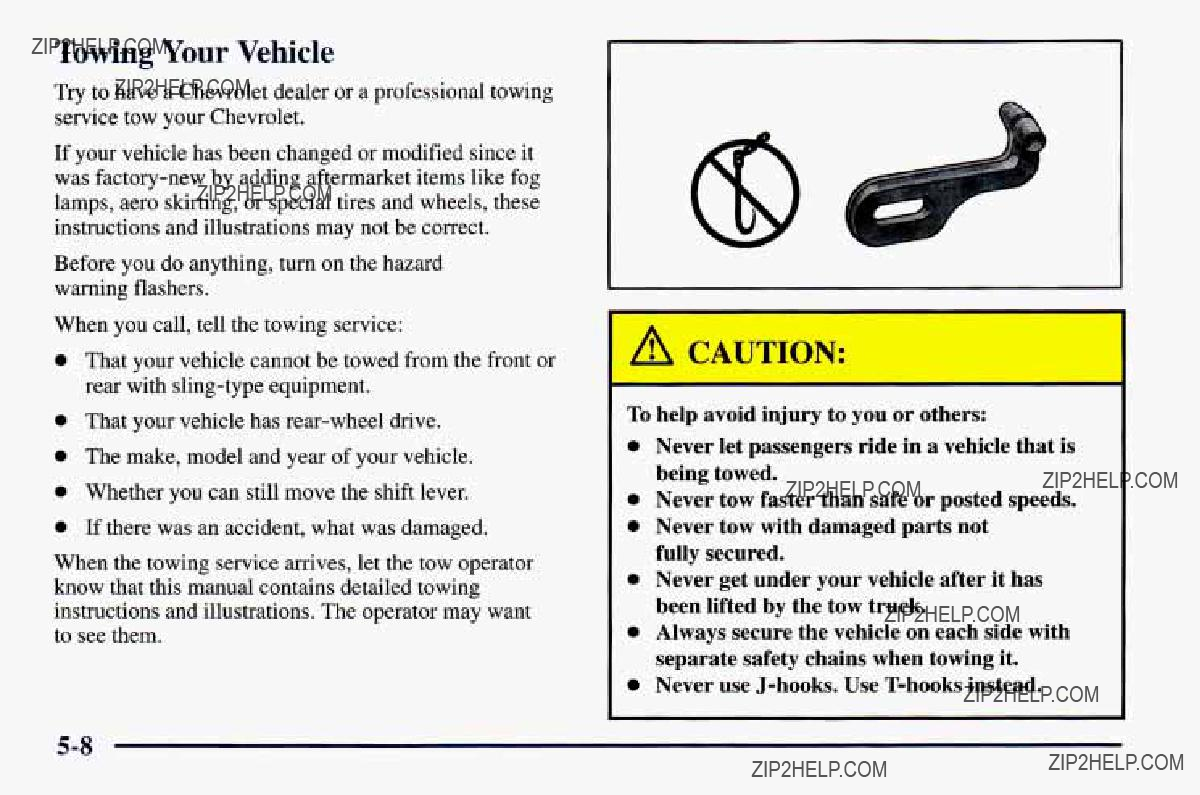
Towing Your Vehicle
Try to have a Chevrolet dealer or a professional towing service tow your Chevrolet.
If your vehicle has been changed or modified since it was
Before you do anything, turn on thehazard warning flashers.
When you call, tell the towing service:
0That your vehicle cannot be towed from the front or rear with
0 That your vehicle has
0 The make, model and year of your vehicle.
0 Whether you can still move the shift lever.
0 If there was an accident, what was damaged.
When the towing service arrives, let the tow operator know that this manual contains detailed towing instructions and illustrations. The operator may want to see them.
To help avoidinjury toyou or others:
0 Never let passengersride in a vehicle that is being towed.
0 Never towfaster than safe or posted speeds.
0 Never tow with damagedparts not fully secured.
0 Never getunder your vehicle after it has been liftedby the tow truck.
0Always secure the vehicleon each side with separate safety chains when towing it.
Never use

A CAUTION:
A vehicle can fall from a car carrierif it isn???t adequately secured. Thiscan cause a collision, serious personal injury andvehicle damage. The vehicle should be tightly secured with chains or steel cables beforeit is transported.
Don???t usesubstitutes (ropes, leather straps, canvas webbing, etc.) that can be cut by sharp edges underneath the towed vehicle. Always use
When your vehicle is being towed, havethe ignition key turned to the OFF position.The steering wheel should be clamped in a
brake released.
Don???t have your vehicle towed on the drivewheels, unless you must. If the vehiclemust be towed on the drive wheels, be sureto follow the speed and distance restrictions later in this section youror transmission will be damaged.If these limitationsmust be exceeded, then the drive wheels have tobe supported on a dolly.

Front Towing
Tow Limits - 35mph (56 k d ) , 50 miles (80 km)
Do not tow with
Use wheel lift or car carrier equipmentAdditional. ramping may be required for
I
Attach
NOTICE:
Do not attach winch cables or
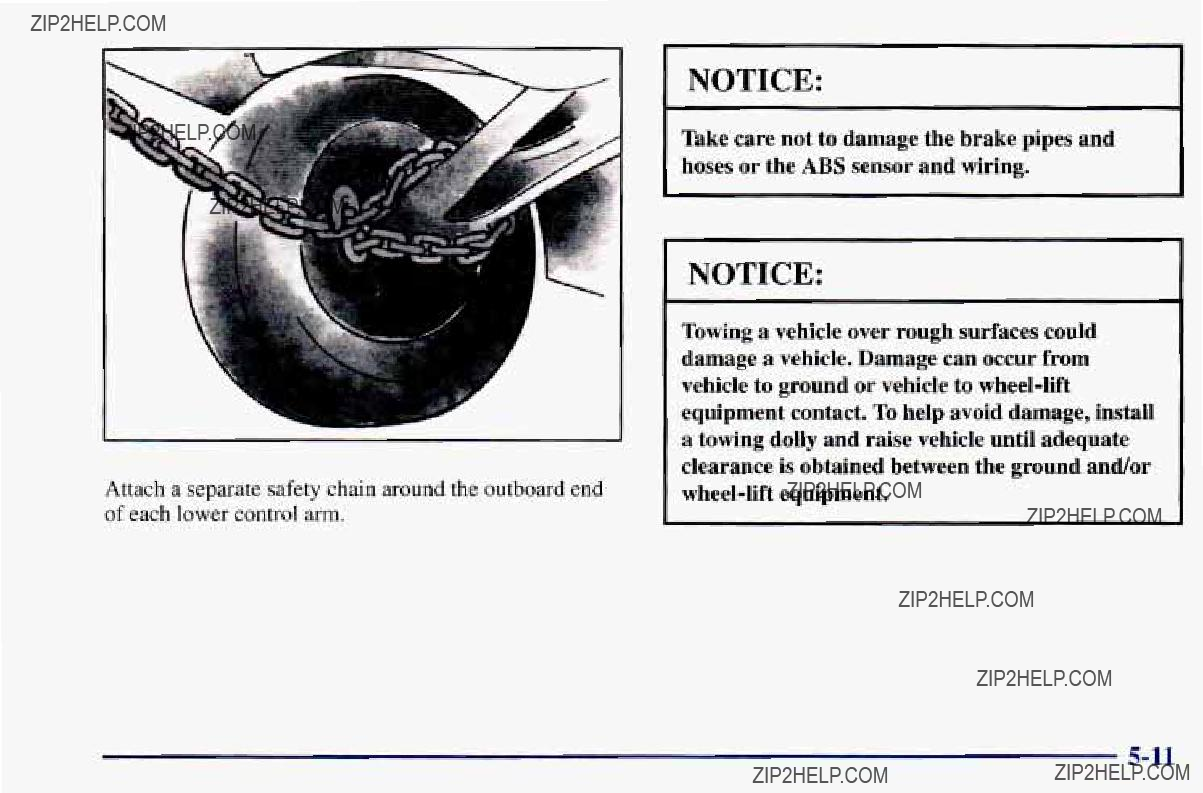
Attach a separatesafety chain around the outboard end of each lower control arm.
Take care not to damage the brake pipes and hoses or the ABS sensor and wiring.
NOTICE:
Towing a vehicle over roughsurfaces could damage a vehicle, Damagecan occur from vehicle to ground or vehicle to

Rear Towing
NOTICE:
Do not attachwinch cablesor
Do not tow with
Use
Use safety chainsand wheel straps.
Towing a vehicle over roughsurfaces could damage a vehicle. Damagecan occur from vehicle to ground or vehicle to

Attach
Attach a separatesafety chain around each outboard end of the rear axle.
I NOTICE:~
Take carenot to damage the brake pipes and cables.

'Engine Overheating
You will find a coolant temperature gage on your Chevrolet's instrument panel. You may also find a LOW COOLANT warning light on your Chevrolet's instrument panel. (V8 Engine Only)
If Steam Is Coming From Your Engine
t A
/!\ CAUTION:
Steam from an overheated engine canburn badly, evenif youjust open the hood. Stay away from the engine if you see or hearsteam coming from it. Just turn it off and get everyone away from the vehicle until it cools down. Waituntil there is no sign of steam or coolant beforeyou open the hood.
If you keepdriving when your engine is overheated, the liquids init can catch fire.You or others could be badlyburned. Stop your engine if it overheats, and get out of the vehicle until the engine is cool.
I NOTICE:
~~~
If your engine catchesfire because you keep driving with no coolant,your vehicle can be badly damaged. The costlyrepairs would not be covered by your warranty.

If No Steam Is Coming From Your Engine
If you get the overheatwarning but see or hear no steam, the problem may not be too serious.Sometimes the engine can geta little toohot when you:
0 Climb a long hill on a hot day.
0 Stop after
0 Idle for long periods in traffic.  Tow a trailer.
If you get the overheat warning with no sign of steam, try this for aminute or so:
1.If you have an air conditioner,turn it off.
2.Turn on your heater to full hot at the highest fan speed and open the window as necessary.
3.If you???re in a traffic jam, shift to NEUTRAL (N);
otherwise, shift to the highest gearwhile driving
If you no longer have the overheatwarning, you can drive. Justto be safe, drive slower for about10 minutes. If the warning doesn???t comeback on, you can
drive normally.
If the warning continues, pull over, stop, and park your vehicle right away.
If there???s still no sign of steam, you can idle the engine for two or threeminutes while you???re parked, to see if the warning stops. But then, if you still have the warning, turn o f t h e engine and get everyone out
of the vehicle until it coolsdown.
You may decide notto lift the hood but to get service help right away.

A CAUTION:
An electric fan under the hood can startup even when the engine is not running and can injure you. Keep hands, clothing and tools away from any underhood electric fan.
If the coolant inside the coolant recovery tank is boiling don???t do anything else until it coolsdown.
When you decide it???s safe to lift the hood, here???s what you???ll see:
A.Coolant Recovery Tank
B.Radiator Pressure Cap
C.Electric Engine Fan
When it is cool, remove the coolantrecovery tank cap and look atthe dipstick.
The coolant level should beat FULL COLD.
If it isn???t, you may have aleak in the radiator hoses, heater hoses,radiator, water pump or somewhere else in the cooling system.
Heater and radiatorhoses, and other engine parts, can be very hot. Don???t touch themIf you. do, you can be burned.
Don???t run the engine if there is a leak.If you run the engine, it could loseall coolant. That could cause an engine fire,and you could beburned. Get any leak fixed beforeyou drive the vehicle.
NOTICE:
Engine damage from running your engine without coolant isn???t coveredby your warranty.
If there seems to be no leak, with the engine on, check to see if the electric engine fanis running. If the engineis overheating, the fanshould be running. If it isn???t, your vehicle needs service.
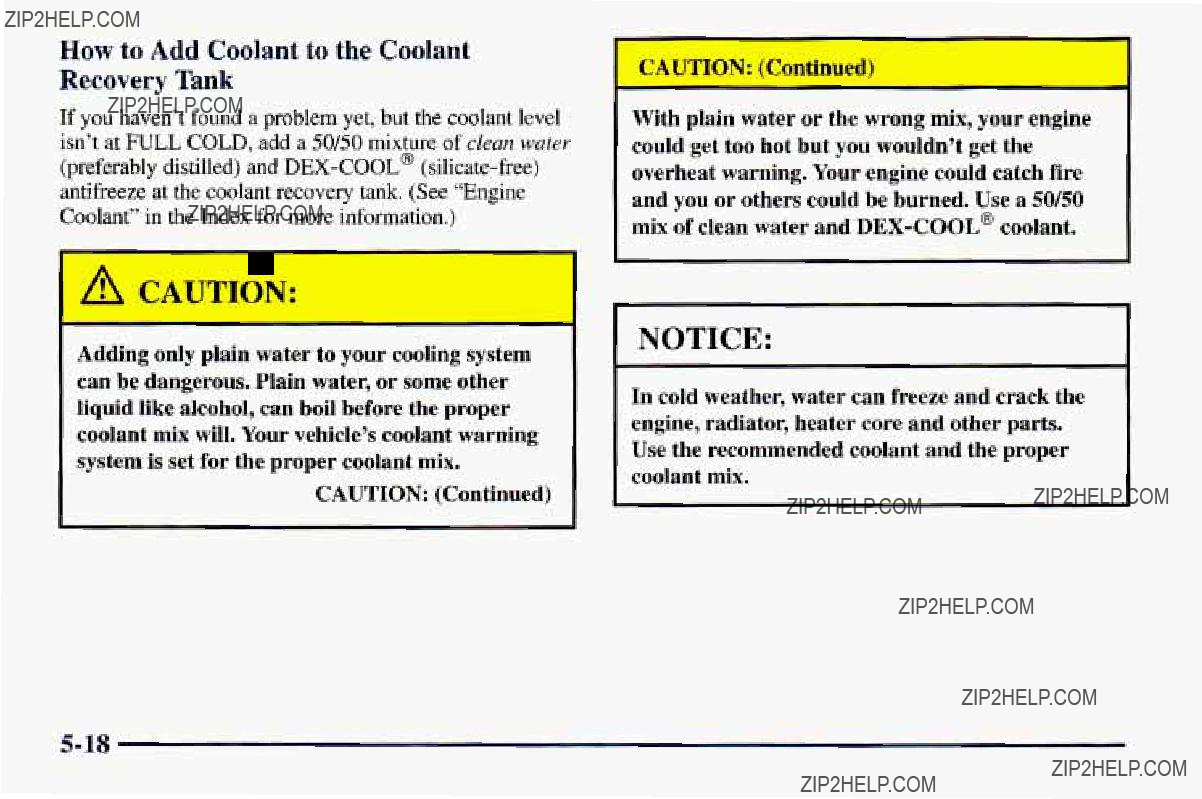
How to Add Coolant to the Coolant
Recovery Tank
If you haven???t found a problem yet, but the coolant level isn???t atFULL COLD, add a 50/50 mixture of clean water (preferably distilled)
A CAUTION:
Adding only plain waterto your cooling system can be dangerous. Plain water,or some other liquid like alcohol,can boil beforethe proper coolant mix will. Your vehicle???s coolant warning system is set for the proper coolant mix.
CAUTION: (Continued)
With plain water or the wrong mix, your engine could gettoo hot but you wouldn???t get the overheat warning.Your engine could catch fire and you or others could beburned. Use a 50/50 mix of clean waterand
I NOTICE:
~
In cold weather, watercan freeze and crack the engine, radiator, heater core and other parts. Use the recommended coolantand the proper coolant mix.

You can be burnedif you spill coolant onhot engine parts. Coolant contains ethylene glycol and itwill burn if the engine parts arehot enough. Don't spill coolant on a hot engine.
When the coolantin the coolant recovery tank is at FULL COLD, start your vehicle.
If the overheat warning continues, there's onemore thing you can try. You can add the proper coolant mix directly to the radiator, but be surethe cooling system is cool beforeyou do it.
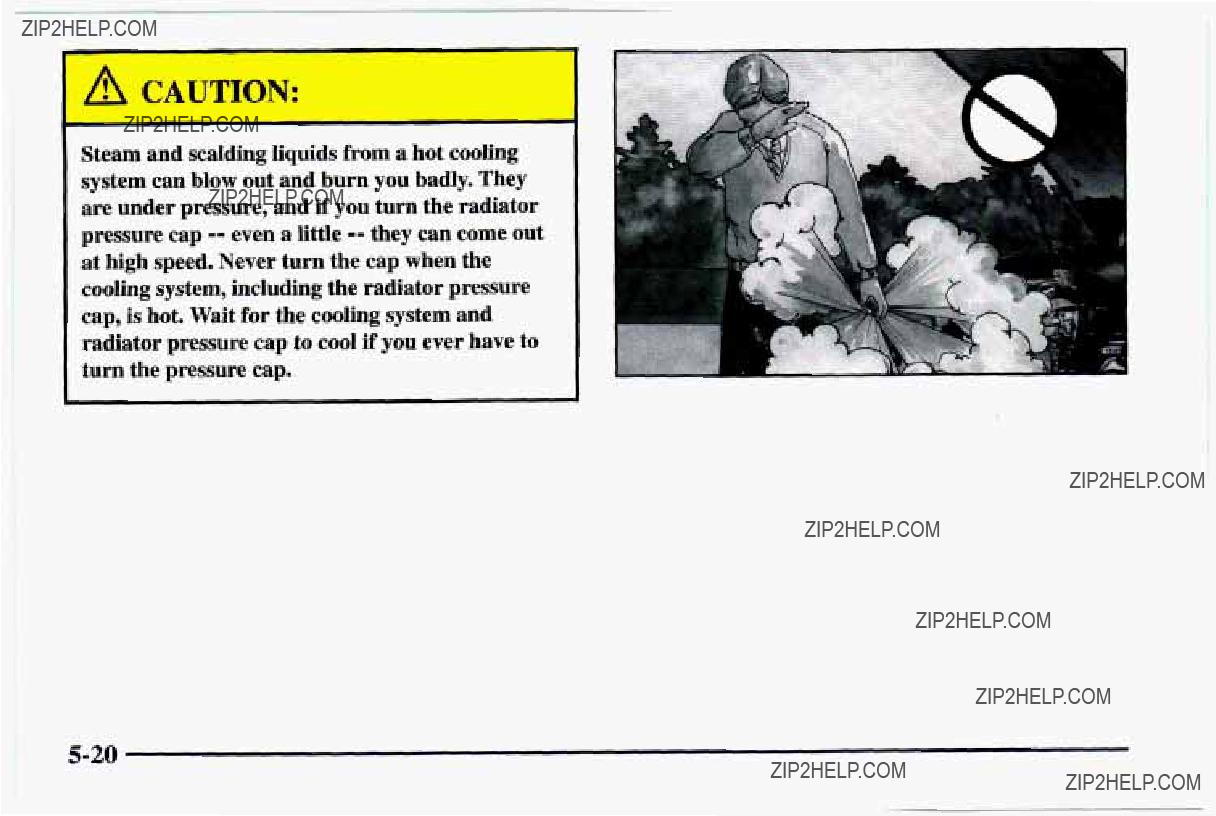
A CAUTION:
Steam and scalding liquids from a hot cooling system can blow out and burnyou badly. They are underpressure, and if

How to Add Coolantto the Radiator (V6 Engine Only)
1 NOTICE:
Your engine has a specific radiator fill procedure. Failure to follow this procedure could cause your engine to overheat and be severely damaged.
1. You can remove the pressure capwhen the cooling system, includingthe pressure capand upper radiator hose, is no longer hot.Turn the pressure capslowly counterclockwise until it first stops. (Don???t press down while turning the pressure cap.)
If you hear a hiss, wait for that to stop. A hiss means there is still some pressure left.

2. Then keep turning the pressurecap, but now push down as you turn it. Remove the pressure cap.
A CAUTION:
You can be burned if you spill coolant on hot engine parts. Coolant contains ethylene glycol and it will burnif the engine parts are hot enough. Don???t spill coolanton a hot engine.
J
3.After the engine cools,open the coolant air bleed valve.
3800 V6 (VIN Code K): There isone bleed valve. It is located on the thermostat housing.

4.Fill the radiator with the proper
If you see a streamof coolant coming from an air bleed valve, close the valve. Otherwise, closethe valve after the radiator is filled.
5.Then fill the coolant recovery tank to FULL HOT.
6.Put the cap back on the coolant recovery tank, but leave the radiator pressure cap off.

3
7.Start the engineand let it run until you can feel the upper radiator hose getting hot.Wdtch out for the engine fan(s).
8.By this time, the coolant level inside the radiator filler neck may be lower. If the level is lower, add more of the proper
9.Then replace the pressure cap. At any time during this procedure if coolant begins to flow out of the filler neck, reinstall the pressure cap. Be surethe arrows on the pressure cap line up like this.

How to Add Coolant tothe Radiator (VS Engine Only)
I NOTICE:
The LT1 Engine (Code P) has a specific radiator fill procedure. Failure to follow this procedure could cause your engineto overheat and be severely damaged.
1. You can remove the radiator pressure cap when the cooling system, includingthe radiator pressure cap and upper radiator hose, isno longer hot.Turn
the pressure cap slowly counterclockwise until it first stops. (Don't press down while turning the pressure cap.)
If you hear a hiss,wait for that to stop. A hiss means there is still some pressure left.
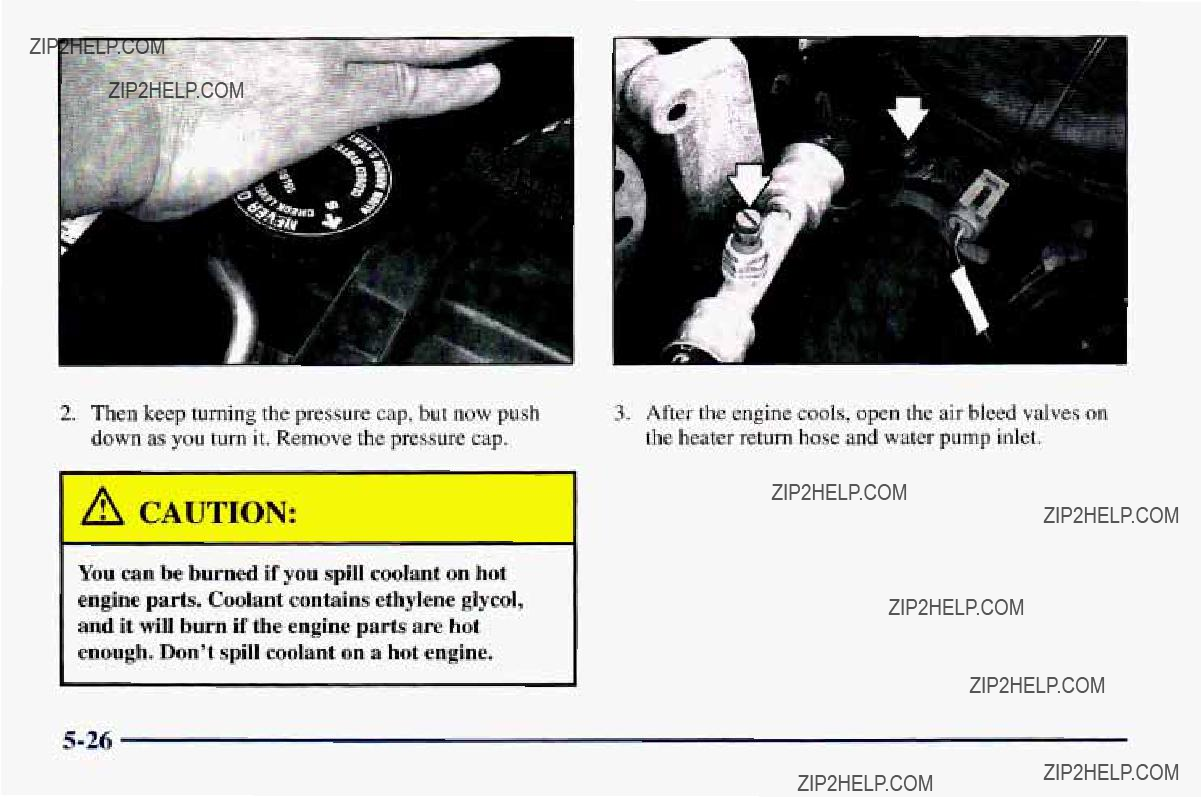
i
A CAUTION:
I
You can be burned if you spill coolant on hot engine parts. Coolant contains ethylene glycol, and it will burn if the engine parts are hot enough. Don't spill coolant ona hot engine.
4.Fill with the proper
5.Close the bleed valves.
6.Continue to fillthe radiator up to the base of the filler neck.
7.Rinse or wipe the spilled coolant from the engine and compartment.
8.Start the engine and allow it to run in idle for approximately four minutes.By this time, the coolant level inside the radiator will be lower. Add more of the proper mix through the filler neck until the level reaches the base of the filler neck.
E
9.Shut the engine off and replace the pressure cap. Be sure the arrows on the cap line up like this.

10.Then fill the coolant recovery tank to the proper level.
For a complete drain, flush and refill, see your Chevrolet dealer ora Chevrolet ServiceManual. To purchase a service manual, see ???Service and Owner Publications??? in the Index.
If a Tire Goes Flat
It???s unusual for a tire to ???blow out??? while you???re driving, especially if you maintain your tires properly. If air goes out of a tire, it???s much more likely to leak out slowly.
But if you should ever have a ???blowout,??? here are a few tips aboutwhat to expect and what to do:
If a front tire fails, the flat tirewill create a drag that pulls the vehicle toward that side. Take your foot off the accelerator pedal and grip the steeringwheel firmly. Steer tomaintain lane position, and then gently brake to a stop well out of the traffic lane.
A rear blowout, particularly on a curve, actsmuch like a skid and may require the same correction you???d use in a skid. In any rear blowout, remove your foot from the accelerator pedal. Get the vehicle under control by steering the way you want the vehicle to go. It may be very bumpy and noisy, but youcan still steer. Gently brake to a stop
If a tire goes flat, the next part shows how to useyour jacking equipment to change a flat tire safely.

Changing a Flat Tire
If a tire goes flat, avoid further tireand wheel damage by driving slowly to a level place. Turn on your hazard
warning flashers.
-
/\ CA, TION:
Changing a tire can cause an injury. The vehicle can slip off the jack androll overyou or other people. You and they could be badlyinjured. Find a level placeto change your tire. To help prevent the vehicle from moving:
1.Set the parking brakefirmly.
2.Put an automatic transmission shift lever in PARK (P), or shift a manual transmission
to FIRST(1) or REVERSE (R).
3.n r n off the engine.
To be evenmore certain the vehicle won???t move, you can put blocks at the front and rearof the tire farthestaway from the one being changed. That would bethe tireon the otherside of the vehicle, at the opposite end.
The followingsteps will tell you how to use the jack and change a tire.

Removing the Spare Tire and Tools
1
The equipment you???ll need is inthe right (passenger) rear areabehind the trim panel.
First you must remove the
Find the plastic screw heads in the trim panel over the spare tire. Use a coin or a key to turn the screw heads until the slots point front and back to the unlock position. Gently lift the trim panel front forward edge and move it out of the way.
Remove the wing nut and adapter and pull out thespare. See ???Compact Spare Tire??? later in this section for more information about the compact spare.

A
-
* .j

I
The jackhas a bolt at the end. Attach the wheel wrench to the jack bolt.
Turnthe wheel wrench to the right to raise the lift head a little.
If your wheel has a center cap, pry it off using the wheel wrench.
If your vehicle has a

Attach the wheel lock key to wrench. Remove the locking counterclockwise.
the socket of the wheel wheel nut by turning
Removing the Flat Tire and Installing the
Spare Tire
1.Using the wheel wrench, loosen all the wheel nuts. Don???t remove them yet.
2.Position the jack under the vehicle. There is a notch in the vehicle???s rocker flange. Raise the jack head until it fitsfirmly into the notch nearest the flat tire.
On convertible models, place the jackin a similar location.

Stay away from the moldings or fender flangesto avoid damaging them.
Put the compact spare tirenear you.
dangerous. If the vehicle slipsoff the jack, you could be badlyinjured or killed. Never getunder a vehicle whenit is supported only by a jack.
I NOTICE:
Raising your vehicle withthe jackimproperly positioned will damage the vehicle or may allow the vehicle to fall off the jack. Be sure to fit the jack lift headinto the proper location before raising your vehicle.

4. Remove any rust or dirt from the wheel bolts, mounting surfaces and spare wheel.
3.Raise the vehicleby rotating the wheel wrench clockwise. Raisethe vehicle far enoughoff the ground so there is enough room for the spare tire to fit.
Remove all thewheel nuts and take off the flat tire.

Rust or dirton the wheel, or on the parts to which it is fastened, can make the wheel nuts become looseafter a time. The wheel could come off and cause an accident. When you change wheel, remove anyrust or dirtfrom the places where the wheel attaches to the vehicle. In an emergency, youcan use a cloth or a paper towel to do this; but be sure to use ascraper orwire brush later, if you need to,to get allthe rust or dirt off.
-
A CAUTION:
Never use oilor grease on studs or nuts. If you
do, the nuts might come loose. Your wheel could fall off, causing a serious accident.
Replace the wheel nuts with the rounded end of the nuts toward the wheel. Tighten each nut by hand until the wheel is held against the hub.
5.Lower the vehicle by rotarmg the wheel wrench counterclockwise. Lowerthe jack completely.
Tighten the wheel nuts firmly in a
I
t
Incorrect wheel nuts or Improperly tightened wheel nuts can causethe wheel to become loose and even come off.This could leadto anaccident. Be sure to use the correct wheel nuts. If you have to replace them, besure to get newGM original equipment wheel nuts.
Stop somewhere as soon as you can and have the nuts tightened with a torque wrench to 100
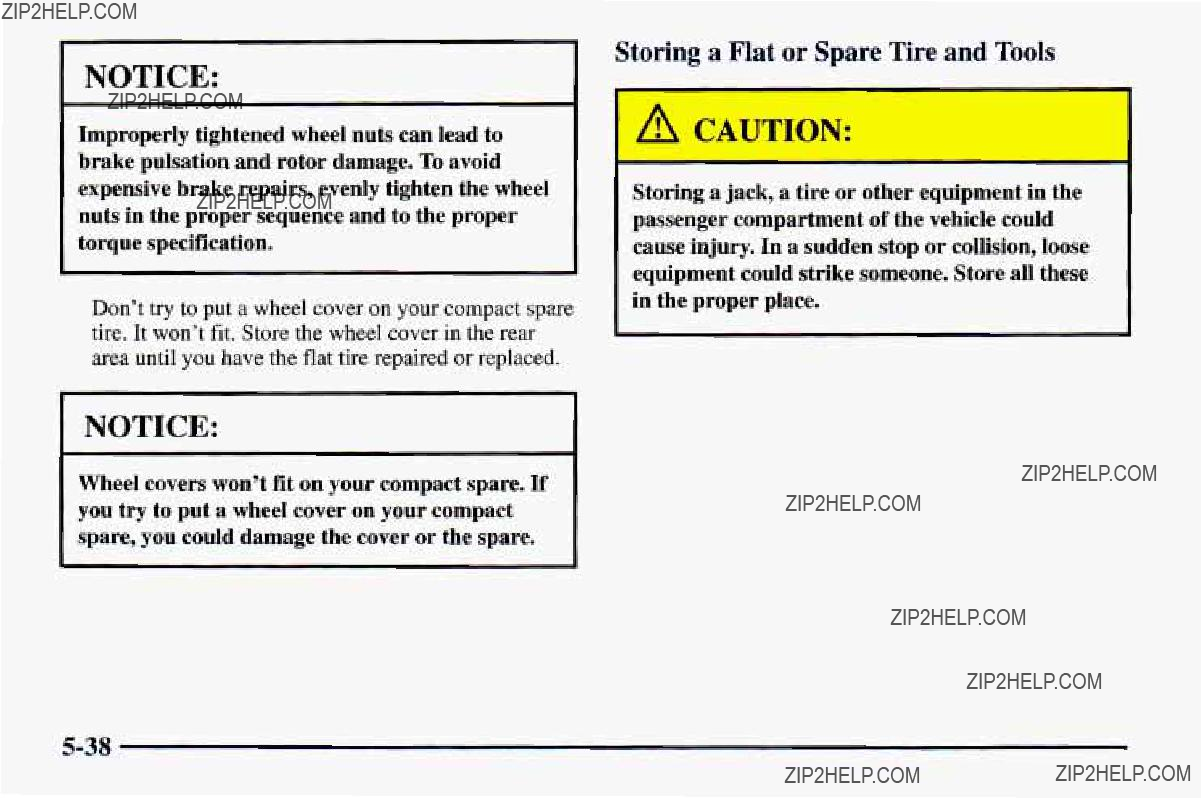
NOTICE:
Improperly tightened wheel nuts can lead to brake pulsation and rotordamage. To avoid expensive brake repairs, evenly tighten the wheel nuts in the proper sequence and tothe proper torque specification.
Don???t try to put a wheel cover on your compact spare tire. It won???t fit. Storethe wheel cover in the rear area until you have the flat tirerepaired or replaced.
I NOTICE:
Wheel covers won???tfit on your compact spare. If you try to put a wheel cover on your compact spare, you could damagethe cover or the spare.
Storing a jack, a tire or other equipment in the passenger compartment of the vehicle could cause injury. In a sudden stop or collision, loose equipment could strike someone. Store all these in the proper place.

Replace the jack, wheel wrench and flat tire using the storage instructions. When you replace the trim panel, be sure to tuck it under the weatherstrip.
1. Trim Panel
2. Bolt
3. Cover
4. Jack
5 . Wing Nut
6. Adapter
7 . Compact Spare Tire
8.
9. Carpet Flap
10. Tire Storage Bolt
I I
I
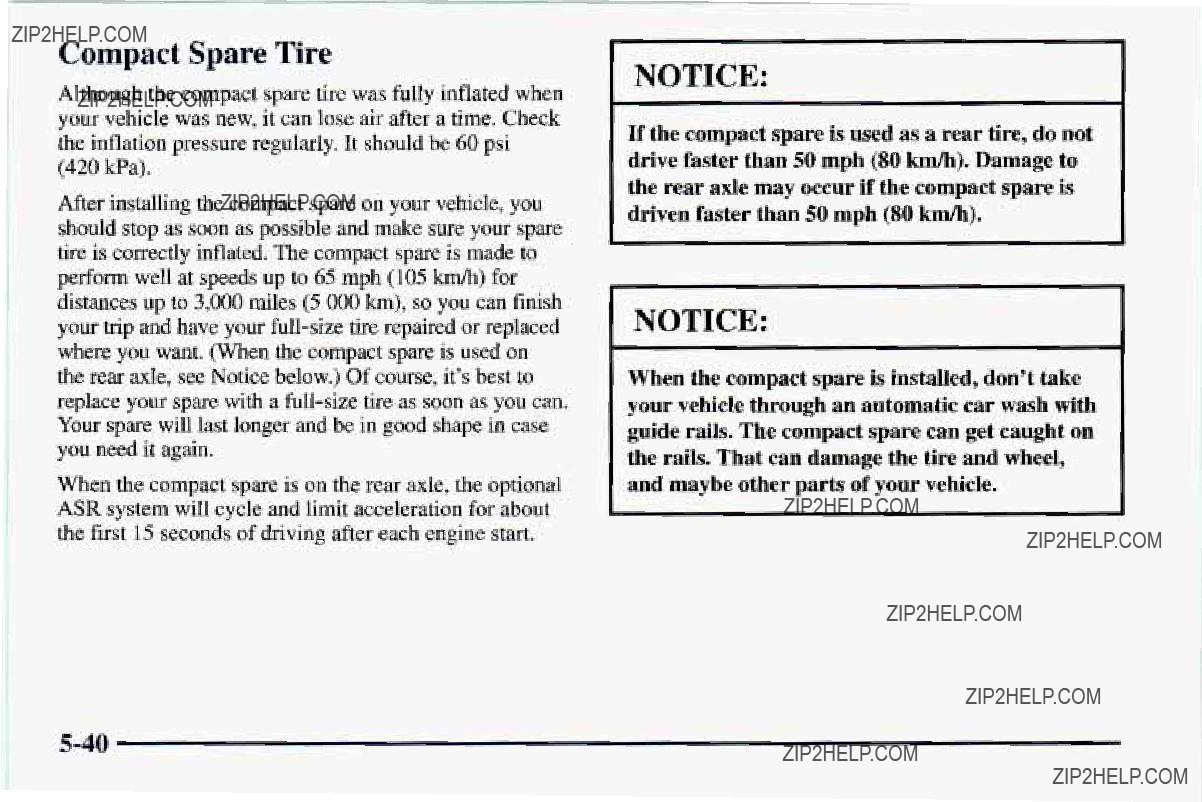

Don???t use your compact spare on other vehicles.
And don???t mix your compact spare tireor wheel with other wheels or tires.They won???t fit. Keep your spare tire and its wheel together.
NOTICE:
Tire chainswon???t fit your compact spareUsing. them can damage your vehicle and can damage the chains too. Don???t use tire chains on your compact spare.
If You???re Stuck: In Sand, Mud,
Ice or Snow
What you don???t want to dowhen your vehicle is stuck is to spin your wheels too fast. Themethod known as ???rocking??? can help you get out when you???re stuck, but you must use caution.
I If you let your tires spinat high speed, they can explode, andyou or others could be injured. And, the transmission or other partsof the vehicle can overheat. That could cause an engine compartment fire or other damage. When you???re stuck, spin thewheels as little aspossible. Don???t
spin thewheels above 35 mph (55 k m h ) as shown on the speedometer.

~
NOTICE:
Spinning your wheels can destroy partsof your vehicle as wellas the tires.If you spin the wheels too fast while shifting your transmission back and forth, you can destroy your transmission.
For information about using tire chainson your vehicle, see ???Tire Chains??? in the Index.
Rocking Your Vehicle To Get It Out
First, turn your steering wheelleft and right. That will clear the area around your front wheelsIf.your vehicle has ASR, you should turn the system off. (See???ASR System??? in the Index.) Then shift back and forth between REVERSE (R) and a forward gear (or witha manual transmission, betweenFIRST (1) or SECOND (2) and REVERSE (R)),spinning the wheels aslittle as possible. Release the accelerator pedal whileyou shift, and press lightly on the accelerator pedal whenthe transmission is
in gear. If that doesn???t get youout after a few tries, you may need to be towed out. If you do need to be towed out, see ???TowingYour Vehicle??? in the Index.
0Section 6 Service and Appearance Care
Here you will find information about the careofyour Chevrolet. This section begins with service and fuel information, and then it shows how to check important fluidand lubricant levels. There is alsotechnical information about your vehicle, and a part devoted to its appearance care.

Service
Your Chevrolet dealerknows your vehicle best and wants you to be happy with it. We hope you???ll go to your dealer forall your service needs. You???ll get genuine GM parts and
We hope you???ll want to keep your GM vehicle all GM. Genuine GM parts have one of these marks:
Delco
Doing Your Own Service Work
If you want to do some of your own service work, you???ll want to get the proper Chevrolet ServiceManual. It tells you much more about how to service your Chevrolet than this manual can. To order the proper service manual, see ???Service and Owner Publications??? in
the Index.
Your vehicle has an air bag system. Before attempting to do your own service work, see ???Servicing Your Air
You should keep a record with all parts receipts and list the mileage and the date of any service work you perform. See ???Maintenance Record??? in the Index.
You can beinjured andyour vehicle could be damaged if you try to do service work ona vehicle without knowing enoughabout it.
0Be sure you have sufficient knowledge, experience, the properreplacement parts and tools before youattempt any vehicle
maintenance task.
Be sure to use the propernuts, bolts and other fasteners. ???English??? and ???metric??? fasteners can be easily confused.If you use the wrong fasteners, parts can later break or fall off. You could behurt.
Adding Equipment to the Outsideof Your Vehicle
Things you might add to the outside of your vehicle can affect the airflowaround it. Thismay cause wind noise and affect windshield washer performance. Check with your Chevrolet dealer beforeadding equipment to the outside of your vehicle.
Fuel
The 8th digitof your vehicle identification number (VIN) shows the code letter for your engine. You will find the VIN at the top left of your instrument panel. (See ???Vehicle Identification Number??? in the Index.)
If you have the 3800 engine (VIN Code K), use regular unleaded gasoline rated at 87 octane orhigher.
If you have the 5.7L engine (VIN Code P), use premium unleaded gasoline rated at 91 octane or higher for best performance. You may use middle grade or regular unleaded gasolines, but your vehicle may not accelerate as well.

At a minimum, the gasoline you use should meet specifications ASTM D4814 in the United States and CGSB
Be sure the posted octane forpremium is atleast 91 (at least89 for middle grade and 87 for regular). If the octane is lessthan 87, you may get a heavy knocking noise when you drive. If it???s bad enough, it can damage your engine.
If you???re using fuel rated at therecommended octane or higher and you still hear heavy knocking, your engine needs service. But don???t worry if you hear a little pinging noise when you???re accelerating or driving up a hill. That???s normal, and you don???t have tobuy a higher octane fuel to getrid of pinging. It???s the heavy, constant knock that means you have a problem.
If your vehicle is certified to meet California Emission Standards (indicated on the underhood
authorized Chevrolet dealer for diagnosis to determine the cause of failure. In the event it is determined that the cause of the condition is the type of fuels used, repairs may not be covered by your warranty.
Some gasolines that are not reformulated for low emissions containan
To provide cleanerair, all gasolines in the United States are now required to contain additives thatwill help prevent deposits fromforming in your engine and fuel system, allowingyour emission control system to function properly. Therefore, you should not have
to add anything to the fuel. In addition, gasolines containing oxygenates,such as ethersand ethanol, and reformulated gasolinesmay be available in your area to help clean theair. General Motors recommends that you use these gasolinesif they comply with the specifications describedearlier.
NOTICE:
Your vehicle was not designedfor fuel that contains methanol. Don???t useit. It can corrode metal parts in your fuel system and also damage plastic and rubber parts. That damage wouldn???t be covered under your warranty.
Fuels in Foreign Countries
If you plan on driving in another country outsidethe United States or Canada, the proper fuelmay be hard to find. Never use leaded gasoline orany other fuelnot recommended in the previous text on fuel. Costly repairs caused by use of improper fuel wouldn???t be covered by your warranty.
To check on fuel availability, ask an auto club, or contact amajor oil company that does business in the country where you???ll be driving.
You can alsowrite us at the following address for advice. Justtell us where you???re going and give your Vehicle Identification Number (VIN).
General Motors International ProductCenter 1908 Colonel Sam Drive
Oshawa, Ontario L l H 8P7
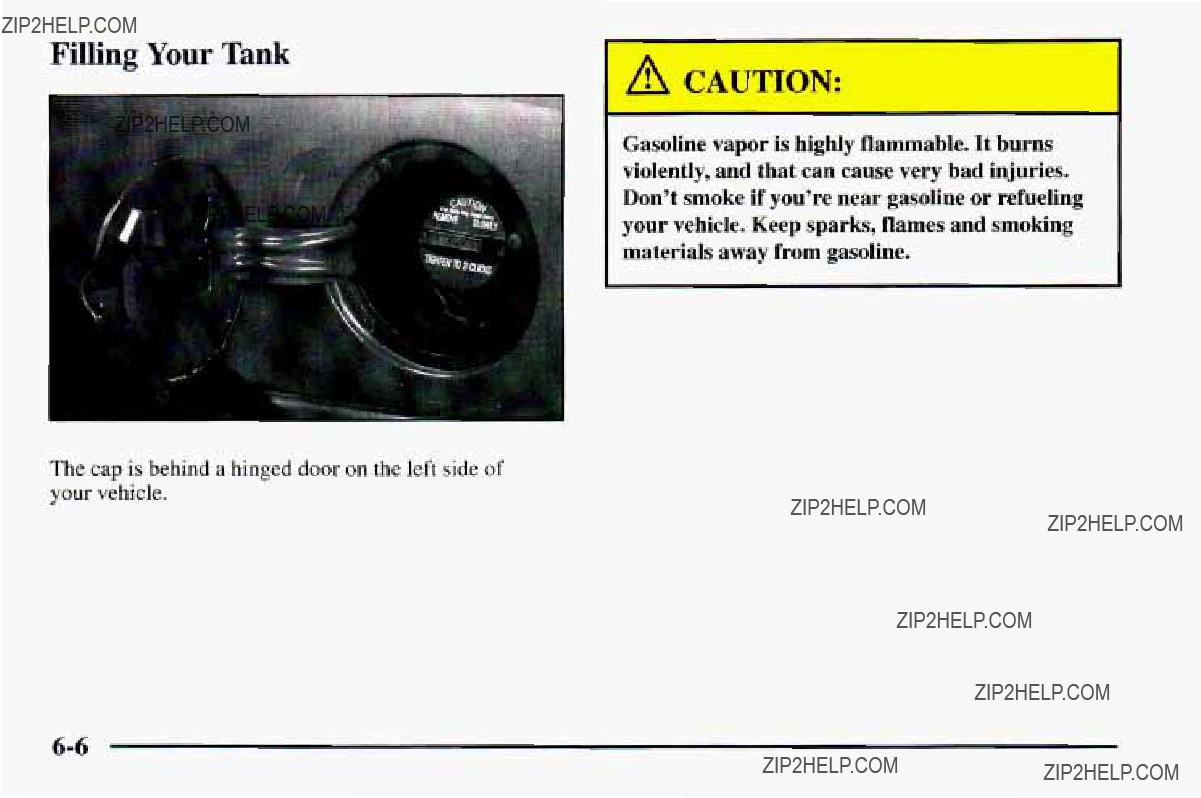
Filling Your Tank
The cap isbehind a hinged door on the left side of your vehicle.
??? A CAUTION:
-
Gasoline vaporis highly flammable. It burns violently, and that can cause very bad injuries. Don???t smoke if you???re near gasoline or refueling your vehicle. Keep sparks,flames and smoking materials away from gasoline.

While refueling,hang the cap insidethe fuel door.
To take off the cap,turn it slowly to the left (counterclockwise).
If you get gasoline on yourselfand then something ignitesit, you could be badlyburned. Gasoline can spray out on youif you openthe fuel filler cap too quickly.This spray canhappen if your tank is nearly full, and is more likely in hot weather. Openthe fuel filler cap slowly and wait for any ???hiss??? noiseto stop. Then unscrew the cap all the way.
Be careful not to spill gasoline. Clean gasoline from painted surfaces assoon as possible. See ???Cleaning the Outside of Your Chevrolet??? in the Index.

When you put the capback on, turn it to the right (clockwise) until you hear aclicking sound. Make sure you fully install the cap. Thediagnostic system can determine if the fuel cap has been left off or improperly installed. This would allow fuel to evaporate into the atmosphere. See ???Malfunction Indicator Lamp??? in
the Index.
NOTICE:
If you need a new cap, be sure to get the right type. Yourdealer can get onefor you. If you get the wrong type,it may not fit or have proper venting, and your fueltank andemissions system might be damaged.
Checking ThingsUnder the Yood
- -
An electric fan under the hood can start upand injure you even whenthe engine is not running. Keep hands, clothingand tools away from any underhood electric fan.
I /A CAUTION:
Things that burncan get on hot engineparts and start a fire. These includeliquids like gasoline, oil, coolant,brake fluid, windshield washerand other fluids, and plastic or rubber. You or others could beburned. Be careful not to drop orspill things that will burn onto a hot engine.

Hood Release
F
To open the hood, firstpull the handle insidethe lower left side of your vehicle.
n
Then go to the frontof the vehicle and pull up on the hood release locatedat the center areaof the hood.
Lift the hood.
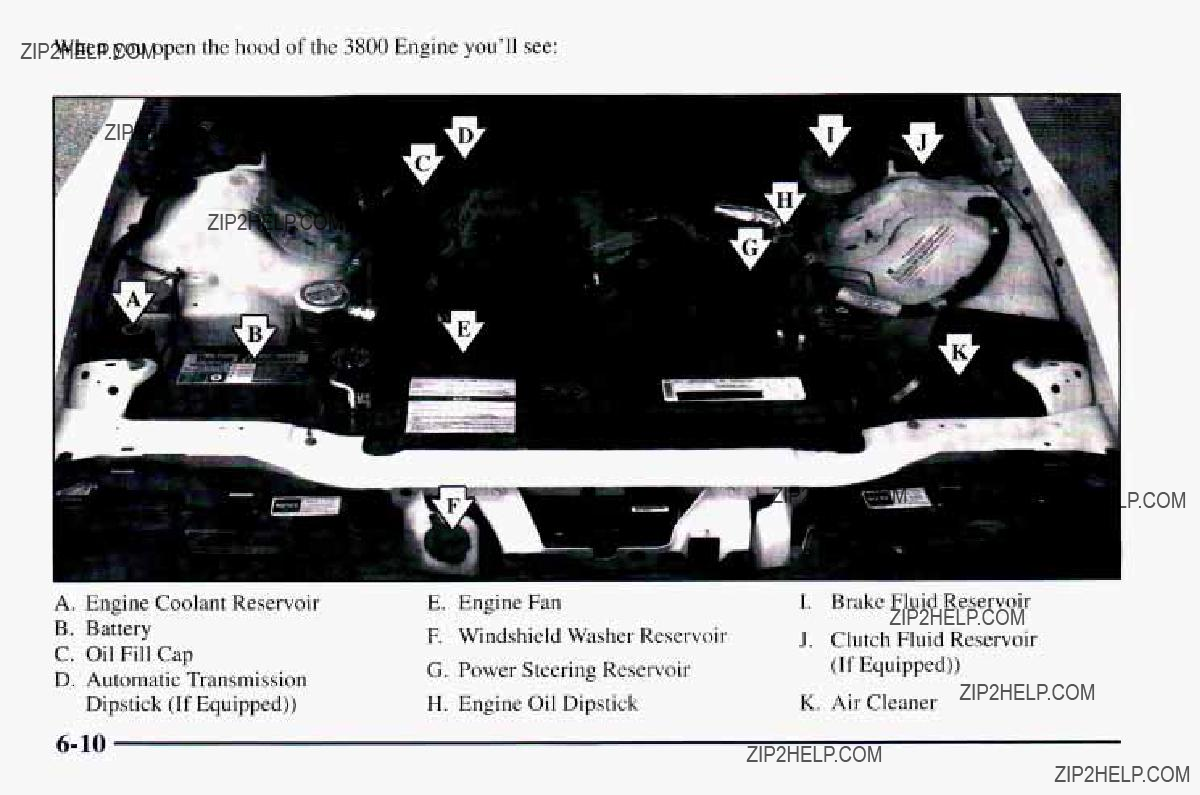
When you open the hood of the 3800 Engine you'll see:
. > . . .
-
k
I. Brake Fluid Reservoir
J. Clutch Fluid Reservoir
(If Equipped))
K . Air Cleaner
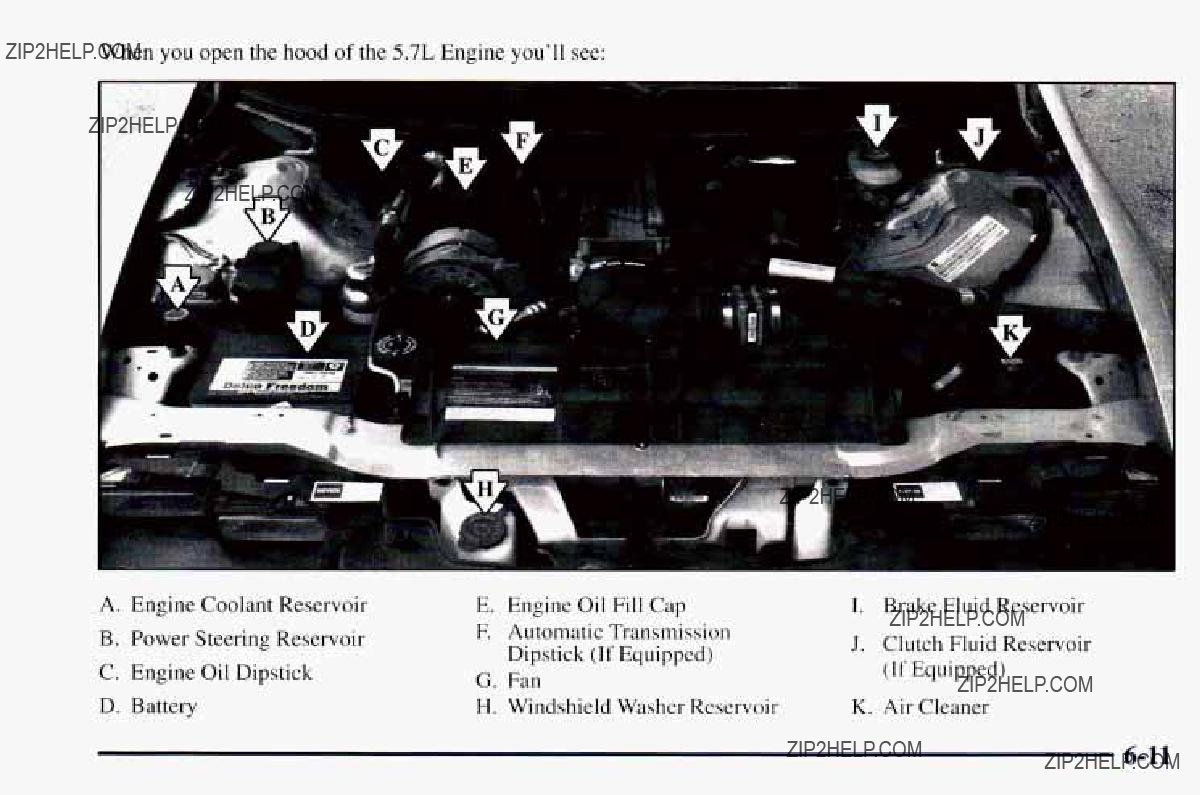
When you open the hood of the
A.Engine Coolant Reservoir
B.Power Steering Reservoir
C.Engine Oil Dipstick
D.Battery
5.7L Engine you???ll see:
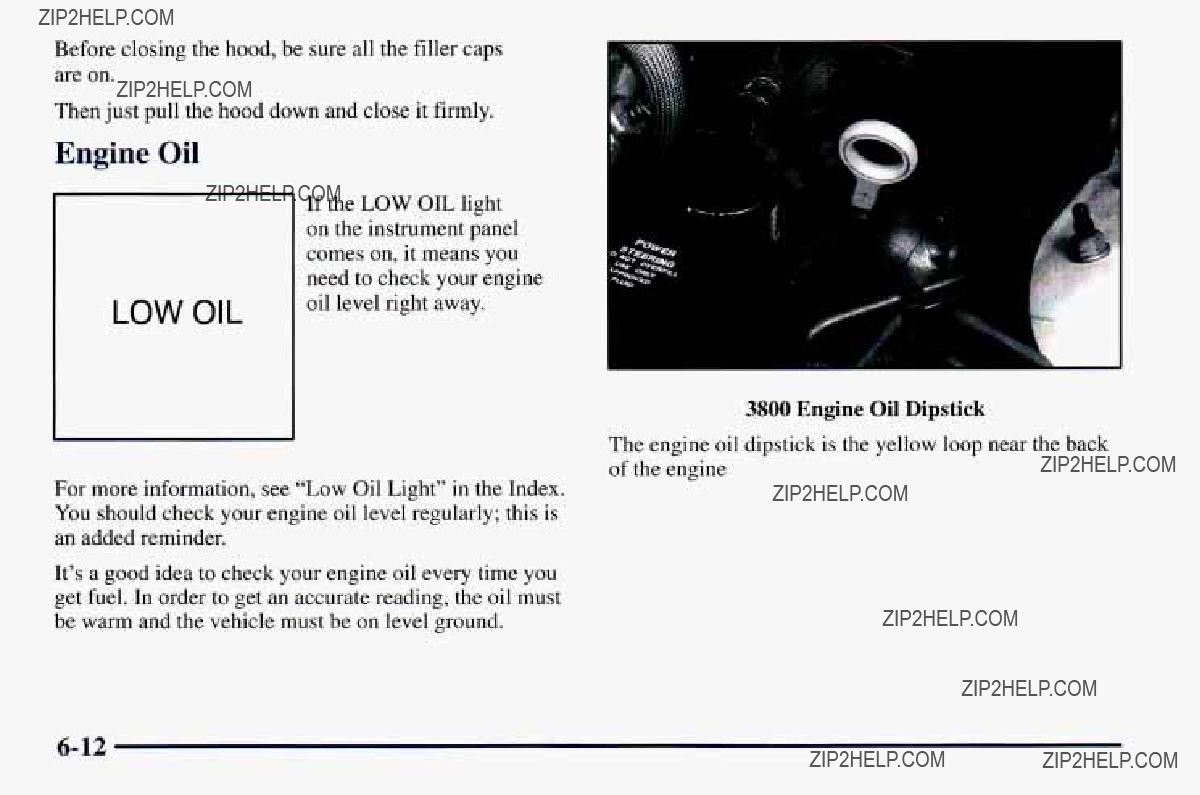


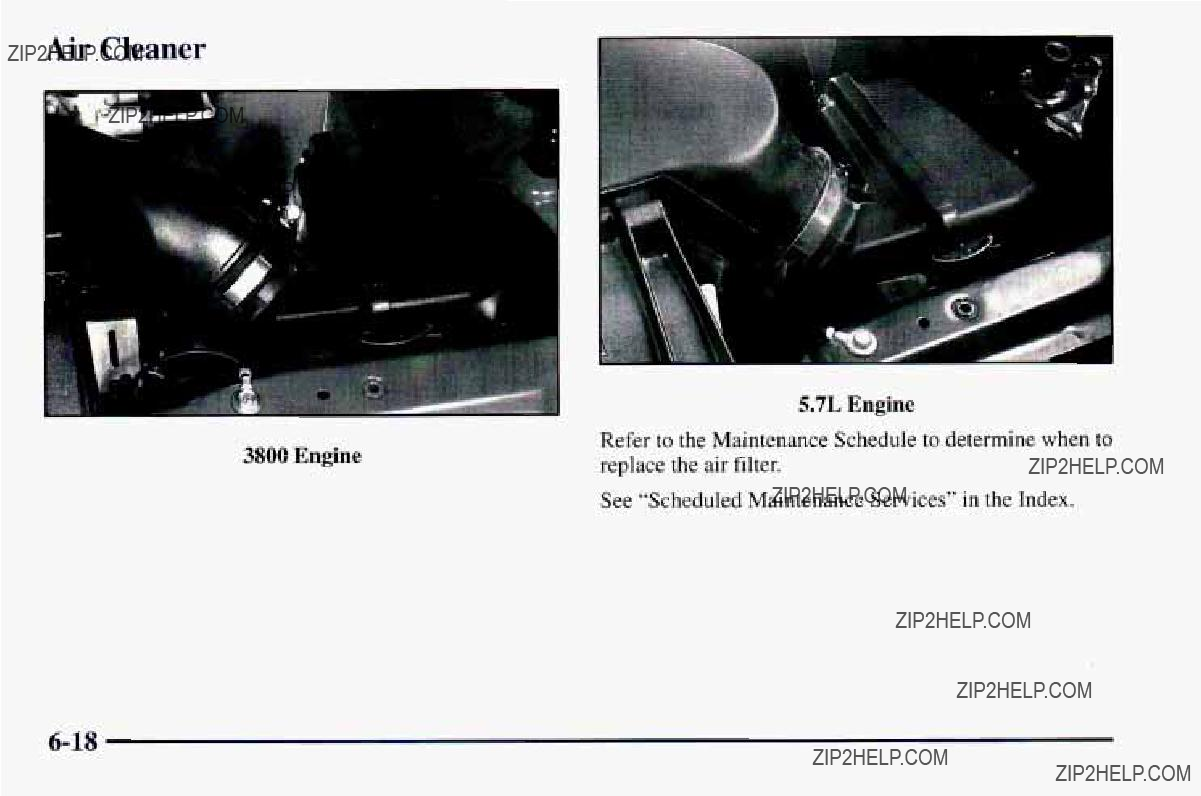


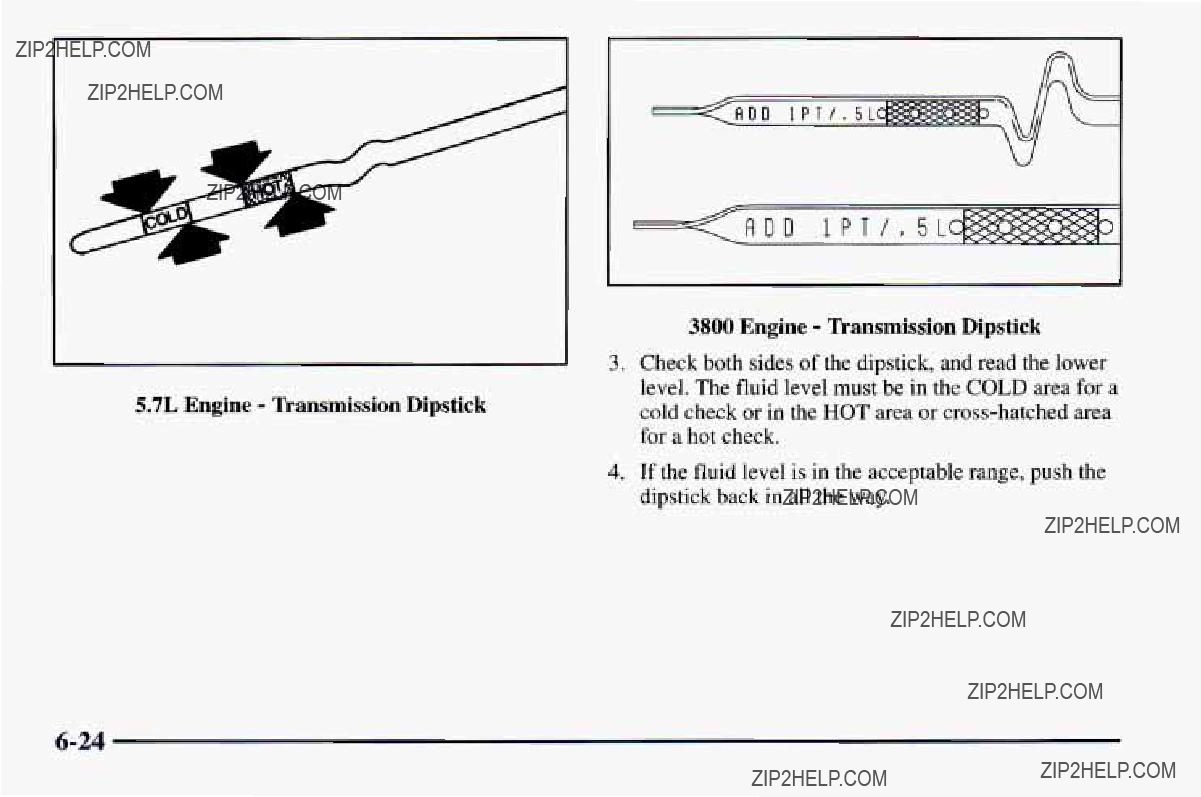


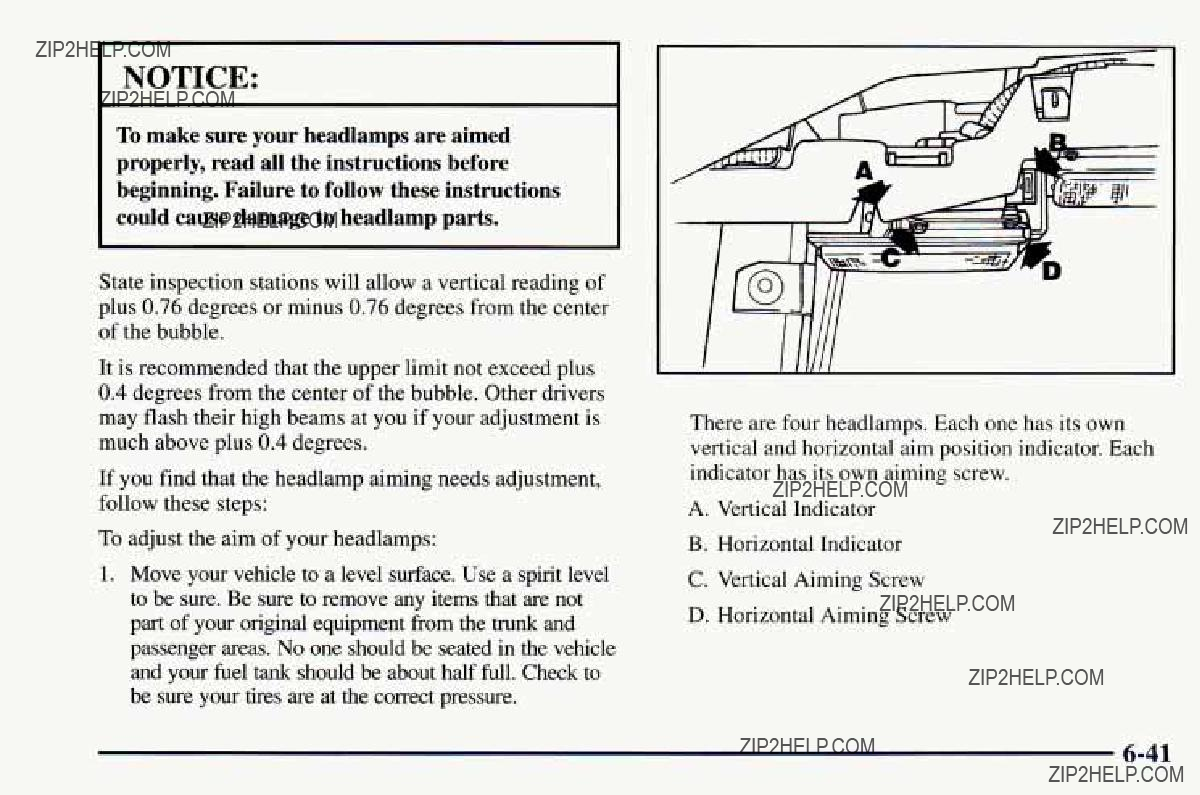

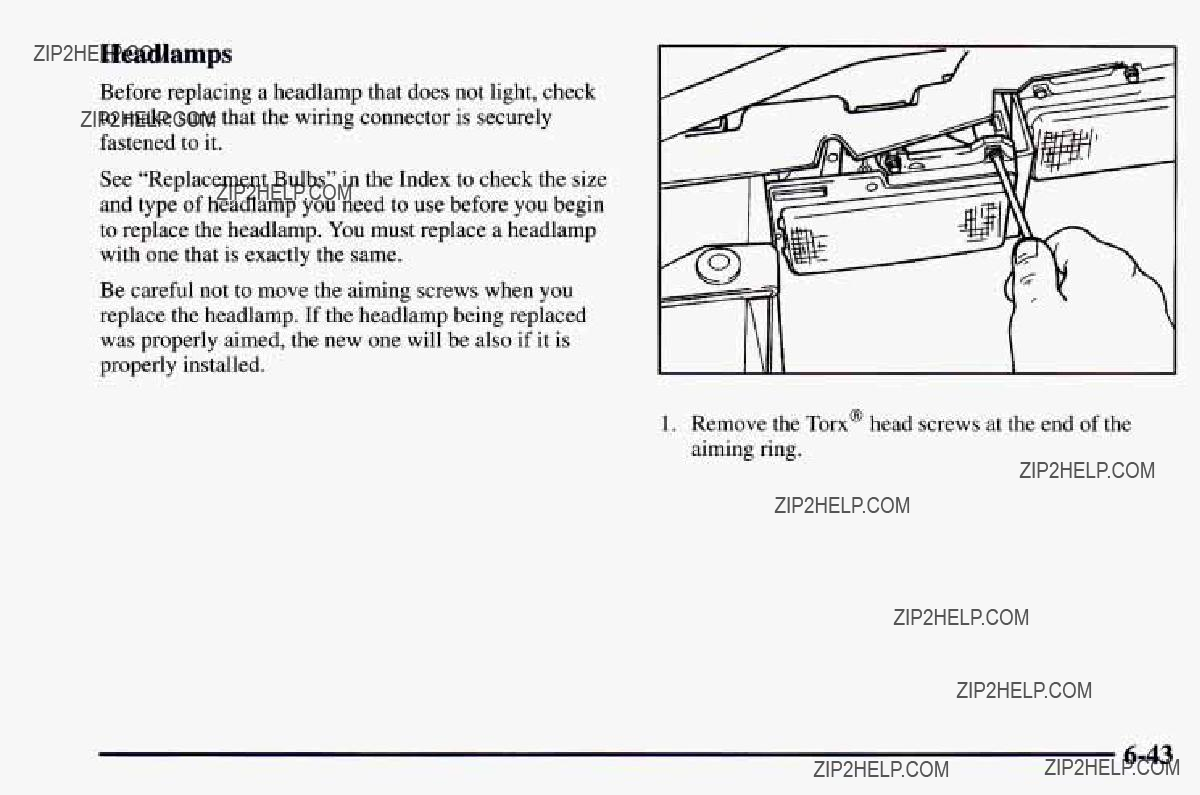
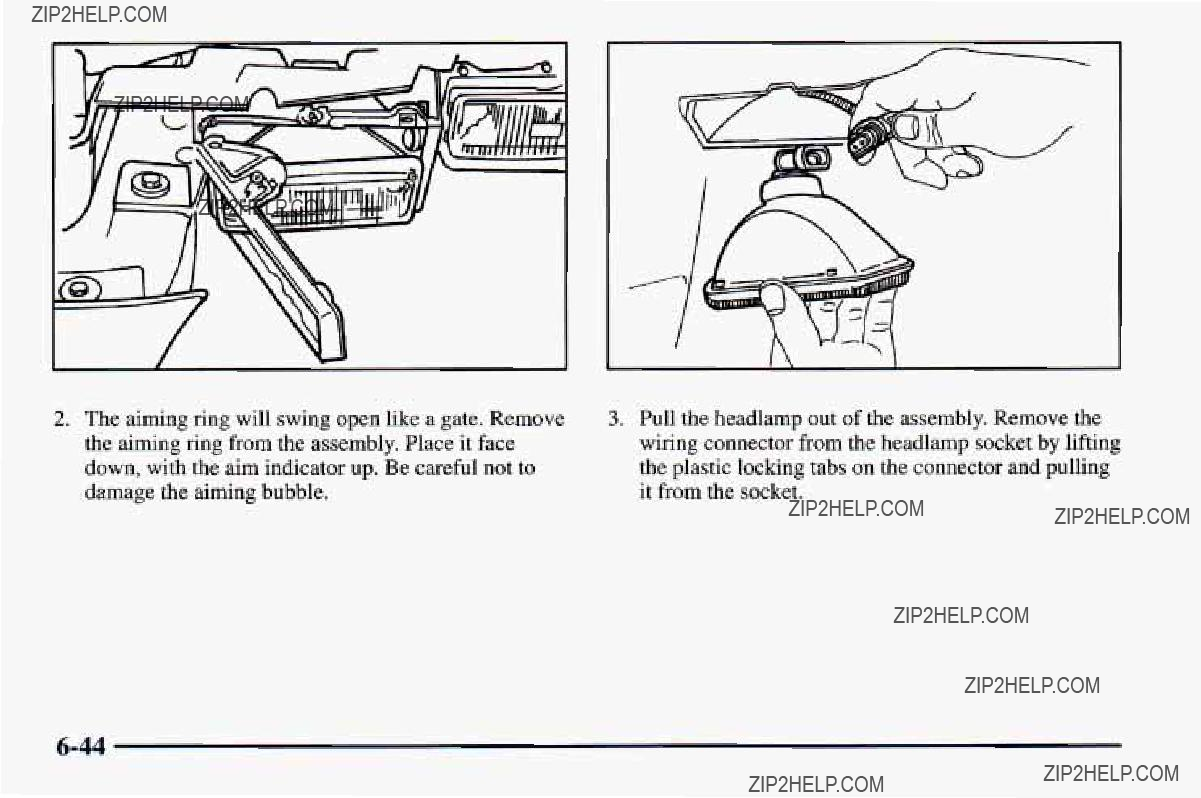


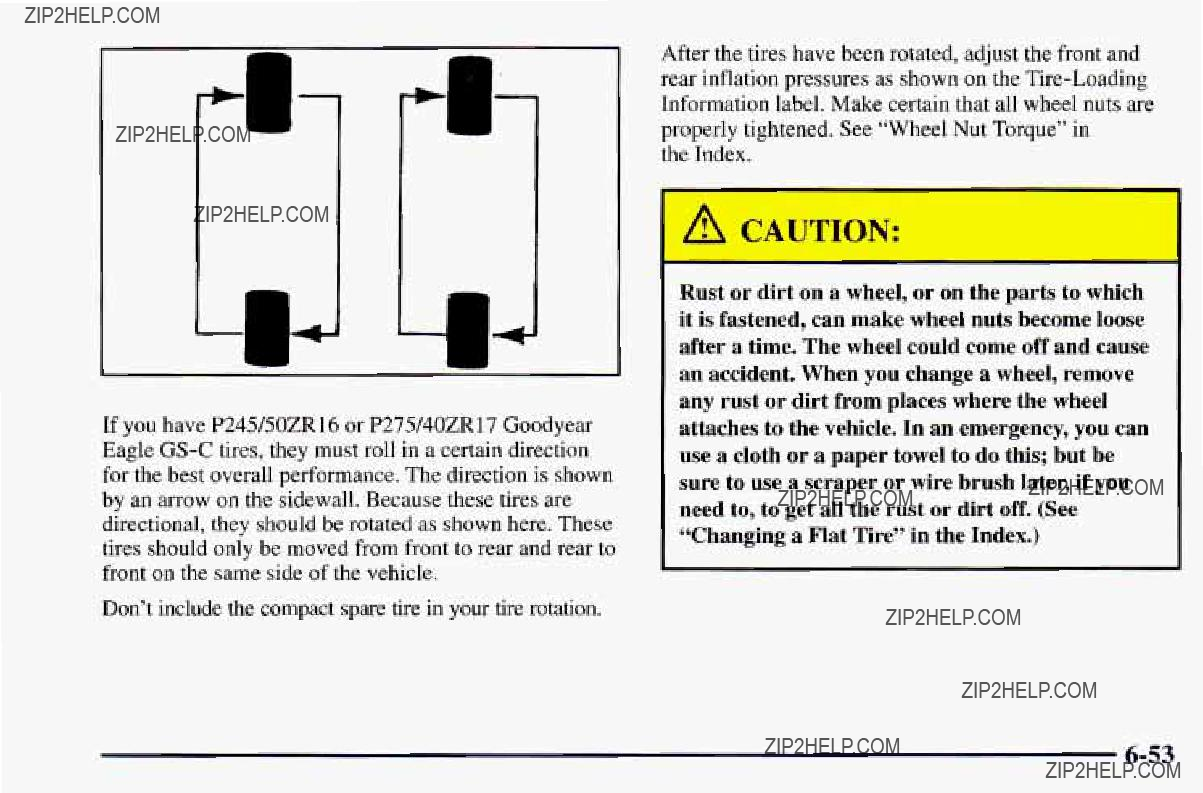


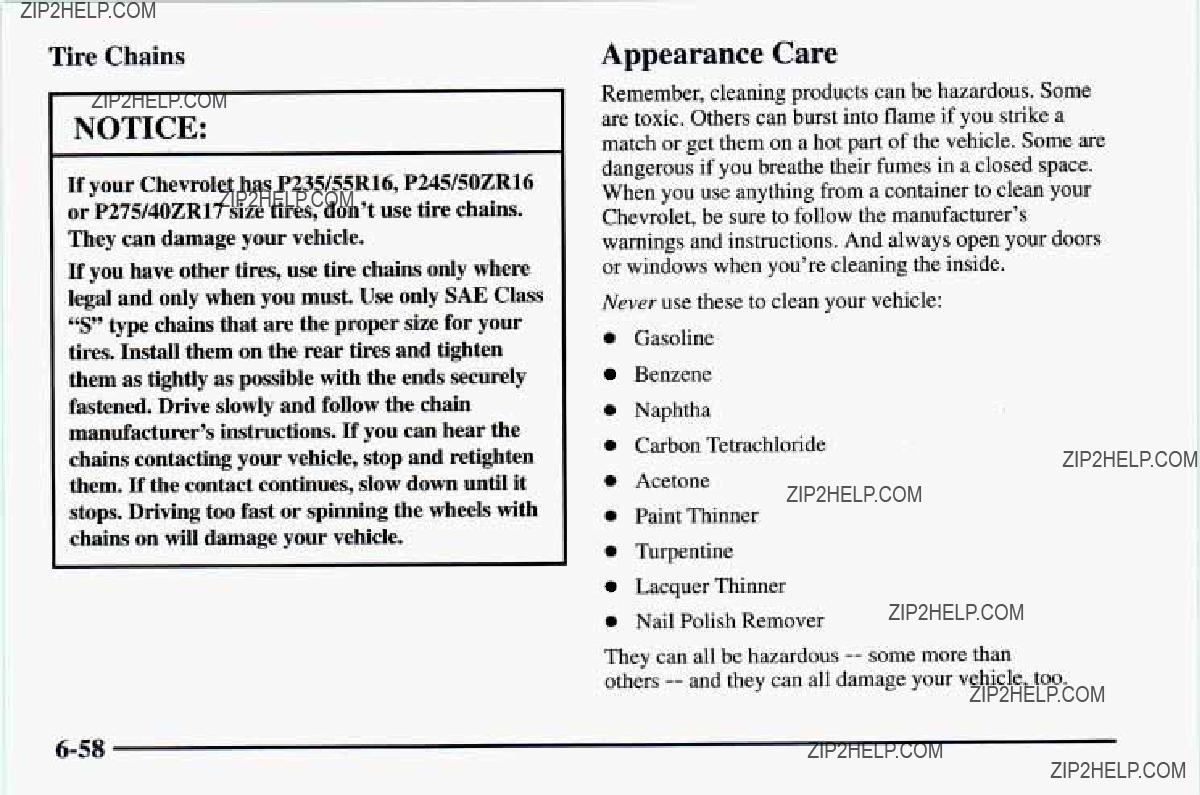


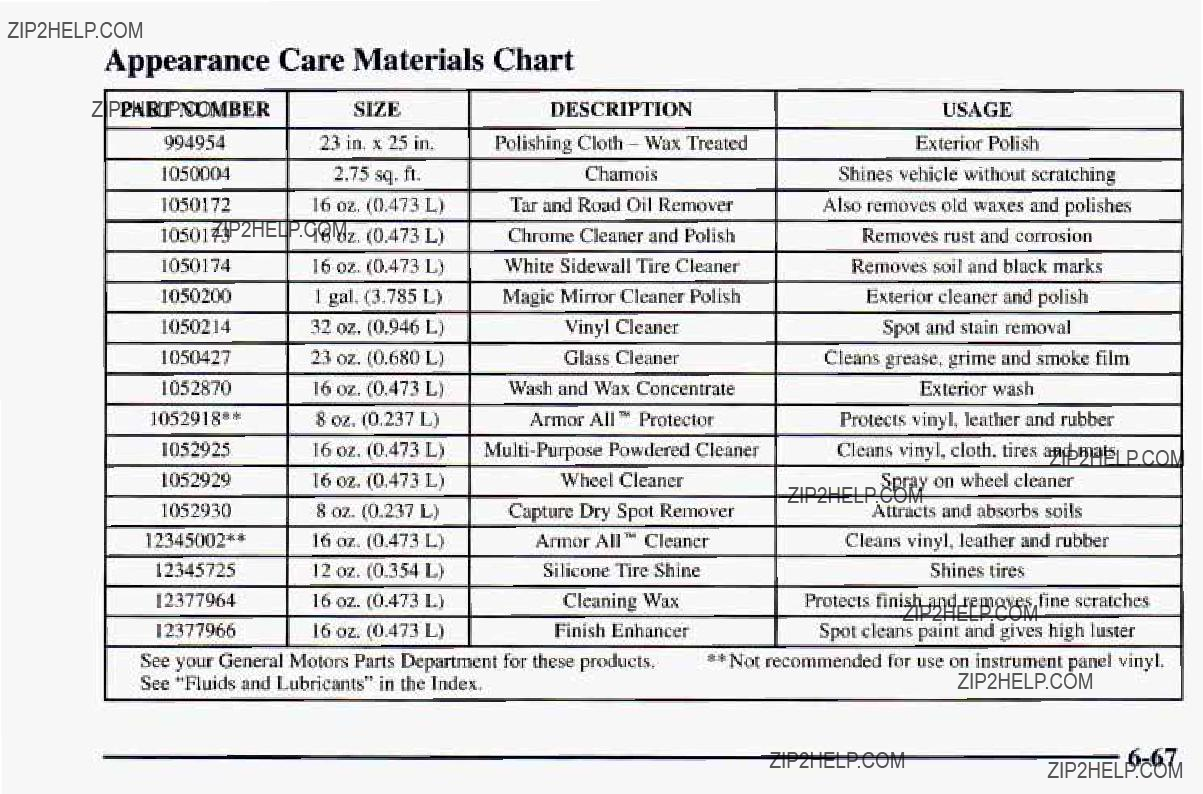


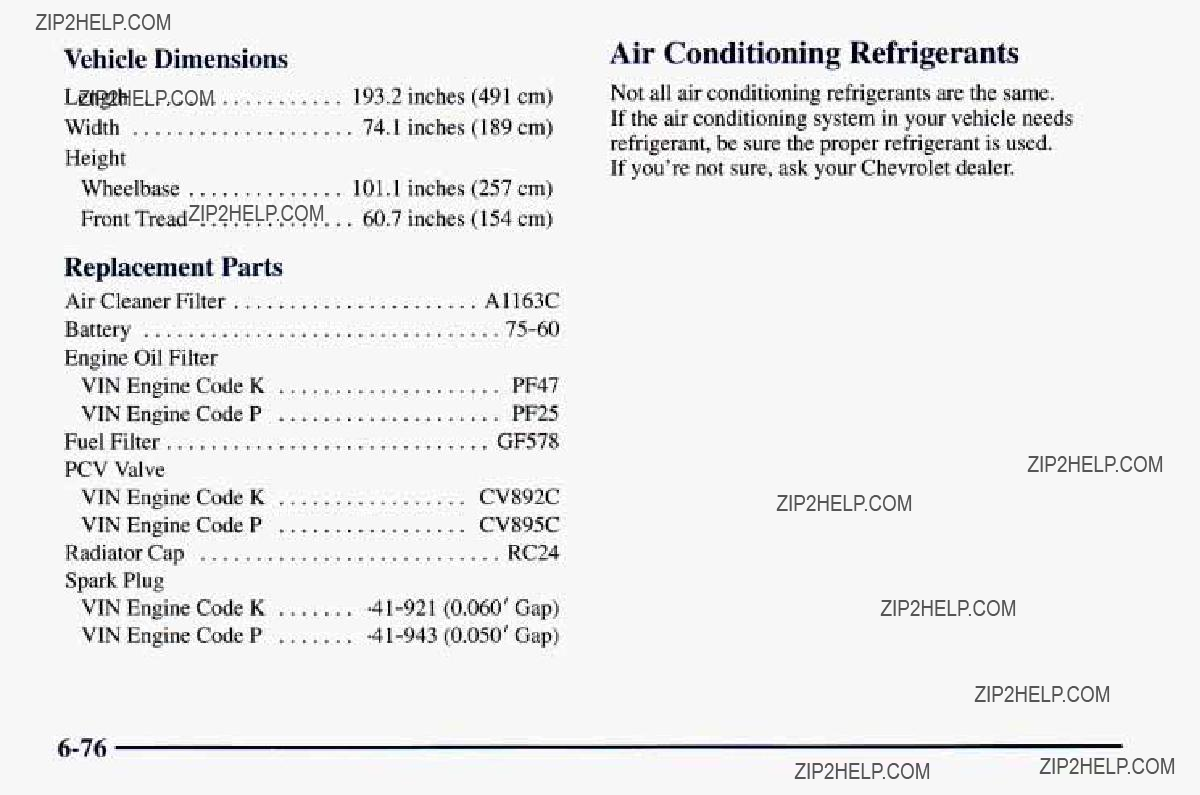


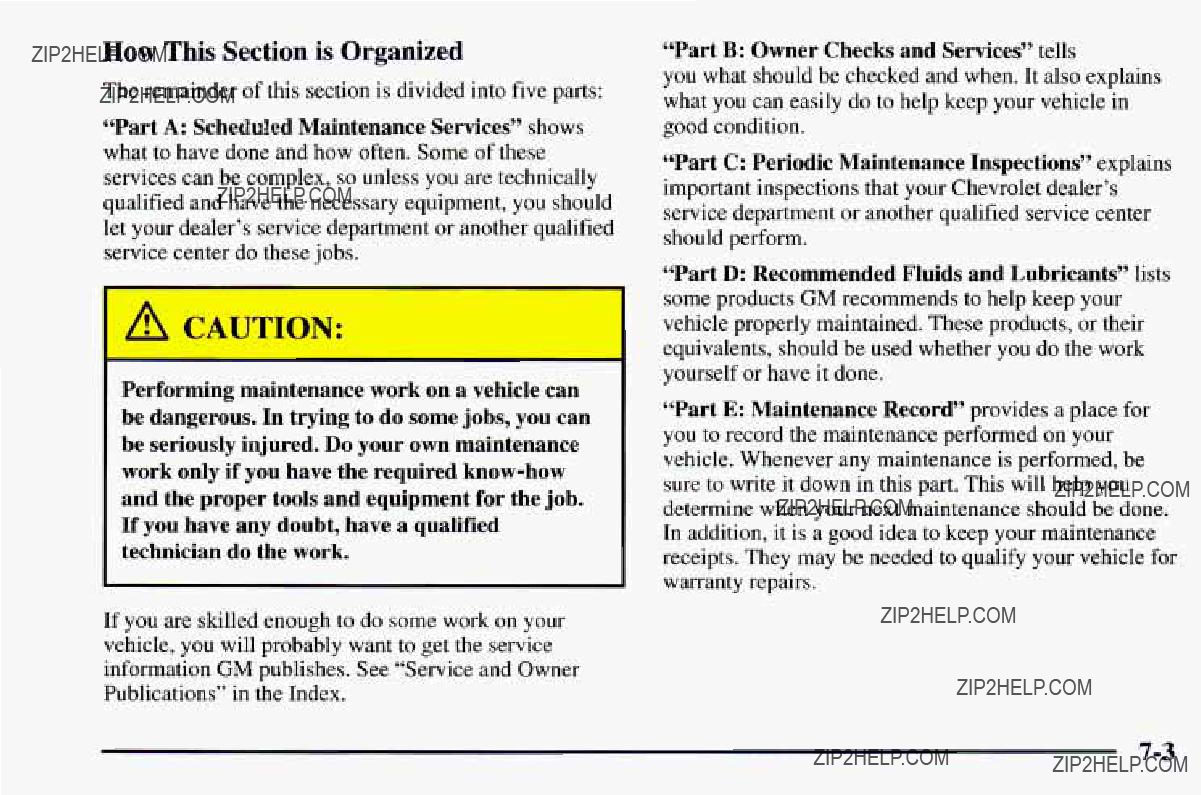

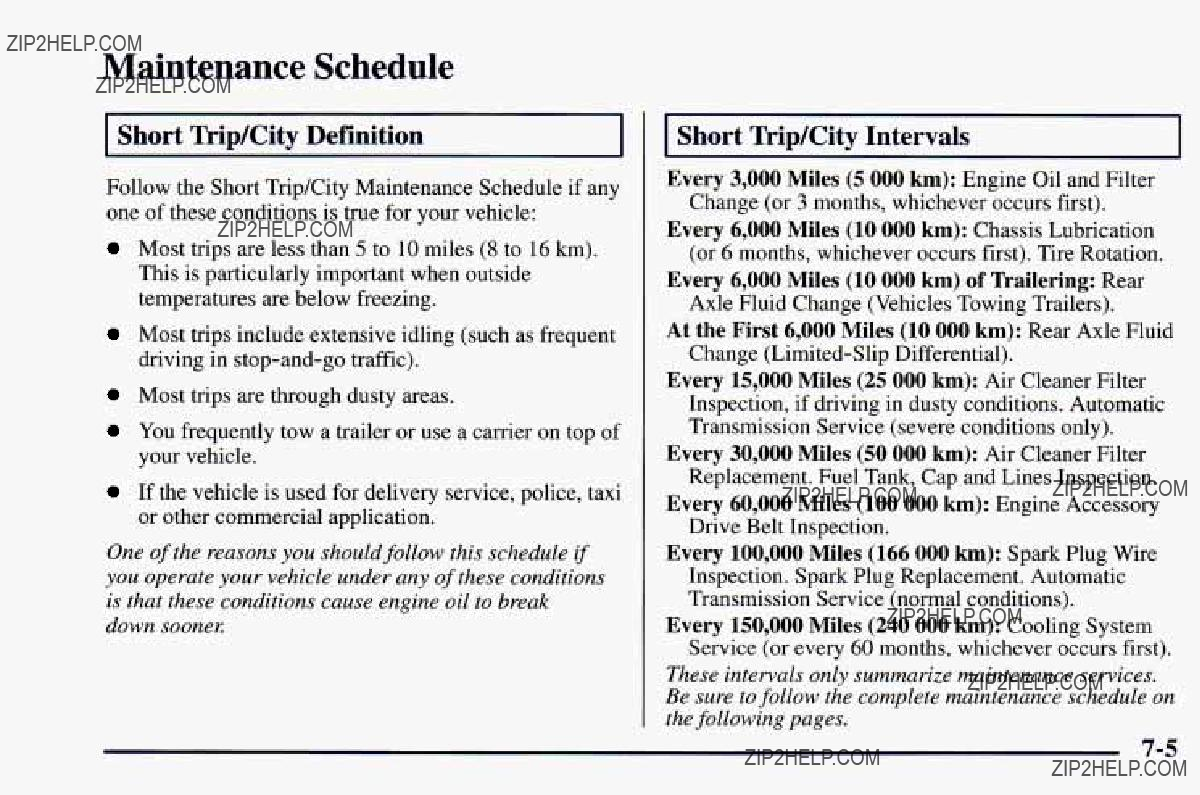


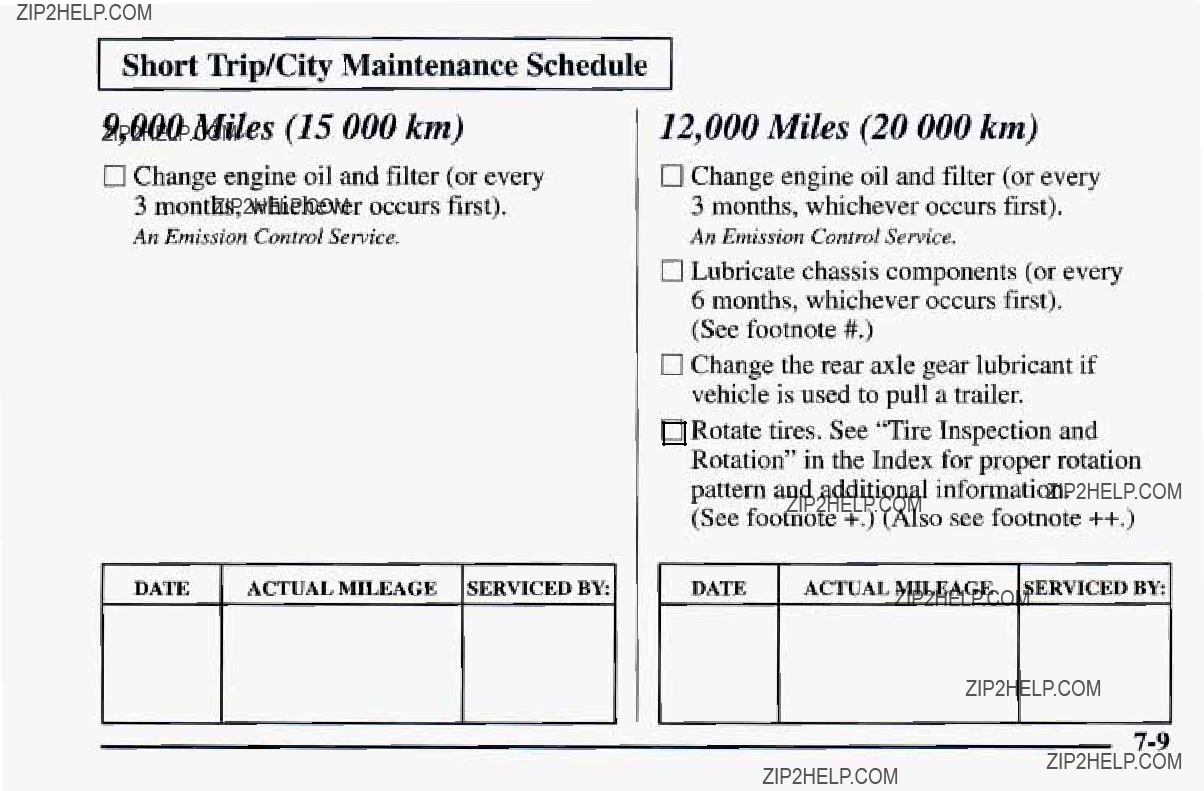


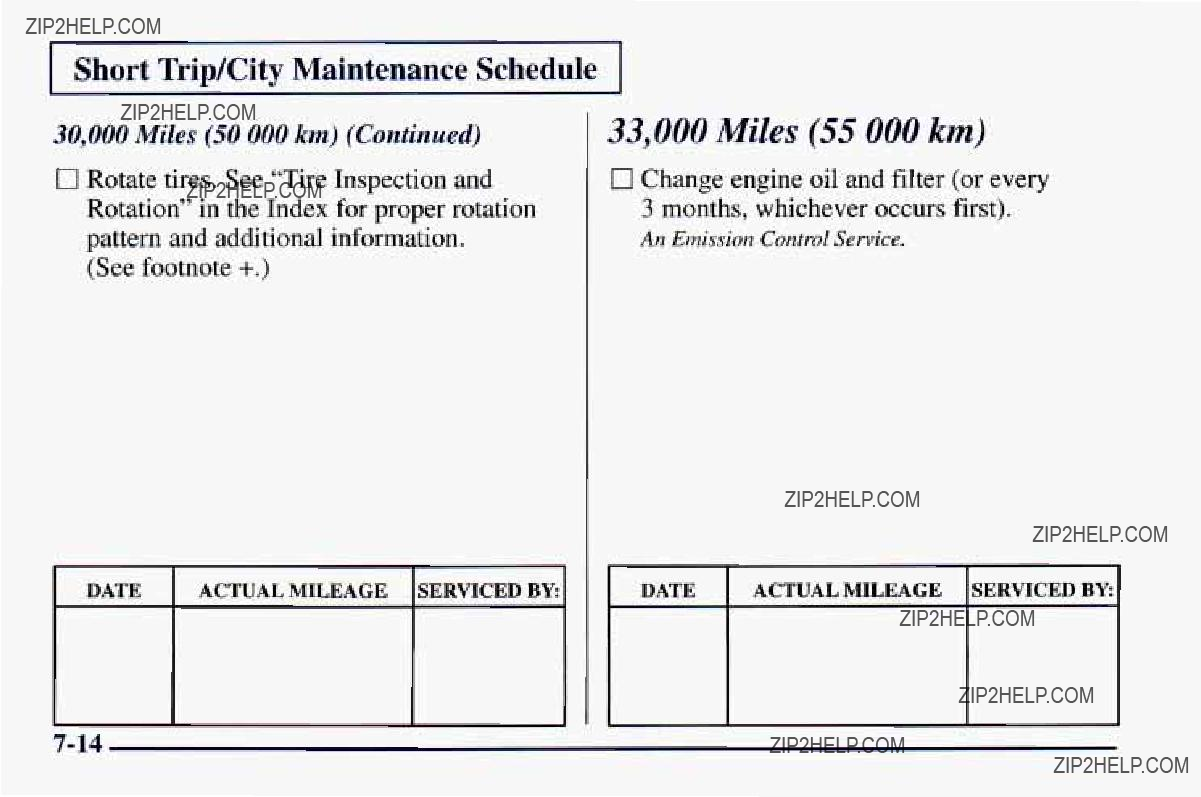

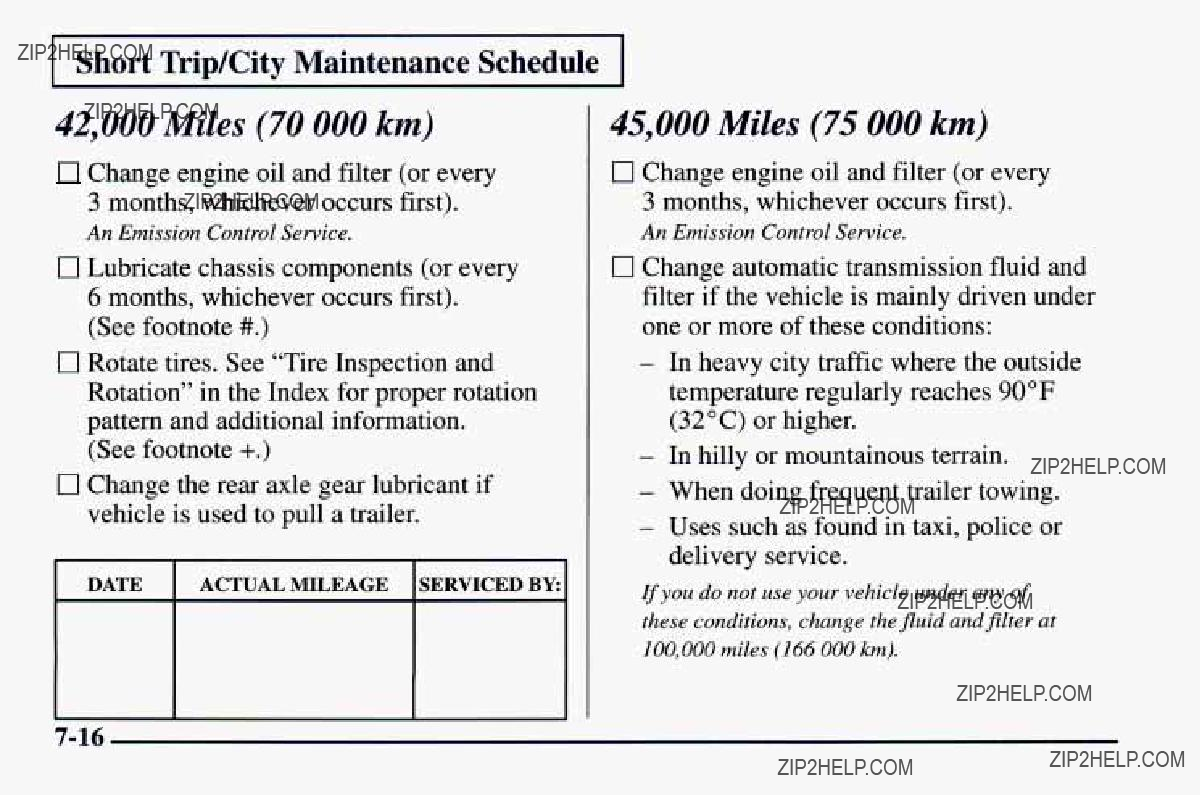
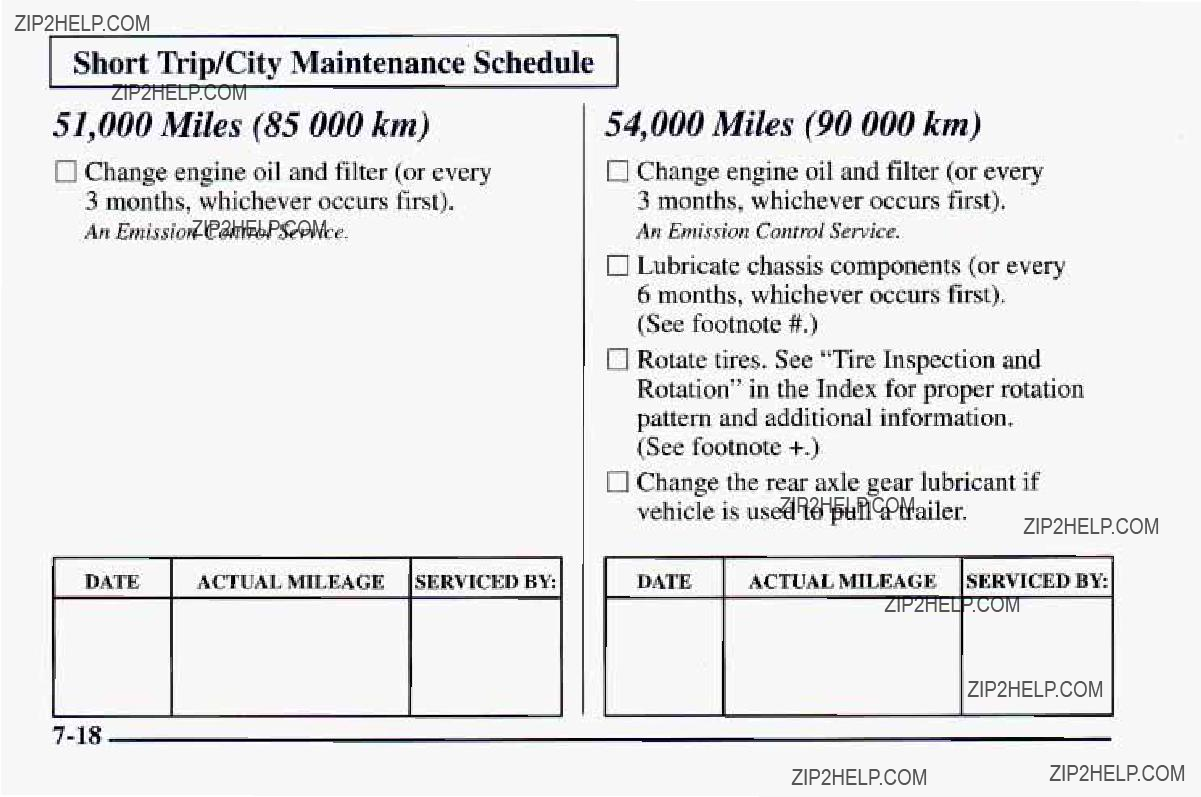
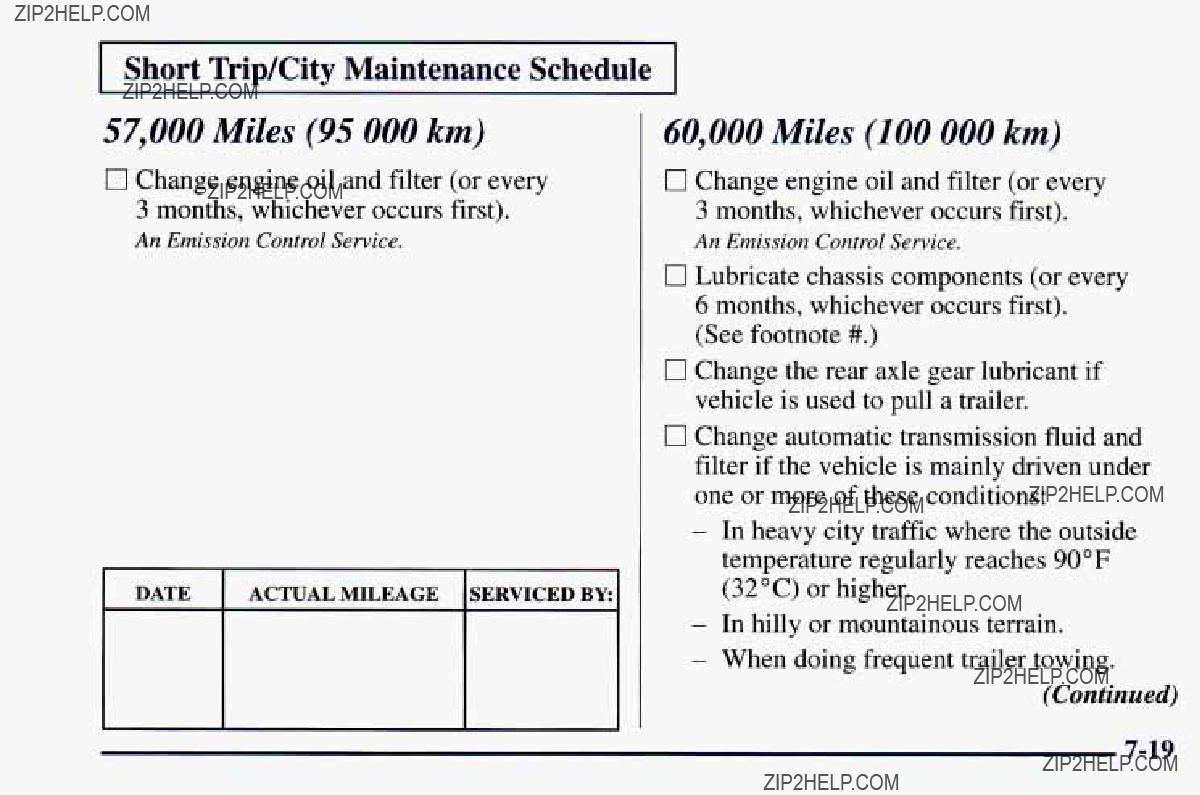

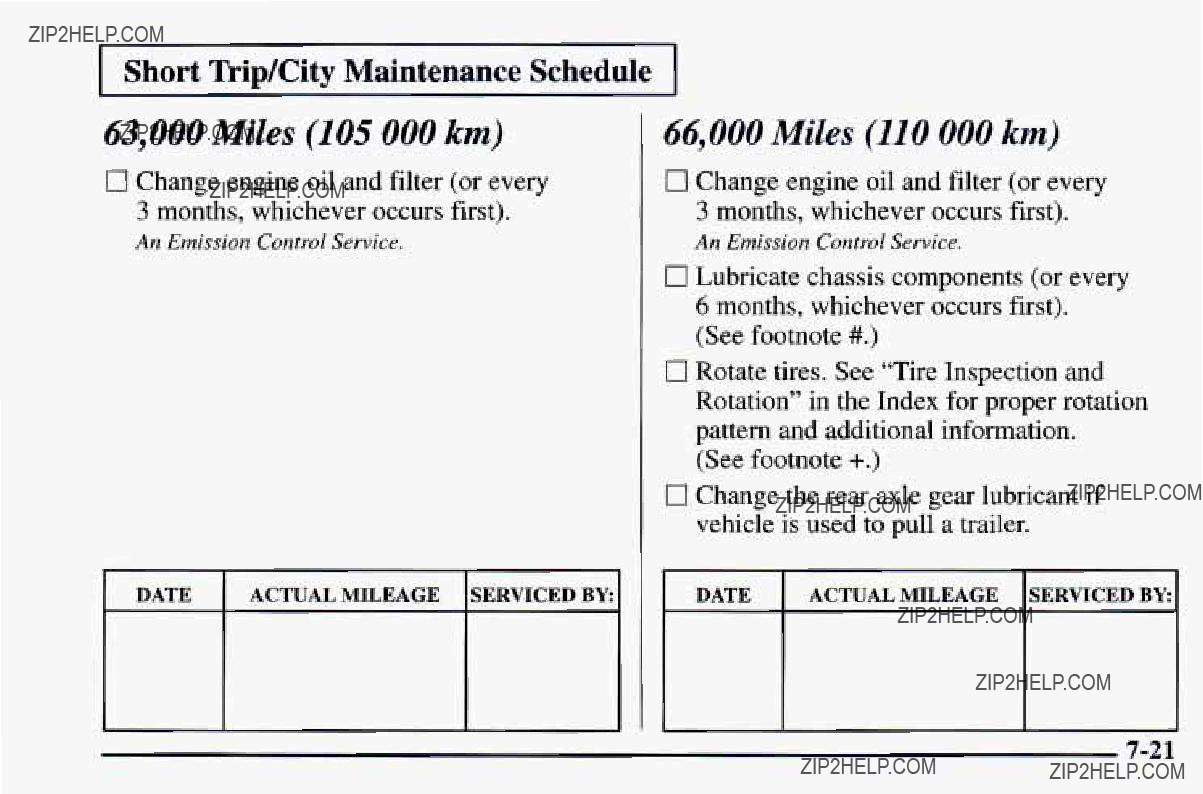


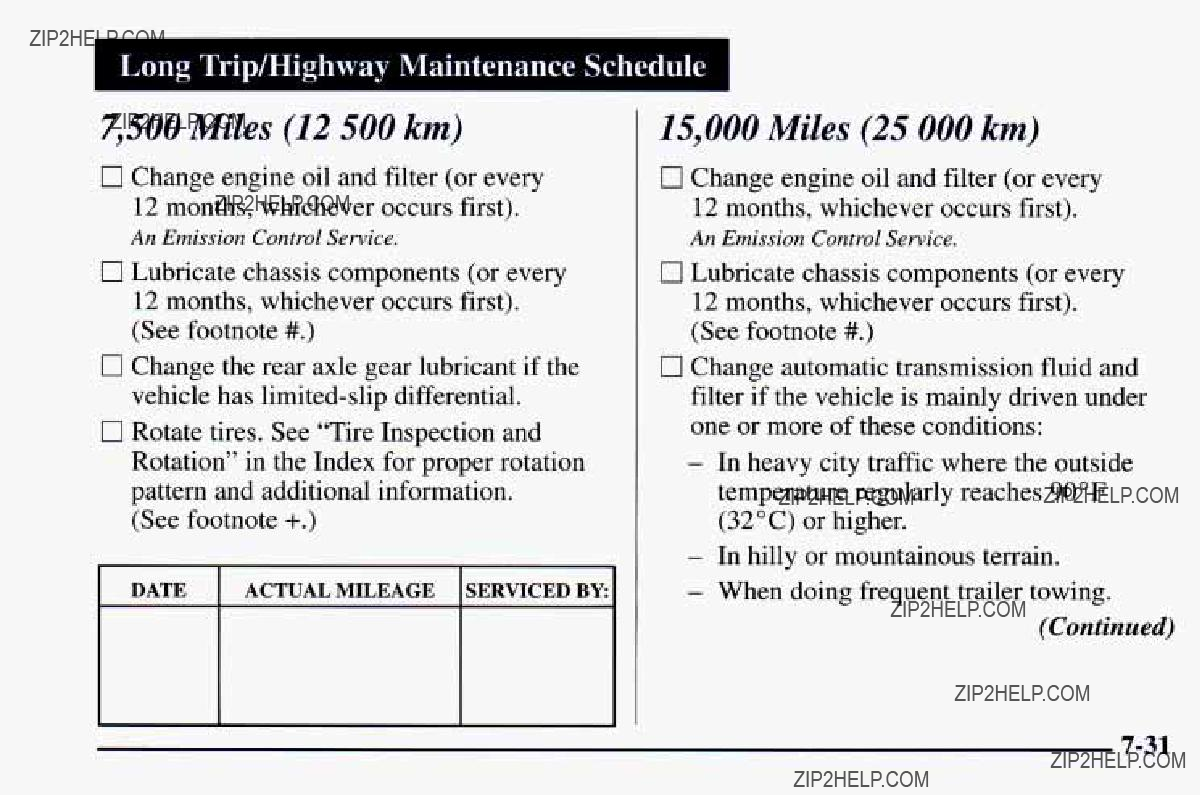
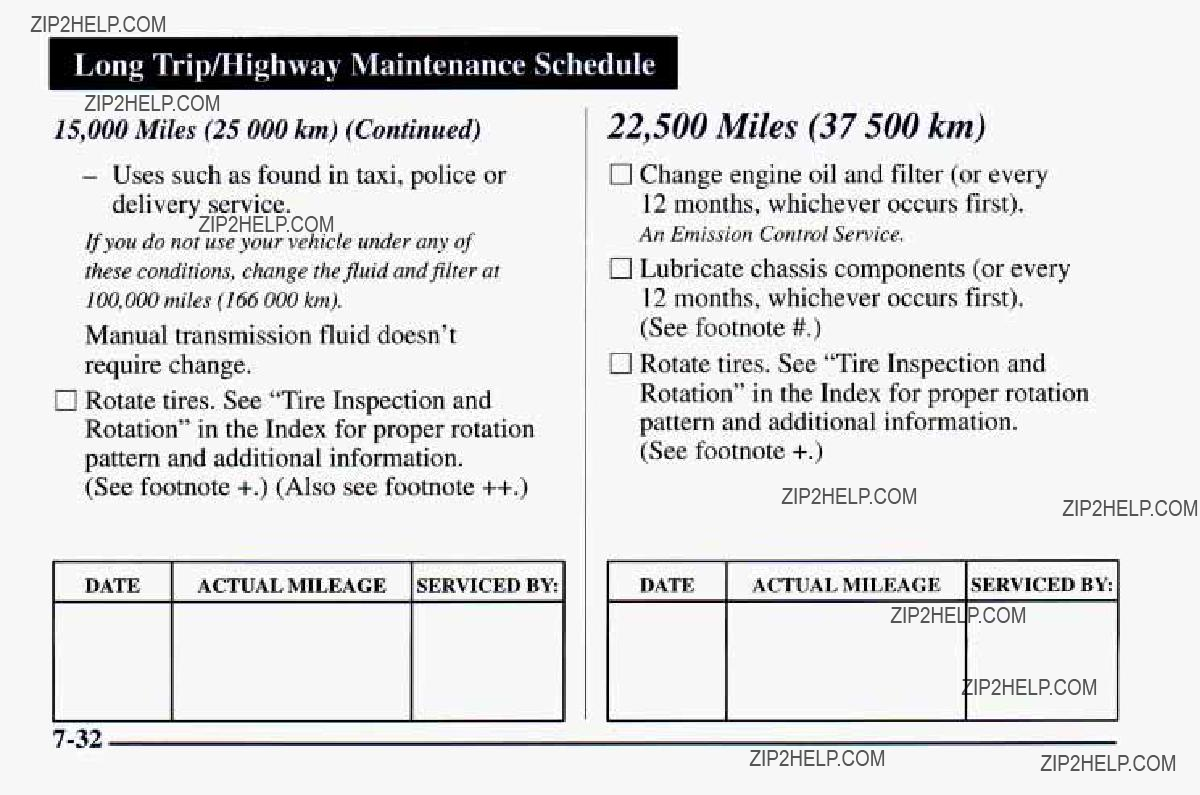


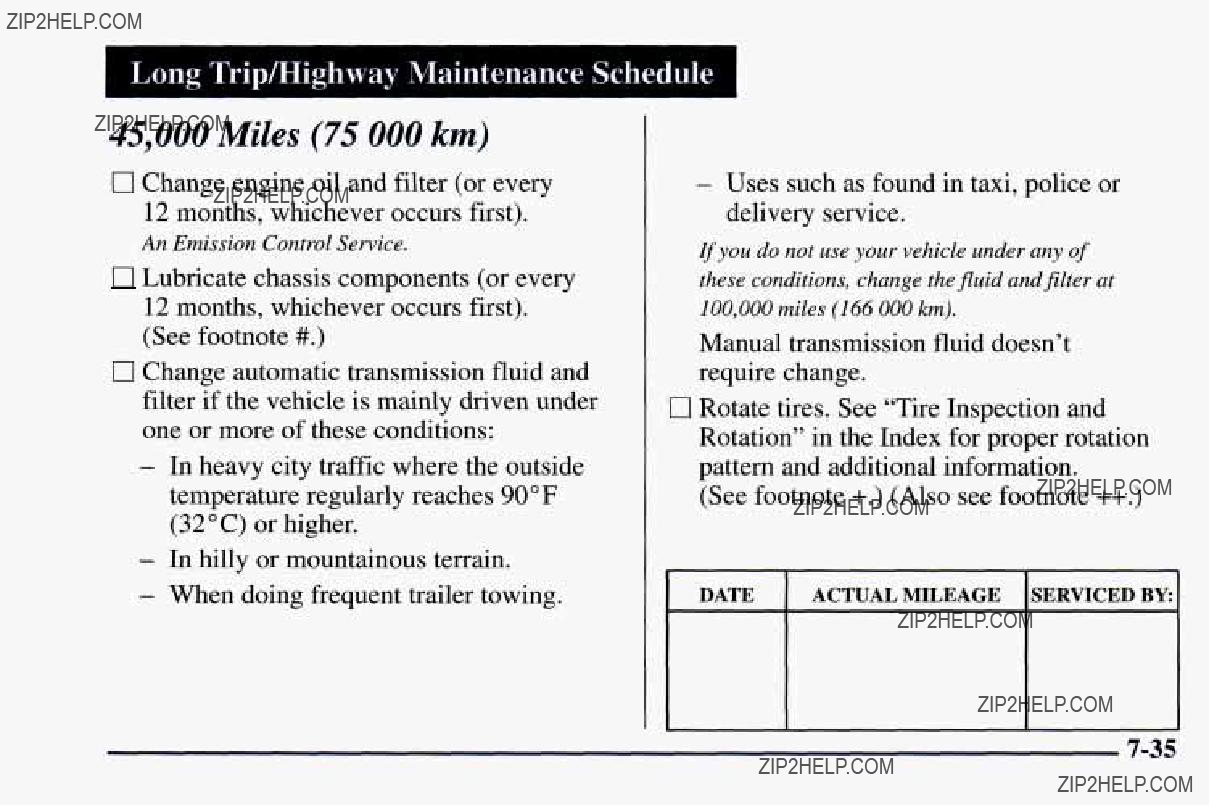


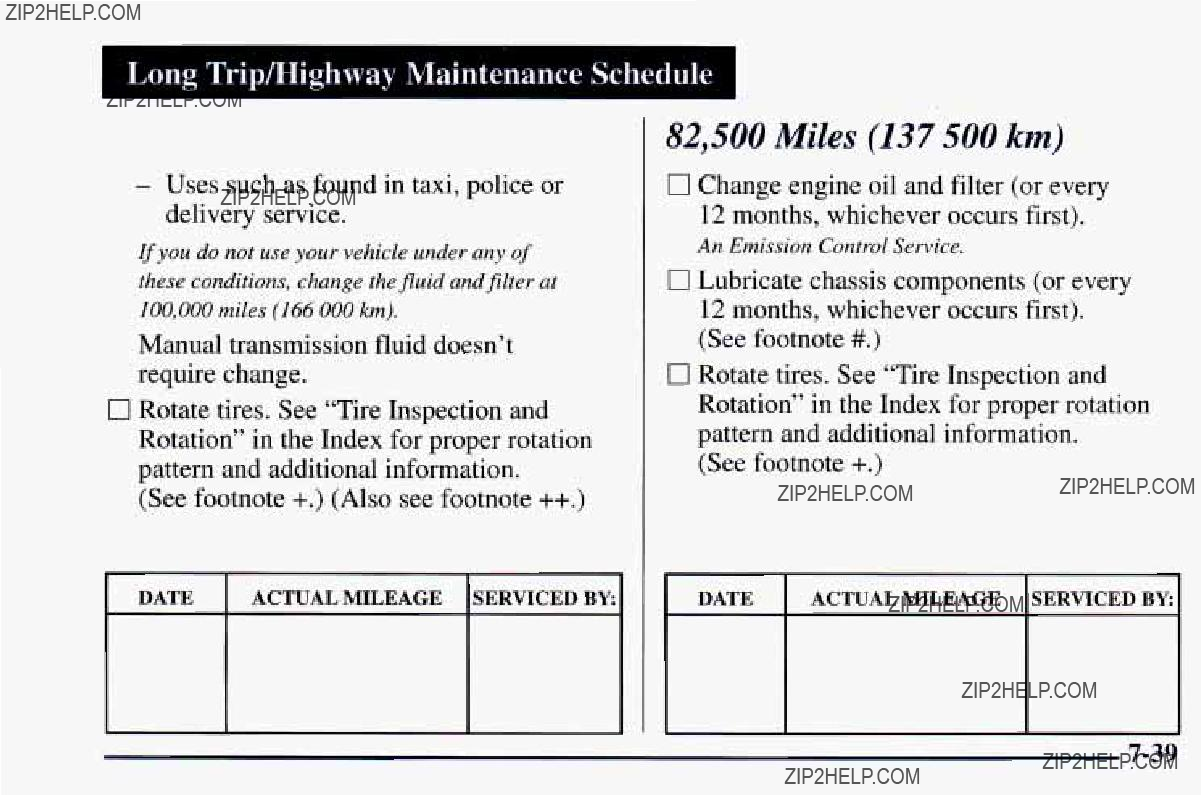


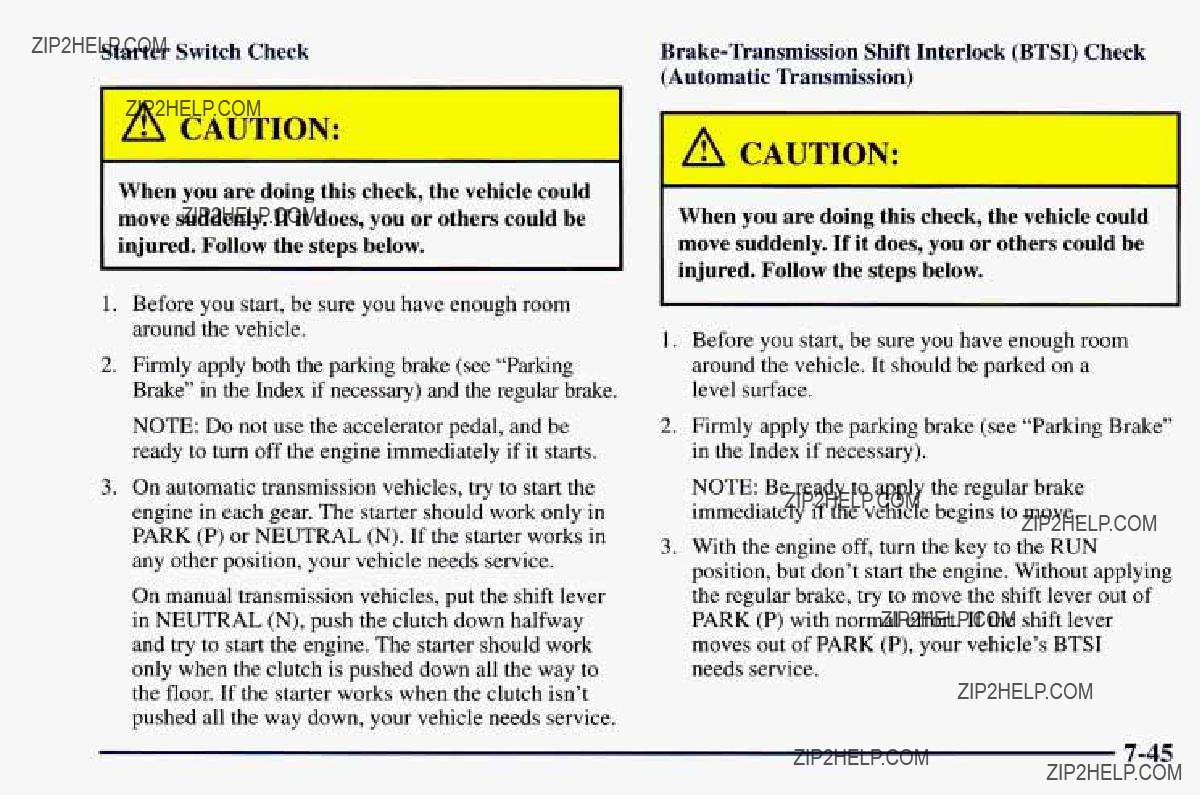


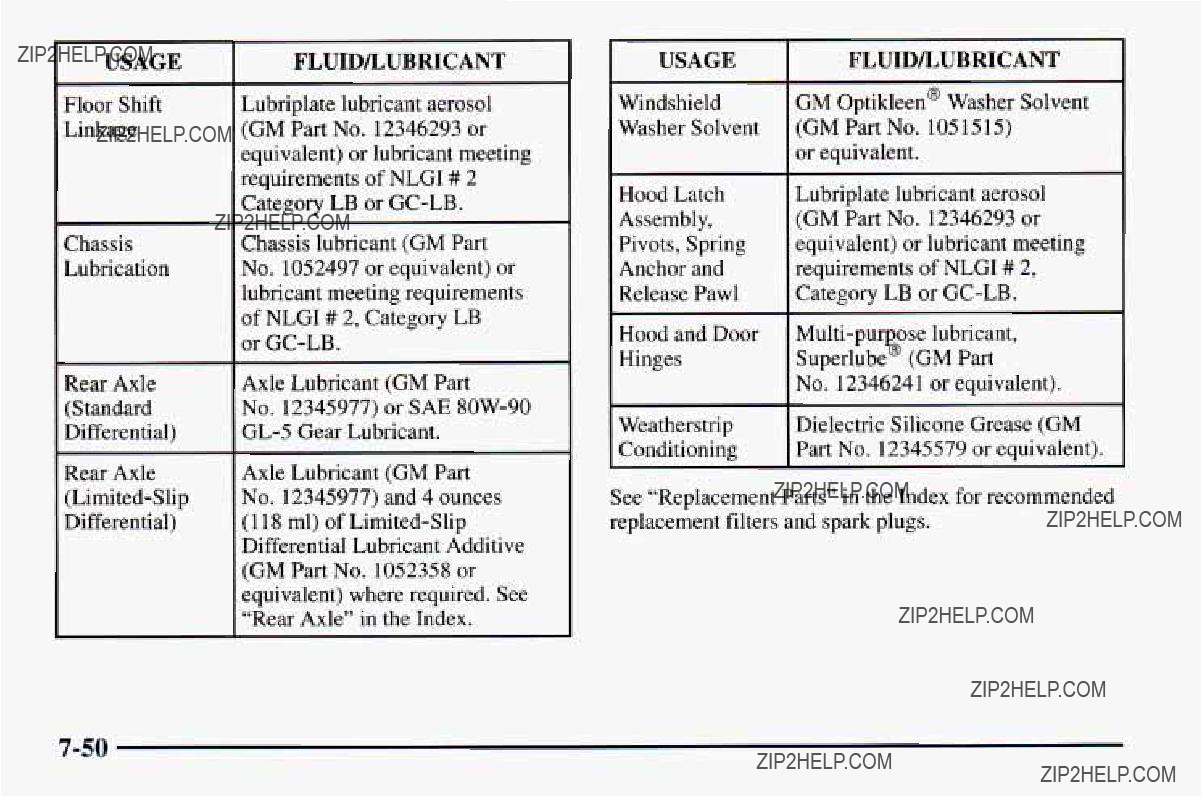


0 Section 8 Customer Assistance Information
Here you will find outhow to contact Chevroletif you need assistance. This section also tellsyou how to obtain service publicationsand how to report any safety defects.


1997CHEVROLET/GEO SERVICE PUBLICATIONS ORDERING INFORMATI
The following publications covering the operation and servicingofyour vehicle can be purchased by filling o the Service Publication Order Form in this book and mailingitwith your check, money order,
or credit card information to Helm, Incorporated (address below.)
CURRENT PUBLICATIONS FOR 1997 CHEVROLET/GEO
SERVICE MANUALSOWNER???S INFORMATION
Service Manuals have the diagnosis and repair information Owner publications are written directly for Owners and


 When outside temperatures are above 90??F (32??C).
  In heavy traffic
  Unusual wear
  Rough ride
 the model designation,
 Cnange engineoil and filter (or every
 Change automatic transmission fluid and filter if the vehicleis mainly driven under one or moreof these conditions:
 Change engine oil andfilter (or every 3 months, whicheveroccurs first).
 Replace air cleaner filter.
 Change engine oil and filter (or every 3 months, whicheveroccurs first).
 Lubricate chassis components (or every 12 months, whichever occursfirst). (See footnote
 Inspect engine accessory drive belt.
  License plate number
  P.O.
P.O.  Detroit, MI 48207