Portable AM/FM Radio with
HD Radio Technology
Instruction Manual
Please read this manual carefully before operation
Portable AM/FM Radio with
HD Radio Technology
Instruction Manual
Please read this manual carefully before operation

Precautions
The lightning flash with arrowhead symbol within an equilateral triangle is intended to alert the user to the presence of uninsulat- ed ???dangerous voltage??? within the product???s enclosure that may be of sufficient magnitude to constitute a risk of electric shock.
The exclamation point within an equilateral triangle is intend- ed to alert the user to the presence of important operation and servicing instructions in the literature accompanying the appliance.
For Customer Use:
Enter below the serial number that is located on the rear of the unit. Retain this information for future reference.
Serial No.
WARNING: To prevent fire or shock hazard, do not expose this device to rain or moisture. Dangerous high voltage is present inside the enclosure. Do not open the cabinet.
CAUTION: To prevent electric shock, match wide blade of plug to wide slot of outlet and fully insert.
Protect your hearing: Hearing experts advise against the constant use of personal stereos played at high volume. Constant exposure to high volumes can lead to hearing loss. If you should experience ringing in the ears or hearing loss, discontinue use and seek medical advice.

Precautions
FCC Statement:
This device complies with Part 15 of the FCC Rules. Operation is subject to the following two conditions:
(1)This device may not cause harmful interference, and
(2)This device must accept any interference received, including interference that may cause undesired operation.
Note: This equipment has been tested and found to comply with the limits for Class B digital devices, pursuant to Part 15 of the FCC rules. These limits are designed to provide rea- sonable protection against harmful interference in a residential installation. This equipment generates, uses and can radiate radio frequency energy and, if not installed and used in accordance with the instructions, may cause harmful interference to radio communications. However, there is no guarantee that interference will not occur in a particular installation. If this equipment does cause harmful interference to radio or television reception, which can be determined by turning the equipment off and on, the user is encouraged to try to correct the interference by one or more of the following measures:
???Reorient or relocate the receiving antenna.
???Increase the separation between the equipment and receiver.
???Connect the equipment into an outlet on a circuit different from that to which the receiver is connected.
???Consult the dealer or an experienced radio/TV technician for help
Use of shielded cable is required to comply with Class B limits in Subpart B of Part 15 of the FCC rules.
Do not make any changes or modifications to the equipment unless otherwise specified in the manual. If such changes or modifications should be made, you could be required to stop operation of the equipment.
HD Radio??? Technology Manufactured Under License From iBiquity Digital Corp. U.S. and Foreign Patents. HD Radio??? and the HD Radio logo are proprietary trademarks of iBiquity Digital Corp.
For recycling or disposal information about this product, please contact your local authorities or the Electronics Industries Alliance: www.eiae.org.

Important Safety Instructions
1.Read Instructions: All the safety and operating instructions should be read before the product is operated.
2.Retain Instructions: The safety and operating instructions should be retained for future reference.
3.Heed Warnings: All warnings on the product and in the operating in- structions should be adhered to.
4.Follow Instructions: All operating and usage instructions should be fol- lowed.
5.Cleaning: Unplug this product from the wall outlet before cleaning. Do not use liquid cleaners or aerosol cleaners. Use a damp cloth for cleaning.
6.Attachments: Use only attachments recommended by the manufacturer. Use of other attachments may be hazardous.
7.Water and Moisture: Do not use this product near water (e.g., near a bath tub, washbowl, kitchen sink, laundry tub, in wet basements, or near a swimming pool and the like).
8.Accessories: Do not place this product on an unstable
cart, stand, tripod, bracket, or table. Use only with carts, stands, tripods, brackets, or tables recom-
mended by the manufacturer or sold with the prod- uct. Any mounting of the product should follow the manufacturer???s instructions and should use a mount- ing accessory recommended by the manufacturer.
A product and cart combination should be moved with care. Quick stops, excessive force, and uneven surfaces may cause the product and cart combination to overturn.
9.Ventilation: Slots and openings in the cabinet are provided for ventila- tion to ensure reliable operation of the product and to protect it from overheating. These openings should never be blocked by placing the product on a bed, sofa, rug, or other similar surface. This product should not be placed in a
10.Power Sources: This product should be operated only from the type of power source indicated on the rating label. If you are not sure of the type of power supply to your home, consult your product dealer or local power company. For products intended to operate from battery power or other sources, refer to the operating instructions.
11.Grounding or Polarization: This product may be equipped with a polar- ized
Important Safety Instructions
This plug will only fit into the power outlet in one direction. This is a safety feature. If you are unable to insert the plug fully into the outlet, try reversing the direction of the plug. If the plug should still fail to fit, contact an electrician to replace the obsolete outlet. Do not defeat the safety purpose of the polarized plug.
12.
13.Protective Attachment Plug: The product may be equipped with an at- tachment plug with overload protection. This is a safety feature. See the operating instructions for replacement or directions to reset the protective device. If replacement of the plug is required, be sure the service techni- cian has used a replacement plug that has the same overload protection as the original plug as specified by the manufacturer.
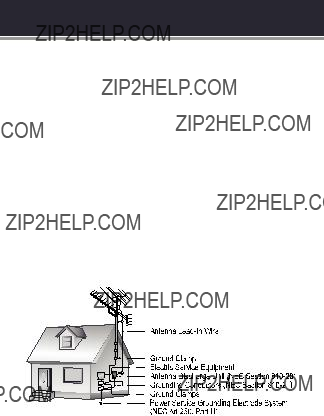
14.Outdoor Antenna Grounding: If an outside antenna is connected to the product, be sure the antenna system is grounded so as to provide some protection against voltage surges and
15.Lightning: For added protection for this product, unplug it from the wall outlet and disconnect the antenna or cable system during a lightning storm or when it is left unattended and unused for long periods of time. This will prevent damage to the product due to lightning or

Important Safety Instructions
16.Overloading: Do not overload wall outlets, extension cords, or integral con- venience receptacles as this can result in a risk of fire or electric shock.
17.Object and Liquid Entry: Never push objects of any kind into this product through openings as they may touch dangerous voltage points or shout- out parts that could result in a fire or electric shock. The apparatus shall not be exposed to dripping or splashing and no objects filled with liquids, such as vases, shall be placed on the apparatus.
18.Servicing: Do not attempt to service this product yourself as opening or removing covers may expose you to dangerous voltage or other haz- ards. Refer all servicing to qualified service personnel.
19.Damage Requiring Service: Unplug this product from the wall outlet and refer servicing to qualified service personnel under the following condi- tions: a) when the
20.Replacement Parts: When replacement parts are required, be sure that your service technician has used replacement parts specified by the manu- facturer or have the same characteristics as the original part. Unauthorized substitutions may result in fire, electric shock, or other hazards.
21.Safety Check: Upon completion of any service or repairs to this product, ask the service technician to perform safety checks to ensure that the product is in proper operating condition.
22.Wall or Ceiling Mounting: The product should be mounted to a wall or ceiling only as recommended by the manufacturer.
23.Heat: The product should be situated away from heat sources such as radiators, heat registers, stoves, or other products (including amplifiers) that produce heat.
24.The mains plug or an appliance coupler is used as the disconnect de- vice, the disconnect device shall remain readily operable.
25.Please read Rating Labels at the bottom of the Sender and Receiver for power input and other safety information.

Table of Contents

Table of Contents

Package Contents
Please make sure that the items shown below are in- cluded in the package. Should an item be missing, please contact the local retailer from which you purchased this product.
1.
2.
3.AUX Cable (3.5mm)
4.AM Loop Antenna
5.Instruction Booklet

Features
???HD Radio tuner receives crystal clear digital broad- casts with no subscription fees.
???FM multicasting support
???Also receives AM/FM analog broadcasts
???
???Integrated rechargeable battery provides up to 5 hours of play time
???
???Integrated
???3.5mm auxiliary input port allows for quick and easy connection of an iPod?? (or other MP3 player or external audio device)
???3.5mm headphone jack
Getting Started
Front View
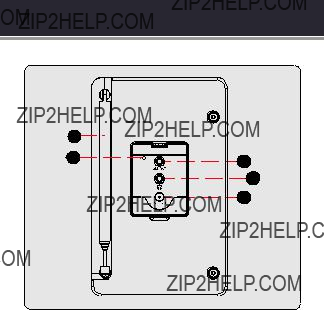
Getting Started
Rear View

Getting Started
Connections
AM Antenna
The unit comes with an AM loop antenna designed specifically to receive AM signals.
1.Plug the AM loop antenna into the AM Antenna Input Port located on the rear of the unit.
2.Position and orient the antenna well away from the unit for best reception.
FM Antenna
The unit comes with a fixed telescopic rod FM antenna.
???Pull out and fully extend the FM antenna and adjust its orientation for best reception.
Headphones (optional)
Connect headphones or earphones to the 3.5mm Headphone Out Jack for private listening.
???Lower the volume level before connecting head- phones, then gradually increase the volume for comfortable listening.
Hearing experts advise against the constant use of personal stereos played at high volume.
Constant

Getting Started
The
Using the supplied AUX cable, your HD radio can be trans- formed into a high quality digital audio speaker system.
1.Connect one end of the AUX cable to the head- phone (or line out) socket of your source device, and then connect the other end to the AUX Port on the lower
2.The LCD screen will now display the words
3.Adjust the output volume level on both the source device and on your HD radio itself to gain optimal volume level.

Getting Started
Connecting Power
Connect the
???Plug one end of the supplied power adapter to the DC 12V Power Input Jack located on the rear of the unit.
Plug the other end into an AC
???It will take approximately 8 hours to fully charge the internal battery.
The battery used in this device may present a fire or chemical burn if mistreated. Do not disassemble, incinerate, or heat the battery.
Do not connect this unit to a power source other than that which is indicated here or on the label as this may result in the risk of fire or electric shock.
Use only the AC adapter supplied. Failure to do so may cause a fire or damage the unit.
Upon initial use, the battery should be charged fully (~8 hours) to ensure optimal performance and bat- tery life.

Using the
Turning on the Radio
Press  to turn on the radio. The current station will be displayed on screen.
To turn off the radio, press  again.
Adjusting the Volume
Adjust the radio volume to the desired level by pressing
 or
or  .
.
Selecting a Band (AM/FM)
AM Mode
Press  until it displays an AM station.
AM 1180 KHz
FM Mode
Press  until it displays an FM station.
FM 88.1 MHz
Using the
Tuning to a Station
If no signal is found in your area, it may be necessary for you to adjust the antenna or to relocate your radio.
HD Radio Technology enables AM and FM radio sta- tions to broadcast their programs
To find stations broadcasting in your area, please visit www.HDRadio.com and click on ???Find a Station???.
Manual Tuning
Turn the tuning dial to cycle through the available sta- tions.
???Turn the dial clockwise to tune to a higher station frequency or turn the dial counterclockwise to tune to a lower station frequency.
higher
stati o n  s
s
T u ne
to
l
o
w
er

Using the
???To
1.Press the tuning dial.
2.Turn the tuning dial to tune.
Preset Tuning
To select a stored AM/FM station:
1.Press  .
.
2.Turn the tuning dial to the desired preset.
3.Press the tuning dial.
To store station presets, see ???Setting Station Presets??? on page 21.

Using the
HD Radio Multicast Stations
HD Radio technology allows for up to 8 simultaneous broadcasts, thus expanding the number of programs available to listeners under a single station frequency.
If a multicast station is available in your area, the station number will be indicated on the display as follows:
FM
Primary Station
FM
2nd HD radio station in FM 105.9

Using the
To seek for an HD radio station:
1.Press  (???HD SEEK??? will be selected). Press the tuning dial to confirm.
* HD SEEK *
FM 101.1 MHz
2.Turn the tuning dial to begin
HD SEEKING...
FM 101.1 MHz
3.The display will indicate ???HD??? when an HD radio station is available.
Setting Station Presets
Your HD radio can store 10 AM and 10 FM presets. To store the current station:
1.Tune to the station you would like to preset.
AM 1180 KHz
2.Press and hold  .
.
SET PRESET
01 AM 1180 KHz
3.Turn the tuning dial to the desired preset number and press the tuning dial to select. The station will be preset to that number.
01 AM 1180 KHz

Viewing Station Information
1.Press  and then turn the tuning dial to select
???FREQ DISPLAY???. Press the tuning dial to confirm.
*** MENU ***
FREQ DISPLAY
2.Turn the dial to cycle through the ???TOGGLE???, ??? STA-
TION NAME??? and ???FREQUENCY??? options.
Resetting the Unit
If the unit should freeze or otherwise behave abnormally, use a paperclip to press the Reset button located on the rear panel.

Troubleshooting
If you have a problem with this device, please read the troubleshooting guide below and check our website
at www.cobyusa.com for Frequently Asked Questions
(FAQs) and firmware updates. If these resources do not resolve the problem, please contact Technical Support.
Address COBY Electronics Technical Support
Maspeth, NY 11378

Specifications
Specifications and manual are subject to change without prior notice.

Notes

Notes

Notes
Coby Electronics Corporation
1991 Marcus Avenue, Suite 301 Lake Success, NY 11042
www.cobyusa.com
www.ecoby.com
Coby is a registered trademark of Coby Electronics Corporation.
Printed in China.