R
U
 SER'S
SER'S MANUAL
DIGITAL AUDIO/VIDEO PLAYER
R
USER'S MANUAL
DIGITAL AUDIO/VIDEO PLAYER

CONTENTS
FEATURES
PACKAGE CONTENTS
SAFETY INSTRUCTIONS
CHARGING YOUR PLAYER
USB DRIVER INSTALLATION
LOCATION OF CONTROLS
Mp3 PLAYER
Display
BASIC OPERATION
Powering Your Player On or Off Connecting/Disconnecting Your Player Transferring Files
Deleting Files
Main Menu/Navigation
Changing Directories
Volume Adjustment
PLAYER MODES
Mp3 Music Player
AMV Video Player
RECORD
PHOTO
FM Radio
SETUP
FIRMWARE UPGRADE
SOFTWARE UTILITIES
SPECIFICATION
TROUBLESHOOTING
2
3
4
5
6
7
7
8
9
9
9
10
10
11
11
11
12
12
16
17
19
20
21
24
25
26
28
29
FEATURES
 512 MB
 65,000 Color LCD Display
 Video Playback
 Mobile Music, Data, Document, and Picture Storage

 Text and Photo Viewer
 Voice Recording

 Plug and Play: Supports Windows 98 SE (with included Installation CD), Windows ME, 2000, XP, and MAC OS X
 Digital Preset Equalizer: Normal, Bass, Jazz, Disco, Rock, and Pop

 Dual Headphone Jacks


 Upgradeable Firmware
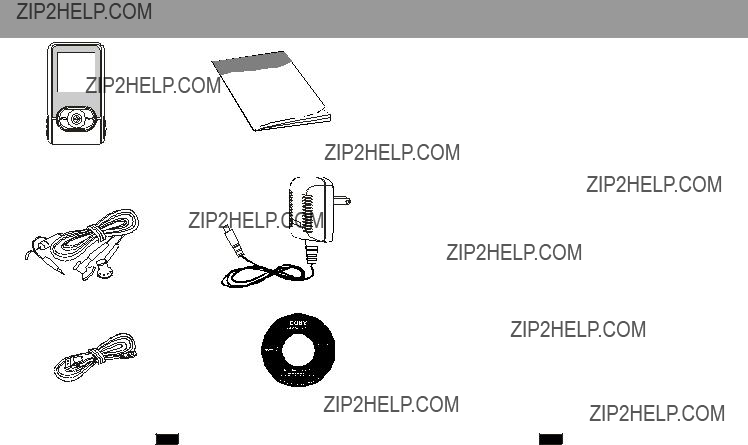
PACKAGE CONTENTS
SAFETY INSTRUCITONS
1.Read these instructions carefully.
2.Keep these instructions for future reference. 3.Heed all warnings.
4.Follow all instructions.
5.Do not expose device to water or moisture. 6.Clean only with a dry cloth.
7.Do not place device near any heat sources such as stoves, radiators, amplifiers or any apparatus that produces heat.
8.Do not force the power plug into the wall outlet. A polarized plug has two blades with one wider than the other; the wider blade is provided for your safety. If the plug provided does not fit into your outlet, consult an electrician for replacement of the obsolete outlet.
9.Position the power cord so that it is protected from being walked on, pinched by objects, or torn and exposed to liquids (especially at plugs, convenience receptacles, and at the point which they exit from the product).
10.Only use attachments/accessories specified by the manufacturer. Use of attachments/accessories not recommended by the product manufacturer may be hazardous.
11.Unplug the device during lightning storms or when unused for long periods of time.
12.Do not use this device near water.
13.Refer all servicing to authorized service personnel.
Protect your ears:
Hearing experts advise against the constant use of personal stereo equipment played at high volumes. Constant
For recycling or disposal information about this product, please contact your local authorities or the Electronics Industries Alliance: www.eiae.org

CHARGING YOUR PLAYER
Your player operates on a
When charging your player, make sure that the POWER ON/OFF switch is set to the ON position and that the automatic Power off option in the Setup menu is set to "0". See the Setup section for instructions on how to set the automatic Power off option.
There are two ways to charge your player:
 Charge through your computer's USB port.
Your player will be charged while it is connected to a
this manual.
 Charge through the provided A/C adapter.
When the A/C adapter is plugged into an electrical outlet, the red charge lamp will light up to indicate that power has
been connected. Connect the adapter to your player's USB port. The green charge lamp will light up to indicate that your player is being charged. When charging is complete, the green charge lamp will dim or turn off.
To an AC Outlet
The charge lamp indicator
USB DRIVER INSTALLATION(Windows 98 SE only)
If you are using Windows 98 SE, you must install the USB driver and update utility.
1.Place the Installation CD in your computer's
D: is your
3.Find and
4.Follow the
USB driver installation is not necessary if you are using
Windows Me/2K/XP or Mac OS X version 10.2.6 or above. Simply connect your player to the computer; the operating system will then take a moment to set up and a removable disk icon will appear in "My Computer." (For Mac OS X users, a removable disk icon will appear on the "Desktop.")


BASIC OPERATION
Powering Your Player On or Off
To Power On:Set the POWER ON/OFF switch to the ON position, then press and hold the  button until your player turns on.
To Power Off:Press and hold the  button until your player turns off. If your player's software freezes, you may set the POWER ON/OFF switch to the OFF position.
Note: Your player has
after a period of inactivity. To wake your player from sleep mode, press and hold the JOYSTICK SELECT key. See the Setup section for instructions on how to set the
Connecting/Disconnecting Your Player
To connect your player to a computer:
1.Plug the large end of the USB cable into the computer's USB port. 2.Power on your player.
3.Plug the other end of the USB cable into your player's
To safely disconnect your player from a computer:


2.In the list of hardware devices,
3.Click the OK button. You may now safely disconnect your player
from the computer.
9
BASIC OPERATION
Transferring Files
To transfer files between your player and a computer:
1.Connect your player to the computer with the USB cable.
2.Open Windows Explorer on the computer.
3.Select the files you want to transfer and
not work properly, power your player off using the ON/OFF switch and then power your player on again.
Deleting Files
To delete files from within your player, enter MP3, AMV, VOICE, or PHOTO mode (these modes may be accessed from the Main menu).
While your player is paused, press the JOYSTICK SELECT key to access the submenu.
1.Highlight then select "Delete".
2.Highlight then select the file you want to delete.
3.Highlight then select "Delete". You may also choose to delete all files listed by selecting "Delete all".
Note: The files available to be deleted are dependent on the mode that your player is in. Music files may be deleted in MP3 mode, movie files in AMV mode, etc.
You may also choose to delete files from your player through your computer while the two are connected. If you delete files in this
manner, make sure you disconnect your player using the process described in the Connecting/Disconnecting Your Player section.
10

BASIC OPERATION
Main Menu/Navigation
When your player is powered on, it will enter the Main menu directly.
To return to the Main menu at any time, press and hold the JOYSTICK SELECT key.
The Main menu consists of eight items: MP3, AMV, RECORD, VOICE, PHOTO, SETUP, and
 To select an item, press the JOYSTICK SELECT key.
Changing Directories
To change directories within your player, enter MP3, AMV, VOICE, or PHOTO mode (these modes may be accessed from the
Main menu).
1.While your player is paused, press the JOYSTICK SELECT key to access the submenu.
2.Highlight then select "Local folder".
3.Highlight then select the folder you would like to change to.
Volume Adjustment
The volume level may be adjusted while your player is in MUSIC, AMV, or VOICE mode. To increase the volume, press the  key. To decrease the volume, press the key.
PLAYER MODES
The following player modes may be selected from the Main menu: Mp3, AMV, RECORD, VOICE, PHOTO, SETUP,
To access the Main menu at any time, press and hold the JOYSTICK SELECT key.
MP3 Music Player
To enter the MP3 mode: From the Main menu, highlight and select the item MP3. (To access the Main menu at any time, press and hold the JOYSTICK SELECT key.)
The MP3 music player will find and play MP3, WMA, AMV, and MTV files loaded on your player.
 To play a track, press the
 button.
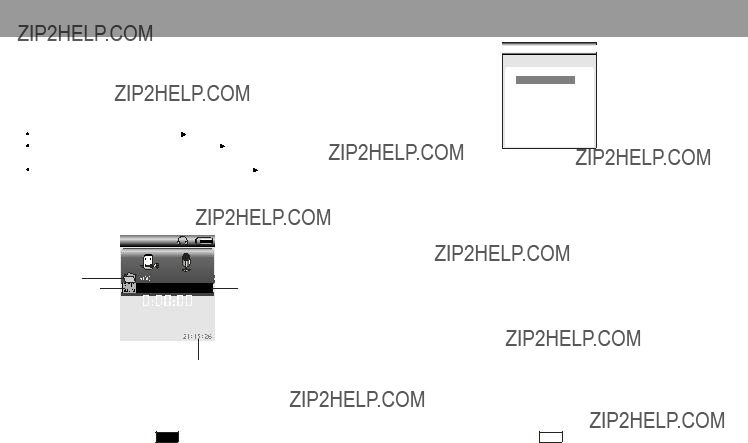
When you are in MP3 mode, the LCD will display the information illustrated below:

PLAYER MODES
Repeat mode options may be set by pressing the

 button during playback. See Repeat in the MP3 Music Player Options section for more information.
during playback. See Replay in the MP3 Music Player Options section for more information.
To exit
MP3 Music Player Options
To access the MP3 Music Player Options menu, press the JOYSTICK SELECT key during playback. To return to MP3 Music Player mode, press the  button.
Highlight and select one of the following items to set its options: Repeat, Equalizer, Tempo rate, Replay, Replay times, or Replay gap.
Music
 Repeat
 Equalizer
 Tempo rate
 Replay
 Replay times
 Replay Gap
PLAYER MODES
Repeat
Press or
or  to select one of the following repeat functions:
  Normal (plays all tracks in order once)
 Repeat One (repeats current track)
 Folder (plays all tracks in the current folder once)
 Repeat Folder (repeats tracks in current folder)
 Repeat All (repeats all tracks)
 Random (plays tracks in current folder in random order)
 Intro (plays the first 10 seconds of all tracks in the current folder)
Equalizer
The equalizer presets allow you to change the way music sounds on your player. Press or
or to select one of the following preset options: Natural, Rock, Pop, Classic, Soft, Jazz, or DBB.
Tempo rate
This setting changes the speed at which your music plays (tempo only affects music and voice files). Press  for slower
playback or  for faster playback. A Tempo rate setting of "0" will play music at normal speed.
Replay
This setting will put your player in
pressing the RECORD button. The B will start to blink on the

PLAYER MODES
2.Set the end of the track segment to be repeated by pressing the RECORD button again.
The segment you have selected will then play in a loop for the number of times specified in "Replay times" (see Replay times below for more information). You can also set how much time elapses between loops in "Replay gap" (see Replay gap below for more information).
Note: It is possible to append a voice recording to the end of an
1.While the  to begin voice recording.
2.To stop  again.
The
You may exit
Replay times. Sets how many times your player will repeat track segments specified in
5
Replay gap. Sets the duration of time (in seconds) your player will pause between
PLAYER MODES
AMV Video Player
To enter the AMV mode: From the Main menu, highlight and select the item AMV. (To access the Main menu at any time, press and hold the JOYSTICK SELECT key.)
Repeat mode options may be set from the AMV Video Player submenu by pressing the JOYSTICK SELECT key while your player is paused. See Repeat in the MP3 Music Player Options section for more information.
PLAYER MODES
RECORD
To enter the RECORD mode: From the Main menu, highlight and select the item RECORD. (To access the Main menu at any time, press and hold the JOYSTICK SELECT key.)
The voice recorder allows you to record sound from the
 To save the recording and return to the Main menu, press and hold the JOYSTICK SELECT key.
When you are in RECORD mode, the LCD will display the information illustrated below:
PLAYER MODES
Record
REC type
 Fine REC
 Long REC
 Fine VOR
 Long VOR
1.Highlight then select "REC type".
2.Highlight, then select one of the following recording options: Fine REC.
Filename/Timestamp
Recording Time Elapsed
Note: Recording may be started instantly at any time by pressing the RECORD button except during playback in MP3 mode.
VOICE Player
To enter the VOICE mode: From the Main menu, highlight and select the item VOICE. (To access the Main menu at any time, press and hold the JOYSTICK SELECT key.)
The VOICE player will find and play any ACT or WAV files loaded on your player. Its functionality is the same as the MP3 Music Player except that there is no
Available Recording Time remaining
To change the recording quality (i.e., bitrate/filetype) options, press the JOYSTICK SELECT key while the recorder is stopped.
PLAYER MODES
PHOTO Viewer
To enter the PHOTO mode: From the Main menu, highlight and select the item PHOTO. (To access the Main menu at any time, press and hold the JOYSTICK SELECT key.)
The PHOTO viewer will find and display any JPG, GIF, or BMP files loaded on your player. The viewer can display photos with manual control or automatically as a slideshow (all photos in the current folder are displayed sequentially).
 To display a photo or start the slideshow, highlight a file and
To change between slideshow and manual modes:
1.Press the JOYSTICK SELECT key to access the submenu 2.Highlight then select "play set".
3.For manual mode: Highlight then select "Manual play." Manual mode is now set.
For slideshow mode: Highlight then select "auto play". Continue to the next step.
PLAYER MODES
FM Radio
To enter the FM Radio mode: From the Main menu, highlight and select the item FM Radio. (To access the Main menu at any time, press and hold the JOYSTICK SELECT key.)
Press the  or
or key to select your desired station. Use the
  or key to adjust the volume.
Press the JOYSTICK SELECT key to access the menu shown below:
FM Mode
 Save
Save
 Delete
 Delete all
 Normal Band
 Japan Band
 Fine REC
Record the FM voice in WMA format.
Delete all favorite stations.
Delete current station from the favorite stations.
Save current station to the favorite stations.

PLAYER MODES
SETUP
To access the SETUP menu: From the Main menu, highlight and select the item SETUP. (To access the Main menu at any time, press and hold the JOYSTICK SELECT key.)
In the SETUP menu, highlight and select one of the following items to set its options: Clock, LCD set, Language, Power off,
Replay mode, Online mode, Memory info, Firmware version,
PLAYER MODES
LCD set
LCD set allows you to set the brightness and black level of the LCD screen.
To set the brightness:
 Highlight and select "Brightness".
 Press
Press  or
or  to adjust the brightness of the screen (0 is dimmest, 10 is brightest), then press the JOYSTICK SELECT key.
or Firmware upgrade.
 Clock
Clock
 LCD set
 Language
 Power off
 Replay mode
 Online Mode
Clock
Sys Set
LCD Set
 Br ightness
 Black
Black
 Ex it
Ex it
Clock setup allows you to set your player's internal clock to the proper date and time.
When you are in Clock setup mode, the LCD will display the information illustrated below:
To set the black level:
 Highlight and select "Black".
 Press
Press  or
or to adjust the black level of the screen, (0 is darkest, 10 is lightest), then press the JOYSTICK SELECT key.
Sys Set
LCD Set
 Brightness
 Black
Black
 Exit
Exit

PLAYER MODES
Language
Language setup allows you to set the language of your player. Supported languages are Simple Chinese, English, Traditional Chinese, Korean, Japanese, French, German, Italian, Dutch, Portuguese, Spanish, Czech, Danish, and Russian.
Power off
Power off setup allows you to set the
Sleep Time specifies the amount of time (in seconds) your player
can be left idle before your player enters a
Note: A setting of "0" will disable these
Replay mode
Replay mode setup allows you to choose whether your player inserts a pause between tracks during Manual replay or Auto replay.
Online mode
Online mode setup allows you to choose between
Memory info
The memory info screen displays both the total amount of memory available and the percentage of memory used.
Firmware version
The firmware version screen displays the current version of the firmware installed on your player.
Firmware upgrade
See the Firmware Upgrade section for instructions on how to upgrade the firmware of your player.
PLAYER MODES
To enter the
The
 Dir Select: Selects a directory for your player to find TXT files
 File Select: Selects and loads a file for your player to read. You
must load a file here for your player to read
 Text Read: Displays the loaded TXT file. Press
  or
or  in this mode to scroll through the TXT document. Press the
  button to return to the

25

SOFTWARE UTILITIES
1.Run the Movie Convert Tool utility from the START menu on your computer.
2.Find and select the video file that you would like to convert in the INPUT field.
3.Find and select the directory location that you would like to save the converted file to.
4.Click the  button to run the conversion process.
SPECIFICATION
Technical Specifications
PROP.65 WARNING:
Handling the cord on the earphones will expose you to lead, a chemical known to the State of California to cause[cancer, and] birth defects or other reproductive harm.
Wash hands after handling.

TROUBLESHOOTING
This troubleshooting guide aims to save you time in case you experience any inconvenience with this digital audio player.
If you are still having difficulty, please contact Consumer Service/ Technical Support.
My player does not work.
1.Ensure that the ON/OFF switch is set to the ON position. 2.Ensure that the battery is charged.
File transfer failure.
1.Ensure that the USB driver has been installed correctly on the PC. 2.Ensure that the USB cable is attached securely to both the PC
and your player.
3.Ensure that your player's memory capacity limit has not been reached.
4.Ensure that the battery is charged.
Poor sound quality or no sound.
1.Ensure that the volume level is not set to "0".
2.Ensure that your headphones are attached securely to the headphone jack.
3.Poor sound quality may result from corrupt or poorly encoded music files. Try downloading the music file again or encodin g the file at a higher bitrate. The recommended bitrates for this player is 128 kbps for Mp3 files and 64 kbps for WMA files.
Can't find any music files.
1.Ensure that audio files have been transferred to your player. 2.Ensure that the audio file is of a compatible format (Mp3 or WMA).
The screen displays nothing.
1.Pleases call Technical Support for a
Technical Support
Monday to Friday: 8:00 AM - 11:00 PM EST
Saturday and Sunday: 9:00 AM - 11:00 PM EST
Telephone:
You can also reach us online at www.cobyusa.com or by
29