Multiquick??
Minipimer??
Complete
MR 5550 M FP
12
6


www.braun.com/register
Multiquick??
Minipimer??
Complete
MR 5550 M FP
12
6
www.braun.com/register

English 5
8
11
Internet:
www.braun.com
www.service.braun.com
Braun GmbH
Frankfurter Stra??e 145
61476 Kronberg/Germany
A
6


B
C
E
F
G
H
I
J
4

 click!
2
2
3
2c
4
5
A
6b
6
1
click!
2
click! 

i
.
6
.
.
3

click!
4

English
Our products are engineered to meet the highest standards of quality, functionality and design. We hope you thoroughly enjoy your new Braun appliance.
Caution
Please read the use instructions carefully and completely before using the appliance.
???The blades are very sharp!
???Keep the appliance out of reach of children.
???The appliance is constructed to process normal household quantities.
???Always unplug the appliance when it is left unattended and before assembling, disas- sembling, cleaning or storing.
???Before operating, check whether your voltage corresponds to the voltage printed on the bottom of the appliance.
???Especially when operating the handblender attachment in hot liquids, do not immerse the blender shaft into ??? or remove it from the liquid while the appliance is switched on.
???Do not hold the motor part !, nor the whisk gearbox ?? under running water, nor immerse them in water.
???The beaker ?? is not
???Before operating the food preparation attachment ??, make sure that the lid interlock (2c) is properly clicked in and that the pusher (1) is in place.
???Do not insert other tools than the pusher (1) into the ???lling tube during processing.
???Always switch off the appliance before removing the lid (2).
???The lid (2) can be cleaned under running water, but do not immerse it in water, nor clean it in a dishwasher.
???The bowl (4) is not
???Braun electric appliances meet applicable safety standards. Repairs or the replace- ment of the mains cord must only be done by authorised service personnel. Faulty, unquali???ed repair work may cause con- siderable hazards to the user.
and baby food as well as for mixing drinks and milkshakes:
1.Insert the motor part ! into the blender shaft & until it locks.
2.Introduce the handblender vertically into the vessel, then press switch ??? or turbo switch ???.
3.To release the blender shaft after use, press buttons ??? and pull it off.
You can operate the handblender in the measuring beaker ??, and just as well in any other vessel. When blending directly in the saucepan while cooking, take the pan from the stove ???rst to protect the appliance from overheating.
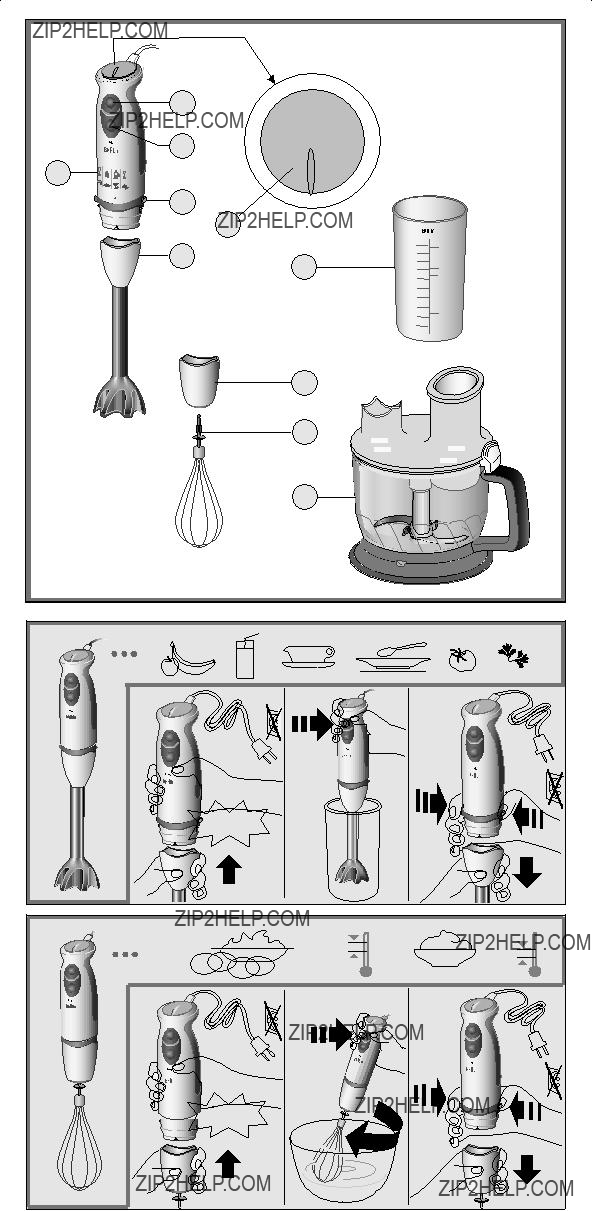
How to operate your whisk
Use the whisk only for whipping cream, beating egg whites and mixing sponges and
1.Insert the whisk ?? into the whisk gearbox ??, then insert the motor part ! into the gearbox until it locks.
2.Place the whisk in a vessel and only then, press switch ??? to operate it.
3.To release, press buttons ??? and pull off the gearbox. Then pull the whisk out of the gearbox.
For best results ...
???use a wide bowl rather than the beaker
???move the whisk clockwise, holding it slightly inclined
Whipped cream:
Only whip up to 400 ml chilled cream (min. 30 % fat content, 4 ??? 8 ??C).
Start with a low speed setting ??1?? and while whipping, increase the speed to setting ??12??.
Egg snow:
Only whip up to 4 egg whites.
Start with a medium speed setting ??7?? and while beating, increase the speed to setting ??12??.
Description
! Motor part
??? On/off switch for variable speed
# Turbo switch
$ Release buttons
% Variable speed regulator & Blender shaft
?? Measuring beaker ?? Whisk gearbox ?? Whisk
?? Food preparation (FP) attachment
Setting the speed
When activating switch ???, the processing speed corresponds to the setting of the variable speed regulator %. The higher the speed setting, the faster and ???ner the chopping results will be.
For maximum processing speed, press the turbo switch #. You may also use the turbo switch for instant powerful pulses without having to manipulate the speed regulator.
Depending on your application, we recom- mend the following speed settings: Handblender 1... turbo
Whisk3... 12 Food preparation attachment
How to operate your handblender
The handblender is perfectly suited for preparing dips, sauces, soups, mayonnaise
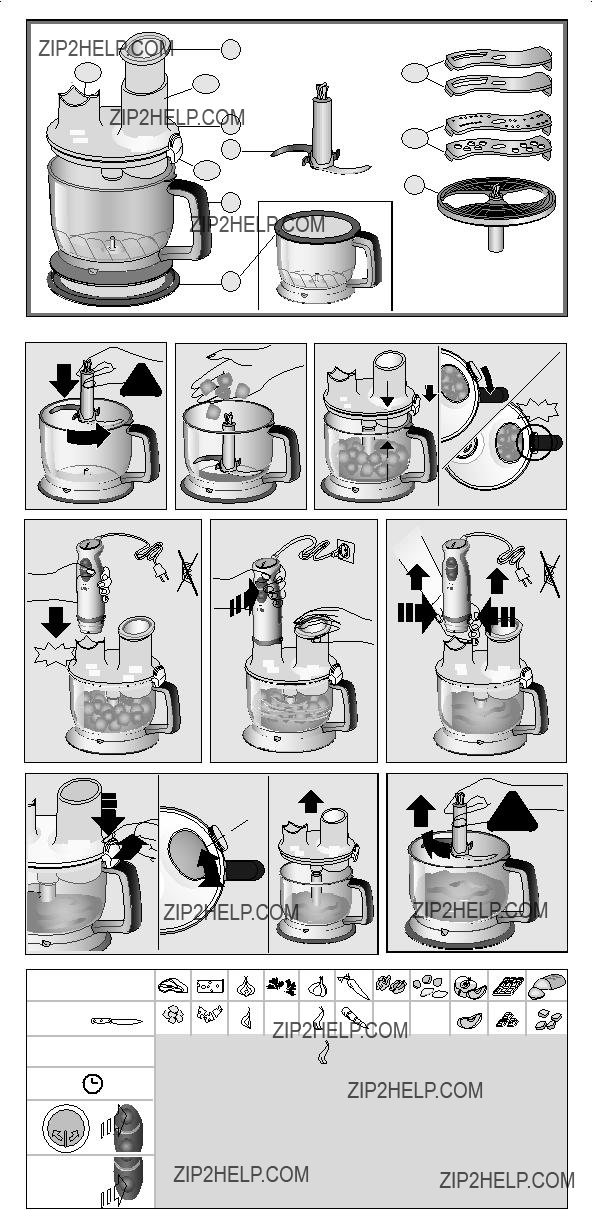
How to operate your food preparation (FP) attachment
1Pusher
2Lid
2a Coupling for motor part
2b Filling tube
2c Lid interlock
3Blade
4Bowl
5
6Tool holder
6a Slicing tools (???ne, coarse)
6b Shredding tools (???ne, coarse)
Chopping
(see picture section A with processing table i)
The blade (3) is perfectly suited for chopping meat, cheese, onions, herbs, garlic, carrots, walnuts, hazelnuts, almonds etc.
For chopping hard goods, use the turbo switch ???.
N.B.: Do not chop extremely hard food, such as nutmeg, coffee beans and grains.
Before chopping ...
???
???remove stalks from herbs,
???remove bones, tendons and gristle from meet.
For best results, please refer to the speed settings recommended in the processing table.
5

a)Carefully remove the plastic cover from the blade (3). Caution: the blade is very sharp! Always hold it by the upper plastic part. Place the blade on the centre pin of the bowl (4) and give it a turn to lock into place. Always place the bowl on the anti- slip base (5).
b)Place the food in the chopper bowl.
c)Attach the lid (2) onto the bowl with the interlock (2c) positioned next to the bowl handle. To lock the lid, turn it clockwise so that the interlock engages with a ??click?? above the handle.
d)Insert the motor part ! into the coupling (2a) until it locks. Make sure the pusher is in place.
e)To operate, press switch ??? or ??? on the motor part and take hold of the bowl with your other hand.
f)After use, press buttons ??? to remove the motor part. Remove the pusher.
g)Pressing the lid interlock (2c), turn the lid
(2)
h)Carefully take out the blade by turning and pulling it, before removing the processed food.
Mixing light dough
Using the blade (3), you may also mix light dough like a pancake batter or a cake mixture based on up to 250 g ???our.
For a pancake batter, for instance, ???rst pour liquids into the bowl, then add ???our and ???nally eggs. Pressing the turbo switch ???, mix the batter until smooth.
Slicing / shredding
(see picture section B with processing table i)
Using the slicing tools (6a), you can slice e.g. cucumbers, onions, mushrooms, apples, carrots, radishes, raw potatoes, courgettes, cabbage.
Using the shredding tools (6b), you can shred e.g. apples, carrots, raw potatoes, beetroot, cabbage, cheese (soft to medium).
a)Place a tool (6a or 6b) into the tool holder
(6) and snap into position. Place the tool holder on the centre pin of the bowl and give it a turn to lock into place.
b)Attach the lid (2) onto the bowl with the interlock (2c) positioned next to the bowl handle. To lock the lid, turn it clockwise so that the interlock engages with a ??click?? above the handle.
c)Insert the motor part into the coupling until it locks. Select speed settings according to recommendations in picture (i).
d)Fill the food to be processed into the ???lling tube. Never reach into the ???lling tube when the appliance is switched on. Always use the pusher (1) to feed in food.
e)Press switch ??? or ??? on the motor part to operate.
f)After use, press buttons ??? to remove the motor part.
g)Pressing the lid interlock (2c), turn the lid
h)Take out the tool holder before removing the processed food. To remove the tool, push it up at the end that protrudes at the bottom of the tool holder.
Cleaning the appliance
(see picture section C)
Clean the motor part ?? and the whisk gearbox ?? with a damp cloth only. The lid
(2) can be cleaned under running water, but
do not immerse it in water, nor clean it in a dishwasher.
All other parts can be cleaned in the dish- washer.
When processing foods with colour (e.g. carrots), the plastic parts of the appliance may become discoloured. Wipe these parts with vegetable oil before cleaning them.
Accessories
(available at Braun Service Centres; however not in every country)
BC: Chopper attachment, perfectly suited for chopping large quantities as well as for preparing shakes, making light doughs and crushing ice cubes.
HC:
Recipe example
Mayonnaise (use handblender)
1 egg (yolk and white),
1 tbsp. lemon juice or vinegar, salt and pepper to taste
Put all ingredients into the beaker according to the a.m. order. Introduce the handblender to the base of the beaker. Pressing the turbo switch ???, keep the handblender in this position until the oil emulsi???es. Then, without switching off, slowly move it up and down until the mayonnaise is well combined.
Subject to change without notice.
This product conforms to the European Directives EMC 89/336/EEC and Low Voltage 73/23/EEC.
Please do not dispose of the product in the household waste at the end of its useful life. Disposal can take place at a Braun Service Centre or at appropriate collection points provided in your country.
Guarantee
We grant a 2 year guarantee on the product commencing on the date of purchase. Within the guarantee period we will eliminate any defects in the appliance resulting from faults in materials or workmanship, free of charge either by repairing or replacing the complete appliance at our discretion.
This guarantee extends to every country where this appliance is supplied by Braun or its appointed distributor.
This guarantee does not cover: damage due to improper use, normal wear or use as well as defects that have a negligible effect on the value or operation of the appliance. The guarantee becomes void if repairs are undertaken by unauthorised persons and if original Braun parts are not used.
To obtain service within the guarantee period, hand in or send the complete appliance with your sales receipt to an authorised Braun Customer Service Centre.
For UK only:
This guarantee in no way affects your rights under statutory law.
6

For Australian only:
Warranty
We grant a 24 Month Replacement Warranty on this appliance commencing on the date of purchase.
This warranty applies in all States and Territories of Australia and in New Zea- land and is in addition to any mandatory statutory obligations imposed on Procter & Gamble Australia Pty. Ltd., its distributors and its manufacturer. This express war- ranty does not purport to exclude, restrict or modify any such mandatory statutory obligations.
This warranty only covers defects in the appliance resulting from faults in workman- ship or materials. Therefore, if your appliance becomes faulty as a result of faults in work- manship or materials, it will be exchanged by your retailer, on presentation of proof of purchase.
This warranty only applies to domestic or household use of this appliance and the warranty will only apply if the correct operating instructions included with this
product have been followed. The warranty on any appliance replaced under this warranty ends on the expiry of the warranty period that applied to the original appliance.
This warranty does not cover:
A.Damage arising from improper use or operation on incorrect voltages.
B.Breakages to shaver foils, glass jars, etc.
C.Normal wear due to moving parts.
D.Repairs undertaken by unauthorised service personnel or use of non genuine parts.
E.Appliances that are outside the warranty period or are not faulty.
This appliance is not intended for use by young children or in???rm persons without supervision. Young children should be supervised to ensure that they do not play with the appliance.
If the appliance is supplied from a cord exten- sion set or electrical portable outlet device these should be positioned so they are not subject to splashing or ingress of moisture.
To the extent permitted by the laws of the Commonwealth of Australia and New Zealand and applicable laws of a State or Territory of Australia, and subject to the second paragraph of this warranty above, this warranty is given in exchange for any
other rights you may have against Procter & Gamble Australia Pty. Ltd. or its distributors or manufacturer, whether at law, in tort (including negligence), in equity or under statute.
Please retain proof of purchase of this appli- ance. If you have any questions in relation to this warranty, please call our Consumer Service line (see below for numbers).
Repairs and service
If you are sending your appliance for repair, please pack the appliance adequately and send it to your nearest Service Agent. For service or replacement parts refer to the authorised Service Agents listed overleaf. Local Service Agents may change from time to time ??? in that event please contact the Consumer Service free call number below for updated local service agent details.
Australian Consumer Service (free call): 1 800 641 820
New Zealand Consumer Service (free call): 0 800 108 909
 N2820
N2820
Australian & N.Z. Service Agents
VICTORIA & TASMANIA
State Wide Services Pty. Ltd. trading as J A Appliances
Tel. (03) 8371 9100
Fax. (03) 9355 8644 Email: jaappliances@ statewideservices.com.au
QUEENSLAND
Walters Import trading as Brisbane Appliance Service Centre 449 Beaudesert Road
Moorooka
QLD 4105
Tel. (07) 3277 0360
Fax. (07) 3274 2909
Email: basc@waltersimport.com.au
WESTERN AUSTRALIA
Mark 1 Appliances
Unit 1, 46 Abernethy Rd.,
Belmont, WA 6104
Tel. (08) 9475 0911
Fax. (08) 9475 0922
NEW SOUTH WALES & A.C.T.
Faulder Appliance Services
Shop 4, 9 Evans Road,
Rooty Hill, N.S.W. 2766
Tel. (02) 9625 3064
Fax. (02) 9625 3037
SOUTH AUSTRALIA & N.T.
Adelaide Service Centre
Shop B2,
Parkholme Shopping Centre,
319 Oaklands Rd.,
Parkholme, S. Aust. 5043
Tel. (08) 8357 5800
Fax. (08) 8357 5833
NEW ZEALAND
Key Service Ltd.
69 Druces Rd.,
Manakau City, Auckland, N.Z.
Tel. (09) 262 5838
Fax. (09) 262 5839
7

8

9
10

11
12

13