Radio / CD
Acapulco CD51
Operating instructions
Radio / CD
Acapulco CD51
Operating instructions
3

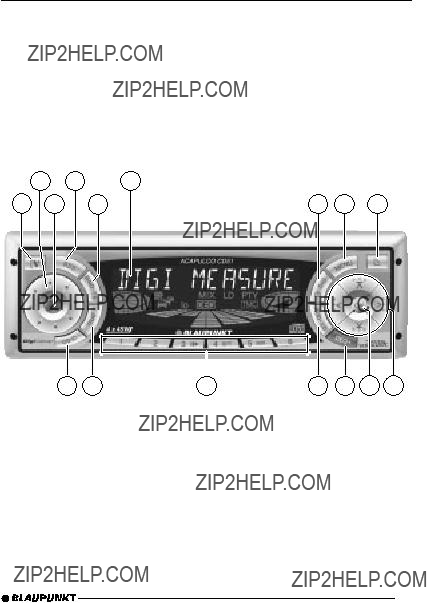
OPERATING ELEMENTS
1
 button for unlatching the removable release panel
2Volume control
3Button for switching the device on/off and for muting the device
4RDS button for switching the RDS (Radio Data System) convenience function on/off and for selecting display of running texts
5BND button (band) for the se- lection of the radio source Switches between FM memory levels and the MW and LW wavebands
TS starts the Travelstore function
6Display
7 button to display clock time DIS changes display contents
8MENU button, which calls up the basic settings menu
9
 button for opening the flip- release panel
:Arrow buttons
;OK button to confirm menu en- tries and start scan function
<DEQ+ button (Digital Equalizer) to switch equalizer on/off
=AUD button (Audio) for adjusting bass, treble, balance and fader LD switches loudness function
>Buttons 1 - 6
?TRAF button (Traffic) to switch traffic news reception on/off
@CD???C button for choosing be- tween CD,
ENGLISH
33

TABLE OF CONTENTS
34

NOTES AND ACCESSORIES
Thank you for choosing a Blaupunkt product. We hope you will enjoy your new equipment.
Please read these instructions before using for the first time. Blaupunkt???s edi- tors are constantly working to write clear, generally understandable instructions for use. If you still have questions about how to use your equipment, please re- fer to your dealer or to your country???s telephone hotline.You will find the tele- phone numbers on the back of this booklet.
Accessories
Only use accessories approved by Blau- punkt.
Remote control
The optional RC 08 and RC 10 remote control units allow you to control your car radio???s basic functions safely and conveniently from the steering wheel.
Amplifiers
Any Blaupunkt amplifier can be used.
CD Changers
ENGLISH
Road Safety
 Road safety has top priority. Only make adjustments to your car radio when traffic conditions allow. Famil- iarise yourself with the device before you start driving.
You must be able to hear audible alarms from police vehicles, fire en- gines or ambulances promptly inside the vehicle.
You should therefore listen at an ap- propriate volume when travelling.
Fitting
If you want to fit your car radio yourself, read the fitting and connecting instruc- tions at the end of this guide.
The following Blaupunkt CD changers can be connected:
CDC A 06, CDC A 08, CDC A 072 or IDC A 09.
Using an adapter cable (Blaupunkt No. 7 607 889 093) you can also connect the CDC A 05 or CDC A 071 CD chang- ers.
Subwoofer
You may connect an active bass loud- speaker (subwoofer) to your device. This is done using a Blaupunkt connec- tion cable (Blaupunkt No.: 7 607 609 093) available from your accessory dealer.
For further information, please consult the installation guide at the back of this guide.
35
RELEASE PANEL
Release Panel
Theft Protection
Your device has a removable
Protect your device from theft by taking the release panel with you whenever you leave the vehicle. Do not leave the panel in the car, even in a hidden place. The release panel is designed for easy handling.
Note:
???Do not drop the panel.
???Do not expose the panel to direct sunshine or any other source of heat.
???Always carry the panel in the case provided.
???Avoid touching the contacts on the panel with your skin. If necessary, clean the contacts using a
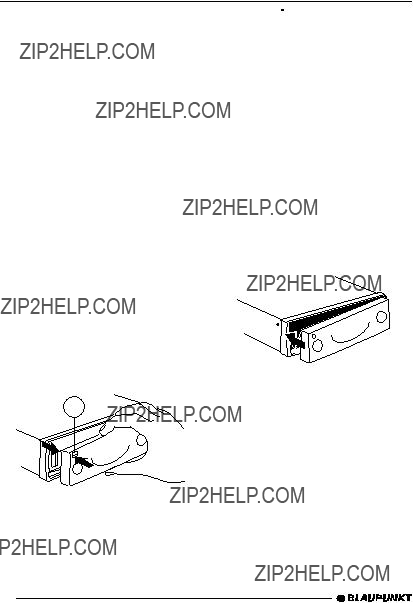
Removing the Release Panel
1
???Press the 
 button 1. The panel unlatches.
???Pull the panel off the device, first straight forward and then to the left.
???When the release panel has been separated from the device, it switches itself off.
???All current settings are saved.
???If a CD has been inserted, it re- mains in the device.
Attaching the Release Panel
???Push the panel into the guides on the device from left to right.
???Push the left hand side of the panel into the device until it engages.
Note:
???Do not press the display as you in- sert the panel.
If the device was switched on when the panel was removed, it will switch itself back on automatically with the last set- tings (radio, CD,
36

SWITCHING ON AND OFF
Switching On and Off
The device can be switched on and off in the following ways:
Switching On and Off with the Vehicle Ignition
If the device is correctly connected to the vehicle ignition, and has not been switched off with button 3, it is switched on and off along with the ignition.
To switch the device on when the igni- tion is off:
??? Press button 3.
Note:
To protect the vehicle battery, the de- vice is automatically switched off after one hour if the vehicle ignition is off.
Switching On / Off with the Release Panel
???Remove the release panel. The device switches off.
???Replace the release panel.
The device switches on. The most re- cent settings (radio, CD,
Switching On / Off with Button 3
???Press button 3to switch on.
???To switch off, hold button 3 pressed for longer than 2 seconds.
The device switches off.
Switching on by Inserting a CD
If there is no CD in the device when it is switched off:
???Press the 
 button 9. The flip release panel opens.
???Push the CD gently into the device, printed side up, until you feel it stop.
The CD is then automatically drawn into the device.
While the CD is being drawn in, do not push or pull it.
???Close the panel with a gentle push until it locks.
The device switches on. The CD starts playing.
ENGLISH
37

VOLUME ADJUSTMENT
Volume Adjustment
The volume can be adjusted in steps from 0 (off) up to 66 (maximum).
???To increase the volume, turn the volume control 2to the right.
???To reduce the volume, turn the vol- ume control 2to the left.
Setting
???Press the MENU button 8.
???Press the  button :until ???ON VOLUME??? appears in the display.
???Adjust the 
 buttons :.
If you set ???0???, then whatever volume was in use before the device was switched off will be reactivated.
 Risk of serious injury! If the level of
If the volume was set to maximum before switching off, and the value for the
???When the setting process is com- plete, press the MENU button 8 or OK ;.
Immediate Volume Reduction (Mute)
You can reduce the volume immediate- ly (mute) to a
??? Press button 3briefly.
???MUTE??? appears in the display.
Adjusting Muted Volume
The mute level is adjusted as follows:
???Press the MENU button 8.
???Press the  button :until ???MUTE LEVEL??? appears in the display.
???Adjust the mute level with the 
 buttons :.
???When the setting process is com- plete, press the MENU button 8 or OK ;.
Telephone Audio/Navigation
Audio
If your car radio is connected to a mo- bile telephone or navigation system, then when the telephone is taken ???off the hook???, or when the navigation sys- tem is speaking, the car radio is muted. The telephone conversation or speech output are reproduced via the car radio speakers.This requires the mobile tele- phone or navigation system to be con- nected to the car radio as described in the installation instructions.
Your Blaupunkt dealer can tell you which navigation systems can be used with your car radio.
If a traffic announcement is received during a telephone call, or while the navigation system is speaking, the traf-
38

VOLUME ADJUSTMENT
fic announcement is not reproduced until the call or the speech output has finished.
If a call is received or if the navigation system begins speaking during a traffic announcement, the announcement is reproduced. The telephone call or speech output can be heard when the traffic announcement has finished.
The volume at which navigation output or telephone calls start is adjusted as follows:
???Press the MENU button 8.
???Press the  button :until ???TEL/ NAVI VOL??? appears in the display.
???Set the desired volume with the 
 buttons :.
???When the setting process is com- plete, press the MENU button 8 or OK ;.
Note:
You can adjust the volume level of tele- phone calls and of speech output as they are made with the volume control
2.
Automatic Sound
This function adjusts the volume of your car radio automatically to your driving speed. This requires your device to be connected as described in the installa- tion guide.
The automatic volume booster can be set in six stages
??? Press the MENU button 8.
???Press the  button :until ???AUTO SOUND??? appears in the display.
???Set the volume adjustment with the 
 buttons :.
???When the setting process is com- plete, press the MENU button 8 or OK ;.
Note:
The right
Adjusting the Volume of the
Confirmation Tone
With certain functions, if you hold a but- ton pressed for longer than 2 seconds (e.g. when saving a station frequency on a station button) a confirmation tone (or beep) is heard.To adjust the volume level of the beep:
???Press the MENU button 8.
???Press the  button :until ???BEEP??? appears in the display.
???Set the desired volume with the 
 buttons :.
???0??? means no beep, ???9??? means maximum beep volume.
???When the setting process is com- plete, press the MENU button 8 or OK ;.
ENGLISH
39

RADIO OPERATION
Radio Operation
This device is equipped with an RDS radio receiver. Many FM stations trans- mit an additional signal containing ex- tra information such as station name and program type (PTY).
As soon as it can be received, the name of the station is shown in the display.
Switching on Radio Operation
If the current operating mode is CD, CD- changer or AUX
??? Press the BND/TS button 5.
RDS Convenience Function
(AF, REG)
The RDS convenience functions AF (alternative frequency) and REG (regional) extend your radio???s function- al power.
???AF: If the RDS convenience func- tion has been activated, the device automatically switches to the best frequency on which the chosen station can be received.
???REG: Some stations divide their programs at certain times into re- gional programs with different con- tent. The REG function prevents the car radio from switching to al- ternative frequencies with different program content.
Note:
REG must be separately activated or deactivated in the menu.
Switching REG On / Off
???Press the MENU button 8.
???Press the  button :until
???REG ON ??? or ???REG OFF ??? appears in the display.
???To turn REG on or off, press the  or
or  button :.
???Press the MENU button 8or
OK ;.
Switching RDS Convenience
Function On / Off
???To use the RDS convenience func-
tions AF and REG, press the RDS button 4.
The RDS convenience functions are active if the RDS symbol shows in the display. When the RDS convenience functions are switched on ???REG ON??? or ???REG OFF??? flashes up.
Selecting Waveband / Memory
Level
This radio receives stations in the VHF (FM) waveband as well as MW and LW (AM) stations. (The MW and LW wave- bands can be deactivated. For more details, consult the section on ???Deacti- vating Wavebands??? at the end of this chapter).Three memory levels are avail- able for the FM waveband, and one memory level each is available for the MW and LW bands.
Six stations can be stored in each mem- ory level.
40
RADIO OPERATION
???To switch between memory levels
and wavebands, briefly press the BND/TS button 5.
Setting the Station
There are a number of ways to set the station.
Automatic Station Search
??? Press the  or
or  button :.
The next station that can be received is tuned in.
Manual Station Tuning
To tune to a station manually
??? Press the  or
or  button :.
Note:
Manual station tuning is only possible when the RDS convenience function is switched off.
Browsing a chain of stations (FM only)
If a station provides several programs, it is possible to browse through this ???chain??? of stations.
???Press the  or
or  button :to change to the next link in the sta- tion chain.
Note:
To use this function, the RDS conven- ience function must be active.
This means you can only switch to a station you have already received at least once. Use the Scan or Travelstore function for this purpose.
Adjusting Station Search
Sensitivity
You can choose whether to search only for stations with strong signals, or wheth- er weak stations should be included.
???Press the MENU button 8.
???Press the  button :until ???SENS??? appears in the display.
???Press the  button :.
The current sensitivity level appears in the display. ???SENS HI6??? means maxi- mum sensitivity, ???SENS LO1??? means minimum sensitivity. When ???SENS LO??? is selected, the display shows ???lo???.
???Set the desired sensitivity with the 
 buttons :.
???When the setting process is com- plete, press the MENU button 8 or OK ;.
Saving Stations
Saving a Station Manually
???Choose between memory levels FM1, FM2, FMT or the MW and LW wavebands.
???Tune to the station you want.
???Choose one of the station buttons 1 - 6 >on which you want to store the station and hold it pressed for longer than 2 seconds.
ENGLISH
41

RADIO OPERATION
Saving Stations Automatically (Travelstore)
You can also save the six strongest sta- tions in the area automatically (FM only). The stations are saved on the FMT memory level.
Note:
Any stations previously saved on this level will be deleted.
???Press the BND/TS button 5for longer than 2 seconds.
Storing starts.
Going to
???Select the memory level where the station is stored.
???Press the corresponding button
1 - 6 >.
Sampling Available Stations (SCAN)
You can listen to short samples of all the stations that can currently be re- ceived. The length of samples can be set, in the menu, to between 5 and 30 seconds.
Starting SCAN
???Hold down the OK button ;for longer than 2 seconds.
The scanning process starts. ???SCAN??? appears briefly in the display, after which the current frequency is displayed, flash- ing.
Stop SCAN, continue listening to a station
??? Press the OK button ;.
The scanning process is stopped, and the last station tuned in plays.
Setting Scan Time
???Press the MENU button 8.
???Press the  :until ???SCANTIME??? appears in the display.
???Set the desired sampling time with the 
 buttons :.
???When the setting process is com- plete, press the MENU button 8 or OK ;.
Note:
The chosen sampling time also applies to CD and
Program Type (PTY)
As well as the station name itself, some FM stations also supply information about the type of program being trans- mitted.This information can be received and displayed by your radio.
Examples of these program types could be:
CULTURE TRAVEL JAZZ
SPORT NEWS POP
ROCK CLASSICS
Using the PTY function it is possible to specifically select stations transmitting a particular program type.
42

RADIO OPERATION
When the program type has been se- lected and the search started, the de- vice changes from the current station to one with the selected program type.
Note:
If no station with the chosen program type is found, a beep is heard and the display briefly shows ???NO PTY???. The tuner returns to the most recently re- ceived station.
If the station set, or another station from the station chain, starts to transmit the desired program type at a later time, the device changes automatically from the current station, or out of CD or CD changer mode, and switches to the sta- tion with the desired program type.
Switching PTY On / Off
???Press the MENU button 8.
???Press the  button :until
???PTY ON??? or ???PTY OFF??? appears in the display.
???Use the 
 buttons :to turn PTY on or off.
When PTY is switched on, ???PTY??? shows in the display.
???Press the MENU button 8or
OK ;.
Selecting program type and starting search
??? Press the  or
or  button :.
The current program type is shown in the display.
???To change to a different program type, press the  or
or  button : while the type display is active.
Or
???Press one of the buttons 1 - 6 > to change the program type stored for that button.
The selected program type is briefly dis- played.
???Press the  or
or  button :to start the search.
The next station with the selected pro- gram type is tuned in.
Storing program types on station buttons
???Select a program type with the  or
or  button :.
???Hold down the desired station but- ton 1 - 6 >for longer than 2 sec- onds.
The program type is saved on the cho- sen button 1 - 6 >.
ENGLISH
43

RADIO OPERATION
Optimising Radio Reception
Treble cut in the presence of interference (HICUT)
The HICUT function improves the sound when radio reception is poor (FM only). When interference is being experienced, the treble is automatically cut, which therefore also reduces the level of in- terference.
Switching HICUT On / Off
???Press the MENU button 8.
???Press the  button :until ???HICUT??? appears in the display.
???Press the  or
or  button :to ad- just the HICUT.
???HICUT 0??? means the function is inac- tive, while ???HICUT 3??? indicates the strongest automatic reduction of the tre- ble and the interference.
???Press the MENU button 8or
OK ;.
Bandwidth selection in the presence of interference (SHARX)
The SHARX function allows you to elim- inate interference from neighbouring stations as far as possible (FM only). Switch on the SHARX function when stations are crowded.
Switching SHARX On / Off
???Press the MENU button 8.
???Press the  button :until ???SHARX??? appears in the display.
???Press the  or
or  button :to switch SHARX on or off.
???SHARX OFF??? means no automatic bandwidth switching will be carried out. ???SHARX ON??? means that automatic bandwidth switching will be carried out.
???Press the MENU button 8or
OK ;.
Select Display of Running Texts
Some radio stations use the RDS sig- nal to transmit advertising or other in- formation instead of the station name. These ???running texts??? are shown in the display.To switch off the display of ???run- ning texts???:
???Hold the RDS button 4pressed until ???NAME FIX??? appears in the display.
???To reactivate the display of running texts, hold the RDS button 4 pressed until ???NAME VAR??? appears in the display.
Adjusting the Display
In radio mode, it is possible to choose between continuous display of the time or continuous display of the station name (or frequency).
???Hold the  / DIS button 7 pressed until the display you want appears.
44

Deactivating Wavebands
It is possible to deactivate the LW and MW wavebands separately or together. This makes sense if you don???t use these wavebands, i.e. if you don???t listen to MW or LW stations.
To deactivate the MW and LW wave- bands together or separately:
???In FM radio mode, press the
MENU button 8.
???Press the  button :until ???AM ON??? appears in the display.
Note:
If ???AM OFF??? shows in the display, MW and LW are already deactivated.
If ???MW OFF??? or ???LW OFF??? appears in the display, MW or LW is already deac- tivated.
???Press the  or
or  button : to switch between ???AM ON???, ???AM OFF???, ???MW OFF??? and ???LW OFF???.
???Press the MENU button 8or OK ;.You settings are saved.
Traffic Information
This device is equipped with an RDS EON receiver. EON means Enhanced Other Network.
Whenever a traffic announcement (TA) is made, the radio switches automati- cally from a station that does not broad- cast traffic information to one in the chain of stations that does.
After the traffic announcement, the de- vice returns to the station that was pre- viously tuned in.
Switching Traffic Information
Priority On / Off
??? Press the TRAF button ?.
Traffic announcement priority is activat- ed if the traffic jam symbol is lit.
Note:
You will hear a warning tone:
???If you leave the reception area of a traffic radio station you are listening to.
???If, when you are listening to a CD, you leave the reception area of the selected traffic radio station and the following automatic search fails to find a new traffic radio station.
???If you change from a traffic radio station to a station with no traffic information.
Either switch off traffic information pri- ority, or switch to a station with traffic information.
ENGLISH
45

Adjusting the Volume for Traffic Announcements
???Press the MENU button 8.
???Press the  button :until
???TA VOLUME??? appears in the dis- play.
???Use the 
 buttons :to adjust the volume.
???When the setting process is com- plete, press the MENU button 8 or OK ;.
Note:
During a traffic announcement you can adjust the volume for the duration of the announcement using the volume con- trol 2.
Note:
You can set the tone and volume for traf- fic announcements. For more informa- tion, consult the section on ???Tone and volume controls???.
CD Operation
This device can be used to play stand- ard CDs with a diameter of 12 cm.
 Danger of damage to CD drive! This device is not suited for playing
No liability will be accepted for dam- age caused to the CD drive by un- suitable CDs.
Starting CD Operation
??? If there is no CD in the drive
???Press the 
 button 9. The
???Push the CD printed side up gently into the CD slot until you feel it stop.
The CD is then automatically drawn into the device.
While the CD is being drawn in, do not push or pull it.
???Close the
The CD begins playing.
??? If there is already a CD in the drive.
???Press the CD???C button @until ???CD??? appears in the display.
The CD starts playing where it last stopped.
Selecting a Track
???Use the arrow keys :to select the next or previous track.
Pressing the  or
or  button :once re- starts the track currently playing.
46

CD OPERATION
Fast Search (Audible)
To search rapidly backwards or forwards
???Hold down one of the 
 buttons :until fast searching begins.
Playing Tracks in Random
Sequence (MIX)
??? Press button 5 MIX >.
???MIX CD??? appears briefly in the display and the MIX symbol shows. The next track is played at random.
Ending MIX
??? Press button 5 MIX >again.
???MIX OFF??? flashes up and the MIX sym- bol disappears.
Sampling Tracks (SCAN)
To listen to a short sample of each track on the CD:
???Press the OK button ;for longer than 2 seconds. The next track is played.
Note:
The lengths of these samples can be set. Please consult the section on ???Set- ting Scan Time??? under ???Radio Opera- tion???.
Ending SCAN, Continue Listening to Track
???To halt the scan, press the OK but- ton ;.
The track currently being sampled will continue to play.
Repeating Tracks (REPEAT)
???To repeat a track, press button
4 RPT >.
???REPEAT TRCK??? flashes up and the RPT symbol shows.The track is repeat- ed until RPT is deactivated.
Stopping REPEAT
???To stop repetition of the current track, press button 4 RPT > again.
???REPEAT OFF??? flashes up in the dis- play, the RPT symbol disappears, and normal play resumes.
Pausing During Play
??? Press button 3 
 >. ???PAUSE??? appears in the display.
Continuing after the pause
??? Press button 3  >again. Play resumes.
ENGLISH
Changing Display Contents
???To change the display between track number plus clock time, track number plus play time, or track
number plus CD name, press the  / DIS button 7longer than 2 seconds until the desired display appears.
47

CD OPERATION
Traffic Announcements in CD
Mode
???To receive traffic announcements
while listening to a CD, press the TRAF button ?.
Traffic information priority is activated when the traffic jam symbols shows in the display.For more information, please read the section on ???Traffic Information???.
Naming CDs
In order to recognise your CDs more effectively, the car radio allows you to give individual names to up to 30 CDs. The names may have up to eight char- acters.
If you attempt to assign more than 30 names, the display will show ???FULL???.
Entering / Changing CD Names
???Start playing the CD you wish to name.
???Press the MENU button 8.
???Use the  or
or  button :to select ???CD NAME???.
???Press the  or
or  button :twice.
The device is now in editing mode. If your chosen CD is not yet named, eight underscores appear in the display.
???The current entry location flashes.
???Use the  or
or  button :to select your characters. If a space is re- quired, select the underscore.
???Use the  or
or  button :to change the input location.
???To save the name, press the MENU button 8or OK ;.
Deleting a CD name
???Start playing the CD whose name is to be deleted.
???Press the MENU button 8.
???Use the  or
or  button :to select ???CD NAME???.
???Press the  or
or  button :.
???Press and hold the MENU button 8. After 4 seconds a beep is heard and ???DELETE NAME??? ap- pears in the display.
???Release the MENU button 8. The CD name has been deleted.
???Return to the menu by pressing the OK button ;.
Removing CD from Player
??? Press the 
 button 9.
The
???Remove the CD and close the flip- release panel.
48

CD CHANGER OPERATION
CD Changer Operation
Note:
For information on handling CDs, insert- ing them and operating the CD chang- er, please consult the operating instruc- tions for your CD changer.
Starting CD Changer Operation
???Press the CD???C button @until ???CHANGER??? appears in the dis- play.
Play will start with the first CD recog- nised by the CD changer.
Selecting a CD
???To change to a different CD, press the  or
or  button :one or more times.
Selecting a Track
???To change to a different track on
the current CD, press the  or
or  button :one or more times.
Fast Search (Audible)
To search rapidly backwards or forwards
???Hold down one of the 
 buttons :until fast searching begins.
Changing Display Contents
???To switch the display between track number plus play time, track number plus clock time, track number plus CD number, or track
number plus CD name, press the  / DIS button 7for longer than 2 seconds one or more times until the desired display appears.
Repeat Playing Tracks or Whole CDs (REPEAT)
???To repeat the current track, press button 4 RPT >briefly.
???REPEAT TRCK??? flashes up briefly and the display shows ???RPT???.
???To repeat the current CD, press button 4 RPT >again.
???REPEAT DISC??? flashes up briefly and the display shows ???RPT???.
Stopping REPEAT
???To stop repetition of the current track or CD, press button 4 RPT > until ???REPEAT OFF??? flashes up and RPT disappears from the display.
Playing Tracks in Random
Sequence (MIX)
???To play the tracks of the current CD
in random sequence, press button 5 MIX >briefly.
???MIX CD??? flashes up, the display shows ???MIX???.
???To play the tracks of all the CDs in
the CD changer in random se- quence, press button 5 MIX > again.
???MIX ALL??? flashes up and the display shows ???MIX???.
Note:
The CDC A 08 and IDC A 09 models mix all tracks on all CDs in the CD changer, while all other changers mix the tracks of a single CD before moving to the next CD in the changer.
ENGLISH
49

CD CHANGER OPERATION
Ending MIX function
???Press button 5 MIX >until ???MIX OFF??? flashes up and ???MIX??? disappears.
Sampling All Tracks on All CDs (SCAN)
???To listen to short samples of all tracks on all the CDs in the CD
changer in ascending order, press the OK button ;for longer than 2 seconds.
???SCAN??? appears in the display.
Ending SCAN
???To halt the scan, press OK ; briefly.
The track currently being sampled will continue to play.
Note:
The lengths of these samples can be set. Please consult the section on ???Set- ting Scan Time??? under ???Radio Opera- tion???.
Pausing During Play
??? Press button 3  >. ???PAUSE??? appears in the display.
Continuing after the pause
??? Press button 3 
 >again. Play resumes.
Naming CDs
In order to recognise your CDs more effectively, the car radio allows you to give individual names to up to 99 CDs. The names may have up to seven char- acters.
If you attempt to assign more than 99 names, the display will show ???FULL???.
Entering and changing CD names
???Press the MENU button 8.
???Use the  or
or  button :to select ???CDC NAME???.
???Press the  or
or  button :.
The device is now in selection mode.
???Choose the CD that you want to name with the  or
or  button :.
???Press the  or
or  button :.
The device enters edit mode. If your chosen CD is not yet named, seven underscores appear in the display.
???The current entry location flashes.
???Use the  or
or  button :to select your characters. If a space is re- quired, select the underscore.
???Use the  or
or  button :to change the input location.
???To save the name, press the MENU button 8or OK ;.
Deleting a CD name
???Start playing the CD whose name is to be deleted.
???Press the MENU button 8.
50
???Use the  or
or  button :to select ???CDC NAME???.
???Press the  or
or  button :.
???Press and hold the MENU button 8. After 4 seconds a beep is heard and ???DELETE NAME??? ap- pears in the display.
???Release the MENU button 8. The CD name has been deleted.
???Return to the menu by pressing the OK button ;.
Deleting all CD names
To delete all stored CD names:
???Start listening to a CD.
???Press the MENU button 8.
???Use the  or
or  button :to select ???CDC NAME???.
???Press the or
or  button :.
???Hold down the MENU button 8. After 4 seconds a beep is heard and ???DELETE NAME??? appears in
the display. Continue to hold the MENU button 8until a second beep is heard and ???DELETE ALL??? appears in the display.
???Release the MENU button 8.
All CD names in the CD changer have been cleared.
???Return to the menu by pressing the OK button ;.
CLOCK Time
Displaying the Time Briefly
???To display the time, press the  / DIS button 7briefly.
Setting the Time
The clock time can be set automatically via the RDS signal.If you cannot receive an RDS station, or if the RDS station to which you are listening does not sup- port this function, it is also possible to set the time manually.
Setting clock time automatically
???To have the time set automatically, press the MENU button 8.
???Press the  button :until ???CLOCK MAN??? (manual) or ???CLOCK AUTO??? (automatic) ap- pears in the display.
???Press the  button :until ???CLOCK AUTO??? appears in the display.
???Press the MENU button 8or OK
;.
When a station with the RDS clock func- tion
Setting clock time manually
???To set the time manually, press the MENU button 8.
???Press the  button :until ???CLOCKSET??? appears in the display.
???Press the  button :.
ENGLISH
51

CLOCK TIME
The time is shown in the display. The minutes are flashing, and can be ad- justed.
???Set the minutes with the  or
or  button :.
???Having set the minutes, press the  button :. The hours flash.
???Set the hours with the  or
or  button :.
???Press the MENU button 8or OK
;.
Choosing 12/24 Hour Clock
Mode
???Press the MENU button 8. ???MENU??? appears in the display.
???Press the  button :until ???24H MODE??? or ???12H MODE??? appears in the display.
???Press the  or
or  button :to switch modes.
???When the setting process is com- plete, press the MENU button 8 or OK ;.
Displaying Time When the Device is Switched Off But the Ignition On
???To display the clock time when the device is switched off and the igni-
tion is switched on, press the MENU button 8.
???MENU??? appears in the display.
???Press the  button :until ???CLK DISP OFF??? or ???CLK DISP ON??? appears in the display.
???Press the  or
or  button :to switch the display between ON and OFF.
???When the setting process is com- plete, press the MENU button 8 or OK ;.
Displaying the time briefly when the device is switched off
To display the time briefly when the de- vice is switched off
??? Press the  / DIS button 7.
The time appears in the display for ap- prox. 8 seconds.
52

TONE AND VOLUME CONTROLS
Tone and Volume Controls
Separate tone and volume adjustments can be made for each audio source (ra- dio, CD,
Note:
The tone and volume settings for traf- fic announcements can only be adjust- ed while such an announcement is being received.
Adjusting the Bass
???Press the AUD/LD button =. ???BASS??? appears in the display.
???Press the  or
or  button :to ad- just the bass.
???When the setting process is com- plete, press the MENU button 8 or OK ;.
Adjusting the Treble
???Press the AUD/LD button =. ???BASS??? appears in the display.
???Press the  button :until ???TREBLE??? appears
???Press the  or
or  button :to ad- just the treble.
???When the setting process is com- plete, press the MENU button 8 or OK ;.
Adjusting the Balance
???To adjust the balance, press the AUD/LD button =.
???BASS??? appears in the display.
???Press the  button :until ???BALANCE??? appears.
???Press the  or
or  button :to ad- just the balance.
???When the setting process is com- plete, press the MENU button 8 or OK ;.
Adjusting the Fader
???To adjust the fader, press the AUD/ LD button =.
???BASS??? appears in the display.
???Press the  button :until ???FADER??? appears.
???Press the  or
or  button :to ad- just the fader balance.
???When the setting process is com- plete, press the MENU button 8 or OK ;.
ENGLISH
53

Switching Loudness
On / off
Loudness refers to boosting the bass and treble at low volume levels to match the ear???s sensitivity.
???Press the AUD/LD button =for about 2 seconds.
If loudness is switched on, LD shows in the display.
Setting Loudness Intensity
The loudness boost can be set in steps from one to six.
???Press the MENU button 8. ???MENU??? appears in the display.
???Press the  button :until ???LOUD- NESS??? appears in the display.
???Press the  or
or  button :to ad- just the boost.
???When the setting process is com- plete, press the MENU button 8 or OK ;.
Equalizer
This device is equipped for automatic, digital sound measurement, using three-
Using the microphone included, the settings for equalizers USER 1 - USER 3 can be measured automatical- ly.
In addition, the automatically measured values can be adjusted and the equal- izer can be set manually.
The device also has a parametric 5- band digital equalizer and six sound presets.
Switching Equalizer On / Off
???To switch the equalizer on, hold down the DEQ+ button <until ???EQ ON??? flashes up and DEQ ap- pears in the display.
???To switch the equalizer off, hold down the DEQ+ button <until ???EQ OFF??? flashes up and DEQ dis- appears from the display.
Automatic Sound Measurement
You can make and store electronic measurements for three different situa- tions/users, for example:
USER 1 driver alone
USER 2 driver and passenger USER 3 front and back seats occu-
pied
While the measurements are being made, hold the microphone in the cor- responding position.
54

EQUALIZER
The microphone position for situation 1 (e.g. driver alone) is at the height of the driver???s head.
For situation 2, hold the microphone between driver and passenger.
For situation 3, hold the microphone in the centre (left/right, back/front) of the vehicle???s interior.
These measurements require really quiet surroundings. Outside noise dis- torts the results.
Note:
Sound output from the loudspeakers must not be blocked by objects. All loud- speakers must be connected. The mi- crophone must be connected to the device.
To take automatic equalizer measure- ments:
???Hold the microphone at the desired position inside the vehicle.
???Press the DEQ+ button <.
???Use the  or
or  button :to select ???AUTO DEQ+???.
???Use the 
 buttons :to enter USER mode.
???Use the  or
or  button :to choose between ???USER 1???, ???USER 2??? and ???USER 3???.
???Hold the DEQ+ button <pressed for longer than 2 seconds.
A countdown runs in the display. During the countdown, you can still reposition the microphone. When the countdown is over, the automatic measurement starts and ???MEASURING??? shows in the display. The process lasts about 1 minute.
If an error occurs during measurement or if the microphone is not properly con- nected, ???ERROR??? appears in the display and the process is interrupted.
Stopping Automatic Measurement
To stop the automatic measurement procedure:
???Briefly press the DEQ+ button < or OK ;.
Adjusting Sound Measurements
Manually
To change the settings for USER 1 - USER 3 manually:
???Press the DEQ+ button <.
???Use the  or
or  button :to select ???AUTO DEQ+???.
???Use the 
 buttons :to activate USER mode.
???Use the  or
or  button :to select ???USER 1???, ???USER 2??? or ???USER 3???.
???Use the 
 buttons :to select a filter.
???Press the  or
or  button :.
???Use the  button :to select a fre- quency.
ENGLISH
55

EQUALIZER
???Use the  or
or  button :to set the frequency level.
???To select the next filter, press first
OK ;and then one of the 
 buttons :.
???When all settings are complete, press the DEQ+ button <.
Setting Digital Equalizer
In addition to automatic sound meas- urement, you can also make manual settings using the
In this case, parametric means that in each of the five filters, one individual fre- quency can be emphasised or reduced (with a gain of +8 to
The following filters are available:
These filters can be set without using any measuring instruments.You can use them to make a significant difference to the properties of the sound in the vehi- cle.
Adjustment Instructions
For the purposes of this adjustment, we recommend you use a CD you know well.
Before making any adjustments to the equalizer, set the tone and volume con- trols to zero and deactivate loudness. For more information on this, read the section on ???Tone and volume controls???.
???Start playing a CD.
???Assess the sound you hear.
???Now consult the ???Equalizer Adjust- ment Guide??? table for ???Sound Qual- ity???.
???Adjust the equalizer values as de- scribed under ???Action???.
Setting the Equalizer
???Press the DEQ+ button <.
???Use the  or
or  button :to select ???DIGITAL EQ???.
???Use the  or
or  button :to select the filter.
???Press the  or
or  button :.
???Press the  button :to select the frequency.
???Adjust the level with the  or
or  button :.
???To select the next filter, press first
the OK button ;then the  or
or  button :.
???When you have completed all the
settings, press the DEQ+ button
<.
56

EQUALIZER
Equalizer Adjustment Guide
Start by setting the middle and treble ranges, and finish with the bass.
ENGLISH
57

EQUALIZER
Selecting Sound Presets
It is also possible to activate
???CLASSICS
???POP
???JAZZ
???ROCK
???TECHNO
???SPEECH
To activate
???Press the DEQ+ button <.
???Press the  or
or  button :until ???SOUND PRESET??? appears in the display.
???Use the 
 buttons :to select the desired preset.
???Press the DEQ+ button <or
OK ;.
Adjusting the Level Indicator
The level indicator, or spectrometer, on your display gives a symbolic indication of volume, tone control settings and equalizer settings while you make ad- justments.
When adjustments are not being made, the spectrometer displays the car radio???s output level.
You can choose the spectrometer type via the menu.
Two types are available.
Selecting spectrometer type
???Press the MENU button 8. ???MENU??? appears in the display.
???Press the  button :until ???EQ DISPLAY??? appears in the display.
???Press the  or
or  button :to select between ???SPECTRUM 1???, ???SPECTRUM 2??? or ???EQ DISP OFF???.
???When the setting process is com- plete, press the MENU button 8 or OK ;.
58

External Audio Sources
In addition to the
If no CD changer is installed, two exter- nal sources can be connected.
The AUX input must be switched on in the menu.
To connect an external audio source, you need an adapter cable, available from your authorised Blaupunkt dealer.
Switching AUX Input On / Off
???Press the MENU button 8. ???MENU??? appears in the display.
???Press the  button :until ???AUX-
For the second AUX input, the ???1??? is re- placed by a ???2???. If a CD changer is in- stalled, ???2??? is the only option.
???Press the  or
or  button :to switch AUX on or off.
???When the setting process is com- plete, press the MENU button 8 or OK ;.
Note:
If the AUX input is switched on, it can be selected via the CD???C button @.
TMC for Dynamic
Navigation Systems
TMC means ???Traffic Message Channel???. TMC is used to transmit traffic an- nouncements digitally for use in route planning by suitable navigation systems. Your car radio has a TMC output that can be connected to Blaupunkt naviga- tion systems.Your Blaupunkt dealer can tell you which navigation systems can be used with your car radio.
If a navigation system is connected and a TMC station is received, TMC lights up in the display.
If dynamic route guidance is active, a TMC station will be tuned in automati- cally.
ENGLISH
59

Technical data
Amplifier
Tuner
FM frequency response:
20 - 16,000 Hz
CD
Frequency response:
20 - 20,000 Hz
Input sensitivities
Subject to technical alterations!
Guarantee
The extent of the guarantee depends on the statutory conditions applicable in the country where the device was bought.
If there should be a fault in your device, please refer to your dealer, providing proof of purchase.
If the statutory minimum guarantee pe- riod in your country is less than 12 months, Blaupunkt provides a 12 month manufacturer???s guarantee. Damage caused by wear, incorrect use or use for commercial purposes are excluded from this guarantee.
In order to make a claim on the basis of Blaupunkt???s manufacturer???s guarantee, please send the faulty device together with proof of purchase to the central Blaupunkt customer service depot in your country.
You can obtain the nearest address from the telephone hotline on the back of this booklet. Blaupunkt reserves the right to carry out a repair or to provide a substi- tute device.
60