www.blaupunkt.com

Radio CD MP3 WMA

Bedienungsanleitung

Operating instructions

Mode d???emploi

Istruzioni d???uso

Gebruiksaanwijzing

Bruksanvisning

Instrucciones de manejo

Instru????es de servi??o

Betjeningsvejledning

Instrukcja obs??ugi

N??vod k obsluze

N??vod na obsluhu

14

2

Controls

1 button to open the ???ip-release con- trol panel.

2On/Off button

Short press: Switches the device on. In

operation: Mutes the device.

Long press: Switches the device off.

3 SOURCEbutton

Short press: Source selection be- tween radio and CD and (if connected or switched on) CD changer, AUX and

FRONT AUX.

Long press: Brie???y displaying time.

4 Volume control

5 Keys 1 - 5

6 FRONT AUX input

7TRAF???RDS button

Short press: Switches traf???c informa- tion standby on/off.

Long press: Switches convenient RDS function on/off.

8 Arrow keys and

9ESC???DIS button

Short press: Changes from a menu item back to the main menu (also in Audio menu).

Long press: Changes display contents.

: Arrow keys and

;MENU???OK button

Short press: Calls up the menus for basic settings and con???rms settings. Ending the scan function.

Long press: Starts the Scan function.

<AUD button to call up the Audio menu: Adjusting bass, treble, middle, subout, balance and fader.

Switching X-BASS on/off and adjust- ing it.

Selects an equaliser presetting.

=BAND???TS button

Short press: Selects the FM memory banks and the MW and LW wavebands. Long press: Starts the Travelstore func- tion.

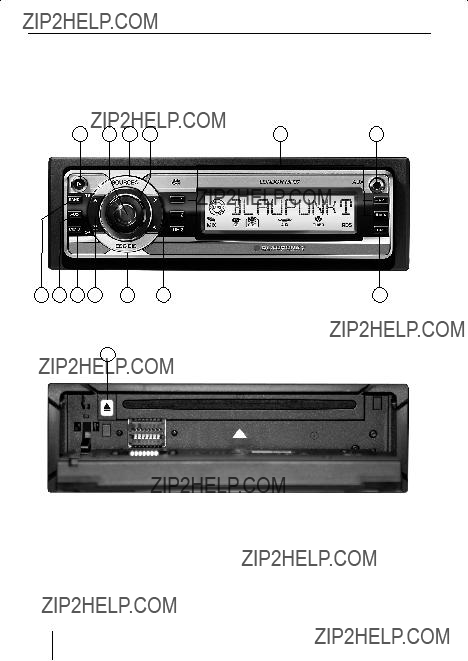
> button (Eject) for removing a CD from the device.

ENGLISH

37

Contents

38

Contents

ENGLISH

39

About these instructions

About these instructions

These instructions contain important infor- mation to easily and safely install and oper- ate the device.

???Read these instructions carefully and completely before using the device.

???Keep the instructions at a location so that they are always accessible to all users.

???Always pass on the device to third par- ties together with these instructions.

In addition, observe the instructions of the devices used in conjunction with this de- vice.

Symbols used

These instructions employ the following symbols:

DANGER!

Warns about injuries

CAUTION!

Warns about laser beam

CAUTION!

Warns about damaging the CD drive

The CE mark con???rms the compli- ance with EU directives.

??? Identi???es a sequencing step

???Identi???es a listing

Use as directed

This device is intended for installation and operation in a vehicle with 12 V vehicle sys- tem voltage and must be installed in a DIN slot. Observe the 'performance limits in the technical data. Repairs and installation, if necessary, should be performed by a spe- cialist.

Declaration of conformity

The Blaupunkt GmbH declares that this car sound system complies with the basic requirements and the other relevant regula- tions of the directive 1999/5/EG.

40

For your safety

For your safety

The device was manufactured according to the state of the art and established safety guidelines. Even so, dangers may occur if you do not observe the safety notes in these instructions:

If you are installing device yourself

You may only install the device yourself if you are experienced in installing car sound systems and are very familiar with the elec- trical system of the vehicle. For this pur- pose, observe the installation instructions at the end of these instructions.

Observe the following!

DANGER!

Increased risk of injury from connector

In case of an accident, the protruding con- nector in the FRONT-AUX-IN socket may cause injuries. The use of straight plugs or adapters can lead to an increased risk of in- jury.

??For this reason, we recommend using angled jack plugs, e.g. the Blaupunkt accessories cable (7 607 001 535).

CAUTION!

The device contains a Class 1 laser that can cause injuries to your eyes.

Do not open the device and do not perform any modi???cations.

In operation

??? Operate the device only if traf???c situa-

??? Always listen at a moderate volume so that you can hear acoustic warning signals (e.g. police sirens) and protect your hearing. Do not increase the vol- ume when selecting a different audio source or while the CD changer chang- es the CD. The device is brie???y muted.

After operation

???The device is worthless to a thief with- out the control panel. Always remove the control panel whenever you leave the vehicle.

???Transport the control panel so that it is protected against impacts and the con- tacts cannot become dirty.

Cleaning notes

Solvents, cleaning and scouring agents as well as dashboard spray and plastics care product may contain ingredients that will damage the surface of the device.

???Use only a dry or slightly moistened cloth for cleaning the device.

???If necessary, clean the contacts of the control panel regularly using a soft cloth moistened with cleaning alcohol.

41

Disposal of old unit

(EU countries only)

Do not dispose of your old unit in

the household trash!

Use the return and collection systems avail- able to dispose of the old device.

Scope of delivery

The scope of delivery includes:

1Car sound system

1Case for the control panel

1Support frame

2 Disassembly bar

1Guide pin

1Operating instructions

Optional equipment

(not part of the scope of delivery)

Use only accessories approved by Blaupunkt.

Remote control

The steering wheel and/or handheld remote control allows you to access the basic func- tions of your car sound system safely and conveniently.

You cannot switch the device on/off using the remote control!

You can ???nd out from your Blaupunkt dealer or on the Internet at www.blaupunkt.com which remote controls can be used with your car sound system.

Ampli???er

You can use all Blaupunkt and Velocity am- pli???ers.

CD changers

You can connect the following Blaupunkt CD changers:

CDC A 03, CDC A 08 and IDC A 09.

42

Hold the control panel by its right side and then pull the control panel straight out of the bracket.
43

Warranty

We provide a manufacturer's warranty for products bought within the European Union. Devices purchased outside the European Union are subject to the warranty terms published by our respective regional agency.

The warranty terms can be called up under www.blaupunkt.com or requested directly from:

Blaupunkt GmbH Hotline Robert-Bosch-Str. 200

D-31139 Hildesheim

Service

In some countries, Blaupunkt offers a repair and pick-up service.

Information about the availability of this service in your country can be found at www.blaupunkt.com.

If you want to take advantage of this serv- ice, you may request a pick-up service for your device via the Internet.

Detachable control panel

Theft protection

The device is equipped with a detachable control panel (???ip-release panel) as a way

Notes:

???Never drop the control panel.

???Never expose the control panel to di- rect sunlight or other heat sources.

???Avoid direct skin contact with the control panel???s electrical contacts. If necessary, please clean the contacts with a lint-free cloth moistened with cleaning alcohol.

Detaching the control panel

??? Press the button 1.

The control panel opens out towards you.

???

Detachable control panel

Notes:

???The device is switched off after a time preset by you. For instructions, please read the section "Switch-off time (OFF TIMER)" in this chapter.

???All the current settings are saved.

???Any CD already inserted in the device remains there.

Attaching the control panel

???Hold the control panel approximately at a right angle to the device.

???Slide the control panel into the de- vice???s guides that are positioned on the left and right at the lower edge of the housing. Push the control panel care- fully into the bracket until it clicks into place.

???Carefully ???ip up the control panel until it clicks into place.

2.

1.

If the device was still switched on when you detached the control panel, it will automati- cally switch on with the last setting activat- ed (radio, CD, CD changer or AUX) when the panel is replaced.

Switch-off time (OFF TIMER)

After opening the control panel, the device is switched off after an adjustable time. You can set this time from 0 to 30 seconds.

???Press the MENU button ;.

???Press the or button :repeatedly until the displays shows "OFF TIMER".

???Press the or button 8to open the menu.

???Set the time with the or button 8.

When you have ???nished making your changes,

???press the MENU button twice ;.

Note:

If you set the switch-off time to 0 sec- onds, the device is switched off imme- diately after opening the control panel.

44

Switching on/off

There are various ways of switching the device on/off:

Switching on/off using button 2

???To switch on the device, press button

2.

The device switches on.

???To switch off the device, press and hold down button 2 for longer than two seconds.

The device switches off.

Switching on/off using the vehicle ignition

The device will switch on/off simultane- ously with the ignition if the device is cor- rectly connected to the vehicle???s ignition as shown in the installation instructions and you did not switch the device off by press- ing button 2.

Switching the device on/off using the detachable control panel

??? Detach the control panel.

The devices switches off after the time set in the "OFF TIMER" menu.

??? Attach the control panel again.

The device switches on. The last setting (radio, CD, CD changer or AUX) is reacti- vated.

Note:

To protect the vehicle battery, the de- vice will switch off automatically after one hour if the ignition is off.

Setting the power-on volume

Note:

The device features a time-out function (time window).

For example, if you press the MENU button ; and select a menu item, the device switches back after approx. 8 seconds after the last button acti- vation. The settings performed are saved.

You can set the power-on volume. ??? Press the MENU button ;.

??? Press the or button : repeat- edly until "ON VOLUME" appears on the display.

??? Press the or button 8to open the menu.

??? Set the power-on volume with the or button 8.

To help you adjust the setting more easily, the device will increase or decrease the vol- ume as you make your changes.

If you enable "LAST VOL", the volume which was set the last time you switched off the device is re-enabled.

45

Volume

Note:

To protect your hearing, the power-on volume is limited to the value "38" for the setting "LAST VOL". If the volume was higher before switch-off, the value is automatically set to "38" at switch- on. This prevents an unintentionally and unexpectedly high volume when switching on the device.

When you have ???nished making your changes,

??? press the MENU button twice ;.

Quickly reducing the volume (Mute)

You can quickly reduce the volume to a preset level (Mute).

??? Brie???y press button 2. "MUTE" appears on the display.

Cancelling mute

To return to your previously set volume level,

??? brie???y press button 2again.

Adjusting the mute level

You can adjust the mute level.

???Press the MENU button ;.

???Press the or button : repeat- edly until "MUTE LVL" appears on the display.

???Press the or button 8to open the menu.

???Set the mute level with the or button 8.

When you have ???nished making your changes,

??? press the MENU button twice ;.

Telephone Audio/Navigation

Audio

If your car sound system is connected to a mobile telephone or a navigation system, the sound system???s volume will be muted as soon as you "pick up" the phone or as soon as a navigation announcement is made. You will then hear the caller or navigation an- nouncement over the car sound system???s loudspeakers. In order for this feature to work, the mobile telephone or navigation system must be connected to the car sound system as described in the installation in- structions.

You can ???nd out from your Blaupunkt dealer which navigation systems can be used with your car sound system.

If the sound system receives a traf???c an- nouncement during a telephone call or whilst a navigation announcement is be- ing made, you will only be able to hear the traf???c announcement after the call or navi- gation announcement is ???nished (in so far as the traf???c announcement is still being broadcast). The traf???c announcement is not recorded!

You can adjust the volume with which you switch on the telephone calls or the voice output of the navigation.

???Press the MENU button ;.

???Press the or button :repeatedly until "TEL VOL" appears on the display.

???Press the or button 8to open the menu.

46

???Set the desired volume with the or button 8.

When you have ???nished making your changes,

???press the MENU button twice ;.

Note:

You can use the volume control 4to adjust the volume of telephone calls and navigation announcements whilst you are listening to them.

Switching the con???rmation beep on/off

The system will output a con???rmation beep for some functions if you keep a button pressed down for longer than two seconds, for instance, when assigning a radio station to a station preset button. You can switch the beep on or off.

???Press the MENU button ;.

???Press the or button :repeatedly until "BEEP ON" or "BEEP OFF" appears on the display.

???Switch the BEEP ON or OFF with the or button 8.

When you have ???nished making your changes,

??? press the MENU button ;.

Radio mode

This device is equipped with an RDS radio receiver. Many of the receivable FM stations broadcast a signal that not only carries the programme but also additional information such as the station name and programme type (PTY).

The station name appears on the display as soon as the tuner receives it.

Adjusting the tuner

To ensure proper functioning of the tuner, the device must be set for the region in which it is being operated. You can select among Europe "EUROPE", America "USA", South America "S-AMERICA", and Thailand "THAI". The tuner is factory-set to the re- gion in which it was sold. If you experience problems with your radio reception, please check this setting.

The radio functions described in these op- erating instructions refer to the tuner set- ting EUROPE.

???Switch off the device by pressing but- ton 2.

???Hold the buttons 1 and 5 5pressed at

the same time and switch on the device again with the button 2.

"TUNER" is displayed.

???Select your tuner region with the or button :.

To save the setting,

???switch the device off and on again or wait approx. 8 seconds. The radio starts playing with the last setting se- lected (radio, CD, CD changer or AUX).

ENGLISH

47

Radio mode

Switching to radio mode

If you are in CD, CD changer or AUX mode,

???press the BAND???TS button =

or

???press the SOURCE button 3repeat- edly until the memory bank, e.g. "FM1", appears on the display.

Convenient RDS functions (AF, REG)

The convenient RDS functions AF (Alternative Frequency) and REGIONAL ex- tend your radio???s range of functions.

???AF: If the RDS function is activated, the radio automatically tunes into the best receivable frequency for the station that is currently set.

???REGIONAL: At certain times, some ra- dio stations divide their programme into regional programmes providing different content. You can use the REG function to prevent the car radio from switching to alternative frequencies that are transmitting different pro- gramme content.

Note:

REGIONAL must be activated/deacti- vated separately in the menu.

Switching REGIONAL on/off

???Press the MENU button ;.

???Press the or button :repeatedly until "REG" appears on the display.

"OFF" or "ON" is displayed alongside "REG". To switch REGIONAL on/off,

??? press the or button 8.

When you have ???nished making your changes,

??? press the MENU button ;.

Switching the RDS function on/off

To switch the RDS functions AF and REGIONAL on or off,

???press and hold down the TRAF???RDS button 7 for longer than two sec- onds.

If the RDS comfort function is active, RDS appears on the display.

Selecting the waveband/ memory bank

This device can receive programmes broad- cast over the FM frequency range as well as the MW and LW (AM) wavebands. There are three memory banks available for the FM waveband (FM1, FM2 and FMT) and one for each of the MW and LW wavebands.

Five stations can be stored in each memory bank.

To switch between the FM memory banks (FM1, FM2 and FMT) and the MW and LW wavebands,

??? brie???y press the BAND???TS button =.

48

Radio mode

Tuning into a station

There are various ways of tuning into a sta- tion.

Automatic station seek tuning

??? Press the or button :.

The radio tunes into the next receivable station.

Note:

If the priority for traf???c information is active (the display shows the traf???c jam symbol), the next traf???c informa- tion station is set.

Tuning into stations manually

You can also tune into stations manually.

Note:

You can only tune into stations manu- ally if the RDS function is deactivated.

To change the set frequency in small incre- ments,

???brie???y press the or button 8. To change the set frequency quickly,

???press and hold down the or button 8for a longer period of time.

Browsing through broadcasting networks (FM only)

If a radio station provides several pro- grammes, you have the option of browsing through its so-called "broadcasting net- work".

Note:

The convenient RDS function must be activated before you can use this fea- ture.

??? Press the or button 8to switch

Setting the sensitivity of station seek tuning

You can choose whether the radio should only tune into stations providing good re- ception or whether it can also tune into those with a weak reception.

??? Press the MENU button ;.

??? Press the or button :repeatedly until "SENS HI" or "SENS LO" appears on the display.

The display shows the currently set sensi- tivity level. "SENS HI3" indicates the high- est sensitivity, "SENS LO1" the lowest.

??? Set the desired sensitivity with the or button 8.

When you have ???nished making your changes,

???press the MENU button ;.

Note:

The device stores the sensitivity value set in the respective FM and AM wave- band.

49

Radio mode

Storing stations

Storing stations manually

???Select the desired memory bank (FM1, FM2, FMT) or one of the wavebands (MW or LW).

???Tune into the desired station.

???Press and hold down one of the station buttons 1 - 5 5 for longer than two seconds to assign the station to that button.

Storing stations automatically (Travelstore)

You can automatically store the ???ve sta- tions offering the strongest reception in the region (FM only). The stations are stored in the FMT memory bank.

Note:

Any stations that were previously stored in this memory bank are deleted in the process.

???Press and hold down the BAND???TS but- ton =for longer than two seconds.

The storing procedure begins. "FM TSTORE" appears on the display. After the process has completed, the radio will play the sta- tion that is stored in memory location 1 of the FMT memory bank.

Note:

If the priority for traf???c information is active (the display shows the traf???c jam symbol), only traf???c information stations are stored.

Listening to stored stations

???Select the memory bank or waveband.

???Press one of the station buttons 1 - 5

5.

The stored station is played if it can be received.

Scanning receivable stations (SCAN)

You can use the scan function to play all the receivable stations brie???y. You can set the scanning time in the menu to between 5 and 30 seconds.

Starting SCAN

???Press and hold down the MENU button ;for longer than two seconds.

The radio scans the next receivable station. The current memory bank and "SCAN" ap- pear brie???y on the display followed by a ???ashing display of the current station name or frequency.

Cancelling the SCAN and continuing to listen to a station

??? Press the MENU button ;.

Scanning stops and the radio continues playing the station that it tuned into last.

Setting the scanning time

???Press the MENU button ;.

???Press the or button : repeat- edly until "SCAN TIME" appears on the display.

???Press the or button 8to open the menu.

???Set the desired scan time with the or button 8.

50

Radio mode

When you have ???nished making your changes,

???press the MENU button twice ;.

Note:

The de???ned scanning time is also ap- plied by the system to scanning carried out in CD and CD changer mode.

Programme type (PTY)

Besides transmitting the station name, some FM stations also provide informa- tion on the type of programme that they are broadcasting. Your car radio can receive and display this information.

For example, the programme types can be:

You can use the PTY function to select sta- tions of a particular programme type.

PTY-EON

If you specify the programme type and start seek tuning, the radio will switch from the current station to a station of the selected programme type.

Notes:

???If the tuner does not ???nd a station that corresponds to the selected pro- gramme type, you will hear a beep and "NO PTY" appears brie???y in the display. The radio will then retune to the station that it received last.

???If the tuned radio station or another station on the broadcasting network broadcasts your selected programme type at a later point in time, the radio

will automatically switch from the cur- rently tuned station or from CD mode or CD-changer mode to the station whose programme type matches the one you selected.

???If you want to deactivate this PTY EON switching, you must disable PTY in the menu with "PTY OFF". In CD or CD changer mode, the menu

item "PTY ON/ OFF" is not available. Instead, use the SOURCE button 3 or BAND???TS button =to change to radio mode ???rst.

Switching PTY on/off

???Press the MENU button ;.

???Press the or button :repeatedly until "PTY" appears on the display with the current setting.

???Press the or button 8to switch PTY ON or OFF.

When you have ???nished making your changes,

??? press the MENU button ;.

Selecting the PTY language

You can select the language for the display of the programme types. Options include DEUTSCH, ENGLISH and FRAN??AIS.

???Press the MENU button ;.

???Press the or button : repeat- edly until "PTY LANG" appears on the display.

???Press the or button 8to open the menu.

???Set the desired language using the or buttons 8.

ENGLISH

51

Radio mode

When you have ???nished making your changes,

??? press the MENU button twice ;.

Selecting a programme type and starting seek tuning

??? Press the or button 8.

The current programme type appears on the display.

???If you want to select another pro-

gramme type, you can do so by press- ing the or button 8 whilst this display is visible.

The selected programme type appears brie???y on the display.

???Press the or button : to start seek tuning.

The radio will then tune into the next station that it ???nds that corresponds to your select- ed programme type.

Optimising radio reception

Treble reduction feature during interference (High Cut)

The High Cut function results in an improved reception in case of weak radio reception (FM only). If reception interferences are present, the interference level is automati- cally reduced.

Switching High Cut on/off

???Press the MENU button ;.

???Press the or button :repeated- ly until "HICUT" appears on the display with the current setting.

???Press the or button 8to switch High Cut on or off.

"HICUT 0" means no automatic reduction of the interference level, "HICUT 1" means au- tomatic reduction of the interference level.

When you have ???nished making your changes,

??? press the MENU button ;.

52

Traf???c information

Traf???c information

Your device is equipped with an RDS-EON receiver. EON (Enhanced Other Network) ensures that whenever a traf???c announce- ment (TA) is broadcast, the system switch- es automatically from a station that does not provide traf???c reports to the appropri- ate traf???c information station within the broadcasting network that does.

Once the traf???c report has been played, the system will switch back to the programme that you were listening to before.

Switching traf???c information priority on/off

??? Press the TRAF???RDS button 7.

The priority for traf???c announcements is ac- tivated if the display shows the traf???c jam symbol.

Notes:

You will hear a warning beep:

???If you leave the reception area of a traf???c information station that you are currently listening to.

???If you leave the reception area of a traf???c information station that the system is tuned into while you are in the CD or CD changer mode, and the subsequent automatic seek tuning cannot ???nd a new traf???c information station.

???If you retune the radio from a traf???c in- formation station to a station that does not broadcast traf???c information.

If you hear the warning beep, you can ei- ther switch off traf???c information priority or tune into a station that broadcasts traf???c information.

Setting the volume for traf???c announcements

???Press the MENU button ;.

???Press the or button : repeat- edly until "TA VOLUME" appears on the display.

???Press the or button 8to open the menu.

???Set the volume using the or button

8.

To help you adjust the setting more easily, the device will increase or decrease the vol- ume as you make your changes.

When you have ???nished making your changes,

???press the MENU button twice ;.

Notes:

???Using the volume control 4, you can also adjust the volume during a traf- ???c announcement for the duration of that announcement.

???You can adjust the sound settings and volume distribution settings for traf???c announcements. For further information, please read the "Sound" chapter.

ENGLISH

53

press and hold down the or button :until fast track selection backwards / forwards begins.

CD mode

CD mode

You can use this device to play standard au- dio CDs, CD-Rs and CD-RWs with a diame- ter of 12 cm. To avoid problems when play- ing self-burned CDs, you should not burn CDs at speeds greater than 16-speed.

Risk of severe damage to the

CD drive!

CD singles with a diameter of 8 cm and non- circular contoured CDs (shape CDs) must not be used.

We accept no responsibility for any damage to the CD drive that may occur as a result of the use of unsuitable CDs.

To ensure proper functioning, use only CDs with the Compact-Disc logo. Copy-pro- tected CDs can cause playback problems. Blaupunkt cannot guarantee the proper functioning of copy-protected CDs!

Besides being able to play audio CDs on this device, you can also play CDs containing MP3/WMA music ???les. For further informa- tion, please read the chapter entitled "MP3/ WMA mode".

The drive draws in the CD automatically.

You must not hinder or assist the drive as it draws in the CD.

???Gently close the control panel whilst exerting a little pressure until you feel it click into place.

The CD playback starts and "CD" is shown on the display.

Note:

If the vehicle ignition was switched off prior to inserting the CD, you must switch the device on ???rst with the but- ton 2to start the playback.

If a CD is already inserted in the drive,

???press the SOURCE button 3repeat- edly until "CD" appears on the display.

Playback begins from the point at which it was last interrupted.

Selecting tracks

???Press an arrow button 8or :to se- lect the next or previous track.

If you press the button :or button 8 once, the player will play the current track again from the beginning.

Switching to CD mode

The control panel opens.

???Gently insert the CD with its printed side uppermost into the drive until you feel some resistance.

Fast track selection

To quickly select tracks backwards or for- wards,

???

54

CD mode

Fast searching (audible)

To fast search backwards or forwards,

???press and hold down the or button 8until fast searching backwards/for- wards begins.

Random track play (MIX)

??? Press the 5 MIX button 5.

"MIX CD" appears brie???y on the display and the MIX symbol is displayed. The next ran- domly selected track will then be played.

Cancelling MIX

??? Press the 5 MIX button 5again.

"MIX OFF" appears brie???y on the display and the MIX symbol disappears.

Scanning tracks (SCAN)

You can scan (brie???y play) all the tracks on the CD.

???Press the MENU button ;for longer than two seconds.

The next track will then be scanned. The dis- play brie???y shows "TRK SCAN". The ???ashing track number is displayed next.

Note:

You can set the scanning time. For further information, please read the section entitled "Setting the scanning time" in the "Radio mode" chapter.

Cancelling Scan and continuing listening to a track

To end the scanning process, ??? press the MENU button ;.

The currently scanned track will then con-

Repeating tracks (Repeat)

If you want to repeat a track,

??? press the 4 RPT button 5.

"RPT TRCK" appears brie???y on the display and the RPT symbol is displayed. The track is repeated continuously until you deacti- vate Repeat.

Cancelling Repeat

If you want to cancel the repeat function, ??? press the 4 RPT button 5again.

"RPT OFF" appears brie???y on the display and the RPT symbol disappears. Normal playback is then resumed.

Interrupting playback (PAUSE)

??? Press the button 3 5. "PAUSE" appears on the display.

Cancelling pause

??? During the pause, press the button 3

5. Playback is continued.

55

CD mode

Con???guring the display

You can choose from various display op- tions in CD mode:

???Track number and playing time

???Track number and time

To switch between the display options,

???press the ESC???DIS button 9for long- er than 2 seconds.

Displaying CD text

Some CDs include CD text. The CD text might contain the names of the artist, al- bum and tracks.

The CD text is shown as scrolling text on the display with every track change.

Switching CD text on/off

???Press the MENU button ;.

???Press the or button :repeatedly until "CD TEXT" appears on the display.

???Press the or button 8to open the menu.

???Select between the options "TEXT ON"

(show CD text) or "TEXT OFF" (hide CD text) using the or button 8.

When you have ???nished making your changes,

??? press the MENU button twice ;.

Traf???c announcements in CD mode

If you wish to receive traf???c announcements in CD mode,

??? press the TRAF???RDS button 7.

The priority for traf???c announcements is ac- tivated if the display shows the traf???c jam symbol. For further details, please read the chapter entitled "Traf???c information".

Ejecting a CD

??? Press the button 1.

The control panel opens out towards you.

???Press the button >next to the CD compartment.

The CD is ejected.

???Remove the CD and close the control panel.

Notes:

???If a CD is ejected, the drive will auto- matically draw it back in again after 10 seconds.

???You can also eject CDs whilst the de- vice is switched off or whilst another audio source is activated.

56

MP3/WMA mode

MP3/WMA mode

You can also use this car sound system to play CD-Rs and CD-RWs that contain MP3 music ???les. You can also play WMA ???les. The operation for playing MP3 and WMA ???les is identical.

Notes:

???WMA ???les with Digital Rights Management (DRM) from online mu- sic shops cannot be played with this device.

???WMA ???les can only be played back safe- ly if they were created with Windows Media-Player version 8 or later.

Preparing an MP3 CD

The various combinations of CD burners, CD burning software and CD blanks may lead to problems arising with the device???s ability to play certain CDs. If problems oc- cur with your own burned CDs, you should try another brand of CD blank or choose an- other colour of CD blank.

The format of the CD must be ISO 9660 Level 1/Level 2 or Joliet. Other formats can- not be played reliably.

You can create a maximum of 252 directo- ries on a CD. You can use this device to ac- cess directories individually.

Regardless of the number of directories on the CD, the device can handle up to 511 MP3 ???les on a single CD, with a maximum of 255 ???les in one directory.

This device supports as many subdirecto- ries as your burner software can create de- spite the fact that the maximum directory depth de???ned by the ISO 9660 standard is only 8.

D01

A Directories

B Tracks ?? Files

You can name each directory using a PC. The device is capable of displaying the di- rectory name. Name the directories and tracks/???les using your CD burner software. The software???s instruction manual will pro- vide details on how to do this.

Note:

When naming directories and tracks/ ???les you should avoid using accents and special characters.

ENGLISH

57

MP3/WMA mode

If you like your ???les to be in the correct or- der, you should use burner software that places ???les in alphanumerical order. If your software does not provide this fea- ture you also have the option of sorting the ???les manually. For this purpose, you must enter a number in front of each ???le name, e.g. "001", "002", etc. The leading zeros must also be entered.

MP3 tracks can contain additional infor- mation such as the artist, album and track names (ID3 tags). This device can display ID3 tags (version 1).

When creating (encoding) MP3 ???les from audio ???les, you should use bit rates up to a maximum of 256 Kbit/sec.

This device can only play MP3 ???les that have the ".MP3" ???le extension.

Notes:

To ensure uninterrupted playback,

???do not try changing the ???le extension to ".MP3" of any ???les other than MP3 ???les and then attempt to play them! The device will ignore these invalid ???les during playback.

???Do not use "mixed" CDs containing both non-MP3 data and MP3 tracks (the device only reads MP3 ???les dur- ing MP3 playback).

???Do not use mix-mode CDs containing both CD-audio tracks and MP3 tracks. If you try playing a mix-mode CD, the device will only play the CD-audio tracks.

Switching to MP3 mode

MP3 mode is activated in the same way as normal CD mode. For further information, please read the section entitled "Switching to CD mode" in the "CD mode" chapter.

Con???guring the display

Con???guring the default display

You can display various types of informa- tion on the current track:

???Directory number and playing time

???Track number and playing time

???Track number and time

???Directory number and track number

???Directory number and time

To switch between the different display op- tions,

???press the ESC???DIS button 9once or several times for longer than 2 seconds until the desired display is shown.

Con???guring the MP3 scrolling texts

One of the following scrolling texts is shown once on the display with every track change. Afterwards, the con???gured stand- ard display is shown.

The available scrolling texts are:

???Directory name ("DIR NAME")

???Name of the track ("SONG NAME")

???Name of the album ("ALBM NAME")

???Name of the artist ("ARTIST")

???File name ("FILE NAME")

58

MP3/WMA mode

Note:

Artist, track and album name are a com- ponent of the MP3 ID tag of version 1 and can only be displayed if they were stored with the MP3 ???les. For further de- tails, please read the instructions of your PC MP3 software or burner software.

To switch between the different display op- tions,

???press the MENU button ;.

???Press the or button : repeat- edly until "MP3 DISP" appears on the display.

???Press the or button 8to open the menu.

???Select the desired MP3 scrolling text with the or button 8.

When you have ???nished making your changes,

???press the MENU button twice ;.

Note:

The "MP3 DISP" menu item is available only during the playback of a CD with MP3/WMA ???les.

Selecting a directory

To move up or down to another directory,

???press the or button : once or several times.

Notes:

???The device will automatically skip any directories that do not contain MP3 ???les. The device will automatically correct the number of directories for the display. This number might there-

fore no longer be identical to the number of directories that you actu- ally created.

Selecting tracks/???les

To move up or down to another track/???le in the current directory,

current track will be played again from the beginning.

Fast search

To fast search backwards or forwards,

??? press and hold down the or button 8until fast searching backwards/for- wards begins.

Random track play ??? MIX

To play the tracks in the current directory in random order,

??? brie???y press the 5 MIX button 5.

"MIX DIR" appears on the display and the MIX symbol is displayed.

To play the tracks contained in all the direc- tories on the inserted MP3 CD in random order,

???press the 5 MIX button 5for longer than two seconds.

"MIX CD" appears on the display and the MIX symbol is displayed.

59

MP3/WMA mode

Cancelling MIX

To cancel MIX,

??? brie???y press the 5 MIX button 5.

"MIX OFF" appears on the display and the MIX symbol disappears.

Scanning tracks ??? SCAN

You can scan (brie???y play) all the tracks on the CD.

???Press the MENU button ;for longer than two seconds.

The next track will then be scanned. "TRK SCAN" brie???y appears on the dis- play. The directory number and the track number are displayed next. The track number ???ashes.

Note:

You can set the scanning time. For fur- ther information on setting the scan- ning time, please read the section en- titled "Setting the scanning time" in the "Radio mode" chapter.

Cancelling Scan and continuing listening to a track

??? Brie???y press the MENU button ;.

The currently scanned track will then con- tinue to be played normally.

Repeated playback of individual tracks or entire directories

??? REPEAT

To play the current track repeatedly, ??? brie???y press the 4 RPT button 5.

"RPT TRCK" appears brie???y on the display and the RPT symbol is displayed.

To repeat the whole directory,

???press the 4 RPT button 5for longer than two seconds.

"RPT DIR" appears brie???y on the display and the RPT symbol is displayed.

Cancelling Repeat

To stop the current track or current direc- tory from being repeated,

??? brie???y press the 4 RPT button 5.

"RPT OFF" appears brie???y on the display and the RPT symbol disappears.

Interrupting playback (PAUSE)

??? Press the button 3 5. "PAUSE" appears on the display.

Cancelling pause

???During the pause, press the button 3

5.

Playback is continued.

60

CD-changer mode

CD-changer mode

Note:

Information on handling CDs, inserting CDs and operating the CD changer can be found in the operating instructions supplied with your CD changer.

Switching to CD-changer mode

???Press the SOURCE button 3 re- peatedly until "CHANGER" appears on the display.

The device starts playing the ???rst CD that the CD changer detects.

Selecting CDs

To move up or down to another CD,

???press the or button : once or several times.

Note:

The device will ignore empty CD slots in the changer and slots containing invalid CDs.

Selecting tracks

To move up or down to another track on the current CD,

???press the or button 8 once or several times.

Fast searching (audible)

To fast search backwards or forwards,

???press and hold down the or button 8until fast searching backwards/for- wards begins.

Repeating individual tracks or whole CDs (REPEAT)

To repeat the current track,

??? brie???y press the 4 RPT button 5.

???press and hold down the 4 RPT button 5for longer than two seconds.

"RPT DISC" appears brie???y on the display and the RPT symbol is displayed.

Cancelling Repeat

To stop the current track or current CD from being repeated,

??? brie???y press the 4 RPT button 5.

"RPT OFF" appears brie???y on the display and the RPT symbol disappears.

Random track play (MIX)

To play the tracks on the current CD in ran- dom order,

??? brie???y press the 5 MIX button 5.

"MIX CD" appears brie???y on the display and the MIX symbol is displayed.

To play the tracks on all inserted CDs in ran- dom order,

???press and hold down the 5 MIX button 5for longer than two seconds.

"MIX ALL" appears brie???y on the display and the MIX symbol is displayed.

61

CD-changer mode

Cancelling MIX

??? Brie???y press the 5 MIX button 5.

"MIX OFF" appears brie???y on the display and the MIX symbol disappears.

Scanning all tracks on all CDs (SCAN)

To scan (brie???y play) all the tracks on all the inserted CDs in ascending order,

???press the MENU button ;for longer than two seconds.

The next track will then be scanned. The display shows "TRK SCAN". The CD number and the track number are displayed next. The track number ???ashes.

Stopping Scan

To stop scanning,

??? brie???y press the MENU button ;.

The currently played track will then contin- ue to be played normally.

Note:

You can set the scanning time. For further information, please read the section entitled "Setting the scanning time" in the "Radio mode" chapter.

Interrupting playback (PAUSE)

??? Press the button 3 5. "PAUSE" appears on the display.

Cancelling pause

???During the pause, press the button

3 5.

Playback is continued.

Con???guring the display

You can choose from various display op- tions in CD changer mode:

???CD number and track number

???CD number and time

???CD number and playing time

???Track number and playing time

???Track number and time

To switch between the display options,

???press the ESC???DIS button 9once or several times for longer than 2 seconds.

62

Clock ??? Time

Clock ??? Time

Displaying the time

To brie???y display the time,

???press the SOURCE button 8 for longer than two seconds.

The display changes and the time is shown for approx. 2 seconds.

Setting the time

To set the time,

???press the MENU button ;.

???Press the or button : repeat- edly until "CLOCK SET" appears on the display.

???Press the or button 8to open the menu.

The time appears on the display. The hours and minutes can be adjusted.

???Set the time using the or button

:.

To switch between hours and minutes, ??? press the or button 8.

When you have ???nished making your changes,

??? press the MENU button twice ;.

Selecting 12/24-hour clock mode

???Press the MENU button ;.

???Press the or button :repeatedly until "24 H MODE" or "12 H MODE" ap- pears on the display.

???Press the or button 8to switch between the modes.

When you have ???nished making your changes,

??? press the MENU button ;.

Displaying the time continuously when the device is off and the ignition is on

To display the time when the device is off and the vehicle ignition is on,

???press the MENU button ;.

???Press the or button :repeatedly until "CLOCK OFF" or "CLOCK ON" ap- pears on the display.

???Press the or button 8to switch the display between CLOCK ON and

CLOCK OFF.

When you have ???nished making your changes,

??? press the MENU button ;.

ENGLISH

63

Sound

Sound

You can adjust the sound settings (bass, middle and treble) separately for each source (radio, CD, CD changer, AUX, traf- ???c announcement, telephone/navigation). The volume distribution settings (balance and fader) and X-BASS apply to all the au- dio sources except for traf???c announce- ments and telephone/navigation. You can adjust the volume distribution settings separately for traf???c announcements and telephone/navigation.

Note:

The settings of the sound for traf???c an- nouncements and telephone/naviga- tion can only be made during a traf???c announcement or during a telephone call/voice output.

Adjusting the bass

You can select 1 of 4 middle frequencies (60 Hz, 80 Hz, 100 Hz, 200 Hz). In ad- dition, you can adjust the level between -7 and +7 for the selected bass frequency.

Adjusting bass frequency and level

???Press the AUD button <. "BASS" appears on the display.

???Press the or button : once to reach the BASS submenu.

???Press the or button 8repeatedly until the desired bass frequency ap- pears on the display.

???Press the or button :to adjust the level between -7 and +7.

???Press the AUD <button twice to exit the menu.

Note:

If an Equaliser preset (POP, ROCK, CLASSIC) is selected, the manual in- crease of the bass level does not result in an audible change starting at a cer- tain setting. For further information, please read the note in the section entitled "Equaliser presets".

Adjusting the middle

You can select 1 of 4 centre frequencies (500 Hz, 1 kHz, 2 kHz, 3 kHz). In addition, you can adjust the level between -7 and +7 for the selected centre frequency.

Adjusting centre frequency and level

???Press the AUD button <. "BASS" appears on the display.

???Press the or button 8repeatedly until "MIDDLE" appears on the display.

???Press the or button : once to reach the MIDDLE submenu.

???Press the or button 8repeatedly until the desired centre frequency ap- pears on the display.

???Press the or button :to adjust the level between -7 and +7.

???Press the AUD <button twice to exit the menu.

64

Sound

Adjusting the treble

You can select 1 of 4 treble frequencies (10 kHz, 12 kHz, 15 kHz, 17 kHz). In ad- dition, you can adjust the level between -7 and +7 for the selected treble frequency.

Adjusting treble frequency and level

???Press the AUD button <. "BASS" appears on the display.

???Press the or button 8repeatedly until "TREBLE" appears on the display.

???Press the or button : once to reach the TREBLE submenu.

???Press the or button 8repeatedly until the desired treble frequency ap- pears on the display.

???Press the or button :to adjust the level between -7 and +7.

???Press the AUD <button twice to exit the menu.

Note:

If an Equaliser preset (POP, ROCK, CLASSIC) is selected, the manual in- crease of the treble level does not re- sult in an audible change starting at a certain setting. For further informa- tion, please read the note in the section entitled "Equaliser presets".

Setting the left/right volume distribution (Balance)

To adjust the left/right volume distribution (balance),

until "BAL" appears on the display with the current setting.

??? Press the or button :to adjust the balance (right/left).

???Press the AUD < button to exit the menu.

Adjusting the front/rear volume distribution (Fader)

To adjust the front/rear volume distribution (fader),

??? press the AUD button <. "BASS" appears on the display.

??? Press the or button 8repeatedly until "FADER" appears on the display with the current setting.

??? Press the or button :to adjust the volume distribution front/rear.

???Press the AUD < button to exit the menu.

65

Preampli???er output

Preampli???er output (Preamp-Out/Sub-Out)

You can use the preampli???er outputs (Preamp-Out) of the car sound system to connect external ampli???ers. In addition, you can connect an ampli???er for operating a subwoofer to the integrated dynamic low- pass ???lter of the device (level and cutoff fre- quency can be adjusted).

For this purpose, the ampli???ers must be connected as described in the installation instructions.

Adjusting the sub-out level

The sub-out level can be adjusted in 8 incre- ments (0 to +7).

???Press the AUD button <. "BASS" appears on the display.

???Press the or button 8 repeat- edly until "SUBOUT" appears on the display.

???Press the or button : once to reach the SUBOUT submenu.

???Press the or button :to adjust a value between 0 and +7.

When you have ???nished making your changes,

??? press the AUD button <twice.

Adjusting the sub-out cutoff frequency

You can select 1 of 4 settings: 0 Hz, 80 Hz, 120 Hz and 160 Hz.

???Press the AUD button <. "BASS" appears on the display.

???Press the or button 8 repeat- edly until "SUBOUT" appears on the display.

???Press the or button : once to reach the SUBOUT submenu.

???Press the or button 8repeatedly until the desired frequency appears on the display.

When you have ???nished making your changes,

??? press the AUD button <twice.

66

X-BASS

X-Bass allows you to increase the bass at low volume.

The selected X-Bass setting is effective for all audio sources (radio, CD, CD changer or AUX).

The X-BASS increase can be set in incre- ments of 1 to 3.

"XBASS OFF" means that the X-BASS func- tion is switched off.

Adjusting the X-BASS boost

???Press the AUD button <. "BASS" appears on the display.

???Press the or button 8repeatedly until "X-BASS" appears on the display.

???Press the or button : once to reach the X-BASS submenu.

???Press the or button :repeatedly until the desired setting appears on the display.

When you have ???nished making your changes,

??? press the AUD button <twice.

Equalizer presettings (Presets)

This device features an equaliser in which the settings for the music genres "ROCK", "POP" and "CLASSIC" are already pro- grammed.

To select an equaliser setting,

???press the AUD button <. "BASS" appears on the display.

???Press the or 8 repeatedly until "POP", "ROCK", "CLASSIC" or "EQ OFF" appears on the display.

???Press the or button :to select one of the settings or select "EQ OFF" to switch off the equalizer.

When you have ???nished making your changes,

???press the AUD button <.

Note:

Without Equaliser presets, you can ad- just the bass and treble up to +7.

If you selected an Equaliser preset (POP, ROCK, CLASSIC), the adjust- ment of bass and treble is only limited. For example, the preset POP only al- lows for an audible treble adjustment up to +3.

ENGLISH

67

Display

Adjusting the display settings

Adjusting the display brightness

If your car sound system is installed as de- scribed in the installation instructions and your vehicle features the corresponding connection, the display brightness for day and night is switched by switching on the vehicle lighting. The display brightness can be adjusted separately for day and night in increments from 1 - 9.

???Press the MENU button ;.

???Press the or button :repeatedly until "DIM DAY" or "DIM NIGHT" appears on the display.

???Press the or button 8to open the menu.

???Press the or button 8to switch between the brightness levels.

When you have ???nished making your changes,

??? press the MENU button twice ;.

Setting the display illumination colour

For the display illumination, you can mix a colour from the RGB spectrum (red green blue) or select a colour during a colour seek.

Mixing a colour for the display illumination

To customise the display illumination to suit your tastes you can mix a colour yourself using the three primary colours red, green and blue.

???Press the MENU button ;.

???Press the or button : repeat- edly until "DISP COL" appears on the display.

???Press the or button 8to open the menu.

The menu for mixing your own colour is dis- played. "R", "G", and "B" are displayed with the current values. The setting for "R" is ac- tivated.

???Press the or button : repeat- edly until the desired colour value is displayed.

???Press the or button 8to move the selection marker to the position after the other colours.

???Adjust the other colour components to suit your preferences.

When you have ???nished making your changes,

??? press the MENU button twice ;.

68

Selecting a display illumination during a colour scan

???Press the MENU button ;.

???Press the or button : repeat- edly until "COL SCAN" appears on the display.

???Press the or button 8to start the colour seek.

The device starts changing the display illu- mination colour.

To select the currently set colour,

???press the MENU button ;. To start the seek tuning again,

???press the or button 8. If you found the desired colour,

???press the MENU button twice ;.

External audio sources

External audio sources, such as portable CD players, MiniDisc players or MP3 play- ers, can be connected to the device in two ways:

1.Via the rear AUX input (if no CD changer is connected to the device).

Notes:

???An adapter cable is needed to con- nect an external audio source via the rear AUX input. You can obtain this ca- ble (Blaupunkt no.: 7 607 897 093) from your Blaupunkt dealer.

???The rear AUX input must be activated in the menu.

???The rear AUX input can be selected with the SOURCE button 3. "AUX INPUT" then appears on the dis- play.

2.Via the front AUX-IN socket.

Note:

As soon as an audio source is con- nected to the front AUX-IN socket,

it can be selected with the SOURCE button 3. "FRONT AUX" then ap- pears on the display.

ENGLISH

69

Switching the rear AUX input on/off

???Press the MENU button ;.

???Press the or button :repeated- ly until "AUX OFF" or "AUX ON" appears on the display.

???Use the or button 8 to select between the options "AUX ON" and "AUX OFF".

When you have ???nished making your changes,

???press the MENU button ;.

Note:

If no CD changer is connected to the device, the AUX menu item cannot be selected.

Technical data

Ampli???er

Tuner

CD

Frequency response:

Subject to changes

70

Bitte den ausgef??llten Ger??tepass sicher aufbewahren! Please keep the ???lled-in radio pass in a safe place!

Pri??re de conserver soigneusement la carte d???autoradio remplie ! Tenete per favore il libretto di apparecchio, debitamente riempito, in un posto sicuro!

Bewaar de ingevulde apparaatpas op een veilige plaats! V??nligen f??rvara ifyllt apparatpass p?? s??ker plats!

??Favor guardar el documento del aparato debidamente llenado en un lugar seguro!

Por favor, guardar o cart??o preenchido do aparelho num lugar seguro! Det udfyldte apparatpas opbevares et sikkert sted!

Prosimy przechowywa?? metryk?? radia w bezpiecznym miejscu! Vypln??n?? dokument o p????stroji pros??m bezpe??n?? uschovejte! Vyplnen?? dokument o pr??stroji pros??m bezpe??ne uschovajte!

423

Fax:WWW:

05121-49 4002

01-610 39 391

02-525 5263

44-898 644

09-435 99236

01-4010 7320

01-89583 8394

210 94 12 711

01-46 66 706

02-369 62464

40 2085

00 31 24 35 91 336

+47 64 87 89 02

2185 00165

91 410 4078

08-7501810

01-8471650

02-6130 0514

76 511 809

022-8771260

0212-346 00 40

708-6817188

+55-19 3745 2773

+604-6413 640

http://www.blaupunkt.com

11/06 - CM-AS/SCS1 (dt, gb, fr, it, nl, sw, es, pt, dk, pl, cz, sk)

8622405201

Blaupunkt GmbH, Robert-Bosch-Stra??e 200, D-31139 Hildesheim

424