Operating instructions
http://www.blaupunkt.com
Operating instructions
http://www.blaupunkt.com

2
11 1098 7 6
RC 14 H
2

CONTROLS
1Button to switch the device on/ off and operate the volume mute feature.
OFF button on the remote con- trol for switching the device off.
2
 button to open the
3Volume control.
4BND???TS button.
Short press: Selects the FM memory banks and the MW and LW wavebands.
Long press: Starts the FM Trav- elstore function.
5DIS???ESC button to change the display contents, to close the menus without saving changes.
6Arrow buttons on the remote control and the device with identical function.
7MENU???OK button
Short press: Calls up the men- us for basic settings and con- firms menu entries. Confirms menu entries in DVD menus. Long press: Starts the scan function.
8TRAF button to switch traffic in- formation standby on/off.
9Buttons 1 - 6.
:AUD???DEQ button (Audio). Short press: Sets bass, treble, balance, fader and
;SRC button to switch sources between CD/DVD, Tuner, CD changer (if connected) and AUX.
<SETUP button to call up the setup menu of the DVD player.
=MENU button to call up the main menu (root menu) of a DVD.
>ENTER button to confirm menu entries on DVDs and in the set- up menu.
?MUTE button to mute the de- vice.
@
 buttons to start the fast forward/reverse search, to con- trol
A button to start and interrupt (freeze frame) the DVD play- back.
BGOTO button for direct selec- tion of playing time or title on a CD/DVD, selecting playing time, chapter or title on a DVD.
68

CONTROLS
CDISPLAY button to display playing time information on the external display.
DANGLE button to select a cam- era perspective (dependent upon the DVD).
ETV MODE button to switch the TV standard of the DVD player to adjust to the external display.
FZOOM button to zoom the im- age area in/out.
GDIMMER button to directly call up the display menu.
HAUDIO ONLY button No function
IPBC button, playback control.
JPLAY MODE button for setting the repeat mode (REPEAT) of a CD or DVD.
KPROGRAM button to program the playlist of a CD or DVD.
L
MAUDIO button to select the au- dio track of a DVD.
N
OSTOP button to interrupt the playback.
P
 button for up and down track selection in CD mode and to select the previous or next chapter in DVD mode, single- frame search in DVD mode.
QRETURN button to change back one level in the menu of a DVD.
RTITLE button to call up the title menu of a DVD.
SNumeric keys for direct selec- tion of chapters and playing time in DVD mode or MP3 mode.
 button to eject a CD from the device (visible only with opened control panel).
DEUTSCH ENGLISH FRAN??AIS ITALIANO NEDERLANDS SVENSKA ESPA??OL PORTUGU??S DANSK
69

CONTENTS
70

CONTENTS
DEUTSCH ENGLISH FRAN??AIS ITALIANO NEDERLANDS SVENSKA ESPA??OL PORTUGU??S DANSK
71

CONTENTS
72

NOTES AND ACCESSORIES
Notes and accessories
Thank you for choosing a Blaupunkt product. We hope you enjoy using this new piece of equipment.
Please read these operating instruc- tions before using the equipment for the first time.
The Blaupunkt editors are constantly working on making the operating in- structions clearer and easier to under- stand. However, if you still have any questions on how to operate the de- vice, please contact your dealer or the telephone hotline for your country. You will find the telephone number printed at the back of this booklet.
We provide a manufacturer guarantee for our products bought within the Eu- ropean Union. You can view the guar- antee conditions at www.blaupunkt.de or ask for them directly at:
Blaupunkt GmbH
Hotline
Robert Bosch Str. 200
Road safety
 Road safety has absolute priority. Only operate your car sound system if the road and traffic conditions allow you to do so. Familiarise yourself with the device before setting off on your journey.
You should always be able to hear police, fire and ambulance sirens in good time from inside your vehicle. For this reason, listen to your car sound system at a suitable volume level during your journey.
Note that due to road safety, the driv- er should be viewing videos only while the vehicle is standing.
Installation
If you want to install your car sound system yourself, please read the instal- lation and connection instructions that follow these operating instructions.
Remote control RC 14 H
When you operate the Las Vegas DVD35 for the first time, you must in- sert the batteries in the remote con- trol.
Inserting the batteries
1.Open the battery compartment by removing the cover.
2.Battery size: Two AAA batteries, type LR03 Micro.
Before inserting the batteries, en- sure that the poles of the battery are aligned as shown in the bat- tery compartment.
Insert the batteries.
3.Close the battery compartment.
Note:
Exhausted batteries do not belong in household waste; they should be disposed of according to local regulations.
DEUTSCH ENGLISH FRAN??AIS ITALIANO NEDERLANDS SVENSKA ESPA??OL PORTUGU??S DANSK
73

NOTES AND ACCESSORIES
Activating the remote control
Point the remote control at the infrared receiver in the front of the device. Operating angle: Approx. 30?? in each direction from the front side of the IR receiver in the front of the device.
The accompanying remote control al- lows for operating all the functions of the DVD mode and controlling the ba- sic functions of the other operating modes.
You cannot switch the device on/off us- ing the accompanying remote control.
Installations
(not part of the scope of delivery)
Use only accessories approved by Blaupunkt.
???Remote controls
The RC 10 steering wheel remote control allows you to access the most important functions of your car sound system safely and con- veniently from your steering wheel.
You cannot switch the device on/ off using the remote control.
The RC 13 H cable remote control and the corresponding adapter al- lows for controlling the RSA (Rear Seat Entertainment) in the dual zone mode. You can obtain further information from your Blaupunkt dealer.
???External display
An external display is required to view DVD movies and VCDs. You can obtain further information about suitable monitors from your Blaupunkt dealer.
???Amplifiers
You can use all Blaupunkt and Ve- locity amplifiers.
???CD changers
You can connect the following Blaupunkt CD changers:
CDC A 03, CDC A 08 and IDC A 09.
Activating/deactivating demo mode
You can activate the demo mode at the device. In demo mode, the different functions of the device are displayed.
???Press the MENU???OK button 7. The display shows the menu.
???Press and hold the MENU???OK button 7pressed for more than four seconds while the menu is displayed to activate or deactivate the demo mode.
The device features a
For example, if you press the MENU???OK button 7 and select a menu item, the device switches back after approx. 16 seconds after the last button activation. The settings per- formed are saved.
74
CONTROL PANEL
Detachable control panel
Theft protection
The device is equipped with a detach- able control panel
Protect your device against theft by taking the control panel with you when- ever you leave your vehicle. Do not leave the control panel inside your ve- hicle - not even in a hiding place.
The control panel has been designed to be easy to use.
Notes:
???Never drop the control panel.
???Never expose the control panel to direct sunlight or other heat sources.
???Avoid direct skin contact with the control panel???s electrical contacts. If necessary, please clean the contacts of the KeyCard with a
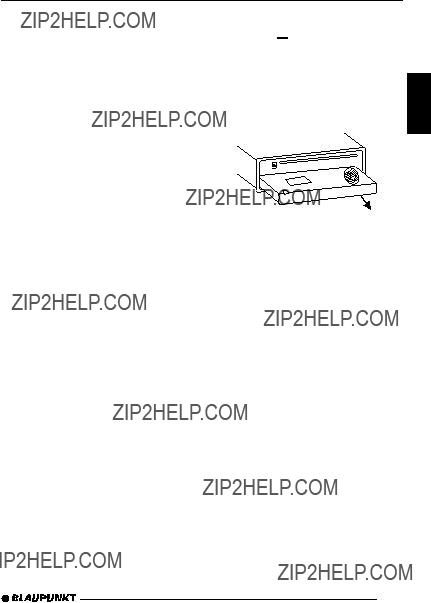
Detaching the control panel
??? Press the 
 button 2.
The control panel opens out towards you.
???Hold the control panel by its right side and then pull it straight out of the bracket.
Notes:
???All the current settings are saved.
???Any inserted DVD/CD remains in the device.
???The device switches off automati- cally after approx. one minute.
DEUTSCH ENGLISH FRAN??AIS ITALIANO NEDERLANDS SVENSKA ESPA??OL PORTUGU??S DANSK
75
Attaching the control panel
???Hold the control panel at approxi- mately right angles to the device.
???Slide the control panel into the de- vice???s guides that are positioned on the left and right at the lower edge of the housing. Push the control panel carefully into the bracket until it clicks into place.
???Flip up the control panel and care- fully press it into the device until it clicks into place.
2.
1.
Note:
When attaching the control panel, make sure you do not press the display.
If the device was still switched on when you detached the control panel, it will automatically switch on with the last setting activated (radio, DVD/CD, CD changer or AUX) when the panel is replaced.
Switching on/off
There are various ways of switching the device on/off:
Switching on/off using the vehicle ignition
The device will switch on/off simulta- neously with the ignition if the device is correctly connected to the vehicle???s ignition and you did not switch the de- vice off by pressing button 1.
Switching the device on/off using the detachable control panel
??? Detach the control panel.
The device switches off automatically after approx. one minute.
??? Attach the control panel again.
The device switches on. The last set- ting (radio, DVD/CD, CD changer or AUX) will be reactivated.
Switching on/off using button 1
???To switch on the device, press but- ton 1.
???To switch off the device, press and hold down button 1for longer than two seconds.
The device switches off.
Note:
To protect the vehicle battery, the device will switch off automatically after one hour if the ignition is off.
76

Switching the device off with the remote control
The device can also be switched off using the supplied RC 14 H remote control.
???Press the OFF button 1on the remote control.
The device switches off.
Adjusting the volume
Note:
The internal amplifier can be switched off. If the loudspeakers do not emit any sound, please read the section entitled ???Switch- ing the internal amplifier on/off??? in the ???Amplifier??? chapter.
You can adjust the volume in steps from 0 (off) to 50 (maximum).
To increase the volume,
???turn the volume control 3clock- wise.
To decrease the volume,
???turn the volume control 3coun- terclockwise.
Adjusting the volume with the remote control
The volume can also be adjusted us- ing the supplied remote control.
???To increase the volume, press the VOL+ button 3on the remote control.
???To decrease the volume, press the VOL- button 3on the remote control.
Setting the
You can set the default volume level at which the device plays when it is switched on.
???Press the MENU???OK button 7.
???Press the  or
or  button 6re- peatedly until ???VOLUME MENU??? appears on the display.
DEUTSCH ENGLISH FRAN??AIS ITALIANO NEDERLANDS SVENSKA ESPA??OL PORTUGU??S DANSK
77

ADJUSTING THE VOLUME
???Press the MENU???OK button 7 to display the volume menu.
???ON VOLUME??? and the currently set value are displayed or ???LAST VOL- UME??? is displayed.
???Adjust the 
 buttons 6.
To help you adjust the setting more easily, the device will increase or de- crease the volume as you make your changes.
If you change the setting to ???LAST VOLUME???, the volume when the de- vice switches on will be the same as the volume level that was set the last time you switched the device off.
 Danger to hearing!
If the
If the volume was set to maximum before the device was switched off and the
Severe damage to your hearing can be caused in both cases!
When you have finished making your changes,
???press the MENU???OK button 7 and then the DIS???ESC button 5 to exit the menu.
Quickly reducing the volume (Mute)
You can quickly reduce the volume to a preset level (Mute).
??? Briefly press button 1.
???MUTE??? appears on the display.
Cancelling mute
To return to your previously set volume level,
??? briefly press button 1again.
Muting with the remote control
The volume can also be muted using the supplied remote control.
???Press the MUTE button ?on the remote control.
???MUTE??? appears on the display.
Cancelling mute
To return to your previously set volume level,
??? press the MUTE button ?again.
Telephone audio/navigation audio
If your car sound system is connected to a mobile telephone or a navigation system, the sound system???s volume will be muted as soon as you ???pick up??? the phone or as soon as a navigation an- nouncement is made. You will then hear the caller or navigation announcement over the car sound system???s loud- speakers. In order for this feature to work, the mobile telephone or naviga- tion system must be connected to the car sound system as described in the installation instructions.
78

ADJUSTING THE VOLUME
You will need a cable for this with the following Blaupunkt number:
7 607 001 503.
You can find out from your Blaupunkt dealer which navigation systems can be used with your car sound system.
If the sound system receives a traffic announcement during a telephone call or whilst a navigation announcement is being made, you will only be able to hear the traffic announcement after the call or navigation announcement is finished (in so far as the traffic announcement is still being broadcast). The traffic an- nouncement is not recorded!
The volume with which telephone calls or navigation announcements are broadcast can be adjusted.
???Press the MENU???OK button 7.
???Press the  or
or  button 6re- peatedly until ???VOLUME MENU??? appears on the display.
???Press the MENU???OK button 7 to display the volume menu.
???Press the  or
or  button 6 repeatedly until ???TEL/NAVI??? appears on the display.
???Set your preferred volume level using the 
 buttons 6.
When you have finished making your changes,
???press the MENU???OK button 7 and then the DIS???ESC button 5 to exit the menu.
Note:
You can use the volume control 3to adjust the volume of tele- phone calls and navigation an- nouncements whilst you are lis- tening to them.
Setting the volume of the confirmation beep
The system will output a confirmation beep for some functions if you keep a button pressed down for longer than approx. two seconds, for instance, when assigning a radio station to a sta- tion preset button. You can adjust the volume of this beep.
???Press the MENU???OK button 7.
???Press the  or
or  button 6 repeatedly until ???VOLUME MENU??? appears on the display.
???Press the MENU???OK button 7 to display the volume menu.
???Press the  or
or  button 6 repeatedly until ???BEEP VOL??? appears on the display.
???Adjust the volume using the 
 buttons 6. ???0??? means that the beep is deactivated, ???6??? means that the maximum beep volume is set.
When you have finished making your changes,
???press the MENU???OK button 7 and then the DIS???ESC button 5 to exit the menu.
DEUTSCH ENGLISH FRAN??AIS ITALIANO NEDERLANDS SVENSKA ESPA??OL PORTUGU??S DANSK
79

Automatic sound
This feature automatically adjusts the volume of the car sound system to suit the speed at which the vehicle is trav- elling. In order for this to work, your car sound system must be connected as described in the installation instruc- tions.
You can adjust the automatic volume boost feature in six steps from (0 to 5).
???Press the MENU???OK button 7.
???Press the  or
or  button 6re- peatedly until ???VOLUME MENU??? appears on the display.
???Press the MENU???OK button 7 to display the volume menu.
???Press the  or
or  button 6 repeatedly until ???AUTO SOUND??? appears on the display.
???Set the volume adjustment level
When you have finished making your changes,
???press the MENU???OK button 7 and then the DIS???ESC button 5 to exit the menu.
Note:
The optimum setting for the speed- dependent volume adjustment fea- ture depends on how noise levels develop in your particular vehicle. You will need to test various set- tings in order to find out which is best suited to your vehicle.
Radio mode
This device is equipped with an RDS radio receiver. Many of the receivable FM stations broadcast a signal that not only carries the programme but also additional information such as the sta- tion name and programme type (PTY). The station name appears on the dis- play as soon as the tuner receives it.
Switching to radio mode
To start the radio mode,
??? press the BND???TS button 4
or
???press the SRC button ;on the device or the SOURCE button ; on the remote control repeatedly until ???TUNER??? appears on the dis- play.
Convenient RDS functions (AF, REG)
The convenient RDS functions AF (Al- ternative Frequency) and REGIONAL extend your radio???s range of functions.
???AF: If the RDS function is activat- ed, the radio automatically tunes into the best receivable frequency for the station that is currently set.
???REGIONAL: At certain times, some radio stations divide their programme into regional pro- grammes providing different con- tent. You can use the REG func- tion to prevent the car radio from switching to alternative frequen- cies that are transmitting different programme content.
80

RADIO MODE
Note:
REGIONAL must be activated/de- activated separately in the menu.
Switching REGIONAL on/off
??? Press the MENU???OK button 7.
???TUNER MENU??? appears on the dis- play.
???Press the MENU???OK button 7to display the tuner menu.
???Press the  or
or  button 6 repeatedly until ???REG??? appears on the display. ???OFF??? or ???ON??? is displayed alongside ???REG???.
???To switch REGIONAL on/off, press the  or
or  button 6.
???Press the MENU???OK button 7 and then the DIS???ESC button 5 to exit the menu.
Switching the RDS function on/off
If you want to use the RDS functions (AF and REGIONAL),
??? press the MENU???OK button 7.
???TUNER MENU??? appears on the dis- play.
???Press the MENU???OK button 7to display the tuner menu.
???RDS ON??? or ???RDS OFF??? appears on the display.
???To switch RDS on/off, press the  or
or  button 6.
???Press the MENU???OK button 7 and then the DIS???ESC button 5 to exit the menu.
The convenient RDS functions are ac- tive if the RDS appears on the display.
Selecting the waveband / memory bank
This device can receive programmes broadcast over the FM frequency range as well as the MW and LW (AM) wave- bands. There are three memory banks available for the FM waveband (FM1, FM2 and FMT) and one for each of the MW and LW wavebands.
Five stations can be stored in each memory bank.
To switch between the FM memory banks (FM1, FM2 and FMT) and the MW and LW wavebands,
???briefly press the BND???TS button
4.
Tuning into a station
There are various ways of tuning into a station.
Automatic station seek tuning
??? Press the  or
or  button 6.
The radio tunes into the next receiva- ble station.
Tuning into stations manually
You can also tune into stations manually.
Note:
You can only tune into stations manually if the RDS function is deactivated.
??? Press the  or
or  button 6.
DEUTSCH ENGLISH FRAN??AIS ITALIANO NEDERLANDS SVENSKA ESPA??OL PORTUGU??S DANSK
81

RADIO MODE
Browsing through broadcasting networks (only FM)
If a radio station provides several pro- grammes, you have the option of browsing through its
Note:
The RDS function must be activat- ed before you can use this feature.
???Press the  or
or  button 6to switch to the next station on the broadcasting network.
Note:
When using this feature, you will only be able to switch to stations that you have received previously. To receive the stations, use the Scan or Travelstore function.
Setting the sensitivity of station seek tuning
You can choose whether the radio should only tune into stations provid- ing good reception or whether it can also tune into those with a weak re- ception.
??? Press the MENU???OK button 7.
???TUNER MENU??? appears on the dis- play.
???Press the MENU???OK button 7to display the tuner menu.
???Press the  or
or  button 6 repeatedly until ???SENS??? appears on the display.
The display shows the currently set sensitivity level. ???SENS HI3??? means that the tuner is set to the highest sensitiv-
ity setting. ???SENS LO1??? means it is set to the lowest sensitivity setting.
???Set the sensitivity level that you want using the 
 buttons 6.
When you have finished making your changes,
???press the MENU???OK button 7 and then the DIS???ESC button 5 to exit the menu.
Note:
You can set different sensitivity levels for FM and MW or LW (AM).
Storing stations
Storing stations manually
???Select the memory bank that you want (FM1, FM2, FMT) or one of the wavebands (MW or LW).
???Tune into the station that you want.
???Press and hold down one of the station buttons 1 - 6 9for longer than two seconds to assign the station to that button.
Storing stations automatically (Travelstore)
You can automatically store the six sta- tions offering the strongest reception in the region (FM only). The stations are stored in the FMT memory bank.
Note:
Any stations that were previously stored in this memory bank are deleted in the process.
???Press and hold down the BND???TS button 4for longer than two sec- onds.
82

RADIO MODE
The storing procedure begins. ???TRAV- EL STORE PLEASE WAIT??? appears on the display. After the process has completed, the radio will play the sta- tion that is stored in memory location 1 of the FMT memory bank.
Listening to stored stations
???Select the memory bank or wave- band.
???Press the station button 1 - 6 9 of the desired station.
Scanning receivable stations (SCAN)
You can use the scan function to play all the receivable stations briefly. You can set the scanning time from 5 to 30 seconds in the menu in increments of five seconds.
Starting SCAN
???Press and hold down the MENU???OK button 7 for longer than two seconds.
Scanning begins. ???SCAN??? appears briefly on the display followed by a dis- play of the current station name or fre- quency.
Cancelling SCAN and continuing listening to a station
??? Press the MENU???OK button 7.
Scanning stops and the radio contin- ues playing the station that it tuned into last.
Setting the scanning time
??? Press the MENU???OK button 7.
???TUNER MENU??? appears on the dis- play.
???Press the  or
or  button 6re- peatedly until ???VARIOUS MENU??? appears on the display.
???Press the MENU???OK button 7to display the menu. ???SCAN TIME??? and the currently set time are dis- played.
???Set the scanning time that you want using the 
 buttons 6.
When you have finished making your changes,
???press the MENU???OK button 7 and then the DIS???ESC button 5 to exit the menu.
Note:
The defined scanning time is also applied by the system to scanning carried out in DVD/CD and CD- changer mode.
Programme type (PTY)
Besides transmitting the station name, some FM stations also provide infor- mation on the type of programme that they are broadcasting. Your car radio can receive and display this informa- tion.
For example, the programme types can be:
CULTURE TRAVEL JAZZ
SPORT NEWS POP
ROCK CLASSICS
DEUTSCH ENGLISH FRAN??AIS ITALIANO NEDERLANDS SVENSKA ESPA??OL PORTUGU??S DANSK
83

RADIO MODE
You can use the PTY function to se- lect stations of a particular programme type.
If you specify the programme type and start seek tuning, the radio will switch from the current station to a station of the selected programme type.
Notes:
???If the tuner does not find a station that corresponds to the selected pro- gramme type, you will hear a beep and ???NO PTY??? appears briefly on the display. The radio will then retune to the station that it received last.
???If the tuned radio station or another station on the broadcasting net- work broadcasts your selected pro- gramme type at a later point in time, the radio will automatically switch from the currently tuned sta- tion or from DVD/CD or
Switching PTY on/off
??? Press the MENU???OK button 7.
???TUNER MENU??? appears on the dis- play.
???Press the MENU???OK button 7to display the tuner menu.
???Press the  or
or  button 6re- peatedly until ???PTY??? appears on the display with the current setting.
???Press the  or
or  button 6to switch PTY ON or OFF.
???Press the MENU???OK button 7 and then the DIS???ESC button 5 to exit the menu.
Selecting a programme type and starting seek tuning
??? Press the  or
or  button 6.
The programme type that you select- ed last appears on the display.
???If you want to select another pro-
gramme type, you can do so by pressing the  or
or  button 6 whilst this display is visible.
Or
???Press one of the buttons 1 - 6 9 to select a programme type that is assigned to one of these buttons.
The selected programme type appears briefly in the display.
???Press the  or
or  button 6to start seek tuning.
The radio will then tune into the next station that it finds that corresponds to your selected programme type.
Assigning a programme type to a station button
???Select a programme type using the  or
or  button 6.
???Press and hold the desired station button 1 - 6 9for longer than two seconds.
The programme type is stored on the selected button 1 - 6 9.
84

RADIO MODE
Optimising radio reception
Treble reduction feature during interference (HICUT)
The HICUT function improves recep- tion during poor radio reception (only FM). If reception interferences are present, the interference level is auto- matically reduced.
Switching HICUT on/off
??? Press the MENU???OK button 7.
???TUNER MENU??? appears on the dis- play.
???Press the MENU???OK button 7to display the tuner menu.
???Press the  or
or  button 6re- peatedly until ???HICUT??? appears on the display.
???Press the  or
or  button 6to ad- just the HICUT setting.
???HICUT 0??? means that no automatic reduction of the interference level will be made; ???HICUT 2??? means that a maximum reduction will be made.
???Press the MENU???OK button 7 and then the DIS???ESC button 5 to exit the menu.
SHARX
The SHARX function allows you to largely avoid interference caused by neighbouring radio stations (FM only). Switch on the SHARX function if the density of radio stations in your area is very high.
Switching SHARX on/off
??? Press the MENU???OK button 7.
???TUNER MENU??? appears on the dis- play.
???Press the MENU???OK button 7to display the tuner menu.
???Press the  or
or  button 6re- peatedly until ???SHARX??? appears on the display.
???Press the  or
or  button 6to switch SHARX on/off.
???SHARX OFF??? means automatic band- width switching is deactivated, ???SHARX ON??? means it is activated.
???Press the MENU???OK button 7 and then the DIS???ESC button 5 to exit the menu.
Configuring the display
In radio mode, you can choose between various display modes.
1.???NORMAL MODE???
First line: Memory bank and sta- tion name (if it can be received) Second line: Frequency of the se- lected station or radio text (if acti- vated).
2.???CLOCK MODE???
First line: Memory bank and sta- tion name (if it can be received) Second line: Frequency of the se- lected station or radio text (if acti- vated) and time.
3.???MINIMAL MODE???
First line: Memory bank and sta- tion name (if it can be received) Second line: No display.
DEUTSCH ENGLISH FRAN??AIS ITALIANO NEDERLANDS SVENSKA ESPA??OL PORTUGU??S DANSK
85
???Briefly press the DIS???ESC button 5to switch between the options.
Activating/deactivating the radio text display
Some stations use the RDS signal to broadcast scrolling texts known as ra- dio texts. You can allow radio texts to be displayed or you can block them.
Since displaying radio texts can distract you from the current road and traffic situation, we ask you kindly to deacti- vate the ???radio text??? function or to use it only whilst the vehicle is stationary.
??? Press the MENU???OK button 7.
???TUNER MENU??? appears on the dis- play.
???Press the MENU???OK button 7to display the tuner menu.
???Press the  or
or  button 6re- peatedly until
???Press the  or
or  button 6to switch RADIOTEXT on/off.
???Press the MENU???OK button 7 and then the DIS???ESC button 5 to exit the menu.
Traffic information
Your device is equipped with an RDS- EON receiver. EON stands for En- hanced Other Network.
Whenever a traffic announcement (TA) is broadcast, the system switches au- tomatically from a station that does not provide traffic reports to the appropri- ate traffic information station within the broadcasting network that does.
Once the traffic report has been played, the system will switch back to the pro- gramme that you were listening to before.
Switching traffic information priority on/off
??? Press the TRAF button 8.
The priority for traffic announcements is activated if the display shows the traf- fic jam symbol.
Notes:
You will hear a warning beep:
???If you leave the reception area of a traffic information station that you are currently listening to.
???If you leave the reception area of a traffic information station that the system is tuned into while listening to a DVD/CD or a CD in the changer, and the subsequent au- tomatic search cannot find a new traffic information station.
???If you retune the radio from a traffic information station to a station that does not broadcast traffic information.
If you hear the warning beep, you can either switch off traffic information pri- ority or tune into a station that broad- casts traffic information.
86

Setting the volume for traffic announcements
???Press the MENU???OK button 7.
???Press the  or
or  button 6re- peatedly until ???VOLUME MENU??? appears on the display.
???Press the MENU???OK button 7to display the volume menu.
???Press the  or
or  button 6re- peatedly until ???TRAFFIC??? appears on the display.
???Adjust the volume using the 
 buttons 6.
???Press the MENU???OK button 7 and then the DIS???ESC button 5 to exit the menu.
Note:
Using the volume control 3, you can also adjust the volume during a traffic announcement for the du- ration of that announcement.
DVD operation
 Risk of severe damage to the DVD/CD drive!
Mini DVDs/CD singles with a diam- eter of 8 cm and
We accept no responsibility for any damage to the DVD/CD drive that may occur as a result of the use of unsuitable DVDs/CDs.
Region code
Code Region
1North America, incl. the US and Canada.
2Japan, Europe (excl. Eastern Europe), Middle East, South Africa.
3Korea and
4Oceania incl. Australia, New Zealand, Central and South America.
5India, Eastern Europe, Africa, and Russia.
6 China.
All regions.
DEUTSCH ENGLISH FRAN??AIS ITALIANO NEDERLANDS SVENSKA ESPA??OL
The Las Vegas DVD35 and the DVDs are labelled with the region code that is applicable for the pertinent country.
This device is permanently set to the region code that is valid for the country in which it was sold.
Playing a DVD with a different region code is not possible.
DANSK PORTUGU??S
87

DVD OPERATION
This device can be used to play the following data carriers/data formats:
???DVD video and DVD audio. DVD- MP3/WMA
???Video CD (VCD).
???MP3/WMA CDs, see the chapter ???MP3/WMA mode???.
???Audio CDs, see the chapter ???CD mode???.
License
Manufactured under license of Dolby Laboratories. ???Dolby???, ???Pro Logic??? and the
This product contains technologies that are
Switching to DVD mode
If there is no DVD inserted in the drive,
???switch on the device by pressing button 1.
???Press the 
 button 2.
The control panel opens.
???Gently insert the DVD with its printed side pointing up into the drive until you feel some resist- ance.
The drive draws in the DVD automati- cally.
You must not hinder or assist the drive as it draws in the DVD.
???Gently close the control panel whilst exerting a little pressure un- til you feel it click into place.
The DVD data are loaded.
Dependent upon the inserted DVD, the playback starts or the DVD menu dis- plays.
If a DVD is already inserted in the drive,
???press the SRC button ;on the device or the SOURCE button ; on the remote control repeatedly until ???DVD??? appears on the display.
Playback begins from the point at which it was last interrupted.
Starting playback
After the desired DVD/VCD is loaded, either the DVD menu is displayed or the playback starts. This action is de- pendent upon the inserted DVD.
???Press the  button Aor move the selection mark to the menu
item that starts the movie, and press the ENTER button >to start the playback.
The DVD starts playing.
88

DVD OPERATION
Display
Different information about the playing time can be shown on the connected display. The display can be hidden.
The following displays are available:
???TITLE ELAPSED
Example: TITLE 01/12 CHAP-
TER 08/26 01 : 26 : 14: The first of twelve titles and the eighth of 26 chapters of this title is playing. Next to it is the time elapsed of the current title.
???TITLE REMAIN
Example: TITLE 01/12 CHAP-
TER 08/26 00 : 31 : 58: The first of twelve titles and the eighth of 26 chapters of this title is playing. Next to it is the time remaining of the current title.
???CHAPTER ELAPSED Example: TITLE 01/12 CHAP- TER 08/26 00 : 01 : 34: The first of twelve titles and the eighth of 26 chapters of this title is playing. Next to it is the elapsed playing time of the current chapter.
???CHAPTER REMAIN Example: TITLE 01/12 CHAP- TER 08/26 00 : 05 : 22: The first of twelve titles and the eighth of 26 chapters of this title is playing. Next to it is the remaining playing time of the current chapter.
Showing/changing the display information
???Press the DISPLAY button Con the remote control repeatedly until the desired information is dis- played.
The display information is shown at the top edge of the display.
Hiding the display information
???Press the DISPLAY button C repeatedly until DISPLAY OFF displays briefly and the display in- formation is hidden.
Fast forward/reverse search
You can fast forward or reverse the DVD at 2x, 4x, 8x, 16x and 32x the speed (dependent upon the DVD; some DVDs can only be played up to 16x the speed).
To fast forward or reverse search the DVD,
???press the  or
or  @button on the remote control repeatedly until the desired speed is displayed.
Stopping fast forward/reverse search
To stop fast forward,
???press the  button Aon the remote control.
The DVD is played back at normal speed.
DEUTSCH ENGLISH FRAN??AIS ITALIANO NEDERLANDS SVENSKA ESPA??OL PORTUGU??S DANSK
89

DVD OPERATION
Slow motion
The DVD can be played forward or reverse at reduced speed.
???First, press the  button Aon the remote control.
???Press the SLOW  button @ once or several times on the remote control for forward slow motion
or
???the SLOW  button @for reverse slow motion.
After pressing the SLOW  /
/  but- ton @several times, the playback is switched to half the regular speed (1/2).
With every additional press of the but- ton, the speed is reduced further (1/4, 1/8 and 1/16).
To play the DVD at regular speed again,
???press the  button Aon the re- mote control.
Single frame
You can stop the movie of a DVD and watch it in single frames.
???First, press the  button Aon the remote control.
???Press the STEP  button Pon the remote control once or several times to display the next frames
or
???press the STEP  button Pto display the previous frames.
Freeze frame
???During playback, press the  but- ton Aon the remote control or the button 6
  9on the device.
The playback is interrupted and shown as a freeze frame.
Continuing playback
To continue the playback
???press the  button Aon the re- mote control or the button 6
 9 on the device.
Interrupting playback
???Press the  button Oon the re- mote control.
The playback is interrupted, the start screen of the device and the text ???PRESS PLAY TO CONTINUE??? are displayed.
Continuing playback
???press the  button Aon the re- mote control.
Playback is continued again.
Skipping a chapter
A title of the DVD can be divided into several smaller chapters.
To jump to the next or another chapter,
???press the  button Ponce or several times on the remote con- trol.
The playback jumps to the beginning of the next or the corresponding follow- ing chapter.
90

DVD OPERATION
To jump to the beginning of the current or a previous chapter,
???press the  button Ponce or several times on the remote con- trol.
The playback jumps to the beginning of the current or the corresponding pre- vious chapter.
Repeated playback of a DVD title
ADVD is divided into different titles and chapters, which can be selected on an individual basis.
Repeated playback of a chapter or title
To repeat the current chapter,
???press the PLAY MODE button J on the remote control.
The display shows the repeat symbol and ???CHAPTER???.
To repeat the current title,
???press the PLAY MODE button J on the remote control a second time.
The display shows the repeat symbol and ???TITLE???.
To repeat the entire DVD,
???press the PLAY MODE button J on the remote control a third time.
The display shows the repeat symbol and ???ALL???.
Cancelling repeat
If you want to cancel the repeat func- tion,
???press the PLAY MODE button J on the remote control repeat- edly until the repeat symbol is no longer shown on the display.
Direct selection of a chapter
The remote control can also be used to directly select a chapter or a specif- ic position (playing time).
Selecting a chapter
To directly select a chapter,
???press the GOTO button B on the remote control.
The external display shows the GOTO menu.
???Move the selection mark with the
buttons of the remote control 
 6 to ???CHAPTER???.
???Press the ENTER button >on the remote control.
???Enter the
desired chapter using the numeric buttons 0 to 9 S on the remote
control and press the ENTER but- ton >.
Playback is continued at the desired position.
To exit the GOTO menu and continue with full playback,
???press the GOTO button B on the remote control.
DEUTSCH ENGLISH FRAN??AIS ITALIANO NEDERLANDS SVENSKA ESPA??OL PORTUGU??S DANSK
91

DVD OPERATION
Selecting the playing time
You can directly select a specific posi- tion on the DVD by specifying the play- ing time of this position either in the chapter or in the title.
To jump to a specific position,
???press the GOTO button B on the remote control.
The external display shows the GOTO menu.
???Move the selection mark with the
buttons of the remote control 
 6to ???TT TIME??? to set the abso- lute playing time in the title, or to ???CH TIME??? to set the playing time of the current chapter.
???Press the ENTER button >on the remote control.
???Enter the desired position in
hours, minutes and seconds using the numeric buttons 0 to 9 S on the remote control.
Playback is continued at the desired position.
To exit the GOTO menu and continue with full playback,
???press the GOTO button B on the remote control.
Resuming playback at the start of the first title of a DVD
???Press the  button Aon the re- mote control.
Playback resumes at the start of the title.
Note:
For most DVDs, this is the main menu (root) of the DVD.
Displaying subtitles
To display subtitles,
???press the
The display information appears. The number of languages available for sub- titles and the current language are dis- played next to ???SUBTITLE???.
To change the language of the subti- tles,
???press the
Note:
You can also determine in the menu of the DVD whether and in which language subtitles are dis- played (see DVD menu).
92

DVD OPERATION
Selecting the playback language
To select the playback language,
???press the AUDIO button Monce or several times on the remote control.
The display information is shown. The number of the language, the number of available playback languages and the current language are shown.
Note:
You can also select the playback language in the menu of the DVD (see DVD menu).
Changing the camera perspective
There are DVDs that offer two or more different camera perspectives for a scene.
The number of the current camera per- spective and the number of possible camera perspectives is shown in the display information next to the camera symbol.
To change the camera perspective,
???press the ANGLE button Don the remote control.
The scene is shown from the next cam- era perspective. The display informa- tion is shown.
Note:
You can specify in the setup menu that a camera symbol is shown if additional camera perspectives are available. For further details, read the section ???Displaying the camera perspective??? in the ???Setup??? chapter.
Zooming in/out of an image area
You can enlarge a freely selectable section of the movie being played up to 4 times or reduce it to
To enlarge the image area,
???press the ZOOM button Fonce or several times on the remote control.
Every time you press the button, the central image area is enlarged incre- mentally. Available zoom levels are 2x, 3x and 4x.
Note:
After setting the desired zoom, you can freely move the image area with the arrow buttons 6of the remote control.
Reducing the image area
After the maximum zoom is reached, the image is reduced with each press of the ZOOM button Fin increments of 1/2, 1/3 and 1/4.
DEUTSCH ENGLISH FRAN??AIS ITALIANO NEDERLANDS SVENSKA ESPA??OL PORTUGU??S DANSK
93

DVD OPERATION
Deactivating zoom in/out
To continue viewing the movie without zoom,
???press the ZOOM button Fon the remote control repeatedly until the image is displayed without zoom in/out.
Traffic announcements in DVD mode
If you wish to receive traffic announce- ments in DVD mode,
??? press the TRAF button 8.
The priority for traffic announcements is activated if the device display shows the traffic jam symbol. For further de- tails, please read the chapter entitled ???Traffic information???.
DVD menu
The DVD menu is offered by the insert- ed DVD. If you insert a DVD and play- back starts, the DVD menu automati- cally appears on the screen.
Note:
The selection options offered by the DVD menu are dependent upon the respective DVD.
The DVD menu of a DVD can offer the following:
???You can select from different lan- guages for the playback or the subtitles.
???In addition to the actual movie, you can also view the trailer that was used in movie theatres or on television to promote the movie or view the ???Making of ...??? of the movie.
???A movie is divided into several se- quential chapters. You can select a chapter and directly start the play- back in the chapter without first having to ???fast forward??? to the cor- responding position like you have to with a video cassette.
Displaying the DVD menu
You can end the playback at any time and display the menu of the DVD.
???Press the MENU button =on the remote control.
94

DVD OPERATION
Selecting menu entries
DVDs generally provide menus in which you can select among different options, such as ???Start movie???, ???Chap- ter selection???, etc.
To switch between the individual menu entries,
???press one of the arrow buttons 
 /
/ 
 6on the remote con- trol.
To confirm a menu entry,
???press the ENTER button >on the remote control.
Exiting the DVD menu
When you make a corresponding se- lection in the DVD menu, e.g. the play- back of the movie, you automatically leave the DVD menu and the playback starts.
Displaying the title menu
You can also call the title menu directly to conveniently select the individual ti- tles/chapters:
???Press the TITLE button Ron the remote control.
The title menu appears.
Note:
This function is not supported by all DVDs.
Playback of DVD audio
This device can also be used to play DVD audio. The functions described above can be used provided that the DVD supports them.
The following functions are particularly useful for DVD audio.
Repeated playback of a defined section of a title
You can use the remote control to de- fine a section of a title and repeat it endlessly in a loop.
Note:
This function is operable only if an external display is connected.
To define the starting point of the sec- tion,
???listen to a title and press the
To define the ending point of the sec- tion,
???listen to the title again and press the
The section of the title is repeated until you press the
DEUTSCH ENGLISH FRAN??AIS ITALIANO NEDERLANDS SVENSKA ESPA??OL PORTUGU??S DANSK
95
DVD OPERATION
Programming your favourite track with the remote control
In DVD mode, you can use the remote control to program a playlist of up to 20 of your favourite tracks of the cur- rent DVD. The playlist is deleted when you remove the DVD or when you stop the playlist and exit the programming mode.
Note:
This function is operable only if an external display is connected.
Defining and starting a playlist
???Press the PROGRAM button K on the remote control.
The programming mode is displayed. The number of available titles on the DVD is displayed and the selection mark (green) is positioned at memory location 1.
???Enter the first title and the chapter
of your playlist with the numeric buttons 0 to 9 S.
Note:
After entering the title, the chap- ters available for this title are dis- played.
The selection mark moves to the next memory location.
???Enter the next titles and chapters
of your playlist with the numeric buttons 0 to 9 S.
If your playlist should have fewer than twenty titles,
???move the selection mark with the arrow buttons 6to ???START??? and press the ENTER button >.
Stopping the playlist
To end a running playlist,
???press the PROGRAM button K on the remote control.
The programming mode is displayed. The selection mark is positioned on ???STOP???.
To end the playback of the playlist,
??? press the ENTER button >.
Note:
You can also edit the playlist by moving the selection mark to indi- vidual memory locations and en- tering a different title with the nu- meric buttons.
96

DVD OPERATION
DVD setup
The setup of the device offers a varie- ty of options to customise the device.
Calling up the setup menu
To call up the setup menu,
???press the SETUP button <on the remote control.
Performing settings in the setup menu
The setup menu is divided into five sections: General Setup, Audio Setup, Video Setup, Preference Page and Password Setup.
???Select one of the five sections in
the setup menu using the buttons 
 6of the remote control or the arrow buttons on the device.
???Confirm your entry with the EN- TER button >on the remote control.
???Confirm your entries with the EN- TER button >on the remote control.
If you want to perform additional set- tings in other sections of the menu:
???Press the  button 6of the re- mote control or the
  button 6on the device to return to the selec- tion of the menu sections.
To exit the setup menu,
???press the SETUP button <on the remote control.
General Setup - general settings
In the general settings, you can define the type of connected display, display a symbol if more than one camera per- spective is available, switching captions on and off, and set the priority for au- dio or video DVDs.
Selecting the monitor setting
DEUTSCH ENGLISH FRAN??AIS ITALIANO NEDERLANDS
The selection mark (yellow) is dis- played and positioned on the first en- try of the selected menu.
???Select the desired menu item us- ing the buttons 
 6of the re- mote control or the arrow buttons on the device.
???Confirm your entries with the EN- TER button >on the remote control.
???Perform your settings using the buttons 


 6of the remote control or the arrow buttons on the device.
The setting of the monitor is performed under the ???TV Display??? menu item.
The following monitor settings are avail- able:
???Normal/LB: The DVD player is connected to a 4:3 monitor. The wide image is displayed on the screen at full width with black bars at the top and bottom edge of the screen.
???Normal/PS: The DVD player is connected to a 4:3 monitor. The wide image is displayed using the full height of the screen. The left and right edge of the wide image is automatically cut off.
SVENSKA ESPA??OL PORTUGU??S DANSK
97

DVD OPERATION
???WIDE: The DVD player is con- nected to a 16:9 monitor. The wide image is displayed on the screen at full size.
Displaying the camera perspective
You can specify that a camera symbol is shown if more than one camera per- spective is available on the DVD. For this purpose, select the setting ???ON???.
The setting of the camera perspective is performed under the ???Angle Mark??? menu item.
Displaying captions
Captions are special subtitles that can- not be switched on/off using the subtitle function of a DVD.You can use this menu to switch these subtitles on or off. Se- lect the setting ???Off??? to switch it off.
DVD/DVD audio priority
DVD audio generally contains audio data in two versions:
One
Here you can define whether you want to listen to
Select the ???DVDAudio??? setting for high- er quality or ???DVD Video??? for the com- pressed version.
The setting of the priority is performed under the ???Priority??? menu item.
Audio Setup
The Audio Setup allows you to control the SPDIF output of the device, set the PCM channel and set the sampling rate of the LPCM output. In addition, you can control the Dynamic Range Con- trol (DRC) and the HDCD filter.
SPDIF setting
For the SPDIF output of the device, you can select whether an
Select the desired setting under ???SPDIF Output???.
Notes:
???The SPDIF output is not muted for traffic announcements, incoming telephone calls and navigation voice output.
???The audio data of the DVD drive are output via the SPDIF output.
PCM channel
The SPDIF output can be used to out- put the PCM data in the ???L/R???, ???LS/RS??? or ???C/LFE??? mode.
The respective setting can be per- formed under ???PCM Channel??? in the ???SPDIF Output???.
98

DVD OPERATION
Setting the LPCM
This device can be used to output a linear PCM signal (LPCM) with a sam- pling rate of 48 K, 96 K or 192 K.
The LPCM setting is located under ???LPCM OUT??? in the ???SPDIF Setup???.
Dolby Digital Setup - Dynamic
Range Control
Dynamic Range Control means that the difference between ???loud??? and ???soft??? sounds is adjusted. The volume of soft sounds is increased and that of loud sounds is lowered. You can use the DRC of the device to set the dynamics of a Dolby programme in increments from ???OFF??? to ???Full???. Select the ???FULL??? setting for full dynamic adjustment.
The setting of DRC is located under ???Dynamic??? in the ???Dolby Digital Setup???.
Setting the HDCD filter
If you play
Select the desired filter under ???HDCD???.
Brightness
You can adjust the brightness in incre- ments from
The setting for brightness is located in ???Quality??? under ???Brightness???.
Contrast
You can adjust the contrast in incre- ments from
The setting for contrast is located in ???Quality??? under ???Contrast???.
Gamma correction
You can adjust the gamma correction for playback on TFT displays. You can select among the settings ???High???, ???Me- dium???, ???Low???, and ???None???.
The setting for gamma correction is located in ???Quality??? under ???Gamma???.
Colour
You can adjust the colour in increments from
The setting for colour is located in ???Quality??? under ???Hue???.
Colour saturation (for NTSC only)
DEUTSCH ENGLISH FRAN??AIS ITALIANO NEDERLANDS SVENSKA
Video Setup - image settings
In the Video Setup, you can perform different settings for an optimal image playback on the connected display.
Adjusting picture sharpness
To adjust the picture sharpness, you can select among the settings ???High???, ???Medium??? and ???Low???.
The setting for picture sharpness is lo- cated in ???Quality??? under ???Sharpness???.
You can adjust the colour saturation in increments from
The setting for colour saturation is lo- cated in ???Quality??? under ???Saturation???.
Luminance (for NTSC only)
You can select the settings ???0T??? and ???1T??? for luminance.
The setting for luminance is located in ???Quality??? under ???Luma Delay???.
ESPA??OL PORTUGU??S DANSK
99

DVD OPERATION
Preferences - preferred settings
Under ???Preferences???, you can set the television standard of the external dis- play, switch PBC on and off, set the preferred playback language, select the preferred language for subtitles, set the parental control, set the region, and reset the device.
To call up the preferred settings,
???press the  button Oon the remote control twice.
???Press the SETUP button <on the remote control.
???Select "Preferences Page" using the buttons 
 6of the remote control or the arrow buttons on the device.
???Confirm your entry with the EN- TER button >on the remote control.
Setting the colour television standard of the TV device
For a perfect image quality, set the col- our television standard on the device which is used by the attached monitor.
???PAL??? is the standard used in Europe, ???NTSC??? is the standard for the Ameri- can/Asiatic region.
If you select the ???MULTI??? setting, the standard of the DVD is used for the output.
The setting of the television standard is performed under the ???TV TYPE??? menu item in the menu ???Preferences Page???.
Note:
The television standard can also be switched using the remote con- trol. Press the
Switching playback control on/off
If the Playback Control (PBC) function is switched off, the titles and chapters of a VCD/SVCD are played in ascend- ing order. With PBC on, the VCD/ SVCD is played with the predefined menus and in logical order.
The setting for PBC is located under ???PBC???.
Selecting the playback language
You can preselect the preferred play- back language of the DVD. If the se- lected language is available on the DVD, the playback starts with the pre- set language.
The setting of the playback language is performed under the ???Audio??? menu item.
Selecting the language of subtitles
You can preselect the preferred lan- guage for subtitles. If the selected lan- guage for subtitles is available on the DVD, the subtitles are displayed in the preset language.
The setting of the subtitles is performed under the ???Subtitle??? menu item.
100

DVD OPERATION
Selecting the language for the DVD menu
You can preselect the preferred lan- guage for the menus of the DVD. If the selected language for menus is avail- able on the DVD, the menus of the DVD are displayed in the preset lan- guage.
The setting of the language for the DVD menu is performed in the ???Disc Menu??? menu item.
Parental control
You can secure the device against un- authorised use by assigning a pass- word. In addition, you can specify a rating level.
Rating level means that some DVDs are equipped with a code that de- fines the
If you set a rating level that is lower than the one found on the inserted DVD, it can be played only after entering the password.
Note:
Not all DVDs support the Rating Level function.
In the menu you can define which mov- ies can be played. These ratings follow the recommendations of the Motion PictureAssociation ofAmerica (MPAA).
The following options can be selected:
1 KID SAF: Approved for children
2 G: Approved for children
3 PG:Accompanying adult during play- back is suggested.
4 PG 13: Accompanying adult is sug- gested, not suitable for children under the age of 13.
5
6 R: Prohibited for adolescents, con- tents includes violence, obscene lan- guage, etc.
7 NC 17: Contents not suitable for ad- olescents under the age of 17.
8 ADULT: Contents for adults only: Vi- olence, sex, etc.
Notes:
???Some blocked DVDs can be re- leased directly at the start with YES (ENTER) and the password. Others require you to change the rating level in the setup before the playback of the DVD. This action is dependent upon the DVD.
???If you activated password protec- tion, the
The setting for the parental control can be performed in the ???Parental??? menu item.
DEUTSCH ENGLISH FRAN??AIS ITALIANO NEDERLANDS SVENSKA ESPA??OL PORTUGU??S DANSK
101

DVD OPERATION
Resetting the device
You can reset the device, thereby de- leting all, personal setting (including the
Resetting the device is performed in the ???Default??? menu item.
Setting password protection - Assigning a password
You can activate the password protec- tion for the device. With activated pass- word protection, you can change the
Activating/deactivating password protection
The password protection can be acti- vated (ON) or deactivated (OFF) in the ???Password Mode??? menu. To change the setting, you must enter the current password using the numeric buttons
S.
If you have not yet entered a password, use the preset password 000000.
After you have entered the correct password, the entry marking automat- ically switches to ???OK???.
Changing the password
You can change the preset password and define your own. The password must have six digits. To change the password, you must first enter the old password. If you have not yet assigned a password, use the preset password
000000.
The password is changed in the ???Pass- word??? menu. To change the password, you must first enter the current pass- word with the numeric buttons Sand then enter the new password twice.
After you have entered the correct password and entered the new pass- word twice, the entry marking automat- ically switches to ???OK???.
Note:
If you forgot your password, you can use the master code 136900 and assign a new password.
Exiting the setup menu
To exit the setup menu,
???press the SETUP button <on the remote control.
Or
???Select ???Exit Setup Menu??? using the buttons 
 6of the remote control or the arrow buttons on the device.
???Confirm your entry with the EN- TER button >on the remote control.
102

CD MODE
CD mode
You can use this device to play stand- ard audio CDs,
To ensure proper functioning, use only CDs with the
Besides being able to play audio CDs on this device, you can also play CDs containing MP3 music files and DVDs. For further details, please read the chapters ???MP3 mode??? and ???DVD mode???.
 Risk of severe damage to the DVD/CD drive!
CD singles with a diameter of 8 cm and
We accept no responsibility for any damage to the DVD/CD drive that may occur as a result of the use of unsuitable DVDs/CDs.
Switching to CD mode
If there is no CD inserted in the drive,
???switch on the device by pressing button 1.
???Press the 
 button 2.
The control panel opens.
???Gently insert the CD with its print- ed side uppermost into the drive until you feel some resistance.
The drive draws in the CD automati- cally.
You must not hinder or assist the drive as it draws in the CD.
???Gently close the control panel whilst exerting a little pressure un- til you feel it click into place.
The CD starts playing.
If a CD is already inserted in the drive,
???press the SRC button ;on the device or the SOURCE button ; on the remote control repeatedly until ???DISC??? appears on the dis- play.
Playback begins from the point at which it was last interrupted.
DEUTSCH ENGLISH FRAN??AIS ITALIANO NEDERLANDS SVENSKA ESPA??OL
Selecting tracks
???Press one of the arrow buttons 6 to select the next or previous
track, or press the  or
or  button Pon the remote control.
If you press the  or
or  button 6 or
  Ponce, the current track is played again.
DANSK PORTUGU??S
103

CD MODE
Direct track selection with the remote control
In CD mode, you can directly select tracks with the remote control or se- lect a specific playing time on the CD or in the current track.
Note:
This function is operable only if an external display is connected.
Track selection
???Enter the number of the desired
track directly using the numeric buttons 0 to 9 Sof the remote control.
After entering the number, the desired track begins to play.
Or
???Press the GOTO button Bre- peatedly until the external display shows ???SELECT TRACK???.
???Enter the number of the desired
track using the numeric buttons 0 to 9 S, e.g. 0 2 for the second or 1 2 for the twelfth track.
After entering the number, the desired track begins to play.
Selecting the playing time on the
CD
???Press the GOTO button Bre- peatedly until the external display shows ???DISC GO TO???.
???Enter the desired playing time in the
you want the playback to start us- ing the numeric buttons S.
After entering the time, the playback is continued at the desired position.
Selecting the playing time in the current track
???Press the GOTO button Bre- peatedly until the external display shows ???TRACK GO TO???.
???Enter the desired playing time in the
to start using the numeric buttons
S.
After entering the time, the playback is continued at the desired position.
Fast track selection
To quickly select tracks backwards or forwards,
???press and hold down one of the  /
/  buttons 6until
Fast searching (audible)
To fast search backwards or forwards,
???press and hold down one of the 
 buttons 6until fast searching backwards/forwards begins.
Fast searching with the remote control
You can perform a fast searching with different speeds (2x, 4x, 8x, 16x, and 32x) with the remote control.
Note:
The search speed is shown on an external display (optional equip- ment).
104

CD MODE
For fast searching forwards
???press the  button @on the remote control repeatedly until the desired speed is shown.
For fast searching backwards
???press the  button @on the remote control repeatedly until the desired speed is shown.
To end the searching,
???press the  button Aon the remote control.
Random track play (MIX)
??? Press the 1 MIX button 9.
???MIX CD ON??? appears briefly on the display and the MIX symbol is dis- played. The next randomly selected track will then be played.
Cancelling MIX
??? Press the 1 MIX button 9again.
???MIX CD OFF??? appears briefly on the display and the MIX symbol disap- pears.
Cancelling SCAN and continuing listening to a track
To end the scanning process,
??? press MENU???OK button 7.
The currently scanned track will then continue to be played normally.
Repeating tracks (REPEAT)
If you want to repeat a track,
??? press the RPT 4 button 9.
???REPEAT TRACK??? appears briefly on the display, and the RPT symbol is shown. The track is repeated continu- ously until you deactivate RPT.
Cancelling REPEAT
If you want to cancel the repeat func- tion,
??? press the RPT 4 button 9again.
???REPEAT ALL??? appears briefly on the display, and the RPT symbol disap- pears. Normal playback is then re- sumed.
REPEAT with the remote control
DEUTSCH ENGLISH FRAN??AIS ITALIANO NEDERLANDS SVENSKA
Scanning tracks (SCAN)
You can scan (briefly play) all the tracks on the CD.
???Press and hold down the MENU???OK button 7for longer than two seconds.
The next track will then be scanned.
Note:
You can set the scanning time. For further information, please read the section entitled ???Setting the scanning time??? in the ???Radio mode??? chapter.
In CD mode, you can select the RE- PEAT mode with the remote control.
To repeat a track,
???press the PLAY MODE button J repeatedly until ???TRACK??? is shown on the external display next to the repeat symbol.
To cancel REPEAT,
???press the PLAY MODE button J repeatedly until ???ALL??? is shown on the external display next to the re- peat symbol.
ESPA??OL PORTUGU??S DANSK
105
CD MODE
Repeated playback of a defined section of a title
You can use the remote control to de- fine a section of a title and repeat it endlessly in a loop.
Note:
This function is operable only if an external display is connected.
To define the starting point of the sec- tion,
???listen to a title and press the
To define the ending point of the sec- tion,
???listen to a title and press the
The section of the title is repeated until you press the
Interrupting playback (PAUSE)
??? Press the button 6  9. ???PAUSE??? appears on the display.
Cancelling pause
???During the pause, press the but- ton 6  9.
9.
Playback is continued.
You can also interrupt and continue playback using the  button Aon the remote control.
Changing the display
You can select different displays for CD mode:
??????NORMAL MODE???: First line: Track number Second line: Playing time
??????INFO MODE???:
First line: Track number and play- ing time.
Second line: CD text (if available)
??????CLOCK MODE???:
First line: Track number and play- ing time.
Second line: CD text (if available) and time
??????MINIMAL MODE???:
The title number is displayed on the top line.
Note:
CD text can only be displayed if the appropriate information is con- tained on the CD.
To switch between the display options,
???press the DIS???ESC button 5 once or several times until the de- sired display is shown.
Display on an external display
In CD mode, the following information is always shown on an external display, independent of the selected display of the device display:
???the number of the current track,
???the number of tracks on the CD,
???the track information from the CD text (if available)
and
106

CD MODE
???the playing time of the track (Single Elapsed)
or
???the remaining playing time of the track (Single Remain)
or
???the elapsed playing time of the CD (Total Elapsed)
or
???the remaining playing time of the CD (Total Remain)
To select one of the different time dis- play options,
???press the DISPLAY button Con the remote control repeatedly until the desired information is shown on the external display.
Displaying CD text
Some CDs include CD text. The CD text might contain the names of the artist, album and tracks.
If the CD text is available on the CD, it is shown on the second line of the dis- play in Info Mode and Clock Mode. The CD text is shown as scrolling text on the display with every track change. After the CD text is displayed once, the first 13 characters of the CD text of the current track are displayed.
Note:
The CD text is displayed as scroll- ing text if it contains more than 13 characters in Info mode or more than 8 characters in Clock mode.
Scrolling CD text again
You can
??? Briefly press the 5 SCL button 9.
Programming your favourite track with the remote control
In CD mode, you can use the remote control to program a playlist of up to 20 of your favourite tracks of the cur- rent CD. The playlist is deleted when you remove the CD or when you stop the playlist and exit the programming mode.
Note:
This function is operable only if an external display is connected.
Defining and starting a playlist
???Press the PROGRAM button K on the remote control.
The programming mode is displayed. The number of available tracks on the CD is displayed and the selection mark (green) is positioned at memory loca- tion 1.
???Enter the first track of your playlist with the numeric buttons 0 to 9 S.
The selection mark moves to the next memory location.
???Enter the next track of your playlist with the numeric buttons 0 to 9 S.
If your playlist should have fewer than 20 tracks,
???move the selection mark with the arrow buttons 6to ???START??? and press the ENTER button >.
DEUTSCH ENGLISH FRAN??AIS ITALIANO NEDERLANDS SVENSKA ESPA??OL PORTUGU??S DANSK
107

CD MODE
Note:
After you have programmed a playlist and exited the menu with ???EXIT???, the playlist is not saved.
Stopping the playlist
To end a running playlist,
???Press the PROGRAM button K on the remote control.
The programming mode is displayed. The selection mark is positioned on ???STOP???. To end the playback of the playlist,
??? press the ENTER button >.
Notes:
???If you selected ???STOP??? and con-
firmed it with the ENTER button >, the playlist is deleted.
???If you want to exit the display of the playlist without deleting the
playlist, mark ???EXIT??? and confirm it with the ENTER button >.
Traffic announcements in CD mode
If you wish to receive traffic announce- ments in CD mode,
??? press the TRAF button 8.
The priority for traffic announcements is activated if the display shows the traf- fic jam symbol. For further details, please read the chapter entitled ???Traf- fic information???.
Ejecting a CD
??? Press the 
 button 2.
The control panel opens out towards you.
???Press the eject button next to the CD compartment.
The CD is ejected.
???Remove the CD and close the con- trol panel.
Notes:
???If a CD is ejected, the drive will automatically draw it back in again after approx. 10 seconds.
???CDs can also be ejected if another audio source is active.
108

MP3/WMA MODE
MP3/WMA mode
You can also use this car sound sys- tem to play DVDs,
Notes:
???WMA files with Digital Rights Man- agement (DRM) from online music shops cannot be played with this device.
???WMA files can only be played back safely if they were created with Windows
Preparing an MP3/WMA CD
The various combinations of DVD/CD burners, DVD/CD burning software and DVD/CD blanks may lead to problems arising with the device???s ability to play certain CDs. If problems occur with your own burned DVDs/CDs, you should try another brand of DVD/CD blanks or choose another colour of CD blanks. To avoid problems when play- ing CDs, you should not burn DVDs/ CDs at speeds greater than 16x.
The format of the DVD/CD must be ISO 9660 Level 1/Level 2 or Joliet. Other formats cannot be played reliably.
You can create a maximum of 254 di- rectories on a DVD/CD. You can use this device to access each of these di- rectories.
Up to 599 MP3 files in one directory can be managed with this device. The maximum number of files per CD/DVD is 150,000, the maximum directory depth is five.
You can name each directory using a PC. The device is capable of display- ing the directory name. Name the di- rectories and tracks/files using your CD burner software. The software???s instruc- tion manual will provide details on how to do this.
DEUTSCH ENGLISH FRAN??AIS ITALIANO NEDERLANDS SVENSKA ESPA??OL PORTUGU??S DANSK
109

MP3/WMA MODE
Note:
When naming directories and tracks/files you should avoid using accents and special characters. You can use a maximum of 32 characters (including the ???.MP3??? or ???.WMA??? file extension) for track names and directory names.
If you like your files to be in the correct order, you should use burner software that places files in alphanumerical or- der. If your software does not provide this feature you also have the option of sorting the files manually. For this purpose, you must enter a number in front of each file name, e.g. ???001???, ???002???, etc. The leading zeros must also be entered.
MP3 tracks can contain additional in- formation such as the artist, album and track names (ID3 tags). This device can display ID3 tags (version 1).
When creating (coding) MP3 files from audio files, you should use bit rates from 80 to 320 kbit/s and sampling rates of 32, 44 and 48 kHz.
This device can only play MP3 files that have the ???.MP3??? file extension.
Notes:
To ensure uninterrupted playback,
???do not try changing the file exten- sion to ???.MP3??? of any files other than MP3 files and then attempt to play them! The device will ignore these invalid files during playback.
???Do not use ???mixed??? CDs contain- ing both
???Do not use
Switching to MP3 mode
MP3 mode is activated in the same way as normal CD mode. For further information, please read the section entitled ???Switching to CD mode??? in the ???CD mode??? chapter.
If you connected an external display, the following information is displayed after the CD is read and the MP3/WMA playback has started:
???Number of the track and number of tracks in the directory.
???Bit rate of the file.
???Elapsed playing time and total playing time of the track.
???Name of the directory.
???In the left column, the list of tracks in the directory.
???In the right column, MP3 informa- tion from the ID tags (only if avail- able on the DVD/CD).
110

MP3/WMA MODE
Setting the display (internal display)
Configuring the default display
You can display various types of infor- mation on the current track:
1.???NORMAL MODE???:
First line: Type of file (MP3 or WMA), number of track and play- ing time.
Second line: Track name
2.???INFO MODE???:
First line: Track name.
Second line:
Note:
The system can display
3.???MP3 BROWSE MODE???:
First line: Name of current track
Second line: Name of next track.
4.???CLOCK MODE???:
First line: Type of file (MP3 or WMA), number of track and play- ing time.
Second line: MP3 info and time.
To switch between the different display options,
??? press the DIS???ESC button 5.
Selecting the directory on the device
For convenient navigation in the data structure of the CD, you can display the current and the following directory on the two lines of the display. The di- rectories are displayed with the names that you created when burning the CD. Whilst the directories are being dis- played, you can use the arrow buttons to display and select all the available directories.
???During the MP3 playback, press the  or
or  button 6.
The browse mode is automatically started, the current track is displayed on the first line of the display and the next track is displayed on the second line.
???Press the  or
or  button 6 repeatedly until the first line of the display shows a D.
???Press the  button 6.
The names of the current and the fol- lowing directory are shown on the dis- play.
If you want to select a directory,
???press one of the  /
/  buttons 6 repeatedly until the directory is
shown in the top line of the display and then press the  button 6.
The selected directory is opened. The tracks contained in the directory are displayed in browse mode.
DEUTSCH ENGLISH FRAN??AIS ITALIANO NEDERLANDS SVENSKA ESPA??OL PORTUGU??S DANSK
111

MP3/WMA MODE
???Press the  or
or  button 6re- peatedly until the first line of the display shows the desired track.
???Press the  button 6.
The playback starts, the browse mode is automatically ended after approx. 10 seconds.
Selecting a track on the device
Selecting tracks/files using the arrow buttons (Normal, info and clock mode)
To move up or down to another track/ file in the current directory,
???press the  or
or  button 6once or several times.
A single press of  button 6restarts the current track, if it previously played for more than 3 seconds.
Selecting tracks in browse mode
Browse mode conveniently allows you to view the tracks contained in a direc- tory and then select a particular track.
???During MP3 playback, repeatedly press the DIS???ESC button 5until ???MP3 BROWSE MODE??? is dis- played.
???Press the  or
or  button 6to display all the tracks contained in the directory one after another.
???If you want to select the track
shown on the upper display line, press the  button 6.
Selecting a directory/track with the remote control
In MP3 mode, you can directly select directories and tracks using the remote control.
Note:
This function is operable only if an external display is connected.
Track selection in the same directory
???Enter the number of the desired
track directly using the numeric buttons 0 to 9 Sof the remote control.
After entering the number, the desired track begins to play.
Or
To move up or down to another track/ file in the current directory,
???press the  or
or  button Ponce or several times.
Selecting a directory
To select a directory with the remote control,
???press the  button 6repeatedly until the selection mark is posi- tioned on the directory symbol.
???Press the ENTER button >.
The directory list is shown on the external display.
???Press the  or
or  button 6to mark the desired directory.
???Press the ENTER button.
The track list of the directory is dis- played.
112

MP3/WMA MODE
???Press the  or
or  button 6to mark a track in the directory.
???Press the ENTER button. The desired track is started.
Selecting a track from the track list
You can display a list of all tracks of a DVD/CD on the external display and select a track from the list.
???Press the PROGRAM button K. The track list is displayed.
???Enter the number of the desired
track directly using the numeric buttons 0 to 9 Sof the remote control.
After entering the number, the desired track begins to play.
Or
To move up or down to another track/ file in the current directory,
???press the  or
or  button 6once or several times to move the se- lection mark to the desired track.
???Press the ENTER button.
The desired track is started.
Fast search
To fast search backwards or forwards,
???press and hold down the  or
or  button 6until fast searching backwards/forwards begins.
Fast searching with the remote control
You can perform a fast searching with different speeds (2x, 4x, 8x, 16x, and 32x) with the remote control.
Note:
The search speed is shown on an external display.
For fast searching forwards
???press the  button @on the remote control repeatedly until the desired speed is shown.
For fast searching backwards
???press the  button @on the remote control repeatedly until the desired speed is shown.
To end the searching,
???press the  button Aon the remote control.
Random track play ??? MIX
To play the tracks in the current direc- tory in random order,
??? briefly press the 1 MIX button 9.
???MIX ON??? and the MIX symbol appear on the display.
Cancelling MIX
To cancel MIX,
???press the 1 MIX button 9repeat- edly until ???MIX OFF??? is displayed.
The MIX symbol disappears.
The Repeat function is automatically activated, and the display shows the RPT symbol.
DEUTSCH ENGLISH FRAN??AIS ITALIANO NEDERLANDS SVENSKA ESPA??OL PORTUGU??S DANSK
113

MP3/WMA MODE
Scanning tracks ??? SCAN
You can scan (briefly play) all the tracks on the CD.
???Press and hold down the MENU???OK button 7for longer than two seconds.
The next track will then be scanned. ???SCAN??? briefly appears on the display.
Notes:
???You can set the scanning time. For further information, please read the section entitled ???Setting the scanning time??? in the ???Radio mode??? chapter.
???The Scan function cannot be acti- vated if it is started at the last title of a directory.
Cancelling SCAN and continuing listening to a track
???Press and hold down the MENU???OK button 7for longer than two seconds.
The currently scanned track will then continue to be played normally.
Repeated playback of individual tracks or entire directories ???
REPEAT
To play the current track repeatedly,
??? briefly press the 4 RPT button 9.
???REPEAT TRACK??? and RPT appear briefly on the display.
To repeat the whole directory,
??? press the 4 RPT button 9again.
???REPEAT DIR??? appears briefly on the display.
Cancelling REPEAT
To stop the current track or current directory from being repeated,
???press the 4 RPT button 9repeat- edly until ???REPEAT OFF??? is dis- played.
RPT disappears from the display.
REPEAT with the remote control
In CD mode, you can select the RE- PEAT mode with the remote control.
Note:
This function is operable only if an external display is connected.
To repeat a track,
???press the PLAY MODE button J repeatedly until ???REPEAT ONE??? is shown on the lowest line of the external display.
To repeatedly play all the tracks of a directory,
???press the PLAY MODE button J repeatedly until ???REPEAT FOLD- ER??? is shown on the lowest line of the external display.
To cancel REPEAT,
???press the PLAY MODE button J repeatedly until ???FOLDER??? is shown on the lowest line of the external display.
Repeated playback of a defined section of a title
You can use the remote control to de- fine a section of a title and repeat it endlessly in a loop.
114

MP3/WMA MODE
Note:
This function is operable only if an external display is connected.
To define the starting point of the sec- tion,
???listen to a title and press the
To define the ending point of the sec- tion,
???continue listening to the title and press the
The section of the title is repeated until you press the
Interrupting playback (PAUSE)
??? Press the 
 button 6 9. ???PAUSE??? appears on the display.
Cancelling pause
???During the pause, press the button 
 6 9.
6 9.
Playback is continued.
You can also interrupt and continue playback using the  button Aon the remote control.
Selecting MP3 info
If you want to select the ???MP3 INFO??? display mode, you first have to activate this function in the menu. In order for the system to be able to display MP3 information, the information must be stored on the CD in the form of ID tags together with the MP3 files.
???Press the MENU???OK button 7.
???Press the  or
or  button 6 repeatedly until ???VARIOUS MENU??? appears on the display.
???Press the MENU???OK button 7.
???Press the  or
or  button 6 repeatedly until ???MP3 INFO??? appears on the display.
???Use the 
 buttons 6to switch between the ???ON??? and ???OFF??? options.
When you have finished making your changes,
???press the MENU???OK button 7 and then the DIS???ESC button 5 to exit the menu.
Displaying scrolling texts (scroll)
The selected information title, track names or file name and directory name are shown once as scrolling text when the title changes.
To display the information again as scrolling text,
??? briefly press the 5 SCL button 9.
Note:
The information is displayed as scrolling text if it contains more than 13 characters in Normal/Info mode, more than 11 characters in Browse mode or more than 8 characters in Clock mode.
DEUTSCH ENGLISH FRAN??AIS ITALIANO NEDERLANDS SVENSKA ESPA??OL PORTUGU??S DANSK
115
CD CHANGER MODE
Note:
Information on handling CDs, in- serting CDs and operating the CD changer can be found in the oper- ating instructions supplied with your CD changer.
Fast searching (audible)
To fast search backwards or forwards,
???hold one of the 
 buttons 6
pressed on the device or the  or
or  button 6of the remote control until the fast searching backwards or forwards starts.
Switching to
???Press SRC ;on the device or the SOURCE button ;on the re- mote control repeatedly until ???CDC??? appears on the display.
The device starts playing the first CD that the CD changer detects.
Selecting CDs
To move up or down to another CD,
???press the  or
or  button 6on the device or the
  or
or  button 6of the remote control once or several times.
Note:
The device will ignore empty CD slots in the changer and slots con- taining invalid CDs.
Selecting tracks
To move up or down to another track on the current CD,
???press the  or
or  button 6on the device or the
  or
or  button 6of the remote control once or several times.
Changing the display
You can choose from various display options in CD mode:
??????NORMAL MODE???: First line: Track number
Second line: CD number/CD name and playing time
??????CLOCK MODE???:
First line: Track number.
Second line: CD number/CD name and clock time
??????MINIMAL MODE???: First line: Track number.
To switch between the display options,
??? press the DIS???ESC button 5.
In the menu you can choose to display the CD name (if available) instead of the CD number. (For further informa- tion, please read the ???Naming CDs??? section):
???Press the MENU???OK button 7.
???Press the  or
or  button 6re- peatedly until ???VARIOUS MENU??? appears on the display.
???Press the MENU???OK button 7.
116

CD CHANGER MODE
???Press the  or
or  button 6 repeatedly until ???CD NAME??? or ???DISC NUMBER??? appears on the display.
???Use the 
 buttons 6to switch between the ???CD NAME??? and ???DISC NUMBER??? options.
When you have finished making your changes,
???press the MENU???OK button 7 and then the DIS???ESC button 5 to exit the menu.
Repeating individual tracks or whole CDs (REPEAT)
To repeat the current track,
??? briefly press the RPT 4 button 9.
???REPEAT TRACK??? appears briefly and RPT lights up on the display.
To repeat the current CD,
??? press the RPT 4 button 9again.
???REPEAT CD??? appears briefly and RPT lights up on the display.
Cancelling REPEAT
To stop the current track or current CD from being repeated,
???repeatedly press button RPT 4 9until ???REPEAT OFF??? appears in the display and RPT disappears.
Random track play (MIX)
To play the tracks on the current CD in random order,
??? briefly press the 1 MIX button 9.
???MIX CD??? appears briefly and MIX lights up on the display.
To play the tracks on all inserted CDs in random order,
??? briefly press the 1 MIX button 9.
???MIX ALL??? appears briefly and MIX lights up on the display.
Cancelling MIX
???Press the 1 MIX button 9repeat- edly until ???MIX OFF??? is displayed.
Scanning all tracks on all CDs (SCAN)
To scan (briefly play) all the tracks on all the inserted CDs in ascending or- der,
???press and hold down the MENU???OK button 7for longer than two seconds.
???SCAN??? and the selected display mode appear alternately on the display.
Note:
You can set the scanning time. For further information, please read the section entitled ???Setting the scanning time??? in the ???Radio mode??? chapter.
DEUTSCH ENGLISH FRAN??AIS ITALIANO NEDERLANDS SVENSKA ESPA??OL PORTUGU??S DANSK
117

CD CHANGER MODE
Stopping SCAN
To stop scanning,
???press and hold down the MENU???OK button 7for longer than two seconds.
The currently scanned track will then continue to be played normally.
Naming CDs
The car sound system allows you to assign names for up to 30 CDs so that you can recognise them more easily. The names can be a maximum of sev- en characters long.
???CD NAME FULL??? will appear on the display if you try assigning more than 30 names.
Entering/editing CD names
???Listen to the CD that you want.
???Press the MENU???OK button 7.
???Press the  or
or  button 6re- peatedly until ???VARIOUS MENU??? appears on the display.
???Press the MENU???OK button 7.
???Press the  or
or  button 6re- peatedly until ???CD NAME EDIT??? appears on the display.
???Press the MENU???OK button 7. You will now enter editing mode.
If your CD does not have a name yet, ???ABCDEFG??? appears on the display. The currently active text input position flashes.
???Use the  /
/  buttons 6to select the character that you want. If you want an empty space, simply se- lect the underscore.
???Use the  or
or  button 6to move from one text input position to an- other.
When you have finished making your changes,
???press the MENU???OK button 7 and then the DIS???ESC button 5 to exit the menu.
Deleting a CD name
???Listen to the CD whose name you want to delete.
???Press the MENU???OK button 7.
???Press the  or
or  button 6re- peatedly until "VARIOUS MENU" appears on the display.
???Press the MENU???OK button 7.
???Press the  or
or  button 6 repeatedly until ???CD NAME EDIT??? appears on the display.
???Press the MENU???OK button 7.
The name of the current CD is dis- played.
???Press and hold down the MENU???OK button 7. After ap- prox. four seconds you will hear a beep and ???DELETE NAME??? ap- pears on the display.
???Release the MENU???OK button 7. The CD name will be deleted.
???You can return to the menu by
pressing the MENU???OK button
7.
118

Deleting all CD names
You can delete all the CD names stored in the car sound system.
???Listen to a CD.
???Press the MENU???OK button 7.
???Press the  or
or  button 6 repeatedly until ???VARIOUS MENU??? appears on the display.
???Press the MENU???OK button 7.
???Press the  or
or  button 6re- peatedly until ???CD NAME EDIT??? appears on the display.
???Press the MENU???OK button 7.
The name of the current CD is displayed.
???Press and hold down the MENU???OK button 7. After ap- prox. four seconds you will hear a beep and ???DELETE NAME??? ap- pears on the display. Continue holding the button pressed down until you hear a second beep and ???DELETE ALL??? appears on the dis- play.
???Release the MENU???OK button 7. The CD names will be deleted.
???To exit the menu, press the MENU???OK button 7and twice
DIS???ESC 5.
CLOCK time
Displaying the time
You can make the clock time appear continuously in the bottom part of the display while any audio source is acti- vated. For further information, please read the ???Configuring the display??? sec- tions in the relevant chapters.
Setting the clock automatically
You can configure the system to set the clock time automatically using the RDS signal.
???Press the MENU???OK button 7.
???Press the  or
or  button 6 repeatedly until ???CLOCK MENU??? appears on the display.
???Press the MENU???OK button 7.
???Press the  or
or  button 6 repeatedly until ???CLOCK AUTO??? or ???CLOCK MANUAL??? appears on the display.
???Select the ???CLOCK AUTO??? setting using the  or
or  button 6.
???Press the MENU???OK button 7. The menu appears again.
Setting the clock manually
To set the clock time manually,
???Press the MENU???OK button 7.
???Press the  or
or  button 6 repeatedly until ???CLOCK MENU??? appears on the display.
???Press the MENU???OK button 7.
DEUTSCH ENGLISH FRAN??AIS ITALIANO NEDERLANDS SVENSKA ESPA??OL PORTUGU??S DANSK
119

???Press the MENU???OK button 7.
???Press the  or
or  button 6 repeatedly until ???24 HOUR MODE??? or ???12 HOUR MODE??? appears on the display.
???Press the  or
or  button 6to switch between the modes.
When you have finished making your changes,
???press the MENU???OK button 7 and then the DIS???ESC button 5 to exit the menu.
120

SOUND
Sound
You can adjust the sound settings (bass and treble) separately for each source (radio, DVD/CD, CD changer, AUX). The volume distribution settings (bal- ance and fader) apply to all the audio sources.
Note:
Instead of the AUD???DEQ button :on the device, you can also use the 3D button :on the remote control.
Adjusting the bass
???Press the AUD???DEQ :button.
???Press the  or
or  button 6to adjust the bass.
???Press the AUD???DEQ :button, to
close the menu or press the  or
or  button 6to make further changes to the settings.
Adjusting the treble
???Press the AUD???DEQ :button.
???Press the  or
or  button 6 repeatedly until ???TREBLE??? appears on the display.
???Press the  or
or  button 6to adjust the treble.
???Press the AUD???DEQ :button, to
close the menu or press the  or
or  button 6to make further changes to the settings.
Setting the left/right volume distribution (balance)
To adjust the left/right volume distribu- tion (balance),
???press the AUD???DEQ :button.
???Press the  or
or  button 6 repeatedly until ???BALANCE??? appears on the display.
???Press the  or
or  button 6to adjust the balance (right/left).
???Press the AUD???DEQ :button, to
close the menu or press the  or
or
 button 6to make further changes to the settings.
Adjusting the front/rear volume distribution (fader)
To adjust the front/rear volume distri- bution (fader),
???press the AUD???DEQ :button.
???Press the  or
or  button 6 repeatedly until ???FADER??? appears on the display.
???Press the  or
or  button 6to adjust the fader (front/rear).
???Press the AUD???DEQ :button, to
close the menu or press the  or
or
 button 6to make further changes to the settings.
DEUTSCH ENGLISH FRAN??AIS ITALIANO NEDERLANDS SVENSKA ESPA??OL PORTUGU??S DANSK
121

The
Adjusting the
The
???LVL 0??? means that no
???Press the AUD???DEQ button :on
the device or 3D :on the remote control.
???BASS??? appears on the display.
???Press the  or
or  button 6repeat- edly until
???Press the MENU???OK button 7or ENTER >on the remote control.
The
???Press the  or
or  button 6to set the frequency that you want.
???Press the  button 6.
The boost level (LVL) flashes.
???Press the  or
or  button 6to set the boost level that you want.
???Press the AUD???DEQ :button.
Equalizer
The device features a digital equalizer DEQ.
This means you have three
You can configure the EQ1 - EQ3 equalizers manually. When doing so you can adjust (boost or reduce) one frequency of an equalizer band as well as the quality factor, i.e. the width of the filter.
The following bands are available:
???HIGH 1 315 - 20,000 Hz
???HIGH 2 315 - 20,000 Hz
???HIGH 3 315 - 20,000 Hz
Switching the equalizer on/off
To switch the equalizer on/off,
???hold the AUD???DEQ button :or
the 3D button :on the remote control pressed for more than two seconds.
The equalizer menu appears on the display.
To activate the equalizer,
???select one of the sound presets or adjust the equalizer manually. For further details on this, please read the sections that follow in this chapter.
122

EQUALIZER
To deactivate the equalizer,
???press the  or
or  button 6repeat- edly until ???EQ OFF??? appears on the display.
???Press the MENU???OK button 7 and then the DIS???ESC 5.
Selecting sound presets
You can select sound presets for the following music types.
???POP
???ROCK
???TECHNO
???JAZZ
???CLASSIC
???SPEECH
The settings for these music styles have already been programmed.
???Hold the AUD???DEQ button :or
the 3D button :on the remote control pressed for more than two seconds.
???Press the  or
or  button 6repeat- edly until ???SOUND PRESETS??? appears on the display.
???Press the MENU???OK button 7or ENTER >on the remote control.
???Press the  or
or  button 6 repeatedly until the sound preset that you want is displayed.
???Press the MENU???OK button 7 and then the DIS???ESC 5.
The settings are saved.
Selecting vehicle presets
You can select optimised equalizer settings for the following vehicle types:
???COMPACT
???4DOOR
???CONVERT
???VAN
???ROADSTER
???MINI
???TRUCK
The settings for these vehicle types have already been programmed.
???Hold the AUD???DEQ button :or
the 3D button :on the remote control pressed for more than two seconds.
???Press the  or
or  button 6repeat- edly until ???CAR PRESETS??? appears on the display.
???Press the MENU???OK button 7or ENTER >on the remote control.
???Press the  or
or  button 6re- peatedly until the vehicle type that you want is displayed.
???Press the MENU???OK button 7and then the DIS???ESC 5.
The settings are saved.
DEUTSCH ENGLISH FRAN??AIS ITALIANO NEDERLANDS SVENSKA ESPA??OL PORTUGU??S DANSK
123

EQUALIZER
Manually adjusting the equalizer
Notes on adjusting the settings
We recommend you use a CD that you are familiar with for making changes to the settings.
Before adjusting the equalizer, set the sound and volume distribution settings to zero and deactivate
???Listen to the CD.
???What kind of impression does the sound make?
???Now read the ???Sound impression??? column in the table entitled ???Help adjusting the equalizer???.
???Set the equalizer values as de- scribed in the ???Measures??? column.
Making adjustments
???Hold the AUD???DEQ button :or
the 3D button :on the remote control pressed for more than two seconds.
???Press the  or
or  button 6 repeatedly until ???MANUAL EQ??? appears on the display.
???Press the MENU???OK button 7or ENTER >on the remote control.
???Press the  or
or  button 6 re- peatedly until the equalizer that you want to configure (???USER EQ1???, ???USER EQ2??? or ???USER EQ3???) appears on the display.
???Press the MENU???OK button 7.
???Press the  or
or  button 6repeat- edly until the equalizer band that you want to configure (???LOW1???, ???LOW2???, ???HIGH1???, ???HIGH2??? or ???HIGH3???) appears on the display.
???Press the MENU???OK button 7.
???Press the  or
or  button 6repeat- edly until the frequency that you want is displayed.
???Press the MENU???OK button 7.
The top line displays the GAIN and the quality factor ???Q???. The gain setting flashes. You can use the quality factor to adjust the width of the filter. The high- er you set the value for the quality fac- tor the more directly the filter will be applied to the selected frequency.
To adjust the gain,
???press the  or
or  button 6. To adjust the quality factor,
???press the  button 6.
The quality factor setting flashes.
???Press the  or
or  button 6 repeatedly until the setting that you want is displayed.
Note:
Please note that you can boost or reduce one frequency in each equalizer band. Proceed in the way described above with all the equalizer bands that you want to adjust.
???Press the MENU???OK button 7
and then repeatedly the DIS???ESC button 5or the AUD???DEQ button ;for longer than two seconds.
The settings are saved.
124

EQUALIZER
Help adjusting the equalizer
DEUTSCH ENGLISH FRAN??AIS ITALIANO NEDERLANDS SVENSKA ESPA??OL PORTUGU??S DANSK
125
DISPLAY
Adjusting the display settings
Adjusting the display brightness
If your car sound system is connected as described in the installation instruc- tions, the display brightness of the in- ternal display switches with the head- lights. You can adjust the display bright- ness separately for night and day in steps ranging from 1 - 16.
Note:
The brightness of a connected display can be set in the DVD setup. For further details, read the section ???DVD setup??? in the ???DVD mode??? chapter.
???Press the MENU???OK button 7.
???Press the  or
or  button 6 repeatedly until ???DISPLAY MENU??? appears on the display.
???Press the MENU???OK button 7.
OR
???Press the DIMMER button on the remote control.
???Press the  or
or  button 6 repeatedly until ???DAY??? or ???NIGHT??? appears on the display with the current setting.
???Press the  or
or  button 6to switch between the brightness levels.
When you have finished making your changes,
???press the MENU???OK button 7 and then the DIS???ESC button 5
to exit the menu or the DIMMER button Gon the remote control.
Adjusting the viewing angle
You can adjust the display???s viewing angle to suit the installation position of the device in your vehicle.
???Press the MENU???OK button 7.
???Press the  or
or  button 6 repeatedly until ???DISPLAY MENU??? appears on the display.
???Press the MENU???OK button 7or the DIMMER button Gon the remote control
???Press the  or
or  button 6 repeatedly until ???ANGLE??? appears on the display with the current setting.
???Press the  or
or  button 6to adjust the viewing angle.
When you have finished making your changes,
???press the MENU???OK button 7 and then the DIS???ESC button 5 or the DIMMER button Gon the remote control to exit the menu.
126

EXTERNAL AUDIO SOURCES
External audio sources
In addition to the CD changer, you can also connect another external audio source equipped with a line output. If no CD changer is connected to the device, you can connect two external audio sources. Audio sources can, for example, be portable CD players, Mi- niDisc players or MP3 players.
The AUX input must be activated in the menu.
An adapter cable is needed to connect an external audio source instead of a CD changer. You can obtain this cable (Blaupunkt no.: 7 607 897 093) from your authorised Blaupunkt dealer.
Information about where to connect an audio source to the AUX2 input can be found in the installation instructions.
Switching the AUX input on/off
???Press the MENU???OK button 7.
???Press the  or
or  button 6 repeatedly until ???AUX MENU??? appears on the display.
???Press the MENU???OK button 7.
???Repeatedly press the  or
or  button 6until ???AUX2??? or ???AUX1??? appears on the display.
If a CD changer is connected, ???AUX1??? is not available.
???Use the 
 buttons 6to switch between the ???ON??? and ???OFF??? options.
When you have finished making your changes,
???press the MENU???OK button 7 and then the DIS???ESC button 5 to exit the menu.
Note:
If the AUX input is switched on, you can select it by pressing the SRC button ;.
DEUTSCH ENGLISH FRAN??AIS ITALIANO NEDERLANDS SVENSKA ESPA??OL PORTUGU??S DANSK
127

The car sound system provides con- nections that allow you to connect ex- ternal amplifiers. You can also connect an amplifier to the device's integrated
Switching the internal amplifier on/off
If you are using external amplifiers, you can switch off the device???s internal amplifier (???INT AMP OFF??? setting).
Note:
Please check this setting if the loudspeakers do not emit any sound.
???Press the MENU???OK button 7.
???Press the  or
or  button 6re- peatedly until "VARIOUS MENU" appears on the display.
???Press the MENU???OK 7, to display the menu.
???Press the  or
or  button 6 repeatedly until ???INT AMP ON??? or ???INT AMP OFF??? appears on the display.
???Use the 
 buttons 6to choose between ???INT AMP ON??? and ???INT AMP OFF???.
When you have finished making your changes,
???press the MENU???OK button 7 and then the DIS???ESC button 5 to exit the menu.
Switching the dual zone on/off
If you connected the RC 13 H remote control (available as optional equip- ment) via an adapter, the rear loud- speakers are switched off. You can lis- ten to the audio playback from the DVD/CD mode via the headphone out- puts of the RC 13 H while the driver listens to a different source via the front loudspeakers.
???Press the MENU???OK button 7.
???Press the  or
or  button 6 repeatedly until ???VARIOUS MENU??? appears on the display.
???Press the MENU???OK 7, to display the menu.
???Press the  or
or  button 6 repeatedly until ???DUAL ZONE ON??? or ???DUAL ZONE OFF??? appears on the display.
???Use the 
 buttons 6to choose between ???DUAL ZONE ON??? and ???DUAL ZONE OFF???.
When you have finished making your changes,
???press the MENU???OK button 7 and then the DIS???ESC button 5 to exit the menu.
128

TMC for dynamic navigation systems
TMC stands for ???Traffic Message Channel???.
Traffic reports are broadcast digitally via TMC, which means they can be used by compatible navigation systems during dynamic route planning. Your car sound system has a TMC output, which you can use for connecting Blaupunkt navigation systems.
You can find out from your Blaupunkt dealer which navigation systems can be used with your car sound system.
If a navigation system is connected and a TMC sender is being received, the display shows TMC.
If dynamic navigation is active, the sys- tem will tune into a TMC station auto- matically.
Specifications
Amplifier
Output power: 4 x 26 watt sine according to
DIN 45 324 at 14.4 V 4 x 50 watt max. power
Tuner
Wavebands in Europe:
FM frequency response:
35 - 16,000 Hz
DVD
Supported formats: DVD??R, DVD??RW, SVCD, VCD, JPEG.
Region code 2
Dolby Digital Coaxial??? output Video output
PAL/NTSC support
DEUTSCH ENGLISH FRAN??AIS ITALIANO NEDERLANDS SVENSKA
CD
Frequency response:
20 - 20,000 Hz
4 channels: 2 V
Input sensitivity
AUX input: 2 V / 6 k???
Tel./Navi input: 10 V / 1 k???
Subject to changes!
ESPA??OL PORTUGU??S DANSK
129
DEUTSCH
ENGLISH
FRAN??AIS
ITALIANO
NEDERLANDS
Bitte den ausgef??llten Ger??tepass sicher aufbewahren!
Please keep the
Pri??re de conserver soigneusement la carte d???autoradio remplie !
Tenete per favore il libretto di apparecchio, debitamente riempito, in un posto sicuro!
Bewaar de ingevulde apparaatpas op een veilige plaats!
329
Blaupunkt GmbH,

(DE) Hinweis zum
Wenn Ihr
M??chten Sie diese
Men?? mit ???PTY off??? aus. Dr??cken Sie zuvor eine der Tasten AUDIO, SRC oder BND.
Bitte lesen Sie dazu auch in der Bedienungsanleitung unter ???Radiobetrieb??? den Absatz
(GB) Note regarding
If your Blaupunkt system switches from your chosen radio programme to another radio programme or from your chosen audio source (CD or CD changer) to a radio programme, please check whether you have activated the PTY (programme type) function.
If you do not want this
Please also read about this in the operating instructions in the section entitled ???Programme type (PTY)??? under ???Radio mode???.
(FR) Remarque concernant la r??ception PTY EON
Quand votre appareil Blaupunkt commute d???une ??mission de radio que vous ??tes en train d?????couter ?? un autre programme radio ou d???une source (CD ou changeur
CD) que vous avez choisie,
Si vous ne souhaitez pas cette commutation PTY EON,
Pour plus d???informations,
(IT) Nota sulla ricezione del
Quando il vostro apparecchio Blaupunkt si sintonizza da un radioprogramma in ascolto ad un altro, oppure si disinserisce dalla fonte audio selezionata (CD o multilettore CD) e passa alla ricezione di un programma radio, controllate per favore se avete inserito la funzione PTY (tipo di programma).
8 622 404 7941

Se volete evitare queste commutazioni
Leggete per favore a tale proposito quanto riportato nelle istruzioni d???uso nella sezione "Esercizio Radio" al punto "Tipo di programma (PTY)".
(NL) Aanwijzing bij de
Wanneer uw
Wanneer u geen prijs stelt op deze
BND.
Lees hiervoor ook in de gebruiksaanwijzing onder "Radioweergave" de alinea "Programmatype (PTY)".
(SW) Information om mottagning med
Byter din Blaupunkt bilstereo sj??lvmant fr??n inst??llt radioprogram eller spelad cd/cd- v??xlare till annat radioprogram? D?? ??r m??jligen funktionen Programtyp
Om Du vill undvika detta, fr??nkopplar Du funktionen Programtyp
"PTY off".
F??r mer information, se avsnittet "Programtyp (PTY)" i bruksanvisningens kapitel "Radio".
(ES) Observaciones sobre la recepci??n
Si su equipo Blaupunkt cambia de la emisora de radio que est?? escuchando a otra, o de la fuente de sonido seleccionada (CD o cambiadiscos) a una emisora de radio, verifique si tiene activada la funci??n PTY (tipo de programa).
Si no desea que el equipo cambie autom??ticamente a emisoras
Para m??s detalles, consulte el punto ???Tipo de programa (PTY)??? en el cap??tulo
???Modo de radio??? de las instrucciones de manejo.
2

(PT) Informa????o sobre a recep????o no modo
Se o seu aparelho mudar de um programa para outro programa ou de uma fonte que est?? a ouvir actualmente (CD ou CDC) para um programa radiof??nico, verifique se a fun????o PTY (tipo de programa) est?? activada.
Se n??o desejar usar a fun????o
???PTY OFF???. Prima anteriormente uma das teclas AUDIO, SRC ou BND.
Para tal, leia tamb??m o par??grafo ???Tipo de programas (PTY)??? no cap??tulo ???R??dio??? nas instru????es de servi??o.
(DK) Oplysning om
Hvis din Blaupunkt radio sl??r fra det aktuelle radioprogram over i et andet eller fra en valgt kilde (CD eller Multi CD) over i et radioprogram, b??r du tjekke om du har t??ndt for PTY (programtype).
Hvis
L??s ogs?? afsnittet om "Programtype (PTY)" under "Radiodrift" i betjeningsvejledningen.
(SF)
Jos
Jos et halua laitteen vaihtavan
Lue my??s k??ytt??ohjeen kohdasta "Radiok??ytt??" kappale "Ohjelmatyyppi (PTY)".
(PL) Wskaz??wki dotycz??ce odbioru
Gdy urz??dzenie prze?????cza si?? z jednej stacji radiowej na inn?? lub z wybranego ??r??d???a audio (CD / zmieniacz CD) na odbi??r programu radiowego, to nale??y sprawdzi??, czy w?????czony program jest programem typu PTY.
Je??eli nie chc?? Pa??stwo korzysta?? z funkcji PTY EON, to prosz?? w odpowiednim menu wybra?? opcj?? ???PTY off???. Przed wybraniem tej opcji trzeba wcisn???? jeden z przycisk??w AUDIO, SRC lub BND.
Dalsze informacje na ten temat znajd?? Pa??stwo w instrukcji obs???ugi w rozdziale ???Tryb obs???ugi radia???, w punkcie ???Typ programu (PTY)???.
3

(CZ) Upozorn??n?? k p?????jmu s funkc??
Pokud se v????? p?????stroj p???epne ze stanice, kterou pr??v?? poslouch??te, na jinou rozhlasovou stanici, nebo ze zvolen??ho zdroje (CD nebo m??ni?? CD) na jin?? rozhlasov?? vys??l??n??, zkontrolujte, jestli nen?? zapnut?? funkce PTY (typ programu).
Pokud si nep???ejete, aby do???lo k p???ep??n??n?? p?????stroje funkc??
Bli??????? informace k tomuto bodu naleznete v n??vodu k obsluze v kapitole ???Re??im r??dia??? v odstavci ???Typ programu (PTY)???.
(HU) Utas??t??s a
Ha az ??n Blaupunkt k??sz??l??ke egy hallgatott r??di??m??sorr??l egy m??sik r??di??m??sorra vagy egy kiv??lasztott forr??sr??l (CD vagy
Ha ??nnek nem megfelel?? ez a
K??rj??k, ezzel kapcsolatban olvassa el a kezel??si ??tmutat?? ???R??di?? ??zemm??d??? fejezet??ben a ???M??sort??pus (PTY)??? c. bekezd??st.
(KR) Napomena uz
Ako Va??? Blaupunkt ure???aj prebacuje sa jednog
Ako ne ??elite ovo
Molimo Vas, o tome pro??itajte i u uputama za upotrebu pod ???Rad radija??? poglavlje ???Tip programa (PTY)???.
(SE) Napomena uz
Ako Va??? Blaupunkt ure???aj prebacuje sa jednog
Ako ne ??elite ovo
Molimo Vas, o tome pro??itajte i u uputstvu za upotrebu pod ???Rad radija??? pasus ???Tip programa (PTY)???.
4
(SK) Pokyny pre pr??jem
Ak V????? pr??stroj Blaupunkt prep??na z po????van??ho r??dioprogramu na in?? r??dioprogram alebo z niektor??ho zvolen??ho zdroja (CD alebo meni??a CD) na in?? r??dioprogram, tak pros??m skontrolujte, ??i ste zapnuli PTY (Program Type).
Ak nechcete toto prep??nanie
Pre????tajte si pros??m k tomu tie?? v n??vode na obsluhu, pod ???R??diov?? prev??dzka??? odsek ???Program Type (PTY)???.
(SL) Navodilo za
Ko se Va???a Blaupunkt naprava preklopi iz slu???nega radijskega programma na drugi radijski program, oziroma iz izbrane zveze (CD ali
??e no??ete preklop
Prosimo, da si preberete v navodilih za uporabo pod ???radijo delovanje??? odstavek
(TR)
E??er Blaupunkt cihaz???n???z dinledi??iniz bir radyo program???ndan ba??ka bir radyo program???na veya se??mi?? oldu??unuz bir kaynaktan (CD veya CD de??i??tirici) bir radyo program???na ge??erse, PTY (program tipi) fonksiyonunu a??m????? olup olmad????????n???z??? l??tfen kontrol ediniz.
E??er bu
L??tfen bu konu ile ilgili olarak, kullanma k???lavuzunda "Radyo modu" b??l??m??ndeki "Program tipi (PTY)" k???sm???n??? okuyunuz.
(GR) ??????????????????? ?????? ???? ??????????
???????? ?? ??????????????? ?????? Blaupunkt ?????????????? ???????? ?????? ???????????????????????? ???????????????????? ??????? ????????????? ???? ?????? ???????? ???????????????????????? ???????????????????? ??? ???????? ?????? ????????????????????? ?????????? (CD ??? ?????????????????????? CD) ???? ?????? ???????????????????????? ????????????????????, ????????? ?????????????? ?????????????????, ?????? ?????????? ???????????????????????????? ???? PTY (???????????? ?????????????????????????).
???????? ??????? ?????????????????????? ???? ?????????? ????????? ?????? ????????????? ???????????????????????
????????????????? ????????????????? ??????? ????????? ?????????????? ???????? ???????????????? ??????????????????? ???????? ???????? ???????????????????????? ???????????????????????? ?????? ??????????????? ??????????????? ????????????????????????? (PTY)???.
5

(RU) ???????????????? ???? ????????????
?????? ???????????????????????? ???????????? ???????????????? Blaupunkt ???? ???????????? ???????????????????????? ?????? ???????????????????????? ?? ?????????????????????? ???? ???????????? ???????????????? ?????????? (?????????????????????????? CD ??????
????????????????????????, ????????????????????, ?? ???????????????????????????????? ???????????????????????? ?? ?????????????????? ?????????????????????????????? ???????????? ???????????? ???????????????? (PTY) ?? ?????????????? "?????????? ????????????????????????" ???????????????????????????????? ???????????????????????? ?? ???????????? ???????????????? Blaupunkt.
6