DR100B ManualENSP 041408.qxp 4/14/2008 2:34 PM Page 16

INFORMACI??N DEL SERVICIO T??CNICO

Todos los Centros de mantenimiento de Black & Decker cuentan con personal capacitado dispuesto a brindar a los clientes un servicio eficiente y confiable en la reparaci??n de herramientas el??ctricas. Si necesita consejo t??cnico, reparaciones o piezas de repuesto originales de f??brica, p??ngase en contacto con el Centro de Servicio de Black & Decker m??s cercano a su domicilio. Para ubicar su centro de mantenimiento local, consulte la secci??n "Herramientas el??ctricas" (Tools-Electric) de las p??ginas amarillas, llame al 1-800-544-6986 o visite www.blackanddecker.com.

GARANT??A COMPLETA DE DOS A??OS PARA USO EN EL HOGAR

Black & Decker (Estados Unidos) Inc. ofrece una garant??a de dos a??os por cualquier defecto del material o de fabricaci??n de este producto. El producto defectuoso se reparar?? o reemplazar?? sin costo alguno de dos maneras.

La primera opci??n, el reemplazo, es devolver el producto al comercio donde se lo adquiri?? (siempre y cuando se trate de un comercio participante). Las devoluciones deben realizarse conforme a la pol??tica de devoluci??n del comercio (generalmente, entre 30 y 90 d??as posteriores a la venta). Le pueden solicitar comprobante de compra. Consulte en el comercio acerca de la pol??tica especial sobre devoluciones una vez excedido el plazo establecido.

La segunda opci??n es llevar o enviar el producto (con flete pago) a un Centro de mantenimiento propio o autorizado de Black & Decker para su reparaci??n o reemplazo seg??n nuestro criterio. Le pueden solicitar comprobante de compra. Encontrar?? una lista de los Centros de mantenimiento autorizados y de propiedad de Black & Decker bajo "Herramientas el??ctricas" (Tools-Electric) en las p??ginas amarillas de la gu??a telef??nica y tambi??n en nuestro sitio Web www.blackanddecker.com.

Esta garant??a no se extiende a los accesorios. Esta garant??a le concede derechos legales espec??ficos; usted puede tener otros derechos que pueden variar seg??n el estado o la provincia. Si tiene alguna pregunta, comun??quese con el Centro de mantenimiento de Black & Decker m??s cercano. Este producto no est?? dise??ado para uso comercial.

REEMPLAZO GRATUITO DE LA ETIQUETA DE PRECAUCIONES: Si las etiquetas de advertencia se tornan ilegibles o faltan, llame al 1-800-544-6986 para que se le reemplacen gratuitamente.

ESPECIFICACIONES

DIGITAL MP3WORKSITE RADIO

INSTRUCTION MANUAL

Catalog Number DR100B

Thank you for choosing Black & Decker! Go to www.BlackandDecker.com/NewOwner to register your new product

BEFORE RETURNING THIS PRODUCT

FOR ANY REASON PLEASE CALL

1-800-544-6986

BEFORE YOU CALL, HAVE THE CATALOG No, AND DATE CODE

AVAILABLE. IN MOST CASES, A BLACK & DECKER REPRESENTATIVE

CAN RESOLVE THE PROBLEM OVER THE PHONE. IF YOU HAVE A

SUGGESTION OR COMMENT, GIVE US A CALL. YOUR FEEDBACK IS

VITAL TO BLACK & DECKER.

SAVE THIS MANUAL FOR FUTURE REFERENCE.

16

DR100B ManualENSP 041408.qxp 4/14/2008 2:34 PM Page 2

SAFETY GUIDELINES / DEFINITIONS

DANGER: Indicates an imminently hazardous situation which, if not avoided, will result in death or serious injury.

WARNING: Indicates a potentially hazardous situation which, if not avoided, could result in death or serious injury.

CAUTION: Indicates a potentially hazardous situation which, if not avoided, may result in minor or moderate injury.

CAUTION: Used without the safety alert symbol indicates potentially hazardous situation which, if not avoided, may result in property damage.

RISK OF UNSAFE OPERATION. When using tools or equipment, basic safety precautions should always be followed to reduce the risk of personal injury. Improper operation, maintenance or modification of tools or equipment could result in serious injury and property damage. There are certain applications for which tools and equipment are designed. Black & Decker strongly recommends that this product NOT be modified and/or used for any application other than for which it was designed. Read and understand all warnings and operating instructions before using any tool or equipment.

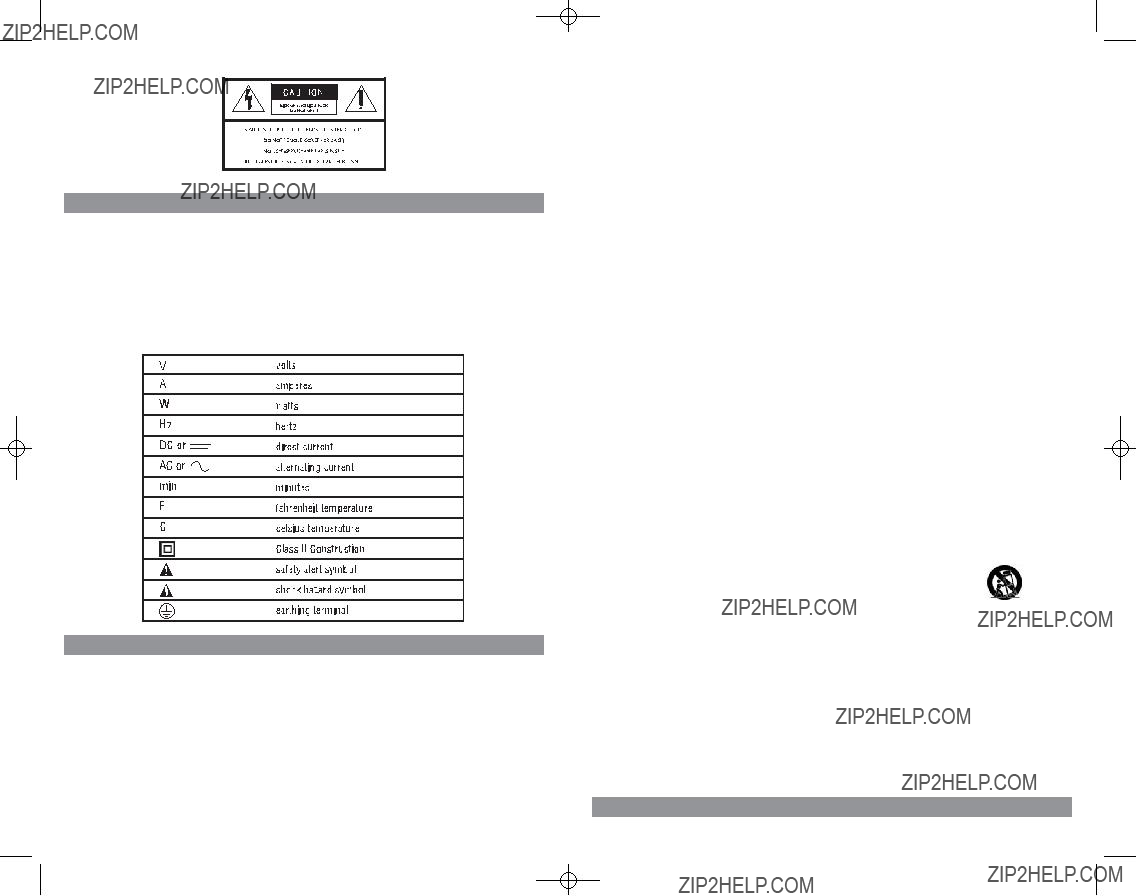
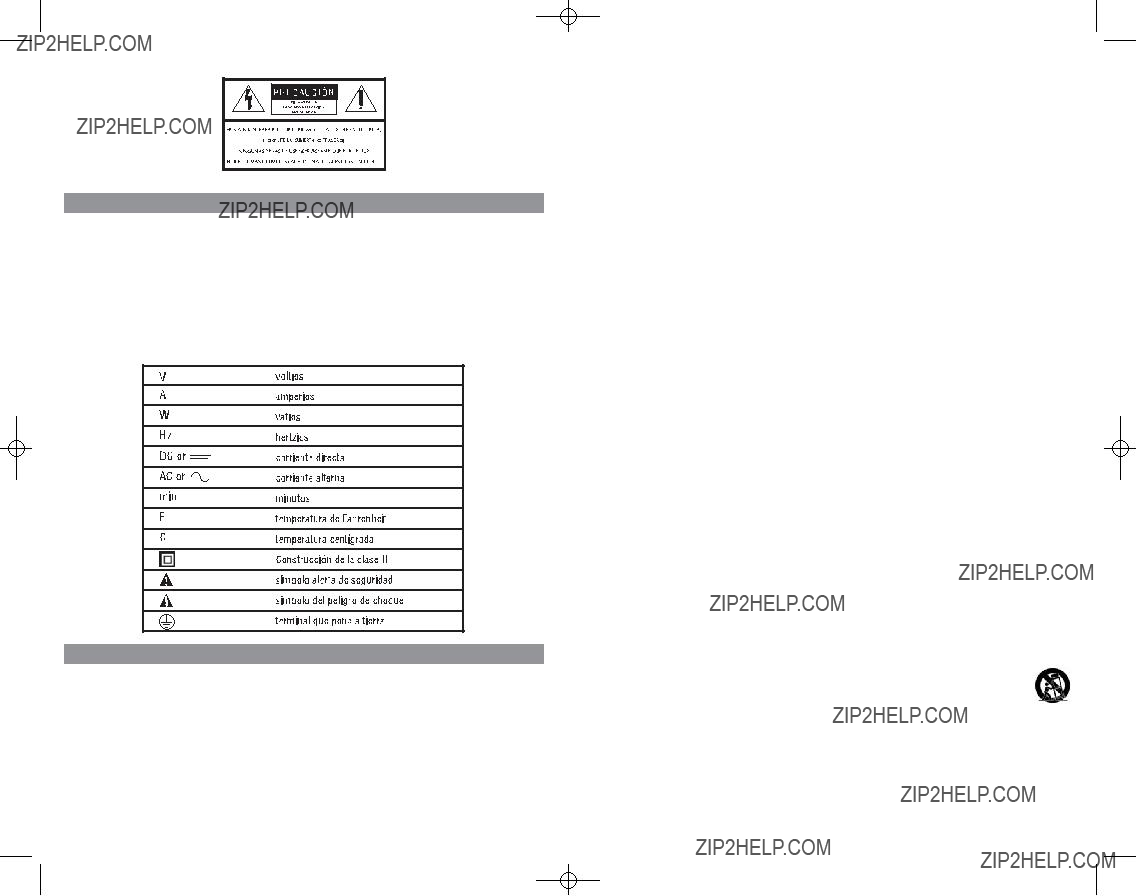
The label on your appliance may contain the following symbols:

IMPORTANT SAFETY INSTRUCTIONS

GENERAL SAFETY WARNINGS AND INSTRUCTIONS FOR ALL APPLIANCES

READ ALL INSTRUCTIONS

WARNING: Read all instructions before operating product. Failure to follow all instructions listed below may result in electric shock, fire and/or serious injury.

???Keep these instructions.

???Heed all warnings.

???Follow all instructions.

???Do not use this apparatus near water.

???Clean only with a dry cloth.

WARNING: This product or its power cord contains lead, a chemical known to the State of California to cause cancer and birth defect or other reproductive harm. Wash hands after handling.

???DO NOT install near any heat sources such as radiators, heat registers, stoves or other apparatus (including amplifiers) that produce heat.

???DO NOT BLOCK ANY VENTILATION OPENINGS. Install in accordance with the manufacturer???s instructions.

2

???STORE IDLE APPLIANCES INDOORS. When not in use, appliances should be stored indoors in dry place.

???USE OF ACCESSORIES AND ATTACHMENTS. The use of any accessory or attachment not recommended for use with this appliance could be hazardous. Note: Refer to the accessory section of this manual for further details.

???DON???T ABUSE CORD:

???Never carry appliance by cord or yank it to disconnect from receptacle. Keep cord from heat, oil, and sharp edges.

???Protect the AC Charging Adapter cord from being walked on or pinched, particularly at plugs, convenience receptacles, and the point where they exit from the appliance.

???DO NOT expose the AC Charging Adaptor to dripping or splashing. DO NOT place objects filled with liquids, such as vases, on the apparatus.

???DISCONNECT APPLIANCE. The AC Charging Adapter should be kept in a readily operable condition. To avoid damage to the unit or Adapter, disconnect the unit from any power supply when not in use, before cleaning, during lightning storms, and changing accessories or when it will be unused for long periods of time. To disconnect the unit from the power supply, the AC

Charging Adapter must be completely disconnected from any AC outlet.

???ELECTRICAL FAULT CIRCUIT INTERRUPTOR protection should be provided on the circuits or outlets to be used. Receptacles are available having built in electrical fault circuit interruptor protection and may be used for this measure of safety.

???OUTDOOR USE EXTENSION CORDS. When appliance is used outdoors, use only extension cords intended for use outdoors and so marked.

???EXTENSION CORDS. Make sure your extension cord is in good condition. When using an extension cord, be sure to use one heavy enough to carry the current your product will draw. An undersized cord will cause a drop in line voltage resulting in loss of power and overheating. The accompanying table shows the correct size to use depending on cord length and nameplate ampere rating. If in doubt, use the next heavier gage. The smaller the gage number, the heavier the cord.

WARNING: SHOCK HAZARD:

???If an extension cord is used, make sure that:

a)the pins of extension cord are the same number, size and shape as those in the Charger/Adapter,

b)the extension cord is properly wired and in good electrical condition,

c)the wire size is large enough for the AC rating of the charger as indicated in the Minimum Gage for Cord Sets Table.

???Do not operate unit with damaged cord or plug; or if the unit has received a sharp blow, been dropped, or otherwise damaged in any way. Do not disassemble the unit; take it to a qualified service technician when service or repair is required. Incorrect reassembly may result in a risk of electric shock or fire, and will void warranty.

???Do not defeat the safety purpose of the polarized or grounding-type plug. A polarized plug has two blades with one wider than the other. A grounding type plug has two blades and a third grounding prong. The wide blade or the third prong are provided for your safety. If the provided plug does not fit into your outlet, consult an electrician for replacement of the obsolete outlet.

CAUTION: TO REDUCE THE RISK OF INJURY OR PROPERTY DAMAGE:

???Use only on a flat, stable surface. When a cart is used, use caution when moving the appliance/cart combination to avoid injury from tip-over.

???Do not disassemble the main body of the unit. There are no user-replaceable parts.

???This unit is weather-resistant, NOT waterproof. Do not submerge in liquids of any kind.

*Manufacturer makes no claims of weather-resistance for MP3/digital music player (not included).

???DO NOT expose to extreme heat or flames.

???DO NOT expose battery to excessive heat such as sunshine, fire or the like.

???Only use attachments/accessories specified by the manufacturer.

???Position charging adapter cord so it does not become entangled or become a safety hazard. Keep cord away from sharp edges.

???Pull cord by plug rather than cord when disconnecting the 120V AC Charging Adapter from the unit.

???Never insert anything other than the supplied Charging Adapter into the unit???s AC Power Adapter Receptacle/Charging Port.

???Refer all servicing to qualified service personnel. Servicing is required when the appliance or adapter cord or plug has been damaged in any way, liquid has been spilled or objects have fallen into the appliance, the appliance has been exposed to rain or moisture, does not operate normally, or has been dropped.

???FIRST AID ??? LCD LIQUID CRYSTAL DISPLAY: If liquid crystal comes in contact with your skin: Wash area off completely with

plenty of water. Remove contaminated clothing. If liquid crystal gets into your eye: Flush the affected eye with clean water and

then seek medical attention. If liquid crystal is swallowed: Flush your mouth thoroughly with water. Drink large quantities of water and induce vomiting. Then seek medical attention.

???The marking information is located on the bottom or back of apparatus. Read this information.

???Read And Understand This Instruction Manual Before Using This Unit.

SAVE THESE INSTRUCTIONS

3

DR100B ManualENSP 041408.qxp 4/14/2008 2:34 PM Page 4

This device complies with part 15 of the FCC rules. Operation is subject to the following two conditions: (1) this device may not cause harmful interference, and (2) this device must accept any interference received, including interference that may cause undesired operation.

This equipment has been tested and found to comply with the limits for a Class B digital device, pursuant to part 15 of the FCC Rules. These limits are designed to provide reasonable protection against harmful interference in a residential installation. This equipment generates, uses and can radiate radio frequency energy and, if not installed and used in accordance with the instructions, may cause harmful interference to radio communications. However, there is no guarantee that interference will not occur in a particular installation. If equipment does cause harmful interference to radio or television reception, which can be determined by turning the equipment off and on, the user is encouraged to try to correct the interference by one or more of the following measures:

???Reorient or relocate the receiving antenna.

???Increase the separation between equipment and receiver.

???Connect the equipment into an outlet on a circuit different from that to which the receiver is connected.

???Consult the dealer or an experienced radio/TV technician for help.

Changes or modifications not approved by the party responsible for compliance could void user???s authority to operate the equipment.

INTRODUCTION

Thank you for choosing the Black & Decker?? Digital MP3 Worksite Radio. Please read this guide carefully before use to ensure optimum performance and avoid damage to the unit or items that you are using it with.

ADAPTER COMPARTMENT DETAIL

LCD DISPLAY DETAIL

FEATURES

???Built-in MP3/Digital Music Player* Compartment

???Digital AM/FM Stereo Tuner

???4" Speaker

???Bass boost

???Built-in Antenna

???120 Volt AC Charging/Power Adapter included

???Rechargeable SLA Battery

???Heavy duty housing, roll bars and durable base stand

???Convenient carry handle

*MP3/digital music player not included.

Controls and Features

ROLL BARS & CARRY HANDLE

MP3 PLAYER COMPARTMENT

LCD DISPLAY

(SEE DETAIL BELOW)

STATION SELECTOR

PUSHBUTTONS

SOURCE

PUSHBUTTON

CHARGING LED

SPEAKER

BUILT-IN ANTENNA

AC POWER ADAPTER

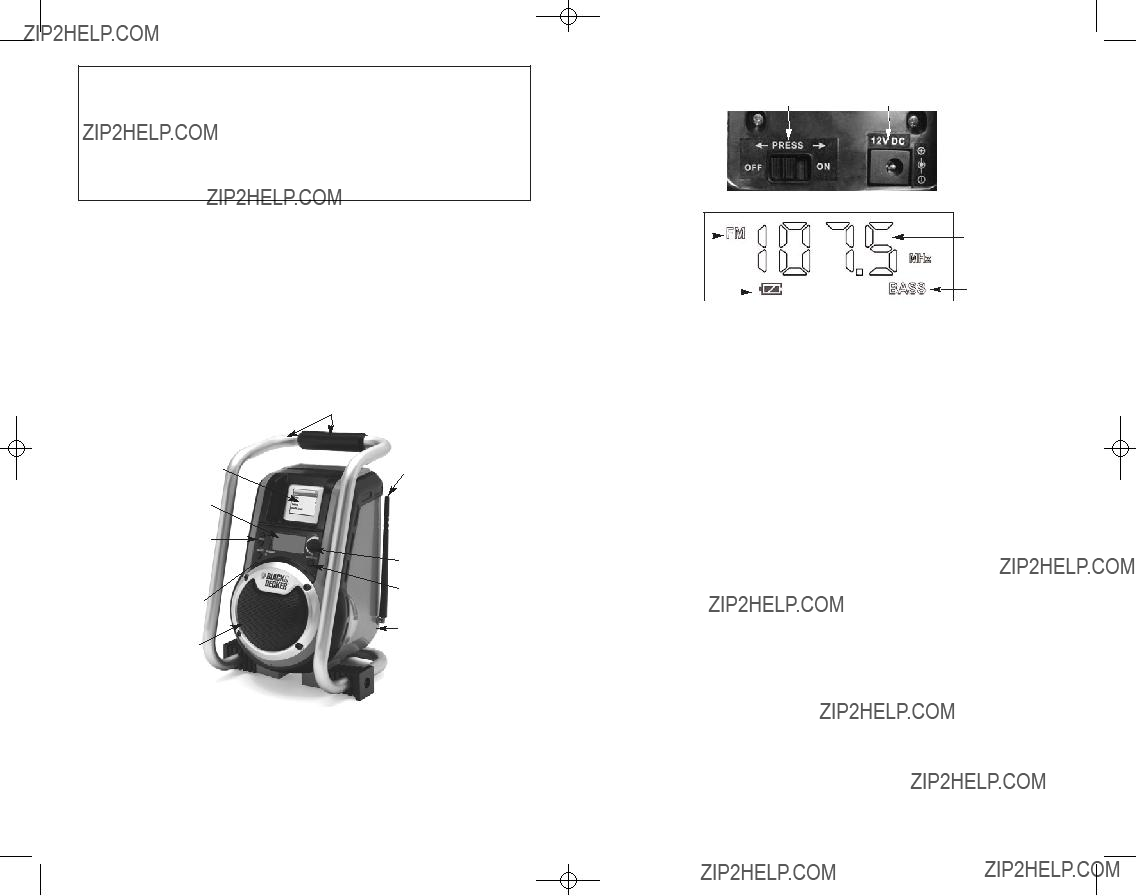
RECEPTACLE & CHARGING PORT

(BACK OF UNIT)

ON/OFF/VOLUME CONTROL DIAL

BASS BOOST PUSHBUTTON

ADAPTER COMPARTMENT

(BACK OF UNIT ??? SEE DETAIL BELOW)

BASE STAND

PREPARING THE UNIT FOR FIRST USE

Activating the Unit

Prior to first use, open the Adapter Compartment located on the back of the unit (refer to the illustrations in the ???Controls and Features??? section) and then slide the Main Power ON/OFF Switch to the ON position. This switch disables all Radio functions and battery charging when this is in the OFF position, protecting the battery from draining.

Note: If the radio will not be used for a long period of time, we recommend first fully charging the unit and then turning the Main Power ON/OFF Switch to the OFF position to extend the life of the rechargeable battery.

Charging the Unit

This unit is delivered in a partially charged state ??? you must fully charge it before using it for the first time before using it in cordless mode. Initial AC charge should be for 24 hours. Follow the directions in the following section.

AC CHARGING/RECHARGING

For maximum battery life, we recommend the unit be kept fully charged at all times. If the battery is allowed to remain in a discharged state, battery life will be shortened.

???FULLY CHARGE THE UNIT USING THE SUPPLIED 120 VOLT AC CHARGER/ADAPTER BEFORE FIRST USE.

???Recharge the unit fully after each use.

???Recharge the unit every two months when it has not been used regularly.

Note: Recharging the battery after each use prolongs battery life; frequent discharges between recharges reduces battery life.

CAUTION: To avoid damage to the unit, surrounding air temperature should ideally be 5-40??C (41-104??F) when charging.

Viewing Battery Charge Status

Battery Status Icon is located on the LCD DIsplay (refer to the illustration above). When the full icon displays, the unit is fully charged. As power is used, the Icon displays partially (with the two bars fading from left to right), similar to the charge bars on a cell phone. The Battery Status Icon flashes when the the unit is charging.

Note: The unit will shut down automatically after the Battery Status Icon shows empty for 5 minutes in cordless mode.

120 Volt AC Charging Using the AC Power/Charger Adapter

1.Connect the AC Power/Charger Adaptor cube to a standard North American 120 volt wall outlet.

2.Connect the other end of the cord to the AC Power Adapter Receptacle/Charging Port (refer to the illustrations in the ???Controls and Features??? section).

a.If the battery icon is empty before charging, the right bar will flash first. As the battery charges, the right bar will display solid and the left bar will flash. When the battery is fully charged, both bars will display solid.

b.If the right bar was solid before charging (indicating that the battery is partially charged), the left bar will flash. When the battery is fully charged, both bars will display solid.

3.Once fully charged, disconnect the AC Power/Charger Adapter.

WARNING: To reduce the risk of fire or electric shock, do not expose the AC Power/Charger Adapter to rain or moisture.

POWERING THE UNIT

Corded Use

1.Connect the supplied AC Power/Charger Adaptor cube to a standard North American 120 volt wall outlet.

2.Connect the other end of the cord to the AC Power Adapter Receptacle/Charging Port (refer to the illustrations in the ???Controls and Features??? section). The Charging LED will light, indicating that the unit is powered/charging.

4

5

DR100B ManualENSP 041408.qxp 4/14/2008 2:34 PM Page 6

Note: When the unit is powered using this method, it will also be in ???recharge mode??? as long as it is connected to an AC wall outlet, so there is no drain on the built-in battery and it will remain charged.

WARNING: To reduce the risk of fire or electric shock, do not use this radio outdoors in corded mode. The AC Power/Charger Adapter is NOT weather-resistant.

Cordless Use

This unit has a built-in SLA rechargeable battery for cordless use.

Note: If audio is weak or sound drops out, it is an indication that the battery may need recharging. Refer to the ???AC Charging/Recharging??? section for directions.

USING THE RADIO

Refer to the ???Controls and Indicators??? section to locate referenced buttons and controls.

1.Turn the ON/OFF/Volume Control Dial clockwise to turn the power ON. The LCD Display will illuminate. Adjust volume by turning dial to desired level.

Note: The LCD Display backlight will turn OFF after 10 seconds if no additional buttons are pressed.

2.Press the Source Pushutton to cycle through AM, FM and AUX. Select the desired band (AM or FM). Rotate the antenna upward if the radio is tuned to an FM station.

Notes: Reception will vary depending on location and strength of radio signal.

If reception is poor: For FM stations, rotate the built-in antenna in all directions until reception improves. For AM stations, try rotating the radio itself.

AM reception may be clearer when the unit is used in Cordless mode.

3.Press either the ??? or ??? Station Selector Pushbutton to tune in the desired station. The receiver will automatically ???lock??? onto channels with strong enough signals. The station frequency will show on the LCD Display.

4.Turn the ON/OFF/Volume Control Dial clockwise to adjust the volume.

Bass Boost

???Press the Bass Boost Pushbutton while the unit is turned ON to activate the Bass Boost function.

???Press again to cancel this function. When this function is activated, the Bass Boost icon on the LCD Display will illuminate.

USING THE MP3/DIGITAL MUSIC PLAYER COMPARTMENT/CABLE PLUG

Refer to the ???Controls and Indicators??? section to locate referenced buttons and controls.

The DR100B comes with an MP3/Digital Music Player Compartment and Cable Plug. To play music from an MP3 or digital music player:

1.Turn the ON/OFF/Volume Control Dial clockwise to turn the power ON. The LCD Display will illuminate. Adjust volume by turning dial to desired level.

Note: The LCD Display backlight will turn OFF after 10 seconds if no additional buttons are pressed.

2.Press the Source Pushutton to cycle through AM, FM and AUX. Select AUX.

3.Open the MP3/Digital Music Player Compartment cover door.

4.Connect one plug of the cable located inside the door to the MP3 player to the jack inside the compartment. Connect the other jack plug to the MP3 player. Refer to the following illustrations.

5.The device can be used in two different ways:

???Stored inside the compartment with the door open or closed, or

???Seated on a table or hard surface with the door open.

TROUBLESHOOTING

General

Auxiliary input

Radio

CARE AND MAINTENANCE

This product has a sealed lead acid battery that should be kept fully charged. Charge before first use, immediately after each use, and once every two months if not used regularly. Failure to do this may reduce the battery life dramatically.

Battery Replacement/Disposal

It is recommended that the unit be returned to a Black & Decker Service Center. Contact Customer Service, toll-free, at 1-800-618-5178 to locate the Service Center near to you.

Battery Disposal

Contains a maintenance-free, sealed, non-spillable, lead acid battery, which must be disposed of properly. Recycling is required ??? contact your local authority for information. Failure to comply with local, state and federal regulations can result in fines or imprisonment. For more information on recycling or imprisonment. For more information on recycling this battery, call toll-free 1-800-822-8837.

WARNINGS

Do not dispose of this unit in fire as batteries inside this product may explode or leak. Do not expose the unit containing a battery to fire or intense heat as it may explode.

Before disposing of the battery, protect exposed terminals with heavy-duty electrical tape to prevent shorting (shorting can result in injury or fire).

ACCESSORIES

Recommended accessories for use with your appliance are available from your local dealer or authorized service center. If you need assistance regarding accessories, please call: 1-800-544-6986.

WARNING: The use of any accessory not recommended for use with this appliance could be hazardous.

SERVICE INFORMATION

All Black & Decker Service Centers are staffed with trained personnel to provide customers with efficient and reliable power tool and appliance service. Whether you need technical advice, repair, or genuine factory replacement parts, contact the Black & Decker location nearest you. To find your local service location, refer to the yellow page directory under "Tools???Electric" or call:

1-800-544-6986 or visit www.blackanddecker.com.

CAUTION: TO AVOID DAMAGING THE UNIT:

If the cord, wires, or cables become damaged, return the entire unit to manufacturer immediately for service/repair.

DR100B ManualENSP 041408.qxp 4/14/2008 2:34 PM Page 8

FULL TWO-YEAR HOME USE WARRANTY

Black & Decker (U.S.) Inc. warrants this product for two years against any defects in material or workmanship. The defective product will be replaced or repaired at no charge in either of two ways.

The first, which will result in exchanges only, is to return the product to the retailer from whom it was purchased (provided that the store is a participating retailer). Returns should be made within the time period of the retailer???s policy for exchanges (usually 30 to 90 days after the sale). Proof of purchase may be required. Please check with the retailer for their specific return policy regarding returns that are beyond the time set for exchanges.

The second option is to take or send the product (prepaid) to a Black & Decker owned or authorized Service Center for repair or replacement at our option. Proof of purchase may be required. Black & Decker owned and authorized Service Centers are listed under "Tools-Electric" in the yellow pages of the phone directory and on our website www.blackanddecker.com.

This warranty does not apply to accessories. This warranty gives you specific legal rights and you may have other rights which vary from state to state or province to province. Should you have any questions, contact the manager of your nearest Black & Decker Service Center. This product is not intended for commercial use.

FREE WARNING LABEL REPLACEMENT: If your warning labels become illegible or are missing, call 1-800-544-6986 for a free replacement.

SPECIFICATIONS

RADIO DIGITAL CON MP3

MANUAL DE INSTRUCCIONES

N??mero de cat??logo DR100B

??Gracias por elegir Black & Decker! Vaya a www.BlackandDecker.com/NewOwner

para registrar su nuevo producto.

ANTES DE DEVOLVER ESTE PRODUCTO POR CUALQUIER

MOTIVO, LLAME AL

1-800-544-6986

ANTES DE LLAMAR, TENGA A MANO EL N.?? DE CAT??LOGO Y EL C??DIGO

DE LA FECHA. EN LA MAYOR??A DE LOS CASOS, UN REPRESENTANTE DE

BLACK & DECKER PODR?? SOLUCIONAR SU PROBLEMA POR TEL??FONO.

SI DESEA REALIZAR UNA SUGERENCIA O COMENTARIO, LL??MENOS, SU

OPINI??N ES FUNDAMENTAL PARA BLACK & DECKER.

DR100B ManualENSP 041408.qxp 4/14/2008 2:34 PM Page 10

NORMAS DE SEGURIDAD/DEFINICIONES

PELIGRO: Indica una situaci??n de peligro inminente que, si no se evita, provocar?? la muerte o lesiones graves.

ADVERTENCIA: Indica una situaci??n de peligro potencial que, si no se evita, podr??a provocar la muerte o lesiones graves.

PRECAUCI??N: Indica una situaci??n de peligro potencial que, si no se evita, puede provocar lesiones leves o moderadas.

PRECAUCI??N: Utilizado sin el s??mbolo de alerta de seguridad indica una situaci??n de peligro potencial que, si no se evita, puede provocar da??os en la propiedad.

RIESGO DE OPERACI??N INSEGURA. Cuando se utilizan herramientas o equipos, siempre se deben respetar las precauciones de seguridad para reducir el riesgo de lesiones personales. La operaci??n, la modificaci??n o el mantenimiento incorrectos de herramientas o equipos pueden provocar lesiones graves y da??os a la propiedad. Las herramientas y los equipos est??n dise??ados para determinados usos. Black & Decker recomienda enf??ticamente que NO se modifique este producto y que NO se utilice para ning??n otro uso que aqu??l para el que fue dise??ado. Lea y comprenda todas las instrucciones operativas y las advertencias antes de utilizar cualquier herramienta o equipo.

La etiqueta en su aplicaci??n puede contener los s??mbolos siguientes:

INSTRUCCIONES IMPORTANTES SOBRE SEGURIDAD

INSTRUCCIONES Y ADVERTENCIAS DE SEGURIDAD GENERALES PARA TODOS LOS ARTEFACTOS

LEA TODAS LAS INSTRUCCIONES

ADVERTENCIA: Lea todas las instrucciones antes de hacer funcionar el producto. El incumplimiento de todas las instrucciones enumeradas a continuaci??n puede provocar una descarga el??ctrica, un incendio o lgraves.

???Conserve estas instrucciones.

???Preste atenci??n a todas las advertencias.

???Siga todas las instrucciones.

???Para reducir el riesgo de incendio o descarga el??ctrica, no exponga este aparato a la lluvia o la humedad. No utilice este aparato cerca del agua.

???Limpie solamente con un pa??o seco.

WARNING: This product or its power cord contains lead, a chemical known to the State of California to cause cancer and birth defect or other reproductive harm. Wash hands after handling.

???NO INSTALE cerca de ninguna fuentes de calor tales como radiadores, registros del calor, estufas u otros aparatos (amplificadores incluyendo) ese calor del producto.

10

???NO BLOQUEE NINGUNA ABERTURAS DE LA VENTILACI??N. Instale de acuerdo con las instrucciones del fabricante. ???GUARDE LOS ARTEFACTOS QUE NO UTILICE EN EL INTERIOR. Cuando no los utilice, los artefactos deben guardarse bajo

techo, en un lugar seco, alto o bajo llave

???USO DE SUPLEMENTOS Y ACCESORIOS. El uso de accesorios o dispositivos no recomendados para utilizar con este aparato puede resultar peligroso.

???NO TIRE DEL CABLE:

???Nunca transporte el aparato por el cable ni lo jale para desconectarlo del tomacorriente.

???Mantenga el cable alejado del calor, el aceite y los bordes afilados. Proteja el cable el??ctrico contra ser caminado encendido o sejeci??n, particularmente en de los enchufes, de los recept??culos de la conveniencia, y del punto donde salen de la aplicaci??n.

???NO exponga el adaptador de carga de la CA al goteo o a salpicar. NO ponga los objetos llenados de los l??quidos, tales como floreros, en el aparato.

???DESCONECTE LOS APARATOS. El adaptador de carga de la CA se debe mantener condiciones f??cilmente operables. Para evitar da??o a la unidad o al adaptador, desconecte la unidad de cualquier fuente de alimentaci??n cuando no en uso, antes de limpiar, durante tormentas del rel??mpago, y los accesorios que cambian o cuando ser?? inusitada por per??odos del tiempo largos. Para desconectar la unidad de la fuente de alimentaci??n, el adaptador de carga de la CA se debe desconectar totalmente de cualquier enchufe de la CA.

???La protecci??n del INTERRUPTOR del CIRCUITO de la AVER??A EL??CTRICA se debe proporcionar en los circuitos o los enchufes que se utilizar??n. Los recept??culos est??n disponibles que construyen en la protecci??n del interruptor del circuito de la aver??a el??ctrica y se pueden utilizar para esta medida de seguridad.

???EN ESPACIOS ABIERTOS, USE CABLES PROLONGADORES. Cuando utiliza la herramienta al aire libre, utilice solamente cables prolongadores dise??ados para su uso al aire libre o marcados como tales.

???CABLES PROLONGADORES. Aseg??rese de que el cable prolongador est?? en buenas condiciones. Cuando utilice un cable prolongador, cerci??rese de que tenga la capacidad para conducir la corriente que su producto exige. Un cable de menor capacidad provocar?? una disminuci??n en el voltaje de la l??nea, lo cual producir?? una p??rdida de potencia y sobrecalentamiento. La siguiente tabla muestra la medida correcta que debe utilizar seg??n la longitud del cable y la capacidad nominal en amperios indicada en la placa. En caso de duda, utilice el calibre inmediatamente superior. Cuanto menor es el n??mero de calibre, m??s grueso es el cable.

ADVERTENCIA: RIESGO DE DESCARGA EL??CTRICA:

???Si es necesario utilizar un cable prolongador, aseg??rese de que:

a)las patas del cable prolongador sean del mismo n??mero, el mismo tama??o y la misma forma que las del cargador/adaptador,

b)el cable prolongador posea los conductores correctos y est?? en buenas condiciones el??ctricas,

c)la medida del conductor sea suficientemente grande para la capacidad nominal en amperios como se indic?? en la Tabla de calibre m??nimo para juegos de cables de la secci??n "Advertencias e instrucciones de seguridad generales".

???No opere la unidad con un cable o enchufe da??ados, o si ??sta ha recibido un golpe fuerte, se cay?? o presenta alg??n da??o. No desarme la unidad; ll??vela a un t??cnico de servicio calificado cuando se requiera mantenimiento o una reparaci??n. Volver a armarla de manera incorrecta podr??a provocar un riesgo de descarga el??ctrica o un incendio, y anular?? la garant??a.

???No anule la funci??n de seguridad del enchufe polarizado o a tierra. Un enchufe polarizado posee dos hojas, de las cuales una es m??s amplia que la otra. Un enchufe a tierra posee dos hojas y una tercera prolongaci??n a tierra. La hoja amplia o la tercera prolongaci??n se proporcionan para su seguridad. Si el enchufe provisto no se adapta a su tomacorriente, consulte a un electricista para que reemplace el tomacorriente.

PRECAUCI??N: PARA REDUCIR EL RIESGO DE LESIONES O DA??O A LA PROPIEDAD:
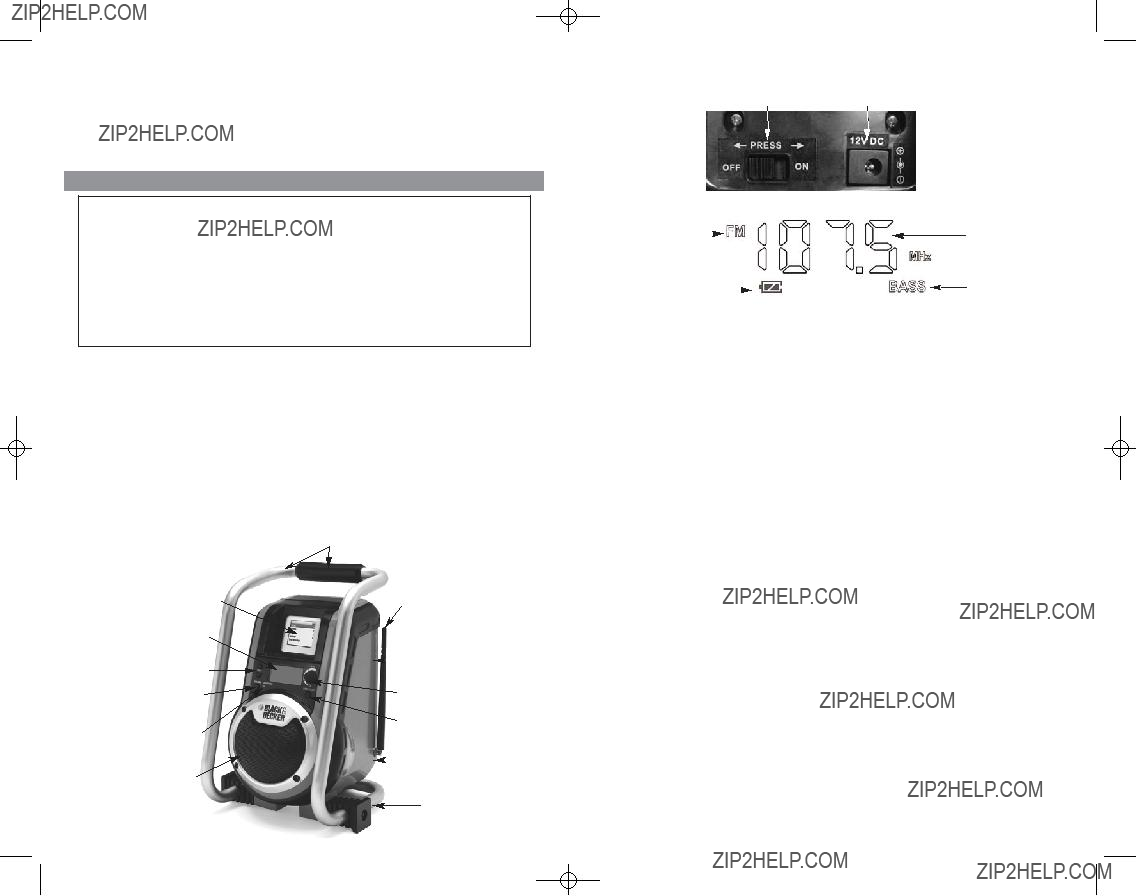
???Utilice solamente en una superficie plana, estable. Cuando se utiliza un carro, tenga cuidado al mover la combinaci??n de appliance/cart para evitar lesi??n de inclinar-sobre.

???No desmonte el cuerpo principal de la unidad. No hay piezas usuario-reemplazables.

???Esta unidad es resistir-resistente, no impermeable. No se sumerja en l??quidos de la clase.

*El fabricante no hace ninguna demanda de resistencia al tiempo para el jugador de la m??sica de MP3/digital (no incluido).

???NO lo exponga al calor extremo o a las llamas.

???No exponga la bater??a al calor excesivo tal como sol, fuego o similares.

???Utilice solamente attachments/accessories especificado por el fabricante.

???Coloque la cuerda de carga del adaptador as?? que no se enreda ni se convierte en un peligro de seguridad. Cuerda de la subsistencia lejos de los bordes agudos.

???Tire de la cuerda por el enchufe m??s bien que de la cuerda al desconectar el adaptador de carga de la CA 120V de la unidad.

???Nunca inserte cualquier cosa con excepci??n del adaptador de carga provisto en el recept??culo del adaptador de la corriente alterna/el puerto de carga de la unidad.

11

DR100B ManualENSP 041408.qxp 4/14/2008 2:35 PM Page 12

??? Refiera todos que mantienen al personal de servicio cualificado. Se requiere se ha derramado el mantenimiento cuando la aplicaci??n o la cuerda o el enchufe del adaptador se ha da??ado de cualquier manera, l??quido o los objetos han ca??do en la aplicaci??n, la aplicaci??n se ha expuesto a la lluvia o a la humedad, no funciona normalmente, ni se ha ca??do.

???PRIMEROS AUXILIOS ??? PANTALLA DE CRISTAL L??QUIDO (LCD): Si el cristal l??quido entra en contacto con la piel, lave el ??rea por completo con mucha agua. Retire la ropa contaminada. Si el cristal l??quido entra en contacto con los ojos, enjuague el ojo afectado con agua limpia y luego busque atenci??n m??dica. Si ingiere cristal l??quido, enjuague la boca cuidadosamente con agua. Beba abundante cantidad de agua e induzca el v??mito. A continuaci??n, busque asistencia m??dica de inmediato.

???La informaci??n de la marca se encuentra en el fondo o la parte posteriora del aparato. Lea esta informaci??n.

???Lea y comprenda este manual de instrucciones antes de utilizar esta unidad.

CONSERVE ESTA INSTRUCCIONES

Este dispositivo cumple con la parte 15 de las normas de la Comisi??n Federal de Comunicaciones de Estados Unidos (FCC). La operaci??n est?? sujeta a las dos condiciones siguientes: (1) este dispositivo no puede causar interferencia perjudicial y (2) este mecanismo debe aceptar cualquier interferencia recibida, incluida la interferencia que puede provocar una operaci??n no deseada.

Este equipo ha sido probado y se encontr?? que cumple con los l??mites para dispositivo digital Clase B, seg??n la parte 15 de las normas de la FCC. Estos l??mites est??n dise??ados para brindar protecci??n razonable contra interferencia perjudicial en una instalaci??n residencial. Este equipo genera, usa y puede irradiar energ??a en frecuencia de radio y, si no se instala y se usa de acuerdo con las instrucciones, puede provocar interferencia perjudicial en las comunicaciones de radio. Sin embargo, no hay garant??a de que la interferencia no ocurra en una instalaci??n en particular. Si el equipo provoca interferencia perjudicial en la recepci??n de radio o televisi??n, lo que se puede determinar al apagar y encender el equipo, el usuario debe tratar de corregir la interferencia mediante una o m??s de las siguientes medidas:

???Cambiar la orientaci??n o la ubicaci??n de la antena de recepci??n.

???Aumentar la separaci??n entre el equipo y el receptor.

???Conectar el equipo a un tomacorriente sobre un circuito diferente de aquel al que est?? conectado el receptor.

???Consultar al vendedor o pedir la ayuda de un t??cnico en radio y televisi??n con experiencia.

Los cambios o las modificaciones no aprobados por el partido responsable de conformidad pod??an anular la autoridad del usuario para funcionar el equipo.

INTRODUCCI??N

Gracias por elegir la Radio Digital con MP3 de Black & Decker??. Por favor lea esta gu??a cuidadosamente antes de usar la unidad para asegurarse el rendimiento ??ptimo de la misma y evitar da??os a la unidad o a los art??culos con los cuales la est?? usando.

CARACTER??STICAS

???Compartimiento incorporado del jugador de la m??sica de MP3 y de Digital*

???Sintonizador digital est??reo AM/FM

???Altavoce de 101.6 mm (4")

???Alza Baja

???Antena incorporada

???Incluye adaptador de carga/alimentaci??n de 120 voltios de CA con compartimiento para almacenamiento del cable incorporado

???Bater??a SLA recargable

???Cubierta resistente, barras del rodillo y soporte bajo durable

???Conveniente lleve la manija

*MP3 y jugador digital de la m??sica no incluidos.

Controles e caracter??sticas

PREPARACI??N DE LA UNIDAD PARA EL PRIMER USO

Activaci??n de la unidad

Antes del primer uso, abra el compartimiento del adaptador ubicado en la parte posterior de la unidad (consulte las ilustraciones de la secci??n "Controles y caracter??sticas"), luego deslice el interruptor de ENCENDIDO/APAGADO (ON/OFF) hacia la posici??n de ENCENDIDO (ON). Este interruptor inhabilita todas las funciones y bater??a de radio que cargan cuando ??ste est?? en la posici??n de reposo, protegiendo la bater??a contra el drenaje.

Nota: Si la radio no es utilizada por un per??odo del tiempo largo, recomendamos primero completamente el cargar de la unidad y despu??s el dar vuelta del interruptor CON./DESC. de la alimentaci??n principal a la posici??n de reposo para ampliar la vida de la bater??a recargable.

Carga de la unidad

Esta unidad se entrega parcialmente cargada, usted debe cargarla completamente antes de usarla por primera vez y antes de utilizarla en modo inal??mbrico. La carga inicial de CA debe ser de 24 horas. Siga las indicaciones en la siguiente secci??n.

CARGA/RECARGA DE CA

Para una duraci??n m??xima de la bater??a, recomendamos que la unidad se mantenga completamente cargada en todo momento. Si se permite que la bater??a permanezca descargada, se acortar?? su duraci??n.

???CARGUE COMPLETAMENTE LA UNIDAD CON EL CARGADOR/ADAPTADOR DE 120 V DE CA PROVISTO ANTES DEL PRIMER USO.

???Vuelva a cargar la unidad completamente despu??s de cada uso.

???Vuelva a cargar la unidad cada dos meses si no se ha utilizado regularmente.

Nota: Recargar la bater??a despu??s de cada uso prolonga la duraci??n de la bater??a; las descargas frecuentes entre las recargas reducen la duraci??n de la bater??a.

PRECAUCI??N: Evitar da??o a la unidad, temperatura del aire circundante debe idealmente ser 5-40??C (41-104??F) al cargar.

Visualizaci??n del estado de carga de la bater??a

El icono de estado de la bater??a se encuentra en la pantalla LCD (refiera a la ilustraci??n arriba). Cuando aparece el icono completo, la unidad est?? completamente cargada. A medida que se consume la energ??a, el icono aparece en forma parcial (con las dos barras descolor??ndose de izquierda a derecha), como las barras de carga de un tel??fono celular. El icono del estado de la bater??a destella cuando el unidad est?? cargando.

Nota: La unidad cerrar?? autom??ticamente despu??s de que el icono del estado de la bater??a demuestre vac??o por 5 minutos en modo sin cuerda.

Carga de 120 voltios de CA con el cargador/adaptador de CA

1.Conecte el cubo del cargador/adaptador de CA a un tomacorriente de pared est??ndar de los Estados Unidos de 120 voltios.

2.Conecte el otro extremo de la cuerda con el recept??culo del adaptador de la CA/puerto de carga (refiera a las ilustraciones en la secci??n de los "controles y de las caracter??sticas").

a.Si el icono de la bater??a es vac??o antes de cargar, la barra derecha destellar?? primero. Pues la bater??a carga, la barra derecha exhibir?? el s??lido y la barra izquierda destellar??. Cuando la bater??a se carga completamente, ambas barras exhibir??n el s??lido.

b.Si la barra derecha era s??lida antes de cargar (que indica que la bater??a est?? cargada parcialmente), la barra izquierda destellar??. Cuando la bater??a se carga completamente, ambas barras exhibir??n el s??lido.

3.Una vez que la unidad est?? completamente cargada, desconecte el cubo del cargador/adaptador de CA.

ADVERTENCIA: Para reducir el riesgo del fuego o de la descarga el??ctrica, no exponga el adaptador de la adaptador de la CA y el puerto de carga a la lluvia o a la humedad.

DR100B ManualENSP 041408.qxp 4/14/2008 2:35 PM Page 14

ACCIONAMIENTO DE LA UNIDAD

Uso con cable

1.Conecte el cubo provisto del adaptador de la CA y del cargador con un norteamericano est??ndar enchufe de pared de 120 voltios.

2.Conecte el otro extremo de la cuerda con el recept??culo del adaptador de la CA y el puerto de carga (refiera a las ilustraciones en la secci??n de los "controles y de las caracter??sticas"). El LED de carga se encender??, indicando que la unidad

es powered/charging.

Nota: Cuando la unidad se acciona a trav??s de este m??todo, tambi??n se encontrar?? en "modo de recarga" mientras est?? conectada a un tomacorriente de pared de CA, de manera que la bater??a incorporada no se agote y la unidad permanezca cargada.

ADVERTENCIA: Para reducir el riesgo del fuego o de la descarga el??ctrica, no utilice esta radio al aire libre en modo corded. El adaptador de la CA y el puerto de carga no es tiempo resistente.

Uso inal??mbrico

Esta unidad tiene una bater??a recargable incorporada de SLA para el uso sin cuerda.

Nota: Si el audio es d??bil o sano cae hacia fuera, es una indicaci??n que la bater??a puede necesitar recargar. Refiera a la secci??n de la "Carga/Recarga de CA" para las direcciones.

USO DE LA RADIO

Refiera a la secci??n de los "controles y de los indicadores" para localizar los botones referidos y los controles.

1.Para encender el aparato, gire la perilla de control de encendido/apagado y volumen en el sentido de las agujas del reloj. La pantalla LCD se iluminar??. Para ajustar el volumen, gire la perilla hasta el nivel deseado.

Nota: El contraluz de la exhibici??n del LCD se apagar?? despu??s de 10 segundos, si no se presionan otros botones.

2.Presione el Bot??n de la fuente para pasar de AM, FM y AUX y as?? elegir la banda deseada. Seleccione la venda deseada (AM o FM). Rote la antena hacia arriba si la radio se templa a una estaci??n de FM.

Notas: La recepci??n variar?? seg??n la ubicaci??n y la fuerza de la se??al de radio.

Si la recepci??n es pobre: Para las estaciones de FM, rote la antena incorporada en todas las direcciones hasta que la recepci??n mejora. Para las estaciones de AM, intento que rota la radio s?? mismo.

La recepci??n de las estaciones de AM puede estar m??s clara cuando la unidad se utiliza en modo sin cuerda.

3.Presione los botones de sintonizaci??n ??? o ??? para sintonizar la estaci??n deseada. La frecuencia de la estaci??n se mostrar?? en la pantalla LCD.

4.Para ajustar el volumen, gire la perilla de control de encendido/apagado y volumen en el sentido de las agujas del reloj.

Amplificaci??n de bajos

???Presione el bot??n de amplificaci??n de bajos (Bass Boost) con la unidad encendida para activar la funci??n Bass Boost (bajos).

???Para cancelar esta funci??n, presione el bot??n nuevamente. Cuando esta funci??n est?? activada, el ??cono Bass Boost en la pantalla LCD se iluminar??.

USO DEL ENCHUFE DE CABLE/COMPARTIMIENTO PARA REPRODUCTOR

DE M??SICA DIGITAL/MP3

Refiera a la secci??n de los "controles y de los indicadores" para localizar los botones referidos y los controles.

El DR100B viene con un compartimiento para reproductor digital/MP3 y un enchufe de cable. Para jugar m??sica de un MP3 o de un jugador digital de la m??sica:

1.Para encender el aparato, gire la perilla de control de encendido/apagado y volumen en el sentido de las agujas del reloj. La pantalla LCD se iluminar??. Para ajustar el volumen, gire la perilla hasta el nivel deseado.

Nota: El contraluz de la exhibici??n del LCD se apagar?? despu??s de 10 segundos, si no se presionan otros botones.

2.Presione el Bot??n de la fuente para pasar de AM, FM y AUX y as?? elegir la banda deseada. Seleccione AUX.

3.Abra la puerta de la cubierta del compartimiento para reproductor digital/MP3.

4.Conecte un enchufe del cable situado dentro de la puerta con el jugador MP3 al gato dentro del compartimiento. Conecte el otro enchufe del gato con el jugador MP3. Refiera a las ilustraciones siguientes.

5.El dispositivo se puede utilizar de dos formas diferentes:

???Guardado en el compartimiento de espuma con la puerta abierta o cerrada, o

???Apoyado en una mesa o una superficie dura con la puerta abierta.

DETECCI??N DE PROBLEMAS

General

Entrada auxiliar

Radio

CUIDADO Y MANTENIMIENTO

Este producto tiene una bater??a de plomo-??cido sellada que se debe mantener completamente cargada. C??rguela antes del primer uso, inmediatamente despu??s de cada uso y cada dos meses si no se utiliza en forma regular. Si esto no se cumple la duraci??n de la bater??a se reduce de manera muy importante.

Reemplazo/Eliminaci??n de la bater??a

Se recomienda que la unidad est?? vuelta a un negro y a un centro de servicio de Decker. Entre en contacto con el servicio de cliente, gratis, en 1-800-618-5178 para localizar el centro de servicio cerca a usted.

Eliminaci??n de la bater??a

Contiene una bater??a de plomo-??cido sellada, que no derrama y no requiere mantenimiento, la que debe ser eliminada de la manera correcta. Se requiere reciclado: comun??quese con su autoridad local para obtener informaci??n. El incumplimiento de las reglamentaciones locales, estatales y federales pueden provocar multas o penas de prisi??n. Para obtener m??s informaci??n sobre c??mo reciclar esta bater??a, llame a la l??nea gratuita 1-800-822-8837.

ADVERTENCIAS

No disponga de esta unidad en fuego como las bater??as dentro de este producto pueden estallar o escaparse. No exponga la unidad que contiene una bater??a al fuego o al calor intenso como puede estallar.

Antes de eliminar la bater??a, proteja los terminales expuestos con cinta aislante para trabajo pesado para evitar cortocircuitos (un cortocircuito puede producir lesiones o incendio).

ACCESORIOS

Los accesorios que se recomiendan para la herramienta est??n disponibles en su distribuidor local o en el centro de mantenimiento autorizado. Si necesita asistencia en relaci??n con los accesorios, llame al: 1-800-544-6986.

ADVERTENCIA: El uso de accesorios no recomendados para utilizar con esta herramienta puede resultar peligroso.