Operating Instructions
Model FPE1087
8??? LCD TV/DVD Player
For assistance, please call:
Operating Instructions
Model FPE1087
8??? LCD TV/DVD Player
For assistance, please call:
Thankyou...
...forchoosingthistabletDVDplayer.Foryourownsafetyandinorder tolearnallaboutthefunctionsavailable,pleasereadthismanualand keepitforfuturereference.
Note:
An LCD panel and/or video monitor may be installed in a motor vehicle andvisibletothedriveriftheLCDpanelorvideomonitorisusedfor vehicleinformation,systemcontrol,rearorsideobservationor navigation.IftheLCDpanelorvideomonitorisusedfortelevision reception, video or DVD play, the LCD panel or video monitor must be installedsothatthesefeatureswillonlyfunctionwhenthevehicleisin ???park???orwhenthevehicle???sparkingbrakeisapplied.
AnLCDpanelorvideomonitorusedfortelevisionreception,videoor DVDplaythatoperates whenthevehicleisingearorwhenthe parkingbrakeisnotappliedmustbeinstalledtotherearofthedriver???s seatwhereitwillnotbevisible,directlyorindirectly,totheoperatorof themotorvehicle.
Note:
Thisproductincorporatescopyrightprotectiontechnologythatisprotectedby methodclaimsofcertainU.S.patentsandotherintellectualpropertyrights ownedbyMacrovisionCorporationandotherrightsowners.Useofthis copyrightprotectiontechnologymustbeauthorizedbyMacrovisionCorporation ,andisintendedforhomeandotherlimitedviewingusesonlyunlessotherwise authorizedbyMacrovisionCorporation.Reverseengineeringordisassemblyis prohibited.
2
3
A. Cautions and Warnings
Alloperationandmaintenanceinstructionsmustbefollowedandwarningsadhered
to.
???Donotexposetheunittoexcessivemoisture.
???Donotplaceobjectsfilledwithliquids,suchasvases,ontheunit.
???Donotusetheunitwheretherearetemperatureextremes(below41??F,5??Cor exceeding95??F,35??C).
???Adjustthevolumetopreventdamagetospeakers.
???Suddenchangesintheambienttemperaturemaycausecondensationtoformon theopticallensinsidetheunit.Ifthishappens,removethedisc,andallowabout 2hourstopassandthenproceedwithnormaloperation.
???Toensureproperventilationandproperoperation,nevercoverorblockthe slotsandopeningswithaclothorothermaterial.
???Keeptheunitawayfromstrongmagnets,heatingsources,sunlight,and excessivedust.
???Neverallowobjectsofanykindorliquidstobepushed/spilledintotheunit
openingsastheymaycomeintocontactwithdangerousvoltages.
???Unplugtheunitfromthewalloutletbeforecleaning.Donotuseliquidor aerosol cleaners.
???Do not use accessoriesnot recommended in this manual as they may be hazardous.
???Powercordsshouldberoutedsothattheyarenotlikelytobewalkedonor pinchedbyitemsplaceduponoragainstthem.Payparticularattentiontoplugs andthepointfromwhichthecordexitstheunit.
???Donotattempttoservicethisproductyourselfasopeningorremoving coversmayexposeyoutodangerousvoltagepointsorotherhazards.Referall servicingtoqualifiedservicepersonnel.
4
???Whenreplacementpartsarerequired,besuretheservicetechnicianhasused replacementpartsthatarespecified.Unauthorisedsubstitutionsmayresultin fire,electricshockorotherhazards.
???Uponcompletionofanyserviceorrepairstotheunit,asktheservicetechni- ciantoperformoperationalcheckstodeterminethattheproductisoperating correctly.
Handling the LCD panel
DonotpresshardorjolttheLCDpanel.ItmaycausetheLCDpanelglasstobreak andinjurymayoccur.
IftheLCDpanelisbroken,donottouchliquidinthepanel.
Also,iftheliquidgetsinyoureyesortouchesyourskin,consultwithyourdoctor afterrinsingforatleast15minutesorlongerwithcleanwater.
1.1 x 8??? LCD Monitor & DVD Player
2.1 x RCA AV Cable
3.1 x AC To DC Adapter
4.1xVehicleDCPowerAdapter
5.1xRemoteControl
6.1xBase
5

B. About This Manual
The operations described mainly refers to the use of the remote control.
Buttonswithsameorsimilarmarkingonthemainunithavethesamefunctionas thoseontheremotecontrol.
Ifthesymbol 
 occursonthescreenduringoperation,thefunctionrequestedis notsupportedbythemediatypeinsertedintheDVDplayer. Theunitwillplay thefollowing:
Pleasebeawareofthefollowing:
???Thisinstructionmanualexplainsthebasicinstructionofthisunit.
???SomeDVDdiscshavedifferentfunctionsthatmaynotbeexplainedinthis
instructionmanual.Youmayneedextrainstructions.Inthiscase,pleasefollow
the instructionsdisplayed on the screen or jacket or case of the disc.
??? The disc information takes priority in various settings.
6

??? In this manual, the language in the
change the language, please follow the selected language in the
???The screen shown as an example in this manual may be different from the actual screen.
???
Note:Thetypesoffunctionsandoperationsthatcanbeusedforaparticular discvarydependingonthefeaturesofthatdisc.Insomecases,thesefunctions andoperationsmaydifferfromthedescriptionsgiveninthisOwner???sManual. Inthisevent,followtheinstructionsgivenonthescreenandonthesleeveofthe disc.
Region Management Information
PleasenotethattheprogramofaDVDmaybedividedintoseveral???titles???(e.g. mainmovie,bonusmaterial,interviewsetc.).Eachofthesetitlescanbedivided into???chapters???.TheprogramofaudioCD???sisdividedinto???tracks???.
3 Multiplelanguages
16: 9 LB
2
Closedcaption
7

C. Desktop Base Installation
Screw Hole
Unit Base
1.PlacethetabletDVDplayerbaseonflatsurface. 2.Alignthethumbscrewwiththeholeonthebackof theDVDplayer. 3.Threadthethumbscrewintotheholeonthebackof theDVDplayerandturn thethumbscrewclockwisetotightenthebasetotheDVDplayer. 4.WhileholdingtheDVDplayerand thebase,adjusttheunit???sswivelanglefora comfortableviewingposition.
8

D. Mount the unit on the wall
Theunitcanbeeasilybemountedonthewall.YouwillneedanoptionalVESA75 Wall Mount Bracket. The VESA75 Wall Mount Bracket can be purchased at mostlocalelectronicretailers. Therearoftheunitcontainsfourscrewholes (Refertofigurebelow).TheVESA75WallMountBracketisattachedtotheback of the unit with four screws (M4x6 or M4x8). Follow the instructions supplied with the VESA75 Wall Mount Bracket to complete the installation.
9

E.PriortoOperation
PlaceinPosition
 Forsettinguptheunitpleasechoosealocationwithsufficientaircirculation
topreventoverheating.
 Theproductmustbepositionedhorizontallyonly.
 Donotplaceheavyobjectsonitshousing.
 Toprotectthelaserunitavoiddustysurroundings.Ifnecessary,pleaseusea
cleaningdisccarefullyfollowingitsoperatinginstructions.
Moisture Condensation
Insomecaseswatermaycondenseonthelaserlenscausinga malfunction:
 The unit was suddenly brought from a cold to a warm surrounding.
=>Pleasetakeoutthediscandwaitforaboutanhour,
untiltheunithaswarmedup.
 Theunitwasoperatedinaveryhumidsurrounding.
=>Pleasechoosealocationwithlowerhumidity.
Handling Disc???s
 Inordertokeepthediscclean,nevertouchthe shinysurface.
 Neverplaceastickeroradhesivelabelonthedisc.
 Don???texposediscstodirectsunlightorotherheatsources.
 Pleasestorethediscsonlyintheirsleeves.
10
Cleaning a Disc
Tocleanadiscuseasoftclothwithoutanycleaningagents.
Only wipe from the center hole towards
theouteredge,neverintowardthecenter.
Using the Remote Control Handset
1.
Iftheremotecontrolshouldbegintooperate unreliablyreplacethebatterywithanewbatteryof thesametype.Toreplacethebatteryopenthebattery compartment.Pushtheretentionclipinthedirectionof arrowandpulloutthebatterymounting.
2.Beforeyouremovethebattery,rememberthebattery position.The???+???markingmustfaceupwards,otherwise theremotecontrolwill notworkandmaybedamaged. Replacethecover.
3.Pleasepointtheremotecontroltowardsthemainunitwhenoperatingthebut- tons. Obstaclesbetweentheremotecontrolandinfraredsensorwilladversely affectoperationoftheremotecontrol.
 Batteries should disposed in an environmentally correct manner. Never
throwbatteriesintofire.
 Iftheremotecontrolisnottobeusedforanextendedperiodoftime,please remove the battery from the compartment to prevent damage by battery leakage.
 Whenreplacingthebattery,pleaseobservethepolarity. The???+???mustface
upwards.
11

F. The Remote Control
12

G. DVD Player
USB
17
13

H. Power Supplies
a. Using AC adaptor
ConnectthesuppliedACadaptor.
INPUT: AC 100 ~ 240V, 50/60Hz, 0.4A
Use with other AC adaptors may damage the unit.
???DonottouchtheACadaptor withwethands.Doingsoisdangerous,asthis couldresultinanelectric shock.
???Donotusewithavoltageotherthanthevoltagedisplayed.Impropervoltage could causefire,electricalshock,ordamage.
Caution on the cigarette lighter adaptor:
???Use only the supplied DC power adaptor. Using other DC power adaptors coulddamagetheunit.
???Afteruse,disconnectthecigarettelighteradaptorplugsfromboththisunitand thevehiclepowersocket.
???TheDCpoweradaptormaycauseinterferencewithreceptionfromthecar radiooranotherradioinsidethevehicle.Ifthisisthecase,disconnectthe
DCpoweradaptorfromthevehiclepowersocket,orusetheradiolocatedata furtherdistancefromthevehiclepowersocket.
Trafficsafety:
???Donotusewhileoperatingamotorizedvehicle.Itmaycreateatraffichazard
andisillegalinmanyareas.
14

After connecting the unit to power,press ???POWER??? button, and the logo picturewillappearonthescreenandtheLEDpowerindicatorlocatedonlower leftfrontoftheunitwillbelight.
I.Connections
Althoughthisunithasitsownscreen,youcanconnectittoanexternal televisionsetaswell.
1. Playing a Video Game
1)SlidetheAVin/outswitch 


 tothe???In???position.


 2) PlugtheAV outputfromyour
game system into the Audio L+ R andvideoinputjackontheleftsideof theunitwithcorrespondingcolor:
(Audio Left= White, Audio Right= Red,Video=yellow). 3)Press ???DVD/TV/AV??? until the word ???AV???
appearsonthetopright;Adjustthevolume controlandthebrightnesscontrolon thetop oftheunittoyourindividualpreference.
AV
2.ConnectingtoaTVoranothermonitor
You can also connect the DVD


 player to a TV or monitor to


 e
e njoy high quality stereo.
???SlidetheAVin/outswitchtothe???Out???position
???Inserteachcablefirmlyintoitsdesignatedjack.
15

1)ConnectthesuppliedAV (RCA)cablesintotheAudioL+R
andvideojackontheleftsideoftheunitfollowing the corresponding colors: (AudioLeft= White, Audio Right= Red, Video=yellow). 2)ConnectthesuppliedAVcablesontheotherendtoyourTV. Matchthecable bycolorcode.
J.ReceivingTVPrograms
1.ConnecttheExteralantennatotheCableAntenna Connectorontheleftsideoftheunit.
2.Press???TV/AV/DVD???untiltheword???TV??? appearsonthetopright. 2.Press???AUTO???,theunitwillsearchTVchannels
automatically.
3.PressDTV/ATVbuttontoselectthemodewhatyouwant. 4.Press???AUTO???inremotecontrolor???Program???ontheunit,theunitwillsearchTV channelsautomatically.
5.Afterthechannelsaresearched,youcanuseCH or
or tochoosethechannelyoulike.
Note: a.Thepictureandaudioarenotvisiblewhensearchingchannels.
b.Ifyoudon???tlikeachannel,press???SKIPSEARCH???. Thechannelwillnotappear when youpress???CH or
or ???.
???.
K. Reading SD (Secure Digital) and MMC (Multimedia)Card/MS
Note:
Themaximumcardsizeis2GB.
1.Press???TV/AV/DVD???untiltheword???DVD???appearsonthetopright. 2.InserttheSDcard(withthelabelsidefacedtoyou)intotheSDslotontheleft
sideoftheunitandtheunitwillreaditautomatically.
16

L. Playing DVDs
DVD Playback
1.Press???TV/AV/DVD???untiltheword???DVD???appearsonthetoprightofthescreen.; 2.Insertthediskintherightsideoftheunitwithlabel 


 facingtoyou.Thenthediskwillbepulledintotheunit
  andplaywillbeginautomatically.


DVDdiscswillusuallyshowamenutochoosefrom.Usethenavigationbuttons 

 ontheremotecontrol.
HighlightthedesiredmenuitemandpresstheENTERbuttontoactivateit.This startstheplaybackoftheselecteditem.
To stop playback press the STOP button once. The screenshows???PressPlaykeytocontinue???. Theplayerwill recallthelocationwhereplaybackwasstopped.
PressthePLAYbuttontoresumeplaybackthere.Butif
PO WER DISPL AY DVD/ TV/ AV EJECT
AUDIO
R EPEAT
SUBT ITLE
youpresstheSTOPbuttonagaintheunitwillstop andnotrecallthelastpositionofplayback.
The???resumeplay???isnotsupportedbyalldiscs.
NOTE
Ifthissymbolappearsonthescreenduringoperation,thefunction
requestedisnotsupportedbythemediatypeinserted.
PICTURE ADJUSTMENT
Picture: Cyclethrough pictureadjustments Brightness,Contrast,Tint,Color,Sharpness andRecall.
Vol+: Increasepictureadjustment
NOTE: ButtonlocatedonRemoteandtopofunit
17

M. Menu
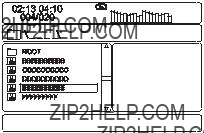
A DVD is divided into sections called titles and chapters. When you play a DVD, a root menu of the disc will appear on the screen of your TV or Monitor. The contents of the menu vary from disc to disc. Press MENU during playback to display the menu. Some DVDs only allow you to select disc playback options using the DVD root menu.
N.Display
1.PLAYING TIME AND REMAINING TIME
During playback press the ???DISPLAY??? button to display the following: 
Title, Chapter Number, and Time Screen Display
TitleElapsed:Theelapsedtimeofthetitle
TitleRemain:Theremainingtimeof thetitle
ChapterElapsed:Theelapsedtimeofthechapter
Chapter Remain: The remaining time of the chapter
Display Off: TheDVD???stimeInformationwillnotbedisplayed.
 Title Elapsed
  Title Remain
 Chapter Elapsed
18

2. SUBTITLE
Duringdiscplaybackpress???SUBTITLE???toselectthesubtitlelanguageyoude- sire*, with the current SubtitleLanguage Number (1) and the total Number of SubtitleLanguages(2)displayed.If there aremultiplelanguagespress???SUB- TITLE???againtoselectanothersubtitlelanguage.ToturnsubtitlesOFF,pressthe ???SUBTITLE???buttonuntil???SubtitleOff???isdisplayed.TheSubtitledisplaywill disappearautomaticallyifthe???SUBTITLE???buttonisnotpressedagainwithin3 seconds.
SubtitleScreenDisplay
*Some DVDs only allow access to this function through the DVD menu
3.AUDIO
Duringplaybackpress???AUDIO???toselecttheaudiolanguageyoudesire*,withthe current Audio Channel Number (1) and the total number of Audio Channels (2) displayed.PressAUDIOagaintoselectanotheraudiolanguage.Theaudiodisplay willdisappearautomaticallyifthe???AUDIO???buttonisnot pressedwithinfor3 seconds.
AudioLanguageScreenDisplay
* Some DVDs only allow access to this function through the DVD menu.
19

4. REPEAT
During playback each time ??? REPEAT??? is pressed, the following modes will be- comeavailable.
The???Chapter???repeatdisplayshowsbelowforexample:
Chapter Repeat Screen Display
O. Playing Audio CDs
When playing an audio CD press the DISPLAY button repeatedly on the remote toviewtimeinformation.Theoptionsbelowappearonscreendisplaycircularly toshowyouwhatinformationisavailableusingthisfunction.
 Single Elapsed
 Single Remain
 Total Elapsed
Display Off  Total Remain
CD Display Mode
SingleElapsed:Thecurrent trackplayingandplayingtimeof that trackwilldisplayonthescreen.
SingleRemain: Thecurrent trackplayingandtheamountoftime left.
20
TotalElapsed: Thecurrent trackplayingandthetotaltimethatthe CDhasbeenplaying.
TotalRemain: Thecurrenttrackplayingand theamountoftime
remainingontheCD.
DisplayOff: TheCDtimeInformationwillnotbedisplayed.
Take???SingleElapsed???displayasaexample:
SingleElapsedScreenDisplay
USING THE REPEAT FEATURE
The default mode for the Repeat feature is OFF. Pressing 1/ALL REPEAT con- secutively changestherepeatoptions:
???
???
???Off
Asyoutogglethroughtheoptions,therepeatoptionchanges. Theselectedrepeat optionloopsrepeatedlyuntilyouturnitoff.
21
P. Playing MP3 Discs
MP3 MENU Screen Display
WhenanMP3discisinsertedintotheunit,themenuscreenappearsautomatically.
Youcanusethemenuscreentoselectyourdesiredfoldersandsongsorthesystem
playsthesongsintheordertheywereburnedontothedisc.
1.Pressthe or
or buttontochooseafolderfromthefolderlistontheleftsideof thescreen.
2.PressENTERtoselectthehighlightedfolder. Thesongsavailableunderthe folderwillbelisted.
3.Use or
or buttontochooseasongfromthelist.PressENTERtoselectand beginplaybackofthehighlightedsong.
22

4.Usethe

 (NEXT)buttontomovetothenextsong.Pressthe
 (PREVIOUS)buttontomovetothebeginningoftheprevious
song.
USING THE REPEAT FEATURE
ThedefaultmodefortheRepeatfeatureisOFF.PressingREPEATconsecutively changestherepeatoptions:
???RepeatOne(repeatplaybackofasong)
???RepeatFolder(repeatplaybackofaspecificfolder)
???RepeatOff(normalplayback)
Asyoutogglethroughtheoptions,therepeatmodechanges.Theselectedrepeat modeloopsrepeatedlyuntilyouturnitoff.
NOTICE
 ??? ??? iconinfrontofafilenameindicatesthatthisisafolder,notan MP3file.
???MP3???iconinfrontofafilenameindicatesthatthisisanMP3file.
Note:
Duetothecompany???spolicyofconstantimprovementandtechnicalrefinement, thecompanyreservestherighttochangeoraltersoftware.
23

Q. Setup DVD
1. General Setup Page
1)Withnodiscinsidetheplayer,press???SETUP???todisplaytheMainscreenof theSetupMenu.The???GeneralSetupPage???willalsoappear.Atthesametime, ???GeneralSetup???ishighlighted.Press???SETUP???againtoexittheSetupMenu.
2)PresstheENTERbutton,???TVDisplay???ishighlighted.
5)Pressthe or
or button to select the sub menu and press the ENTER to confirmyourselection.
6)
a)TV Display
*Normal/PS: When the player outputs signal to a normal TV, a normal pictureisshownonthefullscreen.
*Normal/LB: When the player outputs signal to a normal TV, a normal pictureisshownonthescreenwithablackstripatboth thetopand bottomofthescreen.
*Wide:WhentheplayeroutputssignaltoawidescreenTV,a widepicture isshownonthefullscreen.
b)Angle Mark
*On: The screen will show the angle mark icon. (*If an angle option is available).
*Off: The screen will not display the Angle Mark
NOTE:Notalldiscscontain abovefeatures.Theabovefeaturesare disc
dependent.
24

c) Screen Saver
*On:Enablesscreensaver
*NOTE: The DVD player will enter the Screen Saver mode after approxi-
matelyfiveminutesifthesameimageremainson thescreen.*Off:Disables screensaver(off)
d) Last Memory
*On: Theunitwillreturntothelastpositiononthedisc.
*Off: Theunitwillnotreturntothelastpositiononthedisc.
2. Password
In Setup menu, Press the or button to select ???Password Setup Page???and ishighlighted.PressENTERtoenterthepasswordpage.
Press ENTER twice to enter the Password Change Page. Input the Old Pass- word or the Default Password, the New Password, and Confirmed the New Password. Press ENTER to confirm the change.
Note: The default password is 3308.
25

4.PreferencePage
 ishighlighted.PressENTERtoenterthepreferencepage.
2)PresstheENTERbutton,???Audio???ishighlighted.
3)Pressthe or
or buttontoselecttheothermenusinpreferencepage.
5)Pressthe or
or button to select the sub menu and press the ENTER to confirmyourselection.
6)
a)Audio
b)Subtitle
c)Disc Menu
Note:Languageandsubtitleselectionisonlyavailablefordiscsthatarerecorded in theabovelistedlanguages. Iftheselectedlanguageisnotavailable,theplayer willplayanddisplayonthescreentheoriginalrecordedlanguagecontainedin thedisc.
outfunctionormultipleratinglevels.Thesearelistedfromthelowestlevel(1Kid Safe)tothehighestlevel(8Adult).PressENTERandinput4digitpassword,then pressENTERagaintoconfirmtheparentallevelsetting.
NOTE:Thelevelof8Adultisthefactorydefault.
e)Default
Select???Default???usingthe and
and button,thenpress toenterthesubmenu.
PressENTERtomakethesettingreturntothefactorysetmode.
NOTE:Theparentalsettingisnotaffectedbythedefaultresetfunction.
NOTE: The Default Password is 3308. This password is always effective even afteryouhaveselectedyourownpassword andchangedit.To avoid the possi- bilityofothersusingthedefaultpasswordtosettheparentallevel andchangethe password,youcan recordthis defaultpasswordinanotherarea anddeleteitfrom thismanual.Somediscscanbelimited dependingontheageofuserswhilesome discscannot.
26

R.Setup TV
Power on the TV and press the menu button to display the setup menu.
Themenuwillautomaticallydisappearafterbeinginactivefortenseconds.Press menubuttontoexitsetupmenu.
Screen Format
Using Up/Down button to select the Screen Format item and press
Enter button to select Auto mode and 16:9 mode
Time
Using the Up/Down button to select the Time item and press Enter
toaccessTimemenu.
MENU
Timezone:PressenterbuttonselectfromHawaii,Atlantic,
Eastern,Central,Mountain,Pacific,Alaska.
Sleep:Pressenterbuttontochoosethe10minutes,20minutes,
30minutes,60minutes,120minutesandoffselction.
Forexample:Whenyouselectthe10minutes,theTVwillautomatically
poweroffafter10minutes.
Note:Pressleftbuttononce toreturntothesetupmenu,twice toexitsetupmenu.
27

Closed Caption
Using the Up/Down button to select the Closed Caption item and press
EntertoaccessClosedCaption.
Caption: You can select the Caption ON/OFF/ON MUTE for the TV
Program.
MENU
Note:TheCaptionFunctionishelpfulforthosepeoplewithhearingdifficulties.
Mode: Displays the menu in an analog or digital manner.
MENU
28
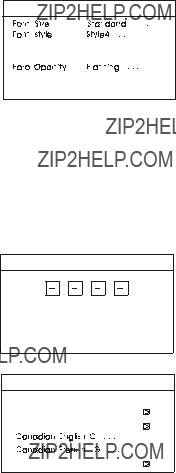
Options:Optioninclulde(fontsize,fontstyle,forecolor,back color,foreopacity,backopacity).Press theUp/Down buttontoselect theoption,then pressEnterbutton toaccesstheoption.
MENU
Note:Press  buttononcetoreturntothesetupmenu,twice toexitsetupmenu.
Using the Up/Down button to select the
MENU
MENU
V- Chip Lock On . . .
Parent Guide
MPAA Rating
Change PIN
You can press  button to selcet the
29

Parent Guide
Pressthe buttontoentertheParentGuiderMenu.Youcanlock the TV Program in this menu. Press the Left/Right /Up/Down button to selecttheratingthatyouwanttolock orunlockandpressEnterto comfirm.
ALL
FV
D
L
S
V
Allchildren
Directedtoolderchildren General audience
Parental guidance suggested Parents strongly cautioned Mature audience only
AllContent
Fantasy Violence
Sexually Suggestive Dialog
Adult Language
SexualSituation
Violence
30
MPAA Rating
Press the  button to enter the MPAA Rating Menu. You can lock the movie Programinthismenu.PresstheUp/Downbuttontoselecttheratingthatyou wanttolockorunlock andpressEntertocomfirm.
MENU
G
PG
Pg13
R
Nc17
X
NR
G
P G
R
NC17
X
N R
General audience
Parental guidance suggested Parents strongly cautioned Restricted
No one 17 and under admitted Adult audience only
Notavailable
Canadian Ratings
You can use the  button to select the Lock rating in
Canadian English as below:
Canadian Ratings
Youcanusethe buttontoselecttheLockrating accordingtoCanadian
standardsasshownbelow:
Change PIN
Entertheold(ordefault)password,thenenterthenewpasswordinthespaces provided.Thedefaultpasswordis0000.
Note:Pressleftbuttononcetoreturntothesetupmenu,twiceto
exitsetupmenu.
Transparent
Using the Up/Down button to select the Transparent item and press Enterbuttontoselectbetweenon/offselection.Themenudisplaywill changebetweenthetransparentandopaque.
32
33
Features
User friendly remote and On Screen Display (OSD)
Photo Show on Disc and SD/MMC/MS
Receive the DTV/ATV
Accessories in the box
8" LCD/DVD unit 1x RCA AV Cable 1x AC/DC Adapter 1x 12V Car Adapter 1x Remote Control 1x Owner???s Manual
34

*Designsandspecificationsaresubjecttochangewithoutnotice.
Waste electrical products should not be disposed of with household waste. Please recycle where facilities exist. Check with your local authority or retailer for recycling advice.
35

??2007AudiovoxElectronicsCorporation