90 DAY LIMITED WARRANTY
Applies to Audiovox V ideo Products
AUDIOVOX ELECTRONICS CORPORATION (the Company) warrants to the original retail purchaser of this product that should this product or any part thereof, under normal use and conditions, be proven defective in material or workmanship within 90 days from the date of original purchase, such defect(s) will be repaired or replaced with reconditioned product ( at the Company's option) without chargeorf parts and repair labor.
To obtain repair or replacement within the term of this Warranty, the products is to be delivered with proof of warranty coverage (e.g. dated bill of sale), specification of defect(s), transportation prepaid, to the Company at the address shown below.
This Warranty does not extend to the elimination of externally generated static or noise, to correction of antenna problems, to costs incurred for installation, removal or reinstallation of the product, or to damage to tapes, discs, speakers, accessories, or electrical systems.
This Warranty does not apply to any product or part thereof which, in the opinion of the Company , has suffered or been damaged through alteration, improper installation, mishanding, misuse, neglect, accident, or by removal or defacement of the factory serial number / bar code lable(s). THE EXTENT OF THE COMPANY'SLIABILITY
UNDER THIS WARRANTY IS LIMITED TO THE REPAIR OR REPLACEMENT PROVIDED ABOVE AND, IN NO
EVENT , SHALL THE COMPANY'SLIABILITY EXCEED THE PURCHASE PRICE PAID BY PURCHASER FOR
THE PRODUCT.
This Warranty is in lieu of all other express warranties or liabilities. ANY IMPLIED WARRANTIES, INCLUDING
ANY IMPLIED WARRANTY OF MERCHANTABILITY, SHALL BE LIMITED TO THE DURATION OF THIS
WRITTEN WARRANTY. ANY ACTION FOR BREACHY OF ANY WARRANTY HEREUNDER INCLUDING ANY
IMPLIED WARRANTY OF MERCHANTABILITY MUST BE BROUGHT WITHIN A PERIOD OF 30 MONTHS FROM
DATE OF ORIGINAL PURCHASE. IN NO CASE SHALL THE COMPANY BE LIABLE FOR ANY
CONSEQUENTIAL OR INCIDENTAL DAMAGES FOR BREACH OF THIS OR ANY OTHER WARRANTY, EXPRESS OR IMPLIED, WHATSOEVER. No person or representative is authorized to assume for the Company any liability other thatn expressed herein in connection with the sale of this product.
Some states do not allow limitations on how long an implied warranty lasts or the exclusion or limitation of llimitation of incidental or consequential damage so the above limitation or exclusions may not apply to you. This Warranty gives you specific legal rights and you may also have other rights which vary from state to state.
U.S.A.: AUDIOVOX ELECTRONICS CORPORA TION, 150 MARCUS BLVD.,HAUPPAUGE, NEW YORK 1 1788 1-800-645-4994
CANADA: CALL 1-800-645-4994 FOR LOCATION OF WARRANTY STATION SERVING YOUR AREA
 OX
OX


 Super 2,359,296
  Super 450cd/m
 Super wide viewing angle : Horizontal : 130 , Vertical : 120 .
 Super 9300 color temperature for LCD monitor choice of color.
 Internal subtitle decode function to precisely display
  CATV
CATV 
 3D Stereo for realistic acoustics.
 Slim
Slim  Light design reduces weight by 15% compared with traditional TV monitor.
 High contrast ratio of 500 : 1 provides optimum clear image.
 Supports
  Intelligent screen image setting


 30
30 Applying excessive pressure when pressing buttons
 Exposing to extreme Low or High temperatures
 Exposing to excessive Moisture
 Mishandling to Dropping


 button to highlight
 button to highlight AVIDEO. Then Press and release the Menu button to select AVIDEO for
  button to select VOV ADJUST
 button to select the
 button to select Position. Press and release the Menu button to go back to the previous Menu.
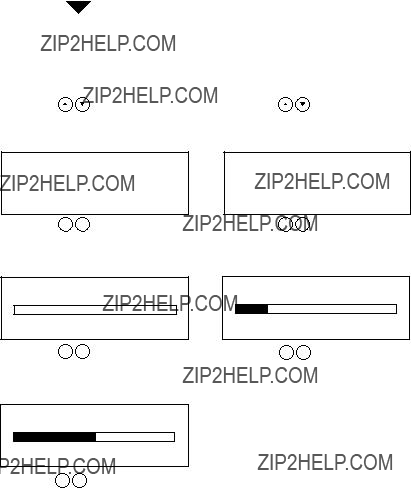

 button to adjust setting and then
 button to adjust setting and then
 button to adjust setting and then
 button to adjust setting and then
 button to adjust setting and then
 button to highlight
 button to highlight PARENT CONTROL :
 button to highlight
  button to
 button to highlight MPAA OPTION and
 button to highlight OSD
 button, select the desired
 button, select the amount of time you would like the OSD Massage to be viewed (5,10,15 seconds) then Press and release the Menu button to confirm
 button, select the desired OSD Message Color then Press and release the Menu button to confirm
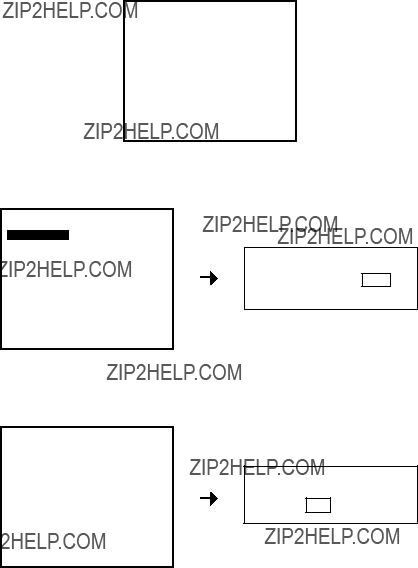
 button, select ERASE or ADD then Press and release the Menu button to confirm.
 button, select YES or NO. (No need to press Menu button, The Autoprogram will Autostart).

 button to adjust setting then press Menu to return to the previous menu.
 button to adjust setting then press Menu to return to the previous menu.
 button to adjust setting then press Menu to return to the previous menu.
 button to adjust setting then press Menu to return to the previous menu.
 button to adjust setting then press Menu to return to the previous menu.
 buttons to select YES or NO option, (No need to select Menu, the RECALL will happen Automatically).

 button to highlight MAIN DISP and Press and release
 button to select AUTOTUNE
 button to adjust setting then press Menu to return to the previous menu.
 button to adjust setting then press Menu to return to the previous menu.
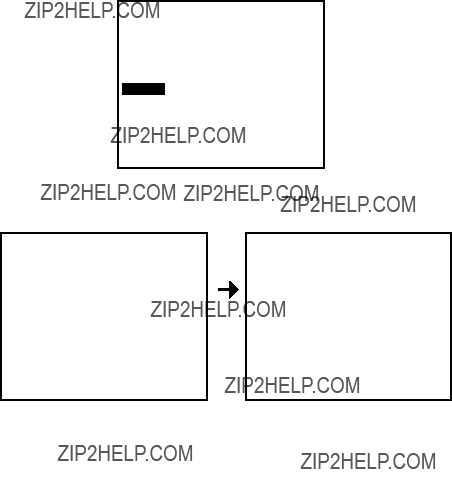
 button to selcet COLOR.
 button to select USER.
 and
and  buttons to adjust setting. Do this for each of the COLORS.
 button to select QUALITY.

 button to select SAVE EXIT
 button to select EXIT

 Please note the following common TV reception interferences:


 Ignition


 Ghost
Ghost 


 Flurries


 note: If interferences occur while you are using a cable system, then the problem could be at the cable source and not from your TV reception.


 Picture


 Check if you have accidentally pressed the "mute" button
  Check other channels if the same problem exist. If other channels are fine, then problem is with the TV program you are viewing. This shouldn't be a concer


 Check main power source
 Check other TV channels. If they are okay , problem is just with the TV program you are viewing
 Press the
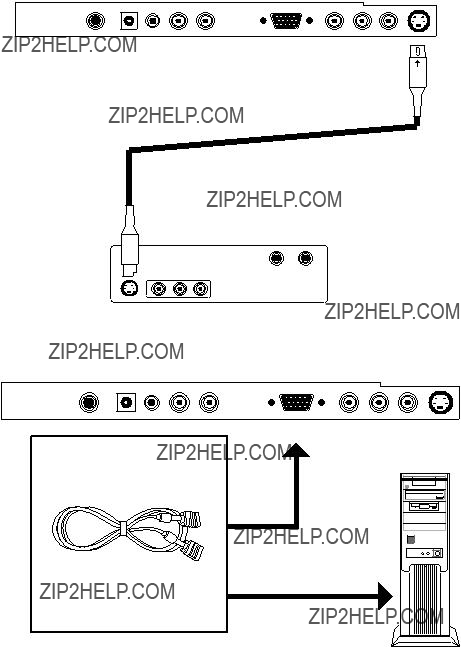
  Please check if your power cord is connected properly, it may be loose
 Switch off main power, disconnect cable. Reconnect cable after two minutes rest then switch on the main power
  Check if the antenna or cable are well connected
 Check your Remote Control
 Check power adapter and power cord if they have been damaged


 Picture


 Check your brightness level
 Check your contrast level
 In the on screen display (OSD) select
  Check your LCD monitor for possible demage


 Remote


 Check TV main power source
 Check if remote control batteries are weak
 Check if batteries have been correctly installed
 Check if there are obstructions between your remote control and the main TV remote sensor
 Disconnect your cable for two minutes before reinstalling it
 If failure resulted from electrical interferences, lighting or static, disconnect the TV main powerfor 10 seconds before reinstalling it. Restart your TV
 Try holding remote 2 inches from sensor


 Picture


 Check other channels. Problem may be an isolated incidence
 If using outdoor antenna, please check connections
 Please check your accessories. Such as V ideo recorder,
 Check your cable company or outdoor antenna reception
 RF signal may be too slow
 If all fails, please contact our serviceman immediately

