Portable DVD Player with Color TFT LCD Screen
D1800
USER???S MANUAL
Portable DVD Player with Color TFT LCD Screen
D1800
USER???S MANUAL
A BEFORE USING THE DVD PLAYER
Important! Please read the following instructions before attempting to operate the DVD Player
B Rain and Moisture Warning
To reduce the risk of fire or electric shock, do not expose this appliance to rain or moisture.
1
Power Cord Warnings
If op<>rnting 110 [N[) PIa)'l>rt om botlofy powgf, _ rto Chaplo r 10 of th O. ma nuoj
lJo.o <W1 opprol'Od~ cord
If tho origi nal ~ co rd o. mis~ or i00i, po.xcro... a POW'" cord: _ That i. opprol'Odlor "'" n )'OUr OOOJrtry
_ That i. rojod for th o
oioctric<l l mtngo !abo l
_ That has ??? I'OIt _ <Wld e<..<r<>nt r"'ing groolo rt"'""'ho voItago and axrort mtng
.....I<od on 110
_ W if1 a m n mum wir<> ~\o( of 0.75 rrmll1eAWG
_ That i.
If )'OUh ol'Oq u. d "", oboot tho t_ eX powgf cord Xl u... oontoct your o uth orizod
.....vioI> pro<idof
BatteryWaming
Tho [N[) PIa)'Ofcomo. "'th a U<on bo_V pod Thor<> .. a ris!< eX ft. and b<xns if tho b<Ktory pac, i.
_ Do not disa, _ , c rush, or po.rcl.J ro 110 OO_y poe,
_ Do not sIlort tho
_ Do not ""PO'" th o b<Ktory pac>; Xl f.... or wo...
_ Do not on~ to <>pO n or """';oo 110
_ R"I' iooo on ly w l h tho botlofy pod <Io~od lor this
_ [hcard I.'&od bono M?????? acoordlng to tho m<nJfoctu",,'. nstructions
CAUTION
Vis; t>e L:>Se< Rad iat.,n Whoo Ope n Do Not Store Into Bea m
'" Vie w 0; , ectl, W ill , O~i"",1 I,, >! ,u , " e " i,
CAUTION
U'"of =tro~, adju stment" m:j proood lJ"e, oth er th on those specified he"" n moy res " t n ho",,"oo l.OS r:Jdiat .,n expos ure
2
CAUTION: This unit employs a laser system. To ensure the proper use of
the unit, read this manual carefully and keep it for future reference. To prevent direct exposure to the laser radiation, do not open the cabinet. Invisible laser radiation when the cabinet is opened or the interlocks are defeated. DO NOT stare into the laser beams. Use of any controls, adjustments, or procedures other than those specified herein may result in hazardous radiation exposure!
3
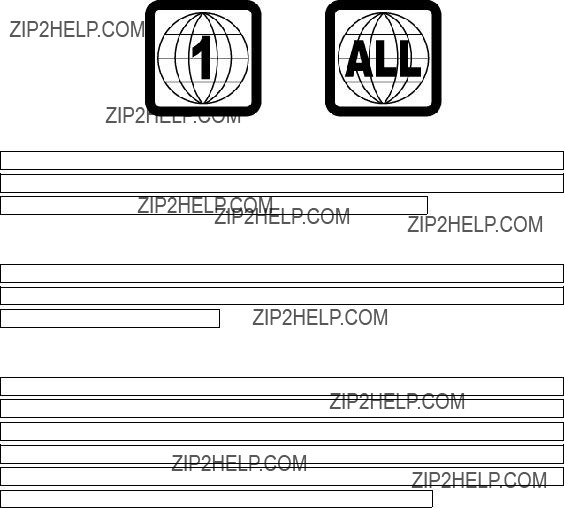
Region Management Information ??? This Player is designed to respond to the Region Management Information recorded on DVDs, The region number of this player is ???1???. If the region number described on the DVD does not correspond to the region number of this player, this player cannot play this disc. This Player will play DVDs made for ???ALL??? regions. This player will play DVDs with labels containing the region number ???1??? or ???ALL??? see below.
Dolby
Manufactured under license from Dolby Laboratories. ???Dolby???, ???Pro Logic??? and the
Works ??
DTS
Manufactured under license from Digital Theater System, Inc. ???DTS??? and ???DTS Digital
Surround??? are trademarks of Digital Theater System, Inc ?? 1996 Digital Theater
Systems, Inc. All rights reserved.
Macrovision
This product incorporates copyright protection technology that is protected by method
claims of certain U.S patents and other intellectual property rights owned by
Macrovision Corporation and other rights owners. Use of this copyright protection
technology must be authorized by Macrovision Corporation. And is intended for
home and other limited viewing use only unless otherwise authorized by Macrovision
Corporation. Reverse engineering or disassembly is prohibited.
.
NOTE:??? Some DTS decoders, which do not support
Reference
Dolby Digital is a digital sound compression technique developed by Dolby Laboratories, Inc. Supporting
4
The Digital Theater System (DTS) is a
Linear PCM (LPCM) is a
If you have a Dolby Pro Logic Surround decoder, you will obtain the full benefit of Pro Logic from the same DVD movies that provide fill
The digital audio output connector (optical) converts electrical signals into optical signals (light) and transfers them to an amplifier. These optical signals are immune from electrical interference, and they also have minimal effect on other equipment.
5
CD1800 Main Features
???8 Inch
???Standard Screen (4:3) And Wide Screen (16:9) Displays Are Available
???Screen Saver, Prevent LCD From Being Damaged
???Dolby Digital
???Parental Lock Makes It Easy To Control Content (Disc Dependent)
???Eight Language Supported OSD
???Compact Size, Easy To Carry
???Use Anytime And Anywhere
???Connects To Most Home TV???s Or Monitors.
???Plays DVD / MP3 / CD /
Includes:
???Wireless IR Remote Control (With Battery)
???Cigarette lighter adapter included for use in car/boat.
???Audio and Video Cords
???AC/DC Adapter
???Rechargeable
???Optical Cable
???
6
DABOUT THIS MANUAL
???This Manual introduces how to use the controls on the unit and the Remote Control.
???Please review the symbols shown in the chart below.
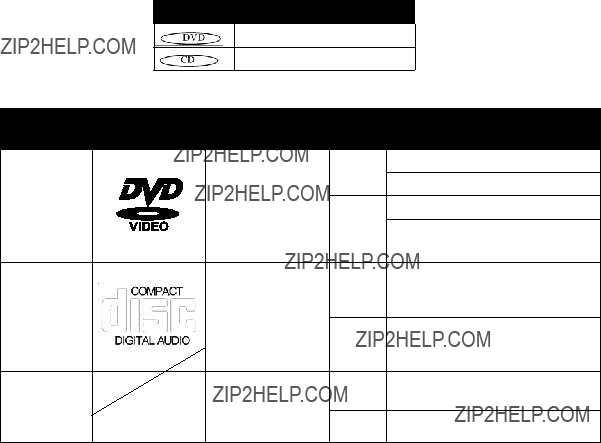
ESymbols Used In This Manual
MARK INDICATION
DVD Disc
Audio Compact Disc
F PLAYABLE DISC FORMATS
7

16.REPEAT PLAYBACK OF ANY PART OF AN AUDIO CD / DVD 

 CD
CD


 DVD
DVD
 ... 35
9
10

1. ACCESSORIES FOR D1800 DVD PLAYER
Before using the D1800 DVD player, please check the contents of the package to make sure nothing is missing or damaged. Contact your dealer with any questions.
Supplied D1800 DVD Player Components
STANDARD ACCESSORIES FOR PORTABLE DVD PLAYER:
A.Portable DVD Player
B.Remote Control (Incl. One Cr 2025 Button Battery)
C.Audio and Video Cords
D.Automobile Lighter Adapter
E.User???s Manual
F.AC/DC Adapter
G.Rechargeable
H.Battery Charger
I.Optical Cable
J.
11
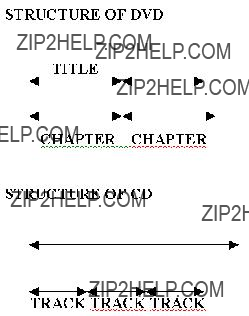
2. TERMS FOR DISCS
TITLE
The images or music contained on a CD are divided into units. ???Title??? is the largest unit. Each Title is numbered so it is possible to search a disc by Title.
CHAPTER
A Title is composed of several smaller units called ???Chapters???. Each Chapter is assigned a number so it is possible to search a disc by Chapter.
NOTE: Some discs may not have numbered chapters.
TRACK
Audio discs are divided into units called ???Tracks???. Each Track is assigned a number for searching.
DISC STRUCTURE
DISC
DISC
12
3. BEFORE OPERATING THE DVD PLAYER
SAFETY INFORMATION
???Read all of the safety and operating instructions before operating the system and retain for future reference.
???Do not attempt to service, repair or modify the DVD Player. See your dealer for qualified service personnel.
???Do not insert foreign objects into the DVD compartment.
???The front of the liquid crystal display (LCD) screen may break when hit with a hard surface. If the screen is broken, do not touch the liquid crystalline material. In case of contact with skin, wash immediately with soap and water.
NOTE: Do not expose the liquid crystal display (LCD) screen to direct sunlight or intensive ultraviolet rays for extensive periods of time. Ultraviolet rays deteriorate the liquid crystal.
???Be sure to review User Manuals for video games and video game equipment when used as auxiliary inputs for your DVD Player.
CARE AND SERVICE OF THE DVD PLAYER
Environmental Extremes
Exposing the D1800 to harsh environmental conditions may be damaged or may perform at less than maximum capability. Whenever possible avoid exposing your DVD player to:
???Extremely Hot or Cold Temperatures.
???Direct Sunlight.
???High Humidity.
???Dusty Environment.
???Locations where strong magnetic fields are generated.
???Humidity and Moisture Condensation
Temperature Extremes
When the vehicle is parked under direct sunlight or in an extremely cold place for a long period of time, wait until the cabin temperature of the vehicle is at normal temperature before operating the system.
Humidity and Moisture Condensation
Under extremely humid conditions or when moving the DVD Player from a cold place to a warm place moisture in the air may condense. Moisture condensation may cause damage to the DVD and/or player. If moisture condensation occurs, do not insert a CD or DVD into the player. If one is already in the player, remove it. Turn the DVD Player ON to dry the moisture before inserting a DVD. This could take an hour or more.
13
Foreign Substances
Exercise care to prevent dirt and foreign objects from entering the DVD Player compartment. Be especially careful not to spill liquids of any kind onto the media controls or into the system. If liquid is accidentally spilled onto the system, immediately turn the system OFF and consult a qualified service technician.
Cleaning the Liquid Crystal Display (LCD)
Clean the display screen by using a damp soft cloth. Rub the screen gently until the dust, dirt or fingerprints are removed. Do not spray the screen directly with water or glass cleaning solvents. Over spray from these fluids could drip down into the internal electronics of the screen and cause damage. Do not apply excessive pressure while cleaning the screen.
Cleaning Compact Discs
Inspect all discs for contamination before playing. If necessary, clean discs only with an approved CD cleaner and wipe from the center out to the edge. Do not use circular motion.
Cleaning the DVD Player
Clean the exterior of the DVD player with a damp cloth. Do not use CD cleaning kits or CDs intended to clean the interior of your DVD player. Use of these products may damage your system.
14
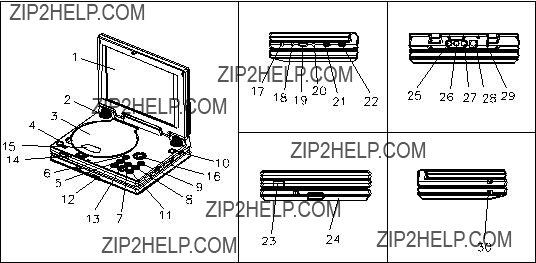
4. DVD PLAYER CONTROLS AND INDICATORS DVD PLAYER
D1800 DVD Player Controls and Indicators Layout
1.TFT LCD MONITOR.
2.SPEAKERS: Provides the audio signal from the DVD Player.
3.DISC COMPARTMENT COVER: Protects the DVD disc during playback.
4.POWER ON/OFF BUTTON: Press this button to turn the DVD Player on. The DVD will be displayed on screen and the picture will appear in a few seconds. Press the button again to turn the DVD Player off.
7.SET UP BUTTON: Allows the user to select the DVD options (Language, Video, Audio, Rating, Exit) etc.
10.LCD ON/OFF BUTTON: Allows the user to turn the LCD display on or off.
11.STOP BUTTON: Allows the user to stop disc play.
12.PAUSE ( ) BUTTON: DVD disc play will be paused. During Disc Playback, momentarily press the PLAY Button to Pause the Disc from the unit.
15.CLEAR WINDOW: Transparent window which allows the user to see the DVD disc while in the compartment.
15
16.ENTER (PLAY) AND DIRECTION BUTTON: Used to select or switch a highlighted selection in the various DVD Player menus.
17.AUDIO IN: Allows the user to apply an external audio signal
18.VIDEO IN: Allows the user to apply an external video signal.
19.VOLUME: Allows the user to increase or decrease the audio sound levels
20.PHONES: Allows the user to listen to DVD player audio output signals through headphones.
21.COLOR ADJUSTMENT BUTTON: Allows the user to adjust the color intensity of the images displayed on the LCD monitor.
22.LIGHT ADJUSTMENT BUTTON: Allows the user to adjust the brightness of the images displayed on the LCD monitor.
23.REMOTE CONTROL SENSOR: The DVD Player incorporates an Infrared sensors which relay signals from the remote control to allow the unit to be controlled simply by pointing its remote control at the remote sensor eye
24.BATTERY CONTACT PLATE: Bottom of the DVD Player, which houses the rechargeable battery pack.
25.AUDIO OUT R Allows the user to route right channel audio output signals to an external device.
26.AUDIO OUT L Allows the user to route left channel audio output signals to an external device.
27.VIDEO OUT Allows the user to route video output signals to an external device.
28.
29.DC OUT 9V:
30.DC IN 15V: The player is supplied with an AC/DC adapter suited for home or
16

5. DVD PLAYER REMOTE CONTROL UNIT CONTROLS
D1800 REMOTE CONTROL
Remote Control Button Layout
1.DVD DIGEST BUTTON: (Menu Button)
Play DVD disc and obtain the playing status of DVD digest menu instructions.
2.PBC ON/OFF BUTTON:
This is selected for playing back control for DISC play mode.
3.NUMBER BUTTON:
You can select Tracks or Main Menus/Submenus to press number keys for your selection.
4.CLEAR BUTTON:
This is selected for deleting number, GO TO Play, Repeated play, Program play and Security code selections.
5.DISPLAY BUTTON:
This button displays the status bar on the top of the screen, including title playback time, title remaining time, chapter playback time, and chapter remaining time.
6.ENTER BUTTON: (PLAY)
This button is used to enter selections or commands as well as to start playback of a disc.
17
7.PAUSE/PLAY BUTTON:
When playing a disc, press the PAUSE/PLAY button to pause the playback of a movie temporarily then press the PAUSE/PLAY button to restart the playback of the movie.
8.FB BUTTON:
This button is used to fast reverse the play back of the movie at 2,4,6 and 8 times the normal playback speed.
9.FF BUTTON:
This button is used to fast forward the play back of the movie at 2,4,6 and 8 times the normal playback speed.
10.RESUME BUTTON: (Step Backward)
NOTE: this button is only used in conjunction with the ???STEP BUTTON???(16). By pressing this button while in ???STEP??? mode, the user can view a movie frame by frame in a reverse sequence. Press the ???ENTER/PLAY??? button to return to normal play mode.
11.MUTE BUTTON:
This button is used mute sound while the disc is in play mode.
12.SLOW BUTTON:
Plays the movie in 1/2x, 1/4x, and 1/8x normal playback speed.
13.ZOOM BUTTON:
14.VOL
This button is used to decrease the Volume level of the disc playback.
15.VOL (+) BUTTON:
This button is used to increase the Volume level of the disc playback.
16.STEP BUTTON:
When playing a disc, press this button to enable viewing of frames in sequence. Frames are displayed on the LCD screen with no sound in this mode. Press the ENTER/PLAY button during step play and the normal play will resume
17.
Most DVD video titles contain hidden subtitles. This button allows the user to change the language of the subtitles.
18.STOP BUTTON:
When playing a disc, press this stop key and start to stop playing.
19.NEXT BUTTON:
Play the next chapter of a DVD disc or the next track of an Audio CD.
20.VOCAL ASSIST BUTTON:
21.PREV BUTTON:
18
Play the previous chapter of a DVD disc or the previous track of an Audio CD.
22.PROGRAM BUTTON:
Push to display a screen from which to program the playback of an Audio CD.
23.REPEAT BUTTON:
Press this button once to repeat the current Chapter in play, press the button twice to repeat the current Title in play and pressing this button a third time will cancel the repeat command.
24.SHUFFLE BUTTON:
This button is used to Shuffle music tracks for random playback.
25.GOTO BUTTON:
This button is used to GOTO a desired Chapter Number or Playback Time.
26.
This button is used to mark a start location (A) and a stop location (B) for movie playback. Press this button once to mark the desired beginning point of the movie playback and a second time to mark the ending point. This will create a Loop and the unit will play the movie continuously from point (A) to point (B) until the A/B button is pressed again.
27.ANGLE BUTTON:
Some DVD discs have images with different screen angles, you may select among them, For example, when you watch a running train, you may select to watch it from the front, the right window or the left window without stopping it.
This only works when there is an angle mark on the DVD and select ???ON??? status for angle mark in the GENERAL SET UP.
28.TITLE BUTTON: Pressing the TITLE button will bring up the DVD???s title screen. The majority of DVD???s will allow a title selection and usually will permit selection at the next level down as well (e.g., chapters). Some DVD???s also permit you to select language and sound preferences in this screen. Once in the TITLE screen, use the scroll buttons to choose your preferences, and then press ENTER to confirm choices and close out the screen.
29.AUDIO BUTTON:
Allows the user to select DVD output language.
30.P/N BUTTON: This button is used to select the video format for the DVD Player. The user can choose from NTSC, PAL, or MULTI.
31.POWER ON/OFF BUTTON: Press this button to turn the DVD Player on. DVD will be displayed on screen and the picture will appear a few seconds after. Press this button again to turn the DVD Player OFF.
32.SET UP BUTTON: This button allows the user to select DVD options (Language, Video, Audio, Rating, Exit). The setup display can only be viewed when the player is in STOP mode.
19
33.INFRARED TRANSMITTER:
The Infrared Transmitter sends the commands from the remote to the unit.
20
6. CONNECTIONS
CHARGING THE BATTERY
1.Connect the end of the supplied DC Power Adaptor cable to an AC wall outlet.
2.Connect the other end of the supplied DC Power Adaptor cable to the 15V DC IN
(DC IN) jack on the side of the D1800 jack.
When the battery is charging, a red LED will light while charging. Once the charging cycle is complete the LED will light green.
NOTE: The battery will drain if connected to the unit. Unplug the battery from the unit to conserve power.
USING THE EARPHONES
1.Set the volume control to the lowest level.
2.Connect a pair of
3.Adjust the volume control to the desired sound volume.
CONNECTING THE VIDEO IN/AUDIO IN JACKS
The Audio/Video Input Jacks are used to connect any device with an Audio/Video Output function to the D1800 such as a High 8, VHS or DVD Player etc..
1.Connect one end of the supplied Audio/Video cable to all three off the
2.Connect the other end of the Audio/Video cable to the
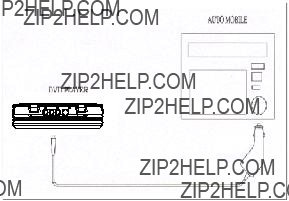
CONNECTING THE CAR CORD
Connect one end of the supplied DC power adapter cable into the automobile lighter socket and the other end of the same cable into the DC IN 15V (Power in) jack on the side of the D1800.
Connecting The Unit To An Automobile Power Source
21

CONNECTING THE D1800 TO A TV SET
The Audio/Video Output Jacks are used to connect the D1800 to any TV/Monitor that is equipped with Audio/Video Input Jacks.
1.Connect one end of the supplied Audio/Video cable to all three off the
2.Connect the other end of the Audio/Video cable to all three off the
TV or Monitor Connection
CONNECTING THE D1800 TO AN AMPLIFIER
1.Be sure to turn off the power of the Amplifier before making connections.
2.Connect one end of the supplied Audio Cable (Red and White) to the Red and White Jacks on the back of the D1800.
3.Connect the other end of the supplied Audio Cable (Red and White) to the Red and White Jacks of the selected Amplifier.
4.Adjust the sound volume using the amplifier volume control.
Amplifier Connection
22
7. REMOTE CONTROL OPERATION
 A
A
 C
C

 B
B
Amplifier Connection
Refer to the illustration above for the following battery replacement steps:
1.Open the battery compartment (A) and remove the old battery
2.Insert one new button battery (CR 2025) into the battery compartment making sure that the ???+??? mark faces up (towards the backside of the Remote Control)
3.Slide the battery compartment to the closed position (C).
4.Point the Remote Control towards the Remote Sensor on the D1800.
NOTE:
???The Remote Control is designed to operate in the range of 7 meters and 60 degrees from the front of the Remote Sensor. To ensure optimal operation of the Remote Control make sure that there are no barriers between the D1800 and the Remote Control.
???Generally, the Battery can last for about 6 months.
???The Battery should be changed if the Remote Control does not work.
???If the Remote Control is not used for a long period of time, remove the battery to prevent leakage, which will damage the Remote Control.
23

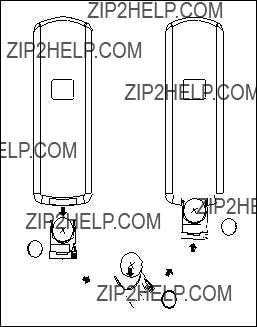
8. CUSTOM BATTERY PACK OPERATION
Rechargeable Battery Replacement
RECHARGEABLE BATTERY PACK OPERATION:
A.Insert the battery connective into the joiner of base case.
B.Then slide battery slowly down onto the case.
C.Turn on the hinge
D.Align the battery case to the four rectangular nubs on the button of DVD PLAYER. and make sure the connection is secure.
E.Push DVD PLAYER backward to lock connection.
24
9. BASIC D1800 OPERATING PROCEDURES
The following describes how to play a disc in the D1800.
1.Press the ???PUSH OPEN??? button to unlock and open the disc compartment cover.
2.Press the ???POWER??? button to power on the unit, the Power LED will light up to indicate that the unit is on and is reading the disc.
3.During play:
(a)Press the ???ENTER??? button in stop mode to start the playback of a disc.
(b)Press the ???PAUSE??? button in play mode to stop the playback of a disc temporarily. To continue the playback of the disc, press the ???PAUSE??? button again.
(c)Press the ???STOP??? button to stop playback of the disc.
(d)Press the ???SET UP??? button to adjust starting to SET UP DVD FUNCTION to obtain the best playing status.
(e)Press the ???PREV/NEXT??? button for returning to the PREV/NEXT menu.
(f)Press the ???FF/BF??? button to start the fast forward/fast backward function.
(g)To remove the disc from the disc compartment, press the ???PUSH OPEN??? button to stop the player and open the compartment cover. Wait until the disc is no longer spinning before removing the disc.
(h)To turn the player off, press the ???POWER??? button and the Power LED will shut off indicating that the unit is off.
25

10. REMOTE CONTROL OPERATING PROCEDURES
DVD SET UP SETTING
According to the recorded information and external equipment, set the following functions for DVD to obtain the best playing status.
SETUP

Remote Control SETUP Button
1.Press the ???SETUP??? button to access and configure the SETUP MENU MAIN PAGE. The following menu will be displayed:
SETUP MENU
GENERAL SETUP
SPEAKER SETUP
AUDIO SETUP
PREFERENCES
EXIT SETUP
Setup Menu Main Page
2. Use the direction ( , ) buttons to highlight a configurable menu item then press the ???ENTER??? button to enter that selection.
Example: To select ???SPEAKER SETUP???
??? Use the or buttons to highlight SPEAKER SETUP as shown bellow. The following menu will be displayed:
SETUP MENU
GENERAL SETUP
SPEAKER SETUP
AUDIO SETUP
PREFERENCES
EXIT SETUP
Setup Menu Main Page
??? Press the ???ENTER??? button to confirm selection and to enter the ???SPEAKER SETUP
26

PAGE???.
The following
Speaker Setup Page
??? Press the to select ???DOWNMIX??? t. The following
Speaker Setup Page
??? Use the or buttons to highlight ???STERO???
???Push ???ENTER??? button to confirm
3.To exit from menus.
Push direction buttons ( , ) and ???ENTER??? buttons to select the relevant exit paths.
??? Press ???ENTER??? to exit from ???SPEAKER SETIUP PAGE??? The SETUP MENU MAIN PAGE will be displayed:
SETUP MENU
GENERAL SETUP
SPEAKER SETUP
AUDIO SETUP
PREFERENCES
EXIT SETUP

Setup Menu Main Page
??? Push to select ???EXIT SETUP??? then push ???ENTER??? button to exit from the menu.
GENERAL SETUP
The setting structure of the GENERAL SETUP menu is as follows:
TV DISPLAY>>
???NORMAL/PS
???NORMAL/LB
???WIDE
TV TYPE>>
???MULTI
???NTSC
???PAL PIC MODE>>
???AUTO
???
???
ANGLE MARK>>
???ON
???OFF
OSD LANG>>
???ENGLISH
???CHINESE CAPTIONS>>
???ON
???OFF SCR SAVER>>
???ON
???OFF MAIN PAGE>>
The following
TV DISPLAY 1. NORMAL/PS
This setting is selected when the unit is connected with a normal TV.
28
2. NORMAL/LB
This setting is selected when the unit is connected to a normal TV.
3. WIDE
This setting is selected when the unit is connected with a 16:9
TV TYPE
You may select the TV Type according to the color system of the TV to be connected.
???Select " MULTI " for a
???Select " NTSC " for a NTSC TV.
???Select " PAL " for a PAL TV.
PIC MODE
Select ???AUTO??? for display mode that of automatically chooses picture on the unit. Select
Select
ANGLE MARK
This setting only works when there is an angle mark on the disc.
Select " ON ", the screen will show the mark when playing a DVD.
Select " OFF ", the mark is not shown.
OSD LANG
This setting allows the user to choose the language of the On Screen Display (OSD) ENGLISH: The On Screen Display (OSD) will be set to English.
CHINESE: The On Screen Display (OSD) will be set to Chinese.
CAPTIONS
This setting is used to turn the ???SUBTITLE??? option On and Off.
ON: The hidden subtitle is shown.
OFF: The hidden subtitle is turned off.
SCR SAVER
The Screen Saver is used to help prevent the TFT LCD screen from becoming damaged. The Screen Saver image appears when the unit stops or if the DVD/CD image that is being viewed is motionless for longer then a few seconds.
This setting allows the user to turn this option On and Off.
29
??ON: Start the TFT LCD screen saver .
??OFF: remove the TFT LCD screen saver .
SPEAKER SETUP
The setting structure of the SPEAKER SETUP menu is as follows:
DOWNMIX >>
???LT/RT
???STEREO
MAIN PAGE
The following describe the functionality of the DOWNMIX setup menus.
DOWNMIX
LT/RT: select this when you play a disc with DOLBY
DOLBY DIGITAL SETUP
The setting structure of the AUDIO SETUP menu is as follows:
AUDIO OUT>>
???ANALOG
???SPDIF/RAW
???SPDIF/PCM
OP MODE >> (OPERATIONAL)
???LINE OUT
???RF REMOD DUAL MONO >>
???STEREO
???
???
???
PRO LOGIC>>
???OFF
???ON
???AUTO
LPCM OUTPUT>>
???LPCM 48K
???LPCM 96K
MAIN PAGE
The following
OPERATIONAL
LINE OUT: Compress input signals linearly.
RF REMOD: Adjust input signals for RF
30

DUAL MONO
The is the output mode of the L and R signals of the set audio output. If it is set to "MIXED MONO", the function only works when the DVD being played is
DYNAMIC RNG
When the compression mode is set to "LINE OUT", this is selected to adjust linear compression rate to obtain the different compression results of the signals.
PREFERENCES SETUP
NOTE: The ???PREFERENCE??? menu is an active function only before the disc is in play mode. If the disc is already in play mode, you must first press the ???STOP??? button twice to access the ???PREFERENCE??? menu.
The setting structure of the PREFERENCES SETUP menu is as follows:
AUDIO >>
???ENGLISH
???FRENCH
???SPANISH
???CHINESE
???JAPANESE SUBTITLE >>
???ENGLISH
???FRENCH
???SPANISH
???CHINESE
???JAPANESE
???OFF
DISC MENU>>
???ENGLISH
CHINESE
FRENCH
SPANISH
JAPANESE
PARENTAL>>
???1. G
3.PG
4.PG 13
6.
7.
8.ADULT
NO_PARENTAL
PASSWORD >> (NOTE: THE FACTORY DEFAULT PASSWORD IS: 3308)
???CHANGE DEFAULTS >>
???RESET SMART NAV >>
???NO MENU
???WITH MENU
MAIN PAGE
31
AUDIO, SUBTITLES AND DISC MENU LANGUAGE SETTINGS
If a language mentioned above is recorded on the disc, you can select AUDIO, SUBTITLES or DISC MENU languages. If not, the language recorded on the disc is shown.
PARENTAL
The content of a disc with lock function is evaluated by grades. You may select an age control grade, as needed.
Example: Select "G" (CHILD), the scenes of violence not recommended for children are not played. For ???ADULT???, the user will be prompted to enter a password followed by pressing the "Enter" button. By doing this adult content can only be watched if a correct password is entered.
NOTE: The password is set by the user.
DEFAULT >>RESET
Each function returns to the initial settings when the factory default password (3308) is entered.
32

11. VARIOUS DISC PLAY MODES
VOCAL ASSIST PLAY MODE
In this mode you may select a desired language from a
PLAYING DVD 
 DVD
DVD

When playing a DVD press the VOCAL ASSIST button and the following selections will be displayed on the screen in the order shown:
AUDIO 1 VOCAL
AUDIO 2 VOCAL
AUDIO 1
AUDIO 2
NOTE: Disc languages differ from one to another.
PLAYING CD 

 CD
CD
When playing an AUDIO CD press the VOCAL ASSIST button and the following selections will be displayed on the screen in the order shown:
MONO LEFT
MONO RIGHT
STEREO
MUTE
When playing a disc, this function can remove the sound.
1. SILENCE SOUND
Press the ???MUTE??? button to temporarily silence the disc sound. The word ???MUTE??? will be displayed on the screen while in this mode.
2. RESUME SOUND
Press the ???MUTE??? button again to resume disc sound.
12. FF / FR PLAYBACK OF DVD AND CD 
 DVD
DVD


 CD
CD


When playing a disc, you may play it forward fast or reverse it fast to find what you need.
FAST FORWARD
1. Press the ( ) button to FAST FORWARD the playback of the disc. The following messages are displayed on the screen each time you push the ( ) button in order.
FF 1X (Audio CD Only)
FF 2X (DVD/MP3/Audio CD) FF 3X (Audio CD Only)
FF 4X (DVD/MP3/Audio CD)
33

FF6X (DVD/MP3) FF 8X (DVD/MP3)
PLAY
FAST REVERSE
PLAY
3. Press the ???Enter??? button to
13. SLOW PLAYBACK OF DVD 
 DVD
DVD
SLOW PLAY
The following steps allow the user to view a DVD???s in slow motion
1.When a disc is in playback mode, press the ???SLOW??? button to play slowly.
2.The following messages are displayed on the screen each time you push the ???SLOW??? button in order
SF 2X SF 4X SF 8X SR 2X SR 4X SR 8X
PLAY
3.Push ???ENTER Button??? to play normally.
14. REPEAT PLAYBACK OF DVD 
 DVD
DVD
DVD REPEAT PLAYBACK
You may repeat the playback of a Title or Chapter.
To Repeat A Chapter:
Press the ???REPEAT??? button on the remote control once and the message "CHAPTER REPEAT ON" will be displayed on the screen for a few seconds and then disappear.
34

The playback of the disc will remain in this mode until either the unit is turned off or step 3 below is preformed.
To Repeat A Title:
Press the ???REPEAT??? button twice and the message "TITLE REPEAT ON" will be displayed on the screen, then disappear. The playback of the disc will remain in this mode until either the unit is turned off or the ???REPEAT??? is turned off by performing step 3 below.
To Turn Off The "REPEAT " Function:
Press the ???REPEAT??? button twice and the message ???REPEAT OFF??? to remove the display on the TFT LCD screen.
15. REPEAT PLAYBACK OF AUDIO CD 

 CD
CD
You may repeat the playback of a single Track or all Tracks on an AUDIO CD.
Repeat A Single Track:
Press the "REPEAT" button once and the screen will display
Repeat All Tracks.
Press the "REPEAT" button twice and the screen will display
Turn off the "REPEAT" Function.
Press the "REPEAT" button three times and the screen will display ???REPEAT OFF???.
16. REPEAT PLAYBACK OF ANY PART OF AN AUDIO CD / DVD
 CD
CD 

 DVD
DVD


 DVD
DVD


 CD
CD


This option is used to mark a starting point (A) and an ending point (B) of a particular part of a AUDIO CD or DVD that you may want to play repeatedly.
1.Press the
2.Press the
To cancel (stop) the repeat playback, press the
35

17. TURN OFF PBC
This function is only accessible when the unit is in stop mode, push PBC until the TFT LCD screen shows "PBC OFF", then push "Enter button" to select tracks.
18. SUBTITLE PLAY 
 DVD
DVD

When playing a
To enter the ???SUBTITITLE??? Mode:
Press the
To Exit the ???SUBTITITLE??? Mode:
Press the
NOTE: For some discs, subtitles cannot be removed. Different discs differ in the language of subtitles. If the subtitles of discs cannot be selected, push ???SUBTITLE???, the screen will display "NO SUBTITLE".
19. GO TO PLAY 
 DVD
DVD


 CD
CD


This feature allows you to directly enter a Time, Title or Chapter number to search for on a AUDIO CD /DVD, the unit will play from that point.
WHILE PLAYING DVD
Search a title or a chapter.
Example: Search chapter 2 in title 6.
Press the ???GOTO??? button to the Remote Control. The following screen will be displayed:
TITLE03/30 CHAPTER 00/04
Press the Left ( ) or Right ( ) button to move the cursor from side to side until the Title number is highlighted. Enter the Time you would like to search for. The following screen will be displayed:
TITLE03/30 CHAPTER 00/04
Press the Left ( ) or Right ( ) button to move the cursor from side to side until the
36

Title number is highlighted.
Press the number 6 button on the Remote Control to select Title 6.
The following screen will be displayed:
TITLE06/30 CHAPTER 00/04
Repeat the steps above, select chapter 2 in title 6.
TITLE06/30 CHAPTER 02/04
WHILE PLAYING AUDIO CD
When playing an AUDIO CD you can only enter a Time you wish to search for. Example: to play from 00:01:38 of a track.
1.Press the ???GOTO??? button on the Remote Control. The following screen will be displayed:
GO TO __ __:__
2.Press the number buttons 0,1,3,8, to enter the time. The following screen will be displayed::
GO TO 01:38
3.The unit is now set to start playback from 00:01:38 of track 6 after setting.
20.SURROUND PLAY 
 DVD
DVD


 CD
CD


When playing AUDIO CD or DVD you may select the Surround mode of your choice to improve the stereo sound quality of the disc playback.
21. DISPLAY PLAY 
 DVD
DVD


 CD
CD


The function can be used to know the elapsed and remaining time of a Title, Chapter, Track or a Disc.
WHILE PLAYING DVD
1. Press the ???DISPLAY??? button once and the screen will display the ???ELAPSED TITLE???
37

time and ???TITLE and CHAPTER???.
2.Press the ???DISPLAY??? button again and the screen will display the elapsed time of the
TITLE.
3.Press the ???DISPLAY??? button once more and the screen will display CHAPTER ELAPSED time.
4.Press the ???DISPLAY??? button again and the screen will display ???CHAPTER REMAINING??? time.
5.Press the ???DISPLAY??? once more to exit time display.
WHILE PLAYING AUDIO CD
Example: Check the remaining time when play the Track.
1.Press the ???DISPLAY??? button once and the screen will display the ???Single Elapsed??? time.
2.Press the ???DISPLAY??? button again and the screen will display the ???Single Remain??? time.
3.Press the ???DISPLAY??? button a third time and the screen will display the ???Total Elapsed??? time.
4.Press the ???DISPLAY??? button a fourth time and the screen will display the ???Total Remain??? time
ZOOM PLAY 
 DVD
DVD
The ZOOM function can be used on either motion or motionless pictures. The ZOOM function enlarges the viewing area by 1.5, 2 and 4 times the original size each time the ???ZOOM??? button is pressed.
ZOOM OFF
The following screens are displayed with each press of the ???ZOOM??? button:
To resume normal payback of the picture, press the ???ZOOM??? button a fourth time and the following screen will be displayed confirming that the ZOOM function was turned off.
ZOOM OFF
38

22. PROGRAM PLAY
You may program the tracks on a disc and play them in the programmed order.
PLAYING DVD
1. After the unit stops and press PBC OFF, push ???PROGRAM Button??? to select. The following screen will be displayed:
PROGRAM
P00:00
2.Press the number buttons in the order according to the titles (or chapters) to be programmed.
Example: Push 2,8.
The following screens will be displayed:
PROGRAM
P01:02
PROGRAM
P04:08
Notes:
P* *: * *
Title (Chapter) number
Program
3.Press the ???Enter??? button to begin playback of the DVD after the programming is finished.
4.Press the ???Stop??? button to exit program play.
SHUFFLE PLAY
The unit can play by random orders.
The order is different each time.
PLAY DVD and AUDIO CD
1.Press the ???STOP Button??? to stop playing and press ???PBC OFF??? button.
2.Press the ???Shuffle Button??? to select a random order. The following screen will be displayed:
SHUFFLE ON
The screen shows ???SHUFFLE ON??? for a DVD and Audio CD.
3. Press the ???Enter Button??? to start shuffle play. The unit will select a Track to play.
To exit ???SHUFFLE PLAY???
Press the ???STOP Button??? to stop playing.
39
23.MP3 OPERATIONS
Playing MP3 Discs
MP3 is a format for storing digital audio. An audio
Press the ???DISPLAY??? button on the remote to Display the banner. The options below show you what happens when you press the DISPLAY button.
Press DISPLAY 1x CHAPTER REMAIN appears along with the amount of time left in the song that is playing. CHAPTER REMAIN and the time that is left remain
Press DISPLAY 2x CHAPTER ELAPSED appears along with the amount of time the song has played. CHAPTER ELAPSED and the time will remain
Press DISPLAY 3x OFF appears along with the amount of time the song has played. The time remains
Selecting Folders and Songs
When an MP3 disc is inserted in the player, the Smart Navi screen appears automatically. You can change folders and songs through Smart Navi. The DVD player plays the songs in order they were burned on to the disc.
1.If a disc is playing, press STOP. Press the up or down arrow button to go through the folder list on the right side of the Smart Navi screen.
2.Once the folder you want is highlighted, press Enter (the folder list shifts to the left side of the screen and the songs in the folder appear on the right).
3.Press the up or down arrow button to go through the song list and highlighted the song you want. Press Enter to begin playback of the highlighted song.
40
Skipping Songs
Use the Next ( XXl ) button on the remote control to move to the next song. Use the Previous ( lWW) button to move to the beginning of the currently playing song. Press the button again to move to the previous song.
Using The Repeat Feature
The default mode for the Repeat feature is OFF. Pressing REPEAT consecutively changes the repeat options:
???
???FOLDER REP- repeats the folder that is playing.
???FOLDER- turns off repeat and returns to regular play mode.
Selecting a Play Mode
You can choose what order the songs will play on a disc temporarily. The FOLDER play mode is the default. To access the play mode options, press STOP if the disc is playing. Press the right arrow button until the PLAY MODE option is highlighted. Use the up or down arrow to choose a option. The play mode options are:
???SINGLE: Play a selected song.
???REP_ONE: Repeats the song that is playing.
???FOLDER: Plays the folder in the order the songs were recorded.
???FOLDER R: Repeats the folder that is playing.
???DISC SCAN: Plays from beginning of each song for 10 seconds.
???DISC: Plays the entire disc.
???DISC: REP: Repeats the entire disc.
???RANDOM: Plays the songs in the random order.
???SHUFFLE: Plays the songs in random order (from within the selected folder)
???
Program Play
To use the program play option, you must create a playlist of songs in the order you want them to play.
NOTE: Once you begin adding songs from a folder to create your play list, you cannot add songs from a different folder.
1.Highlight the song you want to program.
2.Choose the
3.Add songs to the program list by pressing ???ENTER??? once the song is highlighted. The song you have chosen and the number of songs you have chosen appear at the top of
the screen.
41
???Example, if you choose the number five song within the folder and it is the first song you have chosen, PROGRAM P01:05 appears.
4.You can continue to add songs to the list from within the same folder by using the up or down arrow button and then pressing ???ENTER??? to add it to the list.
5.When you are done creating the list, press ???STOP??? to end the programming. Then press ???PLAY??? to begin the program play mode.
Deleting the Playlist
To delete the entire Playlist, press STOP while the disc is playing and change to other play mode.
42
24.TROUBLESHOOTING
Before calling for service, it is advisable to refer to the troubleshooting table below.
25.TROUBLESHOOTING TABLE
43
26.D1800 SPECIFICATIONS
DISPLAY
???Aspect Ratios ................................................................?????????..........4:3 / 16:9
???Horizontal Image Resolution...........................................?????????.................480
???Pixels ..........................................................................??????.......???........336,960
???Diagonal Viewable Screen Size (Inches)...............??????.......???.......................8"
VIDEO AND AUDIO INPUT AND OUTPUT
???
???
???Video
???Standard Resolution ....??????.....................................???......???........NTSC / PAL
???
???
???Composite Video Output ?????????????????????????????????..???????????????..RCA Jack
???Audio L/R ???????????????????????????????????????????????????..????????????.???RCA Jack
???
???Optical
DIMENSIONS
???Width X Depth X Height (W/O Battery).............??????..........8.2" X 6.6" X 1.3"
???Weight (W/O Battery) .........................................???......??????................2.75 Lbs
44
12 MONTH DAY LIMITED WARRANTY
Applies to Audiovox Video Products
AUDIOVOX ELECTRONICS CORPORATION (the Company) warrants to the original retail purchaser of this product that should this product or any part thereof, under normal use and conditions, be proven defective in material or workmanship within 12 months from the date of original purchase, such defect(s) will be repaired or replaced with reconditioned product (at the Company's option) without charge for parts and repair labor.
To obtain repair or replacement within the terms of this Warranty, the product is to be delivered with proof of warranty coverage (e.g. dated bill of sale), specification of defect(s), transportation prepaid, to the Company at the address shown below.
This Warranty does not extend to the elimination of externally generated static or noise, to correction of antenna problems, to costs incurred for installation, removal or reinstallation of the product, or to damage to tapes, discs, speakers, accessories, or electrical systems.
This Warranty does not apply to any product or part thereof which, in the opinion of the Company, has suffered or been damaged through alteration, improper installation, mishandling, misuse, neglect, accident, or by removal or defacement of the factory serial number/bar code label(s). THE EXTENT OF THE COMPANY'S LIABILITY
UNDER THIS WARRANTY IS LIMITED TO THE REPAIR OR REPLACEMENT PROVIDED ABOVE AND, IN NO
EVENT, SHALL THE COMPANY'S LIABILITY EXCEED THE PURCHASE PRICE PAID BY PURCHASER FOR
THE PRODUCT.
This Warranty is in lieu of all other express warranties or liabilities. ANY IMPLIED WARRANTIES, INCLUDING
ANY IMPLIED WARRANTY OF MERCHANTABILITY, SHALL BE LIMITED TO THE DURATION OF THIS
WRITTEN WARRANTY. ANY ACTION FOR BREACH OF ANY WARRANTY HEREUNDER INCLUDING ANY
IMPLIED WARRANTY OF MERCHANTABILITY MUST BE BROUGHT WITHIN A PERIOD OF 30 MONTHS
FROM DATE OF ORIGINAL PURCHASE. IN NO CASE SHALL THE COMPANY BE LIABLE FOR ANY
CONSEQUENTIAL OR INCIDENTAL DAMAGES FOR BREACH OF THIS OR ANY OTHER WARRANTY, EXPRESS OR IMPLIED, WHATSOEVER. No person or representative is authorized to assume for the Company any liability other than expressed herein in connection with the sale of this product.
Some states do not allow limitations on how long an implied warranty lasts or the exclusion or limitation of incidental or consequential damage so the above limitations or exclusions may not apply to you. This Warranty gives you specific legal rights and you may also have other rights, which vary from state to state.
CANADA: CALL
45