D1500B
PORTABLE 5" LCD MONITOR AND DVD PLAYER
1
D1500B
PORTABLE 5" LCD MONITOR AND DVD PLAYER
1
Notice:
This Product incorporates copyright protection technology that is pro- tected by method claims of certain U.S. Patents and other intellectual property rights owned by Macrovision Corporation and other rights own- ers. Use of this copyright protection technology must be authorized by Macrovision Corporation, and is intended for home and other limited view- ing uses only unless otherwise authorized by Macrovision Corporation. Reverse engineering or disassembly is prohibited.
2
A.Introduction
Thank you for choosing the D1500B portable DVD player. The main features include a 5" Screen (4:3 aspect ratio) Liquid Crystal Display (LCD) monitor and a DVD player. The unit applies the latest state of the art electronics and is designed for use in hotels, offices, vehicles or your home. The unit is constructed to provide years of reliable,
B.Cautions and Warnings
1.Placement
To prevent fire or electric shock, do not expose this appliance to rain or moisture. Do not place the set on an unstable cart, stand, tripod, bracket or table to prevent it from falling. Keep the unit away from strong magnets, heat sources, direct sunlight, and excessive dust. If the unit is brought directly from a cold to a warm location, moisture may condense inside the unit. When you move it from a cold to a warm location, wait for about one hour before operating the unit, or remove the disc and leave the unit turned on until the moisture evaporates.
2.Installation
Ensure that the D1500B portable DVD player is installed in accor- dance with the instructions and illustrations provided in this manual.
3.Caution
Do not push objects of any kind into the unit through openings; do not spill or spray liquid of any kind on or in the system (this
may result in a fire or electric shock). Do not place anything
3
heavy on the unit. To ensure proper ventilation and proper operation, never cover or block the slots and openings with a cloth or other material. Keep the unit away from an open flame such as fire, candle etc. It is hazardous to replace the battery incorrectly. Replace the battery only with the same or equivalent type, in order to protect the environmnent, please dispose of the battery prop- erly. Do not use the unit in temperatures higher than 95 degrees Fahrenheit or 35 degrees Celsius.
4. Disassemble
Do not attempt to disassemble the cabinet. There is a risk of elec- tric shock and/or exposure to Laser Radiation. Contact qualified service personnel if your system needs repair.
5. Cleaning Unit
When cleaning, make sure the system is unplugged from the power source. Do not use liquid cleaners or aerosol cleaners. Use a cloth lightly dampened with water for cleaning the exterior of the system only.
6.Disc
Do not use irregularly shaped discs such as heart or
4

C.Contents
1.1 x 5?????? LCD Monitor & DVD Player Combination
2.1 x AC to DC Adapter
3.1 x Remote Control with battery (CR2025)
4.1 x Rechargeable Battery
5.1 x DC Power Adapter
6.1 x Instruction Manual
7.1 x Audio/Video Cable
D.Powering and installation
1.Powering the system indoors (Refer to Figure 1)
Plug one end of the AC to DC adapter into the DC 12V jack on the right side of the main unit, then plug the other end into a 120VAC power outlet.
2.Powering the system in a car (refer to Figure 1)
Plug one end of the DC power adapter into the DC 12V jack on the unit, then plug the other end into the vehicle power outlet.
Figure 1
5

E.Controls, Indicators, and Connectors
1. Unit View (Refer to Figure 2)
6

2.Remote Control View (Refer to Figure 3)
1)Setup Button
2)Up Button
3)Previous Button
4)Enter Button
5)Reverse Scan/Left Button
6)Down Button
7)Numeric Button
8) Display Button
9) Zoom Button 10) Subtitle Button
11) Next Button
12)
13) Forward Scan/Right Keypad
14) 1/All Repeat Button
15) Stop Button
16) Menu Button
17)Audio Button
18)Pause Button
19)Play Button
Figure 3
F.Loading and Playing a Disc
a.After connecting power to the unit, power on DVD player by sliding the power switch to the on position. The power indicator will light.
b.Open the disc tray by pressing the OPEN button and place a disc into the tray with the label side facing up.
c.Close the tray by pressing the ???PRESS??? area.The unit will load the disc and start playing.
d.Rotate the BRIGHTNESS and VOLUME to adjust the LCD???s bright- ness and the DVD player???s volume.
e.To stop playing a disc, press STOP.
7
G. Setup
Press ???SETUP??? to display the Main screen of the Setup Menu on the screen. Press ???SETUP??? again to exit the Setup Menu and the unit will resume it???s last playback mode.
Main Setup Menu Screen
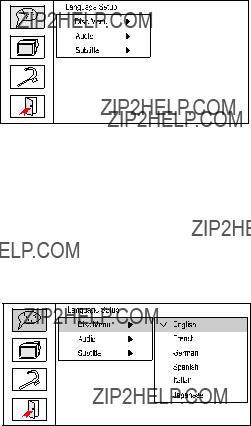
1)Press ???SETUP???, the ???Language Setup Page??? will be displayed on the screen.
a). Press ENTER and select ???Disc Menu??? using the UP/DOWN button, and then press RIGHT to enter the submenu. Select the desired Menu Language using UP/DOWN, and press ENTER to confirm the setting. Press LEFT to return.
Disc Menu Language Screen Display
8

b).Select ???Audio??? using the UP/DOWN button, and then press the RIGHT button to enter the submenu. Choose the Audio Language you de- sire using the UP/DOWN button and then press ENTER to confirm the setting. Press the LEFT button to return.
Audio Language Screen Display
c).Select ???Subtitle??? using the UP/DOWN buttton, and then press the RIGHT button to enter the submenu. Choose the Subtitle Language you desire using the UP/DOWN button and then press ENTER to confirm the setting. Press the LEFT button to return.
Subtitle Language Screen Display
9

4). Press the left button to return to the main menu. Select ???Screen Setup??? using the UP / DOWN button, then press ENTER to enter the screen setup page.
a.Select ???TV Display??? using the UP/DOWN button, then press RIGHT to enter the submenu. Select the desired display ratio using the UP/DOWN button, then press ENTER to confirm the setting. Press LEFT to return.
TV Display Screen Display
*4:3 PS (Normal/PS): When the player is connected to a normal TV, and a wide picture is shown on the full screen.
*4:3 LB (Normal/LB): When the player is connected to a normal TV, and a wide picture is shown on the screen with a black strip at both the top and bottom of the screen.
*16:9 (Wide): When the player is connected to a wide screen TV, a wide picture is shown on the full screen.
b.Select ???TV Type??? the using UP/DOWN button, then press RIGHT to enter the submenu. Select the desired TV Type using the UP/DOWN button, then press ENTER to confirm the setting. Press LEFT to return.
TV Type Screen Display
10
3).Press the left button to return to the main menu. Select ???Custom Set- up??? using the UP/DOWN button, then press the ENTER button to access the custom setup page.
a.Select ???Parental??? using the UP/DOWN button, then press RIGHT to enter the submenu.
Parental Control Screen Display
Select the parental level you desire using the UP/DOWN button for discs with
NOTE: The level of 8 Adult is the factory default.
b.Select ???Password??? using the UP/DOWN button, then press the RIGHT button to enter the Password Change Page. Input the Old Password or the Default Password, the new password and the Confirmed New Password.
Password Setup Page Screen Display
11
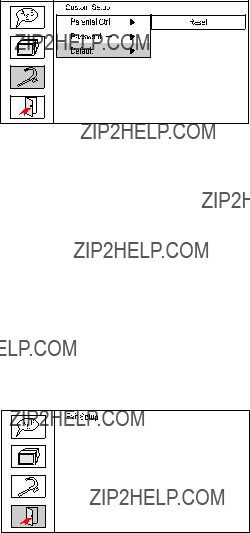
c.Select ???Default??? using the UP/DOWN button, then press RIGHT to en- ter the submenu. Press ENTER to make all of the settings return to the factory preset mode.
NOTE: The parental setting is not affected by the default reset function.
Default Screen Display
NOTE: The Default Password is 3308. This password is always ef- fective even after you have selected your own password and changed it. To avoid the possibility of others using the default password to set the parental level and change the password, you can record this default password in another area and delete it from this manual. Some discs can be limited depending on the age of users while some discs cannot.
4) Press ???SETUP??? to exit the setup mode or select ???Exit??? using the UP/DOWN button, then press the ENTER button to exit the Setup mode.
Exit Screen Display
12
H. Basic Operation
13

I. Menu
A DVD is divided into sections called titles and chapters. When you play a DVD, a root menu of the disc will appear on the screen of your TV or Monitor. The contents of the menu vary from disc to disc. Press MENU during playback to display the menu. Some DVDs only allow you to select disc playback options using the DVD root menu.
J.Display
1.PLAYING TIME AND REMAINING TIME
a. During playback press the ???DISPLAY??? button to display the cur- rent Title Number (1), the total Number of Titles (2), the current Chapter Number (3), the total Number of Chapters (4), and the Elapsed playback time for the title (5). The heading will disappear automatically after 3 seconds if the DISPLAY button is not pressed.
Title, Chapter Number, and Time Screen Display
b.Press ???DISPLAY??? again to display the Remaining Time of the title. The heading will disappear automatically in 3 seconds.
Title Remaining Time Screen Display
14

c. Press ???DISPLAY??? a third time to display the Elapsed Time for the chapter. The heading will disappear automatically in 3 seconds.
Chapter Elapsed Time Screen Display
d. Press ???DISPLAY??? a fourth time to display the Remaining Time for the chapter. The heading will disappear automatically in 3 seconds.
Chapter Remaining Time Screen Display
e. Press ???DISPLAY??? a fifth time to exit, ???Display Off??? will be displayed and will disappear automatically in 3 seconds.
15

2. SUBTITLE
During disc playback press ???SUBTITLE??? to select the subtitle language you desire*, with the current Subtitle Language Number (1) and the total Number of Subtitle Languages (2) displayed. If there are mul- tiple languages press ???SUBTITLE??? again to select another subtitle lan- guage. To turn subtitles OFF, press the ???SUBTITLE??? button until ???Sub- title Off??? is displayed. The Subtitle display will disappear automatically if the ???SUBTITLE??? button is not pressed again within 3 seconds.
Subtitle Screen Display
* Some DVDs only allow access to this function through the DVD menu.
16

3.AUDIO
During playback press ???AUDIO??? to select the audio language you de- sire*, with the current Audio Channel Number (1) and the total number of Audio Channels (2) displayed. Press AUDIO again to select another audio language. The audio display will disappear automatically if the ???AUDIO??? button is not pressed within for 3 seconds.
Audio Language Screen Display
*Some DVDs only allow access to this function through the DVD menu.
4.ZOOM
During playback press ???ZOOM??? to enlarge the picture by 2x or 4X with the current zoom multiple displayed (1) Press ???zoom???one time, the picture will be enlarged 2X. (2) Press ???zoom??? a second time, the picture will be enlarged 4X. (3) Press ???zoom??? a third time, and the picture will return to normal size.
Zoom Screen Display
17

5.
a. During playback press
b.Press
c.Press
18

6.1/ALL REPEAT
a.During playback press ???1/ALL REPEAT??? once to repeatedly play the current chapter.
Chapter Repeat Screen Display
b.During playback press ???1/ALL REPEAT??? again to repeatedly play the current title.
Title Repeat Screen Display
c.During playback press ???1/ALL REPEAT??? a third time to repeat whole disc.
Disc Repeat Screen Display
19

d.Press ???1/ALL REPEAT??? a fourth time, to cancel the repeat function and resume normal playback.
Repeat Off Screen Display
K. Playing Audio CDs
When playing an audio CD the track and playback time information will automatically be displayed. Pressing the display button will change the displayed information. The options below show you what information is available using this function.
a.The current track and playing time of that track will be displayed on the screen.
Single Elapsed Screen Display
b.Press ???DISPLAY??? one time and Single Remain appears along with the current track playing and the amount of time left.
Single Remain Screen Display
20
c.Press ???DISPLAY??? a second time and Total Remain appears along with the current track playing and the total time left.
Total Remain Screen Display
d.Press ???DISPLAY???a third time and Display Off appears. The disc information will no longer be displayed.
Display Off Screen Display
USING THE REPEAT FEATURE
The default mode for the Repeat feature is OFF. Pressing REPEAT consecutively changes the repeat options:
???Track- repeats the track that is playing.
???Disc- repeats the disc that is playing.
???Off
As you toggle through the options, the repeat option changes. The selected repeat option loops repeatedly until you turn it off.
21

L. Playing MP3 Discs
MP3 is a format for storing digital audio. An audio
Insert a MP3 CD, the DVD player will initialize the disc and the directory (folder) will be displayed.
MP3 MENU Screen Display
When an MP3 disc is inserted into the unit, the menu screen appears and playback will begin. You can use the menu screen to change folders and songs. The system plays the songs in the order they were burned onto the disc.
1.Press the  or
or  button to choose a folder from the folder list on the left side of the screen.
2.Press ENTER to select the highlighted folder. The songs avail- able in the folder will be listed.
3.Use  or
or  button to choose a song from the list. Press EN- TER to select and begin playback of the highlighted song.
22

Use the 
 ( NEXT ) button to move to the next song. Press the
 (PREVIOUS) button to move to the beginning of the previous song.
USING THE REPEAT FEATURE
The default mode for the Repeat feature is OFF. Pressing REPEAT consecutively changes the repeat options:
???Repeat One
???Repeat Folder
???Repeat Off
As you toggle through the options, the repeat option changes. The selected repeat option loops repeatedly until you turn it off.
NOTICE
???  ??? icon in front of a file name indicates that this is a folder, not an
MP3file.
??? ??? icon in front of a file name indicates that this is a MP3 file.
23
M.Playing JPG file
1)Load the JPG Disc into the tray and JPEG playback starts automatically.
2)To select individual JPEGs press the menu button to display folders and a list of the JPEGs contained within.
3)To select a folder highlight the desired folder on the left side and press ???ENTER???. The JPEGS contained in the folder will be listed on the right side. Highlight the desired JPEG and press ???ENTER???.
4)The unit will then play the JPEGs in order. To continually view a JPEG, press the ???PAUSE??? button.
5)Pressing the ???LEFT?????? button will rotate the picture counterclockwise. Pressing the ???RIGHT?????? button will rotate the picture clockwise.
6)You can reverse the photo horizontally by pressing the ???UP??? button, or you can reverse the photos vertically by pressing ???DOWN??? button.
7)When previewing the file, if you press ???DISPLAY???, ???SUBTITLE???, ???AUDIO???, ???AB???, ???STOP???, a hand icon will appear on the display meaning that these options are not available.
24

N. Connecting to a TV or another monitor ( Refer to Figure 4)
You can also connect the DVD player to a TV to enjoy high quality stereo sound and picture on another monitor as follows:
Connect one end of the audio/video cable???s black (1/8??? plug) plug into the unit???s AV Out jack, and connect the other end to the AUDIO INPUT jacks on your TV or Monitor (white = left channel, red = right channel). Connect the yellow plug to the VIDEO INPUT jack on your TV or Monitor.
Figure 4
*Optional wired headphones may be used with the unit. Simply plug in the headset to either Headphone jack.
Note: Plugging into the Headphone jack disables the internal speakers.
25
O. Specifications
Compatible DISC: DVD/CD/MP3/JPEG Signal system:NTSC
Panel size: 5 inch
Frequency response: 20 Hz to 20 kHz
Video output: 1
Audio output: 1.4Vrms/10kOhm
Audio S/N: Better than 60 dB
Dynamic range : Better than 85 dB
Laser: Semiconductor Laser, Wave Length: 650 nm/795 nm
Power source: DC 12V
Power consumption: 12 W
Operating temperature: 5~35??C
Weight : 0.651 kg/1.43 lbs
Dimensions (W x D x H): 6.54 X 5.60 X2.40 inches 166 x 142 x 61 mm
Battery Type: NiMh
P.Rechargeable Battery Installation and Use
The player utilizes a set of
NOTE: When the DVD player is used for the first time ensure that the battery has been charged for at least eight hours prior to connecting it to the DVD player.
If you plan not to use the battery for an extended period of time (one week or longer), we recommend that you first fully charge the battery and store it away properly. For longer periods of storage, please re- charge the battery at least once every two months to maintain the battery in optimum condition. Under no circumstances short the bat- tery terminals, store the battery in a metal container, or leave the bat-
tery in a humid or damp environment. Ideally, store the battery in an
26
airtight container with desiccant or other dehumidifying agent. Each full recharge takes approximately
During recharge, the red indicator will stay on. Once fully recharged, the red light will turn off. At this point you may remove the wall plug and stop charging.
Precautions Related to Battery Recharge:
1.Once the battery is fully discharged, immediately recharge (regard- less of whether you plan to use battery or not) in order to maximize battery life.
2.To charge the battery, connect the AC adapter power jack directly into the battery.
Using and Maintaining your Rechargeable Batteries
1.Please make sure you always use only the AC adapter included with the player to recharge your batteries.
2.Recharge efficiency will degrade when environmental temperatures drop below 50oF (10oC) or exceed 95oF (35oC).
3.Please remove battery from the player and store it properly if the player is not to be used for long time. During this period, please recharge the battery at least once two months to avoid irreparable damage to the battery.
27

Installing the Battery Pack:
1.First, make sure the player is in ???Stop??? mode and that the AC power supply has been disconnected.
2.Close the player cover.
3.Align the battery pack with the player module???s front edge.
4.Push the battery towards the rear of the player until it locks into position. The lock position is indicated by a click. The unit will fit snugly to the player.
5.Push the battery plug into the DVD player DC input jack.
Installing the DVD Player Battery
Removing the Battery Pack:
1.First, make sure the player is in ???Stop??? mode and the AC power supply has been disconnected.
2.Unplug the battery plug from the DVD player.
3.Press the release button on the rear of battery.
4.Slide the battery towards the back of the unit.
Removing the DVD Player Battery
28

90 DAY LIMITED WARRANTY
Applies to Audiovox Video Products
AUDIOVOX ELECTRONICS CORP. (the Company) warrants to the original retail purchaser of this product that should this product or any part thereof, under normal use and conditions, be proven defective in material or workmanship within 90 days from the date of original purchase, such defect(s) will be repaired or replaced with reconditioned product (at the
Company's option) without charge for parts and repair labor.
To obtain repair or replacement within the terms of this Warranty, the product is to be delivered with proof of warranty coverage (e.g. dated bill of sale), specification of defect(s), transportation prepaid, to the Company at the address shown below.
This Warranty does not extend to the elimination of externally generated static or noise, to correction of antenna problems, to costs incurred for installation, removal or reinstallation of the product, or to damage to tapes, discs, speakers, accessories, or electrical systems.
This Warranty does not apply to any product or part thereof which, in the opinion of the Company, has suffered or been damaged through alteration, improper installation, mishan- dling, misuse, neglect, accident, or by removal or defacement of the factory serial number/ bar code label(s). THE EXTENT OF THE COMPANY'S LIABILITY UNDER THIS WARRANTY
IS LIMITED TO THE REPAIR OR REPLACEMENT PROVIDED ABOVE AND, IN NO EVENT,
SHALLTHECOMPANY'SLIABILITYEXCEEDTHEPURCHASEPRICEPAIDBYPURCHASER
FORTHEPRODUCT.
This Warranty is in lieu of all other express warranties or liabilities. ANY IMPLIED
WARRANTIES,INCLUDINGANYIMPLIEDWARRANTYOFMERCHANTABILITY,SHALLBE
LIMITEDTOTHEDURATIONOFTHISWRITTENWARRANTY. ANYACTIONFORBREACH
OFANYWARRANTYHEREUNDERINCLUDINGANYIMPLIEDWARRANTYOFMERCHANT-
ABILITYMUSTBEBROUGHTWITHINAPERIODOF30MONTHSFROMDATEOFORIGINAL
PURCHASE. INNOCASESHALLTHECOMPANYBELIABLEFORANYCONSEQUENTIAL
ORINCIDENTALDAMAGESFORBREACHOFTHISORANYOTHERWARRANTY,EXPRESS
OR IMPLIED, WHATSOEVER. No person or representative is authorized to assume for the Company any liability other than expressed herein in connection with the sale of this product.
Some states do not allow limitations on how long an implied warranty lasts or the exclusion or limitation of incidental or consequential damage so the above limitations or exclusions may not apply to you. This Warranty gives you specific legal rights and you may also have other rights which vary from state to state.
U.S.A.: AUDIOVOX ELECTRONICS CORPORATION, 150 MARCUS BLVD., HAUPPAUGE, NEW YORK 11788 !
CANADA : CALL
SERVING YOUR AREA
29

?? 2004 Audiovox Electronics Corp., 150 Marcus Blvd., Hauppauge, N.Y. 11788
30