FM/MW/LW/RDS CD Player
??? OWNER'S MANUAL
Please read before using this equipment.
??? BEDIENUNGSANLEITUNG
Lesen Sie diese Bedienungsanleitung bitte vor Gebrauch des Ger??tes.
??? MODE D'EMPLOI
Veuillez lire avant d???utiliser cet appareil.
??? MANUAL DE OPERACI??N
L??alo antes de utilizar este equipo.
??? ISTRUZIONI PER L???USO
Si prega di leggere prima di utilizzare il attrezzatura.
??? ANV??NDARHANDLEDNING
Innan du anv??nder utrustningen b??r du l??sa igenom denna anv??ndarhandledning.
DHE
CD changer for CDA-7969R CD-Wechsler f??r CDA-7969R Changeur CD pour CDA-7969R Cambiador de CD para CDA-7969R
Cambia CD per CDA-7969R CD-v??xlare f??r CDA-7969R
CD changer for CDA-7969R CD-Wechsler f??r CDA-7969R Changeur CD pour CDA-7969R Cambiador de CD para CDA-7969R
Cambia CD per CDA-7969R CD-v??xlare f??r CDA-7969R
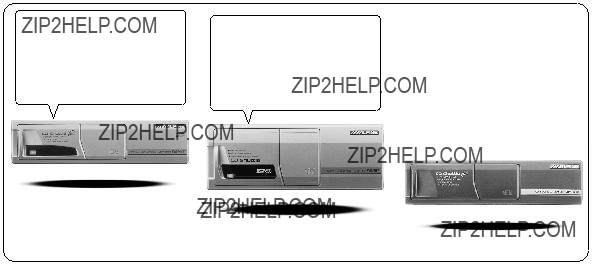
CHA-S624
CHA-1214
CHM-S620
Alpine CD Changers Give You More!
More musical selections, more versatility, more convenience.
An Alpine CD Changer adds more musical choices to your sound system. All models can be controlled from Alpine head units and deliver excellent sound quality. The CHA-S624 is a high-performance 6-disc changer with a new M DAC, Ai-NET compatibility, Optical Digital Output, 150 Disc Title Memory and CD TEXT. The CHA-1214 Ai-NET model holds 12 discs, and the CHM-S620 M-Bus model is a super-compact 6-disc changer.
Von Alpine CD-Wechslern haben Sie mehr!
Mehr Musikauswahl, mehr Vielseitigkeit, mehr Komfort.
Mit einem Alpine CD-Wechsler erweitern Sie die Musikauswahl Ihres Systems. S??mtliche Modelle lassen sich von einer Alpine- Bedieneinheit aus steuern und liefern hervorragende Klangqualit??t. Der CHA-S624 ist ein Ai-NET-kompatibler Hochleistungs-Wechsler f??r 6 CDs mit dem neuen M-DAC, Digitalausgang f??r Glasfaserkabel, CD-Titelspeicher f??r 150 Titel und CD-TEXT. Das Ai-NET- Modell CHA-1214 nimmt 12 CDs auf, und der M-Bus-kompatible CHM-S620 ist ein superkompakter Wechsler f??r 6 CDs.
Changeurs de CD Alpine : vous avez le choix!
Plus de s??lections musicales, plus de souplesse, plus de confort.
Un changeur de CD Alpine permet d'augmenter la plage des s??lections musicales de votre syst??me embarqu??. Tous les mod??les peuvent ??tre contr??l??s ?? partir des autoradios Alpine et offrent une excellente qualit?? audio. Le mod??le CHA-S624 est un changeur 6 disques ultra performant compatible Ai-NET et ??quip?? d'un convertisseur N/A standard, d'une sortie optique num??rique, d'une m??moire d'une capacit?? de 150 titres et de la fonction CD TEXT. Le mod??le CHA-1214 Ai-NET peut contenir 12 disques. Le mod??le CHM-S620 M-Bus est un changeur 6 disques super compact.
??Los cambiadores Alpine de CD le ofrecen m??s!
M??s selecciones musicales, m??s versatilidad y m??s ventajas.
Un cambiador Alpine de CD a??ade m??s opciones musicales a su equipo de sonido. Todos los modelos pueden controlarse desde las unidades principales de Alpine y proporcionar un sonido de calidad excepcional. El modelo CHA-S624 es un cambiador de 6 discos de alto rendimiento con el nuevo DAC "M" y compatibilidad con Ai-NET, salida digital ??ptica, memoria de t??tulos de 150 discos y TEXTO CD. El modelo CHA-1214 Ai-NET admite 12 discos y el modelo CHM-S620 Bus-M es un cambiador de 6 discos y tama??o reducido.
I caricatori CD Alpine danno di pi??!
Pi?? scelta, pi?? versatilit??, pi?? comodit??.
Un caricatore CD Alpine offre maggiore scelta. Tutti i modelli possono essere controllati tramite le unit?? di controllo Alpine e producono un suono di qualit?? eccellente. CHA-S624 ?? un caricatore a 6 dischi Ai NET compatibile e dotato di un nuovo M DAC, di un'uscita ottica digitale, memorizzazione dei titoli di 150 dischi e CD TEXT. Il modello CHA-1214 Ai NET pu?? contenere un massimo di 12 dischi, mentre il modello CHM-S620 M-Bus ?? un caricatore a 6 dischi ultra compatto.
Alpines CD-v??xlare ger mer!
Fler musikval, mer variation, st??rre bekv??mlighet.
Med Alpines CD-v??xlare i systemet f??r du st??rre musikalisk valfrihet. Alla modeller kan styras fr??n Alpines huvudenheter och ger enast??ende ljudkvalitet. CHA-S624 ??r en h??gpresterande v??xlare f??r 6 skivor med en ny M D/A-omvandlare, kompatibel med Ai-NET, optisk digitalutg??ng, titelminne f??r 150 skivor och CD-TEXT. Modellen CHA-1214 Ai-NET rymmer 12 skivor och modellen CHM- S620 M-Bus ??r en superkompakt v??xlare f??r 6 skivor.
Press and hold the INTLZ button for at least 2 seconds again to return to normal operation.
4
3 Press the TUNE button to turn on or off the DEMO mode.
Each press toggles between DEMO ON and
DEMO OFF.
If no buttons are pressed 30 seconds after the DEMO mode is turned ON, "DEMO" blinks 3 times in the display. The DEMO mode then begins.
NOTE
The initial setting at the factory is "DEMO OFF."
button the display scrolls in
NOTE
If you press the DN g reverse sequence.
Audio Mute Function
Activating this function will instantly lower the volume level by 20 dB.
1 Press the MUTE button to activate the MUTE mode. The audio level will decrease by about 20 dB.
Pressing the MUTE button again will bring the audio back to its previous level
Demonstration
This unit has the Demonstration feature which simulates the display functions.
1 Press and hold the INTLZ button for at least 2 seconds.
2 Press the f UP button to select the DEMO mode. Each press changes the modes as shown:
??? FM-LE ??? REG ??? PTY31 ??? AMBER ??? DIM ??? SUB ??? BEEP
D-OUT ??? CLOSE ??? DEMO ??? AUX ??? SCR ??? MUTE ???
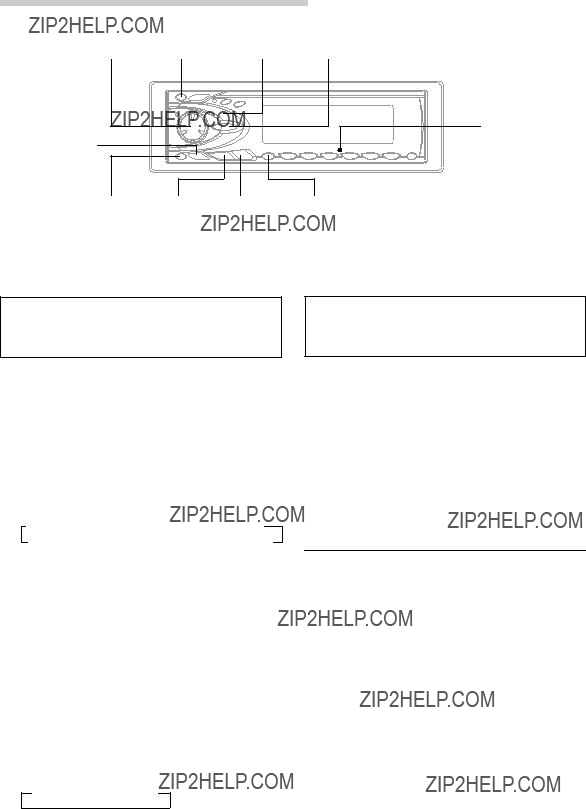
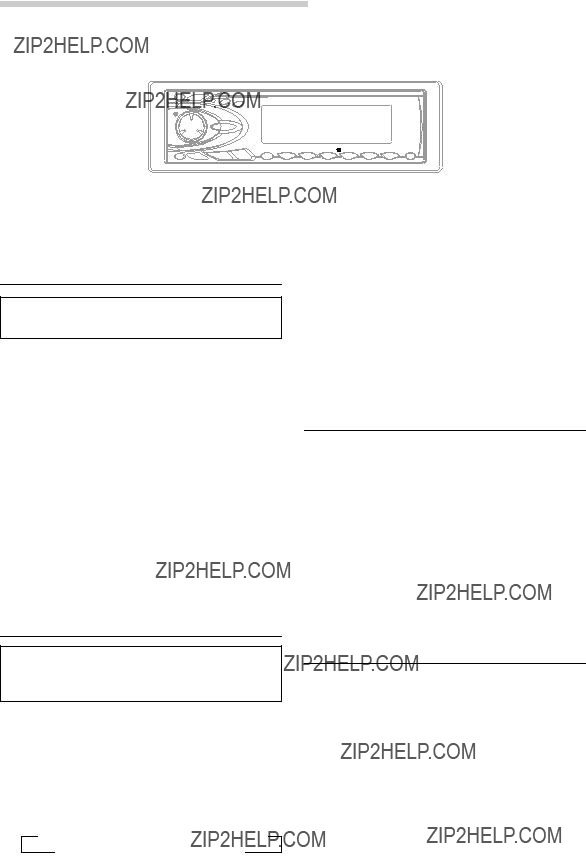
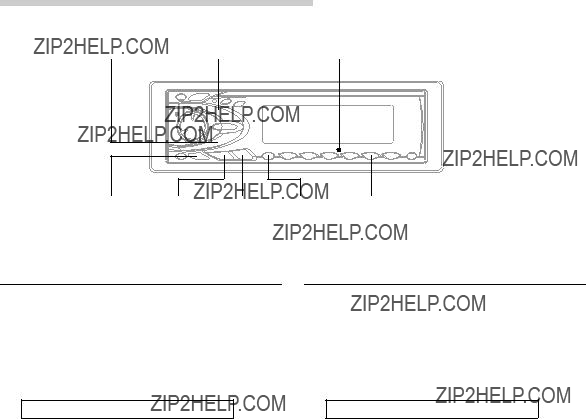
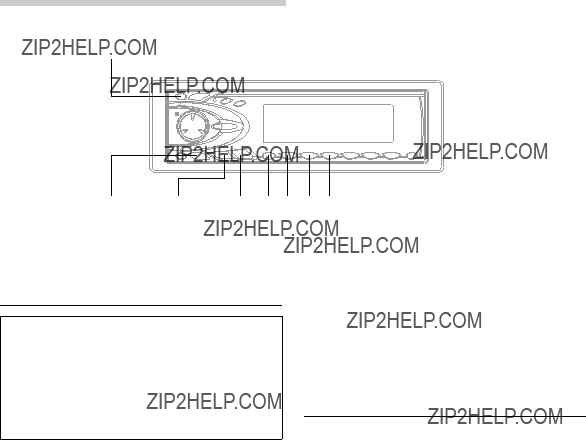
Basic Operation
MUTE TUNE DN g f UP
Changing Backlighting Colour
1 Press and hold the INTLZ button for at least 2 seconds.
2 Press the f UP button repeatedly to select "AMBER".
Each press of the f UP button changes the modes as shown:
NOTE
If you press the DN g button the display scrolls in reverse sequence.
???FM-LE ??? REG ??? PTY31 ??? AMBER ??? DIM ??? SUB ??? BEEP D-OUT ??? CLOSE ??? DEMO ??? AUX ??? SCR ??? MUTE ???
3 Press the TUNE button to toggle the mode between AMBER ON (amber) and AMBER OFF (green).
4 Press and hold the INTLZ button for at least 2 seconds to set the selected mode.
Dimmer Control
Set the DIMMER control to AUTO to decrease the illumination brightness of the unit with the head lights of the vehicle ON. This mode is useful if you feel the unit's backlighting is too bright at night.
1 Press and hold the INTLZ button for at least 2 seconds.
2 Press the f UP button repeatedly to select "DIM (DIMMER)".
Each press of the f UP button scrolls the modes as shown:
???FM-LE ??? REG ??? PTY31 ??? AMBER ??? DIM ??? SUB ??? BEEP D-OUT ??? CLOSE ??? DEMO ??? AUX ??? SCR ??? MUTE ???
NOTE
If you press the DN g button the display scrolls in reverse sequence.
3 Press the TUNE button to select the Dimmer mode. Each press toggles between DIMMER AUTO and DIMMER MANU.
4 Press and hold the INTLZ button for at least 2 seconds to activate the normal mode.
7-EN
Press and hold the INTLZ button for at least 2 seconds to set the selected mode.
4
??? FM-LE ??? REG ??? PTY31 ??? AMBER ??? DIM ??? SUB ??? BEEP
D-OUT ??? CLOSE ??? DEMO ??? AUX ??? SCR ??? MUTE ???
3 Press the TUNE button to toggle the mode between BEEP ON and BEEP OFF.
NOTE
The initial setting at the factory is BEEP ON.
button the display scrolls in
NOTE
If you press the DN g reverse sequence.
3 Press the TUNE button to toggle mode between SUB-W ON and SUB-W OFF.
If an Ai-NET compatible processor with Subwoofer output is connected:
Press the TUNE button after selecting the SUB-W ON mode, and the subwoofer output phase is toggled NORMAL (0??) or REVERS (180??).
4 Press and hold the INTLZ button for at least 2 seconds after setting the SUB-W ON.
5 Press the MODE button repeatedly to select the SUB-W mode.
??? SUB-W ??? BALANCE ??? FADER ??? VOLUME
6 Rotate Audio Control knob until the desired sound is obtained in each mode.
Sound (Beep) Guide Function
This function will give audible feedback with varying tones depending upon the button pressed.
1 Press and hold the INTLZ button for at least 2 seconds.
2 Press the f UP button repeatedly to select "BEEP."
Each press of the f UP button changes the modes as shown:
button the display scrolls in
NOTE
If you press the DN g reverse sequence.
Subwoofer On and Off
1 Press and hold the INTLZ button for at least 2 seconds.
2 Press the f UP button repeatedly to select "SUB."
Each press of the f UP button changes the modes as shown:
??? FM-LE ??? REG ??? PTY31 ??? AMBER ??? DIM ??? SUB ??? BEEP
D-OUT ??? CLOSE ??? DEMO ??? AUX ??? SCR ??? MUTE ???
Turning Mute Mode On/Off
If a device having the interrupt feature is connected, audio will be automatically muted whenever the interrupt signal is received from the device. This function can be turned ON or OFF from the head unit by following procedure below.
1 Press and hold the INTLZ button for at least 2 seconds.
2 Press the f UP button to select the MUTE mode. Each press changes the modes as shown:
??? FM-LE ??? REG ??? PTY31 ??? AMBER ??? DIM ??? SUB ??? BEEP D-OUT ??? CLOSE ??? DEMO ??? AUX ??? SCR ??? MUTE ???
NOTE
If you press the DN g button the display scrolls in reverse sequence.
3 Press the TUNE button to turn on or off the Mute mode.
Each press toggles between the MUTE ON and OFF modes.
NOTE
The initial setting at the factory is "MUTE ON."
4 Press and hold the INTLZ button for at least 2 seconds again to return to normal operation.
CD Text Scroll Setting
This CD player has the ability to scroll the disc and track name recorded on CD-Text discs. The scrolling feature will work with names greater than 12 characters. This feature will not work for the 12 character titles that were input manually.
1 Press and hold the INTLZ button for at least 2 seconds.
2 Press the f UP button repeatedly to select "SCR (SCROLL)".
Each press of the f UP button changes the modes as shown:
??? FM-LE ??? REG ??? PTY31 ??? AMBER ??? DIM ??? SUB ??? BEEP D-OUT ??? CLOSE ??? DEMO ??? AUX ??? SCR ??? MUTE ???
NOTE
If you press the DN g button the display scrolls in reverse sequence.
3 Press the TUNE button to toggle mode between SCROLL AUTO and MANU.
???SCROLL AUTO: the display of CD text is scrolled continuously.
???SCROLL MANU: the display is scrolled only when a disc is loaded or when a track is changed.
4 When the setting is completed, press and hold the INTLZ button for at least 2 seconds to return to the normal mode.
NOTES
???Initial mode is "SCROLL MANU".
???The unit scrolls only CD text names. The disc titles input manually (refer to page 20) cannot be scrolled.
???The display of CD text will scroll even for text less than 12 characters.
??? FM-LE ??? REG ??? PTY31 ??? AMBER ??? DIM ??? SUB ??? BEEP ??? MUTE D-OUT ??? CLOSE ??? DEMO ??? AUX (AUX Mode Display Setting*) ??? SCR ???
??? Displayed after AUX-IN ON is set.
3 Press the TUNE button to toggle the mode between AUX-IN ON and AUX-IN OFF.
NOTES
??? The initial setting at the factory is AUX-IN OFF.
??? You can set the AUX mode display by pressing the DN g or f UP button after AUX-IN ON is set, select the AUX mode display setting, and then press the TUNE button.
4 Press and hold the INTLZ button for at least 2 seconds to return to the normal mode.
5 To adjust the volume, etc., first press the SOURCE button and select the AUX mode, then make the necessary adjustment.
??? TUNER ??? CD ??? AUX
NOTE
When AUX-IN ON is selected, a CD changer cannot be used.
8-EN
button the display scrolls in
NOTE
If you press the DN g reverse sequence.
Press and hold the INTLZ button for at least 2 seconds.
Press the f UP button repeatedly to select "AUX" .
Each press of the f UP button changes the modes as shown:
You can input TV/video sound by connecting an optional Ai-NET/RCA Interface cable (KCA-121B) to this component.
1
2
When the Blackout mode is turned on, the display will turn off to reduce power consumption.
This additional power enhances the sound quality.
1 Press and hold the BLACK OUT button for at least 2 seconds to start the blackout mode. By doing so the display will be removed.
NOTE
If any button on the unit is pressed during the blackout mode, the function will be displayed for 5 seconds to show the operation before returning to Blackout mode.
To cancel the blackout mode, press and hold the BLACK OUT button for at least 2 seconds.
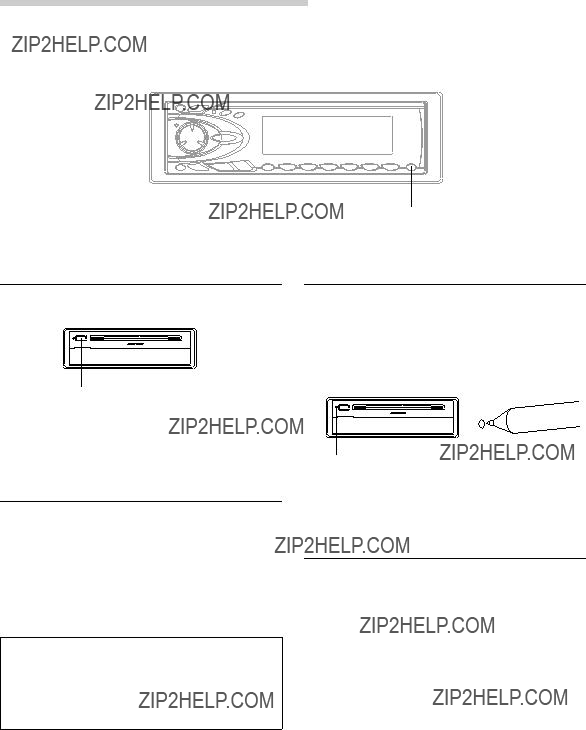
Switching the Display Modes
1 Press the DISP (DISPLAY) button to select the desired Display pattern mode.
Each press changes the display patterns.
Press the SOURCE button until a radio frequency appears in the display.
Press the SOURCE button until a radio frequency appears in the display.
Radio Operation
TUNE/A.ME DN g f UP FF5
Manual Tuning
1
2 Press the BAND button repeatedly until the desired radio band is displayed.
Each press changes the band:
??? FM1 ??? FM2 ??? FM3 ??? MW ??? LW
3 Press the TUNE button repeatedly until "DX SEEK" and "SEEK" disappear from the display.
NOTE
The initial mode is DX SEEK.
4 Press the DN g or f UP button to move downward or upward one step respectively until the desired station frequency is displayed.
NOTE
The ST indicator appears on the display when a Stereo FM station is tuned in.
Automatic Seek Tuning
1
2 Press the BAND button repeatedly until the desired radio band is displayed.
Each press changes the band:
??? FM1 ??? FM2 ??? FM3 ??? MW ??? LW
3 Press the TUNE button to illuminate the DX and SEEK indicators in the display.
With the DX (Distance) mode activated, both strong and weak stations will be tuned in the Auto-Seek operation.
Press again to return to the local mode. The DX indicator will turn off and the SEEK indicator will remain illuminated. Now, only strong stations will be tuned.
4 Press the DN g or f UP button to automatically seek for a station downward or upward respectively.
The unit will stop at the next station it finds. Press the same button again to seek the next station.
1
Select the radio band and tune in a desired radio station you wish to store in the preset memory.
??? FM1 ??? FM2 ??? FM3 ??? MW ??? LW
2 Press the F button. The FUNC indicator will illuminate.
3 Press the F5 (TRVS) button to activate the Travel Search mode. The unit will automatically search and store up to 12 stations (max.) receivable in the region you are travelling.
4 To recall a station stored, press the DN g or f UP button.
To deactivate the Travel Search mode, press the F5 button.
5 Press the F button to activate the normal mode. The FUNC indicator will turn off.
NOTES
??? If no stations are stored, the display shows "NO MEMORY."
??? When the radio band is changed, the stations stored in memory using this function will be erased.
??? Operate the unit while the FUNC indicator is illuminated.
If no buttons are pressed within 5 seconds, the FUNC indicator will turn off.
Press the BAND button repeatedly until the desired radio band is displayed.
Each press changes the radio bands as follows:
2 Press the BAND button repeatedly until the desired band is displayed.
3 Press the station Preset button that has your desired radio station in memory.
The display shows the band, preset number with a triangle and frequency of the station selected.
Auto Station Search While Travelling
This function will automatically search for up to 12 stations receivable in the region you are in and store them in temporary memory.
Use this function when you are travelling in a region away from home.
Tuning to Preset Stations
1 Press the SOURCE button to select the radio mode.
Manual Storing of Station Presets
1
2 Press and hold any one of the Preset buttons (F1 through F6) for at least 2 seconds until the station frequency on the display blinks.
3 Press the Preset button into which you wish to store the station while the frequency display is blinking (within 5 seconds).
The display stops blinking once the station has been memorized. The display shows the band, preset No. with a triangle (9) and station frequency memorized.
4 Repeat the procedure to store up to 5 other stations onto the same band.
To use this procedure for other bands, simply select the band desired and repeat the procedure.
A total of 30 stations can be stored in the preset memory (6 stations for each band; FM1, FM2, FM3, MW and LW).
NOTE
If you store a station in a preset memory which already has a station, the current station will be cleared and replaced with the new station.
Automatic Memory of Station
Presets
1 Press the SOURCE button to select the radio mode.
2 Press the BAND button repeatedly until the desired radio band is displayed.
3 Press and hold the A. ME button for at least 2 seconds.
The frequency on the display continues to change while the automatic memory is in progress. The tuner will automatically seek and store 6 strong stations in the selected band. They will be stored into presets F1 to F6 buttons in order of signal strength.
When the automatic memory has been completed, the tuner goes to the station stored in the preset location No. 1.
NOTE
If no stations are stored, the tuner will return to the original station you were listening to before the auto memory procedure began.
Press the F button. The FUNC indicator will illuminate.
Press and hold the INTLZ button for at least 2 seconds to activate the setting mode.
Receiving RDS Regional (Local)
Stations
1
2 Press the f UP button repeatedly to select "REG. (REGIONAL)" Each press of the f UP button scrolls the modes as shown:
???FM-LE ??? REG ??? PTY31 ??? AMBER ??? DIM ??? SUB ??? BEEP D-OUT ??? CLOSE ??? DEMO ??? AUX ??? SCR ??? MUTE ???
NOTE
If you press the DN g button the display scrolls in reverse sequence.
3 Press the TUNE button to turn on or off the REGIONAL mode.
In the REGIONAL OFF mode, the unit automatically keeps receiving the related local RDS station.
4 Press and hold the INTLZ button for at least 2 seconds to deactivate the setting mode.
Receiving Traffic Information
1
2 Press the F2 (T.INF) button to activate the Traffic Information mode.
3 Press the DN g or f UP button to select your desired traffic information station. When a traffic information station is tuned in, the TP indicator lights up.
Traffic information is heard only when it is being broadcast. If traffic information is not being broadcast, the unit is set in the standby mode. When a traffic information broadcast begins, the unit automatically receives it and the display shows "TRF-INFO" for 5 seconds, then returns to the previous display.
When traffic information broadcast is over, the unit will automatically set in the standby mode.
4 Press the F button to activate the normal mode. The FUNC indicator will turn off.
NOTES
???If the traffic information broadcast signal falls below a certain level, the unit remains in the receiving mode for 1 minute. If the signal remains below a certain level for over 1 minute, the "T.INFO" indicator blinks.
???If you do not want to listen to the traffic information being received, lightly press the F2 button to skip that traffic information message. The T.INFO mode will remain in the ON position to receive the next traffic information message.
???If the volume level is changed while receiving traffic information, the changed volume level will be memorized. When traffic information is received next time, the volume level will be automatically adjusted to the level memorized.
???In the T.INFO mode, the SEEK tuning selects only the TP stations.
PTY (Programme Type) Tuning
1 Press the F button. The FUNC indicator will illuminate.
2 Press the F3 (PTY) button to activate the PTY mode. The Programme Type of the station being currently received will be displayed for 5 seconds.
If there is no receivable PTY broadcast, "NO PTY" will be displayed for 5 seconds.
NOTE
If no button is pressed within 5 seconds after pressing the PTY button, the PTY mode will be automatically cancelled.
3 Press the DN g and f UP buttons within 5 seconds after activating the PTY mode to choose the desired programme type while the PTY (programme type) is being displayed. Each press scrolls the programme type by one.
??? LIGHT M ??? CLASSICS ??? OTHER M
4 Press the F3 button within 5 seconds after selecting the programme type to start searching for a station in the selected programme type. The chosen programme type indicator blinks during searching and lights when a station is found.
If no station is found, "NO PTY" will be displayed for 5 seconds.
5 Press the F button to activate the normal mode. The FUNC indicator will turn off.
NOTE
Operate the unit while the FUNC indicator is illuminated.
If no buttons are pressed within 5 seconds, the FUNC indicator will turn off.
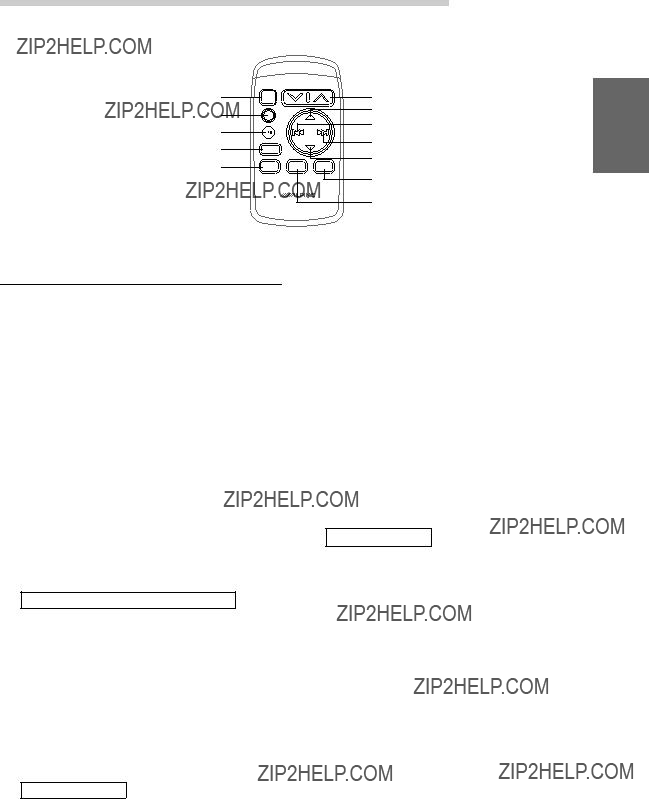
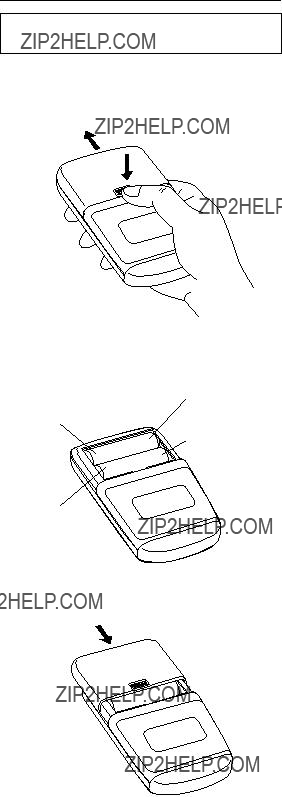
Battery Replacement
Applicable battery: Use two "AAA" sized dry batteries or equivalent.
1 Opening the battery cover
Slide out the battery cover while firmly pressing outward.
2 Replacing the battery
Put the batteries in the case observing the polarities as illustrated.
e
d
d
e
3 Closing the cover
Push the cover as illustrated until a click is heard.
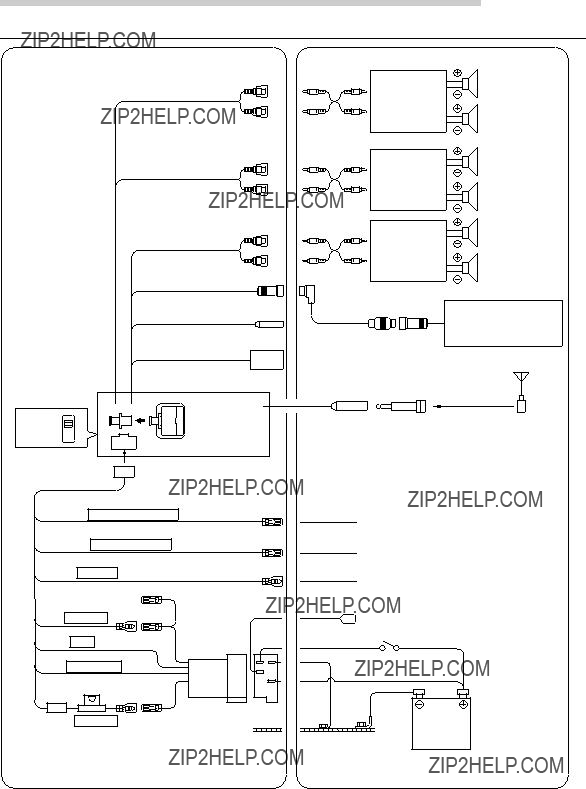
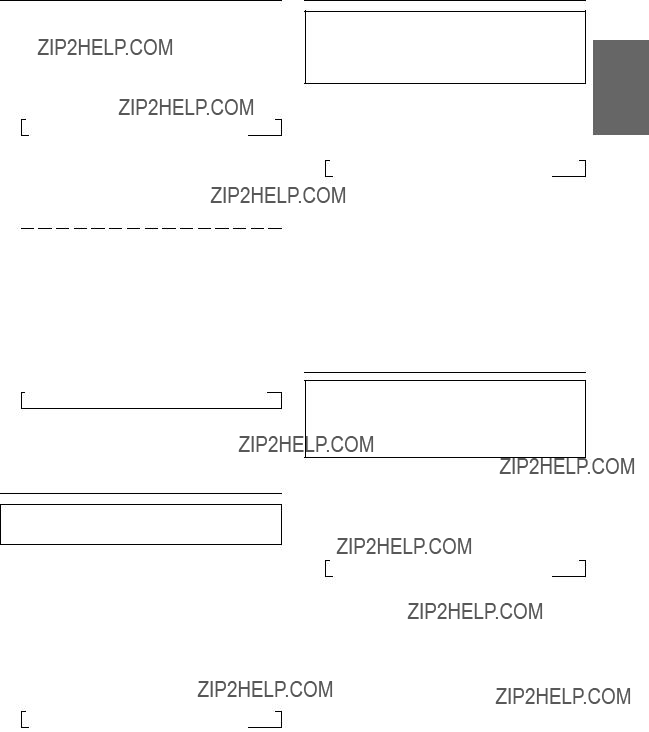
Installation and Connections
Connection
For details on how to set the Subwoofer to ON/OFF, see "Subwoofer On and Off" on page 7.

1Antenna Receptacle
Connect to the supplied ISO antenna convertor plug.
2Audio Interrupt In Lead (Pink/Black)
Connect this lead to the Audio Interface output of a cellular phone which provides ground shorting when a call is received.
3Remote Turn-On Lead (Blue/White)
Connect this lead to the remote turn-on lead of your amplifier or signal processor.
4Dimmer Lead (Orange)
This lead may be connected to the vehicle???s instrument cluster illumination lead. This will enable the vehicle???s dimmer control to dim the backlighting of the CDA-7969R.
5Switched Power Lead (Ignition) (Red)
Connect this lead to an open terminal on the vehicle???s fuse box or another unused power source which provides (+) 12V only when the ignition is turned on or in the accessory position.
6Power Antenna Lead (Blue)
Connect this lead to the +B terminal of your power antenna, if applicable.
NOTE
This lead should be used only for controlling the vehicle's power antenna. Do not use this lead to turn on an amplifier or a signal processor, etc.
7Fuse Holder (7.5A)
8Battery Lead (Yellow)
Connect this lead to the positive (+) post of the vehicle???s battery.
9ISO Power Supply Connector
!Ground Lead (Black)
Connect this lead to a good chassis ground on the vehicle. Make sure the connection is made to bare
metal and is securely fastened using the sheet metal screw provided.
" Power Supply Connector
#Ai-NET Connector
Connect this to the output or input connector of other product (CD changer, Equalizer, etc.) equipped with Ai-NET.
NOTE
You can input TV/video sound by connecting an optional Ai-NET/RCA Interface cable (KCA-121B) to this component.
$ The Digital Output Connector
Connect this to any other optical digital products of
ALPINE.
The digital signal will be output when the CD mode is on.
%Remote Control Interface Connector
To remote control interface box.
&System Switch
When connecting an equalizer or divider using Ai- NET feature, place this switch in the EQ/DIV position. When no device is connected, leave the switch in the NORM position.
NOTE
Be sure to turn the power off to the unit before changing the switch position.
( DC/DC Converter
NOTES
???Do not install the converter at a location subjected to water such as under the floor mat or air conditioner. This may cause a malfunction.
???Do not bundle the DC/DC converter cable with other audio cables. Doing so may induce noise into your system.
???Keep the DC/DC converter away from the Antenna cables and the rear side of the unit, otherwise noise may be generated when receiving radio broadcast.
) Ai-NET Cable (Included with CD Changer)
~Front Output RCA Connectors
RED is right and WHITE is left.
+Rear Output RCA Connectors
RED is right and WHITE is left.
,Subwoofer RCA Connectors
RED is right and WHITE is left.
- RCA Extension Cable (Sold Separately)
To prevent external noise from entering the audio system.
???Locate the unit and route the leads at least 10cm away from the car harness.
???Keep the battery power leads as far away from other leads as possible.
???Connect the ground lead securely to a bare metal spot (remove the coating if necessary) of the car chassis.
???If you add an optional noise suppressor, connect it as far away from the unit as possible. Your Alpine dealer carries various Alpine noise suppressors, contact them for further information.
???Your Alpine dealer knows best about noise prevention measures so consult your dealer for further information.
 WARNING
 WARNING
 CAUTION
 PRECAUTIONS
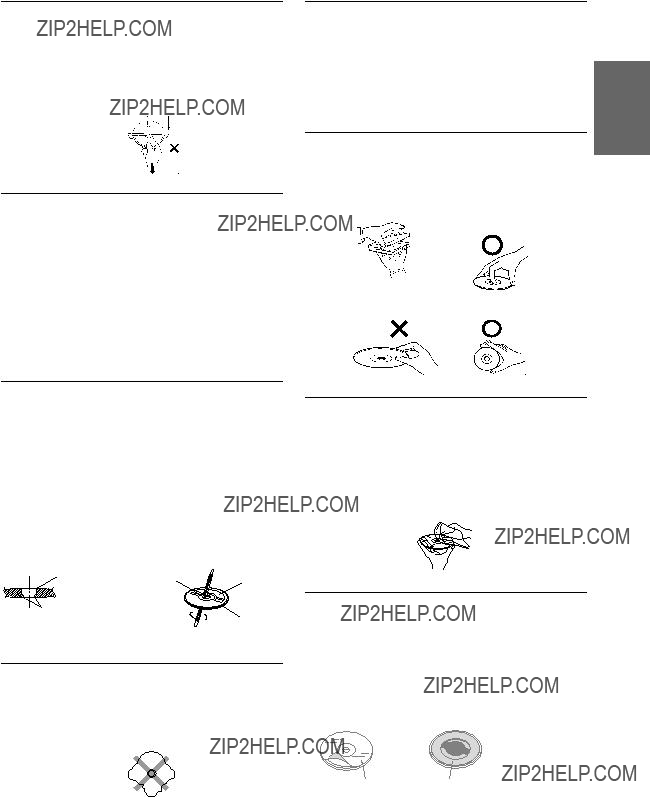


 " symbol into all spaces.


 Warning
 Caution