
R
FM/AM CD Player
??? OWNER'S MANUAL
Please read before using this equipment.
??? MODE D'EMPLOI
Veuillez lire avant d???utiliser cet appareil.
??? MANUAL DE OPERACI??N
L??alo antes de utilizar este equipo.
ENGLISH
FRAN??AIS
ESPA??OL


WARNING
 WARNING
This symbol means important instruc- tions.
Failure to heed them can result in serious injury or death.
DO NOT OPERATE ANY FUNCTION THAT
TAKES YOUR ATTENTION AWAY FROM
SAFELY DRIVING YOUR VEHICLE.
Any function that requires your prolonged attention should only be performed after coming to a complete stop. Always stop the vehicle in a safe location before performing these functions. Failure to do so may result in an accident.
KEEP THE VOLUME AT A LEVEL WHERE YOU
CAN STILL HEAR OUTSIDE NOISE WHILE
DRIVING.
Failure to do so may result in an accident.
MINIMIZE DISPLAY VIEWING WHILE
DRIVING.
Viewing the display may distract the driver from looking ahead of the vehicle and cause an accident.
DO NOT DISASSEMBLE OR ALTER.
Doing so may result in an accident, fire or electric shock.
USE THIS PRODUCT FOR MOBILE 12V
APPLICATIONS.
Use for other than its designed application may result in fire, electric shock or other injury.
KEEP SMALL OBJECTS SUCH AS BATTERIES
OUT OF THE REACH OF CHILDREN.
Swallowing them may result in serious injury. If swallowed, consult a physician immediately.
USE THE CORRECT AMPERE RATING WHEN
REPLACING FUSES.
Failure to do so may result in fire or electric shock.
USE ONLY IN CARS WITH A 12 VOLT
NEGATIVE GROUND.
(Check with your dealer if you are not sure.) Failure to do so may result in fire, etc.
DO NOT BLOCK VENTS OR RADIATOR
PANELS.
Doing so may cause heat to build up inside and may result in fire.
DO NOT PLACE HANDS, FINGERS OR
FOREIGN OBJECTS IN INSERTION SLOTS OR GAPS.
Doing so may result in personal injury or damage to the product.

 CAUTION
This symbol means important instruc- tions.
Failure to heed them can result in injury or material property damage.
HALT USE IMMEDIATELY IF A PROBLEM
APPEARS.
Failure to do so may cause personal injury or damage to the product. Return it to your authorized Alpine dealer or the nearest Alpine Service Center for repairing.
 PRECAUTIONS
Temperature
Be sure the temperature inside the vehicle is between +60??C (+140??F) and
Moisture Condensation
You may notice the CD playback sound wavering due to condensation. If this happens, remove the disc from the player and wait about an hour for the moisture to evaporate.
Damaged Disc
Do not attempt to play cracked, warped, or damaged discs. Playing a bad disc could severely damage the playback mechanism.
Maintenance
If you have problems, do not attempt to repair the unit yourself. Return it to your Alpine dealer or the nearest Alpine Service Station for servicing.

Never Attempt the Following
Do not grip or pull out the disc while it is being pulled back into the player by the automatic reloading mechanism.
Do not attempt to insert a disc into the unit when the unit power is off.
New Discs
As a protective measure to prevent the CD from jamming, the CD player will automati- cally eject discs with irregular surfaces or inserted incorrectly. When a new disc is inserted into the player and ejected after initial loading, using your finger, feel around the inside of the centre hole and outside edge of the disc. If you feel any small bumps or irregularities, this could inhibit proper loading of the disc. To remove the bumps, rub the inside edge of the hole and outside edge of the disc with a
Center Hole
Inserting Discs
Your player accepts only one disc at a time for playback.
Do not attempt to load more than one disc. Make sure the label side is facing up when you insert the disc. Your player will automatically eject any disc that is inserted incorrectly. If the player continues to eject a correctly inserted disc, push the Reset switch with a pointed object such as a
Playing a disc while driving on a very bumpy road may result in skips, but this will not scratch the disc or damage the player.
Bumps
Center Hole
New Disc
Outside (Bumps)
Irregular Shaped Discs
Be sure to use round shape discs only for this unit and never use any special shape discs. Use of special shape discs may cause damage to the mechanism.

Installation Location
Make sure the
???Direct sun and heat
???High humidity and water
???Excessive dust
???Excessive vibrations
Handling the Detachable Front Panel
???Do not expose to rain or water.
???Do not drop or apply shock.
Correct Handling
Do not drop the disc while handling. Hold the disc so you will not leave fingerprints on the surface. Do not affix tape, paper, or gummed labels to the disc. Do not write on the disc.
CORRECT
INCORRECT CORRECT
Disc Cleaning
Fingerprints, dust, or soil on the surface of the disc could cause the CD player to skip. For routine cleaning, wipe the playing surface with a clean, soft cloth from the center of the disc to the outer edge. If the surface is heavily soiled, dampen a clean, soft cloth in a solution of mild neutral detergent before cleaning the disc.
Disc Accessories
There are various accessories available on the market for protecting the disc surface and improving sound quality.
However, most of them will influence the thickness and/or diameter of the disc. Using such accessories can cause the disc to be out of standard specifications and may create operational problems. We recommend not using these accessories on discs played in Alpine CD players.
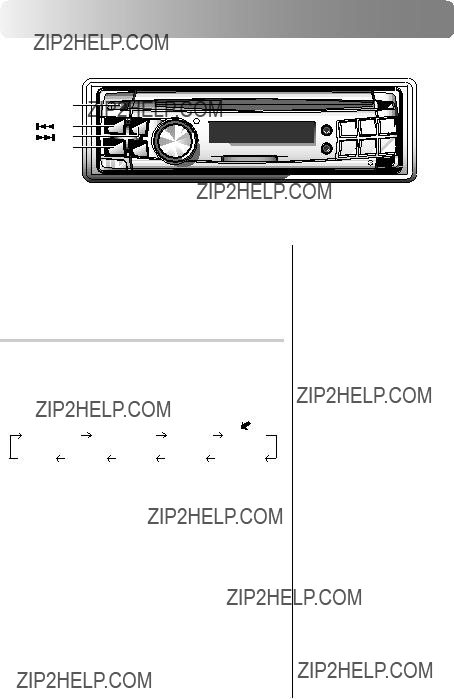
Basic Operation
POWER
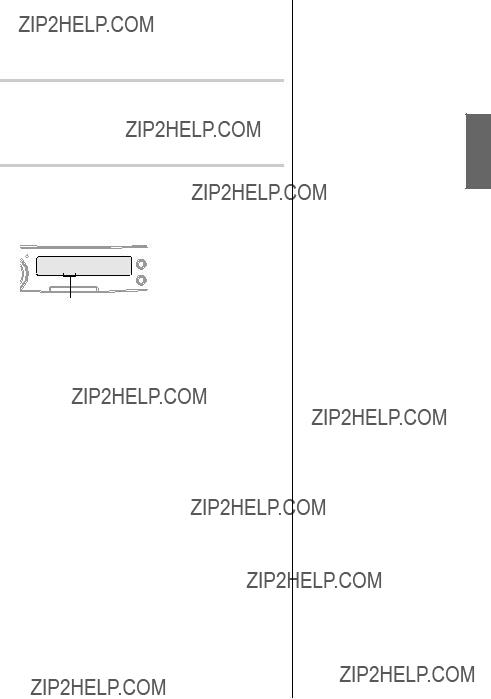
Detaching the Front Panel
Press the POWER button for more than 3 seconds to turn off the power.
Press the RLS (Release) button at lower left corner until the front panel pops out.
Grasp the left side of the front panel and pull it out.
???The front panel may become hot in normal usage (especially the connector terminals), this is not malfunction.
???To protect the front panel, place it in the supplied carrying case.
Attaching the Front Panel
1 First, insert the right side of the front panel into the main unit. Align the groove on the front panel with the projections on the main unit.
2 Push the left side of the front panel until it locks firmly into the main unit.
2
 1
1
Initial System
Make sure that the Power is turned off. When the power is on, press and hold the POWER button for at least 3 seconds to turn off the power.
Immediately after installing or applying power to the unit, it should be initialized. To do this, first, remove the detachable front panel. Behind the front panel, to the right of the connector, there is a small hole.
Using a
RESET switch
??? Before attaching the front panel, make sure that there is no dirt or dust on the connector terminals and no foreign object between the front panel and the main unit.
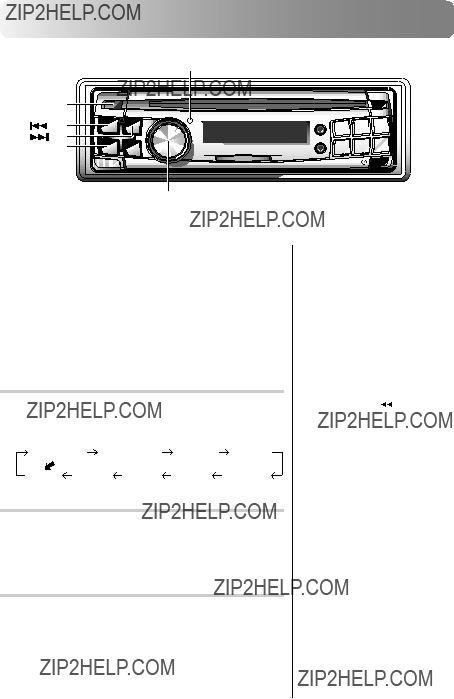
Basic Operation
MODE(Audio Control) POWER
??? Connectable to Remote
Control Interface Box
You can operate this unit from the vehicle???s control unit when an Alpine Remote Control Interface Box (optional) is connected. For details, contact your Alpine dealer.
??? The unit can be turned on by pressing any other button except the eject button.
??? The very first time the power is turned on, the volume will start from
Adjusting Volume/Subwoofer/
Bass/Treble/Balance (Between Left
and Right)/Fader (Between Front
and Rear)
1 Press the MODE (Audio Control) knob repeatedly to choose the desired mode.
Each press changes the modes as follows:
2 Rotate the MODE (Audio Control) knob until the desired sound is obtained in each mode.
Audio Mute Function
Activating this function will instantly lower the volume level by
20dB.
1Press the MUTE button to activate the MUTE mode. The audio level will decrease by about 20 dB.
Pressing the MUTE button again will bring the audio back to its previous level.
???* Not displayed when setting the
???** To display the BASS or
TREBLE mode:
1 Press and hold the SETUP button for at least 3 seconds.
2 Press the DN or
DN or  UP button to select the BASS/ TRE mode.
3 Press the TUNE button to set the BASS/TRE to ON.
4Press the SETUP button to complete the setting. Then perform the step 1 in the left
column.
**???BASS???, ???TREBLE??? is not displayed when an external audio processor is connected (except
???If the MODE (Audio Control) knob is not rotated in 5 seconds after selecting the
BASS, TREBLE, BAL- ANCE, or FADER mode, the unit automatically returns to the VOLUME mode.
???When the subwoofer mode is ON, its respective levels may be adjusted.
???The settings of the Bass and Treble will be individually memorized for each source (FM, AM and CD) until the setting is changed. Depending on the connected devices, some functions and display indications do not work.

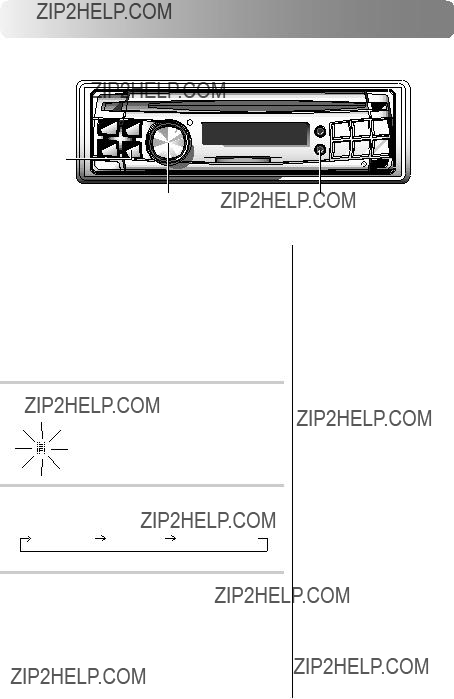
Basic Operation
CD Player/Changer modes

Setting Time
1 Press and hold the CLK (Clock) button for at least 3 seconds while the time is displayed until the time indication blinks.
2 Rotate the MODE (Audio Control) knob to adjust the hours while the time indication is blinking.
3 When the hours has been adjusted, press the MODE (Audio Control) knob.
4 Rotate the MODE (Audio Control) knob to adjust the minutes while the time indication is blinking. The time is automatically set 5 seconds after the minute adjustment. The time can also be manu- ally set by pressing the MODE (Audio Control) knob.
D 6 T 0 1 4 : 1 1

Basic Operation
SETUP
Adjusting the Bass/Treble
Center Frequencies
You can change the Bass/Treble center frequencies on this unit. This gives you flexibility in creating your ideal sound field.
1 Press the hold the SETUP button for at least 3 seconds.
2 Press the
 UP button to select the BASS/TRE mode. Each press changes the modes as shown :
BASS/TRE REM CONT TUNER ILLUMI
MUTE
3 After pressing the TUNE button, press the
 UP or
UP or DN button to select the mode to change.
??? If you press the  DN button the display scrolls in reverse sequence.
BASS/TRE BC BW TC REM CONT
4 Press the TUNE button to select the desired setting.
1. BC (Setting the Bass Center Frequency):
 BC 60Hz
 BC 70Hz
  BC 80Hz
  BC 90Hz BC 200Hz
  BC 150Hz
  BC 130Hz BC 100Hz
Emphasizes the displayed Bass frequency ranges.
2.BW (Setting the Bass Band Width):
Changes the displayed frequency???s band width to narrow or wide.
3. TC (Setting the Treble Center Frequency):
TC 10.0kHz TC 12.5kHz
 TC 15.0kHz TC 17.5kHz
Emphasizes the displayed treble frequency ranges.
Default values
BC: 80 Hz
BW: WIDE1
TC: 10.0kHz
5 Press the SETUP button again to return to normal operation.

Basic Operation
SETUP
Setting when Using the Remote Control
1 Press and hold the SETUP button for at least 3 seconds.
2 Press
 UP or
UP or DN button to select REM CONT mode. Each press changes the modes as shown:
BASS/TRE REM CONT TUNER ILLUMI
MUTE
3 Press the TUNE button to toggle the REM CONT mode between On and Off.
REM CONT OFF  REM CONT ON
???REM CONT ON: Set to ON when using the optional Remote Control to operate the
???REM CONT OFF: Resist the inference from the noise such as ultraviolet rays exist in the natural to provide a much higher quality sound.
Set to OFF when not using the optional Remote
Control.
<Display of ???REM CONT ON???>
R EM CON T ON
4 When the setting is completed, press the SETUP button to return to the normal mode.
???If you press the  DN button the display scrolls in reverse sequence.
???The initial setting at the factory is ???REM CONT OFF???.

Switching the Tuner Mode
The
1 Press and hold the SETUP button for at least 3 seconds.
2 Press the
 UP or
UP or DN button to select TUNER mode. Each press changes the modes as shown.
BASS/TRE REM CONT TUNER ILLUMI
MUTE
3 Press the TUNE button to toggle the TUNER mode between NORMAL and
TUNER NORMAL  TUNER
TUNER
NORMAL: Standard setting
<Display of ???TUNER NORMAL???>
T UNER NORMA L
4 When the setting is completed, press the SETUP button to return to the normal mode.
???If you press the  DN button the display scrolls in reverse sequence.
???The initial setting at the factory is ???TUNER NORMAL???.
???If you find the sound is very noisy while listening to the tuner in the
???How MaxTune SQ works its magic
There are a variety of reasons, so let???s get technical. 1) The FM section has an extraordinarily high 80dB
What all this adds up to is very simple: a tuner capable of delivering radio sound that doesn???t suffer in comparison with CD sound.
Basic Operation
SETUP
Changing Lighting Color
1 Press and hold the SETUP button for at least 3 seconds.
2 Press the
 UP button repeatedly to select ???ILLUMI???.
Each press of the
 UP button changes the modes as shown:
??? If you press the 
 DN button the display scrolls in reverse sequence.
BASS/TRE REM CONT TUNER ILLUMI
MUTE

3 Press the TUNE button to toggle the mode between Blue and Green.
ILLUMI BLUE  ILLUMI GREEN
<Display of ???ILLUMI BLUE???>
I L LUM I B L U E
4 Press the SETUP button to set the selected mode.
??? The initial setting at the factory is ???ILLUMI BLUE???.

Basic Operation
MODE(Audio Control)
CD Text Scroll Setting
This CD player has the ability to scroll the disc and track name recorded on
1 Press and hold the SETUP button for at least 3 seconds.
2 Press the
 UP button repeatedly to select ???SCROLL???.
Each press of the
 UP button changes the modes as shown:
BASS/TRE REM CONT TUNER ILLUMI
MUTE
3 Press the TUNE button to toggle mode between SCROLL ON and OFF.
???SCROLL ON: the display of CD text is scrolled continuously.
???SCROLL OFF: the display is scrolled only when a disc is loaded or when a track is changed and the text information exceeds 12 digits.
4 When the setting is completed, press the SETUP button to return to the normal mode.
??? If you press the  DN button the display scrolls in reverse sequence.
???Initial mode is ???SCROLL OFF???.
???The unit scrolls only CD text names. But, when the MD player is connected, the unit also scrolls MD titles. The disc titles input manually (refer to pages 26, 27) cannot be scrolled.
Subwoofer On and Off
1 Press and hold the SETUP button for more than 3 seconds.
2 Press the
 UP button repeatedly to select
Each press of the
 UP button changes the modes as shown:
BASS/TRE REM CONT TUNER ILLUMI
MUTE
3 Press the TUNE button to toggle mode between
If an
Press the TUNE button after selecting the
4 Press the SETUP button after setting the
5 Press the MODE (Audio Control) knob repeatedly to select the
VOLUME FADER
6 Rotate MODE (Audio Control) knob until the desired sound is obtained in each mode.
the display scrolls in reverse sequence.
??? ???BASS???, ???TREBLE??? is displayed when setting the BASS/TRE mode to ON.

Basic Operation
SETUP
SOURCE
Digital Optical Output On and
Off
When connecting to the Multimedia Manager
1 Press and hold the SETUP button for at least 3 seconds.
2 Press the
 UP button to select the
BASS/TRE REM CONT TUNER ILLUMI
MUTE
3 Press the TUNE button to turn on the
Each press toggles between
OUT OFF.

<Display of
D - OUT ON
4 Press the SETUP button again to return to normal operation.
the display scrolls in reverse sequence.
??? The initial setting at the factory is

Setting the AUX Mode
You can input TV/video sound by connecting an optional Ai- NET/RCA Interface cable
1 Press and hold the SETUP button for more than 3 seconds.
2 Press the
 UP button repeatedly to select
Each press of the
 UP button changes the modes as shown:
BASS/TRE REM CONT TUNER ILLUMI
MUTE
3 Press the TUNE button to set the mode to

4 Once 
 UP or
UP or DN button.

 MUTE
MUTE
5 Press the TUNE button to select the desired display setting in
AUXILIARY TELEVISION VCR GAME
<Display when setting to ???AUXILIARY???>
AU X I L I ARY
6 Press the SETUP button to activate the normal mode.
7 To adjust the volume, etc., first press the SOURCE button and select the AUXILIARY mode, then make the necessary adjustment.
TUNER CD AUXILIARY 
??? If you press the  DN button the display scrolls in reverse sequence.
??? The initial setting at the factory is
Basic Operation
B. OUT indicator
SETUP
B.OUT (Black out)
Turning Mute Mode On/Off
If a device having the interrupt feature is connected, audio will be automatically muted whenever the interrupt signal is received from the device. This function can be turned ON or OFF from the head unit by following procedure below.
1 Press and hold the SETUP button for at least 3 seconds.
2 Press the
 UP button to select the MUTE mode. Each press changes the modes as shown:
BASS/TRE REM CONT TUNER ILLUMI
MUTE
3 Press the TUNE button to turn on or off the Mute mode.
Each press toggles between the MUTE ON and OFF modes.
4 Press the SETUP button again to return to normal operation.
the display scrolls in reverse sequence.
??? The initial setting at the factory is ???MUTE ON???.

Blackout Mode On and Off
Turning off the back light of front panel can resist the inference from the noise caused by the back light and provide you a much higher quality sound.
1 Press and hold the B. OUT (Black out) button for at least 3 seconds, the
B. OUT indicator ON, and the audio signals bypass the treble and bass circuits. This reduces noise to give a clean, flat response.
To cancel the blackout mode, press and hold the B. OUT (Black out) button for at least 3 seconds. After the
B. OUT indicator OFF.
???If any button on the unit is pressed during the blackout mode, the function will be displayed for 5 seconds to show the operation before returning to Blackout mode.
???The BASS/TREBLE control is bypassed when the display panel lighting is OFF.

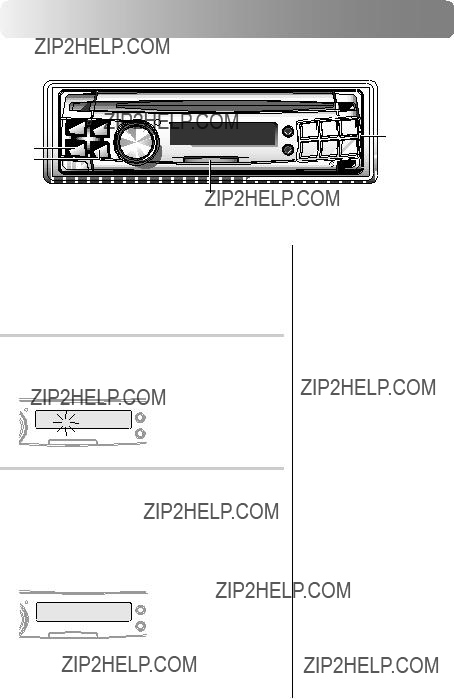
Basic Operation
Displaying the Title/Text
It is possible to display the CD/Station title if the title has been previously inputted. For details, see Titling Discs/Stations (pages 26, 27). Text information, such as the disc name and the track name, will be displayed if playing a CD text compatible disc.
1 Press the TITLE button.
The mode will change every time the button is pressed.
About ???Title??? and ???Text???
Title: With this device, it is possible to input the CD/ Station name (see pages 26, 27). This inputted name is referred to as a ???title???.
Text: Text compatible CDs contain text information such as the disc name and track name. Such text information is referred to as ???text???.
Radio mode:
FREQUENCY DISPLAY
CLOCK DISPLAY
TITLE DISPLAY*2

CD/Changer mode:
ELAPSED TIME DISPLAY
CLOCK DISPLAY
TEXT DISPLAY (DISC NAME)*1
TEXT DISPLAY(TRACK NAME)*1
TITLE DISPLAY*2
*1 Displayed during playback of a text compatible CD. ???NO TEXT??? will be displayed when the CD is not text compatible.
*2
Sample display with a text compatible CD.
???Some characters used for CD Text, may not be compatible with this device. These characters will not be displayed correctly.
???CD Text can store more information than this unit can display, depending on the CD changer.
Basic Operation
Titling Discs/Stations
It is possible to title your favorite CD???s or radio stations.
1 Press the TITLE button and select the title display mode.
For details, see ???Displaying the Title/Text??? (pages 24, 25).
2 Press and hold the TITLE button for at least 3 seconds. The first character will blink.
3 Press the BAND button to switch to the desired character.
4 Rotate the MODE (Audio Control) knob to select the desired letter/numeral/symbol available for naming. (???A??? for example).
Capital letter :
_ A B C D E F G H I J K L M N O
P Q R S T U V W X Y Z
Small letter :
_ a b c d e f g h i j k l m n o p q r s t u v w x y z
Numeral/symbol :
_ 0 1 2 3 4 5 6 7 8 9 ! ??? # $ % & ???
( ) * + ,

5 Press the MODE (Audio Control) button to store the first character. The first character will stop blinking and the display will automatically ad- vance to the next character. When that character begins to blink, you may choose the next letter or symbol of your title.
6 Repeat the steps 3 and 5 above to complete the titling. Pressing the MODE (Audio Control) button after entering the 12th character, automatically stores the title into memory.
When entering a title of less than 12 characters (for example, 3 character title):
After entering 3 characters to complete your title, the 4th character space will be blinking. Press the TITLE button to record the title.
The title memory number will be displayed for about 2 seconds.
For example :
???The memory capacity for the disc title is up to 150 including the
???To input a new title, one of the previously inputted titles must first be deleted.
???When you want to erase a title,
enter the ??? ??? symbol into all spaces.
Number of titles memorized
Memory capacity
7 Press the TITLE button to end the title display mode.

Basic Operation
Searching for Titled Stations
If a Station is titled, you can do a search for it.
(To title Stations, refer to ???Titling Discs/Stations??? on pages 26, 27.)
1 Press and hold the T.S.M. button for at least 2 seconds. The title blinks in the display.
2 Press the DN or
DN or
 UP button to select the desired station title.
3 Press the T.S.M. button to play the selected station.
The unit will automatically search for the station and begin play.
??? If no title is entered, the display will show ???No DATA???.
Searching for Titled Discs/CD-
TEXT
If a CD is titled or contains
1 Press and hold the T.S.M. button for at least 2 seconds. The title blinks in the display.
2 Press the DN or
DN or
 UP button to select the desired disc title or
For example:
???The display scroll sequence varies depending on the connected source.
3 Press the T.S.M. button to play the selected disc. The unit will automatically search for the disc and begin play.
??? This function cannot be performed when using a multi- changer switching device.

Basic Operation
TITLE
Erasing Disc Title (CD/CD Changer only)
1 Press the TITLE button to select the disc titling mode. Then, press and hold for at least 3 sec- onds.
2 Press and hold the
 button for at least 2 seconds to activate the title scanning mode. The title in the display will blink.
3 Press the DN or
DN or
 UP button repeatedly unitl the disc title you want to erase is displayed.
4 Press and hold the
 button for at least 2 seconds to erase the disc title displayed.
5 Press and hold the TITLE button for at least 3 seconds to cancel the disc title erasing mode.
??? You cannot erase a

Recalling the Stored Settings
Settings stored in the Alpine Multimedia Manager
Switching the Disc Mode
Use this function when connecting the optional CD/MD player, changer.
1 Press the BAND button to switch the Disc mode in the CD/MD/Changer mode.
Disc mode is displayed for about 3 seconds.
???The display may be different depending on the production connected.

Radio Operation
SOURCE
Manual Tuning
1 Press the SOURCE button until a radio frequency appears in the display.
2 Press the BAND button repeatedly until the desired radio band is displayed.
Each press changes the band:
F1(FM1) F2(FM2) AM 
3 Press the TUNE button repeatedly until ???DX SEEK??? and ???SEEK??? disappear from the display.
4 Press the DN or
DN or
 UP button to move downward or upward one step respectively until the desired station frequency is displayed.
<Display example>
???The initial mode is DX SEEK.
???The ST indicator appears on the display when a Stereo FM station is tuned in.

Automatic Seek Tuning
1 Press the SOURCE button until a radio frequency appears in the display.
2 Press the BAND button repeatedly until the desired radio band is displayed.
Each press changes the band:
F1(FM1) F2(FM2) AM
3 Press the TUNE button to illuminate the DX and SEEK indicators in the display.
With the DX (Distance) mode activated, both strong and weak stations will be tuned in the
Press again to return to the local mode. The DX indicator will turn off and the SEEK indicator will remain illuminated. Now, only strong stations will be tuned.
4 Press the DN or
DN or
 UP button to automati- cally seek for a station downward or upward respectively.
The unit will stop at the next station it finds. Press the same button again to seek the next station.
<Display example>
Radio Operation
SOURCE
Manual Storing of Station
Presets
1 Select the radio band and tune in a desired radio station you wish to store in the preset memory.
2 Press and hold any one of the Preset buttons (1 through 6) for at least 2 seconds until the ??? P ??? (Preset) on the display blinks.
3 Press the Preset button into which you wish to store the station while the ??? P ??? (Preset) display is blinking (within 5 seconds).
The display stops blinking once the station has been memorized. The display shows the band, preset No. with a ??? P ??? and station frequency memorized.

4 Repeat the procedure to store up to 5 other stations onto the same band.
To use this procedure for other bands, simply select the band desired and repeat the proce- dure.
A total of 24 stations can be stored in the preset memory (6 stations for each band; FM1, FM2, AM and D.A.P.).
Automatic Memory of Station
Presets
1 Press the SOURCE button to select the radio mode.
2 Press the BAND button repeatedly until the desired radio band is displayed.
3 Press and hold the A. ME button for at least 2 seconds.
The frequency on the display continues to change while Automatic Memory is in progress. The tuner will automatically seek and store 6 strongest stations into the selected band.
They will be stored into presets 1 to 6 in order of signal strength.
When Automatic Memory has been completed, the tuner goes to the station stored in Preset No. 1.
???If you store a station in a preset memory which already has a station, the current station will be cleared and replaced with the new station.
???The function indicator will always light in green in the radio mode.
??? If no stations are stored, the tuner will return to the original station you were listening to before the auto memory procedure began.

Radio Operation
D.A.P.


 Preset
BAND
SOURCE
Storing into Direct Access Preset (D.A.P.) Band
A combination of radio stations in any band (up to 6 stations) can be manually preset into the D.A.P. band.
1 Press the D.A.P. button to toggle the D.A.P. setting between ON and OFF.
D.A.P. ON  D.A.P. OFF
<Display of ???D.A.P. ON??? >
D . A . P . ON
Press the BAND button to select FM or AM. The selected band will be displayed.
To memorize stations onto the D.A.P. band, follow the steps for the automatic or Manual Storing of Station Presets section above.
??? This function can be used together with the Automatic Memory Preset.
Tuning to Preset Stations
1 Press the SOURCE button to select the radio mode.
2 Press the BAND button repeatedly until the desired band is displayed.
To select the D.A.P. band, press the D.A.P. button to set the D.A.P. to ON.
3 Press the station Preset button that has your desired radio station in memory.
The display shows the band, preset number with a ???P??? and frequency of the station selected.
Preset indicator
Display when receiving the station stored in ???1??? to ???6???.

CD Player Operation
Playback
Insert a disc with the label side facing up.
1 Insert a disc with the label side facing up.
The disc will be pulled into the unit automatically. The unit starts to play the CD.
<Display example of CD mode>
CD T 0 2 0 '3 2
 CD playback elapsed time Track Number
CD mode
When a disc is already inserted, press the SOURCE button to switch to the CD mode. The mode will change every time the button is pressed.
TUNER CD CD CHANGER* 
(* Only when the CD changer is connected)
???
???If the CD is not removed for several seconds after it has been ejected, the player automatically draws the CD into the compart- ment to protect the CD.
???Only compact discs containing the mark shown can be used.
???We cannot fully guarantee the playback of
???The function indicator will always light in red in the CD mode.
2 To pause playback, press the
 button. Press- ing the
 button again will resume playback.
3 To eject the disc, press the button.
Music Sensor (Skip)
1 Momentarily press the  DN button once during CD play to return to the beginning of the current track. If you wish to access the beginning of a track further back, repeatedly press until you reach the desired track.
Press the 
 UP button once to advance to the beginning of the next track. If you wish to access the beginning of a track further ahead, press repeatedly until the desired track is reached.
Fast Forward and Backward
1 Press and hold the  DN or
DN or 
 UP button to quickly move backward or forward until you reach the desired section of the track.
??? The music sensor feature is functional in the play or pause mode.

CD Player Operation
M.I.X. Function indicator
Repeat Play
1 Press the REPEAT button to play back repeatedly the track being played.
The RPT indicator appears and the track will be played repeatedly.
Press the REPEAT button again and select OFF to deactivate the repeat play.
??? If a CD Changer is connected and the RPT ALL mode is selected, the unit repeatedly plays back all tracks on the disc selected.
 (off)
(off)
???In case a
In CD changer mode, press the FUNC button to light the function indicator in red, set the Function mode to ON and go to step 1.
To set the Function mode to OFF, press the FUNC button again.
???In case a
In CD changer mode, press the FUNC button twice to light the function indicator in red, set the Function mode to ON and go to step 1.
To set the Function mode to OFF, press the FUNC button again.

M.I.X. (Random Play)
1 Press the M.I.X. button in the play or pause mode. The M.I.X. indicator will illuminate and the tracks on the disc will be played back in a random sequence. After all the tracks on the disc have been played back once, the player will begin a new random sequence play until the M.I.X. mode is cancelled.
To cancel M.I.X. play, press the M.I.X. button again to turn off the M.I.X.
Scanning Programs
1 Press the SCAN button to activate the Scan mode.
The first 10 seconds of each track will be played back in succession.
To stop scanning, press the SCAN button and deactivate the Scan mode.
??? If a CD Changer equipped with the ALL M.I.X. function is connected, ALL M.I.X. will also be selectable.
In this mode, the tracks on all the CDs in the current magazine will be included in the random playback sequence.
 (off)
(off)
???In case a
In CD changer mode, press the FUNC button to light the function indicator in red, set the Function mode to ON and go to step 1.
To set the Function mode to OFF, press the FUNC button again.
???In case a
In CD changer mode, press the FUNC button twice to light the function indicator in red, set the Function mode to ON and go to step 1.
To set the Function mode to OFF, press the FUNC button again.
???In case a
In CD changer mode, press the FUNC button to light the function indicator in red, set the Function mode to ON and go to step 1.
To set the Function mode to OFF, press the FUNC button again.
???In case a
In CD changer mode, press the FUNC button twice to light the function indicator in red, set the Function mode to ON and go to step 1.
To set the Function mode to OFF, press the FUNC button again.

CD Player Operation
Controlling CD Changer (Optional)
An optional
Using the
See the
1 Press the SOURCE button to activate the CHANGER mode. The display shows the ???Changer???, disc number and track number.
2 Press the Disc Select buttons (1 through 6) corresponding to one of the discs loaded in the CD Changer. The selected disc number appears in the display and CD playback starts.
<Display example of CD changer mode>
D 2 T 0 2 0 '1 1
CD playback elapsed time
Track Number
Disc Number
???The controls on the
???The ???Changer??? indicator illuminates in the CD Changer mode.
???The source indicator varies depending on the connected source.
???After selecting the desired disc, you can operate in the same way as for the
???If the function indicator lights in red, the Disc Select buttons become nonfunctional.
???Press the FUNC button to turn the function indicator to green, then, select the discs numbered from 1 to 6.

When a
To select discs numbered from 1 to 6, the proce- dure is the same as for the
Alpine???s
1 Press the SOURCE button on the
Alternatively, press the SOURCE button on the optional Remote Control to activate the CD Changer mode. Proceed to Step 3 below to select the desired CD Changer.
2 Press the BAND button on the
3 The CD Changer Selection mode remains active for 3 seconds after Step 2 is performed. Press the BAND button until the desired CD Changer indicator appears on the display.
Alternatively press the BAND button on the optional Remote Control until the desired changer indicator appears on the display.
4 To operate the selected changer, see ???CD Operation??? section.
??? Press the FUNC button to turn the function indicator off, then, select the discs numbered from 7 to 12.
??? If the selected CD Changer is not connected, the display will show ???NO CHANGER???.

Information
In Case of Difficulty
If you encounter a problem, please review the items in the following checklist. This guide will help you isolate the problem if the unit is at fault. Otherwise, make sure the rest of your system is properly connected or consult your authorized Alpine dealer.
Basic
No function or display.
???Vehicle???s ignition is off.
-If connected following instructions, the unit will not operate with the vehicle???s ignition off.
???Improper power lead connections.
-Check power lead connections.
???Blown fuse.
-Check the fuse on the battery lead of the unit; replace with the proper value if necessary.
???Internal
-Press the Reset switch with a
Radio
Unable to receive stations.
???No antenna or open connection in cable.
-Make sure the antenna is properly connected; replace the antenna or cable if necessary.
Unable to tune stations in the seek mode.
???You are in a weak signal area.
-Make sure the tuner is in the DX mode.
???If the area you are in is a primary signal area, the antenna may not be grounded and connected properly.
-Check your antenna connections; make sure the antenna is properly grounded at its mounting location.
???The antenna may not be the proper length.
-Make sure the antenna is fully extended; if broken, replace the antenna with a new one.
Broadcast is noisy.
???The antenna is not the proper length.
-Extend the antenna fully; replace it if it is broken.
???The antenna is poorly grounded.
-Make sure the antenna is grounded properly at its mounting location.
CD
CD Player/Changer not function- ing.
??? Out of operating temperature range +50??C (+120??F) for CD.
-Allow the vehicle???s interior (or trunk) temperature to cool.
CD playback sound is wavering.
???Moisture condensation in the CD Module.
-Allow enough time for the condensation to evaporate (about 1 hour).
CD insertion not possible.
???A CD is already in the CD player.
-Eject the CD and remove it.
???The CD is being improperly inserted.
-Make sure the CD is being inserted following instructions in the CD Player Operation section.

Unable to fast forward or back- ward the CD.
???The CD has been damaged.
-Eject the CD and discard it; using a damaged CD in your unit can cause damage to the mechanism.
CD playback sound skips due to vibration.
???Improper mounting of the unit.
-Securely
???Disc is very dirty.
-Clean the disc.
???Disc has scratches.
-Change the disc.
???
-Do not use the lens cleaner disc on the market.
Consult your nearest ALPINE dealer.
CD playback sound skips without vibration.
???Dirty or scratched disc.
-Clean the disc; damaged disc should be replaced.
Error displays.
???Mechanical error
-Press the  button. After the error indication disappears, insert the disc again. If the
Indication for CD Changer
HIGH TEMP
??? Protective circuit is activated due to high temperature.
-The indicator will disappear when the temperature returns to within operation range.
ERROR - 01
???Malfunction in the CD Changer.
-Consult your Alpine dealer. Press the magazine eject button and pull out the magazine.
Check the indication. Insert the magazine again.
If the magazine cannot be pulled out, consult your Alpine dealer.
???Magazine ejection not possible.
-Press the magazine eject button. If the magazine doesnot eject, consult your Alpine dealer.
ERROR - 02
???A disc is left inside the CD Changer.
-Press the Eject button to activate the eject function.
When the CD Changer finishes the eject function, insert an empty CD magazine into the CD Changer to receive the disc left inside the CD Changer.
NO MAGAZINE
??? No magazine is loaded into the CD Changer.
- Insert a magazine.
NO DISC
???No indicated disc.
-Choose another disc.

Specifications
FM TUNER SECTION
AM TUNER SECTION
CD PLAYER SECTION
GENERAL
CHASSIS SIZE
NOSEPIECE SIZE
Due to continuous product improvement, specifications and design are subject to change without notice.

LIMITED WARRANTY
ALPINE ELECTRONICS OF AMERICA, INC. AND ALPINE OF CANADA INC. ("Alpine"), are dedicated to quality craftsmanship and are pleased to offer this Warranty. We suggest that you read it thoroughly. Should you have any questions, please contact your Dealer or Alpine at one of the telephone numbers listed below.
??? PRODUCTS COVERED:
This Warranty covers Car Audio/Visual Products and Related Accessories ("the product"). Products purchased in the Canada are covered only in the Canada. Products purchased in the U.S.A. are covered only in the U.S.A.
2You should provide a detailed description of the problem(s) for which service is required.
3You must supply proof of your purchase of the product.
4You must package the product securely to avoid damage during shipment.
??? LENGTH OF WARRANTY:
This Warranty is in effect for one year from the date of the first consumer purchase.
??? LIFETIME TAPE HEAD WARRANTY:
All Alpine Car Audio analog tape heads excluding Video tape heads are warranted for life against manufacturing defects causing failure.
??? WHO IS COVERED:
This Warranty only covers the original purchaser of the product, who must reside in the United States, Puerto Rico or Canada.
??? WHAT IS COVERED:
This Warranty covers defects in materials or workmanship (parts and labor) in the product.
??? WHAT IS NOT COVERED:
This Warranty does not cover the following:
1Damage occurring during shipment of the product to Alpine for repair (claims must be
presented to the carrier).
2Damage caused by accident, abuse, negligence, misuse, improper connections, improper
operation or failure to follow instructions contained in the Owner's manual.
3Damage caused by act of God, including without limitation, earthquake, fire, flood, storms or other
acts of nature.
4Any cost or expense related to the removal or reinstallation of the product.
5 Service performed by an unauthorized person, company or association.
6 Any product which has the serial number defaced, altered or removed.
7Any product which has been adjusted, altered or modified without Alpine's consent.
8Any product not distributed by Alpine within the United States, Puerto Rico or Canada.
9Any product not purchased from an Authorized Alpine Dealer.
pAny product that has been determined to contain an excessive amount of dust or dirt and any product that contains other contaminants including liquid or foreign objects.
???HOW WE LIMIT IMPLIED WARRANTIES:
ANY IMPLIED WARRANTIES INCLUDING
FITNESS FOR USE AND MERCHANTABILITY
ARE LIMITED IN DURATION TO THE PERIOD OF
THE EXPRESS WARRANTY SET FORTH ABOVE
AND NO PERSON IS AUTHORIZED TO ASSUME
FOR ALPINE ANY OTHER LIABILITY IN
CONNECTION WITH THE SALE OF THE
PRODUCT.
???HOW WE EXCLUDE CERTAIN DAMAGES:
ALPINE EXPRESSLY DISCLAIMS LIABILITY FOR
INCIDENTAL AND CONSEQUENTIAL DAMAGES
CAUSED BY THE PRODUCT. THE TERM
"INCIDENTAL DAMAGES" REFERS TO
EXPENSES OF TRANSPORTING THE PRODUCT
TO THE ALPINE SERVICE CENTER, LOSS OF
THE ORIGINAL PURCHASER'S TIME, LOSS OF
THE USE OF THE PRODUCT, BUS FARES, CAR
RENTALS OR OTHERS COSTS RELATING TO
THE CARE AND CUSTODY OF THE PRODUCT.
THE TERM "CONSEQUENTIAL DAMAGES"
REFERS TO THE COST OF REPAIRING OR
REPLACING OTHER PROPERTY WHICH IS
DAMAGED WHEN THIS PRODUCT DOES NOT
WORK PROPERLY. THE REMEDIES PROVIDED
UNDER THIS WARRANTY ARE EXCLUSIVE AND
IN LIEU OF ALL OTHERS.
???HOW STATE/PROVINCIAL LAW RELATES TO
THE WARRANTY:
This Warranty gives you specific legal rights, and you may also have other rights which vary form state to state and province to province. In addition, some states/provinces do not allow limitations on how long an implied warranty lasts, and some do not allow the exclusion or limitation of incidental or consequential damages. Accordingly, limitations as to these matters contained herein may not apply to you.
??? IN CANADA ONLY:
This Warranty is not valid unless your Alpine car audio product has been installed in your vehicle by an Authorized Installation Center, and this warranty stamped upon installation by the installation center.
??? HOW TO OBTAIN WARRANTY SERVICE:
1You are responsible for delivery of the product to an Authorized Alpine Service Center or Alpine for repair and for payment of any initial shipping charges. Alpine will, at its option, repair or replace the product with a new or reconditioned product without charge. If the repairs are covered by the warranty, and if the product was shipped to an Authorized Alpine Service Center or Alpine, Alpine will pay the return shipping charges.
??? HOW TO CONTACT CUSTOMER SERVICE:
Should the product require service, please call the following number for your nearest Authorized Alpine Service Center.
Alpine Electronics of America, Inc., 19145 Gramercy Place, Torrance, California 90501, U.S.A. Alpine Electronics of Canada, Inc., Suite 203, 7300 Warden Ave. Markham, Ontario, L3R 9Z6, Canada

R
ALPINE ELECTRONICS, INC.
Tokyo office:
Tel.: (03)
ALPINE ELECTRONICS OF AMERICA, INC.
19145 Gramercy Place, Torrance,
California 90501, U.S.A.
Tel.:
ALPINE ELECTRONICS OF CANADA, INC.
Suite 203, 7300 Warden Ave. Markham,
Ontario L3R 9Z6, Canada
Tel.:
ALPINE ELECTRONICS OF AUSTRALIA PTY. LTD.
Victoria 3173, Australia
Tel.: (03)
ALPINE ELECTRONICS GmbH
Kreuzerkamp
Germany
Tel.:
ALPINE ITALIA S.p.A.
Via C. Colombo 8, 20090 Trezzano Sul
Naviglio MI, Italy
Tel.:
ALPINE ELECTRONICS FRANCE S.A.R.L.
(RCS PONTOISE B 338 101 280)
98, Rue De La Belle Etoile, Z.I. Paris Nord II
B.P. 50016
ALPINE ELECTRONICS OF U. K., LTD.
13 Tanners Drive, Blakelands,
Milton Keynes MK14 5BU, U.K.
Tel.:
ALPINE ELECTRONICS DE ESPA??A, S.A.
Portal De Gamarra 36, Pabell??n 32
01013 Vitoria (Alava) - Apdo. 133, Spain
Tel.:
Designed by ALPINE Japan
Printed in Japan (S)
Sankei Kikaku Co., Ltd.
Hino, Tokyo, Japan