ES
MP3/WMA CD Receiver
EN
??? MANUAL DE OPERACI??N
L??alo antes de utilizar este equipo.
??? MANUAL DO PROPRIET??RIO
Leia por favor este manual antes de utilizar este equipamento.
??? OWNER'S MANUAL
Please read before using this equipment.
ES
MP3/WMA CD Receiver
EN
??? MANUAL DE OPERACI??N
L??alo antes de utilizar este equipo.
??? MANUAL DO PROPRIET??RIO
Leia por favor este manual antes de utilizar este equipamento.
??? OWNER'S MANUAL
Please read before using this equipment.
???Cambiador de CD para
???Disqueteiras para
???CD changer for
???Cambiador de CD para
???Disqueteiras para
???CD changer for
??Los cambiadores Alpine de CD le ofrecen m??s!
M??s selecciones musicales, m??s versatilidad y m??s ventajas.
As Disqueteiras da Alpine
Mais sele????es musicais, mais versatilidade, mais comodidade.
O
Alpine CD Changers Give You More!
More musical selections, more versatility, more convenience.
The

ENGLISH

Installation and Connections
Operating Instructions
WARNING
 WARNING
This symbol means important instructions. Failure to heed them can result in serious injury or death.
DO NOT OPERATE ANY FUNCTION THAT TAKES YOUR
ATTENTION AWAY FROM SAFELY DRIVING YOUR
VEHICLE.
Any function that requires your prolonged attention should only be performed after coming to a complete stop. Always stop the vehicle in a safe location before performing these functions. Failure to do so may result in an accident.
 CAUTION
This symbol means important instructions. Failure to heed them can result in injury or material property damage.
HALT USE IMMEDIATELY IF A PROBLEM APPEARS.
Failure to do so may cause personal injury or damage to the product. Return it to your authorized Alpine dealer or the nearest Alpine Service Center for repairing.
DO NOT MIX NEW BATTERIES WITH OLD BATTERIES.
INSERT WITH THE CORRECT BATTERY POLARITY.
When inserting the batteries, be sure to observe proper polarity (+ and
KEEP THE VOLUME AT A LEVEL WHERE YOU CAN STILL
HEAR OUTSIDE NOISE WHILE DRIVING.
Failure to do so may result in an accident.
MINIMIZE DISPLAY VIEWING WHILE DRIVING.
Viewing the display may distract the driver from looking ahead of the vehicle and cause an accident.
DO NOT DISASSEMBLE OR ALTER.
Doing so may result in an accident, fire or electric shock.
USE ONLY IN CARS WITH A 12 VOLT NEGATIVE GROUND.
(Check with your dealer if you are not sure.) Failure to do so may result in fire, etc.
KEEP FINGERS AWAY WHILE THE MOTORIZED FRONT
PANEL OR MOVING MONITOR IS IN MOTION.
Failure to do so may result in personal injury or damage to the product.
 PRECAUTIONS
Product Cleaning
Use a soft dry cloth for periodic cleaning of the product. For more severe stains, please dampen the cloth with water only. Anything else has the chance of dissolving the paint or damaging the plastic.
KEEP SMALL OBJECTS SUCH AS BATTERIES OUT OF THE
REACH OF CHILDREN.
Swallowing them may result in serious injury. If swallowed, consult a physician immediately.
Temperature
Be sure the temperature inside the vehicle is between +60??C (+140??F) and
USE THE CORRECT AMPERE RATING WHEN REPLACING
FUSES.
Failure to do so may result in fire or electric shock.
Moisture Condensation
You may notice the CD playback sound wavering due to condensation. If this happens, remove the disc from the player and wait about an hour for the moisture to evaporate.
DO NOT BLOCK VENTS OR RADIATOR PANELS.
Doing so may cause heat to build up inside and may result in fire.
USE THIS PRODUCT FOR MOBILE 12V APPLICATIONS.
Use for other than its designed application may result in fire, electric shock or other injury.
DO NOT PLACE HANDS, FINGERS OR FOREIGN OBJECTS
IN INSERTION SLOTS OR GAPS.
Doing so may result in personal injury or damage to the product.
Damaged Disc
Do not attempt to play cracked, warped, or damaged discs. Playing a bad disc could severely damage the playback mechanism.
Maintenance
If you have problems, do not attempt to repair the unit yourself. Return it to your Alpine dealer or the nearest Alpine Service Station for servicing.

 PRECAUTIONS
Never Attempt the Following
Do not grip or pull out the disc while it is being pulled back into the player by the automatic reloading mechanism.
Do not attempt to insert a disc into the unit when the unit power is off.
Installation Location
Make sure the
???Direct sun and heat
???High humidity and water
???Excessive dust
???Excessive vibrations
Inserting Discs
Your player accepts only one disc at a time for playback. Do not attempt to load more than one disc.
Make sure the label side is facing up when you insert the disc. Your player will automatically eject any disc that is inserted incorrectly. If the player continues to eject a correctly inserted disc, push the RESET switch with a pointed object such as a ballpoint pen.
Playing a disc while driving on a very bumpy road may result in skips, but this will not scratch the disc or damage the player.
New Discs
As a protective measure to prevent the CD from jamming, the CD player will automatically eject discs with irregular surfaces or inserted incorrectly. When a new disc is inserted into the player and ejected after initial loading, using your finger, feel around the inside of the center hole and outside edge of the disc. If you feel any small bumps or irregularities, this could inhibit proper loading of the disc. To remove the bumps, rub the inside edge of the hole and outside edge of the disc with a ballpoint pen or other such instrument, then insert the disc again.
Irregular Shaped Discs
Be sure to use round shape discs only for this unit and never use any special shape discs.
Use of special shape discs may cause damage to the mechanism.
Correct Handling
Do not drop the disc while handling. Hold the disc so you will not leave fingerprints on the surface. Do not affix tape, paper, or gummed labels to the disc. Do not write on the disc.
CORRECT
Disc Cleaning
Fingerprints, dust, or soil on the surface of the disc could cause the CD player to skip. For routine cleaning, wipe the playing surface with a clean, soft cloth from the center of the disc to the outer edge. If the surface is heavily soiled, dampen a clean, soft cloth in a solution of mild neutral detergent before cleaning the disc.
Disc Accessories
There are various accessories available on the market for protecting the disc surface and improving sound quality. However, most of them will influence the thickness and/or diameter of the disc. Using such accessories can cause the disc to be out of standard specifications and may create operational problems. We recommend not using these accessories on discs played in Alpine CD players.
Transparent Sheet Disc Stabilizer

On handling Compact Discs
???Do not touch the surface.
???Do not expose the disc to direct sunlight.
???Do not affix stickers or labels.
???Clean the disc when it is dusty.
???Make sure that there are no bumps around the disc.
???Do not use commercially available disc accessories.
Do not leave the disc in the car or the unit for a long time. Never expose the disc to direct sunlight. Heat
and humidity may damage the CD and you may not be able to play it again.
To customers using
???If a
???Finalize the
About media that can be played.
Use only compact discs with the label side showing the CD logo marks below.
If you use unspecified compact discs, correct performance cannot be guaranteed.
You can play
???Some of the following CDs may not play on this unit: Flawed CDs, CDs with fingerprints, CDs exposed to extreme temperatures or sunlight (e.g., left in the car or this unit), CDs recorded under unstable conditions, CDs on which a recording failed or a
???Use discs with MP3/WMA files written in a format compatible with this unit. For details, see page
Windows Media and the Windows logo are trademarks, or registered trademarks of Microsoft Corporation in the United States and /or other countries.
Apple, the Apple logo and iPod are trademarks of Apple Computer, Inc., registered in the U.S. and other countries.

About the GlideTouch??? Bar Operation
1 Touch or press the desired position on the GlideTouch bar.
Function guide
ON OFF
GlideTouch bar
Press any one of the 6 positions on the GlideTouch bar to which a function has been assigned in the guide display.
For example, to select ON, press the GlideTouch bar directly below where ON is indicated in the guide display. The manual expresses this as follows: ???Change the setting by pressing the GlideTouch bar below either the ON or OFF function indicators.???
2 Move your finger on the GlideTouch bar to the left or right.
GlideTouch bar
Place your finger on the GlideTouch bar and slide it gently to the left or right. Items or lists in the display will change as you move your finger across the GlideTouch bar.
To select items on the following page, scroll the page as follows:
???Place and hold your finger on either side of the GlideTouch bar for at least 3 seconds.
When scrolling the page toward the left, place and hold your finger on the left side of the GlideTouch bar. When scrolling the page toward the right, place and hold your finger on the right side of the GlideTouch bar.
???Move your finger quickly on the GlideTouch bar toward the side that the page is scrolled.

Getting Started
7 Adjust ???Minute??? by turning the Rotary encoder by repeating steps 5 and 6.
8 After setting, press and hold MENU for at least 2 seconds to return to normal mode.
???To synchronize the clock to another clock/watch or radio time announcement, press and hold the Rotary encoder for at least 2 seconds after setting the ???hour.??? Minutes will reset to 00.
If the display shows over ???30??? minutes when you do this, the time will advance one hour.
???If MENU is pressed while adjusting or setting the items in the MENU mode, the unit will return to the previous selection screen.
???By pressing the GlideTouch bar under RETURN in the MENU mode, the unit will return to the normal mode.
???If no operation is performed for 60 seconds, the unit will return to the normal mode.
Turning Power On and Off
Press SOURCE/POWER to turn on the unit.
???The unit can be turned on by pressing any other button except TITLE and eject c.
Opening and Closing the Movable Display
Press c.
The movable display will open.
Press and hold SOURCE/POWER for at least 2 seconds to turn off the unit.
??? The first time power is turned on, the volume will start from level 12.
Initial System
Be sure to press the RESET switch when using the unit for the first time, after installing the CD changer, after changing the car battery, etc.
1 Turn off the unit power.
2 Press RESET with a
Setting Time
1 Press MENU.
2 Select SETUP by sliding your finger on the GlideTouch bar to the left or right. Press the
GlideTouch bar under SETUP.
The main SETUP menu is displayed.
3 Select GENERAL by sliding your finger on the GlideTouch bar to the left or right.
Press the GlideTouch bar under GENERAL.
The GENERAL SETUP menu is displayed.
4 Select CLOCK by sliding your finger on the GlideTouch bar to the left or right. Press the
GlideTouch bar under CLOCK.
5 Select ???Hour??? by sliding your finger on the GlideTouch bar to the left or right.
6 Adjust ???Hour??? by turning the Rotary encoder.
To close the movable display, press c again.
The movable display will close.
???Do not apply shock to the movable display when it is open as it may result in malfunction of the unit.
???The display may be dim during low temperatures and immediately after turning on the power. The brightness will return to normal as time elapses.
???The display will stop at the set tilt angle when closing.
Caution
Keep hands (or any other object) away from the display while it is opening or closing to avoid damage or injury. The back of the movable display will get very warm under normal operating conditions. This is not a malfunction. Do not touch.

Display Tilt Adjustment
The movable display may be adjusted to 3 different angles depending upon user preference.
1 Press MENU.
2 Select TILT ADJUST by sliding your finger on the GlideTouch bar to the left or right. Press the GlideTouch bar under TILT ADJUST.
3 Touch UP or DOWN on the GlideTouch bar to adjust the display angle.
??? Selecting RETURN will return to the previous screen.
Movable display
4 After setting, press and hold MENU for at least 2 seconds to return to normal mode.
???The adjusted tilt angle of the display is stored in memory. There is no need to
???If MENU is pressed while adjusting or setting the items in the MENU mode, the unit will return to the previous selection screen.
???By pressing the GlideTouch bar under RETURN in the MENU mode, the unit will return to the normal mode.
Caution
Keep hands (or any other object) away from the display while it is opening or closing to avoid damage or injury. The back of the movable display will get very warm under normal operating conditions. This is not a malfunction. Do not touch.
Adjusting Volume
Turn the Rotary encoder until the desired sound is obtained.
Lowering Volume Quickly
Activating the Audio Mute function will instantly lower the volume level by 20 dB.
Press MUTE to activate the MUTE mode.
The audio level will decrease by about 20 dB.
Pressing MUTE again will bring the audio back to its previous level.
Detaching and Attaching the Front Panel
Detaching
1 Turn off the unit power.
2 Press  (Release) at the upper left side until the front panel pops out.
3 Grasp the left side of the front panel and pull it out.
???The front panel may become hot in normal usage (especially the connector terminals on the back of the front panel.) This is not a malfunction.
???To protect the front panel, place it in the supplied carrying case.
Attaching
1 Insert the right side of the front panel into the main unit. Align the groove on the front panel with the projections on the main unit.
2 Push the left side of the front panel until it locks firmly into the main unit.
???Before attaching the front panel, make sure that there is no dirt or dust on the connector terminals and no foreign object between the front panel and the main unit.
???Attach the front panel carefully. Hold the panel by its sides to avoid pushing any buttons by mistake.
Radio
SOURCE/ TUNE/
POWER A.ME BAND
MENUFUNC.
Changing the Radio Frequencies for each Country
For customers not living in North America, change the radio frequencies as follows.
1 Press MENU.
2 Select SETUP by sliding your finger on the GlideTouch bar to the left or right. Press the
GlideTouch bar under SETUP.
The main SETUP menu is displayed.
3 Select TUNER by sliding your finger on the GlideTouch bar to the left or right. Press the
GlideTouch bar under TUNER.
The TUNER SETUP menu is displayed.
4 Select TUNER AREA by sliding your finger on the GlideTouch bar to the left or right. Press the GlideTouch bar under TUNER AREA.
5 Press the GlideTouch bar under 1 or 2 in the guide display.
AREA 1: Radio frequencies for North America
AREA 2: Other Radio frequencies
6 After setting, press and hold MENU for at least 2 seconds to return to normal mode.
???The stored radio stations will be cleared every time you change the setting.
???If MENU is pressed while adjusting or setting the items in the MENU mode, the unit will return to the previous selection screen.
???By pressing the GlideTouch bar under RETURN in the MENU mode, the unit will return to the normal mode.
Listening to Radio
1 Press SOURCE/POWER until a radio frequency appears in the display.
2 Press BAND repeatedly until the desired radio band is displayed.
FM1 ??? FM2 ??? AM ??? FM1
3 Press TUNE/A.ME to select the tuning mode.
DX SEEK (Distance mode) ??? SEEK (Local mode) ??? OFF (Manual mode) ??? DX SEEK
??? The initial mode is Distance mode.
Distance mode:
Both strong and weak stations will be automatically tuned in (Automatic Seek Tuning).
Local mode:
Only strong stations will be automatically tuned in (Automatic Seek Tuning).
Manual mode:
The frequency is manually tuned in steps (Manual tuning).
4 Press gor fto tune in the desired station.
Holding down gor fwill change the frequency continuously.
???The ST indicator appears on the display when a stereo FM station is tuned in.
Manual Storing of Station Presets
1 Select the radio band and tune in a desired radio station you wish to store in the preset memory.
2 Press FUNC. to activate the preset mode.
Source select mode ??? Preset mode ??? Source select mode
3 Select any one of the preset numbers (1 through 6) by sliding your finger on the GlideTouch bar to the left or right. Press and hold the GlideTouch bar for at least 2 seconds under the selected preset number.
The selected station is stored.
???A total of 18 stations can be stored in the preset memory (6 stations for each band; FM1, FM2 and AM).
???If you store a station in a preset memory which already has a station, the current station will be cleared and replaced with the new station.
Automatic Memory of Station Presets
1 Press BAND repeatedly until the desired radio band is displayed.
2 Press and hold TUNE/A.ME for at least 2 seconds.
The frequency on the display continues to change while the automatic memory is in progress. The tuner will automatically seek and store 6 strong stations in the selected band. They will be stored into buttons 1 to 6 in order of signal strength.
When the automatic memory has been completed, the tuner goes to the station stored in preset location no. 1.
???If no stations are stored, the tuner will return to the original station you were listening to before the auto memory procedure began.

CD / MP3 / WMA
SOURCE/POWER TITLE
???Title Search mode is canceled by pressing and holding for at least 2 seconds.
???If either side of the GlideTouch bar is touched and held, the radio stations are scrolled continuously.
???You can speed up your search by moving your finger quickly on the GlideTouch bar to skip radio stations.
???If a station has no title, ???NO TITLE??? is displayed for 2 seconds.
???Any radio station can be searched by the Station Title Search function. The station titles are displayed in the order they were input.
Frequency Search Function
You can search for a radio station by its frequency.
1 Press and hold for at least 2 seconds in Radio mode to activate Frequency Search mode.
2 Within 10 seconds, select the desired frequency by sliding your finger to the left or right on the
GlideTouch bar. Press the GlideTouch bar under the desired frequency.
The radio station on the frequency selected is received.
???Frequency Search mode is cancelled by pressing and holding for at least 2 seconds.
???If either side of the GlideTouch bar is touched and held, the frequencies are scrolled continuously.
???You can speed up your search by moving your finger quickly on the GlideTouch bar to skip frequencies.
Playback
1 Press c.
The movable display will open.
2 Insert a disc with the label side facing up.
The disc will be pulled into the unit automatically.
The movable display will close and playback will begin. When a disc is already inserted, press SOURCE/POWER to switch to the CD mode.
The mode will change every time the button is pressed.
CD ??? TUNER ??? CD CHANGER* ??? CD
* Only when the CD changer is connected
3 While playing back MP3/WMA, press 8 or 9 to select the desired folder.
Pressing and holding 8 or 9 will change folders continuously.
4 Press gor fto select the desired track (file).
Returning to the beginning of the current track (file):
Press g.
Fast backward :
Press and hold g.
Advancing to the beginning of the next track (file) :
Press f.
Fast forward :
Press and hold f.
5 To pause playback, press
Pressing
6 To eject the disc, press c.
???Do not remove a CD during its eject cycle. Do not load more than one disc at a time. A malfunction may result from doing either.
???If the CD does not eject, press and hold c for at least 2 seconds with the movable display open.

???The
???A WMA format file that is protected by DRM (Digital Rights Management) cannot be played back on this unit.
??????MP3??? is displayed during MP3 playback.
??????WMA??? is displayed during WMA playback.
???The track display for MP3/WMA data playback is the file numbers recorded on the disc.
???If the
MP3/WMA Play Display
The folder number, file number, sampling rate, and bit rate will be displayed as described below.
.
Folder number display
 File number display
 01
01  03
03
kHz
44 .1
Sampling rate display
The sampling rate and the bit rate (frame display) are alternately displayed.*
Folder number display
 File number display
 01
01  03
03
kbps
160
Bit rate display
???Press TITLE to switch the display. Please see ???Displaying the Title/Text??? (page 22) for information about display switching.
*The recording sampling rate and bit rate of the MP3/WMA file are displayed. A WMA file of variable bit rate displays the average bit rate.
Repeat Play
1 Press FUNC. to activate the audio function mode.
Source select mode ??? Audio function mode ??? Source select mode
2 Press the Glide Touch bar under RPT to select the RPT mode.
The track (file) will be played back repeatedly.
CD mode :
(off)
*1 When a CD changer is connected.
???If REPEAT is set to ON during M.I.X. play in CD changer mode, M.I.X. will apply to the current disc only.
MP3/WMA mode :
???*2
RPT  : A disc is repeatedly played back
???
(off)
*2 When an MP3 compatible CD changer is connected.
The RPT mode is canceled by selecting off.
???The function mode you previously recalled can be recalled again if the GlideTouch bar is touched.
???If no operation is performed for 10 seconds, the audio function mode turns off.

M.I.X. (Random Play)
1 Press FUNC. to activate the audio function mode.
Source select mode ??? Audio function mode ??? Source select mode
2 Press the GlideTouch bar under M.I.X. to select the Random Play mode.
The tracks (files) will be played back in random sequence.
CD mode :
???
M.I.X. : Track are played back in random sequence.
???
*3
Scanning Programs
1 Press FUNC. to activate the audio function mode.
Source select mode ??? Audio function mode ??? Source select mode
2 Press the GlideTouch bar under SCAN to select the Scan mode.
The first 10 seconds of each of track (file) will be played back in succession.
3 If the desired song is found, perform steps 1 and 2 to stop scanning.
???
M.I.X.: The tracks on all the CDs in the current magazine will be included in the random playback sequence.
Searching from CD Text
(off)
*3 When a CD changer equipped with the All M.I.X. function is connected.
???If M.I.X. is set to ON during RPT (REPEAT ALL) play in CD changer mode, M.I.X. will apply to the current disc only.
MP3/WMA mode :
???
 M.I.X.: Only files in a folder are played back in random sequence.
???
M.I.X.: Files are played back in random sequence.
Tracks can be searched and played using the CD text on the disc. In the case of discs and changers that do not support text, searches can be made using the track numbers.
1 Press during play.
This will set the search mode.
2 Select the desired track (file) by sliding your finger on the GlideTouch bar to the left or right.
Press the GlideTouch bar under the Text of the desired Track.
This will play the selected track.
???
If an MP3 compatible CD changer is connected, all files in a disc are played back in random sequence, and playback shifts to the next disc.
(off)
The Random Play mode is canceled by selecting off.
???The function mode you previously recalled can be recalled again if the GlideTouch bar is touched.
???If no operation is performed for 10 seconds, the audio function mode turns off.
File/Folder Name Search (concerning MP3/
WMA)
You can display and search for the folder and file name while listening to the file currently being played back.
1 Press in MP3/WMA mode.
2 Within 10 seconds, select the Folder search mode or File search mode by sliding your finger on the GlideTouch bar to the left or right.
Press the GlideTouch bar under the desired search mode.
Folder Name Search mode ??? File Name Search mode
Folder Name Search mode
The desired folder is searched from all folders in a disc.
File Name Search mode
File is searched from all files in a disc or folder that is selected by folder search.

Folder Name Search mode
3 Within 10 seconds, select the folder to play back by sliding your finger on the GlideTouch bar to the left or right. Press
The first file in the selected folder is played back. To search for a file in the selected folder, press the GlideTouch bar or FUNC. to change to the file search mode.
Refer to ???File Name Search mode??? for operation.
???Folder Name Search mode is cancelled by pressing and holding for at least 2 seconds.
???If a disc contains only the root folder, Folder Name Search cannot be made.
??????NO FILE??? is displayed for 2 seconds if the folder that is selected by the Folder Name Search mode contains no files.
??????ROOT??? is displayed for the root folder that does not have folder name.
???Folder Name search cannot be made during M.I.X. play.
???Folders are skipped continuously by touching and holding either side of the GlideTouch bar.
???You can speed up your search by moving your finger quickly on the GlideTouch bar to skip folders.
File Name Search mode
3 Within 10 seconds, select the file to play back by sliding your finger on the GlideTouch bar to the left or right. Press the GlideTouch Bar or FUNC. to play the selected file.
The selected file is played back.
???File Name Search mode is cancelled by pressing and holding for at least 2 seconds.
??? While in the File Name Search mode, press to switch to the previous mode (Folder Search mode or the selecting search mode).
???File Name search cannot be made during M.I.X. play.
???Files are skipped continuously by touching and holding either side of the GlideTouch bar.
???You can speed up your search by moving your finger quickly on the
GlideTouch bar to skip files.
Quick Search
You can search for tracks (files).
1 Press and hold for at least 2 seconds in the CD/ Changer/MP3/WMA mode to activate Quick Search mode.
2 Within 10 seconds, select the track (file) to play back by sliding your finger on the GlideTouch bar to the left or right.
The selected track is played back immediately.
???Quick Search mode is cancelled by pressing and holding for at least 2 seconds.
???Tracks (files) are skipped continuously by touching and holding either side of the GlideTouch bar.
???You can speed up your search by moving your finger quickly on the GlideTouch bar to skip tracks (files).
About MP3/WMA
CAUTION
Except for private use, duplicating audio data (including MP3/ WMA data) or distributing, transferring, or copying it, whether for free or for a fee, without permission of the copyright holder is strictly prohibited by the Copyright Act and by international treaty.
What is MP3?
MP3, whose official name is
MP3 files contain compressed audio data. MP3 encoding is capable of compressing audio data at extremely high ratios, reducing the size of music files to as much as
What is WMA?
WMA, or ???Windows Media??? Audio,??? is compressed audio data. WMA allows you to create music files and store them at higher ratios of compression than MP3 audio data (approx. half original size). This is achieved while still maintaining CD quality sound.
Method for creating MP3/WMA files
Audio data is compressed by using MP3/WMA specified software. For details on creating MP3/WMA files, refer to the user's manual for that software.
MP3/WMA files that can be played back by this device have the file extension ???mp3??? / ???wma???. Files with no extension cannot be played back. (WMA ver. 7.1, 8 and 9 are supported)
Supported playback sampling rates and bit rates
Note that for sampling rates, this device???s frame display (Page 11) may not display correctly.
This device may not play back correctly depending on sampling rates.
ID3 tags/WMA tags
This device supports ID3 tag v1 and v2, and WMA tag.
If tag data is in an MP3/WMA file, this device can display the title (track title), artist name, and album name ID3 tag/WMA tag data.
This device can only display
Producing MP3/WMA discs
MP3/WMA files are prepared, then written to a
Media supported
The media that this device can play back are
Continued

Corresponding File Systems
This device supports discs formatted with ISO9660 Level 1 or Level 2.
Under the ISO9660 standard, there are some restrictions to remember.
The maximum nested folder depth is 8 (including the root directory). The number of characters for a folder/file name is limited.
Valid characters for folder/file names are letters
This device also can play back discs in Joliet, Romeo, etc., and other standards that conform to ISO9660. However, sometimes the file names, folder names, etc., are not displayed correctly.
Formats supported
This device supports
This device cannot correctly play back discs recorded with Track At Once or packet writing.
Order of files
The unit plays the files in the order that the writing software writes them. Therefore, the playing order may not be the same as the order you input. The playback order of the folders and files is as follows. However, the folder and file playback order differs from the folder no. and file no. indicated on the display.
Terminology
Bit rate
This is the ???sound??? compression rate specified for encoding. The higher the bit rate, the higher the sound quality, but also the larger the files.
Sampling rate
This value shows how many times per second the data is sampled (recorded). For example, music CDs use a sampling rate of 44.1 kHz, so the sound is sampled (recorded) 44,100 times per second.
The higher the sampling rate, the higher the sound quality, but also the larger the volume of data.
Encoding
Converting music CDs, WAVE (AIFF) files, and other sound files into the specified audio compression format.
Tag
Song information such as track titles, artist names, album names, etc., written into MP3/WMA files.
MP3: ID3 tag
WMA: WMA tag
Root folder
The root folder is found at the top of the file system. The root folder contains all folders and files.
Sound Setting
Adjusting Balance (Between Left and Right)/ Fader (Between Front and Rear)/Defeat
1 Press the Rotary encoder (MODE) repeatedly to choose the desired mode.
Each press changes the modes as follows:
SUBWOOFER*1 ??? BALANCE ??? FADER ??? DEFEAT ???
VOLUME ??? SUBWOOFER*1
Subwoofer : 0 ~ +15
Balance : L15 ~ R15
Fader : R15 ~ F15
Defeat : ON/OFF
Volume : 0 ~ 35
Press gor fafter selecting the Subwoofer mode, and the subwoofer output phase is switched NORMAL (0??) or REVERS (180??).
???If the Rotary encoder (MODE) is not pressed within 5 seconds after selecting the BALANCE, FADER, DEFEAT or SUBWOOFER mode, the unit automatically returns to normal mode.
???If you set the 2WAY/3WAY switch (pages 39 to 41) to 3WAY, you cannot adjust the FADER mode.
*1 When the subwoofer mode is set to OFF, its level and phase cannot be adjusted.
2 Turn the Rotary encoder (MODE) until the
desired sound is obtained in each mode.
By setting Defeat ON, previously adjusted settings of EQ will return to the factory defaults and MX is turned off.
???Depending on the connected devices, some functions and display indications do not work.
Equalizer Presets
9 typical equalizer settings are preset at the factory for a variety of musical source material.
1 Press MENU.
2 Select the Factory???s EQ mode by sliding your finger on the GlideTouch bar to the left or right.
Press the GlideTouch bar under the Factory???s EQ mode.
3 Select the desired equalizer characteristic by sliding your finger on the GlideTouch bar to the left or right.
???By selecting USER???S 1 to 6, you can recall the stored preset number in ???Adjusting and Storing the Parametric Equalizer Curve??? (page 16) or ???Adjusting and Storing the Graphic Equalizer Curve??? (page 16) .
4 Press and hold MENU for at least 2 seconds to return to normal mode.
???This function is inoperable when DEFEAT is set to ON (this page).
???If MENU is pressed while adjusting or setting the items in the MENU mode, the unit will return to the previous selection screen.
???By pressing the GlideTouch bar under RETURN in the MENU mode, the unit will return to the normal mode.
Setting User's EQ mode
This setting gives you a choice of
1 Press MENU.
2 Select SETUP by sliding your finger on the GlideTouch bar to the left or right. Press the
GlideTouch bar under SETUP.
The main SETUP menu is displayed.
3 Select AUDIO by sliding your finger on the GlideTouch bar to the left or right. Press the
GlideTouch bar under AUDIO.
The AUDIO SETUP menu is displayed.
4 Select EQ MODE by sliding your finger on the GlideTouch bar to the left or right. Press the
GlideTouch bar under EQ MODE.
5 Select EQ Type by sliding your finger on the GlideTouch bar to the left or right. Press the GlideTouch bar under PEQ or GEQ.
PEQ :
GEQ :
6 Press and hold MENU for at least 2 seconds to return to normal mode.
???If MENU is pressed while adjusting or setting the items in the MENU mode, the unit will return to the previous selection screen.
???By pressing the GlideTouch bar under RETURN in the MENU mode, the unit will return to the normal mode.

Adjusting and Storing the Parametric
Equalizer Curve
You can modify the Equalizer settings to create a response curve more appealing to your personal taste.
To adjust the parametric equalizer curve, set the EQ mode to PEQ. For details, refer to ???Setting User's EQ mode??? (page 15).
1 Press and hold MENU for at least 2 seconds.
2 Select the User???s EQ mode by sliding your finger on the GlideTouch bar to the left or right. Press the GlideTouch bar under the User???s EQ mode.
3 Press BAND to select the band to be adjusted.
BAND1 ??? BAND2 ??? BAND3 ??? BAND4 ??? BAND5 ??? BAND1
4 Select the frequency by sliding your finger on the GlideTouch bar to the left or right.
Adjustable frequency bands:
20Hz to 20kHz (in 1/3 octave steps)
5 Adjust the level by turning the Rotary encoder.
Adjustable level:
6 Press SOURCE/POWER to set the band width (Q).
Adjustable band width: 1.0, 1.5, 3.0
7 To adjust another band, repeat steps 3 to 6 and adjust all bands.
8 When the setting has been completed, press
FUNC. or the GlideTouch bar to activate the preset mode.
9 Select any one of the preset numbers (1 through 6) by sliding your finger on the GlideTouch bar to the left or right. Press and hold the GlideTouch bar under the desire preset for at least 2 seconds to store the adjusted contents.
10After setting, press and hold MENU for at least 2 seconds to return to normal mode.
???The frequencies of adjacent bands cannot be adjusted within 4 steps.
???This function is inoperable when DEFEAT is set to ON (page 15).
???If MENU is pressed while adjusting or setting the items in the MENU mode, the unit will return to the previous selection screen.
???By pressing the GlideTouch bar under RETURN in the MENU mode, the unit will return to the normal mode.
???If no operation is performed in 60 seconds, the unit will return to the normal mode.
Adjusting and Storing the Graphic Equalizer
Curve
You can modify the equalizer settings to create a response curve more appealing to your personal taste. To adjust the graphic equalizer curve, set the EQ mode to GEQ. For details, refer to ???Setting User's EQ mode??? (page 15).
1 Press and hold MENU for at least 2 seconds.
2 Select the User???s EQ mode by sliding your finger on the GlideTouch bar to the left or right. Press the GlideTouch bar under the User???s EQ mode.
3 Press BAND to select the band to be adjusted.
BAND1 ??? BAND2 ??? BAND3 ??? BAND4 ??? BAND5 ??? BAND6 ??? BAND7 ??? BAND1
4 Adjust the level by turning the Rotary encoder.
Adjustable output level:
5 To adjust another band, repeat steps 3 and 4, then adjust all bands.
6 When the setting has been completed, press
FUNC. or the GlideTouch bar to activate the preset mode.
7 Select any one of the preset numbers (1 through 6) by sliding your finger on the GlideTouch bar to the left or right. Press and hold the GlideTouch bar under the desire preset for at least 2 seconds to store the adjusted contents.
8 After setting, press and hold MENU for at least 2 seconds to return to normal mode.
???This function is inoperable when DEFEAT is set to ON (page 15).
???If MENU is pressed while adjusting or setting the items in the MENU mode, the unit will return to the previous selection screen.
???By pressing the GlideTouch bar under RETURN in the MENU mode, the unit will return to the normal mode.
???If no operation is performed in 60 seconds, the unit will return to the normal mode.
Recalling the Stored Equalizer Curve
1 Press and hold MENU for at least 2 seconds.
2 Select the User's EQ mode by sliding your finger on the GlideTouch bar to the left or right. Press the GlideTouch bar under the User's EQ mode.
3 Press FUNC. or the GlideTouch bar to activate the preset mode.
4 Select any one of the preset numbers (1 through 6) by sliding your finger on the GlideTouch bar to the left or right. Press the GlideTouch bar under the desire preset to recall the stored contents.
5 Press and hold MENU for at least 2 seconds to return to normal mode.
???This function is inoperable when DEFEAT is set to ON (page 15).
???You can recall the adjusted equalizer curve from ???Equalizer Presets??? (page 15).
???If MENU is pressed while adjusting or setting the items in the MENU mode, the unit will return to the previous selection screen.
???By pressing the GlideTouch bar under RETURN in the MENU mode, the unit will return to the normal mode.
???If no operation is performed in 60 seconds, the unit will return to the normal mode.
About the Crossover
Crossover:
This unit is equipped with an active crossover. The crossover limits the frequencies delivered to the outputs. Each channel is controlled independently. Thus, each speaker pair can be driven by the frequencies for which they have been optimally designed.
The crossover adjusts the HPF (high pass filter) or LPF (low pass filter) of each band, and also the slope (how fast the filter rolls off the highs or lows). Adjustments should be made according to the reproduction characteristics of the speakers. Depending on the speakers, a passive network may not be necessary. If you are unsure about this point, please consult your authorized Alpine dealer.
2 way mode
3 way mode
*1 Only when selecting USER'S in ???Setting the Response Slope for the High Range Speaker (TW SETUP)??? (page 28).
(Different from actual display)
Level adjusting
(0 to - 12 dB)
Output frequency range
???HPF (high pass filter): Cuts the lower frequencies and allows the higher frequencies to pass.
???LPF (low pass filter): Cuts the higher frequencies and allows the lower frequencies to pass.
???Slope: The level change (in dB) for a frequency change of one octave.
???The higher the slope value, the steeper the slope becomes.
???Adjust the slope to FLAT to bypass the HP or LP filters.
???Do not use a tweeter without the HPF on or set to a low frequency, as it may cause damage to the speaker due to the low frequency content.
???You cannot adjust the crossover frequency higher than the HPF or lower than the LPF.
???Adjustment should be made according to the recommended crossover frequency of the connected speakers. Determine the recommended crossover frequency of the speakers. Adjusting to a frequency range outside that recommended may cause damage to the speakers.
For the recommended crossover frequencies of Alpine speakers, refer to the respective Owner's Manual.
We are not responsible for damage or malfunction of speakers caused by using the crossover outside the recommended value.
(Different from actual display)

Adjusting and Storing the Crossover
Settings
Before performing the following procedures, refer to ???About the Crossover??? (Page 17).
1 Press and hold MENU for at least 2 seconds.
2 Select the
2 WAY System
3 Press BAND to select the band to be adjusted.
LOW ??? MID ??? HIGH ??? LOW
4 Select the desired
Adjustable frequency bands: 20Hz to 200Hz
(in 1/3 octave steps)
5 Press SOURCE/POWER to adjust the slope.
Adjustable slope: 0 (FLAT), 1 (6dB/oct.), 2 (12dB/oct.) 3 (18dB/oct.) 4 (24dB/oct.)
6 Adjust the output level by turning the Rotary encoder.
Adjustable output level:
7 To adjust another band, repeat steps 3 to 6, then adjust all bands.
8 When the setting has been completed, press
FUNC. or the GlideTouch bar to activate the preset mode.
9 Select any one of the preset numbers (1 through 6) by sliding your finger on the GlideTouch bar to the left or right. Press and hold the GlideTouch bar under the desire preset for at least 2 seconds to store the adjusted contents.
10After setting, press and hold MENU for at least 2 seconds to return to normal mode.
???If MENU is pressed while adjusting or setting the items in the MENU mode, the unit will return to the previous selection screen.
???By pressing the GlideTouch bar under RETURN in the MENU mode, the unit will return to the normal mode.
???If no operation is performed in 60 seconds, the unit will return to the normal mode.
3 WAY System
3 Press BAND to select the band to be adjusted.
LOW ???
4 Select the desired
Adjustable frequency bands:
LOW: 20Hz to 200Hz (in 1/3 octave steps)
HIGH: 1kHz to 20 kHz (in 1/3 octave steps)
5 Press SOURCE/POWER to adjust the slope.
Adjustable slope: 0 (FLAT)*1, 1 (6dB/oct.), 2 (12dB/oct.) 3 (18dB/oct.), 4 (24dB/oct.)
*FLAT can be set for the HIGH slope only when USER'S is selected in ???Setting the Response Slope for the High Range Speaker (TW SETUP)??? (page 28). Depending on the response characteristics of the speaker, care should be taken when setting the response slope to FLAT, as speaker damage may result.
6 Adjust the output level by turning the Rotary encoder.
Adjustable output level:
7 To adjust another band, repeat steps 3 to 6, then adjust all bands.
8 When the setting has been completed, press
FUNC. or the GlideTouch bar to activate the preset mode.
9 Select any one of the preset numbers (1 through 6) by sliding your finger on the GlideTouch bar to the left or right. Press and hold the GlideTouch bar under the desire preset for at least 2 seconds to store the adjusted contents.
10After setting, press and hold MENU for at least 2 seconds to return to normal mode.
???If MENU is pressed while adjusting or setting the items in the MENU mode, the unit will return to the previous selection screen.
???By pressing the GlideTouch bar under RETURN in the MENU mode, the unit will return to the normal mode.
???If no operation is performed in 60 seconds, the unit will return to the normal mode.
???About the 2way/3way system
You can switch to 2way/3way system mode with the 2way/3way switch on the bottom side of the unit (pages 39 to 41).
Recalling the Stored Crossover Settings
1 Press and hold MENU for at least 2 seconds.
2
3
4
5
???If MENU is pressed while adjusting or setting the items in the MENU mode, the unit will return to the previous selection screen.
???By pressing the GlideTouch bar under RETURN in the MENU mode, the unit will return to the normal mode.
About Time Correction
The distance between the listener and the speakers in a car vary widely due to the complex speaker placement. This difference in the distances from the speakers to the listener creates a shift in the sounds image and frequency characteristics. This is caused by the time delay between the sound reaching the listener???s right versus the left ear.
To correct this, the
The adjustment will be made for each speaker in 0.1 ms steps.
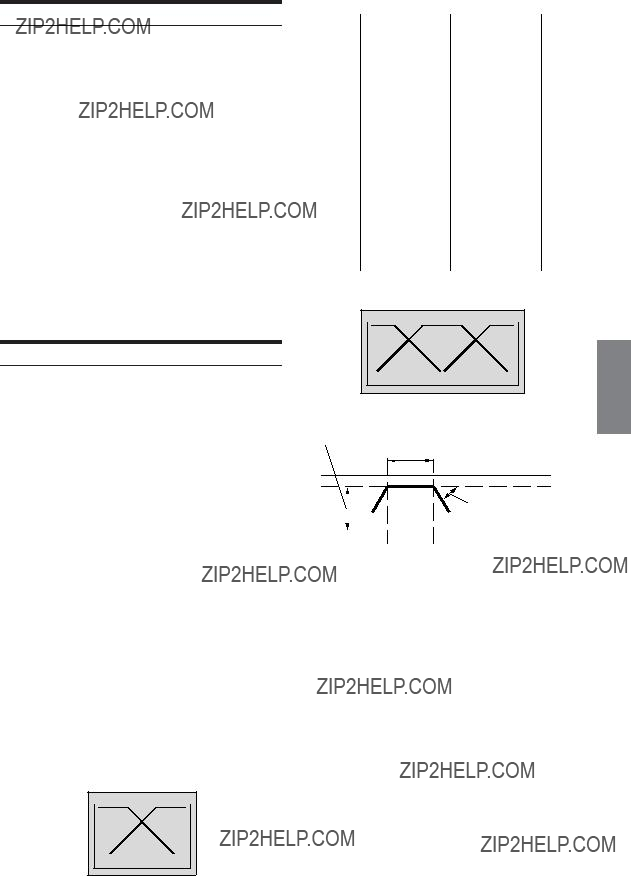
Example 1. Listening Position: Front Left Seat
Adjust the time correction level of the front left speaker to a high value and the rear right to zero or a low value.


 5.1ms
5.1ms 

 0.5m
0.5m

2.25m
The sound is not balanced because the distance between the listening position and the various speakers is different.
The difference in distance between the front left speaker and the rear right speaker is 1.75 m
Here we calculate the time correction value for the front left speaker in the diagram on the above.
Conditions:
Farthest Speaker ??? listening position : 2.25 m
Front left speaker ??? listening position : 0.5 m
Calculation: L = 2.25 m ??? 0.5 m = 1.75 m
*1 Speed of sound: 343 m/s (765 mph) at 20??C
In other words, giving the front left speaker a time correction value of 5.1 ms makes it seem as if its distance from the listener is the same as the distance to the farthest speaker.
Time correction eliminates the differences in the time required for the sound to reach the listening position.
The time of the front left speaker is corrected by 5.1 ms so that its sound reaches the listening position at the same time as the sound of other speakers.
Example 2. Listening Position: All Seats
Adjust the time correction level of each speaker to almost the same level.
1 Sit in the listening position (driver???s seat, etc.) and measure the distance (in meters) between your head and the various speakers.
2 Calculate the difference between the distance to the farthest speaker and the other speakers.
L = (distance to farthest speaker) ??? (distance to other speakers)
3 Divide the distances calculated for the speakers by the speed of sound (343 m/s (765 mph) at 20??C).
These values are the time correction values for the different speakers.
Continued

Time Difference Table
Setting the Time Correction Unit
You can change the unit, (ms, cm or inch) of time correction.
1 Press MENU.
2 Select SETUP by sliding your finger on the GlideTouch bar to the left or right. Press the
GlideTouch bar under SETUP.
The main SETUP menu is displayed.
3 Select DISPLAY by sliding your finger on the GlideTouch bar to the left or right. Press the
GlideTouch bar under DISPLAY.
The DISPLAY SETUP menu is displayed.
4 Select T.CORR PAR by sliding your finger on the GlideTouch bar to the left or right.
Press the GlideTouch bar under T.CORR PAR.
5 Select ms (MS), cm (CM) or inch (INCH) by sliding your finger on the GlideTouch bar to the left or right. Press under ms (MS), cm (CM) or inch (INCH) on the GlideTouch bar.
6 After setting, press and hold MENU for at least 2 seconds to return to normal mode.
???If MENU is pressed while adjusting or setting the items in the MENU mode, the unit will return to the previous selection screen.
???By pressing the GlideTouch bar under RETURN in the MENU mode, the unit will return to the normal mode.
Adjusting and Storing the Time Correction
Before performing the following procedures, refer to ???About Time Correction??? (page 19).
1 Press and hold MENU for at least 2 seconds.
2 Select T.CORR mode by sliding your finger on the GlideTouch bar to the left or right. Press the
GlideTouch bar under T.CORR.
3 Press BAND to select a speaker to be adjusted.
4 Adjust the time difference (0.0 to 9.9 ms) or distance by sliding your finger on the GlideTouch bar to the left or right. Or turn the Rotary encoder to adjust the time difference.
5 Repeat steps 3 and 4 to set another speaker.
6 When the setting has been completed, press
FUNC. or the GlideTouch bar to activate the preset mode.

7 Select any one of the preset numbers (1 through 6) by sliding your finger on the GlideTouch bar to the left or right. Press and hold the GlideTouch bar under the desire preset for at least 2 seconds to store the adjusted contents.
8 After setting, press and hold MENU for at least 2 seconds to return to normal mode.
???If MENU is pressed while adjusting or setting the items in the MENU mode, the unit will return to the previous selection screen.
???By pressing the GlideTouch bar under RETURN in the MENU mode, the unit will return to the normal mode.
???If no operation is performed in 60 seconds, the unit will return to the normal mode.
Recalling the Stored Time Correction
Settings
1 Press and hold MENU for at least 2 seconds.
2 Select the Time T.CORR mode by sliding your finger on the GlideTouch bar to the left or right. Press the GlideTouch bar under the Time T.CORR mode.
3 Press FUNC. or the GlideTouch bar to activate the preset mode.
4 Select any one of the preset numbers (1 through 6) by sliding your finger on the GlideTouch bar to the left or right. Press the GlideTouch bar under the desired preset to recall the stored contents.
5 Press and hold MENU for at least 2 seconds to return to normal mode.
???If MENU is pressed while adjusting or setting the items in the MENU mode, the unit will return to the previous selection screen.
???By pressing the GlideTouch bar under RETURN in the MENU mode, the unit will return to the normal mode.
Setting the MX Mode
MX (Media Xpander) makes vocals or instruments sound distinct regardless of the music source. The FM radio, CD, and MP3, will be able to reproduce the music clearly even in cars with a lot of road noise.
1 Press MENU.
2 Select the MX mode by sliding your finger on the GlideTouch bar to the left or right. Press the GlideTouch bar under the MX mode.
3 Press the GlideTouch bar under ON to activate MX.
4 After setting, press and hold MENU for at least 2 seconds to return to normal mode.
5 Press SOURCE/POWER to select the source to which you want to apply MX (Media Xpander).
6 Press and hold MENU for at least 2 seconds.
7 Select the MX mode by sliding your finger on the GlideTouch bar to the left or right. Press the GlideTouch bar under the MX mode.
8 Select the MX Level by sliding your finger on the GlideTouch bar to the left or right. Press the GlideTouch bar under the desired level or OFF.
FM (MX level 1 to 3):
The medium to high frequencies become clearer, and produces well balanced sound at all frequencies.
CD (MX level 1 to 3):
CD mode processes a large amount of data during playback. MX takes advantage of this large data quantity to reproduce a more clear, clean output.
CMPM (MX level 1 to 3):
This corrects information that was lost at the time of compression. This reproduces a
DVD (Video CD) (MOVIE MX level 1 to 2):
The dialogue portion of a video is reproduced more clearly.
(DVD MUSIC):
A DVD or Video CD contains a large quantity of data such as music clip. MX uses this data to reproduce the sound accurately.
AUX (MX level 1):
Choose the MX mode (CMPM, MUSIC, or MOVIE) that corresponds to the media connected.
If two external devices are connected, a different MX mode for each media can be selected.
9 After setting, press and hold MENU for at least 2 seconds to return to normal mode.
???To cancel MX mode for all music sources, set MX to OFF in step 3.
???Each music source, such as FM radio, CD, and MP3/WMA can have its own MX setting.
???On disks with both MP3/WMA and
???Setting to MX OFF sets MX mode of each music source to OFF.
???This function is inoperable when DEFEAT is set to ON.
???There is no MX mode for AM radio.
???If an audio processor with the MX function
??????CMPM??? is applied for MP3/WMA, WAV and iPod.
???If MENU is pressed while adjusting or setting the items in the MENU mode, the unit will return to the previous selection screen.
???By pressing the GlideTouch bar under RETURN in the MENU mode, the unit will return to the normal mode.
???If no operation is performed in 60 seconds, the unit will return to the normal mode.
About the MX indicator display
MX Level Display
Lights up when MX is on

Other Functions
MENU
Displaying the Title/Text
The display in MP3/WMA mode:
It is possible to display the CD/Station title if the title has been previously inputted (???Titling Discs/Stations??? page 23). Text information, such as the disc name and the track name, will be displayed if playing a CD text compatible disc. It is also possible to display the folder name, the file name, and the tag, etc., while playing MP3/WMA files.
Press TITLE.
The display will change every time the button is pressed.
The display in Radio mode:
*1 TITLE can be input or erased.
*2 Displayed during playback of a disc with CD Text.
???NO TEXT??? will be displayed when the CD contains no Text data. *3 ???ROOT??? is displayed for a root folder that does not have a folder
name.
*4 ID3 tag/WMA tag
If an MP3/WMA file contains ID3 tag/WMA tag information, the ID3 tag/WMA tag information is displayed (e.g., track name, artist name, and album name). All other tag data is ignored.
???NO DATA??? will be displayed when an MP3/WMA file contains no ID3 tag/WMA tag information.
*5 Only when an external Amplifier Link compatible amplifier is connected. For details, refer to ???Displaying the External Amplifier Information??? (page 24).
About the indicator display
The display in CD mode:
TRACK NO./ELAPSED TIME
CLOCK
TEXT (DISC NAME)*2
TEXT (TRACK NAME)*2
TRACK NO./ELAPSED TIME
TITLE*1
TRACK NO./ELAPSED TIME
TRACK NO./ELAPSED TIME
CLOCK
1 This indicator is lit when an album name is displayed.
2 This indicator is lit when a folder name is displayed.
3 This indicator is lit when a file name is displayed.
4 This indicator is lit when the elapsed playback time is displayed below.
5 This indicator is lit when the bit rate and sampling rate are displayed.
6 This indicator is lit when an artist name is displayed.

About ???Title??? and ???Text???
Title:
With this device, it is possible to input the CD/Station name (page 23). This inputted name is referred to as a ???title.??? You cannot input or display titles on MP3/WMA discs.
Text:
Text compatible CDs contain text information such as the disc name and track name. Such text information is referred to as ???text.???
???Some characters may not be displayed correctly with this device, depending on the character type.
???The CD changer must also be CD Text compatible for the Text information to be displayed.
???When the Scroll Setting (page 28) is set to ???MANUAL,??? press and hold TITLE for at least 2 seconds to scroll the Text information only once (TEXT DISPLAY, FOLDER NAME DISPLAY, FILE NAME DISPLAY or TAG DISPLAY mode).
??????NO SUPPORT??? is displayed when the desired text information cannot be displayed on this unit.
???If the title was not previously input, ???NO TITLE??? is displayed.
???The text or tag information may not be correctly displayed, depending on the contents.
???Elapsed time is displayed for 5 seconds in the CD/MP3/WMA mode immediately after changing sources or songs, etc.
7 Press TITLE to record the title.
???If you cancel while entering a title, selected characters are not written.
???You can enter 24 radio station titles and 18 CD titles on this unit. If you try to store beyond the limit, the display will show ???FULL DATA.??? At this point, no more titles can be stored. To input a new title, one of the previously inputted titles must first be deleted.
???The CD Changer title length or memory capacity varies depending upon the model being used.
??? When you want to erase a title, enter a symbol ???


 ???.
???.
???The operations described in steps 3 to 6 must be made within 10 seconds. The input mode will be canceled if no action is taken for over 10 seconds.
Erasing Disc Title/Station Title
1 Press TITLE to select the Title Display. Then, press again and hold for at least 2 seconds.
??? For details, see asterisk 1 of ???Displaying the Title/Text??? (page 22).
2 Within 10 seconds, press and hold
The title in the display will blink.
3 Within 10 seconds, press gor frepeatedly until the title you want to erase is displayed.
4 Within 10 seconds, press and hold
5 Press TITLE to cancel the title erasing mode.
???You cannot erase
???"NO DATA" is displayed for 2 seconds if the title is not input in step 2, or if all titles are erased in step 4.
Displaying Time
Press TITLE repeatedly until the time is displayed.
Each press changes the display.
For details, see ???Displaying the Title/Text??? (page 22).
???Selecting any tuner or CD function while in the clock priority mode will interrupt the time display momentarily. The function selected will be displayed for about 5 seconds before the time returns to the display.
???When the power is off but the ignition key is on, press TITLE to display the time.

Setting Amplifier Link
When an Amplifier Link compatible amplifier
1 Press and hold MENU for at least 2 seconds.
2 Select the
3 Select the
The input level mode to be adjusted is activated.
Displaying the External Amplifier Information
When an Amplifier Link compatible amplifier is connected, the amplifier's status (voltage, temperature and fan status) can be shown in the head unit's display.
1 Press TITLE in the Radio or CD mode to switch the display of the external amplifier information.
???For switching the display, refer to the section ???Displaying the Title/ Text??? (page 22).
???For changing the iPod display, refer to the section ???Displaying the Text??? (page 31).
Fan Status
Display
Voltage Display
If a Mono Amplifier is Connected
4 Adjust the input level by sliding your finger on the GlideTouch bar to the left or right. Press the GlideTouch bar under the desired level.
If a 4ch Amplifier is Connected
4 Adjust the input level of CH 1/2 by sliding your finger on the GlideTouch bar to the left or right. Press the GlideTouch bar under the desired level.
5 Adjust the input level of CH 3/4 by sliding your finger on the GlideTouch bar to the left or right. Press the GlideTouch bar under the desired level.
6 When adjustment has been completed, press and hold MENU for at least 2 seconds to return to normal mode.
???For details of each of the settings, refer to the Owner's Manual of the external amplifier.
???If amplifier settings are made on the unit, do not then change the setting with the amplifier buttons as the amplifier display may not match the operations of the unit.
??????No Link??? is displayed if the amplifier is removed or its power cannot be turned on, etc.
???If multiple amplifiers are connected to this unit, set a different ID on each amplifier. Otherwise the display may flicker.
???External amplifier information display can be changed by pressing TITLE while adjusting the input level.
???If the GlideTouch bar is pressed and held while adjusting the input level, the amplifier link mode can be switched between lock and unlock.
???If MENU is pressed while adjusting or setting the items in the MENU mode, the unit will return to the previous selection screen.
???By pressing the GlideTouch bar under RETURN in the MENU mode, the unit will return to the normal mode.
???If no operation is performed in 60 seconds, the unit will return to the normal mode.
12.4V HIGH
42.0??C
Temperature Display
???To switch the display between Celsius and Fahrenheit, refer to page 28.

SOURCE/POWER
About
You can download data (from Alpine???s website) to a
To start
http://www.alpine.com or
Downloadable data
The file name of download data shall be ???A_U*****.MP3.???
A_U???????????????.MP3
Extender (fixed)
Identifier (alphabet or number 5 letters maximum)
Header (fixed)
You can create a file name via the website. Do not change a file name once it has been created. Malfunction may result.
???For downloading procedure details, see ALPINE???s Web site.
???If the
???If an external audio processor is connected, data that is downloaded cannot be used.
Data Downloading
1 Insert the
2 Press MENU.
3 Select the Download mode by sliding your finger on the GlideTouch bar to the left or right. Press the GlideTouch bar under the Download mode.
4 Select YES by pressing the GlideTouch bar under YES.
Data search of the disc starts and the first file name is displayed.
???If you want to cancel the data search, press the GlideTouch bar under NO.
???If a file is not found by a data search, ???No File??? is indicated.
???The ???No File??? display will automatically disappear if no operation is performed for 5 seconds.
5 Select the file to download by sliding your finger on the GlideTouch bar to the left or right. Press the GlideTouch bar under the desired file.
Data downloading starts.
6 When data download is finished successfully, each confirmation screen of download data is sequentially displayed, and download finishes.
Successfully downloaded items are indicated as checked boxes on the confirmation screen.
PARAMETRIC EQ or Graphic EQ data*
The data is memorized in Preset 6 of Parametric EQ mode or Graphic EQ mode. The memorized data settings in Preset 6 (Parametric EQ mode or Graphic EQ mode) are automatically applied.
The data is memorized in Preset 6 of
You cannot download the data if the setting of the 2WAY/3WAY switch is not suitable for the data.
TIME CORRECTION data
The data is memorized in Preset 6 of the Time correction mode. The memorized data settings in Preset 6 (Time Correction mode) are automatically applied.
*If the downloaded parametric EQ or graphic EQ differs from the current EQ mode, Preset 6 setting will not change automatically. Change the EQ mode and recall Preset 6.
*If data is downloaded while setting DEFEAT to ON, Preset 6 setting will not change automatically. Recall Preset 6 in the EQ mode.
7 Press and hold MENU for at least 2 seconds to return to normal mode.
???When you download the data again, the data is overwritten in Preset 6.
???If MENU is pressed while adjusting or setting the items in the MENU mode, the unit will return to the previous selection screen.
???By pressing the GlideTouch bar under RETURN in the MENU mode, the unit will return to the normal mode.

SETUP
You can flexibly customize the unit to suit your own preferences and usage. Choose the SETUP menu from General Setting, Tuner Setting, etc., to select your desired setting.
The common operation for SETUP is step 1 to 4 as follows. See down below for further information about each SETUP menu.
1 Press MENU.
2 Select SETUP by sliding your finger on the GlideTouch bar to the left or right. Press the
GlideTouch bar under SETUP.
The main SETUP menu is displayed.
3 Select the desired item by sliding your finger on the GlideTouch bar to the left or right. Press the GlideTouch bar under your selection.
GENERAL ??? TUNER ??? AUDIO ??? DISPLAY ??? DEMO
The SETUP menu of the selected item is displayed.
4 Select the desired item by sliding your finger on the GlideTouch bar to the left or right. Press the GlideTouch bar under your selection.
GENERAL
CLOCK*1 ??? PLAY MODE ??? BEEP ??? INT MUTE ??? INT AUDIO ??? AUX IN ??? (AUX NAME)*2 ???
POWER IC ??? STEERING
TUNER
TUNER MODE ??? TUNER AREA*3
AUDIO
SUBWOOFER ??? SUBW SYSTEM*4 ???
EQ MODE*5 ??? TW SETUP*6 ??? AP SELECT
DISPLAY
DIMMER ??? DIMMER LEV ??? SCROLL TYPE ??? TEXT SCROLL
??? LCD CONTRAST ???
DEMO
DEMO
*1 Refer to ???Setting Time??? (page 7). *2 Displayed only when AUX is ON.
*3 Refer to ???Changing the Radio Frequencies for each Country??? (page 9)
*4 Displayed only when SUBWOOFER is ON. *5 Refer to ???Setting User's EQ mode??? (page 15).
*6 Displayed only when the 2WAY/3WAY switch (pages 39 to 41) is set to 3WAY.
This function cannot be selected when an external audio processor is connected.
*7
*8 Refer to ???Setting the Time Correction Unit??? (page 20).
5 Change the parameter by pressing the GlideTouch bar under the setting desired.
6 After setting, press and hold MENU for at least 2 seconds to return to normal mode.
???If MENU is pressed while adjusting or setting the itmes in the MENU mode, the unit will return to the previous selection secreen.
???By pressing the GlideTouch bar under RETURN in the MENU mode, the unit will return to the normal mode.
???If no peration is performed in 60 seconds, the unit will return to the normal mode.
General Setting
General is selected on the setup main menu in step 3.
Playing MP3/WMA Data (PLAY MODE)
CDDA (Initial setting) / CDDA&MP3/WMA
This product can playback CDs containing both CD and MP3/WMA data. However, in some situations (some enhanced CDs), playback may be difficult. For these special cases, you can select playback of CD data only. When a disc contains both CD or the MP3/WMA data, playback starts from the CD data portion of the disc.
CDDA :Only CD data can be played back.
CDDA&MP3/WMA : Both CD data and MP3/WMA file tracks can be played back.
???Perform this setting before inserting a disc. If a disc has already been inserted, perform the setting after you remove the disc. (If you use an MP3 changer, you have to change discs.)
Sound (Beep) Guide Function
BEEP ON (Initial setting) / BEEP OFF
This function will give audible feedback with varying tones depending upon the button pressed.
Turning Mute Mode On/Off
INT MUTE ON (Initial setting) / INT MUTE OFF
If a device having the interrupt feature is connected, audio will be automatically muted whenever the interrupt signal is received from the device.
Setting Tone Defeat for External Devices
INT AUDIO ON / INT AUDIO OFF (Initial setting)
When inputting external devices to this unit, turning tone defeat on will bypass EQ and MX, i.e., sound for external devices is output at the default setting.
Setting the AUX Mode
AUX IN ON / AUX IN OFF (Initial setting)
You can input TV/video sound by connecting an optional
You can change the AUX name display when AUX ON is set. Select the AUX name by sliding your finger on the GlideTouch bar to the left or right. Then press the GlideTouch bar.
If the
???Via
Setting the External Digital Input
When an ALPINE
???After setting
???Press SOURCE/POWER, and select the
???Depending on the connected audio processor, DVD player sound may continue to be output, even though the source is changed to another one. If this occurs, set the DVD player's power to OFF.
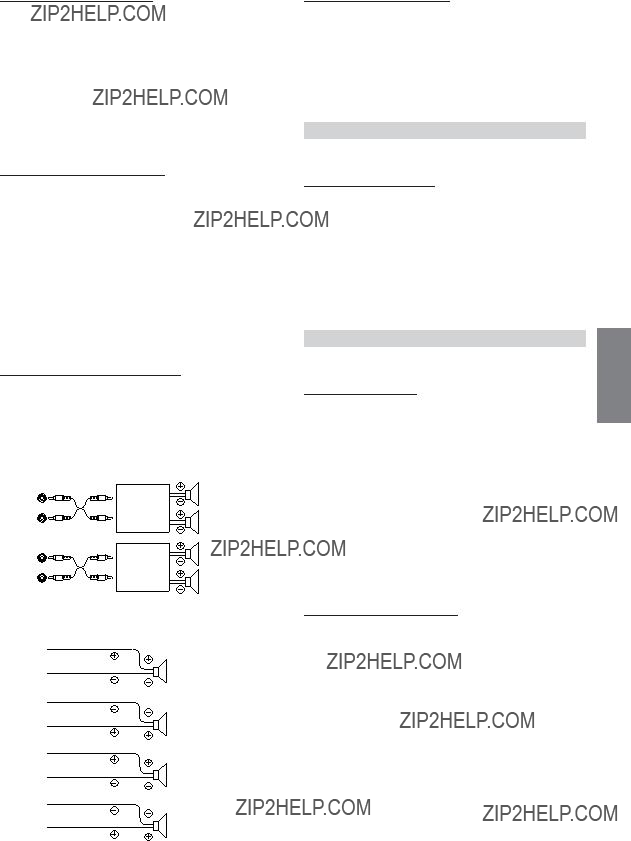
Connecting to an External Amplifier
When an external amplifier is connected, sound quality can be improved by stopping the power supply of the
Front
left
Amplifier
Front right
Rear
left
Amplifier
Rear right
Speakers
SPEAKER
RIGHT FRONTFront right
SPEAKER
RIGHT REARRear right
SPEAKER
LEFT REARRear left
SPEAKER
LEFT FRONTFront left
???No sound is produced by the system when the power output is set to OFF.
Setting the Steering Position
STEERING RIGHT / STEERING LEFT (Initial setting)
According to the car's steering position, set to left or right.
LEFT : Set to LEFT for a
RIGHT : Set to RIGHT for a
Tuner Setting
Tuner is selected on the setup main menu in step 3.
Switching the Tuner Mode
STABLE / NORMAL (Initial setting) /
This unit incorporates the MAX TUNE PRO for the highest quality tuner audio. Moreover, you can choose between three settings to suit your own personal sound preferences and usage.
NORMAL : Standard setting
STABLE : Noiseless priority setting
???If you find the sound is very noisy while listening to the tuner in Hi- Fi mode, we recommend you change to Normal mode.
Audio Setting
Audio is selected on the setup main menu in step 3.
Subwoofer On and Off
SUBWOOFER ON (Initial setting) / SUBWOOFER OFF
When the subwoofer is on, perform the steps below to adjust the subwoofer output phase and level.
1Press the Rotary encoder repeatedly to select the SUBWOOFER mode.
SUBWOOFER ??? BALANCE ??? FADER ??? DEFEAT ???
VOLUME ??? SUBWOOFER
???If you set the 2WAY/3WAY switch (pages 39 to 41) to 3WAY, you cannot adjust the FADER mode.
2Press gor f.
The subwoofer output phase is toggled SUBWOOFER NORMAL (0??) or SUBWOOFER REVERS (180??).
To adjust the level, turn the Rotary encoder.
Setting the Subwoofer System
SUBW SYSTEM1 (Initial setting) / SUBW SYSTEM2
Select either SYSTEM1 or SYSTEM2 for the desired subwoofer effect.
SYSTEM1 : Subwoofer level changes according the main volume setting.
SYSTEM2 : Subwoofer level change is different from the main volume setting. For example, even at low volume settings, the subwoofer is still audible.

Setting the Response Slope for the High Range Speaker (TW SETUP)
MAKER???S (Initial setting) / USER???S
Depending on the response characteristics of the speaker, care should be taken when setting the response slope of the high range speaker to FLAT in
MAKER???S : As protection from possible speaker damage, FLAT cannot be set for the response slope of the high range speaker in
USER???S : The FLAT setting is possible in
Connecting an Optical Digital Compatible Audio
Processor and an
AP SELECT H510 / OTHER (Initial setting)
After setting
H510 : If a
OTHER : If an audio processor other than a
???After input selection is completed, turn the ignition off and back on again. Setting of the optical digital input switch is completed.
Display Setting
The display is selected on the setup main menu in step 3.
Dimmer Control
DIMMER AUTO (Initial setting) / DIMMER MANUAL
Set the DIMMER control to AUTO to decrease the illumination brightness of the unit with the head lights of the vehicle ON. This mode is useful if you feel the unit's backlighting is too bright at night.
Setting the Display Dimmer
DIMMER LEV1 (initial setting) / 2 / 3
In the display Dimmer AUTO setting, three levels are available, the highest level (LEVEL 3) being the dimmest when the car headlights are on.
Scroll Type Setting
SCROLL TYPE1 / SCROLL TYPE2 (Initial setting)
Two types of scroll can be selected.
You can select the scroll type you like.
TYPE1 : The characters scroll right to left, appearing from the right side of the display, one character at a time.
TYPE2 : The display will show complete words, unless they do not fit in the display at one time. Words hyphenated when necessary and are shown sequentially until the full title has been displayed.
Scroll Setting
TEXT SCROLL AUTO / TEXT SCROLL MANUAL (Initial setting)
This CD player can scroll the disc and track names recorded on CD- TEXT discs, as well as the text information of MP3/WMA files, folder names, and tags.
AUTO : The CD text information, the text information of folder and file names, and the tags are scrolled automatically.
MANUAL : The display is scrolled when a disc is loaded or when a track is changed, etc.
???The unit scrolls CD text names, folder names, file names or tag display. The disc titles input manually (page 23) cannot be scrolled.
Adjusting Display Contrast
CONTRAST
You can adjust the display contrast for better visibility.
You can adjust in a range of - 6 and + 6.
??? The initial setting at the factory is ???0.???
Setting theTemperature Display for the External Amplifier
AMP TEMP ??F (Initial setting)/ AMP TEMP ??C
When a separately sold Amplifier Link compatible amplifier is connected, you can set how to display its temperature. You can switch the setting between Fahrenheit and Celsius.
??F : The temperature is displayed in Fahrenheit.
??C : The temperature is displayed in Celsius.
Setting the Display of the Audio Level Indicator
AUDIO LV ON (initial setting) / AUDIO LV OFF
You can set whether the audio level indicator is displayed.
Demo Setting
Demo is selected on the setup main menu in step 3.
Demonstration
DEMO ON / DEMO OFF (Initial setting)
This unit has a Demonstration feature for the display and sound.
??? To quit Demo mode, set to DEMO OFF.
iPod??? Operation (Optional)
SOURCE/
POWER
GlideTouch bar
When an iPod??? or iPod??? mini is connected to the optional Alpine Interface adapter for iPod???
???For details, refer to the Owner???s Manual of the iPod??? Interface adapter
???Refer to the iPod???s documentation for a description of its functions.
Playback
1 Press SOURCE/POWER to switch to the iPod mode.
2 Press gor fto select the desired song.
Return to the beginning of the current song:
Press g.
Fast backward:
Press and hold g.
Advance to the beginning of the next song:
Press f.
Fast forward:
Press and hold f.
3 To pause playback, press :/J.
Pressing :/J again will resume playback.
???If a song is playing on the iPod when it is connected to the adapter, it will continue playing after the connection.
???If using the iPod with a changer, the Versatile Link Terminal (KCA- 410C) must be used. In this case, press BAND to select the changer mode applicable to the iPod.
Searching for a desired Song
An iPod can contain hundreds of songs. By keeping these songs organized in playlists, the
??? When Shuffle (M.I.X.) is on, the search function cannot be used.
Searching by Playlist
3*1Within 10 seconds, select the playlist by sliding your finger on the GlideTouch bar to the left or right.
4 Within 10 seconds, press
To search for a song in the selected playlist
1After selecting the playlist in step 3*1, press the GlideTouch bar or FUNC. to change to the song search mode of the selected playlist.
2Within 10 seconds, select a song by sliding your finger on the GlideTouch bar to the left or right, then pressing
The selected song is played back.
???If you choose ???iPod name??? of iPod in step 3*1 and you press
???The search mode is cancelled by pressing and holding for at least 2 seconds in the search mode.
???The playlist can be scrolled continuously by touching and holding either side of the GlideTouch bar.
???You can speed up your search by sliding your finger quickly on the GlideTouch bar to skip playlists.
Searching by artist name
3*2Within 10 seconds, select the artist to be played back by sliding your finger on the GlideTouch bar to the left or right.
4 Within 10 seconds, press
Continued

To search for an album of the selected artist
1After selecting the artist in step 3*2, press the GlideTouch bar or FUNC. to change to the album search mode of the selected artist.
2*3 Within 10 seconds, select the album to be played back by sliding your finger on the GlideTouch bar to the left or right.
3 Press
To search for a song of the selected album
1After selecting the album in step 2*3, press the GlideTouch bar or FUNC to change to the song search mode of the selected album.
2Within 10 seconds, select a song by sliding your finger on the GlideTouch bar to the left or right, then pressing
The selected song is played back.
???If you choose ALL in step 3*2 , and you press :/J, all songs in iPod are played back. If you choose ALL, and you press the GlideTouch bar or FUNC., the ALBUM search mode for all artists is activated.
???If you choose ALL in step 2*3 , and you press :/J, all songs of the selected artist are played back. If you choose ALL, and you press the GlideTouch bar or FUNC., the SONG search mode for the selected artist is activated.
???The search mode is canceled by pressing and holding for at least 2 seconds in the search mode.
???The artist, album or song can be scrolled continuously by touching and holding either side of the GlideTouch bar.
???You can speed up your search by sliding your finger quickly on the GlideTouch bar to skip artists, albums or songs.
Searching by album name
3*4Within 10 seconds, select the album to be played back by sliding your finger on the GlideTouch bar to the left or right.
4 Within 10 seconds, press
To search for a song of the selected album
1After selecting the album in step 3*4, press the GlideTouch bar or FUNC. to change to the song search mode of the selected album.
2Within 10 seconds, select a song by sliding your finger on the GlideTouch bar to the left or right, then pressing
The selected song is played back.
???If you choose ALL in step 3*4 , and you press :/J, the search mode is canceled. If you choose ALL, and you press the GlideTouch bar or FUNC., the SONG search mode for all albums is activated.
???The search mode is canceled by pressing and holding for at least 2 seconds in the search mode.
???The album or song can be scrolled continuously by touching and holding either side of the GlideTouch bar.
???You can speed up your search by sliding your finger quickly on the GlideTouch bar to skip albums or songs.
Random Play Shuffle (M.I.X.)
The Shuffle function of the iPod is displayed as M.I.X. on the CDA- 9854L.
Shuffle Albums (M.I.X. ALBUM):
Select an album randomly in the iPod, and plays back the songs of the album in sequential order. If a song has been selected in the playlist/ artist search mode before selecting Shuffle Album, only the albums within the playlist/artist are selected randomly. The songs of the album are played back sequentially.
Shuffle Songs (M.I.X. ALL):
All songs in the iPod are played back in random sequence. If a song has been selected in the playlist/artist search mode before selecting Shuffle song, only the songs of the playlist/artist/album are played back randomly.
1 Press FUNC. to activate the audio function mode.
Source select mode ??? Audio function mode ??? Source select mode
2 Press the GlideTouch bar under the M.I.X . function in the function guide display.
The songs will be played back in random sequence.
???  M.I.X. ???
  M.I.X. ??? (off)
(Shuffle Albums) (Shuffle Songs)
The Random Play mode is canceled by selecting off.
???The function mode you previously recalled can be recalled again if the GlideTouch bar is touched.
???If no operation is performed for 10 seconds, the audio function mode turns off.
???For details of the search mode, refer to ???Searching for a desired Song??? (page 29).
???If a song is selected in the album search mode before selecting Shuffle (M.I.X.), the songs will not play back randomly even when Shuffle album is selected.
???If there is no album in the playlist, Shuffle (M.I.X.) will not function even when Shuffle album is selected.
Repeat Play
Only Repeat One is available for the iPod.
Repeat One: A single song is repeatedly played back.
1 Press FUNC. to activate the audio function mode.
Source select mode ??? Audio function mode ??? Source select mode
2 Press the GlideTouch bar under the RPT function in the function guide display.
The song will be played back repeatedly.
RPT ??? (off)
(Repeat One)
The RPT mode is canceled by selecting off.
???The function mode you previously recalled can be recalled again if the GlideTouch bar is touched.
???If no operation is performed for 10 seconds, the audio function mode turns off.
???During repeat playback, no other songs are selectable by pressing gor f.
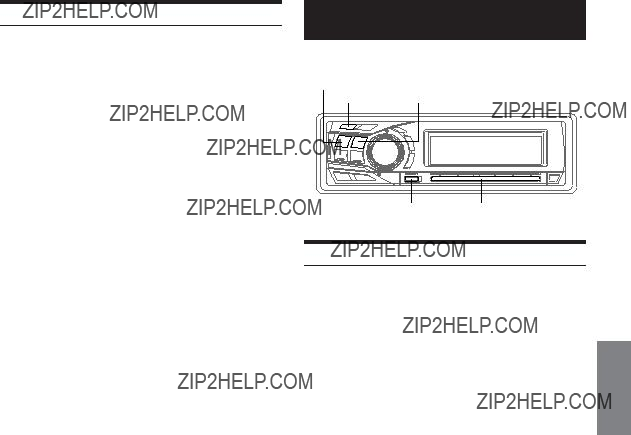
Displaying the Text
You can display the tag information of a song in the iPod.
Press TITLE.
Each press changes the display.
*1 ???NO DATA??? is displayed if there is no information.
*2 Only when an external Amplifier Link compatible amplifier is connected. For details, refer to ???Displaying the External Amplifier Information??? (page 24).
???When the Scroll Setting (page 28) is set to ???MANUAL,??? press and hold TITLE for at least 2 seconds to scroll the tag information only once.
???Elapsed time is displayed for 5 seconds immediately after changing sources or songs, etc.
???Only alphanumeric characters can be displayed.
???When the artist name, album name or song name is set on iTunes, and the amount of characters is increased, songs may not be played back when connected to the adapter. Therefore, a maximum of 250 characters is recommended. The maximum number of characters for the head unit is 64.
???Some characters may not be correctly displayed.
??????NO SUPPORT??? is displayed when text information is not compatible with the
Changer (Optional)
SOURCE/
POWER
FUNC. GlideTouch bar
Controlling CD Changer (Optional)
An optional
Using the
See
???The controls on this unit for CD Changer operation are operative only when a CD Changer is connected.
???The DVD changer (optional) is controllable from this unit as well as the CD changer.
1 Press SOURCE/POWER to activate the CHANGER mode.
The display shows the disc number and track number.
??? The source indicator varies depending on the connected source.
2 Press FUNC. to activate the direct disc recall mode.
Source selection mode ??? Audio function mode ??? Direct disc recall mode ??? Source selection mode
3 Select a disc (1 to 6) or (1 to 12) by touching the GlideTouch bar and sliding your finger to the left or right. Press the GlideTouch bar under the desired disc.
The selected disc number appears in the display and CD playback starts.
???After selecting the desired disc, you can operate in the same way as for the CD player of this unit.
For details, please see the CD/MP3/WMA section.

Playing MP3 Files with the CD Changer (Optional)
If you connect a changer compatible with MP3, you can play CD- ROMs,
1 Press SOURCE/POWER to switch to the MP3 Changer mode.
2 Press FUNC. to activate the direct disc recall mode.
Source selection mode ??? Audio function mode ??? Direct disc recall mode ??? Source selection mode
3 Select a disc (1 to 6) by touching the GlideTouch bar and sliding your finger to the left or right. Press the GlideTouch bar under the desired disc.
4 To pause playback, press
Pressing
???The unit can play discs containing both audio data and MP3 data.
???For operating MP3 with an MP3 compatible CD Changer, refer to ???CD/MP3/WMA??? pages 10 to 14.
Alpine's
1 Press SOURCE/POWER on this unit to activate the CD Changer mode.
Alternatively, press SOURCE on the remote control (RUE- 4202) to activate the CD Changer mode.
SOURCE
BAND
2 Press BAND on this unit or the
The CD Changer Selection mode remains active for a few seconds.
3 Press BAND until the desired CD Changer indicator appears on the display.
Alternatively press BAND on the Remote Control until the desired changer indicator appears on the display.
???If the selected CD Changer is not connected, the display will show ???NO CHGR.???
???To operate the selected changer, see ???CD/MP3/WMA??? (page 10).
???For further details about the external input (AUX) when using
Remote Control
Controls on Remote Control
1Source Button
Press this button to select the audio source.
2Volume Adjustment Buttons
To increase the volume level: Press the L button
To decrease the volume level: Press the K button
38 Button
Radio mode: Pressing this button will select, in ascending order, stations programmed into the radio's presets as shown below.
1 ??? 2 ... 6 ??? 1
CD Changer mode: DISC Select (UP) button
Press this button to select a disc in ascending order.
MP3/WMA mode: Folder Select (UP) button. Press this button to select the folder.
MP3 compatible CD changer mode:
Folder Select (UP) / DISC Select (UP) button
Press this button to select a folder in ascending order. Press and hold this button to select a disc in ascending order.
4gDN Button
Radio mode: SEEK (DN) Button
CD mode: Press this button to go back to the beginning of the current track.
5
Press this button to switch between the Play and Pause modes for CD.
6Audio Processor Button
Each press of the button changes the audio processor mode.
For details, refer to ???Operating the Audio Processor??? as shown below.
Press the button to call the external audio processor mode when the external audio processor is connected.*1
7Power Button
Press this button to turn the power on/off.

8Band Button
Radio mode: BAND Button
Press this button and the band will change. Changer mode: To switch the changer.
9fUP Button
Radio mode: SEEK (UP) button
CD mode: Press this button to advance to the beginning of the next track.
!9 Button
Radio mode: Pressing this button will select, in descending order, stations programmed into the radio's presets as shown below.
6 ??? 5 ... 1 ??? 6
CD Changer mode: DISC Select (DN) button
Press this button to select a disc in descending order. MP3/WMA mode: Press the Folder Select (DN) button. Press this button to select the folder.
MP3 compatible CD changer mode:
Folder Select (DN) / DISC Select (DN) button
Press this button to select a folder in descending order. Press and hold this button to select a disc in descending order.
"Mute Button
Press this button to lower the volume by 20 dB instantly. Press this button again to cancel.
*1 For the operation of external audio processor, refer to the Owner's Manual of the external audio processor you purchased.
Operating the Audio Processor
1 Press A.PROC to select the mode.
Normal mode ??? EQ mode (Equalizer Presets) ??? Time Correction mode (Recalling the Stored Time Correction) ??? Crossover mode (Recalling the Stored Crossover) ??? Normal mode
2 Press 8 or 9 to select the item.
EQ mode:
Select from factory???s EQ mode and USER'S 1 to 6.
Time Correction mode/Crossover mode:
Select from MEMORY 1 through 6.
Battery Replacement
Applicable battery: Use two ???AAA??? sized dry batteries or equivalent.
1 Opening the battery cover
Slide out the battery cover while firmly pressing in the direction of the arrow.
2 Replacing the battery
Insert the batteries, observing the polarities as illustrated.
3 Closing the cover
Slide the cover as illustrated until a click is heard.
Point the remote control transmitter at the remote control sensor.
Remote control sensor
Connectable to Steering Remote Control Interface Box
You can operate this unit from the vehicle???s control unit when an Alpine Steering Remote Control Interface Box (optional) (for sale in the near future) is connected.
For details, contact your Alpine dealer.

Information
In Case of Difficulty
If you encounter a problem, please turn the power off, then on again. If the unit is still not functioning normally, please review the items in the following checklist. This guide will help you isolate the problem if the unit is at fault. Otherwise, make sure the rest of your system is properly connected or consult your authorized Alpine dealer.
Basic
No function or display.
???Vehicle's ignition is off.
-If connected following instructions, the unit will not operate with the vehicle's ignition off.
???Improper power lead connections.
-Check power lead connections.
???Blown fuse.
-Check the fuse of the unit; replace with the proper value if necessary.
???Internal
-Press the RESET switch with a ballpoint pen or other pointed article.
Radio
Unable to receive stations.
???No antenna or open connection in cable.
-Make sure the antenna is properly connected; replace the antenna or cable if necessary.
Unable to tune stations in the seek mode.
???You are in a weak signal area.
-Make sure the tuner is in the DX mode.
???If the area you are in is a primary signal area, the antenna may not be grounded and connected properly.
-Check your antenna connections; make sure the antenna is properly grounded at its mounting location.
???The antenna may not be the proper length.
-Make sure the antenna is fully extended; if broken, replace the antenna with a new one.
Broadcast is noisy.
???The antenna is not the proper length.
-Extend the antenna fully; replace it if it is broken.
???The antenna is poorly grounded.
-Make sure the antenna is grounded properly at its mounting location.
CD
CD Player/Changer not functioning.
???Out of operating temperature range +50??C (+120??F) for CD. - Allow the vehicle's interior (or trunk) temperature to cool.
CD playback sound is wavering.
???Moisture condensation in the CD Module.
-Allow enough time for the condensation to evaporate (about 1 hour).
CD insertion not possible.
???A CD is already in the CD player.
-Eject the CD and remove it.
???The CD is being improperly inserted.
-Make sure the CD is being inserted following instructions in the CD Player Operation section.
Unable to fast forward or backward the CD.
???The CD has been damaged.
-Eject the CD and discard it; using a damaged CD in your unit can cause damage to the mechanism.
CD playback sound skips due to vibration.
???Improper mounting of the unit.
-Securely
???The disc is very dirty.
-Clean the disc.
???The disc has scratches.
-Change the disc.
???The
-Do not use a commercial available lens cleaner disc. Consult your nearest ALPINE dealer.
CD playback sound skips without vibration.
???The disc is dirty or scratched.
- Clean the disc; damaged disc should be replaced.
Error displays
???Mechanical error
-Press c. After the error display disappears, insert the disc again. If the
???Close session (finalization) has not been performed. - Perform finalization and attempt playback again.
MP3/WMA
MP3 or WMA is not played back.
???Writing error occurred. The CD format is not compatible.
-Make sure the CD has been written in a supported format. Refer to ???About MP3/WMA??? (page

Indication for CD Player
???Protective circuit is activated due to high temperature.
-The indicator will disappear when the temperature returns to within operation range.
Indication for CD Changer
???Protective circuit is activated due to high temperature.
-The indicator will disappear when the temperature returns to within operation range.
NO DISC
???No CD is inserted.
-Insert a CD.
???Although a disc is inserted, ???NO DISC??? is displayed and the unit does not start to play or eject the disc.
-Remove the disc by following these steps:
1)Press the c button.
The movable display will open.
2)Press the c button again for at least 2 seconds while the movable display is open.
ERROR
???Mechanism error.
1)Press the c button and eject the CD.
If not ejecting, consult your Alpine dealer.
2)When the error display remains after ejecting, press the c button again.
If the error display still does not turn off after pressing the c button for a few times, consult your Alpine dealer.
???When ???ERROR??? is displayed:
If the disc cannot be ejected by pressing c, press the RESET switch (refer to page 7) and press c again.
If the disc still cannot be ejected, consult your Alpine dealer.
ERROR - 01
???Malfunction in the CD Changer.
-Consult your Alpine dealer. Press the magazine eject button and pull out the magazine.
Check the indication. Insert the magazine again.
If the magazine cannot be pulled out, consult your Alpine dealer.
???Magazine ejection not possible.
-Press the magazine eject button. If the magazine does not eject, consult your Alpine dealer.
ERROR - 02
???A disc is left inside the CD Changer.
-Press the eject button to activate the eject function. When the CD Changer finishes the eject function, insert an empty CD magazine into the CD Changer to receive the disc left inside the CD Changer.
NO MAGAZIN
???No magazine is loaded into the CD Changer. - Insert a magazine.
PROTECT
???A
- You can only play back
UNSUPPORT
???The disc is not written in a MP3/WMA supported format. - Use a disc written at the MP3/WMA supported format.
NO DISC
???No indicated disc.
- Choose another disc.

Indication for iPod Mode
NO IPOD
???The iPod is not connected.
-Make sure the iPod is correctly connected. Make sure the cable is not bent excessively.
???The iPod???s battery remains low.
-Refer to the iPod???s documentation and charge the battery.
NO FILE
???There are no songs in the iPod.
- Download songs to the iPod and connect to the
???Communication error
-Turn the ignition key off, and then set to ACC or ON again.
-Check the display by reconnecting between the iPod and the adapter, using the iPod cable.
???Caused by the iPod Software Version not being compatible with the adapter
-Refer to the Owner's Manual of the adapter
Specifications
*Primary amplifier ratings per
???Power output: measured at 4 Ohms and ??? 1% THD+N
???S/N: 80 dBA (reference: 1 W into 4 Ohms)
???Due to continuous product improvement, specifications and design are subject to change without notice.
Installation and Connections
Before installing or connecting the unit, please read the following and pages 3 to 5 of this manual thoroughly for proper use.
 Warning
MAKE THE CORRECT CONNECTIONS.
Failure to make the proper connections may result in fire or product damage.
USE ONLY IN CARS WITH A 12 VOLT NEGATIVE GROUND.
(Check with your dealer if you are not sure.) Failure to do so may result in fire, etc.
BEFORE WIRING, DISCONNECT THE CABLE FROM THE
NEGATIVE BATTERY TERMINAL.
Failure to do so may result in electric shock or injury due to electrical shorts.
DO NOT ALLOW CABLES TO BECOME ENTANGLED IN
SURROUNDING OBJECTS.
Arrange wiring and cables in compliance with the manual to prevent obstructions when driving. Cables or wiring that obstruct or hang up on places such as the steering wheel, gear lever, brake pedals, etc. can be extremely hazardous.
DO NOT SPLICE INTO ELECTRICAL CABLES.
Never cut away cable insulation to supply power to other equipment. Doing so will exceed the current carrying capacity of the wire and result in fire or electric shock.
DO NOT DAMAGE PIPE OR WIRING WHEN DRILLING
HOLES.
When drilling holes in the chassis for installation, take precautions so as not to contact, damage or obstruct pipes, fuel lines, tanks or electrical wiring. Failure to take such precautions may result in fire.
DO NOT USE BOLTS OR NUTS IN THE BRAKE OR
STEERING SYSTEMS TO MAKE GROUND CONNECTIONS.
Bolts or nuts used for the brake or steering systems (or any other
KEEP SMALL OBJECTS SUCH AS BATTERIES OUT OF THE
REACH OF CHILDREN.
Swallowing them may result in serious injury.
If swallowed, consult a physician immediately.
DO NOT INSTALL IN LOCATIONS WHICH MIGHT HINDER
VEHICLE OPERATION, SUCH AS THE STEERING WHEEL
OR GEARSHIFT.
Doing so may obstruct forward vision or hamper movement etc. and results in serious accident.
 Caution
HAVE THE WIRING AND INSTALLATION DONE BY
EXPERTS.
The wiring and installation of this unit requires special technical skill and experience. To ensure safety, always contact the dealer where you purchased this product to have the work done.
USE SPECIFIED ACCESSORY PARTS AND INSTALL THEM
SECURELY.
Be sure to use only the specified accessory parts. Use of other than designated parts may damage this unit internally or may not securely install the unit in place. This may cause parts to become loose resulting in hazards or product failure.
ARRANGE THE WIRING SO IT IS NOT CRIMPED OR
PINCHED BY A SHARP METAL EDGE.
Route the cables and wiring away from moving parts (like the seat rails) or sharp or pointed edges. This will prevent crimping and damage to the wiring. If wiring passes through a hole in metal, use a rubber grommet to prevent the wire???s insulation from being cut by the metal edge of the hole.
DO NOT INSTALL IN LOCATIONS WITH HIGH MOISTURE
OR DUST.
Avoid installing the unit in locations with high incidence of moisture or dust. Moisture or dust that penetrates into this unit may result in product failure.
Precautions
???Be sure to disconnect the cable from the
???Be sure to connect the color coded leads according to the diagram. Incorrect connections may cause the unit to malfunction or damage to the vehicle's electrical system.
???When making connections to the vehicle's electrical system, be aware of the factory installed components (e.g.
???The
???Be sure to connect the speaker
IMPORTANT
Please record the serial number of your unit in the space provided below and keep it as a permanent record. The serial number plate is located on the bottom of the unit.
SERIAL NUMBER:
INSTALLATION DATE:
INSTALLATION TECHNICIAN:
PLACE OF PURCHASE:

Installation
Metal plate
Detachable
Front panel
Caution
When you install this unit in your car, do not remove the detachable front panel.
If the detachable front panel is removed during installation, you might press too hard and warp the metal plate that holds it in place.
Caution
Do not block the unit???s fan or heat sink, thus preventing air circulation. If blocked, heat will accumulate inside the unit and may cause a fire.
Air ventilation hole
(Rear of
1
Mounting Sleeve (Included)
Dashboard
this unit
Slide the mounting sleeve into the dashboard.
2
Screw
Hex Nut (M5)
 *2 Bolt Stud
Metal
Mounting
Strap
 *1
*1
this unit
Reinforce the head unit with the metal mounting strap (not supplied). Secure the ground lead of the unit to a clean metal spot using a screw (*1) already attached to the vehicle's chassis.
???For the screw marked ???*2???, use an appropriate screw for the chosen mounting location.
Connect each input lead coming from an amplifier or equalizer to the corresponding output lead coming from the left rear of the
3 Slide the
Removal
1Remove the detachable front panel.
2Insert the bracket keys into the slot and through the guides on either side of the unit. The unit can now be removed from the mounting sleeve.
This unit
Bracket Keys (Included)
3 Pull the unit out, keeping it unlocked as you do so.
<JAPANESE CAR>
Face Plate
Screws (M5 ??? 8)
(Included)
this unit
Ground Lead
*3
Mounting Bracket
???Secure the ground lead of the unit to a clean metal spot using a screw (*3) already attached to the vehicle's chassis.
Connections
Blue POWER ANT
Blue/White REMOTE
AUDIO
Pink/Black INTERRUPT IN
Orange ILLUMINATION
Red IGNITION
Yellow BATTERY
Black GND
Gray
1
2
3
4
5
6
7
8
9
!
To amplifier
Antenna
To power antenna
To amplifier or equalizer
To vehicle phone
To the instrument cluster illumination lead
Ignition Key
Battery
Speakers
SPEAKER
RIGHT FRONT
Gray/Black
Violet/Black
SPEAKER
RIGHT REAR
Violet
Green
SPEAKER
LEFT REAR
Green/Black
White/Black
SPEAKER
LEFT FRONT
White
=
>
>
>
"
#
$
%
&
(
)
Front right
Rear right
Rear left
Front left
CD Changer
(Sold Separately)
Amplifier
Amplifier
Speakers
Rear Left
Rear Right
Front Left
Front Right
*1 The label is attached on the bottom of the unit.
1Amplifier Link Connector
Outputs Amplifier Link control signals. Connect this to an external Amplifier Link
compatible amplifier, using the (also separately sold) Amplifier Link box
2Antenna Receptacle
3Power Antenna Lead (Blue)
Connect this lead to the +B terminal of your power antenna, if applicable.
This lead should be used only for controlling the vehicle's power antenna. Do not use this lead to turn on an amplifier, or a signal processor, etc.
4Remote
Connect this lead to the remote
5Audio Interrupt In Lead (Pink/Black)
6Illumination Lead (Orange)
This lead may be connected to the vehicle's instrument cluster illumination lead. This will allow the backlighting of the unit to dim whenever the vehicle's lights are turned on.
7Switched Power Lead (Ignition) (Red)
Connect this lead to an open terminal on the vehicle's fuse box or another unused power source which provides (+)12V only when the ignition is turned on or in the accessory position.
8Battery Lead (Yellow)
Connect this lead to the positive (+) post of the vehicle's battery.
9Ground Lead (Black)
Connect this lead to a good chassis ground on the vehicle. Make sure the connection is made to bare metal and is securely fastened using the sheet metal screw provided.
! Right Front (+) Speaker Output Lead (Gray)
" Right Front
# Right Rear
% Left Rear (+) Speaker Output Lead (Green)
& Left Rear
( Left Front
) Left Front (+) Speaker Output Lead (White)
~ Power Supply Connector
+
Connect this to the output or input connector of another device (CD Changer, Equalizer, INTERFACE ADAPTER FOR iPod???* etc.) equipped with
*When connecting iPod, INTERFACE ADAPTER FOR iPod???
You can input TV/video sound by connecting an optional
,Steering Remote Control Interface Connector
To steering remote control interface box.
- Fuse Holder (10A)
. Rear Output RCA Connectors
RED is right and WHITE is left.
/Front Output RCA Connectors
RED is right and WHITE is left.
:Subwoofer RCA Connectors
RED is right and WHITE is left.
;Setting the 3WAY/2 WAY switch
Set the 3way/2way switch according to your audio system.
<System Switch
When connecting a processor or divider using
Be sure to turn the power off to the unit before changing the switch position.
=
> RCA Extension Cable (sold separately)

The
The
???Use the
???You can use the
???You cannot adjust the fader when set to 3WAY.
To prevent noise/interference in the audio system.
???Locate the unit and route the leads at least 10 cm away from the car harness.
???Keep the battery power leads as far away from other leads as possible.
???Connect the ground lead securely to a bare metal spot (remove any paint, dirt or grease if necessary) of the car chassis.
???If you add an optional noise suppressor, connect it as far away from the unit as possible. Your Alpine dealer carries various noise suppressors, contact them for further information.
???Your Alpine dealer knows best about noise prevention measures so consult your dealer for further information.