1
1
Precautions
The monitor may be damaged if placed too near a source of heat. Be aware of the location of radiators, cookers, open fires, etc.
Do not cover the slots and openings on the back or top of the cabinet, as the monitor requires ventilation. The monitor should be located in a
Do not allow sharp objects such as knives, pens, or pencils near the screen. If such objects touch the screen, the LCD panel may be permanently scratched.
When cleaning this monitor, disconnect it from the electrical socket to avoid any danger of electrocution. A soft,
If you encounter a problem, please check the "Troubleshooting" section first. If this does not resolve the problem, do not attempt to repair the monitor by yourself. Opening or removing covers can lead to injury or death through electrocution or other hazards. Please contact a qualified engineer if the troubleshooting section does not solve your problem.
Recycling information
Acer cares very much about protecting the environment, and firmly believes that the environment will be healthier if appropriate measures are taken to treat and recycle industrial technology products.
Such products contain hazardous, poisonous substances that can seriously harm the environment. Furthermore, industrial technology products contain materials that can be recycled and
United States: http://www.ciwmb.ca.gov/electronics/act2003/Recovery/Approved/
Asia: http://recycle.epa.gov.tw/public/public4_2.htm
Europe:
SWICO: http://swico.one.webbuild.ch/
Special notes on LCD monitors
The following symptoms are normal for LCD monitors and do not indicate a problem with the device:
???Due to the nature of the fluorescent light, the screen may flicker during initial use. Turn off the power switch and then turn it on again to make the flicker disappear.
???You may find slightly uneven brightness on the screen depending on the desktop pattern you use.
???The LCD screen has effective pixels of 99.99% or more. It may include blemishes of 0.01% or less (caused by a missing pixel or a pixel that is always lit).
???When the same image is displayed for hours on end, its afterimage may remain after switching to a new image. When this happens, the screen will recover slowly by changing the image. Turning the LCD monitor off for several hours will also correct this problem.
2
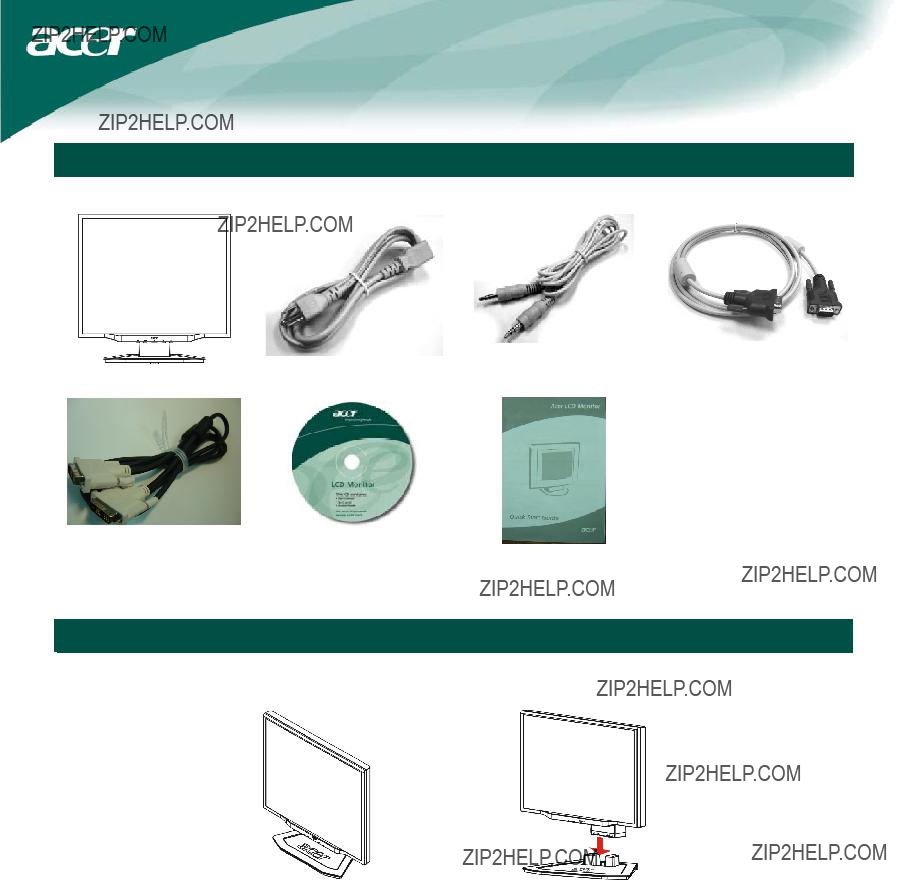
Package contents
Installation instructions
Assembling the monitor
1.Position the monitor on top of the base.
2.Connect the base into the neck of the monitor along the track.
Detaching the monitor
If you need to detach the monitor for repackaging, the monitor and base must be separated in order to fit in the carton.
To detach the monitor:
1.Unplug the AC power cord to make sure the power is off.
2.Pull the 4 hooks on the bottom side of the base and hold.
3.Separate the monitor and base.
 Important
When separating the monitor and base, find a clean, flat surface to place the monitor on and place a clean dry cloth under the monitor to protect it further. After removing the monitor from the base, pull the monitor slightly up and away from the base and place it on the cloth.
3
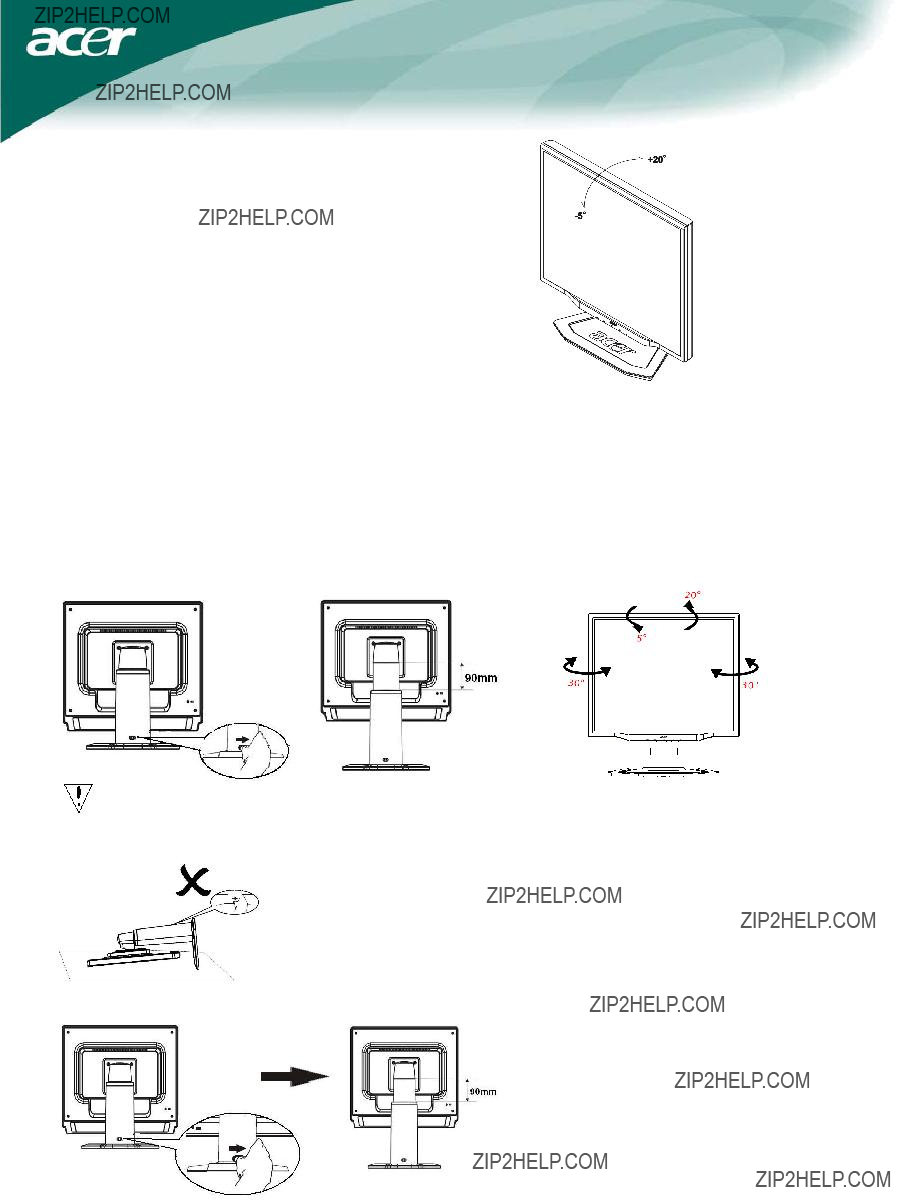
Adjusting the viewing angle
The viewing angle of the monitor ranges from
Adjusting the viewing angle (Only AL2023 h/AL2023 r)
Your monitor features a
Do not slide the lock to right when the display is under slanting status to prevent the display from ejecting.
Slide the lock to right from the display support frame as per the figure and then adjust the height. Note that to slide the lock to right, erect the machine on the table to prevent the top part of the display from ejecting.
4
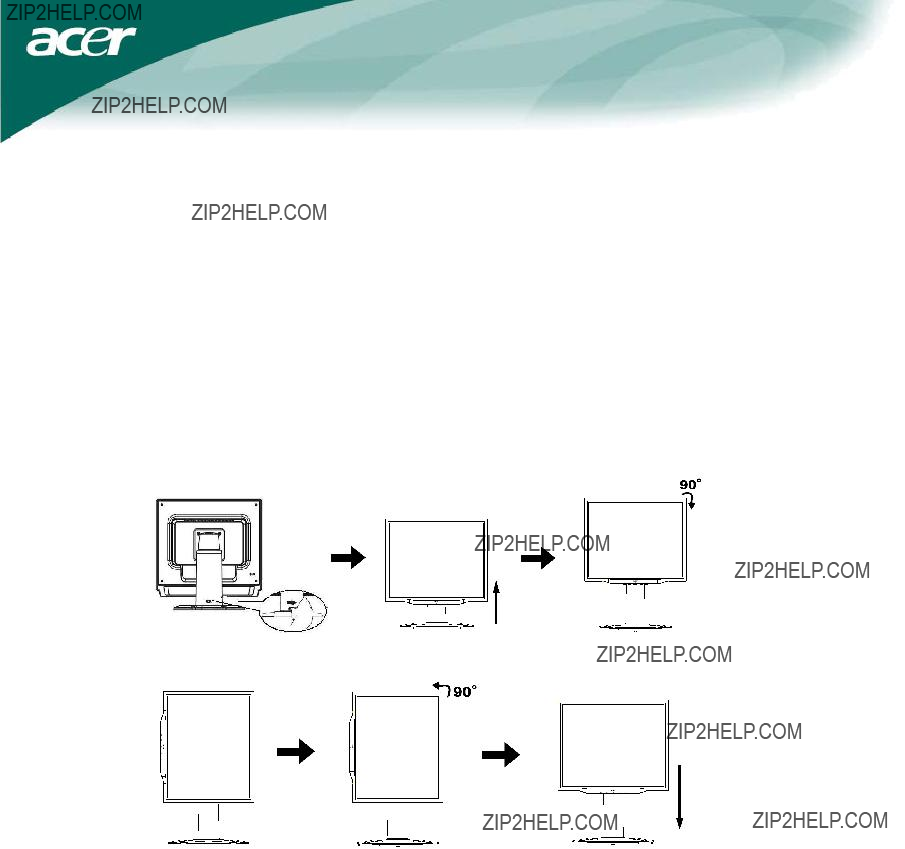
Rotate Adjustment (Only AL2023 r):
1.Before adjusting the height, be sure to slide the lock to right indicated in the figure. as per Fig. 1.
2.To rotate the screen, set the screen position to the highest height, as per Fig. 2.
3.Hold the left and right sides of screen with both hands and then turn 90 degrees in clockwise direction. as per Fig. 3.
4.After rotation is complete, adjust the screen height to suit your own position. as per Fig. 4.
5.To return to original position, turn 90 degrees in counter clockwise direction. as per Fig. 5.
6.After rotation is complete, adjust the screen height to suit your own position. as per Fig. 6.
???In order to use the Pivot function, the included Pivot Software must be installed.
?? Portrait Displays, Inc. All rights reserved.
NOTES
???Do not touch the LCD screen when you change the angle. It may cause damage or break the LCD screen.
???Careful attention is required not to catch your fingers or hands when you change the angle.
5

Connecting the devices
Caution: Make sure that the computer and the monitor are both disconnected from the power supply.
WARNING!
Check the VGA card of your computer. Make sure the shape of the plug matches the shape of the socket it is inserted into. Also check that none of the pins are bent or otherwise damaged.
6

Switching the power
First, switch on the
Adjusting display settings
External controls
7
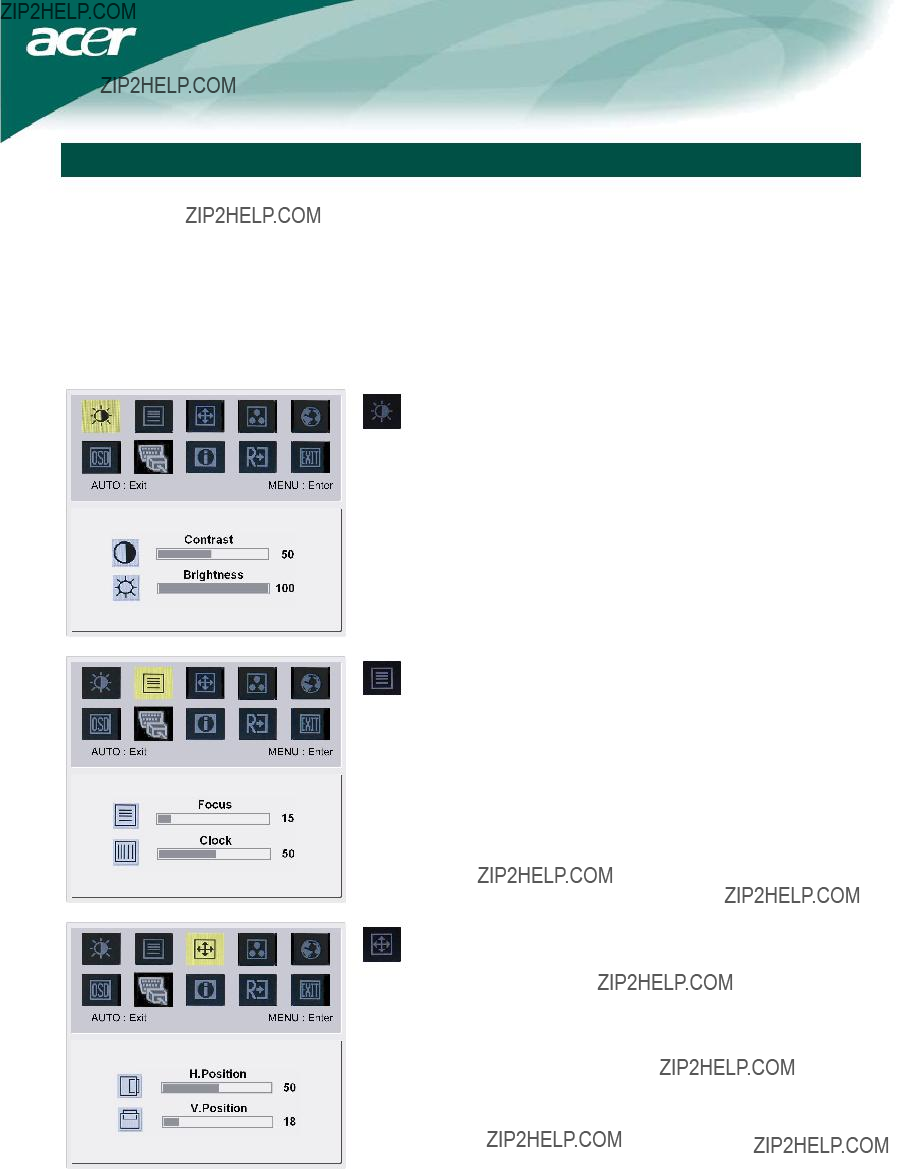
OSD options
Please refer to "External controls" on Page 7.
To adjust the OSD settings:
1.Press the Menu button to open the OSD menu.
2.Use Plus/Minus buttons to toggle between the 10 OSD functions (and also to adjust the controls to desired levels once a function has been selected).
3.Press Menu again to select one of the 10 OSD functions.
4.When you have finished adjusting the OSD settings, press the Auto button to exit the OSD.
OSD menu
Contrast:
This adjusts dark and light shades of color relative to each other.
Brightness:
This adjusts the brightness of the picture on the screen.
Focus:
This removes any horizontal distortion and makes the picture clear and sharp.
Clock:
If there are any vertical stripes seen on the background of the screen, this renders them less noticeable by minimizing their size. It also changes the size of the horizontal screen.
This adjusts the horizontal.
This adjusts the vertical.
8
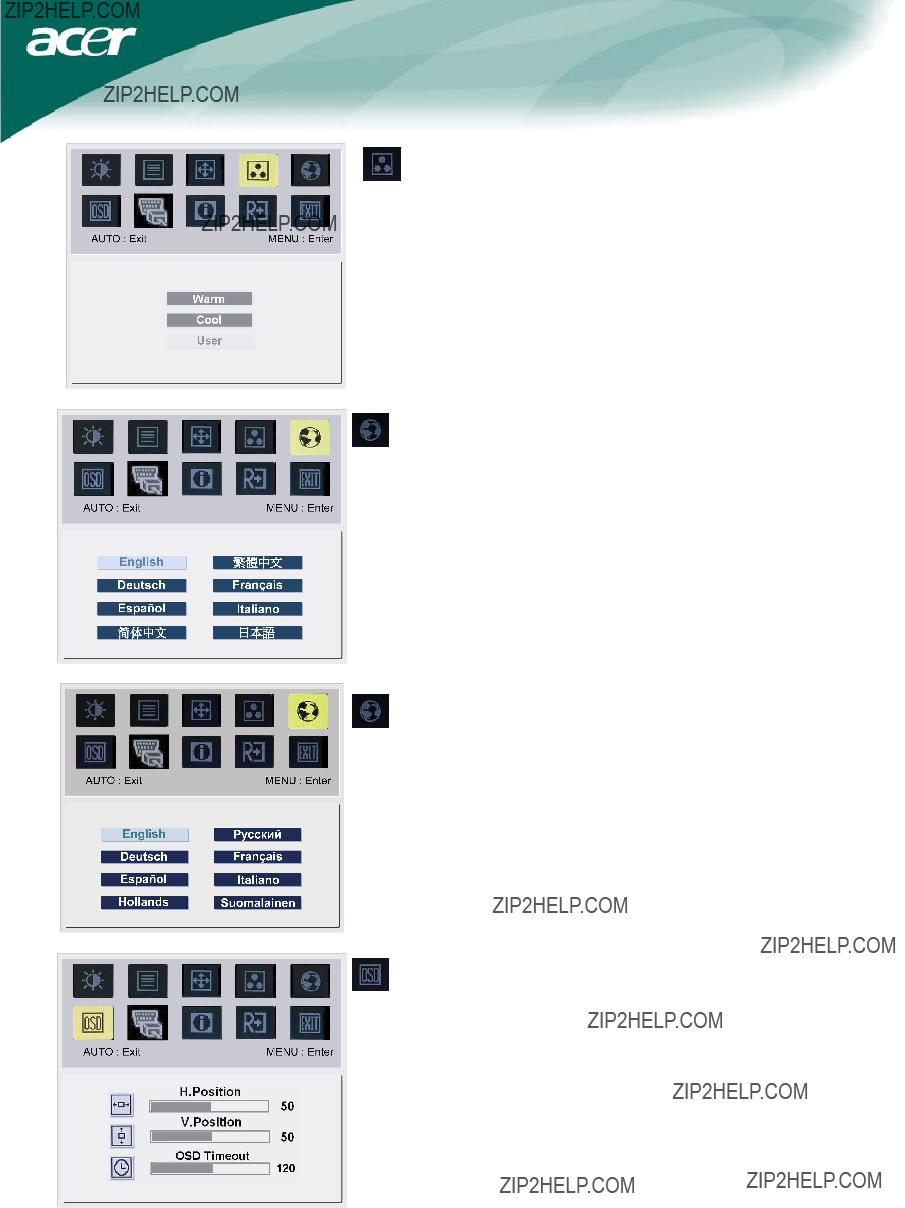
Color adjustment:
There are three ways to adjust color: Warm (reddish white)
Cool (bluish white)
User (you can adjust the colors red, green and blue to the intensity you desire)
Language for Asia:
Select the OSD menu language. Select from English, German, Spanish, Simplified Chinese, Traditional Chinese, French, Italian, and Japanese.
Language for EMEA:
Select the OSD menu language. Select from English, German, Spanish, Russia, Nederlands, French, Italian, and Finnish.
OSD Settings:
This changes the position of the OSD window on the screen and the staying time.
9

Input signal:
Select either Analog Input or Digital Input video.
Information:
This shows information about the screen.
Reset:
Resets all settings to default levels.
Exit:
Exit from OSD.
10
Caution: Do not attempt to service or open the monitor or computer yourself. Please refer all servicing to qualified service personnel if the "Troubleshooting" section cannot solve your problems.
11

Lamp disposal
Lamp(s) inside this product contain mercury and must be recycled or disposed of according to local, state or federal laws. For more information, contact the Electronic Industries Alliance at www.eiae.org. For
12