Safety Rules Note: To ensure your safety and prolong the life of the product, read the following safety rules
carefully when you use the product for the first time.
Electrical Safety
Installation Safety
Cleaning Safety
??DO NOT touch the inside of the display. Only authorized and qualified technicians are allowed to open the LCD display case.
??Only hold the plug, not the power cable, when you connect the plug to the receptacle. Make sure that your hands are dry without moisture.
??This product should be operated from the type of power indicated on the marking label. If you are not sure of the type of power available, consult your dealer or local power company.
??This product is equipped with a
??Don???t expose your LCD display in the rain, water, or the environment with high temperature or humidity, such as kitchens, surroundings of a swimming pool, any place near flower vases, etc.)
??If your LCD display operates abnormally, especially if there is smoke, noise or smell, remove the plug immediately and contact our authorized dealer or service center.
??Don???t touch your LCD display with your fingers or any hard objects to avoid scratching or leaving any oil sludge on the surface of the display
??Install your LCD display at the place where the risk of dust contamination is low. Take
??Don???t install your LCD display near any heat source, such as kitchen tables, ovens, or fire sources, or in the sun.
??Install your LCD at the place where children will not touch it to avoid electric shock, or dropping. Secure your LCD firmly or explain the safety rules to children, if required.
??When installing your LCD display or adjusting its angle, attention shall be paid to the loading capability and leveling of the display.
??Don???t spray or pour cleanser or water onto your LCD display or its case directly.
??When cleaning your LCD display, make sure that no liquid permeates into the inside of the LCD display or any accessory.
??Moisten a clean and soft
SPECIAL NOTES ON LCD MONITORS
The following symptoms are normal with LCD monitor and do not indicate a problem.
NOTES
zDue to the nature of the fluorescent light, the screen may flicker during initial use. Turn off the Power Switch and then turn it on again to make sure the flicker disappears.
zYou may find slightly uneven brightness on the screen depending on the desktop pattern you use.
zThe LCD screen has effective pixels of 99.99% or more. It may include blemishes of 0.01% or less such as a missing pixel or a pixel lit all of the time.
zDue to the nature of the LCD screen, an afterimage of the previous screen may remain after switching the image, when the same image is displayed for hours. In this case, the screen is recovered slowly by changing the image or turning off the Power Switch for hours.
1

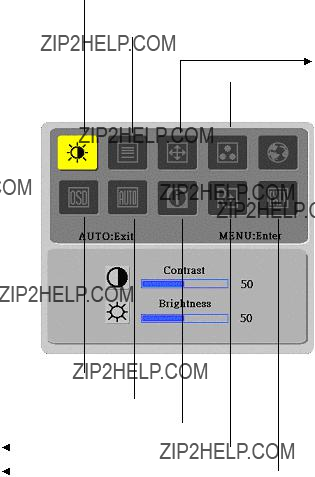
 ??? to close the OSD window and save changes. To change other settings, repeat steps
  Bright/Contract Adjustment
 Phase/Clock pulse Adjustment
 Color Temp. Adjustment
 Language Selection


 ??? to close the OSD window and save changes. To change other settings, repeat steps
  Bright/Contract Adjustment
 Phase/Clock pulse Adjustment
 Color Temp. Adjustment
 Language Selection


