AastraLink RP Solution
6751i RP
Goodbye
Services
Hold
Redial
Save
Delete
Speaker
Mute
Goodbye
Options
Hold
Redial
Line 3
Line 2
Line 1
Mute
6757i CT RP
Administrator Guide
6753i RP
Options
Hold
Redial
Line 2
Line 1
Mute
CT Cordless
AastraLink RP Solution
6751i RP
Goodbye
Services
Hold
Redial
Save
Delete
Speaker
Mute
Goodbye
Options
Hold
Redial
Line 3
Line 2
Line 1
Mute
6757i CT RP
Administrator Guide
6753i RP
Options
Hold
Redial
Line 2
Line 1
Mute
CT Cordless

Software License Agreement
Aastra Telecom Inc., hereinafter known as "Seller", grants to Customer a personal, worldwide,
Customer agrees to not reverse engineer, decompile, disassemble or display Software furnished in object code form. Customer shall not modify, copy, reproduce, distribute, transcribe, translate or reduce to electronic medium or machine readable form or language, derive source code without the express written consent of the Seller and its Suppliers, or disseminate or otherwise disclose the Software to third parties. All Software furnished hereunder (whether or not part of firmware), including all copies thereof, are and shall remain the property of Seller and its Suppliers and are subject to the terms and conditions of this agreement. All rights reserved.
Customer's use of this software shall be deemed to reflect Customer's agreement to abide by the terms and conditions contained herein. Removal or modification of trademarks, copyright notices, logos, etc., or the use of Software on any Equipment other than that for which it is intended, or any other material breach of this Agreement, shall automatically terminate this license. If this Agreement is terminated for breach, Customer shall immediately discontinue use and destroy or return to Seller all licensed software and other confidential or proprietary information of Seller. In no event shall Seller or its suppliers or licensors be liable for any damages whatsoever (including without limitation, damages for loss of business profits, business interruption, loss of business information, other pecuniary loss, or consequential damages) arising out of the use of or inability to use the software, even if Seller has been advised of the possibility of such damages.
Agreement License Software

sContent of Table

Table of Contents

Introduction
Congratulations on your purchase of the AastraLink RP Solution for small to
PSTN
6757i CTRP
IPPhone CT cordless
About This Guide
This manual is designed for network system administrators and describes how to install and maintain your AastraLink RP Solution. Not all features listed are available by default and some may depend on your phone system or service provider. The following guides may apply to components of your AastraLink RP Solution:
???AastraLink RP 500 Base Unit Installation Guide
???AastraLink RP 540 Gateway Installation Guide
???AastraLink RP Solution Quick Start Guide
???Aastra 6751i RP, 6753i RP and 6757i CT RP Phone Installation Guides
???AastraLink IP Phone User Guide
The AastraLink RP 500 Base Unit Installation Guide ??? includes detailed instructions on setting up the AastraLink RP 500 Base Unit required for all AastraLink RP systems.
The AastraLink RP 540 Gateway Installation Guide ??? gives detailed instructions on setting up the AastraLink RP 540 Gateway for all AastraLink RP systems which connect to external phone lines.
The AastraLink RP Solution Quick Start Guide ??? provides basic information on setting up and configuring the AastraLink RP Solution.
The Aastra 6751i RP, 6753i RP and 6757i CT RP Phone Installation Guides - contain detailed instructions on setting up the Aastra RP phones you can use with theAastraLink RP Solution.
Introduction

Introduction
The AastraLink IP Phone User Guide - describes how to use the features of the different Aastra RP phones, from basic calling to advanced phone features.
These guides along with release notes and other documentation can be downloaded from our Web site at www.aastratelecom.com

System Overview
The AastraLink RP Solution offers
Summary of System Features
Voice Recognition
The AastraLink RP Solution is a phone system that offers a
Overview System

System Overview
All components of the AastraLink RP Solution are designed to be sensed by the Response Point software automatically on your LAN. Once everything is plugged in and turned on, setting up and configuring the AastraLink RP Solution is a straightforward process done on the system administrator???s PC.
Microsoft Response Point Administrator
The Microsoft Response Point Administrator software administers the AastraLink RP Solution. This software is installed only on the system administrator???s computer, and controls the basic settings for all individual phone extensions as well as the base unit and gateway. Using the Administrator, system settings such as the date and time, call- routing plan, and extension numbers may be configured with ease.
Microsoft Response Point Assistant
The Microsoft Response Point Assistant software is optionally installed on each phone user???s individual PC. It allows each phone user in the Aastralink RP Solution to specify individual user preferences such as their nicknames, directory listing, voicemail options, and
System Deployment Requirements
The Aastralink RP Solution requires all components be connected to the same local area network (LAN). This includes the AastraLink 500 Base Unit, the AastraLink 540 Gateway, all Aastra RP phones, the system administrator???s PC, and phone users??? PCs (for the Assistant software).
Microsoft Response Point Administrator and Microsoft Response Point Assistant require that your computer run one of the following system programs:
???Microsoft Windows XP Professional or Home Edition, with Service Pack 2 (SP2,
???Microsoft Windows Vista
???Windows Server 2003 R2 SP2,
???Small Business Server 2003 R2,
Administrator and Assistant also work with the following programs for adding and importing contacts:
???Microsoft Office Outlook
???Windows Address Book (for Windows XP)
???Windows Contacts (for Windows Vista)
???Business Contact Manager
System Installation
The AastraLink RP Solution uses
Note: All phones, base units and gateways must be connected to the same LAN in order for the AastraLink RP Solution to function as designed.
Base Unit
The AastraLink 500 Base Unit should be installed following the instructions given in the AastraLink 500 Base Unit Installation Guide or AastraLink RP Solution Quick Start Guide.
The AastraLink 500 Base Unit may be installed as a desktop unit flat on the desk or on end, or may be
The AastraLink 500 Base Unit must be connected to both power and the LAN, and must be turned on for
Gateway
The AastraLink RP 540 Gateway should be installed following the instructions given in the AastraLink 540 Base Unit Installation Guide or AastraLink RP Solution Quick Start Guide.
The AastraLink RP 540 Gateway may be installed on a desktop, stacked under an AastraLink RP 500 Base Unit, or
Installation System
System Installation
The AastraLink RP 540 Gateway must be connected to both power and the LAN, and must be turned on for
RP Phones
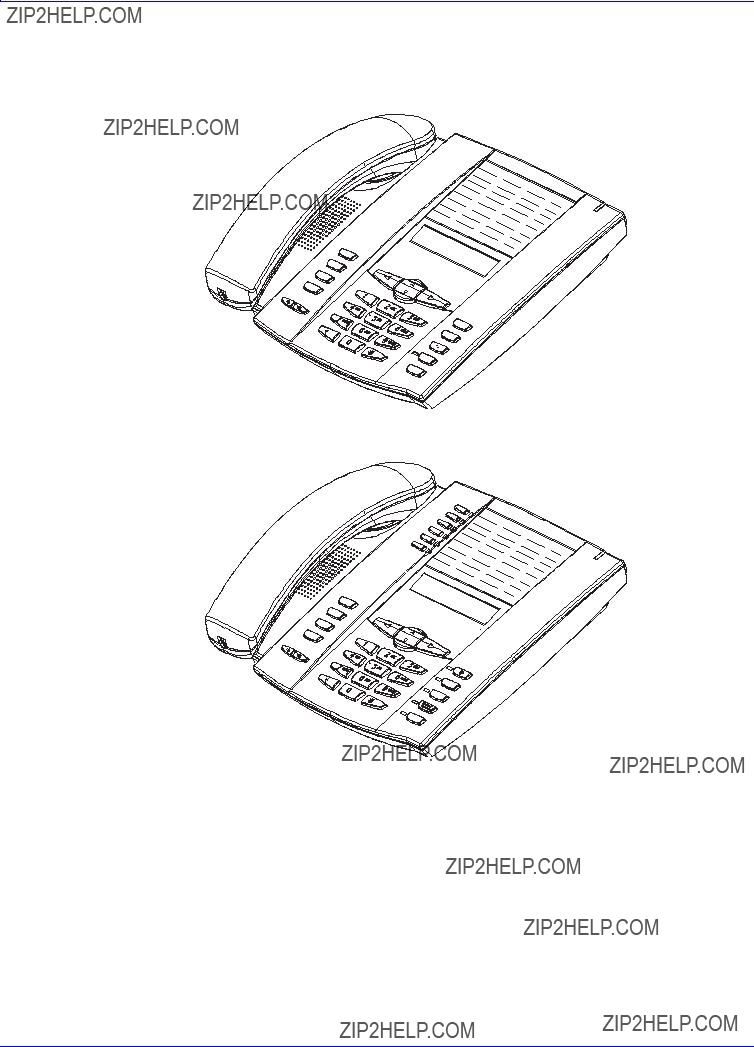
Any combination of Aastra phone models 6751i RP, 6753i RP, and 6757i CT RP works with the AastraLink RP Solution.
Aastra 6751i RP Phone
Goodbye
Services
Hold
Redial
Save
Delete
Speaker
Mute
Aastra 6753i RP Phone
Options
Hold
Redial
Line 2
Line 1
Mute

Aastra 6757i CT RP Phone
Goodbye
Options
Hold
Redial
Line 3
Line 2
Line 1
Mute
Each phone should be installed following the instructions given in the phone installation guide for the correct model.
The Aastra RP phones can be set up and connected to the LAN initially, or can be connected when prompted by the Response Point Administrator software.
Installation System
Response Point Administrator
Response Point Administrator
The Microsoft Response Point Administrator software connects the components of your AastraLink RP Solution, and allows you to configure phones and users individually. Administrator should be installed on one computer connected to your LAN, for use by the system administrator.
Installing Administrator
The Microsoft Response Point Administrator software will
To install the Administrator software and other Microsoft Response Point components on the system administrator???s computer, do the following.
Note: Administrator should only be installed on one computer connected to the same
LAN as all phones, base units and gateways.
1.Insert the AastraLink RP system CD that was supplied with the AastraLink RP 500 base unit into the CD drive of your computer.
Note: If the Autoinstall window does not open, use Windows Explorer to view the CD directory.
2.Click Install AastraLink RP software.
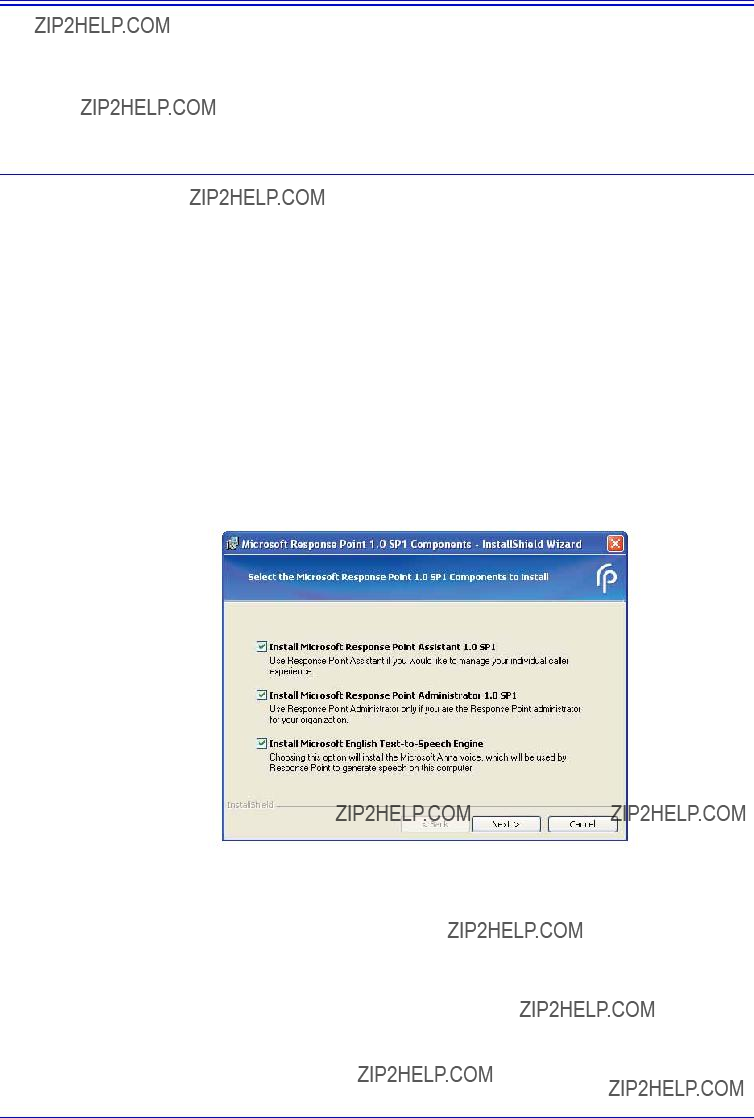
3.As the system administrator, you should install all of the Response Point software components on your computer. Check the Install Microsoft Response Point Administrator box and ensure all boxes are checked.
4. Click Next. Follow the prompts to install all of the Microsoft Response Point components.
Note: You must review and accept the license agreements in order to install the software.

Starting Administrator
The Administrator software walks you through setting up and configuring your AastraLink RP Solution. Once you have installed the software on the system administrator???s computer you are ready to start the system.
To start the Administrator software and configure your system, do the following.
1.Select Start > Programs > Microsoft Response Point Administrator. The Important Notice screen opens.
2.Review the emergency considerations listed and click OK. The Select the base unit screen opens.
Note: If no base units are listed, ensure your base unit is turned on and wait 30 seconds for the list to refresh. If it is still not detected see
3. Choose your base unit. If more than one is shown, check the MAC address on the bottom sticker on your base unit. The first time you connect, a security screen opens.
Aastra
4. Confirm that the correct MAC address for your base unit is displayed, and click Yes to continue. A security warning screen opens.
5. Click Yes to accept the security certificate.
Administrator Point Response

Response Point Administrator
The Connect to Base Unit dialog opens.
Aastra
6. Enter the default password admin and click Connect. The Change password now dialog opens.
The base unit is now connected to the Microsoft Response Point Administrator software. Change the password now, or do so from the main menu at a later time.
Note: If you ever forget your password you can reset the AastraLink RP 500 Base Unit password using the Microsoft Utility provided. See Resetting the AastraLink RP 500 Base Unit Password on page 67.
To add phones to your AastraLink RP Solution, follow the steps given in Adding Phones on page 25.
Note: In some cases the security certificate will not match the previously downloaded certificate when you connect to the base unit. This will occur if the base unit has been serviced or the base unit software upgraded. Click Help for further information.
Response Point Assistant
The Microsoft Response Point Assistant software is installed on both the system administrator???s computer and each phone user???s computer. When you check the boxes to install Administrator and all other Response Point components on page 14, Assistant is also installed on your computer. This allows you to access your own personal phone account as a phone user.
You, as system administrator, must add phones to the system and assign extension numbers before anyone can log on to the Assistant software. For more information see System Installation on page 11 and Adding Users on page 19.
Note: If you do not have the Assistant software installed on your computer, see the
AastraLink IP Phone Users Guide for installation instructions.
Starting Assistant
Once you have installed the Assistant software on your computer you are ready to personalize your phone settings.
To start the Assistant software and set your phone preferences, do the following.
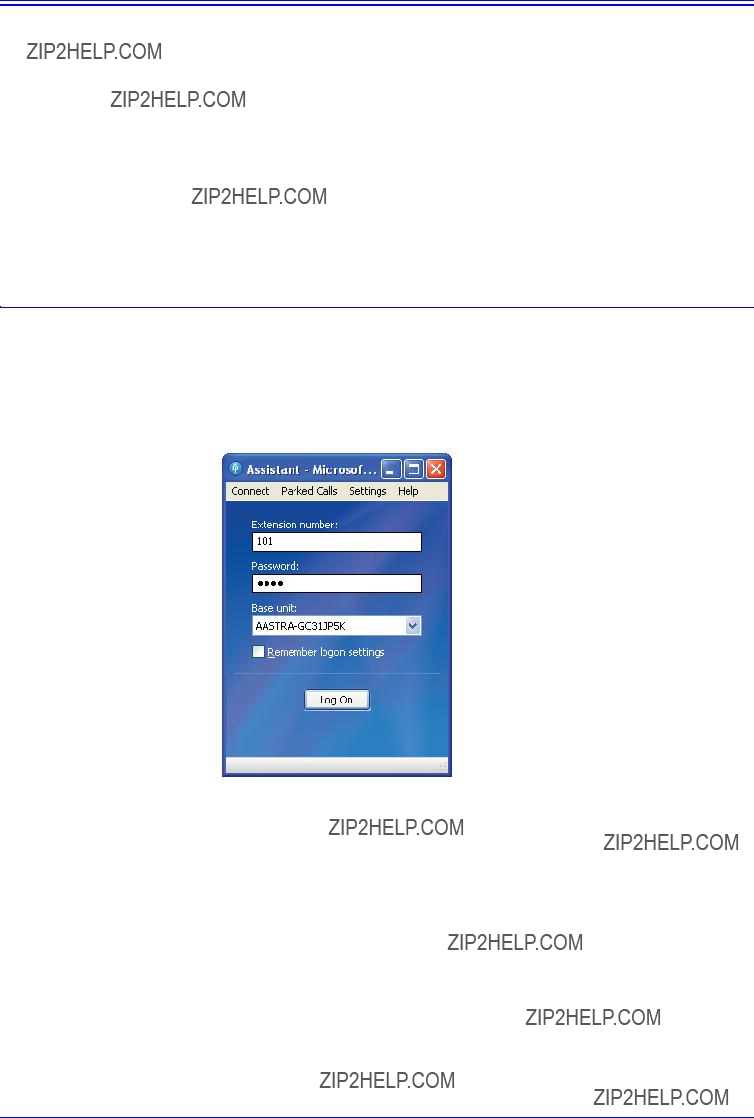
1. Select Start > Programs > Microsoft Response Point Assistant. The Log On screen opens.
2.Enter the extension number you assigned yourself as system administrator, and select your base unit.
3.Enter the default password 9999, and click Log On.
Note: The Assistant password is also used for voicemail. If you change the password for one, both will change.
4. Assistant opens to display a phone directory. You will see your name already in the directory, as entered in Microsoft Response Point Administrator by the system administrator.
Assistant Point Response

Response Point Assistant
Note: You can only log on to Microsoft Response Point Assistant once your extension number has been assigned.
You can now change your personal phone settings by clicking Settings. See the
AastraLink IP Phone Users Guide for more information.

Using Administrator
The Microsoft Response Point Administrator software is designed to be used by the local system administrator to configure the AastraLink RP Solution. To install the Administrator, use the software and documentation CD which came with the AastraLink RP 500 Base Unit, and the procedure given on page 14. To uninstall the Administrator, use the Add/Remove Programs option in the Windows control panel.
The Administrator software, once installed, controls all components of the AastraLink RP Solution. Phone Users are added to the directory contained with Administrator, and can then be assigned to phones you connect to the network.
Note: Think about keeping a list of the users and extension numbers as you assign them. This is especially useful when configuring phone models with multiple lines, or adding users to several phones or user groups.
Adding Users
When you configure a new phone using the Configure Phone Wizard at least one primary user must be assigned to the new phone. You can also add additional users at any time on the Phone System page by clicking Add User.
To add a new phone user in Administrator, do the following.
1. Click the Phone System button. In the Tasks pane, under Users, click Add user. The New User dialog box opens.
2.On the Identification tab, in the User type box, click Person, Group, Job Role, or Location, as appropriate.
3.In the Name boxes, if you chose the user type Person, type the first and last name, and optional nicknames and titles of the person who will use this phone. You should specify nicknames and titles if you think callers will use them when asking for this user.
Administrator Using

Using Administrator
4. If you chose the user type Group, Job Role, or Location, type the applicable name in the Name box, and type any other names in the Alternate name 1 and
Alternate name 2 boxes.
5. Click OK in the New User dialog box.
Recording User Names
The name you have assigned to a user will be added to the directory and will be the name callers hear when they ask the Automated Receptionist to speak to a user. The recorded name can be changed by specifying a different name for the computer- generated speech, or by recording a sound file of your own through the phone handset.
The words that the Automated Receptionist will use to confirm a caller's request are not always the same as the user name or directory entry. For example, a caller may request to speak to "Ms. Margheim." However, you may want the Automated Receptionist to say "Diane Margheim" in confirmation, and the user name may be "Dr. Margheim".
Note: Individual users may also change the spoken name or file used for their name through the Assistant software.
Using
Using Administrator you can listen to the
To edit or check the
1.Click the Phone System button.
2.In the Tasks pane, under Users, click Edit user. The Select a user to edit list opens.
3.Click the name of the user you want to edit, and then click OK.
4.Click the Identification tab, if it is not displayed.
5.Click the Record Name... button. The Specify Spoken Name dialog opens.
6.Type the name callers will hear in the Words to say box.
7.Click Play to ensure recording quality.
8.When you have finished editing the spoken name, click OK.
Note: If you select Use
Recording Audio from a Phone
If you are not satisfied with the
To record an audio message from a phone, do the following.
1.Click the Phone System button.
2.In the Tasks pane, under Users, click Edit user.
3.Select the name of the user you want to edit and click OK.
4.Click the Identification tab, if it is not displayed.
Administrator Using

Using Administrator
5. Click the Record Name... button. The Specify Spoken Name dialog opens.
6.Click the Use audio recorded on a phone button.
7.Click the Record New button. The Record Audio Using a Phone window opens.
8. Select your extension number to call for recording, and click Record.
Your phone rings and plays a message prompting for the name after the beep. Clearly say the user name, then click Stop on your computer.
Note: Hanging up will also stop the recording but you will hear the sound of the phone hanging up at the end of the recording.
9.Click Play to ensure recording quality.
10.When you are satisfied with the recording, click OK.
11.Click OK to close the Specify Spoken Name dialog.
12.Click OK once more to finish editing the user.
Using a Prerecorded Sound File
You may use an existing sound file if you prefer. The sound file needs to be recorded in a sound recording application such as Windows Sound Recorder, available in the Windows XP operating system. (Windows Vista includes a different recording capability. Review the documentation for Windows Vista to learn how to make recordings.)
When using a sound recording application to create sound files, use the PCM format and make sure that the sound files are 8 kHz, 16 bit, mono, WAV files. Likewise, you may find that the volume is too low. Adjust the volume to your liking in the sound recording application.
Note: Make sure that the sound file for your name does not exceed 10 seconds.
To upload a prerecorded sound file to the base unit, do the following.
1.Click the Phone System button.
2.In the Tasks pane, under Users, click Edit user.
3.Select the name of the user you want to edit and click OK.

4.Click the Identification tab, if it is not displayed.
5.Click the Record Name... button. The Specify Spoken Name dialog opens.
6.Click the Use a prerecorded sound file uploaded to the base unit button.
7.Click Choose New File.
8.Browse to your .WAV file location, select the file you want to upload and click
Open.
9.Click Play to ensure recording quality.
10.When you are satisfied with the recording, click OK.
Note: If you select a file that is not a sound file in the right format, an error message will be displayed.
Click OK to return to the Specify Spoken Name dialog.
11.Once you are finished click OK to close the Specify Spoken Name dialog.
12.Click OK once more to finish editing the user.
Editing Users
You can edit a Response Point user at any time in the User Properties dialog box. You can also change settings such as enabling voicemail or setting initial call forwarding rules.
Note: Call forwarding rules can be changed by the phone user in the Assistant program.
Administrator Using

Using Administrator
To edit a Response Point user using Administrator, do the following.
1.Click the Phone System button.
2.In the Tasks pane, under Users, click Edit user. The Select a user to edit list opens.
3.Click the name of the user that you want to edit, and then click OK.
4.Click the Identification tab, if necessary, and change the options that are available for editing.
5.Make that changes that you want on the Voicemail and Call Forwarding tabs.
6.Click OK in the User Properties dialog box.
Removing Users
You may want to remove phone users from your system if they leave the company or you have made multiple entries for one phone user.
Note: You cannot remove users if they are assigned to a phone. You must first edit the phone to remove the user from it, and then remove the user from Administrator. For information on editing phones, see Editing a Phone on page 31.
To remove a Response Point user in Administrator, do the following.
1.Click the Phone System button.
2.In the Tasks pane, under Users, click Remove User.
3.Click the user that you want to remove, then click OK. a warning message opens before you delete the user.
4. Confirm that you want to remove the user by clicking Yes in the message box.
Note: If you remove a user who is the receptionist or operator you will have to assign a new user to that role. See Using a Receptionist or Operator on page 46 for more information.
Adding Phones
When you add a phone you must physically connect the device to the LAN and a power source, as well as configure it using the Configure Phone Wizard.
To add a phone in Administrator, do the following.
1.Click the Phone System button.
2.In the Tasks pane, under Phones, click Add Phone. The Configure Phone wizard opens.
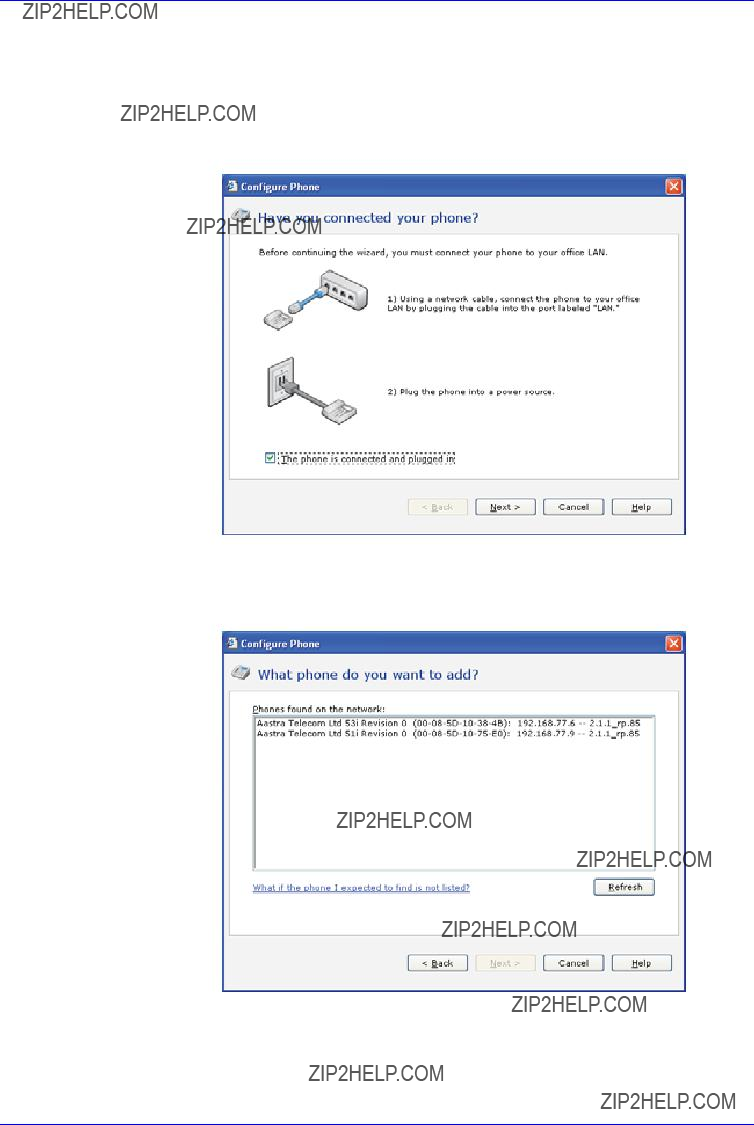
3. Confirm that the phone is connected and plugged in, select the check box at the bottom of the Have you connected your phone page, and click Next. The What phone do you want to add page opens.
4. Click the phone you just connected.
Administrator Using

Using Administrator
Note: If you do not see the phone that you just connected, click Refresh in the Tasks pane. If you still do not see the phone make sure the phone is connected to the LAN with a working cable. Unplug the phone from the power source, then plug it back in. After plugging in the phone you may need to wait at least sixty seconds before the phone is initialized and ready to be configured.
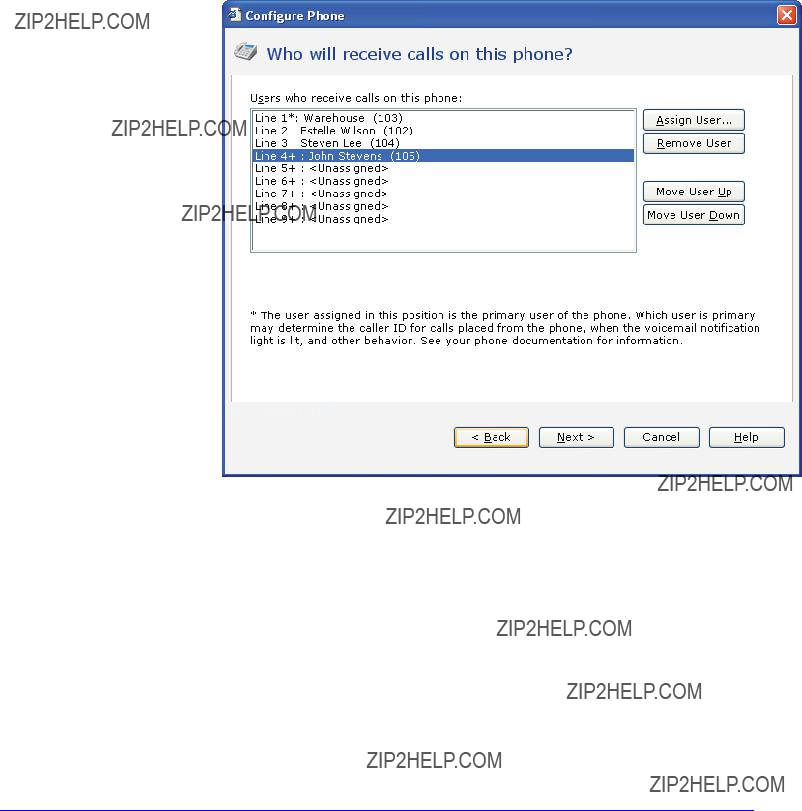
5. Click Next to display the Who will receive calls on this phone page.
6. Click Assign User.
The
7.Select a user from the list, or add a new user by clicking New User and typing the correct information on the Identification tab. Click OK when finished.
8.Click Next to confirm your choice of phone user.

9.On the What do you want to name this phone page the name and owner of the phone have been filled in for you. You can change them both if you want.
10.Click Finish.
11.When the configuration process is complete, click Close.
The phone you have added will display the following screens (shown for models 6751i RP and 6753i RP)
Initializing
network
Aastra 6753i RP
.
Downloading
language packs.....
Done
The user you have assigned to the phone will then display along with the extension number you selected.
1 John Burns
103
Sat Jun 8 2:55p
To change any of the information displayed on the phone screen, see Editing a Phone on page 31.
Adding Multiple Line Phones
Multiple line phones allow you to assign different users to different phone lines. Model 6753i RP and 6757i CT RP phones have both hard lines (labelled on the keypad) and programmable keys you can make into additional phone lines.
Note: Programmable or soft key lines must be set in Microsoft Response Point Administrator and on the Aastra Web UI. The phone must then be restarted for the phone lines to become active.
Administrator Using
Using Administrator
To add a multiple line phone using the Administrator software, do the following.
1.Click the Phone System button.
2.In the Tasks pane, under Phones, click Add Phone. The Configure Phone wizard opens.
3.Confirm that the phone is connected and plugged in, select the check box at the bottom of the Have you connected your phone page, and click Next. The What phone do you want to add page opens.
4.Select the phone you just connected and click Next.
Note: If you do not see the phone that you just connected, click Refresh in the Tasks pane. If you still do not see the phone, make sure that the phone is connected to the LAN. Unplug the phone from the power source, then plug it back in. After plugging in the phone, you may need to wait at least sixty seconds before the phone is initialized and ready to be configured.
The Who will receive calls on this phone page opens.
5. Click Assign User to select an existing user, and click OK. (To add a new user, click New User at the bottom of the Administrator - Select dialog box and type the correct information on the Identification tab.)
Note: Lines marked with + require activation on the Web UI followed by restarting the phone. See Activating phone lines on the Web UI on page 29 to finish adding these lines.
6.Click Next.
7.On the What do you want to name this phone page the name and owner of the phone have been filled in for you. You can change them both if you want.
8.Click Finish.
9.When the configuration process is complete, click Close.
Activating phone lines on the Web UI
If you are using more than 2 phone lines on model 6753i RP or more than 3 lines on model 6757i CT RP, activation is a
Note: For more information on the Web UI interface, see Using the Aastra Web UI on page 56.
To activate additional phone lines on the WebUI using the Administrator software, do the following.
1.From within the Administrator software, click the Phone System button.
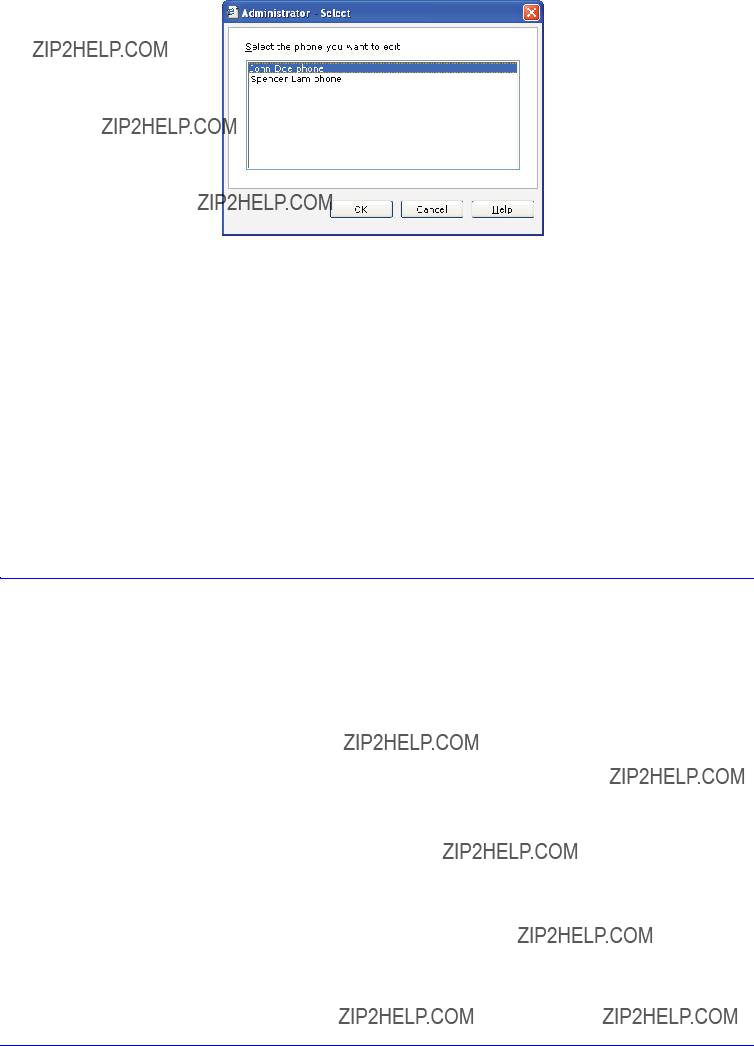
2.In the Tasks pane, under Phones, click Edit Phone. The Select the phone you want to edit list opens.
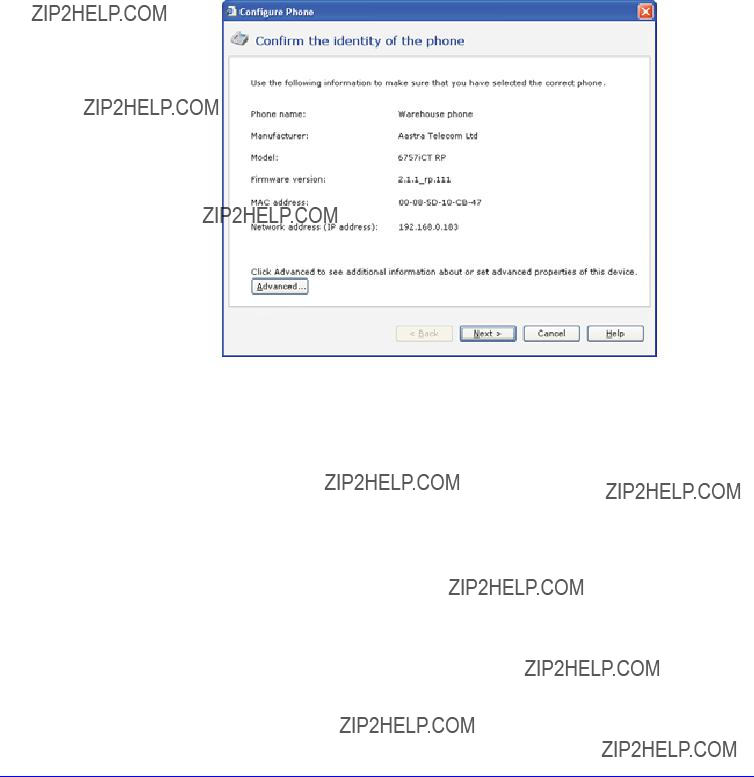
3.Click the phone that you want to edit, then click OK. The Confirm the identity of the phone dialog opens.
4.Click Advanced... to open the Aastra Web UI in your web browser.
5.At the prompt, enter your username and password, then click OK.
Note: For an administrator, the default username is ???admin??? and the password field is "22222". For a user, the default username is "user" and the password field is left blank. Either account type allows you to configure extra lines.
Administrator Using

Using Administrator
The Network Status window opens for the IP phone you are accessing.
For Model 6757i CT RP
If you are using a Model 6757i CT RP phone, continue as follows.
1.Select Softkeys and XML on the left menu
2.Choose where the line will appear and click the Bottom Keys tab (lower 6 programmable keys) or Top keys tab (upper 6 programmable keys).
3. For the chosen key, set the Type to Line and make sure the number in the Line column matches the line you assigned in the Administrator software. Enter a name such as "Line 4" in the label column for display on the phone beside the new line button.
Note: Model 6757i CT RP allows up to 9 lines in total, 3 on the keypad and 6 on the softkeys set through the Aastra Web UI.
4. Click Save Settings to save the line assignment.
5. Click Reset on the left menu, then click the Restart button. A window opens confirming the phone restart.
Note: Restarting a phone disrupts service to the phone. Check that the phone is not in use before restarting.
6. Click OK to restart the phone. The phone line is now configured.
Note: Make sure the line has been assigned in the Administrator software, configured on the Web UI, and the phone has been restarted. Phone lines will only work once all three steps have been completed.
For Model 6753i RP
If you are using a Model 6753i RP phone, continue as follows. 1. Select Programmable Keys on the left menu.
2. Choose where the line will appear and set the Type to Line. Make sure the number in the Line column matches the line you assigned in the Administrator software.
Note: Model 6753i CT RP allows up to 6 lines in total, 2 on the keypad and 4 on the programmable keys set through the Aastra Web UI.
3.Click Save Settings to save the line assignment.
4.Click Reset on the left menu, then click the Restart button. A window opens confirming the phone restart.
Note: Restarting a phone disrupts service to the phone. Check that the phone is not in use before restarting.
5. Click OK to restart the phone.The phone line is now configured.
Note: Make sure the line has been assigned in the Administrator software, configured on the Web UI, and the phone has been restarted. Phone lines will only work once all three steps have been completed.
Editing a Phone
You can change who is assigned to a phone, the phone owner, and the phone name by editing a phone in Administrator.
Administrator Using
Using Administrator
To edit a phone using the Administrator software, do the following.
1.Click the Phone System button.
2.In the Tasks pane, under Phones, click Edit Phone. The Select the phone you want to edit list opens.
3.Click the phone that you want to edit, then click OK. Some pages of the Configure Phone Wizard will be displayed, starting with Confirm the identity of the phone. If the options are unavailable, click Next.
4.Make any changes that you want on the Who will receive calls on this phone page, including changing the primary user of the phone and adding a new user.
5.On the What do you want to name this phone page, change the name if you want to do so.
6.Click Finish.
7.When the configuration process is complete, click Close.
The changes you have made will display on the phone screen once it has finished restarting. The phone will not be available for use during the restarting process.
Removing a Phone
You can remove a phone from the phone system. Removing a phone does not change the settings on the phone itself; however, the base unit will no longer recognize the phone, and it must be reconfigured if you add it to the phone system again.
Note: If you just want to move a phone to another location, do not remove the phone through Administrator; just unplug it instead. The phone configuration is maintained by the base unit so that when it is plugged back in, the phone is registered with the base unit as before. No additional configuration is needed.

To remove a phone from your AastraLink RP Solution, use Administrator to do the following.
1.Click the Phone System button.
2.In the Tasks pane, under Phones, click Remove Phone. The Select the phone you want to remove list opens.
3. Click the phone that you want to remove, then click OK. A warning opens, allowing you to change your mind.
4. Confirm that you want to remove the phone by clicking Yes in the message box.
Administrator Using

Voice Services
Voice Services
You can use traditional phone service with Response Point for inbound and outbound calls, using
Adding Gateways (Analog Phone Services)
To set up a
Note: Once a landline is connected through the AastraLink RP Solution, you must dial the prefix 8 or 9 (whichever you select) to call external numbers through the gateway.
Add phone service using a gateway do the following.
1.Click the Phone System button.
2.In the Tasks pane, under Voice Services, click Add Voice Service. The Add Voice Service window opens.

3. Click the Analog Service option, and click OK. The Configure Analog Phone Service wizard opens.
4. Click Next, and select the phone line adapter (AastraLink RP 540 Gateway) you are adding to the network.
Services Voice

Voice Services
5. Click Next, and select the properties of the analog service lines connected to the AastraLink RP 540 Gateway. Enter a description for each line, such as the local phone number and area code. If you want to block outbound calls through a phone line, checkthe Block Outbound Calls box for that line.
6. Click Next to choose the prefix used to access analog service.
Note: If only analog service is configured, only the prefix 9 is available. If both analog and VoIP services are configured, you can select which uses the prefix 9 and which uses the prefix 8.
7.Click Next and enter a name for your gateway. Ensure that the name you choose distinguishes the AastraLink RO 540 Gateway from others on the network.
8.Click Finish to complete configuration of your analog voice service.
Adding VoIP Phone Services
To set up a VoIP internet service, you can enter your account information directly into the Response Point Administrator software.
If you have VoIP service that comes with hardware, the digital VoIP signal is likely being changed to an analog signal by the hardware. In this case Response Point considers your VoIP service analog, and cannot add it in the same manner.
Note: Once VoIP service is connected through the AastraLink RP Solution, you must dial 8 or 9 (whichever you select) to call external numbers through the VoIP service.

Add an internet VoIP phone service as follows.
1.Click the Phone System button.
2.In the Tasks pane, under Voice Services, click Add Voice Service. The Add Voice Service window opens.
3. Click the VoIP option, and click OK. The Configure VoIP Service Provider
Wizard opens.
Note: You must be using a VoIP service provider that supports Microsoft Response Point. a list of compatible service providers is available on the Microsoft Response Point website.
4. Follow the prompts to enter your VoIP service provider and account information, and click Finish to complete the configuration of your VoIP phone service.
Editing Voice Services
Once a voice service (analog or VoIP) is configured, it can be edited as required using the Administrator software.
To edit an existing service, do the following.
1.Click the Phone System button.
2.In the Tasks pane, under Voice Services, click Edit Voice Service and select the service that you want to edit.
3.Complete the steps of the Configure Voice Service Wizard, and click Finish.
Removing Voice Services
Once a voice service (analog or VoIP) is configured, it can be removed using the
Administrator software.
To remove an existing service, do the following.
1.Click the Phone System button.
2.In the Tasks pane, under Voice Services, click Remove Voice Service and select the service that you want to remove.
Services Voice

Voice Services
3. A confirmation window opens. Ensure you have selected the voice service you want to remove, and click Yes.
Note: Once you remove a voice service you cannot undo your action, and the settings for the removed service are not saved.
4. A message confirming removal of the voice service opens.

Advanced Administrator Options
Once you have added phones and users to your system, there are a variety of options you can change if you choose to, such as the system date and time, and the email server to use for sending voicemail attachments.
Setting the Date and Time
You can change the date and time of the base unit clock, which appear on the Base Unit page. The date and time display can be used to identify backups and other activities on the base unit. The display is refreshed from the base unit clock periodically. At any given time, it may not match the base unit clock precisely.
You can also specify a new time zone for the base unit, if necessary, and specify whether you want to manually or automatically adjust the time for changes such as daylight savings.
Note: When you confirm the changes that you want to make, the base unit will restart, which could take several minutes. Notify users that incoming calls will not get through and active calls may be disconnected when the base unit restarts.
To change the date and time on the base unit, do the following.
1.Click the Base Unit button.
2.Click Change Date and Time under the heading Properties.
3. In the Set Date and Time on Base Unit dialog box, select the options that you want and click OK.
Note: The values in the base unit date and time options initially reflect the current settings from the base unit. Because these settings are not updated in real time when the dialog box is open, they will not match the base unit's current date and time for long.
Options Administrator Advanced

Advanced Administrator Options
A warning opens, indicating the base unit will restart if you continue.
4. Click Yes to save the date and time, and restart the base unit.
5. Click OK.
Note: The time on all system components, such as phones, will take a few minutes to change.
Configuring the Email Server
Configuring an email server allows you to set up voicemail so that voice messages can be sent as attachments via email. The email address you specify will display as the sender for all voicemail message attachments sent by Response Point.
Note: Before configuring the email server, you'll need to establish a
Internet connection with an Internet service provider.
To configure the email server using Administrator, do the following.
1.Click the Base Unit button.
2.In the Tasks pane, under Properties, click Configure
3.In the Configure
4.To verify that the server name and connection information is correct, configure your user account in the Assistant program to send voice messages as email attachments.
5.Call your own extension number from another phone, and leave a voice message for yourself.
6.Open your email program, and verify that you received it.
7.
Note: If you do not receive the email message with attached voicemail file, check the event log to see if there was a failure in connecting to the email server or sending email. Also, check the junk email folder in your email program to make sure the message wasn't filtered as spam. It may be necessary to add the sending email address to your "safe sender" list.
Setting Parked Call Music
Configuring Parked Call Music helps add a professional touch while filling the silence for callers waiting in park. Using a custom feed, you can broadcast the music you prefer, promotional materials, or other important messages you want callers to hear. Attach a cable from an analog audio source, such as a radio, CD player, or other sound device, to the audio jack on the Aastralink RP 500 Base Unit.
Options Administrator Advanced

Advanced Administrator Options
A custom feed plays on a continuous cycle, without a definite beginning or ending. When you park a call, the caller will hear the audio file from where it is currently playing, not from where the audio file begins. Therefore, callers waiting in park hear the same thing at the same time.
Using the default
To configure the
1.Click the Base Unit button.
2.Click Configure Park Music under the heading Properties.
3. Click Play the default music and click OK to complete the configuration.
Using an external music source for Parked Call Music
To configure external music to play while a call is parked, do the following.
1.Use an appropriate cable to connect your radio, CD player, or other sound device to the analog jack marked with a microphone  on the base unit.
2.Click the Base Unit button.
3.Click Configure Park Music under the heading Properties.
4.Click Play input connected to the audio jack on the base unit.
5.In the Input list, select Mono or Stereo, depending on the sound device you're using. (Radios are usually mono; CD players are usually stereo.)
6.In the Volume list, adjust the setting to the appropriate level.
Note: To prevent distortion and improve the
7. Click OK to complete the configuration.

Setting Voicemail Options
You can specify a number of settings to control how employees initially receive voicemail messages, including whether they'll listen to messages on their phones or receive them as attachments to email (or both), as well as how callers will be greeted.
To change voicemail settings using Administrator, do the following.
1.Click the Phone System button.
2.In the Tasks pane, under Users, click Add User or Edit User, as appropriate.
3.Click the Voicemail tab and select the options that you want to change.
4.Click OK in the User Properties dialog box.
Note: Voicemail settings can also be changed by users through the Assistant software.
Using the Automated Receptionist
Incoming calls may be routed directly to one or more phones, or answered by the Automated Receptionist.
The Automated Receptionist Plan is useful if you want an automated voice, called the Automated Receptionist, to answer calls and transfer them accordingly. Occasionally, a caller may want to speak to a person instead of the automated voice, or the Automated Receptionist may not be able to recognize what a caller is saying. It is good idea to specify a user as the operator charged with handling these situations.
To specify an Automated Receptionist Plan using Administrator, do the following.
1.Click the Call Routing button.
2.In the Tasks pane, click Choose How to Answer Calls.
3. Click the Automated Receptionist Plan.
Options Administrator Advanced

Advanced Administrator Options
4. Click Assign an operator, and then select the person who will perform this role.
5. Click OK.
Using Advanced Automated Receptionist Features
Once you have selected the Automated Receptionist plan, there are a variety of options to configure, such as the greeting and prompts used, and whether your directory should be made available to outside callers.
Configuring the Automated Receptionist
To configure Automated Receptionist properties using Administrator, do the following.
1.Click the Call Routing button.
2.In the Tasks pane, click Configure Automated Receptionist Properties.
3.Specify the options you want, including enabling the directory and configuring prompts for the Automated Receptionist to use.
4.Click OK.
Choosing the Automated Receptionist Greeting and Prompt
How the Automated Receptionist greets and prompts people is important, because callers hear these greetings every time they call your business.

To select the welcome greeting and opening prompt using Administrator, do the following.
1.Click the Call Routing button.
2.In the Tasks pane, click Configure Automated Receptionist Properties.
3.Select the Welcome greeting check box.
4.Click Configure, and decide whether you want to use the default greeting, record a custom greeting, or upload a sound file with the greeting that you want.
5.When you're finished specifying the greeting, click OK.
6.Click Configure to record the Please say the name of the person or group prompt, which is required so that Response Point can detect the answers from callers. This opening prompt is played immediately after the welcome greeting.
7.When you're finished specifying the prompt, click OK.
8.When you're satisfied with both the welcome greeting and opening prompt, click
OK in the Configure Automated Receptionist Properties dialog box.
Configuring Bypass Receptionist
Using Bypass Receptionist allows callers to reach an extension number directly when they phone in. Employees can configure phone numbers to bypass the receptionist using the Assistant program. Otherwise, all other calls are handled by the specified call routing plan.
The table of phone numbers and users is sorted first by conflicts. For example, if two employees have used Bypass Receptionist for the same incoming phone number, these conflicts are grouped together at the top of the table. You need to inform users of conflicts and resolve them, since only one phone user can use the bypass receptionist for a given number.
Options Administrator Advanced

Advanced Administrator Options
To configure the Bypass Receptionist feature using Administrator, do the following.
1.Click the Call Routing button.
2.In the Tasks pane, click Configure Bypass Receptionist.
3.Select the Allow calls to bypass the receptionist based on the caller ID phone number check box.
4.Note any conflicts, and notify employees that they need to resolve who gets a direct call. Only one person can receive calls from a number configured with the Bypass Receptionist. (Likewise, you might see conflicts because an outside number has been designated for External Access.)
5.Click OK to complete the configuration.
Using a Receptionist or Operator
If you have a
Even when using the Automated Receptionist plan, it is important to choose an operator. The operator is the person calls will be forwarded to when callers want to speak to a person, or when Response Point has trouble understanding a request.
Using the Receptionist Plan
The Receptionist Plan is useful for your office if you want a person to answer calls and transfer them accordingly.

To specify a Receptionist Plan using Administrator, do the following.
1.Click the Call Routing button.
2.In the Tasks pane, click Choose How to Answer Calls.
3.Click the Receptionist Plan, and then select the person who will receive incoming calls.
4.Click OK.
Note: You can customize this plan by specifying call forwarding for the user you've specified as receptionist. For instance, you can edit the user properties of the receptionist so that calls are forwarded to another employee, or to the Automated Receptionist when that person can't answer the phone.
Using an Operator
An operator differs from a receptionist, and is only sent calls when a caller wants to speak to a person instead of the automated voice, or the Automated Receptionist doesn???t recognize what a caller is saying.
To specify an operator using Administrator, do the following.
1.Click the Call Routing button.
2.In the Tasks pane, click Choose How to Answer Calls.
3.Click Automated Receptionist Plan.
4. Click Assign an operator, and select the person who will perform this role.
Options Administrator Advanced

Advanced Administrator Options
5. Click OK.
Note: You may want to set up call forwarding for the user that you specify as the operator.
Simultaneous Ringing/Ringing Groups
The Multiple Phones Ring Plan is a manually configured plan that allows many or all phones to ring when there is an incoming call. You can choose the Multiple Phones Ring Plan for your office if the following is true:
???Your receptionist is unavailable to answer the phone a significant part of the time.
???You don't have a dedicated receptionist.
???There is a group of people who are assigned the task of answering incoming calls.
???Incoming phone calls are answered by the person who is available or gets to the phone first.
This plan usually involves some sort of social agreement among coworkers. For example, if the receptionist doesn't pick up an incoming call in three rings, someone else will answer one of the other phones that are ringing.
In order to set up a Multiple Phones Ring Plan in your office using Administrator you must first create a
For example, Rene and Diane are assigned to answer phones in the office. You do the following:
???Create a user named "Receptionist
???Assign "Receptionist" as a user on Rene's phone so that it has two users: "Rene" and "Receptionist."
???Assign "Receptionist" as a user on Diane's phone in addition to the user "Diane."
???On the Calling Routing page, you can then specify that the "Receptionist" user receive incoming phone calls.
Now when calls are sent to the "Receptionist" user, both Rene's and Diane's phones ring because "Receptionist" is assigned to both phones.
Setting up a
To set up a Multiple Phones Ring Plan using a
1.Click the Phone System button, and click Add User.
2.In the New User dialog box, on the Identification tab, click Job Role in the User type list.
3.Type the name for the role (in this example, "Receptionist") and set other properties, as appropriate.
4.Click OK in the User Properties dialog box.
Next, you'll assign this user to the phones used by those people in your office who perform this role.

Assigning a
To assign a
1.Click the Phone System button, and click Edit Phone.
2.Choose a phone used by someone who is assigned to answer phones, and click OK in the Administrator - Select dialog box.
3.Click Next to bypass the Confirm the identity of the phone page.
4.On the Who will receive calls on this phone page of the Configure Phone Wizard, click Assign User, and select the
5.Click OK.
6.Complete the wizard so that the phone is updated.
Repeat steps
Now you'll assign the
Assigning Incoming Calls to the
To assign any kind of user, including
1.Click the Call Routing button, and click Choose How to Answer Calls.
2.Click Receptionist Plan, and select the
3.Click OK in the Choose How to Answer Calls dialog box.
4.Place a test call to your office.
Each of the phones that you edited should ring when the call arrives.
Call History
A call history log records useful information about your business. Use the data to analyze business patterns, trends, and expenses. After you select the categories to evaluate, Administrator displays the results in the Call information table. You can filter and sort using different criteria as many times as you want. For example, view the VoIP call activity of an employee for the month of May. Then, change the search parameters, and view how many minutes you spent on the phone with a particular client. The default view shows all calls for all users on the current day. For a more complex view, save the history to a CSV file, and use Microsoft Office Excel to perform further analysis.
To view a specific call history log, do the following.
1.Click the Phone System button.
2.Click View Call History under the heading Other.
3.In the Interval to show list, choose a time frame to view.
4.In the Types of calls to show list, choose the type of call to view.
5.In the Show calls to and from user list, choose a user to view.
6.Wait for Administrator to load your selections and display the results in the Call information table.
Options Administrator Advanced

Advanced Administrator Options
Saving Call History list
You can save the call history log you view on screen as a CSV file appropriate for Microsoft Office Excel. Open the call history log you want to save, as detailed above.
???Click Save to create a CSV file, which contains more advanced information useful for further analysis of call patterns.
Voicemail Storage
You can review how much total space on the base unit is being used for voicemail files and how much is still available. You can also see how much space is used for voicemail files by each specific user. When the base unit nears storage capacity, you need to ask users to delete some or all of their voice messages or contacts.
Base Unit Storage Limits
There is a minimum of 75 MB free space maintained at all times on the base unit. If the base unit detects that it does not have the minimum required free space, groups of files will be deleted until the minimum required free space is reached. These files are deleted in this order:
1.All files in the temporary folder on the base unit.
2.All personal contacts.
3.All voicemail older than 15 days.
Note: This information also appears under Storage Space Use in the Base Unit page.
If base unit storage is becoming an issue, ask users to do one or more of the following:
???Delete their voicemail, or switch to receiving voicemail as email.
???Delete contacts that they don't use often for voice dialing or phone numbers they've configured for Bypass Receptionist.
Viewing Storage Space
To view storage space details using Administrator, do the following.
1.Click the Base Unit button.
2.In the Tasks pane, under Status, click View Storage Space Detail.
3.Review the Storage Space Summary and Voicemail Storage Used by User to determine if you need to ask employees to delete voice messages.
4.When finished, click Close.
Base Unit Storage FAQs
At points when you are saving information to the base unit, the following message may display.
This warning opens in both Administrator and Assistant, and the questions answered here may help explain any concerns you have about the security of information on your base unit.
What information is stored in the base unit, and for how long?
Voice messages that you retrieve by phone are stored on the base unit for up to 30 days from the time a caller leaves you a voice message, not from the time you save a voice message. In addition, the base unit must keep a minimum amount of free space available to function efficiently. Voicemail files older than 15 days may be deleted if the base unit does not have enough free space. If you would like to guarantee that Response Point will not delete a voice message after 15 days, you should choose to
Options Administrator Advanced

Advanced Administrator Options
receive voice messages as email attachments. Voice messages sent as email attachments are not stored on the base unit, and therefore they are not deleted by the base unit after any period of time.
When are voice messages deleted?
When voice messages are restored from a backup, any voice messages older than 30 days will be deleted. If the base unit does not have enough free space, voice messages older than 15 days may also be deleted.
How long are passwords stored on the base unit?
Base unit and extension number passwords are stored on the base unit indefinitely, or until the user who is associated with this information is removed from the phone system.
How long is user data stored on the base unit?
How long is the email server password stored?
The email server password is stored on the base unit indefinitely, or until the phone system administrator removes it. (This only applies if the phone system administrator configures Response Point to send voice messages as email attachments.)
Where is this information stored?
All data is stored on the physical device, which is why it???s important to keep the base unit in a secured location with restricted access.
What information can I prevent from being stored?
If you do not want your voice messages stored on the base unit, you can configure Response Point to send your voice messages as email attachments. With this configuration, your voice messages are stored in your email program instead of on the base unit.
How do I erase the information stored in the base unit?
The AastraLink RP Solution CD comes with the Erase Data program ("ResponsePointEraseData.exe"), a tool that the phone system administrator can use to permanently delete all data stored on the base unit. You will want to erase all personal information from the physical device if you are giving it to someone else.
Backing up and Restoring Base Unit Configuration
Backing Up
It's important to back up the base unit, where contact information, voice messages, and other settings are stored. In the unlikely event that the base unit is damaged or fails, you can restore your phone system from a backup of the base unit. If your business is
Note: If you back up during a period of heavy phone use, the backup copy will not include voice messages that are left by callers while the backup is in progress.
Backups are also necessary when you want to upgrade the Administrator software or the base unit.
Note: Both configuration files and voicemail files may contain confidential information, such as the names of employees, personal voice messages, and so forth. So, it's important to store this file in a secure location on the LAN or elsewhere.
Consider putting the backup on removable media that is not usually on the computer or LAN (such as an external hard drive). Another option is to copy the backup to the computer, burn it on a CD or DVD, and delete the backup from the computer.
Likewise, you could consider putting the backup on an encrypted drive on the LAN., and put the CD or DVD in a locked drawer.
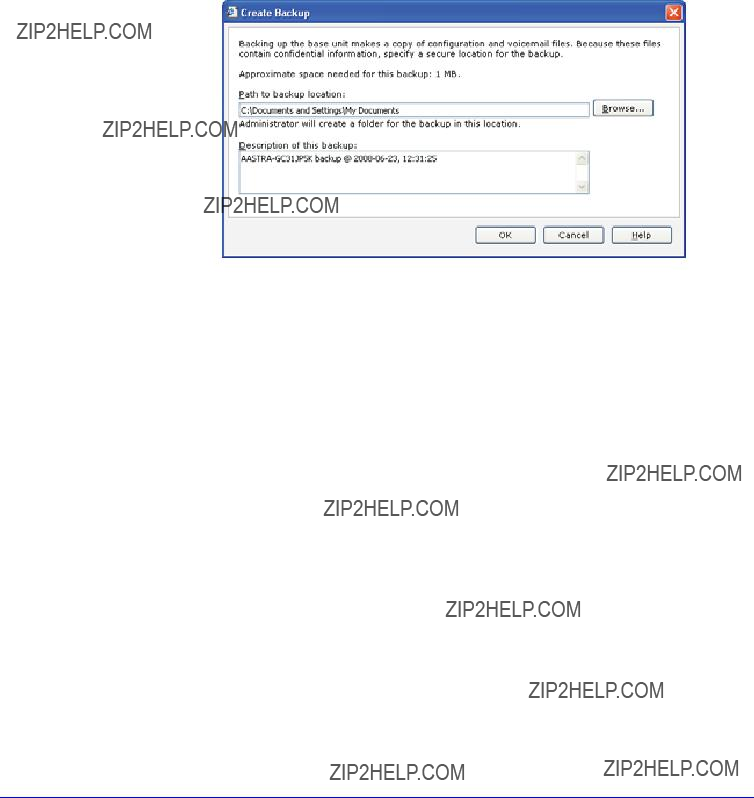
To back up the base unit from Administrator, do the following.
1.Click the Base Unit button.
2.In the Tasks pane, under Backup, click Create Backup.
3. Enter a name, location, and description for you backup in the Create Backup dialog box, and click OK.
Restoring a Backup
If required, you can restore your phone system from a backup of the base unit. Messages, contacts, and other settings that have been made since the backup will be lost when you restore from the backup. Because the base unit will be restarted as part of restoration, phone calls cannot be answered during the process.
You can also restore a backup of one base unit onto another base unit, which may be necessary if you are replacing a base unit and need to transfer a configuration from the old one to the new one. When restoring a backup onto a base unit other than the one from which the backup was made, all passwords will have to be reset. In particular, the base unit password and extension number passwords will be reset to their default values. The email server password must be
To restore a backup of the base unit using Administrator, do the following.
1.Click the Base Unit button.
2.In the Tasks pane, under Backup, click Restore Backup.
3.In the Restore Backup dialog box, select the location of the backup that you want to restore.
4.Select a backup to restore.
Options Administrator Advanced

Advanced Administrator Options
Note: Usually, you'll want to restore the latest backup copy.
5.Specify what happens to voicemail when the backup is restored.
???Keep the current voicemail and do not restore voicemail from the backup
???Combine the current voicemail with the voicemail restored from the backup
???Replace the current voicemail with the voicemail restored from the backup
???Delete the current voicemail and do not restore voicemail from the backup
Note: The fastest backup results from deleting all voicemail, but important messages may ba lost.
Event Logs on the Base Unit
The event log details errors, warnings, and information about activity on the base unit. For example, you can see when an internal error occurred or when a restore or upgrade action was completed. You can also see when an employee attempted to log on with an incorrect password and other such events.
Some events are monitored in other parts of the program, as well as in the event log. For example, space allocated to voicemail is reported under Storage Space Use on the Base Unit page.
To view the event log using Administrator, do the following.
1.Click the Base Unit button.
2.In the Tasks pane, under Status, click View Event Log.
3.Review the event summary and list of events.
4.Filter the events, as needed, using options in the Show list.
5.Click Base Unit Performance for more information about the base unit.
Note: To see more details about an event,

Setting Options via the Aastra Web UI
In addition to the IP Phone UI options, you can customize advanced options on the AastraLink IP phones using the Aastra Web UI.
The Aastra Web UI is used to set some advanced features such as emergency dialing plans (all models) and programmable keys (models 6753i RP and 6757i CT RP). Using the Aastra Web UI you can also add lines, upgrade the phone firmware, restart the phone, or reset the phone to its factory default settings.
Both phone users and phone system Administrators can log on to the Aastra Web UI, but users are able to access fewer options.
The Aastra Web UI may be reached through the Administrator software, or by typing in the phone???s IP address directly.
Finding Your Phone???s IP Address
Using Administrator.
To find the IP address of your phone from within the Administrator software, do the following.
1.From within the Administrator software, click the Phone System button.
2.In the Tasks pane, under Phones, click Edit Phone.
The Select the phone you want to edit list opens.
3. Click the phone that you want to edit, and then click OK.
The Confirm the identity of the phone dialog opens. You will see the IP address of the phone beside Network Address (IP Address):
Using the Phone Interface.
To find the IP address of your phone from the phone user interface, do the following. 1. Press the  key and select "Options List" from the menu for model 6751i
RP, or press the  key for models 6753i RP and 6757i CT RP. 2. Select Phone Status and press the 4 key.
3 Phone Status
=Next =Enter
3. Select "IP&MAC Addresses" and press the 4 key.
1 IP&MAC Addresses
=Next =Enter
UI Web Aastra the via Options Setting

Setting Options via the Aastra Web UI
The IP address of your AastraLink RP phone displays in the "IP Address" field.
IP Address: 10.40.50.112
=Next =Exit
Using the Aastra Web UI
The Aastra Web UI may be reached through the Administrator software, or by typing in the phone???s IP address directly.
To open the Aastra Web UI directly in your web browser, do the following.
???Open your web browser, enter the phone???s IP address or host name into the address field and press Enter. Proceed to step 5 on page page 57 for username and password information.
Use the following procedure to access the Aastra Web UI using the Administrator software.
1.From within the Administrator software, click the Phone System button.
2.In the Tasks pane, under Phones, click Edit Phone.
The Select the phone you want to edit list opens.
3. Click the phone that you want to edit, and then click OK.

The Confirm the identity of the phone dialog opens.
4. Click Advanced... to open the Aastra Web UI in your web browser
The password window opens.
5. At the prompt, enter your username and password and click OK.
Note: For an administrator, the default username is ???admin??? and the password field is "22222". For a user, the default username is "user" and the password field is left blank.
UI Web Aastra the via Options Setting
Setting Options via the Aastra Web UI
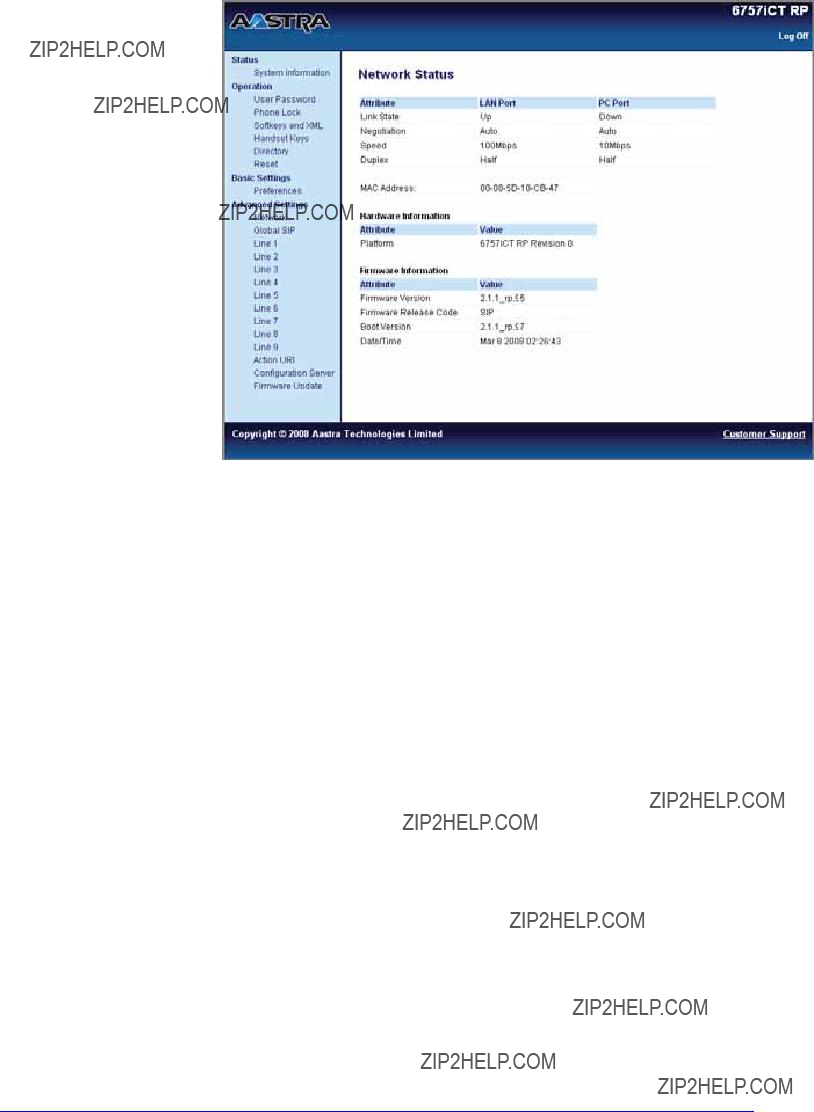
The Network Status window opens for the IP phone you are accessing.
You can logout of the Aastra Web UI at any time by clicking Log Off.
The following categories display in the side menu of the Aastra Web UI when logged in as an Administrator: Status, Operation, Basic Settings.

UI Web Aastra the via Options Setting

Upgrading the AastraLink RP Solution
Upgrading the AastraLink RP Solution
The components of your AastraLink RP Solution may be upgraded in the future to access the added functionality provided by new software versions.
The AastraLink RP 500 Base Unit is upgraded along with the Microsoft Response Point Administrator and Assistant software. Assistant, Administrator, and the AastraLink RP 500 Base Unit must be running compatible software versions for your AastraLink RP Solution to function as a system.
The AastraLink IP phones can be upgraded independently, using the Aastra Web UI menu to send out a firmware update.
Base Unit and Software Upgrades
The upgrade process involves three main components of Response Point: the base unit, Administrator, and Assistant. A new copy of the software is required in order to upgrade.
Version Control
Response Point can only be upgraded to larger (or later) version numbers; you can never "downgrade" to a previous version. It's best to keep the versions of Administrator and the base unit the same. However, they fallout of sync when:
???The phone system administrator upgrades Administrator and then connects to the base unit for the first time.
???The base unit was upgraded from another computer other than the one on which this copy of Administrator is currently running.
Depending on the situation, an upgrade of Administrator will be recommended but optional, or it will be necessary to continue.
Upgrade Process
You may be prompted to upgrade the base unit when connecting to a base unit from Administrator. When it connects, Administrator compares the versions of the base unit and Administrator, and displays these in the Upgrade Base Unit dialog box if the base unit is an earlier version than Administrator.
When you click Upgrade in this dialog box, these tasks are performed:
???A backup of the current phone system configuration and voicemail is created.
???A copy of the backup is created.
???The backup is upgraded to the new version.
???New files are uploaded to the base unit.
???The base unit software is upgraded.
???The upgraded configuration is restored to the base unit.
These steps may take several minutes if your phone system has many users and phones. So, don't be alarmed if some time passes during an upgrade. In addition, the base unit will restart in the process.
The end result of this process is that both Administrator and the base unit are upgraded to the same version. The Assistant program must then be upgraded on each computer on which Assistant is installed.
If the version of the base unit is a later version than Administrator, you'll see a message telling you whether an upgrade is mandatory or optional
Phone and Gateway Upgrades
Response Point venders will periodically release firmware packages to upgrade both IP phones and gateways on your AastraLink Response point Solution. Upgrade software packages may include new versions of firmware for one or more devices. You can elect to upgrade all devices, or only some devices on your network.
Upgrade All Device Firmware Using Administrator
To upgrade all devices (recommended) do the following.
Note: Upgrading will disrupt phone service, so don???t begin an upgrade during business hours.
1.From within the Administrator software, click the Phone System button.
2.Click Upgrade Device Firmware under the heading Other.
3.Click Browse to find the upgrade package on your computer.
A table displays detailed information about the upgrade package you selected including the new version number, the release date of the package, and the number of your devices that apply to this upgrade package.
4.Click Upgrade all devices to which this package applies, and click Next.
5.On the Confirmation and warnings page, review the devices in the Devices to be upgraded list, and read the cautionary information regarding the upgrade process.
6.Click Upgrade to start the process.
Do not disturb the devices during the upgrade. Each device may take several minutes for
Response Point to upgrade.
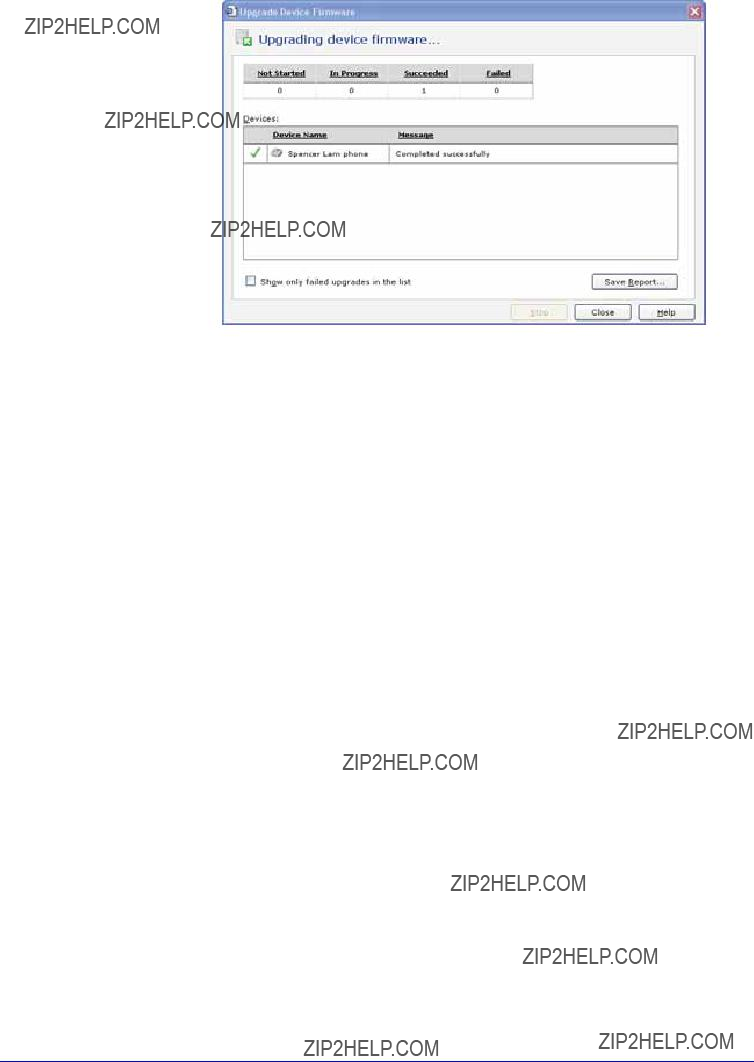
7. The Upgrading device firmware page shows you the status of every
Show only failed upgrades in the list check box.
Solution RP AastraLink the Upgrading

Upgrading the AastraLink RP Solution
8.When the upgrade is complete, a message opens indicating Administrator has finished the upgrade process.
9.The upgrade report can be saved as a text file by clicking Save Report...
Upgrade Selected Device Firmware Using Administrator
To upgrade individual devices do the following.
Note: Upgrading will disrupt phone service, so don???t begin an upgrade during business hours.
1.From within the Administrator software, click the Phone System button.
2.Click Upgrade Device Firmware under the heading Other.
3.Click Browse to find the upgrade package on your computer.
A table displays detailed information about the upgrade package you selected including the new version number, the release date of the package, and the number of your devices that apply to this upgrade package
4. Click Let me choose which devices to upgrade (advanced), and click Next.
5.On the Which of your devices do you want to upgrade page, select the check box for each device that you want to upgrade, and click Next.
6.On the Confirmation and warnings page, review the devices in the Devices to be upgraded list, and read the cautionary information regarding the upgrade process.
7.Click Upgrade to start the process.
Do not disturb the devices during the upgrade. Each device may take several minutes for Response Point to upgrade.
8. When the upgrade is complete, a message opens indicating Administrator has finished the upgrade process.
9. The Upgrading device firmware page shows you the status of every
Show only failed upgrades in the list check box.
10. The upgrade report can be saved as a text file by clicking Save Report...
Manual Phone Upgrades
To activate a manual firmware download, you need to use a TFTP server, and need the updated firmware file for your model of Aastra RP Phone.
Note: This procedure allows you to download the phone_model.st file from a TFTP server even if your phone is configured to use HTTP or FTP. Do not reset or turn off the phone until the download is complete.
To upgrade the firmware on a phone, do the following.
1. Connect to the Aastra Web UI as an administrator following Using the Aastra Web UI on page 56.
Note: For an administrator, the default username is ???admin??? and the password field is "22222". Only an administrator can upgrade the firmware on a phone.
Solution RP AastraLink the Upgrading

Upgrading the AastraLink RP Solution
2. Click Firmware Update on the left menu of the Aastra Web UI. The Manual Firmware Update window opens.
3.Enter the TFTP server IP address or qualified domain name in the "TFTP Server IP" field.
4.Enter the firmware file name (<phone model>.st) that you want to download to your IP phone in the "File Name" field. For example, 6753irp.st.
Note: This file name must match the actual name of the firmware file residing on your configuration server.
5. Click Download Firmware.
This starts the upgrade process. If the upgrade is successful the following message displays on the screen: "Firmware Upgrade Successful".
Note: You may need to remove and then add the phone using Administrator for the upgrade to register with the Administrator software.
Resetting Your AastraLink RP Solution
It may be necessary to reset components of your AastraLink RP Solution should you forget a password, or want to restore the default settings for other reasons. You can also erase all personally identifiable information (PII) from the AastraLink RP 500 Base Unit, such as recorded messages and account information.
Factory Defaulting Aastra RP Phones
The AastraLink RP phones can be reset to the factory defaults from the phone interface or the Aastra WebUI. In both cases you need the Administrator password to reset a phone.
Resetting with the Aastra WebUI
The phones connected to your AastraLink RP Solution can be reset using the Aastra Web UI, either through the Administrator software or directly through your web browser.
There are two options for setting factory defaults using the Aastra Web UI:
???Restore to Factory Defaults
???Remove Local Configuration Settings
The "Restore to Factory Defaults" option resets the factory defaults for all of the phone settings, and local configuration. Performing this option results in losing all modified settings. The phone will need to be configured using Administrator, although the current phone settings will remain in Administrator unless you also follow Removing a Phone on page 32.
The "Remove Local Configuration Settings" option resets the settings on the local IP phone configuration only, and only settings modified through the phone interface or the Aastra Web UI will be lost. All Response point settings will be retained, and the phone will still be connected to the AastraLink RP Solution system.
To restore the default settings on a phone, do the following.
1. Connect to the Aastra Web UI as an administrator following Using the Aastra Web UI on page 56.
Note: For an administrator, the default username is ???admin??? and the password field is "22222". Only an administrator can restore default settings on a phone.
2. Click Reset on the left menu of the Aastra Web UI.
Solution RP AastraLink Your Resetting

Resetting Your AastraLink RP Solution
The Reset window opens in the Aastra Web UI.
3. Consider whether you want to remove the local configuration settings, or restore all factory default settings.
???To remove the local configuration settings click Remove.
???To restore all factory default settings click Restore.
Note: Clicking either Remove and Restore will permanently remove all settings modified through the phone interface or Aastra Web UI. Clicking Restore will also disconnect the phone from the Response Point system, although the phone settings will remain in Response Point.
4.A message will display, indicating successful completion of your choice and instructing you to restart the phone. Click Reset to continue.
5.In the Reset Window, click Restart to restart your Aastra RP Phone.
If you chose to restore all factory default settings, the phone displays "Waiting Assignment..." To reconnect the phone to the Response Point system, follow Editing a Phone on page 31. To remove the phone from your system with the factory settings intact, instead disconnect the phone and follow Removing a Phone on page 32.
If you chose to remove local configuration, the phone will still be connected to Response Point, and display the user and extension idle screen.
1 John Burns
103
Sat Jun 8 2:55p

Resetting with the Phone UI
To reset your phone from the phone user interface, do the following.
1. Press the Services key and select "Options List" from the menu for model 6751i
RP, or press the  key for models 6753i RP and 6757i CT RP.
2.Select Admin Menu and press the 4 key.
3.Enter the Administrator password (22222 is the default Administrator password) and press the 4 key.
4.Select Factory Default and press the 4 key.
5.Press # to confirm and reset the phone to the factory default settings.
Microsoft Utilities
Response Point has three utilities to help you perform the following tasks:
???Resetting the password of the base unit.
???Extracting diagnostic information from the base unit, which a product support technician may need in order to diagnose performance problems.
???Erasing all private information on the base unit, including configuration files, logs, and voice messages.
Each of these utilities is a separate executable file (an.exe file). To use a particular utility, copy the executable file onto an empty USB flash drive (also called a "USB drive"). When you insert the drive into the USB slot on the base unit, the base unit will automatically execute the utility.
You should use a USB drive with an activity light that indicates when the drive is being accessed, so that you can monitor the progress of
Note: Do not put more than one utility at a time onto the USB drive. If there are multiple utilities on the USB drive, the base unit will not execute any of them.
Resetting the AastraLink RP 500 Base Unit Password
Use the "ResponsePointPasswordReset.exe" file to reset the base unit password to its default value, which is "admin". This is useful if the phone system administrator forgets the password or if someone who should not have access to the phone system discovers the password and changes it.
To reset the base unit password do the following:
1.Copy the "ResponsePointPasswordReset.exe" file from the Response Point DVD/ CD onto an empty USB drive.
2.Plug the USB drive into the base unit. The password will be reset immediately.
3.To verify that the password has been reset, start the Administrator program, and connect to the base unit using the default password "admin".
4.If you are unable to connect, plug the USB drive into your computer, and open the file named "ResponsePointPasswordReset.txt". Follow the instructions described in the file, and repeat this procedure, starting with step 1.
Solution RP AastraLink Your Resetting

Resetting Your AastraLink RP Solution
Extracting Diagnostic Information from the Base Unit
Use the "ResponsePointSystemInfo.exe" file to extract diagnostic logs from the base unit. You will not need these logs on a
To extract diagnostic information from the base unit do the following:
1.Copy the "ResponsePointSystemInfo.exe" file from the Response Point DVD/CD onto an empty USB drive.
2.Plug the USB drive into the base unit. The extraction process will begin immediately.
3.Remove the USB drive after the activity light stops blinking. It may take several minutes (sometimes 30 minutes or more) for all of the diagnostic information to be extracted and copied to the USB drive. The precise time required depends on the amount of information to be extracted.
4.Plug the USB drive into your computer, and verify that the new files have been copied to the USB drive.
5.Open the file named "ResponsePointSystemInfo.txt". If the message in the file indicates that the information was not extracted, follow the instructions described in the file, and repeat this procedure, starting with step 1.
6.Share the files on the USB drive with a product support technician.
Erasing All Private Information on the Base Unit
Use the "ResponsePointEraseData.exe" file to erase all private information on the base unit, such as configuration files, logs, and voice messages. This is a useful security measure if you decide to give the physical device to someone else.
To erase all private information on the base unit, do the following.
1.Copy the "ResponsePointEraseData.exe" file from the Response Point DVD/CD onto an empty USB drive.
2.Plug the USB drive into the base unit. The deletion process will begin immediately.
3.Remove the USB drive after the activity light stops blinking.
It may take several minutes (sometimes 30 minutes or more) for all of the private information to be erased. The precise time required depends on the amount of information to be erased.
4.Plug the USB drive into your computer, and verify that the information has been erased.
5.Open the file named "ResponsePointEraseData.txt". If the message in the file indicates that the information was not erased, follow the instructions described in the file, and repeat this procedure, starting with step 1.
Troubleshooting Solutions
General Troubleshooting
Why can???t I see ???WaitingAssignment??? on my new phone?
You may need to restart your phone. Try unplugging the phone, and then plugging it back in. If the phone still doesn???t display ???Waiting Assignment???, reset the phone to the factory default settings. For more information, see Resetting with the Phone UI on page 67.
Why doesn't Administrator run on my computer?
You may need to upgrade your system software. For more information, see System Deployment Requirements on page 10.
You may also need to run an upgraded version of Administrator. For more information, see Base Unit and Software Upgrades on page 60.
Why can't I log on to the AastraLink RP 500 Base Unit?
If you have successfully downloaded a security certificate and confirmed it, but are still experiencing problems logging on to the base unit, there may be a number of reasons, including hardware or software problems.
You can try the following:
???Log on again to see if the error has cleared.
???Restart the computer on which Administrator is running, and try logging on again.
???Install Administrator on another computer, and try logging on again.
???Call the customer support service for the base unit.
Why can't our employees add contacts using Assistant?
This condition may occur when the base unit storage space is at full capacity for Response Point files. Go to the Base Unit page, and confirm that more than 75 MB of storage space is still available. For more information, see Base Unit Storage FAQs on page 51.
Why can???t our employees use all the lines I set through the Administra- tor?
If you are using softkeys (model 6757i CT RP) or programmable keys (model 6753i RP) as line keys, the line keys must be assigned by the system administrator, and then configured using the Web UI and the phone must be restarted. The line keys only take effect after all of these steps are complete. See Adding Multiple Line Phones on page 27.
Check that the line number assigned through Administrator is the same as the line number configured on the Web UI, and that the phone has been restarted.
Solutions Troubleshooting

Troubleshooting Solutions
Why can't I record my voice prompts using the
Response Point automatically uses Microsoft Anna to record your sound files. If this
What should I do if I'm having trouble voice dialing a personal contact?
If you've repeatedly tried to voice dial a particular personal contact, and each time the Automated Receptionist says "invalid location," use Assistant to remove the contact from the phone system,
What should I do if I see this message in the event log?
"The Microsoft Response Point Dialog Manager encountered an error while loading device registration information. Some devices may not work correctly until they re- register. Most devices will
If this message does not eventually disappear from the event log, the phone may not have been properly connected to the base unit. Using Administrator, remove the phone from the phone system,
Why can't I record sound files with my phone using Administrator?
If you are unable to record sound files with your phone using Administrator, your firewall might be configured to block communication with this program. Make sure that you have set up an exception that allows the Administrator program to communicate through your firewall.
Why do the Assistant and Administrator programs display a different number of contacts for the same user?
Response Point may list a different number of contacts for the same user on the Contacts tab (in Assistant) and in the Storage Space Details dialog box (in Administrator), if the Assistant program encountered an error when the user originally uploaded the contacts. As a result, the defective links to these contacts may consume a large amount of storage space on the base unit. You will not be able to edit or remove the contacts using Assistant. To reclaim the lost storage space, remove and then
Why did I lose connection to the AastraLink RP 500 Base Unit?
If Administrator was connected to the base unit, and then the connection was lost, the problem may be one of the following:
???The computer running Administrator and the base unit are no longer connected to the network.
???The network is down, or communication is somehow being blocked. Try restarting the network.
??? The base unit is not responding, and it probably needs to be restarted.
Why isn't the AastraLink RP 500 Base Unit responding?
This condition may occur when there is a connectivity issue between the computer on which Administrator is running and the base unit. Check these possible issues and resolutions in the following order:
???Make sure that the computer on which Administrator is running is physically connected to the LAN.
???Check that the software on the computer running Administrator can access the network. For example, connect to the Internet or access some other network resource, such as file share or printer.
???If you can???t get to network resources, check that the network is operating for other computers.
???If the network is working, restart the computer running Administrator, and try connecting to the network again.
???If that works but you still can???t connect to the base unit, make sure that the base unit is connected, plugged in, and then restart it. Remember that while you're restarting the base unit, the phone system can't receive or place calls and existing calls may be dropped.
Why can't I see the AastraLink RP phone that I just configured on the Phone System page?
If the phone is securely plugged in to both an electrical outlet and the LAN, you can try reinitializing the phone so that you can see it on the Phone System page. To do this, go through the Configure Phone Wizard, changing nothing, and click Finish at the end. For more information, see Editing a Phone on page 31.
I can see the AastraLink RP 540 Gateway and my phone on the Phone System page, but I still can't receive or place any calls. What's wrong?
This condition may occur for the following reasons:
???If you've plugged the AastraLink RP 540 Gateway into a power source and to the network, configured it through Administrator, but forgot to plug the phone line into the phone line adapter. Some phone line adapters will automatically detect this condition, but not all of them. Try plugging the phone line into the port of the phone line adapter and placing a call.
???The phone lines may be plugged into the wrong ports. For example, if you configured ports 1 and 2 but plugged the phone cables into ports 3 and 4.
???Response Point may be experiencing connectivity problems. To test receiving calls, set up the Automated Receptionist Plan, and then call the number. If the Automated Receptionist answers, the phone line and the adapter are configured and connected properly. If the problem persists, check the phone itself. See if any red messages appear in the Phone list on the Phone System page, try restarting the phone, and make sure that the primary user's (if applicable to the device) extension number shows up on the display panel (if applicable to the device).
???The phone lines supplied by the phone company may not be active yet. Contact your phone service provider's customer support service for more information.
Solutions Troubleshooting

Limited Warranty
Aastra Telecom warrants this product against defects and malfunctions during a one
(1) year period from the date of original purchase. If there is a defect or malfunction, Aastra Telecom shall, at its option, and as the exclusive remedy, either repair or replace the telephone set at no charge, if returned within the warranty period.
If replacement parts are used in making repairs, these parts may be refurbished, or may contain refurbished materials. If it is necessary to replace the telephone set, it may be replaced with a refurbished telephone of the same design and color. If it should become necessary to repair or replace a defective or malfunctioning telephone set under this warranty, the provisions of this warranty shall apply to the repaired or replaced telephone set until the expiration of ninety (90) days from the date of pick up, or the date of shipment to you, of the repaired or replacement set, or until the end of the original warranty period, whichever is later. Proof of the original purchase date is to be provided with all telephone sets returned for warranty repairs.
Exclusions
Aastra Telecom does not warrant its telephone sets to be compatible with the equipment of any particular telephone company. This warranty does not extend to damage to products resulting from improper installation or operation, alteration, accident, neglect, abuse, misuse, fire or natural causes such as storms or floods, after the telephone is in your possession.
Aastra Telecom shall not be liable for any incidental or consequential damages, including, but not limited to, loss, damage or expense directly or indirectly arising from the customers use of or inability to use this telephone, either separately or in combination with other equipment. This paragraph, however, shall not apply to consequential damages for injury to the person in the case of telephones used or bought for use primarily for personal, family or household purposes.
This warranty sets forth the entire liability and obligations of Aastra Telecom with respect to breach of warranty, and the warranties set forth or limited herein are the sole warranties and are in lieu of all other warranties, expressed or implied, including warranties or fitness for particular purpose and merchantability.
Warranty Repair Services
Should the set fail during the warranty period;
In North America, please call
Outside North America, contact your sales representative for return instructions.
You will be responsible for shipping charges, if any. When you return this telephone for warranty service, you must present proof of purchase.
After Warranty Service
Aastra Telecom offers ongoing repair and support for this product. This service provides repair or replacement of your Aastra Telecom product, at Aastra Telecom's option, for a fixed charge. You are responsible for all shipping charges. For further information and shipping instructions;
In North America, contact our service information number:
Note: Repairs to this product may be made only by the manufacturer and its authorized agents, or by others who are legally authorized. This restriction applies during and after the warranty period. Unauthorized repair will void the warranty.
Warranty Limited

Index
A
Aastra Web UI
removing local phone configuration 65 resetting phones 65
restoring factory defaults 65 setting options 55
AastraLink IP Phone User Guide 8
AastraLink RP 500 Base Unit Installation Guide 7 AastraLink RP 540 Gateway Installation Guide 7
AastraLink RP Solution guides 7
AastraLink RP Solution Quick Start Guide 7 adding lines 27
adding multiple line phones 27 adding phones 25
Administrator about 10
adding multiple line phones 27 adding phones 25
adding users 19 automated receptionist
advanced features 44 basic features 43 bypass receptionist 45 configuring 44 greeting and prompt 44
base unit backups 52 event logs 54 storage
FAQs 51 limits 50 storage space 51
multiple phones ring plan 48 operator 47
receptionist plan 46 recording
ringing groups 48 simultaneous ringing 48 sound files, using 22 starting 15
uninstalling 19 users
using 19 voice services
about 34 editing 37 removing 37
voicemail options 43 storage 50
analog voice services, adding 34
Assistant about 10
password default 17 starting 17
automated receptionist advanced features 44 basic features 43 bypass receptionist 45 configuring 44 greeting and prompt 44
Index

Index
B
backups
base unit 52 restoring base unit 53
base unit backups 52
choosing in Administrator 15 event logs 54
storage clearing 52 FAQs 51 limits 50 time 51 viewing 51
user data storage 52 what is stored 51
C
call history saving 50 viewing 49
call park music default 42 external 42 setting 41
computer requirements 10
D
E
email server configuring 40 password storage 52
F
features of AastraLink RP Solution 9
firmware upgrades phones, manually 63
G
gateway adding 34 installation 7
installation summary 11 setting up 7
H
history log about 49 saving 50
hold music default 42 external 42 setting 41
I
J
L

M
Microsoft Response Point upgrading 60
Microsoft Response Point Administrator about 10
Microsoft Response Point Assistant 10 multiple phone lines 27, 29
multiple phones ring plan 48
O
P
parked call music default 42 external 42 setting 41
password
Assistant default 17 base unit default 16 Web UI default 29
phones adding 25
assigned user display 27 factory defaulting 65 installation 7 installation summary 12 IP addresses
Administrator 55 phone interface 55
manual upgrading 63 programmable lines 29
removing local configuration 65, 67 resetting 65, 67
restoring factory defaults 65, 67 setting up 7
R
receptionist see also automated receptionist receptionist, bypassing 45
recording
resetting 65 ringing groups 48
S
simultaneous ringing 48 sound files 22
system about 9
deployment requirements 10 features 9
limitations 10 system installation 11
T
U
upgrading base unit 60 gateway 61 phones 61
users adding 19 deleting
see users, removing editing 23
recording names 20 removing 24
Index

Index
V
voice services about 34 removing 37
voicemail email 43 greeting 43
setting options 43 storage 50 storage time 52
VoIP voice services, adding 36 VoIP, adding 36
W
Web UI
see Aastra Web UI
If you???ve read this owner???s manual and consulted the Troubleshooting section and still have problems, please visit our Web site at www.aastra.com, or call
Microsoft?? Response Point??? is a trademark of Microsoft Corporation.
?? Aastra Telecom Inc. 2008